

Page 1
Firmware Version: 1.16
Date Released: FEB 2013
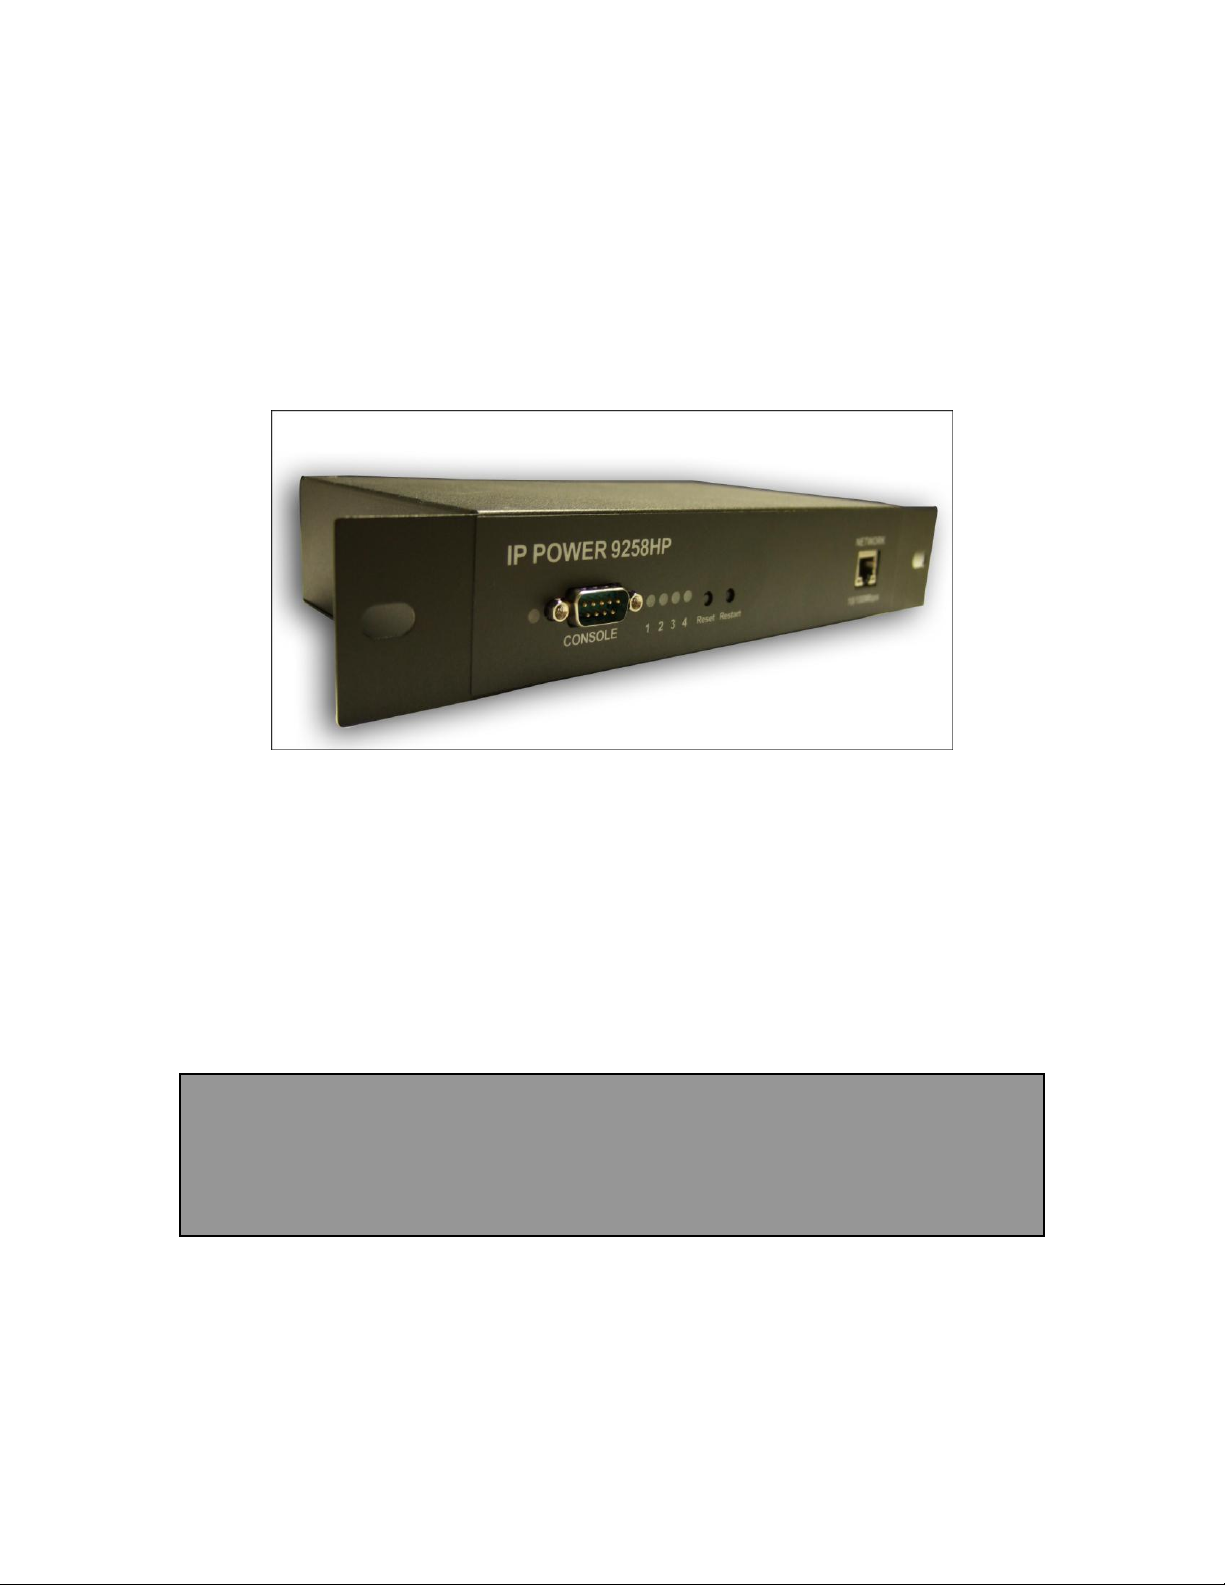
IP Power 9258 HP
User Manual
- 1 -
Page 2

Warning: Any changes made to this equipment without permission may cause damages to the device!
IMPORTANT NOTICE
1. IP Power 9258 HP was designed for indoor use, we carry no responsibility for possible
damages caused by outdoor use, especially in the rain.
2. Please use the power adapter provided by the dealer, we carry no responsibility for the
possible damage from using power adapters not.
4. Do not shake the IP Power 9258 HP in any fashion.
5. Please contact the dealer If IP Power 9258 HP is not working properly.
6. Place the product in a well-ventilated place
Copyright © 2012 All rights reserved. No part of this publication may be reproduced, stored in a
retrieval system, or transmitted in any form or by any means, electronic, mechanical,
photocopying, recording or otherwise, without the prior written consent of us.
All trademarks and products mentioned in this document are the properties of us.
- 2 -
Page 3

Table of Content
1.) WELCOME ...................................................................................................... 5
Introduction .................................................................................................................................................. 5
Minimum System Requirements ................................................................................................................. 5
2.) PRODUCT OVERVIEW ................................................................................... 6
Features ......................................................................................................................................................... 6
Specification .................................................................................................................................................. 6
Package Contents ......................................................................................................................................... 7
3.) INTERFACE DESCRIPTION ........................................................................... 8
Front View..................................................................................................................................................... 8
Rear View ...................................................................................................................................................... 9
Rear View .................................................................................................................................................. 9
4.) HARDWARE SETUP .................................................................................... 10
5.) SOFTWARE SETUP ..................................................................................... 11
Installing IP Power Software ......................................................................................................................11
Using IP Edit ................................................................................................................................ ................12
IP Service......................................................................................................................................................15
6.) HARDWARE INTERFACE ............................................................................ 16
Reset ..............................................................................................................................................................16
Restart ..........................................................................................................................................................16
How to Replace Fuse ...................................................................................................................................16
7.) WEB INTERFACE ......................................................................................... 17
Connecting to the 9258 HP .........................................................................................................................17
The Control Console....................................................................................................................................18
Power Control Settings: ............................................................................................................................18
- 3 -
Page 4

System Configuration: ..............................................................................................................................18
Advance Settings ......................................................................................................................................18
Information ...............................................................................................................................................18
Log Out .....................................................................................................................................................18
Power Control Settings ...............................................................................................................................19
Power Controls .........................................................................................................................................19
Scheduler Settings ....................................................................................................................................21
Ping Settings .............................................................................................................................................25
PC Control Settings ..................................................................................................................................28
Ethernet to RS232 .....................................................................................................................................30
System Configuration ..................................................................................................................................31
User Management ................................................................................................ .....................................31
Change Password ......................................................................................................................................33
Network Settings ......................................................................................................................................34
PPPOE Settings ........................................................................................................................................35
Date & Time .............................................................................................................................................36
Advance Configuration ...............................................................................................................................37
Maintenance ..............................................................................................................................................37
DDNS .......................................................................................................................................................38
IP Server & CNT ......................................................................................................................................38
Telnet & Snmp Settings ............................................................................................................................39
Email Settings ...........................................................................................................................................39
Blacklist ....................................................................................................................................................40
Information ..................................................................................................................................................41
System ......................................................................................................................................................42
Log ............................................................................................................................................................42
Http Command .........................................................................................................................................44
XML Information .....................................................................................................................................47
8.) CONTROLLING THE DEVICE ...................................................................... 48
CGI HTTP Commands ...............................................................................................................................48
Serial Com (RS-232) Control......................................................................................................................48
Serial Port (RS-232) .................................................................................................................................48
Telnet ............................................................................................................................................................50
9.) FREQUENTLY ASKED QUESTIONS (F.A.Q) .............................................. 52
- 4 -
Page 5
1.) Welcome
Introduction
The IP Power 9258 HP is a state of the art Power Distribution Unit (PDU) & Remote Power
Control (RPC) system. It allows you to control up to 4 separate devices remotely via the internet.
Using a web browser, you can control the power to your devices from virtually anywhere.
The various applications of the 9258 HP includes: Power Management, Server Management,
Internet Controllable Timer, System Integration, Remote Power Control in Remote
locations, & etc.
Minimum System Requirements
Operating Systems: WINDOWS Operating Systems (IE5.0+SPI
RJ45 LAN & Internet HUB & Switch
Internet (For remote access) or Ethernet Network (Internal Network use) with some type of Internet
connection, (i.e. ADSL, Cable, Dial up or any other forms of Internet service)
- 5 -
Page 6

2.) Product Overview
Features
1. Control each output On, Off, or Reboot of up to 4 different power sources.
2. Built in Web Server Design, directly access Power Control from webpage.
3. Power scheduler and built in internal clock to enable daily, weekly, and monthly Power
cycles
4. Auto Ping (Watch dog) capability to monitor each output
5. Self Auto Ping - Monitors 9258 HP to make sure device is working properly.
6. IP Service - Search utility, to easy to find your IP Power on internet hassle free.
7. Http Command generator for integration
8. E-mail functionality for notifying user.
9. Log capabilities to store device information and usage.
10. Hardware Watchdog design to make sure devices are working properly
11. IP Blacklist capability to block unwanted IP Address.
12. CNT Technology – For quick and Easy setup, just plug and play
13. Each outlet name can be assigned by user and memorized on webpage.
14. Support HTTP CGI commands / Telnet Commands / RS232 inter control for easy for
system integration
15. IP Service: Easily Find your device on the internet without having to remember
complicated IP’s
16. Password Base64 encryption for internet protection.
17. Supports UPNP (Universal Plug & Play)
Specification
1.) Total Input power up to 15A/110V or 10A/240V
2.) Each Output: 6A/110V or 6A/240V
3.) Dimensions: 260 x 115 x 43 (L x W x H)
4.) Weight: 0.96kg
- 6 -
Page 7
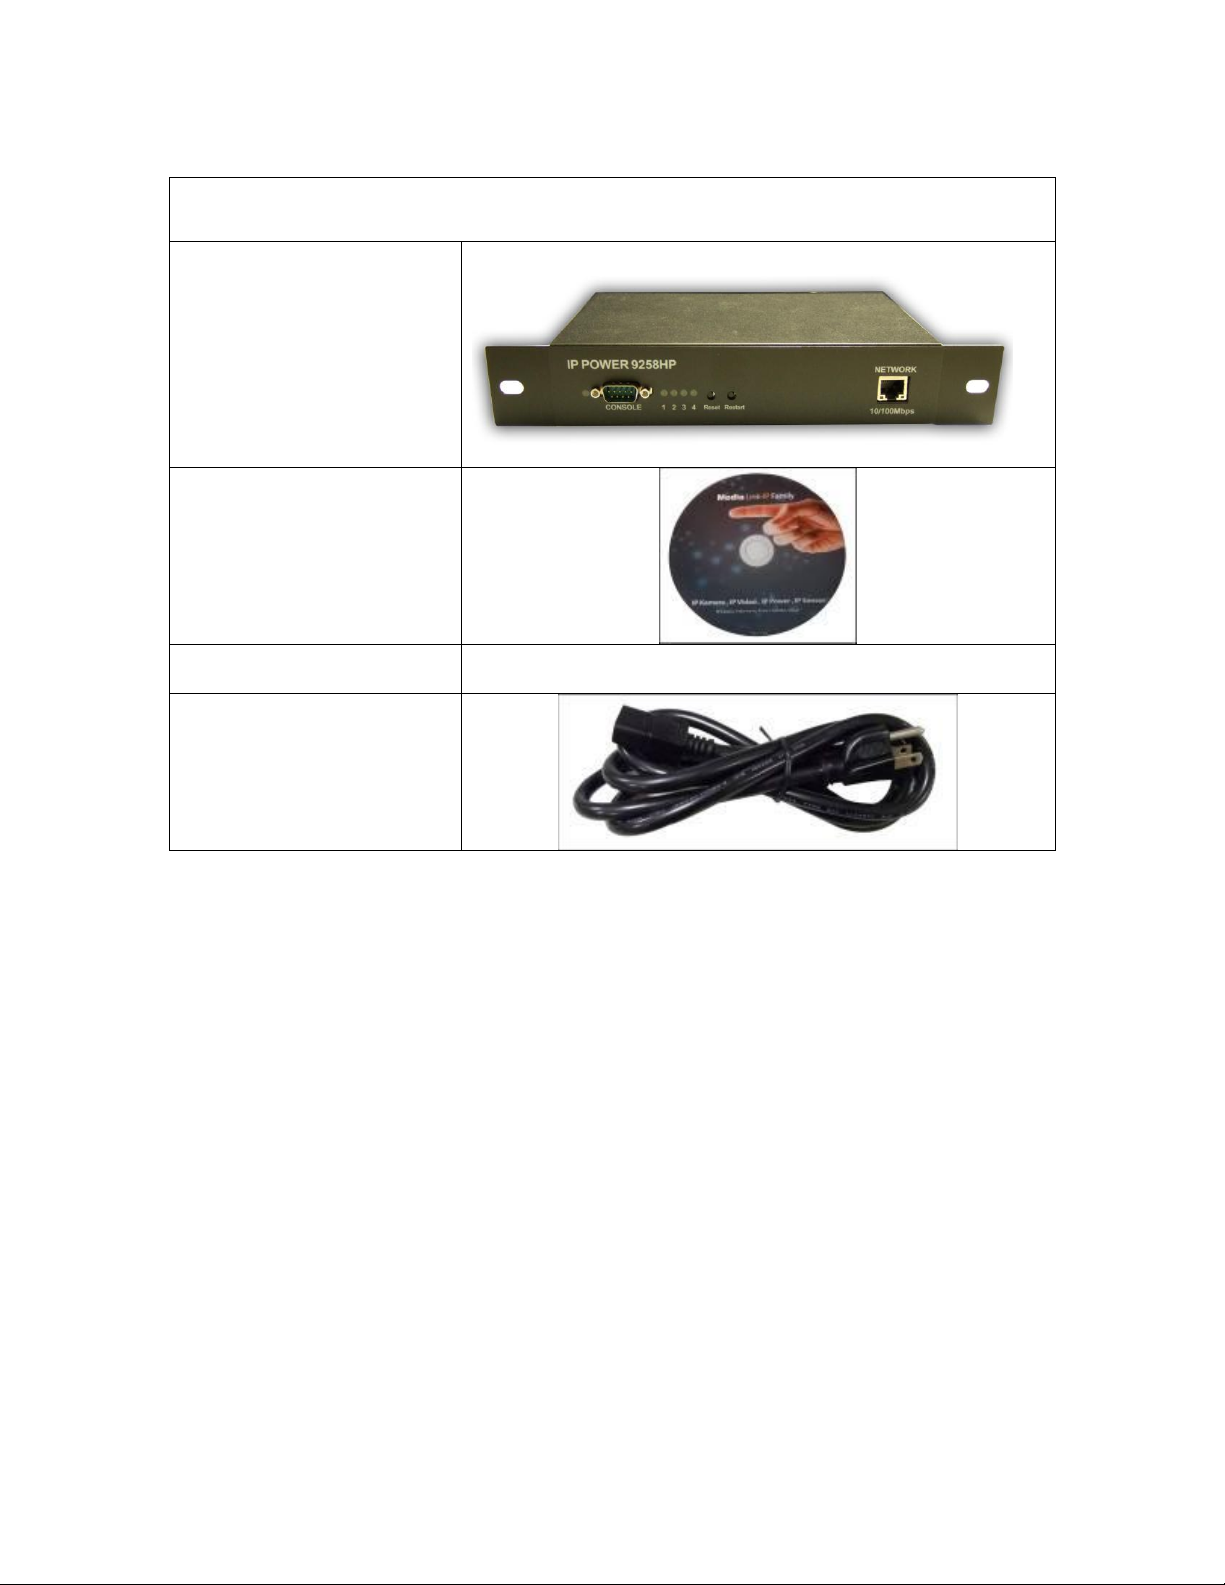
Package Contents
1.) 9258 HP Unit x 1
2.) 9258 HP Installation CD
4.) RJ45 Cable x 1 (Optional)
5.) Input Power Cable
(Optional)
- 7 -
Page 8
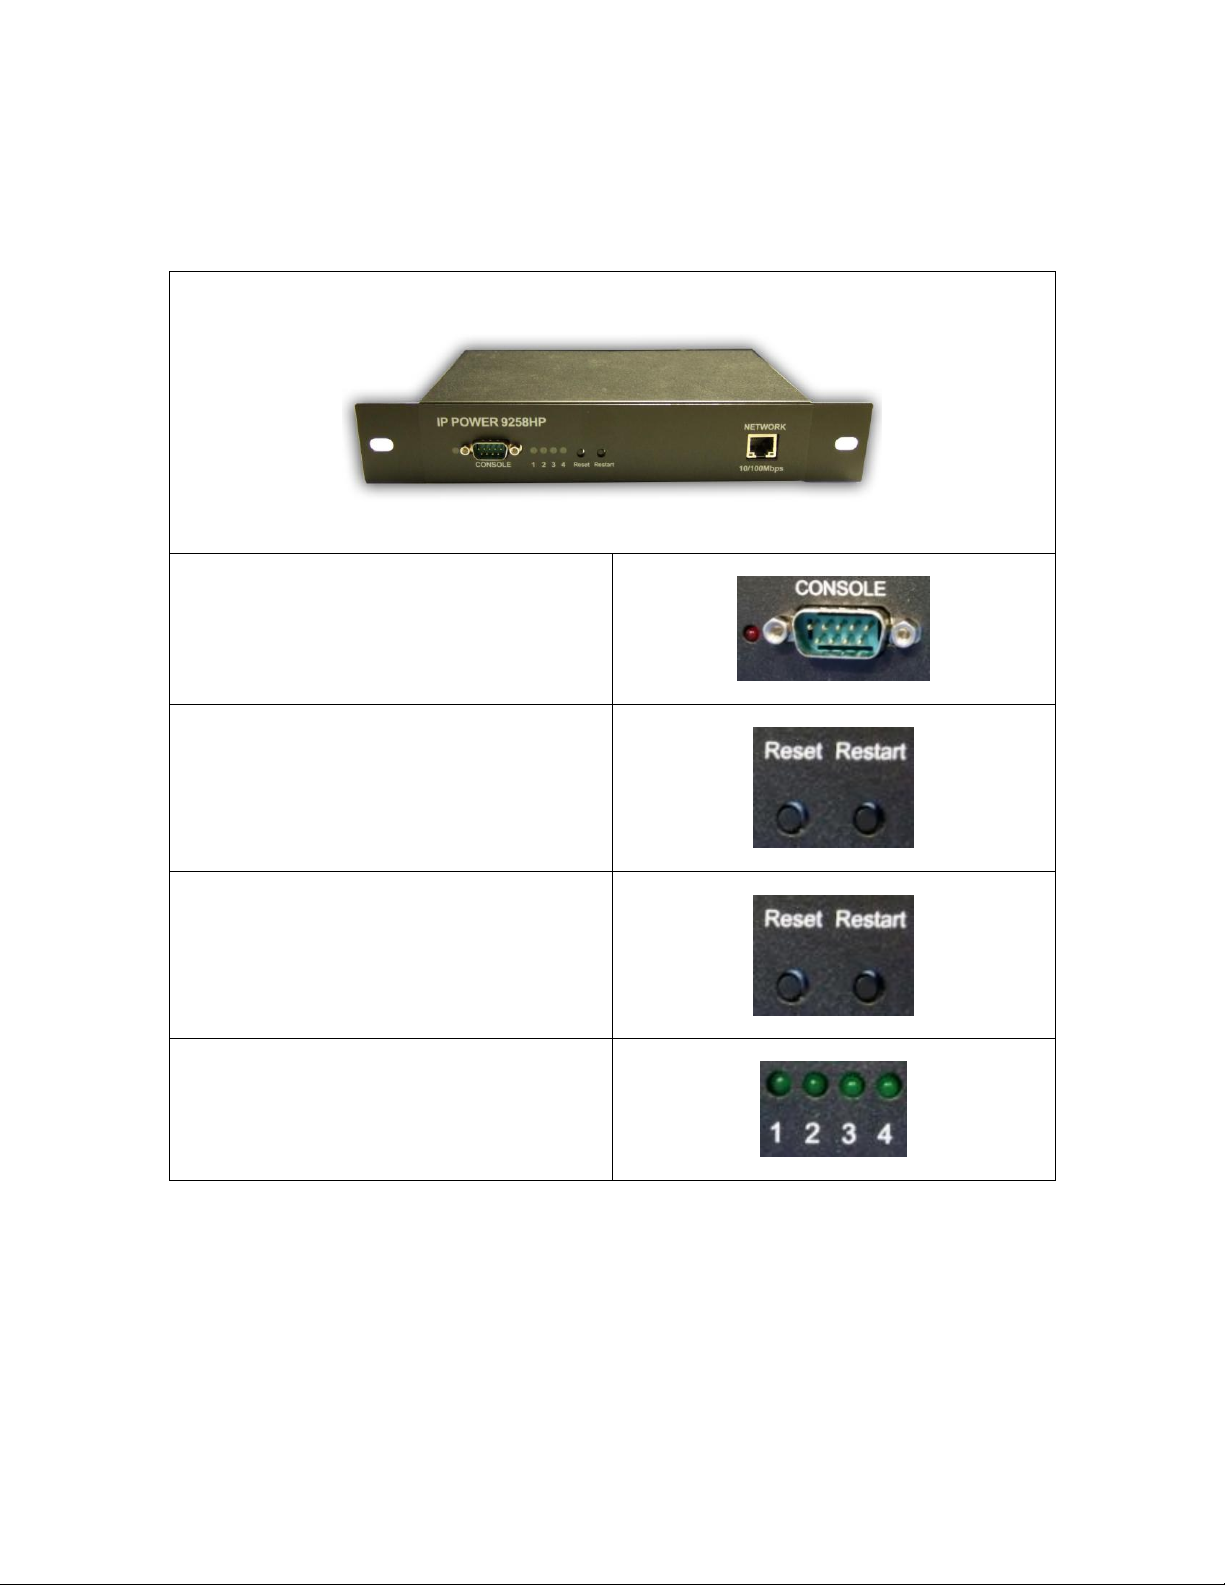
3.) Interface Description
RS232 Serial Port
Reset Button:
To reset to original manufacture settings,
hold down the reset button with a pen or
a pin for 10 second s until hear a long beep
sound
Restart Button:
The restart button just resets the device by
turning off and then turning on the power.
Power Status Indicator:
The Power Status Indicator
Front View
- 8 -
Page 9
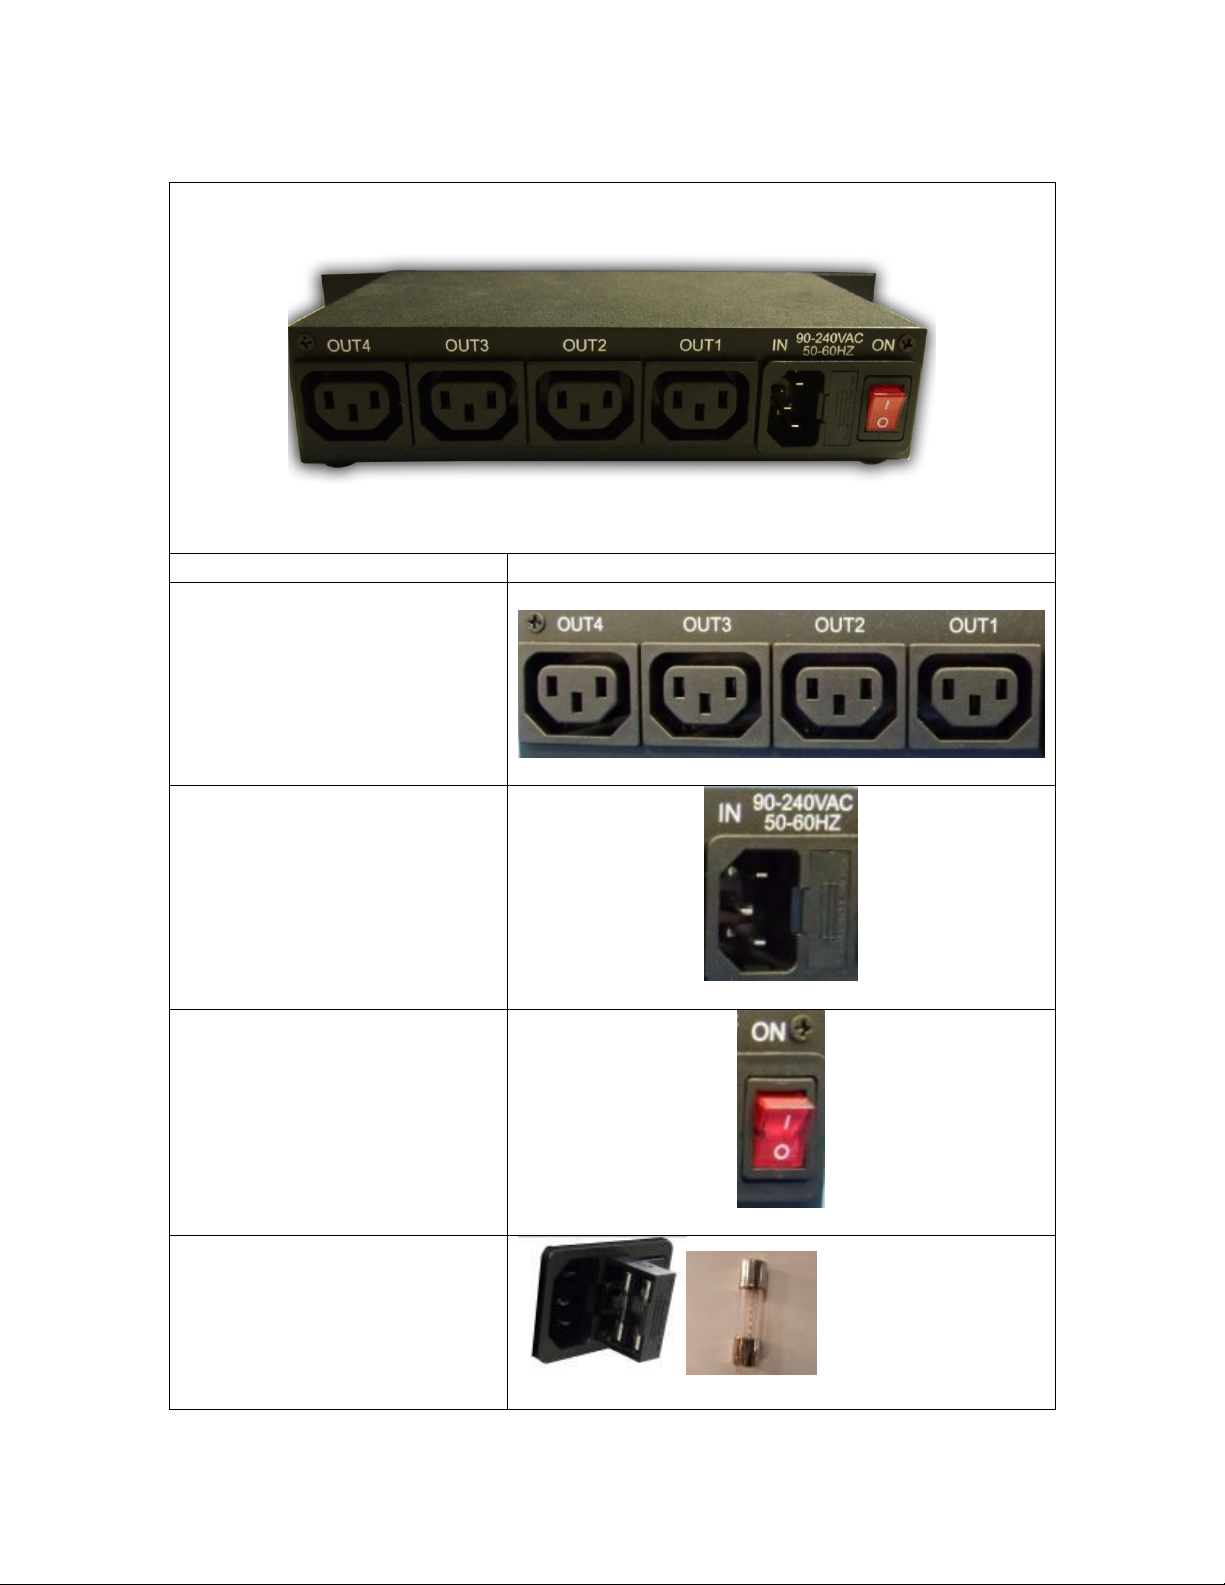
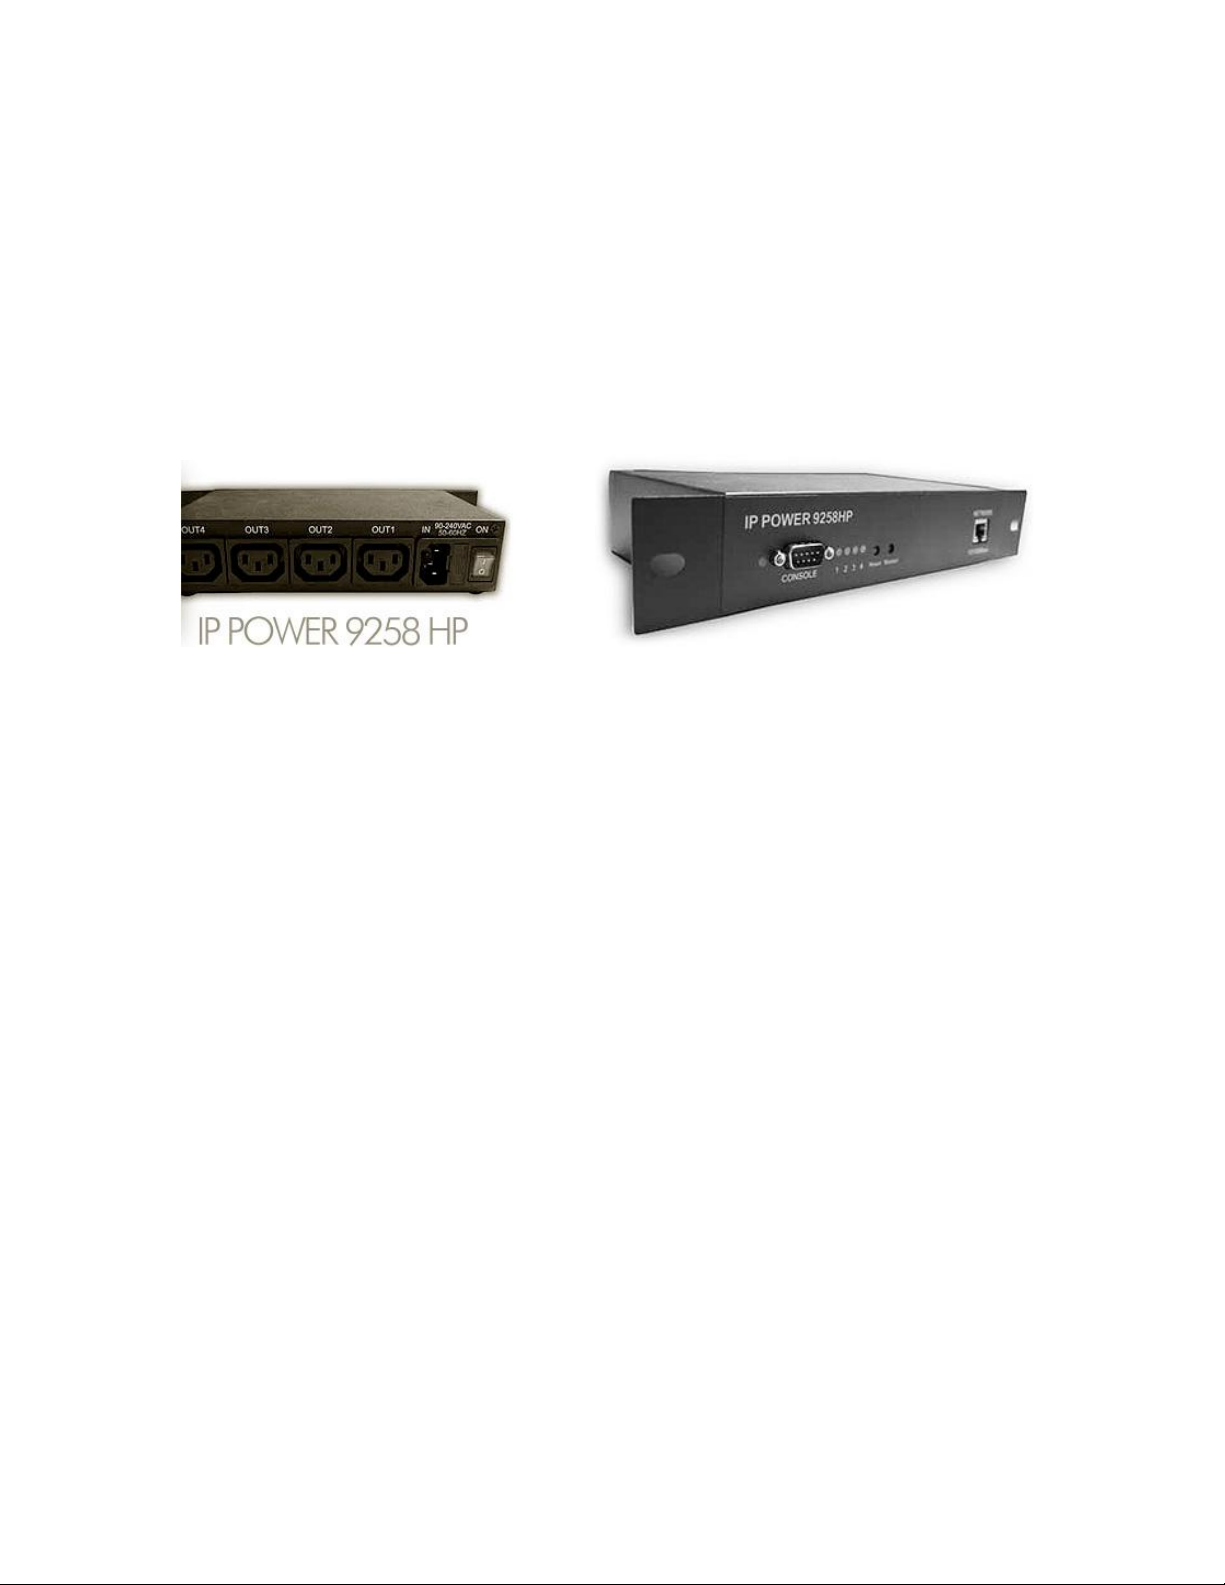
Rear View
Rear View
Rear View
4 Output Power Ports:
Connect up to 4 separate devices
that will be controlled by the 9258
HP. Ports 1-4
1 Input Power Ports:
The input power sends power to
the 9258 HP.
1 Power Switch:
The Power switch turns on the
device power
Fuse System: To prevent electrical
surges from damaging the unit. The
9258 HP comes with 1 spare fuse
in the unit.
TYPE:U/C GFE 10A 250V (PF)
- 9 -
Page 10
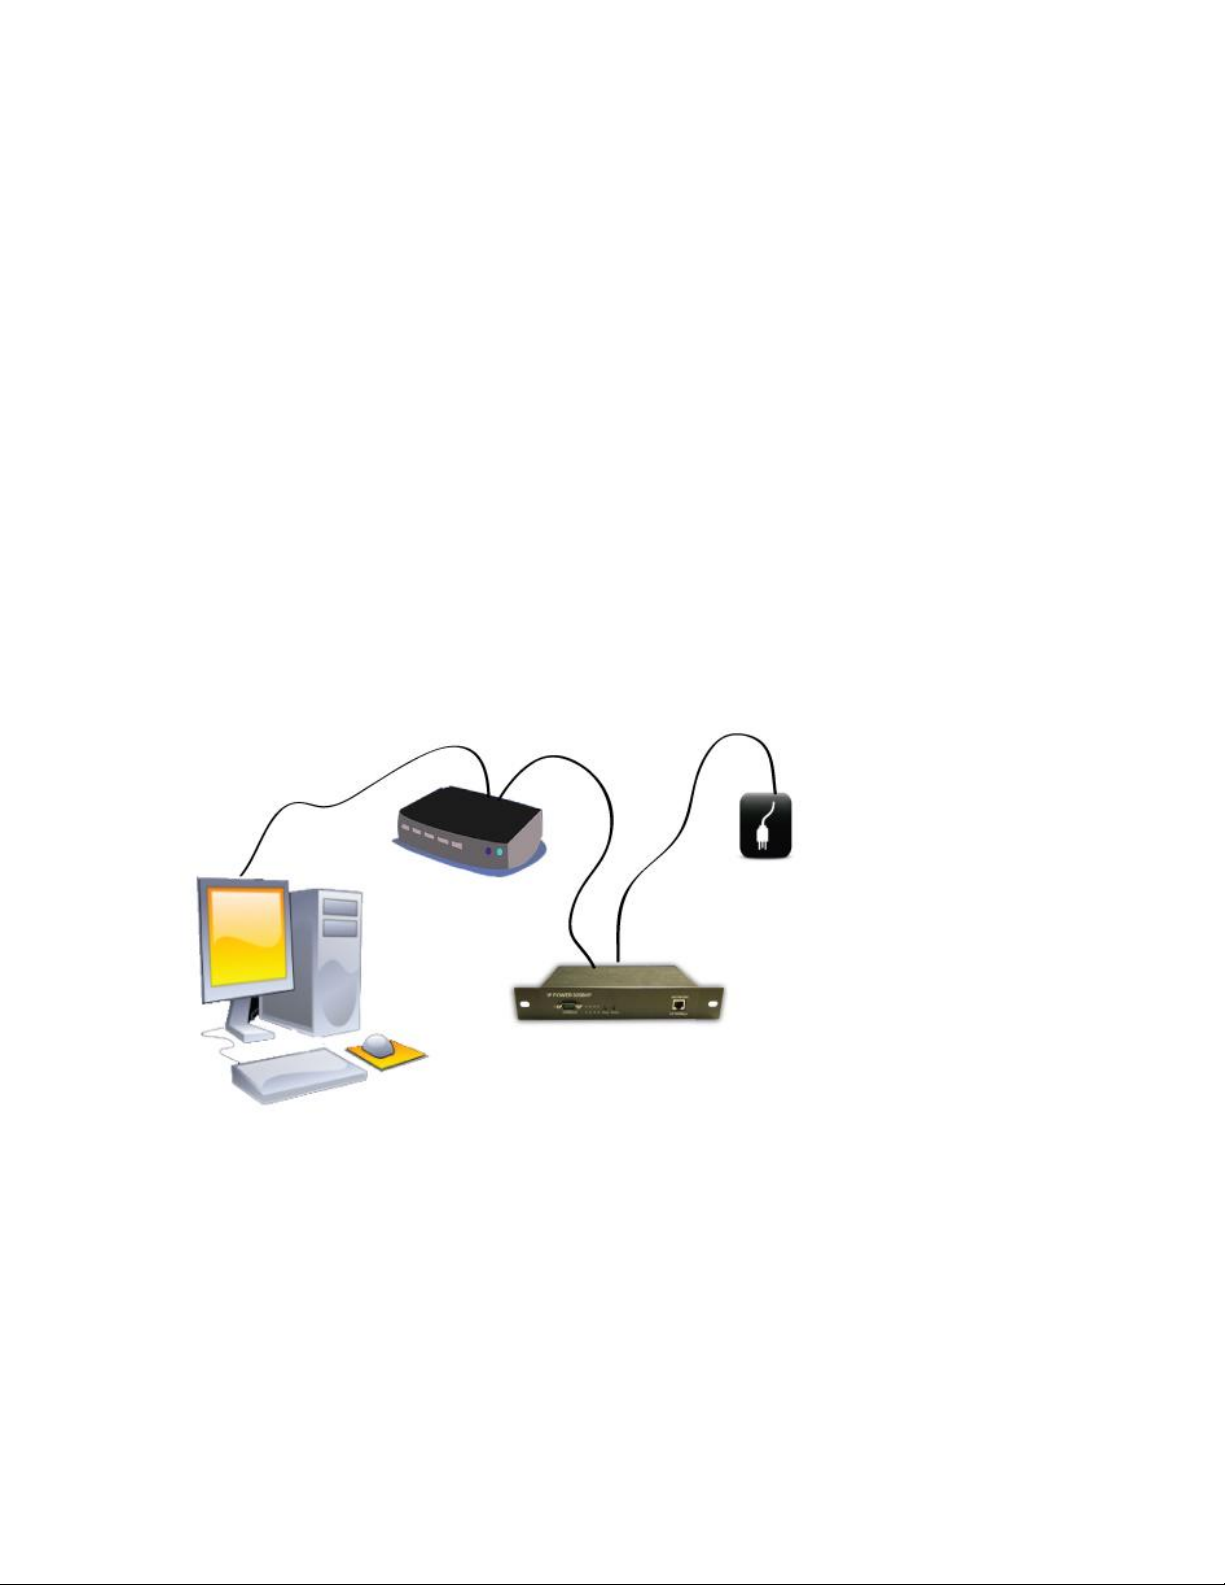
4.) Hardware Setup
1.) Connect the IP Power 9258 HP to a HUB or Router using a RJ45 network cable.
2.) Connect the power adapter to the IP Power 9258 HP.
3.) Connect the HUB or Router to the internet (May through ADSL/XDSL modem).
4.) Connect the power adapters of under control electric equipment to corresponding out port of
IP Power 9258-HP.
5.) Turn on the computer and the power adapter of IP Power 9258-HP
* For 220-250V, please use power cable that can support 10A current.
Max. output current: (total of each four outlets) 10A, (each outlet) 6A.
* For 100-120V, please use power cable that can support 15A current.
Max. Output current: (total of each four outlets) 15A, (each outlet) 6A.
- 10 -
Page 11

5.) Software Setup
The Media Link - IP Family CD that came with the device will have all the necessary software to
run and setup the device.
IP Power Software:
IP Edit (Required)
IP Power Center
Installing IP Power Software
1.) Place the Media Link-IP Family CD into the CD/DVD Rom drive.
(The CD should auto run but if it does not go to the CD/DVD Rom drive and select the
“autorun.html” file.)
2.) Click on the IP Power Section Bar
3.) Select the IP Power 9258 HP
- 11 -
Page 12
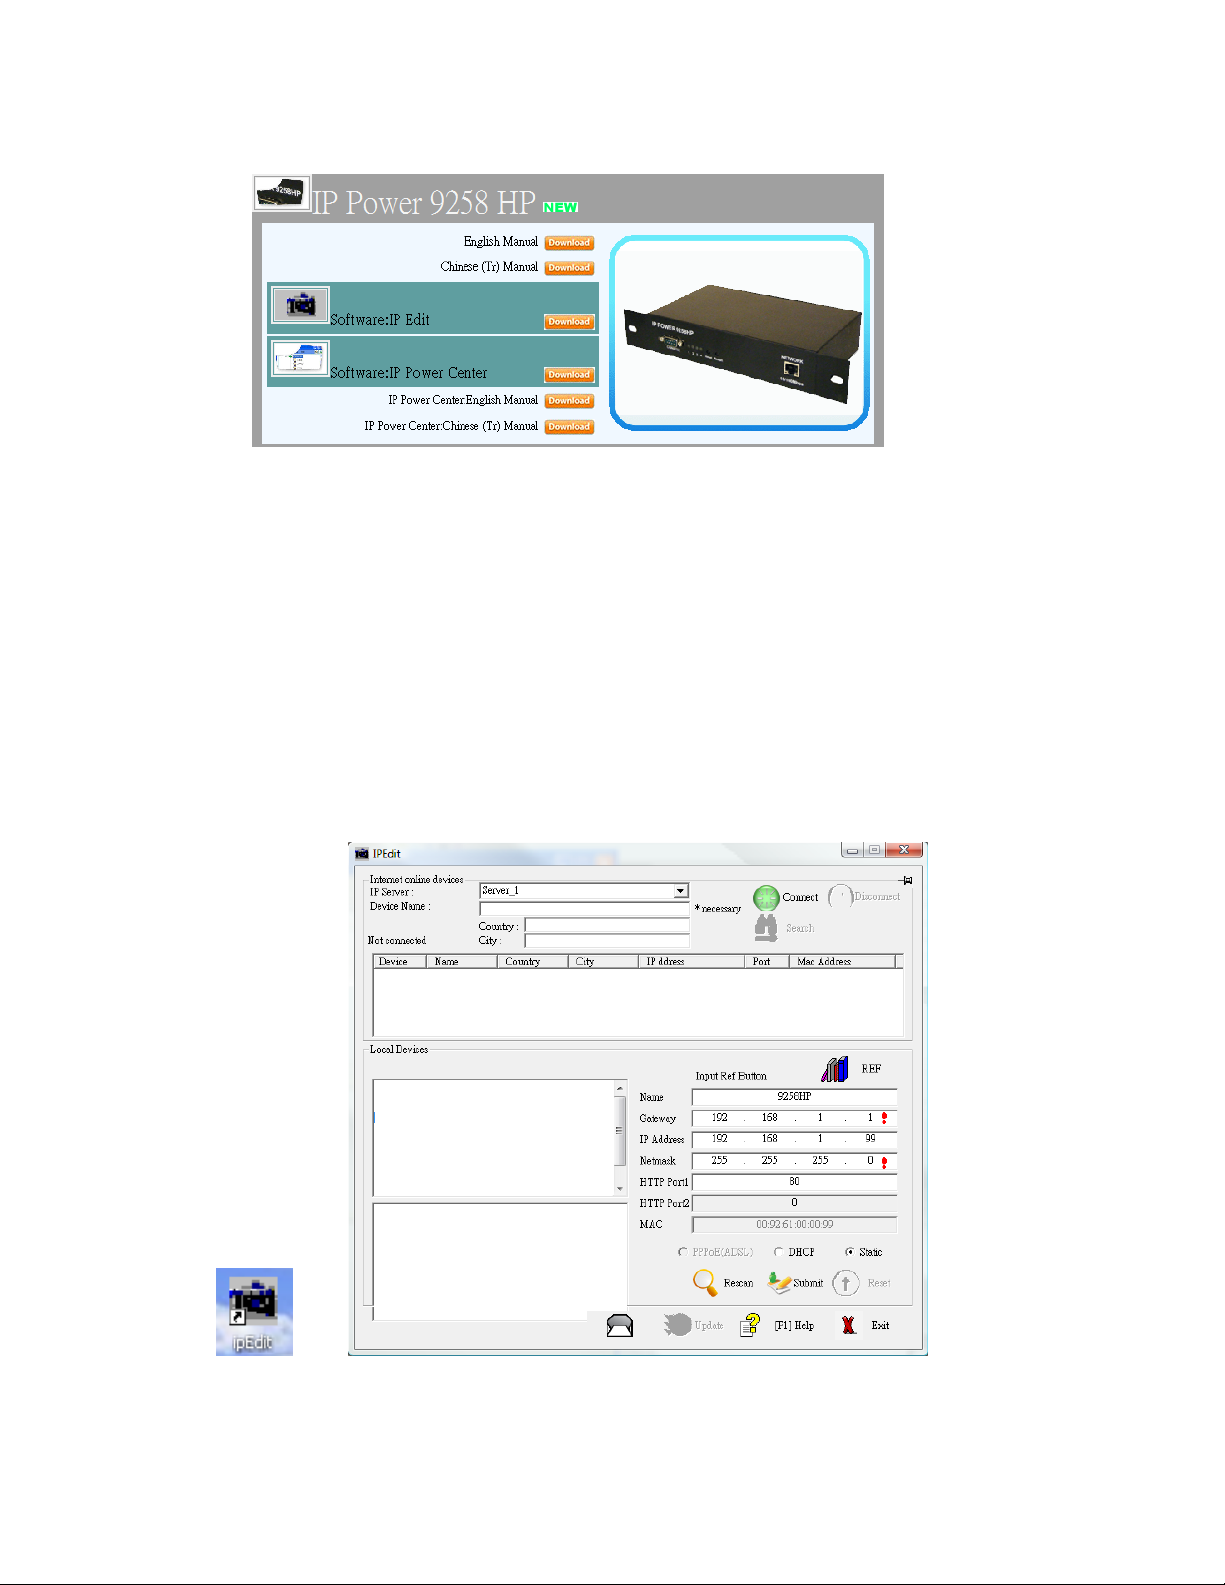
4.) All the downloads available for the 9258HP will be available
5.) Download all required software – IP Edit by clicking on the download button.
Using IP Edit
IP Edit is a search tool designed to help setup and access the 9258HP.
With IP Service feature included the device can easily be found without having to remember long
complicated IP addresses. Instead, this technology allows the user to use a name method to find
his or her device through the internet.
Please make sure you have the most updated version of IPEdit. Contact your distributor to
provide you with the newest updated IPEdit.
1.) After correctly installing the IPEdit software, double click on the IPEdit icon to run the
program.
- 12 -
Page 13
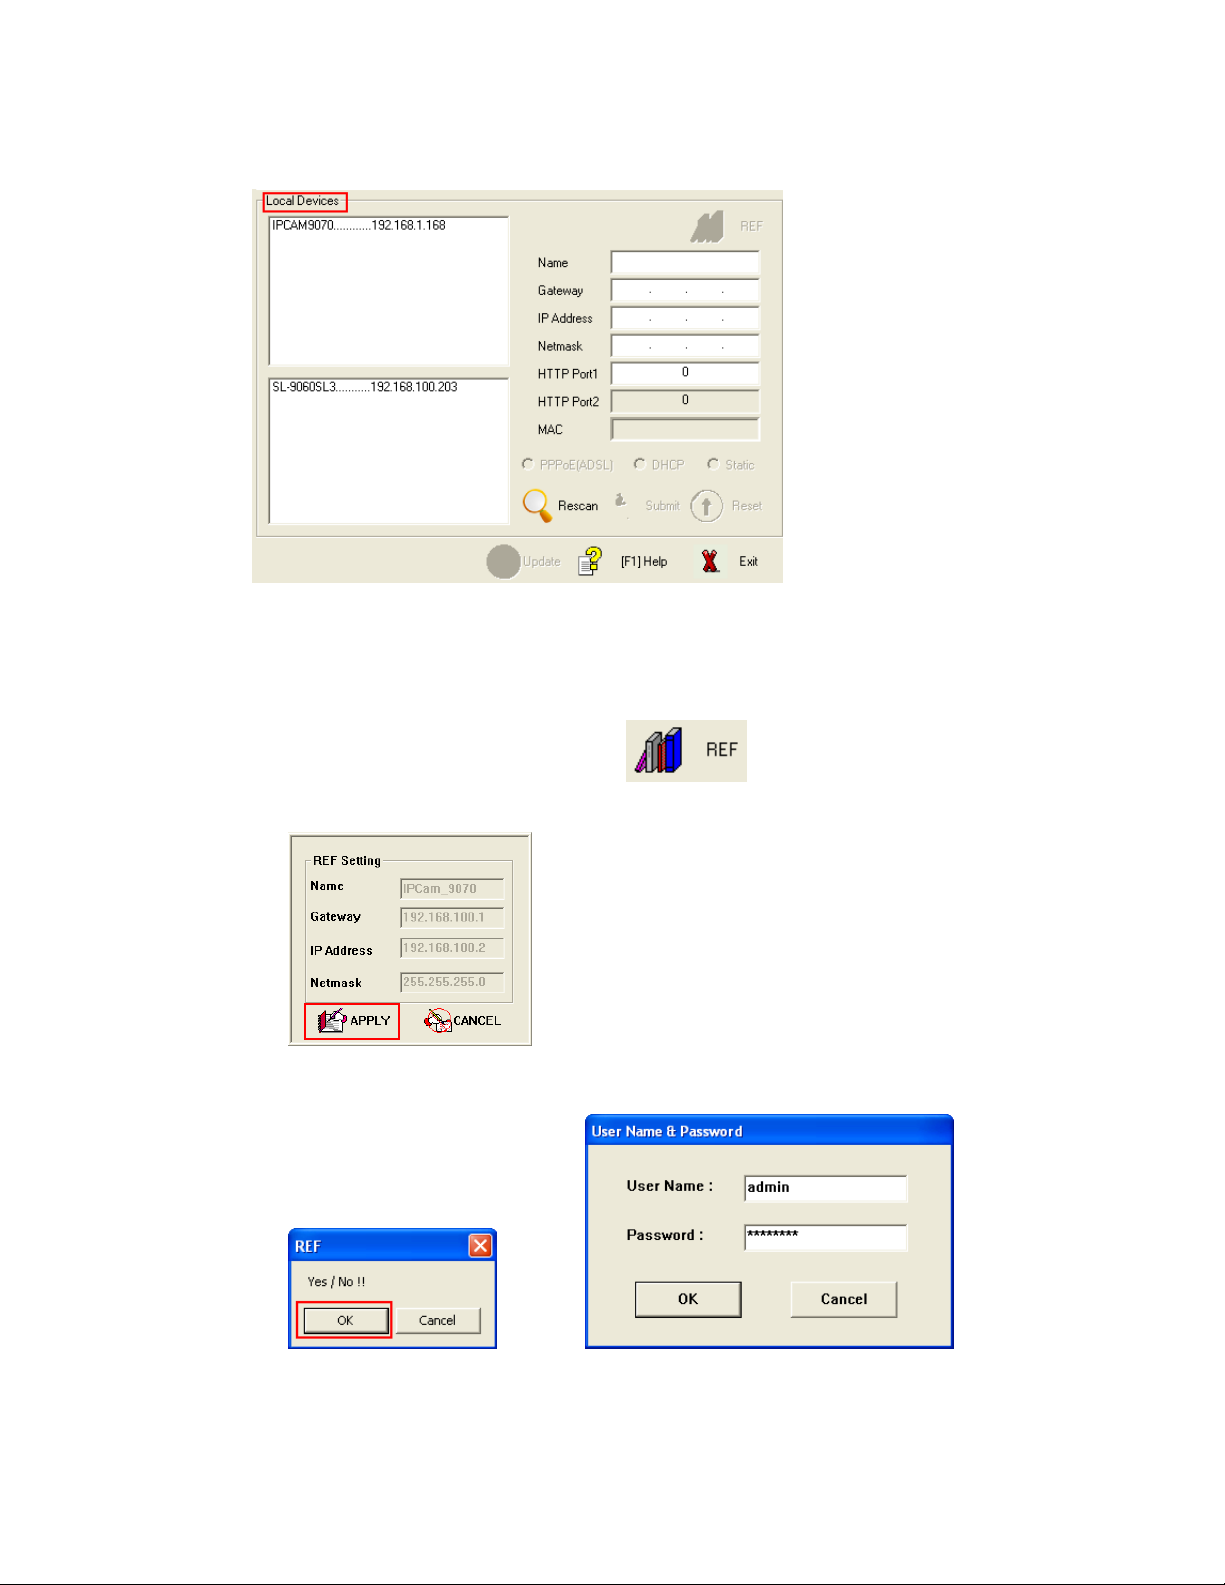
2.) Open IPEdit and any device in the same network should automatically be detected and
listed in the local devices sections.
3.) Setup the Device:
Note: (If the device is not on the same network as the computer being used it cannot be
accessed)
a. Quick Easy Setup (Recommended)
1.) Click on the REF button in IPEdit, and wait a few seconds. This will
detect the network settings and setup the device automatically.
2.) Once settings have been detected hit the apply button to apply the new settings.
3.) Hit yes to confirm and Enter the login and password for the Device to Approve
changes
Default Login: admin
Password: <blank>
- 13 -
Page 14
4.) Give the device 1 minute then hit the rescan button on IPEdit to confirm the
changes have been made.
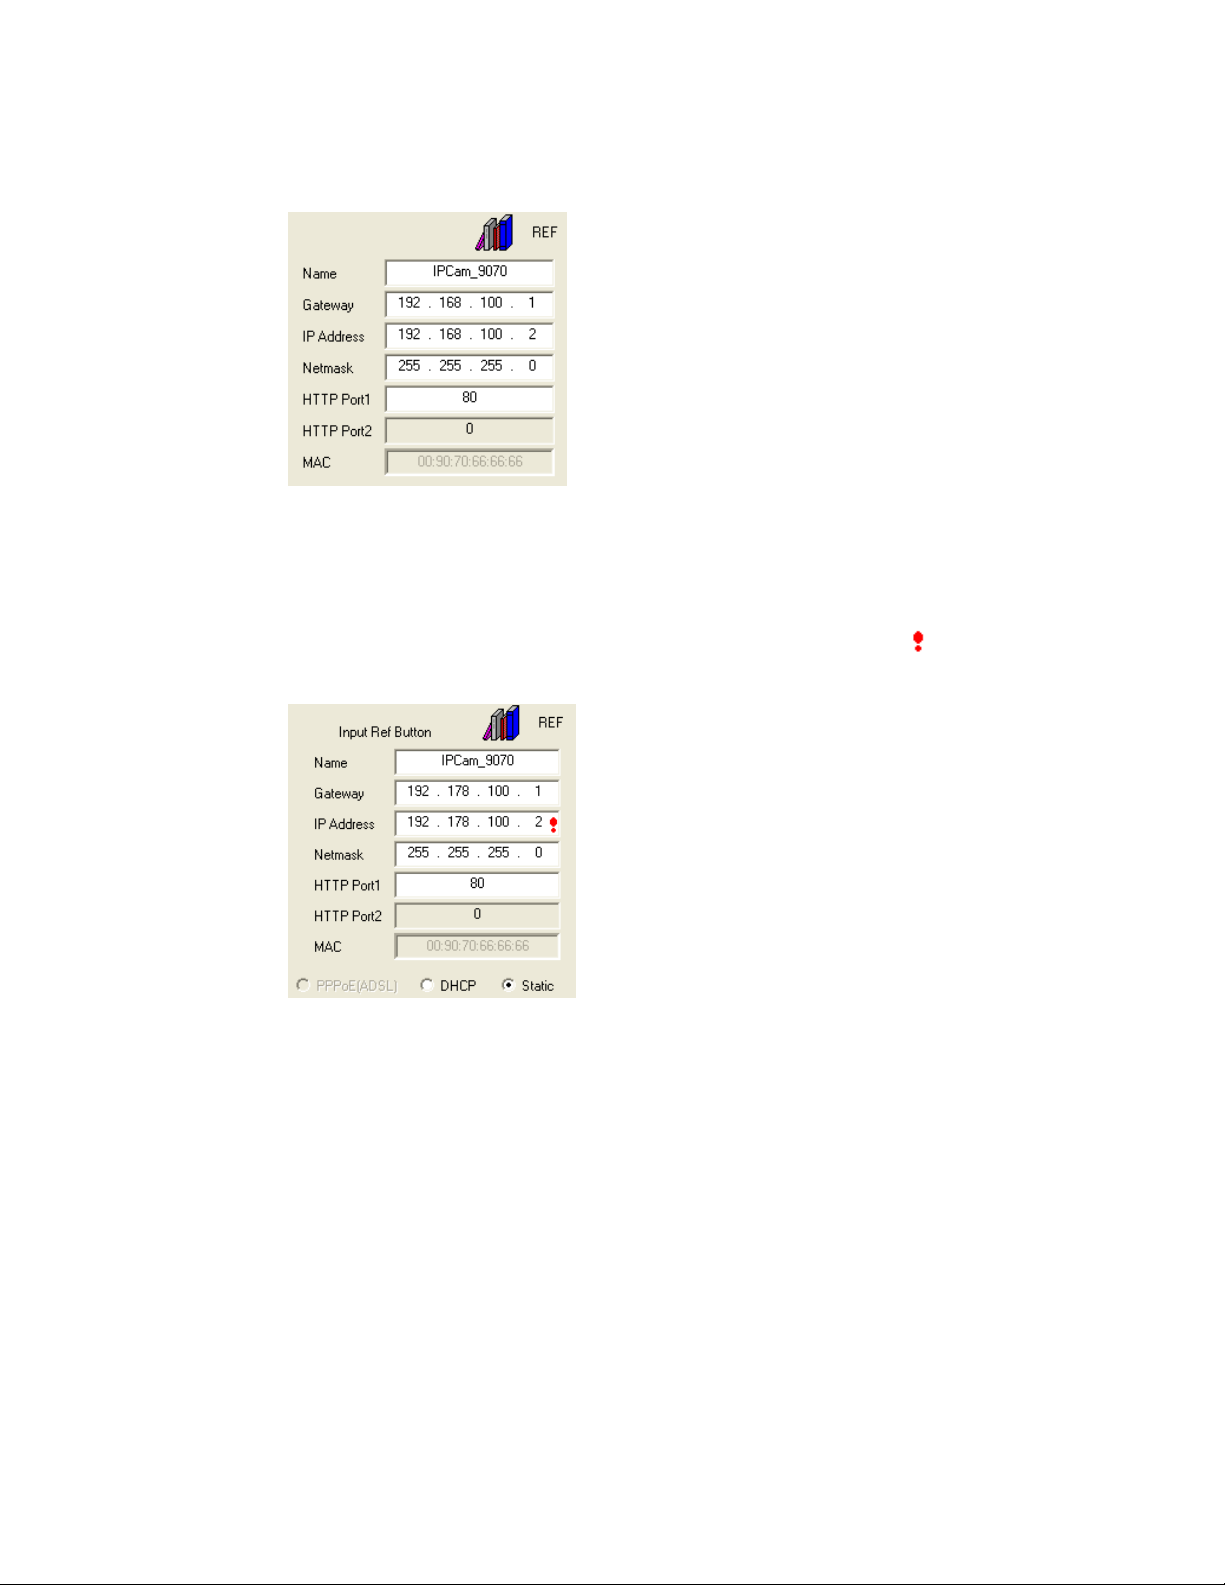
b. Custom Setup (Advance Users)
1.) Highlight the device on the local devices section and on the right side of IPEdit all
network information on the device will be displayed.
If the device is not on the same network a Red Exclamation mark will appear
in the IP Network information section
2.) To setup the device, type in the correct Gateway and IP Address.
The gateway address:
Gateway Address: The gateway address can be obtained in Windows under the
network connections page
- 14 -
Page 15
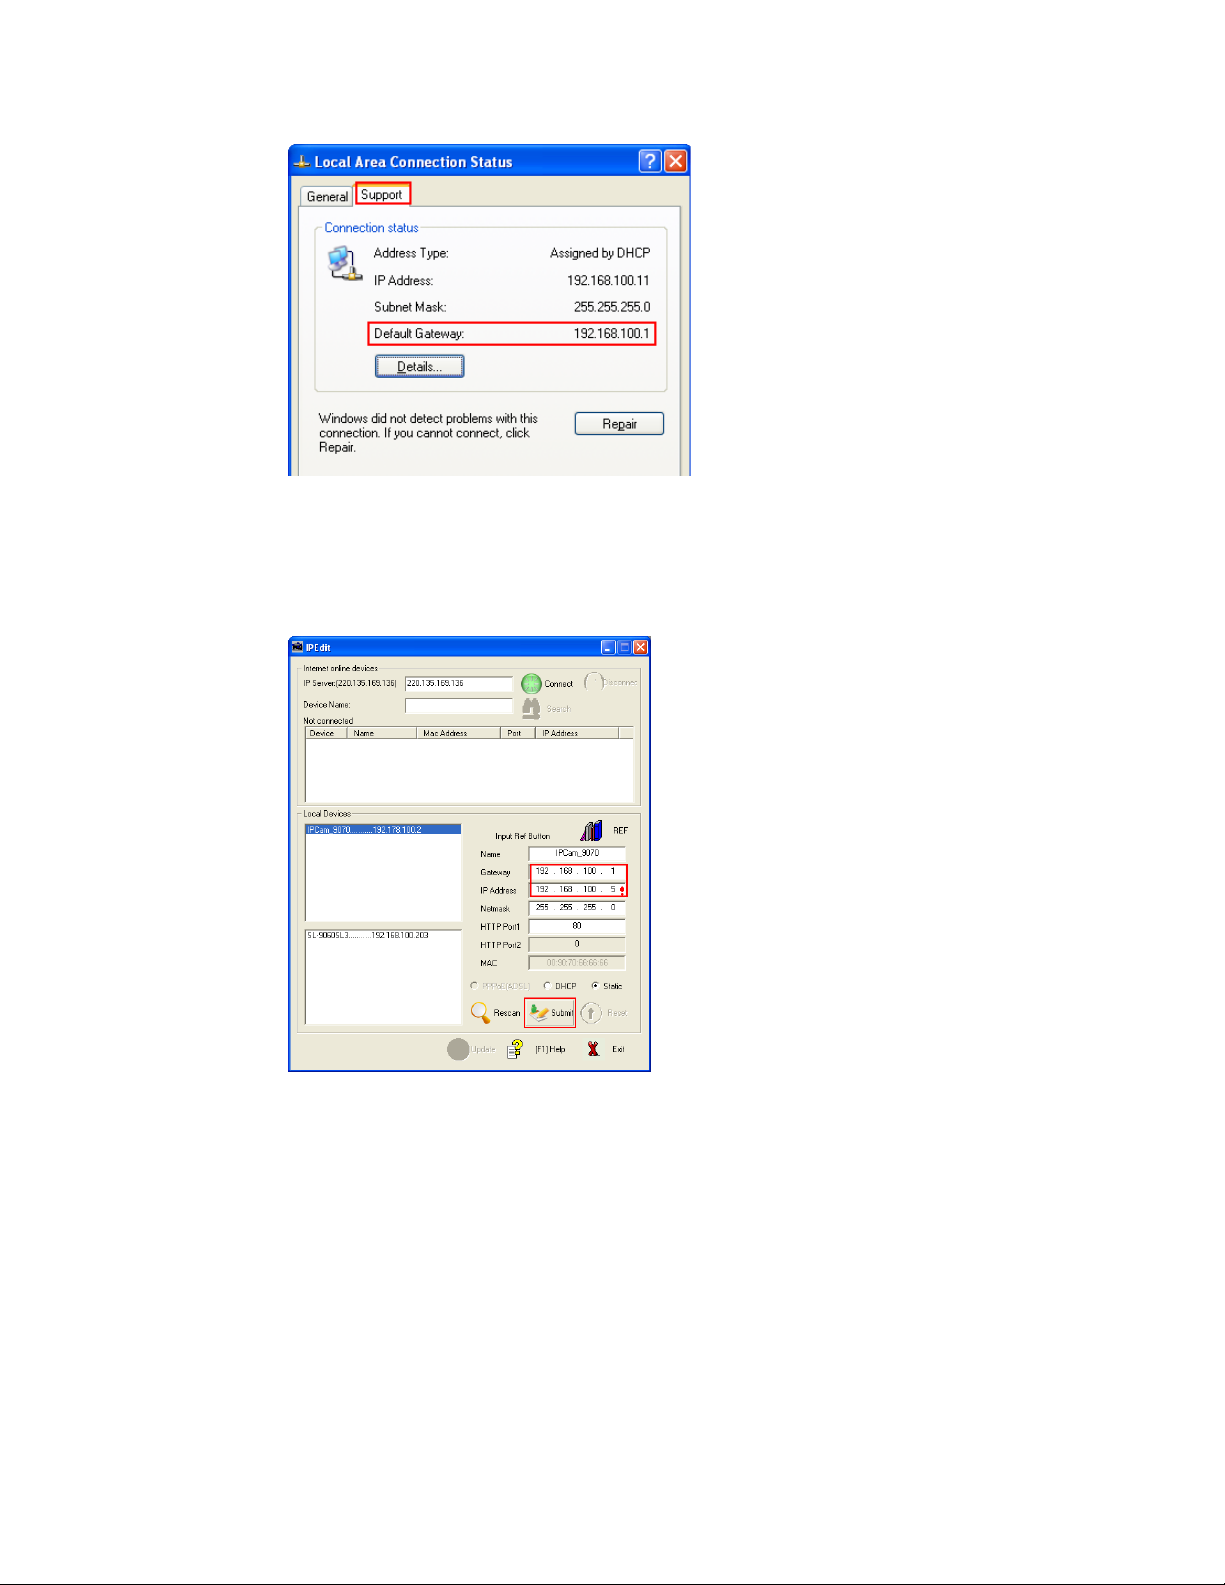
IP Address: Make sure the first 3 sections of the IP Address matches the gateway
address.
Example: Gateway Address – 192.168.1.1 IP Address – 192.168.1.xxx
3.) Once the Default Gateway information has been obtained, enter the correct
information into IPEdit and hit the submit button.
4.) Then hit the rescan button on IPEdit to confirm the changes have been made
IP Service
How to use IP Service on IPEdit:
IP service allows the user to directly connect to his / her device through the internet without
having to remember long confusing IP Address. Instead with this IP Service Technology, the user
only has to remember the name of the device that the user has selected. Then the user can
connect to IP Service, type in the device name, and connect directly to the device.
First if you have de-activated IP Service on your device make sure you re-enable it. (Refer to your
manual if you have questions on How to activate IP Service)
- 15 -
Page 16
1.) Open IPEdit, the device will show up in the Local Device Section. If you have not
selected a name for the device, please refer to the section on the manual labeled:
“Naming your device”.
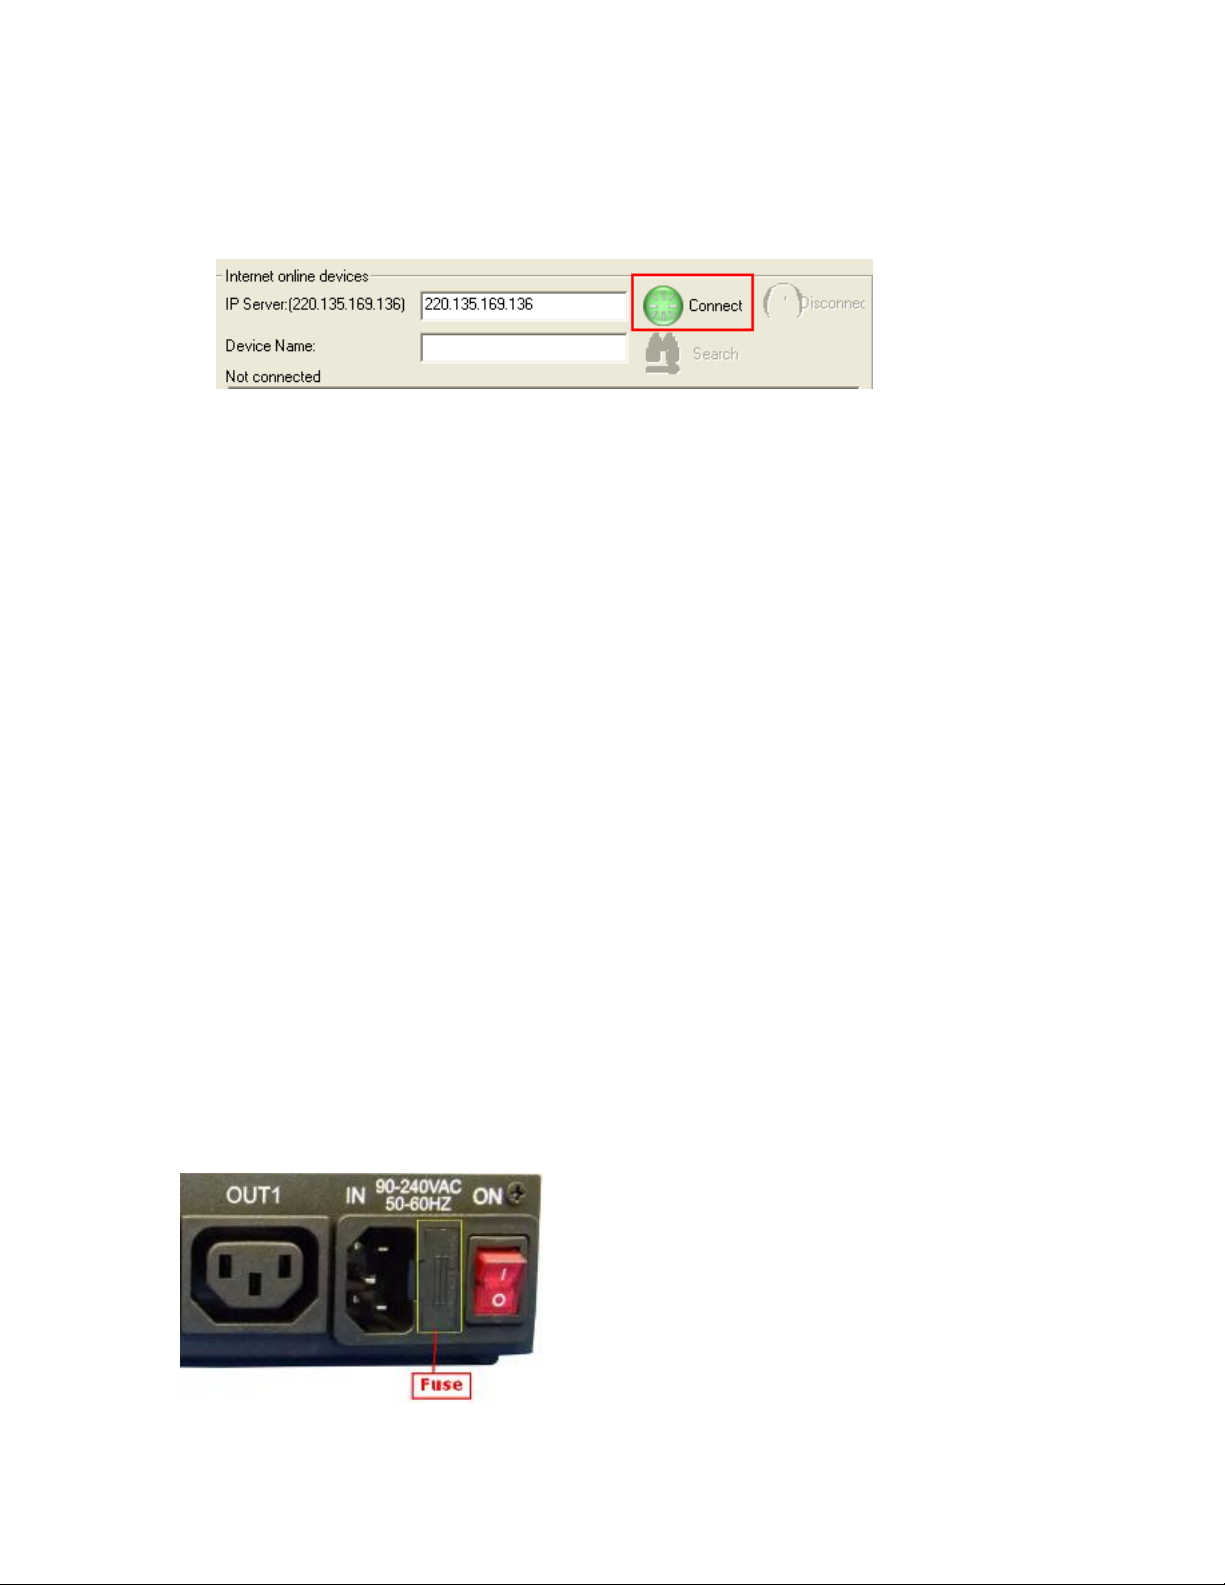
2.) To start IP Service, Hit the green connect button on the top of IPEdit.
3.) Once you have been connected search for your device by typing in at least the first 3
letters that you named your device with. Then hit the search button.
4.) Double click on your device and a Internet Explorer window will appear connecting directly
to your device.
*Remember: It is crucial to have the IP Address of the device port forwarded from the router
that you are using so you can connect to your device from anywhere. Please refer to your
routers user manual on how to port forward your device.
6.) Hardware Interface
Reset
To Reset the device back to the manufacturer default:
Use a small pen or pin and press the reset button firmly and hold for a minimum of 10 seconds.
The device will be reset a “beep” sound is heard.
Restart
To restart the device, use a small pen or pin then press and release the restart button.
The device will automatically restart.
How to Replace Fuse
1.) The fuse is located between the power switch and the power input plugs.
- 16 -
Page 17

2.) Carefully remove the fuse holder with a flat screwdriver.
3.) The fuse can be purchased at most electrical stores
Model: U/C GFE 10A 250V (PF)
7.) Web Interface
Connecting to the 9258 HP
Once the 9258 HP has been setup correctly, log into the device.
First Option
1.) Go to IPEdit find the device that is being used
2.) Double click on the device link and a IE window will appear with the loading screen
Second Option
1.) Open Internet Explorer type in the IP Address of the device followed by the “:” sign.
For example: http:192.168.122.188:9258
192.168.122.188 – IP Address
9268 – Port
2.) Once you have typed in the address the 9258 HP is ready to use.
The default password for the 9258 HP
Login: admin
Password: <blank>
- 17 -
Page 18

The Control Console
The Right Panel of the Web Interface controls the functionality and setup of the IP Power 9258
HP.
The IP Power 9258 HP Console consists of four main sections which will be explained in details
below.
Power Control Settings:
Power Controls
Scheduler Settings
Ping Settings
PC Control Setting
Ethernet to RS232
System Configuration:
User Management
Change Password
Network Settings
PPPOE Settings
Date & Time
Advance Settings
Maintenance
DDNS Settings
IP Server & CNT
Telnet & Snmp Settings
Syslog Settings
E-mail Settings
Black List
Information
System
Log
Http Commands
XML Information
Log Out
- 18 -
Page 19

Power Control Settings
The Power Configuration Section allows you to directly control the outlets of the 9258 HP as well
as schedule daily, weekly, and monthly power cycles.
Power Controls
The Power Controls page allows you to control the power , default value , and assign each name :
Power Control
Power No: This section shows the outlet of the output that you would like to control.
Name: If the output has been named the name that you have chosen will show up here
Control: The control section will allow you to turn on or turn off the output manually
Timer: The timer allows you to do second control after first control
Alarm: The alarm section allows the 9258 HP to notify you when an outlet status change. There
are two ways that you can be notified either by E-mail or by a beeping sound.
Status: The status function will show you whether the power is on or off.
- 19 -
Page 20

Recycle power : Here you can set up the delay time " minutes: seconds " of each output form
Off to On. You can press the pink button from P1 to P4 to do the power reboot procedure.
Example :
Output 1 status is ON , Set as " 0: 15 " and then press P1 :
The output 1 will turn off immediately and then turn on after 15 seconds.
Demo Start : 9258HP will turn on and off of each output in turns. For demo purpose only
Device Startup Default Value
The system Power Default Value allows you to set each power port as on or off when the device
power reboot. You can also enable / disable the beeper sound as power reboot ( system startup )
Power Control Rename
Changing the Name of your Device
Device Name: Allows you to name the 9258 HP device. Type in the desired name for the device
and hit the rename button
Power 1-4: To rename each outlet, type in the desired name and hit the rename button.
Changing the Color
- 20 -
Page 21

For easier identification purposes you can also change the color of each device. Just hit the
square located to the right of the naming section and a color table window will appear. Select the
color of choice and hit the close button.
Setup the Country and City :
This is for search by CNT & IP Service
Scheduler Settings
The scheduler allows you to power devices or turn them off on a scheduled time or basis.
Please set up the time gap of each schedule action at 15 seconds at least .
To avoid the action of schedule be delay by the action of Email as keep waiting server
response, we suggest to turn off email function as use Schedule.
Adding a scheduled event
1.) Add a new scheduled event start by clicking the Addition button
2.) Select the Device Name that you would like to control
3.) Select the Command
Select a mode:
Date: Select a specific date range where the device will repeat the desired actions during the
time specified.
- 21 -
Page 22

a.) Select the date From with you would like the action to be activated
b.) Click on the calendar picture to select a From date and a To date:
Weekly: The weekly mode allows the device to repeat the cycle on a weekly basis.
a.) Select the From Date and then select the To Date
b.) Enter the time that you would like the action to be activated
4.) Once the scheduler has been setup hit the submit button and you will see your device
located on the top of the screen.
- 22 -
Page 23

Removing a Scheduled Event
1.) To remove a Scheduled event click on event that you would like to remove.
2.) It the remove button.
3.) Reconfirm the remove
Editing a Scheduled Event
- 23 -
Page 24

1.) To edit a scheduled event, click on the even that you would like to edit
2.) Edit the settings.
3.) Then hit the submit button for confirmation.
Ping : Enable or Disable
The section allow you to set the time period to enable the ping function.
Before setup the "ping" as enable / disable , you need to use the Ping function in " Schedule
Setting " .
- 24 -
Page 25

Ping Settings
The ping function on 9258 HP allows the device to automatically Ping an IP Address to act as a
watchdog to make sure the device getting Pinged is working properly.
Also to setup the "Wake up Settings " for each output with ping failures .
Let’s start by describing the sections of the Ping Interface.
Ping Settings
- 25 -
Page 26

Name:
This section lists out the ports of the device. If a name has been selected in the power control
section they will appear here instead of the default names.
Action Enable / Disable:
In this section you can turn enable or disable the ping function for each individual output.
Host Name / IP Address:
Input the IP Address or web address of the IP you would like to ping.
Select the action that you would like the Ping Function to use when the device being Ping cannot
be located or is not responding.
Ping Failures:
Select the number of Ping Failures that you would like to occur before the action is activated. The
reddish pink number to the right represents the actual number of ping failures. Keep in mind that
four consecutive pings equals to 1 Ping failure.
Example:
Say you have Port 2 set to 2 Ping failures this is what would happen:
Port 1: Pings with no failure the device will move to Port 2
Port 2: If Port 2 has a Ping failure it will continue Pinging until 4 unsuccessful ping with equals 1
failure.
Ping failure is now 1
Then it moves to the next port. (When it reaches the designated Ping failures then the action will
happen)
Port 3: Pings with no failure the device will move to Port 4
Port 4: Pings with no failure the device will move to Port 1
Port 1: Pings with no failure the device will move to Port 2
- 26 -
Page 27

Port 2: If Port 2 has a Ping failure it will continue Pinging until 4 unsuccessful ping with equals 1
failure.
Ping Failure is now 2
9258 will do the action and reset Port 2 by Turning the port off first
Then since you have set the timer to 1 minute and 20 seconds, the device will turn back on the
port in that time.
Note: The timer is usually used for devices that have a boot up time this will prevent the device from
continuously resetting the device attached
Then the 9258 will continue to then next port and continue this cycle.
Port 3: Pings with no failure the device will move to Port 4
Port 4: Pings with no failure the device will move to Port 1
Wake-up Settings :
The section allow you to auto wake up the assigned PC ( with setting MAC ) in LAN by the times
of " Ping Failures " .
To enable the " wake up setting" , you need to assign the MAC address of controlled device in "
PC Control Settings " of " Power Control Settings" as following :
First : Click " PC Control settings " of "Power Control settings " and set the MAC address plan
to ping and click "Save" bottom.
- 27 -
Page 28

Second : Go to "Wake up Settings " under " Ping Settings "" of " Power Control settings " and
setup : enable , IP address and the times of ping failures.
As above picture , the pink value 0 next to the Ping Failures value 6 means the exact pig
failure times is zero time . As the pink value reach to the setting value , device will action as
setting .
Connectivity Alarm :
The section allow you to enable or disable the alarm as lost network connectivity.
As enable this function , 9258HP will keep beeping if it`s own network connectivity lost.
PC Control Settings
The section allow you to control PC shutdown and wake up in LAN .
- 28 -
Page 29

Network Wake-up Settings
This section allow you to wake up the mainboard ( by MAC address) in LAN. The main board of
this PC need to support and enable " Wake On Lan" function in it`s BIOS. Please fill the MAC
address and click save bottom.
Shutdown settings :
Premise:
To safely shutdown your PC ( shutdown Windows system first then turn off the outlet power ) ,
please install our software " IP9258Config.exe " at the PC you would like to shut down in LAN
through our IP Power series. The software need to keep working in system.
You can get the software " IP9258Config.exe " in 9258SDK SDK section in our CD :
- 29 -
Page 30

In the webpage of 9258HP , you can enable disable this function and delay the time to turn off the
Windows OS system by our own software " and then wake up the PC in LAN . The main board
of this PC need to support and enable " Wake On Lan" function in it`s BIOS.
The delay time is 30 seconds at least.
Ethernet to RS232
This section allows the RS232 port on 9258HP to receive / pass out command from other
9258HP/ 9258WiFi .
- 30 -
Page 31

System Configuration
User Management
The User Management section allows you to create users that will be able to access your device.
- 31 -
Page 32

There are two main types of users:
Administrator: The Administrator has the authority to create other users, remove users, and
control the device.
Guest: The guest only has the ability to view & operate the device. Any other function will be
disabled.
Adding an User
1.) Click on the add button and a add user screen will appear below
2.) Type in Username, Password, Confirmation Password and select the User Group.
3.) Then click the save button to add the new user.
The maximum number of users that can be created is 20
Removing an User
1.) Highlight the user that you would like to remove.
2.) Then hit the remove button to remove the unwanted user.
3.) You will be asked to reconfirm your remove action. Click ok to continue
- 32 -
Page 33

Anonymous User Settings
Using the Anonymous user settings allows anyone to enter the device and change the settings.
By default this setting is set to Disable
Change Password
The change password page allows you to change your password for the 9258 HP. You must login
as the administrator to change the password for the device.
1.) Just type in a new password and reconfirm the password
2.) Hit the save button and the 9258 HP will as you to re-enter the new password.
- 33 -
Page 34

Network Settings
IP Address Configuration
Obtain IP address via DHCP: This allows the 9258 HP to automatically obtain a IP Address from
the server. Recommended for non-advance users.
Use the following IP address: You can also enter the IP Address information manually by
selecting this setting. For advance user.
- 34 -
Page 35

DNS Configuration
Obtain DNS server address via DHCP: This allows the 9258 HP to automatically obtain a IP
Address from the server. Recommended for non-advance users.
Use the following DNS server address: You can also enter the IP Address information
manually by selecting this setting. For advance user.
HTTP Port
Http port: Enter the port of 9258 HP here in this section.
Note: You will need to port forward your device to this port on your router in order for the device
to be able to be accessed from outside of the network
DHCP Clone MAC
The clone Mac section allows you to clone a Mac address. This setting is usually used when a
Mac address is blocked by the ISP. By cloning a Mac the device can still be accessed through
the internet.
PPPOE Settings
If you use DSL or ADSL and need to enter the PPPoE for the 9258 HP to connect to the internet:
1.) Enable the PPPoe settings
2.) Type in the username and password
- 35 -
Page 36

3.) Hit the save button
If E-mail notification is necessary when IP has changed select Yes in that section.
Date & Time
The Date and time section, is where you can set the time and date of the 9258 HP. There are four
sections:
Current Server Time
This displays the current time of the 9258 HP
Time Zone
Displays the time zone of the country that you reside in.
Time Mode
The NTP Server allows the 9258 HP to check with a NTP (Network Time Protocol) to constantly
keep the internal clock of the device updated.
Update Server Time
To manually update the Server time, type in the current time then hit the save button.
- 36 -
Page 37

Advance Configuration
Maintenance
The Maintenance section has two sections
Maintain Server
This section of the 9258 HP allows you to
Restart: Restarts the 9258 HP devices
Restore: Resets all parameters, except the IP parameters, to the original factory settings
Default: Resets all parameters to the original factory settings
Upgrade Server
To upgrade the 9258 HP:
1.) Hit the brose button and search for the upgrade file.
2.) Hit the upgrade button and follow the directions carefully.
- 37 -
Page 38

DDNS
The DDNS section allows you to setup the 9258 HP with a DDNS server (i.e. www.dyndns.com).
After the server has been setup correctly, enter the necessary information into the 9258 HP
DDNS settings.
IP Server & CNT
The IP Server & CNT functions allow the device to be easily accessed on the internet. With this
feature anyone can find there device with no problems.
IP Server: Allows you can find your 9258 HP on the internet without having to remember long IP
Addresses. Instead you can just remember the name of your device.
The Default IP Server Address is: 220.135.169.136
CNT allows the device to easily be accessed on the internet, you no longer have to port forward
your device to be able to use it. Only some devices are CNT compatible.
- 38 -
Page 39

The Default IP Server Address is: 61.59.37.154
Telnet & Snmp Settings
Email Settings
The email function allows you to send emails for notification purposes. The 9258 HP allows you
to setup up to 2 separate E-mails just in case one is down. Both E-mails will be sending
notification E-mails
Mail Server: The mail server is the field where you will enter the outgoing
From E-Mail Address: This is the senders Email Address
Authentication: If the mail server needs to be authenticated make sure the yes is checked in
User Name: Login for the E-mail address
- 39 -
Page 40

Password: Password for the E-mail address.
Blacklist
The Blacklist allows you to block certain range groups of IP Address. By doing this these blocked
IP Addresses will not be able to access your device at all.
Blocking an IP Address
1.) First hit the Add button to start the process.
2.) Then type the blacklisted IP Address.
3.) Then hit the submit button
4.) You will then see the newly added IP Address in the Black List .
Removing an IP Address
To remove an IP Address:
- 40 -
Page 41

1.) Click on the IP Address that you would like to remove.
2.) Hit the Remove Button.
3.) Reconfirm the Remove and hit Ok.
Information
The Information section contains the:
System: The System section will provide basic information on the devices network status.
LOG: The log is a log of all the movements that have occurred in the device.
Http Command: HTTP Commands is a command generator and t
XML Information: XML allows the user to use XML for integrating in different uses.
- 41 -
Page 42

System
The system section tells you information about the 9258 HP. This is where you will find
information on the:
System Information
Firmware Current Version/Date: This will tell you the firmware version of the device.
Network Status
Ethernet MAC Address: The MAC address of the 9258 HP will be displayed here
LAN IP Address: IP Address of the 9258 HP
LAN Netmask Address: This will show the subnet Mask of the 9258 HP
LAN Gateway Address: This information will provide the gateway information.
DHCP State: The DHCP state will notify the state of the 9258 HP.
Log
The Log Section collects information on the device. From when someone logged in to what ports
were activated. The log can keep up to 100 records.
The most recent log will be the first log in the log.
Saving the Log: Saving the Log File will allow you to save the current view onto a
text file. To accomplish this hit the save file button. A new window will pop out and ask you to
- 42 -
Page 43

save the log in the directory of the computer. A new screen will appear, please save the log
carefully.
E-mail: Email will E-mail the current log page to the selected receiver mail in the E-
mail settings.
- 43 -
Page 44

Http Command
The Http Command section is a very powerful tool in the 9258 HP. This section allows you to
easily create HTTP Commands to specific commands you are looking for. It also allows
you to run commands directly from here.
Command: The command is the command name
Parameter: Is the parameters that you would like to be used or ran in the command.
Auth Req.: If a password is required
Allowed User: Which user is allowed to use this command
Action:
a.) Run CMD: Will execute the command you have desired
b.) Cmd Syntax: Will produce the syntax needed to execute the command
manually.
Here are all the available commands
- 44 -
Page 45

Http Commands Format
On the Top of the Http Commands Section you will find the syntax to submit commands to the
device.
View & Run Commands
Create Command Lines
1.) To Create command Lines select the appropriate settings to achieve the desired
commands.
2.) Hit the Cmd Syntax link to create the http Command
3.) The command line will be created in the HTTP Command section.
- 45 -
Page 46

Run Command Lines
1.) To Create command Lines select the appropriate settings to achieve the desired
commands.
2.) Hit the Run CMD link Run the command desired.
3.) Another window will appear and confirm the settings have been activated.
Please review the section on the Controlling the Device for a list all of all the available commands.
- 46 -
Page 47

XML Information
The XML function allows you to use XML for programming purposes.
To enable the XML make sure the Enable button has been selected and press submit.
- 47 -
Page 48

8.) Controlling the Device
CGI HTTP Commands
CGI Commands allow you to easily integrate the 9258 HP with other systems and programs.
Please read the instructions carefully on how to use the Http:// Commands
To use http:// Commands open up a web browser and type in the command that you would like to
use.
Control
‧ SetPower – Allows you to turn on and off the 9258 HP
http://192.168.1.100:90/SetPower.cgi?p1=1+p2=1+p3=1+p4=1 , OFF=0, ON=1
‧ GetPower – Tells you the current power settings
http://192.168.1.100:90/GetPower.cgi?
‧ SetStartup – Sets the Default Startup Value for Ports 1-4
http://192.168.1.100:90/SetStartup.cgi?status=1+p1=1+p2=0+p3=1+p4=0
status= 0 is Disable , 1 is Enable
‧ GetStartup – Get the Default Startup Value for Ports 1-4
http://192.168.1.100:90/GetStartup.cgi?
Name
‧ SetDeviceName – Set the Device Name
http://192.168.1.100:90/SetDeviceName.cgi?Name=
‧ GetDeviceName – Get Device Name
http://192.168.1.100:90/GetDeviceName.cgi?
‧ SetPowerName – Set Power Name for Each Outlet
http://192.168.1.100:90/SetPowerName.cgi?p1=test1+p2=test2+p3=test3+p4=test4
‧ GetPowerName – Get Power Name
http://192.168.1.100:90/GetPowerName.cgi?
Others
‧ GetVer – Get the Firmware Version of the 9258 HP
‧ GetSeries – Get the Serial Number of the 9258 HP
‧ Demo.cgi – Sets the 9258 HP in Demo Mode
http://192.168.1.100:90/Demo.cgi?start=0
http://192.168.1.100:90/Demo.cgi?stop=1
Serial Com (RS-232) Control
Serial Port (RS-232)
The Com1 allows you to read the status of the 9258 HP. Information can be extracted through
this port like an output
1.) Use DB9 cable connect to the COM1 of PC and the RS232 of device
2.) Execute WIN program "Hyper Terminal" : please go to " Start" / "program" /
"Accessories" / "Communications" / "Hyper Terminal" .
- 48 -
Page 49

3.) Enter a name and choose an Icon.
4.) Select the correct Com port for your RS-232
5.) Use these settings provided below.
Bits per second: 57600
Data Bits: 8
Parity: None
Stop Bits: 1
Flow Control: None
- 49 -
Page 50

6.) Then the device will be connected via Rs232. Hit “?” to show a list of all the commands.
Telnet
IP Power 9258 HP can be controlled by using Telnet.
To use Telnet:
1.) Open “Command Prompt” in windows.
2.) Type telnet and the IP address of your device
- 50 -
Page 51

3.) Type in the login and password to the 9258 HP then hit enter. The text “user name
correct” will appear if you have entered the login and password correctly
4.) Then type “help” for a list of all the commands. All the commands are explained in telnet
please read the syntax carefully.
Power Control On/ OFF
- 51 -
Page 52

9.) Frequently Asked Questions (F.A.Q)
Q1: How do I reset the device back to manufacturer default values?
Ans: In the front panel of the 9258 HP, there is a reset feature that will reset the device back to
manufacturer default settings. Take a pen or small pin, then press and hold for about 10-15
seconds. Once you hear a single “beep” sound the device will be reset back to manufacturer
default
Q2: How come I cannot connect to my device from an outside network?
Ans: To use the device outside of LAN (Local Area Network. If a router is present you will have to
port forward the Local IP Address of the 9258 HP so that it could be reached by the outside world.
Please refer to the manual on how to accomplish this task.
- 52 -
 Loading...