

Page 1

Firmware Version: 4.03
IP Power 9258 DS
User Manual
Date Released: 11/09/2012
- 1 –
Ref: DS9258Y90M02
Page 2

Warning: Any changes made to this equipment without permission may cause damages to the device!
IMPORTANT NOTICE
1. IP Power 9258 DS was designed for indoor use, we carry no responsibility for possible damages caused
by outdoor use, especially in the rain.
2. Please use the power adapter provided by the dealer, we carry no responsibility for the possible
damage from using power adapters not .
4. Do not shake the IP Power 9258 DS in any fashion
5. Please contact the dealer If IP Power 9258 DS is not working properly.
Copyright © 2009 All rights reserved. No part of this publication may be reproduced, stored in a
retrieval system, or transmitted in any form or by any means, electronic, mechanical,
photocopying, recording or otherwise, without the prior written consent of us.
All trademarks and products mentioned in this document are the properties of us.
- 2 –
Ref: DS9258Y90M02
Page 3

Table of Content
1.) WELCOME ........................................................................................................................................... 5
INTRODUCTION .............................................................................................................................................. 5
MINIMUM SYSTEM REQUIREMENTS ................................................................................................................... 5
2.) PRODUCT OVERVIEW .......................................................................................................................... 6
FEATURES...................................................................................................................................................... 6
SPECIFICATION ............................................................................................................................................... 6
PACKAGE CONTENTS ....................................................................................................................................... 7
3.) INTERFACE DESCRIPTION .................................................................................................................... 8
FRONT VIEW ..................................................................................................... ERROR! BOOKMARK NOT DEFINED.
REAR VIEW .................................................................................................................................................... 9
Rear View .............................................................................................................................................. 9
4.) QUICK START GUIDE ......................................................................................................................... 10
QUICK HARDWARE SETUP .............................................................................................................................. 10
QUICK DEVICE SETUP .................................................................................................................................... 10
5.) HARDWARE SETUP ............................................................................................................................ 11
6.) SOFTWARE SETUP ............................................................................................................................. 12
INSTALLING IP POWER SOFTWARE ................................................................................................................... 12
USING IP EDIT ............................................................................................................................................. 13
IP SERVICE .................................................................................................................................................. 16
7.) HARDWARE INTERFACE .................................................................................................................... 17
HARDWARE RESET ........................................................................................................................................ 17
SERIAL PORT CONTROL .................................................................................................................................. 17
HOW TO REPLACE FUSE ................................................................................................................................. 17
8.) WEB INTERFACE ................................................................................................................................ 18
CONNECTION TO YOUR DEVICE ........................................................................................................................ 18
THE CONTROL CONSOLE ................................................................................................................................ 18
POWER SETUP ............................................................................................................................................. 19
Power Controls ................................................................................................................................... 19
SYSTEM CONFIGURATION ............................................................................................................................... 20
System Setup ...................................................................................................................................... 20
DDNS ................................................................................................................................................... 21
E-mail .................................................................................................................................................. 22
Schedule Ports 1-4 & Ports 5-8 ........................................................................................................... 23
IP Service ............................................................................................................................................. 24
Ping ..................................................................................................................................................... 25
Network Wakeup ................................................................................................................................ 27
Change Password ................................................................................................................................ 27
Firmware Update ................................................................................................................................ 27
- 3 –
Ref: DS9258Y90M02
Page 4

Time Change ....................................................................................................................................... 28
9.) CONTROLLING THE DEVICE................................................................................................................ 29
CGI HTTP COMMANDS ................................................................................................................................. 29
Set Power Command .......................................................................................................................... 29
Set Power Delay Command ................................................................................................................ 29
Set Name Command ........................................................................................................................... 30
Get Name Command .......................................................................................................................... 30
Get Firmware Version Command........................................................................................................ 30
Get Time Command ............................................................................................................................ 30
Set Time Command ............................................................................................................................. 31
Set Device Gateway Command ........................................................................................................... 31
Set Device DNS Command ...................................................................... Error! Bookmark not defined.
Turn D HCP ON/OFF ..................................................................................................................... 32
View Log Command ............................................................................................................................ 32
SERIAL COM (RS-232) CONTROL .................................................................................................................... 33
Com1 ................................................................................................................................................... 33
SNMP ....................................................................................................................................................... 34
Initial Setup: ........................................................................................................................................ 34
SNMP MIB ........................................................................................................................................... 35
10.) XML FUNCTIONALITY ...................................................................................................................... 37
11.) FREQUENTLY ASKED QUESTIONS (F.A.Q)......................................................................................... 38
- 4 –
Ref: DS9258Y90M02
Page 5
1.) Welcome
Introduction
The IP Power 9258 DS is a state of the art Power Distribution Unit (PDU) & Remote Power Control (RPC)
system. The 9258 DS can be used for various applications including: Power Management, Server
Management, Internet Controllable Timer, System Integration and much more.
This device allows you to control up to 8 separate devices via the internet. By using a web browser, you
can remotely control the power of the 9258 DS from virtually anywhere.
What makes this device different from other PDU’s is that it has a dual switch design.
Unlike other PDU or RPC units the 9258 DS is completely safe. The dual switch design cuts off the power
and will eliminate any most electrical threats that other systems may have.
Minimum System Requirements
Operating Systems : W INDOW S Operating Systems (IE5.0+SPI) & LINUX
RJ45 LAN & Internet HUB & Switch
Internet (For remote access) or Ethernet Network (Internal Network use) with some type of Internet
connection, (i.e. ADSL, Cable, Dial up or any other forms of Internet service)
- 5 –
Ref: DS9258Y90M02
Page 6

2.) Product Overview
Features
1. Dual Switch Design for extra safety and protection
2. HUB function four 4 RJ45 connections
3. Auto-ping (Watch dog) Device Auto Restart / Reboot.
4. Supports: RJ45(HUB), TCP/IP, Http API, Web Server, SMTP Server, SNMP & TRAP, DHCP,
DDNS, CNT, XML
5. 8 Power control output
6. 2 Main power inputs.
7. 1 RS232 port for System Integration.
8. Design Pressure System: Prevent interference with power noise design. (Second stage isolation)
9. Scheduler System for date sensitive control
10. Http commands through Internet
11. Log Capability
12. CNT Technology: No Port Forwarding Needed in Router – Just Plug & Play
13. IP Service: Easily Find your device on the internet without having to remember complicated IP’s
14. Light Aluminum Design
15. Supports UPNP (Universal Plug & Play)
Specification
1. Input Power Voltage: 90-240 VAC
2. Input Frequency: 50/60 Hz full range
3. Dimension: 440x235x40 mm 1.8kg
4. Reliability testing Certification MBTF 200,000 hrs +
5. Operating temperature range: 0 - 50 degrees Celsius.
- 6 –
Ref: DS9258Y90M02
Page 7

(Optional)
Package Contents
1.) 9258 DS Unit x 1
2.) 9258 DS Installation CD
3.) Extra Fuse x 1: Located in the
power input of the 9258 DS
Refer to installing fuse section
4.) RJ45 Cable x 1 (Optional)
5.) Input Power Cable x 2
- 7 –
Ref: DS9258Y90M02
Page 8

3.) Interface Description
Front View
4 Port Ethernet Hub:
Connect up to 4 separate devices with
the built in hub.
1 Serial Ports:
Serial Port 1: Regular Speed
Reset Button:
To reset to original manufacture
settings, hold down the reset button
with a pen or a pin for 15 seconds until
will hear a long beep sound.
Power Status Indicator:
The Power Status indicator
- 8 –
Ref: DS9258Y90M02
Page 9

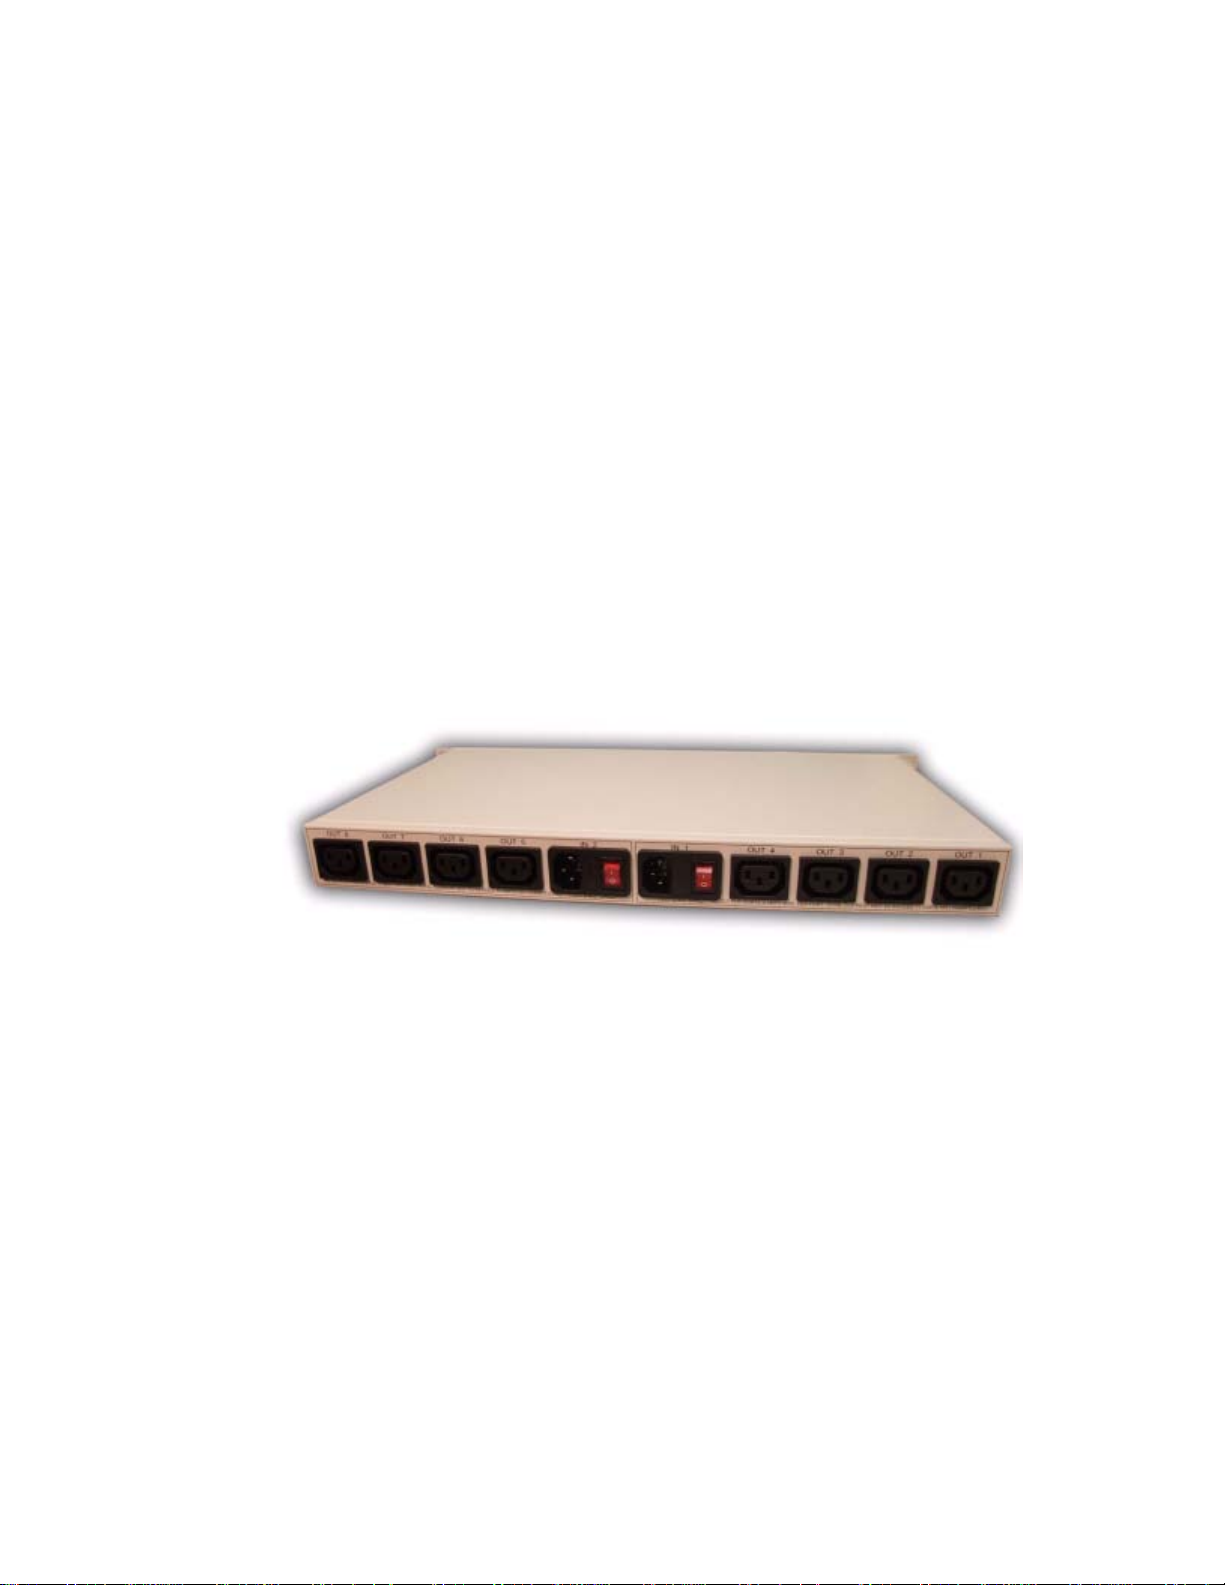
Rear View
Rear View
Replaceable Fuse: The 9258 uses a
Rear View
8 Output Power Ports:
Connect up to 8 separate devices that will be
controlled by the 9258 DS. Ports 1-4
2 Input Power Ports:
The input power sends power to the 2 sets o
9258.
2 Power Switch:
The 2 Power switch turns on the input power
Ports 1-4: Switch 1
Ports 5-8 Switch 2
TYPE:U/C GFE 10A 250V (PF)
- 9 –
Ref: DS9258Y90M02
Page 10

4.) Quick Start Guide
Quick Hardware Setup
*Before you plug in the device make sure you have the appropriate input plugs.
* For 220-250V, please use power cable that can support 10A current.
Max Output Current: (total of each four outlets) 10A, (each outlet) 6A.
* For 100-120V, please use power cable that can support 15A current.
Max Output Current: (total of each four outlets) 15A, (each outlet) 6A
1.) Make sure that all the package contents are included, if anything is missing please contact
the store.
2.) Plug the RJ45 (Ethernet Cable) from your router or modem to any of the 4 ports on the
9258 DS.
3.) Plug in the Input Power Plugs into the device and then into the wall of your device.
4.) Plug in the devices that you want to control in the output ports of the 9258 DS
Quick Device Setup
Using IPEdit
1.) Click on the REF button,
detect the network settings and setup the device.
2.) Once settings have been detected hit the apply button to apply the new settings.
3.) Hit yes to confirm and Enter the login and password for the Device to Approve changes
and wait a few seconds. IPEdit will automatically
- 10 –
Ref: DS9258Y90M02
Page 11

4.) Then hit the rescan button on IPEdit to confirm the changes have been made.
5.) Once you have found your device double click on the device and the internet explorer will
pop up and ask for your login information.
6.) Type in your password & login and the device is ready to use.
* Remember that to access your device from the outside network, you will need to port forward the
IP Address of your device.
5.) Hardware Setup
1.) Connect the IP Power 9258 DS to a HUB or Router with a RJ45 network cable.
2.) Connect the HUB or Router to the internet (May through ADSL/XDSL modem).
3.) Connect the power adapter to the IP Power 9258 DS.
4.) Connect the power adapters of under control electric equipment to
corresponding out port of IP Power 9258-Pro.
Turn on your computer and the power adapter of IP Power 9258-Pro
* For 220-250V, please use power cable that can support 10A current.
Max. output current: (total of each four outlets) 10A, (each outlet) 6A.
* For 100-120V, please use power cable that can support 15A current.
Max. Output current: (total of each four outlets) 15A, (each outlet) 6A
- 11 –
Ref: DS9258Y90M02
Page 12

6.) Software Setup
The software for the device is located on the Media Link-IP Family CD that came with the device. IP
Power Pack is located on the main page of the CD. Please follow the directions carefully and install the
necessary files
The IP Power Necessary Software:
* IPEdit : For search our IP product , access, modify basic configurations of IP POWER 9258DS.
* IP POWER Center : Own software for CNT and multiple IP power to control in one software .
Installing IP Power Softwa re
1.) First place the Media Link-IP Family CD that came with your device into your CD/DVD Rom drive.
The CD should auto run but if it does not go to the CD/DVD Rom drive and select the file
“autorun.html”.
2.) Once the CD has started, go to the IP Power section and click and install the following:
IPedit:
IP Family Program used to search, access, modify basic configurations of IP Family products.
IP Power Center:
Multiple IP Power device manager to control the ON and OFF of the managed devices. (For IP Power
9258 Ping , 9280, 9211, 9222.)
3.) Once installation is complete please double click the IPEdit to configure and search for your
device.
- 12 –
Ref: DS9258Y90M02
Page 13

Using IP Edit
IPEdit is a search tool designed to setup and access the device.
It comes with the IP Service feature which searches for the device easily without having to remember long
complicated IP addresses. Instead, this technology allows the user to use a name method to find his or her
device through the internet. .
Please make sure you have the most upda ted version of IPEdit. Contact your distributo r to
provide you with the newest updated IPE d it.
1.) After correctly installing the IPEdit software, double click on the IPEdit icon to run the program.
2.) Open IPEdit and any device in the same network should automatically be detected and listed in
the local devices sections. The devices will need to be setup correctly through IPEdit so
that you can properly access the device.
- 13 –
Ref: DS9258Y90M02
Page 14

3.) Setup the Device:
All devices will need to be on the same network if not the device cannot be accessed and will not be
detected.
a. Quick Easy Setup (Recommended)
7.) Click on the REF button,
detect the network settings and setup the device.
8.) Once settings have been detected hit the apply button to apply the new settings.
9.) Hit yes to confirm and Enter the login and password for the Device to Approve changes
and wait a few seconds. IPEdit will automatically
10.) Then hit the rescan button on IPEdit to confirm the changes have been made.
b. Custom Setup (Advance Users)
1.) Highlight the device on the local devices section and on the right side of IPEdit all network
information on the device will be displayed.
- 14 –
Ref: DS9258Y90M02
Page 15

If the device is not on the same network a Red Exclamation mark will appear in the IP
Network information section
2.) To setup the device, type in the correct Gateway and IP Address.
* Gateway Address: The gateway address can be obtain ed in Windows under the network
connections page
* IP Address: Make sure the first 3 sections of the IP Address matches the gateway address.
Example: Gateway Address – 192.168.1.1 IP Address – 192.168.1.xxx
3.) Once the Default Gateway information has been obtained, enter the correct information
into IPEdit and hit the submit button.
4.) Then hit the rescan button on IPEdit to confirm the changes have been made
- 15 –
Ref: DS9258Y90M02
Page 16

IP Service
How to use IP Service on IPEdit:
IP service allows the user to directly connect to his / her device through the internet without having to
remember long confusing IP Address. Instead with this IP Service Technology, the user only has to
remember the name of the device that the user has selected. Then the user can connect to IP Service,
type in the device name, and connect directly to the device.
First if you have de-activated IP Service on your device make sure you re-enable it. (Refer to your manual
if you have questions on How to activate IP Service)
1.) Open IPEdit, the device will show up in the Local Device Section. If you have not selected a name
for the device, please refer to the section on the manual labeled: “Naming your device”.
2.) To start IP Service, Hit the green connect button on the top of IPEdit.
3.) Once you have been connected search for your device b y typi ng in at least the first 3 letters that
you named your device with. Then hit the search button.
4.) Double click on your device and a Internet Explorer window will appear connecting directly to your
device.
*Remember: It is crucial to have the IP Address of the device port forwarded from the router that you
are using so you can connect to your device from anywhere. Please refer to your routers user
manual on how to port forward your device.
- 16 –
Ref: DS9258Y90M02
Page 17

7.) Hardware Interface
Hardware Reset
To reset the device back to manufacturer default, use a small pen or pin and press the reset button and
hold for a minimum of 10 seconds. Once you hear a “beep” sound the device will be reset.
Serial Port Control
Please view the Controlling the Device section on this manual on page 31.
How to Replace Fuse
1.) The fuse is located between the power switch and the power input plugs.
2.) Carefully remove the fuse holder with a flat screwdriver.
3.) The fuse can be purchased at most electrical stores
Model: U/C GFE 10A 250V (PF)
- 17 –
Ref: DS9258Y90M02
Page 18

8.) Web Interface
Connection to your Device
Once you have the 9258 DS setup correctly.
Open IPEdit and double click on your IP Power 9258 DS.
A Internet Explorer browser screen pop up with the login screen for the 9258 DS.
Default IP: 192.168.1.100 (When 9258 DS is connected to PC directly)
Default Login: Admin
Default Password: 12345678
The Control Console
The Right Panel of the Web Interface controls the functionality and setup of the IP Power 9258 DS.
- 18 –
Ref: DS9258Y90M02
Page 19

Power Setup
Power Controls
The Power Controls setting allows you to control the devices that are connected to the 9258 DS.
Name: The name field allows you to enter a name of the Power that you are controlling. Simple type in the
name of the device next to the outlet that it is connected to, then hit apply.
Control: Control allows the user to actively control the device on each port. To turn off or turn on the
device, select the control you want then hit the apply button
Timer: The timer allows you to turn On or Off your device with a delay. Please view the example below:
Power 1: The device will turn on when you hit the apply button and after 5 seconds the device will be
turned off.
Power 2: The device will be off and when you hit apply after 10 seconds then the device will turn on.
- 19 –
Ref: DS9258Y90M02
Page 20

System Configuration
System Setup
The System Setup page is where you would configure the basic IP information needed for the device to
work properly
IP Address: The IP Address of the 9258 DS can be specified here. If you are using a hub or router, the IP
address may be selected for you already. Otherwise you can manually select the IP Address here.
Subnet Mask: The Subnet Mask Address of the 9258 DS can be specified here. If you are using a hub or
router, the IP address may be selected for you already. Otherwise you can manually select the IP Address
here.
Default Gateway: The Default Gateway is given by a router or hub and this is where that information
would be specified.
DNS: The DNS is the Domain Name Server. This information can be obtained by contacting the ISP
DHCP Client: The DHCP client allows the 9258 DS to use DHCP to obtain the IP Information from a Hub
or Router.
Beeper: The Beeper turns on/off the beeper sound from the 9258 DS. When commands are sent a beep
sound will appear
.
Http Command Verification: The HTTP Verification turns on or off the HTTP Command mode. This mode
allows you to send commands directly to the device via internet without having to enter the device.
Device Name: In this section you can change the name of the 9258 DS for easier identification purposes.
It is also a way to find your device using IP Service.
Release Version: Displays information on the Firmware version and release date.
- 20 –
Ref: DS9258Y90M02
Page 21

DDNS
The DDNS section allows you to setup the 9258 DS with a DDNS server (i.e. www.dyndns.com). The the
server has been setup correctly, enter the necessary information into the 9258 DS DDNS settings.
DDNS Server IP: Input IP Address of the DDNS server.
Your Domain: Type in the Domain Name that you selected for your DDNS server
DDNS Username: Enter the DDNS Username
DDNS Password : Enter the corresponding Password for your DDNS account
Enable DDNS: Select Enable or Disable to turn on or off DDNS settings for the 9258 DS
Proxy Enable: Select enable or disable if any proxy servers are used.
Proxy IP: Enter the proxy server IP Address of the proxy server here.
Proxy Port: Enter Port of the proxy server
- 21 –
Ref: DS9258Y90M02
 Loading...