

Page 1

IP SENSOR 9216 USER MANUAL
IP SENSOR 9216
USER MANUAL
Page 2
USER MANUAL USER MANUAL
IP SENSOR 9216 USER MANUAL
IP SENSOR 9216
Version: 1.0
2006.08
- 1 -
VER. 1.0,
Page 3

IP SENSOR 9216 USER MANUAL
Warning: Any changes to this equipment without permission may cause damages to your equipment! This
equipment has been authenticated by FCC and CE, it can be prevented from the influence of harmful
electronic jamming in normal business use condition.
IMPORTANT NOTICE
1. IP SENSOR
damage caused by badly working environment
2. Please use the DC adapter provided by the dealer, we have no responsibility for the possibl e damage
caused by using other adapter
3. Do not use IP SENSOR 9216 in strong shaking condition.
4. Please contact the dealer if IP SENSOR 9216 works improperly.
Copyright © 2006 Aviosys. All rights reserved. No part of this publication may be reproduced, stored in a
retrieval system, or transmitted in any form or by any means, electronic, mechanical, photocopying,
recording or otherwise, without the prior written consent of Aviosys
9216 is only designed for splash-proof shell. We have no responsibility for the possible
All other products mentioned in this document are trademarks of their respective manufactures.
AVIOSYS are exempt from notify any change of our products.
- 2 -
Page 4

IP SENSOR 9216 USER MANUAL
Table of Content
1. INTRODUCTION..........................................................................................................4
FEATURES .........................................................................................................................
FUNCTION DESCRIBE ................................................................................................
9216
2.SPECIFICATION...........................................................................................................6
PACKAGE CONTENTS.........................................................................................................
MINIMUM SYSTEM REQUIREMENTS ....................................................................................
3.INTERFACE DESCRIPTION........................................................................................7
4.HARDWARE & SOFTWARE INSTALLATION..........................................................8
HARDWARE INSTALLATION..................................................................................................
SOFTWARE INSTALLATION..................................................................................................
5. INITIAL SETTING.........................................................................................................9
INITIAL SETTING THROUGH ETHERNET ................................................................................
READ MESSAGE FROM RS232 SERIAL-PORT.......................................................................
6. CONTROL AND SETTING THROUTH THE INTERNET EXPLORE....................10
S
TATE REPORT..................................................................................................................
SETTING THE IP ADDRESS…………………… ………………………………………………
SETTING THE DDNS..........................................................................................................
SETTING THE E-MAIL....................................................................................................... …
SETTING THE PASSWORD………………………………………………… …………… …..
NETWORK AKE UP FUNCTION.………………………… ……………………………………
SNMP SETTINGS……………………………………… ……………………………….. ….
MONITORING SETTING ……………………… …………… ………… ……… …… … …..
EXTERNAL VOLTAGE LEVEL MONITORING …………… ……………… ……… …… … …..
ONLINE FIRMWARE UPDATE………………………………… …………………………. …
7. CONTROL AND SETTING THROUTH HTTP COMMAND...................................20
- 3 -
VER. 1.0,
Page 5

IP SENSOR 9216 USER MANUAL
1. introduction
IP SENSOR 9216 is a web sensor with build-in web server which can be easy used in the industry supervise
filed. With the remote net control technology, user can get the IO state of remote equipments, monitoring the
voltage, temperature or working state of power supply directly in remote. User can start the fan and when the
fan is not working properly it will make an alarm automatically.
User can do this in any computer connected to the internet or local area network, no need for any special
program or computer. This design is easy to use, is fit for the office/industry automation or house security
manage. Otherwise the popular develop tool VB/VC is provided for user to modify the applications according to
your own needs.
Feature
Built in web server, can be used through the Ethernet network or Internet network without computer.
1.
2. Supported 10/100M Ethernet and TCP/IP UDP, ICMP, DHCP, HTTP protocol.
3. Built in network browser interface, you can remote receive or trigger the signal of dry contact operate the
switch and check the state. Support multi platform and server application, such as Internet Explore,
Netscape, Mozilla (Linux).
5. 3 route DC voltage monitoring, 9216 will alarm if voltage is out of preset normal range.
6. n, monitoring the operation of each fan, 9216 will alarm if rot ate
Control the startup and turn off of 3 route fa
speed is lower than the preset lower limit.
ormal range.
7. 2 route temperature monitoring, 9216 will alarm if temperature is higher than the preset n
8. Supported HTTP, SMTP, SNMP, INTERNET- fixed IP, DDNS, DHCP, LAN–virtu
fy. Easily installed and can be updated online. 9. Security passwords identi
munication, indicate all kinds of real time state of 9216.
om10. Supported serial port c
11. Supported http command.
12. Built in Watch Dog.
13. LED display indicates the status.
Develop tool 14. SDK (VB/ VC) is provided. It can be modified to meet the user’s special need.
nonflammable material
6. Polarity protective—no damage to your equipment if you reverse the polarity in installation.
1
17. can be used separated or associated with other 9xxx series products of AVIOSYS.
It
al IP
cal cu15. Safely designed for high voltage resistance and protection for leakage of electri
contact.4. 16 route input digital signals monitoring, 8 input signals can be set to dry contact or wet
rrency, using
- 4 -
Page 6
IP SENSOR 9216 USER MANUAL
9216 function describetions
1. Voltage monitoring of 9216
9216 can monitor 3 standard voltage of 12V, 5V, 3V. When these 3 under mon itoring voltage are beyond of the
predetermined upper limit or lower limit, the buzzer will make an alarm as enable .
2. Temperature monitoring of 9216
9216 can monitor 2 route temperature signals. The monitoring temperature can be predetermined by user. T1
is the temperature sensor for 9216 circuit board, can indicate the own tempe rature of 9216. T2 and T3 is outlet
emperature sent sors, the temperature will display to -48 degree if the sensor has not been connected. When
any of the 3 sensor’s tempe
this alarm function is not forbidden by user). Only when the temperatu re is lower than the upper limit again, th e
alarm will stop.
3. Fan monitoring of 9216
9216 can monitoring 3 route fan ( DC fan, 12V/0.5A), if t
value, the buzzer will make an alarm(if this
rature is beyond of the predetermined upper limit, the buzzer will ma ke an alarm (if
he working fan’s rotate speed is lower than the preset
alarm function is not forbidden by user)
. 16 route input signals monitoring 4
9216 can monitor 16 route input signals; user can get the voltage lever of each route signal. There are 8 dry
contacts (DI 01– DI 08), DI 09 – DI 16 can be set to dry contact or wet contact. When a po rt is set to dry cont
act,
9216 will supply DC 5V to contact, monitoring if there is an external switch on or switch off movement.
5. Monitoring through RS232 serial-port
User can monitor the working state in each port of 9216 through the RS232 serial-port.
6. E-mail report
When 9216 starts up or the preset alarm event happens, 9216 can automatically send e-mail report to the
r. mailbox preset by use
7. Setting the password and IP
User can set the password and IP address of 9216, supporting control multiple 9216s in one local network.
- 5 -
VER. 1.0,
Page 7

IP SENSOR 9216 USER MANUAL
8. Setting the buzzer
User can turn off the buzzer in setup webpage, then buzzer will not alarm . User can turn off the alarm in one
onitoring item, so when this monitoring item reach the alarm level , 9216 will not alarm. When one or multiple
m
monitoring item trig
monitoring item reach the alarm level again, the buzzer will make an alar
ger the alarm, you can cancel the alarm by pre ssing the alarm reset button, but whe n these
m again.
9. LED display
9216 can display its working state through the digital LED, for example:
isplay from left to right :
D
IP , 192 , 168 , 100 , 99 , 80 , P1 , 3.00, P2, 0.03 , P3 , 2.00 , T1, 29 , T2 , -48 , T3, -48, F1, 3824
F2 , 3
633 , F3 , 0 .
* IP : means following will display the IP address of 9216. IF following displays 192, 168, 10, 100 : 50 (in 5
times), it means the IP address of 9216 is 192.168.10.100 : 50.
* V1 V2 V3 : means following will display the voltage values of 3 route monitoring vo
T1 T2 T3: means following will display the temperature values of 3 route monitoring temperature(in degree
*
ltage.
centigrade, C)
F1 F2 F3: means following will display the rotate speed of 3 route monitoring fan.
*
,
2. Specification
9216E package contents
One set of 9216
One 1A, 110~220V power adapter
2 temperature sensors
3 voltage sensor wires
Minimum System Requirements
Intel Pentium III 300MHz or above/compatible AMD CPU
WINDOWS operating system (IE5.0+SPI) & LINUX
Minimum 64MB RAM
VGA Card: supported direct draw
ork card with RJ45 port & Ethernet HUB or Switcher
Netw
Internet network (Ethernet, ADSL or other ways, depends on whether you need far end control ability or
not)
- 6 -
Page 8

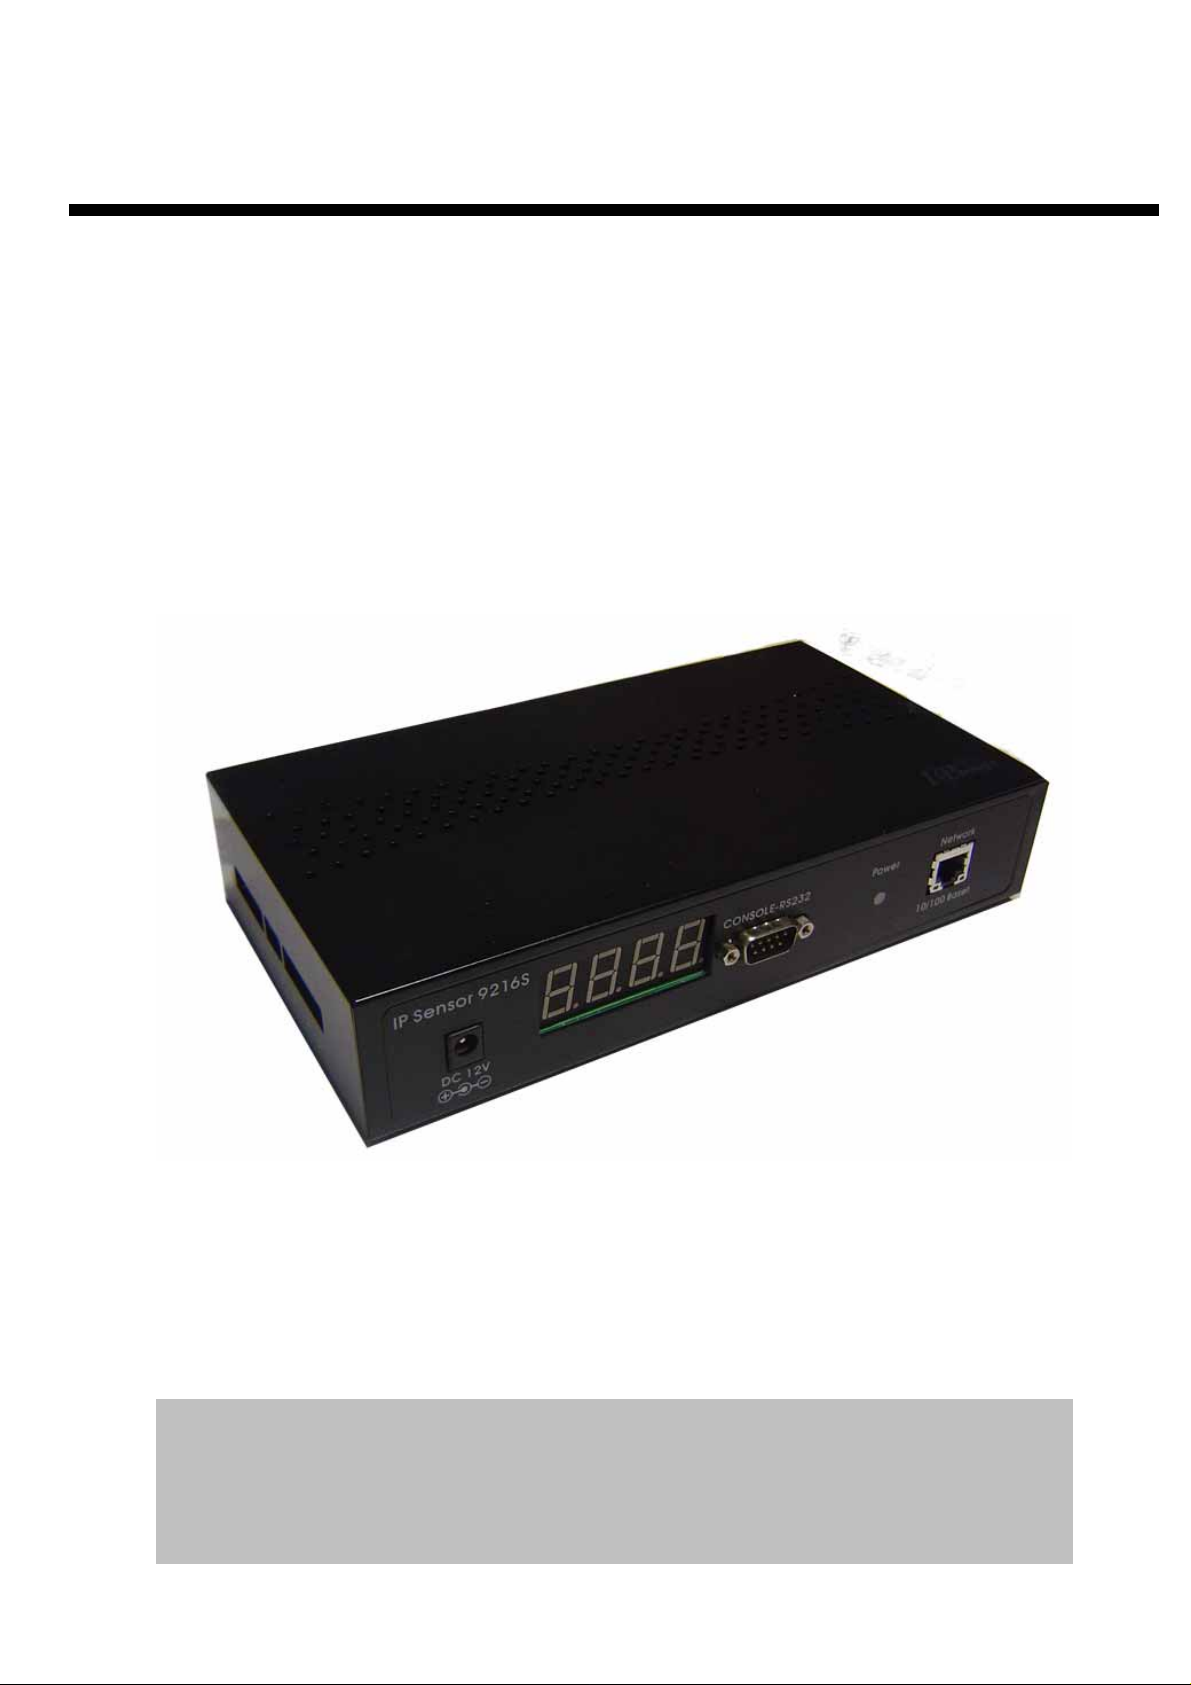
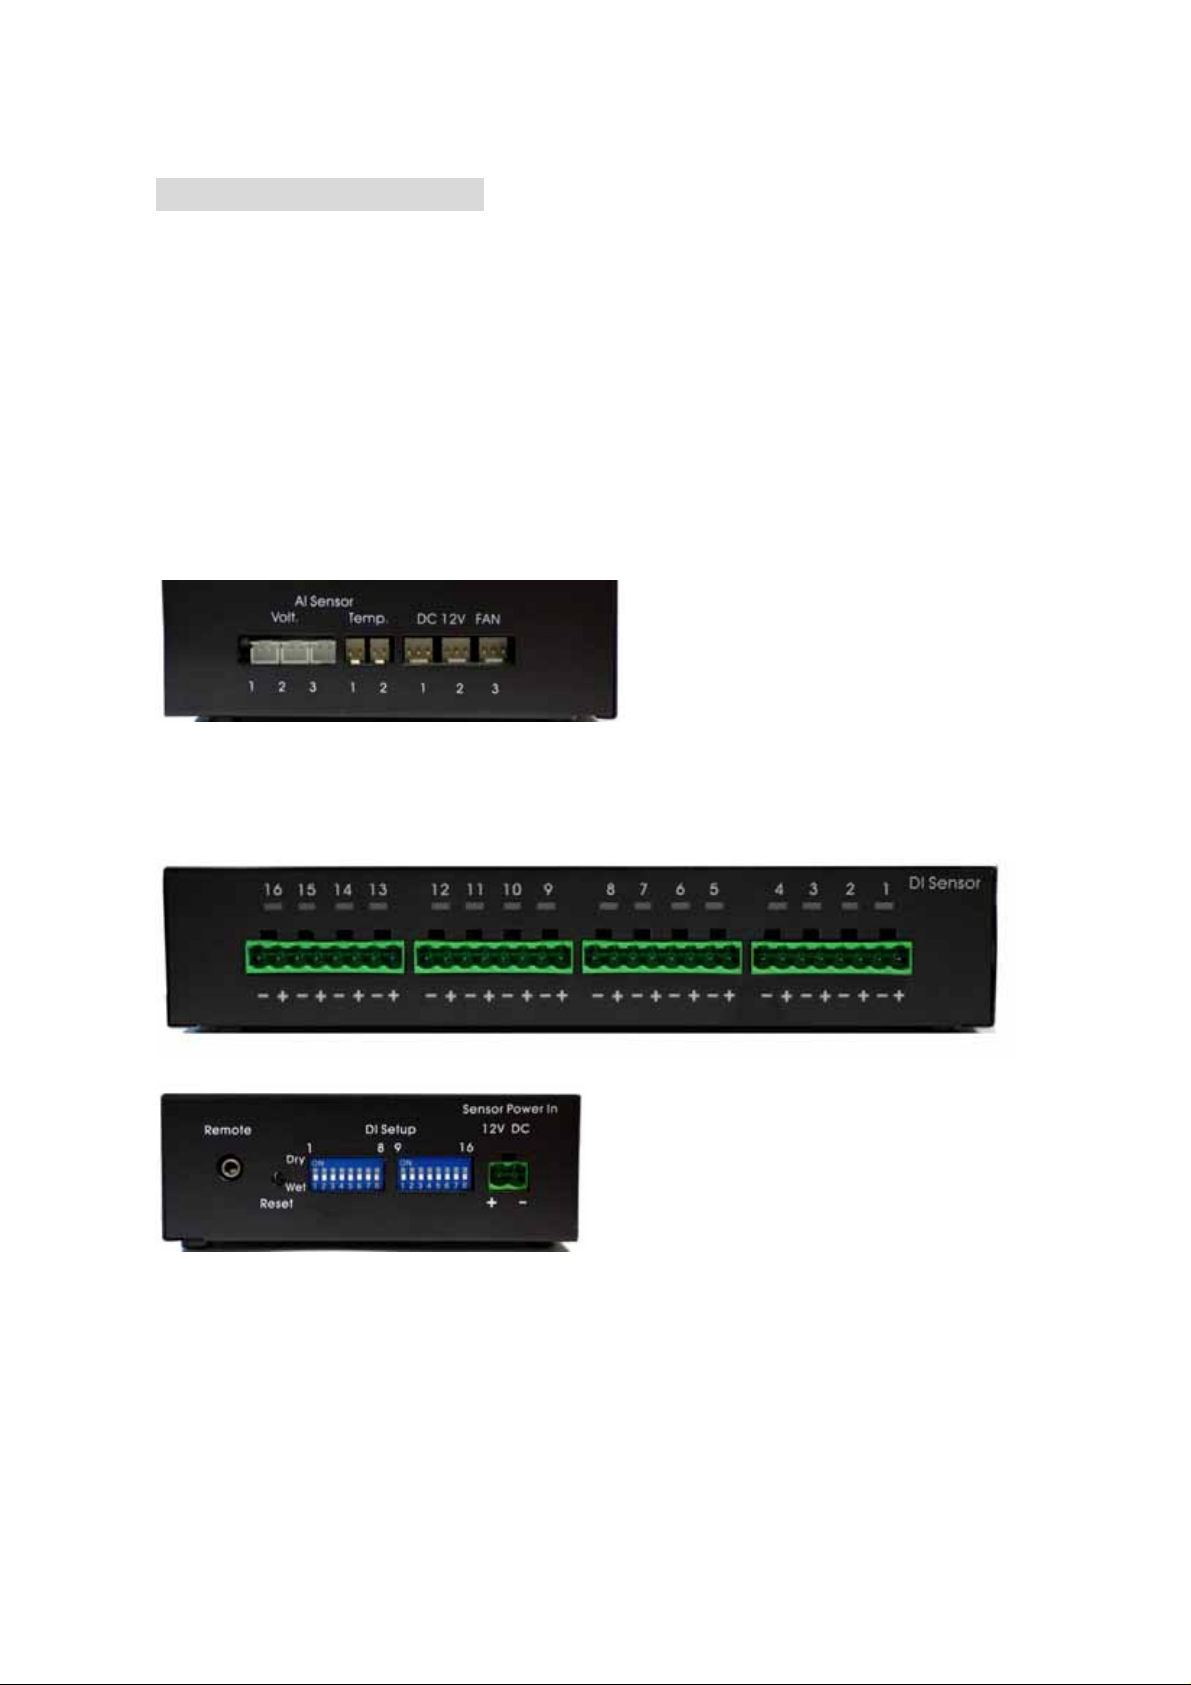
3. Interface Description
Interface of 9216 is as the figure shows:
IP SENSOR 9216 USER MANUAL
Desc
ription of each port:
1. RJ45 Ethernet port 2. RS232 serial port
3. LED board 4. DC 12V input
5 Port of Fan 3 6. Port of Fan 2
8. Port of temperature7. Port of Fan 1
. Port of temperature sensor 2 9
10. Port of voltage sensor 3
sensor 3
11. Port of voltage sensor 2 12. Port of voltage sensor 1
13. DI1 ~ 4 port 14. DI 5 ~ 8 port
15. DI 9 ~D 1
17. DI for 12V
2 port 16. DI 13 ~ 16 port
: Internal debug purpose.
18& 19 : . SW 1 & SW2 - Setting the type of DI9-DI16 contact to dry or wet contact. W
responding contact is wet contact; when SW2 is off, the responding cont
SW1 is responding to DI9, SW2 is responding to DI16 (each contact ne
of SW1 and SW2 at the same time)
For Example :
A. Set DI 9 & 13 as dry contact :1 –ON , 5 –ON , 1- ON , 5 – ON .
B. Set DI 10 & 14 a
s wet contact :2 –OFF , 6 –OFF , 2- OFF , 5 – OFF .
20. Alarm reset button: when alarming, press this b
utton to turn off the alarm of buzzer.
( Keep pressing for 10 seconds will set the IP address and pa ssword of 9216 back to factory default )
21. Internal debug purpose.
hen SW2 is on, the
act is dry contact.
eds the setting
- 7 -
VER. 1.0,
Page 9

IP SENSOR 9216 USER MANUAL
4. tware installation Hardware & Sof
Before you star to use IP SENSOR 9216, please follow the steps below
Check the package t
prepare one Ethernet HUB or Router
Check the voltage of the power supply to make s
Hardware installation
1 to HUB through network wire.
Connect the 9216
2 Connect the HUB or Router to the internet (May through ADSL/XDSL modem).
3 Connec
Connect the power adapters of under control electric equipment to corresponding
4
out port of 9216.
* 9216 HUB XDSL or * 9216 HUB / ROUTER XDSL
Softw
t the power adapter to the 9216.
Turn on your computer and the power adapter of IP SENSOR 9216.
are installation
o make sure the contents is complete.
ure it is AC 110-240 volt
Havin 6, please install the software as
g connected the power supply and network wire with RJ45 port to the 921
the follow steps:
1. Start your computer, put the install disc in the CDROM, an d then find the file named ipedit.exe in the
2. Copy the file to desktop or any directory you want save to.
Start the initial setting process following the construction in next section.
install disc.
- 8 -
Page 10

IP SENSOR 9216 USER MANUAL
5. Initial Settings
Initial setting through the Ethernet
1. Double click the Edit.exe :
2. All the IP 9200 series, IP Kamera 9000
series/IP Video 9100 series in the same subnet
of the Ethernet will be found and be display in the
window by the software. The default name of IP
SENSOR 9216 is IP TERMINAL. The default
IP address of 9216 is fix at 192168.100.100.
3. Click the equipment‘s name that you want to edit in the left of the window; it will turn fuscous, the
equipment’s name and IP address will display in the windows, you can rename (use numbers and letters). After
that, click the update button and the new setting will be work in 20 seconds.
4. Double click the name of the equipm ent you want to control, the IE browser window will open and connected
to this equipment in that Ethernet automatically. You also can type the IP add ress of the 9216 in the IE browser
to open the web page of 9216. We suggest you to update the IE to version 6.0 with SP1 or higher if your IE
notices you the security level is too low to open that web page.
NOTICE:
1. IP Sensor 9216 default setting is fixed IP address: 192.168.10.10 0. The IP address of your comp uter
should in the same subnet with that of IP Sensor 9216, so that you can op en the control web page. In
the figure above, the IP address of 9216 is 192.168.100.168. You can make sure the IP address of
your computer first, then use the ipedit.exe to modify the IP address of 9216. after that, your
computer can connect to the 9216.
2. IF user can not enter the control web page, please set the IP address of IP Sensor 9216 and your
computer in the same subnet. User can obtain the computer’s IP address, subnet mask, and default
gateway through the following method.
start run type in “cmd” then open the MS –DOS window, now type in “ipconfig”
- 9 -
VER.
1.0,
Page 11

IP SENSOR 9216 USER MANUAL
The last number of the IP address (default is 100 ) can be any number between 1~254, but cannot be the same
with that of the computer’s. If you want to use it at home, you can enter the web page by typing in the IP, the IE,
or using ipedit.exe program.
*Same subnet : means the first three parts of the IP address must be the same, such as XXX.XXX.X.abc. For
example, 192.168.1.100 and 192.168.1.123 are in the same subnet.
4. The default username and password of IP Sensor 9216 are:
Username: admin
Password: 12345678
If forget pas sword and ca n not log in webpage, please pre ss Reset for 10 second
, after few second
then restart power . Then the IP address and password will be back to default value
Read message from RS232 serial port
User can read the system state of 9216 in PC through the RS232 serial port in 9216.
First, connect the 9216 serial port to PC serial port and make sure the connection is correct.
Then, click the start menu in your PC, program---accessories---communicate---super terminal, setting as
the figure below shows:
* Bits per second ;19200
* Data bits : 8
* Parity :None
* Stop bits: 1
* Flow control : NONE
Then you can read message of 9216 from RS232 serial port.
- 10 -
Page 12

6. Control and settings through the Internet Explore
IP SENSOR 9216 USER MANUAL
Type the new IP address of IP Sens or 9216 in the address fie ld and you can enter the logi n web page. Input the
default username admin and password 12345678, or the password set by you own, click the OK and then
you can enter the Web Control page.
State report of 9216
You can enter the state report webpage after you enter the user name and password. Or you can click the
“SENSOR” button on the left of the webpage to enter the state report webpage.
1.0,
- 11 -
VER.
Page 13

IP SENSOR 9216 USER MANUAL
1. Power (Voltage) monitoring
The first column on the right side of the webpage is voltage mo nitoring ((Maximum current for P1 is 4V ,
for P2 is 5.8V,for P3 is 15.5V), displaying the real time value of 3 DC voltages. User can set the value in
setup sensor sub-webpage. User can set the upper limit and lower limit of the voltage or turn on/ off the alarm.
2. Temperature monitoring
in the temperature monitoring column on the right side of the webpage, it displays 3 sets of real time
temperature value( 2 sets of external temperature monitoring, 1 set of circuit board temperature monitoring).
User can set the upper limit when make an alarm and the lower limit when alarm stop, or turn on / off the al arm.
3. Fan monitoring
in the fan monitoring column on the right side of the webpage, it displays 3 sets of real time rotate speed. User
can set the lower limit of rotate speed when make an alarm or turn on/ off the alarm.
4. external digital voltage level monitoring
It is used to monitor the voltage in 16 route digital input port. is high level or low level. DI 9— 16 can be set to
DRY or WET contact.
IP settings of 9216
The IP settings of 9216 can be modified through AVIOSYS Network Assistant or modify it in the webpage. Click
the setup option on the left of the webpage; you can enter the IP setting webpage as the figure below shows:
Please fill in the new IP address, subnet mask, default gateway etc.
Notice: when finish setting, you need to click submit button to confirm your settings.
1. IP address
Fill the new IP address you plan to use for 9216 in the IP Address column. T he new IP address of 9216 must be
in the same subnet with the PC, so the PC can control 9216. for example, if the IP address of your PC is
192.168.10.110, subnet mask is 255.255.255.0, the IP address of 9216 should be set to 192.168.10.XXX (XXX
is from 1-255, and the IP address has not been occupied by other PC or equipments in the same subnet) .
2. Default Gateway
if you local network is connect to the internet through router address mapping or gateway and you want to
control the 9216 through internet, you should fill the correct gateway address in the Default Gateway column.
- 12 -
Page 14

IP SENSOR 9216 USER MANUAL
3. DNS Server
In order to make 9216 can sent state report E-mail through the Internet, you need to fill the correct DNS IP
address in DNS column. Please refer to your ISP for DNS IP address.
4. DHCP
If your local network has a DHCP Server, you can choose to use DHCP server to gain IP address
automatically. But the IP address of 9216 will change after every start, it is not good for the use of some
advanced functions.
5. Buzzer setting
There is a buzzer on the circuit board of 9216, the buzzer will alarm when the monitoring item is abnormal. If
you don’t like its alarm, you can disable the buzzer in the BEEPER column or choose enable to turn on the
buzzer.
6. cookie
you can select the web server to use cookie method or cookie + base64 method. We suggest user to use
cookie + base64 method.
DDNS Setting
DDNS Server Settings: when your network connects to the Internet through ADSL, the IP address you gain is
dynamic assigned by your ISP. So the visitor maybe can not visit the 9216 in local network because don’t know
its IP address. We use DDNS method to solve this problem. Let’s explain that using the DDNS service
provided by
www.dyndns.com:
First, we apply a domain name (fo r example, Aviosys) in www. dyndn s.com for 9216, set the domain password
and select propel DNS server (for example, dnsdojo.net) for domain name resolve. Then input the Domain
Name Server (host name), user name, password etc in the DDNS webpage of 9216. after that, every time
9216 start or user select to submit, 9216 will send a message packa ge including its current IP address, domain
name to
www.dyndns.com, then the DNS server you choose will link the domain name of 92 16 to its current IP
address. So , the visitor can visit the 9216 webp age by input the domain name of 9216 (aviosys.dnsdojo.net) in
the address column in browser.
Notice: when finish setting, click SAVE button to confirm it. And click UPDATE NOW button to send
DDNS message package to DDNS Server immediately.
- 13 -
VER. 1.0,
Page 15

IP SENSOR 9216 USER MANUAL
1. DDNS IP
Please fill in the IP address of DDNS Server and port number.
2. Domain
Please fill in your total domain name in Your Domain column.
3. DDNS user
Please fill in the DDNS domain name you applied here.
4. DDNS password
Please fill in the DDNS password here which you set in applying domain process in DDNS Server.
5. Enable DDNS
You can select true to enable DDNS function or select false to disenable it.
6. Proxy server setting
Sometimes the message package can not send to DDNS directly, you can transmit DDNS message package
through proxy server. You can use the proxy server by selecting TRUE in Proxy enable column. You can find
the usable IP address and port of proxy server in some BBS, or you can use some proxy server searching
software to search for usable IP address and port of proxy server.
7. PROXY IP
Please fill in the IP address of proxy server here.
8. PROXY PORT
Please fill in the proxy port here.
E – MAIL settings
9216 can send E-mail to user to report its working state, such as starting or abnormal monitoring object, and
also can report its Internet IP address through E-mail.
Notice: when finish E-mail settings, click SAVE button to confirm the settings, click SEND button will
send a E-mail immediately.
- 14 -
Page 16

IP SENSOR 9216 USER MANUAL
1. set the outgoing mail server (SMTP)
Suppose we use
aviosys@126.com as outgoing mail address, and use aviosys@aviosys.com as incoming
mail address, then the settings will as the figure above shows:
fill in the outgoing mail server in mail server column, the outgoing mail server of
aviosys@126.com is
smtp.126.com.
2. set the incoming mail server (POP3)
Fill in the incoming mail server in POP3 server column, the incoming mail server of aviosys@126.com is
pop3.126.com.
3. set the username of mailbox
Fill in the USER NAME column with the username of
aviosys@126.com :aviosys.
4. set the password of mailbox
Fill in the password column with the password of mailbox
aviosys@126.com
5. set the sender name of the mailbox
Fill in the sender column with the sender name of mailbox
aviosys@126.com, you can fill in aviosys or other
username
6. set the mailbox to receive the incoming E-mail
You can set multiple mailboxes at the same time to receive the incoming E-mails. Please fill in them in
receiver1, receiver2…columns.
Change the password
Click the change password button on the left of the webpage will let user to change the password of 9216. The
default password is admin.
Network wake up function
User can use the network wake up function of 9216 to wake up the PC than in the same subnet with 9216.
Click the network wakeup button on the left of the webpage to enter the Network Wa ke Up Setup webpage. Fill
in the MAC column with the MAC address of the PC you want to wake up and cli ck send button, 9216 will send
a network wake up message package. Click the save button, 9216 will save the MAC address for future use.
- 15 -
VER. 1.0,
Page 17

IP SENSOR 9216 USER MANUAL
NOTICE: user need to enable the ‘network wake’ and ‘PCI wakeup’ option in BIOS settings of the P C you want
to wake up. We also suggest user to select ‘former statues’ in ‘power on (manage) after power failure’ option in
BIOS settings of the PC, otherwise the network wake up fun ction will not work if the power of the PC have been
turned off or the PC have been turned off abnormally.
SNMP settings
9216 can sent SNMP data package s to SNMP server appoint ed by user, reporting th e working state of 92 16 in
these SNMP data packages for the user to manage it directly.
Click the SNMP setup option on the left of the we bpage to enter the S NMP setup webpage. Fil l the IP address
of SNMP server in the TRAP IP column, select enable in Enable trap option and then click submit button to
confirm these SNMP settings.
NOTICE: if 9216 can not detect the SNMP in the corresponding IP address and gain the MAC address of
SNMP server, the SNMP data package will not be send out. Now the user can not use the head off tool to
debug SNMP.
SNMP command format : 9216 support SNMP V1 and V2 , user can use snmp program to get the status of
each port in 9216.
- 16 -
Page 18

IP SENSOR 9216 USER MANUAL
- 17 -
VER. 1.0,
Page 19

Monitoring settings
IP SENSOR 9216 USER MANUAL
Click the setup sensor button on the left of the webpage to enter the monito ring settings webpage. User can set
the values of monitoring voltage, temperature and rotate speed etc. the up limit and lower limit of alarm is
calculated according to the percentage of set value. For e xample, if you monitorin g voltage is 3.3V, the u p limit
is 20%, the lower limit is 10%, then the up limit alarm voltage is 3.3V+3.3*20%=3.96V, the lower limit alarm
voltage is 3.3V-3.3*10%=2.97V.
1. voltage monitoring
9216 can monitor 3 route DC voltages. The highest a llowed monitoring DC voltag e of P1 is 4V, P2 is 5.8V, and
P3 is 15.5V. User can set the monitoring v oltage, up limit and lower l imit in this ra nge. If input volta ge is high er
than the up limit or lower than the lower limit, 9216 will send SNMP alarm data package. If the beep er is enable,
the beeper will alarm. If the monitoring voltage b acks to the norm al range or u ser press the re set button on the
right of 9216, the alarm will stop. If any other monitor items trigger the alarm, the beeper will alarm again.
Notice: if the input voltage exceeds the allowed highest value, it may cause damage to your hardware.
2. Temperature monitoring
9216 can monitor 3 route temperature sensors. T1 is the temperature sensor on the circuit board of 92 16. T2
and T3 are external temperature sensors. User can set the standard temperature of each sensor, if
environment temperature of sensor is high than the preset up limit, 9216 will send SNMP data package. If the
beeper is enable, the beeper will alarm. If the monitoring temperature backs to the normal range or user press
the reset button on the right of 9216, the alarm will stop.
Notice: if the sensors are not connected, the temperature display in the webpage will be
–48 °C.
3. Fan monitoring
9216 can connect to F1, F2 and F3 DC 12V fans, and monitor there rot ate speeds. If the rotate speed of fan is
lower than the alarm lower limit, 9216 will send SNMP alarm data package. If the beeper is enabl e, the beeper
- 18 -
Page 20

IP SENSOR 9216 USER MANUAL
will alarm. If the monitoring rotate speed of fan backs to the normal range or user press the reset button on the
right of 9216, the alarm will stop.
external voltage level monitoring
9216 has 16 IO ports which can be used in monitoring external voltage level. Among them, DI1-DI8 are wet
contacts, can detect the input voltage level is high or low. SW1 and SW2 together control the type setting of
DI9-DI16. When SW is set to ON, the corresponding contact is wet contact, detecting the input voltage level.
When SW is set to OFF, the corresponding contact is dry conta ct, detecting the circuit between corre sponding
IO port is turn on or turn off. SW1 is corresponding to DI9 and SW2 is corresponding to DI16. (The setting of
each contact needs the two switches, SW1 and SW2, to work together)
If DI is wet contact, it can be set to alarm at high voltage level (alarm opti on set to OFF ), ala rm at low v olta ge
level (alarm option set to ON) or not alarm (alarm set to disable) 3 states.
If DI is dry contact, it can be set to alarm at circuit turn on (alarm option set to OFF), alarm at circuit turn off low
(alarm option set to ON) or not alarm (alarm set to disable) 3 states.
Firmware update
User can gain more function for IP Power 9258 through firmware update.
Click the firmware update on the right side of the page, it will pop up the following window
Click update button, it will pop up the following window
- 19 -
VER. 1.0,
Page 21

IP SENSOR 9216 USER MANUAL
Click the Brower button to find the corresponding update file (you can download it from our web site or ask it
from the dealer), then click Update button to start up date firmware. Whe n the update is finish ed, you must wait
one minute before you restart the IP Sensor 9216.
7. Control and setting throuth HTTP Command
User can read the value of 9216 from HTTP command ,the format of http command as follow :
http://username:password@xxx.xxx.xxx.xxx/Set.cmd?cmd=xxxxxx
the Definition of each part in command ;
username:9216 username, factory default value is admin.
password:9216 password , factory default value is admin.
XXX.XXX.XXX.XXX : IP address of 9216
Set.cmd?cmd=xxxxxxxx as command format as 9216.
Command as follow :
Command Description
GetInput16 : read status of DI
GetVolt : read status of voltage
GetTemp : read status of temperature
GetFan : read status of fan
example:
9216 IP address is 192.168.100.99
type following command
http://admin:12345678@192.168.100.99/Set.cmd?cmd=GetInput16
you will get the following result :
Input:I1:1,I2:1,I3:1,I4:1,I5:1,I6:1,I7:1,I8:1,I9:0,I10:0,I11:0,I12:0,I13:0,I14:0,I15:0,I16:0,
1 means high voltage 0 means low voltage
so Input 1~8 is high voltage and Input 9~16 low voltage.
- 20 -
 Loading...