

Page 1
USB Net Power 8800 Manual
Release Date: 11/12/2010
Manual Version:1.0
1
Page 2

Table of Contents
Welcome ........................................................................................................................ 3
Introduction ........................................................................................................... 3
Minimum System Requirements ............................................................................ 3
Product Overview .......................................................................................................... 4
Features.................................................................................................................. 4
Specifications ......................................................................................................... 4
Package Contents ................................................................................................... 5
Product Interface ........................................................................................................... 6
Hardware Interface ................................................................................................ 6
Front View ...................................................................................................... 6
Back View ....................................................................................................... 6
Replacing the Fuse ......................................................................................... 7
Software ......................................................................................................................... 8
Installation Instructions ......................................................................................... 8
Software Interface ................................................................................................ 10
Date & Time ................................................................................................. 10
Scheduler ..................................................................................................... 10
On / Off Controls .......................................................................................... 12
Remote Settings ........................................................................................... 13
Power Timer ................................................................................................. 13
Logs & Messages .......................................................................................... 14
Clear Logs ..................................................................................................... 14
Update Software .......................................................................................... 14
Controlling Power Remotely ................................................................................ 15
Using Mac ..................................................................................................... 15
Using GAE ..................................................................................................... 16
FAQ ............................................................................................................................... 19
FAQ ....................................................................................................................... 19
Customer Feedback ..................................................................................................... 19
2
Page 3

Welcome
Introduction
The USB Net Power is an economical device for network power control. With this device power control
could not be any easier.
Simply plug in the device, run the software and now anyone can turn on turn off their devices via the PC.
Also with a scheduler function included this device can easily become automated to turn on and turn off
anything connected. Based off of Aviosys IP Power design this new 1 port economical solution allows
flexibility of using this device for any situation and location. All you need is a PC and a power jack and
you can control anything.
Minimum System Requirements
CPU Minimum Requirements
Intel(R), Pentium(R), DUAL Core (D),CPU 3.0GHz or equivalent
Operating Systems: WINDOWS Operating Systems (IE5.0+SPI)
512 MB system memory or above
Video Card: 3D hardware accelerator card required – 100% DirectX 9.0c compatible
10/100 Ethernet switch/hub
Sound Card: DirectX 9.0c compatible sound card
Ethernet network port/card
Network cable
Internet (For remote access) or Ethernet Network (Internal Network use) with some type of
Internet connection, (i.e. ADSL, Cable, Dial up or any other forms of Internet service)
3
Page 4

Product Overview
Features
1. Remote & Local power control: Turn ON / OFF devices.
2. Control through any other PC on Internet.
3. Timer Scheduler: Preset the time to control power on / off
4. Exchangeable Fuse Protection.
5. SDK Available
6. User friendly, compact, and simply just plug & play.
Specifications
Model: USB Net Power 8800
Input Voltage Range: 100V ~ 240V
Maximum Current: 6A
Weight: 300 grams
Dimensions: 85mm x 85mm x 50mm
Operation Temp: 0℃~50℃, (32℉ ~120℉)
4
Page 5
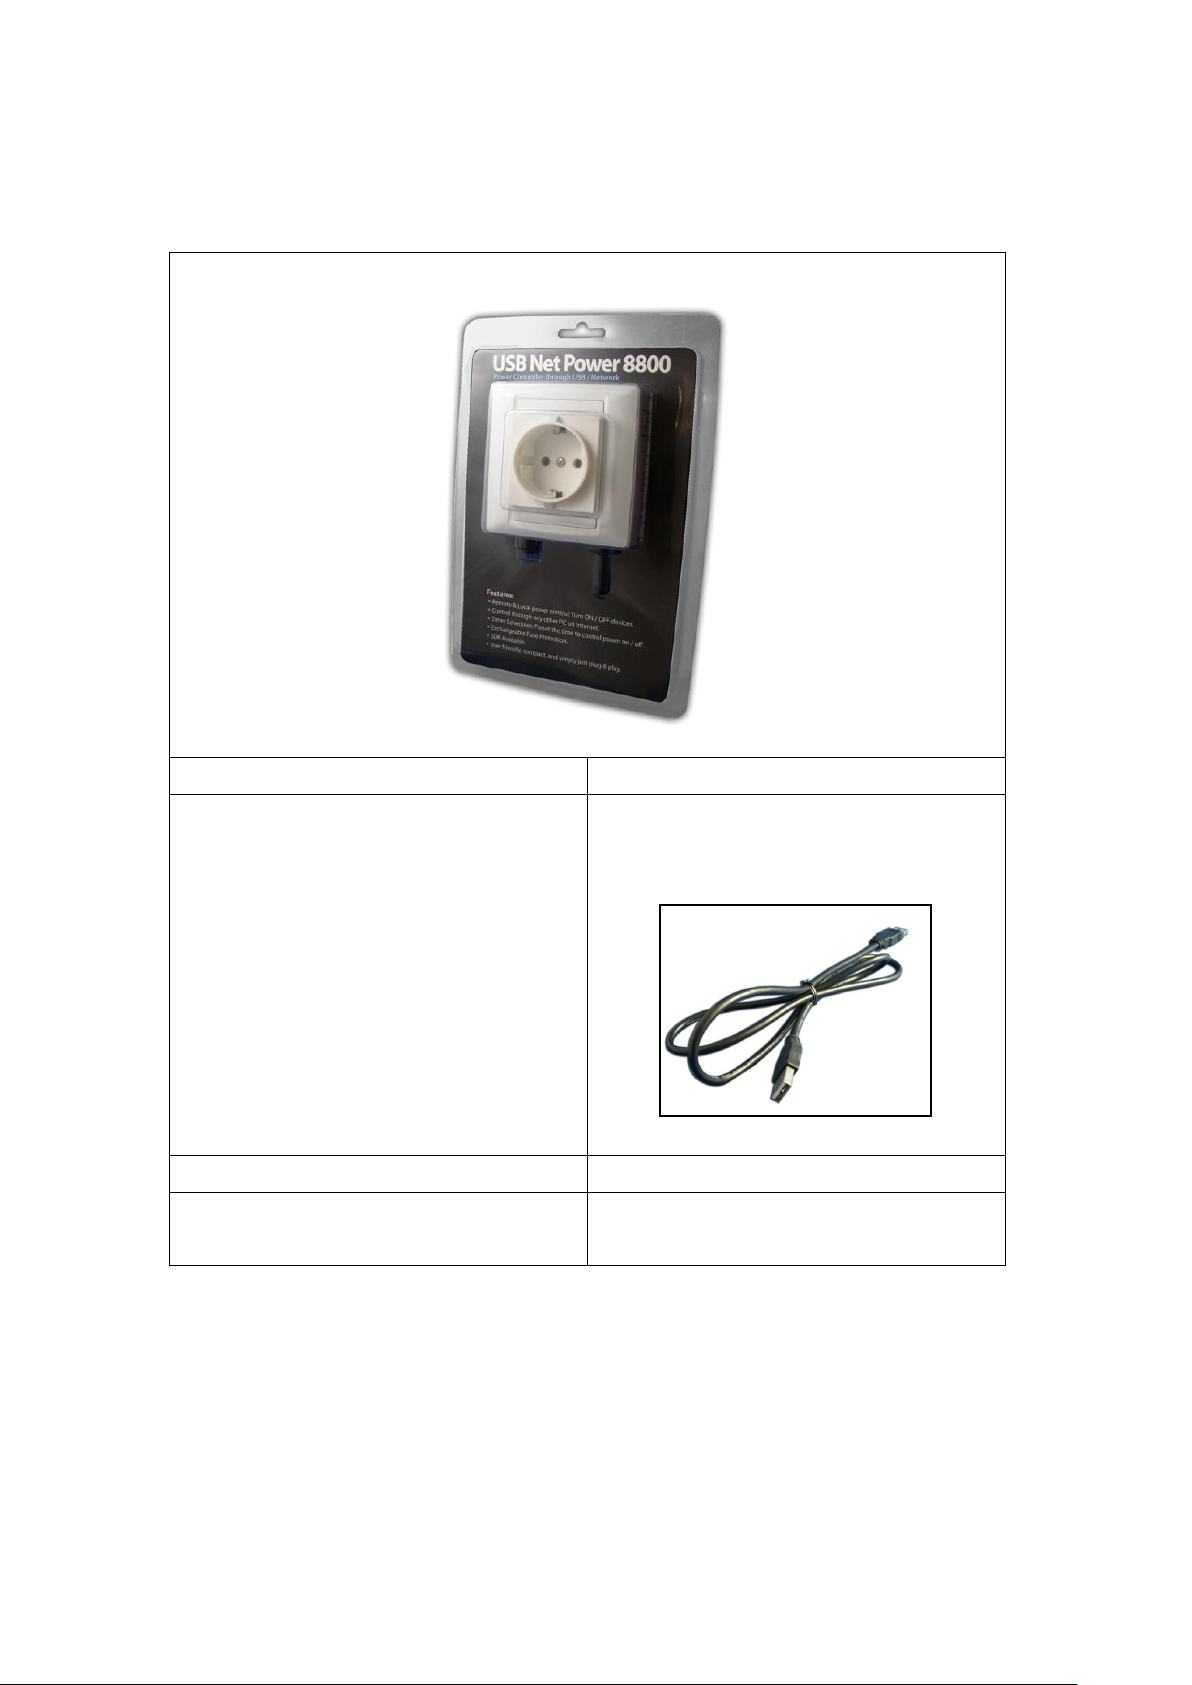
Package Contents
8800 Device x 1
USB Cable
USB cable that is used to connect the 8800 to the
computer that will be controlling the device.
Installation CD
Comes with drivers, manual, and software.
Extra Fuse
Extra fuse is provided.
5
Page 6
Product Interface
Hardware Interface
Front View
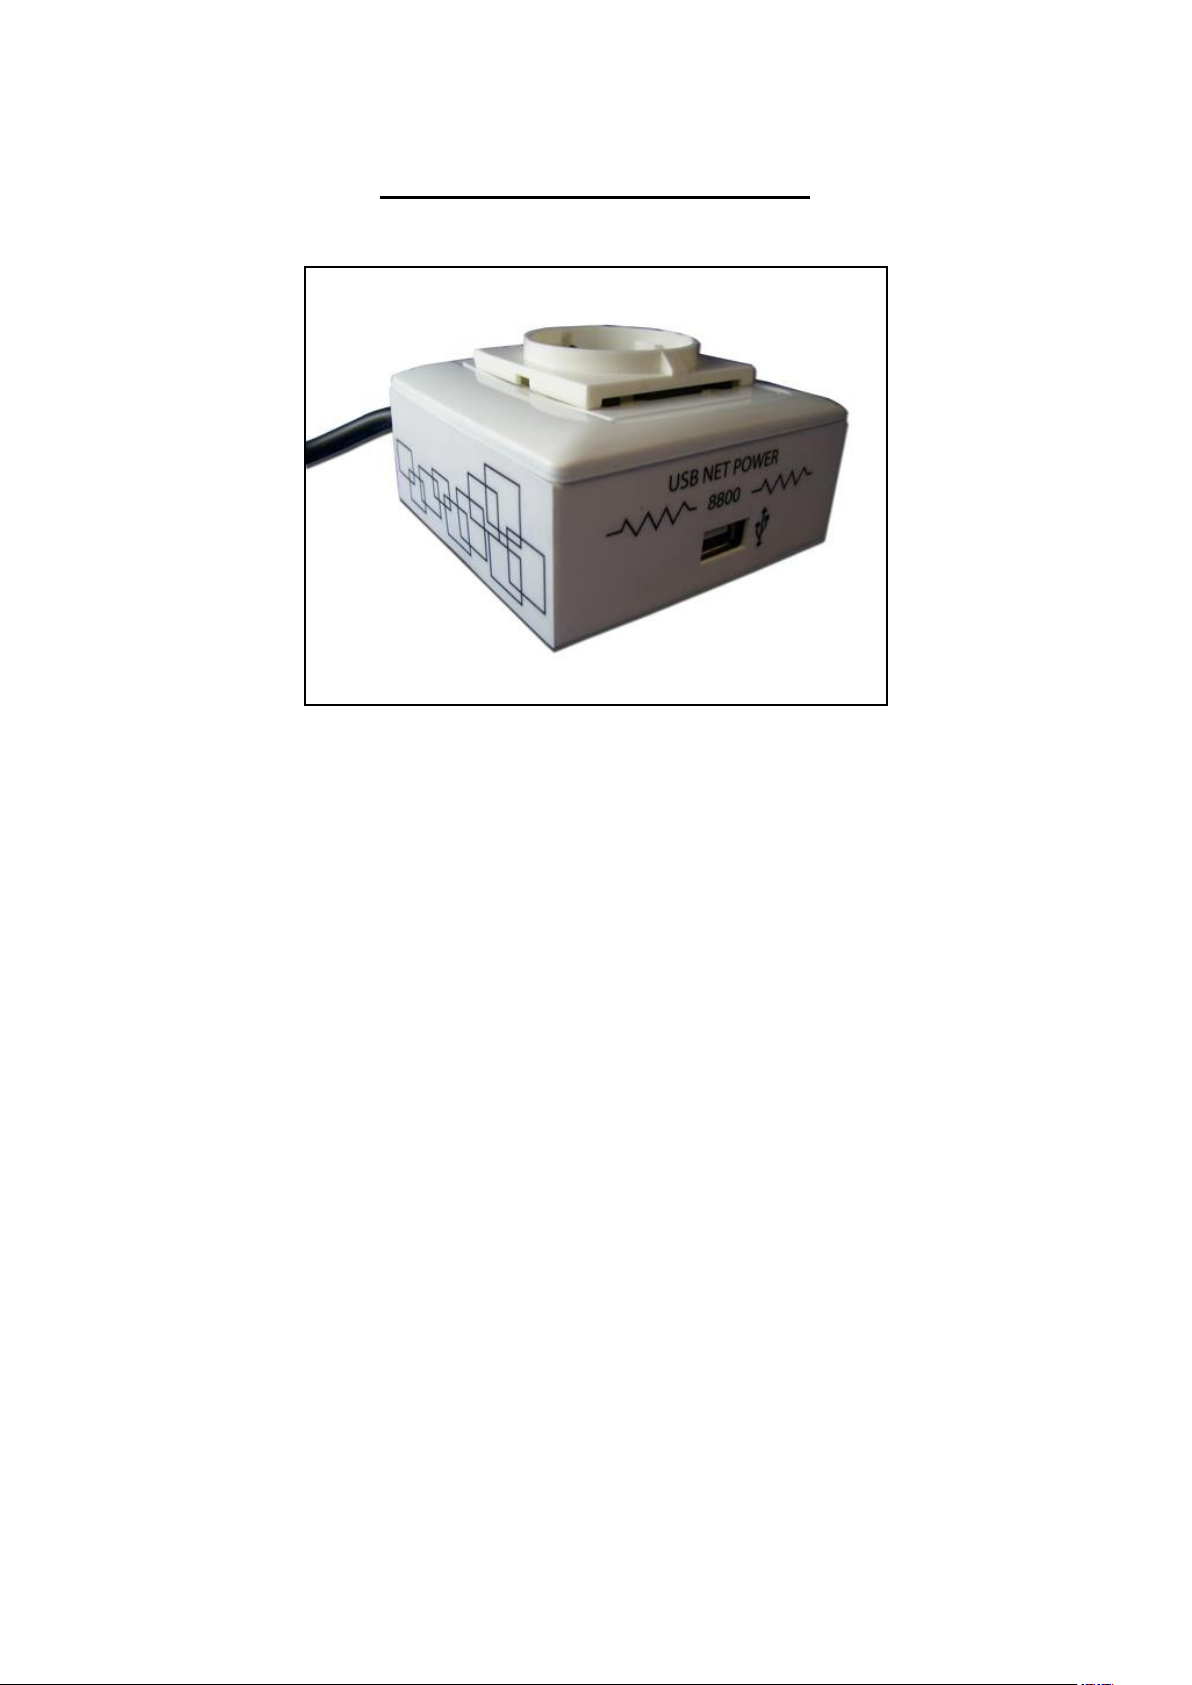
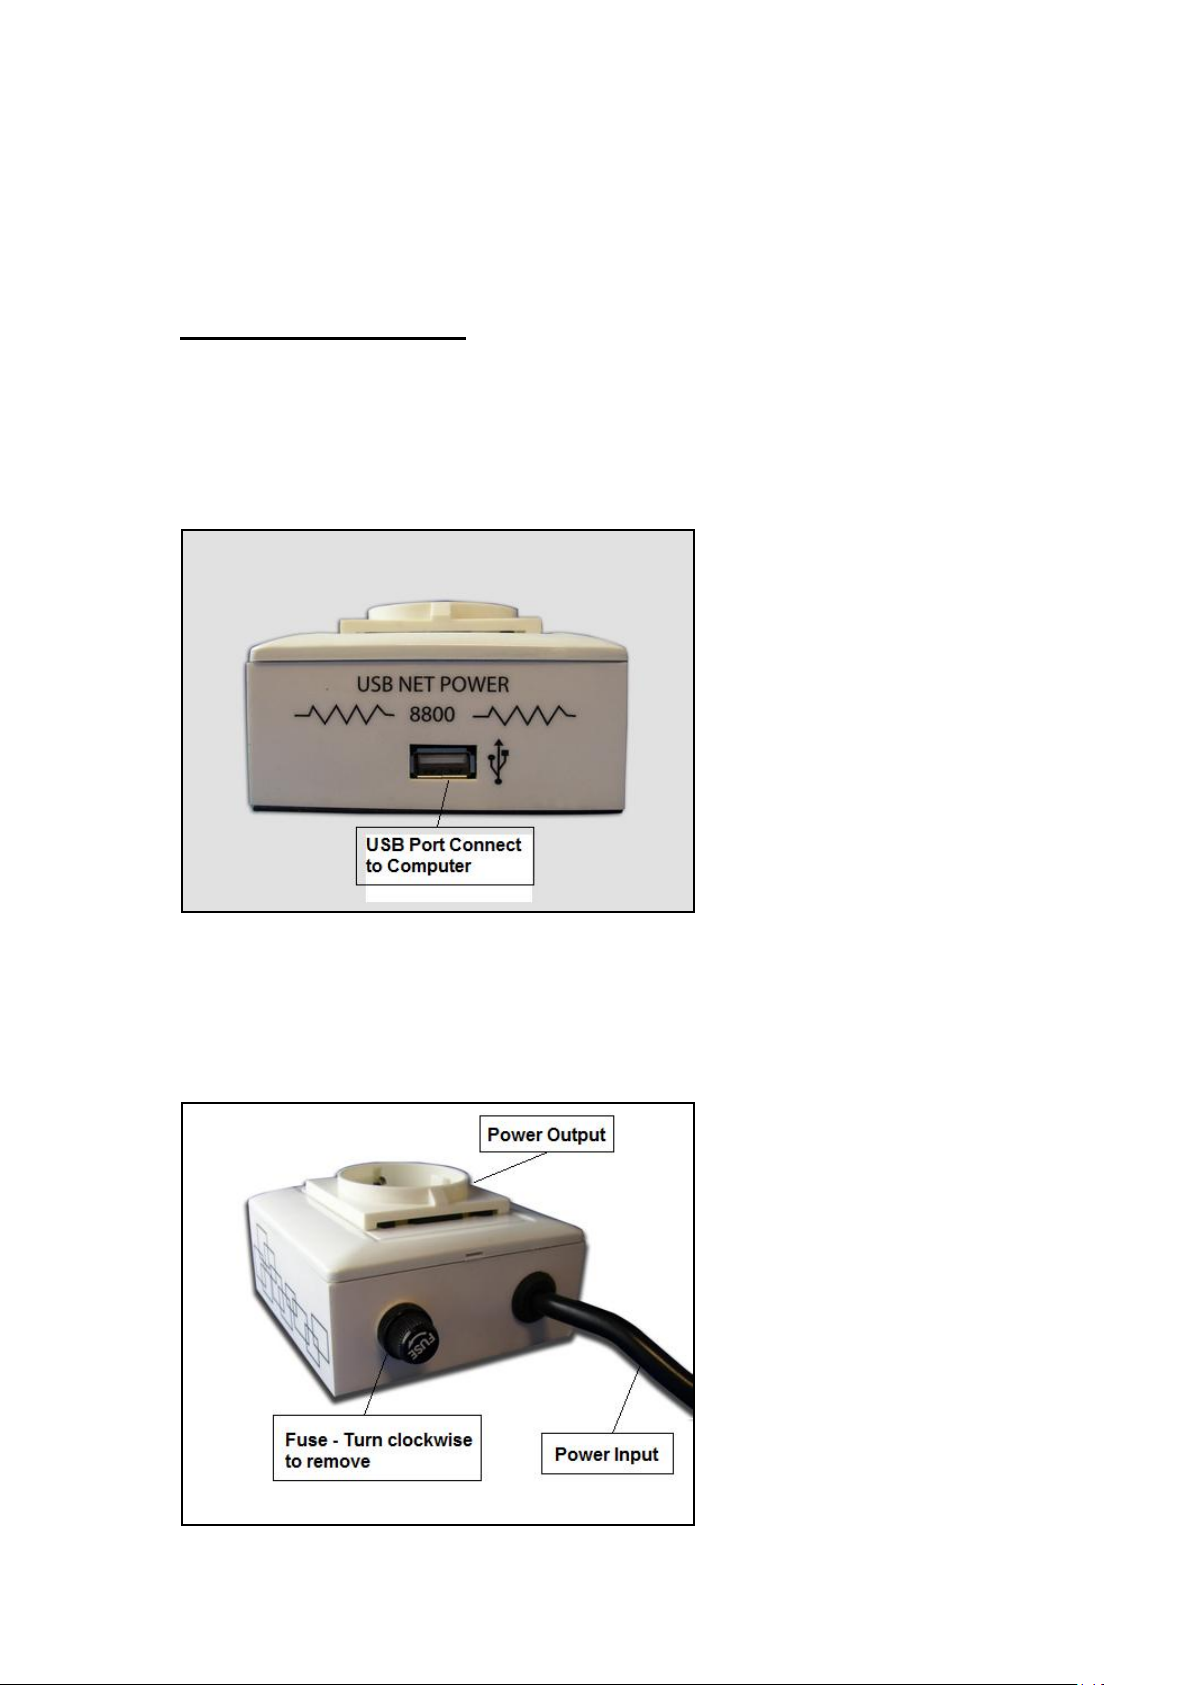
The front view of the 8800 consists of a USB port that allows you to connect the 8800 to the computer.
Back View
On the back of the device there will be a fuse section and the Power Input cord that will be connected to
your power source.
6
Page 7

Replacing the Fuse
The specs for the device are the following:
Model: USB Net Power 8800
Input Voltage Range: 100V ~ 240V
Maximum Current: 6A
Weight: 300 grams
Dimensions: 85mm x 85mm x 50mm
Operation Temp: 0℃~50℃, (32℉ ~120℉)
Fuse Specs:
European Standard: 6.3A
American Standard:6A
If you find that the device is not working correctly you may check the fuse to see if it is still intact.
To replace the fuse on the device please follow the following directions.
1.) Turn the fuse switch in a counter clockwise direction and pull out the fuse once unscrewed.
2.) Then replace the fuse with the new fuse and screw in the fuse in a clock wise direction. Make sure
that the fuse is securely tightened to prevent device from functioning incorrectly.
7
Page 8

Software
Installation Instructions
The software for the device is located on the Media Link-IP Family CD that came with the device.
Please follow the directions carefully and install the necessary files
1.) First place the Media Link-IP Family CD that came with your device into your CD/DVD Rom
drive. The CD should auto run but if it does not go to the CD/DVD Rom drive and select the file
“autorun.html”.
8
Page 9

2.) Select the Usb Net Power 8800 in the USB Series section.
3.) Download the following software and save them to the appropriate locations.
a. USB Net Power – The USB Net Power software is specifically used to control the
device, set a schedule, and setup remote control
b. IP Power Center – This software is used to manage IP Power products. It allows a
easy way to control devices
c. USB Net Power Driver – The driver must be installed for the device to work
correctly when connected to a computer.
4.) Once installation is complete please double click on the USB Net Power Icon to start the
program.
9
Page 10
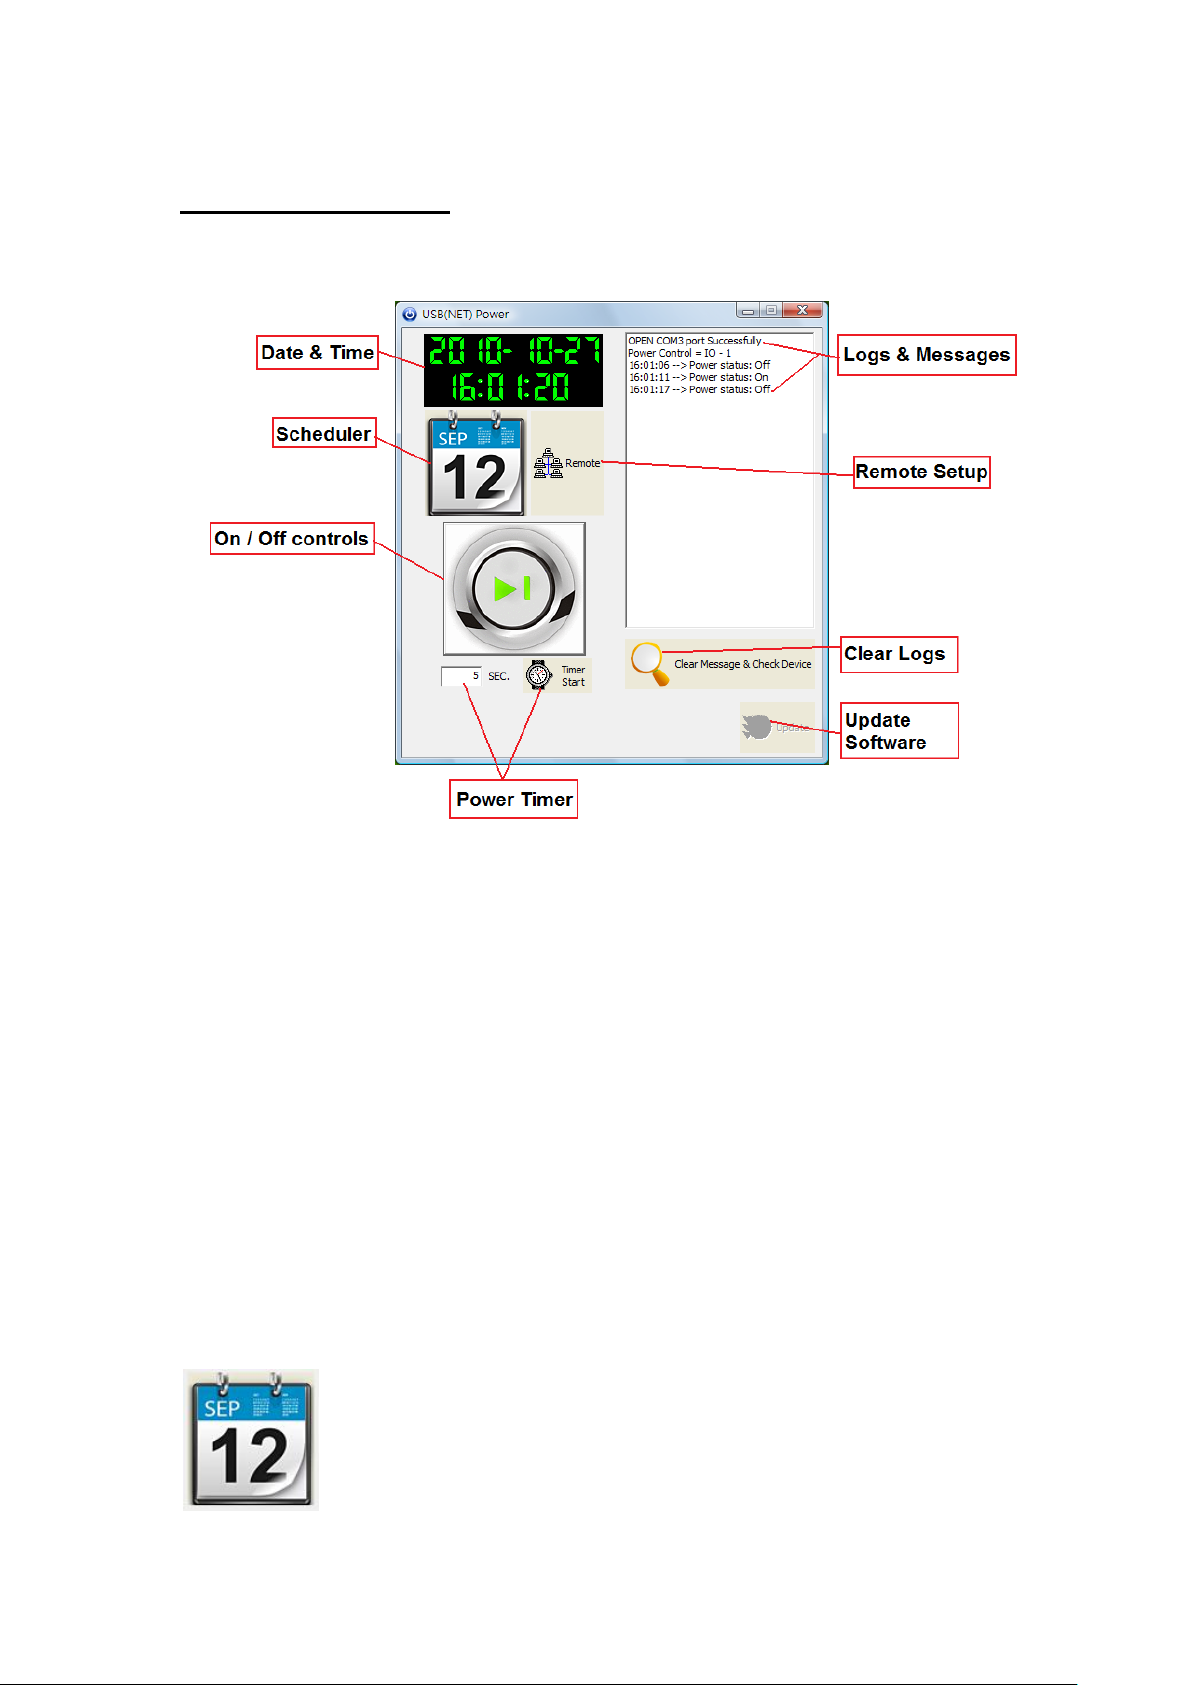
Software Interface
Date & Time
The date and time section will automatically synchronize the time and date with the computer that is
being used. This time will be used to setup the scheduler for the device so that it can correctly turn on
and off devices at the desired times.
Scheduler
The scheduler allows you to schedule events when your device will turn on / turn off. This creates a very
powerful tool, in that all your power needs can become automated. There will be more detailed
information below regarding this section of the software.
10
Page 11

Start Date: Choose the date of when you want the device to turn on or off. Simply type in the date you
would like or click on the dropdown menu to present the calendar. Then simply click on the desired date.
End Date: Choose the date when you want the event to stop happening.
Time: Select the time when the device will activate.
Command: The action that is desired during the specified date and time.
Create Event
To create a new event, follow the following steps:
1.) Select a Start date of when you would like to activate the command.
2.) Then select an end date. If you select a end date a few days later this means the device will turn on
11
Page 12

everyday at the desired time until the end date has been reached.
Off
On
3.) Then select a Time and for the command choose on or off
4.) Once everything has been set make sure to hit the New button to add this new event to your
scheduler
Edit Event
To edit an existing event, follow the following steps:
1.) Click on the event located in your scheduled events section that you would like to edit
2.) Then you change the values the different fields for the Start date, End date, Time, & Command.
3.) Once you have edited the event click on the Edit Event button to save the settings
Delete Event
To delete an existing event, follow the follow steps:
1.) Select the event that you would like to remove from your scheduled events section
2.) Then hit the delete event button to delete the event.
Delete All
To delete all scheduled events, follow the follow steps:
1.) Click on the delete all button to delete all the fields in the scheduler.
2.) The program will ask you to reconfirm before deleting all scheduled events.
On / Off Controls
The on / off controls allows you to directly control the device. From here you can instantly turn on / turn off
your connected device. To the right of this feature you will see a log file which will show you the current
status of the device.
Basically click on the picture to activate or turn off the relay.
Note: There is a 5 second period between each time you can turn on or off the device.
If you click to fast the error message you will receive will look like this.
12
Page 13

To the right side of the program you will see a message log that will keep track of power statuses being
used. It will report the time and status so that you can easily keep track of your power status.
Remote Settings
The remote setting section is where you can setup the device so that it can be controlled from outside the
network. This means as long as the computer with the 8800 is attached and the software is running you
will be able to control the device from a remote location.
Please refer to the section “Remotely Controlling Power” for details on how to setup this section
Power Timer
The Power Timer on the USB Net power software is used to alternate commands in a specified amount
of time. The power timer cannot be set at a time lower than 5 and what it basically does is it alternates the
power between the specified amount of time.
For example: If you set 5 seconds as the time delimiter, then every 5 seconds the device will
automatically switch from 1 state to the other.
Simply press the Timer start to start the timer and in the log you may see the following.
13
Page 14

Logs & Messages
The logs and messages section will basically keep track of the actions of your device. It will state the time
and action that was performed at that time.
Clear Logs
The clear logs button will clear the logs section of the software. Simply just click on the Clear Logs button.
Update Software
When there is an update for the device software, the update button will become activated. Simply click on
the update button and the software will automatically update itself.
14
Page 15

Controlling Power Remotely
Using Mac
With CNT technology connecting to your device without any type of port forwarding has become easy.
When you select this option to control the device using Mac you will be required to use this following
program:
- IP Power Center
With IP Power center you can connect to your device from any networked location. By searching for
the name of your device you can easily find the device in the network and control it from another
computer.
To do this, follow these following steps:
1.) First make sure that remote control portion on the USB Power Software is set correctly.
Make sure to use a User name and Password that is distinct to your device
In this case:
Username is: usbpower
Password is: 12345678
2.) Then open up IP Power Center on a computer that is in the same network and click on search
local network.
15
Page 16

3.) Type the username of your device and click the search button. Then your USB Power will
appear. Double click on the device name and a login window will open
4.) Type in the correct the username and password and click the add button to add to IP Power
Center
5.) Then expand the group device section and you will find your device there. Right click on the
device and select the command of choice.
16
Page 17

Using GAE
GAE adds a new way to remotely control the USB Net Power. With the power google cloud
computing, this GAE functionality allows you to control the USB Net Power from any remote
location with internet.
To use this functionality simply follow the following steps:
1.) Setup the USB Net Power to accept GAE and hit the send button.
2.) Then after you have sent the login information you can upload an image so that your
device is easy to find. Simply click on open img file and browse for a picture then hit the
send button again when finished.
3.) Then type in the following link into any web browser. http://usb-power.appspot.com
17
Page 18

4.) In the link provide type in the user name of your device and click the search button.
5.) Click on your device and a login page will appear to connect to your device.
6.) Then type in the username and login password for your device and press the send
button.
By default:
Login: usbpower
Password: 12345678
7.) Once you are connect to your device you can now turn on or turn off the device via a
remote location.
18
Page 19

FAQ
FAQ
1.) Question: How come the relay is not working on the device?
Answer: There could be numerous reasons why the relay is working incorrectly. Check the plug to
make sure it is plugged in correctly. If not you may need to check the fuse, make sure the device is
unplugged before checking the fuse for your safety.
2.) Question: How can I change the fuse on the device?
Answer: Please visit page 7 on the manual to learn how to change the fuse on the USB Net Power
3.) Question: Where can I download the software for the device?
Answer: The necessary software can either be given to you by your local distributor or downloaded
from our website at: www.Aviosys.com’
Customer Feedback
Your Feedback is definitely important for us to continue providing the great quality products and service
that Aviosys has to offer. We definitely would like to know what you think about our products and how we
can we can make your Aviosys experience even better.
Please email us at our service department at Service@Aviosys.com or visit customer feedback form at:
http://spreadsheets.google.com/viewform?hl=en&formkey=dFFudmRyR2phd1ViNVVvaGV4V0pVNHc6
MA..#gid=0
We are happy to serve you to the best of our ability and to provide an ongoing positive experience with
Aviosys. Thank you for your support.
19
 Loading...