

FR
642278
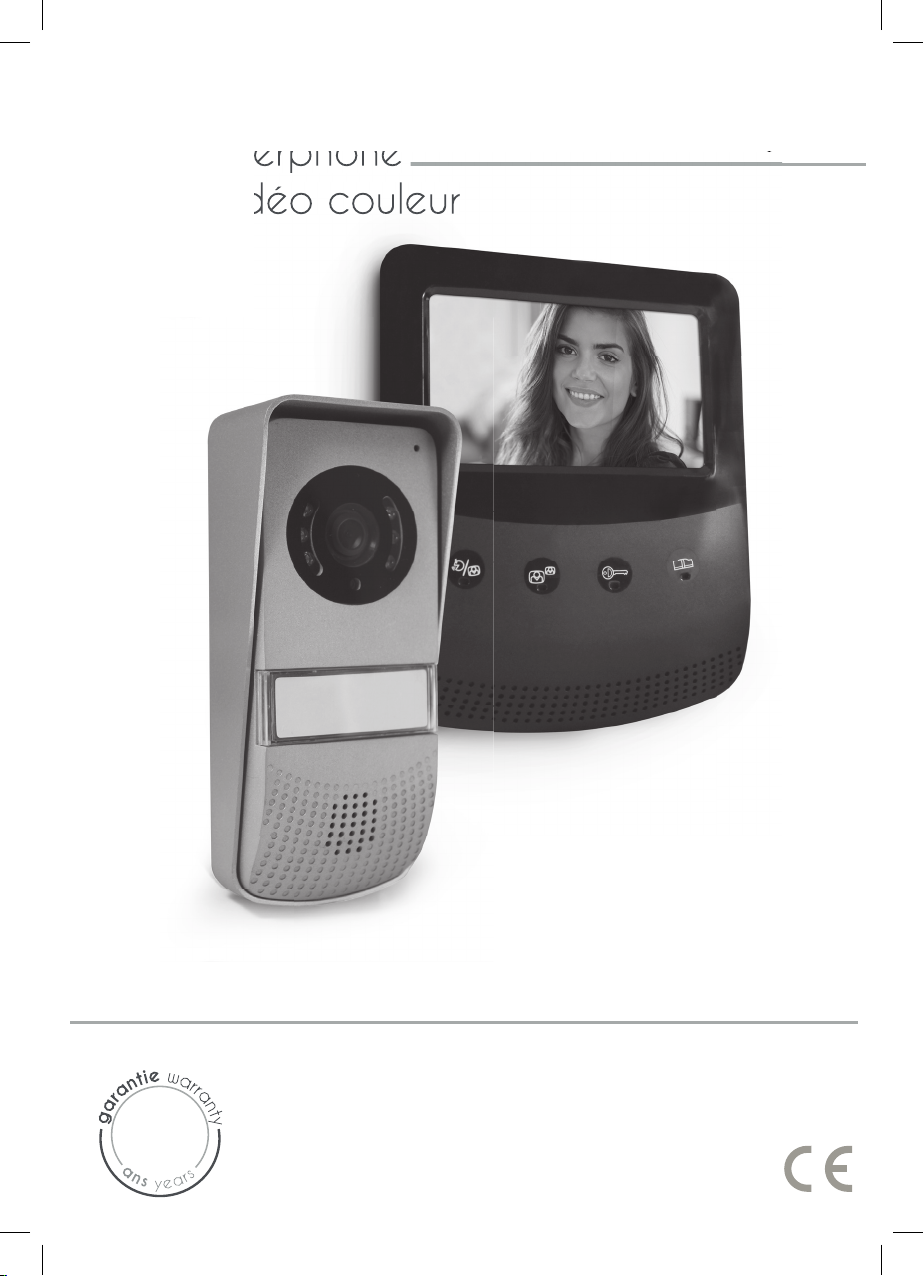
Interphone
vidéo couleur
642278
Guide d’installation et d’utilisation
Type : 461+MU2
V1
2

642278 - V1 642278 - V1
1.60m
1 7
4
3
6
5
2
Fig. 1
21345 78 96
Fig. 2
Fig. 3
1
2 3 4 5
10
1
2
3
4
5
6
7
Fig. 4

1
Fig. 5
2
Fig. 6
3
1.60m
Fig. 7
MODULO B
Non fourni - Non fornito - No suministrado
Não incluídos - Not supplied - Niet bijgeleverd
Nicht mitgeliefert

642278 - V1 642278 - V1
SOMMAIRE
1 CONSIGNES DE SÉCURITÉ. ............................................ p.2
2 DESCRIPTIF. ........................................................................ p.2
3 NOMENCLATURE ............................................................. p.2
a. Moniteur
b. Platine de rue, caméra extérieure
4 INSTALLATION.................................................................. p.3
a. Installation de la platine de rue (caméra)
b. Installation du moniteur
5 CÂBLAGE .................................................................... p.3
a. Raccordement du visiophone
b. Raccordement d’une gâche ou serrure électrique
c. Raccordement d’une motorisation de portail
6 MODE D’EMPLOI ........................................................ p.4
a. Utilisation du visiophone
7 CARACTÉRISTIQUES TECHNIQUES ............................ p.4
a. Moniteur
b. Alimentation
c. Caméra
8 OPTIONS .................................................................... p.5
9 ASSISTANCE TECHNIQUE - GARANTIE ................... p.5
10 MESURES DE SÉCURITÉ ............................................. p.6
F1
1. CONSIGNES DE SÉCURITÉ
Important !
• Veuillez lire le manuel d’utilisation soigneusement avant d’installer ou d’utiliser ce produit.
• Si vous installez ce produit pour d’autres, pensez à laisser le manuel ou une copie à l’utilisateur nal.
Avertissement :
• Les différents éléments ne devront être démontés que par un technicien autorisé.
Mesures de sécurité :
• Pour une exploitation en toute sécurité de ce système, il est essentiel que les installateurs, utilisateurs et techni-
ciens suivent toutes les procédures de sûreté décrites dans ce manuel.
• Des avertissements spéciques et des symboles d’attention sont indiqués sur les éléments si nécessaire.
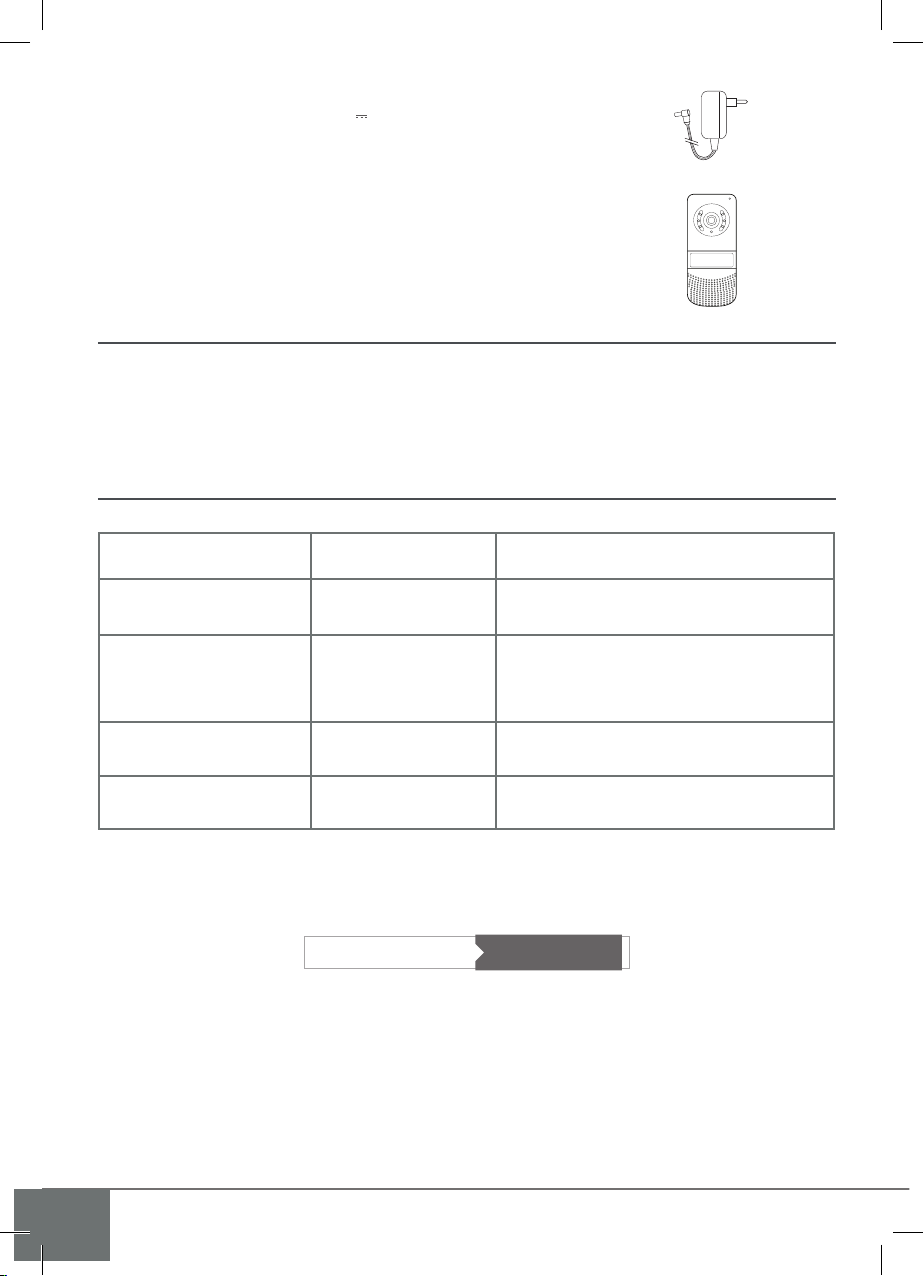
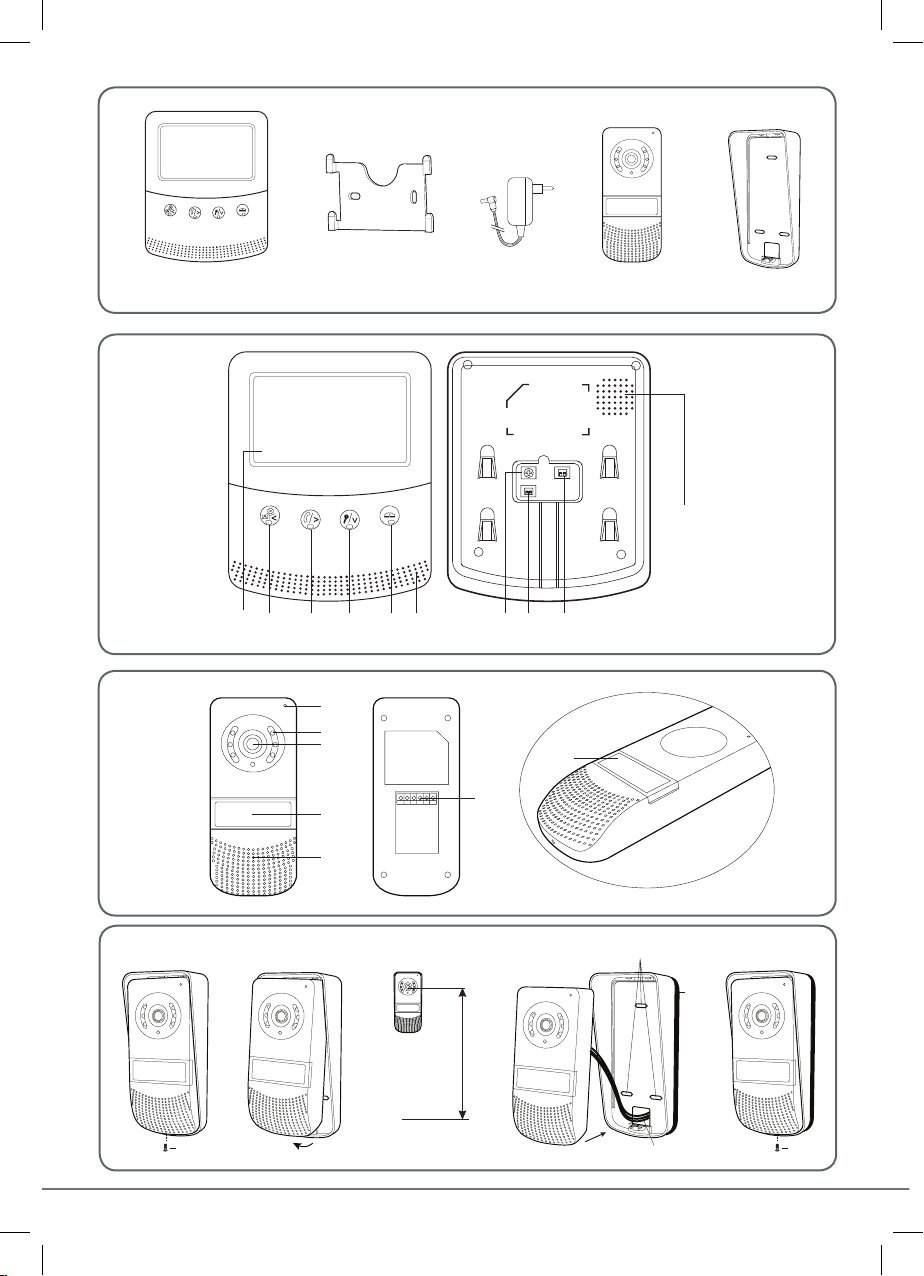
2 . DESCRIPTIF (g 1)
1 • Moniteur 4 • Platine de rue
2 • Support mural 5 • Visière anti-pluie
3 • Adaptateur enchable
Généralité
Ce visiophone est composé d’un poste de réponse intérieur avec écran et d’une platine extérieure avec interphone
et caméra permettant de voir et de communiquer avec le visiteur qui a sonné. Il est facile d’installation puisque
seulement 2 ls sont nécessaires pour toutes les fonctions : sonnerie, image vidéo, interphone et commandes gâche
et automatisme. Pour un usage efcace, veuillez lire attentivement ce manuel d’instructions.
3 . NOMENCLATURE
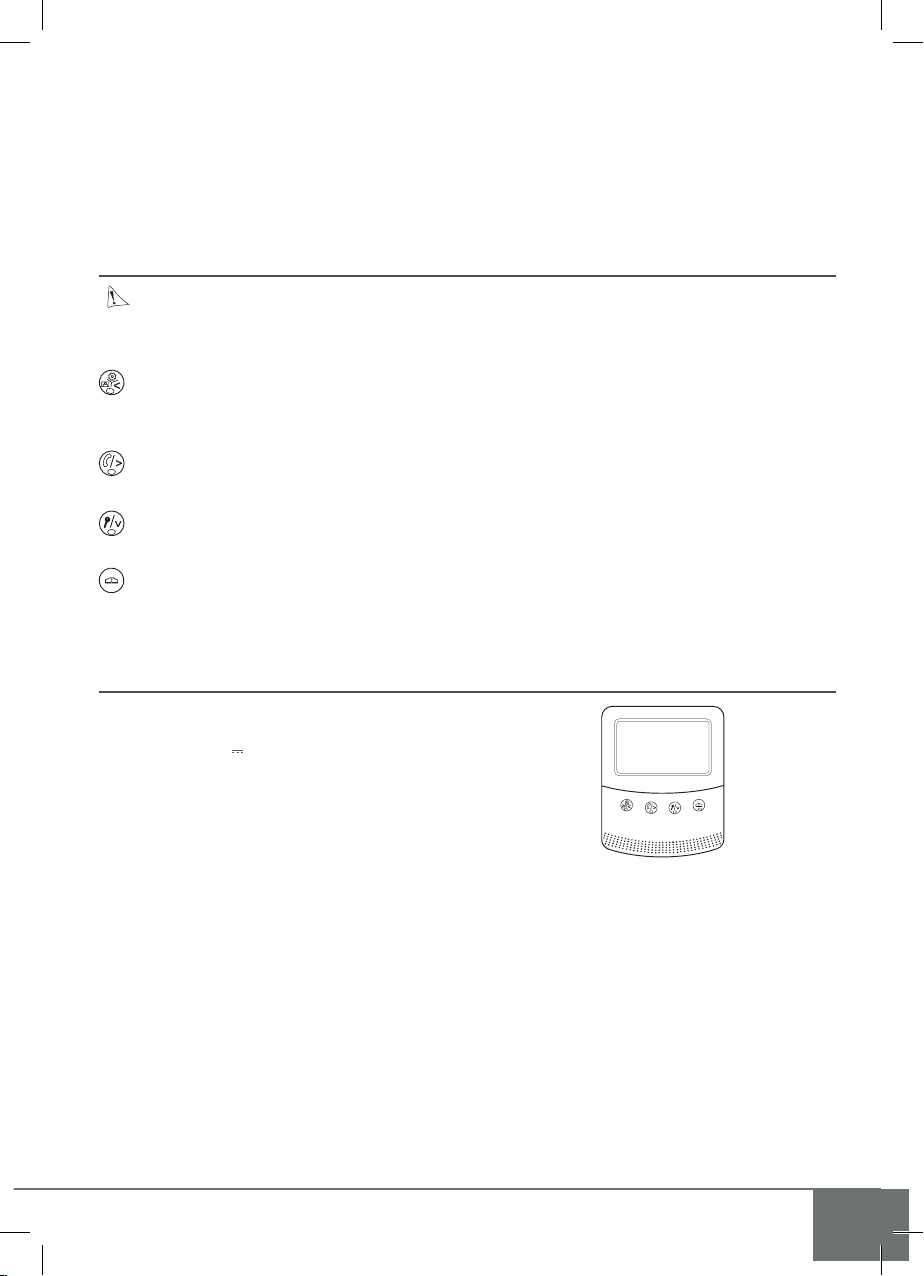
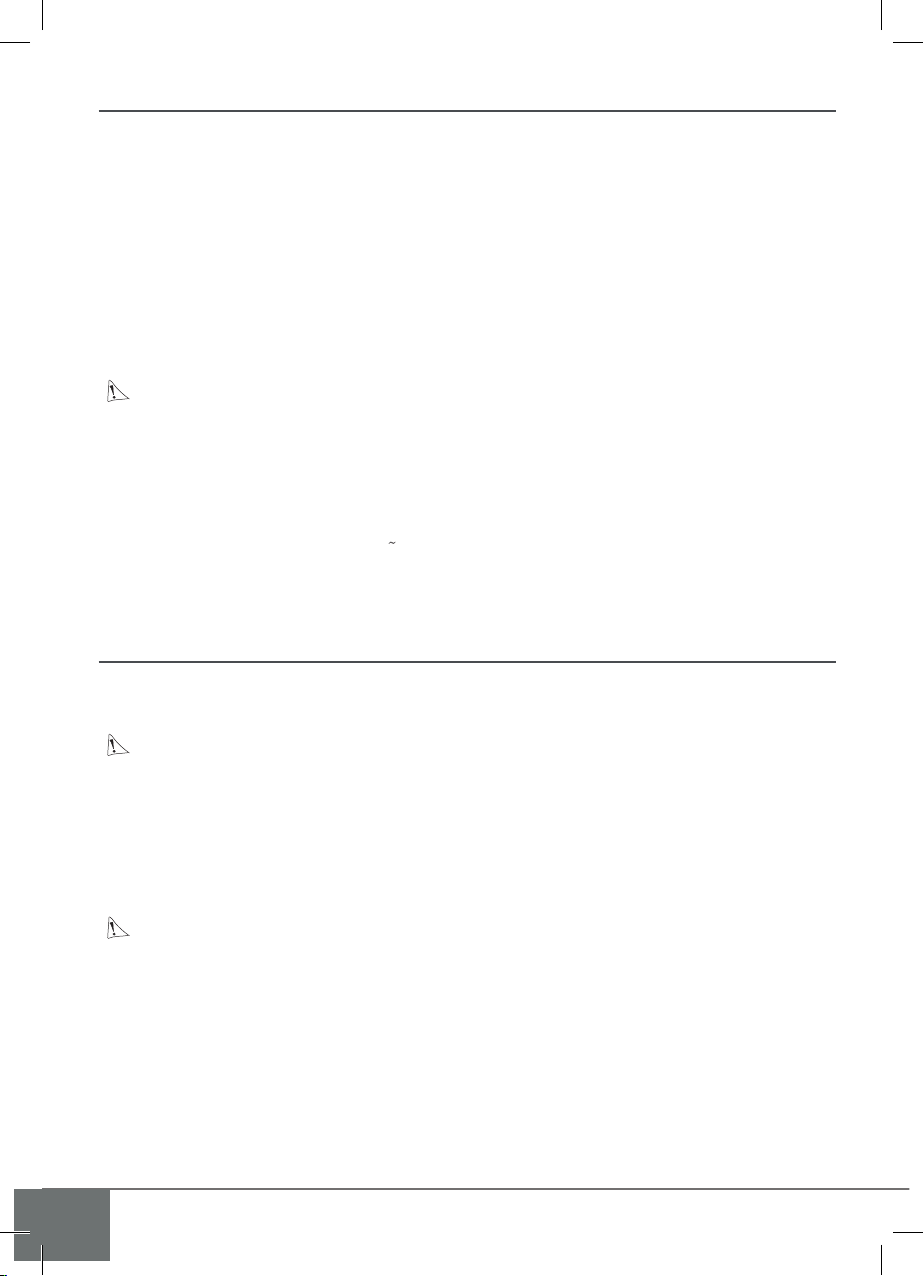
a. Moniteur (g. 2)
1. Ecran couleur 4” (11 cm).
2. Appui < 1s : visualisation de la caméra de la platine de rue.
Appui de 5s : accès au menu.
Appui depuis l’écran de menu : èche de gauche
3. Répondre à un appel et parler au visiteur.
Appui depuis l’écran de menu : èche de droite
4. Ouverture de la gâche électrique.
Appui depuis l’écran de menu : èche du bas
5. Ouverture du portail (contact sec)
6. Micro pour communiquer avec la platine de rue.
7. Réglage du volume de la mélodie.
8. Au dos du moniteur, prise pour la che 17V de l’adaptateur (adaptateur à raccorder sur une installation
conforme aux normes en vigueur : NFC 15-100 pour la France).
9. Bornier pour le raccordement des ls de liaison de la platine de rue.
10. Haut parleur.
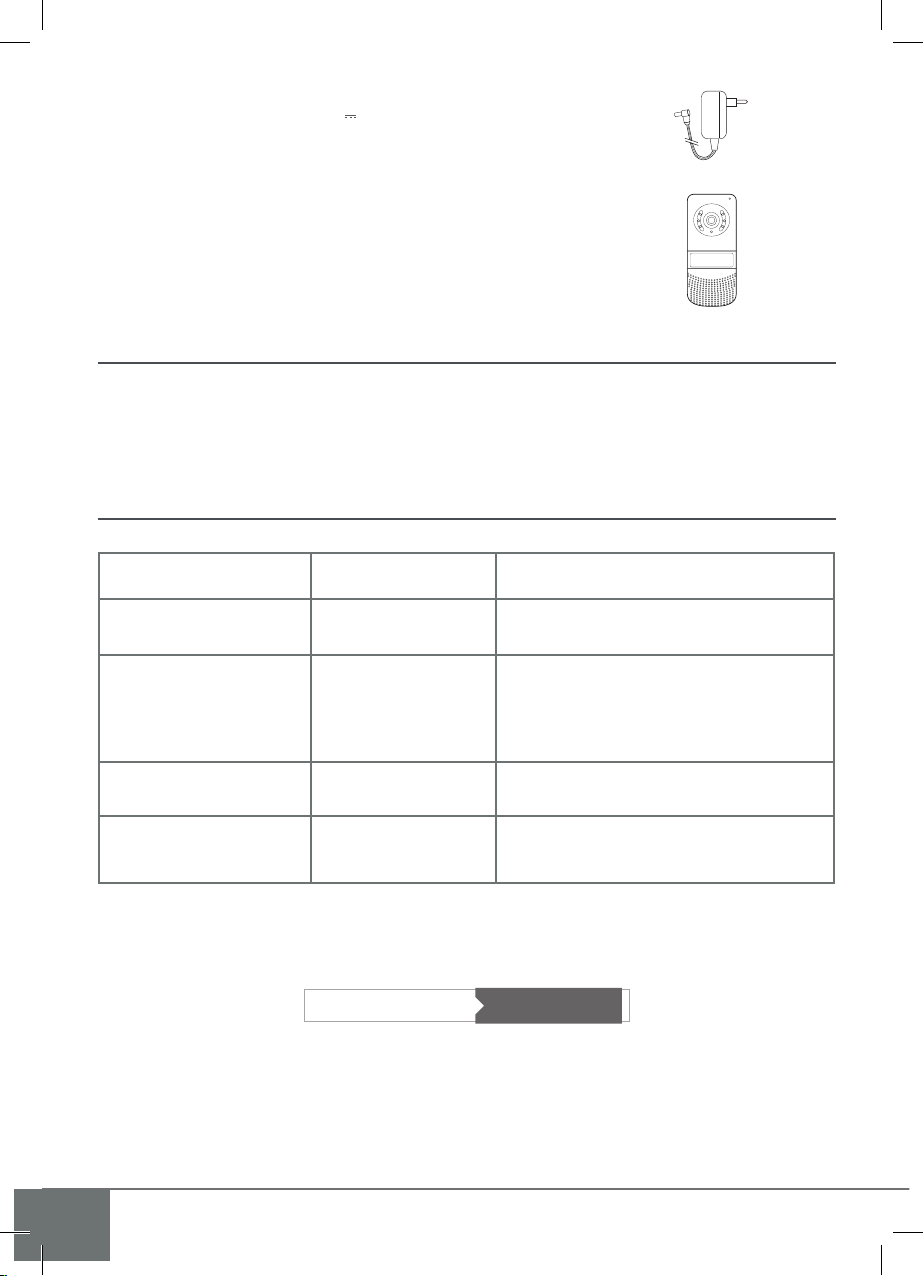
b. Platine de rue, caméra extérieure (g. 3)
1. Micro : permet au visiteur de communiquer vers l’intérieur.
2. LED IR : permet la visibilité en pénombre (lumière non visible à l’oeil nu).
3. Objectif de la caméra C-MOS.
4. Bouton d’appel : lorsqu’on appuie sur ce bouton le porte-nom s’allume et la sonnerie se fait entendre à
l’intérieur. L’écran et la caméra se mettent en fonction.
5. Haut parleur : permet de se faire entendre à l’extérieur.
6. Bornier pour le raccordement des ls de liaison du moniteur
7. Porte-nom. Pour changer l’étiquette porte-nom, soulever délicatement à l’aide d’un petit tournevis la protection plastique (7) et glisser l’étiquette du porte-nom. Le porte-nom s’allume à la pénombre.
F2

642278 - V1 642278 - V1
INSTALLATION
Note : Si vous essayez votre produit avant de l’installer, veillez à ne pas le faire avec la platine de rue et le monit-
eur dans la même pièce, sinon le visiophone émettra un son strident (effet Larsen)
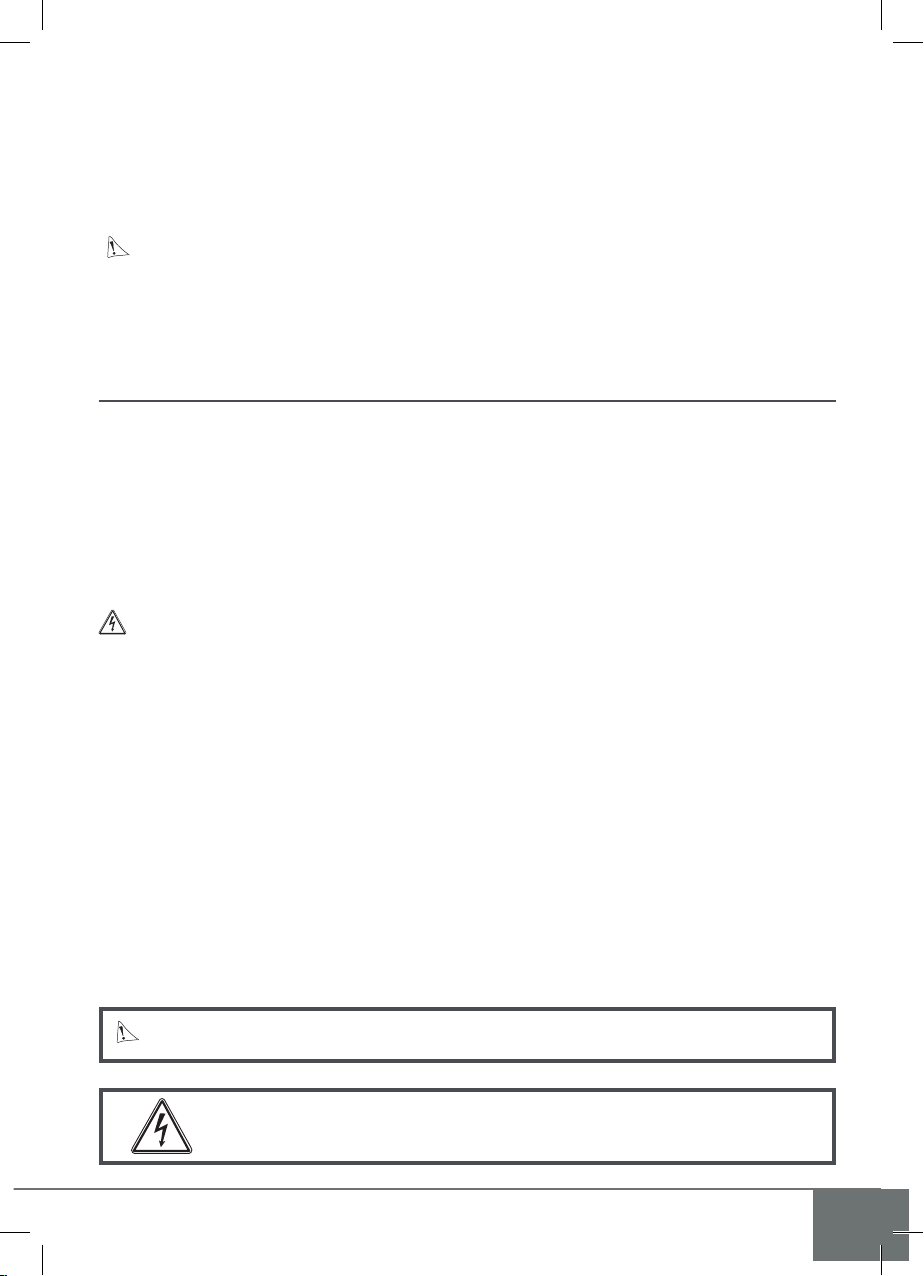
a. Installation de la platine de rue (g. 4)
1. Enlever la vis sous la platine de rue (1)
2. Basculer la platine de rue vers l’avant (2)
3. L’objectif de la platine doit être placé à une hauteur d’environ 1,60 m.
4. Fixer solidement la visière antipluie à l’aide des vis (3) et mettre un joint silicone* (4) entre la visière et le mur
an d’éviter le ruissellement de l’eau. *Ne pas utiliser de silicone à base d’acide acétique (odeur de vinaigre).
5. Raccorder les ls en respectant le plan de câblage (g.6)
6. Emboîter la platine de rue (5) et avec sa visière antipluie (6).
7. Remettre la vis de xation (7).
Important : Ne pas exposer la caméra directement face au soleil, ou face à une surface rééchissante.
Conseil : il est recommandé de faire passer les câbles dans une gaine de protection, an de les protéger des
chocs et des intempéries.
b. Installation du moniteur (g. 5)
1. Fixer le support mural (2) en faisant en sorte que l’écran du moniteur soit à une hauteur d’environ 1,60m.
2. Raccorder les ls venant de la platine de rue.
3. Brancher la che de l’adaptateur (3) au dos du moniteur (sans le brancher sur secteur).
4. Mettre en place le moniteur (1) sur le support mural (2).
5. Brancher la prise du bloc alimentation dans la prise murale 230 V .
Note : En cas de coupure du cordon d’alimentation, veillez à respecter la polarité (liseré blanc (+) (fig. 7)).
CÂBLAGE
Dans le but d’éviter les risques de parasites et de dysfonctionnement, ne pas passer le câble de votre visiophone
dans la même gaine que les câbles d’alimentation électrique.
Attention : il ne faut en aucun cas doubler les fils pour en augmenter la section.
a. Raccordement du visiophone (g. 6)
Fils à utiliser : • 2 fils 0,75 mm2 jusqu’à 25 m
• 2 fils 1.5 mm2 de 25 à 100 m
1. Bien raccorder les fils en respectant le schéma de câblage (fig. 6).
2. 2 fils seulement sont nécessaires pour toutes les fonctions : sonnerie, image vidéo, interphone et les commandes
d’ouverture (gâche et automatisme).
Important :
• Pour le câblage bien se référer à l’étiquette collée au dos du moniteur et au dos de la caméra.
b. Raccordement d’une gâche ou serrure électrique (g. 6)
La raccorder directement sur les bornes 5 et 6 au dos de la platine de rue (aucune polarité à respecter).
A noter que cette fonction n’est valide que si l’écran est allumé.
F3
Important : La gâche ou la serrure électrique que vous allez installer, devra impérativement être équipée d’une
mémoire mécanique. Pour le câblage bien se référer à l’étiquette collée au dos de la caméra.
c. Raccordement d’une motorisation de portail (g. 6)
La raccorder directement sur les bornes 3 et 4 au dos de la caméra. La caméra délivre un contact “sec” sans
courant à raccorder sur la commande “bouton poussoir” de votre automatisme.
A noter que cette fonction n’est valide que si l’écran est allumé.
6. MODE D’EMPLOI
Important : Les touches sensitives doivent être manipulées uniquement avec les doigts.
a. Utilisation et réglage du visiophone
Appui < 1s : visualisation de la caméra de la platine de rue.
Appui de 5s : accès au menu.
Appui depuis l’écran de menu : èche de gauche.
Répondre à un appel et parler au visiteur.
Appui depuis l’écran de menu : èche de droite.
Ouverture de la gâche électrique.
Appui depuis l’écran de menu : èche du bas
Ouverture du portail (contact sec)
A noter que les fonctions d’ouverture ne sont valides que si l’écran est allumé. Une coupure brève
de l’image se produit alors au moment de la commande.
7. CARACTÉRISTIQUES TECHNIQUES
a. Moniteur
• Alimentation : 17 V
• Consommation : 25,5 W
• Ecran 4” (11 cm).
• Résolution : 480 x 275 points
• Dimensions (mm): 153,8x125x24,4
F4
642278 - V1 642278 - V1
b. Alimentation
0 892 350 069
Service 0,35 € / min
+ prix appel
• Adaptateur 100-240 V∼, 50/60Hz, 17 V , 1.5A
En cas de coupure du cordon d’alimentation veiller à respecter la polarité
c. Caméra
• Caméra C-MOS couleur : 420TVL
• Angle de prise de vue : H 90° - V 65°
• Température d’utilisation (environ) : -10°C à +45°C.
• Indice de protection : IP44
• Dimension avec visière (mm) : 165 x 70 x 35
8. OPTIONS
• Toutes les gâches électriques Extel
• Toutes les serrures électriques Extel
• Toutes les motorisations Extel
• Alimentation modulaire MODULO B
9. ASSISTANCE TECHNIQUE - GARANTIE
Panne Cause Solution
• Le moniteur ne s’allume pas • Le moniteur n’est pas
alimenté
• Mauvaise image et/ou son • Environnement
• Câblage trop court
• Image trop lumineuse • Position de la caméra • Ne pas exposer l’objectif de la caméra direct-
• Écran bleu, pas de
sonnerie
• Installation • Les fils de liaison entre le moniteur et la
En cas de besoin, notre site technique à votre disposition :
• Vérifier que la fiche de l’adaptateur soit
correctement enfoncée.
• Vérifier que les câbles utilisés sont de la bonne
section et que les câbles de liaison du visiophone
ne sont pas dans la même gaine que du 230V.
• Utiliser au minimum 4 m de câbles
ment au soleil ou sur une surface réfléchissante.
platine de rue sont inversés (1 et 2)
F5

CONDITION DE GARANTIE : Cet appareil est garanti 2 ans, pièces et main d’œuvre dans nos ateliers.
La garantie ne couvre pas : les consommables (piles, batteries, etc.) et les dégâts occasionnés par : mauvaise uti-
lisation, mauvaise installation, intervention extérieure, détérioration par choc physique ou électrique, chute ou
phénomène atmosphérique.
• Ne pas ouvrir l’appareil afin de ne pas perdre le couvert de la garantie.
• Lors d’un éventuel retour en SAV, protéger l’écran afin d’éviter les rayures.
• Entretien avec un chiffon doux seulement, pas de solvants. La garantie s’annule si vous démontez les pièces. Nettoyer l’extérieur seulement avec un tissu sec et doux. Avant le nettoyage, débranchez ou mettez l’appareil hors
tension.
Attention : N’employez aucun produit ou essence d’épuration carboxylique, alcool ou similaire. En plus
de risquer d’endommager votre appareil, les vapeurs sont également dangereuses pour votre santé et explosives.
N’employez aucun outil pouvant être conducteur de tension (brosse en métal, outil pointu...ou autre) pour le
nettoyage.
Le ticket de caisse ou la facture fait preuve de la date d’achat.
10. MESURES DE SÉCURITÉ
Les dommages provoqués par le manque de conformité au manuel mènent à l’expiration de la garantie. Nous n’assumerons aucune responsabilité pour les dommages en résultant !
Nous n’assumerons aucune responsabilité concernant tout dommage, sur les biens ou les personnes, causé par une
mauvaise manipulation ou par manque de conformité aux consignes de sécurité.
Ce produit a été fabriqué dans le respect total des consignes de sécurité. An de maintenir ce statut et d’assurer
la meilleure exploitation du produit, l’utilisateur doit observer les consignes et avertissements de sûreté contenus
dans ce manuel.
L’utilisateur de ce système en est responsable et se doit de vérier si la vidéosurveillance est conforme à la loi en
vigueur dans le pays d’utilisation.
: Ce symbole indique un risque de choc électrique ou un risque de court-circuit.
- Vous ne devez utiliser ce produit qu’à une tension comprise entre : 100-240 Volts et 50-60 hertz. N’essayez jamais
d’utiliser cet appareil avec une tension différente.
- Veillez à ce que tous les raccordements électriques du système soient conformes aux consignes d’utilisation.
- Dans les établissements commerciaux, assurez-vous d’observer les règles de prévention des accidents pour les
installations électriques.
- Dans les écoles, les équipements de formation, les ateliers… la présence d’un personnel qualié est nécessaire
pour contrôler le fonctionnement des appareils électroniques.
- Observez les consignes d’utilisation des autres appareils reliés au système.
- Veuillez contacter une personne expérimentée au cas où vous auriez des doutes au sujet du mode de
fonctionnement ou de la sûreté des appareils.
- Ne jamais brancher ou débrancher les appareils électriques avec les mains mouillées.
- Lors de l’installation de ce produit, vériez bien que les câbles d’alimentation ne risquent pas d’être endommagés.
- Ne remplacez jamais les câbles électriques endommagés vous-même ! Dans ce cas, enlevez-les et faites appel à
une personne expérimentée.
- La prise de courant doit se trouver à proximité de l’appareil et doit être aisément accessible.
ATTENTION
Avertit l’utilisateur de la présence de « tensions dangereuses », non isolées à l’intérieure du
boîtier du produit, d’une importance sufsante pour représenter un risque d’électrocution
pour les personnes.
Avertit l’utilisateur de la présence d’instructions importantes concernant l’utilisation et l’entretien (la réparation) dans la documentation accompagnant l’appareil.
F6


FR - Ne jetez pas les piles et les
0 892 350 069
+ prix appel
appareils hors d’usage avec les
ordures ménagères. Les subs
tances dangereuses qu’ils sont
susceptibles de contenir peuvent
ment. Faites reprendre ces appareils par votre
distributeur ou utilisez les moyens de collecte
sélective mise à votre disposition par votre
commune.
I - Non gettare le pile e le apparecchiature
fuori uso insieme ai riuti domestici. Le
sostanze dannose contenute in esse possono
nuocere alla salute dell’ambiente. Restituire
questo materiale al distributore o utilizzare la
raccolta differenziata organizzata dal comune.
E - No tire las pilas ni los aparatos inservibles
con los residuos domésticos, ya que las sustan
cias peligrosas que puedan contener pueden
perjudicar la salud y al medio ambiente.
nuire à la santé et à l’environne
FR - Ce symbole indique que l’appareil s’installe et s’utilise uniquement à l’intérieur
I - Questo simbolo indica che l’apparecchio si installa e si utilizza unicamente all’interno
E - Este símbolo indica que el aparato se instala y utiliza únicamente en el interior
P - Este símbolo indica que o aparelho só pode ser instalado e usado em interiores
GB - This symbol indicates that the device must only be installed and used indoors
NL - Dit symbool betekent dat het apparaat alleen binnen mag worden geïnstalleerd en gebruikt
D - Dieses Symbol zeigt an, dass das Gerät nur innen installiert und verwendet wird
Pídale a su distribuidor que los recupere o uti
lice los medios de recogida selectiva puestos a
su disposición por el ayuntamiento.
-
P - Não junte as pilhas nem os aparelhos
que já não se usam com o lixo caseiro. As
substâncias perigosas que ambos podem
conter podem ser prejudiciais para a saúde e
para o ambiente. Entregue esses aparelhos ao
seu lixeiro ou recorra aos meios de recolha
selectiva ao seu dispor.
NL - De lege batterijen en oude apparaten
niet met het huisvuil meegeven: deze kunnen
gevaarlijke stoffen bevatten die de gezondheid
en het milieu schaden.
De oude apparaten door uw distributeur laten
innemen of de gescheiden vuilinzameling van
uw gemeente gebruiken.
GB - Don’t throw batteries or out of order
products with the household waste (garbage).
The dangerous substances that they are
likely to include may harm health or the
environment. Make your retailer take back
these products or use the selective collect of
garbage proposed by your city.
D - Verbrauchte Batterien und nicht mehr
benützte Geräte sind Sondermüll. Sie
enthalten möglicherweise gesundheits- und
umweltschädliche Substanzen.
Geben Sie alte Geräte zur fachgerechten Ent
sorgung beim Gerätehändler ab bzw. benutzen
Sie die örtlichen Recyclinghöfe.
-
France
Service 0,35 € / min
Italia : +39 02 96488273
España : +34 902 109 819
BE-NL-LU-DE-CH-AT : +352 26302353
Printed in P.R.C.

EN
642278
Colour video
intercom
642278
Installation and User Manual
Type: 461+MU2
V1
2
642278 - V1 642278 - V1
1.60m
1 7
4
3
6
5
2
Fig. 1
21345 78 96
Fig. 2
Fig. 3
1
2 3 4 5
10
1
2
3
4
5
6
7
Fig. 4

1
Fig. 5
2
Fig. 6
3
1.60m
Fig. 7
MODULO B
Not supplied - Non fornito - No suministrado
Não incluídos - Non fourni - Niet bijgeleverd Nicht mitgeliefert

642278 - V1 642278 - V1
CONTENTS
a. Monitor
b. Intercom panel, exterior camera
a. Installing the intercom panel (camera)
b. Installing the monitor
b. Connecting an electric strike plate or lock
c. Connecting a gate motor
6
a. Using the videophone
7
a. Monitor
b. Power supply
c. Camera
1
SAFETY INSTRUCTIONS. ................................................ p.2
2
DESCRIPTION. ................................................................... p.2
3
COMPONENT NAMES ..................................................... p.2
4
INSTALLATION.................................................................. p.3
5
WIRING ............................................................................... p.3
a. Connecting the videophone
USER INSTRUCTIONS ..................................................... p.4
TECHNICAL CHARACTERISTICS ................................. p.4
8
OPTIONS ............................................................................ p.5
EN1
9
TECHNICAL SUPPORT - WARRANTY .......................... p.5
10
SAFETY MEASURES .......................................................... p.6

1. SAFETY INSTRUCTIONS
Important!
• Please carefully read the user manual before installing or using this product.
• If you are installing this product for someone else, remember to leave the manual or a copy of it with the end
user.
Warning:
• The various items should only be disassembled by an authorised technician.
Safety measures:
• For operation of this system in complete safety, it is essential that the installers, users, and technicians follow all of
the safety procedures described in this manual.
• Specic warnings and warning symbols are given for items if necessary.
2 . DESCRIPTION (g. 1)
1 • Monitor 4 • Intercom panel
2 • Wall bracket 5 • Weather-proof shield
3 • Adapter plug
General
This videophone is composed of an interior response station with a screen and an exterior panel with an intercom
and camera, allowing the person inside to see and communicate with the visitor outside who rings the doorbell. The
system is easy to install, with only two wires needed for all functions: the doorbell, the video feed, the intercom, and
the strike plate and automated opening controls. For effective usage, please carefully read this instruction manual.
3 . COMPONENT NAMES
a. Monitor (g. 2)
1. 4” (11 cm) colour screen.
2. Press < 1s: view intercom panel camera.
Press for 5s: access menu.
Press left arrow on menu screen
3. Answer a call and talk to visitor.
Press right arrow on menu screen
4. Open electric strike plate.
Press down arrow on menu screen
5. Open gate (dry contact)
6. Microphone to communicate with the intercom panel.
7. Doorbell volume setting.
8. On the back of the monitor, a socket for the 17V adapter plug (adapter to be connected with installed equip-
ment in compliance with standards in force: NFC 15-100 for France).
9. Terminal block for the wires to connect to the intercom panel.
10. Loudspeaker.
b. Intercom panel, exterior camera (g. 3)
1. Microphone: allows the visitor to communicate with the person inside.
2. IR LED: enables visibility in the dark (light not visible to the naked eye).
3. CMOS camera lens.
4. Call button: when a person presses this button, the name holder lights up and the doorbell rings inside. The
screen and the camera turn on.
5. Speaker: allows the person inside to be heard outside.
6. Terminal block for the wires to connect to the monitor.
7. Name holder. To change the label in the holder, carefully lift the plastic protector (7) with a small screwdriver
and slide out the label in the holder. The name holder lights up in the dark.
EN2
642278 - V1 642278 - V1
INSTALLATION
Note: If you test your product before installing it, make sure to not do so with the intercom panel and the
monitor in the same room. If you do so, the videophone will emit a piercing sound (Larsen effect).
a. Installing the intercom panel (g. 4)
1. Remove the screw under the intercom panel (1).
2. Tilt the intercom panel forwards (2).
3. The lens of the panel must be placed at a height around 1.60 m.
4. Firmly attach the weather-proof shield with the screws (3) and put a silicone seal* (4) between the shield and
the wall to prevent water from running between the two. * Do not use an acetic acid-based silicone (smells like
vinegar).
5. Connect the wires according to the wiring diagram (g. 6).
6. Fit the intercom panel (5) into its place with its weather-proof shield (6).
7. Re-install the attachment screw (7).
Important: Do not have the camera directly exposed to the sun or facing a reective surface.
Tip: it is recommended that the wires be passed through a sheath to protect them from shocks and weather.
b. Installing the monitor (g. 5)
1. Attach the wall bracket (2) so that the screen of the monitor will be around 1.60 m high.
2. Connect the wires coming from the intercom panel.
3. Plug in the adapter (3) to the back of the monitor (without plugging it in to the wall socket).
4. Install the monitor (1) on the wall bracket (2).
5. Plug the adapter into the 230V wall socket .
Note: In the event that the power cord gets cut, make sure to follow the polarity when re-connecting (white side
is (+) (fig. 7)).
WIRING
In order to avoid the risks of interference and malfunction, do not pass the wire for your videophone through the
same sheath as the electrical wires.
Note: Do not under any circumstances double wires to increase the wire size.
a. Connecting the videophone (g. 6)
Wires to use: • Two 0.75-mm2 wires up to 25 m long
• Two 1.5-mm2 wires from 25 to 100 m long
1. Properly connect the wires according to the wiring diagram (fig. 6).
2. Only two wires are needed for all functions: the doorbell, the video feed, the intercom, and the opening controls
(strike plate and automated opening).
Important:
• For wiring, refer to the labelling on the back of the monitor and on the back of the camera.
b. Connecting an electric strike plate or lock (g. 6)
Connect it directly to terminals 5 and 6 on the back of the intercom panel (no polarity to adhere to).
Note that this function is only valid if the screen is on.
EN3

Important: The electric strike plate or lock that you install must be equipped with a mechanical memory. For
wiring, refer to the label on the back of the camera.
c. Connecting a gate motor (g. 6)
Directly connect the gate motor wires to terminals 3 and 4 on the back of the camera. The camera provides a
‘dry’-contact connection, without an electric current, to connect to the button for your automated gate.
Note that this function is only valid if the screen is on.
6. USER MANUAL
Important: The touch-sensitive buttons must be used with fingers only.
a. Using and adjusting the videophone
Press < 1s: view intercom panel camera.
Press for 5s: access menu.
Press left arrow on menu screen.
Answer a call and talk to visitor.
Press right arrow on menu screen.
Open electric strike plate.
Press down arrow on menu screen
Open gate (dry contact)
Note that gate opening functions are only valid if the screen is on. When the opening command is
given, the video briey cuts out.
7. TECHNICAL CHARACTERISTICS
a. Monitor
• Power supply: 17 V
• Consumption: 25.5 W
• 4" (11 cm) screen
• Resolution: 480 x 275 points
• Dimensions (mm): 153.8x125x24.4
EN4
642278 - V1 642278 - V1
b. Power supply
0 892 350 069
• Adapter: 100-240 V∼, 50/60 Hz, 17 V , 1.5 A
In the event that the power cord gets cut, make sure to follow the polarity
when re-connecting.
c. Camera
• Colour C-MOS camera: 420 TVL
• Camera angle: H 90° - V 65°
• Usage temperature (approx.): -10°C to +45°C.
• Protection rating: IP44
• Dimensions with shield (mm): 165 x 70 x 35
8. OPTIONS
• All Extel electric strike plates
• All Extel electric locks
• All Extel motors
• Modulo B modular power supply
9. TECHNICAL SUPPORT - WARRANTY
Problem Cause Solution
• The monitor will not turn
on
• Poor image and/or sound • Environment
• Image too bright • Position of the camera • Do not directly expose the camera lens to the
• Blue screen, no
doorbell ring
• The monitor is not
receiving power
• Wires too short
• Installation • The connection wires between the monitor
If needed, consult our technical website:
• Check that the adapter is
properly plugged in.
• Check that the wires used have the right gauge
and that the connection wires for the video-
phone are not in the same sheath as the 230 V
wires.
• Use at least 4 m of wires
sun or a reflective surface.
and the
intercom panel are switched (1 and 2)
Service 0,35 € / min
+ prix appel
EN5
WARRANTY CONDITIONS: This product has a two-year warranty for parts and labour in our workshops.
The warranty does not cover consumables (batteries, etc.) or damage caused by misuse, improper installation,
external intervention, damage due to physical or electrical shocks, dropping or weather-related phenomena.
• Do not open the device as doing so will void the warranty.
• If returning the product for after-sales service, protect the screen to prevent scratches.
• Clean with a soft cloth only, no solvents. The warranty is void if parts have been dismantled. Clean the outside with
a soft dry cloth only. Before cleaning, disconnect the equipment or switch it off at the mains.
Note: Do not use any carboxylic acid, alcohol, or similar chemicals on the product. In addition to damaging
your device, the fumes are also hazardous to your health and are explosive.
Do not use any tool that can conduct voltage (wire brush, sharp tool, etc.) for cleaning.
The receipt or invoice is proof of purchase date.
10. SAFETY MEASURES
Damage caused by failing to adhere to the manual nullies the warranty. We will not accept liability for damage
resulting from non-compliance!
We will not accept liability for any harm to goods or people caused by improper handling or failure to adhere to
safety instructions.
This product was manufactured in total compliance with safety guidelines. In order to maintain this status and
provide for the best possible conditions of usage, the user must adhere to the safety instructions and warnings in
this manual.
The user of this system is responsible for it and must verify that the video surveillance is in compliance with
applicable laws in their country of usage.
: This symbol indicates a risk of electrical shock or short-circuiting.
- Only use this product with electrical current in the following ranges: 100-240 volts and 50-60 hertz. Never try to
use this device with an electrical current outside of these ranges.
- Verify that all of the electrical connections of the system are consistent with the usage instructions.
- In commercial establishments, be sure to adhere to accident prevention rules for electrical installations.
- For schools, training equipment, workshops, etc., the presence of qualied personnel is needed to monitor
operation of the electronic devices.
- Adhere to the usage instructions for other devices connected to the system.
- Contact a person with experience if you are unsure about how to operate the system or about the safety of
devices.
- Never plug in or unplug electrical devices with wet hands.
- When installing this product, verify that the power wires are not at risk of being damaged.
- Never replace damaged electrical wires yourself! If an electrical wire is damaged, remove it and ask for help from
a person with experience.
- The electrical socket must be close to the device and must be easily accessible.
WARNING
Let the user know about ‘dangerous voltage’ without insulation inside the casing of the product.
The voltage is strong enough to pose a risk of electrocution.
Let the user know about important instructions for usage and maintenance (including repair) in the documents accompanying the device.
EN6


GB - Don’t throw away batteries
0 892 350 069
+ prix appel
or out-of-order products with
household waste (rubbish). They
are likely to contain hazardous
substances that are dangerous to
Return the equipment to your local distrib
utor or use the recycling collection service
provided by your local council.
I - Non gettare le pile e le apparecchiature
fuori uso insieme ai riuti domestici. Le
sostanze dannose contenute in esse possono
nuocere alla salute dell’ambiente. Restituire
questo materiale al distributore o utilizzare la
raccolta differenziata organizzata dal comune.
ES - No tire las pilas ni los aparatos
inservibles con los residuos domésticos, ya
que las sustancias peligrosas que puedan
contener pueden perjudicar la salud y al
medio ambiente.
Pídale a su distribuidor que los recupere o
utilice los medios de recogida selectiva pues
tos a su disposición por el ayuntamiento.
both health and the environment.
EN - This symbol indicates that the device must only be installed and used indoors
I - Questo simbolo indica che l’apparecchio si installa e si utilizza unicamente all’interno
ES - Este símbolo indica que el aparato se instala y utiliza únicamente en el interior
P - Este símbolo indica que o aparelho só pode ser instalado e usado em interiores
GB - This symbol indicates that the device must only be installed and used indoors
NL - Dit symbool betekent dat het apparaat alleen binnen mag worden geïnstalleerd en gebruikt
D - Dieses Symbol zeigt an, dass das Gerät nur innen installiert und verwendet wird
P - Não junte as pilhas nem os aparelhos
que já não se usam com o lixo caseiro. As
substâncias perigosas que ambos podem
conter podem ser prejudiciais para a saúde e
para o ambiente. Entregue esses aparelhos ao
seu lixeiro ou recorra aos meios de recolha
selectiva ao seu dispor.
-
NL - De lege batterijen en oude apparaten
niet met het huisvuil meegeven: deze kunnen
gevaarlijke stoffen bevatten die de gezondheid
en het milieu schaden.
De oude apparaten door uw distributeur
laten innemen of de gescheiden vuilinzameling
van uw gemeente gebruiken.
GB - Don’t throw batteries or out of order
products with the household waste (garbage).
Les substances dangereuses qu’ils sont
susceptibles de contenir peuvent nuire à la
santé et à l’environnement. Faites reprendre
ces appareils par votre distributeur ou utilisez
les moyens de collecte sélective mise à votre
disposition par votre commune.
-
D - Verbrauchte Batterien und nicht mehr
benützte Geräte sind Sondermüll. Sie
enthalten möglicherweise gesundheits- und
umweltschädliche Substanzen.
Geben Sie alte Geräte zur fachgerechten
Entsorgung beim Gerätehändler ab bzw.
benutzen Sie die örtlichen Recyclinghöfe.
France
Service 0,35 € / min
Italy: +39 02 96488273
España: +34 902 109 819
BE-NL-LU-DE-CH-AT: +352 26302353
Printed in P.R.C.

NL
Intercom
met kleuren video
642278
2
Installatie en Gebruiksaanwijzing
Type: 461+MU2
V1

642278 - V1 642278 - V1
1.60m
1 7
4
3
6
5
2
Afb. 1
21345 78 96
Afb. 2
Afb. 3
1
2 3 4 5
10
1
2
3
4
5
6
7
Afb. 4

1
Afb. 5
2
Afb. 6
3
1.60m
Afb. 7
MODULO B
Non fourni - Non fornito - No suministrado
Não incluídos - Not supplied - Niet bijgeleverd
Nicht mitgeliefert

642278 - V1 642278 - V1
INHOUDSOPGAVE
a. Scherm
b. Straatunit, buitencamera
a. Installatie van de straatunit (camera)
b. Installatie van het scherm
b. Aansluiting van een slotplaat of een elektrisch slot
c. Aansluiting van een automatische poort
6
a. Gebruik van de videofoon
7
a. Scherm
b. Voeding
c. Camera
1
VEILIGHEIDSVOORSCHRIFTEN. .................................... p.2
2
OMSCHRIJVING. ................................................................ p.2
3
NOMENCLATUUR ............................................................. p.2
4
INSTALLATIE...................................................................... p.3
5
BEDRADING ....................................................................... p.3
a. Aansluiting van de videofoon
HANDLEIDING .................................................................. p.4
TECHNISCHE KENMERKEN ........................................... p.4
8
OPTIES ................................................................................ p.5
NL1
9
TECHNISCHE ASSISTENTIE - GARANTIE ................... p.5
10
VEILIGHEIDSMAATREGELEN ......................................... p.6

1. VEILIGHEIDSVOORSCHRIFTEN
Belangrijk!
• Lees de gebruikershandleiding aandachtig voordat u dit product installeert of gebruikt.
• Als u dit product voor anderen installeert, laat dan de handleiding of de kopie achter bij de eindgebruiker.
Waarschuwing:
• De verschillende elementen mogen alleen door een bevoegde technicus worden gedemonteerd.
Veiligheidsmaatregelen:
• Voor een veilige werking van dit systeem is het essentieel dat installateurs, gebruikers en technici alle veiligheids-
procedures volgen die in deze handleiding worden beschreven.
• Specieke waarschuwingen en attentiesymbolen worden indien nodig op de elementen aangegeven.
2 . OMSCHRIJVING (afb1)
1 • Scherm 4 • Straatunit
2 • Muursteun 5 • Regenscherm
3 • Plug-in-adapter
Algemeen
Deze videofoon is samengesteld uit een reactiepost binnen met scherm en een intercom en camera om te zien en
te communiceren met de bezoeker die belt. Het is eenvoudig te installeren, omdat er voor alle functies slechts 2
draden nodig zijn: beltonen, videobeelden, intercom en bediening van de slotplaat en het automatisme. Lees deze
handleiding aandachtig door voor effectief gebruik.
3 . NOMENCLATUUR
a. Scherm (afb. 2)
1. Kleurenscherm 4” (11 cm).
2. Druk < 1s: visualisering van de camera van de straatunit.
Druk van 5s: toegang tot menu.
Druk op het menuscherm: linkerpijl
3. Een oproep beantwoorden en met een bezoeker praten.
Druk op het menuscherm: rechterpijl
4. Opening van de elektrische slotplaat.
Druk op het menuscherm: onderste pijl
5. Opening van de poort (droog contact)
6. Microfoon om te communiceren met de straatunit.
7. Regeling van het volume van de melodie.
8. Op de achterkant van de monitor, aansluiting voor de 17V-stekker van de adapter (adapter die moet worden
aangesloten op een installatie die voldoet aan de geldende normen: NFC 15-100 voor Frankrijk).
9. Aansluitklem voor het verbinden van de aansluitdraden van de straatunit.
10. Luidspreker.
b. Straatunit, buitencamera (afb. 3)
1. Microfoon: laat de bezoeker met binnen communiceren.
2. IR-LED: zorgt voor zichtbaarheid bij weinig licht (licht onzichtbaar voor het blote oog).
3. Cameralens C-MOS.
4. Bellknop: wanneer op deze knop wordt gedrukt, gaat het naamplaatje branden en hoort u de zoemer binnen.
Het scherm en de camera zijn ingeschakeld.
5. Luidspreker: hiermee kunt u buiten worden gehoord.
6. Aansluitklem voor het verbinden van de aansluitdraden van het scherm
7. Naamplaatje. Als u het naamplaatje wilt wijzigen, tilt u de plastic beschermer (7) voorzichtig op met een kleine
schroevendraaier en schuift u het etiket onder het naamplaatje. Het naamplaatje gaat branden bij weinig licht.
NL2

642278 - V1 642278 - V1
INSTALLATIE
Opmerking: Als u uw product probeert voordat u het installeert, raden wij u aan dat u dit niet doet met de
straatunit en het scherm in dezelfde kamer, anders geeft de videofoon een schril geluid (Larsen-effect)
a. Installatie van de straatunit (afb. 4)
1. Verwijder de schroef onder de straatunit (1)
2. Kantel de straatunit naar voren (2)
3. De cameralens van het plaatje moet op een hoogte van ongeveer 1,60 m worden geplaatst.
4. Bevestig het regenscherm met de schroeven (3) en plaats een siliconenafdichting * (4) tussen het regenscherm
en de muur om afstromend water te voorkomen. * Gebruik geen siliconen op basis van azijnzuur (azijngeur).
5. Sluit de draden aan volgens het bedradingsschema (g.6)
6. Monteer de straatunit (5) en het regenscherm (6).
7. Breng de bevestigingsschroeven terug op hun plaats (7).
Belangrijk: Stel de camera niet rechtstreeks op de zon of op een weerspiegelend oppervlak.
Tip: het wordt aanbevolen om de kabels in een beschermende koker te laten lopen om ze te beschermen tegen
schokken en weersinvloeden.
b. Installatie van het scherm (afb. 5)
1. Bevestig de muursteun (2) met het scherm op een hoogte van ongeveer 1,60 m.
2. Sluit de draden aan die uit de straatunit komen.
3. Sluit de stekker van de adapter (3) aan op de achterkant van de monitor (zonder deze op het lichtnet aan te
sluiten).
4. Monteer het scherm (1) op de muursteun (2).
5. Steek de stekker van de voeding in het stopcontact 230V .
Opmerking: Houd in het geval van een breuk in het netsnoer rekening met de polariteit (witte rand (+) (afb. 7)).
BEDRADING
Om het risico op interferentie en storing te voorkomen, mag u de kabel van uw videofoon niet in dezelfde kabelkoker leggen als de stroomkabels.
Let op: de draden mogen in geen geval worden verdubbeld om de doorsnede te vergroten.
a. Aansluiting van de videofoon (afb. 6)
Te gebruiken draden: • 2 draden 0,75 mm2 tot 25 m
• 2 draden 1.5 mm2 van 25 tot 100 m
1. Sluit de draden op de juiste manier aan volgens het bedradingsschema (afb. 6).
2. Slechts 2 draden zijn nodig voor alle functies: beltonen, videobeeld, intercom en bediening voor het openen
(slotplaat en automatisme).
Belangrijk:
• Raadpleeg voor bedrading het etiket op de achterkant van het scherm en de achterkant van de camera.
b. Aansluiting van een slotplaat of een elektrisch slot (afb. 6)
Sluit deze rechtstreeks op de klemmen 5 en 6 aan de achterkant van de straatunit aan (er hoeft geen polariteit in
acht te worden genomen).
Merk op dat deze functie alleen geldig is als het scherm aan staat.
NL3

Belangrijk: De slotplaat of het elektrische slot dat u gaat installeren, moet uitgerust zijn met een mechanisch
geheugen. Raadpleeg voor bedrading het etiket op de achterkant van de camera.
c. Aansluiting van een automatische poort (afb. 6)
Sluit deze rechtstreeks op de klemmen 3 en 4 aan de achterkant van de camera aan. De camera levert een "droog"
contact zonder stroom om te worden aangesloten op de "drukknop" -besturing van uw automatisme.
Merk op dat deze functie alleen geldig is als het scherm aan staat.
6. HAND- LEIDING
Belangrijk: De aanraaktoetsen mogen alleen met de vingers worden gehanteerd.
a. Gebruik en instelling van de videofoon
Druk < 1s: visualisering van de camera van de straatunit.
Druk van 5s: toegang tot menu.
Druk op het menuscherm: linkerpijl.
Een oproep beantwoorden en met een bezoeker praten.
Druk op het menuscherm: rechterpijl.
Opening van de elektrische slotplaat.
Druk op het menuscherm: onderste pijl
Opening van de poort (droog contact)
Merk op dat de functie voor het openen van de deuren alleen geldig is als het scherm aan staat.
Een korte onderbreking van de afbeelding vindt dan plaats op het moment van de bediening.
7. TECHNISCHE KENMERKEN
a. Scherm
• Voeding: 17 V
• Verbruik: 25,5 W
• Scherm 4” (11 cm).
• Resolutie: 480 x 275 px
• Afmetingen (mm): 153,8x125x24,4
NL4

642278 - V1 642278 - V1
b. Voeding
0 892 350 069
Service 0,35 € / min
+ prix appel
• Adapter 100-240 V∼, 50/60Hz, 17 V , 1.5A
Houd in het geval van een breuk in het netsnoer rekening met de polariteit
c. Camera
• Kleurencamera C-MOS: 420TVL
• Kijkhoek: H 90° - V 65°
• Gebruikstemperatuur (ongeveer): -10°C tot +45°C.
• Beschermingsgraad: IP44
• Afmeting met regenscherm (mm): 165 x 70 x 35
8. OPTIES
• Alle elektrische slotplaten van Extel
• Alle elektrische sloten van Extel
• Alle motoren van Extel
• Modulaire voeding MODULO B
9. TECHNISCHE ONDERSTEUNING - GARANTIE
Storing Oorzaak Oplossing
• Het scherm gaat niet aan • Het scherm staat niet
onder stroom
• Slechte foto en / of geluid • Omgeving
• Bedrading te kort
• Beeld te helder • Plaats van de camera • Stel de cameralens niet rechtstreeks op de zon
• Blauw scherm, geen
bel
• Installatie • De verbindingsdraden tussen het scherm en de
Raadpleeg zo nodig onze technische website:
• Controleer of de stekker van de adapter
er op de juiste manier ingestoken is.
• Controleer of de gebruikte kabels de juiste
doorsnede hebben en of de verbindingskabels
van de videofoon niet in dezelfde koker zitten als
de 230V.
• Gebruik minimaal 4 m aan kabel
of op een weerspiegelend oppervlak.
straatunit zijn omgewisseld (1 en 2)
NL5

GARANTIEVOORWAARDEN: • Dit product heeft een garantie van 2 jaar, op onderdelen en werkuren in
onze werkplaatsen.
De garantie dekt niet: verbruiksproducten (batterijen, accu's, etc.) en schade veroorzaakt door: onjuist gebruik,
onjuiste installatie, externe interventie, beschadiging door fysieke of elektrische schokken, vallen of atmosferische
verschijnselen.
• Open het apparaat niet, bij opening vervalt de garantie.
• Bescherm het scherm bij een retour naar de reparatieservice om krassen te voorkomen.
• Alleen reinigen met een zachte doek, geen oplosmiddelen gebruiken. Wanneer de onderdelen gedemonteerd
worden, komt de garantie te vervallen. Reinig de buitenzijde uitsluitend met een droge en zachte doek. Schakel het
apparaat uit of trek de stekker uit het stopcontact voordat u het apparaat reinigt.
Let op: Gebruik geen carbonzure schoonmaakproducten of -benzine, alcohol of soortgelijke middelen. Naast
het beschadigen van uw apparaat kunnen de dampen bovendien gevaarlijk zijn voor uw gezondheid en explosiegevaar met zich meebrengen.
Gebruik voor de reiniging geen gereedschap dat stroom kan geleiden (staalborstel, puntig gereedschap en dergelijke).
De kassabon of de factuur is het bewijs van de datum van aankoop.
10. VEILIGHEIDSMAATREGELEN
Schade die wordt veroorzaakt doordat de handleiding niet in acht is genomen, leidt tot het vervallen van de garantie. Wij aanvaarden geen enkele aansprakelijkheid voor de daaruit voortvloeiende schade!
Wij aanvaarden geen enkele aansprakelijkheid voor schade aan eigendommen of personen veroorzaakt door onjuiste behandeling of het niet naleven van veiligheidsinstructies.
Dit product is vervaardigd in volledige overeenstemming met de veiligheidsinstructies. Om deze status te behouden en ervoor te zorgen dat het product zo goed mogelijk wordt gebruikt, moet de gebruiker de veiligheidsinstructies en waarschuwingen in deze handleiding in acht nemen.
De gebruiker van dit systeem is hiervoor verantwoordelijk en moet controleren of de videobewaking voldoet aan
de geldende wetgeving in het land van gebruik.
: Dit symbool duidt op een risico van een elektrische schok of een risico op kortsluiting.
- U moet dit product alleen gebruiken op een spanning tussen: 100-240 Volt en 50-60 hertz. Probeer dit apparaat
nooit met een andere spanning te gebruiken.
- Zorg ervoor dat alle elektrische aansluitingen van het systeem voldoen aan de bedieningsinstructies.
- Volg in winkels de regels voor ongevallenpreventie voor elektrische installaties.
- Op scholen, of opleidingsstructuren, werkplaatsen ... is de aanwezigheid van gekwaliceerd personeel nodig om de
werking van elektronische apparaten te controleren.
- Neem de gebruiksaanwijzing voor andere apparaten die op het systeem zijn aangesloten in acht.
- Neem contact op met een ervaren persoon als u twijfelt over de bedieningsmodus of de veiligheid van de
apparaten.
- Sluit elektrische apparaten nooit met natte handen aan of af.
- Verzeker u ervan bij het installeren van dit product dat de voedingskabels niet zijn beschadigd.
- Vervang beschadigde elektrische kabels nooit zelf! Verwijder ze in dit geval en neem contact op met een ervaren
persoon.
- De contactdoos moet zich dicht bij het apparaat bevinden en moet gemakkelijk toegankelijk zijn.
LET OP
Waarschuwt de gebruiker voor de aanwezigheid van niet-geïsoleerde "gevaarlijke spanningen"
in de behuizing van het product, die gevaarlijk genoeg zijn eventueel elektrocutie bij mensen
te veroorzaken.
Waarschuwt de gebruiker voor belangrijke instructies voor gebruik en onderhoud
(reparatie) in de documentatie bij het apparaat.
NL6


0 892 350 069
+ prix appel
GB - Don’t throw away batteries
or out-of-order products with
household waste (rubbish). They
are likely to contain hazardous
substances that are dangerous to
Return the equipment to your local distrib
utor or use the recycling collection service
provided by your local council.
I - Non gettare le pile e le apparecchiature
fuori uso insieme ai riuti domestici. Le
sostanze dannose contenute in esse possono
nuocere alla salute dell’ambiente. Restituire
questo materiale al distributore o utilizzare la
raccolta differenziata organizzata dal comune.
ES - No tire las pilas ni los aparatos
inservibles con los residuos domésticos, ya
que las sustancias peligrosas que puedan
contener pueden perjudicar la salud y al
medio ambiente.
Pídale a su distribuidor que los recupere o
utilice los medios de recogida selectiva pues
tos a su disposición por el ayuntamiento.
both health and the environment.
NL - Dit symbool geeft aan dat het apparaat uitsluitend binnenhuis geïnstalleerd en gebruikt mag worden
I - Questo simbolo indica che l’apparecchio si installa e si utilizza unicamente all’interno
E - Este símbolo indica que el aparato se instala y utiliza únicamente en el interior
P - Este símbolo indica que o aparelho só pode ser instalado e usado em interiores
GB - This symbol indicates that the device must only be installed and used indoors
NL - Dit symbool betekent dat het apparaat alleen binnen mag worden geïnstalleerd en gebruikt
D - Dieses Symbol zeigt an, dass das Gerät nur innen installiert und verwendet wird
P - Não junte as pilhas nem os aparelhos
que já não se usam com o lixo caseiro. As
substâncias perigosas que ambos podem
conter podem ser prejudiciais para a saúde e
para o ambiente. Entregue esses aparelhos ao
seu lixeiro ou recorra aos meios de recolha
selectiva ao seu dispor.
-
NL - De lege batterijen en oude apparaten
niet met het huisvuil meegeven: deze kunnen
gevaarlijke stoffen bevatten die de gezondheid
en het milieu schaden.
De oude apparaten door uw distributeur
laten innemen of de gescheiden vuilinzameling
van uw gemeente gebruiken.
GB - Don’t throw batteries or out of order
products with the household waste (garbage).
Les substances dangereuses qu’ils sont
susceptibles de contenir peuvent nuire à la
santé et à l’environnement. Faites reprendre
ces appareils par votre distributeur ou utilisez
les moyens de collecte sélective mise à votre
disposition par votre commune.
-
D - Verbrauchte Batterien und nicht mehr
benützte Geräte sind Sondermüll. Sie
enthalten möglicherweise gesundheits- und
umweltschädliche Substanzen.
Geben Sie alte Geräte zur fachgerechten
Entsorgung beim Gerätehändler ab bzw.
benutzen Sie die örtlichen Recyclinghöfe.
Frankrijk
Service 0,35 € / min
Italia: +39 02 96488273
España: +34 902 109 819
BE-NL-LU-DE-CH-AT: +352 26302353
Gedrukt in de VRC

DE
642278
FarbvideoGegensprechanlage
642278
Installation und Bedienungsanleitung
Typ: 461+MU2
V1
2

642278 - V1 642278 - V1
1.60m
1 7
4
3
6
5
2
Abb. 1
21345 78 96
Abb. 2
Abb. 3
1
2 3 4 5
10
1
2
3
4
5
6
7
Abb. 4

1
Abb. 5
2
Abb. 6
3
1.60m
Abb. 7
MODULO B
Non fourni - Non fornito - No suministrado
Não incluídos - Not supplied - Niet bijgeleverd Nicht mitgeliefert

642278 - V1 642278 - V1
INHALT
a. Monitor
b. Außensprechanlage, Außenkamera
a. Installation der Außensprechanlage (Kamera)
b. Installation des Monitors
b. Anschluss eines elektrischen Türöffners oder Türschlosses
c. Anschluss eines Torantriebs
6
a. Verwendung der Video-Sprechanlage
7
a. Monitor
b. Stromversorgung
c. Kamera
1
SICHERHEITSANWEISUNGEN. ..................................... S.2
2
BESCHREIBUNG. ............................................................... S.2
3
TEILEVERZEICHNIS ......................................................... S.2
4
INSTALLATION.................................................................. S.3
5
VERKABELUNG ................................................................. S.3
a. Anschluss der Video-Sprechanlage
BEDIENUNGSANLEITUNG ............................................. S.4
TECHNISCHE MERKMALE .............................................. S.4
8
OPTIONEN ......................................................................... S.5
DE1
9
TECHNISCHER SERVICE - GARANTIE ......................... S.5
10
SICHERHEITSMASSNAHMEN ........................................ S.6

1. SICHERHEITSANWEISUNGEN
Wichtig!
•
Bitte lesen Sie das Bedienungshandbuch vor der Installation oder der Verwendung dieses Geräts aufmerksam durch.
• Wenn Sie dieses Gerät für Drittpersonen installieren, denken Sie bitte daran, dem Endanwender das Handbuch
oder eine Kopie davon zu geben.
Warnhinweis:
• Die verschiedenen Elemente dürfen nur von einem befugten Techniker ausgebaut werden.
Sicherheitsmaßnahmen:
• Für den sicheren Betrieb dieses Systems ist es unerlässlich, dass Installateure, Benutzer und Techniker alle in die-
sem Handbuch beschriebenen Sicherheitsmaßnahmen befolgen.
• Bei Bedarf werden an den Elementen spezische Warnhinweise und Warnsymbole angebracht.
2 . BESCHREIBUNG (Abb. 1)
1 • Monitor 4 • Außensprechanlage
2 • Wandhalterung 5 • Regenschutz
3 • Steckadapter
Allgemeines
Diese Video-Gegensprechanlage besteht aus einer Innensprechstelle mit Farbbildschirm und einer Außenstation mit
Gegensprechanlage und Kamera, die es erlaubt, den Besucher, der geklingelt hat, zu sehen und mit ihm zu sprechen.
Die Anlage ist einfach zu installieren, da nur 2 Drähte für sämtliche Funktionen - Klingelton, Video, Gegensprechanlage und Steuerungen des Türöffners und der automatischen Toröffnung - erforderlich sind. Für einen optimalen
Gebrauch lesen Sie bitte diese Bedienungsanleitung aufmerksam durch.
3 . TEILEVERZEICHNIS
a. Monitor (Abb. 2)
1. Farbbildschirm 4” (11 cm).
2. Kurz drücken (< 1 Sek.): Bild der Kamera der Türsprechanlage
5 Sek. drücken: Zugang zum Menü.
In der Menüanzeige den Pfeil nach links drücken:
3. Einen Anruf annehmen und mit dem Besucher sprechen.
In der Menüanzeige den Pfeil nach rechts drücken:
4. Öffnen des elektrischen Türöffners.
In der Menüanzeige den Pfeil nach unten drücken:
5. Öffnen des Tors (potentialfreier Kontakt)
6. Mikrofon für das Sprechen mit der Außensprechanlage.
7. Einstellen der Lautstärke der Melodie.
8. Auf der Monitorrückseite bendet sich der 17 V-Anschluss für den Adapter (der Adapter darf nur an eine
Installation angeschlossen werden, die den gültigen Normen entspricht: NFC 15-100 für Frankreich).
9. Klemmleiste für den Anschluss der Verbindungskabel der Außensprechanlage
10. Lautsprecher
b. Außensprechanlage, Außenkamera (Abb. 3)
1. Mikrofon: Erlaubt dem Besucher, mit den Personen im Haus zu sprechen.
2. Infrarot-LED für Sicht bei Dunkelheit (für das bloße Auge unsichtbares Licht).
3. Objektiv der C-MOS Kamera.
4. Klingeltaste: Bei Drücken der Ruftaste leuchtet das Namensschild und der Klingelton ist im Hausinnern
zu hören. Der Bildschirm und die Kamera schalten sich ein.
5. Lautsprecher, um außen gehört zu werden.
6. Klemmleiste für den Anschluss der Verbindungskabel des Monitors
7. Namensschild. Zum Wechseln des Namensschildes die Plastikfolie (7) vorsichtig mit Hilfe
eines kleinen Schraubenziehers anheben und das neue Namensschild darunter schieben. Das Namensschild wird
ab Einbruch der Dunkelheit erleuchtet.
DE2

642278 - V1 642278 - V1
INSTALLATION
Hinweis: Wenn Sie Ihre Anlage vor dem Installieren ausprobieren wollen, achten Sie
darauf, dass sich Außenstation und Monitor nicht im gleichen Raum befinden, da die Video-Sprechanlage sonst einen
schrillen Ton verursacht (Larsen-Effekt).
a. Installation der Außensprechanlage (Abb. 4)
1. Die Schraube unter der Außensprechanlage entfernen (1)
2. Die Außensprechanlage nach vorne kippen (2).
3. Das Objektiv der Außensprechanlage muss auf einer Höhe von etwa 1,60 m angebracht werden.
4. Den Regenschutz mit Hilfe der Schrauben (3) befestigen und eine Silikondichtung* (4) zwischen dem Regenschutz und der Wand anbringen, um das Eindringen von Wasser zu verhindern. * Kein Silikon auf Basis von
Essigsäure (Essiggeruch) verwenden.
5. Die Kabel verbinden und dabei den Verkabelungsplan beachten (Abb. 6)
6. Die Außensprechanlage (5) und den Regenschutz (6) anbringen.
7. Die Befestigungsschrauben wieder anbringen (7).
Wichtig: Die Kamera sollte nicht direkt der Sonne oder einer reektierenden Fläche ausgesetzt sein.
Tipp: Zum Schutz der Drähte vor Beschädigung und Witterungseinüssen wird eine Kabelrohr empfohlen.
b. Installation des Monitors (Abb. 5)
1. Die Wandhalterung (2) so befestigen, dass sich der Bildschirm des Monitors in ca.1,60 m Höhe benden.
2. Die Drähte, die von der Außenstation kommen, anschließen.
3. Den Netzadapter-Stecker (3) auf der Rückseite des Monitors anschließen (noch nicht ans Stromnetz anschließen).
4. Den Monitor (1) auf der Wandhalterung (2) anbringen.
5. Den Netzstecker an der 230 V-Steckdose anschließen .
Hinweis: Im Fall einer Unterbrechung des Netzkabels ist auf die Polung zu achten (weißer Streifen (+) (Abb. 7)).
VERKABELUNG
Um Störgeräusche und Funktionsstörungen zu vermeiden, darf das Kabel Ihrer Video-Gegensprechanlage nicht im
gleichen Kabelrohr wie die Stromversorgungkabel verlegt werden.
Achtung: Auf keinen Fall zur Erhöhung des Leiterquerschnitts Drähte doppelt verlegen.
a. Anschluss der Videosprechanlage (Abb. 6)
Zu verwendende Drähte: • 2 x Drähte 0,75 mm2 bis 25 m
• 2 x Drähte 1,5 mm mm2 für 25 bis 100 m
1. Die Drähte unter Beachtung des Verkabelungsschemas anschließen (Abb. 6).
2. Nur 2 Drähte werden für alle Funktionen benötigt: Klingel, Videobild, Gegensprechanlage und Öffner (Türöffner
und automatische Toröffnung).
Wichtig:
• Für die Verkabelung beziehen sie sich bitte auf das Etikett auf der Rückseite des Monitors und auf der Rückseite
der Kamera.
b. Anschluss eines elektrischen Türöffners oder Türschlosses (Abb. 6)
Diese werden direkt an den Klemmen 5 und 6 auf der Rückseite der Außensprechanlage (ohne Beachtung der
Polung) angeschlossen.
Beachten Sie, dass diese Funktion nur bei eingeschaltetem Display möglich ist.
DE3

Wichtig: Der Türöffner bzw. das elektrische Schloss, das Sie installieren werden, muss unbedingt einen mechani-
schen Speicher besitzen. Für die Verkabelung ist das Etikett auf der Rückseite der Kamera zu beachten.
c. Anschluss eines Torantriebs (Abb. 6)
Dieser wird direkt an den Klemmen 3 und 4 auf der Rückseite der Kamera angeschlossen. Die Kamera löst einen
potentialfreien Kontakt aus, der an die Türöffner-Taste anzuschließen ist.
Beachten Sie, dass diese Funktion nur bei eingeschaltetem Display möglich ist.
6. BEDIENUNGSANLEITUNG
Wichtig: Die Touchscreen-Tasten dürfen nur mit den Fintern betätigt werden.
a. Verwendung und Einstellung der Video-Sprechanlage
Kurz drücken (< 1 Sek.): Bild der Kamera der Türsprechanlage
5 Sek. drücken: Zugang zum Menü.
In der Menüanzeige den Pfeil nach links drücken.
Einen Anruf annehmen und mit dem Besucher sprechen.
In der Menüanzeige den Pfeil nach rechts drücken.
Öffnen des elektrischen Türöffners.
In der Menüanzeige den Pfeil nach unten drücken:
Öffnen des Tors (potentialfreier Kontakt)
Beachten Sie, dass die Öffnungsfunktionen nur bei eingeschaltetem Bildschirm möglich sind. Beim
Drücken der Taste wird das Bild am Bildschirm kurz unterbrochen.
7. TECHNISCHE MERKMALE
a. Monitor
• Stromversorgung: 17 V
• Stromverbrauch: 25,5 W
• Bildschirm 4” (11 cm).
• Auflösung: 480 x 275 Pixel
• Abmessungen (mm): 153,8x125x24,4
DE4

642278 - V1 642278 - V1
b. Stromversorgung
0 892 350 069
Service 0,35 € / min
+ prix appel
• Adapter 100-240 V∼, 50/60Hz, 17 V , 1.5A
Im Fall einer Unterbrechung des Netzkabels ist auf die Polung zu achten
c. Kamera
• C-MOS Farbkamera: 420TVL
• Bildwinkel: H 90° - V 65°
• Temperaturbereich (ungefähr): -10°C bis +45°C.
• Schutzart: IP44
• Abmessung mit Blende (mm): 165 x 70 x 35
8. OPTIONEN
• Alle elektrischen Türöffner von Extel
• Alle elektrischen Schlösser von Extel
• Alle Torantriebe von Extel
• Modulare Stromversorgung MODULO B
9. TECHNISCHER SERVICE - GARANTIE
Defekt Ursache Lösung
• Der Monitor schaltet sich
nicht ein.
• Schlechte Bild- bzw.
Tonqualität
• Zu helles Bild • Position der Kamera • Das Kameraobjektiv nicht direkt der Sonne
• Blauer Bildschirm, kein
Klingelton
• Keine Stromversorgung
des Monitors
• Umgebung
• Zu kurzes Kabel
• Installation • Die Verbindungsdrähte zwischen Monitor und
Bei Bedarf steht Ihnen unsere technische Website zur Verfügung:
• Prüfen, ob der Stecker des Netzadapters
korrekt eingesteckt ist
• Prüfen, dass die verwendeten Kabel
den richtigen Querschnitt besitzen und sich die
Verbindungskabel der Video-Sprechanlage nicht
im gleichen Kabelrohr wie das 230V-Kabel befinden.
• Mindestens 4 m Kabel verwenden
oder einer reflektierenden Fläche aussetzen.
Außensprechanlage sind vertauscht (1 und 2)
DE5

GARANTIEBEDINGUNGEN: Für dieses Gerät gilt eine 2-jährige Garantie auf Teile und Arbeitsstunden in
unseren Werkstätten.
Von dieser Garantie ausgeschlossen sind Verbrauchsteile (Akkus, Batterien usw.) sowie Schäden, die auf die folgenden Arten verursacht wurden: unsachgemäße Verwendung, unsachgemäße Installation, externer Eingriff, Beschädi-
gung durch Stoß oder Stromschlag, Sturz oder Wettereinüsse.
• Damit der Garantieanspruch nicht erlischt, darf das Gerät nicht geöffnet werden.
• Bei einer eventuellen Rücksendung an den Kundendienst den Bildschirm gegen Kratzer schützen.
• Für die Pflege nur ein weiches Tuch, niemals Lösungsmittel verwenden. Durch Demontage der Teile erlischt die
Garantie. Reinigen Sie das Modul ausschließlich von außen und verwenden Sie hierzu ein trockenes, weiches Tuch.
Stecken Sie das Gerät vor der Reinigung aus oder schalten Sie es aus.
Achtung: Verwenden Sie niemals ein Reinigungsmittel oder eine Reinigungslösung auf Carboxylbasis, Alkohol
oder ähnliches. Diese Mittel können Ihr Gerät beschädigen, ihre Dämpfe stellen außerdem eine Explosionsgefahr
und eine Gefahr für Ihre Gesundheit dar.
Verwenden Sie für die Reinigung keine Werkzeuge, die Spannung leiten können (Metallbürste, spitze Werkzeuge
etc.).
Der Kassenzettel oder die Rechnung dienen als Nachweis für das Kaufdatum.
10. SICHERHEITSMASSNAHMEN
Schäden, die durch eine Missachtung des Bedienungshandbuchs verursacht werden, führen zum Erlöschen der Garantie. Wir übernehmen keine Haftung für daraus entstandene Schäden!
Wir tragen keinerlei Haftung für Sachschäden oder Personenschäden aufgrund einer falschen Handhabung oder
Missachtung der Sicherheitsanweisungen.
Dieses Gerät wurde unter strengster Beachtung der Sicherheitsanweisungen hergestellt. Um diese Sicherheit zu
wahren und die optimale Nutzung des Geräts zu gewährleisten, muss der Benutzer die Anweisungen und Warnhinweise in diesem Handbuch beachten.
Der Benutzer dieses Systems haftet dafür und er muss prüfen, ob die Videoüberwachung der im Verwendungsland
geltenden Gesetzgebung entspricht.
: Dieses Symbol weist auf die Gefahr eines Stromschlags oder eines Kurzschlusses hin.
- Sie dürfen dieses Gerät nur mit einer Spannung zwischen 100-240 Volt und bei 50-60 Hertz verwenden. Versuchen
Sie niemals, das Gerät mit einer anderen Spannung zu betreiben.
- Achten Sie darauf, dass alle elektrischen Anschlüsse des Systems den Gebrauchsanweisungen entsprechen.
- In gewerblichen Einrichtungen ist sicherzustellen, dass die Unfallverhütungsvorschriften für elektrische Anlagen
beachtet werden.
- In Schulen, Ausbildungseinrichtungen, Werkstätten usw. ist die Anwesenheit von qualiziertem Personal erforderlich, um
den Betrieb von Elektrogeräten zu kontrollieren.
- Beachten Sie die Gebrauchsanweisungen der anderen Geräte, die an das System angeschlossen sind.
- Bei Zweifeln bezüglich der Funktionsweise oder der Sicherheit der Geräte wenden Sie sich an eine erfahrene
Person.
- Stecken Sie Elektrogeräte niemals mit nassen Händen ein oder aus.
- Kontrollieren Sie bei der Installation dieses Geräts, dass die Netzkabel nicht beschädigt werden können.
- Ersetzen Sie beschädigte Stromkabel niemals selbst! Wenn die Kabel beschädigt sind, entfernen Sie diese und
wenden sich an eine erfahrene Person.
- Die Steckdose muss sich in der Nähe des Geräts benden und leicht zugänglich sein.
ACHTUNG
Weist den Benutzer auf das Vorhandensein von nicht isolierten „gefährlichen Spannungen“
im Inneren des Geräts hin, die groß genug sind, um eine Stromschlaggefahr für die Personen
darzustellen.
Weist den Benutzer auf das Vorhandensein wichtiger Anweisungen bezüglich der
Benutzung und der Instandhaltung (Reparatur) in der Begleitdokumentation des
Geräts hin.
DE6


0 892 350 069
+ prix appel
GB - Don’t throw away batteries
or out-of-order products with
household waste (rubbish). They
are likely to contain hazardous
substances that are dangerous to
Return the equipment to your local distrib
utor or use the recycling collection service
provided by your local council.
I - Non gettare le pile e le apparecchiature
fuori uso insieme ai riuti domestici. Le
sostanze dannose contenute in esse possono
nuocere alla salute dell’ambiente. Restituire
questo materiale al distributore o utilizzare la
raccolta differenziata organizzata dal comune.
ES - No tire las pilas ni los aparatos
inservibles con los residuos domésticos, ya
que las sustancias peligrosas que puedan
contener pueden perjudicar la salud y al
medio ambiente.
Pídale a su distribuidor que los recupere o
utilice los medios de recogida selectiva pues
tos a su disposición por el ayuntamiento.
both health and the environment.
FR - Ce symbole indique que l’appareil s’installe et s’utilise uniquement à l’intérieur
I - Questo simbolo indica che l’apparecchio si installa e si utilizza unicamente all’interno
E - Este símbolo indica que el aparato se instala y utiliza únicamente en el interior
P - Este símbolo indica que o aparelho só pode ser instalado e usado em interiores
GB - This symbol indicates that the device must only be installed and used indoors
NL - Dit symbool betekent dat het apparaat alleen binnen mag worden geïnstalleerd en gebruikt
D - Dieses Symbol zeigt an, dass das Gerät nur innen installiert und verwendet wird
P - Não junte as pilhas nem os aparelhos
que já não se usam com o lixo caseiro. As
substâncias perigosas que ambos podem
conter podem ser prejudiciais para a saúde e
para o ambiente. Entregue esses aparelhos ao
seu lixeiro ou recorra aos meios de recolha
selectiva ao seu dispor.
-
NL - De lege batterijen en oude apparaten
niet met het huisvuil meegeven: deze kunnen
gevaarlijke stoffen bevatten die de gezondheid
en het milieu schaden.
De oude apparaten door uw distributeur
laten innemen of de gescheiden vuilinzameling
van uw gemeente gebruiken.
GB - Don’t throw batteries or out of order
products with the household waste (garbage).
Les substances dangereuses qu’ils sont
susceptibles de contenir peuvent nuire à la
santé et à l’environnement. Faites reprendre
ces appareils par votre distributeur ou utilisez
les moyens de collecte sélective mise à votre
disposition par votre commune.
-
D - Verbrauchte Batterien und nicht mehr
benützte Geräte sind Sondermüll. Sie
enthalten möglicherweise gesundheits- und
umweltschädliche Substanzen.
Geben Sie alte Geräte zur fachgerechten
Entsorgung beim Gerätehändler ab bzw.
benutzen Sie die örtlichen Recyclinghöfe.
France
Service 0,35 € / min
Italia: +39 02 96488273
España: +34.902.109.819
BE-NL-LU-DE-CH-AT : +352 26302353
Gedruckt in PRC

ES
642278
Videoportero
en color
642278
Instrucciones de uso e instalación
Tipo: 461+MU2
V1
2

642278 - V1 642278 - V1
1.60m
1 7
4
3
6
5
2
Fig. 1
21345 78 96
Fig. 2
Fig. 3
1
2 3 4 5
10
1
2
3
4
5
6
7
Fig. 4

1
Fig. 5
2
Fig. 6
3
1.60m
Fig. 7
MODULO B
Non fourni - Non fornito - No suministrado
Não incluídos - Not supplied - Niet bijgeleverd
Nicht mitgeliefert

642278 - V1 642278 - V1
ÍNDICE
a. Monitor
b. Placa externa, cámara exterior
a. Instalación de la placa externa (cámara)
b. Instalación del monitor
b. Conexión de un cerradero o una cerradura eléctrica
c. Conexión de una motorización de cancela
6
a. Uso del videoportero
7
a. Monitor
b. Alimentación
c. Cámara
1
NORMAS DE SEGURIDAD. ............................................... p.2
2
DESCRIPCIÓN. ................................................................... p.2
3
NOMENCLATURA ............................................................. p.2
4
INSTALACIÓN ................................................................... p.3
5
CABLEADO ........................................................................ p.3
a. Conexión del videoportero
INSTRUCCIONES DE USO .............................................. p.4
CARACTERÍSTICAS TÉCNICAS ..................................... p.4
8
OPCIONES .......................................................................... p.5
ES1
9
ASISTENCIA TÉCNICA - GARANTÍA ............................ p.5
10
MEDIDAS DE SEGURIDAD .............................................. p.6

1. NORMAS DE SEGURIDAD
¡Importante!
• Lea detenidamente el manual de instrucciones antes de instalar o usar este producto.
• Si instala este producto para terceros, recuerde dejar el manual o una copia al usuario nal.
Aviso:
• Solo un técnico autorizado podrá desmontar los diferentes elementos.
Medidas de seguridad:
• Para una explotación segura de este sistema, es esencial que los instaladores, usuarios y técnicos sigan todos los
procedimientos de seguridad descritos en este manual.
• En caso necesario, se indican avisos especícos y símbolos de atención en los elementos correspondientes.
2 . DESCRIPCIÓN (g. 1)
1 • Monitor 4 • Placa externa
2 • Soporte de pared 5 • Visera contra la lluvia
3 • Adaptador enchufable
Generalidades
Este videoportero se compone de un módulo para contestar en el interior con pantalla y una placa externa con
interfono y cámara, que permite ver y comunicar con el visitante que ha llamado. Es sencillo de instalar ya que solo
son necesarios 2 cables para todas las funciones: timbre, imagen de vídeo, interfono y controles del cerradero y del
automatismo. Para un uso ecaz, lea detenidamente este manual de instrucciones.
3 . NOMENCLATURA
a. Monitor (g. 2)
1. Pantalla en color 4” (11 cm).
2. Pulsación < 1 s: visualización de la cámara de la placa externa.
Pulsación de 5 s: acceso al menú.
Pulsación desde la pantalla de menú: echa izquierda
3. Responder a una llamada y hablar con el visitante.
Pulsación desde la pantalla de menú: echa derecha
4. Apertura del cerradero eléctrico
Pulsación desde la pantalla de menú: echa abajo
5. Apertura de cancela (contacto seco)
6. Micrófono para comunicar con la placa externa.
7. Ajuste del volumen de la melodía.
8. Al dorso del monitor, toma para el enchufe de 17 V del adaptador (adaptador para conectar a una instalación
que cumpla con las normas vigentes: NFC 15-100 para Francia).
9. Bornera para la conexión de los cables de conexión de la placa externa.
10. Altavoz.
b. Placa externa, cámara externa (g. 3)
1. Micrófono: permite que el visitante se comunique con el interior.
2. LED IR: permite tener visibilidad en la penumbra (luz no visible a simple vista).
3. Objetivo de la cámara C-MOS
4. Botón de llamada: al pulsar este botón, el portanombres se ilumina y se suena el timbre en el interior. La pantalla y la cámara se ponen en funcionamiento.
5. Altavoz: permite que le oigan en el exterior.
6. Bornera para la conexión de los cables de conexión del monitor
7. Portanombres Para cambiar la etiqueta del portanombres, levante con cuidado con un destornillador pequeño
la protección de plástico (7) y deslice la etiqueta del portanombres. El portanombres se enciende en la penumbra.
ES2

642278 - V1 642278 - V1
INSTALACIÓN
Nota: - Si prueba el producto antes de instalarlo, asegúrese de no hacerlo con la placa externa y el monitor en la
misma habitación. De lo contrario, el videoportero emitirá un sonido estridente (efecto Larsen).
a. Instalación de la placa externa (g. 4)
1. Quite el tornillo de la parte inferior de la placa externa (1)
2. Bascule la placa externa hacia delante (2)
3. El objetivo de la placa debe estar colocado a una altura de aproximadamente 1,60 m.
4. Fije bien la visera para la lluvia con los tornillos (3) y aplique una junta de silicona* (4) entre la visera y la pared
para evitar que circule el agua. *No usar silicona con ácido acético (olor a vinagre).
5. Conecte los cables respetando el plano de cableado (g. 6)
6. Encaje la placa externa (5) y la visera para la lluvia (6).
7. Vuelva a poner el tornillo de jación (7).
Importante: No exponga la cámara directamente al sol ni la dirija a una supercie reectante.
Consejo: se recomienda pasar los cables por una vaina de protección para protegerlos de los golpes y de la
intemperie.
b. Instalación del monitor (g. 5)
1. Fije el soporte mural (2) procurando que la pantalla del monitor esté a una altura de aproximadamente 1,60 m.
2. Conecte los cables procedentes de la placa externa.
3. Conecte el enchufe del adaptador (3) a la parte trasera del monitor (sin conectarlo a la red).
4. Coloque el monitor (1) sobre el soporte mural (2).
5. Conecte la toma del bloque de alimentación a la toma de pared de 230 V .
Nota: En caso de corte del cable de alimentación, asegúrese de respetar la polaridad (ribete blanco [+] [fig. 7]).
CABLEADO
Para evitar los riesgos de interferencias y de funcionamiento incorrecto, no pase el cable del videoportero por la
misma vaina que los cables de alimentación eléctrica.
Atención: no doble nunca los cables para aumentar la sección.
a. Conexión del videoportero (g. 6)
Cables que se deben usar: • 2 cables de 0,75 mm2 a 25 m
• 2 cables de 1,5 mm2 de 25 a 100 m
1. Conecte correctamente los cables respetando el plan de cableado (fig. 6).
2. 2 cables para todas las funciones: timbre, imagen de vídeo, interfono y controles de apertura (cerradero y auto-
matismo).
Importante:
• Para el cableado respete la etiqueta que está pegada en la parte trasera del monitor y de la cámara.
b. Conexión de un cerradero o una cerradura eléctrica (g. 6)
Debe conectarse directamente a los bornes 5 y 6 en la parte trasera de la la placa externa (no hace falta respetar
la polaridad).
Tenga en cuenta que esta función solo es válida si la pantalla está encendida.
ES3

Importante: El cerradero o la cerradura eléctrica que usted va a instalar deberá contar obligatoriamente con una
memoria mecánica. Para el cableado respete la etiqueta pegada al dorso de la cámara.
c. Conexión de una motorización de cancela (g. 6)
Conéctela directamente a los bornes 3 y 4 al dorso de la cámara. La cámara suministra un contacto «seco» sin
corriente al control del «botón pulsador» del automatismo.
Tenga en cuenta que esta función solo es válida si la pantalla está encendida.
6. INSTRUCCIONES DE USO
Importante: Las teclas sensibles al tacto deben manipularse solamente con los dedos.
a. Uso y ajuste del videoportero
Pulsación < 1 s: visualización de la cámara de la placa externa.
Pulsación de 5 s: acceso al menú.
Pulsación desde la pantalla de menú: echa izquierda.
Responder a una llamada y hablar con el visitante.
Pulsación desde la pantalla de menú: echa derecha.
Apertura del cerradero eléctrico
Pulsación desde la pantalla de menú: echa abajo
Apertura de cancela (contacto seco)
Tenga en cuenta que las funciones de apertura solo son válidas si la pantalla está encendida. En el
momento del envío del control se producirá una interrupción breve de la imagen.
7. CARACTERÍSTICAS TÉCNICAS
a. Monitor
• Alimentación: 17 V
• Consumo: 25,5 W
• Pantalla 4” (11 cm)
• Resolución: 480 x 275 puntos
• Dimensiones (mm): 153,8x125x24,4
ES4

642278 - V1 642278 - V1
b. Alimentación
0 892 350 069
Service 0,35 € / min
+ prix appel
• Adaptador 100-240 V∼, 50/60 Hz, 17 V , 1,5 A
En caso de corte del cable de alimentación, asegúrese de respetar la polaridad
c. Cámara
• Cámara C-MOS en color: 420TVL
• Ángulo de visión: H=90° - V=65°
• Temperatura de uso (aproximadamente): de -10°C a +45°C.
• Índice de protección: IP44
• Dimensiones con visera (mm): 165 x 70 x 35
8. OPCIONES
• Todos los cerraderos eléctricos Extel
• Todas las cerraduras eléctricas Extel
• Todas las motorizaciones Extel
• Alimentación modular MÓDULO B
9. ASISTENCIA TÉCNICA - GARANTÍA
Avería Causa Solución
• El monitor no se enciende. • El monitor no tiene
corriente
• Imagen y/o sonido de mala
calidad.
• Imagen demasiado luminosa • Posición de la cámara • No exponga el objetivo de la cámara directa-
• Pantalla azul, sin
timbre
• Entorno
• Cableado demasiado
corto.
• Instalación. • Los cables de conexión entre el monitor y la
En caso necesario, nuestro sitio técnico está a su disposición:
• Compruebe que el enchufe del adaptador esté
correctamente introducido.
• Compruebe que los cables usados tienen la
sección adecuada y que los cables de conexión
del videoportero no estén en la misma vaina que
el de 230 V.
• Use como mínimo 4 m de cables.
mente al sol o hacia una superficie reflectante
placa externa están invertidos (1 y 2)
ES5

CONDICIONES DE LA GARANTÍA: Este aparato tiene una garantía de 2 años para las piezas y la mano
de obra en nuestros talleres.
La garantía no cubre los consumibles (pilas, baterías, etc.) ni los daños ocasionados por un uso incorrecto o una
instalación incorrecta, la intervención de una tercera persona, el deterioro por golpe físico o cortocircuito, caída
o fenómeno atmosférico.
• No abra el aparato para no perder la cobertura de la garantía.
• En caso de una eventual devolución a SPV, proteja la pantalla para evitar que se raye.
• Limpie únicamente con un trapo suave, no utilice disolventes. La garantía quedará anulada en el caso de que
desmonte las piezas. Utilice exclusivamente un paño seco y suave para limpiar el exterior. Antes de limpiarlo, desconecte o apague el aparato.
Atención: No utilice ningún producto o solución de depuración carboxílica, alcohol o similar. Además de
poder dañar el aparato, los vapores son asimismo peligrosos para la salud y explosivos.
No utilice ninguna herramienta que pueda conducir la corriente (cepillo de metal, herramienta puntiaguda... u otros)
durante la limpieza.
El ticket de compra o la factura sirven para demostrar la fecha de compra.
10. MEDIDAS DE SEGURIDAD
Los daños provocados por el incumplimiento de lo estipulado en el manual tendrán como consecuencia la terminación de la garantía. No asumiremos responsabilidad alguna por los daños resultantes.
No asumiremos responsabilidad alguna por cualesquiera daños, en los bienes o personas, provocados por una
manipulación incorrecta o el incumplimiento de las instrucciones de seguridad.
Este producto ha sido fabricado respetando completamente las normas de seguridad. Para mantener este estado y
garantizar el uso correcto del producto, el usuario deberá respetar las instrucciones y avisos de seguridad incluidos
en el manual.
El usuario de este sistema es el único responsable y deberá comprobar si la videovigilancia cumple la ley vigente en
el país donde va a ser utilizada.
: Este símbolo indica un riesgo de electrocución o de cortocircuito.
- Solo deberá utilizar este producto con un nivel de corriente situado entre: 100-240 voltios y 50-60 hercios. No
intente nunca utilizar este aparato con un nivel de corriente distinto.
- Compruebe que todas las conexiones eléctricas del sistema cumplen las instrucciones de uso.
- En los establecimientos comerciales, compruebe que cumple con las normas de prevención de accidentes
correspondientes a las instalaciones eléctricas.
- En las escuelas, los equipos de formación, talleres... se requiere la presencia de personal cualicado para el control
del funcionamiento de los aparatos electrónicos.
- Respete los consejos de uso del resto de aparatos asociados al sistema.
- Póngase en contacto con una persona experimentada en caso de que tenga dudas sobre el modo de funcionamiento
o la seguridad de los aparatos.
- No conecte ni desconecte nunca los aparatos eléctricos con las manos húmedas.
- Durante la instalación de este producto, compruebe que los cables de alimentación no corren peligro de sufrir
daños.
- ¡No cambie nunca los cables eléctricos dañados usted mismo! En este caso, quítelos y llame a una persona
experimentada.
- La toma de corriente debe encontrarse cerca del aparato y debe poder acceder a ella fácilmente.
La empresa advierte al usuario de la presencia de instrucciones importantes rela-
ATENCIÓN
La empresa advierte al usuario de la presencia de «tensiones peligrosas», no aisladas en el
interior de la caja del producto, sucientemente signicativas como para suponer un riesgo de
electrocución para las personas.
tivas al uso y al mantenimiento (reparación) en la documentación que acompaña
al aparato.
ES6


0 892 350 069
+ prix appel
GB - Don’t throw away batteries
or out-of-order products with
household waste (rubbish). They
are likely to contain hazardous
substances that are dangerous to
Return the equipment to your local distrib
utor or use the recycling collection service
provided by your local council.
I - Non gettare le pile e le apparecchiature
fuori uso insieme ai riuti domestici. Le
sostanze dannose contenute in esse possono
nuocere alla salute dell’ambiente. Restituire
questo materiale al distributore o utilizzare la
raccolta differenziata organizzata dal comune.
ES - No tire las pilas ni los aparatos
inservibles con los residuos domésticos, ya
que las sustancias peligrosas que puedan
contener pueden perjudicar la salud y al
medio ambiente.
Pídale a su distribuidor que los recupere o
utilice los medios de recogida selectiva pues
tos a su disposición por el ayuntamiento.
both health and the environment.
FR - Ce symbole indique que l’appareil s’installe et s’utilise uniquement à l’intérieur
I - Questo simbolo indica che l’apparecchio si installa e si utilizza unicamente all’interno
E - Este símbolo indica que el aparato se instala y utiliza únicamente en el interior
P - Este símbolo indica que o aparelho só pode ser instalado e usado em interiores
GB - This symbol indicates that the device must only be installed and used indoors
NL - Dit symbool betekent dat het apparaat alleen binnen mag worden geïnstalleerd en gebruikt
D - Dieses Symbol zeigt an, dass das Gerät nur innen installiert und verwendet wird
P - Não junte as pilhas nem os aparelhos
que já não se usam com o lixo caseiro. As
substâncias perigosas que ambos podem
conter podem ser prejudiciais para a saúde e
para o ambiente. Entregue esses aparelhos ao
seu lixeiro ou recorra aos meios de recolha
selectiva ao seu dispor.
-
NL - De lege batterijen en oude apparaten
niet met het huisvuil meegeven: deze kunnen
gevaarlijke stoffen bevatten die de gezondheid
en het milieu schaden.
De oude apparaten door uw distributeur
laten innemen of de gescheiden vuilinzameling
van uw gemeente gebruiken.
GB - Don’t throw batteries or out of order
products with the household waste (garbage).
Les substances dangereuses qu’ils sont
susceptibles de contenir peuvent nuire à la
santé et à l’environnement. Faites reprendre
ces appareils par votre distributeur ou utilisez
les moyens de collecte sélective mise à votre
disposition par votre commune.
-
D - Verbrauchte Batterien und nicht mehr
benützte Geräte sind Sondermüll. Sie
enthalten möglicherweise gesundheits- und
umweltschädliche Substanzen.
Geben Sie alte Geräte zur fachgerechten
Entsorgung beim Gerätehändler ab bzw.
benutzen Sie die örtlichen Recyclinghöfe.
Francia
Service 0,35 € / min
Italia: +39 02 96488273
España: +34 902 109 819
BE-NL-LU-DE-CH-AT: +352 26302353
Printed in P.R.C.

PT
642278
Videoporteiro
a cores
642278
Guia de instalação e de utilização
Tipo: 461+MU2
V1
2

642278 - V1 642278 - V1
1.60m
1 7
4
3
6
5
2
Fig. 1
21345 78 96
Fig. 2
Fig. 3
1
2 3 4 5
10
1
2
3
4
5
6
7
Fig. 4

1
Fig. 5
2
Fig. 6
3
1.60m
Fig. 7
MÓDULO B
Non fourni - Non fornito - No suministrado
Não incluídos - Not supplied - Niet bijgeleverd
Nicht mitgeliefert

642278 - V1 642278 - V1
ÍNDICE
a. Monitor
b. Placa de rua, câmara exterior
a. Instalação da placa de rua (câmara)
b. Instalação do monitor
b. Ligação de um trinco ou fechadura elétrica
c. Ligação de uma motorização de portão
6
a. Utilização do videofone
7
a. Monitor
b. Alimentação
c. Câmara
1
INSTRUÇÕES DE SEGURANÇA. .................................... p.2
2
DESCRITIVO. ...................................................................... p.2
3
NOMENCLATURA ............................................................. p.2
4
INSTALAÇÃO ..................................................................... p.3
5
CABLAGEM ........................................................................ p.3
a. Ligação do videofone
INSTRUÇÕES DE UTILIZAÇÃO ..................................... p.4
CARACTERÍSTICAS TÉCNICAS ..................................... p.4
8
OPÇÕES .............................................................................. p.5
PT1
9
ASSISTÊNCIA TÉCNICA - GARANTIA .......................... p.5
10
MEDIDAS DE SEGURANÇA .............................................p.6

1. INSTRUÇÕES DE SEGURANÇA
Importante!
• Leia atentamente o manual de utilização antes de instalar ou utilizar este produto.
• Se instalar este produto para outras pessoas, não se esqueça de transmitir o manual ou uma cópia para o utiliza-
dor nal.
Advertência:
• Os diferentes elementos deverão ser desmontados por um técnico autorizado.
Medidas de segurança:
• Para uma exploração em total segurança deste sistema, é essencial que os instaladores, utilizadores e técnicos
respeitem todos os procedimentos de segurança descritos neste manual.
• Se necessário, consulte as advertências especícas e símbolos de atenção indicados nos elementos.
2 . DESCRITIVO (g 1)
1 • Monitor 4 • Placa de rua
2 • Suporte de parede 5 • Viseira anti chuva
3 • Adaptador com conexão de encaixe
Generalidades
Este videofone é composto por um posto de resposta interno com ecrã e uma placa externa com intercomunicador e câmara que permite ver e comunicar com o visitante que tocou a campainha. A instalação do videoporteiro é
fácil com apenas 2 os para todas as funções: campainha, imagem de vídeo, intercomunicador e comandos do trinco
e do automatismo. Para uma utilização ecaz, ler atentamente este manual de instruções.
3 . NOMENCLATURA
a. Monitor (g. 2)
1. Ecrã a cores 4” (11 cm).
2. Pressão <1s: visualização da câmara da placa de rua.
Pressão de 5s: acesso ao menu.
Pressão a partir do ecrã do menu: seta da esquerda
3. Atender uma chamada e falar com o visitante.
Pressão a partir do ecrã do menu: seta da direita
4. Abertura do trinco elétrico.
Pressão a partir do ecrã do menu: seta inferior
5. Abertura do portão (contacto seco)
6. Micro para comunicar com a placa de rua.
7. Ajuste do volume da melodia.
8. Nas costas do monitor, tomada para a cha 17V do adaptador (adaptador a ligar a uma instalação em confor-
midade com as normas em vigor: NFC 15-100 para a França).
9. Terminais para ligar os os provenientes da placa de rua.
10. Altifalante.
b. Placa de rua, câmara exterior (g. 3)
1. Micro: permite que o visitante comunique para o interior.
2. LED IR: para uma melhor visibilidade na penumbra (luz não visível a olho nu).
3. Objetiva da câmara C-MOS.
4. Botão de chamada: ao premir este botão a porta-nome acende-se e o toque faz-se ouvir no interior. O ecrã e a
câmara colocam-se em funcionamento.
5. Altifalante: para ser ouvido do exterior.
6. Terminais para ligar os os provenientes do monitor
7. Porta-nome. Para mudar a etiqueta porta-nome, levantar delicadamente com a ajuda de uma pequena chave de
fendas a protecção plástica (7) e inserir a etiqueta do porta-nome. A porta-nome acende-se na penumbra.
PT2

642278 - V1 642278 - V1
INSTALAÇÃO
Nota: Se experimentar o seu produto antes de o instalar, tenha o cuidado de não o fazer com a placa de rua e o
monitor na mesma divisão, caso contrário o videofone emitirá um som estridente (efeito Larsen)
a. Instalação da placa de rua (g. 4)
1. Retirar o parafuso na parte inferior da placa de rua (1)
2. Balançar a placa de rua para a frente (2)
3. A objetiva da placa de rua deve ser colocada à uma altura de cerca de 1,60 m.
4. Fixar rmemente a viseira antichuva com os parafusos (3) e colocar uma junta de silicone* (4) entre a viseira e
o muro a m de evitar a inltração de água. *Não colocar silicone à base de ácido acético (odor de vinagre).
5. Ligar os os respeitando o esquema de cablagem (g.6)
6. Encaixar a placa de rua (5) na viseira antichuva (6).
7. Recolocar os parafusos de xação (7).
Importante: Não expor a câmara diretamente face ao sol ou a uma superfície reetora.
Conselho: recomenda-se que se passem os cabos numa manga de proteção, para que quem protegidos dos
choques e intempéries.
b. Instalação do monitor (g. 5)
1. Fixar o suporte de parede (2) com o ecrã do monitor à uma altura de cerca de 1,60m.
2. Ligar os os provenientes da placa de rua.
3. Ligar a cha do adaptador (3) na parte traseira do monitor (sem ligar à rede elétrica).
4. Instalar o monitor (1) no seu suporte mural (2).
5. Ligar o bloco de alimentação à tomada de parede de 230 V .
Nota: Em caso de corte do cabo de alimentação, respeite a polaridade correta (realce branco (+) (fig. 7)).
CABLAGEM
Com vista a evitar os riscos de parasitas e de disfunção, não passar o cabo do seu videofone na mesma manga
que os cabos elétricos.
Atenção: não é necessário duplicar os fios para aumentar a secção.
a. Ligação do videofone (g. 6)
Fios a utilizar: • 2 fios 0,75 mm2 até 25 m
• 2 fios 1.5 mm2 de 25 a 100 m
1. Ligar correctamente os fios respeitando o esquema de cablagem (fig.6).
2. Apenas são necessários 2 fios para todas as funções: campainha, imagem de vídeo, intercomunicador e comandos
de abertura (trinco e automatismo).
Importante:
Para a cablagem consultar a etiqueta colada na parte traseira do monitor e da câmara.
b. Ligação de um trinco ou fechadura elétrica (g. 6)
Ligue-a diretamente aos terminais 5 e 6 na parte traseira da placa de rua (nenhuma polaridade a respeitar).
A notar que esta função só é válida se o ecrã estiver aceso.
PT3

Importante: O trinco ou fechadura elétrica que vai instalar, deverá obrigatoriamente dispôr de uma memória
mecânica. Para a cablagem consultar a etiqueta colada no verso da câmara.
c. Ligação de uma motorização de portão (g. 6)
Deve ligá-la diretamente aos terminais 3 e 4 no verso da câmara. A câmara emite um contacto “seco” sem corrente a ligar ao comando “botão de pressão” do seu automatismo.
A notar que esta função só é válida se o ecrã estiver aceso.
6. INSTRUÇÕES DE UTILIZAÇÃO
Importante: As teclas sensíveis devem ser manipuladas unicamente com os dedos.
a. Utilização e ajuste do videofone
Pressão <1s: visualização da câmara da placa de rua.
Pressão de 5s: acesso ao menu.
Pressão a partir do ecrã do menu: seta da esquerda.
Atender uma chamada e falar com o visitante.
Pressão a partir do ecrã do menu: seta da direita.
Abertura do trinco elétrico.
Pressão a partir do ecrã do menu: seta inferior
Abertura do portão (contacto seco)
A notar que as funções de abertura só serão válidas se o ecrã estiver aceso. Produz-se um corte
breve da imagem no momento do comando.
7. CARACTERÍSTICAS TÉCNICAS
a. Monitor
• Alimentação: 17 V
• Consumo: 25,5 W
• Ecrã 4” (11 cm)
• Resolução: 480 x 275 píxeis
• Dimensões (mm): 153,8x125x24,4
PT4

642278 - V1 642278 - V1
b. Alimentação
0 892 350 069
Service 0,35 € / min
+ prix appel
• Adaptador 100-240 V∼, 50/60Hz, 17 V , 1.5A
Em caso de alteração do cabo de alimentação, respeite a polaridade correta
c. Câmara
• Câmara C-MOS colorida: 420TVL
• Ângulo da câmara: H 90° - V 65°
• Temperatura de utilização (aproximadamente): -10°C a +45°C
• Índice de proteção: IP44
• Dimensão com viseira (mm): 165 x 70 x 35
8. OPÇÕES
• Todos os trincos elétricos Extel
• Todas as fechaduras eléctricas Extel
• Todas as motorizações Extel
• Alimentação modular MÓDULO B
9. ASSISTÊNCIA TÉCNICA - GARANTIA
Avaria Causa Solução
• O monitor não se acende • O monitor não está alimentado
• Má imagem e/ou som • Ambiente
• Cablagem muito curta
• Imagem demasiado lumino-
sa
• Ecrã azul, sem
campainha
Em caso de necessidade, o nosso site técnico está à sua disposição:
• Posição da câmara • Não expor a objetiva da câmara diretamente
• Instalação • Os fios de ligação entre o monitor e a
• Verifique se a ficha do adaptador está
corretamente inserida.
• Verifique se os cabos utilizados são de boa secção e se os cabos de ligação do videofone não
estão na mesma manga que o 230V.
• Utilize no mínimo 4 m de cabos
ao sol ou numa superfície refletora.
placa de rua estão invertidos (1 e 2)
PT5

CONDIÇÃO DE GARANTIA: Este aparelho é garantido 2 anos, peças e mão-de-obra nos nossos ateliês.
A garantia não cobre: os consumíveis (pilhas, baterias, etc.) e os danos ocasionados por: má utilização, má instalação,
intervenção exterior, deterioração por choque físico ou eléctrico, queda ou fenómeno atmosférico.
• Não abrir o aparelho, de modo a não perder a cobertura da garantia.
• Durante um eventual regresso em SPV, proteger o ecrã para evitar riscos.
• Manutenção com um pano suave unicamente, sem solventes. A garantia é anulada se desmontar os componentes.
Limpar apenas o exterior com um pano seco e macio. Antes da limpeza, desligue ou coloque o aparelho fora de
tensão.
Atenção: Não utilizar qualquer produto ou essência de lavagem com ácido carboxílico, álcool ou semelhan-
tes. Para além de poderem danicar o seu aparelho, os vapores são perigosos para a sua saúde e são explosivos.
Não utilize nenhum instrumento que possa ser condutor de tensão (escova metálica, ferramenta pontiaguda...ou
outro) para a limpeza.
O talão de compra ou a factura comprovam a data de compra
10. MEDIDAS DE SEGURANÇA
Os danos provocados pela falta de conformidade ao manual conduzem à expiração da garantia. Não assumiremos
qualquer responsabilidade pelos danos daí resultantes!
Não assumiremos qualquer responsabilidade relativamente a todo o dano, em bens e pessoas, causado por uma má
manipulação ou pela falta da conformidade relativamente às instruções de segurança.
Este produto foi fabricado no estrito respeito das instruções de segurança. Para manter este estatuto e assegurar
a melhor exploração do produto, o utilizador deve observar as instruções de segurança e os avisos de segurança
contidos neste manual.
O utilizador deste sistema é responsável e deve vericar se a videovigilância está em conformidade com a lei em
vigor no país de utilização.
: Este símbolo indica o risco de choque eléctrico ou o risco de curto-circuito.
- Só deverá utilizar este produto a uma tensão compreendida entre: 100-240 Volts e 50-60 hertz. Nunca tente
utilizar este aparelho com uma tensão diferente.
- Verique se todas as instalações elétricas do sistema estão em conformidade com as instruções de utilização.
- Nos estabelecimentos comerciais, verique se as regras de prevenção dos acidentes para as instalações eléctricas
são respeitadas.
- Nas escolas, nos equipamentos de formação, os ateliês… é necessária a presença de pessoal qualicado para
controlar o funcionamento dos aparelhos eletrónicos.
- Observe as instruções de utilização dos outros aparelhos ligados ao sistema.
- Queira contactar uma pessoa experiente em caso de dúvida sobre o funcionamento ou a segurança dos aparelhos.
- Nunca ligue ou desligue os aparelhos elétricos com as mãos molhadas.
- Durante a instalação deste produto, verique se os cabos de alimentação não cam danicados.
- Nunca substitua os cabos eléctricos danicados por si mesmo! Neste caso, retire-os e contacte uma pessoa
experiente.
- A tomada deve estar perto do aparelho e ser facilmente acessível.
ATENÇÃO
Avisa o utilizador da presença « de tensões perigosas », não isoladas dentro da caixa do
produto, sucientemente importantes para representar um risco de electrocussão para as
pessoas.
O utilizador dispõe de instruções importantes relativas à utilização e a manutenção
(reparação) na documentação que acompanha o aparelho.
PT6


0 892 350 069
+ prix appel
GB - Don’t throw away batteries
or out-of-order products with
household waste (rubbish). They
are likely to contain hazardous
substances that are dangerous to
Return the equipment to your local distrib
utor or use the recycling collection service
provided by your local council.
I - Non gettare le pile e le apparecchiature
fuori uso insieme ai riuti domestici. Le
sostanze dannose contenute in esse possono
nuocere alla salute dell’ambiente. Restituire
questo materiale al distributore o utilizzare la
raccolta differenziata organizzata dal comune.
ES - No tire las pilas ni los aparatos
inservibles con los residuos domésticos, ya
que las sustancias peligrosas que puedan
contener pueden perjudicar la salud y al
medio ambiente.
Pídale a su distribuidor que los recupere o
utilice los medios de recogida selectiva pues
tos a su disposición por el ayuntamiento.
both health and the environment.
FR - Ce symbole indique que l’appareil s’installe et s’utilise uniquement à l’intérieur
I - Questo simbolo indica che l’apparecchio si installa e si utilizza unicamente all’interno
E - Este símbolo indica que el aparato se instala y utiliza únicamente en el interior
P - Este símbolo indica que o aparelho só pode ser instalado e usado em interiores
GB - This symbol indicates that the device must only be installed and used indoors
NL - Dit symbool betekent dat het apparaat alleen binnen mag worden geïnstalleerd en gebruikt
D - Dieses Symbol zeigt an, dass das Gerät nur innen installiert und verwendet wird
P - Não junte as pilhas nem os aparelhos
que já não se usam com o lixo caseiro. As
substâncias perigosas que ambos podem
conter podem ser prejudiciais para a saúde e
para o ambiente. Entregue esses aparelhos ao
seu lixeiro ou recorra aos meios de recolha
selectiva ao seu dispor.
-
NL - De lege batterijen en oude apparaten
niet met het huisvuil meegeven: deze kunnen
gevaarlijke stoffen bevatten die de gezondheid
en het milieu schaden.
De oude apparaten door uw distributeur
laten innemen of de gescheiden vuilinzameling
van uw gemeente gebruiken.
GB - Don’t throw batteries or out of order
products with the household waste (garbage).
Les substances dangereuses qu’ils sont
susceptibles de contenir peuvent nuire à la
santé et à l’environnement. Faites reprendre
ces appareils par votre distributeur ou utilisez
les moyens de collecte sélective mise à votre
disposition par votre commune.
-
D - Verbrauchte Batterien und nicht mehr
benützte Geräte sind Sondermüll. Sie
enthalten möglicherweise gesundheits- und
umweltschädliche Substanzen.
Geben Sie alte Geräte zur fachgerechten
Entsorgung beim Gerätehändler ab bzw.
benutzen Sie die örtlichen Recyclinghöfe.
França
Service 0,35 € / min
Italia: +39 02 96488273
España: +34 902 109 819
BE-NL-LU-DE-CH-AT: +352 26302353
Impresso na RPC

IT
Videocitofono
a colori
642278
2
Manuale d’installazione e uso
Tipo: 461+MU2
V1

642278 - V1 642278 - V1
1.60m
1 7
4
3
6
5
2
Fig. 1
21345 78 96
Fig. 2
Fig. 3
1
2 3 4 5
10
1
2
3
4
5
6
7
Fig. 4

1
Fig. 5
2
Fig. 6
3
1.60m
Fig. 7
MODULO B
Non fourni - Non fornito - No suministrado
Não incluídos - Not supplied - Niet bijgeleverd
Nicht mitgeliefert

642278 - V1 642278 - V1
INDICE
a. Monitor
b. Pulsantiera esterna, telecamera esterna
a. Installazione della pulsantiera esterna (telecamera)
b. Installazione del monitor
b. Collegamento di una bocchetta o di una serratura elettrica
c. Collegamento di una motorizzazione per cancello
6
a. Utilizzo del videocitofono
7
a. Monitor
b. Alimentazione
c. Telecamera
1
ISTRUZIONI DI SICUREZZA. .......................................... p.2
2
DESCRIZIONE. ................................................................... p.2
3
NOMENCLATURA ............................................................. p.2
4
INSTALLAZIONE ............................................................... p.3
5
CABLAGGIO ....................................................................... p.3
a. Collegamento del videocitofono
ISTRUZIONI PER L’USO ................................................... p.4
CARATTERISTICHE TECNICHE ..................................... p.4
8
OPZIONI ............................................................................. p.5
IT1
9
ASSISTENZA TECNICA: - GARANZIA ........................... p.5
10
MISURE DI SICUREZZA ................................................... p.6

1. ISTRUZIONI DI SICUREZZA
Importante!
• Prima di installare e utilizzare il prodotto, leggere attentamente il manuale d’uso.
• Se si installa il prodotto per terze persone, lasciare il manuale originale o copia di esso all’utente nale.
Avvertenza:
• I vari componenti del prodotto devono essere smontati solo da un tecnico autorizzato.
Misure di sicurezza:
• Per utilizzare il sistema in tutta sicurezza, installatori, utenti e tecnici devono attenersi a tutte le procedure di
sicurezza descritte nel presente manuale.
• Ove necessario, sui vari componenti sono riportati avvisi specici e simboli di avvertenza.
2 . DESCRIZIONE (g 1)
1 • Monitor 4 • Pulsantiera esterna
2 • Supporto a parete 5 • Visiera antipioggia
3 • Adattatore di alimentazione a spina
Generalità
Il videocitofono è composto da una postazione di risposta interna con display e da una pulsantiera esterna con
citofono e telecamera che consentono di vedere chi ha suonato e comunicare con l’esterno. L’installazione è parti-
colarmente semplice, perché 2 soli li bastano per assicurare tutte le funzioni: suoneria, immagine video, citofono e
comando bocchetta e cancello. Per un uso efciente, leggere attentamente il presente manuale d’istruzioni.
3 . NOMENCLATURA
a. Monitor (g. 2)
1. Display a colori 4” (11 cm).
2. Premere < 1s: visualizza telecamera pulsantiera esterna.
Premere 5s: accedi al menu.
Premere dalla schermata menu: freccia sinistra
3. Rispondi a una chiamata e parla con chi ha suonato.
Premere dalla schermata menu: freccia destra
4. Apri bocchetta elettrica.
Premere dalla schermata menu: freccia giù
5. Apri cancello (contatto pulito)
6. Microfono per comunicare con la pulsantiera esterna.
7. Regolazione volume suoneria.
8. Presa sul retro del monitor per la spina 17V dell’adattatore (collegare l’adattatore a un impianto conforme alle
norme vigenti: per la Francia, NFC 15-100).
9. Morsettiera per il collegamento dei li della pulsantiera esterna.
10. Altoparlante.
b. Pulsantiera esterna, telecamera esterna (g. 3)
1. Microfono: permette a chi suona di comunicare con chi risponde.
2. Led IR: permette di migliorare la visibilità quando c’è poca luce (luce non visibile a occhio nudo).
3. Obiettivo della telecamera C-MOS.
4. Pulsante di chiamata: premendo questo pulsante il portaetichette si accende e si avverte una suoneria all’interno dell’abitazione. Il display e la telecamera si accendono.
5. Altoparlante: permette di far sentire la propria voce a chi è in ascolto dalla pulsantiera esterna.
6. Morsettiera per il collegamento dei li del monitor
7. Portaetichette. Per cambiare l’etichetta su cui è scritto il nome del residente sollevare delicatamente la
protezione di plastica (7) servendosi di un piccolo cacciavite e inserire la nuova etichetta nel portaetichette. Il
portaetichette si accende quando c’è poca luce.
IT2

642278 - V1 642278 - V1
INSTALLAZIONE
Nota: Se si desidera provare il prodotto prima dell’installazione, fare attenzione a non effettuare il test con
pulsantiera esterna e monitor nella stessa stanza, altrimenti il videocitofono emetterà un suono stridente (effetto
Larsen)
a. Installazione della pulsantiera esterna (g. 4)
1. Rimuovere la vite sotto la pulsantiera esterna (1)
2. Tirare la pulsantiera esterna in avanti (2)
3. L’obiettivo della pulsantiera esterna deve essere posto a circa 1,60 m da terra.
4. Fissare saldamente la visiera antipioggia con delle viti (3) e applicare del silicone* (4) tra la visiera e la parete
per evitare l’inltrazione di acqua. *Non utilizzare silicone a base di acido acetico (odore di aceto).
5. Collegare i li attenendosi allo schema di cablaggio (g.6)
6. Incastrare la pulsantiera esterna (5) nella visiera antipioggia (6).
7. Reinserire la vite di ssaggio (7).
Importante: Non puntare la telecamera direttamente contro la luce del sole o di fronte a una supercie
riettente.
Consiglio: per proteggere i cavi dagli urti e dalle intemperie si consiglia di farli passare all’interno di una guaina di
protezione.
b. Installazione del monitor (g. 5)
1. Fissare il supporto a parete (2) facendo in modo che lo schermo del monitor si trovi a un’altezza da terra di
circa 1,60m.
2. Collegare i li provenienti dalla pulsantiera esterna.
3. Collegare la spina dell’adattatore di alimentazione (3) sul retro del monitor (senza inserire la spina nella presa
di corrente).
4. Installare il monitor (1) sull’apposito supporto a parete (2).
5. Collegare il blocco di alimentazione a una presa di corrente da 230 V .
Nota: Nel caso in cui si debba tagliare il cavo di alimentazione, rispettare la polarità (bianco = + (fig. 7)).
CABLAGGIO
Per evitare eventuali interferenze o malfunzionamenti, non far passare il cavo del videocitofono all’interno della
stessa guaina in cui passano i cavi dell’impianto elettrico.
Attenzione: Non addoppiare i fili per aumentarne la sezione.
a. Collegamento del videocitofono (g. 6)
Fili da utilizzare: • 2 fili da 0,75 mm2 fino a 25 m
• 2 fili da 1,5 mm2 da 25 a 100 m
1. Collegare i fili attenendosi allo schema di cablaggio (fig. 6).
2. 2 soli fili sono sufficienti per assicurare tutte le funzioni: suoneria, immagine video, citofono e comando apertura
(bocchetta e cancello).
Importante:
• Per il cablaggio fare riferimento all’etichetta presente sul retro del monitor e sul retro della telecamera.
b. Collegamento di una bocchetta o di una serratura elettrica (g. 6)
Collegare direttamente ai morsetti 5 e 6 presenti sul retro della pulsantiera esterna (nessuna polarità da
rispettare).
N.B.: funzione attivabile solo con schermo acceso.
IT3

Importante: La bocchetta o la serratura elettrica da installare deve essere dotata di memoria meccanica. Per il
cablaggio fare riferimento all’etichetta presente sul retro della telecamera.
c. Collegamento di una motorizzazione per cancello (g. 6)
Collegare direttamente ai morsetti 3 e 4 presenti sul retro della telecamera. La telecamera dispone di un contatto
“pulito” senza corrente da collegare al comando “pulsante” dell’automatismo.
N.B.: funzione attivabile solo con schermo acceso.
6. ISTRUZIONI PER L’USO
Importante: I tasti sensibili devono essere azionati solo con le dita.
a. Utilizzo e regolazione del videocitofono
Premere < 1s: visualizza le immagini riprese dalla telecamera della pulsantiera esterna.
Premere 5s: accedi al menu.
Premere dalla schermata menu: freccia sinistra.
Rispondi a una chiamata e parla con chi ha suonato.
Premere dalla schermata menu: freccia destra.
Apri bocchetta elettrica.
Premere dalla schermata menu: freccia giù
Apri cancello (contatto pulito)
N.B.: la funzione di apertura è attivabile solo se il display è acceso. Quando il comando viene inviato si ha una breve interruzione dell’immagine.
7. CARATTERISTICHE TECNICHE
a. Monitor
• Alimentazione: 17 V
• Consumo: 25,5 W
• Schermo 4” (11 cm).
• Risoluzione: 480 x 275 pixel
• Misure (mm): 153,8x125x24,4
IT4

642278 - V1 642278 - V1
b. Alimentazione
0 892 350 069
• Adattatore 100-240 V∼, 50/60Hz, 17 V , 1,5A
Nel caso in cui si debba tagliare il cavo di alimentazione, rispettare la polarità
c. Telecamera
• Telecamera C-MOS a colori: 420TVL
• Angolo di visione: O 90° - V 65°
• Temperatura di utilizzo (approssimativa): da -10°C a +45°C
• Indice di protezione: IP44
• Misure con visiera (mm): 165 x 70 x 35
8. OPZIONI
• Tutte le bocchette elettriche Extel
• Tutte le serrature elettriche Extel
• Tutti i cancelli Extel
• Alimentatore modulare MODULO B
9. ASSISTENZA TECNICA - GARANZIA
Guasto Causa Soluzione
• Il monitor non si accende • Il monitor non è alimentato
• Cattiva qualità audio/video • Ambiente
• Cablaggio troppo corto
• L’immagine è troppo lumi-
nosa
• Schermo blu, nessuna
suoneria
• Posizione della telecamera
• Installazione • I fili che collegano il monitor alla
Se necessario, consultare il nostro sito tecnico:
• Controllare che la spina dell’adattatore di alimentazione
sia inserita correttamente.
• Controllare che i cavi utilizzati siano della
sezione giusta e che i cavi di collegamento del
videocitofono non passino all’interno della stessa
guaina di quelli della rete a 230V.
• Usare fili di almeno 4 m.
• Non puntare l’obiettivo della telecamera direttamente contro la luce del sole o di fronte a una
superficie riflettente.
pulsantiera esterna sono invertiti (1 e 2)
Service 0,35 € / min
+ prix appel
IT5

CONDIZIONI DI GARANZIA: La presente apparecchiatura è coperta da una garanzia pezzi e manodope-
ra di 2 anni presso i nostri laboratori.
La garanzia non copre: dispositivi non riutilizzabili (pile, batterie, ecc.) e danni causati da: uso improprio, installazione
non corretta, interventi esterni, danneggiamento causato da urti, scosse elettriche, eventuali cadute o fenomeni
atmosferici.
• Per non far decadere la garanzia evitare di aprire l’apparecchiatura.
• Qualora fosse necessario inviare l’apparecchiatura in assistenza, coprire lo schermo in modo da proteggerlo da
eventuali graffi.
• Pulire usando solo un panno morbido. Non utilizzare solventi. Se i componenti vengono smontati, la garanzia è
annullata. Pulire solo la parte esterna con panno morbido e asciutto. Prima di pulire, scollegare o mettere fuori
tensione l’apparecchiatura.
Attenzione: Non utilizzare prodotti o soluzioni pulenti a base carbonilica, alcol o simili. Oltre al rischio di
danneggiare l’apparecchiatura, i vapori emanati sono pericolosi per la salute ed esplosivi.
Non utilizzare utensili conduttori di tensione (spazzole di metallo, utensili appuntiti o altro) per pulire l’apparecchiatura.
Per la data d’acquisto fanno fede lo scontrino o la fattura.
10. MISURE DI SICUREZZA
Eventuali danni provocati dal mancato rispetto di quanto specicato nel manuale d’istruzioni del prodotto provocano il venire meno delle condizioni di garanzia. CFI EXTEL declina ogni responsabilità in caso di danni dovuti al
mancato rispetto di quanto indicato nel manuale d’istruzioni.
CFI EXTEL declina ogni responsabilità in caso di danni a cose e/o persone causati da un uso improprio del disposi-
tivo o dal mancato rispetto delle misure di sicurezza.
Il presente prodotto è stato realizzato nel pieno rispetto di tutte le norme di sicurezza applicabili. Per fare in modo
che il prodotto rimanga sicuro e funzioni correttamente, l’utente deve attenersi alle istruzioni e alle avvertenze
relative alla sicurezza contenute nel presente manuale.
L’utente del sistema ne è anche il responsabile ed è suo compito assicurarsi che la videosorveglianza effettuata
rispetti le leggi in vigore nel paese di utilizzo dell’apparecchiatura.
: Questo simbolo indica un pericolo di elettrocuzione o cortocircuito.
- Utilizzare il presente prodotto esclusivamente a una tensione compresa tra: 100-240 volt e 50-60 hertz. Non
provare mai a utilizzare il dispositivo con una tensione diversa da quella indicata.
- Controllare che tutti i collegamenti elettrici dell’impianto siano conformi alle istruzioni per l’uso.
- Per l’impiego in locali commerciali, assicurarsi di attenersi alle regole di prevenzione degli incidenti relative agli
impianti elettrici.
- Per l’uso in scuole, istituti di formazione, laboratori, ecc. la presenza di personale qualicato è necessaria per
controllare che tutti i dispositivi elettronici funzionino correttamente.
- Attenersi alle istruzioni per l’uso degli altri dispositivi collegati all’impianto.
- Nel caso in cui si avessero dubbi riguardanti le modalità di funzionamento o la sicurezza dei dispositivi, contattare
una persona qualicata.
- Non collegare o scollegare mai i dispositivi elettrici dalla rete con le mani bagnate.
- Mentre si installa il prodotto controllare che i cavi di alimentazione non corrano il rischio di essere danneggiati.
- Non sostituire mai da soli i cavi elettrici danneggiati: qualora si dovessero sostituire dei cavi danneggiati, rivolgersi
a una persona qualicata.
- La presa di corrente deve trovarsi nelle immediate vicinanze dell’apparecchiatura e deve essere di facile accesso.
Far presente all’utente nale che nella documentazione che accompagna il dispo-
ATTENZIONE
Questo simbolo avverte l’utente nale della presenza, all’interno della scatola elettronica
del prodotto, di "tensioni pericolose" non isolate abbastanza importanti da rappresentare un
pericolo di elettrocuzione per le persone.
sitivo sono contenute informazioni importanti relative all’uso e alla manutenzione
(riparazione) dello stesso.
IT6


0 892 350 069
+ prix appel
GB - Don’t throw away batteries
or out-of-order products with
household waste (rubbish). They
are likely to contain hazardous
substances that are dangerous to
Return the equipment to your local distrib
utor or use the recycling collection service
provided by your local council.
I - Non gettare le pile e le apparecchiature
fuori uso insieme ai riuti domestici. Le
sostanze dannose contenute in esse possono
nuocere alla salute dell’ambiente. Restituire
questo materiale al distributore o utilizzare la
raccolta differenziata organizzata dal comune.
ES - No tire las pilas ni los aparatos
inservibles con los residuos domésticos, ya
que las sustancias peligrosas que puedan
contener pueden perjudicar la salud y al
medio ambiente.
Pídale a su distribuidor que los recupere o
utilice los medios de recogida selectiva pues
tos a su disposición por el ayuntamiento.
both health and the environment.
FR - Ce symbole indique que l’appareil s’installe et s’utilise uniquement à l’intérieur
I - Questo simbolo indica che l’apparecchiatura può essere installata e utilizzata esclusivamente all’interno
E - Este símbolo indica que el aparato se instala y utiliza únicamente en el interior
P - Este símbolo indica que o aparelho só pode ser instalado e usado em interiores
GB - This symbol indicates that the device must only be installed and used indoors
NL - Dit symbool betekent dat het apparaat alleen binnen mag worden geïnstalleerd en gebruikt
D - Dieses Symbol zeigt an, dass das Gerät nur innen installiert und verwendet wird
P - Não junte as pilhas nem os aparelhos
que já não se usam com o lixo caseiro. As
substâncias perigosas que ambos podem
conter podem ser prejudiciais para a saúde e
para o ambiente. Entregue esses aparelhos ao
seu lixeiro ou recorra aos meios de recolha
selectiva ao seu dispor.
-
NL - De lege batterijen en oude apparaten
niet met het huisvuil meegeven: deze kunnen
gevaarlijke stoffen bevatten die de gezondheid
en het milieu schaden.
De oude apparaten door uw distributeur
laten innemen of de gescheiden vuilinzameling
van uw gemeente gebruiken.
GB - Don’t throw batteries or out of order
products with the household waste (garbage).
Les substances dangereuses qu’ils sont
susceptibles de contenir peuvent nuire à la
santé et à l’environnement. Faites reprendre
ces appareils par votre distributeur ou utilisez
les moyens de collecte sélective mise à votre
disposition par votre commune.
-
D - Verbrauchte Batterien und nicht mehr
benützte Geräte sind Sondermüll. Sie
enthalten möglicherweise gesundheits- und
umweltschädliche Substanzen.
Geben Sie alte Geräte zur fachgerechten
Entsorgung beim Gerätehändler ab bzw.
benutzen Sie die örtlichen Recyclinghöfe.
Francia
Service 0,35 € / min
Italia: +39 02 96488273
España: +34.902.109.819
BE-NL-LU-DE-CH-AT: +352 26302353
Stampato in P.R.C.
 Loading...