

GUIDE D’INSTALLATION RAPIDE/
2.4GHz
QUICK START/ HANDLEIDING
VOOR SNELLE INSTALLATIE/ QUICK
INSTALLATION GUIDE/ GUÍA DE
INSTALACIÓN RÁPIDA/ GUIA DE
INSTALAÇÃO RÁPIDA/ GUIDA
D’INSTALLAZIONE RAPIDA / ΟΔΗΓΟΣ
ΓΡΗΓΟΡΗΣ ΕΓΚΑΤΑΣΤΑΣΗΣ
AA
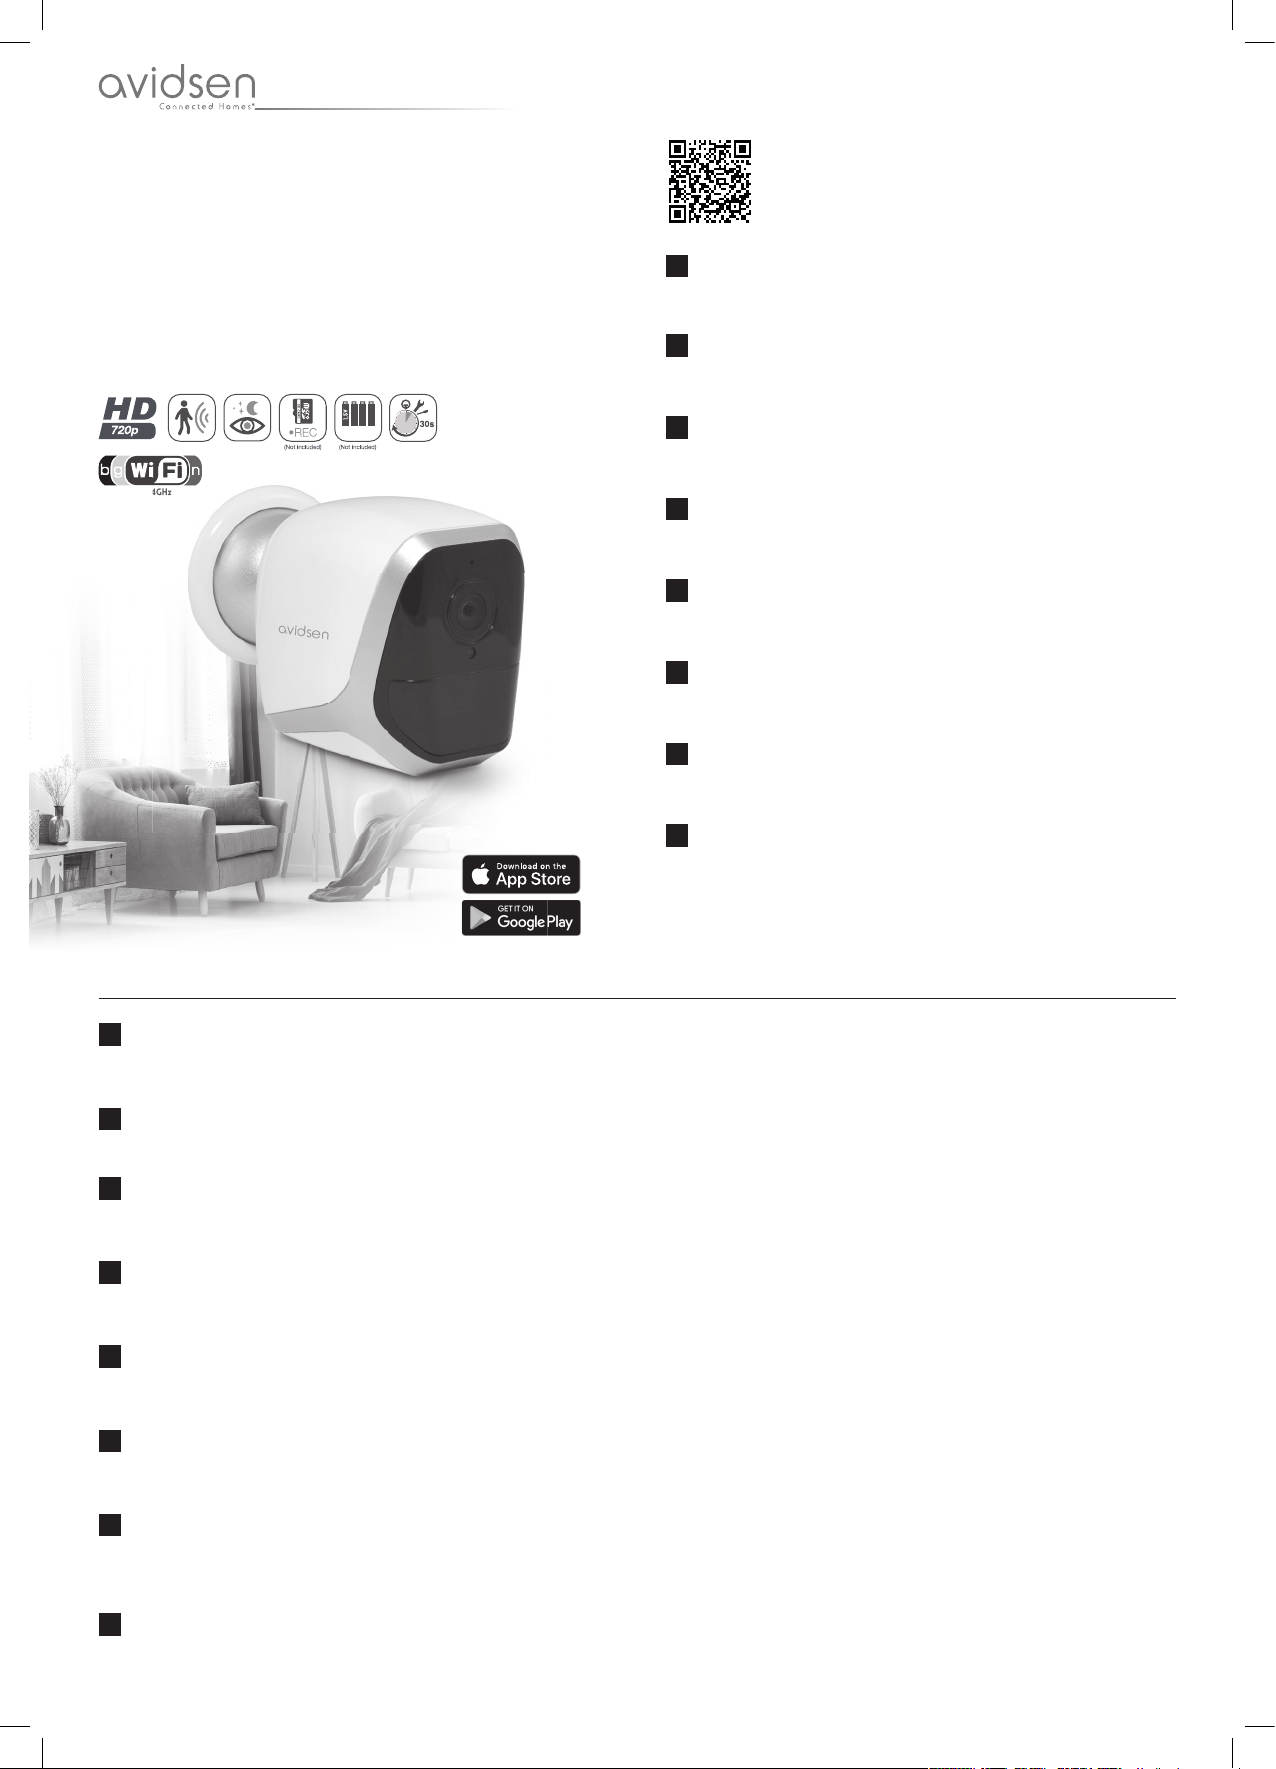
ref. 123985
La notice complète de votre caméra est disponible sur le site www.avidsen.com
FR
ou en fl ashant le QR-CODE ci-dessus depuis votre smartphone ou tablette.
Téléchargez cette notice pour plus de détails sur la mise en service et l’utilisation
de votre caméra IP.
The full instructions for your camera are available on the www.avidsen.com
EN
website or by scanning the QR CODE above using your smartphone or tablet.
Download these instructions for more information on setting up and using your
IP camera.
De volledige handleiding van uw camera is beschikbaar op de site
NL
www.avidsen.com. Deze is ook toegankelijk door bovenstaande QR-CODE
te fl ashen vanaf uw smartphone of tablet. Download de handleiding voor meer
informatie over de installatie en het gebruik van uw IP-camera.
Die vollständige Bedienungsanleitung Ihrer Kamera ist auf der Website
DE
www.avidsen.com erhältlich oder indem Sie nachstehenden QR-CODE über
Ihr Smartphone oder Tablet scannen. Laden Sie sich diese Anleitung für nähere
Einzelheiten zur Inbetriebnahme und Benutzung Ihrer IP-Kamera herunter.
El manual completo de la cámara se encuentra disponible en el sitio
ES
www.avidsen.com o escaneando este código QR con su teléfono inteligente o
tableta. Descargue este manual para más detalles sobre la puesta en marcha y
el uso de la cámara IP.
O manual completo da sua câmara encontra-se disponível no site
PT
www.avidsen.com ou pode usar o CÓDIGO QR no seu smartphone ou tablet.
Transfi ra este manual para mais detalhes sobre a colocação em serviço e a
utilização da sua câmara IP.
V1
Il manuale completo della telecamera è disponibile sul sito www.avidsen.com
IT
oppure fotografando con uno smartphone o un tablet il codice QR qui sopra.
Scaricare questo manuale per maggiori informazioni sulla messa in servizio e
l'utilizzo della telecamera IP.
Το πλήρες εγχειρίδιο της κάμερας είναι διαθέσιμο στην ιστοσελίδα
GR
www.avidsen.com ή σαρώνοντας τον παραπάνω κωδικό QR με το smartphone ή
το tablet σας. Κατεβάστε το εγχειρίδιο αυτό για περισσότερες λεπτομέρειες σχετικά
με την ενεργοποίηση και τη χρήση της κάμερας IP.
1. PRÉCAUTIONS D’UTILISATION / OPERATING PRECAUTIONS / GEBRUIKSVOORSCHRIFTEN / VORSICHTSMASSNAHMEN / PRECAUCIONES DE USO /
PRECAUÇÕES DE UTILIZAÇÃO / PRECAUZIONI PER L’USO / ΠΡΟΦΥΛΑΞΕΙΣ ΧΡΉΣΉΣ
Ne laissez pas les enfants manipuler le produit. Lors du perçage, veillez à ne pas endommager de câbles électriques ou de tuyauterie sous la surface. Coupez l’alimentation
FR
électrique avant toute intervention ou entretien. Le produit est prévu pour une utilisation uniquement intérieure. Ne pas exposer l’objectif aux rayures, salissures ou à la lumière
directe du soleil. L’installation et l’utilisation du produit doivent être en accord avec la législation locale.
Do not allow children to operate the product. When drilling, take care not to damage pipes or electric cables under the surface. Disconnect from the mains before doing any
EN
maintenance or work on the system. This product is designed exclusively for indoor use. Do not expose the lens to scratches, dirt or direct sunlight. Product installation and
use must comply with local laws.
Laat kinderen niet met het product spelen. Let er bij het boren op dat u geen elektrische kabels of leidingen en buizen onder de oppervlakte beschadigt. Sluit de elektrische
NL
voeding af vóór elke interventie of elk onderhoud. Het product is uitsluitend bedoeld voor gebruik binnenshuis. Bewaar de lens niet op een plek waar deze bekrast of vervuild
kan worden, of aan direct zonlicht kan worden blootgesteld. De installatie en het gebruik van het product moeten conform de lokale wetgeving zijn.
Lassen Sie Kinder nicht am Gerät hantieren. Achten Sie darauf, dass Sie beim Bohren keine Stromkabel oder verdeckte Leitungen beschädigen. Trennen Sie das Gerät vor jedem
DE
Eingriff oder jeder Reinigung vom Stromnetz. Das Produkt ist ausschließlich für eine Verwendung im Innenbereich ausgelegt. Das Objektiv darf weder verkratzt noch verschmutzt
und keinem direkten Sonnenlicht ausgesetzt werden. Halten Sie sich bei der Installation und Verwendung des Produkts an die lokalen Gesetze.
No deje que los niños manipulen el producto. Al perforar, tenga cuidado de no dañar los cables eléctricos o las tuberías debajo de la superfi cie. Corte la alimentación eléctrica
ES
antes de realizar cualquier intervención o mantenimiento. El producto está previsto para un uso interior exclusivamente. No exponer el objetivo a rayaduras, suciedad o a la luz
directa del sol. La instalación y el uso del producto deben cumplir con la legislación local.
Não permita que as crianças manipulem o produto Durante a perfuração, certifi que-se de que não danifi ca os cabos elétricos nem os tubos de canalização sob a superfície.
PT
Corte a alimentação elétrica antes de qualquer intervenção ou limpeza. Este produto foi concebido para uma utilização exclusivamente interior. Não expôr a objetiva à arranhões,
sujeira ou à luz direta do sol. A instalação e a utilização do produto deverá ser feita em conformidade com a legislação local.
Tenere lontano dalla portata dei bambini. Quando si praticano i fori per fi ssare la telecamera fare attenzione a non danneggiare eventuali cavi elettrici o tubi posti sotto la superfi cie
IT
del muro. Prima di eseguire interventi di manutenzione o pulizia accertarsi di aver interrotto l’alimentazione elettrica. Il presente prodotto è stato progettato per essere utilizzato
esclusivamente all'interno. Proteggere l’obiettivo contro i graffi e lo sporco e non esporlo alla luce diretta del sole. L’installazione e l’utilizzo del prodotto devono rispettare le
normative locali vigenti.
Μην επιτρέπετε στα παιδιά να χειρίζονται το προϊόν. Κατά τη διάρκεια της διάτρησης, προσέξτε να μην προξενήσετε βλάβη στα ηλεκτρικά καλώδια ή τους σωλήνες κάτω από την
GR
επιφάνεια. Διακόψτε την παροχή ρεύματος πριν από κάθε εργασία παρέμβασης ή συντήρησης. Το προϊόν προορίζεται για χρήση αποκλειστικά σε εσωτερικό χώρο. Αποφύγετε τις
εκδορές, τους ρύπους και την άμεση ηλιακή ακτινοβολία. Το προϊόν θα πρέπει να εγκαθίσταται και να χρησιμοποιείται σύμφωνα με την τοπική νομοθεσία.
2. DESCRIPTION/ DESCRIPTION/ BESCHRIJVING/ BESCHREIBUNG/ DESCRIPCIÓN/ DESCRIÇÃO/ DESCRIZIONE / ΠΕΡΙΓΡΑΦΉ
x 1
2
x 1
4
5
NL
1 Camera
x 1
1
2 USB-kabel voor voeding van de camera
of het opladen van batterijen
3 Plug voor muurbevestiging
4 Schroeven voor muurbevestiging
5 Tool voor het resetten van de camera
PT
1 Câmara
2 Cabo USB para a alimentação da câmara
ou o recarregamento das pilhas
3 Bucha para a fixação na parede
4 Parafusos para a fixação na parede
5 Ferramenta para reinicialização da câmara
x 1
3
FR
x 1
1 Caméra
2 Câble USB pour alimentation de la caméra
ou la recharge de piles
3 Cheville pour fixation murale
4 Vis pour fixation murale
5 Outil pour réinitialisation de la caméra
DE
1 Kamera
2 USB-Kabel zur Stromversorgung der
Kamera oder Akkuaufladung
3 Dübel zur Befestigung an der Wand
4 Schrauben zur Befestigung an der Wand
5 Tool für den Reset der Kamera
IT
1 Telecamera
2 Cavo USB per alimentare la telecamera o
ricaricare le pile
3 Tassello per fissaggio a muro
4 Vite per fissaggio a muro
5 Utensile per il reset della telecamera
EN
1 Camera
2 USB cable for powering the camera
or recharging the batteries
3 Wall plug for wall-mounting
4 Screws for wall-mounting
5 Tool for resetting the camera
ES
1 Cámara
2 Cable USB para al alimentación de la
cámara o para cargar las pilas
3 Taco para la fijación a la pared
4 Tornillos para la fijación mural
5 Herramienta para reiniciar la cámara
GR
1 Κάμερα
2 Καλώδιο USB για την τροφοδοσία της
κάμερας ή τη φόρτιση των μπαταριών
3 Ούπατ για τη στερέωση σε τοίχο
4 Βίδα για τη στερέωση σε τοίχο
5 Αιχμηρό εργαλείο επαναφοράς της κάμερας
3. CONNEXIONS DE LA CAMERA / CAMERA CONNEXIONS/ CAMERA’S AANSLUITEN/ VERBINDUNG DER KAMERAS/ CONEXIONES DE LAS CÁMARAS/ LIGAÇÕES
DAS CÁMARAS / CONNEZZIONE DELLA VIDEOCAMERA / ΣΥΝΔΕΣΕΙΣ ΚΑΜΕΡΑΣ
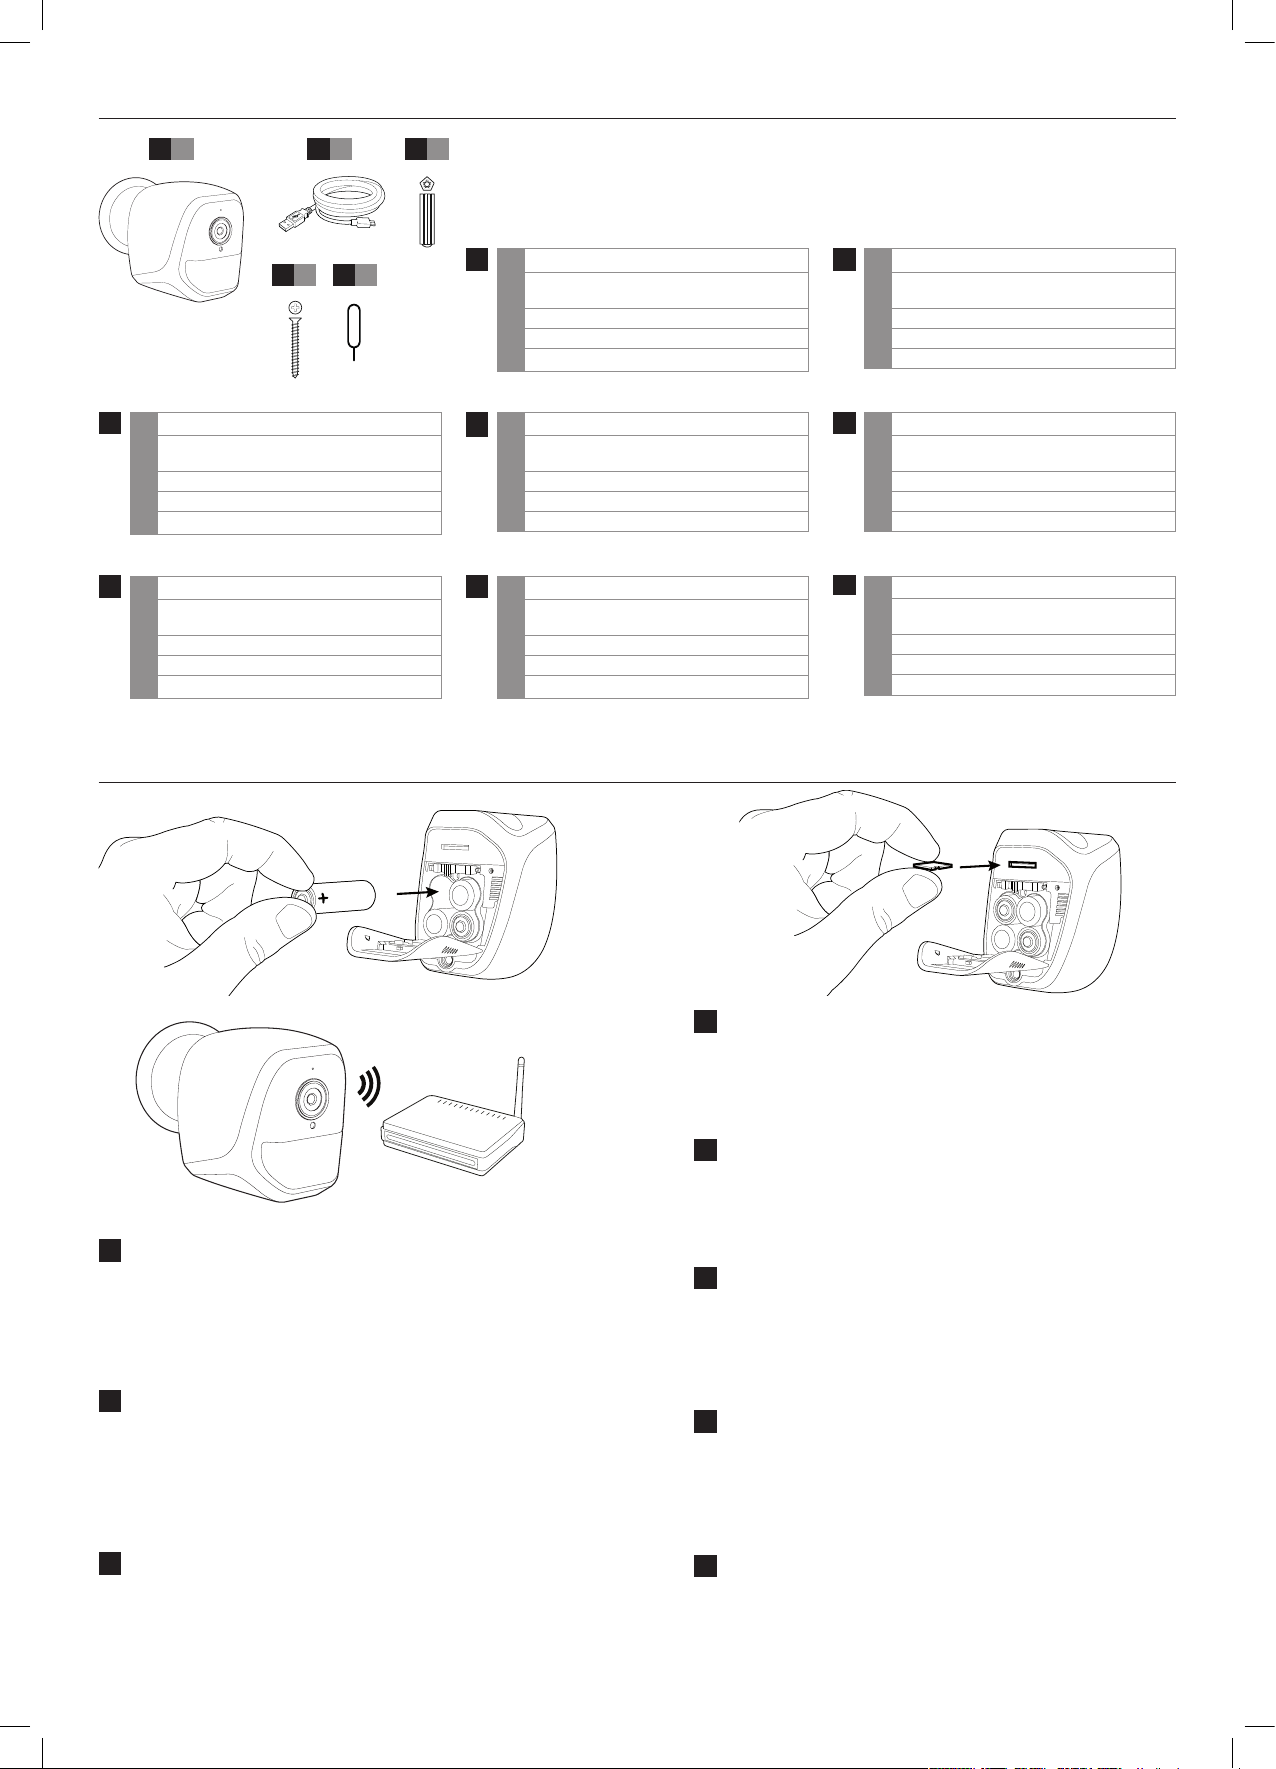
Attention à fixer solidement la caméra pour éviter toute chute. La caméra
FR
peut être posée sur une surface plane, fixée au plafond ou sur un mur.
Alimentez par USB ou insérez 4 piles alcalines ou rechargeables AA dans le
logement de la caméra. Respectez la polarité indiquée sur le capot. Insérez
une carte microSD (non fournie) si vous souhaitez enregistrer lorsqu’un
mouvement est détecté.
Make sure the camera is properly secured to prevent it from falling. The
EN
camera can be placed on a flat surface or fixed to the ceiling or a wall.
Power using USB or insert four alkaline or rechargeable AA batteries into
the camera’s slot. Please comply with polarity indicated on cover. Insert the
microSD card (not included) if you would like to record when movement is
detected.
La cámara se debe fijar firmemente para evitar cualquier caída. La cámara
ES
puede colocarse sobre una superficie plana, se puede fijar en el techo o
en la pared. Conecte una alimentación USB o introduzca 4 pilas alcalinas
o recargables AA en el compartimento de la cámara. Respete la polaridad
indicada en la tapa. Introduzca una tarjeta microSD (no incluida) si desea
grabar cuando se detecte un movimiento.
Zorg ervoor dat de camera stevig is bevestigd, zodat deze niet kan vallen.
NL
De camera kan op een vlakke ondergrond geplaatst worden, aan het
plafond of aan de muur bevestigd worden.
Van voeding voorzien via USB of voer 4 AA alkaline of oplaadbare batterijen
in het vak van de camera in. Let op de polariteit die aangegeven staat op het
klepje. Voer een micro SD-kaart in als u wilt dat beelden worden opgeslagen
bij bewegingsdetectie.
Assicurarsi che la telecamera sia saldamente fissata in modo da prevenire
IT
eventuali rischi di caduta. La telecamera può essere collocata su una
superficie piana oppure fissata al soffitto o a un muro. Alimentare la
telecamera tramite cavetto USB oppure inserendo 4 pile alcaline o
ricaricabili AA nell’apposito alloggiamento. Rispettare la polarità indicata sul
coperchio. Se si desidera avviare una registrazione quando viene rilevato un
movimento, inserire una scheda microSD (non inclusa).
Achten Sie darauf, dass Sie die Kamera gut befestigen, um ein Herunterfallen
DE
zu vermeiden. Die Kamera kann auf einer ebenen Fläche aufgestellt oder an
einer Wand bzw. Decke angebracht werden. Mit USB-Kabel versorgen oder
4 Alkalibatterien bzw. aufladbare Batterien in das vorgesehene Fach der
Kamera einlegen. Die richtige Polarität beachten (siehe Angaben auf dem
Gehäuse). Eine Micro-SD-Karte (gehört nicht zum Lieferumfang) einlegen,
wenn Sie eine Bewegungserkennung speichern wollen.
Πρέπει να προσέξετε, ώστε να στερεώσετε σταθερά την κάμερα προς αποφυγή
GR
τυχόν πτώσης. Η κάμερα μπορεί να τοποθετηθεί σε επίπεδη επιφάνεια, να
στερεωθεί σε οροφή ή σε τοίχο. Η τροφοδοσία μπορεί να γίνει μέσω USB ή
τοποθετώντας 4 αλκαλικές ή επαναφορτιζόμενες μπαταρίες AA στην ειδική
υποδοχή της κάμερας. Ακολουθήστε την πολικότητα που υποδεικνύεται στο
κάλυμμα. Τοποθετήστε μια κάρτα microSD (δεν παρέχεται) εάν επιθυμείτε
εγγραφή βίντεο σε περίπτωση ανίχνευσης κίνησης.
Tenha cuidado para fixar a câmara com segurança de forma a evitar
PT
qualquer queda. A câmara pode ser colocada sobre uma superfície
plana, fixada no teto ou na parede. Forneça energia à câmara por USB ou
coloque 4 pilhas AA alcalinas ou recarregáveis no respetivo compartimento.
Respeite a polaridade indicada na tampa. Introduza um cartão microSD
(não fornecido) caso pretenda que a câmara efetue gravações quando são
detetados movimentos.

4. INSTALLATION DE LA CAMÉRA / INSTALLING THE CAMERA / INSTALLATIE VAN DE CAMERA / MONTAGE DER KAMERA / INSTALACIÓN DE LA CÁMARA /
INSTALAÇÃO DA CÂMARA / INSTALLAZIONE DELLA TELECAMERA / ΕΓΚΑΤΑΣΤΑΣΉ ΤΉΣ ΚΑΜΕΡΑΣ
5. CONFIGURATION / CONFIGURATION / CONFIGURATIE / KONFIGURATION / CONFIGURACIÓN / CONFIGURAÇÃO / CONFIGURAZIONE / ΔΙΑΜΟΡΦΩΣΉ
Téléchargez l’application IP Link sur l’Appstore ou Google Play puis lancez
FR
l’application.
Important : caméra non compatible WiFi 5GHz, non compatible encryptage
WEP. Veuillez vérifier les paramètres WiFi de votre box ou contacter votre
fournisseur d’accès internet en cas de difficulté lors de la connexion.
Download the IP Link application on the Appstore or on Google Play, then
EN
launch the application.
Important: Camera not compatible with 5 GHz WiFi, not compatible with
WEP encryption. Please check the WiFi settings of your gateway with your
internet service provider if you experience connection difficulties.
Download de toepassing IP Link van de App Store of Google Play en start
NL
de toepassing.
Belangrijk: niet-compatibele wifi 5 GHz niet-compatibele WEP-codering.
Controleer de wifiparameters van uw box of neem contact op met uw
internetprovider in geval van problemen met de verbinding.
Laden Sie die APP IP Link im Appstore oder in Google Play herunter und
DE
starten Sie die App.
Wichtig: Die Kamera ist nicht für WLan 5 GHz und nicht für WEPVerschlüsselung geeignet. Überprüfen Sie die WLan-Einstellungen Ihrer Box
oder wenden Sie sich an Ihren Netzbetreiber, wenn Schwierigkeiten mit der
Verbindung auftreten.
Descargue la aplicación IP Link de la Appstore o Google Play y después
ES
inicie la aplicación.
Importante: cámara no compatible con wifi 5 Ghz, no compatible con
encriptado WEP. Compruebe los parámetros wifi de la box o póngase en
contacto con su proveedor de internet en caso de dificultad de conexión.
Descarregue a aplicação IP Link na App Store ou Google Play e inicie a
PT
aplicação.
Aviso: a câmara não é compatível com Wi-Fi de 5 GHz, não é compatível
com a encriptação WEP. Verifique os parâmetros de Wi-Fi da sua box ou
contacte o seu fornecedor de serviços de Internet em caso de dificuldade
de ligação.
Scaricare l’app IP Link da App Store o Google Play e aprirla.
IT
Importante: telecamera non compatibile Wi-Fi 5Ghz, non compatibile
crittografia WEP. In caso di problemi di connessione, controllare le
impostazioni wireless del modem/router o rivolgersi al proprio provider
internet.
Πραγματοποιήστε λήψη της εφαρμογής IP Link από το Appstore ή το Google
GR
Play και εκκινήστε την εφαρμογή.
Σημαντικό: η κάμερα δεν είναι συμβατή με WiFi 5GHz, δεν είναι συμβατή
με κρυπτογράφηση WEP. Σε περίπτωση δυσκολίας σύνδεσης, θα πρέπει να
επαληθεύσετε τις παραμέτρους WiFi ή να επικοινωνήσετε με τον πάροχο
υπηρεσιών Internet.
Application IP Link
IP Link application
Toepassing IP Link
APP IP Link
Aplicación IP Link
Aplicação IP Link
App IP Link
εφαρμογής IP Link

img. 1
img. 2
img. 3
img. 4
img. 5
img. 6
Lancez l’application puis cliquez sur le symbole « + » pour y associer votre caméra
FR
(img 1)
img. 7
A ce stade, votre caméra doit être alimentée et en attente (témoin rouge clignotant
en façade). Cliquez sur « Le voyant rouge clignote » pour poursuivre. (img 2)
L’application vous demande ensuite le type de piles ou batteries (rechargeables
ou non) insérées dans la caméra pour adapter la jauge de batterie à l’écran. Peu
importe votre choix si vous souhaitez utiliser la caméra en l’alimentant par un
adaptateur secteur. (img 3)
L’appareil photo de votre smartphone s’ouvre, et l’appli vous invite à scanner le
QRCode présent sous la caméra. (img 4)
Indiquez ensuite à quel réseau la caméra devra se connecter, ainsi que la clé
correspondante (img 5)
L’accès à chaque caméra nécessite un mot de passe. Renseignez celui que vous
souhaitez utiliser. La combinaison de lettres et chiffres est fortement recommandée
pour plus de sécurité (img 6)
Activez le son de votre smartphone, approchez-le du micro de la caméra puis
cliquez sur « Connecter au WiFi » (img 7)
Le témoin clignotant en façade va passer du rouge clignotant au vert clignotant,
puis au vert fixe une fois le réseau WiFi rejoint. Patientez jusqu’à l’écran suivant :
img. 8
1
2 3 4 5 6
img. 9
7
9
10 11 12 13
img. 10
8
indiquez le nom que vous souhaitez donner à votre caméra. (img 8)
Votre caméra est configurée et connectée. Cliquez sur son image pour afficher
l’image en direct (img 9 et img 10)
1
Miniature de l’image de la caméra
2
Statut de la caméra
Accès au mode « Ne pas déranger » : ne coupe pas les enregistrements
3
mais coupe les notifications dans l’appli
4
Réglages de la détection de mouvement
5
Relecture des vidéos enregistrées sur carte mémoire (non fournie)
6
Réglages complets de la caméra
7
Débit et nombre d’images par seconde actuels
8
Jauge de charge des piles ou batteries
9
Image en direct de la caméra
Démarrage d’un enregistrement en direct avec enregistrement en mémoire
10
du smartphone
11
Activation du micro de la caméra
12
Activation du haut-parleur de la caméra
13
Prise d’une photo en direct avec enregistrement en mémoire du smartphone
Launch the application and click on the "+" symbol to associate your camera (img
EN
1)
At this stage, your camera should be switched on and in standby (flashing red
indicator light on front). Click on “Le voyant rouge clignote” (The red indicator is
flashing). (img 2)
Next, the application will ask you what type of batteries (rechargeable or not) are
in the camera to adapt the battery indicator on the screen. You can choose either
option if you want to power the camera with a mains adapter. (img 3)
The camera on your smartphone opens and the app prompts you to scan the QR
Code on the bottom of the camera. (img 4)
Next, indicate which network the camera should connect to, as well as the
corresponding key. (img 5)
A password is required to access each camera. Enter the one you want you use.
A combination of letters and numbers is highly recommended for better security.
(img 6)
Turn on the sound of your smartphone, bring it closer to the camera microphone
and click on “Connecter au WiFi” (Connect to WiFi). (img 7)
The flashing indicator light on the front will go from flashing red to flashing green,
then to solid green once connected to the WiFi network. Wait until the next screen
appears: enter the name you want to give your camera. (img 8)
Your camera is configured and connected. Click on its image to display the live
video. (img 9 and img 10)
1
Camera image thumbnail.
2
Camera status
Access to « Ne pas déranger » (Do not disturb) mode: does not stop
3
recordings, but mutes notifications in app
4
Movement detection settings
5
Playback videos recorded on memory card (not included)
6
All camera settings
7
Current speed and number of images per second
8
Battery level indicator
9
Live video from the camera
10
Start recording live and save to smartphone memory
11
Activate the camera microphone
12
Activate the camera loudspeaker
13
Take photo immediately and save to smartphone memory

Start de toepassing en druk op het symbool '+' om uw camera ermee te verbinden
NL
(img. 1)
In dit stadium moet uw camera van voeding worden voorzien en in stand-bymodus staan (rood knipperende led aan de voorzijde). Klik op “Le voyant rouge
clignote” (Het rode lampje knippert) om verder te gaan. (img. 2)
De toepassing zal u vervolgens vragen welke soort batterij of accu (oplaadbaar of
niet) u in uw camera heeft ingevoerd om het batterijpercentage aan te passen aan
het scherm. Als u de camera wilt gebruiken met een voedingsadapter is deze keuze
niet van belang. (img. 3)
Het fototoestel van uw smartphone gaat open en de toepassing vraagt u de QRcode, die zich onder de camera bevindt, te scannen. (img. 4)
Geef vervolgens aan met welk netwerk de camera zich zal moeten verbinden en de
bijbehorende sleutel (afb 5)
Voor de toegang van elke camera is een wachtwoord vereist. Vul het wachtwoord
in dat u wilt gebruiken. Voor meer veiligheid wordt een combinatie van letters en
cijfers sterk aangeraden (afb 6)
Zet het geluid van uw smartphone aan, houd uw smartphone dicht bij de microfoon
van de camera en druk op “Connecter au WiFi” (met WiFi verbinden) (afb 7)
Het lampje aan de voorkant gaat van rood knipperend over naar groen knipperend
en wordt, zodra er verbinding is met het WiFi-netwerk, stabiel groen. Wacht tot het
volgende scherm: voer de naam in die u aan uw camera wilt geven. (img. 8)
Uw camera is nu geconfigureerd en verbonden. Druk op het beeld om livebeelden
weer te geven (afb 9 en afb 10)
1
Miniatuur van het beeld van de camera
2
Camerastatus
Toegang tot de modus “Ne pas déranger” (Niet storen): schakelt de
3
opnames niet uit, maar schakelt de meldingen in de toepassing uit
4
Instellingen van de bewegingsdetectie
Opnieuw aflezen van opgenomen video’s op de memorycard (niet
5
bijgeleverd)
6
Volledige instellingen van de camera
7
Debiet en aantal lopende beelden per seconde
8
Batterij- of accupercentage
9
Livebeeld van de camera
Starten van een live-opname met opslag in het geheugen van de
10
smartphone
11
Activering van de microfoon van de camera
12
Activering van een luidspreker van de camera
13
Een livefoto maken met opslag in het geheugen van de smartphone
Starten Sie die App und klicken Sie auf das Symbol „+“, um Ihre Kamera
DE
hinzuzufügen (Bild 1).
Jetzt muss Ihre Kamera unter Strom stehen und sich in der Warteposition befinden
(rot blinkende LED auf der Vorderseite) Klicken Sie auf „Le voyant rouge clignote“
(rote Kontrollleuchte blinkt), um fortzufahren. (img. 2)
Die Applikation fragt Sie anschließend nach dem in die Kamera eingelegten
Batterien- bzw. Akku-Typ (aufladbar oder nicht), um die Akkuanzeige auf dem
Bildschirm anzupassen. Wenn Sie die Kamera über einen Netzadapter einspeisen
wollen, ist Ihre Wahl unwichtig. (img. 3)
Der Fotoapparat Ihres Smartphones wird geöffnet und die App fordert Sie auf,
den QR-Code zu scannen, den Sie auf der Unterseite der Kamera finden. (img. 4)
Machen Sie anschließend Angaben zum Netz, an das sich Ihre Kamera anschließen
soll sowie zum entsprechenden Schlüssel (Bild 5).
Für den Zugriff auf die Kamera ist ein Passwort erforderlich. Geben Sie das von
Ihnen gewünschte Passwort ein. Für eine erhöhte Sicherheit (Bild 6) empfehlen wir
eine Kombination aus Buchstaben und Zahlen.
Aktivieren Sie den Ton Ihres Smartphones, bringen Sie es in die Nähe des
Kameramikrofons und klicken Sie dann auf „Connecter au Wifi“ (Mit dem WLan
verbinden) (Bild 7).
Die rot blinkende Kontrollleuchte auf der Vorderseite blinkt jetzt grün, und sobald
die Verbindung mit dem WLan hergestellt ist, leuchtet sie dauerhaft grün. Warten
Sie geduldig auf den nächsten Bildschirm: Machen Sie Angaben zum Namen, den
Sie Ihrer Kamera geben möchten. (img. 8)
Inicie la aplicación y luego haga clic en el símbolo «+» para emparejar su cámara
ES
(fig. 1)
En ese momento, la cámara debe recibir alimentación y estar en espera (testigo
rojo intermitente en la parte delantera). Haga clic en «Le voyant rouge clignote» (El
indicador rojo parpadea) para continuar. (fig. 2)
La aplicación le preguntará después qué tipo de pilas o baterías (recargables o no)
están introducidas en la cámara para adaptar el indicador de nivel de batería en
la pantalla. Esto no es importante si desea usar la cámara conectándola a la red
eléctrica con un adaptador. (fig. 3)
Se abrirá la cámara de fotos de su teléfono inteligente y la aplicación le invitará a
escanear el código QR que se encuentra debajo de la cámara. (fig. 4)
Indique después a qué red se tiene que conectar la cámara, así como la clave
correspondiente (fig. 5)
El acceso a cada cámara requiere una contraseña. Cumplimente la que desee
usar. Se recomienda vivamente una combinación de letras y cifras para una mayor
seguridad (fig. 6)
Active el sonido de su teléfono inteligente, acérquelo al micrófono de la cámara y
haga clic en «Connecter au WiFi» (Conectar al wifi) (fig. 7).
El testigo intermitente de la parte delantera pasará del rojo intermitente al verde
intermitente y, después, al verde fijo una vez que se haya conectado a la red
wifi. Espere hasta la pantalla siguiente: introduzca el nombre que desea dar a la
cámara. (fig. 8)
Ihre Kamera ist konfiguriert und verbunden. Klicken Sie auf ihr Bild, um das LiveBild anzuzeigen (Bild 9 und Bild 10).
1
Miniaturvorschau der Kamera
2
Statut der Kamera
Zugriff auf den Modus „Ne pas déranger“ (Nicht stören): Die
3
Aufzeichnungen werden hierdurch nicht unterbrochen, sondern nur die
Mitteilungen in der Applikation
4
Stellen Sie hier die Bewegungserfassung ein.
Erneutes Abspielen der auf der Speicherkarte (gehört nicht zum
5
Lieferumfang) gesppeicherten Videos
6
Komplette Einstellung der Kamera
7
Aktuelle Bildrate und Anzahl der Bilder pro Sekunde
8
Batterie- bzw. Akkustandsanzeige
9
Kamera-Livebild
10
Starten der Live-Aufzeichnung mit Ablage im Smartphone-Speicher
11
Aktivieren des Kameramikrofons.
12
Aktivieren des Kameralautsprechers
13
Sofortbildaufnahme (Ablage im Smartphone-Speicher)
La cámara ya está configurada y conectada. Haga clic en la imagen para mostrar
la imagen en directo (fig. 9 y fig. 10)
1
Miniatura de la imagen de la cámara
2
Estado de la cámara
Acceso al modo «Ne pas déranger» (No molestar): no corta las
3
grabaciones, pero sí corta las notificaciones en la aplicación
4
Ajustes de la detección de movimiento
Reproducción de los vídeos guardados en la tarjeta de memoria (no
5
incluida)
6
Ajustes completos de la cámara
7
Velocidad y número de imágenes por segundo actuales
8
Indicador de nivel de carga de las pilas o baterías
9
Imagen en directo de la cámara
Inicio de una grabación en directo con almacenamiento en la memoria del
10
teléfono inteligente
11
Activación del micrófono de la cámara
12
Activación del altavoz de la cámara
Toma de una foto en directo con almacenamiento en la memoria del
13
teléfono inteligente

Inicie a aplicação e clique no símbolo "+" para associar a sua câmara (img 1)
PT
Nesta fase, a câmara deve estar ligada à corrente e ativada (indicador vermelho
intermitente na dianteira). Clique em "Le voyant rouge clignote” (O indicador
vermelho pisca) para continuar. (img 2)
De seguida, a aplicação pergunta qual o tipo de pilhas (recarregáveis ou não)
presentes na câmara para adaptar o indicador de bateria exibido no ecrã. Isto não
será importante se pretender usar a câmara ligada à corrente. (img 3)
A câmara do seu smartphone abre-se e a aplicação solicita a leitura do código QR
presente na câmara. (img 4)
De seguida, indique a que rede a câmara se deve ligar, bem como a palavra-passe
correspondente (img 5)
O acesso a cada câmara exige uma palavra-passe. Introduza a palavra-passe da
câmara que pretende usar. Para maior segurança, é veemente recomendada a
combinação de letras e dígitos (img 6)
Ligue o som do seu smartphone, aproxime-o do microfone da câmara e clique em
"Connecter au WiFi" (Ligar ao Wi-Fi) (img 7)
Depois de efetuada a ligação à rede Wi-Fi, indicador intermitente na dianteira
passa de vermelho intermitente para verde intermitente e depois para verde fixo.
Aguarde até ser exibido o ecrã seguinte: indique o nome que deseja dar à sua
câmara. (img 8)
A sua câmara está configurada e conetada. Clique na imagem para visualizar a
imagem ao vivo (img 9 e img 10)
1
Miniatura da imagem da câmara
2
Estado da câmara
Acesso ao modo "Ne pas déranger" (Não incomodar): são efetuadas
3
gravações mas não são enviadas notificações através da aplicação
4
Configurações da deteção de movimento
5
Reprodução dos vídeos gravados no cartão de memória (não fornecido)
6
Configurações completas da câmara
7
Débito e número real de imagens por segundo
8
Indicador de carga das pilhas ou pilhas recarregáveis
9
Imagem ao vivo da câmara
10
Início de uma gravação ao vivo com gravação na memória do smartphone
11
Ativação do microfone da câmara
12
Ativação do altifalante da câmara
13
Captura de foto ao vivo com gravação na memória do smartphone
Aprire l’app e toccare il simbolo “+” per associare la telecamera (fig. 1)
IT
La telecamera deve essere alimentata e in attesa (spia anteriore rossa
lampeggiante). Cliccare su "Le voyant rouge clignote" (la spia rossa lampeggia) per
continuare. (fig. 2)
L’app chiederà quale tipo di pile è stato inserito (ricaricabile o meno), in modo da
adeguare la barra di indicazione del livello di carica che compare sullo schermo.
Tale impostazione è indifferente se invece si desidera alimentare la telecamera
tramite cavetto. (fig. 3)
La fotocamera dello smartphone o del tablet si apre e l’app invita a fotografare il
codice QR presente sotto la telecamera. (fig. 4)
Indicare a quale rete deve connettersi la telecamera e inserire la relativa password
(fig. 5).
Per accedere a ognuna delle telecamere è richiesta una password. Inserire la
password che si desidera utilizzare. Per una maggiore sicurezza, si consiglia di
usare una password che includa sia lettere che numeri (fig. 6).
Attivare l’audio dello smartphone/tablet, avvicinare il microfono della telecamera e
toccare “Connecter au WiFi” (Connetti alla rete Wi-Fi) (fig. 7).
La spia lampeggiante sulla parte anteriore della telecamera passa da rosso
lampeggiante a verde lampeggiante, per poi diventare verde fissa una volta stabilita
la connessione con la rete Wi-Fi. Attendere fino a quando non sarà visualizzata la
schermata successiva e digitare il nome da assegnare alla telecamera. (fig. 8)
Εκκινήστε την εφαρμογή και κάντε κλικ στο σύμβολο " + " για να αντιστοιχίσετε την
GR
κάμερα (εικ. 1)
Στο στάδιο αυτό, η κάμερα πρέπει να τροφοδοτείται και να βρίσκεται σε κατάσταση
αναμονής (να αναβοσβήνει η κόκκινη ένδειξη στην πρόσοψη). Κάντε κλικ στην επιλογή
«Le voyant rouge clignote» (Η κόκκινη ένδειξη αναβοσβήνει) για να συνεχίσετε. (εικ. 2)
Στη συνέχεια, η εφαρμογή σάς ρωτάει τι είδους μπαταρίες (επαναφορτιζόμενες ή όχι)
έχουν τοποθετηθεί στην κάμερα προκειμένου να ρυθμίσει την ένδειξη μπαταρίας
στην οθόνη. Δεν έχει σημασία τι θα επιλέξετε εάν έχετε σκοπό να χρησιμοποιήσετε
την κάμερα με τροφοδοτικό ρεύματος. (εικ. 3)
Η φωτογραφική μηχανή του smartphone σας ανοίγει και η εφαρμογή σάς προτρέπει
να σαρώσετε τον κωδικό QR που βρίσκεται κάτω από την κάμερα. (εικ. 4)
Υποδείξτε, έπειτα, σε ποιο δίκτυο θα συνδεθεί η κάμερα και καταχωρίστε το αντίστοιχο
κλειδί. (εικ. 5)
Για να έχετε πρόσβαση στην κάμερα απαιτείται κωδικός πρόσβασης. Πληκτρολογήστε
τον κωδικό πρόσβασης που θέλετε να χρησιμοποιήσετε. Για μεγαλύτερη ασφάλεια,
συστήνεται ιδιαίτερα η χρήση συνδυασμού γραμμάτων και αριθμών. (εικ. 6)
Ενεργοποιήστε τον ήχο στο smartphone σας, προσεγγίστε με αυτό το μικρόφωνο της
κάμερας και κάντε κλικ στην επιλογή «Connecter au WiFi» (Σύνδεση στο Wi-Fi). (εικ.7)
Η φωτεινή ένδειξη στην πρόσοψη θα αρχίσει να αναβοσβήνει σε πράσινο χρώμα και
θα σταθεροποιηθεί μόλις ολοκληρωθεί η σύνδεση στο δίκτυο Wi-Fi. Περιμένετε μέχρι
να εμφανιστεί η επόμενη οθόνη: υποδείξτε το όνομα που θέλετε να δώσετε στην
κάμερά σας. (εικ. 8)
La telecamera è configurata e connessa. Toccare l’immagine della telecamera per
mostrare le immagini riprese in diretta (fig. 9 e fig. 10).
1
Anteprima delle immagini della telecamera
2
Stato della telecamera
Accesso alla modalità “Ne pas déranger” (Non disturbare): non interrompe
3
le registrazioni, ma non invia notifiche all’app
4
Impostazione della funzione di rilevamento movimenti
5
Riproduzione dei video salvati nella scheda di memoria (non inclusa)
6
Impostazioni avanzate della telecamera
7
Bitrate e numero di fotogrammi al secondo correnti
8
Barra del livello di carica di pile/batterie
9
Immagini in diretta delle telecamera
Avvio di una registrazione in diretta (salvata nella memoria dello
10
smartphone)
11
Attivazione del microfono della telecamera
12
Attivazione dell'altoparlante della telecamera
13
Scatto di una foto istantanea (salvata nella memoria dello smartphone)
Η κάμερα έχει ρυθμιστεί και συνδεθεί. Κάντε κλικ στην εικόνα της για να εμφανίσετε
απευθείας την εικόνα. (εικ. 9 και εικ. 10)
1
Μικρογραφία της εικόνας της κάμερας
2
Κατάσταση της κάμερας
Ενεργοποίηση της λειτουργίας «Ne pas déranger» (Μην ενοχλείτε): δεν
3
διακόπτεται η εγγραφή, διακόπτονται, όμως, οι ειδοποιήσεις στην εφαρμογή
4
Ρυθμίσεις ανίχνευσης κίνησης
Αναπαραγωγή των βίντεο που καταγράφηκαν στην κάρτα μνήμης (δεν
5
παρέχεται)
6
Γενικές ρυθμίσεις της κάμερας
7
Ροή και αριθμός εικόνων ανά δευτερόλεπτο
8
Ένδειξη φόρτισης μπαταριών
9
Ζωντανή εικόνα κάμερας
Έναρξη εγγραφής ζωντανής μετάδοσης και αποθήκευση στη μνήμη του
10
smartphone
11
Ενεργοποίηση του μικροφώνου της κάμερας
12
Ενεργοποίηση του μεγαφώνου της κάμερας
13
Άμεση λήψη φωτογραφίας και αποθήκευση στη μνήμη του smartphone

6. DÉCLARATION DE CONFORMITÉ / DECLARATION OF CONFORMITY / GELIJKVORMIGHEIDSVERKLARING / KONFORMITÄTSERKLÄRUNG / DECLARACIÓN DE
CONFORMIDAD / DECLARAÇÃO DE CONFORMIDADE / DICHIARAZIONE DI CONFORMITA / ΔΉΛΩΣΉ ΣΥΜΜΟΡΦΩΣΉΣ
Déclaration de conformité à la directive RED
FR EN
SMART HOME FRANCE
Déclare sous son entière responsabilité que
l’équipement désigné ci-dessous :
Caméra-IP sur batteries 720p HD 123985
Est conforme à la directive RED 2014/53/UE et que
sa conformité a été selon les normes applicables en
vigueur :
Konformitätserklärung entsprechend RED-Richtlinie
DE
SMART HOME FRANCE
Erklärt auf eigene Verantwortung, dass das
nachfolgende Gerät:
IP-Kamera mit 720p HD 123985 Akkus
der Richtlinie RED 2014/53/EG entspricht und die
Konformität in Anwendung der geltenden Normen
bewertet wurde:
Dichiarazione di conformità alla direttiva RED
IT
SMART HOME FRANCE
Dichiara sotto la propria responsabilità che il
dispositivo seguente:
Telecamera IP a batterie 720p HD 123985
È conforme alla direttiva RED 2014/53/UE e che tale
conformità è stata valutata in ottemperanza delle
seguenti norme vigenti:
ES
GR
Declaration of conformity with the RED Directive
SMART HOME FRANCE
hereby declares that the equipment designated
below:
720P HD battery-operated IP camera 123985
Complies with the RED 2014/53/EU directive and
that its conformity has been assessed pursuant to
the applicable standards in force:
Declaración de conformidad con la Directiva RED
SMART HOME FRANCE
Declara baja su entera responsabilidad que el
equipo designado a continuación:
Cámara IP con baterías 720p HD 123985
Cumple con la Directiva RED 2014/53/UE y su
conformidad se ha evaluado según las normas
aplicables vigentes:
Δήλωση συμμόρφωσης με την οδηγία RED
Η SMART HOME FRANCE
Δηλώνει υπεύθυνα ότι ο κάτωθι περιγραφόμενος
εξοπλισμός:
Κάμερα IP με μπαταρίες 720p HD 123985
Πληροί τα προβλεπόμενα από την οδηγία RED
2014/53/ΕΚ και η συμμόρφωσή του έχει αξιολογηθεί
σύμφωνα με τα ισχύοντα πρότυπα:
Conformiteitsverklaring betreffende de richtlijn RED
NL
SMART HOME FRANCE
Verklaart onder haar volledige verantwoordelijkheid
dat onderstaande apparatuur:
IP-camera op batterijen 720p HD 123985
Conform de richtlijn RED 2014/53/UE is en dat deze
conformiteit voldoet aan de normen die van kracht
zijn:
Declaração de conformidade à diretiva RED
PT
SMART HOME FRANCE
Declara sob a sua exclusiva responsabilidade que
os equipamentos listados abaixo:
Câmara IP a pilhas 720p HD 123985
Está conforme a diretiva RED 2014/53/UE e que a
sua conformidade foi avaliada segundo as normas
aplicáveis em vigor:
EN60950-1 :2006+A11 :2009+A1 :2010+A12
:2011+A2 :2013
EN62479 :2010
EN301 489-1 V2.2.0 :2017-03
EN301 489-17 V3.2.0 :2017-03
EN300 328 V2.1.1 :2016-11
Tours
13/02/2019
Alexandre Chaverot, President
 Loading...