

Page 1
M O N A R C H
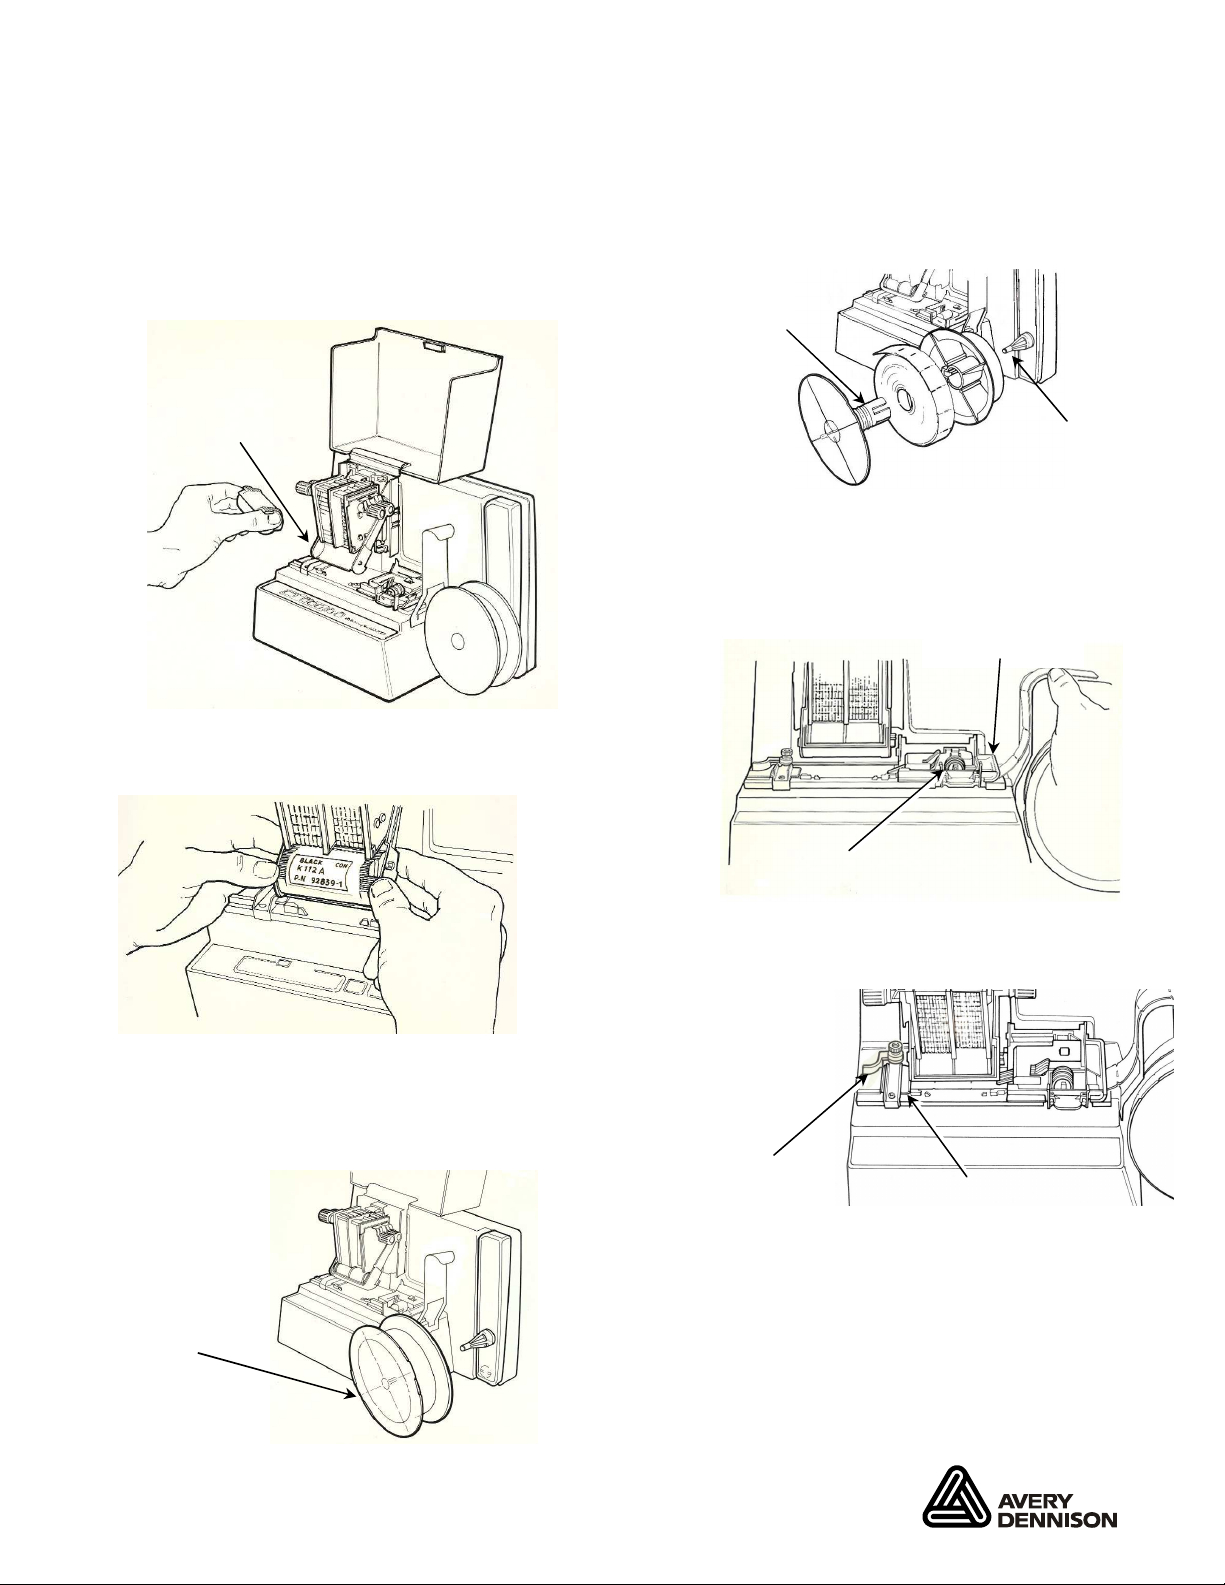
Swin g Arm
Reel s
Reel
Stu d
Oute r
Spi n d l e
An t i
-
backu p Ro ller
Fee d G u ide
Sup p l y
Sup p l y
®
1 7 3 0
®
P R I N T E R
O P E R A T I N G I N S T R U C T I O N S
I N S T A L L A T I O N
1. Place prin ter on a sturdy work surf ace
at a comfor t able height.
2. Ins ert the ink roll assemb ly int o the
ink swing a rm.
3. Rot ate the ink roll cover until t he ink roll
is e xposed and the cover l ocks in place.
2. Ins ert the s pindle of the outer reel into
the supply roll an d inner reel hu b.
Reel
Sup p o rt
3. Snap the a ssembly o n the r eel sup port
stu d. Make sure la bels unwind eas i ly.
4. Lay the supply str ip over the unwi nd
spr ing, und er the f e ed guide, and
to t he anti -backup roller.
L O A D I N G S M A L L C O R E S U P P L Y
1. Remove both r eels fro m the reel supp ort
stu d.
5. Rot ate the anti-backup roller clock wise
to advance the supply under the supply
str ipper.
Guid e
Stri p p e r
6. Use t he suppl y guide t o hold the sup ply
gent ly against the raised edge of the
platen.
Mona rc h an d 173 0 are t ra dem arks of A very Dennison Re tai l Inf or mat io n Service s LLC.
Av er y Denni son is a tr ademark of A ve ry Dennis on Co rp orati on.
TC1740OI Rev. AB 5/09 2009 Avery Dennison Corp. All rights reserved.
Page 2

L O A D I N G L A R G E C O R E S U P P L Y
Reel s
Sup p l y
Seco n d
Posi t i on
Inn e r
Reel
Stu d
Inn e r
An t i
-
backu p Ro ller
Fee d G u ide
Seco n d
1. Remove both r eels fro m the reel supp ort
stu d.
2. Turn the supply ar m lock co unterclockwise t o unlock the su pply ar m .
Ar m
Lock
7. W hen using string tags, shake the roll to
unt angle t he strin g s. Next turn the roll
ove r and b rush the string s outwar d.
Reel
Hub
8. Place the inn er reel h ub int o the su pply
rol l. Make sure the string s are no t
cau ght between the hub and roll.
9. Ins ert the s pindle of the outer reel into
the supply roll an d inner reel hu b.
10. Snap the reel assembl y on the reel
sup port stu d.
11. Insert the secon d flange onto the inner
ree l when using non-string tags.
Fla n g e
Sup p o rt
3. Lif t the sup ply a rm and tur n the lock
clockwise t o lock t he supp ly arm.
4. Turn th e suppl y stud counter -clockwi se
and remove it.
5. Insert the sup port stu d into the sec ond
pos ition a nd turn it clockwise to lock.
6. Insert the fla nge onto the out er reel .
Reel
12. Insert the spind le of the outer reel int o
the supply roll an d inner reel hu b.
13. Snap the assembly on t he reel suppo rt
stu d. Make sure la bels unwind eas i ly.
14. Lay th e supply strip o ver the unwind
spr ing, und er the f e ed guide, and
to t he anti -backup roller.
2
Page 3

15. Rotat e the an ti-back u p rolle r clockwise
Sup p l y
Sup p l y
Sup p l y
Plat e n
Tab
to advance the supply under the supply
str ipper.
2. Stop af ter a f e w labe l s are pr inted:
a) If dat a is in correct, reset th e bands.
b) If data position is inc o rrect, check tha t
sup plies a re again st the r aised e d ge of
the platen . Adjus t the su pply gu ide and
mak e sure th e bands match t he supp ly
type. See “Print Location Adjust m ent”
for more in f ormatio n.
Guid e
Stri p p e r
16. Use the supply g uide to hold the supply
gent ly against the raised edge of the
platen. I f using string t ags, mak e sure
str ings travel free ly in th e feed path.
S E T T I N G P R I NT B A N D S
1. Pull t he knob out unt il chara cter
pointers a re on th e desir ed posit i on.
2. Turn th e knob until t h e desired
cha racter a ppears between the pointers.
(To print a blank, s elect t he blank space
for that position. )
c) If print quality is p oor, see
“Tro ublesh ooting” f or more informat ion.
3. Conti nue prin ting, an d print one mor e
sup ply tha n needed .
4. Tear off print ed supp l ies us i ng the
sup ply st r i pper. Leave ha lf a lab el or
tag as lead er for t he next printi ng.
Stri p p e r
Edg e
5. Posit ion sup p lies ag a inst the raised
edg e of the platen .
P R I N T L O C A T I O N A D J U S T M E N T
3. Repeat steps 1-2 for each po s ition o n
all lines.
4. Push i n the kn ob when f inishe d.
P R I N T E R O P E R A T I O N
1. Turn th e handwheel clockwise . Always
sto p with the han d le at “6 o’cloc k ”.
Dat a may be too f ar to the lef t or rig h t.
1. Push down on the tab:
♦
If data is too f ar left , move the tab left.
♦
If data is too f ar right , move the tab
rig ht.
3
Page 4

C A R E & M A I N T E N A N C E
Tab
Rece s s
Lip
Lat c h
Swin g
Ar m
Cle an the f e ed path and pr int ban d s
reg u larly.
You will n eed a st iff-bris tled no n-metallic
bru sh, soft lint-f ree cloth, an d a com m ercial
adhesive s o lvent.
1. Remove the pr inthead assembly by
pre ssing do wn on t he prin thead la tch.
2. Brush the pri nt surfac e of the print
bands with the bru sh.
Rot ate the bands and clean all pr i nt
cha racters .
Let the in k swing a rm hold the assembly in
place.
5. Remove supplies from t he feed path.
6. Use a soft clo th ligh t ly moistened with
adhesive s o lvent t o remove build- up.
Cle an the platen, unwind spring, and
the f eed guide ass embly.
7. Snap the feed g uide a ssembly down.
8. Repla ce the p rinthea d assembl y by
inserting th e lip into the carrier recess .
Pivot the printhea d up unt il the latch
sna ps int o place.
CAU TION: Never use liquid c leaners or
sol vents t o clean bands.
S P E C I F I C A T I O N S
4. Raise the feed guide assembly by
squeezing t he two tabs.
Hei ght:
Widt h:
Depth:
Wei ght:
Shi pping
Wei ght:
12. 25 inches (311m m)
20 inches ( 508mm)
7.5 inches (190 mm)
7.5 lb. (3. 4 kg)
10 lb. (4. 9 kg)
T R O U B L E S H O O T I N G
Pro b l em Ac t i o n
Hea v y print i n g . Cle a n the pr i n t bands .
Ligh t printi n g .
Voi d s i n pri n t i ng. Cle a n the pr i n t bands .
Doe s n ot pri n t . Che c k that p r i n thead a s s e mbly i s l atched c o rrectl y .
Inc o r r ect pr i n t locat i o n . Adj u s t print l o cation. Also c h e c k corre c t bands a r e set f o r suppl i e s used.
Doe s n ot fee d . Che c k feed gu i d e is se c u re.
To r n suppli e s . Cle a n adhesiv e buildu p f r om pla t e n and fe e d guide.
Cha n g e the i n k roll. ( N e v er tr y to r e -ink th e ink rol l . )
Che c k s upply a r m posit i o n .
Che c k that s u p p l ies ar e a gainst t h e rais e d edge o f t he pla t e n .
4
 Loading...