

Page 1
Page 2

FCC NOTICE
This device has been tested and found to comply with the limits for a Class B digital device, pursuant to Part 15
of the FCC Rules. These limits are designed to provide reasonable protection against harmful interference in a
commercial, industrial or business environment. This equipment can generate, use and radiate radio frequency
energy and, if not installed and used in accordance with the instruction, may cause harmful interference to radio
communications. However, there is no guarantee that interference will not occur in a particular installation. If this
equipment does cause harmful interference to radio or television reception, which can be determined by turning
the equipment off and on, the user is encouraged to try to correct the interference by one or more of the following
measures :
• Reorient or relocate the receiving antenna.
• Increase the separation between the equipment and receiver.
• Connect the equipment into an outlet on a circuit different from that to which the receiver is connected.
• Consult the dealer or an experienced radio/TV technician for help.
This device complies with Part 15 of the FCC Rules. Operation is subject to the following two conditions: (1)
this device may not cause harmful interference, and (2) this device must accept any interference received,
including interference that may cause undesired operation.
CAUTION ON MODIFICATIONS
To comply with the limits for the Class B digital device, pursuant to Part 15 of the FCC Rules, this device must
be installed in computer equipment certified to comply with the Class B limits. All cables used to connect the
computer and peripherals must be shielded and grounded. Operation with non-certified computers or nonshielded cables may result in interference to radio or television reception.
Any changes or modifications not expressly approved by the grantee of this device could void the user's authority
to operate the equipment.
CE NOTICE
This is a Class B product.
DISCLAIMER
No warranty or representation, either expressed or implied, is made with respect to the contents of this
documentation, its quality, performance, merchantability, or fitness for a particular purpose. Information
presented in this documentation has been carefully checked for reliability; however, no responsibility is assumed
for inaccuracies. The information contained in this documentation is subject to change without notice.
In no event will AVerMedia be liable for direct, indirect, special, incidental, or consequential damages arising
out of the use or inability to use this product or documentation, even if advised of the possibility of such
damages.
TRADEMARKS
AVerMedia and AVerMedia TVBox are registered trademarks of AVerMedia TECHNOLOGIES, Inc. IBM PC
is a registered trademark of International Business Machines Corporation. Macintosh is a registered trademark of
Apple Computer, Inc. Microsoft is a registered trademark and Windows is a trademark of Microsoft Corporation.
All other products or corporate names mentioned in this documentation are for identification and explanation
purposes only, and may be trademarks or registered trademarks of their respective owners.
COPYRIGHT
© 2003 by AVerMedia TECHNOLOGIES, Inc. All rights reserved. No part of this publication may be
reproduced, transmitted, transcribed, stored in a retrieval system, or translated into any language in any form by
any means without the written permission of AVerMedia TECHNOLOGIES, Inc.
Page 3

Contents
Introduction ...........................................................................................1
What’s in the Package.........................................................................1
The AVerMedia TVBox™ 5 Unit ..................................................2
Touch Button Control Panel................................................................ 2
Infrared Sensor.................................................................................... 2
Connection Ports................................................................................. 3
Installation and Setup ..................................................................4
Connecting the VGA monitor or LCD Projector ................................. 6
Connecting the Computer.................................................................... 6
Connecting the Antenna ......................................................................7
Connecting the Audio Cable................................................................ 7
Connecting the External Amplified Speaker ........................................ 7
Connecting the Power Adapter............................................................ 7
Connecting the Audio/Video Equipment.............................................. 8
Connecting an Earphone or Headphone .............................................8
Using the AVerMedia TVBox 5 ................................................... 9
Accessing TV Controls ........................................................................9
The Remote Control.............................................................................9
Calling Up a Menu Display.................................................................10
TV Source............................................................................................ 11
CH Finetune .......................................................................................11
CH Scan .............................................................................................11
More.................................................................................................... 12
Default................................................................................................. 12
Favorite CH.........................................................................................12
Set Area ............................................................................................... 13
OSD Positioning ................................................................................. 13
Resolution ...........................................................................................13
Language............................................................................................. 13
Customizing the Picture Setting................................................... 13
Supported Display Setting in PIP mode....................................... 14
LIMITED WARRANTY ................................................................. 14
Page 4
Introduction
Thank you for purchasing the AVerMedia TVBox™ 5!
With the AVerMedia TVBox 5, you can turn your VGA monitor or LCD projector into a
TV/multimedia center with or without turning on your PC. It is true plug-n-play and
there is no software driver required. You can easily switch between TV/Video source
and PC display at anytime.
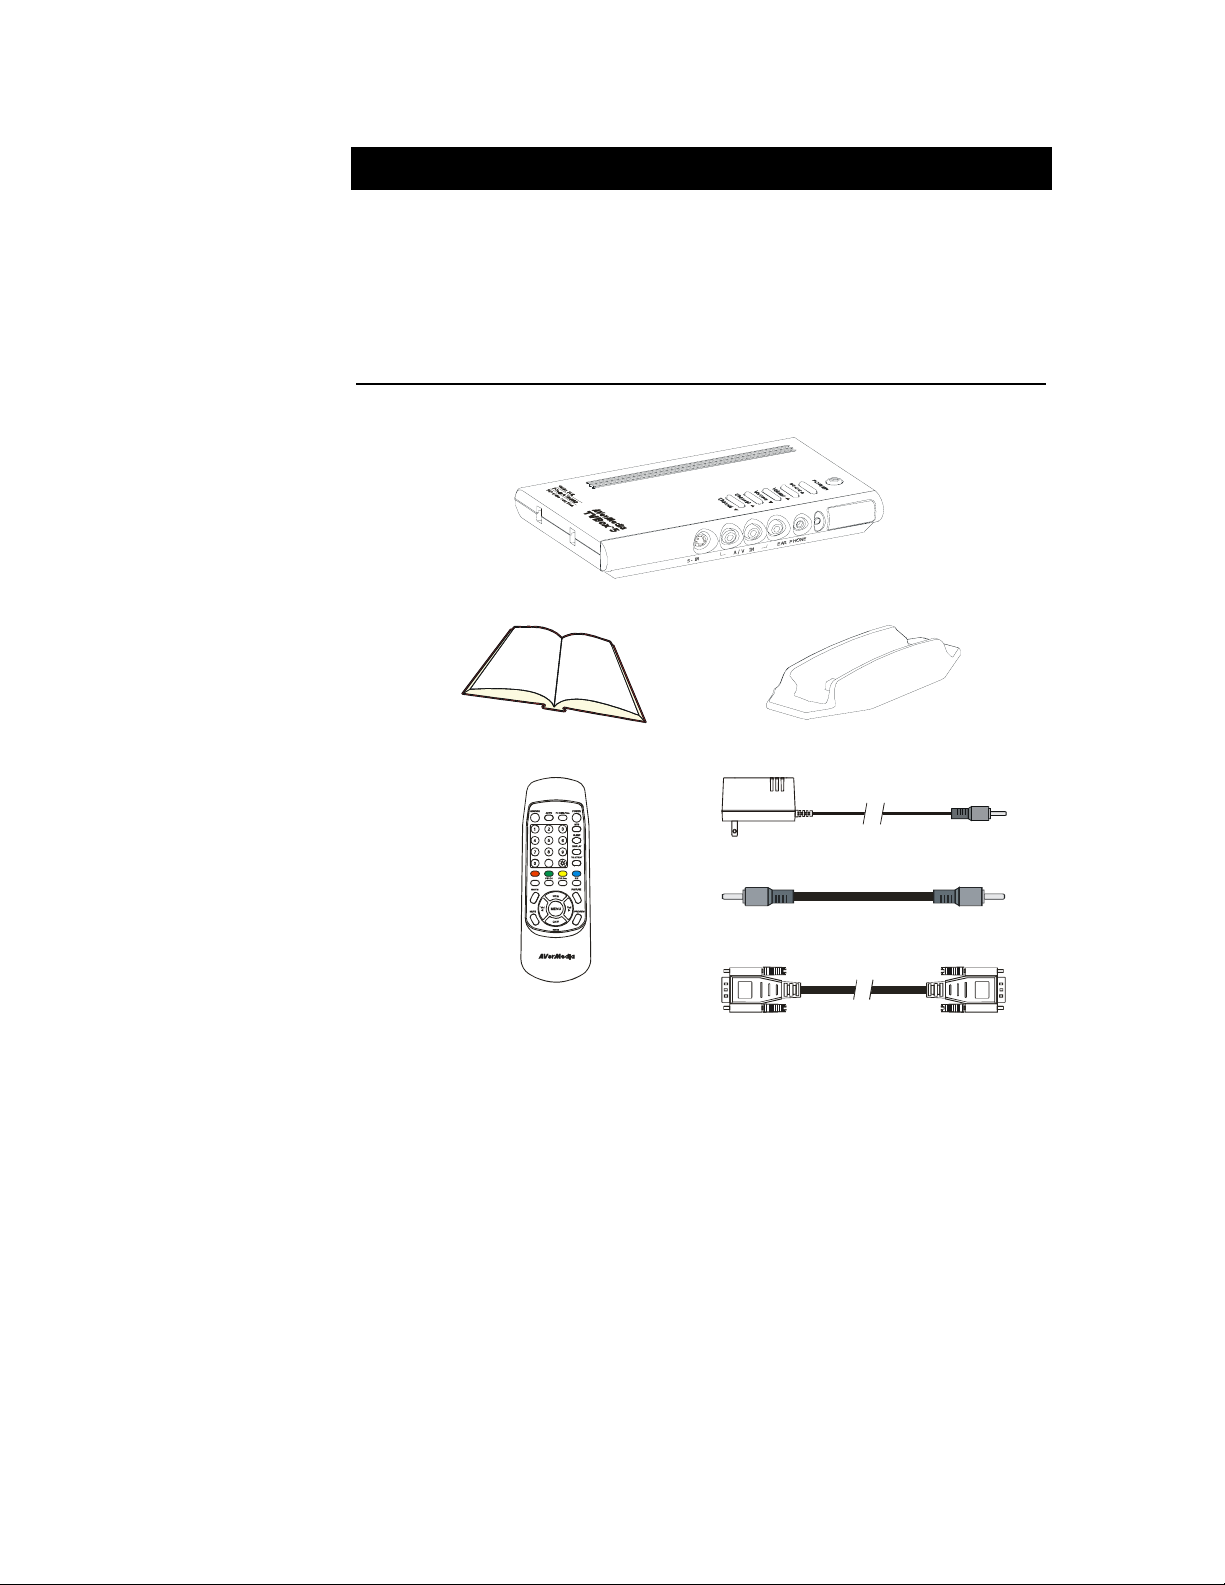
What’s in the Package
Your AVerMedia TVBox 5 package contains the following items:
User’s Manual
AVerMedia TVBox 5
Vertical Stand
Power Adapter
Audio Cable
Remote Control
(Batteries included)
VGA Cable
1
Page 5
AVerMedia TVBox™ 5
The AVerMedia TVBox™ 5 Unit
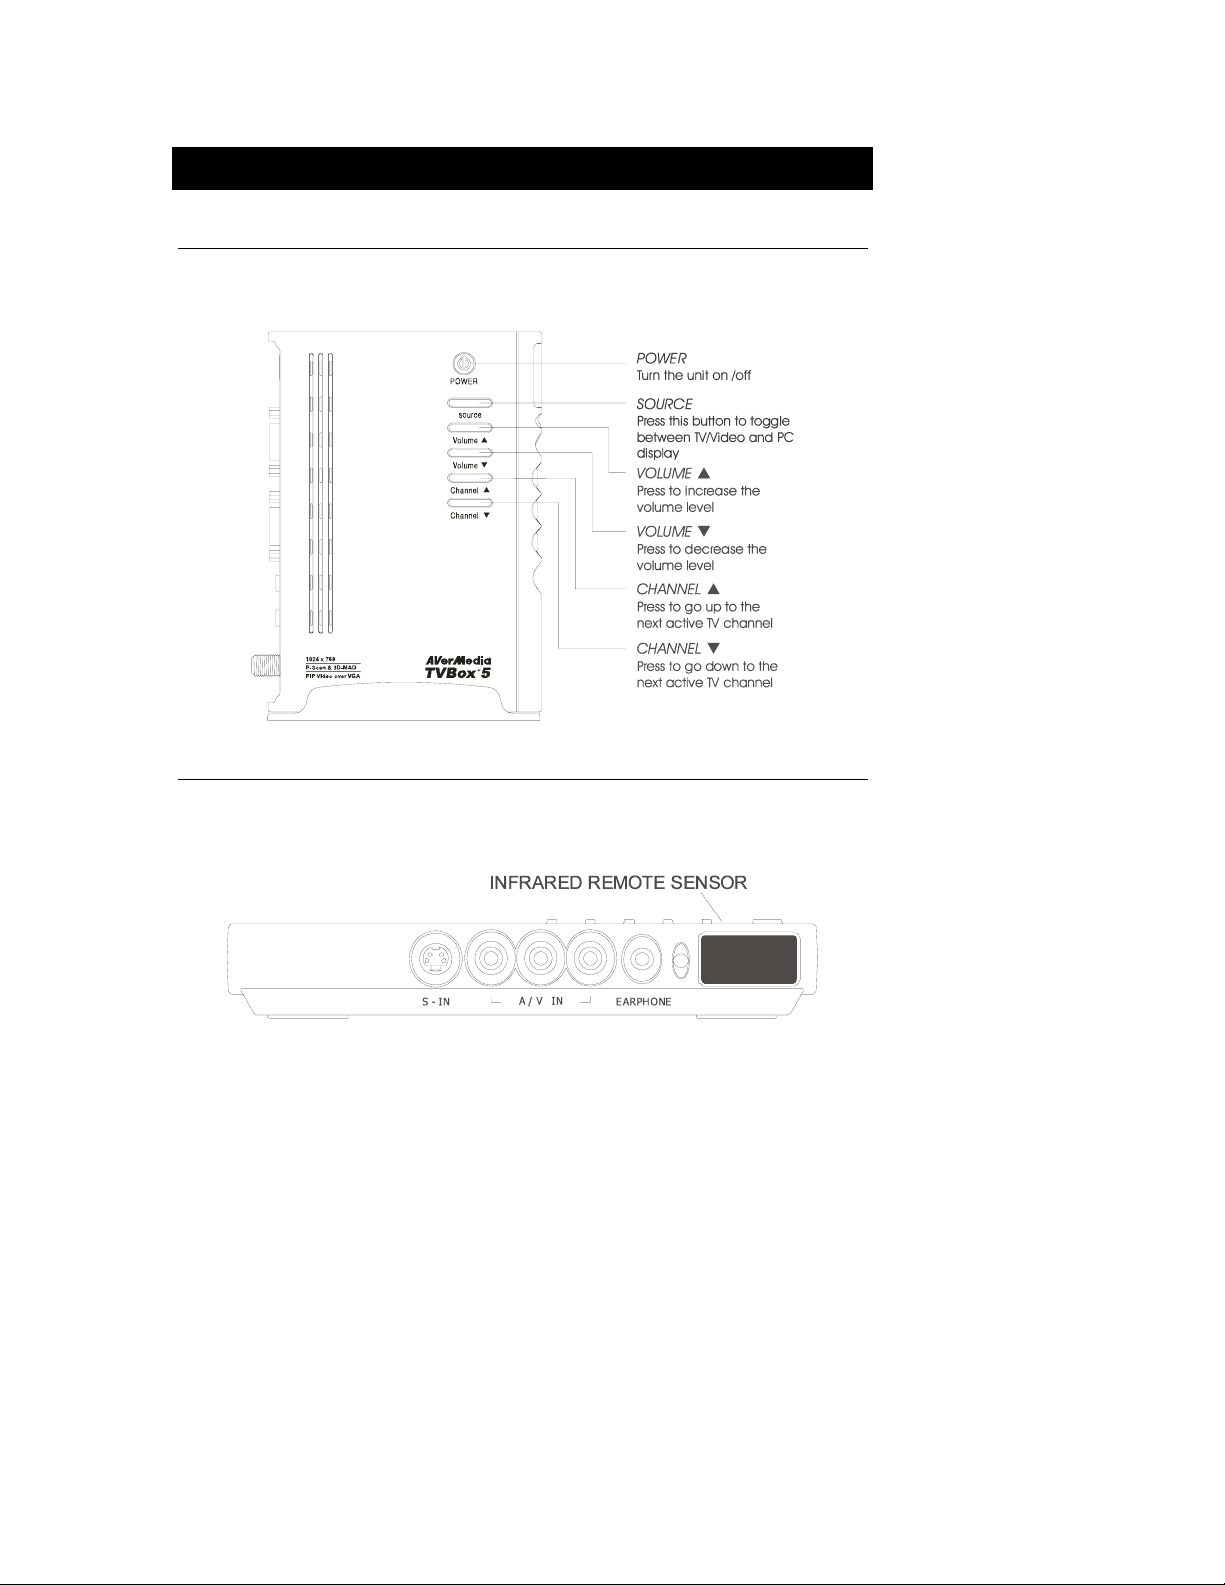
Touch Button Control Panel
The Touch Button Panel found on the top side of the AVerMedia TVBox 5
provides quick access to commonly used functions.
Infrared Sensor
When using the remote control, aim it at the Infrared Sensor which is
located at the front panel of the AVerMedia TVBox 5.
2
Page 6
User Manual
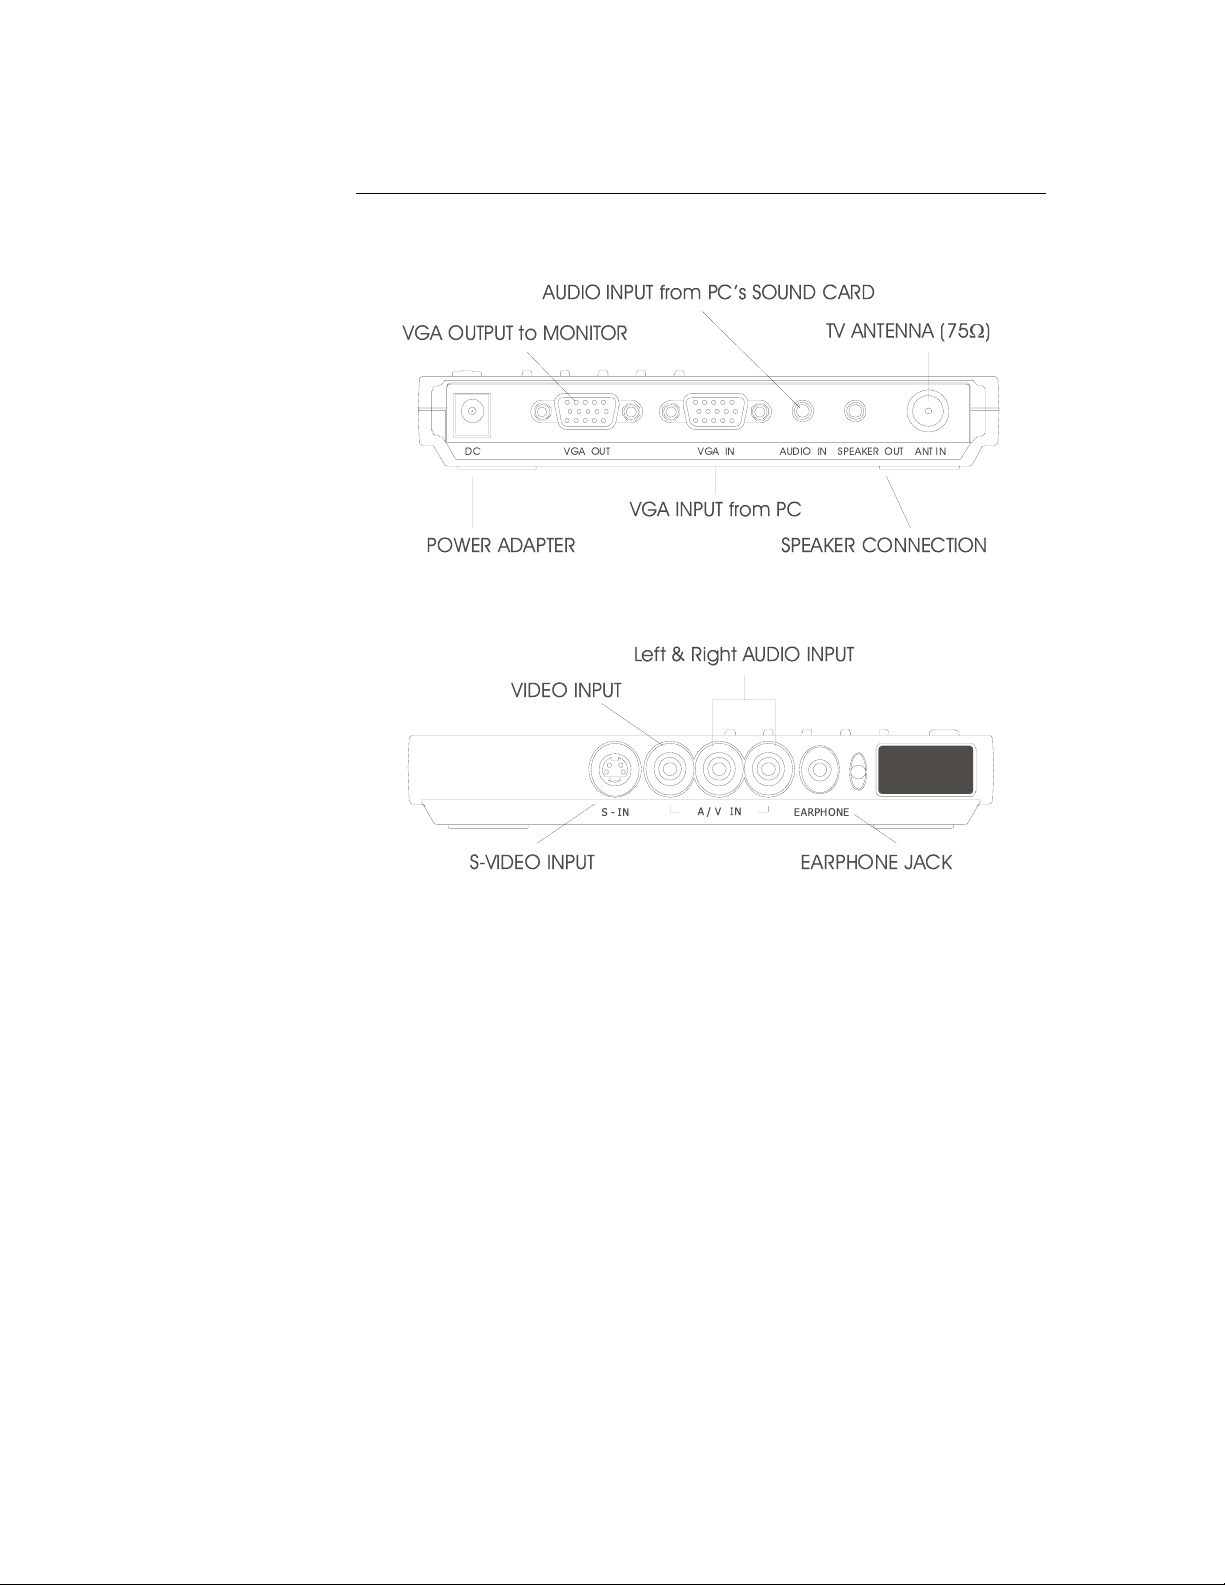
Connection Ports
The port connectors allow connection of your TV antenna, PC, VGA monitor
or LCD projector, speakers, video, or s-video source etc.
AVerMedia TVBox 5 Back Panel
AVerMedia TVBox 5 Front Panel
The Installation and Setup section provides more information on cable
connections.
3
Page 7

AVerMedia TVBox™ 5
Installation and Setup
The figure below shows the proper cable connections for installing AVerMedia TVBox 5 and connecting
it to your audio/video equipment.
4
Page 8

User Manual
5
Page 9

AVerMedia TVBox™ 5
Connecting the VGA monitor or LCD Projector
Connect the VGA monitor or LCD Projector cable to the AVerMedia TVBox
5 VGA OUT port.
Connecting the Computer
You can use AVerMedia TVBox 5 with or without turning on your PC. To
switch to PC anytime, connect the VGA cable to the AVerMedia TVBox 5
VGA IN
connects to the PC).
6
port and to your PC VGA card (the terminal where your monitor
Page 10

Connecting the Antenna
A
Attach the antenna or cable TV to the
ANT IN port of the AVerMedia TVBox 5 .
Connecting an Audio Cable
Plug one end of the supplied audio cable to your sound
card LINE OUT (SPEAKER) port and the
other end to the AUDIO IN port of the
AV e rM ed i a T V Bo x 5 . T hi s connection
allows you to have audio at all times and to
adjust the volume from the
Connecting an External Amplified Speaker
Connect your external
amplified speaker to the
AVerMedia TVBox 5
SPEAKER OUT port.
.
User Manual
AVerMedia TVBox 5 .
Connecting the Power Adapter
Wal l
Outlet
DC VGA INVGA OUT
Power
Adapter
UDIO IN SPEAKER OUT ANT IN
adapter to the DC port of the AVerMedia TVBox 5
then plug it into a standard AC power outlet.
Connect the supplied power
7
Page 11

AVerMedia TVBox™ 5
Connecting the Audio/ Video Equipment
RCA (Composite) Video connection: Connect the video cable (not
included) to the VIDEO OUT of the video device and to the AVerMedia
TVBox 5 A/V IN yellow port.
S-Video connection: Connect the s-video cable (not included) to the SVIDEO OUT of the video device and to the AVerMedia TVBox 5 S-IN port.
If your video device supports s-video, use this type of connection as s-video
provides better picture quality than composite video.
Left and Right Audio connection : Connect the audio cable to the left
& right AUDIO OUT of the video device and to the AVerMedia TVBox 5
A/V IN white and red ports.
Connecting an Earphone or Headphone
You can also use earphones or headphones to listen to audio. Plug
the earphones or headphones to the AVerMedia TVBox 5
EARPHONE port.
8
Page 12

User Manual
Using the AVerMedia TVBox 5
Different countries have different TV systems, for example, PAL-BG, PAL-DK,
NTSC-J, NTSC-M…etc. AVerMedia TVBox 5 functions only with the TV system
of the country it is manufactured for and originally distributed in.
Each column in the table below corresponds to a different type of TV system.
Only one of these TV systems (only one column) will appear as your SET
AREA. Make sure that you select the correct country signal from the menu. To
change the area setting, refer to SET AREA (page 13).
NTSC-J SECAM-DK SECAM-L PAL-I PAL-BG PAL-DK
JAPAN BULGARIA FRANCE UK AUSTRALIA CHINA
ARGENTINA UKRAINE BANGLADESH HUNGARY
BRAZIL BELGIUM POLAND-1
KOREA DENMARK POLAND-2
TAIWAN EGYPT POLAND-3
USA-STD GERMANY SLOVAKIA
USA-HRC GREECE
USA-IRC INDIA
INDONESIA
IRAN
ITALY
NETHERLANDS
NETHERLANDS_1
NETHERLANDS_2
RUMANIA
PORTUGAL
SINGAPORE
SLOVENIA
SPAIN
SWEDEN
SWITZERLAND
TURKEY
UAE
PAL-N
PAL-M
NTSC-M
RUSSIA HK AUSTRIA CZECH
To ensure that you can select and watch all active channels, refer to section CH
SCAN (page 11) on how to automatically scan and memorize all active TV channels
in your area.
Accessing TV Controls
To access various TV controls, open up the menu displays or press on the
remote control buttons.
The Remote Control
The diagram below shows the remote control unit layout.
9
Page 13

AVerMedia TVBox™ 5
Note:
Teletext buttons only present in European model.
Calling Up a Menu Display
Press the MENU button on the
remote control to call up and exit the
main menu or sub-menu display.
Then, you can use the CH▲ or CH▼
buttons to select the items in the
menu list; and the Vol◄ or Vol►
buttons to adjust or to make a
selection. The table on the next page
lists the different functions you will
find in the menu.
10
)
Page 14

Main Menu On Screen Display Usage
TV SOURCE
)
Use the CH▲ or CH▼ buttons to
select between antenna TV or
cable TV source, then press
Vol► button to make the
selection.
User Manual
CH FINETUNE
CH SCAN
)
If the TV reception is not clear,
choose CH FINETUNE then
press Vol◄ and Vol► buttons
until the TV picture becomes
clear.
Use the CH▲ or CH▼ buttons to
select either CH SCAN or All
FREQ SCAN, then press Vol◄
button to make the selection. If
you want to interrupt or cancel the
scanning process, press the
MENU button. Only those
channels scanned prior to
interruption or cancellation will be
memorized.
These two types of channelpreset functions recall all active
channels in your area.
Use the CH SCAN function first.
If there are channels missing after
you perform CH SCAN, use the
ALL FREQ SCAN function and
repeat the searching process.
NOTE: ALL FREQ SCAN is a
very time consuming process. If
the default frequency table
already includes all active TV
channels in your area, then you
do not need to use the ALL FREQ
SCAN.
11
Page 15

AVerMedia TVBox™ 5
Main Menu On Screen Display Usage
MORE..
)
Press Vol► button to call up
MORE.. menu list.
DEFAULT
FAVORITE CH
)
)
Use the CH▲ or CH▼ buttons
to select YES to clear all the
preset channels and to restore
the original factory default
picture setting or NO to exit.
Then press Vol►.
This function enables you to add,
remove, reprogram or reassign
the TV channels with channel
numbers that are easier to
remember.
In the selected USER CH, enter
the new channel number you
want to assign or the channel
number you want to remove/add
to the channel line up. Then, in
the CATV CH or TV CH, enter the
channel number you want to
remap or the channel number you
want to remove/add.
Use the CH▲ or CH▼ buttons
to select ADD to include or DEL
to remove the channel number in
the channel line up and then
press Vol►.
Note: To browse through
channels while setting the
USER CH and CATV
number, press the CH▲ or
CH▼ buttons.
12
Page 16

User Manual
Main Menu
SET AREA
OSD POSITION
RESOLUTION
LANGUAGE
On Screen Display Usage
Press the MENU button, select
)
MORE, select SET AREA in the
MORE, list items, use the CH▲
or CH▼ buttons to choose the
appropriate country signal, then
press Vol► button to make the
selection.
If your country is not listed,
choose another country with the
same TV system as yours.
Use the CH▲, CH▼, Vol◄, and
Vol► buttons to move the frame
where you want to set the position
of the MENU, then press MENU.
Use the CH▲ or CH▼ buttons to
)
choose either 640 x 480, 800 x
600 or 1024 x 768 display
resolution then press Vol►.
Use the CH▲ or CH▼ buttons to
select a different language then
press Vol►.
Customizing the Picture Setting
If you want to adjust the picture quality, press the
PICTURE button on the remote. Then, you can
use the
items in the PICTURE menu; and the Vol◄ or
Vol ► buttons to make the adjustment.
To restore the picture default setting, select
RESET and then press Vol ►.
CH▲ or CH▼ buttons to select the
)
13
Page 17

AVerMedia TVBox™ 5
Supported Display Setting in PIP Mode
The reference table below lists the monitor display resolution and refresh rate
settings that TVBox 5 supports when viewing in PIP mode:
Resolution Refresh Rate (Hz)
640 x 480 60, 72, 75, 85
800 x 600 60, 72, 75, 85
1024 x 768 60, 70, 75, 85
LIMITED WARRANTY
1. Limited Warranty:
For a period of time beginning on the date of purchase of the
applicable product and extending as set forth in Section 6 of this
Limited Warranty (the “Warranty Period”), AVerMedia
Technologies, Inc. (“AVerMedia”) warrants that the applicable
product (“Product”) substantially conforms to AVerMedia’s
documentation for the product and that its manufacture and
components are free of defects in material and workmanship under
normal use. “You” as used in this agreement means you
individually or the business entity on whose behalf you use or install
the product, as applicable. This limited warranty extends only to
You as the original purchaser. Except for the foregoing, the Product
is provided “AS IS.” In no event does AVerMedia warrant that You
will be able to operate the Product without problems or
interruptions, or that the Product is suitable for your purposes. Your
exclusive remedy and the entire liability of AVerMedia under this
paragraph shall be, at AVerMedia’s option, the repair or
replacement of the Product with the same or a comparable product.
This warranty does not apply to (a) any Product on which the serial
number has been defaced, modified, or removed, or (b) cartons,
cases, batteries, cabinets, tapes, or accessories used with this
product. This warranty does not apply to any Product that has
suffered damage, deterioration or malfunction due to (a) accident,
abuse, misuse, neglect, fire, water, lightning, or other acts of
nature, commercial or industrial use, unauthorized product
modification or failure to follow instructions included with the
Product, (b) misapplication of service by someone other than the
manufacturer’s representative, (c) any shipment damages (such
claims must be made with the carrier), or (d) any other causes that
14
Page 18

User Manual
do not relate to a Product defect. The Warranty Period of any
repaired or replaced Product shall be the longer of (a) the original
Warranty Period or (b) thirty (30) days from the date of delivery of
the repaired or replaced Product.
2. Limitations of Warranty:
AVerMedia makes no warranties to any third party. You are
responsible for all claims, damages, settlements, expenses, and
attorneys’ fees with respect to claims made against You as a result
of Your use or misuse of the Product. This warranty applies only if
the Product is installed, operated, maintained, and used in
accordance with AVerMedia specifications. Specifically, the
warranties do not extend to any failure caused by (i) accident,
unusual physical, electrical, or electromagnetic stress, neglect or
misuse, (ii) fluctuations in electrical power beyond AVerMedia
specifications, (iii) use of the Product with any accessories or
options not furnished by AVerMedia or its authorized agents, or (iv)
installation, alteration, or repair of the Product by anyone other than
AVerMedia or its authorized agents.
3. Disclaimer of Warranty
EXCEPT AS EXPRESSLY PROVIDED OTHERWISE HEREIN
AND TO THE MAXIMUM EXTENT PERMITTED BY APPLICABLE
LAW, AVERMEDIA DISCLAIMS ALL OTHER WARRANTIES WITH
RESPECT TO THE PRODUCT, WHETHER EXPRESS, IMPLIED,
STATUTORY OR OTHERWISE, INCLUDING WITHOUT
LIMITATION, SATISFACTORY QUALITY, COURSE OF DEALING,
TRADE USAGE OR PRACTICE OR THE IMPLIED WARRANTIES
OF MERCHANTABILITY, FITNESS FOR A PARTICULAR
PURPOSE OR NONINFRINGEMENT OF THIRD PARTY RIGHTS.
4. Limitation of Liability
IN NO EVENT SHALL AVERMEDIA BE LIABLE FOR INDIRECT,
INCIDENTAL, SPECIAL, EXEMPLARY, PUNITIVE, OR
CONSEQUENTIAL DAMAGES OF ANY NATURE INCLUDING,
BUT NOT LIMITED TO, LOSS OF PROFITS, DATA, REVENUE,
PRODUCTION, OR USE, BUSINESS INTERRUPTION, OR
PROCUREMENT OF SUBSTITUTE GOODS OR SERVICES
ARISING OUT OF OR IN CONNECTION WITH THIS LIMITED
WARRANTY, OR THE USE OR PERFORMANCE OF ANY
PRODUCT, WHETHER BASED ON CONTRACT OR TORT,
INCLUDING NEGLIGENCE, OR ANY OTHER LEGAL THEORY,
EVEN IF AVERMEDIA HAS ADVISED OF THE POSSIBILITY OF
15
Page 19

AVerMedia TVBox™ 5
SUCH DAMAGES. AVERMEDIA’S TOTAL, AGGREGATE
LIABILITY FOR DAMAGES OF ANY NATURE, REGARDLESS OF
FORM OF ACTION, SHALL IN NO EVENT EXCEED THE
AMOUNT PAID BY YOU TO AVERMEDIA FOR THE SPECIFIC
PRODUCT UPON WHICH LIABILITY IS BASED.
5. Governing Law and Your Rights
This warranty gives You specific legal rights; you may also have
other rights granted under state law. These rights vary from state to
state.
Section 6
Warranty Period of AVerMedia Product Purchased:
AVerVision110: 2 Year Limited Parts and Labor.
1 Year of Remote Control, Microscope Lens Adapters
AVerVision300: 3 Year Limited Parts and Labor.
1 Year of LED Document Positioning Light Module, Remote
Control,
and Microscope Lens Adapters.
All other AVerMedia Products: 1 Year Limited Parts and Labor
CONTACT INFORMATION
16
http://www.avermedia.com
Page 20

 Loading...