

Page 1

AVerTV for Mac
User Manual
Ve rs ion 2.0
2008-12-09
Page 2

DISCLAIMER
All the screen shots in this documentation are only example images. The images may vary
depending on the product and software version. Information presented in this
documentation has been carefully checked for reliability; however, no responsibility is
assumed for inaccuracies. The information contained in this documentation is subject to
change without notice.
COPYRIGHT
© 2008 by AVerMedia TECHNOLOGIES, Inc. All rights reserved. No part of this publication
may be reproduced, transmitted, transcribed, stored in a retrieval system, or translated into
any language in any form by any means without the written permission of AVerMedia
TECHNOLOGIES, Inc.
International Headquarter
Address No. 135, Jian-Yi Road Chung-Ho City, Taipei Hsien Taiwan
Website www.avermedia.com
Telephone 886-2-2226-3630
Page 3

AVerTV for Mac User’s Manual
Table of Contents
Table of Contents..................................................................................................................................i
Introduction..........................................................................................................................................1
System Requirements...................................................................................................................2
Running AVerTV for Mac for the First Time...............................................................................3
Introducing the User Interface .....................................................................................................5
Combined.............................................................................................................................5
Horizontal and Vertical ........................................................................................................6
On Screen Menu ..................................................................................................................................7
TV ........................................................................................................................................................9
Scanning Channels.......................................................................................................................9
Scanning Channels (for Advanced Users) .................................................................................12
All Frequencies Scan .........................................................................................................12
Manual Add Channel .........................................................................................................14
Watch TV ...................................................................................................................................16
Operate by Control panel...................................................................................................16
Operate by Control menu...................................................................................................16
Switching Channel by Keyboard .......................................................................................16
Channel Preview........................................................................................................................16
Setting the Channel Preview..............................................................................................17
TimeShift....................................................................................................................................17
Operate by Control panel...................................................................................................17
Operate by Control menu...................................................................................................18
TimeShift Setting...............................................................................................................18
Using the EPG Function ............................................................................................................20
Fine Tuning Color of the Display..............................................................................................22
Using the OverScan function.....................................................................................................23
Adjusting Volume.......................................................................................................................24
Changing Audio Channels .........................................................................................................24
Change Signal Source................................................................................................................24
Changing the OSD Attributes....................................................................................................24
Changing Display Aspect Ratio.................................................................................................25
TV W indow Controlling............................................................................................................26
Other Layout Controlling in Window Menu......................................................................26
i
Page 4

AVerTV for Mac User’s Manual
Window Size Setting..................................................................................................................27
Personal V ideo Recorder....................................................................................................................29
Record Storage Setting...............................................................................................................29
Recording Format settings.........................................................................................................31
Using the Recording Function ...................................................................................................31
Schedule Recording ...................................................................................................................32
Playing the Recorded Programs.................................................................................................35
Picture-in-Picture Display..........................................................................................................38
Image Capture....................................................................................................................................40
Capture a TV/Video Image ........................................................................................................40
Multiple Image Sequence Capture.............................................................................................40
Other Settings.....................................................................................................................................42
Setting Power Options ...............................................................................................................42
Application Information.............................................................................................................44
Customer Support ......................................................................................................................44
Closed Caption & Subtitle .........................................................................................................45
Use Apple Remote to control AVerTV.......................................................................................45
Hot keys .............................................................................................................................................46
ii
Page 5
Introduction
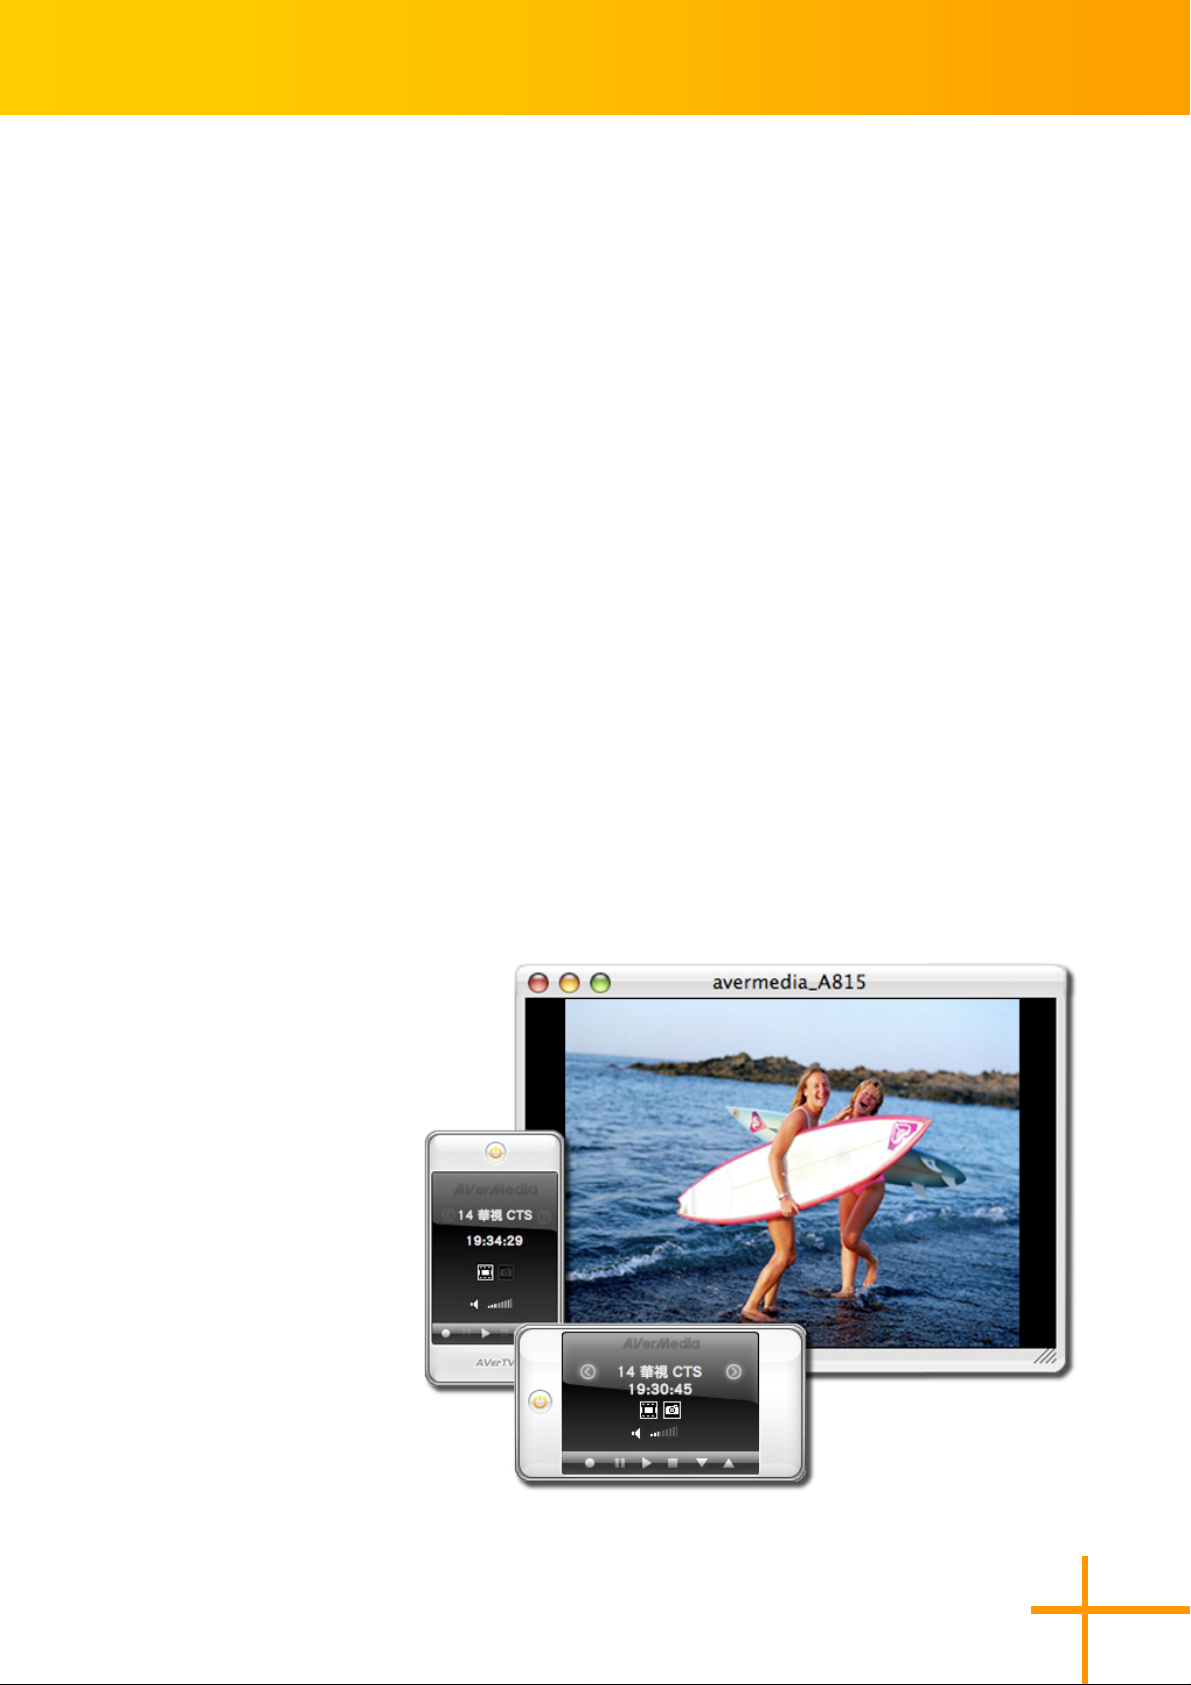
Thanks for purchasing AVerTV for Mac!! This
powerful application allows you to watch TV,
listen to the radio, create slide shows, record
favorite programs and enjoy various features on
your Mac. With our easy-to-use remote control,
you will discover more fun from your Mac.
Turning your computer system into a media
center is just that simple!
This Chapter will introduce the essential
AVerTV for Mac User’s Manual
information of AVerTV for Mac to you. Please
do read this chapter carefully before using the
application.
Please be noted the functions and images may
vary depending on the product you purchased
and the area you’re living.
1
Page 6

AVerTV for Mac User’s Manual
System Requirements
System requirements are described in detail below. Before using AVerTV for Mac, make
sure your Mac meets all the requirements addressed below.
z Processor: Macintosh
For watching MPEG-2 HDTV: Macintosh® computer with a Intel Duo Core processor
z Operating System: Mac OS X v10.4 (or later)
z Memory: 512 MB of physical RAM or above
z Hard Disk: 300 MB of available hard-disk space
z Drives: CD-ROM drive (or connection to a local area network if installing over a
network)
®
computer with a Intel Core processor
2
Page 7
AVerTV for Mac User’s Manual
Running AVerTV for Mac for the First Time
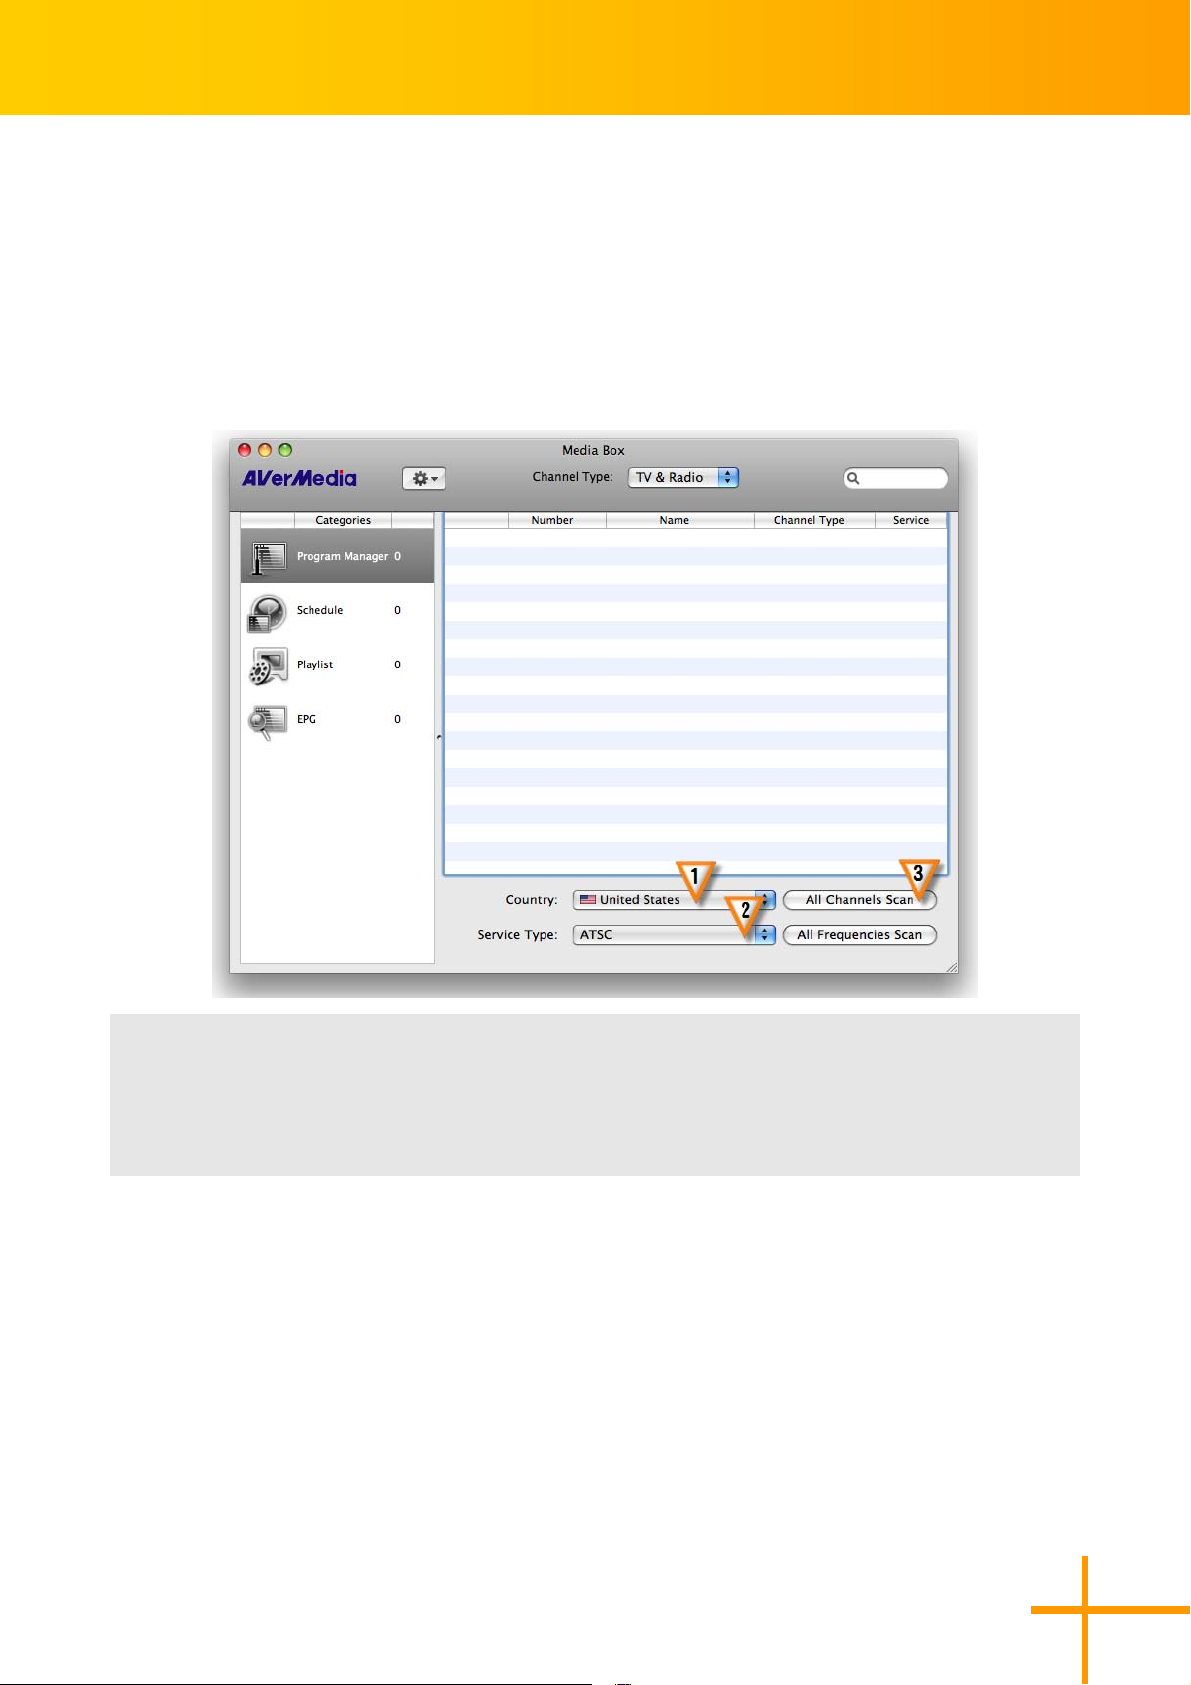
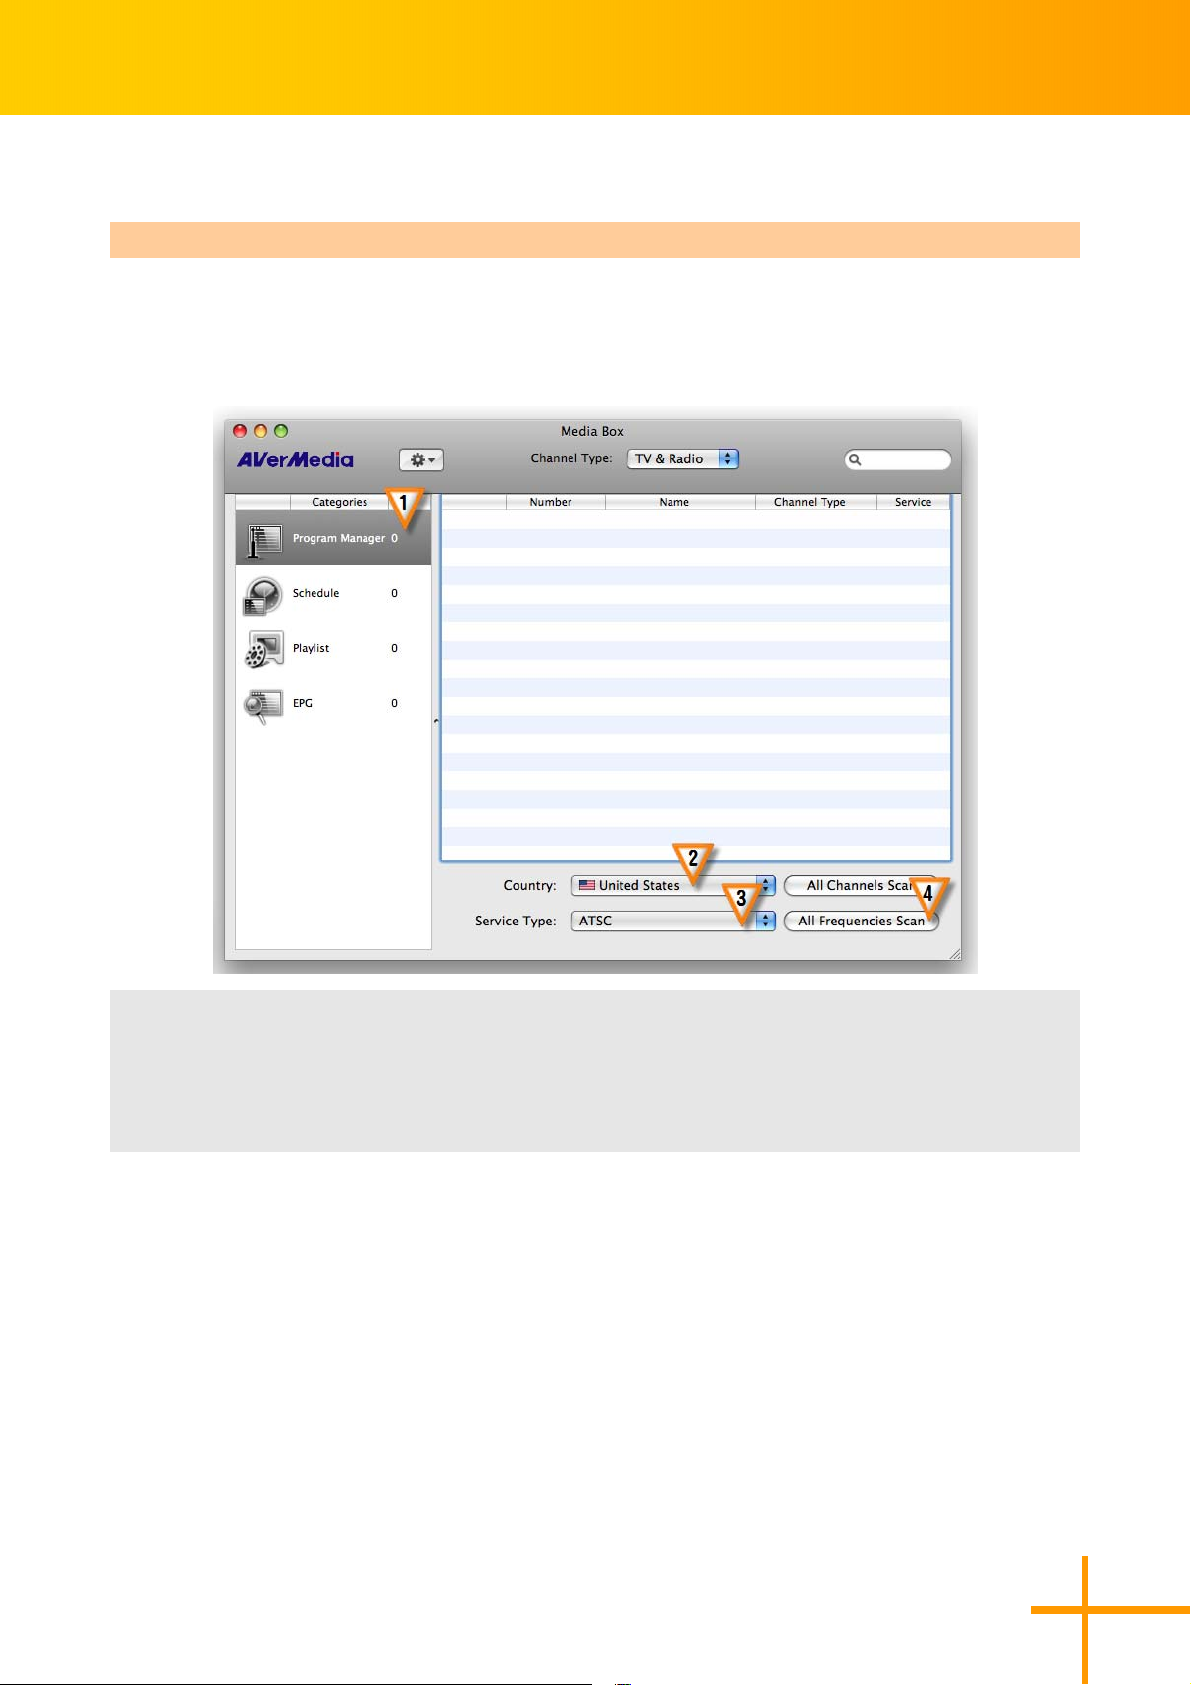
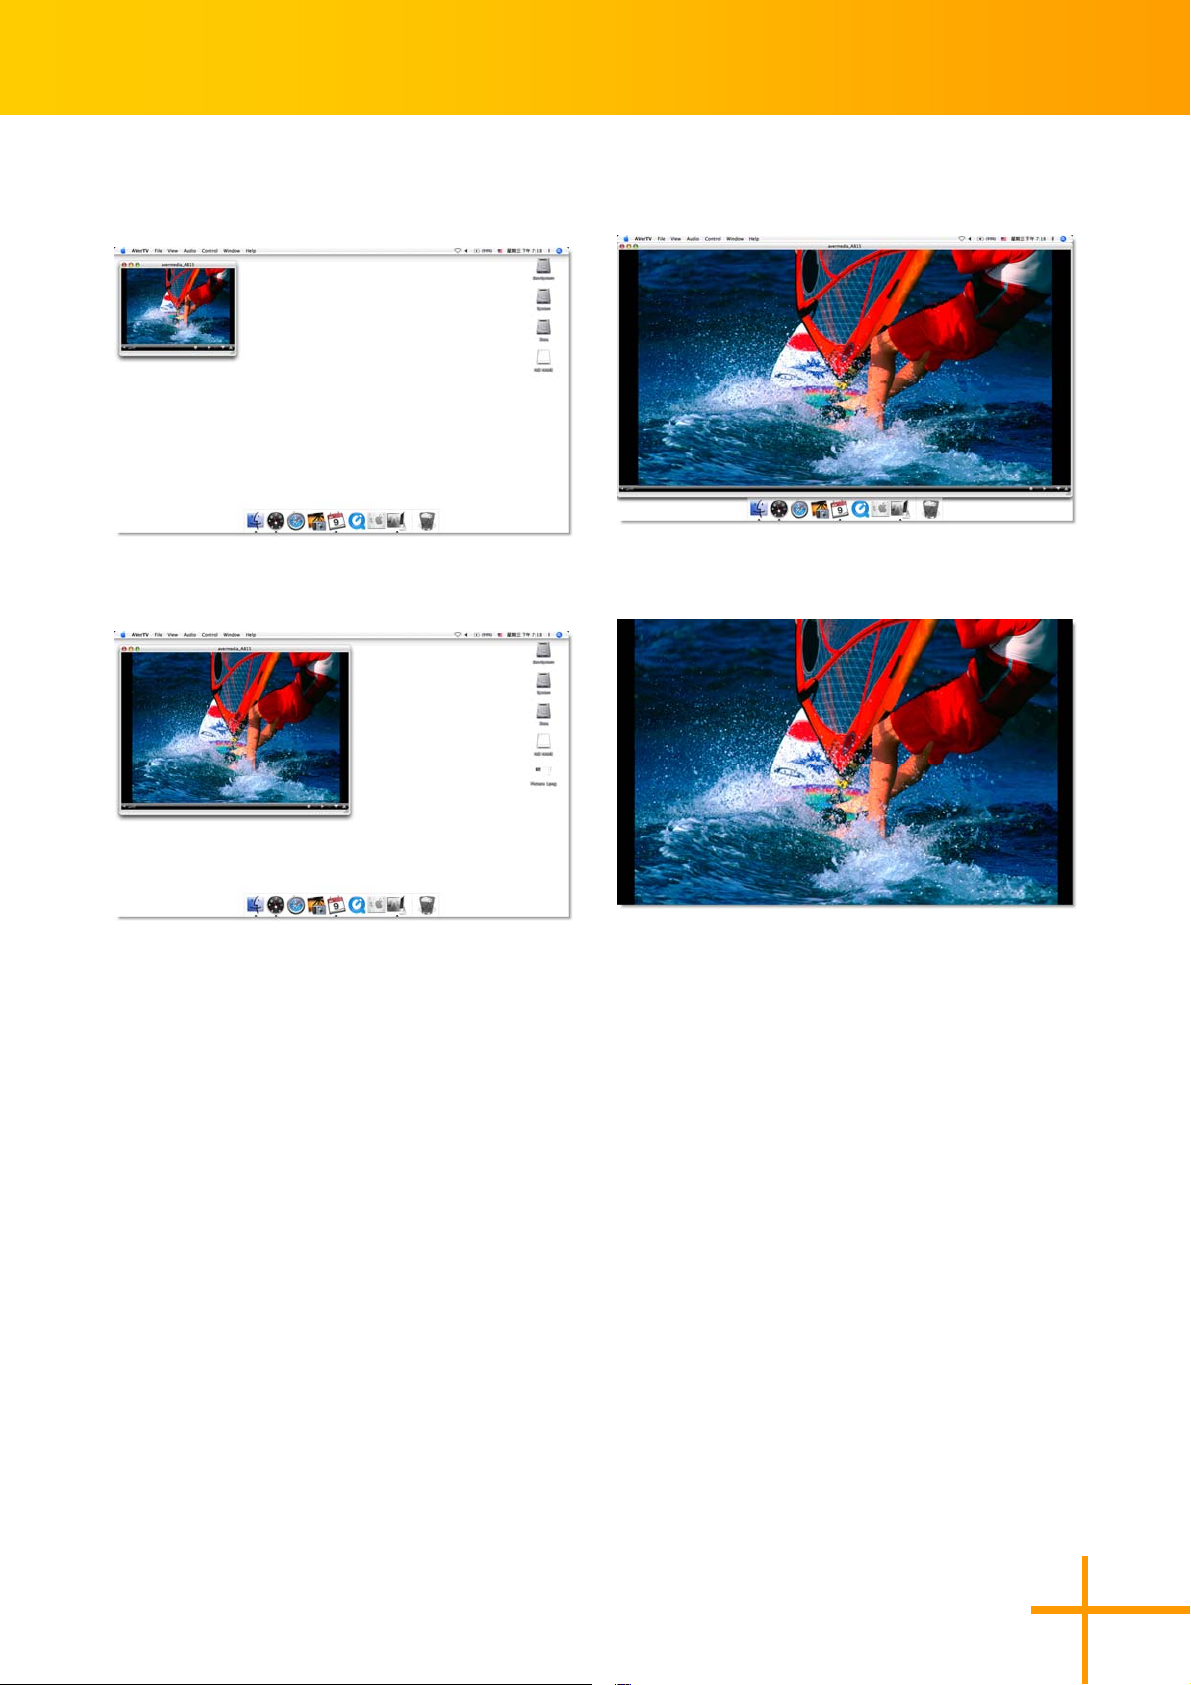
Go to the folder where the AVerTV for Mac was installed and double-click on the AVerTV
icon, the AVerTV for Mac will be launched.
When you run the AVerTV for Mac for the first time, the “Media Box” will automatically
appear.
.
From the Country drop-down menu, select your country or region.
11.
.
Select an available Service Type.
22.
.
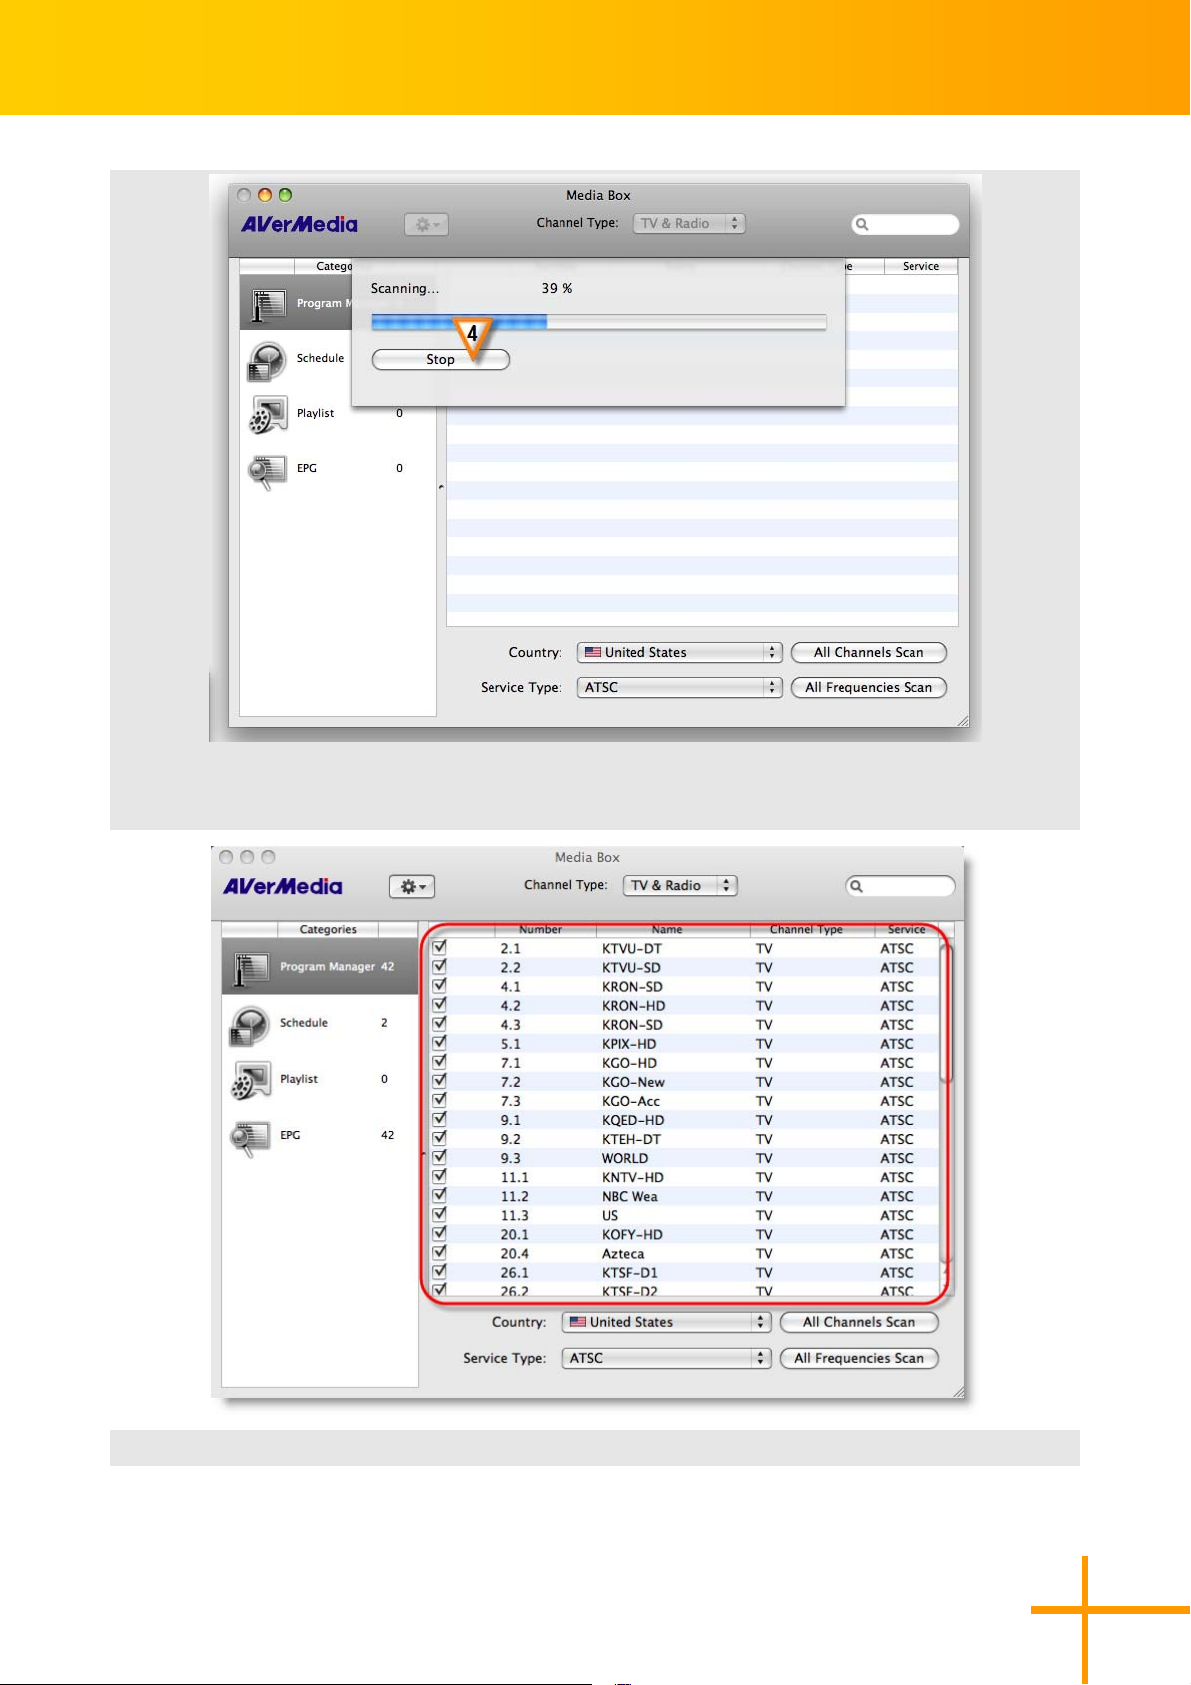
Click All Channels Scan to start searching channels.
33.
.
If you want to terminate the searching process, just click Stop.
44.
3
Page 8
AVerTV for Mac User’s Manual
.
After scanning, new active channels/programs will be memorized and listed in the right
55.
pane of the dialog box.
.
Close the “Media Box” window and the TV window will appear.
66.
4
Page 9
AVerTV for Mac User’s Manual
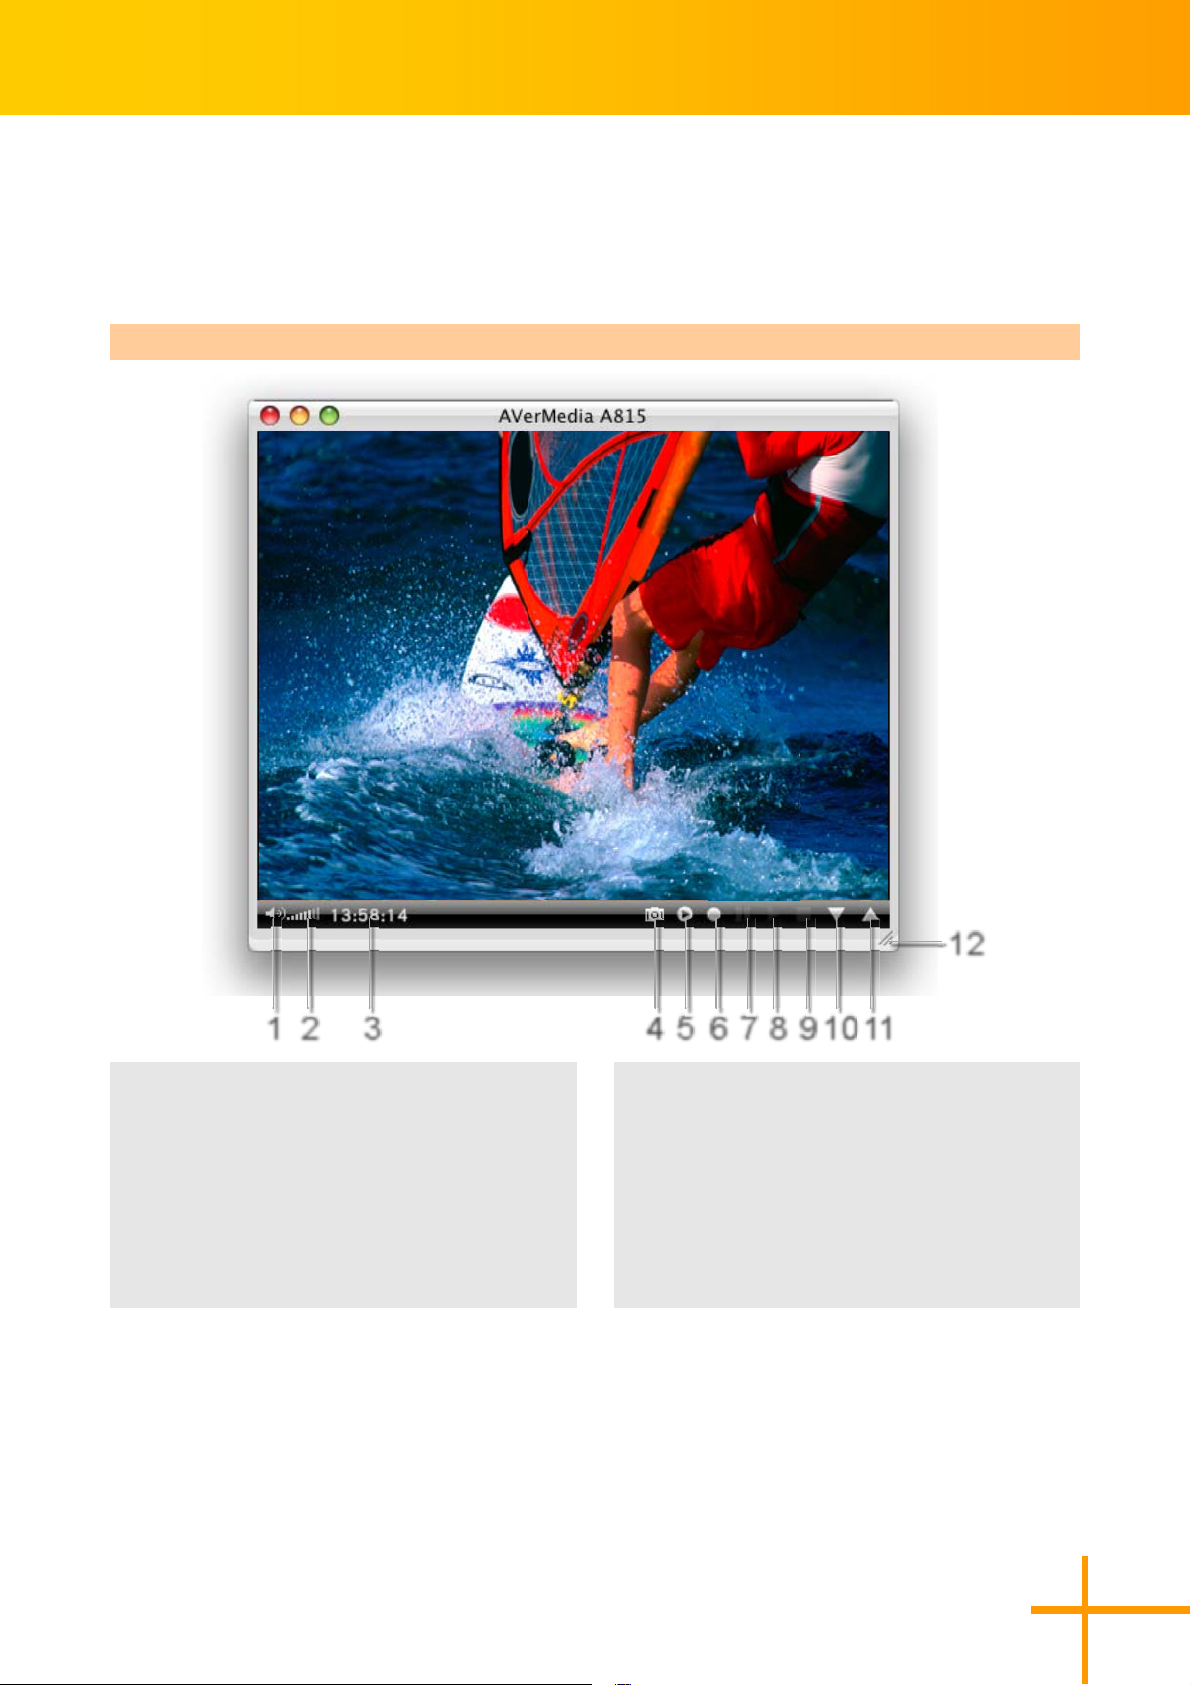
Introducing the User Interface
There are 3 types of control panel: Horizontal, Vertical and Combined. You can click on
Select Control Panel from the Window menu to select.
Combined
.
Mute
11.
.
Volume
22.
.
Time Info
33.
.
Snapshot
44.
.
TimeShift
55.
.
Record
66.
1 2 3 4 5 6 7128 91011
.
Pause
77.
.
Play
88.
.
Stop
99.
.
Channel Down
1100.
.
Channel Up
1111.
.
Resize Window
1122.
5
Page 10
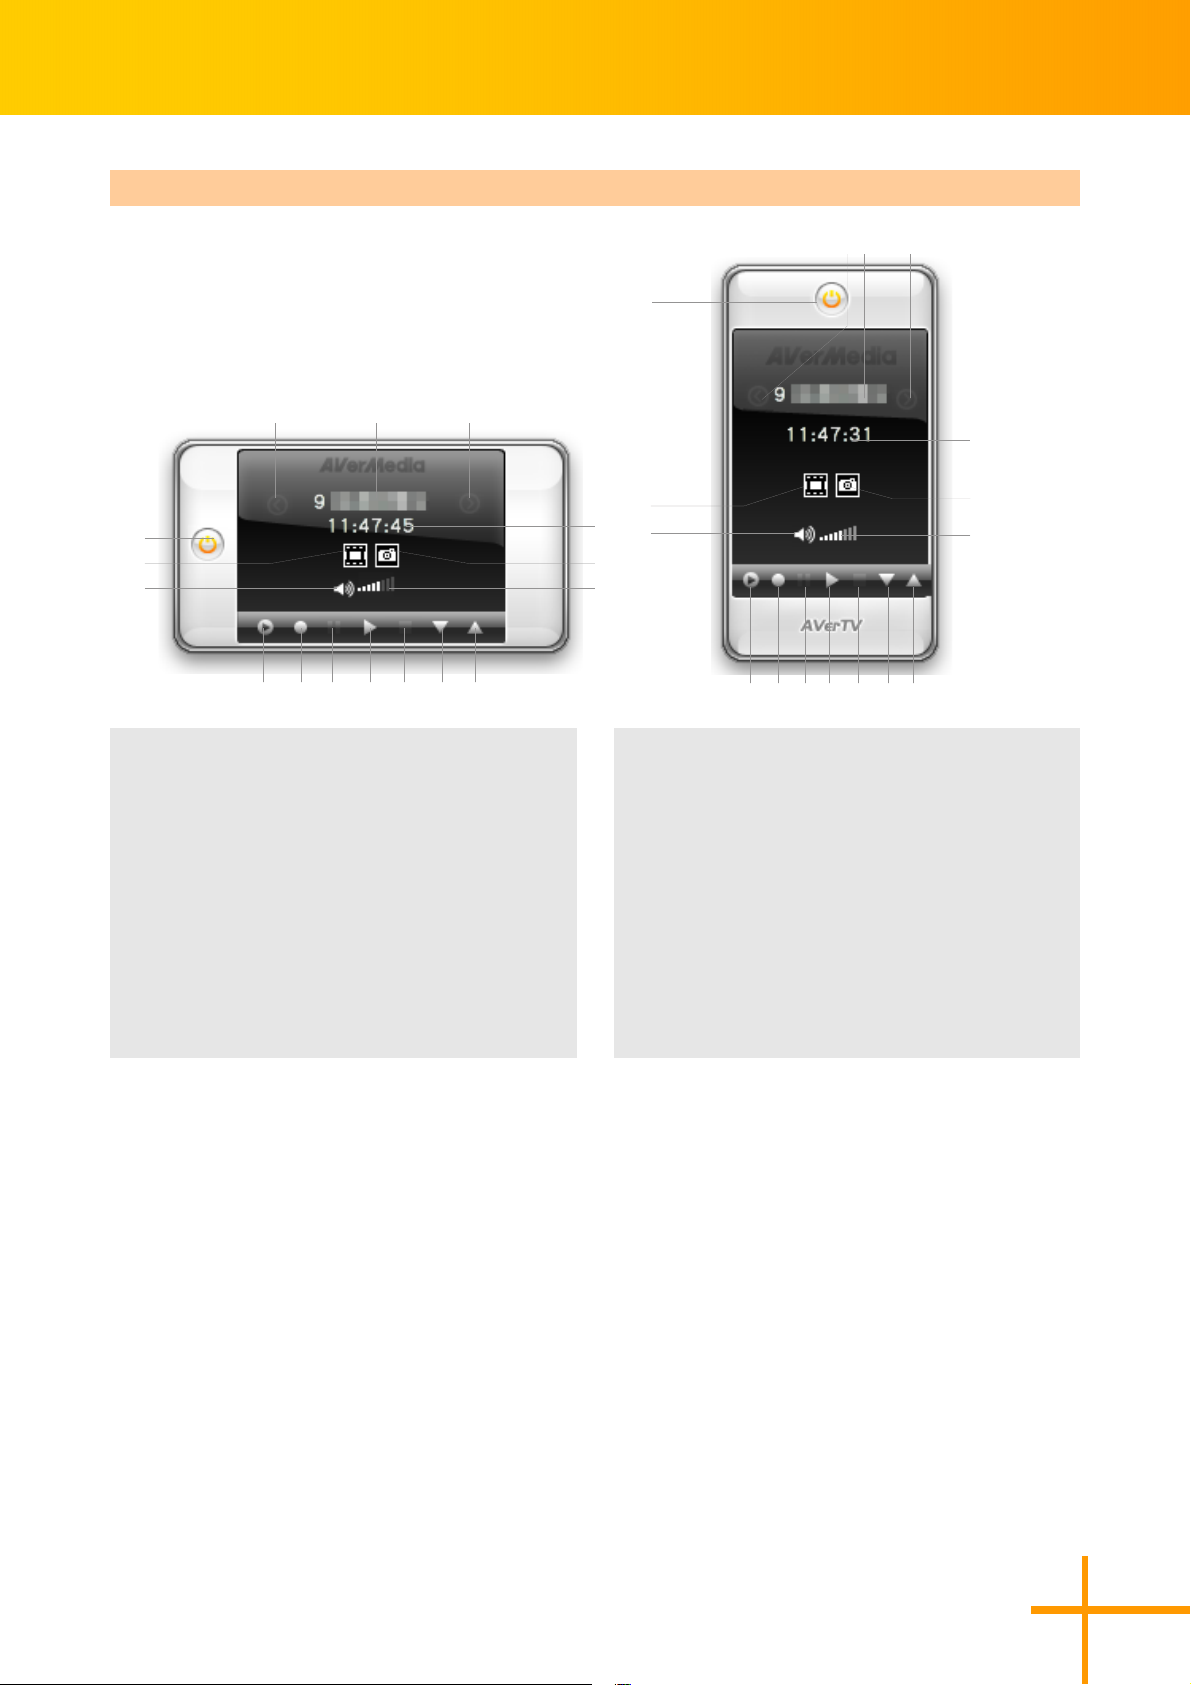
Horizontal and Vertical
5
112
5
1
AVerTV for Mac User’s Manual
64
1
64
7
1
2
3
10 1
.
Power
11.
.
Open Playlist
22.
.
Mute
33.
.
Play Previous File
44.
.
Channel Info
55.
.
Play Next File
66.
.
Current time
77.
.
Snapshot
88.
13 14 1516
7
8
9
2
3
.
Volume
99.
.
TimeShift
1100.
.
Record
1111.
.
Pause
1122.
.
Play
1133.
.
Stop
1144.
.
Channel Down
1155.
.
Channel Up
1166.
10 1
1213 14 15 16
8
9
6
Page 11
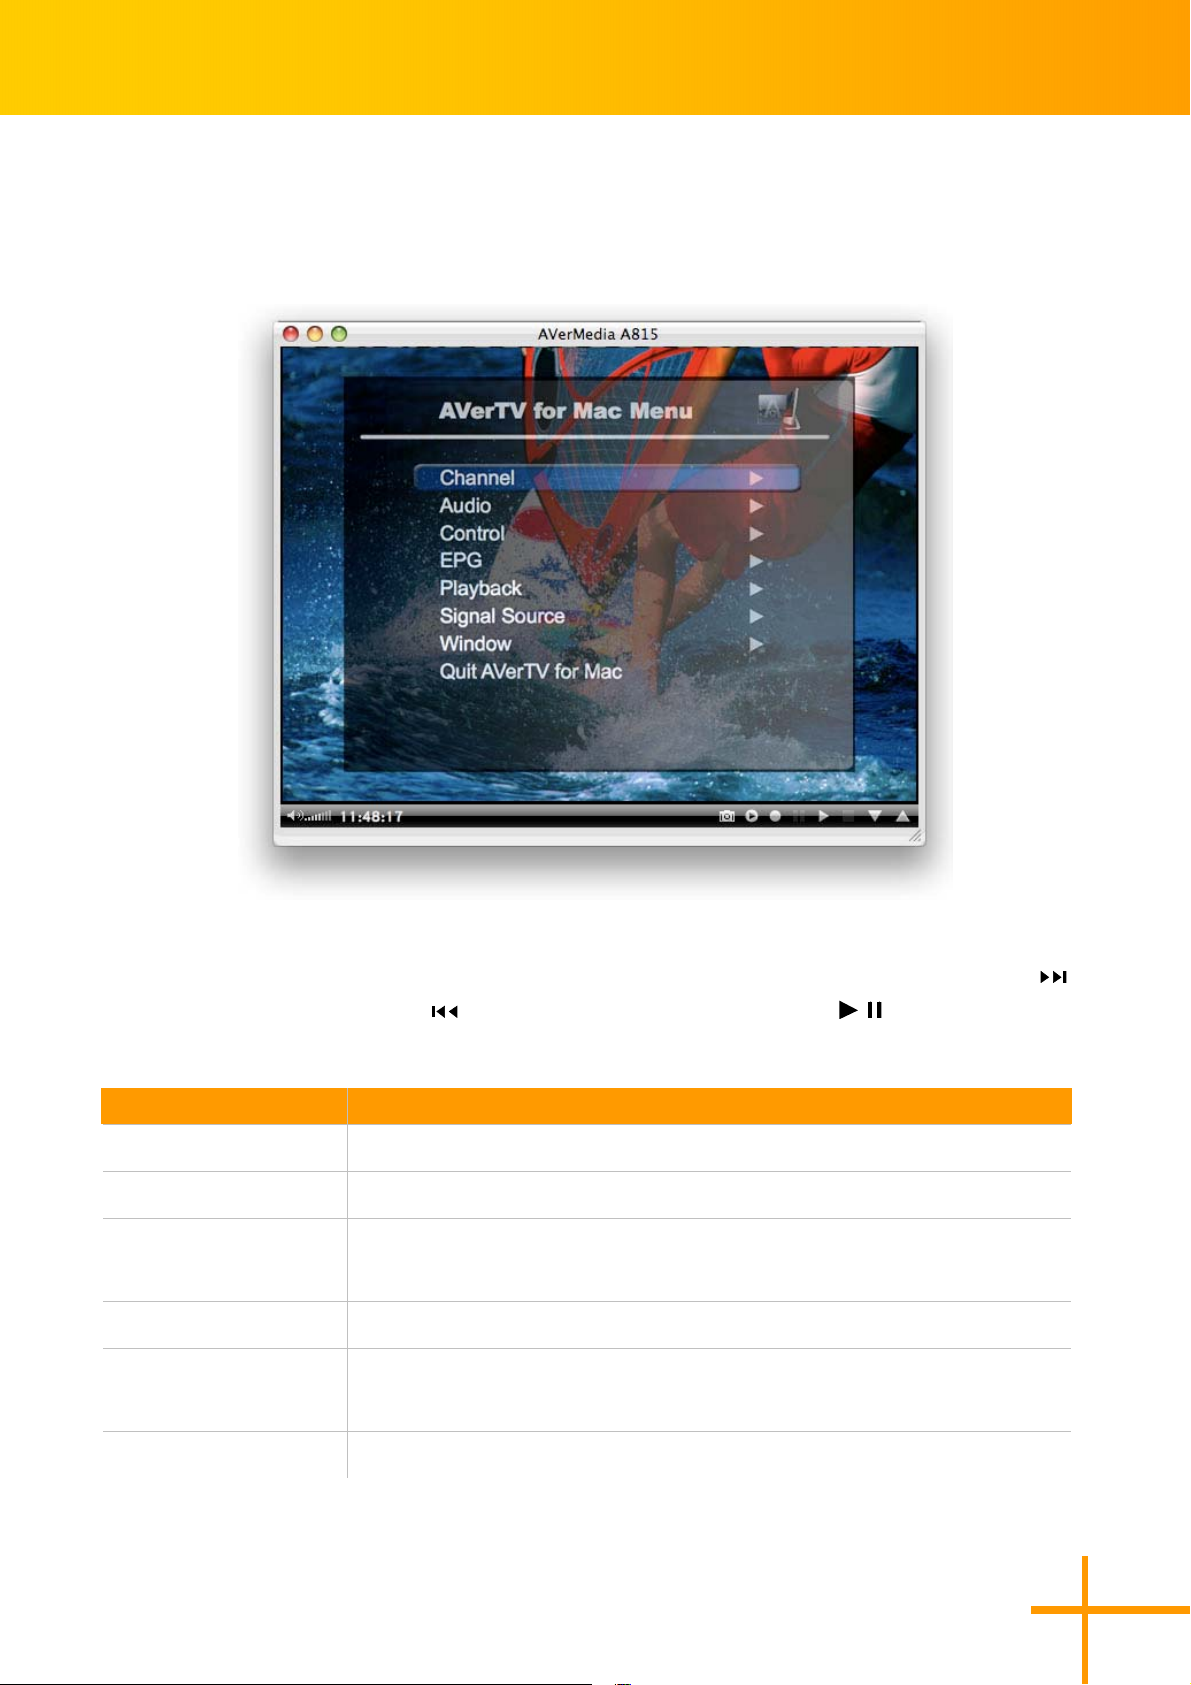
On Screen Menu
AVerTV for Mac User’s Manual
AVerTV offers you an alternative operating method, press MENU button on the Apple
Remote to display the on screen menu. Use + and - buttons to move the selection and
button to enter the submenu, button to exit the submenu. Press button to execute
the selection or enter the submenu (if available).
Menu Description
Channel Enter the channel list to switch channels.
Audio Enter the Audio submenu to switch between available audio modes.
Control Enter the Control submenu to record, TimeShift, Snapshot the current
program or turn on the closed caption/subtitle/Teletext function.
EPG Enter the EPG submenu to display the selected program information.
Playback Enter the Playback submenu to play/stop an existing file or
enable/disable the PIP function.
Signal Source Enter the Signal Source submenu to switch between available signal
7
Page 12

AVerTV for Mac User’s Manual
sources.
Window Enter the Window submenu to adjust the image size to full screen, adjust
the image with keep aspect ratio, or enable the overscan function.
Quick AVerTV for Mac Close the AVerTV application.
8
Page 13
AVerTV for Mac User’s Manual
TV
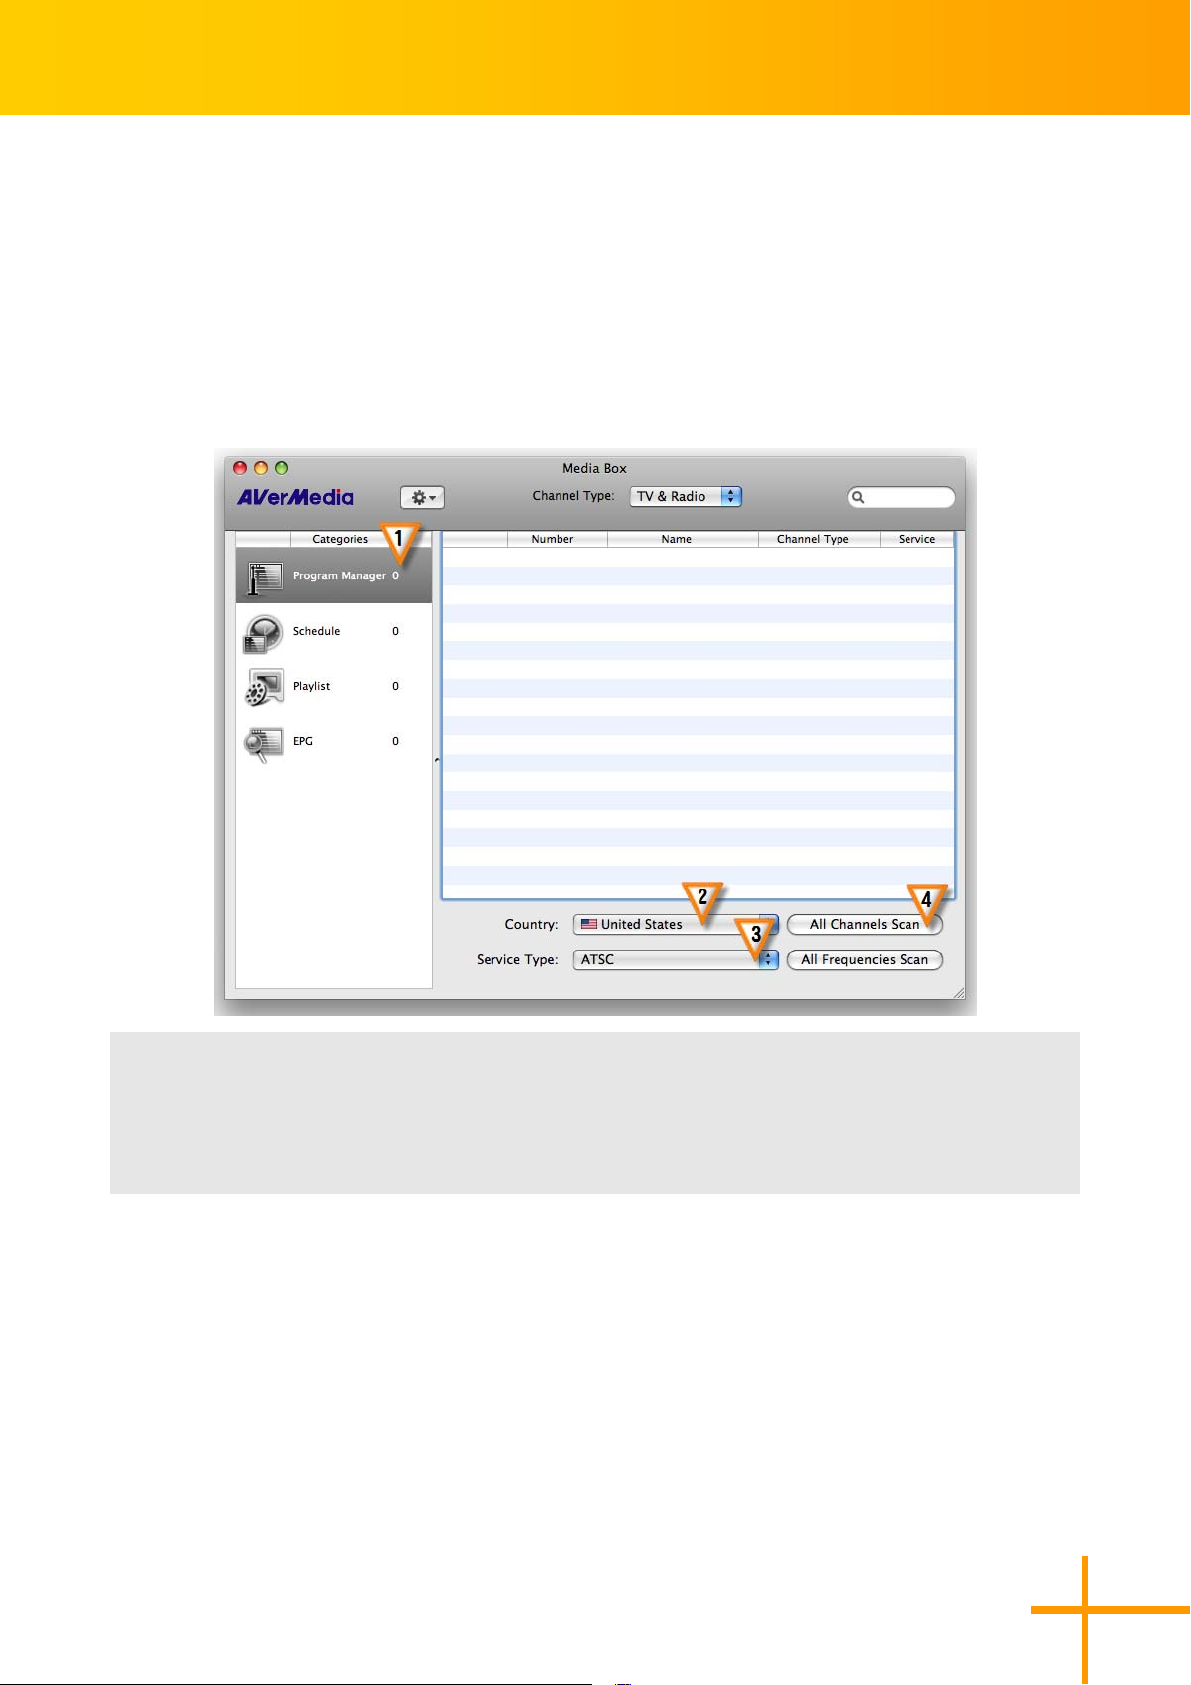
Scanning Channels
If you haven’t done channel scanning when you first run the application, or want to rescan
the channels, follow the steps to complete this procedure.
.
Go to Program Manager.
11.
.
From the Country drop-down menu, select your country or region.
22.
.
Select an available Service Type.
33.
.
Click All Channels Scan to start the searching process.
44.
9
Page 14
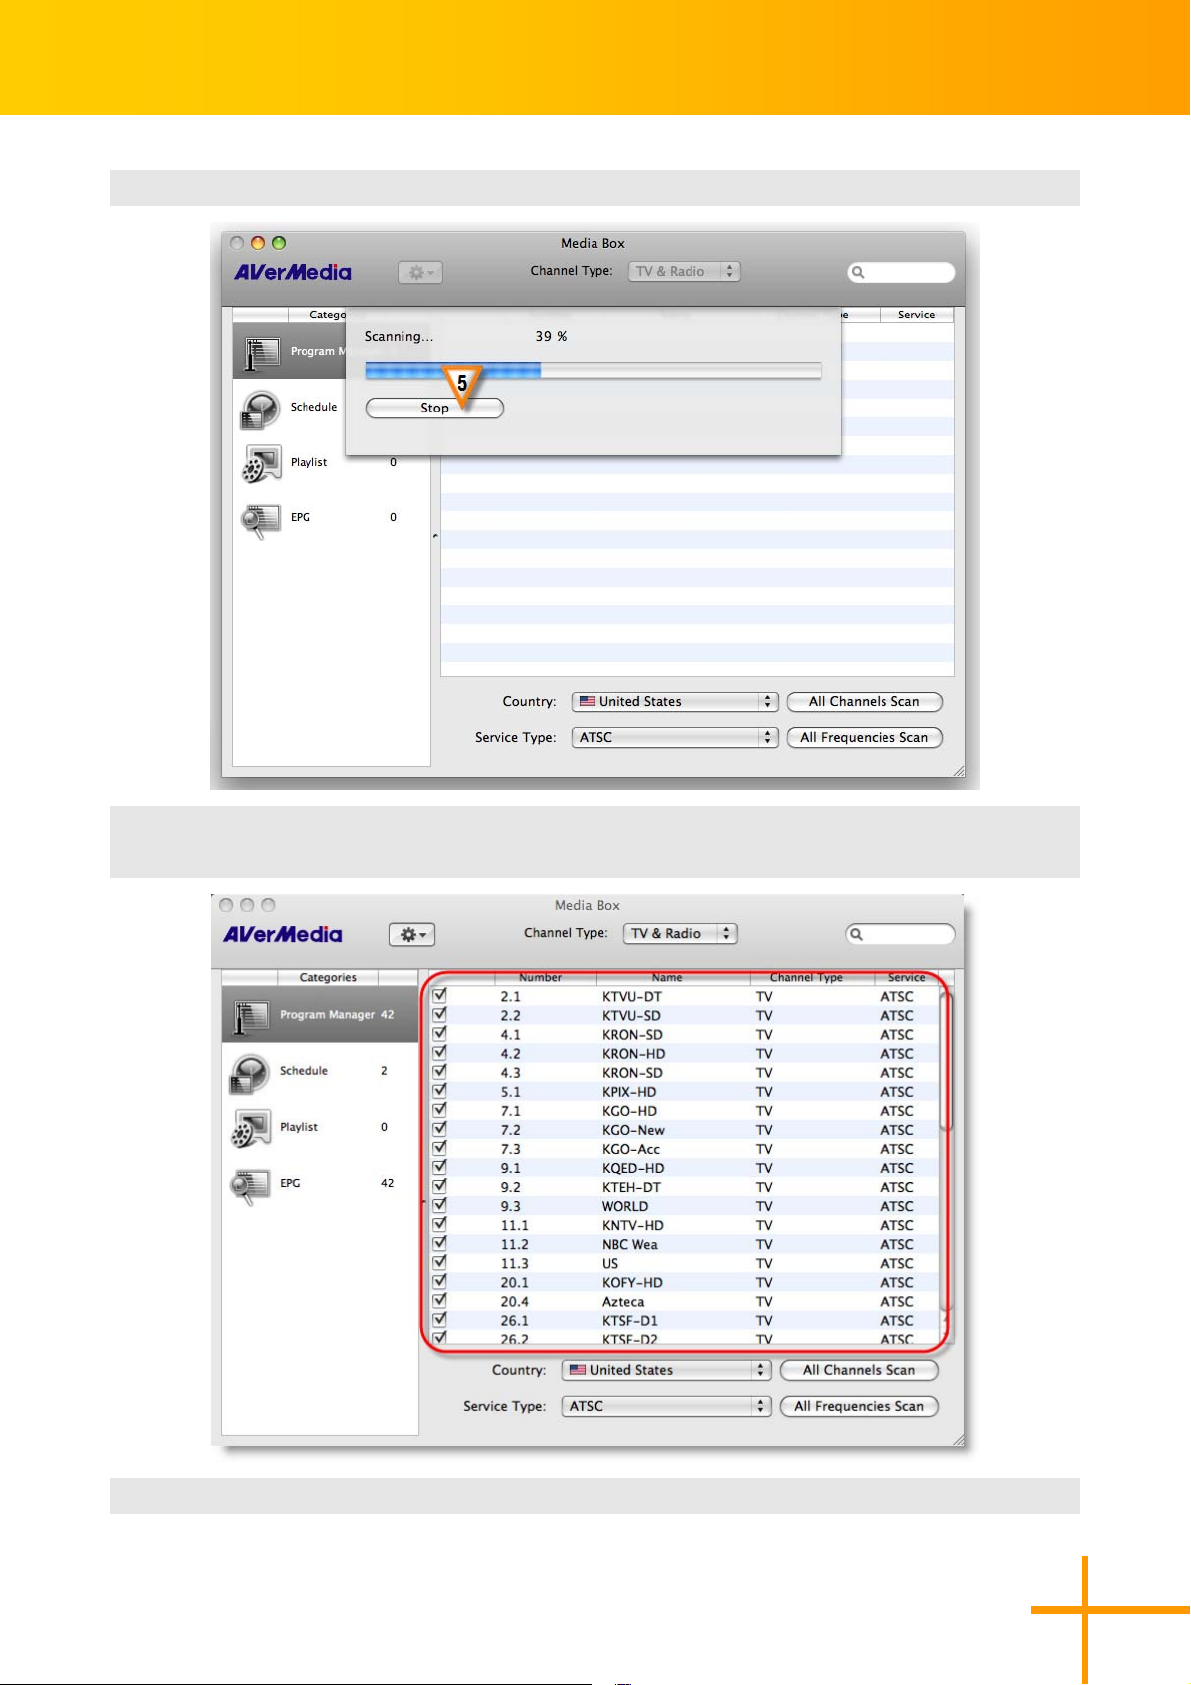
.
If you want to terminate the searching process, just click Stop.
55.
AVerTV for Mac User’s Manual
.
After scanning, new active channels/programs will be memorized and listed in the left
66.
pane of the dialog box.
.
Close the “Media Box” window and the TV window will appear.
77.
10
Page 15

AVerTV for Mac User’s Manual
The application comes with a default frequency table; therefore, the application will
use this table to search for active channels/programs.
button contains more function:
Rename: To change the selected channel name.
Reset Channel Number: To change the selected channel number
Manual Add Channel: To add a channel by entering the channel frequency
and shorten the channel scan.
Enable Selected Channels: To activate the channels when switching
channels.
Disable Selected Channels: To skip the unwanted channels when switching
channels temporarily.
Remove Selected Channels: To delete the unwanted channels.
11
Page 16
AVerTV for Mac User’s Manual
Scanning Channels (for Advanced Users)
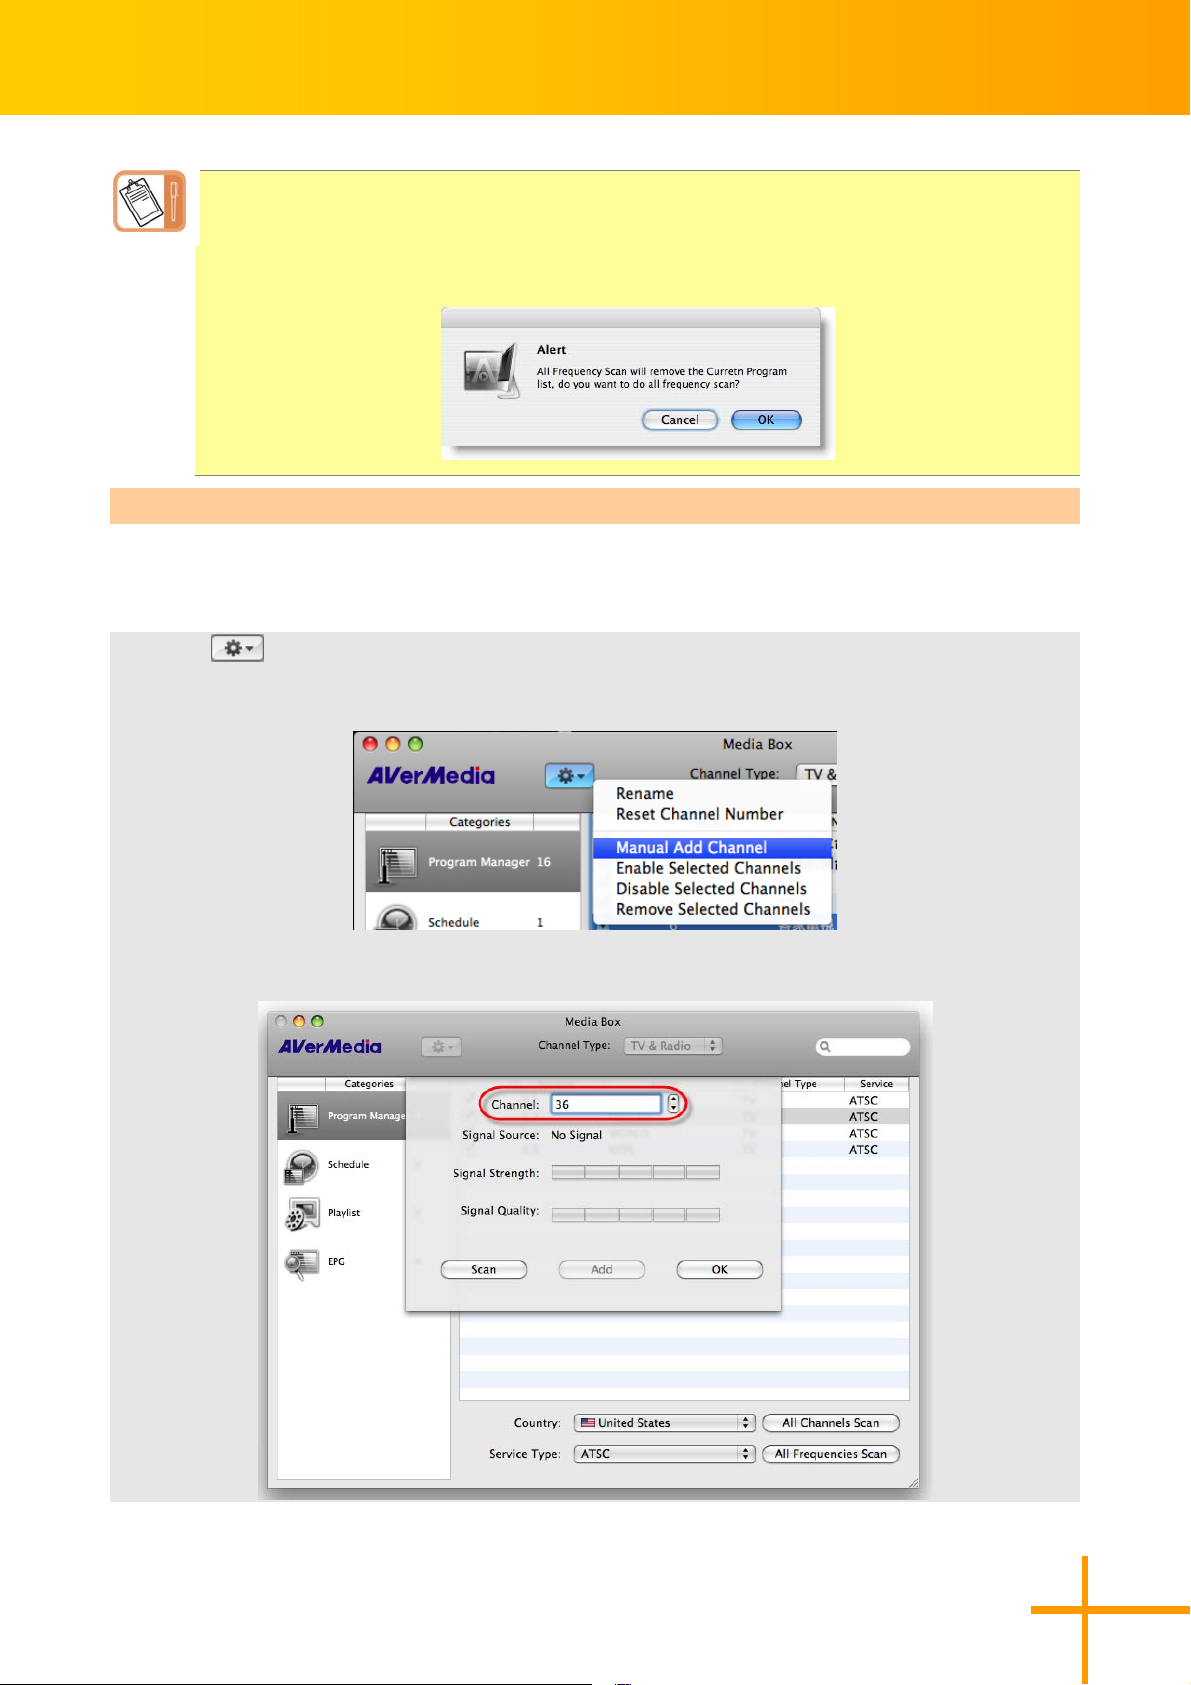
All Frequencies Scan
We recommend using the All Channel Scan function first. If there are channels missing
after you perform All Channels Scan, use All Frequencies Scan function and repeat the
searching process.
.
Go to Program Manager.
11.
.
From the Country drop-down menu, select your country or region.
22.
.
Select an available Service Type.
33.
.
Click All Frequencies Scan to start the searching process.
44.
12
Page 17

.
If you want to terminate the searching process, just click Stop.
55.
AVerTV for Mac User’s Manual
.
After scanning, new active channels/programs will be memorized and listed in the left
66.
pane of the dialog box.
.
Close the “Media Box” window and the TV window will appear.
77.
13
Page 18
AVerTV for Mac User’s Manual
If an alert about removing action shown on the screen, it means to execute the
scanning process will replace the existing program list. Click OK to continue or
click Cancel to stop the rescanning.
Manual Add Channel
If you already know a particular channel number for your local transmitter, use Manual Add
Channel function to add it by entering the channel numbers and shorten the channel scan.
.
Click in the Media Box.
11.
.
Select Manual Add Channel.
22.
.
Enter the channel frequency that you want to start scanning and press Scan.
33.
14
Page 19

.
Click Add to save the scanned channel.
44.
AVerTV for Mac User’s Manual
.
Click OK to exit the window.
55.
15
Page 20

Watch TV
Use control panel or menu to control TV
watching.
Operate by Control panel
.
Use Channel Down and Channel
11.
Up buttons to go to the next upper or
lower active channel.
AVerTV for Mac User’s Manual
Operate by Control menu
PPrreevviioouuss CChhaannnneell
Go to the next lower active channel.
NNeexxtt CChhaannnneell
Go to the next upper active channel.
Channel Preview
The Channel Preview function can display
4, 9 or 16 consecutive TV channels
on-screen at the same time. You can see
clearly which TV programs are currently
showing on these channels. To display a
channel on the TV Monitor window, select
any one of the channels on-screen and
double-click on that channel, you will then
be tuned in to that channel. Select a
channel and click your mouse to view it
only and freeze the other channels.
To start the Channel Preview function, point
to View>Open Channels Preview.
CChhaannnneell LLoooopp
Return to previously accessed channel.
Switching Channel by Keyboard
You may use the numeric keypad to switch
channels. After you type a number, the
correlated channel will be highlighted with a
light bar on the On Screen Menu. Press
Enter to confirm your selection.
16
Page 21

AVerTV for Mac User’s Manual
Setting the Channel Preview
.
Click Genral icon in the
11.
Preference pane.
.
Select desired number of channels to
22.
preview.
4 channels preview
16 channel preview
TimeShift
The TimeShift function performs
background recording of a TV/Radio
program, and lets you return and watch any
part of the recorded program. At the same
time, the live TV/Radio program continues
to be recorded and played back so you
9 channels preview
won’t miss any part of the show. You can
also advance forward to skip commercials
or rewind to replay scenes one more time.
TTiimmeeSShhiifftt CCoonnttrroollss
Operate by Control panel
.
Use button to start timeshift.
11.
.
Click button to temporarily freeze
22.
the playback.
.
Click button to terminate recording
33.
and return to the live program
17
Page 22

AVerTV for Mac User’s Manual
Operate by Control menu
TTiimmeeSShhiifftt
St art TimeShift function.
PPaauussee
To temporarily freeze the playback.
SSttoopp
To terminate the recording and return to the
live program.
TimeShift Setting
Before you start using the TimeShift function, first check its recording settings to see if they
fit your needs.
.
Click Record icon in the Preference pane.
11.
18
Page 23

AVerTV for Mac User’s Manual
.
By default, TimeShift performs recording of the TV program by creating a temporary
22.
video file and deletes this file once you click the Stop button.
.
In the TimeShift Disk Volume section, you can determine desired disk volume to save
33.
the TimeShift file.
.
In the TimeShift Buffer Size section, you can determine the buffer size. The default
44.
value is 2000MB, and the minimum size is 200MB.
19
Page 24
Using the EPG Function
AVerTV for Mac User’s Manual
Electronic Program Guide (EPG) is a service that allows you to check the succeeding
program schedule and even the program schedules of the whole week. If the EPG service
is provided in your region/country, simply click the EPG button in the Preference pane,
or point to menu File>Open EPG to open the EPG window.
First, select the desired date and time from the drop-down menu and the EPG window will
display the schedule for the day.
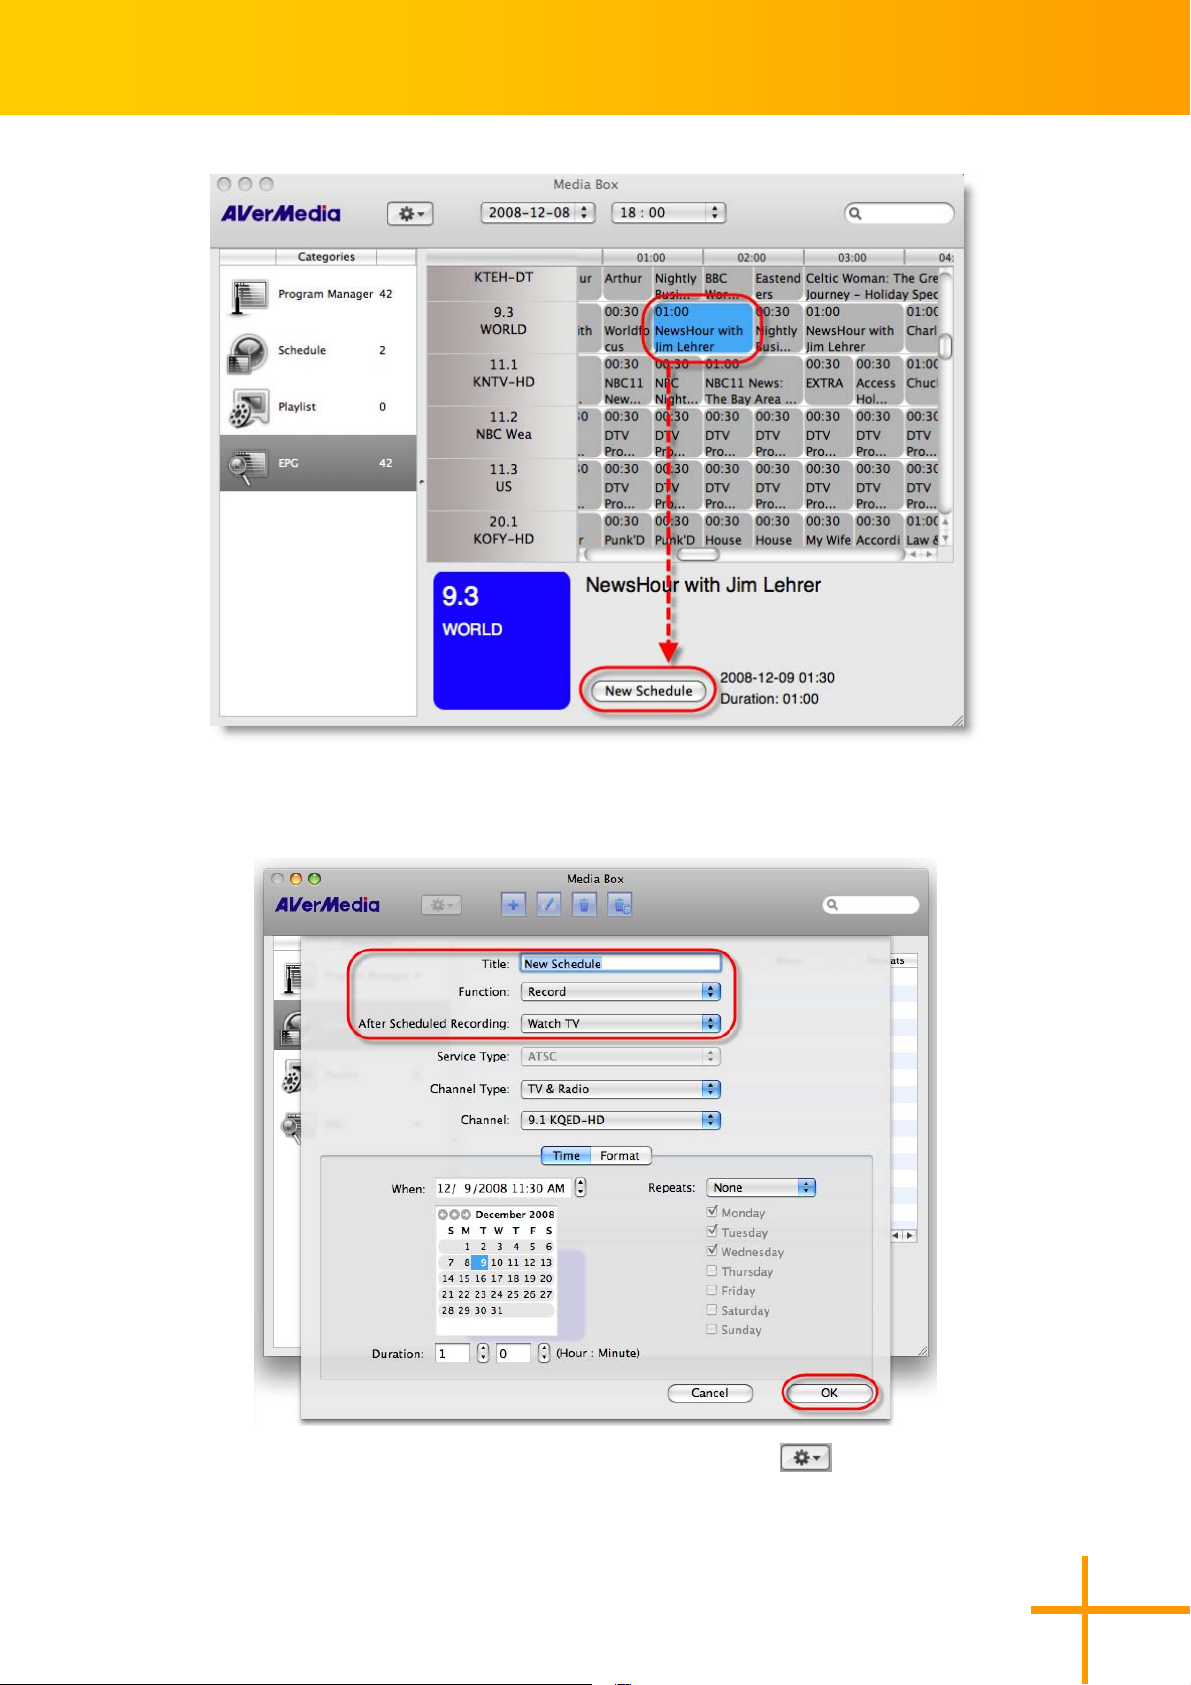
Our EPG window also allows you to preset a schedule for watching or recording programs.
Just select your favorite programs and click New Schedule button, the system will execute
your command on schedule.
20
Page 25
AVerTV for Mac User’s Manual
The program time data will be automatically set. Input the schedule name in Title, select
the action in Function and After Scheduled option and click OK.
If you want to download the latest program schedule, click the button and select
Update EPG button.
21
Page 26

AVerTV for Mac User’s Manual
Fine Tuning Color of the Display
If the color or picture quality of the TV displays needs to be adjusted, please do the
followings.
.
Click Color icon in the Preference pane.
11.
.
Then you can adjust the Brightness, Contrast, Hue, Saturation and Sharpness with
22.
sliders until you get an accurate color.
.
If you want to revert to default settings, just click Set Defaults button.
33.
22
Page 27

AVerTV for Mac User’s Manual
Using the OverScan function
On some broadcast channels, you might see distorted lines or black spaces on the top,
sides, or bottom of the screen. These video artifacts device from the source signal, and can
be masked using the OverScan feature.
To hide the edges of the picture:
.
Click the Display icon in the Preference pane.
11.
.
Specify an appropriate number (1~20%).
22.
.
Select Turn On to enable the Overscan function or Turn Off to disable it.
33.
Another way to enable and disable the Overscan function is point to menu View>Overscan.
You can see the difference from the pictures below:
Before using OverScan function
After using OverScan function
23
Page 28

Adjusting Volume
On the Control Panel, click and drag your
mouse over the Volume meter in
the control panel to increase or decrease
the volume level.
Point to menu Audio>Volume Up to
increase the volume level. Or point to menu
Audio >Volume Down to decrease the
AVerTV for Mac User’s Manual
.
Click Next Signal Source to switch
22.
between available signal sources. Or
select the desired source directly.
Changing the OSD
Attributes
To change the on screen display in the TV
window, do the following:
volume level. Point to menu Audio>Mute
to turn off/on the sound. .
Changing Audio Channels
Select Stereo, Reverse Stereo, Left
Channel Only or Right Channel Only in
the Audio Channels for change the audio
output type. Click Next Audio Track to
switch between available audio tracks or
select the desired audio track directly.
Change Signal Source
.
Click on the Display icon in the
11.
Preference pane.
.
Click Others button.
22.
.
Point to the menu View>Signal Source.
11.
Choose a desired OSD display time by
dragging the OSD Display Time slider bar
Drag the LCD Speed slider bar to set the
24
Page 29

speed of marquee.
To set the Teletext and Closed Caption
background color to Transparent,
Semitransparent or Opaque, click the
drop-down menu in Teletext Background
and Closed Caption Background section.
Changing Display Aspect
Ratio
Aspect ratio indicates the ratio of the width
of an image to its height. To switch the
aspect ratio of the display, do the following:
AVerTV for Mac User’s Manual
.
Select the aspect ratio of home video
22.
you want.
4:3 and 16:9 is the two most
common aspect ratio of home
video. You can choose Free to
adjust the aspect ratio as you want.
.
Click on the Video icon in the
11.
Preference pane.
.
Click Video button.
22.
.
In the Keep Aspect Ratio section,
33.
choose Turn Off to extend the video. Or
select Turn On to preserve the original
width and height of an image.
OR
.
Point to menu View>Aspect Ratio.
11.
Or select Keep Aspect Ratio to
preserve the original width and
height of an image.
You can see the difference from the
pictures below:
NNoorrmmaall
25
Page 30

AVerTV for Mac User’s Manual
KKeeeepp AAssppeecctt RRaattiioo
TV Window Controlling
You can minimize the AVerAP window to
the dock/unhide the AVerTV for Mac
window, hide all other application windows
expect A V erTV for Mac or close AVerTV for
Mac application from the A V erTV menu.
Other Layout Controlling in Window Menu
MMiinniimmiizzee
Minimize the AVerTV windows to the Mac
dock.
ZZoooomm
Click to change the AVerTV window size.
SShhooww MMeeddiiaa BBooxx
Open/Close the Media Box.
HHiiddee AAVVeerrTTVV ffoorr MMaacc
Minimize the
dock.
HHiiddee OOtthheerrss
Hide all windows except
SShhooww AAllll
Show all windows in hiding.
QQuuiitt AAVVeerrTTVV ffoorr MMaacc
Close the AVerTV for Mac application.
AVerTV for Mac window to the
AVerTV for Mac .
CCoommppaacctt MMooddee // FFuullll MMooddee
When in compact Mode, select Full Mode
to display the AVerTV control panel; When
in Full Mode, select Compact Mode to hide
the AVerTV control panel.
CCoommppaacctt MMooddee
26
Page 31

AVerTV for Mac User’s Manual
FFuullll MMooddee
BBrriinngg AAllll ttoo FFrroonntt
Bring all
AVerTV windows to the front.
SSeelleecctt CCoonnttrrooll PPaanneell SSttyyllee
Select a control panel type you like,
Horizontal, Vertical or Combined.
Window Size Setting
There are 4 window size options: Half Size, Normal Size, Max Size and Full Screen. Point
to the menu View>Window Size then select a size you want.
27
Page 32
AVerTV for Mac User’s Manual
HHaallff SSiizzee
NNoorrmmaall SSiizzee
MMaaxx SSiizzee
FFuullll SSccrreeeenn
28
Page 33

AVerTV for Mac User’s Manual
Personal Video Recorder
You can use your Mac as a personal video recorder, and record your favorite TV programs
or capture video from an external source into your hard drive. Besides, you can also divide
the recording files in proper sizes to facilitate burning onto removable optical media, such
as CD-R and DVD disks. Before recording, check if the settings of Storage Setting and
Recording Format settings meet your needs.
Record Storage Setting
.
Click the Record icon in the Preference pane.
11.
.
By default, the system sets the recording “Date”, “Time”, “Signal Source” and “Channel
22.
Name” as the file name format. To create your own file name format, please click
Custom.
.
Determine the File Location destination folder. Click Change to choose a folder you
33.
want.
.
The Duration option allows you to specify a recording duration; otherwise the system
44.
will record the largest clip that your hard drive can accommodate.
29
Page 34

AVerTV for Mac User’s Manual
.
This application allows you to divide the recording files in parts for burning onto
55.
removable optical media, such as VCD (650 MB) and DVD (4096 MB) discs. Enable the
Split Recordings into: option and select the appropriate video file size from the
drop-down menu so that each video file will not exceed the limit you set. Or you can
choose Custom to assign the file size you want.
Click Custom button in the File Name Format section to custom the recording file
name, you can preview the file name format from the Preview section.
30
Page 35

AVerTV for Mac User’s Manual
Recording Format settings
.
To setting the recording format settings, click the Record icon in the Preference
11.
pane.
.
From the Record Format drop-down menu, determine the video file format you wish to
22.
use for saving the recorded video file.
Format Information:
File Format Description
Auto Record the current program into your hard drive.
Audio Only Record the audio part only of the current program into your hard drive.
To hide the sound of the TV program when recording, click the Mute button on
the Control Panel.
Using the Recording Function
To record a TV/Radio program that you want, do the following:
.
Click the Record button on the Control Panel.
11.
.
You can click the Stop button to terminate the recording and return to the live TV
22.
program.
OR
.
Point to menu Control>Record to start the recording.
11.
.
Point to menu Control>Stop to terminate the recording.
22.
31
Page 36
Schedule Recording
AVerTV for Mac User’s Manual
The Schedule allows you to create a list of preset schedules for watching and recording
your favorite TV/Radio programs. You can set the day and time to record the TV/Radio
program and specify the length of recording.
To open the recording schedule to add a new recording or activate the schedule, do the
following:
.
Click the button.
11.
OR
.
Point to the menu File>New Schedule.
22.
.
The following dialog box will then appear:
33.
32
Page 37
AVerTV for Mac User’s Manual
.
Type the desired name in the Title text box.
11.
.
From the Function drop-down menu.
22.
z Select Watch TV to watch a TV program or listen to a radio broadcast.
z Otherwise, select Record to save a TV/Radio program for future viewing/listening.
z You can also select Silent Record which means the system will perform background
recording instead of activating the TV/Radio program.
z If you want to schedule a task to enable Timeshift function, select Timeshift.
.
In the After Record drop-down menu it automatically switches to the selected power
33.
control mode when the schedule recording is completed. Choose an appropriate power
control status listed below:
z Watch TV: Switch to real-time TV mode.
z Exit: Turn off the AVerTV for Mac Application.
z Sleep: Turn off your monitor and hard disks or save everything and then turn off your
computer according to your system setting.
z Shut Down: Turn off your computer.
.
Click the Channel list, select the channel you want to watch or record.
44.
.
Set the schedule to tune in live TV or to perform recording. You can set the schedule
55.
repeat frequency to None, Everyday, Weekly, Weekend or Custom.
z Choose None to perform schedule at a preset day and a preset time.
33
Page 38

AVerTV for Mac User’s Manual
z Choose Everyday to perform schedule everyday at a preset time.
z Choose Weekly to perform schedule every week, at a preset day and time.
z Choose Weekend to perform schedule every weekend, at a preset day and time.
z Choose Custom to select the days you want, at a preset day and time.
.
If you choose Watch TV in step 4, click OK to complete the settings. If you choose
66.
Record or Silent Record, please do the following.
.
In the Format section, you can determine the file format, recording duration, file size,
77.
destination folder or audio mode.
.
Click OK to save the new schedule or click Cancel to abort the saving.
88.
If you want to delete a selected schedule, click to delete it, or click to make
changes.
If a schedule conflict alert shown on the screen, it means the schedule is conflicted
with an existing schedule. You need to adjust the schedule date or time.
button contains more function:
Rename: To change the name of the selected schedule.
34
Page 39
AVerTV for Mac User’s Manual
Playing the Recorded Programs
Each TV/Radio program that you recorded will be saved in the assigned destination folder.
You can find the file list in PlayList.
To play back the recorded files:
.
Click the Play button in the control panel to playback.
11.
.
Use and buttons to playback the previous and next file in the playlist.
22.
.
Use and buttons to pause and stop the playing file.
33.
.
When you want to rewind or forward, use the Playback Seek slider bar to move back or
44.
forward.
OR
.
Use the options in Control menu to operate the playback.
55.
35
Page 40

AVerTV for Mac User’s Manual
PPllaayybbaacckk
Play back recorded video files.
CCoonnttiinnuuee//PPaauussee
Play/Pause (for playback, recording, and TimeShift).
SSttoopp
Stop the playback, recording, TimeShift, or Channel Preview. Exit full screen back to normal
view.
FFoorrwwaarrdd
Press to fast forward.
BBaacckkwwaarrdd
Press to rewind.
PPllaayy NNeexxtt FFiillee
Play the next file in the playlist.
PPllaayy PPrreevviioouuss ffiillee
Play the previous file in the playlist.
If you want to open or customize the playlist, do the following:
.
Point to menu File>Open Playlist to open the playlist.
11.
OR
.
Click Playlist icon in the Media Box.
11.
36
Page 41
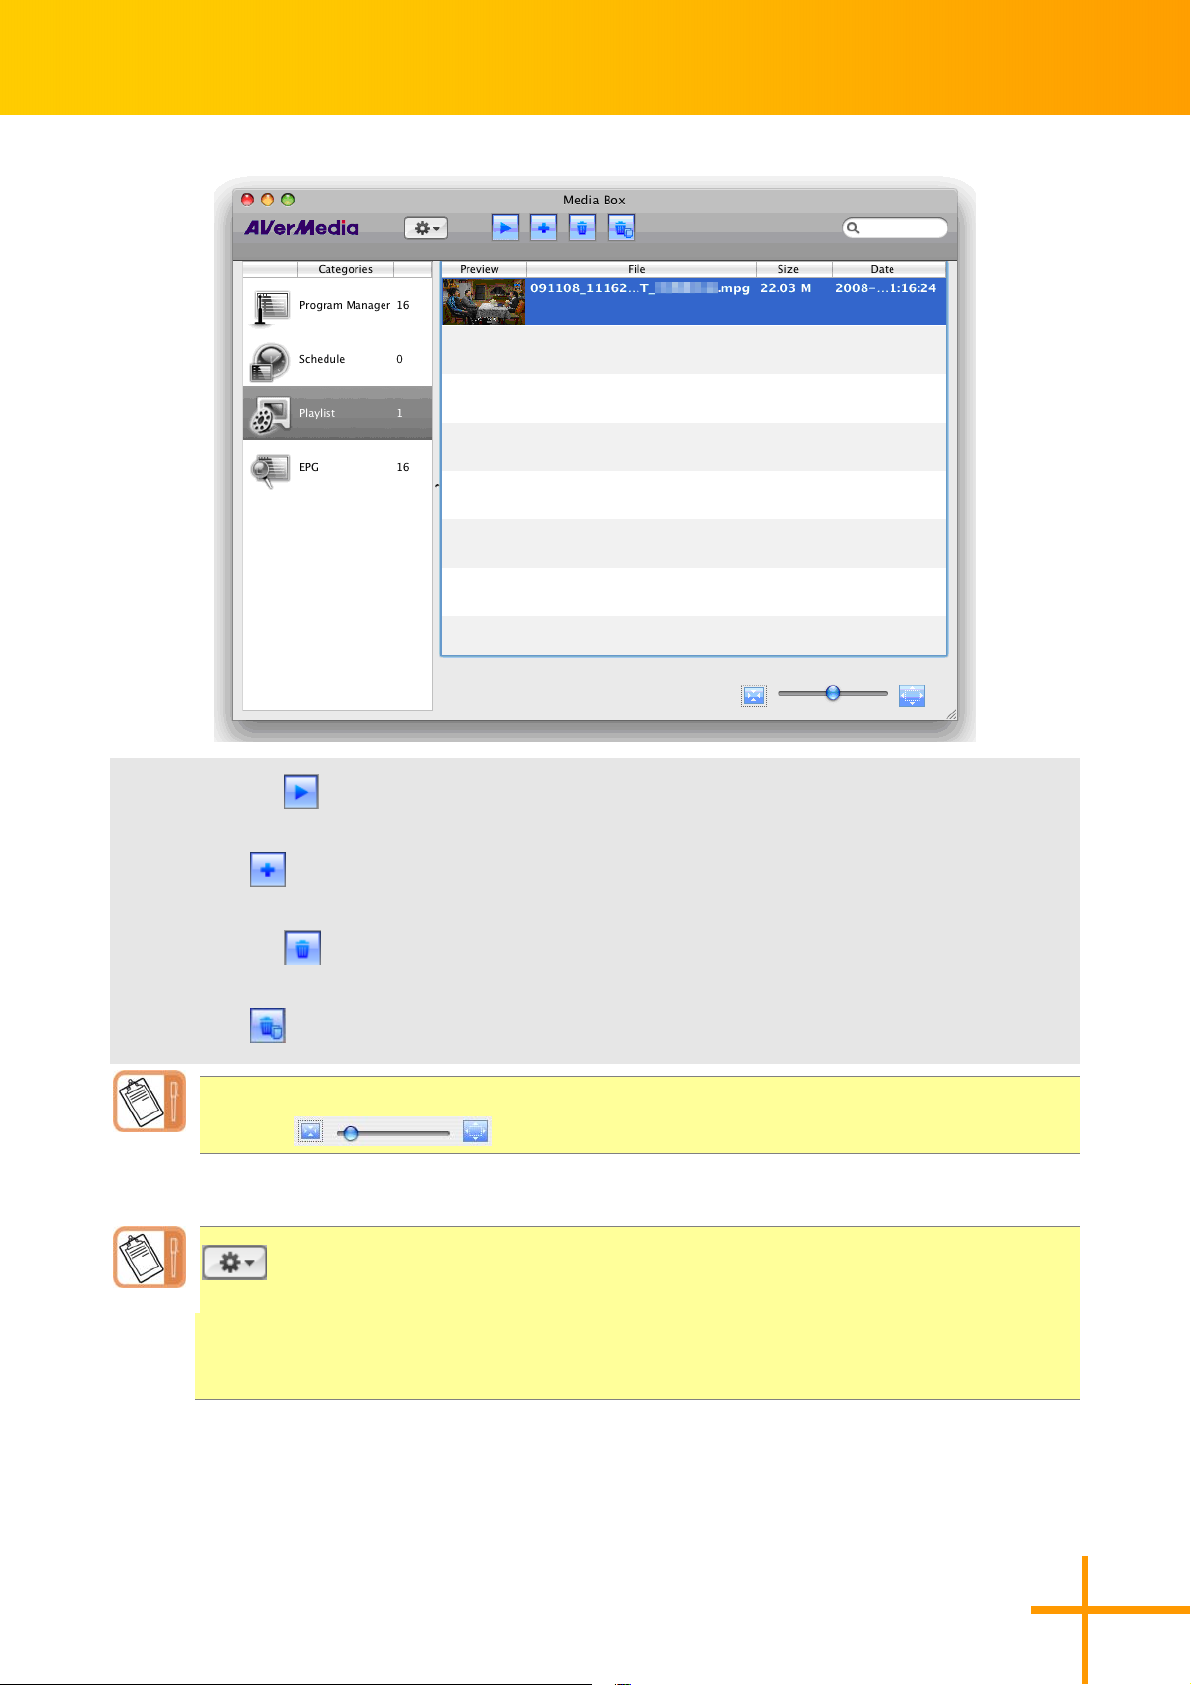
AVerTV for Mac User’s Manual
.
Click button to play back the selected files.
22.
Click button to add a supported media file into the playlist.
.
Click button to delete the selected files from the list.
33.
Click button to delete all files from the list.
You can change the size of the file icon by dragging the slider bar under the
window .
button contains more function:
Rename: To change the selected file name.
Show in Finder: Use Finder to open the folder where the file located.
37
Page 42

AVerTV for Mac User’s Manual
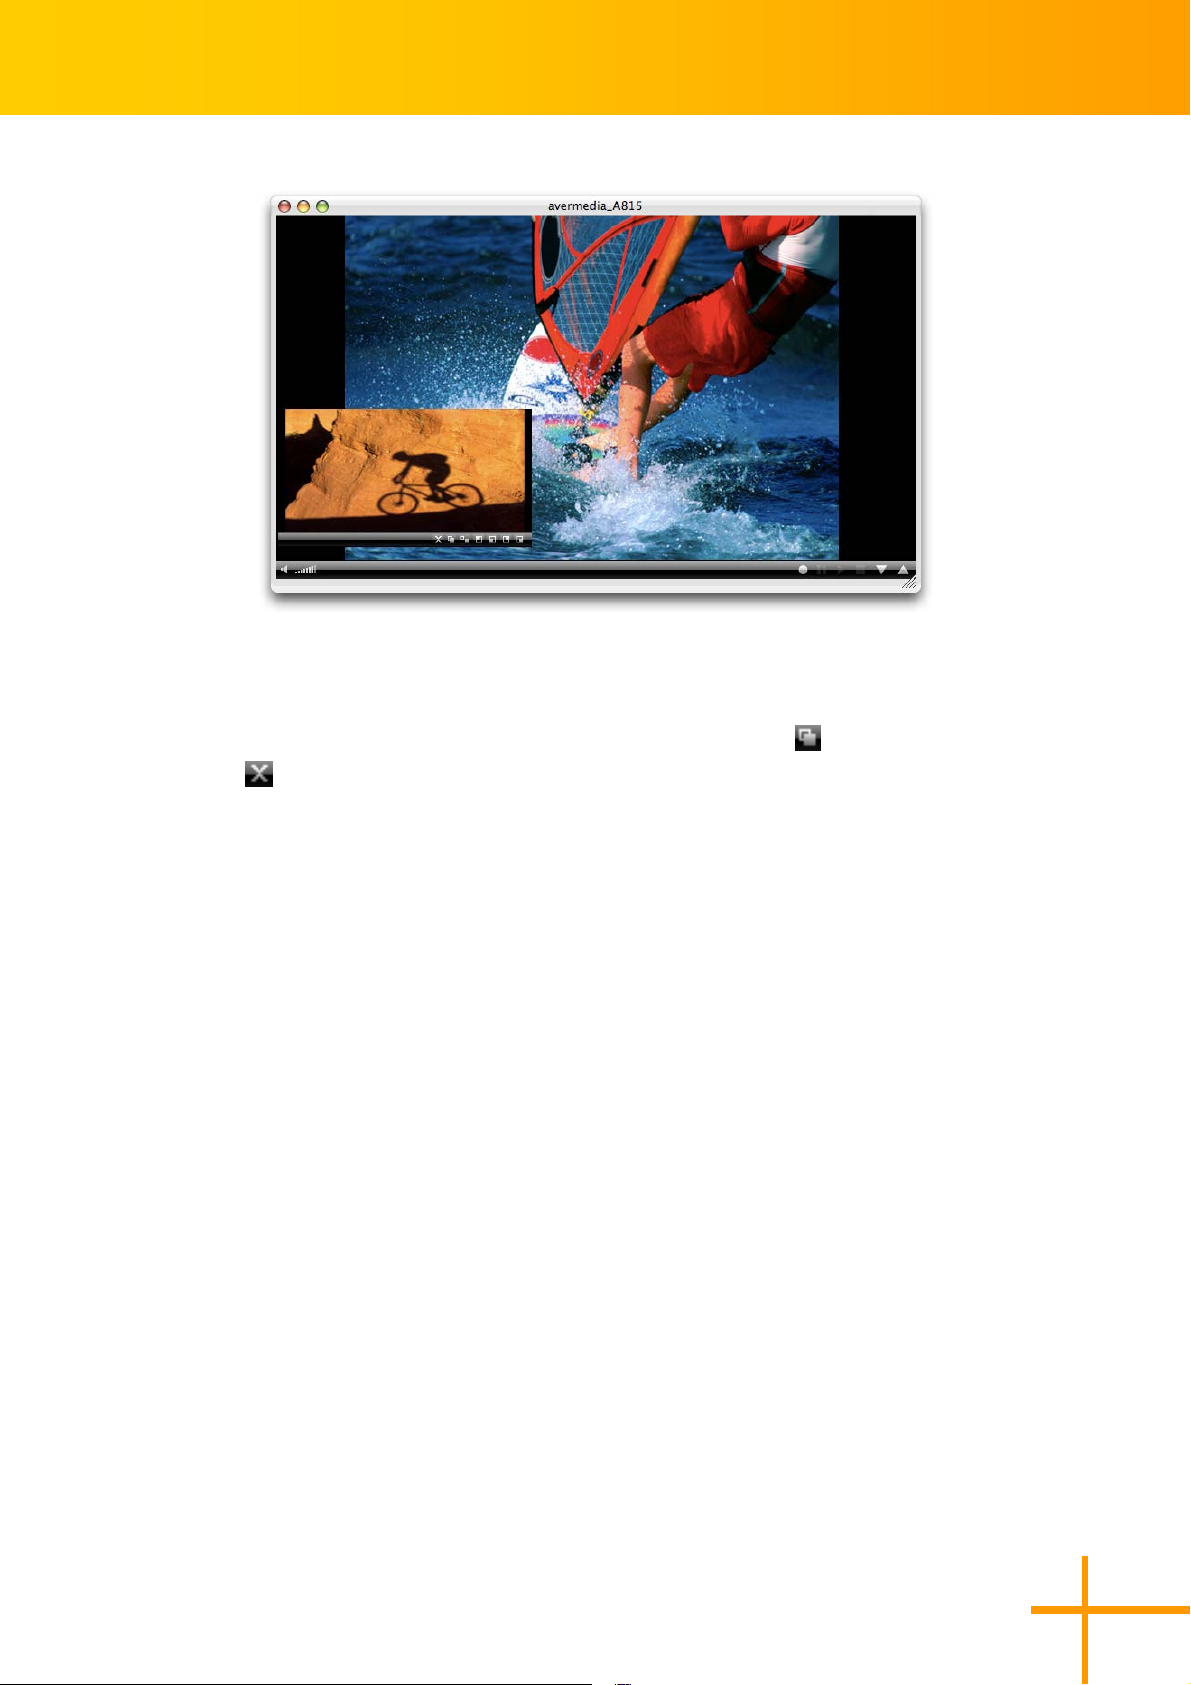
Picture-in-Picture Display
With the picture-in-picture window feature, you will be able to play back recorded video files,
and at the same time, watch live TV.
.
To enable the PIP function, point to menu View>Picture in Picture.
11.
.
Choose desired position of the PIP window.
22.
.
Select Turn on to enable the PIP function, and select Close PIP to disable the PIP
33.
function.
Position Description
Top-left Corner
Bottom-left Corner
Top-right Corner
Bottom-right Corner
Free
Display the PIP window on the top-left corner
Display the PIP window on the bottom-left corner
Display the PIP window on the top- right corner
Display the PIP window on the bottom-right corner
Resize the PIP window and separate it from the main
window
38
Page 43
AVerTV for Mac User’s Manual
By default, you will be able to play back recorded video files on the main window, and at the
same time, watch live TV in the PIP window. If you want to switch the video playback to the
PIP window and the live TV to the main window, press the button . To exit the PIP window,
press button .
39
Page 44

AVerTV for Mac User’s Manual
Image Capture
While you watch TV or a recorded video on your Mac monitor, you can use the AVerTV for
Mac application to capture images for your documents, presentations or web pages. Before
you start capturing images, first set the destination folder for saving captured images.
Capture a TV/Video Image
.
Point to the menu Control>Snapshot to start the capturing.
11.
OR
.
Click the Sanpshot icon in the control panel.
11.
Multiple Image Sequence Capture
To capture a continuous sequence of images, do the following:
.
Click the Snapshot icon in the Preference pane.
11.
.
Select the Export to iPhoto checkbox to save the captured image file to the assigned
22.
location and export to the iPhoto.
40
Page 45

AVerTV for Mac User’s Manual
.
From the File Format drop-down menu, select the format for saving the captured image.
33.
There are 4 options in the Format list:
z PNG
z BMP
z JPEG
z TIFF
.
In the Number of Pictures box, specify the number of images you want to capture.
44.
.
In the Interval Time box, specify the interval between captures. For instance, if you
55.
specify 10 seconds, an image will be captured every 10 seconds.
.
To determine the File Location destination folder for saving captured images, click
66.
Change.
.
To create your own file name format, click Custom in the File Name Format.
77.
Click Custom button in the File Name Format section to custom the capture file
name, you can preview the file name format from the Preview section.
41
Page 46

AVerTV for Mac User’s Manual
Other Settings
Setting Power Options
This option allows you to exit the application and put your Mac into log off, sleep mode or
shut down your Mac while you are away from it.
.
Click the General icon in the Preference pane.
11.
.
Select the Sleep mode you want to use in the System Sleep Setting section.
22.
42
Page 47

AVerTV for Mac User’s Manual
.
After selected the desired sleep mode, then choose an execution time.
33.
.
Point to the menu Control>System Sleep Turn On.
44.
.
The time setting will be displayed on the TV monitor.
55.
For details, please see the description below.
Time setting mode Description
Now Your computer will go into the selected mode in about 10
seconds.
30/60/90/120 Minutes Your computer will go into the selected mode in 30/60/90/120
minutes.
If you want to clear the countdown timer, Point to the menu Control>System Sleep Turn
Off.
43
Page 48

AVerTV for Mac User’s Manual
Application Information
Display version and other information of AVerTV for Mac software.
.
Point to menu AVerTV>About AVerTV for Mac.
11.
.
You can check the AVerTV for Mac version here.
22.
Customer Support
If you need to find more supporting information, you can link to the local AVerMedia
webpage.
.
Point to menu AVerTV>Link To.
11.
.
Select Product Information to link to the web page about product information or select
22.
Technical Support to open the support webpage. Please make sure that you have
already connected to the Internet.
44
Page 49
Closed Caption & Subtitle
Closed Caption & Subtitle are systems to
AVerTV for Mac User’s Manual
.
Point to the menu View>Subtitle.
11.
.
Select Turn On to display the subtitle.
22.
display text on a television. AVerTV for Mac
supports both of them.
To enable Closed Caption function:
.
Point to the menu View>Closed
11.
Caption.
.
Select Turn On to display the Closed
22.
Caption information.
.
Select desired Closed Caption system.
33.
To enable Subtitle function:
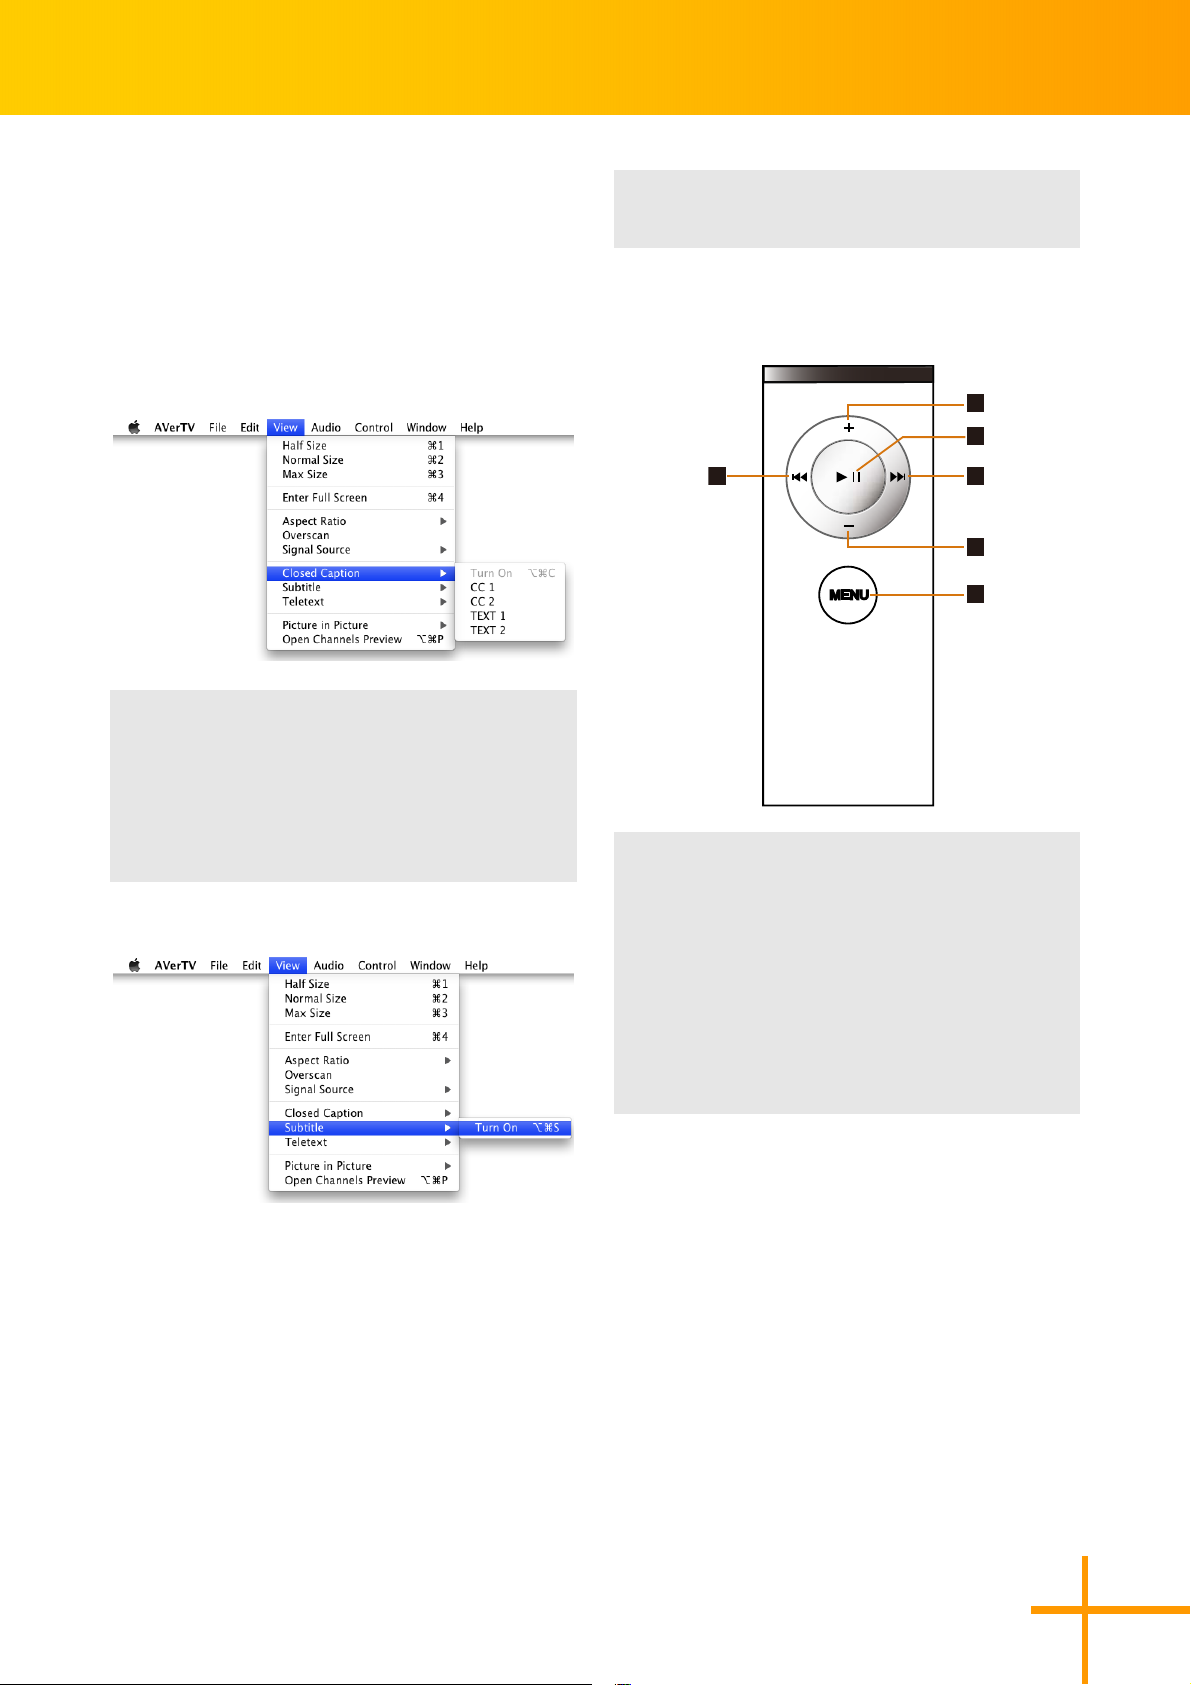
Use Apple Remote to
control A VerTV
6
MENU
.
Move the selection up/Volume up
11.
.
Enter or execute the submenu/Play or
22.
pause
1
2
3
4
5
.
Enter to submenu/Play next file
33.
.
Move the selection down/Volume down
44.
.
Open the On Screen Menu
55.
.
Back to upper menu/Play previous file
66.
45
Page 50

Hot keys
The following is the default definition:
Hot Key Description
AVerTV
AVerTV for Mac User’s Manual
Preference
Hide A V erAP
Hide Others
Quit A V erTV
File
Add schedule
Open Playlist
Open Program management
Open Schedule
Close Window
View
Half Size
System Default
Max Size
Full Screen
Source>Next Source
Subtitle>Open
Teletext>Open
EPG
Audio
Add Volume
Sub Volume
Mute
46
Page 51

AVerTV for Mac User’s Manual
Next Audio Channel
Control
Snapshot
Record
Pause
Stop
Forward
Backward
Playback
Play Next File
Play Previous file
Next Channel
Previous Channel
Space
Channel Loop
Channels Preview>Open/Close
Window
Hide Control Panel
Select Control Panel>Horizontal Panel
Select Control Panel>Vertical Panel
Select Control Panel>Combined Panel
Help
Mac Help
47
 Loading...