

Page 1
AAVVeerrMMeeddiia
a
®
®
AAVVeerrEEPPaacckk330000
UUsseerr’’ss MMaannuuaall
Page 2

FCC NOTICE
This device has been tested and found to comply with the limits for a Class B digital device, pursuant to Part 15 of the
FCC Rules. These limits are designed to provide reasonable protection against harmful interference in a commercial,
industrial or business environment. This equipment can generate, use and radiate radio frequency energy and, if not
installed and used in accordance with the instruction, may cause harmful interference to radio communications.
However, there is no guarantee that interference will not occur in a particular installation. If this equipment does cause
harmful interference to radio or television reception, which can be determined by turning the equipment off and on, the
user is encouraged to try to correct the interference by one or more of the following measures :
• Reorient or relocate the receiving antenna.
• Increase the separation between the equipment and receiver.
• Connect the equipment into an outlet on a circuit different from that to which the receiver is connected.
• Consult the dealer or an experienced radio/TV technician for help.
This device complies with Part 15 of the FCC Rules. Operation is subject to the following two conditions: (1) this
device may not cause harmful interference, and (2) this device must accept any interference received, including
interference that may cause undesired operation.
CAUTION ON MODIFICATIONS
To comply with the limits for the Class B digital device, pursuant to Part 15 of the FCC Rules, this device must be
installed in computer equipment certified to comply with the Class B limits. All cables used to connect the computer
and peripherals must be shielded and grounded. Operation with non-certified computers or non-shielded cables may
result in interference to radio or television reception.
Any changes or modifications not expressly approved by the grantee of this device could void the user's authority to
operate the equipment.
CE NOTICE
This is a Class B product.
DISCLAIMER
No warranty or representation, either expressed or implied, is made with respect to the contents of this documentation,
its quality, performance, merchantability, or fitness for a particular purpose. Information presented in this
documentation has been carefully checked for reliability; however, no responsibility is assumed for inaccuracies. The
information contained in this documentation is subject to change without notice.
In no event will AVerMedia be liable for direct, indirect, special, incidental, or consequential damages arising out of
the use or inability to use this product or documentation, even if advised of the possibility of such damages.
TRADEMARKS
AVerMedia and AVerEPack300 are registered trademarks of AVerMedia TECHNOLOGIES, Inc. IBM PC is a
registered trademark of International Business Machines Corporation. Macintosh is a registered trademark of Apple
Computer, Inc. Microsoft is a registered trademark and Windows is a trademark of Microsoft Corporation. All other
products or corporate names mentioned in this documentation are for identification and explanation purposes only, and
may be trademarks or registered trademarks of their respective owners.
COPYRIGHT
© 2000 by AVerMedia TECHNOLOGIES, Inc. All rights reserved. No part of this publication may be reproduced,
transmitted, transcribed, stored in a retrieval system, or translated into any language in any form by any means without
the written permission of AVerMedia TECHNOLOGIES, Inc.
ENG 01
Page 3

Table of Contents
Chapter 1 Introduction
Product Highlights........................................................................................... 1
What’s in the Package .....................................................................................2
Features and Specifications ............................................................................. 2
System Requirements ...................................................................................... 4
Chapter 2 Hardware Installation and Setup
Connection Ports .............................................................................................5
Connecting AVerEPack300 to PC’s Parallel Port or USB port....................... 6
Connecting AVerEPack300 to the Presentation Display Unit......................... 7
Connecting a VGA Monitor.................................................................. 7
Connecting the LCD Projector.............................................................. 8
Connecting a SCART RGB Monitor ....................................................8
Connecting the TV................................................................................ 9
Chapter 3 Using the Application
Installing AVerEPack300 Software................................................................. 10
Running the AVerEPack300 Program............................................................. 11
Overview ......................................................................................................... 12
Toolbar Buttons and their Functions ...............................................................13
Creating a Slide Presentation...........................................................................15
Inserting the Slide Presentation ....................................................................... 15
Insert Image File Type............................................................................. 15
Insert and Convert PowerPoint Slide Presentation .......................................... 16
For PowerPoint 2000 version .................................................................. 16
For Lower (other) PowerPoint version.................................................... 16
Insert or Retrieve Slide from the CompactFlash card...................................... 17
Storing the Active Project to the CompactFlash card...................................... 17
Transferring AVP file to the CompactFlash card ............................................ 18
Edit the Slide Sequence................................................................................... 18
Chapter 4 Using the AVerEPack300
Using the Remote Control ............................................................................... 19
Touch Button Panel ......................................................................................... 22
Menu Functions............................................................................................... 23
Timer Function................................................................................................ 25
Reference Function.......................................................................................... 26
Special Highlighting Functions ....................................................................... 27
AVerMedia Spot....................................................................................... 27
i
Page 4

AVerMedia Pointer .................................................................................. 28
AVerMedia Spylight ................................................................................ 29
Different Types of Zoom ................................................................................ 30
Normal Zoom........................................................................................... 30
AVerMedia Area Zoom ........................................................................... 30
AVerMedia Spot-Zoom............................................................................ 31
AVerMedia Pointer-Zoom ....................................................................... 32
ii
Page 5

Chapter 1
Introduction
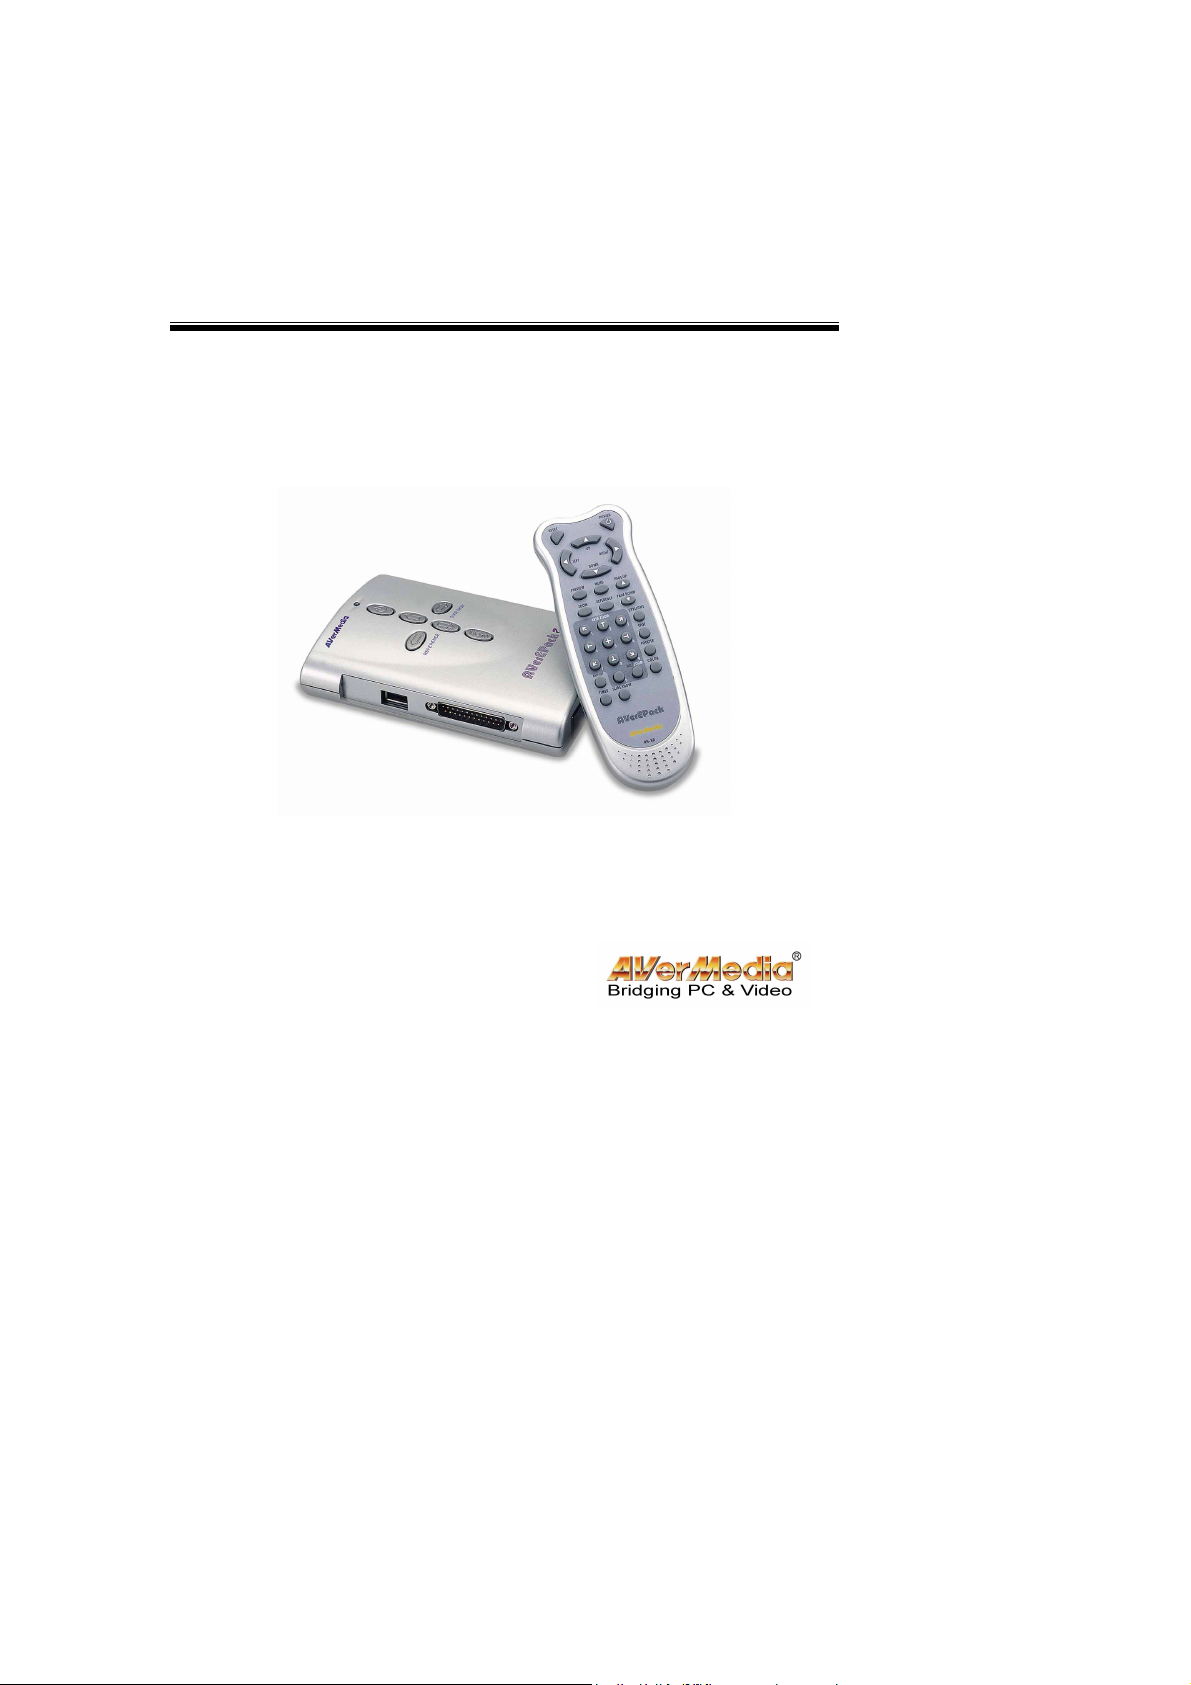
Congratulation! Thank you for choosing AVerMedia® AVerEPack300. We are
certain you will find this product a useful presentation tool that is highly suitable for
business, education, promotional activities and anything that requires visual
application.
To get started, this chapter briefly describes what the AVerEPack300 has to offer.
At the end of the chapter, you will find the system requirements needed in order to
use this product.
Product Highlights
The AVerEPack300 is a truly user friendly mobile presentation device. You need
only bring this portable presentation device anywhere and connect it to a television,
large LCD projector or even to a VGA monitor to conduct your presentation
instantly.
By connecting the AVerEPack300 to your PC’s parallel or USB port, you can easily
store all your PowerPoint slide presentation or a variety of other images into an
8MB CompactFlash card that can keep more than a hundred JPG slide images.
The AVerEPack300 offers many exciting new features to enhance your
presentations. Four very special features are the Area Zoom, AVerMedia
Spot-Zoom, AVerMedia Pointer-Zoom, AVerMedia Spylight. They are
special highlighting functions, which allow you to focus on specific areas
of your screen and emphasize key points in your presentation. The
AVerEPack300 provides Multiple Flicker-Filter Control and Brightness
Controls to choose from. You can horizontally and vertically adjust the
size and position of the image. It also features Full Screen, 16-Slide
Preview, and Quick Slide Reference. You can even make last-minute slide
sequence editing. All of these features and more can be easily accessed
with the Infrared Remote Control.
1
Page 6
AVerMedia® AVerEPack300 User’s Manual
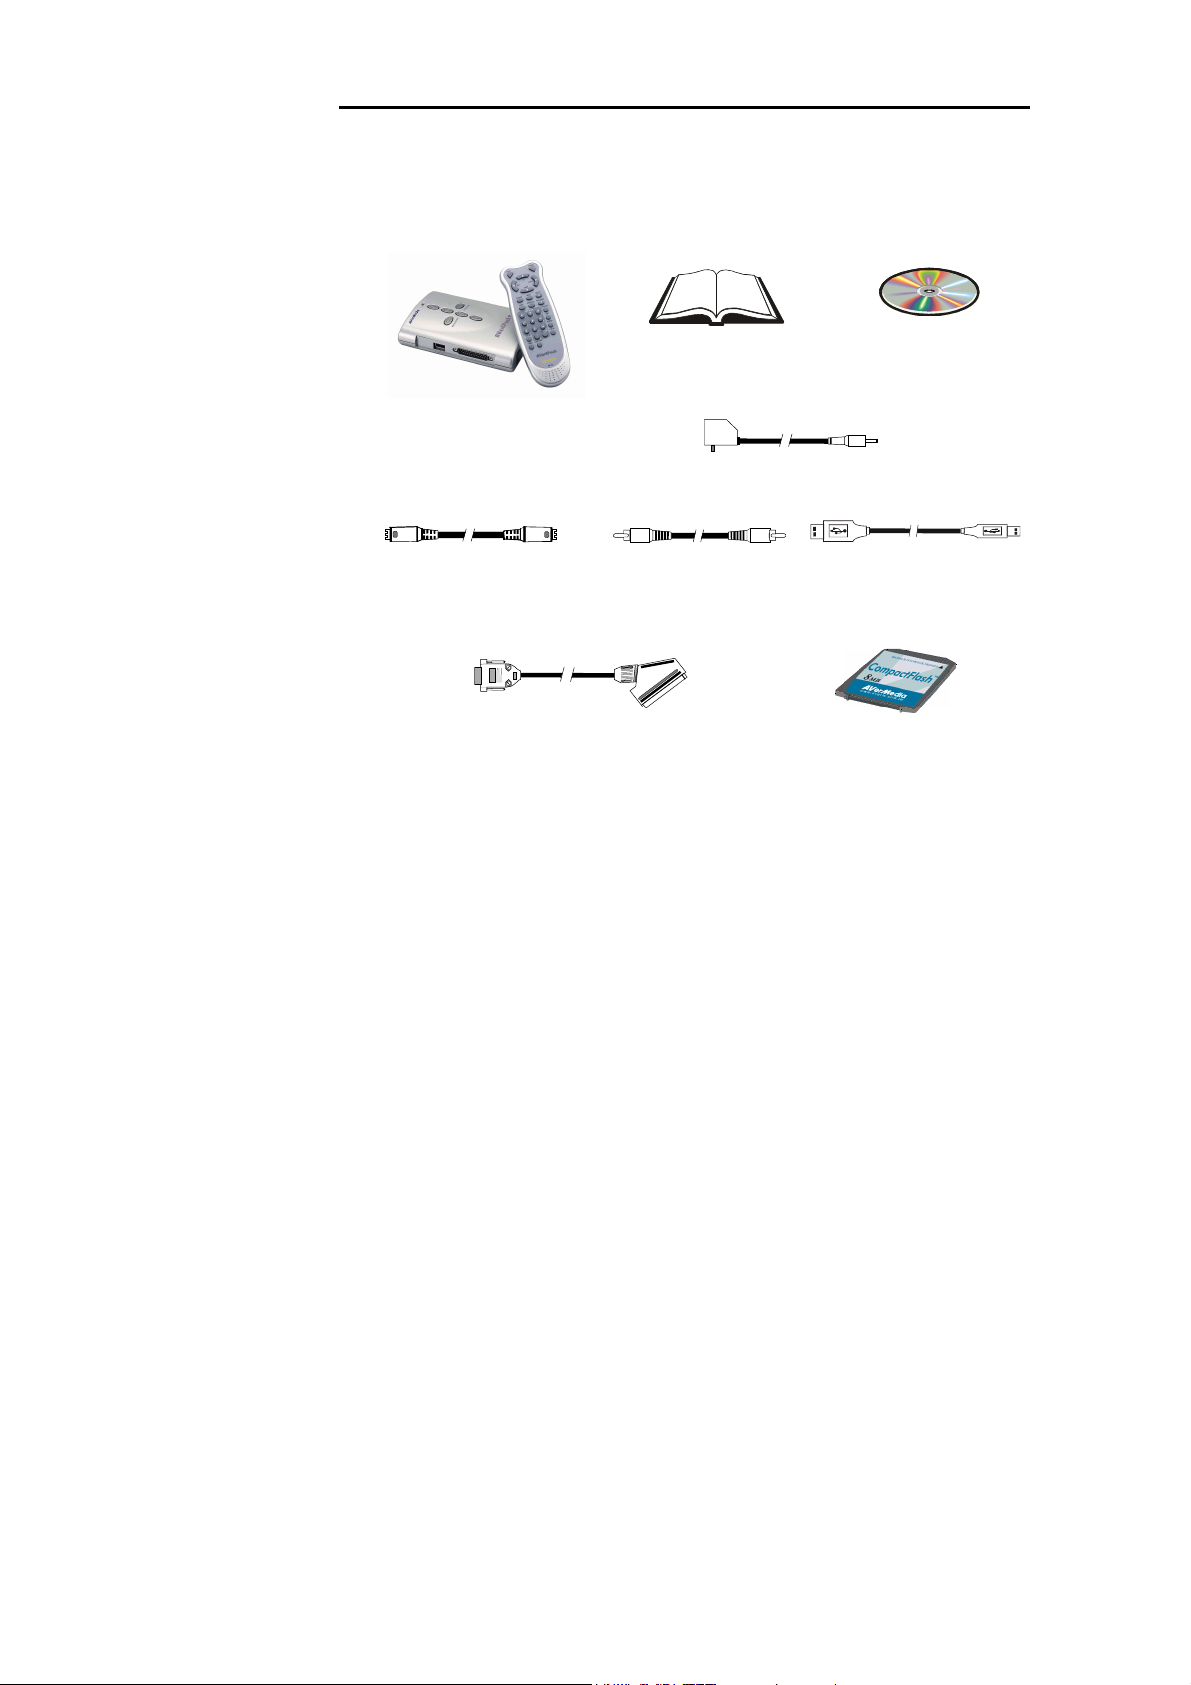
What’s in the Package
Your AVerEPack300 package includes the following:
AVerMedia
Unit and Remote Control
®
AVerEPack300
(batteries included)
S-Video Cable
Optional Accessories :
SCART Cable (optional on PAL version)
This User’s Manual
6 VDC Switching Power Adapter
AV Cable
AVerEPack300
Utility Software CD
USB Cable
8MB CompactFlash Card
Features and Specifications
The AVerEPack300 provides the following features and specifications:
Features
• Windows ®95, 98, 2000 and ME compatible
• Support BMP, JPG and variety of other images
• Auto convert PowerPoint 2000 slide presentation
• Connects directly to PC's parallel (printer) or USB port
• Supports resolutions up to 1024 x 768 image input
• Supports Multiple Image Folder
• 16-Slide Preview
• Slide Sequence Editing
2
Page 7

Chapter 1 Introduction
• Horizontal/Vertical screen panning
• Horizontal/Vertical picture positioning
• Flicker control selection for sharper image display
• Up to 4 levels of brightness control
• Slide Timer Delay
• Quick Slide Reference
• Presentation Countdown Timer
• 8MB CompactFlash
• Compatible to 8MB, 16MB and 32MB CompactFlash
®
Card can keep more than 100 pictures
®
Card
• 3 types of Highlighting functions :
• AVerMedia Spot
This function highlights a certain area on the image by darkening external
areas and by creating a colored border within your area of interest. Create
a highlight as large as 1/4th of your screen or as small as 1/64th of your
presentation screen.
• AVerMedia Pointer
A hand figured pointer lets you direct your viewer’s attention to key areas
on the screen.
• AVerMedia Spylight
This function highlights certain areas of your screen by darkening
unwanted areas. You can darken areas horizontally or vertically.
• 4 types of Zoom :
• Traditional Zoom & Pan
Users can zoom in (200%) the slide images on VGA mode or TV display
and pan around freely to any part of the screen.
• Exclusive AVerMedia Area Zoom
Divides the computer screen into 9 parts and allows you to select the
desired part through the “Area Zoom Control” on the remote.
• New AVerMedia Spot-Zoom
After you highlight a certain area using AVerMedia Spot, you can zoom
in and out of the highlighted area.
• New AVerMedia Pointer-Zoom
You can point to a key area in your presentation using AVerMedia
Pointer and then enlarge that area.
• Supports Composite/S-Video/SCART RGB/VGA output
• NTSC and PAL switchable
• TV/VGA monitor switchable
• Supports TV and VGA output
• Infrared remote control access to all functions
• Built-in Touch Button Control Panel
3
Page 8

AVerMedia® AVerEPack300 User’s Manual
Specification
Input: USB or Parallel Port
Output: TV (Composite/
S-Video/ SCART RGB),
VGA
Power Supply: 6VDC Power Adapter
Dimension: Base Unit :
6.02” × 4.33” × 1.42”
Remote Unit :
6.02” × 2.20” × 1”
Weight: Base Unit: 0.55lb
Remote Unit: 0.22lb
Warranty: 1year parts & labor
Compliance: FCC Class B, CE
System Requirements
CPU: Pentium® 166 MMX or better recommended
Memory: 32MB or higher recommended
OS: Windows
Peripheral I/O: Parallel port or USB port
®
95, 98, ME or 2000
4
Page 9
Chapter 2
A
Hardware Installation and
Setup
C
Panel Directions
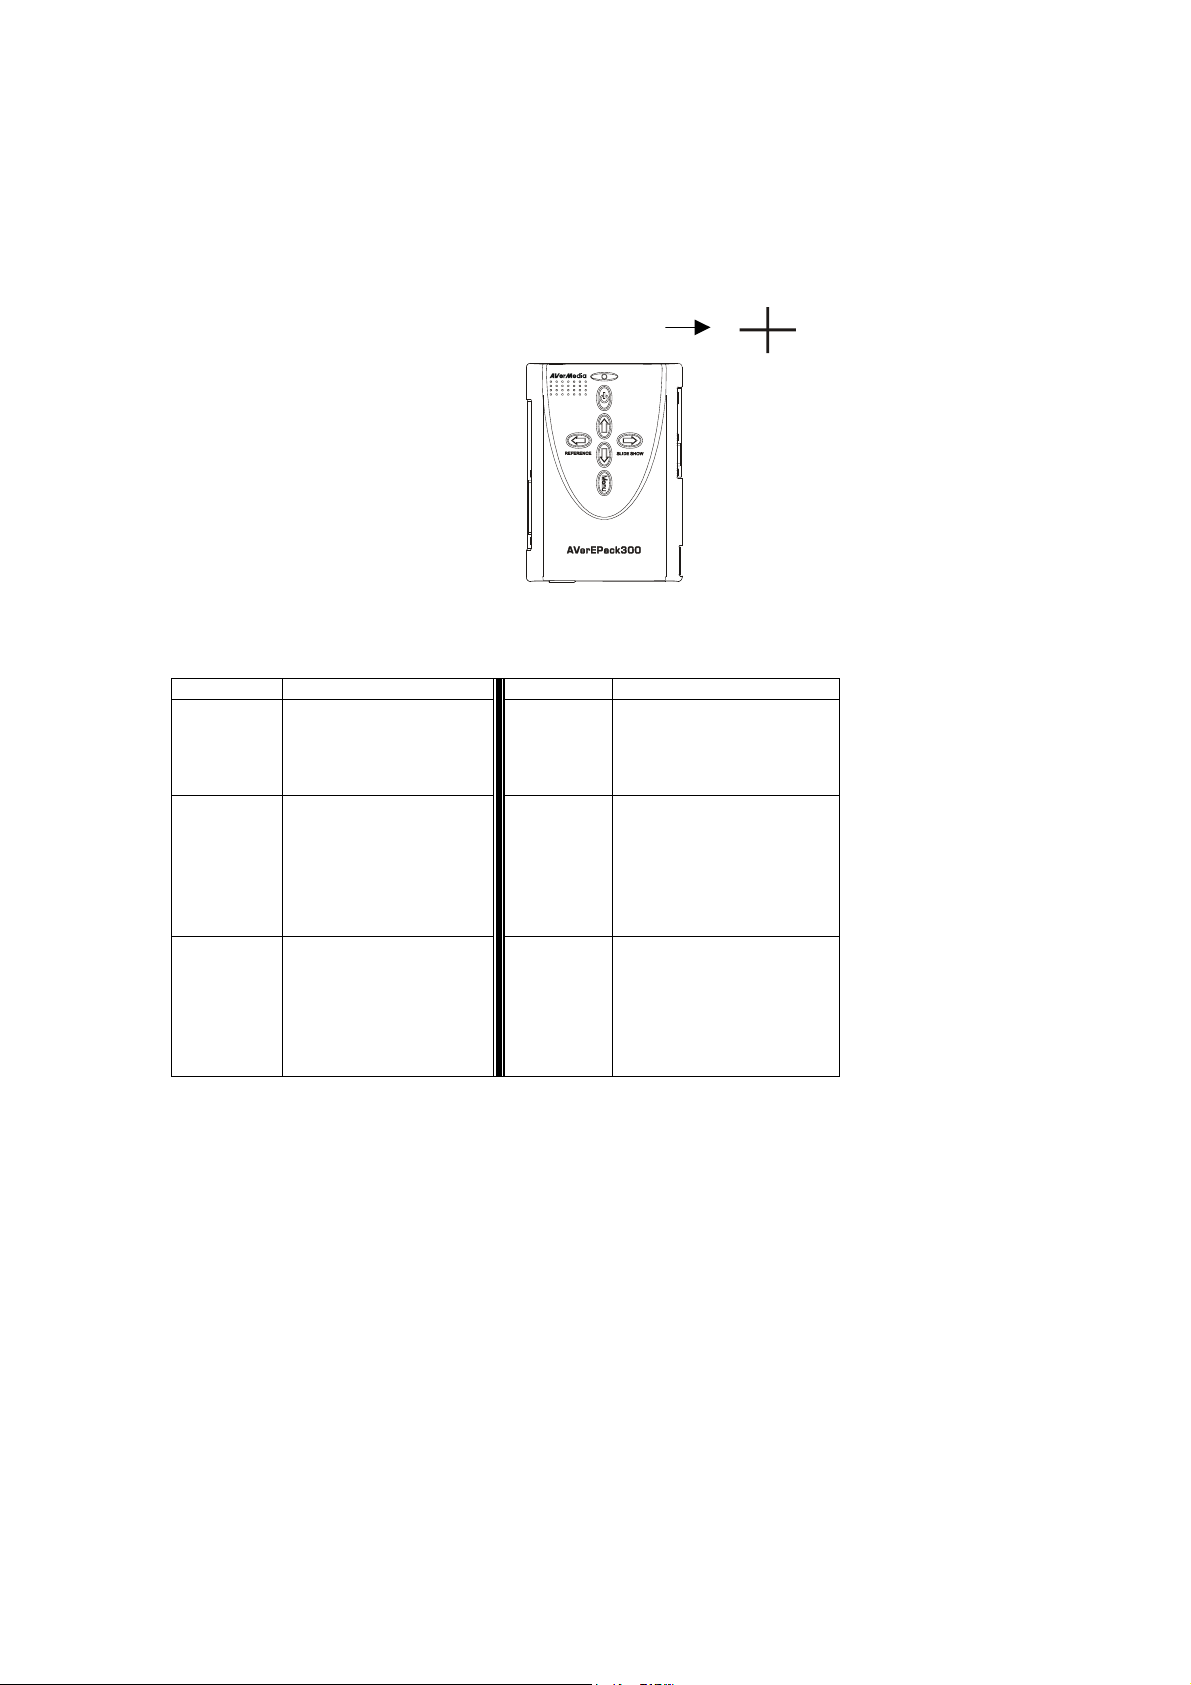
Connection Ports
The Ports on B, C, and D side panel of
the AVerEPack300 are for connecting
the unit to the PC’s parallel port or
USB port, graphics display monitor,
TV and other devices.
This section briefly describes what devices should go into each port. For proper
cable connections and installation, please read the rest of this chapter. (Text
describing each port are printed at the bottom side of the device.)
Port Description Port Description
POWER
PRINTER
USB
Plug the AC Power
Adapter to this port.
This port allows you
to import and export
slide presentation to
and from your PC and
Compact Flash
Memory.
This port allows you
to import and export
slide presentation to
and from your PC and
Compact Flash
Memory.
VIDEO
S-VIDEO
SCART/
VGA
This port allows you to
output the slide image
to a TV monitor which
uses a composite video.
This port allows you to
output the slide image
to a TV monitor which
uses S-Video.
This port allows you to
output the slide image
to a VGA monitor,
LCD projector or TV
Monitor which uses
SCART RGB
B
D
5
Page 10
AVerMedia® AVerEPack300 User’s Manual
A
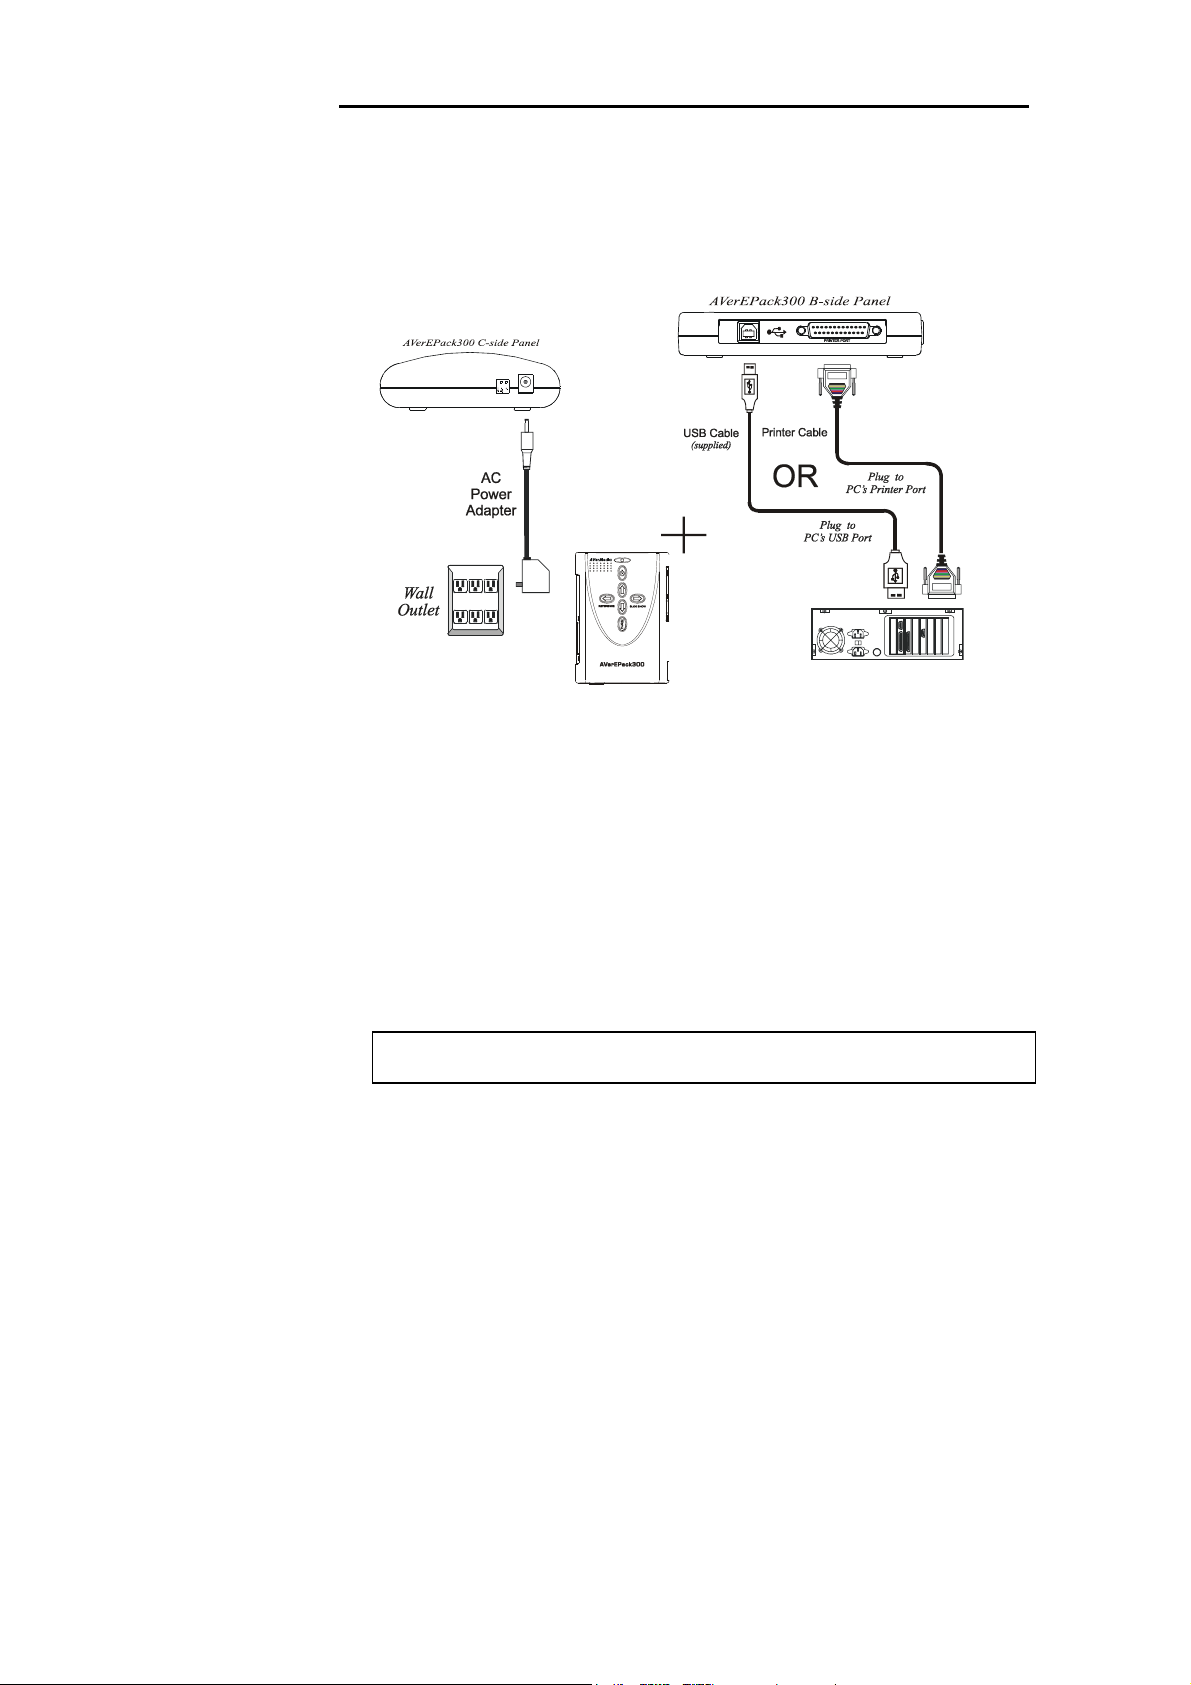
Connecting AVerEPack300 to PC’s Parallel
(Printer) or USB Port
Connecting the AVerEPack300 unit to PC’s parallel port or USB port allows you to
import and export the slide presentation to and from CompactFlash card by using the
AVerEPack300 program.
1. Connect the AVerEPack300 unit to PC’s parallel port or USB port.
For USB cable connection:
Plug one end of the supplied USB cable to the B-side panel of AVerEPack300
“USB” port and the other end to the PC’s USB port.
For Printer cable connection:
Plug one end of your Printer cable to the B-side panel of AVerEPack300
“Printer” port and the other end to the PC’s parallel port.
2. Plug the supplied AC Power Adapter into the C-side panel of AVerEPack300
“Power” port.
NOTE: If you are using Windows 2000, It is a requirement to use the USB
cable connection. When you connect the USB cable for the first time,
the system will automatically detect the newly installed device. On
the Digital Signature Not Found dialog box, click Yes.
WARNING: Do not connect the printer cable and the USB cable at the
same time.
C
B
D
Rear of Computer
6
Page 11
Chapter 2 Hardware Installation and Setup
A
Connecting AVerEPack300 to the Presentation
Display Unit
Connecting AVerEPack300 to a presentation display unit allows you to display slide
presentation on a television, large LCD projector or even to a VGA monitors
instantly without connecting to PC.
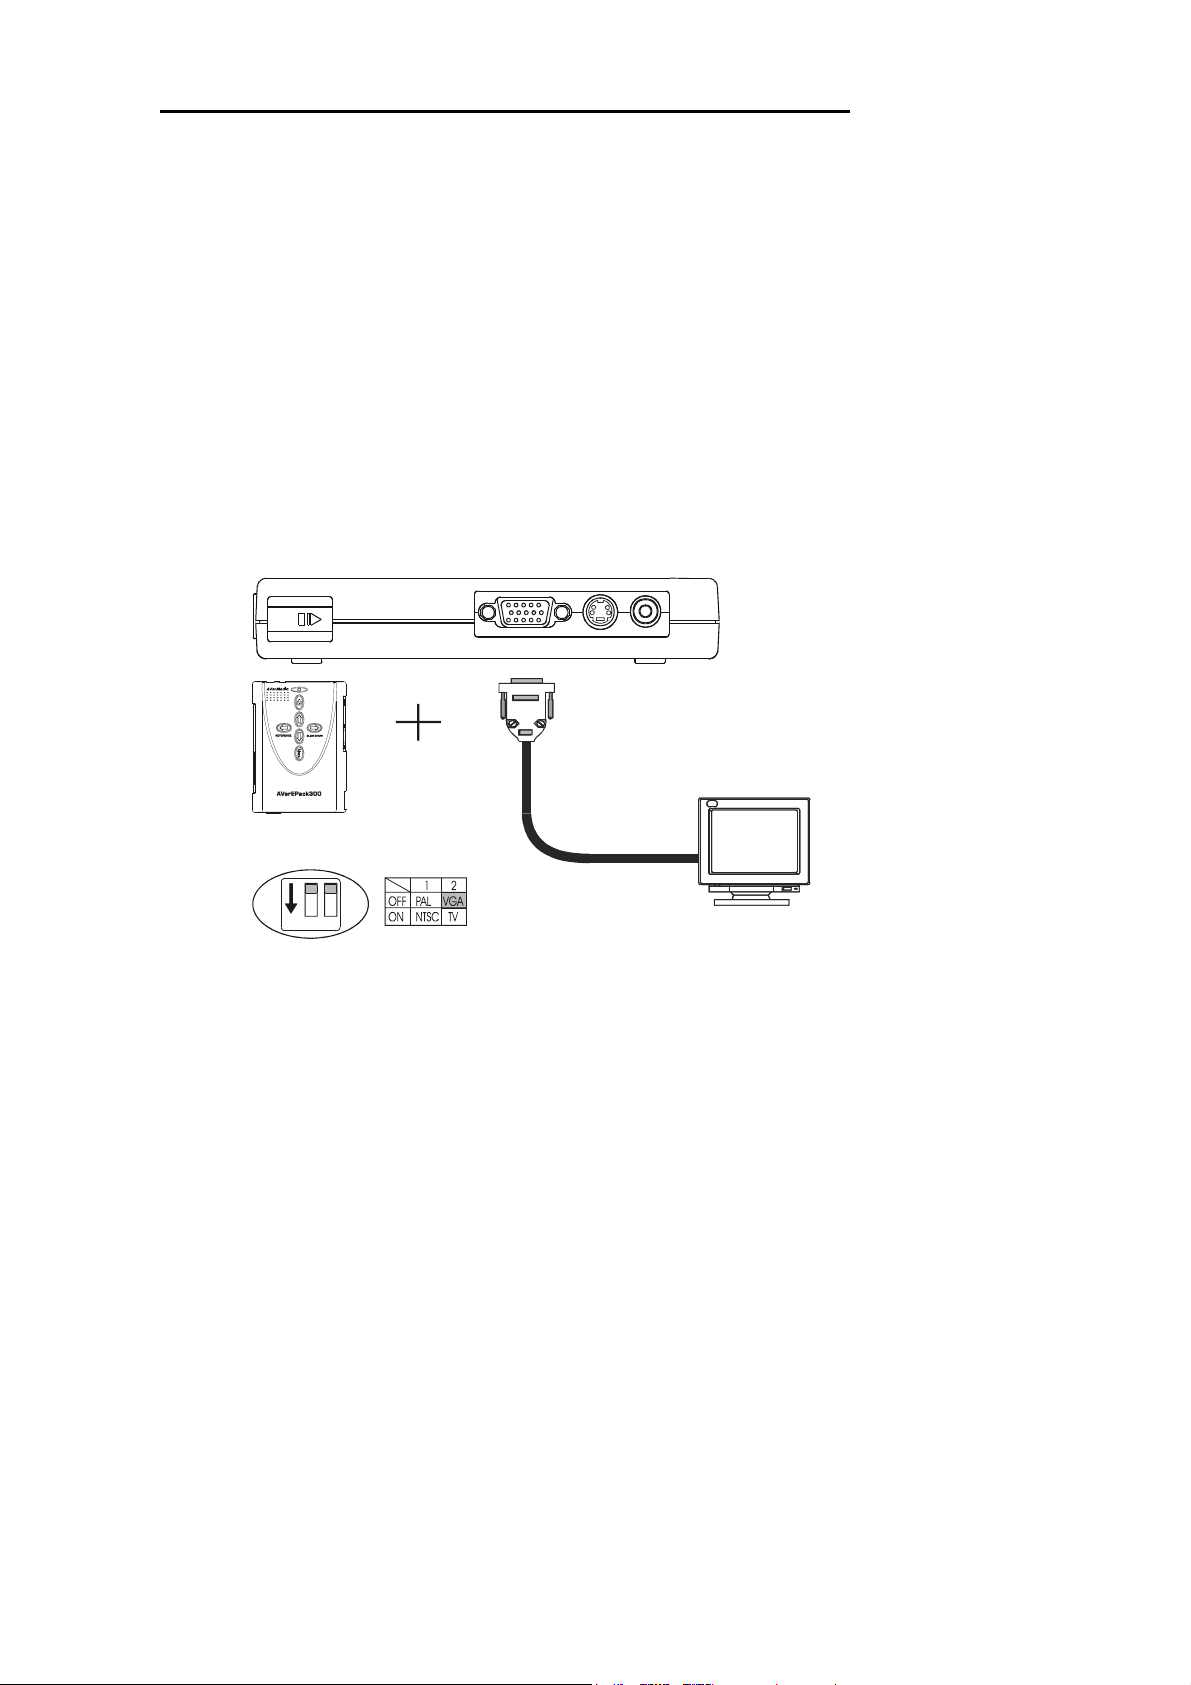
Connecting a VGA Monitor
To display the slide presentation on the VGA monitor, you’ll need to connect
the other end of the VGA monitor signal cable to the “VGA” port at the D-side
panel of AVerEPack300.
Set the DIP switch no. 2 to VGA mode located at the C-side panel of
AVerEPack300 beside the “Power” port.
DIP SWITCH
1
ON
AVerEPack300 D-Side Panel
C
B
2
D
VGA Monitor
7
Page 12
AVerMedia® AVerEPack300 User’s Manual
R
A
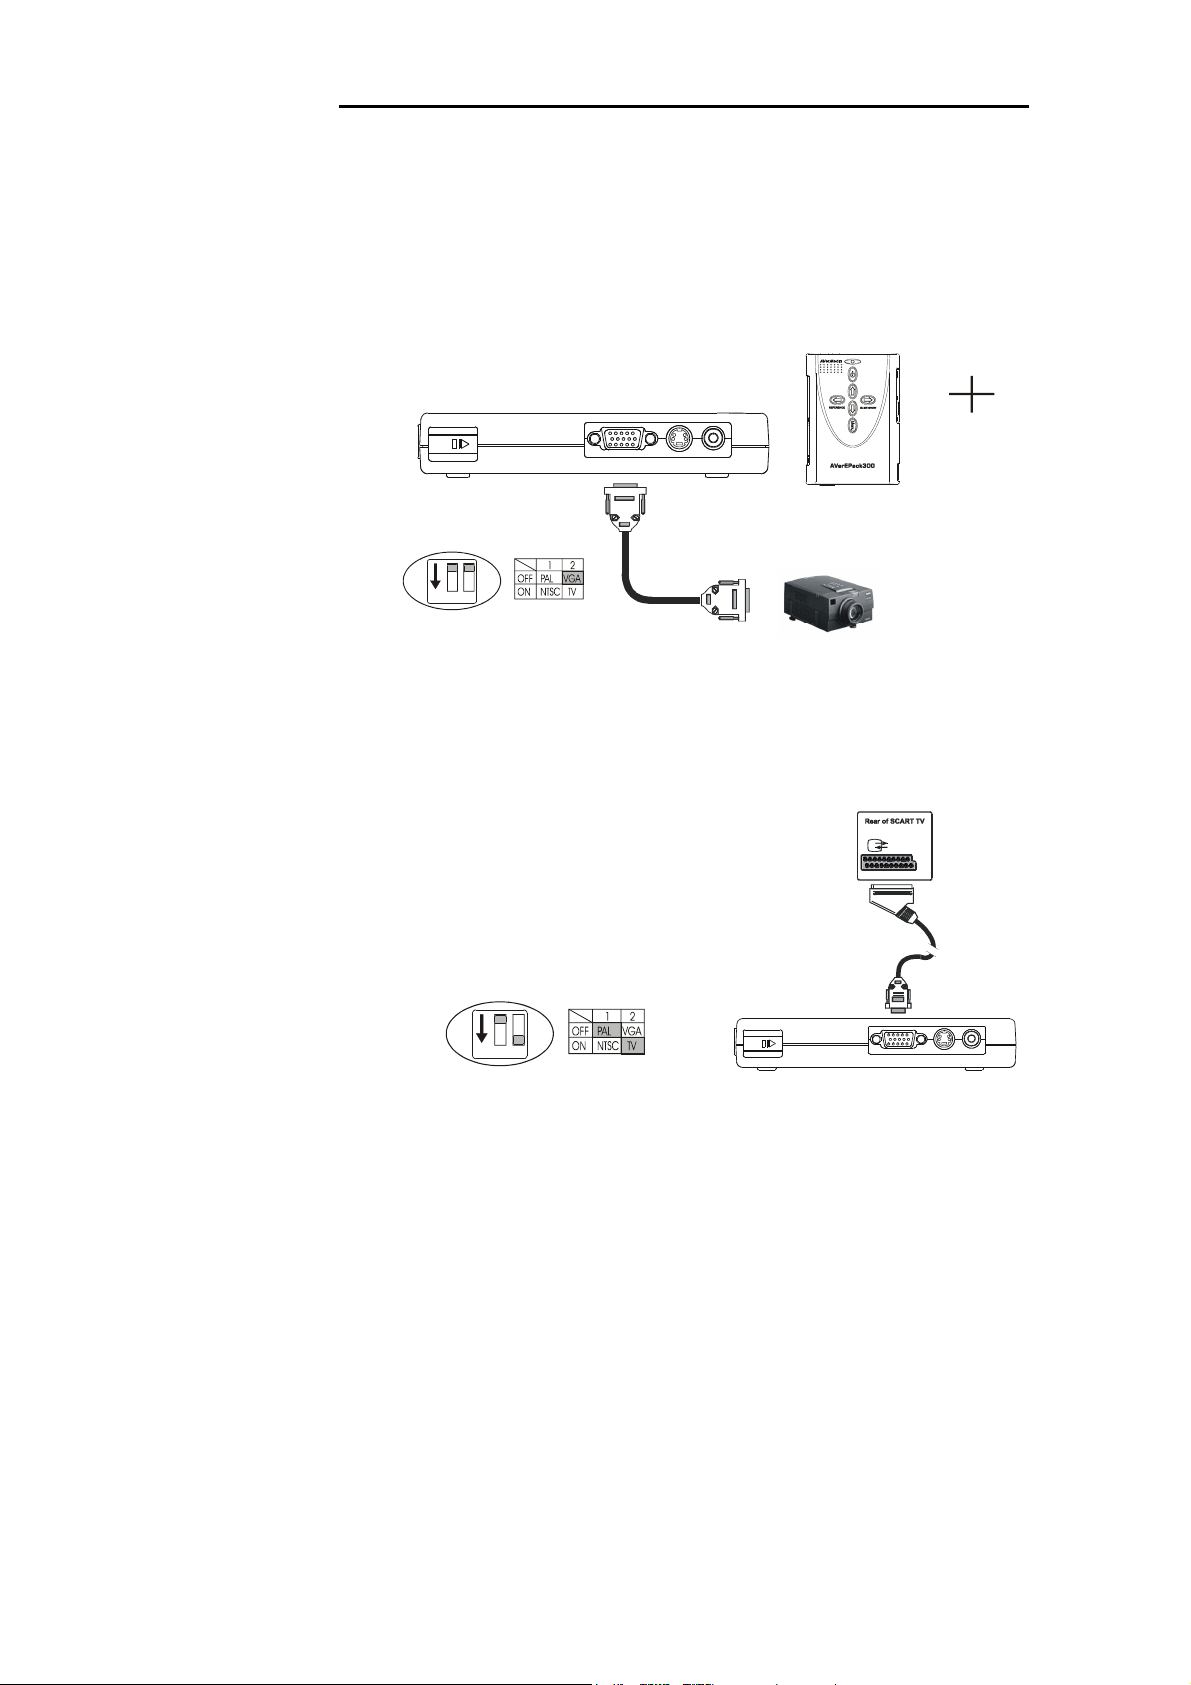
Connecting the LCD Projector
To display the slide presentation on LCD projection screen, you’ll need to
connect one end of the VGA cable (not supplied) to the D-side panel of
AVerEPack300 “VGA” port and the other end to the LCD projector
“Computer” port.
Set the DIP switch no. 2 to VGA mode located at the C-side panel of
AVerEPack300 beside the “Power” port.
AVerEPack300 D-Side Panel
C
B
D
DIP SWITCH
VGA Cable
2
1
ON
(not supplied)
LCD PROJECTO
Connecting a SCART RGB Monitor
If you are using a SCART RGB monitor, connect the monitor to the “SCART
RGB” port at the D-side panel of AVerEPack300 using the SCART RGB cable.
(The SCART RGB cable is an optional accessory cable with the
AVerEPack300.)
Set the DIP switch no. 2 to TV mode then
from DIP switch no. 1 switch the TV system
to PAL. The DIP switch is located at the Cside panel of AVerEPack300 unit beside the
“Power” port.
DIP SWITCH - PAL TV SYSTEM
2
1
ON
SCART RGB Monitor
SCART
RGB Cable
(optional)
AVerEPack300 D-Side Panel
8
Page 13

Chapter 2 Hardware Installation and Setup
V
A
Connecting the TV
To display the slide presentation on TV (or any video monitor), you’ll need to
connect the TV to one of the ports at D-side panel of AVerEPack300.
If the TV set uses the composite video standard, connect the TV to the D-side
panel of AVerEPack300 “VIDEO” port using the supplied AV Cable.
If the TV set uses the S-Video standard, connect the TV to the D-side panel of
AVerEPack300 “S-VIDEO” port using the supplied S-Video Cable.
AVerEPack300 D-Side Panel
C
B
D
S-Video Cable
(supplied)
AV C a ble
(supplied)
IDEO-IN
S-IN
Rear of TV
Set the DIP switch no. 2 to TV mode then from DIP switch no. 1 switch the
proper TV system you have. The DIP switch is located at the C-side panel of
AVerEPack300 unit beside the “Power” port. If you are not sure of your TV
system, please refer to your TV manual.
DIP SWITCH - PAL TV SYSTEM
N
12
O
DIP SWITCH - NTS C TV SYSTEM
N
12
O
9
Page 14

Chapter 3
Using the Application
This chapter will show you how to install, run and use the AVerEPack300
program. You will find details on how to convert the PowerPoint files into slide
presentation, insert other images format, edit the slide sequence, and transfer the
active project to the CompactFlash Card.
Installing AVerEPack300 Software
Start Windows and insert the AVerMedia AVerEPack300 Utility Software CD
into your CD-ROM drive.
If your CD-ROM drive has been set to “Autorun”, the software installation
program will run automatically and guide you through the rest of the setup process.
If “Autorun” has been disabled, then do the following to install the AVerMedia
AVerEPack300 Utility Software.
1. Click Start button, click Run and then
proceed to Step 2.
2. In the Run dialog box type: Your CD-ROM Drive:\Setup.exe
3. Click OK to start the setup program.
4. Follow the on screen instructions to complete the installation.
10
Page 15

Chapter 3 Using the Application
Running the AVerEPack300 Program
To run the AVerEPack300, click Start, select Programs, select
AVerEPack300
and then click AVerEPack300.
Whenever you start using the AVerEPack300 program, a Device Status
dialog box always prompt to inform you about the power and the cable
connection of the AVerEPack300 unit to your PC.
This indicates that you have properly
connected the AVerEPack300 unit to
your PC.
If you have inserted a CompactFlash card,
the content of the card will be displayed.
Click OK to start using the program.
This indicates that your AVerEPack300
unit is not connected to your PC.
You may start using the application
without making the connection.
Click OK to start using the program.
11
Page 16

AVerMedia® AVerEPack300 User’s Manual
Overview
Title Bar Located at the top of AVerEPack300
window. It contains the name of the active
project and buttons for closing and resiz ing
the window.
Menu Bar Contains all the names of the available pull-
down list option menus. To access any of
the menu items, simply click on it or press
the Alt button and the underlined character.
Toolbar This includes buttons that gives quick
access to perform certain frequentlly used
functions in the menus.
Sorting Area The area in which slides are placed and
inserted. To move the slide, simply click
and drag the selected slide to a new location.
Status Bar Located at the lower left corner of
AVerEPack300 wind ow. It contains a short
text message or brief explanation of the
curently selected function.
12
Page 17

Chapter 3 Using the Application
Toolbar Buttons and their functions
New (Ctrl+N)
Creates a new project. If you are currently working on a project, this will
prompt you to save before clearing the sorting area.
Open (Ctrl+O)
Loads the previously saved AVP file.
Save (Ctrl+S)
Saves the active project. If you have not saved the active project before, a
Save As dialog box will appear. The Save As dialog box will not appear if
you have saved the active project bef ore and it will be saved with the already
given name. If you have made some changes and want to keep the original
version use the 'Save As' function.
Undo (Ctrl+Z)
Cancels or reverses only the last action that you have made on the active
project.
Cut (Ctrl+X)
Removes the selected slide and place it on the clipboard.
Copy (Ctrl+C)
Reproduces an identical copy of the selected slide and place it on the
clipboard.
Paste (Ctrl+V)
Places or inserts the slide that has been cut or copied in the sorting area.
Delete (Del)
Removes the selected slide.
Go To… (Ctrl+G)
Searches and locate the desired slide.
13
Page 18

AVerMedia® AVerEPack300 User’s Manual
Full View (F11)
Displays the selected slide in full screen.
To view the next slide, press Page Down button of your keyboard or click
the left-mouse button. The function works only if there is a slide succeeds
the current displayed slide.
To view the previous slide, press Page Up button of your keyboard or click
the right-mouse button. The fu nction works only if there is a slide precedes
the current displayed slide.
To return to the main program, press ESC.
Hide/ Unhide
Shows and hide the slide. When you select the slide to hide this will not be previewed
during slide show.
Set the slide to hide or view:
In the slide sorting area, select the slide you want to hide, and then click Hide/Unhide
button or right-click the selected slide, and choose Hide/Unhide from the pop up
menu.
To view the hidden slide, select the marked hidden slide and then follow the procedure
in setting the slide to hide.
04/ 09/ 16/ 25
Fits the number of slides to be viewed in the sorting area.
Flash Memory
Displays and allows you to remove the content of Compactflash Memory.
Import
Retrieves slide images from the CompactFlash card.
Export
Transfers AVP file to the CompactFlash memory. To transfer the AVP file,
make sure you have properly connected the cables.
14
Page 19

Chapter 3 Using the Application
When you transfer the AVP file, it converts all the slide images into JPG
format. To retain the BMP files, enable the Keep original BMP file check box.
Creating a Slide Presentation
First, you must create your slide pr esentation from PowerPoint or other i mageediting program. Your next step is to insert your slide presentation using the
AVerEPack300 program then transfer the AVP file or active project to CF
card.
Inserting the Slide Presentation:
Use the Insert Menu of the AVerEPack300 program to insert the slide
presentation from your computer storage disk.
Use the Import function from the Transfer menu, incase you want to ret rive
or insert slide from the CompactFlash card. Make sure you have connected the
power and cable connection of the unit to your PC.
Insert Image File Type:
1. Select Image file from the Insert Menu.
2. An Insert Image File dialog box will appear:
3. In the Look in box, click the drive or folder location that contains the
image.
15
Page 20

AVerMedia® AVerEPack300 User’s Manual
4. In the Files of type box, select the image file type you want to
display on the list.
5. Select the image then click Insert button.
Insert and Convert PowerPoint Slide Presentation:
AVerEPack300 automatically converts the PowerPoint file into a JPG
file format. If you are not using PowerPoint
the PPT file from the PowerPoint progra m into an image file format that
AVerEPack300 supports.
®
2000, you need to convert
For PowerPoint 2000 version:
1. Select PowerPoint file from the Insert Menu.
2. An Insert PowerPoint File dialog box will appear:
3. In the Look in box, click the drive or folder location that
contains *.ppt slide presentation.
4. In the folder list, select the *.ppt slide presentation then
click Open button.
For Lower (other) PowerPoint version:
1. From the PowerPoint program, open the .*ppt slide
presentation.
2. Choose Save As from the File menu. A Save As dialog box
will appear:
16
Page 21

Chapter 3 Using the Application
3. In the Save as Type box, select the image format that
AVerEPack300 supports.
4. Click Save.
5. A message box will prompt you. Click Yes to export all the
slide into image file format.
Insert or Retrieve Slide from the CompactFlash Card:
1. Select Import from the Transfer menu or click the Import icon.
2. An Import dialog box will appear:
3. In the Folder name list, select the folder that contains the slide you
want to import.
4. In the Slide list, select the slide image you want to import.
5. Click OK.
Storing the Active Project to the CompactFlash Card:
Use the Export function from the Transfer menu, incase you want to send
or store the slide presentation to the Compa ctFlash card. Make sure you have
connected the power and cable connection of the unit to your PC.
When you transfer the slide present ation, it converts all the slide imag es into
JPG format. To retain the BMP files, enable the Keep original BMP file
check box.
17
Page 22

AVerMedia® AVerEPack300 User’s Manual
Transferring AVP file to the CompactFlash card:
1. Select Export from the Transfer menu or click the Export icon.
2. An Export dialog box will appear:
- To send the active project t o a new folder, click New. Then in
the text box provided, type in the new folder name.
- To overwrite or attach the active project to the end of an
existing folder. Select the desired existing fold er name. Click
OK, then select Append or Overwrite button.
3. The folder name is limited to ei ght characters. You can use letters
and numbers.
Edit the Slide Sequence
On the Slide Sorting Area of the AVerEPack300 program, to move the slide,
simply click and drag the selected slide to a new location.
18
Page 23

Chapter 4
Using the AVerEPack300
This chapter will show you how to use the Remote Control Unit and Touch Button
Control Panel of the AVerEPack300. At the end of this chapter, you will find
details on using the special highlighting and zoom functions of the AVerEPack300.
Using the Remote Control
To use the remote control, first insert the batteries (2 “AAA” size
batteries are provided) into the battery compartment at the back of the
remote.
The Infrared Sensor is located at the front panel of the AVerEPack300
beside the CompactFlash drive (see figure below). While using the remote,
aim it at the infrared sensor.
Infrared Sensor
CompactFlash drive
The figure and descriptions on the following pages show you how to use
the remote control.
19
Page 24

AVerMedia® AVerEPack300 User’s Manual
RESET
MENU
PREVIEW
ZOOM
REFERENCE
AREA ZOOM/
NUMBER BUTTONS
POWER : Switches the AVerEPack300 on or off.
RESET : Restores the AVerEPack300 to its original
Positioning : Use these buttons to :
and * Adjust the settings of the MENU functions.
Movement * Move around the slide on presentation screen.
Control * Move the Pointer to another area on screen.
DISPLAY
TIMER
SLIDE SHOW
factory settings.
* Highlight other areas on presentation screen.
POWER
POSIT IONING &
MOVEMENT CONTROL
PAGE UP
PAGE DOWN
SPYLIGHT
SPOT
POINTER
COLOR
NO./ ZOOM
PREVIEW : Display 16-slide images and exit to full view.
MENU : Opens a menu with functions (Refer to the
section, menu functions for more details.)
PAGE UP : Display the previous slide. This function works
only if there is a slide precedes the current
displayed slide.
PAGE DOWN : Display the next slide. This function works only
if there is a slide succeeds the current displayed
slide.
20
Page 25

Chapter 4 Using the AVerEPack
REFERENCE : Displays the slide that you have stored in the
memory for quick slide reference. (Refer to the
section, reference function for more details.)
ZOOM : Press this button to zoom in or out the image on
the presentation screen.
NO./ ZOOM : Press NO./ZOOM and enter the slide number to
view the selected slide.
AREA ZOOM : Provides quick selection of the slide area to
magnify. The Area Zoom function divides the
slide image on the screen into 9 parts and allows
you to select the desired part to zoom. (Refer to
the section, Different Types of Zoom, for more
details.)
SPYLIGHT : Press this button to highlight certain areas of the
slide and darken the rest. (Refer to the section,
Special Highlighting Functions, for more details.)
SPOT : Press this button to highlight a certain areas of
the slide. The highlighted area will be
surrounded by a colored frame and areas outside
the frame will look dark. (Refer to the section,
Special Highlighting Functions, for more details.)
POINTER : This button functions just like a laser pointer.
(Refer to the section, Special Highlighting
Functions, for more details.)
COLOR : This button is a cyclic switch which, when
pressed successively, alternates with 7 types of
colors. This button allows you to change the
color of the Pointer and the frame surrounding
the area highlighted by AVerMedia Spot. (Refer
to the section, Special Highlighting Functions,
for more details.)
DISPLAY : Display the status mode and the information of
the currently viewed slide. If you are in the slide
21
Page 26

AVerMedia® AVerEPack300 User’s Manual
show mode, the slide show symbol will also
appear, when the DISPLAY button is pressed.
TIMER : Press this button to show the countdown timer of
the time that’s remaining in your presentation.
(Refer to the section, Timer Function, for more
details.)
SLIDE SHOW : Turns the slide show function on and off.
Touch Button Panel
The figure and descriptions below show you how to use the Touch Button
Panel located at the top of the AVerEPack300 unit. This will give you
access to the commonly used functions.
LEFT
UP
DOWN
LED
RIGHT
POWER
MENU
POWER : Switches the AVerEPack300 on
or off
MENU : Opens a menu with functions
(Refer to the section, menu
functions for more details.)
QUICK ACCESS & Movement Control:
Use these buttons to :
• Access REFERENCE, SLIDE SHOW,
PAGE UP and PAGE DOWN functions.
• Adjust the settings of the MENU
functions.
• Move around the slide on presentaion
screen.
• Move the Pointer to another area on
screen.
• Highlight other areas on presentation
screen.
22
Page 27

Chapter 4 Using the AVerEPack
V
LED : If the LED is on, it indicates that the AVerEPack300 has been
powered on.
If the LED blinks, the system is loading the slide or the
CompactFlash Card is not properly inserted.
Menu Functions
AVerEPack300 provides a menu function for opening a slide presentation folder
from the CompactFlash card, setting the presentation TIMER and slide timer delay,
adjusting the slide size horizontally and vertically, fine tuning your slide display
and more. Available menu functions may vary with different slide preview and
mode.
Press the MENU button to view the MENU functions. Then use the
POSITIONING & ADJUSTMENT CONTROL buttons of the remote. Press
the UP or DOWN button to select your desired function. (The selected function
will be highlighted in red.) To adjust the setting of the your selected function, press
the LEFT or RIGHT button. The function that appears in yellow is not available.
In full view slide preview, the menu functions are as follow:
FOLDER
GA OUTPUT
VGA OUTPUT
WIDTH
HEIGHT
SHARPNESS
BRIGHTNESS
SLIDE DE LAY
TIMER
TRANSITION
TV SYSTEM: NTSC
TV SYSTEM: NTSC
0
0
3
0
ON
FOLDER : Allows you to open to another existing folder. A list of folder names
and the total number of slides per folder will appear.
VGA : Allows you to switch between SVGA, XVGA or VGA. This
function is available when you are in VGA mode.
WIDTH : Press the RIGHT button to increase and the LEFT button to
decrease the width of the projected image.
HEIGHT : Press the RIGHT button to increase and the LEFT button to
decrease the height of the projected image.
23
Page 28

AVerMedia® AVerEPack300 User’s Manual
SHARPNESS : Press the RIGHT button to increase and the LEFT
button to decrease the sharpness level. There are three
(3) brightness levels to choose from.
BRIGHTNESS : Press the RIGHT button to increase and the LEFT
button to decrease the brightness level. There are
four (4) brightness levels to choose from.
SLIDE DELAY : Presets the period of time to display the slide before it
loads the next slide. This function works during slide
show. The time value settings in seconds are as follows:
3~10, 15, 20, 25, 30, 45, 60, 120, 180 and 300.
TRANSITION : Press the LEFT or RIGHT button to select the preferred
transition effect.
Transition Effects:
The image transition will appear from the bottom
to top.
The image transition will appear from the top to
bottom.
The image transition will appear from the right to
left.
The image transition will appear from the left to
right.
The image transition will appear from the center
to all sides.
LOADING : Turns the loading indicator function on and off. When the
INDICATOR
STATUS : Indicates which modes you are currently using.
• TV SYSTEM: indicates whether your TV is “NTSC” or “PAL”.
• VGA: indicates the resolution of the displayed slide.
loading indicator is off, the symbol will not show up when the
system is loading a slide.
24
Page 29

Chapter 4 Using the AVerEPack
In 16-Slide Preview, the menu functions are as follow:
CUT : Moves the selected slide and places it in memory.
COPY : Copies the selected slide and places it in the memory.
PASTE : Places the copied or cut slide to a new location.
HIDE : Hides or Unhide the selected slide. When you select the slide to hide
this will not be previewed during slide show and when you are in the
16-slide preview mode, an H symbol on the thumbnail sized slide
will appear.
FOLDER : Allows you to open to another existing folder. A list of folder names
and the total number of slides per folder will appear.
CUT
COPY
PAS TE
DEL
HIDE
FOLDER
EXIT
EXIT : Displays the selected slide in full view mode and exit the 16-
Slide Preview Mode.
Timer Function
The AVerEPack300 allows you to control the pace of your presentation
by showing a countdown screen display of the remaining time. This
merely serves as a reminder. When the time is up, the presentation screen
will not be affected in any way.
To Set the Timer:
1. Press MENU to view on screen function selections.
2. Press the POSITIONING & ADJUSTMENT CONTROL's UP or DOWN
button to select the TIMER function.
3. Press POSITIONING & ADJUSTMENT CONTROL's LEFT or RIGHT
button to select a time value.
25
Page 30

AVerMedia® AVerEPack300 User’s Manual
The time value settings in minutes appear as follows: 0~10, 15, 20, 30,
40, 50, 60, 90 and 120.
4. After selecting a time value, press the MENU button to close the menu.
To View the Countdown Screen Display:
0:00:30
1. To display the previously set time value,
press the TIMER button once. The format is
in hours:minutes:seconds. AVerEPack300
automatically converts your settings to the
above mentioned format.
2. To start the countdown, press the TIMER button the second time.
3. You can toggle the countdown screen display on and off by pressing the
TIMER button.
Reference Function
This function allows you to store a slide into the memory and display it
anytime whenever you press the REFERENCE button.
Storing the Slide in the Memory:
1. If you are in 16-slide preview mode, select the slide you want to
store in the memory. (The designated number of the selected slide
will be highlighted in yellow and blinks.) You may also store the
fully viewed slide or single slide view in the memory.
2. Press REFERENCE button until the OK sign appear to store the
selected slide in the memory.
Note: You can only store one slide at a time. If you restore another slide,
this will replace the prevoiusly stored slide to the newly stored
slide.
Viewing the Stored Slide in the Memory:
After you have stored a slide in the memory, you can view the stored slide
anytime by pressing the REFERENCE button.
To continue viewing the previous slide before it was interrupted, press the
REFERENCE button.
26
Page 31

Chapter 4 Using the AVerEPack
To view the next slide of the previously displayed slide, press the PAGE
DOWN button.
To view the slide preceded by the previously displayed slide, press the PAGE UP
button.
Special Highlighting Functions
The AVerEPack300 provides 3 special functions for highlighting key
points in any presentation: AVerMedia Spot, AVerMedia Pointer and
AVerMedia Spylight. You can use these functions by pressing the
corresponding buttons on the remote control.
AVerMedia Spot
The highlighted area will appear as if there is a "spotlight" directed on it.
The figure below shows an illustration.
Press the SPOT button of the remote.
A colored frame will appear around the
highlighted area.
To cover the rest of the image,
press the SPOT button the
second time.
To lighten the covered area,
press the SPOT button the third
time.
Press the SPOT button the
fourth time and the colored
frame will disappear.
27
Page 32

AVerMedia® AVerEPack300 User’s Manual
Changing the Size of the Highlight
You can adjust the size of the "spotlight", that is, the highlighted area.
Press MENU, until the colored frame blinks. Use the POSITIONING
AND MOVEMENT CONTROL to create a highlight as large as 1/4th
of your screen or as small as 1/64th of your presentation screen.Press
MENU button again after adjusting the frame.
Changing the Color of the Frame
Use the COLOR button to select a color for the frame. There are 7
colors to choose from.
Changing the Highlight
To highlight another area in your presentation, use the Positioning
and Movement Control. Press the Up, Down, Left, and Right Arrows
to direct the "spotlight" to another area.
AVerMedia Pointer
A hand figured pointer lets you direct your viewer's attention to key
areas in your presentation.
To point on a key area in your presentation, press the POINTER button
on the remote. The figure below shows an illustration.
28
Page 33

H
Moving the Pointer
Use the Positioning and Movement Control buttons to move the
pointer up, down, left and right.
Changing the Color
Use the COLOR button to select a color for the pointer. There are 7
colors to choose from.
AVerMedia Spylight
Using AVerMedia Spylight resembles the way you highlight parts of
your presentation with an overhead projector. With Spylight, you can
highlight any portion you want and "cover" the rest by darkening areas
which you do not want to show to your audience.
Chapter 4 Using the AVerEPack
ighlighted Area
Press the SPYLIGHT button of the
remote. The upper part of the slide will
be highlighted.
To lighten the covered area, press
the SPYLIGHT button again.
29
Page 34

AVerMedia® AVerEPack300 User’s Manual
Highlighting Areas Horizontally and Vertically
You can use the Positioning and Movement Control buttons to
slowly "expose" the rest of the slide image to your audience.
Press the Left, Right, Up, and Down Arrows to highlight more areas to
the left, right, top, and bottom. Press the same buttons to "cover up"
more portions of the screen and reduce the highlighted area.
Different Types of Zoom
The AVerEPack300 provides 4 types of zoom : Normal Zoom, AVerMedia
Area Zoom, AVerMedia Spot-Zoom, and AVerMedia Pointer-Zoom.
Normal Zoom
Normal Zoom allows you to zoom in (200%) the slide image on your
screen display. Simply press the ZOOM button on the remote control.
A fixed colored frame will appear.You can move the fixed colored
frame freely to any part of the screen. Use the Positioning and
Movement Control. Press the Up, Down, Left, and Right Arrows, to
move around then press the ZOOM button to zoom in the image.
AVerMedia Area Zoom
This function divides your screen into 9 parts and allows you to select
the desired part to zoom through the available buttons on the remote
control.
The directional buttons on the remote corresponds to 9 parts of your
screen :
Directional Buttons
on the Remote Control
30
9 Parts of the Screen
Page 35

Choose which part you want to zoom, and then press one of the 9
directional buttons on the remote that corresponds to that area.
Example :
To display the image back to its original size, press the last entered
directional buttons again or simply press the ZOOM button.
AVerMedia Spot-Zoom
As described earlier in the section, AVerMedia Spot, under Special
Highlighting Functions, you can highlight a certain area in your
presentation by pressing the SPOT button.
After pressing the SPOT button, press ZOOM if you want to enlarge
the highlighted area inside the colored frame. (Refer to the figure on
the next page.)
Chapter 4 Using the AVerEPack
To shift the focus of the zoomed area, press the Up, Down, Left, and
Right Arrows, which are the Positioning and Movement Control
buttons.
31
Page 36

AVerMedia® AVerEPack300 User’s Manual
P
P
AVerMedia Spot-Zoom Function
AVerMedia Pointer-Zoom
After you press the POINTER button to point on a key area in your
presentation screen, press the ZOOM button to magnify the area where
you are pointing to.
ress the SPOT button to
highlight an area.
Then, press the ZOOM button to
enlarge the highlighted area.
ress the POINTER button, a
hand figured pointer will appear.
Then, press the ZOOM button to enlarge
the area where the pointer is pointing.
32
Page 37

LIMITED WARRANTY
AVerMedia
manufacture or components under the following terms:
WARRANTY LENGTH
Labor is warranted for (1) one year from the date of purchase.
Parts are warranted for (1) one year from the date of purchase.
Replacement products will be warranted for the remainder of the one year warranty period or (30)
thirty days, whichever is longer.
WHO IS PROTECTED
This warranty is enforceable only by the first consumer purchaser.
WHAT IS AND IS NOT COVERED
Except as specified below, this warranty covers all defects resulting from faulty manufacturing of this
product. The following are not covered by the warranty.
WHAT WE WILL AND WILL NOT PAY FOR
We will pay labor and material expenses for covered items. However, we will not pay for the following:
EXCLUSION OF DAMAGES
THE MANUFACTURER’S SOLE OBLIGATION AND LIABILITY UNDER THIS WARRANTY IS
LIMITED TO THE REPAIR OR REPLACEMENT OF A DEFECTIVE PRODUCT AT OUR OPTION.
THE MANUFACTURER SHALL NOT, IN ANY EVENT, BE LIABLE TO THE PURCHASER OR ANY
THIRD PARTY FOR ANY INCIDENTAL OR CONSEQUENTIAL DAMAGE (INCLUDING, BUT NOT
LIMITED TO, DAMAGES RESULTING FROM INTERRUPTION OF SERVICE AND LOSS OF
BUSINESS) OR LIABILITY IN TORT RELATING TO THIS PRODUCT OR RESULTING FROM ITS
USE OR POSSESSION.
LIMITATIONS OF IMPLIED WARRANTIES
There are no other oral or written warranties, expressed or implied, including but not limited to those
of merchantability or fitness for a particular purpose. Any implied warranties are limited in duration to
one year from the date of purchase.
STATE LAW AND YOUR WARRANTY
This warranty gives you specific legal rights, and you may also have other rights granted under state
law. These rights vary from state to state.
TECHNOLOGIES, Inc. warrants this product to be free of defects resulting from faulty
1. Any product on which the serial number has been defaced, modified, or removed.
2. Damage, deterioration, or malfunction resulting from
A. Accident, abuse, misuse, neglect, fire, water, lightning, or other acts of
nature, commercial or industrial use, unauthorized product modification,
or failure to follow instructions included with the product.
B. Misapplication of service by someone other than the manufacturer’s
representative.
C. Any shipment damages. (Claims must be made with carrier.)
D. Any other causes which does not relate to a product defect.
3. Cartons, cases, batteries, cabinets, tapes, or accessories used with product.
4. AVerMedia
responsibility to determine the suitability of this product for your purpose.
1. Removal or installation charges.
2. Shipping charges.
5. Any incidental charges.
does not warrant that this product will meet your requirements; it is your
CONTACT INFORMATION
Home Page : www.averm.com.tw
Page 38

P/N 300AAAP5
MADE IN TAIWAN
 Loading...