

AVerMedia PTZ330 Service Manual
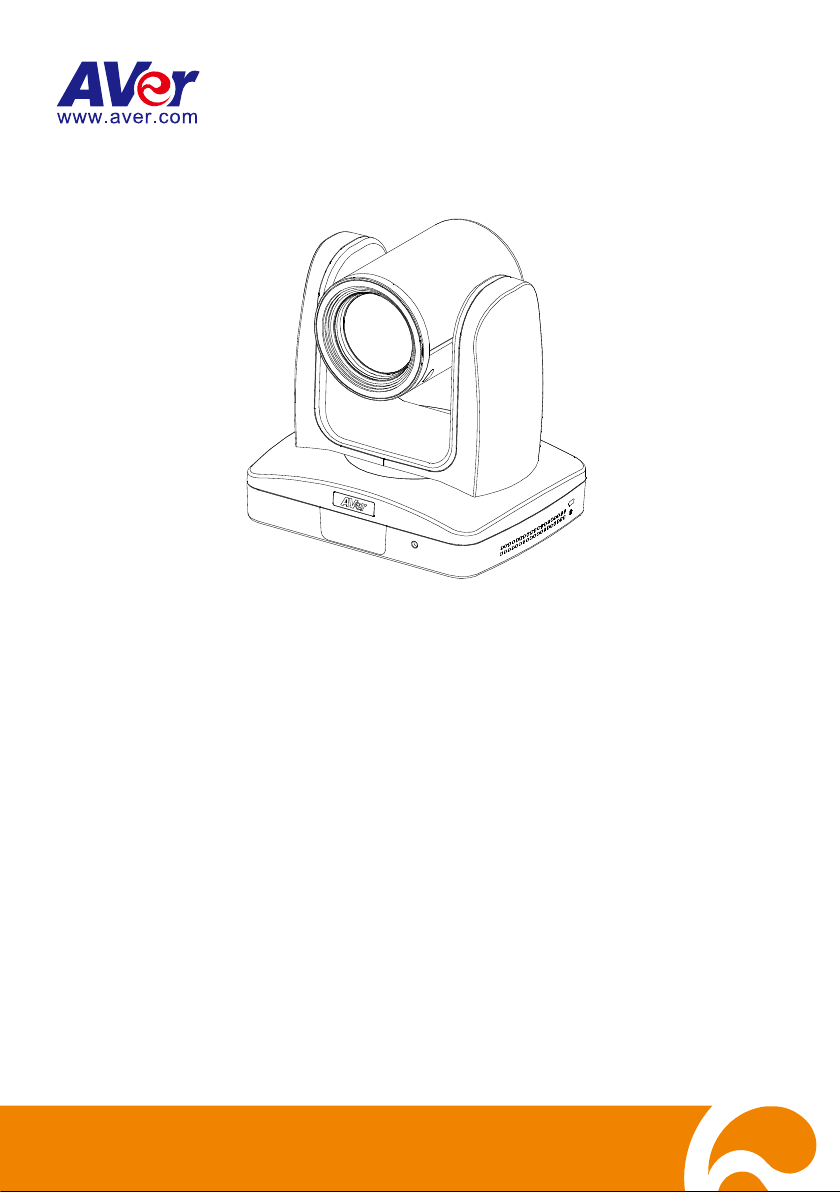
Professional PTZ Camera
User Manual
PTZ310/330
PTZ310W/330W
PTZ310N/330N

FCC NOTICE (Class A)
This device complies with Part 15 of the FCC Rules. The operation is subject to
the following two conditions: (1) this device may not cause harmful interference,
and (2) this device must accept any interference received, including interference
that may cause undesired operation.
Federal Communications Commission Statement
NOTE- This equipment has been tested and found to comply with the limits for a Class A digital
device, pursuant to Part 15 of the FCC Rules. These limits are designed to provide reasonable
protection against harmful interference in a residential installation. This equipment generates
uses and can radiate radio frequency energy and, if not installed and used in accordance with the
instructions, may cause harmful interference to radio communications. However, there is no
guarantee that interference will not occur in a particular installation. If this equipment does cause
harmful interference to radio or television reception, which can be determined by turning the
equipment off and on, the user is encouraged to try to correct the interference by one or more of
the following measures:
Reorient or relocate the receiving antenna.
Increase the separation between the equipment and receiver.
Connect the equipment into an outlet on a circuit different from that to which the receiver is
connected.
Consult the dealer or an experienced radio/television technician for help.
Class A ITE
Class A ITE is a category of all other ITE which satisfies the class A ITE limits but not the class B
ITE limits. Such equipment should not be restricted in its sale but the following warning shall be
included in the instructions for use:
Warning - This is a class A product. In a domestic environment, this product may cause radio
interference in which case the user may be required to take adequate measures.
European Community Compliance Statement (Class A)
This product is herewith confirmed to comply with the requirements set out in the
Council Directives on the Approximation of the laws of the Member States
relating to Electromagnetic Compatibility Directive 2014/30/EU.
Warning - This is a Class A product. In a domestic environment, this product may cause radio
interference in which case the user may be required to take adequate measures to correct this
interference.

DISCLAIMER
No warranty or representation, either expressed or implied, is made with respect to the contents
of this documentation, its quality, performance, merchantability, or fitness for a particular purpose.
Information presented in this documentation has been carefully checked for reliability; however,
no responsibility is assumed for inaccuracies. The information contained in this documentation is
subject to change without notice.
In no event will AVer Information Inc. be liable for direct, indirect, special, incidental, or
consequential damages arising out of the use or inability to use this product or documentation,
even if advised of the possibility of such damages.
TRADEMARKS
“AVer” is a trademark owned by AVer Information Inc. Other trademarks used herein for
description purpose only belong to each of their companies.
COPYRIGHT
©2020 AVer Information Inc. All rights reserved.
All rights of this object belong to AVer Information Inc. Reproduced or transmitted in any form
or by any means without the prior written permission of AVer Information Inc. is prohibited. All
information or specifications are subject to change without prior notice.
NOTICE
SPECIFICATIONS ARE SUBJECT TO CHANGE WITHOUT PRIOR NOTICE. THE
INFORMATION CONTAINED HEREIN IS TO BE CONSIDERED FOR REFERENCE ONLY.
Remote Control Battery Safety Information
- Store batteries in a cool and dry place.
- Do not throw away used batteries in the trash. Properly dispose of used batteries through
specially approved disposal methods.
- Remove the batteries if they are not in use for long periods of time. Battery leakage and
corrosion can damage the remote control. Dispose of batteries safely and through approved
disposal methods.
- Do not use old batteries with new batteries.
- Do not mix and use different types of batteries: alkaline, standard (carbon-zinc) or
rechargeable (nickel-cadmium).
- Do not dispose of batteries in a fire.
- Do not attempt to short-circuit the battery terminals.
to rain or moisture. Warranty will be void if any unauthorized
OK
WARNING
To reduce the risk of fire or electric shock, do not expose this appliance
modifications are done to the product.
Do not drop the camera or subject it to physical shock.
Use the correct power supply voltage to avoid the damaging camera.
Do not place the camera where the cord can be stepped on as this may
result in fraying or damage to the lead or the plug.
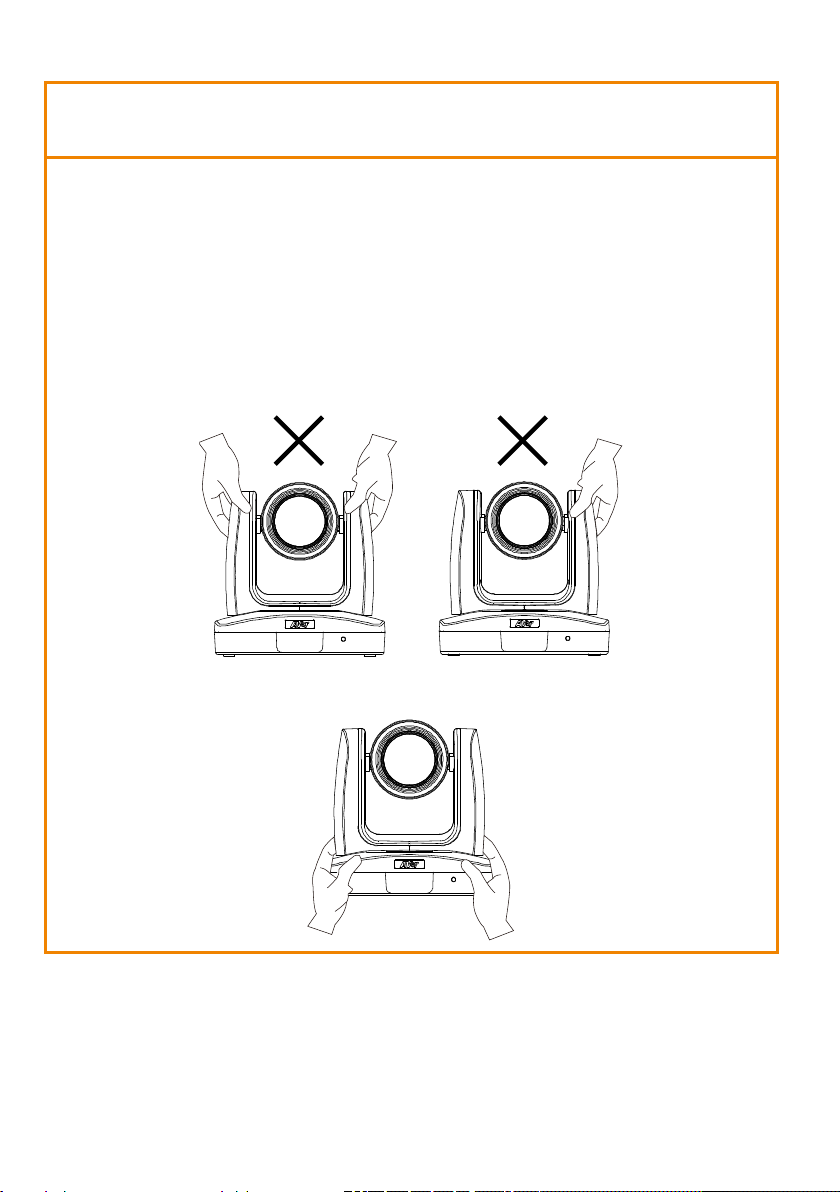
Hold the bottom of the camera with both hands to move the camera. Do
not grab the lens or lens holder to move the camera.

Contents
Package Contents ................................................................................................... 1
Optional Accessories ......................................................................................... 1
Product Introduction ................................................................................................ 2
Overview ............................................................................................................ 2
LED Indicator ..................................................................................................... 2
Pan and Tilt Angle .............................................................................................. 3
Device Connection ............................................................................................. 3
Video Output Connection ................................................................................... 4
RS232 and RS422 Connection .......................................................................... 5
Audio Input Connection ..................................................................................... 9
PoE Connection ............................................................................................... 10
Install Cable Fixing Plate ................................................................................. 11
Remote Control ................................................................................................ 13
Setup the Camera ................................................................................................. 15
OSD Menu ....................................................................................................... 15
Setup IP Address of the Camera ..................................................................... 16
Static IP .................................................................................................... 16
DHCP ....................................................................................................... 16

OSD Tree ......................................................................................................... 17
Camera ..................................................................................................... 17
Video Output ............................................................................................ 18
Network .................................................................................................... 18
Advanced Setting ..................................................................................... 18
System ..................................................................................................... 19
Web Setup ....................................................................................................... 20
Use the AVer IPCam Utility to Find the Camera .............................................. 20
Make a Connection to the Camera via Browser .............................................. 21
Live View .......................................................................................................... 22
Pan-Tilt-Zoom Control .............................................................................. 22
Focus ........................................................................................................ 23
Manual Pan-Tilt-Zoom and Preset Speed Adjustment ............................. 23
Preset ....................................................................................................... 24
Exposure .................................................................................................. 25
Image Process ......................................................................................... 25
Video & Audio .................................................................................................. 26
NDI Function ............................................................................................ 27
Network ............................................................................................................ 29

RTMP Setting ........................................................................................... 29
Advanced Setting ............................................................................................. 30
SmartShoot .............................................................................................. 30
SmartFrame ............................................................................................. 32
System ............................................................................................................. 33
Upgrade Firmware ................................................................................... 34
Use RTSP to Connect to Camera .................................................................... 34
RS232 Command Table ................................................................................... 35
Specification .......................................................................................................... 40
PTZ310/PTZ310W/PTZ310N .......................................................................... 40
PTZ330/PTZ330W/PTZ330N .......................................................................... 43
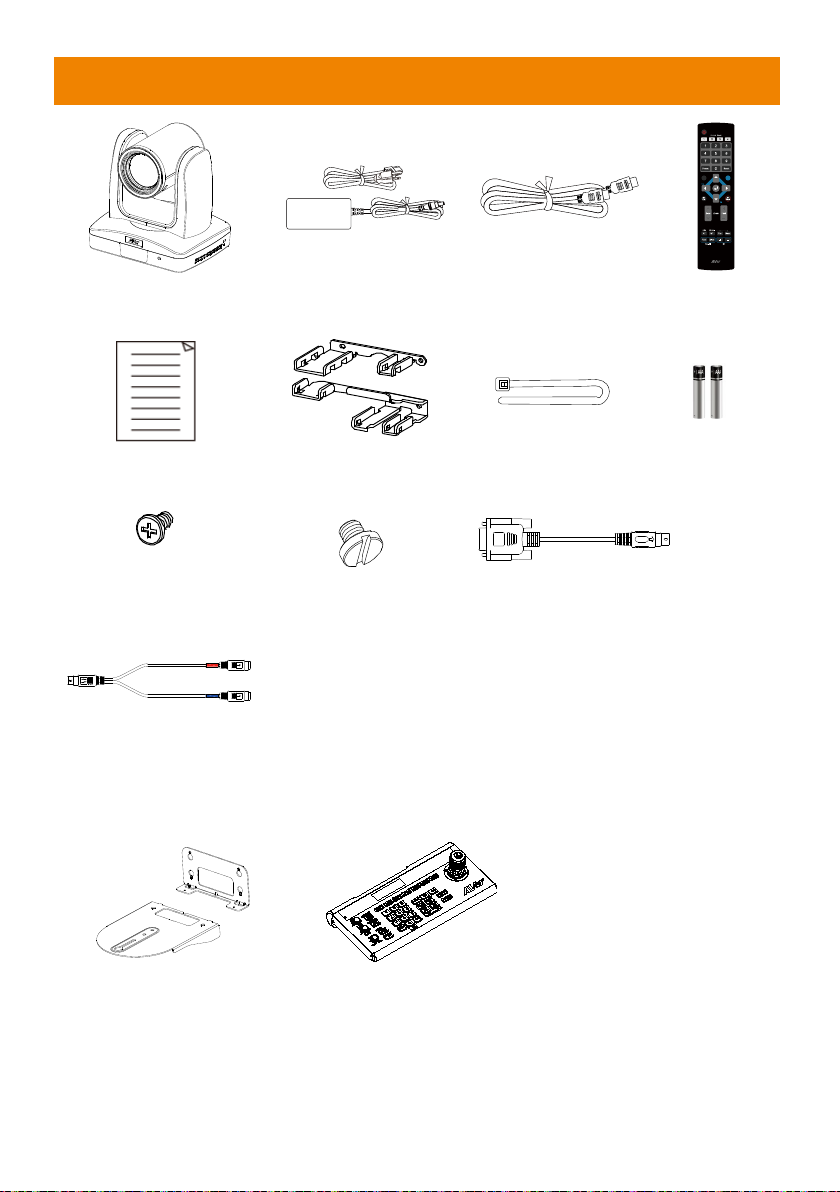
Package Contents
BLC
Menu
PTZ Camera Power Adapter &
Power Cord*
Quick Guide
M2 x 4mm
Screws (x 4) for Cable
Fixing Plate
RS232 In/Out Y Cable
*The power cord will vary depending on the standard power outlet of the country where it is sold.
Cable Fixing Plate Cable Ties (x 5)
Screw for Wall Mount
1/4”-20L=6.5mm
HDMI Cable Remote
Din8 to D-Sub9 Cable
Batteries (x 2)
Control
Optional Accessories
Wall Mount Bracket Camera Controller
1
(4)
(5) (6) (7)(8)(9)
(10)
(11)
(12)
(2) (3)
(1)
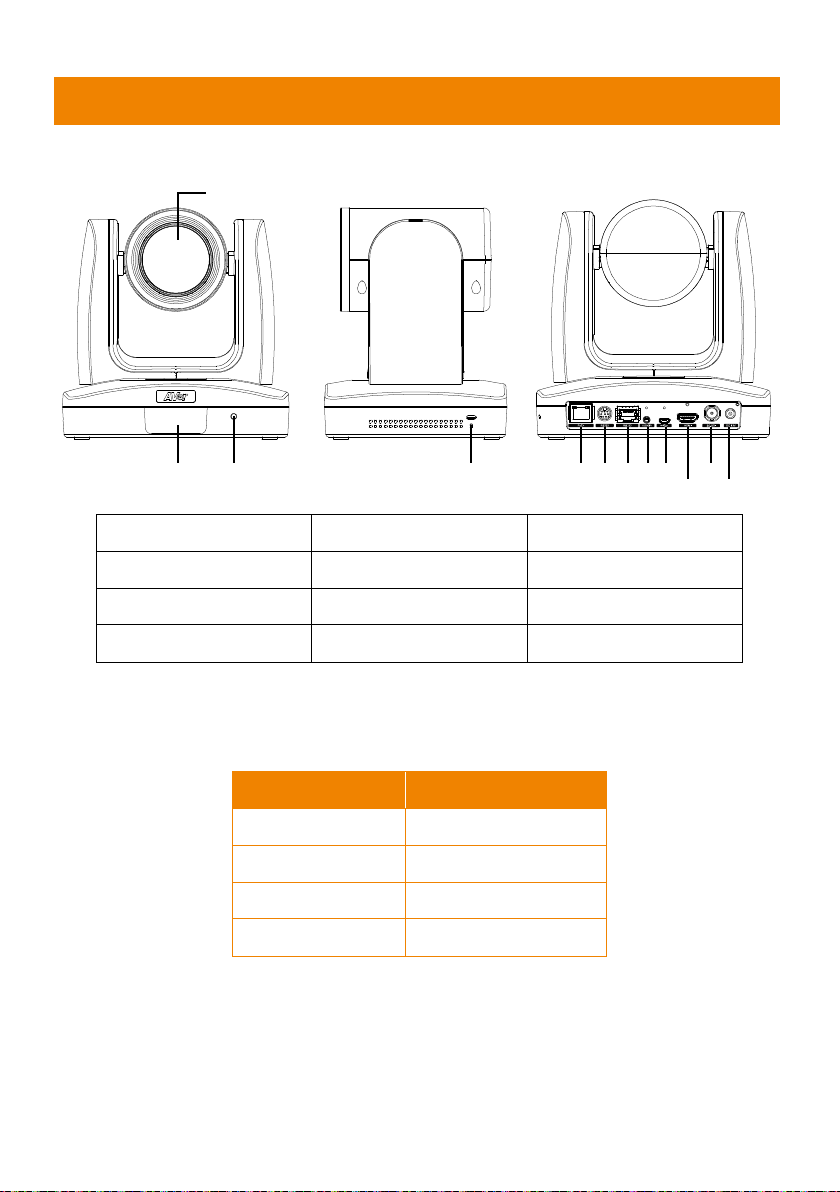
Product Introduction
Overview
(1) Camera lens (5) PoE+ port (9) micro-USB port
(2) IR sensor (6) RS232 port (10) HDMI port
(3) LED indicator (7) RS422 port (11) 3G-SDI port
(4) Kensington lock (8) Audio in* (12) DC power jack
*Line input level: 1Vrms (max.)
*Mic input level: 50mVrms (max.); Supplied voltage: 2.5V
LED Indicator
LED Status
Blue (Solid) Normal Operation
Orange (Blinking) Camera Initialization
Orange (Solid) Standby
Red (Blinking) FW Updating
2
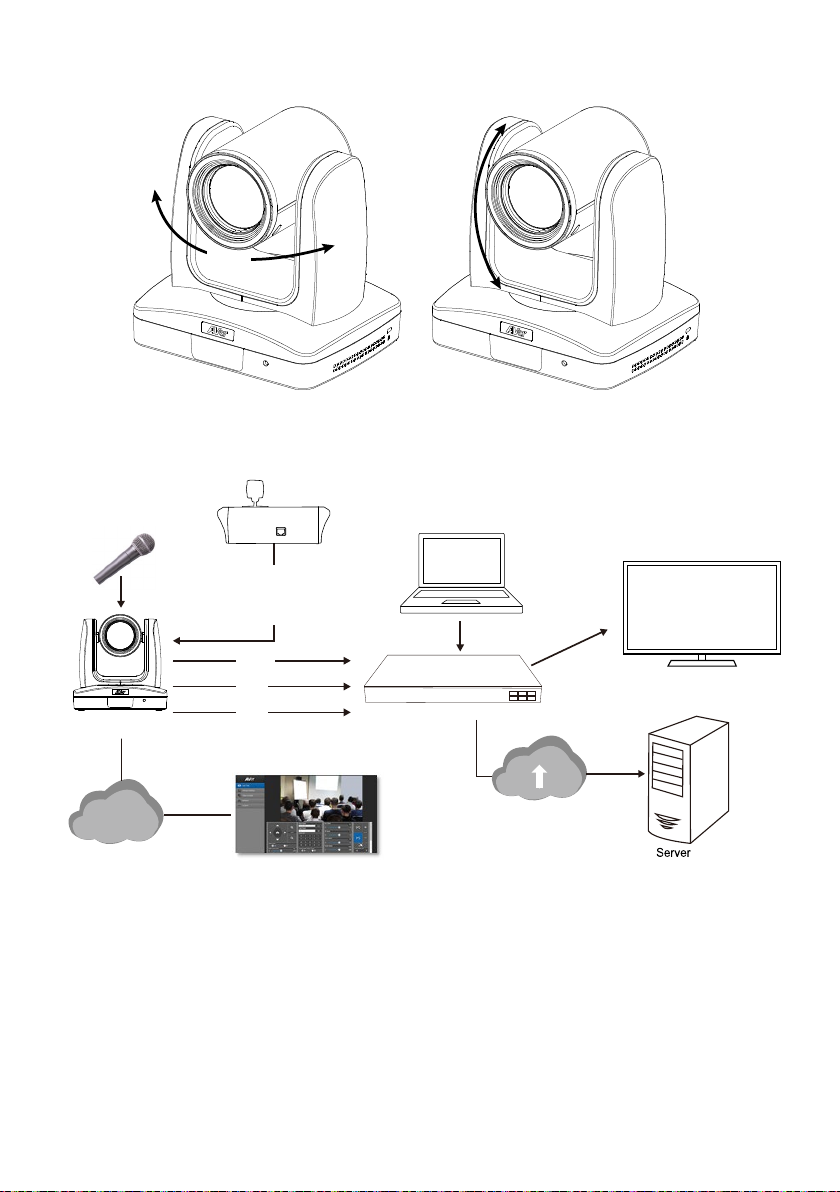
Pan and Tilt Angle
±170°
90°
30°
Lecture capture system
Professional PTZ Camera
3G-SDI
PoE+
HDMI
or
or
LAN
(Record)
Laptop
(Management/Presentation)
Monitor/TV
(Display)
Web application
(Remote Management)
Microphone
Audio input
RS232
or
RS422
or
IP
Joystick
(Camera controller)
Device Connection
3

Video Output Connection
Monitor/TV
HDMI cable
SDI Monitor
3G-SDI cable
(Not included)
HDMI
Use the HDMI cable to connect with monitor or TV for video output.
3G-SDI
Connect to 3G-SDI monitor for video output.
[Note] HDMI and 3G-SDI monitors can be connected to camera and output live video simultaneously;
Assuming HDMI monitor is well connected before the camera is turned on, the OSD menu will be
displayed on HDMI monitor in default.
4
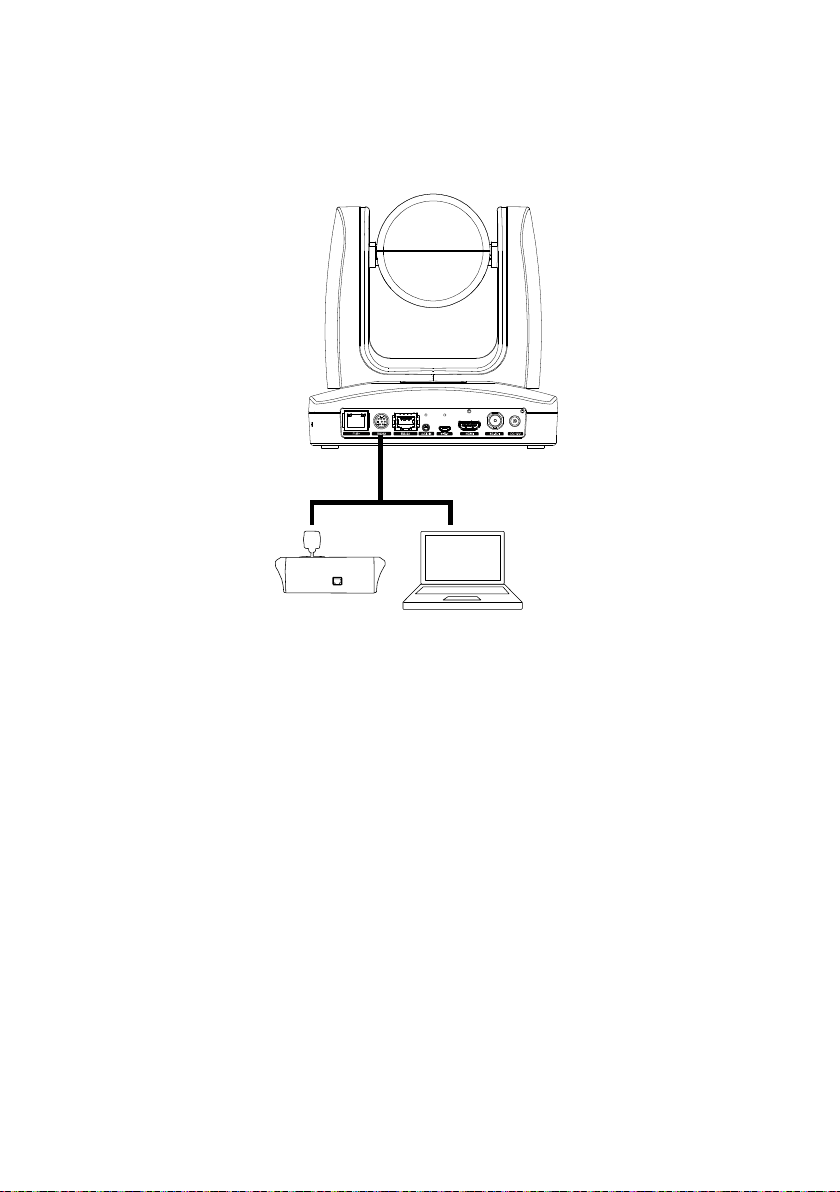
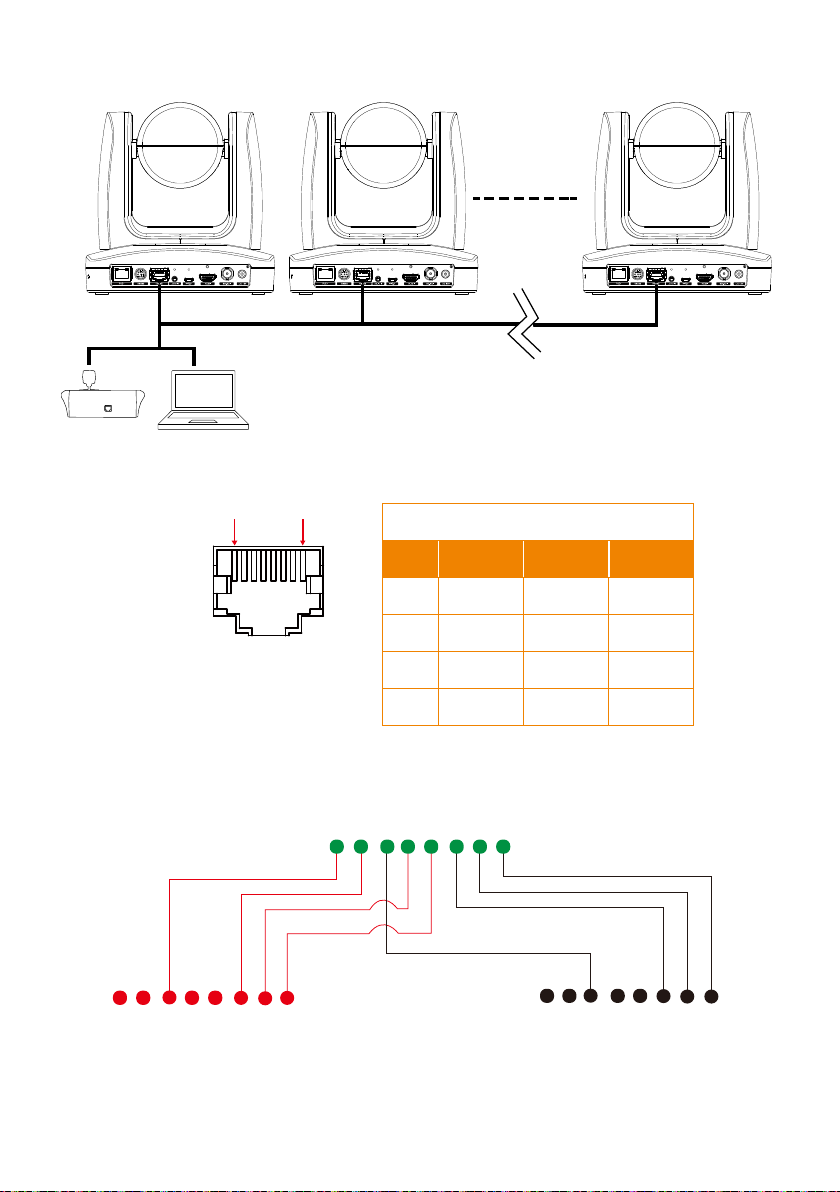
RS232 and RS422 Connection
Laptop
Joystick
RS232 (VISCA) cable
(Not included)
Connect through the RS232 or RS422 for camera control.
RS232 (this cable is not included in the package; only Y cable is provided for RS232 in/out)
5
●
1
2
345
6
789
●
Connect to AVer camera
Connect to next camera
Connect to controller or PC
IN(Mini DIN8)
OUT(Mini DIN8)
Mini DIN9
RS232 Port Pin Definition
Function
VISCA IN
VISCA OUT
Mini DIN9
PIN #
1 Output DTR Data Terminal Ready
2 Input DSR Data Set Ready
3 Output TXD Transmit Data
6 Input RXD Receiver Data
7 Output DTR Data Terminal Ready
4 Input DSR Data Set Ready
8 Output TXD Transmit Data
9 Input RXD Receiver Data
5 --- --- Not connect
I/O Type Signal Description
RS232 mini DIN9 to mini DIN8 Cable Pin Definition
6
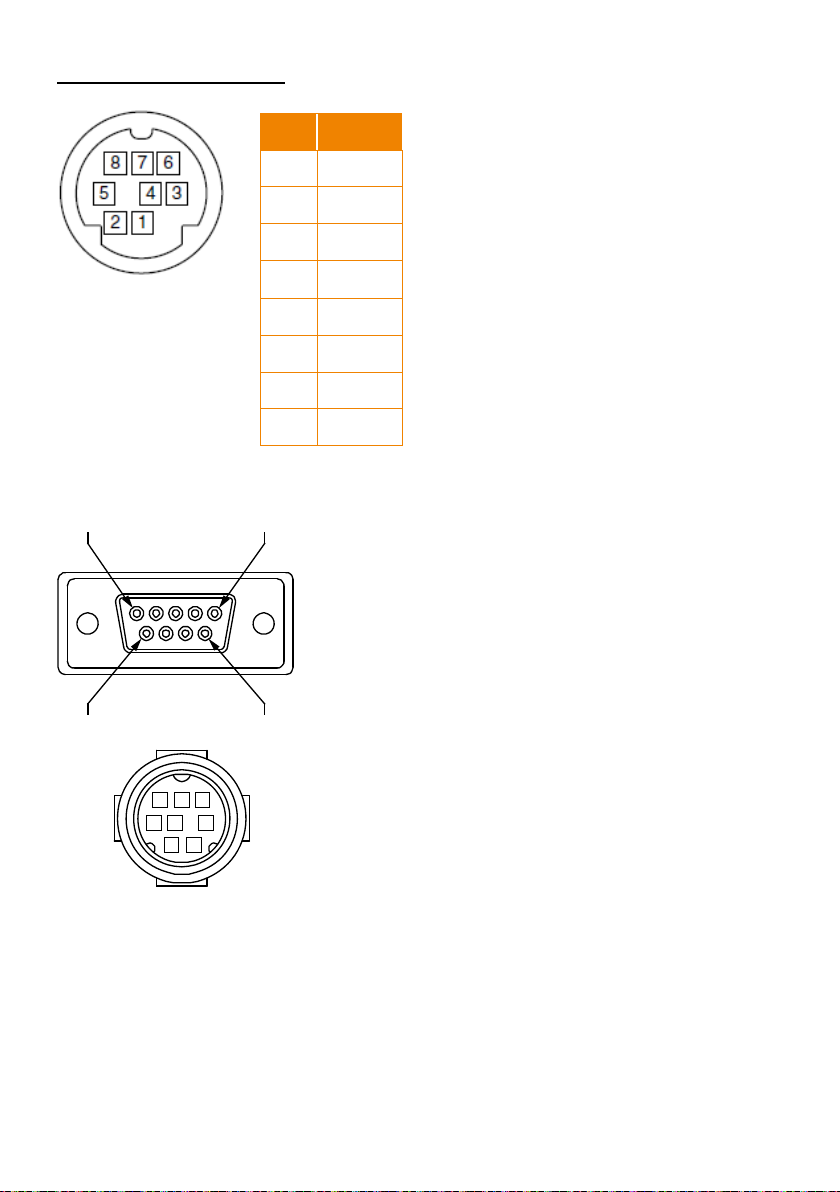
Mini DIN8 Cable Pin Definition
●
6 7 8
3 4 5
1 2
15
6
9
No. Signal
1 DTR
2 DSR
3 TXD
4 GND
Din8 to D-Sub9 Cable Pin Definition
5 RXD
6 GND
7 NC
8 NC
7
1 8
RS422
Laptop
Joystick
RS422 cable
(Not included)
1
234
5
678
1
234
5
678
1
234
5
678
PTZ Camera
Camera/Joystick
Camera/Joystick
[Note] Use cat5e splitter for multi-camera connection.
No. Signal No. Signal
1 TX- 5 TX+
2 TX+ 6 RX+
3 RX- 7 RX-
4 TX- 8 RX+
RS422 Pin
Cat5e splitter pin assignment:
8
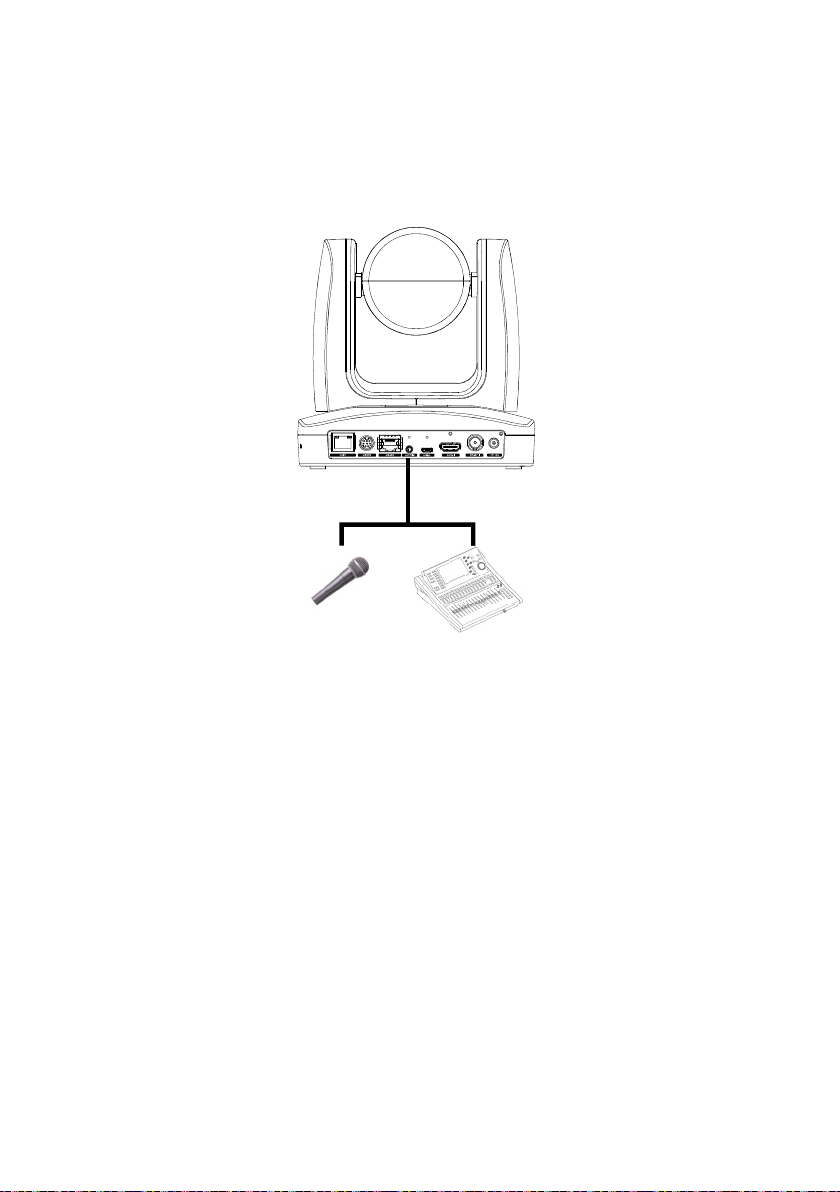
Audio Input Connection
Microphone
Auido mixer
Connect the audio device for audio receiving.
[Note]
- Line input level: 1Vrms (max.)
- Mic input level: 50mVrms (max.); Supplied voltage: 2.5V
9
 Loading...