

Page 1
©
2018 AVer Information Inc. All rights reserved.
CAM520 USB Camera
Quick Start Guide
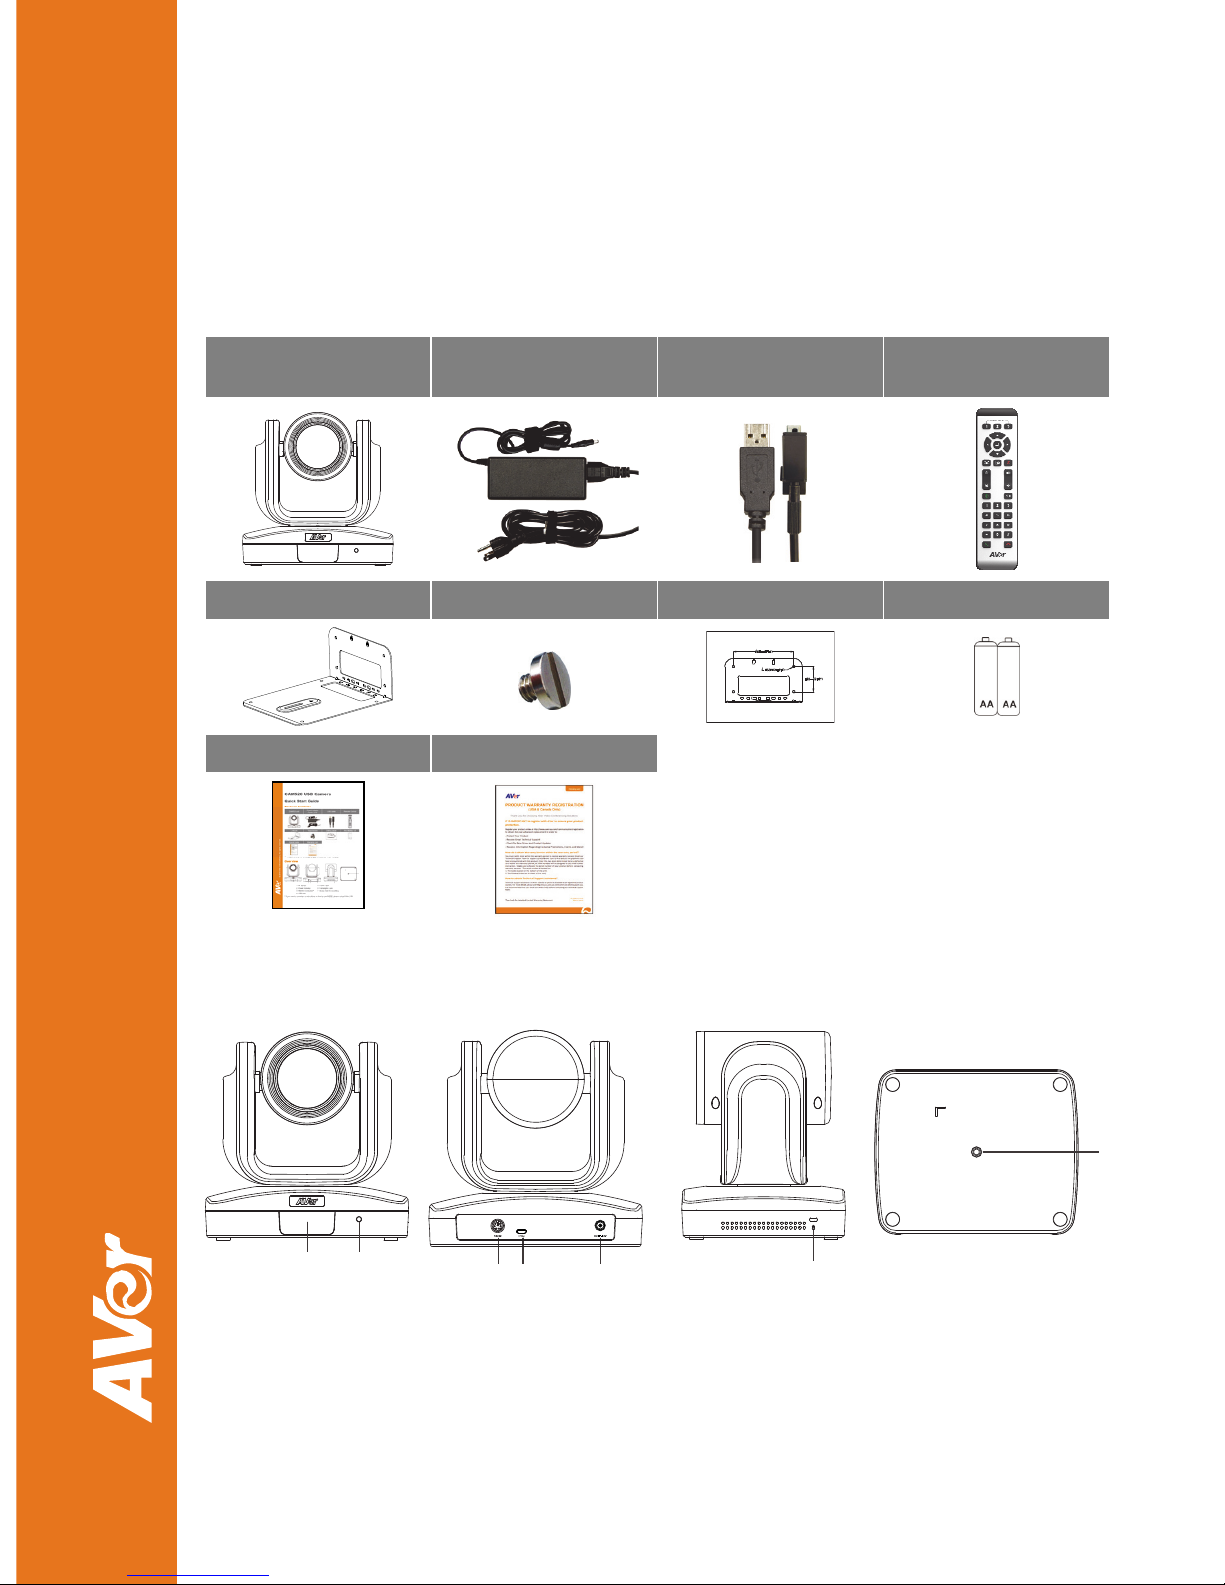
Package Contents
CAM520 unit
Power adapter
Power cord*
USB cable Remote Control
L-Mount Tripod screw Drilling paper AAA Battery x2
P/N:303AV8U2-AF9
Quick Guide Warranty card
* The power cord will vary depending on the country where it is sold.
Overview
21
3 4 5
7
6
1. IR Sensor 5. Power Jack
2. Power Indicator 6. Kensington Lock
3. RS232 Connection* 7. Screw hole for mounting
4. USB port
* If you need a converter or instructions on how to use RS232, please contact AVer USA.
Page 2
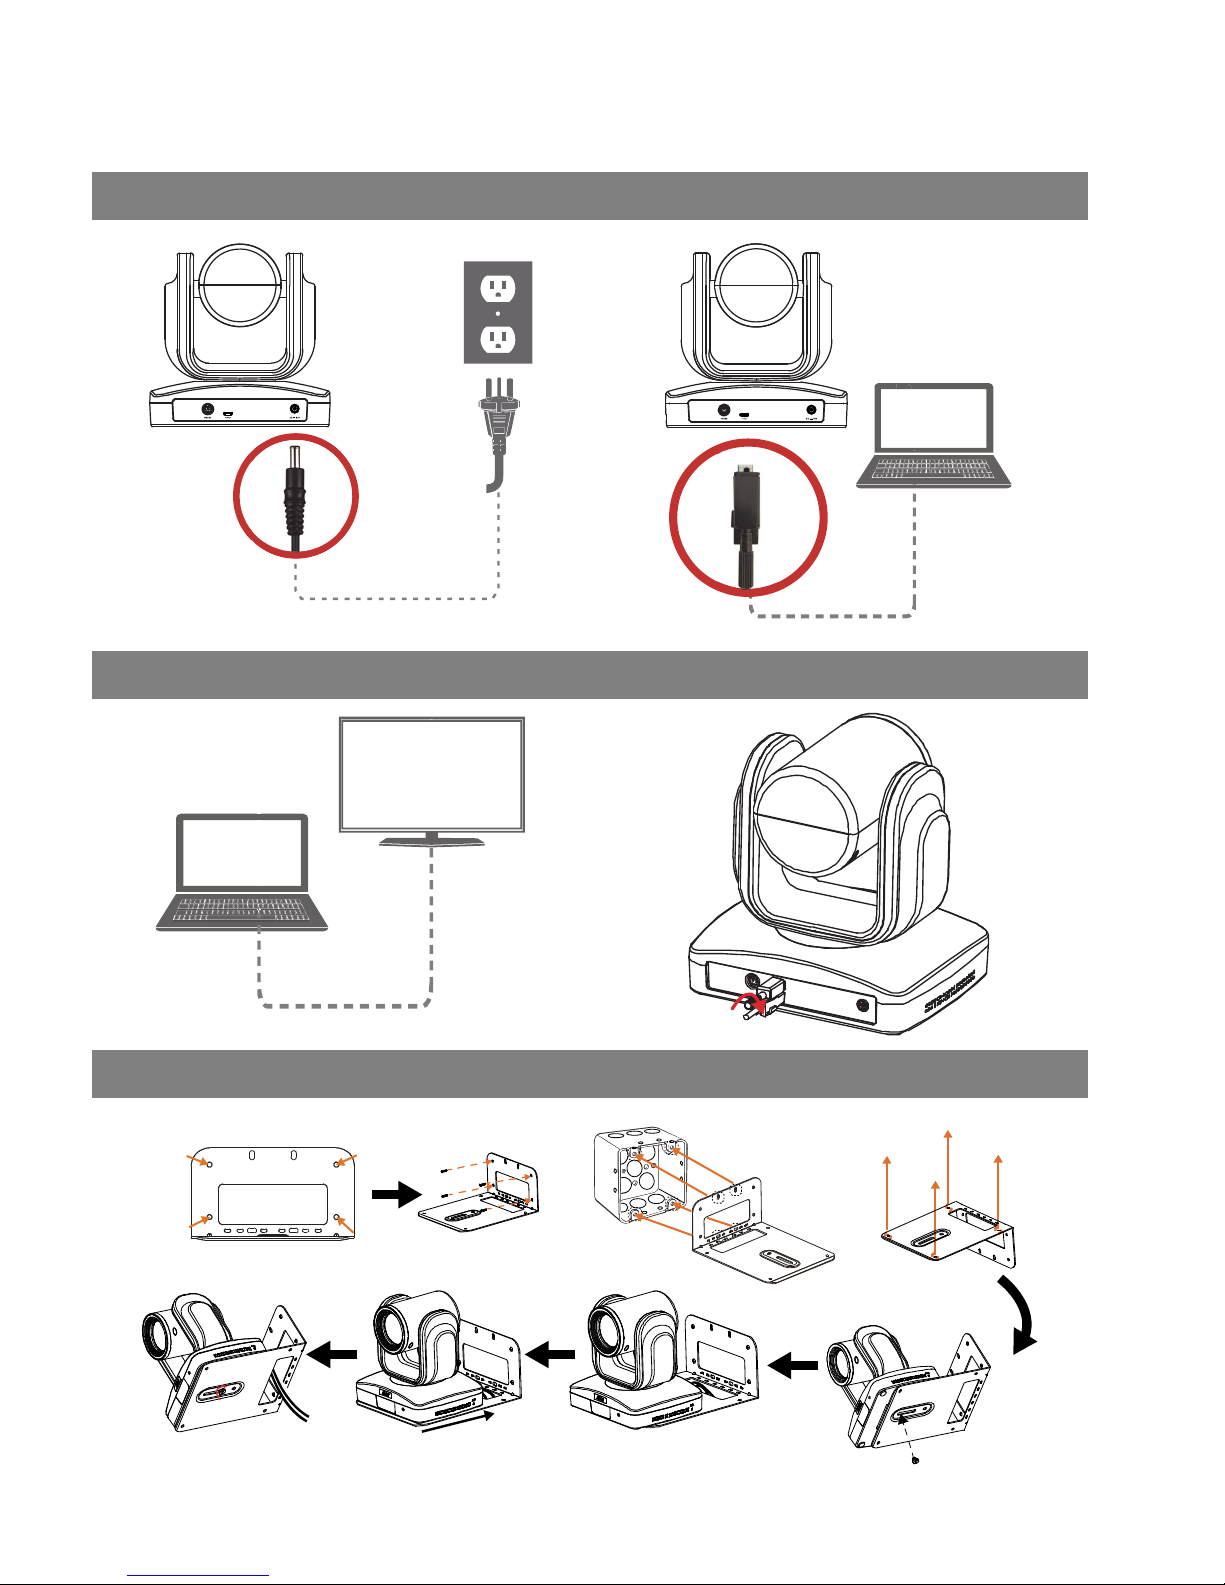
Hardware Installation Steps
1. Connect camera to power outlet. 2. Connect camera to computer.
Power Cable
USB Cable
3. Connect computer to monitor. 4. Secure the USB cable.
Cable Not Included
5. Wall mount installation
or
or
Celling
Page 3
Making a Video Call
A computer is required to use this device.
Step 1: Open your video collaboration application such as Skype
TM
, Skype for Business, Google
Hangouts
TM
, ZoomTM, Bluejeans, WebExTM, Adobe ConnectTM, WebRTC
Step 2: Set the CAM520 as your primary camera devices in your application (Please consult your
application setup guide for details.).
Step 3:
Ready to make a video call.
Quick Reference
Camera Preset ( )
– The Preset button on the remote serves 2 functions.
To Save a Preset
– Move camera to desired position. Press and HOLD the preset button until you
receive the save message on the screen. Select 0 -9 to store the current camera position. Repeat if
needed.
To load a Preset
– TAP the preset button, select 0 – 9 to load a saved camera position. Repeat steps
if needed.
Pan/Tilt (
)
– To move the camera, point the remote at the camera. Use the directional buttons to
guide the camera to the desired position.
IMPORTANT: DO NOTPHSYICALLY MOVE THE CAMERA BY HAND WHEN POWER IS APPLIED.
THIS WILL DAMAGE YOUR CAMREA.
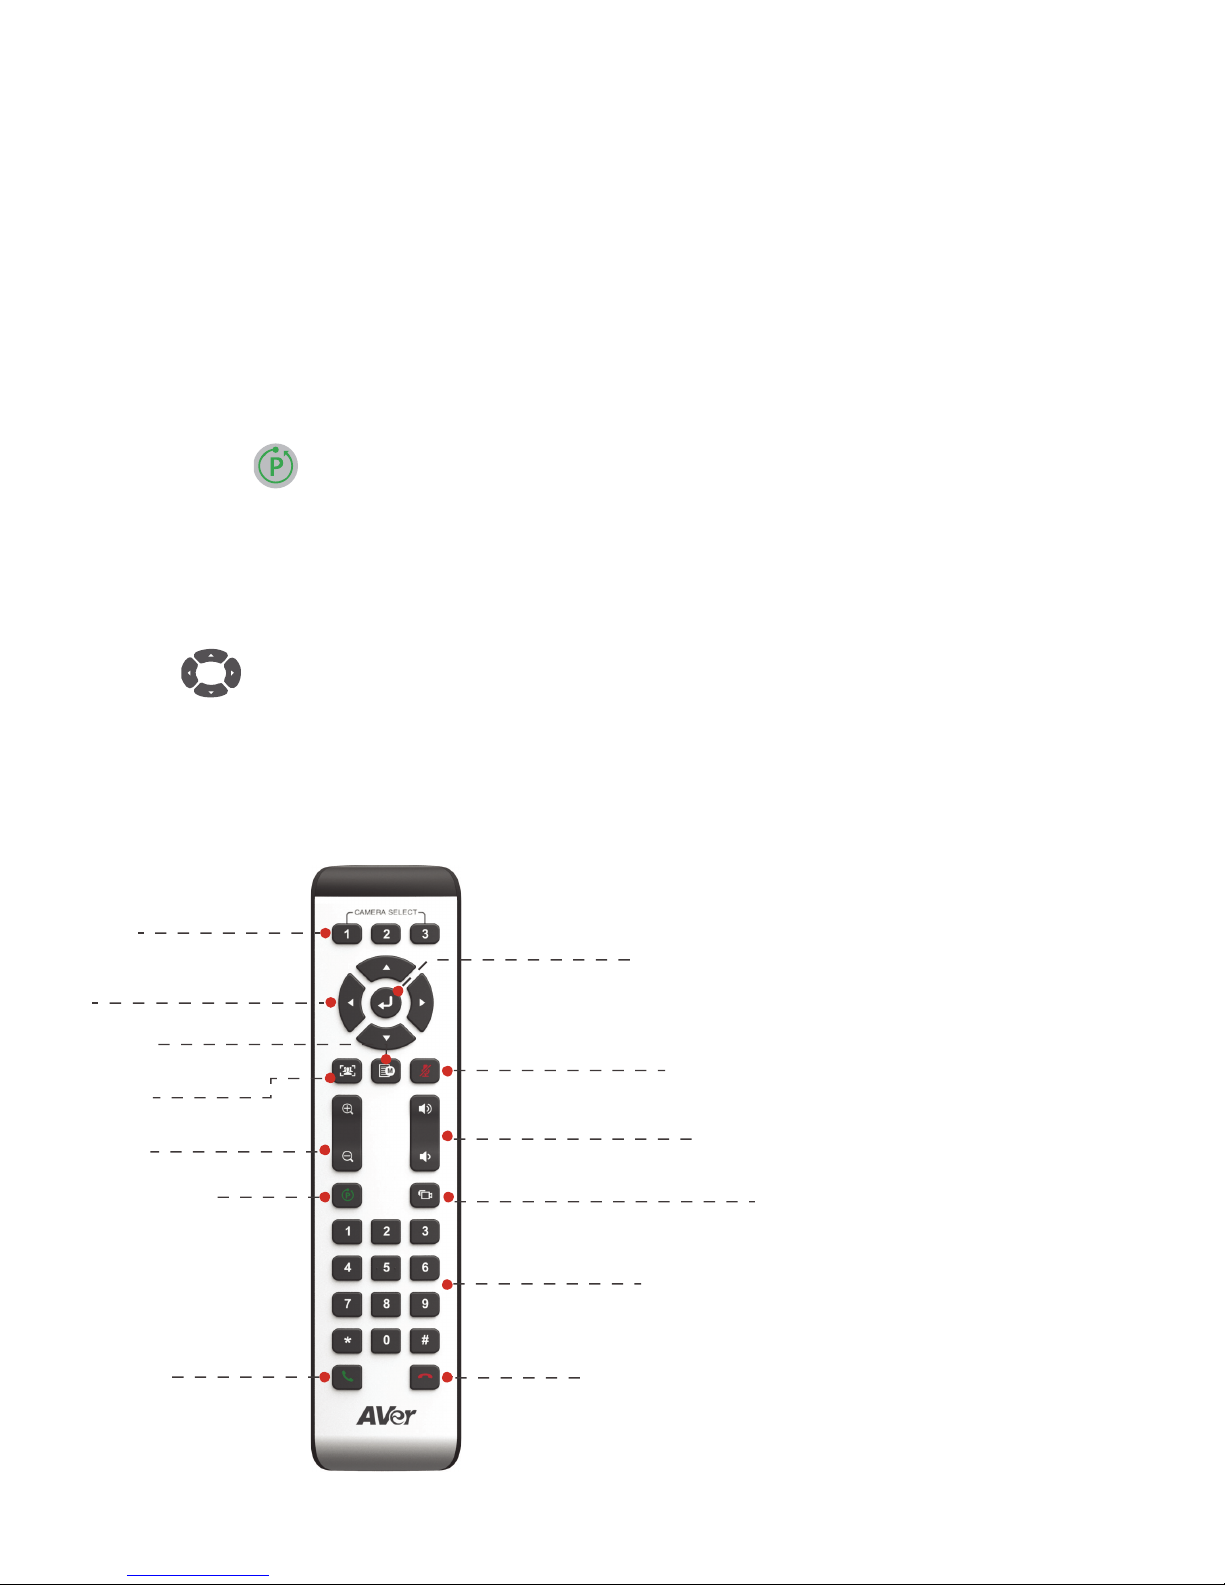
Remote Controller
Camera select
Camera Directional
control
OSD Menu***
FaceLumi
Zoom In/Out
Preset
Call/Answer*
Enter(OSD)***
M
u
t
e
/
U
n
-
m
u
t
e
*
*
*
V
o
l
u
m
e
U
p
/
D
o
w
n
*
*
*
F
a
r
S
i
t
e
C
a
m
e
r
a
c
o
n
t
r
o
l
*
*
P
r
e
s
e
t
P
o
s
i
t
i
o
n
H
a
n
d
u
p
*
*
AAA Batteries (required)
*Function requires AVer PTZApp
**Future Support
***Not support for CAM520
Page 4

More Help
For FAQs, technical support, software and user manual download, please visit: http://www.aver.com
Contact Information
AVer Information Inc.
668 Mission Ct
Fremont, CA 94539
www.averusa.com
Toll-free: 1(877)528-7824
Local: 1(408)263-3828
Fax: 1(408)263-8132
Fax(RMA): 1(408)263-3822
Federal Communication Commission Interference Statement
NOTE: This equipment has been tested and found to comply with the limits for a Class A digital device, pursuant to part 15
of the FCC Rules. These limits are designed to pro-vide reasonable protection against harmful interference when the
equipment is operate din a commercial environment. This equipment generates, uses, and can radiate radiofrequency
energy and, if not installed and used in accordance with the instruction manual, may cause harmful interference to radio
communications. Operation of this equipment in a residential area is likely to cause harmful interference in which case the
user will be required to correct the interference at his own expense.
FCC Caution: Any changes or modifications not expressly approved by the party responsible for compliance could void
the user's authority to operate this equipment.
This device complies with part 15 of the FCC Rules.
Operation is subject to the following two conditions:
(1) This device may not cause harmful interference, and
(2) this device must accept any interference received, including interference that may cause undesired operation.
Warning: This is a class A product. In a domestic environment this product may cause radio interference in which case
the user may be required to take adequate measures.
©2018 AVer Information Inc. All rights reserved.
All rights of this object belong to AVer Information Inc. Reproduced or transmitted in any form or by any means without the
prior written permission of AVer Information Inc. is prohibited. All information or specifications are subject to change
without prior notice.
Note: The CAM520 is a Plug-n-Play USB camera. The system requires no special drivers, but we highly
recommend installing the AVer PTZApp for the best user experience. Please visit
aver.com/video-collaboration for more information.
 Loading...