

Page 1
English Deutsch Español
C20i
User Manual
Français Italiano
Page 2

Page 3
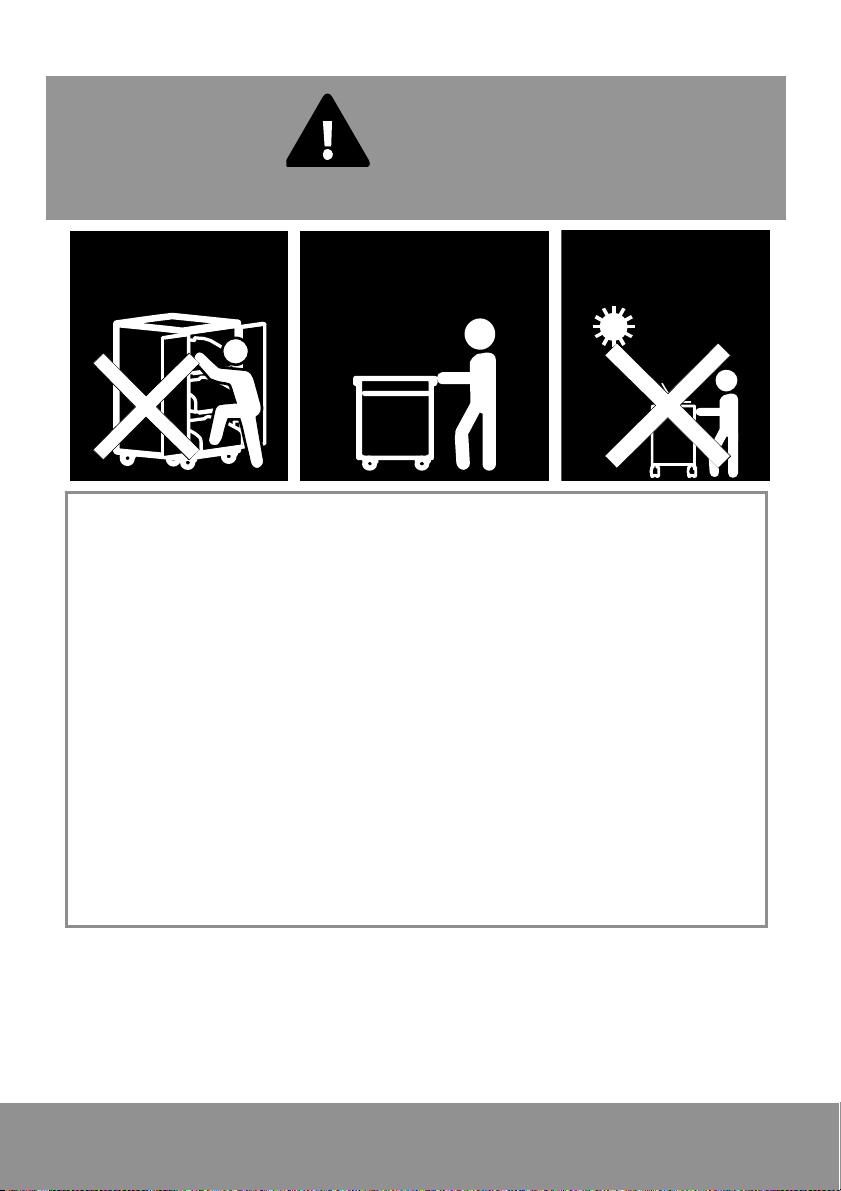
WARNING
ALWAYS FOLLOW SAFETY PRECAUTIONS
NEVER climb, sit
or stand on the
C20i cart.
ONLY ADULTS should
move the C20i cart.
DO NOT allow anyone to sit, stand or climb on the C20i cart.
DO NOT lift the C20i cart.
DO NOT block the ventilation holes used for air circulation.
DO NOT overload objects on the C20i shelves. (work platform maximum
loading = 45kg / 99.20lbs; each pull-out shelf maximum loading = 22.7kg
/ 50.04lbs)
Before moving C20i cart, disconnect the power from the wall outlet.
To reduce risk
of electric shock
ONLY use indoors.
While moving C20i cart, make sure the power cord is secured and tightly
wrapped.
Page 4

Page 5

FCC NOTICE (Class A)
This device complies with Part 15 of the FCC Rules. Operation is
subject to the following two conditions: (1) this device may not cause
harmful interference, and (2) this device must accept any interference
received, including interference that may cause undesired operation.
Federal Communications Commission Statement
NOTE- This equipment has been tested and found to comply with the limits for a
Class A digital device, pursuant to Part 15 of the FCC Rules. These limits are
designed to provide reasonable protection against harmful interference in a
residential installation. This equipment generates uses and can radiate radio
frequency energy and, if not installed and used in accordance with the instructions,
may cause harmful interference to radio communications. However, there is no
guarantee that interference will not occur in a particular installation. If this
equipment does cause harmful interference to radio or television reception, which
can be determined by tuning the equipment off and on, the user is encouraged to
try to correct the interference by one or more of the following measures:
Reorient or relocate the receiving antenna.
Increase the separation between the equipment and receiver.
Connect the equipment into an outlet on a circuit different from that to which
the receiver is connected.
Consult the dealer or an experienced radio/television technician for help.
Class A ITE
Class A ITE is a category of all other ITE which satisfies the class A ITE limits but
not the class B ITE limits. Such equipment should not be restricted in its sale but
the following warning shall be included in the instructions for use:
Warning - This is a class A product. In a domestic environment this product may cause
radio interference in which case the user may be required to take adequate measures.
European Community Compliance Statement (Class A)
This product is herewith confirmed to comply with the requirements set
out in the Council Directives on the Approximation of the laws of the
Member States relating to Electromagnetic Compatibility Directive
2014/30/EU.
Warning - This is a Class A product. In a domestic environment this product may
cause radio interference in which case the user may be required to take adequate
measures to correct this interference.
Page 6
DISCLAIMER
No warranty or representation, either expressed or implied, is made with respect to
the contents of this documentation, its quality, performance, merchantability, or
fitness for a particular purpose. Information presented in this documentation has
been carefully checked for reliability; however, no responsibility is assumed for
inaccuracies. The information contained in this documentation is subject to change
without notice.
In no event will AVer Information Inc. be liable for direct, indirect, special, incidental,
or consequential damages arising out of the use or inability to use this product or
documentation, even if advised of the possibility of such damages.
TRADEMARKS
“AVer” is a trademark owned by AVer Information Inc. Other trademarks used
herein for description purpose only belong to each of their companies.
COPYRIGHT
©2016 AVer Information Inc. All rights reserved.
All rights of this object belong to AVer Information Inc. Reproduced or transmitted
in any form or by any means without the prior written permission of AVer
Information Inc. is prohibited. All information or specifications are subject to
change without prior notice.
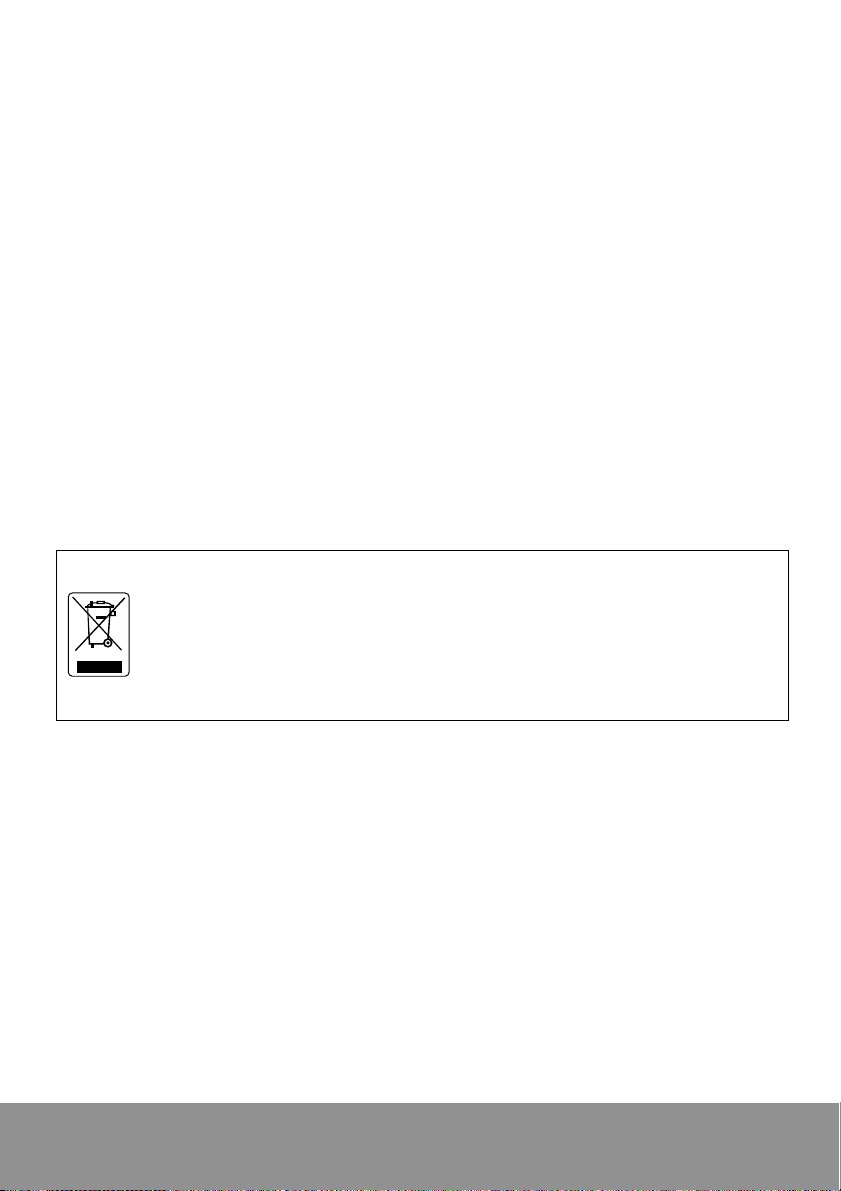
The mark of Crossed-out wheeled bin indicates that this product must
not be disposed of with your other household waste. Instead, you need
to dispose of the waste equipment by handing it over to a designated
collection point for the recycling of waste electrical and electronic
equipment. For more information about where to drop off your waste
equipment for recycling, please contact your household waste disposal
service or the shop where you purchased the product.
Page 7
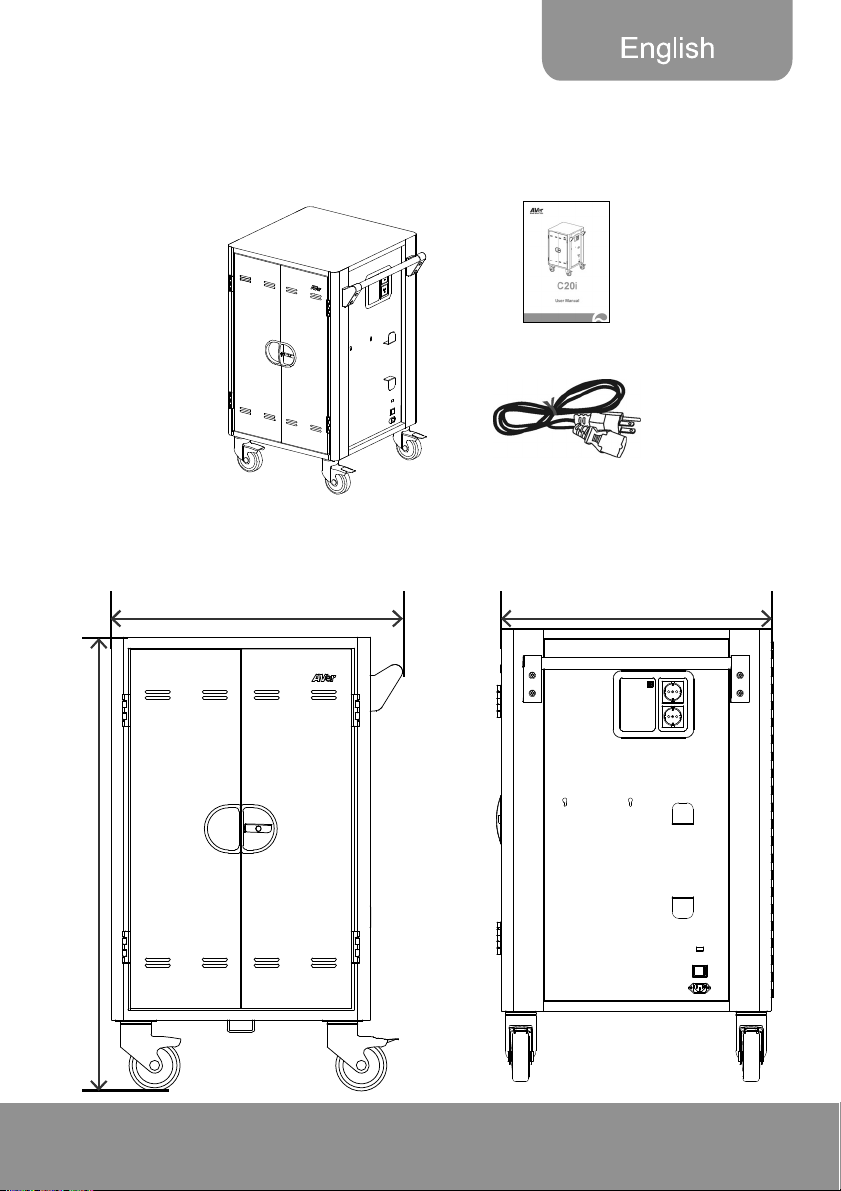
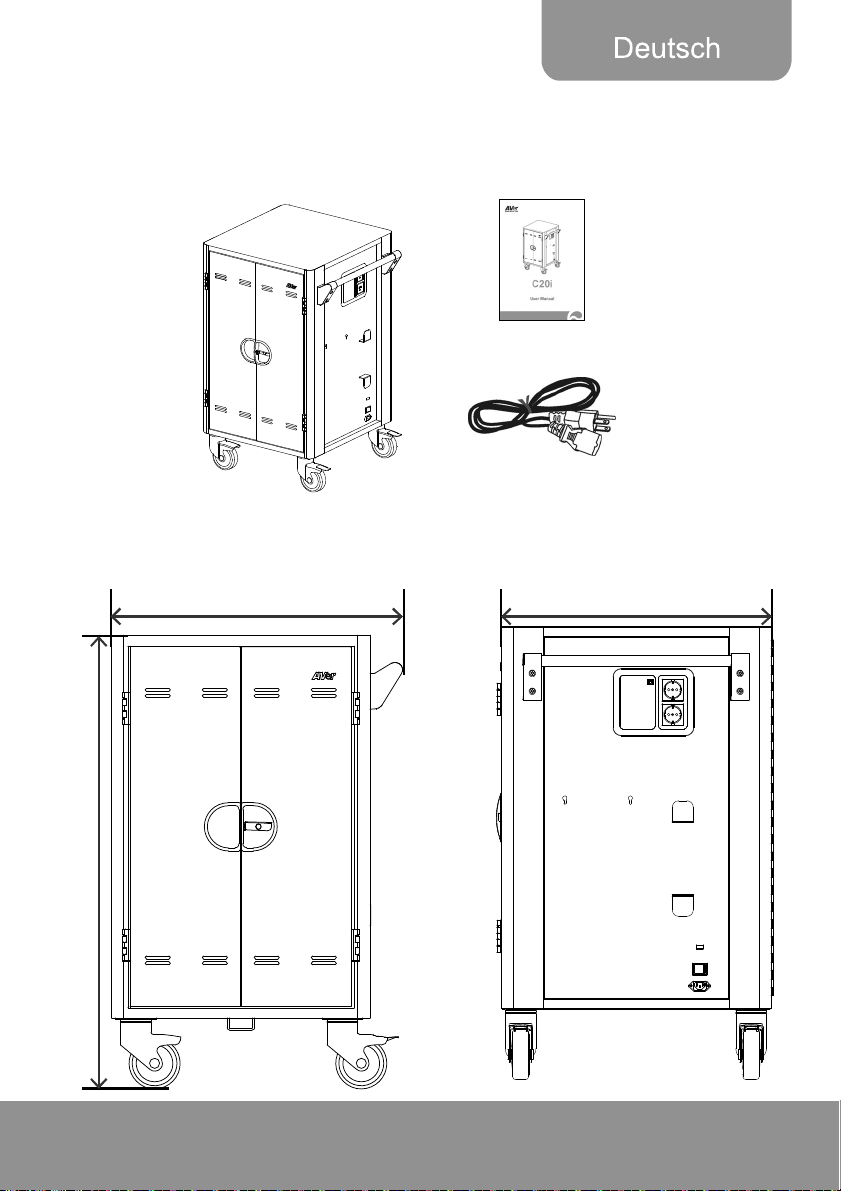
Package Contents
The following items are included in the package. Please check if each item is
available before using.
User Manual
wer Cord
Po
C20i Cart
Dimensions
68.8cm(27.09”) 63.7cm(25.08”)
)
”
3
7
.
1
4
(
m
c
6
0
1
1
Page 8

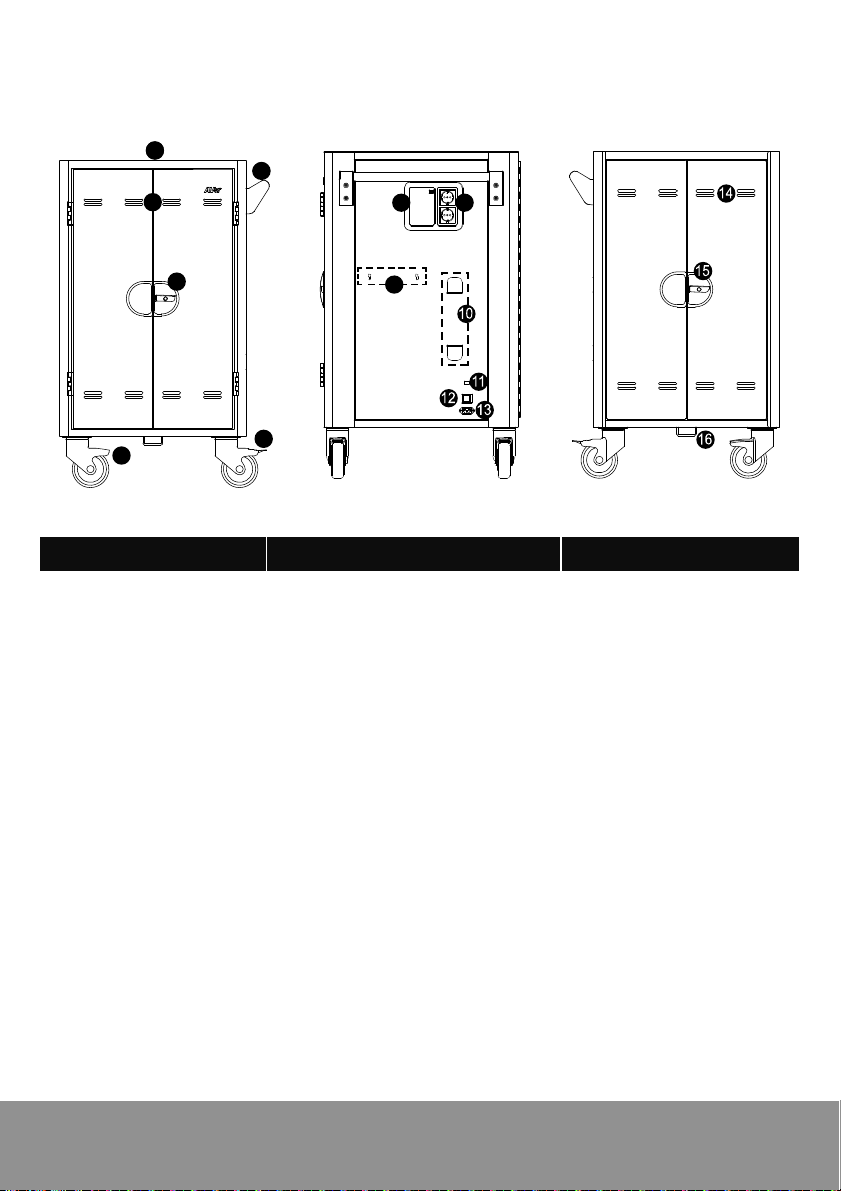
Diagram
1
1
3
2
78
4
5
6
9
Front Side Back
Auxiliary outlets*
1. Work platform
2. Handl
3. V
e
entilation holes
4. Door lock
5. 5” Lo
cking ca
6. 5” Caster
ster
7.
8. LED p
anel
9. Mounting p
ss point
Acce
holder(optiona
10. Powe
11
. USB firmware
bra
r ca
ckets
upgrade p
12. Powe
13. Powe
r switch
r inle
oints fo
l)
ble wrap
ort
t
14. Ventilation holes
15. Door lock
16. Security hook
r
* Auxiliary outlet type may vary as they are country dependent.
2
Page 9

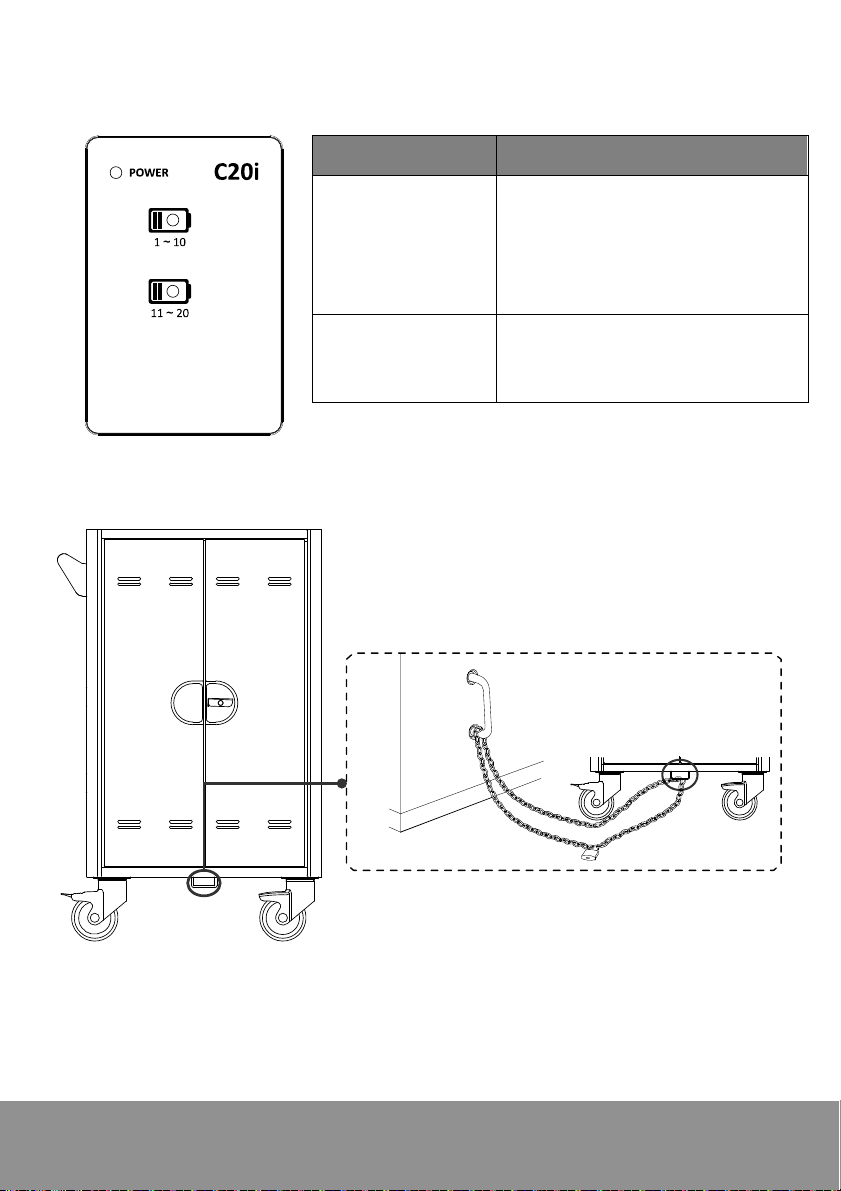
LED Indicators
LED Status
1. Solid Green: ON
Flashing Ora
2.
Power x1
Overload
3. Flashing Re
Failure (Cont
nge:
Current
d: Abno
act Suppo
rmal
rt)
Secure the Cart
Device Status x2
1. OFF: No Cha
2. Solid Blue: C
Use to secure cart
rging
hargi
ng
3
Page 10

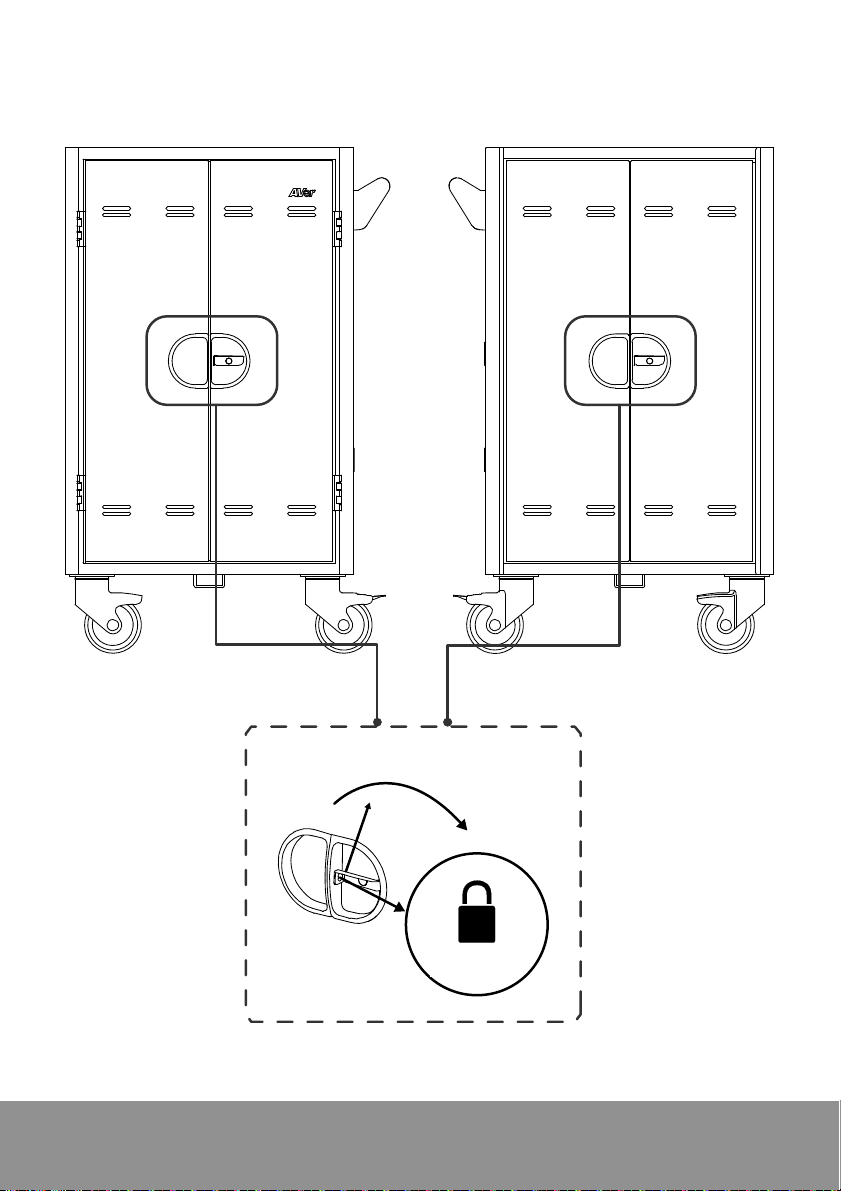
Door Lock
Door lock open
O
pt
i
on
al
[Note] The shackle dimension of front and back doors are limited to Ø8mm
(0.31”).
4
Page 11
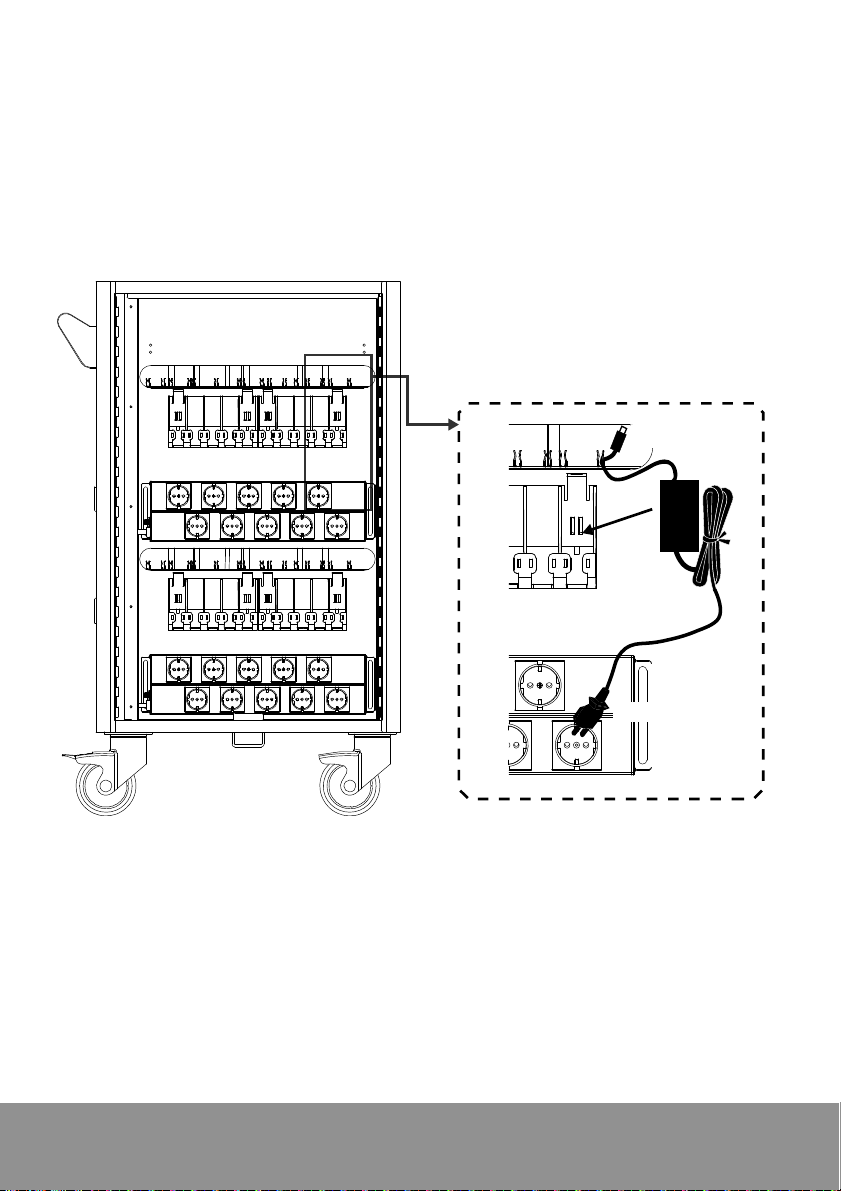
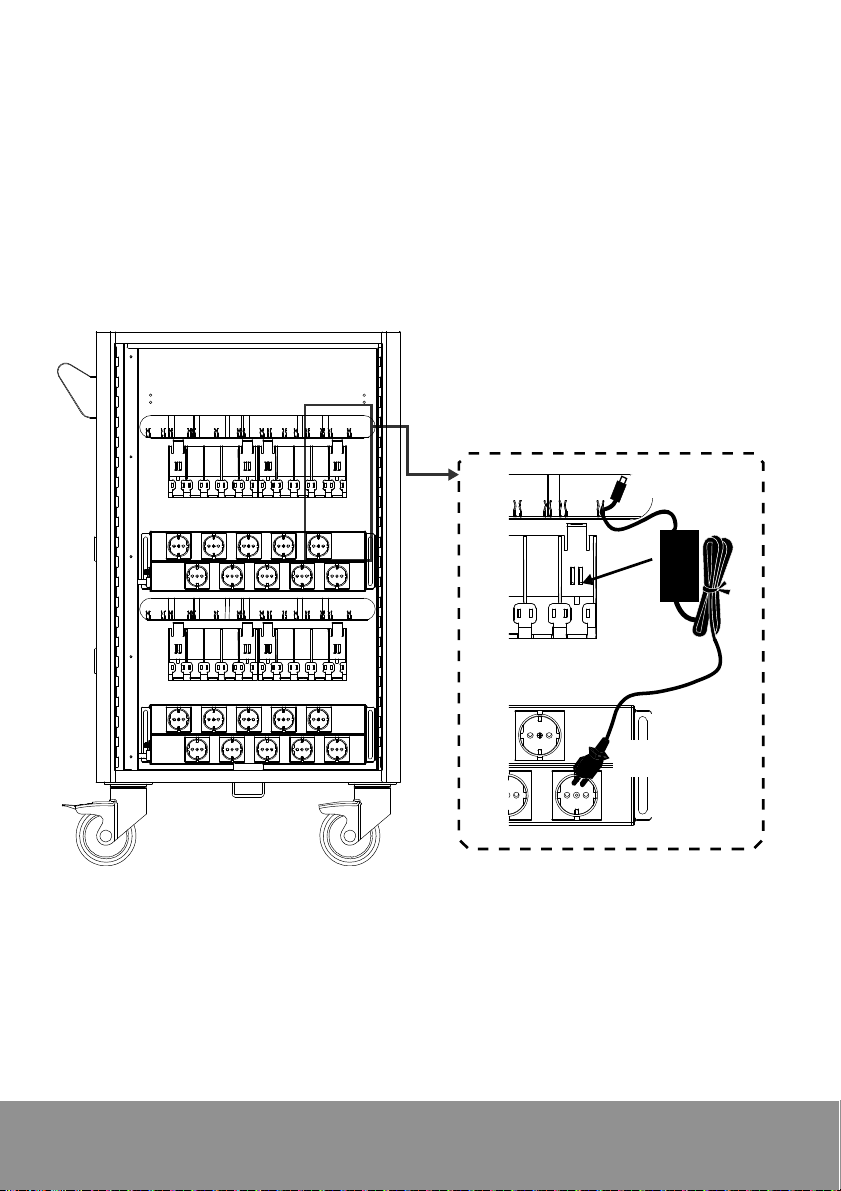
Cable Management
[Note]
1. It is recom
2. It is recom
Back
mended to use cable ties (optional) to secure and manage cables.
mended to allocate 2 human resources for efficient device cabling.
DC-end
AC-end
1. Open the rear door.
2.
Place the power adapter in to the individual adapter compartment.
Pass the DC-end of the adapter cable to the front of the cart through the spac
3.
provided.
5
e
Page 12
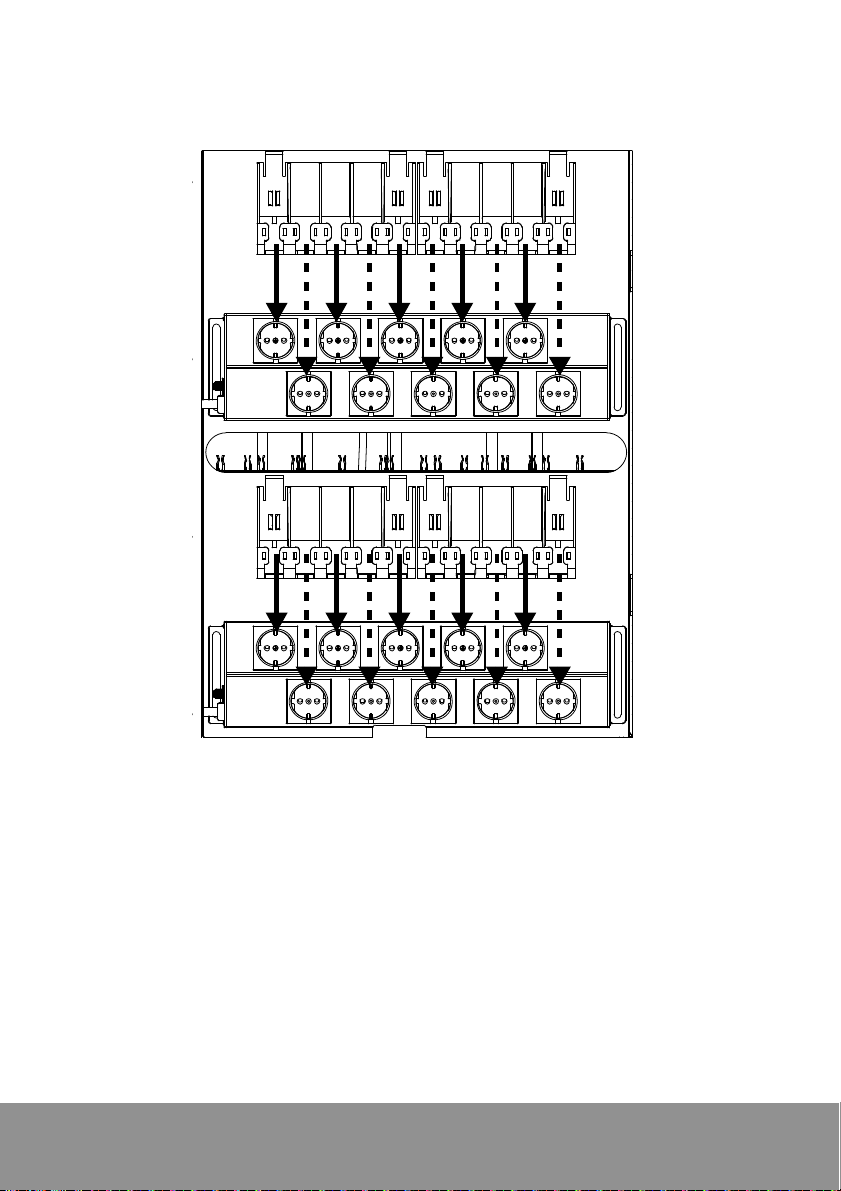
4.
Follow the order as below figure show to plug-in the AC-end power co
sponding power AC
corre
socket.
rd to the
5. Secure the bundle cables with cable tie or zip-tie (not supplied).
6
Page 13
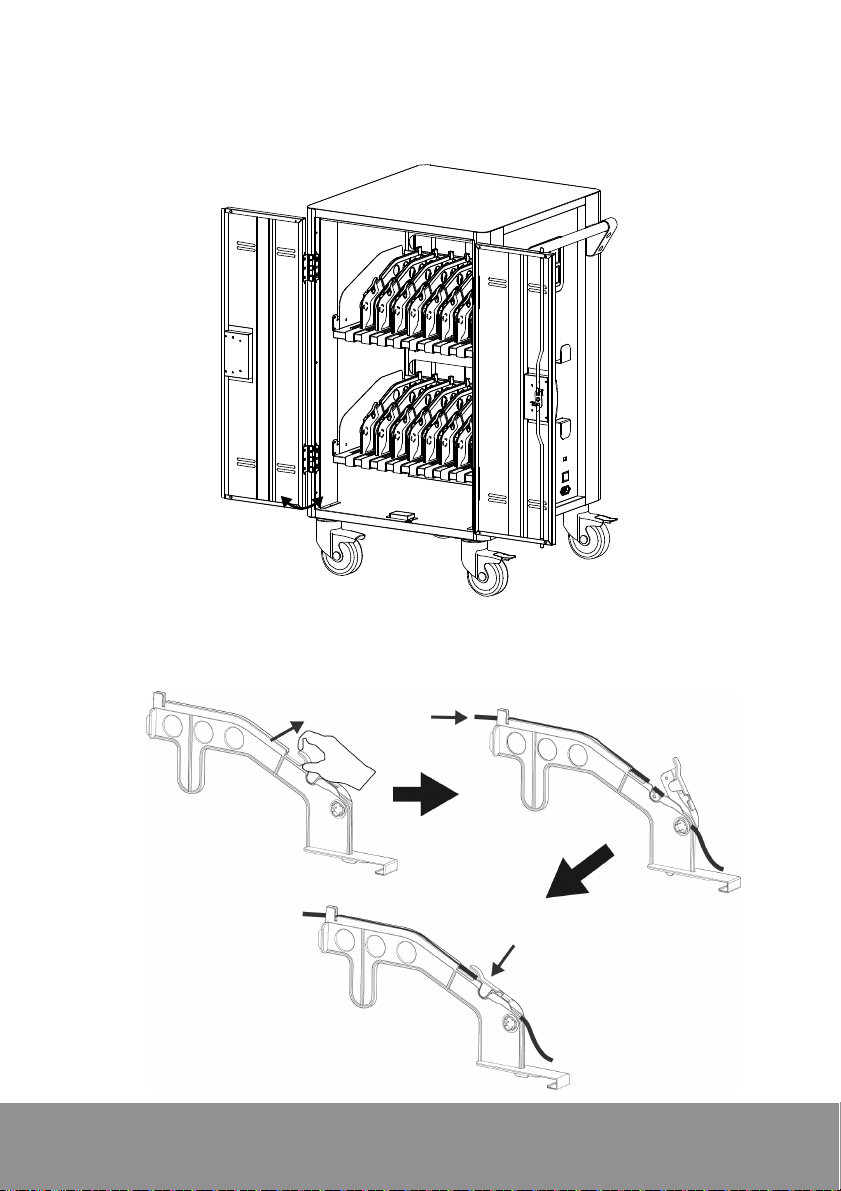
Front
1. Open front doors
180°
2. Release the partition locking piece.
3.
Route the adaptor DC-end cable. Along with the V-shape routing groove.
7
Page 14

4.
Snap the locking piece to firmly secure the DC-end cable.
Place the mobile device into the bay
5.
6.
Plug in the DC-connector to the mobile device.
.
Charging Cart
Wall outlet
Connect power cord to
1
C20i cart and wall outlet
Set the power switch to “ON”
2
to begin charging
[Note]
1. Set the power
Auxiliary outlet and power inlet type may vary as they are country dependent.
2.*
switch to the OFF position before plugging the cart
to wall outlet.
8
Page 15
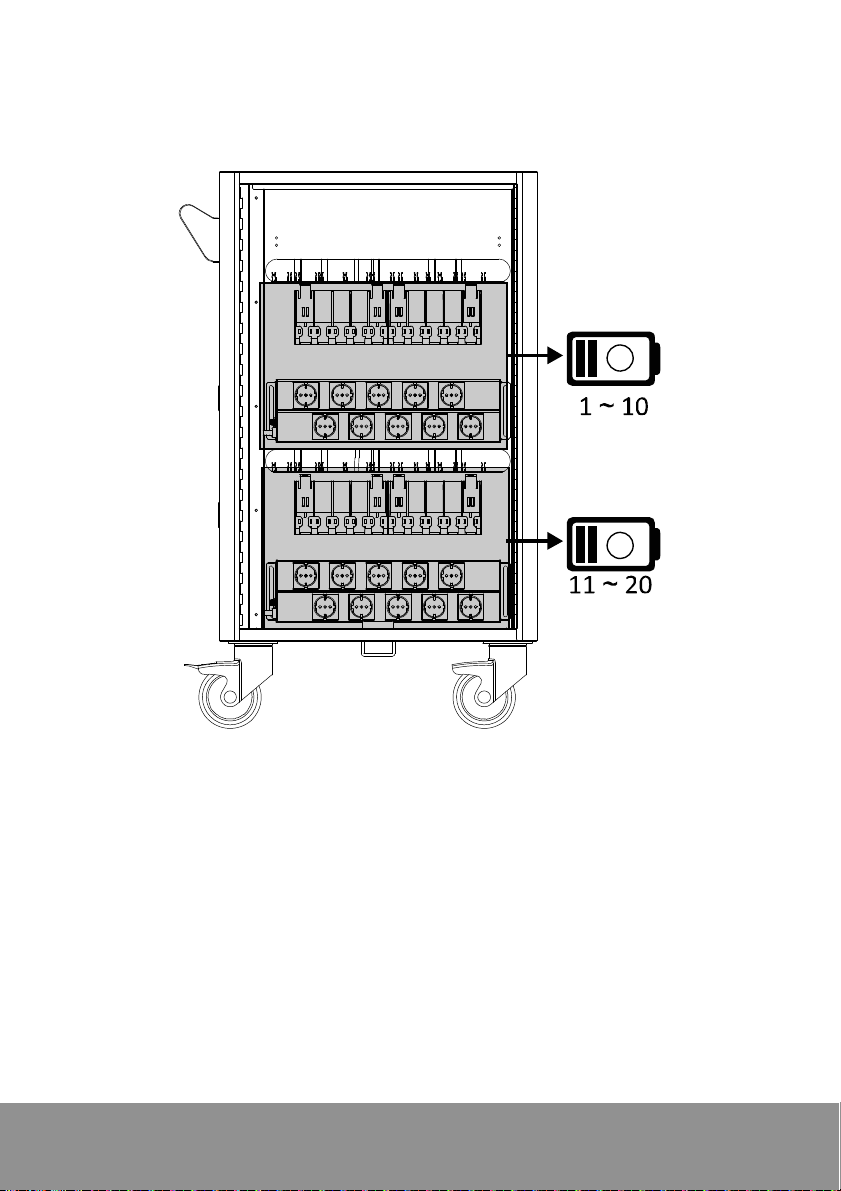
Intelligent Timer
20 bays for C20i are divided into 2 zones (10 bays for each zone).
Zone 1
Zone 2
Firmware
Firmware can be upgraded from the external USB type-A port via typical USB
thumb-drive. Please follow the steps below to upgrade your Firmware:
1. Prior to updating, make sure the USB thumb-drive is formatted to FAT or FAT32
filesystem
2. Copy the Firmware binary file ( *.bin) to USB thumb-drive
3. Turn OFF C20i and then insert the USB thumb-drive
4. Turn ON C20i and the Firmware upgrade will update automatically. The Power
LED will cycle through the following display RED AMBER GREEN
RED.
[Note] Status LEDs are OFF during the upgrading.
9
Page 16

5.
Once the Firmware upgrade is completed, the Power LED will still display RED
AMBER GREEN RED in cycle, but the charging status LED's will
ON.
6. T
urn OFF C20i, remove the USB thumb-drive.
[Note]
C20i supports USB thumb-drive for the following criteria:
1.
FAT or FAT32 filesystem (need to format if necessa
2.
32GB capacity
3.
USB 2.0 high speed interface.
maximum.
ry).
turn
Troubleshooting
Q: Why are all of my devices plugged in but not charging?
A: 1. Make sure power cords are undamaged.
2. Make sure po
stable curren
3. Make sure
country specification standards.
Q: My cart's main power cord or cart components are damaged. Are they
covered under warranty?
A: We provide a 10 year warranty on the cart and tray, and 5 years warranty on the
electrical components.
Q: How do I know if my devices will exceed more than the allotted current?
A: Have a qualified electrician verify the current consumption of your devices.
Perform the test with devices installed and batteries discharged.
Q: When I plug in the device it trips the circuit breaker. What is wrong?
A: You may have other equipment or appliances sharing the same circuit that is
causing a circuit overload. Have a qualified electrician check that adequate
power is available in the circuit.
wer cords are firmly inserted into the available socket with
t.
the power plug and current consumption are compliant with your
10
Page 17

Specifications
Model
Capacity
Supported Devices
AUX Outlets
LEDs Status Indicators
Charging Type
Power Specification
Security
Casters
Intelligent Charging
Working Temperature
Working RH%
Storage Temperature
C20i
Up to 20 Devices (2 shelves, 10 bays per shelf)
Laptops/Chromebooks/Tablets up to 16”
2
Status LED (x2): Solid Blue when charging
AC Intelligent Charging
AC IN: 220~240V, 50/60Hz,8A
Power Strip (x20 ports): 220~240V, 50/60Hz,6A
Outlet( 2 ports): 220~240V, 50/60Hz, 2A
Front Doors: 3-point locking mechanism with
padlock hole
Rear Doors: 3-point locking mechanism with
padlock hole
[Note] Padlock is not included in the package
Four 5” casters: two are lockable
Yes
o
0
~30oC
10%~90%
o
-40
C~60oC
Storage RH%
Warranty
Cart Dimensions
(W x D x H)
Slot Dimensions
for 16 bays (H x W x D)
Slot Dimensions
For 20 bays (H x W x D)
Weight without Devices
5%~95%
10 years cart and tray
5 years electrical components
68.8 (W) x 63.7 (D) x 106 (H)cm
27.09”(W) x 25.08”(D) x 41.73”(H)
33(H) x 4.375(W) x 41.9(D)cm
13"(H) x 1.722"(W) x 16.5"(D)
33(H) x 3.615(W) x 41.9(D)cm
13"(H) x 1.423"(W) x 16.5"(D)
146.83lbs (66.6kg)
11
Page 18

Service and Warranty
All of our products come with a quality and safety assurance.
For customers located in North America, please visit the AVer USA support site for
comprehensive RMA, Warranty, and Service information:
http://averuesa.com/classroom-technology/support/
For cu
stomers located outside North America, please visit AVer Global support site:
http://www.aver.com/
12
Page 19
Inhalt der Verpackung
Die folgenden Artikel sind in der Verpackung enthalten. Prüfen Sie vor der
erstmaligen Verwendung, ob folgende Komponenten mitgeliefert wurden.
Bedienungsanleitung
C20i-Wagen
Abmessungen
68.8cm(27.09”) 63.7cm(25.08”)
)
”
3
7
.
1
4
(
m
c
6
0
1
Stromkabel
1
Page 20
Diagramm
1
1
3
2
78
4
5
6
9
Vorderseite Seite Rückseite
1. Arbeitsplattform
2. Griff
3. Belüftungsöffnungen
4. Türschloss
5. 5-Zoll-Rollen,
verriegelbar
6. 5-Zoll-Rolle
12. Netzschalter
13. Stromeingang
7. Zusatzsteckdosen* 14. Belüftungsöffnungen
8. LED-Bildschirm 15. Türschloss
9. Montageöffnungen für
16. Sicherheitsschloss
Zugriffspunkt
Aufnahme (optional)
10. Stromkabelaufrollhalterung
11. USB-Firmware
Upgrade-Anschluss
* Hilfsausgänge können abhängig von der länderspezifischen Version variieren.
2
Page 21
LED-Meldeleuchten
LED Status
1. Statisch Grün: EIN
2. Blinkt Orange:
Strom x1
Stromüberlast
3. Blinkt Rot: Abnormaler
Fehler (wenden Sie sich an
den Support)
Wagen sichern
Gerätestatus x2
1. AUS: Kein Laden
2. Statisch Blau: Laden
Use to secure cart
Wagen sichern
3
Page 22
Türschloss
Türschloss offen
Door lock open
Optional
O
p
i
t
o
n
a
l
[Hinweis] Die Bügelabmessungen der Türen an Vorder- und Rückseite sind auf
Ø8 mm begrenzt.
4
Page 23
Kabelmanagement
[Hinweis]
1. Für die Sicherung und Kabelverlegung werden (optionale) Kabelbinder
empfohlen.
2. Es wird empfohlen, zwei Personen mit der Verlegung der Kabel zu
beauftragen.
Rückseite
DC-Stecker
DC-end
AC-Stecker
AC-end
1. Öffnen Sie die rückseitige Tür.
2. Verbinden Sie den Stromadapter mit den einzelnen Adapterfächern.
3. Führen Sie das DC-Ende des Adapterkabels durch die dafür vorgesehene
Fläche zur Vorderseite des Wagens.
5
Page 24

4. Beachten Sie die in der Abbildung angezeigte Reihenfolge für die Verbindung
des AC-Kabels mit dem entsprechenden AC-Anschluss.
5. Sichern Sie die Kabelbündel mit einem Kabelbinder (nicht beiliegend).
6
Page 25

Vorderseite
1. Öffnen Sie die Fronttüren.
180°
2. Lösen Sie das Sperrstück der Partition.
3. Verlegen Sie das Adapter-DC-Kabel. Verlegen Sie es in der umlaufenden
V-Führungsnut.
7
Page 26

4. Lassen Sie das Sperrstück einrasten, um das DC-Kabel zu sichern.
5. Legen Sie das Mobilgerät in die Aufnahme.
6. Verbinden Sie den DC-Stecker mit dem Mobilgerät.
Ladewagen
Wandsteckdose
Wall outlet
Connect power cord to
1
Stromkabel mit C20i-Wagen
C20i cart and wall outlet
und Steckdose verbinden
Set the power switch to “ON”
2
Netztaste auf "ON" schalten, um
to begin charging
den Ladevorgang zu beginnen.
[Hinweis]
1. Schalten Sie den Netzschalter in die Stellung AUS (OFF), bevor Sie den
Wagen mit der Steckdose verbinden.
2. Hilfsausgänge können abhängig von der länderspezifischen Version variieren.
8
Page 27

Intelligente Zeitschaltuhr (Timer)
20 Aufnahmen für den C20i, unterteilt in zwei Zonen (zehn Aufnahmen/Zone).
Zone 1
Zone 2
Firmware
Die Firmware kann über den externen USB-Anschluss Typ mit einem typischen
USB-Stick aktualisiert werden. Gehen Sie wie folgt vor, um eine Upgrade Ihrer
Firmware durchzuführen:
1. Formatieren Sie den USB-Stick vor der Aktualisierung mit dem FAT- oder
FAT32-Dateisystem
2. Kopieren Sie die Firmware-Binärdatei (*.bin) auf den USB-Stick.
3. Schalten Sie den C20i AUS und stecken Sie den USB-Stick ein.
4. Schalten Sie den C20i EIN und die Firmware wird automatisch aktualisiert. Die
Netzleuchte leuchtet in folgendem Zyklus: ROT ORANGE GRÜN ROT.
[Hinweis] Während des Upgrade-Vorgangs leuchten die Status-LED NICHT.
9
Page 28

5. Nach dem Upgrade de Firmware leuchtet die Netzleuchte weiterhin in der
Reihenfolge ROT ORANGE GRÜN ROT, allerdings leuchten nun die
Status-LEDs.
6. Schalten Sie den C20i AUS und trennen Sie den USB-Stick.
[Hinweis]
Der C20i unterstützt USB-Sticks, die die folgenden Kriterien erfüllen:
1. FAT- oder FAT32-Dateisystem (ggf. bei Bedarf formatieren).
2. 32 GB max. Kapazität
3. USB 2.0 -Hochgeschwindigkeitsschnittstelle
Fehlerbehebung
F: Alle meine Geräte sind angeschlossen, werden jedoch nicht geladen?
A: 1. Vergewissern Sie sich, dass die Stromkabel intakt sind.
2. Die Stromkabel müssen fest in die Anschlüsse eingesteckt sein. Die
Stromversorgung muss stabil sein.
3. Die Stromkabel müssen eingesteckt sein und die Netzversorgung muss mit
Ihren länderspezifischen Standards übereinstimmen.
F: Das Stromkabel oder die Komponenten meines Wagens sind beschädigt.
Sind Sie von der Garantie abgedeckt?
A: Wir gewähren eine Garantie von zehn (10) Jahren auf den Wagen und die
Aufnahmen und fünf (5) Jahre Garantie auf die elektrischen Komponenten.
F: Wie kann ich feststellen, ob meine Geräte die Verbrauchshöchstgrenze für
den Strom überschreiten?
A: Lassen Sie den Stromverbrauch Ihrer Geräte von einem Fachelektriker
ermitteln. Führen Sie einen Test durch, während die Geräte angeschlossen
sind und die Akkus aufgeladen werden.
F: Wenn ich das Gerät verbinde, löst der Leistungsschalter aus. Was ist
falsch?
A: Möglicherweise sind andere Geräte oder Anlagen mit demselben Stromkreis
verbunden und der Stromkreis ist überlastet. Lassen Sie die zulässige
Höchstspannung im Stromkreis von einem Fachelektriker überprüfen.
10
Page 29

Technische Daten
Modell
Kapazität
Unterstützte Geräte:
AUX-Ausgänge
LED-Statusanzeigen
Ladetyp
Leistungsdaten
Sicherheit
Rollen
Intelligentes Aufladen
C20i
Bis zu 20 Geräte (2 Regalböden, 10 Aufnahmen
pro Regalboden).
Laptops, Chromebooks, Tablets bis 16 Zoll
2
Status LED (x2): Statisch Blau während der
Aufladung
AC Intelligentes Laden
AC EIN 220-240 V, 50/60 Hz, 8 A
Steckerleiste (x20 Anschlüsse) 220-240 V,
50/60 Hz, 6 A
Ausgang (2 Anschlüsse): 220-240 V, 50/60 Hz,
2 A
Fronttüren: 3-Punkt-Verriegelungsmechanismus
mit Vorhängeschlossöffnung
Rückseitige Türen:
3-Punkt-Verriegelungsmechanism
us mit Vorhängeschlossöffnung
[Hinweis] Das Vorhängeschloss ist nicht im
Lieferumfang enthalten.
Vier 5-Zoll-Rollen, zwei davon verriegelbar
Ja
Betriebstemperatur
Betriebsluftfeuchte %
Lagerungstemperatur
Lagerungsluftfeuchte %
Garantie
Wagenabmessungen
(B x T x H)
Schlitzabmessungen
für 16 Aufnahmen
(H x B x T)
0°-30° C
10 %-90 %
-40°C-60° C
5 %~95 %
10 Jahre auf Wagen und Aufnahme
5 Jahre die elektrischen Komponenten
68,8 (B) x 63,7 (T) x 106 (H) cm
33 (H) x 4,375 (B) x 41,9 (D) cm
11
Page 30

Schlitzabmessungen
Für 20 Aufnahme
(H x B x T)
Gewicht, ohne Geräte
33 (H) x 3,615 (B) x 41,9 (D) cm
66,60 kg
Kundendienst und Garantie
Alle unsere Produkte verfügen über eine Qualitäts- und Sicherheitszusicherung.
Kunden in den USA besuchen bitte die AVer USA Support-Website für
umfassende Informationen zu Warenrücksendung (RMA), Garantie und
Kundendienst.
http://averuesa.com/classroom-technology/support/
Kunden außerhalb Nordamerikas besuchen bitte unsere globale
AVer-Support-Website: http://www.aver.com/
12
Page 31

WARNUNG
BEACHTEN SIE STETS ALLE SICHERHEITSHINWEISE
Nicht auf den
C20i-Wagenklettern,
darauf sitzen oder stehen
Der CI20i-Wagen
darf nur von erwachsenen
Personen bewegt werden.
Personen dürfen NICHT auf dem C20i-Wagen sitzen, stehen oder auf
NURin geschlossenen
Räumen verwenden Elektroschlag-Gefahr
diesen klettern.
Den C20i-Wagen NICHT anheben.
Die Belüftungsöffnungen für die Luftzirkulation NICHT verstellen.
Die C20i-Regalböden NICHT überlasten. (Max. Tragkraft der
Arbeitsplattform = 45 kg. Max. Tragkraft jedes ziehbaren Regalbodens:
22,7 kg).
Trennen Sie den C20i-Wagen von der Stromversorgung, bevor Sie ihn
bewegen.
Vergewissern Sie sich, dass das Stromkabel gesichert und fest aufgerollt
ist, bevor Sie den C20i-Wagen bewegen.
13
Page 32

Page 33

Contenido del paquete
El paquete contiene los artículos siguientes. Compruebe que no falte ninguno de
los artículos antes de usar el producto.
Manual del
usuario
Dimensiones
68.8cm(27.09”) 63.7cm(25.08”)
)
”
3
7
.
1
4
(
m
c
6
0
1
Carro C20i
Cable de
alimentación
1
Page 34

Diagrama
1
1
3
2
78
4
5
6
9
Parte delantera Lateral Parte trasera
1. Plataforma de trabajo
2. Asa
3. Orificios de ventilación
4. Cerradura
5. Bloqueo de las ruedas
de 5
”
6. Rueda de 5
”
7. Salidas auxiliares*
8. Panel LED 15. Cerradura
9. Puntos de montaje
para el soporte de
punto de acceso
(opcional)
10. Soportes de
14. Orificios de
ventilación
16. Gancho de
seguridad
enrollado del cable
de alimentación
11. Puerto USB de
actualización del
firmware
12. Interruptor de
encendido/apagado
13. Entrada de
alimentación
* El tipo de salida auxiliar puede variar ya que depende de cada país.
2
Page 35

Indicadores LED
Asegurar el carro
Alimentación x1
Estado del
dispositivo x 2
LED Estado
1. Verde fijo: Encendido
2. Naranja intermitente:
Sobrecarga
3. Rojo intermitente: Error
anómalo (contactar con
soporte técnico)
1. Apagado: No está
cargando
2. Azul intermitente:
Cargando
3
Page 36

Cerradura
[Nota] La dimensión de la argolla de las puertas delanteras y traseras está
limitada a Ø8 mm (0,31 pulgadas).
4
Page 37

Organización del cable
[Nota]
1. Se recomienda utilizar sujetacables (opcional) para asegurar y organizar los
cables.
2. Se recomienda emplear dos recursos humanos para un cableado eficaz del
dispositivo.
Parte trasera
Extremo CA
1. Abra la puerta trasera.
2. Coloque el adaptador de corriente en el compartimiento para el adaptador.
3. Pase el extremo CC del cable del adaptador a la parte delantera del carro a
través del espacio provisto.
5
Page 38

4. Siga el orden indicado en la figura a continuación para enchufar el extremo CA
del cable de alimentación a la toma CA de alimentación correspondiente.
5. Fije el haz de cables con sujetacables (no suministrados).
6
Page 39

Parte delantera
1. Abra las puertas delanteras.
180°
2. Libere el elemento de bloqueo de separación.
3. Pase el extremo CC del cable del adaptador a lo largo de la ranura con forma
de V.
7
Page 40

4. Encaje la pieza de bloqueo para fijar el extremo CC del cable.
5. Coloque el dispositivo móvil en la bahía.
6. Enchufe el conector CC al dispositivo móvil.
Carro de carga
Toma de corriente
Conecte el cable de alimentación al
1
carro C20i y a la toma de corriente
Coloque el interruptor en la
2
posición “ON” para iniciar la carga
[Nota]
1. Coloque el interruptor de encendido/apagado en la posición OFF antes de
desenchufar el carro de la toma de corriente.
2. El tipo de salida auxiliar puede variar ya que depende de cada país.
8
Page 41

Temporizador inteligente
El C20i dispone de 20 bahías divididas en dos zonas (10 bahías por zona).
Zona 1
Zona 2
Firmware
El firmware puede actualizarse desde el puerto externo USB tipo A mediante un
dispositivo de memoria USB estándar. Siga los pasos descritos a continuación
para actualizar el firmware:
1. Antes de realizar la actualización, asegúrese de que se haya formateado el
dispositivo de memoria USB con el sistema de archivos FAT o FAT32.
2. Copie el archivo binario de firmware (*.bin) al dispositivo de memoria USB.
3. Apague el C20i y conecte el dispositivo de memoria USB.
4. Encienda el C20i. El firmware se actualizará automáticamente. El LED de
alimentación seguirá el ciclo siguiente: ROJO ÁMBAR VERDE ROJO.
[Nota] Los LED de estado están apagados durante la actualización.
9
Page 42

5. Una vez que finalice la actualización del firmware, el LED de alimentación
seguirá el mismo ciclo (ROJO ÁMBAR VERDE ROJO), pero también
se encenderá el LED de estado de carga.
6. Apague el C20i y desconecte el dispositivo de memoria USB.
[Nota]
El C20i admite un dispositivo de memoria USB que cumpla los criterios siguientes:
1. Sistema de archivos FAT o FAT32 (se debe formatear, en caso de ser
necesario).
2. Capacidad máxima de 32 GB.
3. Interfaz USB 2.0 de alta velocidad.
Resolución de problemas
P: Todos mis dispositivos están conectados, pero no se cangan. ¿Por qué?
R: 1. Compruebe que los cables de alimentación no estén dañados.
2. Compruebe que los cables de alimentación estén correctamente enchufados
en la toma disponible con corriente estable.
3. Asegúrese de que el cable de alimentación y el consumo de corriente
cumplan con las especificaciones estándar de su país.
P: Los componentes o el cable de alimentación principal del carro están
dañados. ¿Están cubiertos por garantía?
R: Ofrecemos una garantía de 10 años para el carro y la bandeja, y de 5 años
para los componentes eléctricos.
P: ¿Cómo puedo saber si mis dispositivos sobrepasarán la corriente
distribuida?
R: Solicite a un electricista profesional que compruebe el consumo eléctrico de los
dispositivos. Realice la prueba con los dispositivos instalados y las baterías
descargadas.
P: Cuando enchufo el dispositivo, se activa el disyuntor. ¿Cuál es el motivo?
R: Es posible que otros equipos o dispositivos compartan el mismo circuito, lo que
está ocasionando una sobrecarga. Solicite a un electricista cualificado que
compruebe que la potencia disponible en el circuito sea la adecuada.
10
Page 43

Especificaciones
Modelo
Capacidad
Dispositivos compatibles
Salidas auxiliares
Indicadores de estado
LED
Tipo de carga
Especificaciones de
alimentación
Seguridad
Ruedas
Carga inteligente
Temperatura de
funcionamiento
Porcentaje de humedad
relativa de
funcionamiento
Temperatura de
almacenamiento
Porcentaje de humedad
relativa de
almacenamiento
C20i
Hasta 20 dispositivos (dos estantes, 10 bahías
por estante)
Ordenadores portátiles/Chromebooks/Tabletas
de hasta 16”
2
LED de estado (2): Azul fijo durante la carga
Carga inteligente CA
Entrada de CA: 220~240V, 50/60Hz, 8A
Regleta (20 puertos): 220~240V, 50/60Hz, 6A
Salidas (2 puertos): 220~240V, 50/60Hz, 2A
Puertas delanteras: Mecanismo de tres puntos
de cierre con orificio para candado
Puertas traseras: Mecanismo de tres puntos de
cierre con orificio para candado
[Nota] El candado no se incluye en el paquete
Cuatro ruedas de 5”: dos se pueden bloquear
Sí
o
~30oC
0
10%~90%
o
C~60oC
-40
5%~95%
Garantía
Dimensiones del carro
(an. x pr. x al.)
10 años para el carro y la bandeja
5 años para los componentes eléctricos
68,8 (an.) x 63.7 (pr.) x 106 (al.) cm
27,09 (an.) x 25,08 (pr.) x 41,73 (al.) pulgadas
11
Page 44

Dimensiones de las
tomas
para 16 bahías (al. x an. x
pr.)
Dimensiones de las
tomas
para 20 bahías (al. x an. x
pr.)
Peso sin dispositivos
33 (al.) x 4,375 (an.) x 41,9 (pr.) cm
13 (al.) x 1,722 (an.) x 16,5 (pr.) pulgadas
33 (al.) x 3,615 (an.) x 41,9 (pr.) cm
13 (al.) x 1,423 (an.) x 16,5 (pr.) pulgadas
66,6 kg (146,83 libras)
Servicio y garantía
Todos nuestros productos incluyen una garantía de calidad y seguridad.
Los clientes residentes en Norteamérica pueden visitar el sitio de soporte técnico
de AVer USA para obtener información detallada sobre la autorización para la
devolución del equipo, la garantía y el servicio:
http://averuesa.com/classroom-technology/support/
Los clientes fuera de Norteamérica pueden visitar el sitio de soporte técnico de
AVer Global: http://www.aver.com/
12
Page 45

ADVERTENCIA
CUMPLA SIEMPRE LAS PRECAUCIONES DE SEGURIDAD
NUNCA se siente o
se suba al carro C20i.
ÚNICAMENTE LOS
ADULTOSdeben mover
el carro C20i.
NO permita que nadie se siente o se suba al carro C20i.
NO levante el carro C20i.
NO bloquee los orificios de ventilación.
NO sobrecargue los estantes del C20i. (Carga máxima de la plataforma
Para reducir el riesgo
de descarga eléctrica,
NUNCA utilice el carro
en el exterior.
de trabajo = 45 kg (99,20 libras); carga máxima de cada estante extraíble
= 22,7 kg (50,04 libras)
Antes de mover el carro C20i, desconecte el cable de alimentación de la
toma de corriente.
Durante el desplazamiento del carro C20i, asegúrese de que el cable de
alimentación esté bien fijado y enrollado.
13
Page 46

Page 47

Contenu de l'emballage
Les éléments suivants sont compris dans l'emballage : Vérifiez que chaque
élément est disponible avant utilisation.
Manuel de
l’utilisateur
Dimensions
68.8cm(27.09”) 63.7cm(25.08”)
)
”
3
7
.
1
4
(
m
c
6
0
1
Chariot C20i
Cordon
d'alimentation
1
Page 48

Diagramme
1
1
3
2
78
4
5
6
9
Avant Côté Arrière
1. Plateforme de travail
2. Poignée
3. Trous de ventilation
4. Verrou porte
7. Sorties auxiliaires* 14. Trous de ventilation
8. Panneau à DEL 15. Verrou porte
9. Points de montage
16. Crochet de sécurité
pour le point d'accès
support (en option)
5.Roue de 5"
verrouillable
6. Roue de 5"
10. Crochets de maintien
du câble
d'alimentation
11. Port USB de mise à
niveau du firmware
12. Interrupteur
d'alimentation
13. Prise d'alimentation
*Le type de sortie auxiliaire peut varier selon le pays.
2
Page 49

Voyants DEL
DEL État
1. Vert fixe : Allumé
2. Orange clignotant :
Alimentation x1
Surcharge
3. Clignotement rouge : Panne
anormale (contactez
l'assistance)
Fixer le chariot
État appareil x2
1. Éteint : Pas de recharge
2. Bleu fixe : Recharge
3
Page 50

Verrou de porte
[Remarque] La dimension des attaches sur les protes avant et arrière est limitée à
Ø8 mm (0,31”).
4
Page 51

Gestion des câbles
[Remarque]
1. Il est conseillé d'utiliser des attaches de câble (en option) pour fixer et
arranger les câbles.
2. Il est conseillé de travailler à 2 personnes pour effectuer le câblage
efficacement.
Retour
Extrémité CC
Extrémité CA
1. Ouvrez la porte arrière.
2. Placez l'adaptateur secteur dans le compartiment d'adaptateur individuel.
3. Faites passer l'extrémité CC du câble de l'adaptateur à l'avant du chariot, à
travers l'espace fourni.
5
Page 52

4. Suivez l'ordre de l'illustration ci-dessous pour brancher l'extrémité CA du
cordon d'alimentation sur la prise correspondante.
5. Fixez les câbles avec un attache-câble ou serre-câble (non fourni).
6
Page 53

Avant
1. Ouvrez les portes avant.
180°
2. Déverrouillez la pièce de blocage des partitions.
3. Acheminez l'extrémité CC du câble adaptateur. Acheminez le câble sur la
rainure en V.
7
Page 54

4. Placez la pièce de verrouillage pour fixer fermement l'extrémité CC du câble.
5. Placez l'appareil mobile sur le socle.
6. Branchez le connecteur CC à l'appareil mobile.
Chariot de recharge
Wall outlet
Branchez le cordon d'alimentation
1
sur le chariot C20i et la prise murale
Mettez l'interrupteur en position ON
2
pour commencer à charger
[Remarque]
1. Mettez l'interrupteur d'alimentation en position OFF avant de brancher le
chariot à une prise murale.
2. Le type de sortie auxiliaire peut varier selon le pays.
8
Page 55

Minuteur intelligent
20 socles pour C20i sont divisés en 2 zones (10 socles par zone).
Zone 1
Zone 2
Firmware
Le firmware peut être mis à niveau à partir du port USB type A via une clé USB
ordinaire. Veuillez suivre les étapes ci-dessous pour mettre à niveau votre
firmware :
1.
Avant la mise à jour, assurez-vous que le lecteur USB est formaté
systèm
Copiez le fichier binaire de firmware (*.bin) sur la clé USB
2.
3. Mettez le C20i en position OFF et insérez la clé USB
Mettez le C20i en position ON et le firmware sera mi
4.
automatiqu
ORANGE VERT ROUGE
e de fichiers FAT ou FA
ement. La DEL d’alimentation suivra la séquence ROUGE
[Remarque] Les DEL d'état sont éteintes lors de la mise à niveau.
T32
s à niveau
.
9
avec un
Page 56

5. Une fois la mise à niveau du firmware terminée, la DEL d'alimentation affichera
encore les couleurs ROUGE ORANGE VERT ROUGE en séquence,
mais la DEL d'état de recharge sera allumée.
6. Mettez le C20i en position OFF et retirez la clé USB.
[Remarque]
Le C20i prend en charge les clés USB répondant aux critères suivants :
1. Système de fichiers FAT ou FAT32 (formatez si nécessaire).
2. Capacité maximale de 32 Go.
3. Interface USB 2.0 haute vitesse.
Dépannage
Q : Pourquoi mes appareils ne se chargent-ils pas alors qu'ils sont tous
branchés ?
R : 1. Vérifiez que les cordons d'alimentation ne sont pas endommagés.
2. Assurez-vous que les cordons d’alimentation sont bien insérés dans les
prises disponibles avec un courant stable.
3. Assurez-vous que la fiche d'alimentation et la consommation de courant sont
conformes aux normes de votre pays.
Q : Le cordon d'alimentation secteur de mon chariot ou des composants du
chariot sont endommagés. Sont-ils couverts par la garantie ?
R : Nous proposons une garantie de 10 ans sur le chariot et les plateaux, et une
garantie de 5 ans sur les composants électriques.
Q : Comment savoir si mes appareils dépassent le courant autorisé ?
R : Demandez à un électricien qualifié de vérifier la consommation électrique de
vos appareils. Effectuez le test avec des appareils branchés et des batteries
déchargées.
Q : Lorsque je branche l'appareil, le disjoncteur saute. Quel est le
problème ?
R : Il est possible que d'autres équipements ou appareils partagent le même circuit,
ce qui provoque une surcharge. Demandez à un électricien qualifié de vérifier
qu'une puissance adéquate est disponible dans le circuit.
10
Page 57

Spécifications
Modèle
Capacité
Appareils pris en charge
Sorties AUX
Indicateurs d'état DEL
Type de recharge
Spécifications
d'alimentation
Sécurité
Roues
Recharge intelligente
Température de
fonctionnement
%HR de fonctionnement
Température de
stockage
%HR stockage
C20i
Jusqu'à 20 appareils (2 étagères, 10 socles par
étagère)
Ordinateurs portables/Chromebooks/Tablettes
jusqu'à 16"
2
DEL d'état (x2) : Bleu fixe lors de la recharge
Recharge secteur intelligente
Entrée CA : 220~240 V, 50/60 Hz, 8 A
Multiprise (x20 ports) : 220~240 V, 50/60 Hz, 6 A
Sortie (2 ports) : 220~240 V, 50/60 Hz, 2A
Portes avant : Mécanisme de verrouillage 3
points avec trou de cadenas
Portes arrière : Mécanisme de verrouillage 3
points avec trou de cadenas
[Remarque] Le cadenas n'est pas inclus dans
l'emballage
Quatre roues 5", dont deux verrouillables
Oui
0 à 30°C
10 à 90 %
-40 à 60°C
5 à 95 %
Garantie
Dimensions du chariot
(L x l x P)
Dimensions des fentes
Pour 16 socles (L x l x P)
Chariot et plateaux : 10 ans
Composants électriques : 5 ans
68,8 (L) x 63,7 (l) x 106 (P) mm
27,09 (L) x 25,08 (l) x 41,73 (P)"
33 (L) x 4,375 (l) x 41,9 (P) cm
13 (L) x 1,722 (l) x 16,5 (P)"
11
Page 58

Dimensions des fentes
Pour 20 socles (H x L x
P)
Poids sans appareils
33 (L) x 3,615 (l) x 41,9 (P) cm
13 (L) x 1,423 (l) x 16,5 (P)"
146,83 lbs (66,6 kg)
Réparations et garantie
Tous nos produits sont proposés avec une assurance qualité et sécurité.
Pour les clients d'Amérique du Nord, consultez le site d'assistance AVer USA pour
des informations complètes RMA, de garantie et de réparations :
http://averuesa.com/classroom-technology/support/
Pour les cli
d'assistance global d'AVer : http://www.aver.com/
ents se trouvant hors de l'Amérique du Nord, consultez le site
12
Page 59

AVERTISSEMENT
pp
SUIVEZ TOUJOURS LES CONSIGNES DE SÉCURITÉ
NE JAMAIS grimper,
s’asseoir ous’appuyersur
e chariot C20i.
NE LAISSEZ PERSONNE s'asseoir, se tenir debout sur ou grimper sur
SEULS LESADULTES
peuventdéplacer le
chariot C20i.
Pour réduire les
risques d’électrocution,
utilisez UNIQUEMENT
en intérieur.
le chariot C20i.
NE SOULEVEZ PAS le chariot C20i.
NE BLOQUEZ PAS les trous de ventilation utilisés pour la circulation
d'air.
NE SURCHARGEZ PAS les étagères du C20i avec des objets. (charge
maximale de
maximale pa
la plateforme de travail = 45 kg / 99,20 lbs ; char
r étagère coulissante = 22,7 kg / 50,04 lb
s)
ge
Avant de déplacer le chariot C20i, débranchez l'alimentation de la prise
murale.
Lors du déplacement du chariot C20i, assurez-vous que le cordon
d’alimentation est fixé et bien envelo
é.
13
Page 60

Page 61

Contenuto della confezione
La confezione contiene i seguenti articoli. Verificare che siano tutti presenti prima
di iniziare a usare il dispositivo.
Manuale
dell
’utente
Dimensioni
)
”
3
7
.
1
4
(
m
c
6
0
1
Carrello C20i
68.8cm(27.09”) 63.7cm(25.08”)
Cavo di
alimentazione
1
Page 62

Schema
1
1
3
2
78
4
5
6
9
Parte frontale Lato Indietro
1. Piattaforma di lavoro
2. Impugnatura
3. Fori di ventilazione
4. Blocco porta
5. Ruota orientabile da
”, con blocco
5
6. Ruote orientabili da 5
7. Uscite ausiliarie* 14. Fori di ventilazione
8. Pannello LED 15. Blocco porta
9. Punti di montaggio
16. Gancio di sicurezza
per Access point
supporto (opzionale)
10. Staffe avvolgi-cavo di
”
alimentazione
11. Porta USB per
aggiornamento
firmware
12. Interruttore di
alimentazione
13. Ingresso di
alimentazione
* Il tipo di presa ausiliaria può variare a seconda del paese.
2
Page 63

Spie LED
LED Stato
1. Verde fisso: ON
2. Arancione lampeggiante:
Alimentazione x1
Sovraccarico di corrente
3. Rosso lampeggiante:
Guasto anomalo (Contattare
assistenza)
Fissare il carrello
Stato dispositivo
1. OFF: Nessun caricamento
x2
2. Blu fisso: Caricamento
3
Page 64

Blocco porta
[Nota] Le dimensioni della maniglia della porta anteriore e della porta posteriore
sono limitate a Ø8 mm (0.31
”).
4
Page 65

Gestione cavi
[Nota]
1. Consigliamo di usare fascette (opzionali) per fissare e gestire i cavi.
2. Consigliamo di prevedere 2 persone per eseguire il cablaggio in modo efficace.
Indietro
Estremità CC
1. Aprire la porta posteriore.
2. Collocare l
3. Passare l
servendosi dello spazio fornito.
’adattatore nello scomparto adattatore singolo.
’estremità CC del cavo adattatore sulla parte anteriore del carrello,
Estremità CA
5
Page 66

4. Seguire l’ordine della seguente immagine, per collegare l’estremità del cavo
CA alla presa di corrente CA corrispondente.
5. Fissare i cavi con una fascetta o un dispositivo di fissaggio (non fornito in
dotazione).
6
Page 67

Parte frontale
1. Aprire le porte anteriori
180°
2. Rilasciare l’elemento di blocco dello spazio divisorio.
3. Inoltrare il cavo, estremità CC in linea con la scanalatura a V.
7
Page 68

4. Far scattare l’elemento di blocco per fissare saldamente il cavo, estremità CC.
5. Collocare il dispositivo mobile nell
’alloggiamento.
6. Collocare il connettore CC al dispositivo mobile.
Carrello di caricamento
Presa a muro
Collegare il cavo di alimentazione al
1
carrello C20i e alla presa di corrente
Impostare l’interruttore di alimentazione
2
su “ON” per avviare il caricamento
[Nota]
1. Portare l
’interruttore di alimentazione in posizione OFF prima di collegare il
carrello a una presa di corrente.
2. Il tipo di presa ausiliaria può variare a seconda del paese.
8
Page 69

Timer intelligente
20 alloggiamenti per C20i sono suddivisi in 2 zone (10 alloggiamenti per ogni
zona).
Zona 1
Zona 2
Firmware
Sarà possibile aggiornare il firmware dalla porta USB esterna di tipo A servendosi
di una normale chiavetta USB. Attenersi ai seguenti passaggi per eseguire
l
’aggiornamento del Firmware.
1. Prima di eseguire l’aggiornamento, verificare che la chiavetta USB sia
formattata con filesystem FAT o FAT32
2. Copiare il file binario del Firmware ( *.bin) su una chiavetta USB
3. Impostare il C20i su OFF quindi inserire la chiavetta USB
4. Impostare il C20i su ON e l’aggiornamento del firmware si avvierà
automaticamente. Il LED di alimentazione presenta le varie modalità, e
visualizza i seguenti colori: ROSSO AMBRA VERDE ROSSO.
[Nota] I LED di stato sono impostati su OFF durante il processo di
aggiornamento.
9
Page 70

5. Al termine dell’aggiornamento Firmware, il LED di alimentazione si illumina di
ROSSO AMBRA VERDE ROSSO in modalità ciclica, ma i LED di stato
di caricamento vengono impostati su ON.
6. Impostare il dispositivo C20i su OFF, togliere la chiavetta USB.
[Nota]
Il dispositivo C20i supporta le chiavette USB per i seguenti criteri.
1. Filesystem FAT o FAT32 (ove necessario, formattare).
2. Capacità massima 32GB.
3. Interfaccia USB 2.0 ad alta velocità.
Guida alla risoluzione dei problemi
D: Perché tutti i miei dispositivi sono collegati ma non si stanno caricando?
R: 1. Verificare che i cavi di alimentazione siano esenti da danni.
2. Verificare che i cavi di alimentazione siano saldamente inseriti nella presa
disponibile, con un flusso di corrente stabile.
3. Verificare che la presa di alimentazione e il consumo attuale siano in linea
con gli standard e le specifiche del paese.
D: Il cavo di alimentazione del carrello o le componenti del carrello sono
danneggiati. Sono coperti dalla garanzia?
R: Forniamo una garanzia di 10 anni sul carrello e una garanzia di 5 anni sulle
componenti elettriche.
D: Come faccio a sapere se i miei dispositivi superano il quantitativo di
corrente assegnata,
R: Rivolgersi a un elettricista qualificato per verificare il consumo di corrente dei
dispositivi. Eseguire il test con i dispositivi installati e le batterie scariche.
D: Quando collego il dispositivo fa saltare l’interruttore. Cosa c’è che non
va?
R: Forse della strumentazione o altri dispositivi condividono lo stesso circuito che
sta causando il sovraccarico. Rivolgersi a un elettricista qualificato che controlli
la presenza di corrente del tipo adeguato nel circuito.
10
Page 71

Specifiche tecniche
Modello C20i
Capacità
Dispositivi supportati
Fino a 20 dispositivi (2 ripiani, 10 alloggiamenti
per ripiano)
Laptop/Chromebook/Tablet fino a 16”
Uscite AUX
LED Indicatori di stato
Tipo di caricamento
Specifiche tecniche di
alimentazione
Sicurezza
Ruote orientabili
Caricamento intelligente
Temperatura di
funzionamento
Umidità relativa di
funzionamento %
Temperatura di
conservazione
Umidità relativa di
conservazione %
2
LED di stato (x2): Blu fisso in fase di caricamento
Caricamento intelligente CA
INGRESSO CA: 220~240V, 50/60Hz,8A
Striscia di alimentazione (x20 porte): 220~240V,
50/60Hz,6A
Uscita (2 porte): 220~240V, 50/60Hz, 2A
Porte anteriori: Meccanismo di blocco a 3 punti
con foro lucchetto
Porte posteriori: Meccanismo di blocco a 3 punti
con foro lucchetto
[Nota] Il lucchetto non è fornito in dotazione nella
confezione
Quattro ruote orientabili da 5”: due possono
essere bloccate
Sì
o
~30oC
0
10%~90%
o
C~60oC
-40
5%~95%
Garanzia
Dimensioni del carrello
(L x P x H)
Garanzia di 10 anni sul carrello
Garanzia di 5 anni sulle componenti elettriche
68.8 (L) x 63.7 (P) x 106 (H)cm
27.09”(L) x 25.08”(P) x 41.73”(H)
11
Page 72

Dimensioni
dell’alloggiamento
per 16 alloggiamenti
(H x L x P)
Dimensioni
dell’alloggiamento
per 20 alloggiamenti (H x
L x P)
Peso senza dispositivi
33(H) x 4.375(L) x 41.9(P)cm
13”(H) x 1.722”(L) x 16.5”(P)
33(H) x 3.615(L) x 41.9(P)cm
13”(H) x 1.423”(L) x 16.5”(P)
146.83lbs (66.6kg)
Assistenza e Garanzia
Tutti i nostri prodotti vengono forniti in dotazione con una garanzia a livello di
qualità e di sicurezza.
Per i clienti con sede in America del Nord invitiamo a visitare il sito di assistenza
USA per informazioni complete a livello di resi, garanzia e assistenza.
http://averuesa.com/classroom-technology/support/
Per i clienti al di fuori dell
AVer Global: http://www.aver.com/
’America del Nord invitiamo a visitare il sito di assistenza
12
Page 73

ATTENZIONE
ATTENERSI SEMPRE ALLE PRECAUZIONI DI SICUREZZA
Non scalare,
sedersi ostare
MAI sulcarrello C201.
SOLO GLI ADULTI
dovrebbero spostare
il carrello C20i.
NON permettere a nessuno di sedersi, stare o scalare il carrello C20i.
NON sollevare il carrello C20i.
NON bloccare i fori di ventilazione usati per la circolazione dell’aria.
NON caricare eccessivamente di oggetti i ripiani del carrello C20i. (carico
Per ridurre il rischio di
scosse elettriche,
usare SOLO all’interno.
massimo della piattaforma di lavoro = 45kg / 99.20lbs; caricamento
massimo di ogni ripiano a estrazione = 22.7kg / 50.04lbs)
Prima di spostare il carrello C20i, scollegare l’alimentazione dalla presa a
parete.
In fase di spostamento del carrello C20i, verificare che il cavo di
alimentazione sia saldamente fissato e avvolto in modo serrato.
13
Page 74

Page 75

Page 76

v. 01
 Loading...