

Page 1
A
V
®
AVerMedia
®
AVerVision300AF
User Manual
English Deutsch Français
Italiano Español Česky
erMedia
Digital Document Camera
Page 2

P/N 300AACG2
Made in Taiwan
Page 3
FCC NOTICE (Class A)
This device complies with Part 15 of the FCC
Rules. Operation is subject to the following two
conditions: (1) this device may not cause harmful
interference received, including interference that may cause
undesired operation.
NOTE- This equipment has been tested and found to comply
with the limits for a Class A digital device, pursuant to Part 15 of
the FCC Rules. These limits are designed to provide
reasonable protection against harmful interference when the
equipment is operated in a commercial environment. This
equipment generates, uses, and can radiate radio frequency
energy and, if not installed and used in accordance with the
instructions, may cause harmful interference to radio
communications. Operation of this equipment in a residential
area is likely to cause harmful interference in which case the
user will be required to correct the interference at his own
expense.
CAUTION ON MODIFICATIONS
To comply with the limits for the Class A digital device,
pursuant to Part 15 of the FCC Rules, this device must be
installed in computer equipment certified to comply with the
Class A limits. All cables used to connect the computer and
peripherals must be shielded and grounded. Operation with
non-certified computers or non-shielded cables may result in
interference to radio or television reception.
Changes and modifications not expressly approved by the
manufacturer could void the user’s authority to operate this
equipment.
European Community Compliance Statement
(Class A)
States relating to electromagnetic compatibility.
Warning - This is a Class A product. In a domestic
environment this product may cause radio interference in
which case the user may be required to take adequate
measures to correct this interference.
DISCLAIMER
No warranty or representation, either expressed or implied, is
made with respect to the contents of this documentation, its
quality, performance, merchantability, or fitness for a particular
purpose. Information presented in this documentation has been
carefully checked for reliability; however, no responsibility is
interference, and (2) this device must accept any
This product is conformity with the protection
requirements of EU Council Directives 89/336/EEC
amended by 92/31/EEC on the laws of the Member
English Deutsch Français
Italiano Español Česky
Page 4
assumed for inaccuracies. The information contained in this
documentation is subject to change without notice.
In no event will AVerMedia be liable for direct, indirect, special,
incidental, or consequential damages arising out of the use or
inability to use this product or documentation, even if advised of
the possibility of such damages.
TRADEMARKS
AVerMedia is registered trademarks of AVerMedia
TECHNOLOGIES, Inc. IBM PC is a registered trademark of
International Business Machines Corporation. Macintosh is a
registered trademark of Apple Computer, Inc. Microsoft is a
registered trademark and Windows is a trademark of Microsoft
Corporation. All other products or corporate names mentioned
in this documentation are for identification and explanation
purposes only, and may be trademarks or registered
trademarks of their respective owners.
COPYRIGHT
© 2006 by AVerMedia TECHNOLOGIES, Inc. All rights
reserved. No part of this publication may be reproduced,
transmitted, transcribed, stored in a retrieval system, or
translated into any language in any form by any means without
the written permission of AVerMedia TECHNOLOGIES, Inc.
THE MARK OF CROSSED-OUT WHEELED
BIN INDICATES THAT THIS PRODUCT MUST
NOT BE DISPOSED OF WITH YOUR OTHER
HOUSEHOLD WASTE. INSTEAD, YOU NEED
TO DISPOSE OF THE WASTE EQUIPMENT
BY HANDING IT OVER TO A DESIGNATED
COLLECTION POINT FOR THE RECYCLING
OF WASTE ELECTRICAL AND ELECTRONIC
EQUIPMENT. FOR MORE INFORMATION
ABOUT WHERE TO DROP OFF YOUR
WASTE EQUIPMENT FOR RECYCLING,
PLEASE CONTACT YOUR HOUSEHOLD
WASTE DISPOSAL SERVICE OR THE SHOP
WHERE YOU PURCHASED THE PRODUCT.
Page 5

TTaabbllee ooff CCoonntteennttss
Introduction.......................................................E-1
Package Contents ............................................E-1
Optional Accessories....................................... E-2
AVerVision300AF Parts....................................E-3
Technical Specifications.................................. E-4
Making the Connections..................................E-5
Connecting the Power Adapter................................E-6
Connecting a TV......................................................E-6
Connecting a VGA, Mac Display Monitor or
LCD/DLP Projector..................................................E-
Connecting a Computer via USB Connection..........E-8
Installing the Optional Light Box ..............................E-9
Connecting to a Microscope ....................................E-9
Setting Up AVerVision300AF .........................E-10
Camera Head ........................................................E-10
Mechanical Arm.....................................................E-10
LED Light Module.................................................. E-11
Anti-glare Sheet..................................................... E-11
Using the Infrared Remote Control ..............E-12
Touch Button Control Panel.......................... E-14
LED Panel........................................................ E-15
Timer Function................................................E-16
Transferring the captured image from
AVerVision300AF to Computer .....................E-
OSD Navigation Tree...................................... E-17
Menu Functions..............................................E-18
RS-232C Diagram Connection ......................E-20
RS-232C Cable Spec ......................................E-21
RS-232C Transmission Spec.........................E-21
RS-232C Communication Format .................E-21
RS-232C Command Table.............................. E-21
Troubleshooting .............................................E-22
Limited Warranty ............................................E-23
16
English Deutsch Français
7
Italiano Español Česky
Page 6

Page 7
A
V
®
IInnttrroodduuccttiioonn
Thank you for purchasing
the AVerMedia®
AVerVision300AF. This
document camera
displays any documents,
negatives, transparencies
and 3D objects onto a TV,
LCD or DLP projector
making presentations a
snap.
AVerVision300AF is an
ideal presentation tool for
business, academic,
medical and the scientific
community.
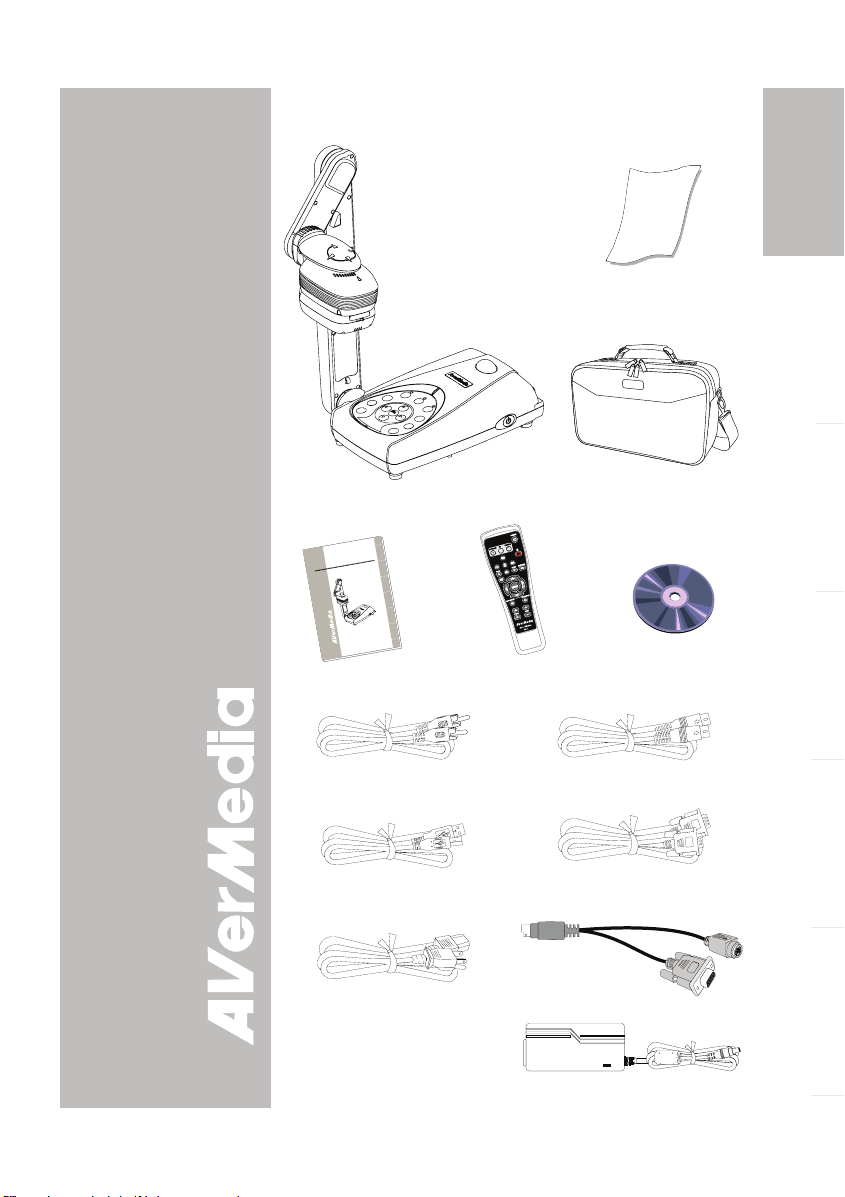
PPaacckkaaggee CCoonntteenntts
AVerMedia® AVerVision300AF
h
s
i
l
g
n
E
F
A
0
0
3
n
o
si
i
V
r
e
®
V
A
h
a
i
d
e
c
M
r
e
V
A
User Manual
s
t
l
a
u
n
u
a
M
r
eD
se
U
s
i
a
ç
n
a
r
F
o
n
a
i
l
a
t
I
l
o
ñ
a
p
s
E
y
k
s
e
ČČ
a
i
ed
M
er
a
r
me
a
C
t
n
me
u
c
o
D
l
a
t
i
g
i
D
Remote Control
(batteries included)
s
English Deutsch Français
Anti-glare Sheet
Carrying Bag
Driver CD
Italiano Español Česky
RCA Cable
USB Cable
S-Video Cable
Computer Extension cable
(VGA Cable)
Power Cord
* The power cord will vary
S-Video/RS-232 Cable
depending on the standard
power outlet of the country
where it is sold.
Power Adapter
E-1
Page 8
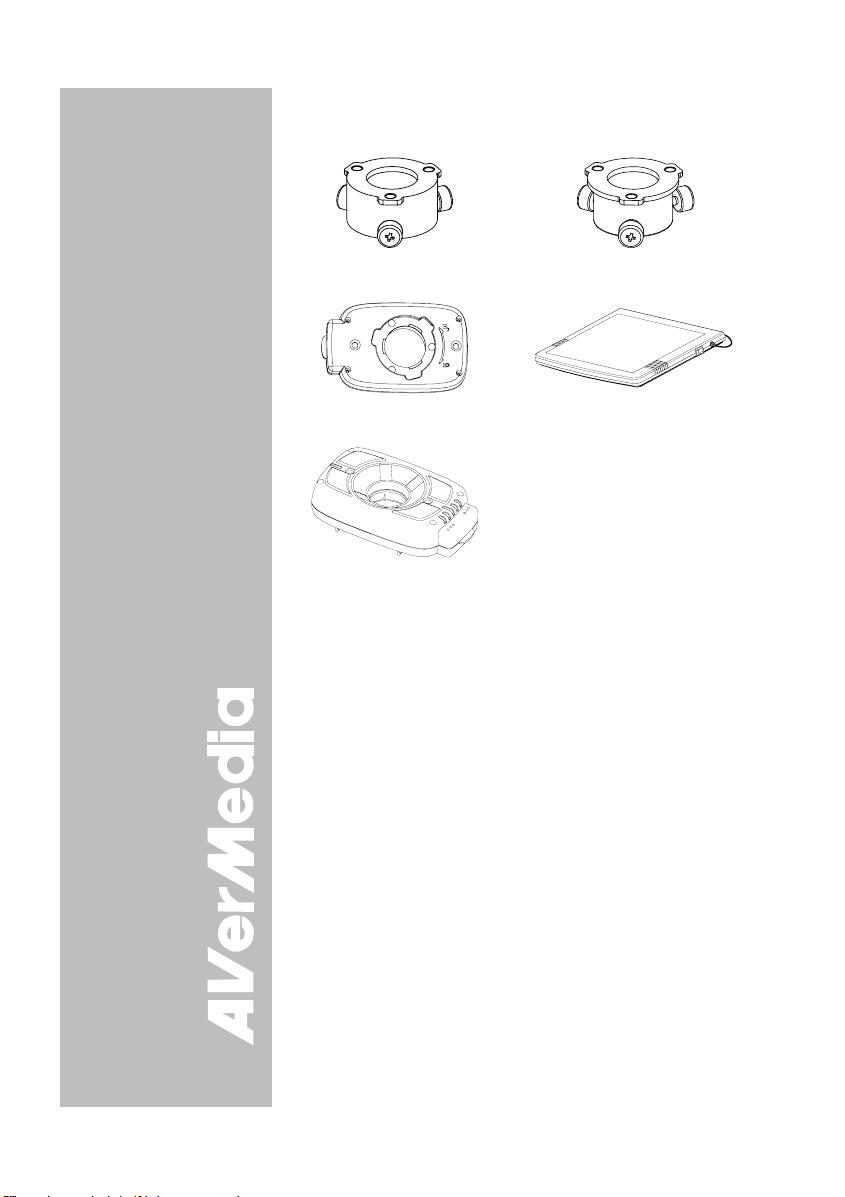
OOppttiioonnaall AAcccceessssoorriieess
34mm Microscopic Adapter
Microscopic Coupler
LED Lamp with Laser
Positioning Pointer
28mm Microscopic Adapter
Light Box
E-2
Page 9
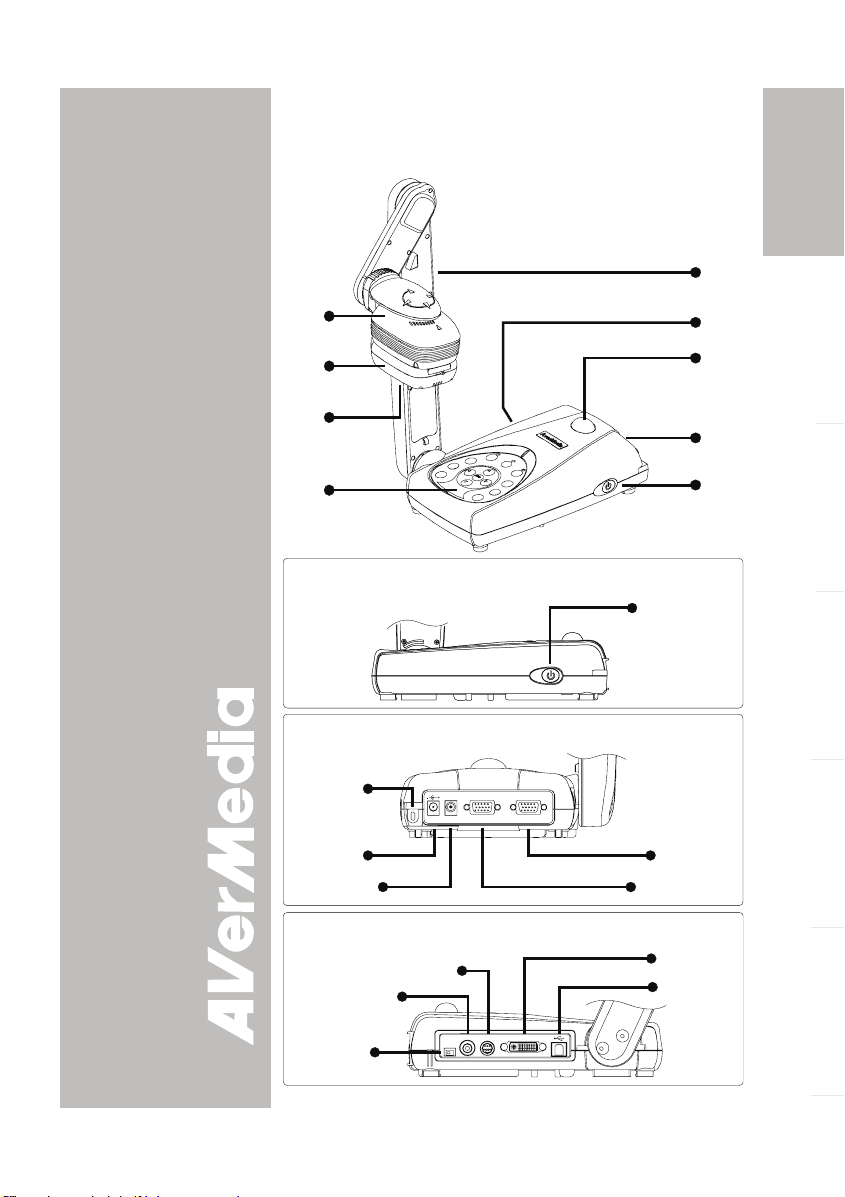
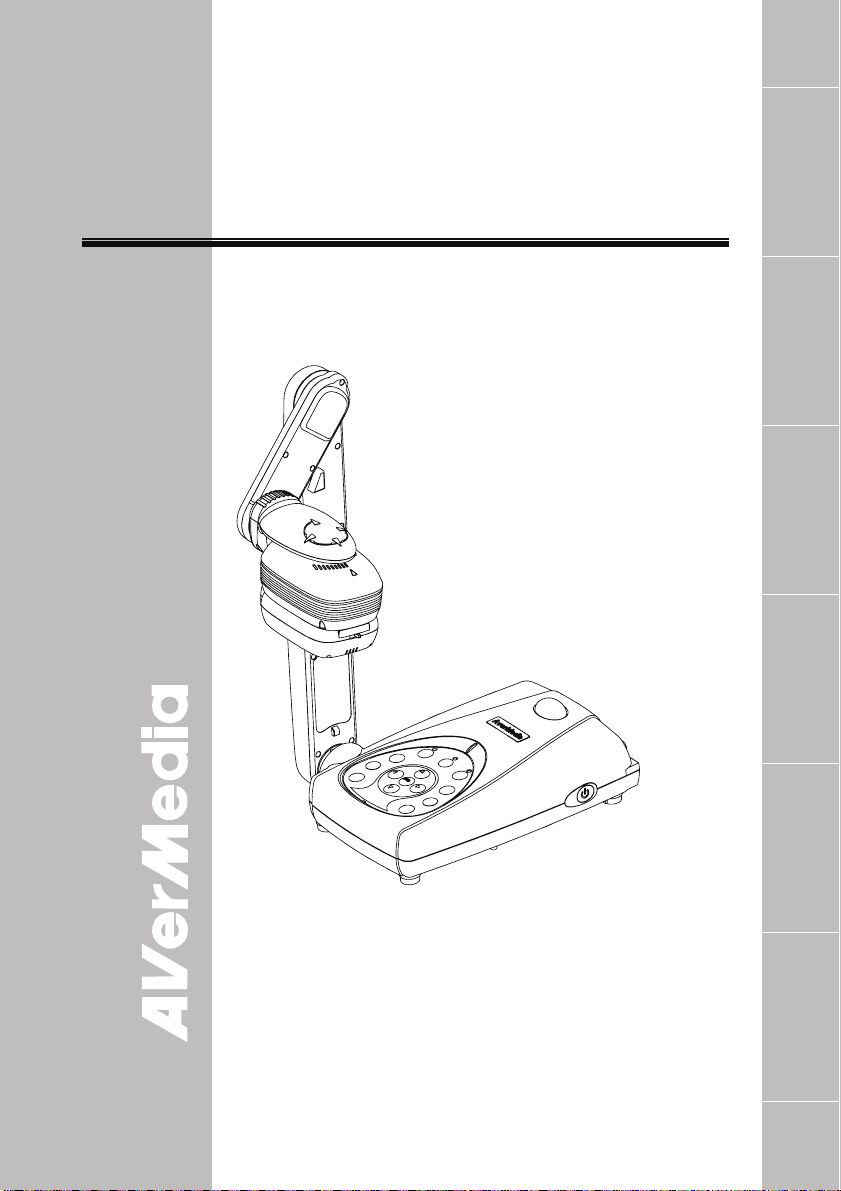
(1) Camera head
(2) LED light module
(3) Camera lens
(4) Control panel
(5) Arm
(6) Left panel
(7) IR sensor
(8) Rear panel
(9) Right panel
(10) Power button
(11) Antitheft Slot
(12) DC 12V port
(13) Light box power
port
(14) VGA output port
(15) VGA input port
(16) S-Video output port
(17) Composite video
output port
(18) TV/RGB display
switch
(19) DVI output port
(20) USB port
AAVVeerrVViissiioonn330000AAFF PPaarrttss
The illustrations below identify the parts of AVerVision300AF.
(1)
(2)
(3)
(4)
Right Panel
(10)
Rear Panel
(11)
LIGHT
BOX
VGAOUTVGAINDC12V
English Deutsch Français
(5)
(6)
(7)
(8)
(9)
Italiano Español Česky
Left Panel
(17)
(18)
E-3
(16)
VIDEO S-VIDEODVI
TV RGB
(15)(13)
(14)(12)
(19)
(20)
Page 10
TTeecchhnniiccaall SSppeecciiffiiccaattiioonnss
Image
Sensor 1/2” progress scan CMOS
Total Pixels 3.2 mega pixel
Frame Rate 24 fps (Max.)
White Balance Auto / Manual
Exposure Auto / Manual / Flicker / Night View
Image Mode Text / Graphics / High Frame
Effect Color / B/W / Negative; Reverse; Mirror
Analog RGB Output
S-Video, Composite
Video Output
Image Capture Up to 80 Frames
Built-In Memory 32MB NAND Flash Memory
XGA: 60 Hz, SVGA: 60 Hz, VGA: 60 Hz
NTSC or PAL
Optics
Lens F3.0; Auto Focusing
Shooting Area 320mm x 240mm (Max.);
Zooming AVERZOOM: 2x, Digital: 8x
Power
Power Source DC 12V, 1.2~ 4A, 100-240V, 50-60 Hz
Consumption 7.44 Watts (Lamp off); 10.68 Watts (Lamp on)
Lighting
Lamp Type LED lamp
Input/Output
VGA Input 15-Pins D-sub (VGA)
VGA Output 15-Pins D-sub (VGA)
DVI Output DVI type
S-Video Mini-DIN Jack
Composite Video RCA Jack
USB USB2.0
DC 6V Output Power Jack
Dimension
Operating 424mm x 173.4mm x 330mm
Folded 365mm x 173.4mm x 95.85mm
Weight 2 kg (about 4.4 lb)
AVerMedia
E-4
Page 11
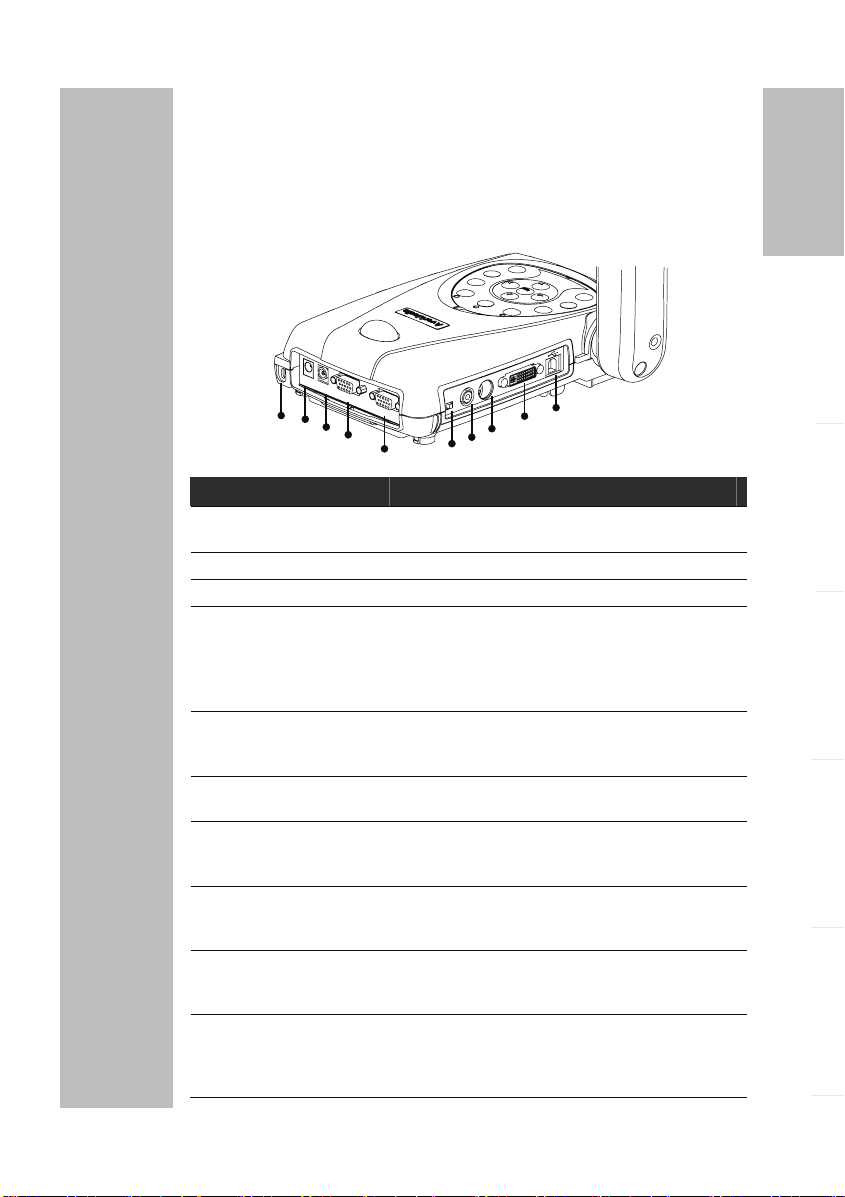
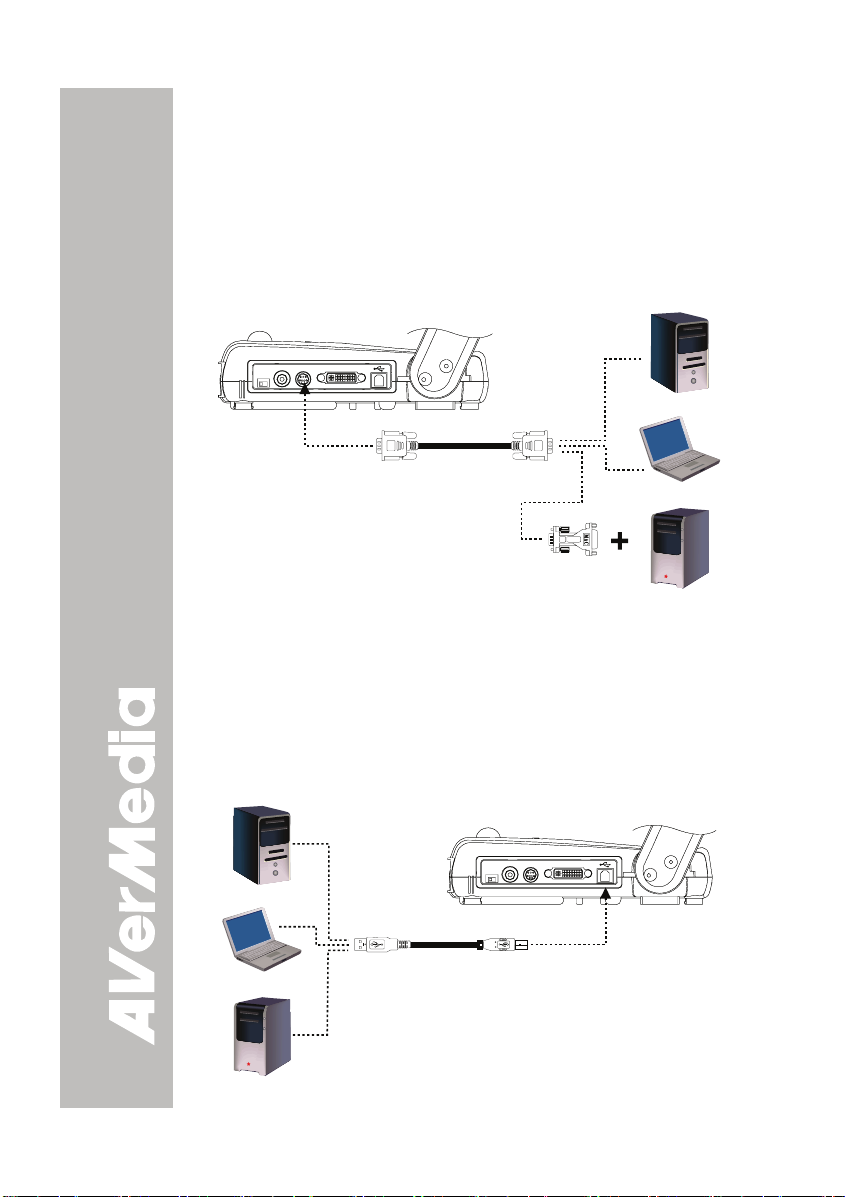
MMaakkiinngg tthhee CCoonnnneeccttiioonnss
The ports on the back and side panel of the AVerVision300AF enable
you to connect the unit to a computer, graphics display monitor or
LCD/DLP projector, TV or other device. Illustrated below are the ports
that are located at the back and side panel of the AVerVision300AF
with their corresponding labels.
I
V
D
O
E
D
(6)
I
V
-
S
O
E
D
I
V
B
G
R
V
T
(10)
(9)
(8)
(7)
(1)
(2)
D
C
12
V
L
I
G
H
T
BO
X
V
G
A
I
N
V
G
A
O
U
T
(3)
(4)
(5)
Port Description
(1) Antitheft Slot Attach a Kensington compatible security lock or
(2) DC 12V (input) Connect the power adapter into this port.
(3) Light Box Port Plug the optional light box into this port.
(4) VGA IN Port Input RGB signal from a computer or other
(5) VGA OUT Port Output RGB signal from the camera, VGA input
(6) TV/RGB Switch Set to select the between RGB (VGA Out) or TV
(7) VIDEO Port
(RCA/Composite)
(8) S-VIDEO Port Output the signal from the camera or the
(9) DVI Port Output video signal from the camera, or the
(10) USB Port Use AVerVision300AF as a USB Camera or
AVerMedia
antitheft device.
sources and actively pass it through to the VGA
output port only.
Connect this port to the VGA output port of the
computer.
port, or the captured images from the memory on
a VGA/Mac monitor or LCD/DLP projector.
(Composite Video/S-Video Out) display output.
Output the signal from the camera or the
captured images from the built-in memory on TV
or video equipment.
captured images from the memory on TV or
video equipment.
captured images from the memory on an LCD
monitor or LCD/DLP projector with DVI interface.
Image Download allowing you to transfer the
captured images to and from the
AVerVision300AF built-in memory and PC.
English Deutsch Français
Italiano Español Česky
E-5
Page 12
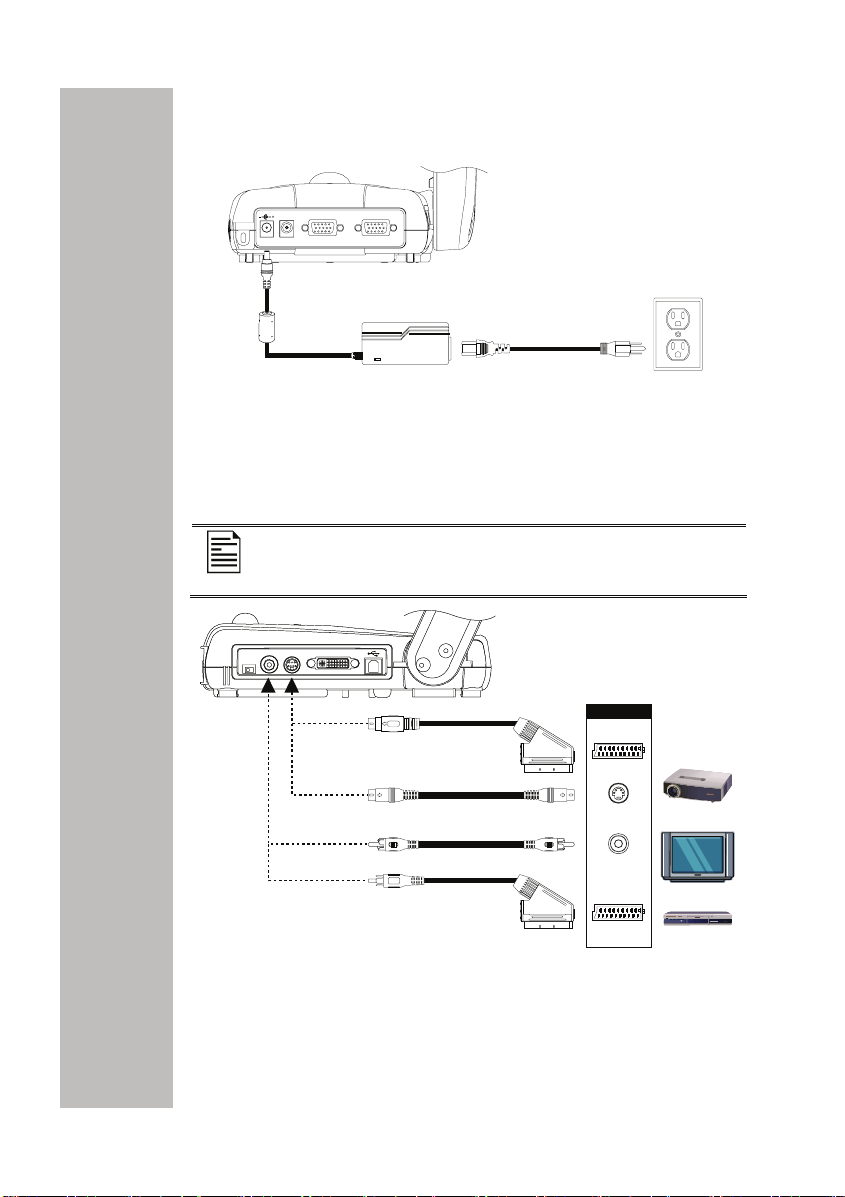
CCoonnnneeccttiinngg tthhee PPoowweerr AAddaapptteerr
Connect the power adapter to a standard 100V~240V AC power source.
LIGHT
BOX
VGAOUTVGAINDC12V
Wall outlet
Power adapter
Power cord
CCoonnnneeccttiinngg aa TTVV
Locate the video, s-video or SCART RGB input port of the TV or Video
equipment (i.e., VCR) to record your presentation on a videotape. If you
are not sure, please refer to the user manual of the TV or Video
equipment.
- Make sure the TV/RBG switch is set to TV.
- For better video quality, we strongly suggest using
s-video connection.
VIDEO S-VIDEO DVI
VIDEO S-VIDEO DVI
TV RGB
TV RGB
AVerMedia
INPUT
S-Video to SCART cable
(not supplied)
S-Video cable
RCA cable
RCA to SCART cable
(not supplied)
SCART
S-VIDEO
VIDEO
SCART
Projector
Television
VCR
E-6
Page 13
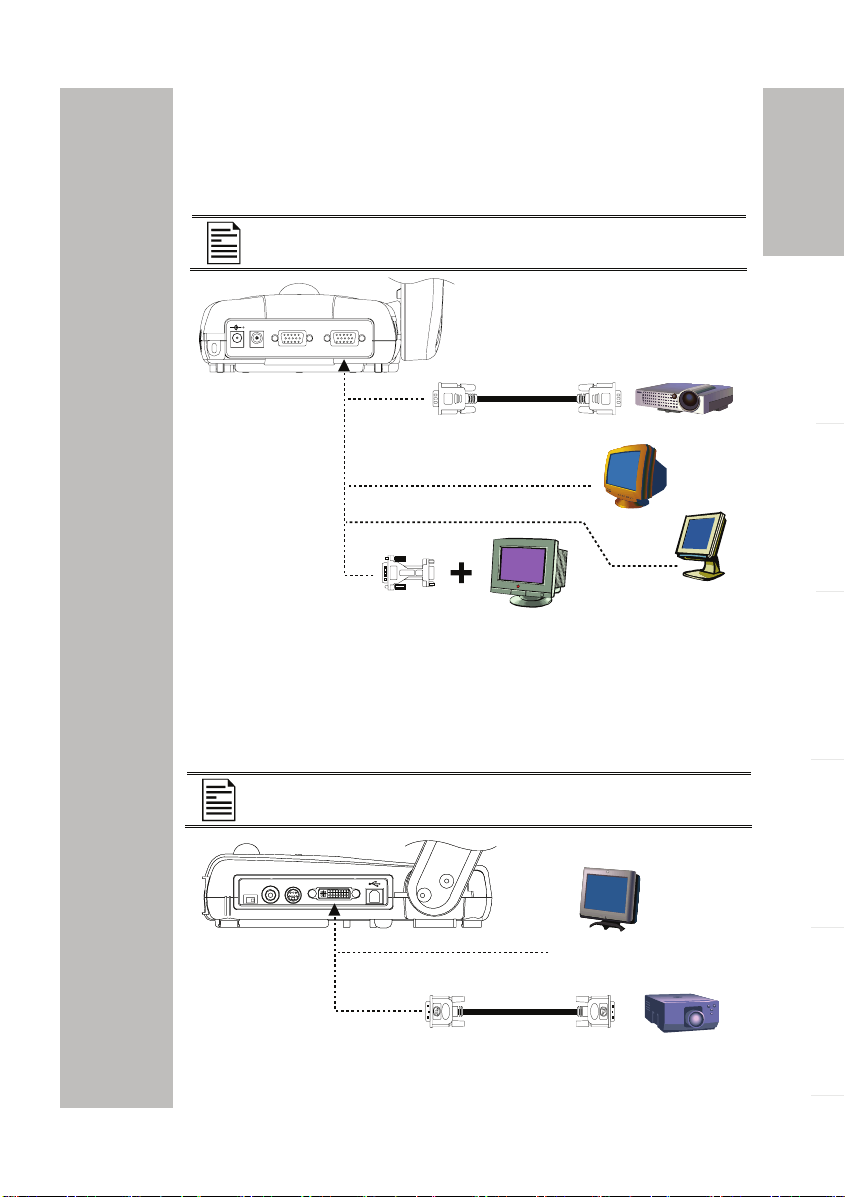
CCoonnnneeccttiinngg aa VVGGAA,, MMaacc DDiissppllaayy
MMoonniittoorr oorr LLCCDD//DDLLPP PPrroojjeeccttoorr
Locate the RGB (VGA) input port of the display device. If you are not
sure, please refer to the user manual of the device.
Make sure the TV/RBG switch is set to RGB.
LIGHT
BOX
VGAOUTVGA INDC12V
Monitor Adapter
(not supplied)
RGB (VGA) cable
(not supplied)
MAC
MAC monitor
LCD/DLP projector
CRT monitor
LCD monitor
CCoonnnneeccttiinngg aa VVGGAA MMoonniittoorr oorr LLCCDD//DDLLPP
PPrroojjeeccttoorr wwiitthh DDVVII iinntteerrffaaccee
Locate the DVI input port of the display device. If you are not sure,
please refer to the user manual of the device.
English Deutsch Français
Italiano Español Česky
AVerMedia
Make sure the TV/RBG switch is set to RGB.
VIDEO S-VIDEO DVI
VIDEO S-VIDEO DVI
TV RGB
TV RGB
with DVI interface
DVI cable
(not supplied)
E-7
LCD Monitor
LCD/DLP projector
with DVI interface
Page 14
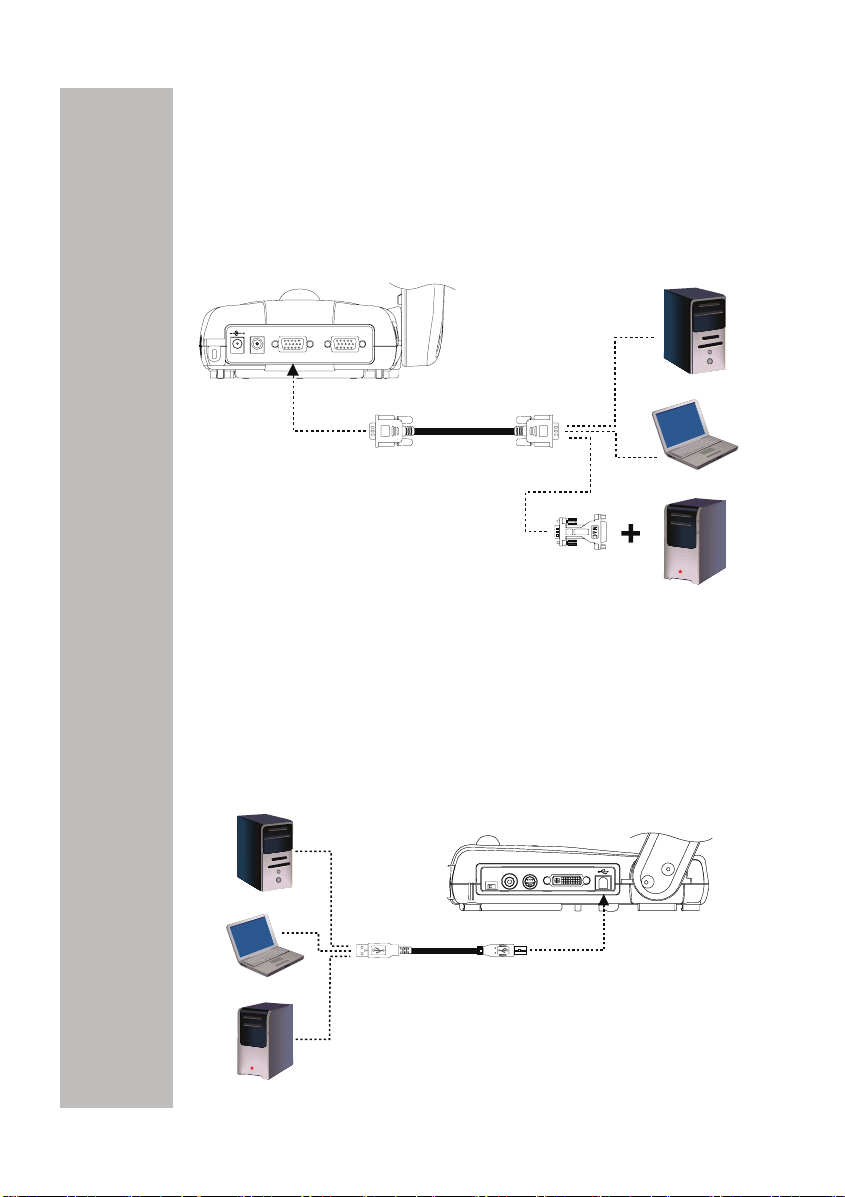
CCoonnnneeccttiinngg aann IIBBMM CCoommppaattiibbllee PPCC oorr
MMaacciinnttoosshh CCoommppuutteer
r
Locate the RGB video output port of the computer or laptop to display
your PC presentation on screen. AVerVision300AF supports active
pass-thru connectivity, wherein the video signal from the VGA input port
is continuously streamed to VGA output port and displayed on screen
even when the AVerVision300AF is turned off.
LIGHT
BOX
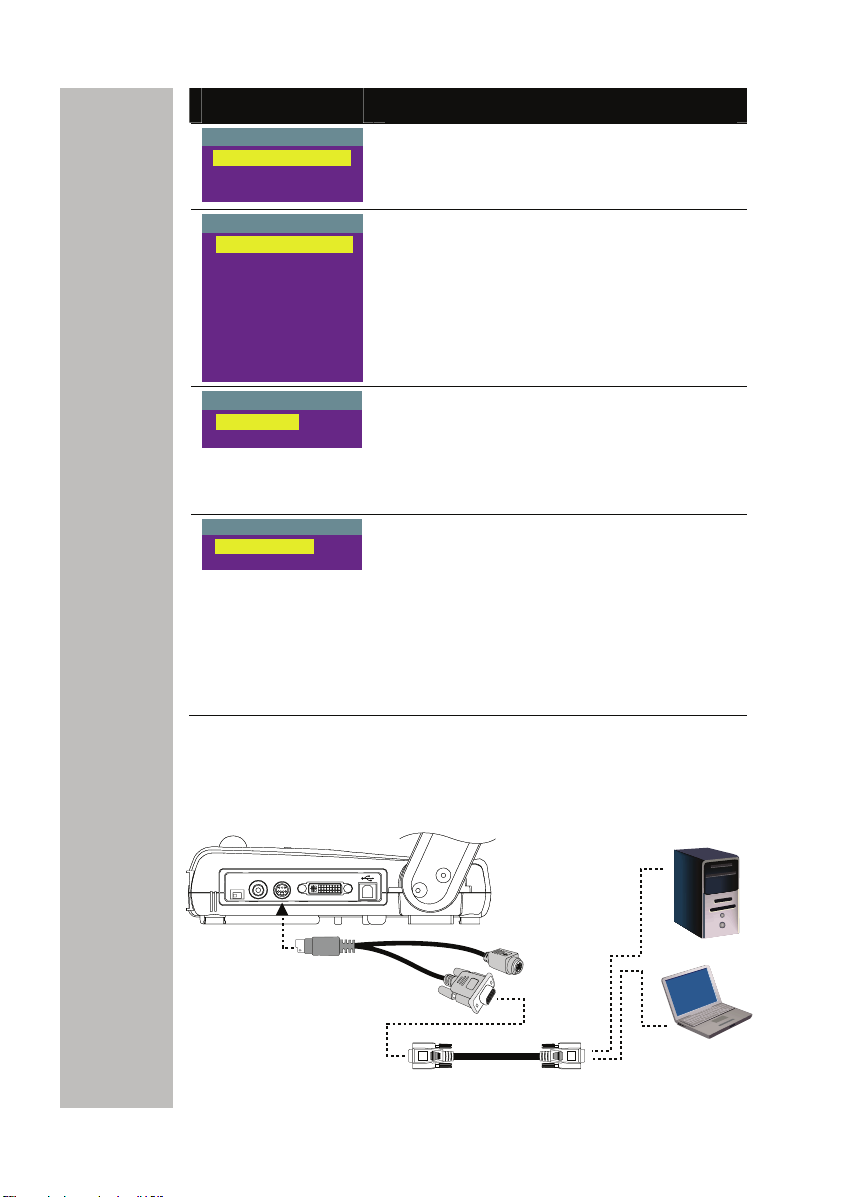
CCoonnnneeccttiinngg aa CCoommppuutteerr vviiaa UUSSBB
CCoonnnneeccttiioonn
VGAOUTVGAINDC12V
Computer extension cable
(VGA cable)
Monitor Adapter
(not supplied)
Computer
Laptop
MAC
Locate the USB port of the computer or laptop. This enables you to use
AVerVision300AF as a USB Camera or to transfer the captured images
from the built-in memory to your computer. Also see “Transfer Image
from AVerVision300AF to PC” and refer to the bundled software user
guide.
VIDEO S-VIDEO DVI
VIDEO S-VIDEO DVI
TV RGB
TV RGB
Computer
USB cable
AVerMedia
Laptop
MAC
E-8
Page 15
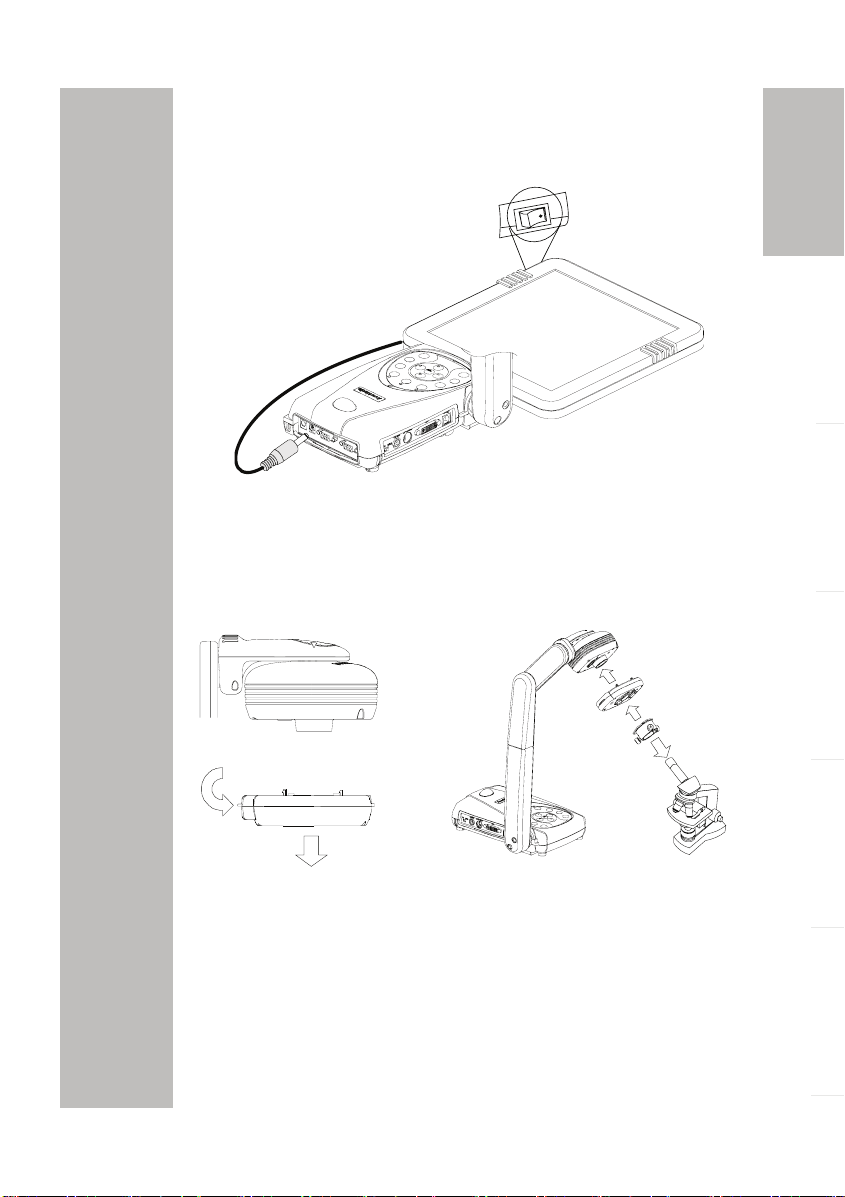
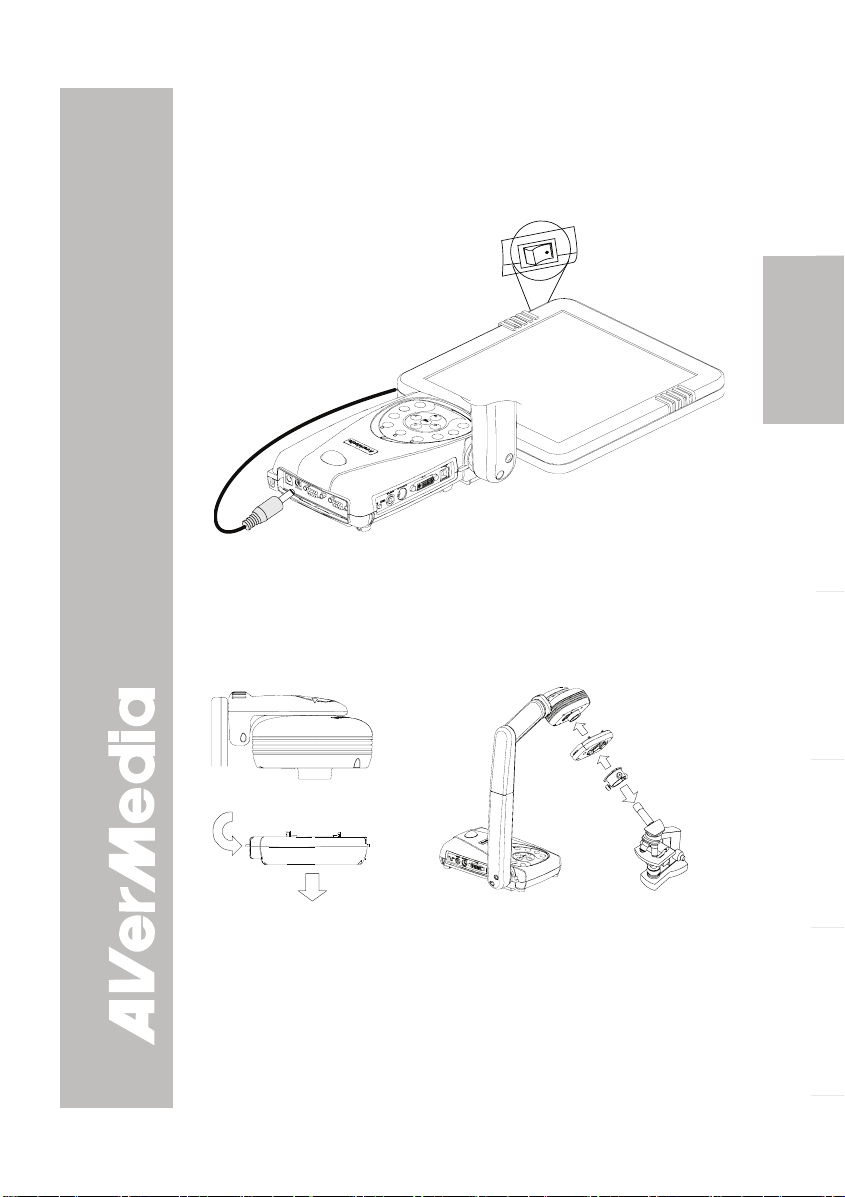
IInnssttaalllliinngg tthhee OOppttiioonnaall LLiigghhtt BBooxx
Connecting an optional light box enables you to view x-rays,
transparencies and negative slides.
TURN ON
Light Box
(optional)
PLUG
IT HERE
CCoonnnneeccttiinngg ttoo aa MMiiccrroossccooppee
Connecting the AVerVision300AF to a microscope enables you to
examine microscopic objects on a big screen without straining your
eyes.
Press the latch to detach
the light module from
the camera head
Microscope
Coupler
Microscope
Adapter
English Deutsch Français
Italiano Español Česky
AVerMedia
LED Light Module
E-9
Microscope
Page 16
SSeettttiinngg UUpp AAVVeerrVViissiioonn330000AAFF
This section provides useful tips on how to adjust the
AVerVision300AF to meet your needs.
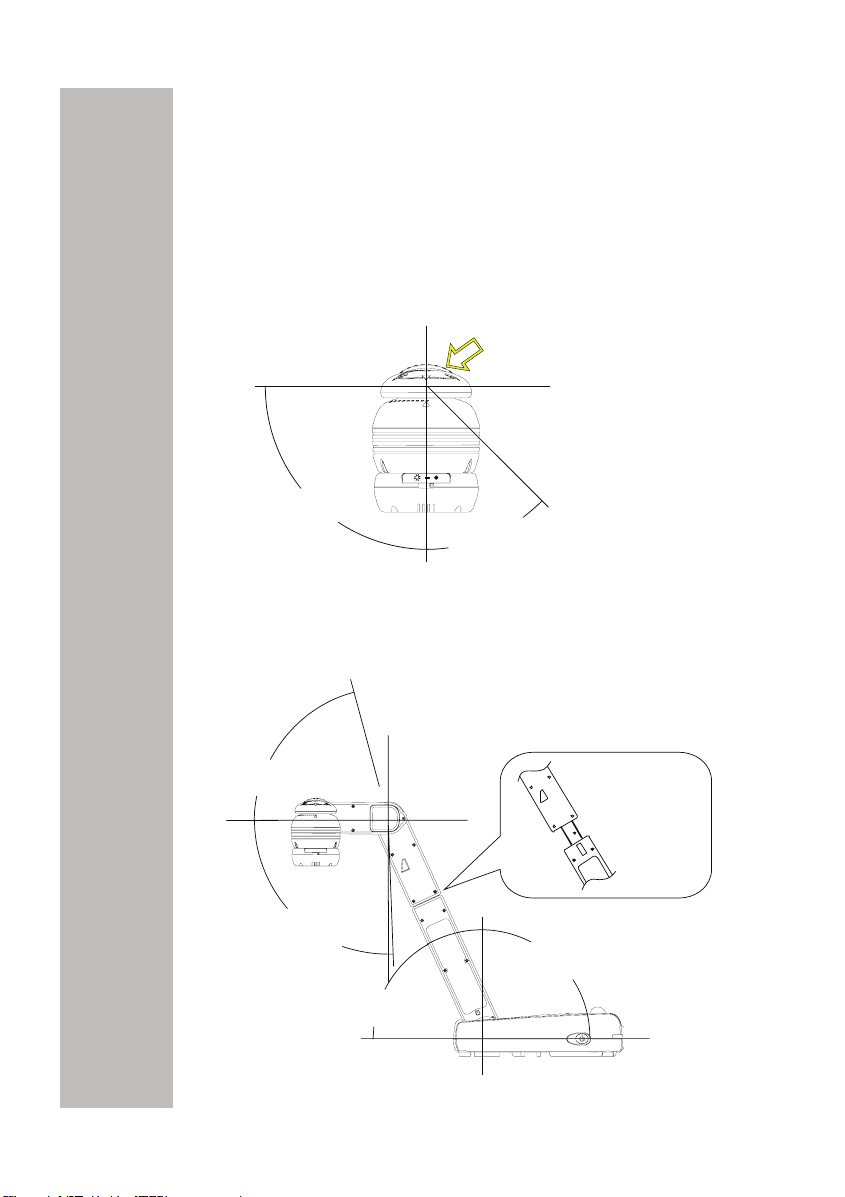
CCaammeerraa HHeeaadd
The camera head can be rotated 135 degrees from left to right. You
can also manually adjust the focus from here to improve the quality of
the pictures.
90°
MMeecchhaanniiccaall AArrmm
The mechanical arm design allows you to project an image to its full
height for full A4 paper landscape viewing.
Adjust the angle here
at the ridged side
45°
AVerMedia
75°
92°
60°
E-10
Extendable up to
122mm (4.8 in)
long.
120°
Page 17
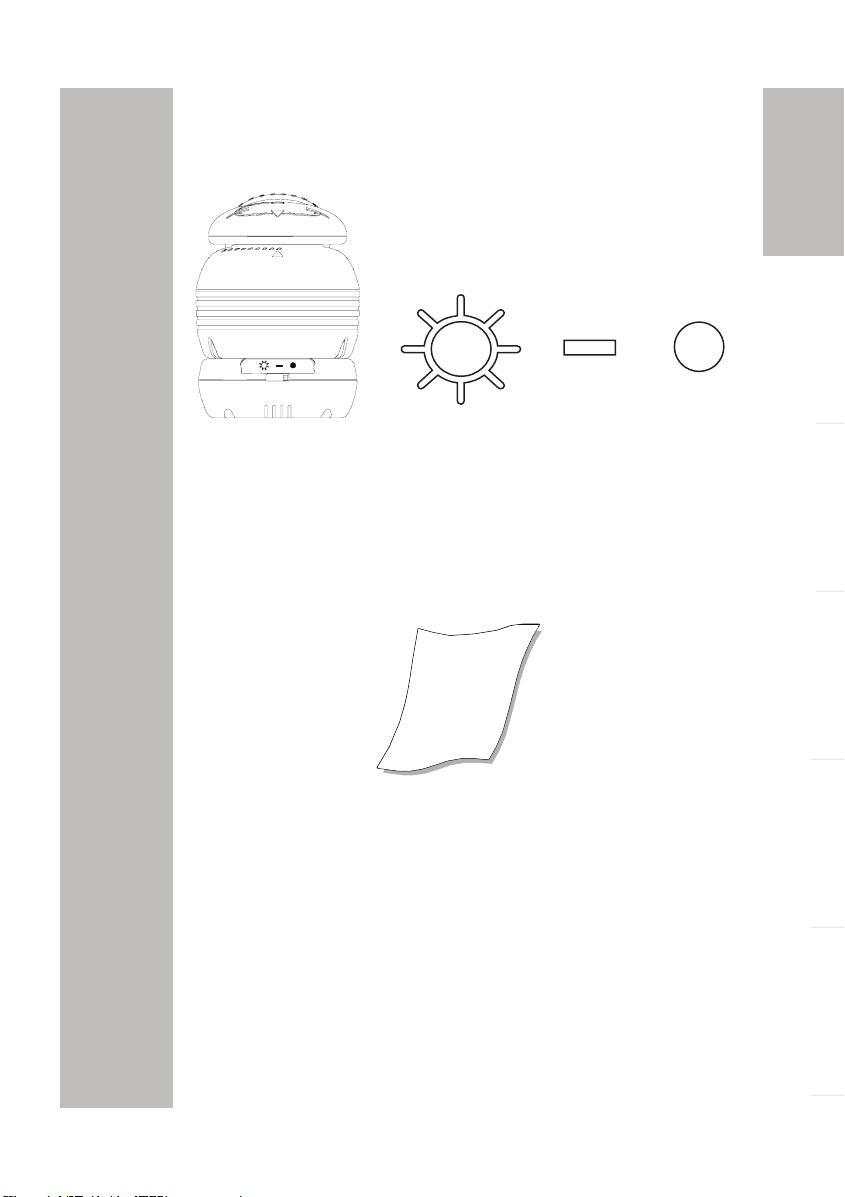
LLEEDD LLiigghhtt MMoodduullee
The LED light module provides white light and it is best use when
presenting in low lighting condition.
Turn OnTurn On Turn OffTurn Off
AAnnttii--ggllaarree SShheeeett
The anti-glare sheet is a special coated film that helps eliminate any
glare you may encounter when you are displaying very shiny object or
glossy surfaces such as magazines, pictures, etc. Simply place the
anti-glare sheet on top of the shiny document to reduce reflected light.
English Deutsch Français
AVerMedia
Italiano Español Česky
E-11
Page 18
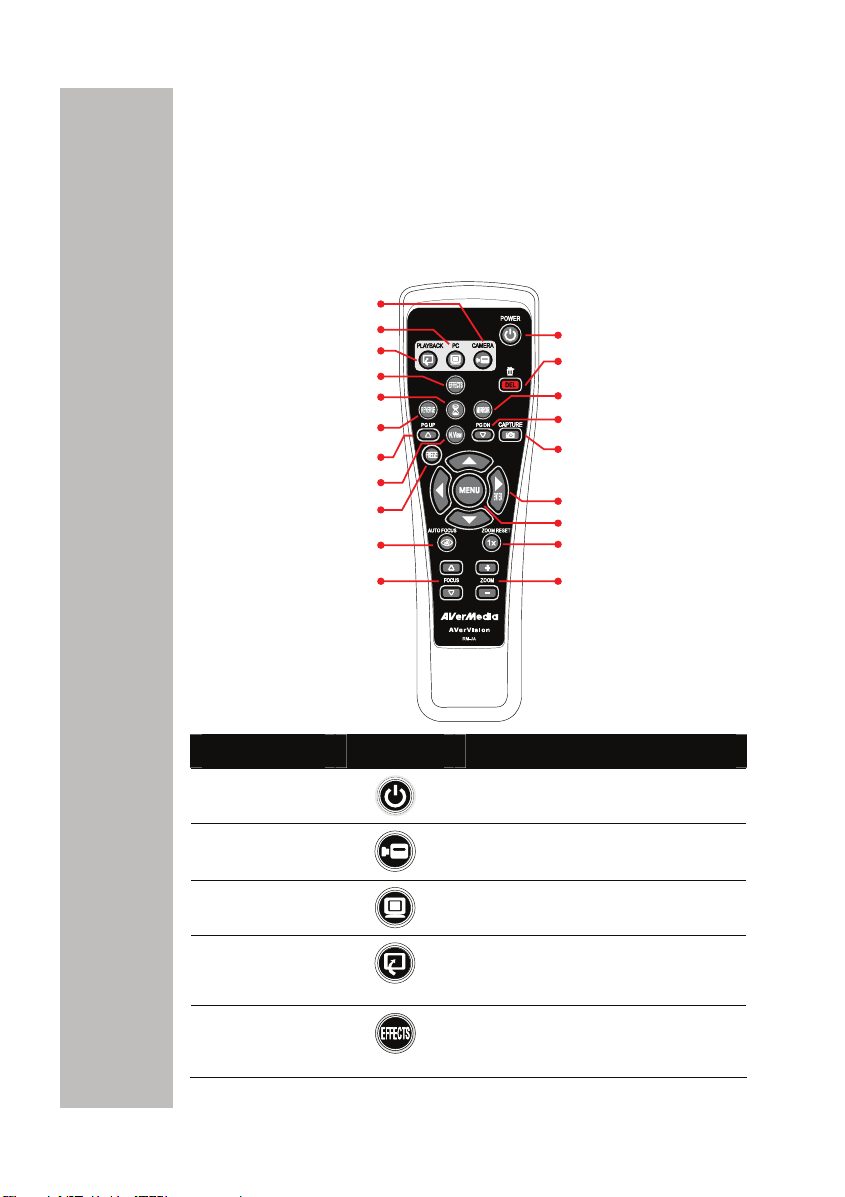
UUssiinngg tthhee IInnffrraarreedd RReemmoottee CCoonnttrrooll
Use the AVerVision300AF Remote Control to enhance your presentation,
switch between (3) three presentation modes and access various
features. To use the remote control, first insert the batteries (2 size “AAA”
batteries are provided) into the battery compartment at the back of the
remote. Use the figure and descriptions below to help you use the
remote control.
(2)
(3)
(4)
(5)
(6)
(7)
(8)
(9)
(10)
(11)
(12)
(1)
(20)
(19)
(18)
(17)
(16)
(15)
(14)
(13)
Name Button Function
(1) POWER
(2) CAMERA
MODE
(3) PC MODE
(4) PLAYBACK
MODE
(5) EFFECTS
AVerMedia
E-12
Turn the unit on/off.
Display image from the document
camera.
Display video signal from the RGB
input port.
Display captured images from the
built-in memory in either 16-thumbnail
mode or full screen mode.
Change live image in BW, Negative or
Color. (camera mode only)
Page 19
Name Button Function
(6) TIMER
(7) REVERSE
(8 & 18)
PAGE UP/
DOWN
REVERSE
PG UP
PG DN
Display, start and hide the on-screen
display timer. (See Timer Function
for more details)
Rotate the image by 180°. (camera
mode only)
Display previous and next set of
16-thumbnail images.
(9) NIGHT
VIEW
(10) FREEZE
(11) AUTO
FOCUS
(12) FOCUS
U / V
Turn on/off Night View.
Use Night View when you are
presenting in a low-light condition.
The display image appears in low
frame rate.
Toggle to pause or resume the display
image. (camera mode only)
Adjust the focus automatically.
Adjust the focus manually.
English Deutsch Français
AVerMedia
(13) ZOOM +/ -
(14) ZOOM
RESET
(15) MENU
(16) ▲ ▼ ◄
(► ENTER)
E-13
Zoom in and zoom out the picture
digitally in Playback mode.
When it reaches the maximum
AVERZOOM level of about 200%, you
can still continue to digitally zoom in
the image up to 1600%.
Return to normal view (1x).
Pull up and exit the OSD main-menu
and sub-menu.
- Pan the mage to the left, right, up,
down when zoom in mode.
ENTER
- Make a selection on the main
menu and sub-menu. (See Menu
Functions, for more details)
- Make a selection in 16-thumbnail
images and press
selected image.
to view the
Italiano Español Česky
Page 20
2
5
Name Button Function
(17) CAPTURE
(19) MIRROR
(20) DELETE
Capture a still image. The captured
image is saved in the built-in memory
at 1024 x 768 resolution.
Flip the image in Camera mode.
Remove the selected picture from the
built-in memory permanently in
Playback mode.
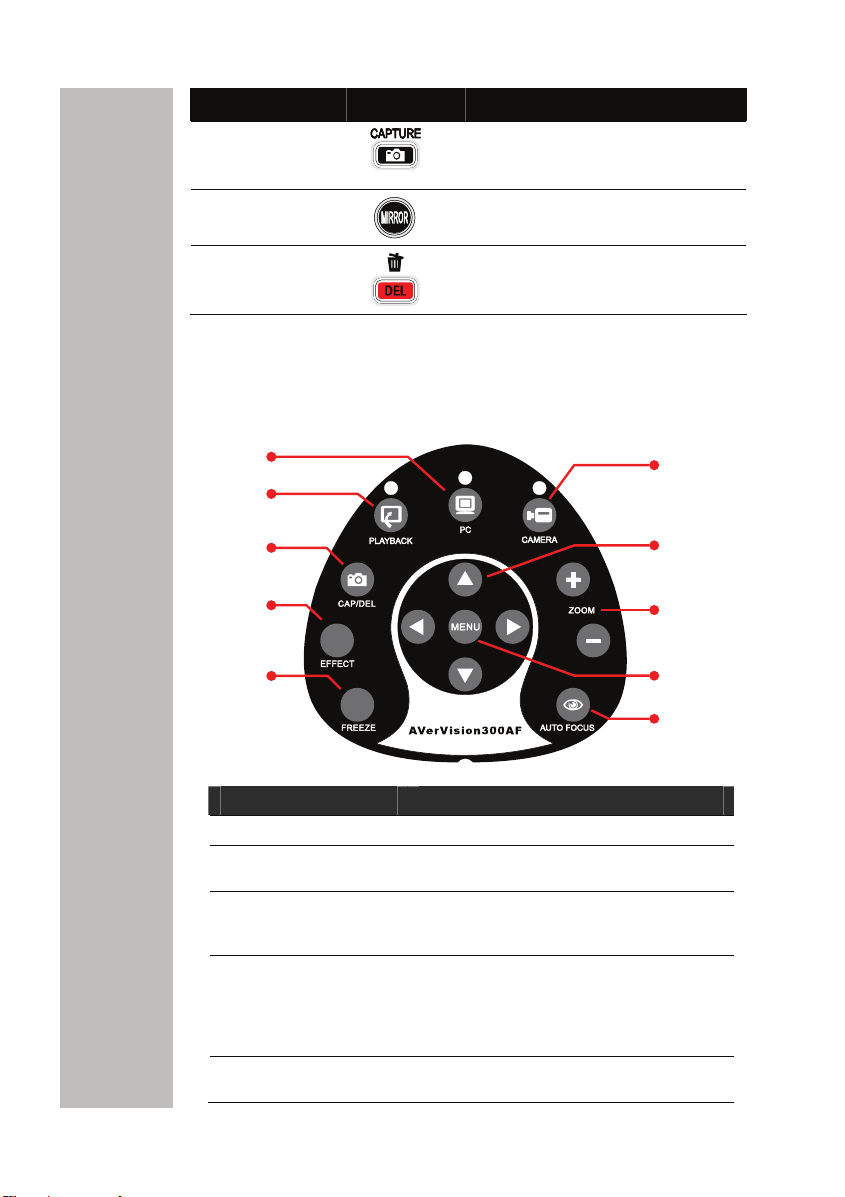
TToouucchh BBuuttttoonn CCoonnttrrooll PPaanneell
The touch button control panel located on the top side of the
AVerVision300AF provides quick access to commonly used functions.
)
(
(3)
(4)
(
)
(6)
Function Description
Display image from the document camera.
Display video signal from the RGB input
port.
Display captured images from the built-in
memory in either 16-thumbnail mode or full
screen mode.
Capture a still image. The captured image
is saved in the built-in memory at 1024 x
768 resolution. Remove the selected
picture from the built-in memory
permanently in Playback mode.
Change live image in BW, Negative or
Color. (camera mode only)
AVerMedia
(1) CAMERA MODE
(2) PC MODE
(3) PLAYBACK
MODE
(4) CAP/DEL
(5) EFFECT
(1)
(10)
(9)
(8)
(7)
E-14
Page 21
Function Description
(6) FREEZE
(7) AUTO FOCUS Adjust the focus automatically.
(8) MENU
(9) ZOOM +/ -
(10) ▲ ▼ ◄ ► - Pan the mage to the left, right, up, down
Toggle to pause or resume the display
image. (camera mode only)
Pull up and exit the OSD main-menu and
sub-menu.
Zoom in and zoom out the picture digitally
in Playback mode.
When it reaches the maximum
AVERZOOM level of about 200%, you can
still continue to digitally zoom in the image
up to 1600%.
when zoom in mode.
- Make a selection on the main menu and
sub-menu. (See Menu Functions, for more
details)
- Make a selection in 16-thumbnail
images and press
selected image.
to view the
LLEEDD PPaanneell
The LED on the front panel of AVerVision300AF indicates the status of
the unit.
Color Description
Green The unit is operated with VGA output.
Orange The unit is operated with TV output
Red The unit is in standby mode.
English Deutsch Français
Italiano Español Česky
AVerMedia
E-15
Page 22
n
TTiimmeerr FFuunnccttiioon
The AVerVision300AF enables you to control the pace of your
presentation by displaying the remaining time on the countdown screen.
This merely serves as a reminder. When the time is up, the timer blanks
at the top right corner only and the presentation screen will not be
affected in any way.
To Set the Timer:
1. Press MENU to view on screen function selections.
2. Press ▲ or▼ buttons to select TIMER.
3. Press ►or◄ buttons to set a time value. You can set the time value
up to 120 minutes.
4. After selecting a time value, press the MENU button to go back to
the main menu.
To View and Start the Timer Countdown:
1. To display the previously set time
value, press the TIMER button once.
The AVerVision300AF automatically
converts your settings to
“hours:minutes:seconds” format. The
maximum setting is 120 minutes.
2. To start the countdown, press the
TIMER button again.
3. Once the countdown timer starts, you
can toggle the countdown screen to
display and hide it by pressing the
TIMER button.
0:00:30
TTrraannssffeerrrriinngg tthhee ccaappttuurreedd iimmaaggee ffrroomm
AAVVeerrVViissiioonn330000A
This enables you to transfer the captured image from the built-in memory
to PC.
: The instruction below MUST be read and followed
BEFORE connecting the USB cable.
1. MUST set the USB SELECT as Image Download before connecting the USB
cable.
To set the USB SELECT as Mass Storage, press MENU > select USB
SELECT and press (►)> select IMAGE DOWNLOAD and press (►).
2. When “IMG Download” appears at the bottom right corner of the screen, you
may connect a USB cable between the doc cam and your computer.
3. Upon connecting the USB cable, the system automatically detects the
document camera as a new removable disk.
4. You may now transfer the captured image from AVerVision300AF to your
AVerMedia
computer.
AFF ttoo CCoommppuutteerr
E-16
Page 23
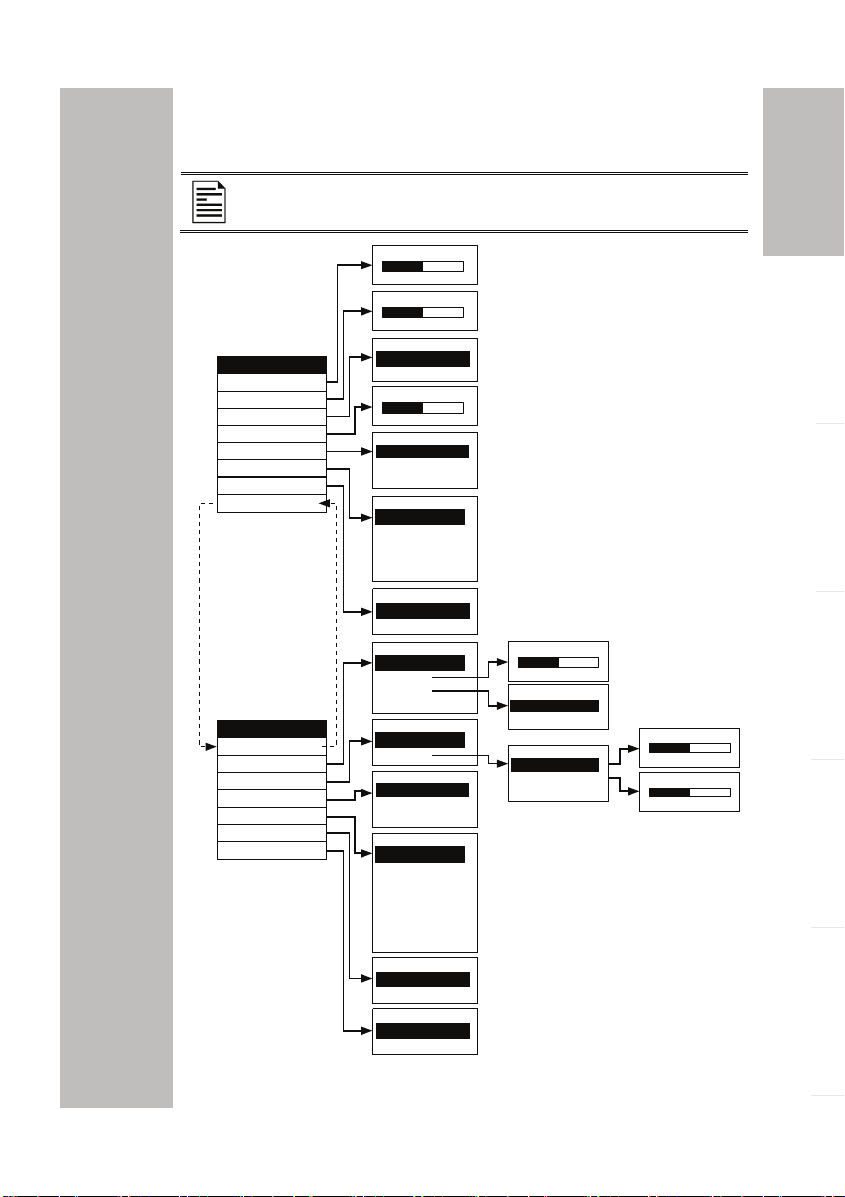
OOSSDD NNaavviiggaattiioonn TTrreeee
VIDEO OUTPUT OSD
For TV output, RESOLUTION is not included in the menu list.
BRIGHTNESS
-50 0 50
CONTRAST
-50 0 50
ZOOM
MENU
BRIGHTNESS
CONTRAST
ZOOM
TIMER
MODE
EFFECT
DEFAULT
ADVANCE
MENU
BASIC
EXPOSURE
WHITE BALANCE
RESOLUTION
LANGUAGE
IMG FORMAT
USB SELECT
LINEAR
FAST
TIMER : MIN.
0 0 120
MODE
TEXT
GRAPHICS
HIGH FRAME
EFFECT
COLOR
B/W
NEGATIVE
MIRROR
REVERSE
DEFAULT
NO
YES
EXPOSURE
AUTO
MANUAL
FLICKER
NIGHT VIEW
WHITE BALANCE
AUTO
MANUAL
RESOLUTION
1024 X 768
800 X 600
640 X 480
LANGUAGE
ENGLISH
DEUTSCH
FRANÇAIS
ITALIANO
ESPAÑOL
PУССКИЙ
POLSKI
PORTUGUÊS
IMG FORMAT
NO
YES
USB SELECT
PC CAM
IMG DOWNLOAD
AVerMedia
MANUAL
0 38 54
FLICKER
50Hz
60Hz
MANUAL
RED
BLUE
MEASURE
RED
0 91 255
BLUE
0 66 255
English Deutsch Français
Italiano Español Česky
E-17
Page 24
MMeennuu FFuunnccttiioonnss
The MENU functions of the AVerVision300AF enable you to fine-tune
your screen display, set the timer, select OSD language and more.
Press the MENU button to call up and exit from the main menu or
sub-menu display. Use the ▲or▼ buttons to select the items in the
menu list. Use the ► button to enter sub-menu. To adjust the setting,
press ◄or► buttons.
OSD Menu Description
BRIGHTNESS
- 50 0 50
CONTRAST
- 50 0 50
ZOOM
LINEAR
FAST
TIMER - MIN
0 0 120
MODE
TEXT
GRAPHICS
HIGH FRAME
BRIGHTNESS
Press ►or◄ buttons to increase or decrease
the brightness level and improve the visibility of
the image. You can adjust the brightness level
up to ±50.
CONTRAST
Press ►or◄ buttons to emphasize or reduce
the difference between light and dark
conditions. You can adjust the contrast level up
to ±50.
ZOOM
Use ▲or▼buttons to select between linear or
fast zoom then press ► to make the selection.
Using the linear zoom you can increase or
decrease the zoom values by 10%. While using
the fast zoom, the increments are by 100%.
The maximum amount of zoom that you can
view is 1600%.
TIMER
Press ►or◄ buttons to set a time value. You can
set the time value up to 120 minutes. (Refer to the
section, Timer Function, for more details.)
MODE
Use ▲or▼ buttons to select between Text,
Graphics and High Frame modes.
In text mode, the AVerVision300AF corrects the
intensity of the adjacent pixel making it more
uniform producing sharper and clearer images.
While in graphics mode, the AVerVision300AF
adjusts the gradient of the adjacent pixel making it
appears to have a smooth image.
While in real-time requirement, we suggest to
select High Frame mode, which can more visually
track animated objects and react quickly. (This
mode is better to be used in good light.)
AVerMedia
E-18
Page 25
OSD Menu Description
EFFECT
COLOR
B/W
NEGATIVE
MIRROR
ROTATE
DEFAULT
NO
YES
EXPOSURE
AUTO
MANUAL
FLICKER
NIGHT VIEW
MANUAL
03854
FLICKER
50 Hz
60 Hz
WHITE BALANCE
AUTO
MANUAL
MANUAL
RED
BLUE
MEASURE
EFFECT
Use ▲or▼ buttons to display the image captured
by the camera into negative, positive (true color),
monochrome (black and white), mirrored image,
or as a rotated image by 180º.
DEFAULT
Use ▲or▼ buttons to select YES to restore to
original factory default setting or NO to exit. Press
► to make the selection.
EXPOSURE
Use ▲or▼ buttons to select between Auto and
Manual.
AVerVision300AF enables you to automatically or
manually adjust the camera to determine how
much light is required.
If you choose to manually adjust the exposure,
press ►or◄ buttons to adjust the exposure level.
If you are presenting in a low-light condition, Night
View enables the image of the object to appear as
though under normal lighting conditions. The
AVerVision300AF automatically adjusts the
exposure to compensate for the adverse
condition, but the captured image will appear to
be in low frame rate.
FLICKER
Use ▲or▼ buttons to select between 50Hz or
60Hz. Some display devices cannot handle high
refresh rates. The image will flicker a couple of
times as the output is switched to another refresh
rate.
WHITE BALANCE
Use ▲or▼ buttons to select between Auto and
Manual.
AVerVision300AF enables you to automatically or
manually adjust the camera to suit the lighting
condition or color temperature. If you select to
manually adjust the white balance, you can adjust
the Red, Blue or use the system to measure the
color temperature.
To obtain a more accurate color balance, place a
sheet of white paper under the camera. Select
MEASURE then press ► button to calibrate the
color temperature. Wait until a "MEASURE OK"
appears at the lower left corner of the
presentation screen.
English Deutsch Français
Italiano Español Česky
AVerMedia
E-19
Page 26
OSD Menu Description
RESOLUTION
x 768
1024
800 x 600
640
ENGLISH
DEUTSCH
FRANÇAIS
ITALIANO
ESPAÑOL
PУССКИЙ
POLSKI
PORTUGUÊS
NO
YES
PC CAMERA
IMG DOWNLOAD
480
x
LANGUAGE
IMG FORMAT
USB SELECT
RESOLUTION
Use ▲or▼ buttons to choose from 1024x768,
800x600 or 640x480 display resolution then press
► to make the selection.
LANGUAGE
Use ▲or▼ buttons to select from different
languages then press ► to make the selection.
IMG FORMAT
Use ▲or▼ buttons to select No to exit or YES to
format and delete all the images saved in the
built-in memory then press ►.
Please wait till the message “FORMAT” disappear
to finish the process.
USB SELECT
Use ▲or▼ buttons to select USB functions
between PC Camera and Image Download.
In PC Camera mode, you can use
AVerVision300AF as a computer webcam or with
the bundled software as video recorder and
capture still image.
In Image Download mode, you can download the
saved images from AVerVision300AF’s built-in
memory to your computer.
RRSS--223322CC DDiiaaggrraamm CCoonnnneeccttiioonn
AVerVision300AF can be controlled using a PC through RS-232
connection.
VIDEO S-VIDEO DVI
VIDEO S-VIDEO DVI
TV RGB
TV RGB
S-Video/RS-232 cable
RS-232 cable
AVerMedia
E-20
(not supplied)
Computer
Laptop
Page 27
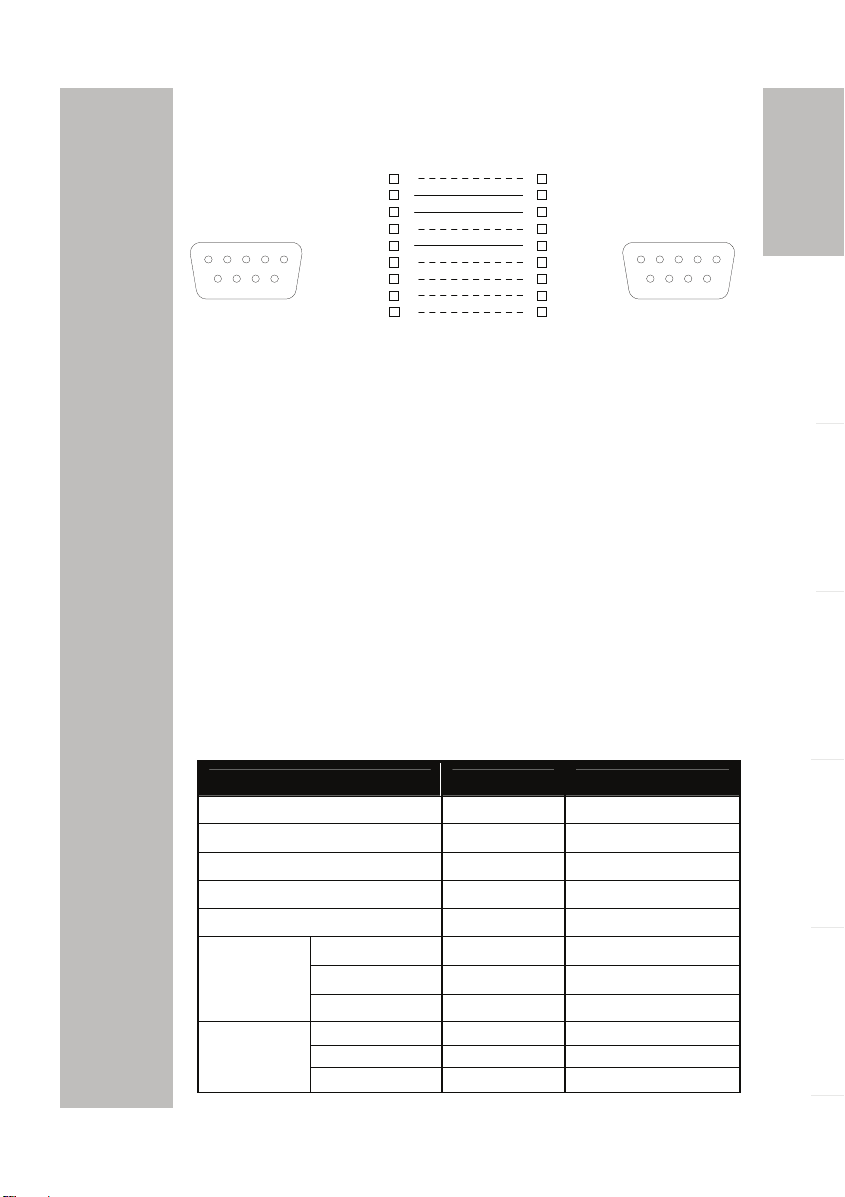
RRSS--223322CC CCaabbllee SSppeecc
Make sure the RS-232 cable matches the cable spec design.
1
PC COM Port
DSUB-9P (Female)
12345
6789
CD
RXD
TXD
DTR
SG
DSR
RTS
CTS
RI (CI)
2
3
4
5
6
7
8
9
RRSS--223322CC TTrraannssmmiissssiioonn SSppeecc
Star bit
Data bit
Stop bit
Parity bit
X parameter
Baud rate(Communication speed)
1
AVerVision RS-232 Port
2
TXD
3
RXD
4
5
SG
6
7
8
9
:1 bit
:8 bit
:1 bit
:None
:None
:9600bps
DSUB-9P (Female)
12345
6789
RRSS--223322CC CCoommmmuunniiccaattiioonn FFoorrmmaatt
Start Code(1 Byte) : 0xFF
Type Code(1 Byte) : 0x70
DataLength Code(1 Byte) : 0x01
Data Code(1 Byte) : See the Command Table for reference.
CheckSum Code(1 Byte) : See the Command Table for reference.
Format : Start + Type + DataLength + Data + CheckSum
Example : 0xFF + 0x70 + 0x01+ 0x80 + 0xF1 (Command Power)
RRSS--223322CC CCoommmmaanndd TTaabbllee
English Deutsch Français
Italiano Español Česky
AVerMedia
FUNCTION DATA CODE CHECKSUM CODE
CAPTURE 0x90 0xE1
NIGHT VIEW 0x8E 0xFF
MODE
SELECTION
PREVIEW
MODE
POWER 0x80 0xF1
TIMER 0x8A 0xFB
FREEZE 0x91 0xE0
CAMERA 0x83 0xF2
PC 0x82 0xF3
PREVIEW 0x81 0xF0
DELETE 0x88 0xF9
PAGE UP 0x8D 0xFC
PAG E DOWN
0x8F 0xFE
E-21
Page 28
FUNCTION DATA CODE CHECKSUM CODE
IN 0x9A 0xEB
ZOOM
FOCUS
OSD
EFFECT
OUT 0x9C 0xED
ZOOM RESET
AUTO FOCUS 0x97 0xE6
NEAR 0x9B 0xEA
FAR 0x99 0xE8
MENU 0x94 0xE5
UP 0x92 0xE3
DOWN 0x96 0xE7
RIGHT 0x95 0xE4
LEFT 0x93 0xE2
MIRROR 0x8B 0xFA
ROTATE 0x89 0xF8
COLOR / B.W /
NEGATIVE
0x98 0xE9
0x86 0xF7
TTrroouubblleesshhoooottiinngg
This section provides many useful tips on how to solve common
problems while using the AVerVision300AF.
There is no picture on the presentation screen.
1. Check all the connectors again as shown in this manual.
2. Check the on/off switch of the display output device.
3. Verify the setting of the display output device.
4. If you are presenting from a notebook or computer through the
display output device, please check and switch the document
camera source to PC Mode.
I have set up the AVerVision300AF and checked all the connections
as specified in the manual, but I cannot get a picture on the
preferred presentation screen.
1. Once the power cords are connected, the LED light turns RED as
standby mode. Simply switch the AVerVision300AF “ON" by pressing
the on/off switch until the LED light is blanking and turns GREEN.
2. The default camera display resolution setting is on 1024x768. If your
output device does not support this resolution; no image can be
projected. Simply press the MENU and RIGHT or LEFT button to the
increase or decrease the resolution setting.
3. If your display output device is TV or any analog device, make sure
the TV/RGB display switch is set to TV.
The picture on the presentation screen is distorted or the image is
blurry.
1. Reset all changed settings, if any, to the original manufacturer default
AVerMedia
setting (Refer to the Menu Functions for more details and steps).
E-22
Page 29

2. Use the Brightness and Contrast menu functions to reduce the
distortion if applicable.
3. If you discover that the image is blurry or out of focus, press the Auto
Focus button on the control panel or remote control.
There is no computer signal on presentation screen.
1. Check all the cable connections among the display device,
AVerVision300AF and your PC.
2. Connect your PC to the AVerVision300AF first before you power on
your computer.
The presentation screen does not show the exact desktop image on
my PC or Notebook after I toggle from Doc Cam mode to PC mode.
1. Return to your PC or Notebook, place the mouse on the desktop and
right click, choose “Properties”, choose “Setting” tab, click on “2”
monitor and check the box “Extend my Windows desktop onto this
monitor”.
2. Then go back one more time to your PC or Notebook and place the
mouse on the desktop and right click again.
3. This time choose “Graphics Options”, then “Output To”, then “Intel®
Dual Display Clone”, and then choose “Monitor + Notebook”.
4. After you follow these steps, you should be able to see the same
desktop image on your PC or Notebook as well as on the
presentation screen.
How do I download images from AVerVision300AF to a computer?
Is it normal that AVerVision300AF will reset to camera mode after I
download images and disconnect the USB cable?
Choose "IMG Download" from the Menu, and then connect the USB
cable to download the captured and stored images from the
AVerVision300AF to your computer. When finished, unplug the USB
cable. The AVerVision300AF will automatically reset at camera mode.
LLiimmiitteedd WWaarrrraannttyy
For a period of time beginning on the date of purchase of the applicable product
and extending as set forth in Section 6 of this Limited Warranty (the “Warranty
Period”), AVerMedia Technologies, Inc. (“AVerMedia”) warrants that the
applicable product (“Product”) substantially conforms to AVerMedia’s
documentation for the product and that its manufacture and components are
free of defects in material and workmanship under normal use. “You” as used
in this agreement means you individually or the business entity on whose
behalf you use or install the product, as applicable. This limited warranty
extends only to You as the original purchaser. Except for the foregoing, the
Product is provided “AS IS.” In no event does AVerMedia warrant that You will
be able to operate the Product without problems or interruptions, or that the
Product is suitable for your purposes. Your exclusive remedy and the entire
liability of AVerMedia under this paragraph shall be, at AVerMedia’s option, the
repair or replacement of the Product with the same or a comparable product.
This warranty does not apply to (a) any Product on which the serial number has
been defaced, modified, or removed, or (b) cartons, cases, batteries, cabinets,
tapes, or accessories used with this product. This warranty does not apply to
any Product that has suffered damage, deterioration or malfunction due to (a)
AVerMedia
accident, abuse, misuse, neglect, fire, water, lightning, or other acts of nature,
English Deutsch Français
Italiano Español Česky
E-23
Page 30

commercial or industrial use, unauthorized product modification or failure to
follow instructions included with the Product, (b) misapplication of service by
someone other than the manufacturer’s representative, (c) any shipment
damages (such claims must be made with the carrier), or (d) any other causes
that do not relate to a Product defect. The Warranty Period of any repaired or
replaced Product shall be the longer of (a) the original Warranty Period or (b)
thirty (30) days from the date of delivery of the repaired or replaced product.
Limitations of Warranty
AVerMedia makes no warranties to any third party. You are responsible for all
claims, damages, settlements, expenses, and attorneys’ fees with respect to
claims made against You as a result of Your use or misuse of the Product.
This warranty applies only if the Product is installed, operated, maintained, and
used in accordance with AVerMedia specifications. Specifically, the warranties
do not extend to any failure caused by (i) accident, unusual physical, electrical,
or electromagnetic stress, neglect or misuse, (ii) fluctuations in electrical power
beyond AVerMedia specifications, (iii) use of the Product with any accessories
or options not furnished by AVerMedia or its authorized agents, or (iv)
installation, alteration, or repair of the Product by anyone other than AVerMedia
or its authorized agents.
Disclaimer of Warranty
EXCEPT AS EXPRESSLY PROVIDED OTHERWISE HEREIN AND TO THE
MAXIMUM EXTENT PERMITTED BY APPLICABLE LAW, AVERMEDIA
DISCLAIMS ALL OTHER WARRANTIES WITH RESPECT TO THE PRODUCT,
WHETHER EXPRESS, IMPLIED, STATUTORY OR OTHERWISE,
INCLUDING WITHOUT LIMITATION, SATISFACTORY QUALITY, COURSE
OF DEALING, TRADE USAGE OR PRACTICE OR THE IMPLIED
WARRANTIES OF MERCHANTABILITY, FITNESS FOR A PARTICULAR
PURPOSE OR NONINFRINGEMENT OF THIRD PARTY RIGHTS.
Limitation of Liability
IN NO EVENT SHALL AVERMEDIA BE LIABLE FOR INDIRECT, INCIDENTAL,
SPECIAL, EXEMPLARY, PUNITIVE, OR CONSEQUENTIAL DAMAGES OF
ANY NATURE INCLUDING, BUT NOT LIMITED TO, LOSS OF PROFITS,
DATA, REVENUE, PRODUCTION, OR USE, BUSINESS INTERRUPTION, OR
PROCUREMENT OF SUBSTITUTE GOODS OR SERVICES ARISING OUT
OF OR IN CONNECTION WITH THIS LIMITED WARRANTY, OR THE USE
OR PERFORMANCE OF ANY PRODUCT, WHETHER BASED ON
CONTRACT OR TORT, INCLUDING NEGLIGENCE, OR ANY OTHER LEGAL
THEORY, EVEN IF AVERMEDIA HAS ADVISED OF THE POSSIBILITY OF
SUCH DAMAGES. AVERMEDIA’S TOTAL, AGGREGATE LIABILITY FOR
DAMAGES OF ANY NATURE, REGARDLESS OF FORM OF ACTION, SHALL
IN NO EVENT EXCEED THE AMOUNT PAID BY YOU TO AVERMEDIA FOR
THE SPECIFIC PRODUCT UPON WHICH LIABILITY IS BASED.
Governing Law and Your Rights
This warranty gives You specific legal rights; You may also have other rights
granted under state law. These rights vary from state to state.
AVerMedia
For warranty period, please refer to the warranty card.
E-24
Page 31

FCC-HINWEIS (KLASSE A)
Dieses Gerät erfüllt Teil 15 der FCC-Regularien.
Der Betrieb unterliegt den folgenden zwei
Voraussetzungen: (1) Dieses Gerät darf keine
jegliche empfangenen Störungen hinnehmen, einschließlich
Störungen, die zu unbeabsichtigtem Betrieb führen können.
HINWEIS – Diese Ausrüstung wurde getestet und als mit den
Grenzwerten für Digitalgeräte der Klasse A gemäß Teil 15 der
FCC-Regularien übereinstimmend befunden. Diese
Grenzwerte wurden geschaffen, um angemessenen Schutz
gegen Störungen beim Betrieb der Ausrüstung im
kommerziellen Einsatz zu gewährleisten. Diese Ausrüstung
erzeugt, verwendet und kann Hochfrequenzenergie abstrahlen
und kann - falls nicht in Übereinstimmung mit den
Bedienungsanweisungen installiert und verwendet - Störungen
der Funkkommunikation verursachen. Der Betrieb dieser
Ausrüstung in Wohngebieten kann leicht zu Störungen führen.
In diesem Fall hat der Anwender auf eigene Kosten für Abhilfe
zu sorgen.
WARNUNG VOR MODIFIKATIONEN
Um die Richtlinien für Digitalgeräte der Klasse A gemäß Teil 15
der FCC-Regularien erfüllen zu können, muss die Ausrüstung
mit Computern und Computerperipherie betrieben werden, die
die Grenzwerte der Klasse A einhalten. Sämtliche Peripherieund Computerverbindungskabel müssen abgeschirmt und
geerdet sein. Der Betrieb mit nicht zertifizierten und/oder nicht
abgeschirmten Kabeln kann zu Störungen des Radio- und/oder
Fernsehempfangs führen.
Änderungen und Modifikationen, die nicht ausdrücklich durch
den Hersteller zugelassen sind, können die Berechtigung des
Anwenders zum Betrieb der Ausrüstung erlöschen lassen.
Einhaltungserklärung (Klasse A) –
Europäische Gemeinschaft
elektromagnetischen Verträglichkeit .
Störungen verursachen, und 2) dieses Gerät muss
Dieses Gerät erfüllt die Schutzanforderungen der
EMV-Direktive 89/336/EEC des Europäischen
Rates (ergänzt durch 92/31/EEC) hinsichtlich der
Vorschriften der Mitgliedsstaaten zur
English Deutsch Français
Italiano Español Česky
Warnung – Dies ist ein Produkt der Klasse A. In
Wohnumgebungen kann dieses Produkt Funkstörungen
verursachen. In diesem Fall obliegt es dem Anwender,
angemessene Maßnahmen zur Beseitigung der Störung zu
ergreifen.
HAFTUNGSAUSSCHLUSS
Hinsichtlich der Inhalte dieser Dokumentation, ihrer Qualität,
Güte, Handelstauglichkeit oder Eignung für einen bestimmten
Page 32

Zweck werden keinerlei Gewährleistungen oder Zusicherungen
übernommen, weder ausdrücklich noch implizit. Die in dieser
Dokumentation präsentierten Informationen wurden sorgfältig
auf ihre Richtigkeit überprüft, allerdings wird keine Haftung für
Ungenauigkeiten übernommen. Die Angaben in dieser
Dokumentation können sich ohne Vorankündigung ändern.
In keinem Fall haftet AVerMedia für direkte, indirekte, spezielle,
beiläufige oder Folgeschäden, die durch den Einsatz oder das
Unvermögen zum Einsatz des Produktes oder der
Dokumentation entstehen, selbst wenn AVerMedia auf die
Möglichkeit solcher Schäden hingewiesen wurde.
MARKEN
AVerMedia ist eine eingetragene Marke der AVerMedia
TECHNOLOGIES, Inc. IBM PC ist eine eingetragene Marke der
International Business Machines Corporation. Macintosh ist
eine eingetragene Marke der Apple Computer, Inc. Microsoft ist
eine eingetragene Marke, Windows ist eine Marke der
Microsoft Corporation. Sämtliche anderen in dieser
Dokumentation erwähnten Produkte oder Firmennamen dienen
lediglich Identifizierungs- und Anschauungszwecken und
können Marken oder eingetragene Marken ihrer jeweiligen
Besitzer sein.
URHEBERRECHT
© 2006 by AVerMedia TECHNOLOGIES, Inc. Alle Rechte
vorbehalten. Kein Teil dieser Publikation darf in jedweder Form
und durch jedwede Mittel ohne schriftliche Genehmigung von
AVerMedia TECHNOLOGIES, Inc. reproduziert, übertragen,
umgesetzt, in Abrufsystemen gespeichert oder in jedwede
Sprachen übersetzt werden.
Das Symbol mit der durchgestrichenen
Abfalltonne bedeutet, dass dieses Produkt nicht
mit dem Hausmüll entsorgt werden darf.
Stattdessen müssen Altgeräte zur
Wiederverwertung von elektrischen und
elektronischen Altgeräten zu speziellen
Sammelstellen gebracht werden. Weitere
Informationen über Annahmestellen zur
Entsorgung von Altgeräten zu
Recyclingzwecken erhalten Sie von Ihrem
Entsorgungsdienstleister oder vom Händler, bei
dem Sie das Gerät erworben haben.
Page 33

IInnhhaallttssvveerrzzeeiicchhnniiss
Einleitung ..........................................................D-1
Packungsinhalt.................................................D-1
Optionales Zubehör .........................................D-2
AVerVision300AF - Komponenten .............D-3
Technische Daten.............................................D-4
Anschlüsse .......................................................D-5
Netzteilanschluss.....................................................D-6
Anschluss eines Fernsehgerätes.............................D-6
Anschluss von VGA-, Mac-Monitor oder
LCD-/DLP-Projektor.................................................D-
Anschluss von VGA-Monitor oder LCD/DLP-Projektor
mit DVI-Schnittstelle ................................................D-
Anschluss an IBM-kompatiblen PC oder
Macintosh-Computer ...............................................D-
Computeranschluss per USB-Verbindung...............D-8
Installation der optionalen Durchlichteinheit ............D-9
Anschluss an ein Mikroskop ....................................D-9
AVerVision300AF einrichten..........................D-10
Kamerakopf ...........................................................D-10
Mechanischer Arm.................................................D-10
LED-Lichtmodul..................................................... D-11
Antireflexbogen......................................................D-11
Infrarotfernbedienung verwenden................D-12
Tipptasten-Bedienfeld....................................D-14
LED-Feld..........................................................D-15
Timerfunktion..................................................D-16
Bilder von der AVerVision300AF zum PC
übertragen.......................................................D-
OSD-Navigationsbaum ..................................D-17
Videoausgang-OSD........................................D-17
Menüfunktionen..............................................D-18
RS232-Anschlussdiagramm..........................D-20
RS232C-Pinbelegung.....................................D-21
RS-232C Übertragungseigenschaften..........D-21
RS-232C Kommunikationsformat .................D-21
RS-232C Kommandoübersicht .....................D-21
Problemlösung ...............................................D-22
Eingeschränkte Garantie...............................D-23
English Deutsch Français
7
7
8
Italiano Español Česky
16
Page 34

Page 35

A
V
®
EEiinnlleeiittuunngg
Vielen Dank für den Kauf
der AVerMedia®
AVerVision300AF. Diese
Dokumentkamera zeigt
sämtliche Dokumente,
Negative,
Transparenzfolien und
3D-Objekte auf
Fernsehgeräten, LCDoder DLP-Projektoren an
und macht Präsentationen
kinderleicht.
Die AVerVision300AF ist
das ideale
Präsentationswerkzeug
für akademische,
geschäftliche,
medizinische und
wissenschaftliche
Anwendungen.
PPaacckkuunnggssiinnhhaallt
AVerMedia® AVerVision300AF
h
s
i
l
g
n
E
F
A
0
0
3
n
o
si
i
V
r
e
®
V
A
h
a
i
d
e
c
M
r
e
V
A
Bedienungsanleitu
s
t
l
a
u
n
u
a
M
r
eD
se
U
s
i
a
ç
n
a
r
F
o
n
a
i
l
a
t
I
l
o
ñ
a
p
s
E
y
k
s
e
ČČ
a
di
e
M
r
e
a
r
me
a
C
t
n
e
m
u
c
o
D
l
a
t
i
g
i
D
Fernbedienung
ng
(inklusive Batterien)
t
English Deutsch Français
Antireflexbogen
Transporttasche
Treiber-CD
Italiano Español Česky
Cinch-Kabel
USB-Kabel
S-Video-Kabel
Computer-Verlängerungskabel
(VGA-Kabel)
Netzkabel
* Das Netzkabel kann je nach
S-Video/RS-232 -Kabel
Steckdosenausführung des
Landes, in dem das Produkt
verkauft wird, unterschiedlich
aussehen.
Netzteil
D-1
Page 36

OOppttiioonnaalleess ZZuubbeehhöörr
34 mm-Mikroskopadapter
Mikroskopkupplung
LED-Leuchte mit
Laser-Positionierungspointer
28 mm-Mikroskopadapter
Durchlichteinheit
D-2
Page 37

(1) Kamerakopf
(2) LED-Lichtmodul
(3) Kameraobjektiv
(4) Bedienfeld
(5) Ausleger
(6) Linke Seitenwand
(7) Infrarotsensor
(8) Rückwand
(9) Rechte Seitenwand
(10) Ein-/Austaste
(11) Diebstahlsicherungs
schlitz
(12) Netzteilanschluss,
12V Gleichspannung
(13) Leuchtkasten-Strom
anschluss
(14) VGA-Ausgang
(15) VGA-Eingang
(16) S-Video-Ausgang
(17) Composite-Videoau
sgang
(18) TV/RGB-Anzeigeum
schalter
(19) DVI-Ausgang
(20) USB-Anschluss
AAVVeerrVViissiioonn330000AAFF -- KKoommppoonneenntteenn
Die nachstehenden Abbildungen zeigen die Komponenten der
AVerVision300AF
(1)
(2)
(3)
(4)
Rechte Seitenwand
Rückwand
(11)
.
(5)
(6)
(7)
(8)
(9)
(10)
LIGHT
BOX
VGAOUTVGAINDC12V
English Deutsch Français
Italiano Español Česky
Linke Seitenwand
(17)
(18)
(16)
D-3
VIDEO S-VIDEODVI
TV RGB
(15)(13)
(14)(12)
(19)
(20)
Page 38

TTeecchhnniisscchhee DDaatteenn
Bilderfassung
Sensor ½ Zoll, progressive Scan-CMOS
Pixel-Gesamtzahl 3,2 Megapixel
Bildrate 24 Einzelbilder/Sekunde (maximal)
Weißabgleich Auto / Manuell
Belichtung Auto / Manuell / Flicker / Nachtmodus
Bildmodus Text / Grafik / Hochgeschwindigkeit
Effekte
RGB-Analogausgang
S-Video, Composite-
Videoausgang
Bilderfassung Bis zu 80 Einzelbilder
Integrierter Speicher 32 MB Flash-Speicher (NAND)
Farbe / Schwarzweiß / Negativ / Umdrehen /
Spiegeln
XGA:60 Hz, SVGA:60 Hz, VGA:60 Hz
NTSC oder PAL
Optik
Objektiv F3,0; manuelle Fokussierung
Aufnahmebereich 320mm x 240mm (max.)
Vergrößerung AVERZOOM: 2 x, Digital: 8 x
Betrieb
Stromversorgung DC 12V; 1.2-4A; 100 bis 240 V; 50 bis 60 Hz
Stromverbrauch
7,44 Watt (Leuchte aus); 10,68 Watt (Leuchte
an)
Beleuchtung
Leuchtmitteltyp LED-Leuchte
Eingang / Ausgang
VGA-Eingang D-Sub, 15-polig (VGA)
VGA-Ausgang D-Sub, 15-polig (VGA)
DVI-Ausgang DVI-I-Buchse
S-Video Mini-DIN-Anschluss
Composite-Video Cinch-Anschluss
USB USB 2.0
6V-Gleichspannungsa
usgang
Stromanschluss
Abmessungen
Im Betrieb 424mm x 173,4mm x 330mm
Zusammengelegt 365mm x 173,4mm x 95,85mm
Gewicht 2 kg
D-4
Page 39

e
AAnnsscchhllüüsssse
Über die Anschlüsse an der Rückseite und an der Seite der
AVerVision300AF können Sie das Gerät an Computer, Monitore,
LCD-/DLP-Projektoren, Fernseh- und andere Geräte anschließen. Die
nachstehende Abbildung zeigt die Anschlüsse an der Rückseite und
der Seite der AVerVision300AF. In der folgenden Tabelle finden Sie
eine kurze Beschreibung der jeweiligen Funktionen.
I
V
D
O
E
D
(6)
I
V
-
S
O
E
D
I
V
B
G
R
V
T
(10)
(9)
(8)
(7)
(1)
(2)
D
C
12
V
L
I
G
H
T
BO
X
V
G
A
I
N
V
G
A
O
U
T
(3)
(4)
(5)
Anschluss Beschreibung
(1) Diebstahlsicherung
sschlitz
(2) DC 12V (Eingang) Hier schließen Sie das Netzteil an.
(3) Leuchtkastenansch
luss
(4) VGA-Eingang An diesen Eingang schließen Sie den
(5) VGA
OUT-Anschluss
(6) TV/RGB-
Umschalter
(7) VIDEO-Anschluss
(Cinch/Composite)
(8) S-VIDEO-
Anschluss
(9) DVI-Anschluss Zur Ausgabe des Videosignals der Kamera oder
(10) USB-Anschluss Über diesen Anschluss können Sie Ihre
Hier können Sie ein Kensington-kompatibles
Sicherheitsschloss oder eine andere
Diebstahlsicherung anbringen.
An diesen Ausgang schließen Sie den optionalen
Leuchtkasten an.
RGB-Signalausgang eines Computers oder einer
anderen Quelle an; das Signal wird aktiv zum
VGA-Ausgang durchgeschliffen.
Hier schließen Sie auch den VGA-Ausgang eines
Computers an.
An diesem Ausgang liegt das RGB-Signal der
Kamera, des VGA-Eingangs und gespeicherter
Bilder an. Hier können Sie einen
VGA-/Mac-Monitor oder einen LCD/DLP-Projektor
anschließen.
Zur Auswahl zwischen RGB- (VGA-Ausgang) oder
TV-Ausgang
(Composite-Video-/S-Video-Ausgang).
Über diesen Ausgang können Sie das Bildsignal
der Kamera oder intern gespeicherter Bilder über
ein Fernsehgerät oder andere Videogeräte
ausgeben.
Über diesen Ausgang können Sie das Bildsignal
der Kamera oder gespeicherter Bilder über ein
Fernsehgerät oder andere Videogeräte ausgeben.
gespeicherter Bilder über LCD-Monitor oder
LCD/DLP-Projektor mit DVI-Schnittstelle.
AVerVision300AF als USB-Kamera zum
Herunterladen von Bildern verwenden und erfasste
Bilder zwischen dem internen Speicher Ihrer
AVerVision300AF und dem PC austauschen.
D-5
English Deutsch Français
Italiano Español Česky
Page 40

NNeettzztteeiillaannsscchhlluussss
Das Netzteil schließen Sie an eine normale Steckdose mit 100 bis 240 V
Wechselstrom an.
LIGHT
BOX
VGAOUTVGAINDC12V
Steckdose
Netzteil
Netzkabel
AAnnsscchhlluussss eeiinneess FFeerrnnsseehhggeerräätteess
Dazu benötigen Sie den Video-, S-Video- oder Scart-RGB-Eingang des
Fernseh- oder Videogerätes (z. B. Videorecorder). Auf diese Weise
können Sie Ihre Präsentation z. B. auf Video aufzeichnen. Sollten Sie
nicht sicher sein, welcher Anschluss der richtige ist, lesen Sie bitte in der
Bedienungsanleitung des Fernseh- oder Videogerätes nach.
- Achten Sie darauf, dass der TV/RGB-Umschalter auf TV
geschaltet ist.
- Um eine bessere Videoqualität zu erreichen, sollten Sie
unbedingt den S-Video-Anschluss benutzen.
D-6
Page 41

r
AAnnsscchhlluussss vvoonn VVGGAA--,, MMaacc--MMoonniittoorr ooddeerr
LLCCDD--//DDLLPP--PPrroojjeekkttoorr
Hier verwenden Sie den RGB-Eingang (VGA) Ihres Anzeigegerätes.
Falls Sie nicht sicher sind, welcher Anschluss der richtige ist, schauen
Sie bitte in die Anleitung zum entsprechenden Gerät.
Sorgen Sie dafür, dass der TV/RGB-Umschalter auf RGB
geschaltet ist.
LIGHT
BOX
AAnnsscchhlluussss vvoonn VVGGAA--MMoonniittoorr ooddeerr
LLCCDD//DDLLPP--PPrroojjeekkttoorr m
VGAOUTVGAINDC12V
MAC
Monitoradapter
(nicht mitgeliefert)
RGB-Kabel (VGA)
(nicht mitgeliefert)
Mac-Monitor
LCD/DLP-Projekto
Röhrenmonitor
m
iitt DDVVII--SScchhnniittttsstteellllee
LCD-Monitor
Hier verwenden Sie den DVI-Eingang Ihres Anzeigegerätes. Falls Sie
nicht sicher sind, welcher Anschluss der richtige ist, schauen Sie bitte in
die Anleitung zum entsprechenden Gerät.
English Deutsch Français
Italiano Español Česky
Sorgen Sie dafür, dass der TV/RGB-Umschalter auf RGB
geschaltet ist.
VIDEO S-VIDEO DVI
VIDEO S-VIDEO DVI
TV RGB
TV RGB
LCD-Monitor
mit DVI-Schnittstelle
DVI-Kabel
(nicht mitgeliefert)
LCD/DLP-Monitor
mit DVI-Schnittstelle
D-7
Page 42
AAnnsscchhlluussss aann IIBBMM--kkoommppaattiibblleenn PPCC ooddeerr
MMaacciinnttoosshh--CCoommppuutteerr
Dazu verwenden Sie den RGB-Videoausgang des Computers oder
Notebooks. So können Sie Ihre Präsentation auf dem PC-Bildschirm
anzeigen lassen. Die AVerVision300AF unterstützt das aktive
Durchschleifen von Signalen: Das Videosignal des VGA-Eingangs wird
permanent an den VGA-Ausgang durchgeschliffen und auf dem
Bildschirm angezeigt – auch wenn die AVerVision300AF ausgeschaltet
ist.
VIDEO S-VIDEO DVI
VIDEO S-VIDEO DVI
TV RGB
TV RGB
Computer
Computer-Verlängerungskabel
(VGA-Kabel)
Monitoradapter
(nicht mitgeliefert)
CCoommppuutteerraannsscchhlluussss ppeerr UUSSBB--VVeerrbbiinndduunngg
Notebook
Mac
Bei dieser Verbindungsart schließen Sie das Gerät an den
USB-Anschluss Ihres Computers oder Notebooks an. Dadurch können
Sie Ihre AVerVision300AF als USB-Kamera einsetzen oder erfasste
Bilder aus dem internen Speicher zum Computer übertragen. Schauen
Sie sich dazu bitte „Bilder von der AVerVision300AF zum PC
übertragen“ an, lesen Sie auch die Bedienungsanleitung zur
Bündelsoftware .
VIDEO S-VIDEO DVI
VIDEO S-VIDEO DVI
TV RGB
TV RGB
Computer
Notebook
Mac
USB-Kabel
D-8
Page 43
r
IInnssttaallllaattiioonn ddeerr ooppttiioonnaalleenn
DDuurrcchhlliicchhtteeiinnhheeiitt
Mit der optionalen Durchlichteinheit können Sie Röntgenbilder,
Transparenzfolien und Negative betrachten.
Durchlichteinheit
HIER EINSTECKEN
(optional)
AAnnsscchhlluussss aann eeiinn MMiikkrroosskkoopp
Wenn Sie die AVerVision300AF an ein Mikroskop anschließen, können
Sie mikroskopisch kleine Objekte auf einem großen Bildschirm
untersuchen, ohne Ihre Augen zu überlasten.
EINSCHALTEN
English Deutsch Français
Zum Lösen des Lichtmoduls
Vom Kamerakopf:
Hier Hebel drücken.
LED-Lichtmodul
Mikroskopkupplung
Mikroskop-adapte
Mikroskop
Italiano Español Česky
D-9
Page 44

AAVVeerrVViissiioonn330000AAFF eeiinnrriicchhtteenn
In diesem Abschnitt finden Sie nützliche Tipps zum Anpassen der
AVerVision300AF an Ihre persönlichen Bedürfnisse.
KKaammeerraakkooppff
Der Kamerakopf lässt sich in Links/Rechts-Richtung um bis zu 135 °
drehen. Zum Verbessern der Bildqualität können Sie den Fokus
manuell einstellen.
MMeecchhaanniisscchheerr AArrmm
Ihr Gerät verfügt über einen mechanischen Arm, mit dessen Hilfe Sie
ein Bild in voller Größe projizieren können (ein A4-Blatt lässt sich
komplett im Querformat darstellen).
Den Winkel hier an der
gerieften Seite einstellen
90°
45°
75°
92°
60°
Auf bis zu 122 mm
ausziehbar
120°
D-10
Page 45

LLEEDD--LLiicchhttmmoodduull
Das LED-Lichtmodul liefert weißes Licht und eignet sich am besten für
Präsentationen bei schwacher Umgebungsbeleuchtung.
Schalten Sie einSchalten Sie ein Schalten Sie ausSchalten Sie aus
AAnnttiirreefflleexxbbooggeenn
Der Antireflexbogen besteht aus einer speziell beschichteten Folie, die
Reflexionen unterdrückt, wenn Sie beispielsweise stark glänzende
Objekte oder Oberflächen wie Magazine, Fotos, und so weiter
darstellen möchten. Legen Sie den Antireflexbogen zur
Reflexreduktion einfach auf das glänzende Dokument.
English Deutsch Français
Italiano Español Česky
D-11
Page 46

IInnffrraarroottffeerrnnbbeeddiieennuunngg vveerrwweennddeenn
Die Fernbedienung Ihrer AVerVision300AF ist eine große Hilfe bei
Präsentationen. Mit der Fernbedienung können Sie zwischen drei
Präsentationsmodi umschalten und auf verschiedene Funktionen
zugreifen. Bevor Sie die Fernbedienung benutzen können, müssen Sie
zunächst zwei Batterien (Größe „AAA“, mitgeliefert) in das Batteriefach
an der Rückseite der Fernbedienung einlegen. Zum Einsatz der
Fernbedienung schauen Sie sich bitte die nachstehende Abbildung und
die folgenden Beschreibungen an.
(2)
(3)
(4)
(5)
(6)
(7)
(8)
(9)
(10)
(11)
(12)
(1)
(20)
(19)
(18)
(17)
(16)
(15)
(14)
(13)
Name Ta st e Funktion
(1) POWER (Betrieb)
(2) CAMERA MODE
(Kameramodus)
(3) PC MODE
(PC-Modus)
(4) PLAYBACK MODE
(Wiedergabemodus)
(5) EFFECTS
(Effekt)
D-12
Schaltet das Gerät ein und aus.
Zeigt das Bild der Dokumentkamera an.
Zeigt das Videosignal vom
RGB-Eingang.
Zeigt erfasste Bilder aus dem
Speicher – als Übersicht mit 16
Miniaturbildern oder als Vollbild.
Wandelt das Live-Bild in Schwarzweiß-,
Negativ- oder Farbdarstellung um. (Nur
im Kameramodus.)
Page 47

Name Ta st e Funktion
(6) TIMER
(7) REVERSE
(Umdrehen)
(8 & 18)
PG UP/DOWN (Seite
vorhergehenden/
nächsten)
(9) NIGHT VIEW
(Nachtansicht)
(10) FREEZE
(Einfrieren)
(11) AUTO FOCUS
(12) FOCUS
(Scharfeinstellung) U /
V
Zeigt, startet und verbirgt den
Anzeigetimer. (Unter Timerfunktion
finden Sie weitere Details.)
Dreht das Bild um 180 °. (Nur im
REVERSE
Kameramodus.)
PG UP
Schaltet zum vorhergehenden oder
nächsten Block mit 16 Miniaturbildern
um.
PG DN
Schaltet den Nachtmodus ein oder aus.
Den Nachtmodus setzen Sie ein, wenn
Sie eine Präsentation bei schwacher
Beleuchtung halten.
Die Bildrate des angezeigten Bildes ist
geringer als üblich.
Friert das angezeigte Bild ein
(Standbild) und setzt die Darstellung
wieder fort. (Nur im Kameramodus.)
Stellt das Bild automatisch scharf.
(Automatisch Scharfeinstellung)
Zur manuellen Scharfeinstellung des
Bildes.
English Deutsch Français
(13) ZOOM +/ -
(14) ZOOM RESET
(Zoom rücksetzen)
(15) MENU
(16) ▲ ▼ ◄
(► ENTER
(Eingeben))
Vergrößert oder verkleinert das Bild im
Wiedergabemodus (die
Größenänderung wird digital erreicht).
Wenn die maximale AVERZOOM-Stufe
von etwa 200 % erreicht ist, können Sie
das Bild digital noch weiter auf bis zu
1600 % vergrößern.
Stellt die normale Ansicht (1x) wieder
her.
Blendet OSD-Hauptmenü und
-Untermenü ein und aus.
- Verschiebt das vergrößerte Bild nach
links, rechts, oben oder unten.
ENTE R
- Zur Auswahl im Hauptmenü und in
Untermenüs. (Unter Menüfunktionen
finden Sie weitere Details.)
- Mit diesen Tasten wählen Sie auch das
gewünschte Bild in der Miniaturansicht
aus; mit der Taste
ausgewählte Bild anzeigen.
D-13
Italiano Español Česky
lassen Sie das
Page 48

2
5
Name Ta st e Funktion
(17) CAPTURE
(Erfassen)
(19) MIRROR
(Spiegeln)
(20) DELETE
(Löschen)
Nimmt ein Standbild auf. Das erfasste
Bild wird in einer Auflösung von 1024 x
768 Pixeln (Bildpunkten) im internen
Speicher abgelegt.
Spiegelt die Bilddarstellung im
Kameramodus.
Im Wiedergabemodus: Löscht das
ausgewählte Bild permanent aus dem
internen Speicher.
TTiippppttaasstteenn--BBeeddiieennffeelldd
Das Tipptasten-Bedienfeld an der Oberseite der AVerVision300AF
ermöglicht Ihnen schnellen Zugriff auf häufig verwendete Funktionen.
)
(
(1)
(3)
(4)
(
(6)
)
(10)
(9)
(8)
(7)
Funktion Beschreibung
(1) CAMERA MODE
(Kameramodus)
(2) PC MODE
(PC-Modus)
(3) PLAYBACK MODE
(Wiedergabemodus)
(4) CAP/DEL
(Erfassen/ Löschen)
Zeigt das Bild der Dokumentkamera an.
Zeigt das Videosignal vom RGB-Eingang.
Zeigt erfasste Bilder aus dem Speicher – als
Übersicht mit 16 Miniaturbildern oder als
Vollbild.
Nimmt ein Standbild auf. Das erfasste Bild wird
in einer Auflösung von 1024 x 768 Pixeln
(Bildpunkten) im internen Speicher abgelegt.
Im Wiedergabemodus: Löscht das
ausgewählte Bild permanent aus dem internen
Speicher.
D-14
Page 49

Funktion Beschreibung
(5) EFFECTS
(Effekt)
(6) FREEZE
(Standbild)
(7) AUTO FOCUS
(Autofokus)
(8) MENU
(9) ZOOM +/ -
(10) ▲ ▼ ◄ ►
Wandelt das Live-Bild in Schwarzweiß-,
Negativ- oder Farbdarstellung um. (Nur im
Kameramodus.)
Friert das angezeigte Bild ein (Standbild) und
setzt die Darstellung wieder fort. (Nur im
Kameramodus.)
Stellt das Bild automatisch scharf.
Blendet OSD-Hauptmenü und -Untermenü ein
und aus.
Vergrößert oder verkleinert das Bild im
Wiedergabemodus (die Größenänderung wird
digital erreicht).
Wenn die maximale AVERZOOM-Stufe von
etwa 200 % erreicht ist, können Sie das Bild
digital noch weiter auf bis zu 1600 %
vergrößern.
- Verschiebt das vergrößerte Bild nach links,
rechts, oben oder unten.
- Zur Auswahl im Hauptmenü und in
Untermenüs. (Unter Menüfunktionen finden
Sie weitere Details.)
- Mit diesen Tasten wählen Sie auch das
gewünschte Bild in der Miniaturansicht aus;
mit der Taste
ausgewählte Bild anzeigen.
LLEEDD--FFeelldd
An der LED an der Vorderseite der AVerVision300AF können Sie den
Betriebsstatus des Gerätes ablesen.
lassen Sie das
English Deutsch Français
Italiano Español Česky
Farbe Beschreibung
Grün Das Gerät arbeitet mit dem VGA-Ausgang.
Orange Das Gerät arbeitet mit dem TV-Ausgang.
Rot Das Gerät befindet sich im Bereitschaftsmodus.
D-15
Page 50

n
TTiimmeerrffuunnkkttiioon
Die AVerVision300AF hilft Ihnen dabei, das Tempo Ihrer Präsentation im
Griff zu behalten, indem sie die restliche Zeit anzeigt. Dies dient in erster
Linie als Erinnerung. Nach Ablauf der Zeit wird lediglich der Timer in der
oberen rechten Bildecke ausgeblendet. Die Darstellung der Präsentation
wird dadurch nicht beeinflusst.
So stellen Sie den Timer ein:
1. Blenden Sie das Funktionsauswahlmenü mit der MENU-Taste ein.
2. Wählen Sie TIMER mit den Tasten ▲ oder ▼ .
3. Stellen Sie die gewünschte Zeit mit den Tasten ► oder ◄ ein. Sie
können eine Maximalzeit von bis zu 120 Minuten wählen.
4. Nachdem Sie die Zeit eingestellt haben, kehren Sie mit der
MENU-Taste wieder zum Hauptmenü zurück.
So zeigen Sie den Timer an und starten den Countdown:
1. Zur Anzeige des zuvor eingestellten
Timerwertes drücken Sie die
TIMER-Taste einmal. Die
AVerVision300AF wandelt Ihre
Einstellung automatisch in das Format
„Stunden:Minuten:Sekunden“ um. Die
maximale Einstellung beträgt 120
Minuten.
2. Zum Starten des Countdowns drücken
Sie die TIMER-Taste noch einmal.
3. Sobald der Countdown läuft, können
Sie die Countdown-Anzeige mit der TIMER-Taste einblenden und
verbergen.
BBiillddeerr vvoonn ddeerr AAVVeerrVViissiioonn330000AAFF
zzuumm PPCC üübbeerrttrraaggeenn
Auf diese Weise können Sie Bilder zwischen internem Speicher und dem
PC austauschen.
0:00:30
: Sie MÜSSEN die nachstehenden Anweisungen lesen
und befolgen, BEVOR Sie das USB-Kabel anschließen.
1. USB-AUSWAHL MUSS auf Bildübertragung eingestellt sein, bevor Sie das
USB-Kabel anschließen.
Zum Einstellen von USB-AUSWAHL zur Bildübertragung
(Massenspeicher), drücken Sie MENU, wählen USB-AUSWAHL, drücken
(►), wählen BILDÜBERTRAGUNG und drücken (►).
2. Wenn „Bildübertragung“ in der unteren rechten Bildschirmecke angezeigt
wird, können Sie die Dokumentkamera über das USB-Kabel mit dem PC
verbinden.
3. Beim Anschluss des USB-Kabels wird die Dokumentkamera vom System
automatisch als neuer Wechseldatenträger erkannt.
4. Nun können Sie erfasste Bilder aus der AVerVision300AF zu Ihrem
Computer übertragen.
D-16
Page 51

OOSSDD--NNaavviiggaattiioonnssbbaauumm
VViiddeeooaauussggaanngg--OOSSDD
Bei der Ausgabe über ein Fernsehgerät erscheint
AUFLÖSUNG nicht in der Menüliste.
MENU
HELLIGKEIT
KONTRAST
ZOOM
ZEITMESSER
MODUS
EFFEKT
STANDARD
ERWEITERT
MENU
BASIS
BELICHTUNG
WEISSABGLEICH
AUFLÖSUNG
SPRACHE
FORMAT
USB AUSWÄHLEN
HELLIGKEIT
-50 0 50
KONTRAST
-50 0 50
ZOOM
LINEAR
SCHNELL
TIMER : MIN.
-0 0 120
MODUS
TEXT
GRAFIK
HIGH FRAME
EFFEKT
FARBE
S / W
NEGATIV
SPIEGEL
INVERTIEREN
STANDARD
NEIN
JA
BELICHTUNG
AUTO
MANUELL
FLICKER
NACHTSICHT
WEISSABGLEICH
AUTO
MANUELL
AUFLÖSUNG
1024 X 768
800 X 600
640 X 480
SPRACHE
ENGLISH
DEUTSCH
FRANÇAIS
ITALIANO
ESPAÑOL
PУССКИЙ
POLSKI
PORTUGUÊS
FORMAT
NEIN
JA
USB AUSWÄHLEN
PC-KAMERA
DOWNLOAD
MANUELL
0 38 54
FLICKER
50Hz
60Hz
MANUELL
ROT
BLAU
MESSEN
English Deutsch Français
Italiano Español Česky
ROT
0 91 255
BLAU
0 66 255
D-17
Page 52

MMeennüüffuunnkkttiioonneenn
Mit den Menüfunktionen der AVerVision30AF können Sie die
Bilddarstellung feinabstimmen, den Timer einstellen, die OSD-Sprache
(Anzeigesprache) festlegen und vieles mehr. Mit der MENU-Taste
können Sie Hauptmenü und Untermenüs ein- und ausblenden. Mit den
Tasten ▲ und▼ wählen Sie Menüelemente aus. Mit der Taste ► rufen
Sie ein Untermenü auf. Zum Anpassen einer Einstellung verwenden Sie
die Tasten ◄ und ►.
OSD-Menü Beschreibung
- 50 0 50
- 50 0 50
LINEAR
SCHNELL
0 0 120
TEXT
GRAFIK
HIGH FRAME
HELLIGKEIT
KONTRAST
ZOOM
TIMER - MIN
MODUS
HELLIGKEIT
Mit den Tasten ► und ◄ erhöhen oder vermindern
Sie die Bildhelligkeit und können so die
Sichtbarkeit nach Wunsch verbessern. Den
Helligkeitspegel können Sie im Bereich ±50
anpassen.
KONTRAST
Mit den Tasten ► und ◄ verstärken oder
reduzieren Sie die Differenz zwischen hellen und
dunklen Bildteilen, den Kontrast. Den Kontrastwert
können Sie im Bereich ±50 anpassen.
ZOOM
Mit den Tasten ▲ und ▼ wählen Sie zwischen
linearem und schnellem Zoom (Vergrößerung)
aus, mit der Taste ► treffen Sie Ihre Auswahl.
Mit Hilfe des linearen Zooms können Sie den
Vergrößerungsfaktor um 10 % vergrößern oder
verkleinern. Beim schnellen Zoom beträgt die
Schrittweite 100 %. Sie können die Bilddarstellung
um maximal 1600 % vergrößern.
ZEITMESSER
Stellen Sie die gewünschte Zeit mit den Tasten ►
oder ◄ ein. Sie können eine Maximalzeit von bis zu
120 Minuten wählen. (Detailliertere Informationen
finden Sie im Abschnitt Timerfunktion.)
MODUS
Mit den Tasten ▲ und ▼ wählen Sie zwischen Text,
Grafik und Schnellmodus aus.
Im Textmodus gleicht die AVerVision300AF die
Helligkeit benachbarter Pixel (Bildpunkte) einander
an, um auf diese Weise schärfere und deutlichere
Bilder zu erzeugen.
Im Grafikmodus passt die AVerVision300AF den
Farbübergang benachbarter Pixel einander an, um ein
glatteres Bild zu erreichen.
Für die meisten täglichen Anwendungen empfehlen
wir den Schnellmodus. Dadurch reagiert die Kamera
schneller und kann bewegte Objekte besser
verfolgen. (Dieser Modus setzt eine gute Beleuchtung
voraus.)
D-18
Page 53

OSD-Menü Beschreibung
EFFEKT
FARBE
S / W
NEGATIV
SPIEGEL
INVERTIEREN
STANDARD
NEIN
JA
BELICHTUNG
AUTO
MANUELL
FLICKER
NACHTSICHT
MANUELL
03854
FLICKER
50 Hz
60 Hz
WEISSABGLEICH
AUTO
MANUELL
MANUELL
ROT
BLAU
MESSEN
AUFLÖSUNG
1024 x 768
800 x 600
640
480
x
EFFEKT
Use ▲or▼ buttons to display the image captured by
the camera into negative, positive (true color),
monochrome (black and white), mirrored image, or as
a rotated image by 180º.
STANDARD
Use ▲or▼ buttons to select YES to restore to
original factory default setting or NO to exit. Press ►
to make the selection.
BELICHTUNG
Mit den Tasten ▲ und▼ wählen Sie zwischen Auto
und Manuell aus.
Sie können die AVerVision300AF so einstellen, dass die
richtige Belichtungseinstellung automatisch ermittelt oder
manuell vorgenommen wird.
Wenn Sie die Belichtung manuell steuern, stellen Sie
die Belichtungsstufe mit den Tasten ► und ◄ ein.
Wenn Sie bei schwacher Beleuchtung arbeiten, sorgt
der Nachtmodus dafür, dass das Objekt wie bei
normalen Lichtverhältnissen dargestellt wird. Die
AVerVision300AF passt die Belichtung automatisch
an die ungünstigen Lichtverhältnisse an; allerdings
wird das Bild dabei in Zeitlupe dargestellt.
FLICKER
Mit den Tasten ▲ und▼ wählen Sie zwischen 50 Hz
und 60 Hz aus. Manche Anzeigegeräte arbeiten nicht
mit hohen Bildwiederholungsraten. Beim Umschalten
auf eine andere Bildwiederholungsrate flackert die
Anzeige ein paar Male.
WEISSABGLEICH
Mit den Tasten ▲ und▼ wählen Sie zwischen Auto
und Manuell aus.
Die AVerVision300AF ermöglicht Ihnen eine
automatische oder manuelle Anpassung der Kamera
an unterschiedliche Licht- und
Farbtemperaturverhältnisse. Falls Sie eine manuelle
Anpassung des Weißabgleichs wünschen, können
Sie die Farbwerte für Rot und Blau angleichen oder
die Farbtemperatur vom System ermitteln lassen.
Um einen exakteren Weißabgleich zu erreichen, legen
Sie ein Blatt weißes Papier unter die Kamera. Wählen Sie
MEASURE (MESSEN), drücken Sie dann die Taste ►
zum Kalibrieren der Farbtemperatur. Warten, Sie bis
„MEASURE OK“(MESSUNG OK) in der linken unteren
Ecke des Präsentationsbildschirms angezeigt wird.
AUFLÖSUNG
Mit den Tasten ▲ und ▼ wählen Sie zwischen den
Anzeigeauflösungen 1024 x 768, 800 x 600 und 640 x
480 Pixeln (Bildpunkten), danach bestätigen Sie Ihre
Auswahl mit der Taste ►.
English Deutsch Français
Italiano Español Česky
D-19
Page 54

OSD-Menü Beschreibung
SPRACHE
ENGLISH
DEUTSCH
FRANÇAIS
ITALIANO
ESPAÑOL
PУССКИЙ
POLSKI
PORTUGUÊS
FORMAT
NEIN
JA
USB AUSWÄHLEN
PC-KAMERA
DOWNLOAD
SPRACHE
Mit den Tasten ▲und▼ wählen Sie zwischen den
verschiedenen Sprachen des Menüs. Ihre Auswahl
bestätigen Sie mit der Taste ►.
FORMAT
Diese Funktion formatiert (löscht) den integrierten
Bildspeicher. Wählen Sie mit den Tasten ▲ oder ▼
Nein (Funktion abbrechen) oder Ja (Speicher
formatieren und alle Bilder löschen) aus, drücken Sie
dann ►.
Bitte warten Sie, bis die Meldung
„FORMAT“(Formatieren) verschwindet. Erst dann ist
der Vorgang abgeschlossen.
USB AUSWÄHLEN
Mit den Tasten ▲ und ▼ schalten Sie den
USB-Modus zwischen PC Camera und
Bildübertragung um.
Im PC Camera-Modus können Sie die
AVerVision300AF als Computer-Webcam oder – mit
der mitgelieferten Software – auch als Videorecorder
und Fotokamera benutzen.
Im Bildübertragungsmodus können Sie im internen
Speicher der AVerVision300AF gespeicherte Bilder
zum Computer übertragen.
RRSS223322--AAnnsscchhlluussssddiiaaggrraammmm
Über den RS232-Anschluss kann die AVerVision300AF mit einem PC
gesteuert werden.
VIDEO S-VIDEO DVI
VIDEO S-VIDEO DVI
TV RGB
TV RGB
S-Video/RS-232-Kabel
RS-232-Kabel
(nicht mitgeliefert)
Computer
Notebook
D-20
Page 55

t
RRSS223322CC--PPiinnbbeelleegguunngg
Achten Sie darauf, dass die Pinbelegung Ihres RS232-Kabels der
folgenden Belegung entspricht.
PC-COM-Port
DSUB-9P (weiblich)
6789
1
CD
RXD
2
TXD
3
4
12345
DTR
DSR
RTS
CTS
RI (CI)
SG
5
6
7
8
9
1
2
3
4
5
6
7
8
9
AVerVision RS-232-Por
TXD
RXD
SG
DSUB-9P (weiblich)
12345
6789
RRSS--223322CC ÜÜbbeerrttrraagguunnggsseeiiggeennsscchhaafftteenn
Start bit
Data Bit
Stop Bit
Parity Bit
X Parameter
Baud rate (Kommunikationsgeschwindigkeit)
RRSS--223322CC KKoommmmuunniikkaattiioonnssffoorrmmaatt
Start Code(1 Byte) : 0xFF
Type Code(1 Byte) : 0x70
DataLength Code(1 Byte) : 0x01
Data Code(1 Byte) : Bitte entnehmen Sie die Kommandos aus der RS-232C
Kommandoübersicht
CheckSum Code(1 Byte) : Bitte entnehmen Sie die Kommandos aus der
RS-232C Kommandoübersicht
Format : Start + Type + DataLength + Data + CheckSum
Beispiel : 0xFF + 0x70 + 0x01+ 0x80 + 0xF1 (Command Power)
:1 bit
:8 bit
:1 bit
:None
:None
:9600bds
English Deutsch Français
Italiano Español Česky
RRSS--223322CC KKoommmmaannddooüübbeerrssiicchhtt
FUNKTION DATA CODE
POWER 0x80 0xF1
CAPTURE 0x90 0xE1
TIMER 0x8A 0xFB
NIGHT VIEW 0x8E 0xFF
FREEZE 0x91 0xE0
MODE
SELECTION
PREVIEW
MODE
CAMERA 0x83 0xF2
PC 0x82 0xF3
PREVIEW 0x81 0xF0
DELETE 0x88 0xF9
PAGE UP 0x8D 0xFC
PAG E
DOWN
0x8F 0xFE
CHECKSUM
CODE
D-21
Page 56

FUNKTION DATA CODE
IN 0x9A 0xEB
ZOOM
FOCUS
OSD
EFFECT
OUT 0x9C 0xED
ZOOM
RESET
AUTO
FOCUS
NEAR 0x9B 0xEA
FAR 0x99 0xE8
MENU 0x94 0xE5
UP 0x92 0xE3
DOWN 0x96 0xE7
RIGHT 0x95 0xE4
LEFT 0x93 0xE2
MIRROR 0x8B 0xFA
ROTATE 0x89 0xF8
COLOR /
B.W /
NEGATIVE
CHECKSUM
CODE
0x98 0xE9
0x97 0xE6
0x86 0xF7
PPrroobblleemmllöössuunngg
In diesem Abschnitt finden Sie einige nützliche Tipps zur Lösung von
allgemeinen Problemen, auf die Sie bei der Arbeit mit der AVerVision300AF
eventuell stoßen können.
Kein Bild auf dem Präsentationsbildschirm.
1. Überprüfen Sie sämtliche Verbindungen, halten Sie sich dabei an die
Hinweise in dieser Anleitung.
2. Schauen Sie nach, ob das Ausgabegerät tatsächlich eingeschaltet ist.
3. Überprüfen Sie die Einstellungen des Ausgabegerätes.
4. Wenn Sie einen (Notebook-) Computer zur Präsentation einsetzen,
überzeugen Sie sich davon, dass sich die Kamera im PC-Modus befindet.
Ich habe die AVerVision300AF richtig eingerichtet und sämtliche
Verbindungen wie im Handbuch angegeben hergestellt und
überprüft. Dennoch wird kein Bild auf dem Präsentationsbildschirm
angezeigt.
1. Sobald die Stromversorgung hergestellt ist, wechselt das Gerät in den
Bereitschaftsmodus, die LED leuchtet ROT. „Switch ON (Schalten)“ Sie die
AVerVision300AF einfach durch Drücken des Ein-/Ausschalters ein: Die LED
erlischt kurz und färbt sich dann GRÜN.
2. Die Kamera-Anzeigeauflösung ist auf 1024 x 768 Bildpunkte voreingestellt.
Falls Ihr Ausgabegerät diese Auflösung nicht unterstützt, kann kein Bild
angezeigt werden. Drücken Sie einfach die MENU- und die RECHTS- oder
LINKS-Tasten zum Erhöhen oder Vermindern der Auflösung.
3. Falls Sie ein Fernsehgerät oder ein sonstiges Analoggerät zur Ausgabe
nutzen, achten Sie darauf, den TV-RGB-Umschalter auf TV einzustellen.
Das Bild auf dem Präsentationsbildschirm ist verzerrt oder
verschwommen.
1. Setzen Sie sämtliche geänderten Einstellungen auf die Werksvorgaben
zurück. (Unter Menüfunktionen finden Sie die nötigen Details und Schritte.)
D-22
Page 57

2. Versuchen Sie, die Verzerrungen durch Anpassung von Helligkeit und
Kontrast (Menüfunktionen) zu reduzieren.
3. Sollte das Bild verschwommen oder unscharf sein, drücken Sie die
Autofokustaste („Auto Focus“) am Bedienfeld oder an der Fernbedienung.
Kein Computerbild auf dem Präsentationsbildschirm.
1. Überprüfen Sie sämtliche Kabelverbindungen zwischen Anzeigegerät,
AVerVision300AF und Ihrem PC.
2. Schließen Sie die AVerVision300AF an Ihren PC an, bevor Sie den Computer
einschalten.
Wenn ich vom Dokumentkameramodus in den PC-Modus
umschalte, wird nicht das exakte Desktop-Bild meines PCs oder
Notebooks auf dem Präsentationsbildschirm angezeigt.
1. Am PC oder Notebook setzen Sie den Mauszeiger auf eine freie Stelle auf
dem Desktop und klicken mit der rechten Maustaste. Wählen Sie
„Properties“(Eigenschaften), danach das Register „Settings“(Einstellungen).
Klicken Sie den Monitor Nummer 2 an und setzen Sie ein Häkchen bei
„Extend my windows desktop onto this mirror“ (Angefügt“ oder
„Windows-Desktop auf diesen Monitor erweitern). Klicken Sie auf „OK“.
2. Setzen Sie den Mauszeiger nun noch einmal auf eine freie Stelle auf dem
Desktop und klicken Sie noch einmal mit der rechten Maustaste.
3. Stellen Sie Ihre Grafikkarte nun so ein, dass das Bild sowohl über den internen
Bildschirm (bei Notebooks) als auch über den externen Bildschirm
ausgegeben wird. Die exakte Vorgehensweise erfahren Sie in der
Dokumentation zu Ihrer Grafikkarte.
4. Nachdem Sie diese Schritte ausgeführt haben, sollte dasselbe Desktop-Bild
sowohl auf dem PC oder Notebook als auch auf dem Präsentationsbildschirm
angezeigt werden.
Wie übertrage ich Bilder von der AVerVision300AF zum PC? Ist es
normal, dass die AVerVision300AF wieder zum Kameramodus
wechselt, nachdem ich Bilder übertragen und das USB-Kabel
getrennt habe?
Wählen Sie „IMG download“(Bildtransfer) aus dem Menü, schließen Sie dann das
USB-Kabel an AVerVision300AF und PC an, übertragen Sie nun die in der
AVerVision300AF gespeicherten Bilder auf den PC. Wenn Sie damit fertig sind,
trennen Sie das USB-Kabel. Die AVerVision300AF wechselt automatisch in den
Kameramodus.
English Deutsch Français
Italiano Español Česky
EEiinnggeesscchhrräännkkttee GGaarraannttiiee
Für einen Zeitabschnitt, beginnend ab dem Kaufdatum des zutreffenden Produkts und sich
wie in Abschnitt 6 dieser eingeschränkten Garantie (der “Garantiezeit”) angegeben
erstreckend, garantiert AVerMedia Technologies, Inc. (“AVerMedia”), dass das zutreffende
Produkt (“Produkt”) im Wesentlichen mit der AVerMedia-Dokumentation für das Produkt
übereinstimmt und dass Ausführung und Materialien des Produkts und seiner Bauteile bei
normaler Verwendung fehlerfrei sind. “Sie” in diesem Vertrag betrifft Sie als Einzelperson
oder als Firma, in derem Auftrag Sie das Produkt verwenden oder installieren. Diese
eingeschränkte Garantie erstreckt sich nur auf Sie als Originalkäufer. Abgesehen vom
oben erwähnten erhalten Sie das Produkt “OHNE MÄNGELGEWÄHR”. AVerMedia
garantiert unter keinen Umständen, dass Sie das Produkt problemlos oder
unterbrechungsfrei bedienen können oder dass das Produkt Ihren Zwecken dienlich ist. Ihr
einziges Rechtsmittel und die gesamte Haftung seitens AVerMedia gemäß diesem
Paragraph ist nach AVerMedias Ermessen die Reparatur oder der Ersatz des Produkts mit
durch ein gleiches oder vergleichbares Produkt. Diese Garantie bezieht sich nicht auf (a)
D-23
Page 58

ein Produkt, auf dem die Seriennummer verunstaltet, modifiziert oder entfernt wurde, oder
auf (b) Kartons, Gehäuse, Batterien, Bänder oder Zubehör, das zusammen mit diesem
Produkt verwendet wird. Diese Garantie bezieht sich nicht auf ein Produkt, das aufgrund
von (a) Unfall, Missbrauch, falscher Verwendung, Vernachlässigung, Brand, Wasser,
Gewitter oder anderen Naturereignissen, gewerblicher oder industrieller Verwendung,
unautorisierter Produktveränderung oder Unterlassung, den dem Produkt beigelegten
Anweisungen Folge zu leisten, (b) falscher Dienstleistung von Personen, die nicht vom
Vertreter des Hersteller beauftragt wurden, (c) Transportschäden (diese müssen beim
Spediteur angezeigt werden) oder (d) anderen Ursachen, die keinen Produktfehler
darstellen, beschädigt wurde, sich verschlechert hat oder nicht richtig funktioniert. Die
Garantiezeit eines reparierten oder ersetzten Produkts ist nicht länger als (a) die originale
Garantiezeit oder beträgt (b) dreißig (30) Tage ab Lieferungsdatum des reparierten oder
ersetzten Produkts.
Einschränkungen der Garantie
AVerMedia übernimmt keine Garantien für Dritthersteller. Sie sind verantwortlich für alle
Forderungen, Schäden, Schlichtungen, Ausgaben und Anwaltskosten hinsichtlich gegen
Sie gerichtete Forderungen als Folge Ihrer Verwendung oder Ihres Missbrauchs des
Produkts. Diese Garantie trifft nur zu, wenn das Produkt entsprechend den
AVerMedia-Spezifikationen installiert, bedient, gewartet und verwendet wird. Insbesondere
erstreckt sich diese Garantie nicht auf Fehler, die erfolgen aufgrund von (i) Unfall,
ungewöhnlicher physikalischer, elektrischer oder elektromagnetischer Belastung,
Vernachlässigung oder Missbrauch, (ii) Schwankungen im Netzstrom über die
AVerMedia-Spezifikationen hinaus, (iii) Verwendung des Produkts mit Zubehör oder
Optionen, die nicht von AVerMedia oder seiner autorisierten Vertretung stammen, oder (iv)
Installation, Änderung oder Reparatur des Produkts von Personen, die nicht von
AVerMedia oder seiner autorisierten Vertretung beauftragt wurden.
Widerruf der Garantie
AUSSER, WIE AUSDRÜCKLICH HIER ANGEGEBEN IST, UND ZUM MAXIMALEN PER
GESETZT ZUGELASSENEN AUSMASS WIDERRUFT AVERMEDIA ALLE ANDEREN
DIREKTEN, INDIREKTEN, GESETZLICHEN ODER ANDERWEITIGEN GARANTIEN
HINSICHTLICH DES PRODUKTS, EINSCHLIESSLICH UND OHNE EINSCHRÄNKUNG
VON ZUFRIEDENSTELLENDER QUALITÄT, GESCHÄFTSVERKEHR,
HANDELSGEBRAUCH ODER PRAKTIKEN ODER INDIREKTER GARANTIEN DER
VERKÄUFLICHKEIT, TAUGLICHKEIT FÜR EINEN BESTIMMTEN ZWECK ODER
NICHTVERLETZUNG VON RECHTEN DRITTER.
Eingeschränkte Haftpflicht
UNTER KEINEN UMSTÄNDEN HAFTET AVERMEDIA FÜR INDIREKTE, ZUFÄLLIGE,
BESONDERE, BEISPIELHAFTE, STRAFRECHTLICHE ODER FOLGERECHTLICHE
SCHÄDEN ALLER ART, EINSCHLIESSLICH, JEDOCH NICHT BESCHRÄNKT AUF
PROFITVERLUSTE, DATEN, EINKÜNFTE, PRODUKTION ODER VERWENDUNG,
GESCHÄFTSUNTERBRECHUNG ODER BESCHAFFUNG VON ERSATZGÜTERN
ODER DIENSTLEISTUNGEN, DIE AUS ODER IN VERBINDUNG MIT DIESER
EINGESCHRÄNKTEN GARANTIE ENTSTEHEN, ODER DER VERWENDUNG ODER
LEISTUNGEN EINES PRODUKTS, SEIEN SIE VERTRAGLICH ABGESICHERT ODER
UNERLAUBT, EINSCHLIESSLICH VERNACHLÄSSIGUNG ODER ANDERER
GESETZLICHER THEORIEN, AUCH WENN AVERMEDIA VON DER MÖGLICHKEIT
DERARTIGER SCHÄDEN UNTERRICHTET WURDE. AVERMEDIAS GESAMTE,
VEREINIGTE HAFTBARKEIT FÜR SCHÄDEN ALLER ART, UNABHÄNGIGKEIT VON
DER ART DER HANDLUNG, ÜBERSCHREITET IN KEINEM FALL DEN BETRAG, DEN
SIE AN AVERMEDIA FÜR DAS BESTIMMTE PRODUKT, AUF WELCHES SICH DIE
HAFTBARKEIT BEGRÜNDET, BEZAHLTEN.
Maßgebliches Gesetze und Ihre Rechte
Diese Garantie bietet Ihnen bestimmte Rechte; gemäß Bundesrecht stehen Ihnen zudem
auch weitere Rechte zu. Diese Rechte sind je nach Bundesstaat unterschiedlich.
Die Länge der Garantiezeit entnehmen Sie bitte der Garantiekarte.
D-24
Page 59
NOTICE FCC (Classe A)
Cet appareil est conforme à la partie 15 des règles
FCC. L’opération est soumise aux deux conditions
suivantes : (1) cet appareil ne peut pas provoquer
toute interférence reçue, y compris l’interférence que pourrait
causer une opération non souhaitée.
REMARQUE- cet appareil a été testé et certifié conforme aux
limites d’un appareil numérique de classe A, conformément à la
partie 15 des règles FCC. Ces limites sont conçues pour fournir
une protection raisonnable contre des interférences nuisibles
quand l ’ équipement est opéré dans un environnement
commercial. Cet équipement génère, utilise et peut émettre
une énergie en radiofréquence et, s’il n’est pas installé et utilisé
selon les instructions, il peut entraîner des interférences
nuisibles aux communications radio. L’opération de cet
équipement dans une zone résidentielle est susceptible
d’occasionner des interférences nuisibles, auquel cas
l’utilisateur sera tenu de corriger l’interférence à ses frais.
PRÉCAUTION LORS DE MODIFICATIONS
Pour se conformer aux limites pour l’appareil numérique de
classe A, conformément à la partie 15 des règles FCC, cet
appareil doit être installé dans un équipement informatique
certifié conforme aux limites de la classe A. Tous les câbles
utilisés pour connecter l’ordinateur et les périphériques doivent
être blindés et mis à la terre. L’opération avec des ordinateurs
non certifiés ou des câbles non blindés peut entraîner des
interférences dans la réception radio ou télévisée.
Les changements et modifications non approuvés
expressément par le fabriquant pourraient annuler la
compétence de l’utilisateur à opérer cet équipement.
Avis de conformité à la Communauté
Européenne (Classe A)
électromagnétique.
Attention – Cet appareil appartient à la Classe A. Dans un
environnement domestique, cet appareil est susceptible
de causer des interférences radio, et dans ce cas il est
possible que l'utilisateur doive prendre des mesures
adéquates pour éliminer ces interférences.
AVIS DE NON-RESPONSABILITÉ
Aucune garantie ou représentation, qu’elle soit exprimée ou
impliquée, n’est faite relativement au contenu de cette
documentation, sa qualité, sa performance, sa qualité
d’interférence et (2) cet appareil doit accepter
Cet appareil est conforme aux limites de
protection définies par la directive 89/336/EEC du
Conseil de l’UE, amendée par 92/31/EEC sur les
lois des Pays Membres pour la compatibilité
English Deutsch Français
Italiano Español Česky
Page 60

marchande ou sa compatibilité dans un but spécifique. La
fiabilité des informations présentées dans cette documentation
ont été vérifiées avec attention ; toutefois, aucune
responsabilité ne sera assumée en cas d’erreurs. Les
informations contenues dans cette documentation sont sous
réserve de changement sans préavis.
En aucun cas AverMedia ne sera responsable de dommages
directs, indirects, particuliers, accidentels ou immatériels en
conséquence de l’utilisation ou de l’incapacité à utiliser ce
produit ou cette documentation, même s’il est avisé de la
possibilité de tels dommages.
MARQUES DE COMMERCE
AVerMedia est une marque déposée d’AverMedia
TECHNOLOGIES, Inc. IBM PC est une marque déposée du
Groupe International Business Machines. Macintosh est une
marque déposée d’Apple Computer, Inc. Microsoft est une
marque déposée et Windows est une marque de commerce du
Groupe Microsoft. Tous les autres produits ou dénominations
sociales mentionnés dans cette documentation ne sont que
pour des raisons d’identification et d’explications et peuvent
être des marques commerciales ou des marques déposées de
leurs propriétaires respectifs.
COPYRIGHT
© 2006 by AVerMedia TECHNOLOGIES, Inc. Tous droits
réservés. Aucune partie de cette publication ne peut pas être
reproduite, transmise, transcrite, stockée dans un système
d’interrogation ou traduite dans une langue quelconque sous
quelque forme et par quelque moyen que ce soit sans
l’autorisation écrite d’AverMedia TECHNOLOGIES, Inc.
LA MARQUE FIGURANT UNE POUBELLE SUR
ROULETTES BARRÉE INDIQUE QUE CE
PRODUIT NE DOIT PAS ÊTRE JETE AVEC
VOS DECHETS MENAGERS. PLUTOT, JETEZ
L’EQUIPEMENT USE EN LE REMETTANT A
UN POINT DE COLLECTE DESIGNE POUR LE
RECYCLAGE DE L’EQUIPEMENT
ELECTRIQUE ET ELECTRONIQUE USAGE.
POUR PLUS D’INFORMATIONS SUR LES
LIEUX OU VOUS POUVEZ DEPOSER VOTRE
EQUIPEMENT USE POUR RECYCLAGE,
VEUILLEZ CONTACTER VOTRE SERVICE
D’ELIMINATION DE DECHETS MENAGERS
OU LE MAGASIN OU VOUS AVEZ ACHETE LE
PRODUIT.
Page 61

TTaabbllee ddeess mmaattiièèrreess
Introduction....................................................... F-1
Contenu de l’emballage................................... F-1
Accessoires en option..................................... F-2
Pièces de l’AVerVision300AF ..........................F-3
Spécifications techniques............................... F-4
Faire les connexions........................................ F-5
Connexion de l’adaptateur d’alimentation................ F-6
Connexion d’un téléviseur .......................................F-6
Connexion d’un moniteur VGA, d’affichage Mac ou
d’un projecteur LCD/DLP......................................... F-
Connexion d’un ordinateur par connexion USB....... F-8
Installation de la table lumineuse en option............. F-9
Connexion sur un microscope .................................F-9
Configuration de l’AVerVision300AF............ F-10
Tête de caméra .....................................................F-10
Bras mécanique.....................................................F-10
Module de la DEL.................................................. F-11
Feuille anti-reflet.................................................... F-11
Utilisation de la télécommande
à infrarouge..................................................... F-
Panneau de commande du bouton
tactile .............................................................. F-
Panneau de DEL .............................................F-15
Fonction Minuterie ......................................... F-16
Transfert de l’image saisie de
l’AVerVision300AF à l’ordinateur.................. F-
Arborescence de navigation de l’affichage
écran................................................................ F-
Fonctions du menu ........................................ F-18
Schéma de connexion RS-232C ................... F-20
Caractéristiques du câble RS-232C.............. F-21
RS-232C Caractéristiques de
Transmission .................................................. F-
RS-232C Format de Communication............ F-21
RS-232C Tableau de Commande ..................F-21
Dépannage ...................................................... F-22
Garantie Limitée ............................................. F-23
12
14
16
17
21
English Deutsch Français
7
Italiano Español Česky
Page 62

Page 63

A
V
®
IInnttrroodduuccttiioonn
Merci d’avoir acheté le
AVerVision300AF
d’AVerMedia®. Ce
document caméra affiche
tous documents, négatifs,
transparents et objets 3D
sur un projecteur de
télévision, d’écran LCD ou
un projecteur DLP, faisant
des présentations
instantanées.
AVerVision300AF est un
outil de présentation ideal
dans le milieu
académique, commercial,
médical et scientifique.
CCoonntteennuu ddee ll’’eemmbbaallllaagge
AVerVision300AF d’AVerMedia®
h
s
i
l
g
n
Manuel d’utilisateur
E
F
0A
on30
i
s
i
V
®
er
V
A
h
a
edi
c
M
er
V
A
s
t
nual
u
a
M
e
er
s
U
D
s
i
a
ç
n
a
r
F
o
n
a
i
l
a
t
I
l
o
ñ
a
p
s
E
y
k
s
e
ČČ
a
i
d
e
M
r
e
a
r
e
m
a
C
t
n
e
m
u
c
o
D
l
a
t
i
g
i
D
Télécommande
(piles fournies)
e
Feuille anti-reflet
Sac de transport
Lecteur CD
English Deutsch Français
Italiano Español Česky
Câble RCA
Câble USB
Câble S-Vidéo
Rallonge de câble d’ordinateur
(câble VGA)
Fiche électrique
* La fiche électrique variera en
Câble S- Vidéo/RS-232
fonction de la prise de courant
standard du pays où elle est
vendue.
Adaptateur de puissance
F-1
Page 64

AAcccceessssooiirreess eenn ooppttiioonn
34mm Adaptateur
miscroscopique
Coupleur microscopique
DEL avec pointeur de
positionnement laser
28 mm Adaptateur
miscroscopique
Table lumineuse
F-2
Page 65

(1) Tête de caméra
(2) Module de la DEL
(3) Objectif de la caméra
(4) Panneau de
commande
(5) Bras
(6) Panneau de gauche
(7) Capteur infrarouge
(8) Panneau arrière
(9) Panneau de droite
(10) Bouton
d’alimentation
(11) Fente antivol
(12) Port CC 12 V
(13) Port d’alimentation
de la table
lumineuse
(14) Port de sortie VGA
(15) Port d’entrée VGA
(16) Port de sortie
s-vidéo
(17) Port de sortie vidéo
composite
(18) Poussoir
d’affichage TV/RVB
(19) Port de sortie DVI
(20) Port USB
PPiièècceess ddee ll’’AAVVeerrVViissiioonn330000AAFF
Les illustrations ci-dessous identifient les pièces de
l’AVerVision300AF
(1)
(2)
(3)
(4)
Panneau de droite
Panneau arrière
(11)
Panneau de gauche
(17)
.
(16)
(10)
LIGHT
BOX
VGAOUTVGAINDC12V
(14)(12)
(15)(13)
(19)
(20)
(5)
(6)
(7)
(8)
(9)
English Deutsch Français
Italiano Español Česky
VIDEO S-VIDEODVI
(18)
TV RGB
F-3
Page 66

SSppéécciiffiiccaattiioonnss tteecchhnniiqquueess
Image
Capteur Balayage progressif ½ po. CMOS
Pixels total 3,2 Mega
Vitesse de défilement 24 images par seconde (maxi.)
Balance des blancs Auto. / Manuel
Exposition Auto. / Manuel / Papillotement / Vue nocturne
Mode image Texte / Graphes / Image haute
Effet
Sortie RVB
alanogique
Sortie S-Vidéo, Vidéo
en composantes
Capture image Jusqu’à 80 images
Mémoire incorporée Mémoire Flash NAND 32 Mo
Couleur / N&B / Négatif ; Marche arrière ; Mirroir
XGA:60 Hz, SVGA:60 Hz, VGA:60 Hz
NTSC ou PAL
Optique
Objectif F3.0 ; Mise au point manuelle
Zone de prise de vue 320 mm x 240 mm (maxi.) ;
Zoom AVERZOOM : 2x, Numérique : 8x
Alimentation
Source d’alimentation
Consommation
DC 12V, 1.2~ 4A, 100-240V, 50-60 Hz
7,44 watts (lampe éteinte) ; 10,68 watts (lampe
alllumée)
Éclairage
Type de lampe Lampe DEL
Entrée/Sortie
Entrée VGA D-sub à 15 broches (VGA)
Sortie VGA D-sub à 15 broches (VGA)
Sortie DVI Type DVI-I
S-Vidéo Connecteur Mini-DIN
Vidéo en
composantes
USB USB2.0
Sortie 6 V cc Connecteur d’alimentation
Connecteur RCA
Dimensions
424mm x 173,4mm x 330mm
365mm x 173,4mm x 95,85mm
2 kg (environ 4,4 lb)
Opération
Plié
Poids
F-4
Page 67

FFaaiirree lleess ccoonnnneexxiioonnss
Les ports sur les panneaux arrière et latéraux de l’AverVision300AF
vous permettent de brancher l’unité sur un ordinateur, un moniteur à
affichage graphique, un projecteur LCD/DLP, une télévision ou
d’autres appareils. L’illustration ci-dessous présente les ports qui
sont situés sur les panneaux arrière et latéraux de l’AverVision300AF
avec leurs étiquettes correspondantes.
I
V
D
O
E
D
(6)
I
V
-
S
O
E
D
I
V
B
G
R
V
T
(10)
(9)
(8)
(7)
(1)
(2)
D
C
1
2
V
L
I
G
H
T
B
O
X
V
G
A
I
N
V
G
A
O
U
T
(3)
(4)
(5)
Nom Fonction
(1) Fente antivol Attacher un verrou de sécurité ou un dispositif
(2) CC 12 V (entrée) Connecter l’adaptateur de courant sur ce port.
(3) Port de la table
lumineuse
(4) Port d’entrée VGA Entrer le signal RVB d’un ordinateur ou d’autres
(5) Port de sortie
VGA
(6) Commutateur
TV/RVB
(7) Port vidéo
(RCA/Composite)
(8) Port s-vidéo Sortir le signal de la caméra ou les images saisies
(9) Port DVI Sortir le signal vidéo de la caméra ou les images
(10) Port USB Utiliser l’AVerVision300AF comme caméra USB ou
antivol compatible Kensington.
Brancher la table lumineuse optionnelle sur ce port.
sources et le faire passer activement dans le port
de sortie VGA seulement.
Connecter ce port au port de sortie VGA de
l’ordinateur.
Sortir le signal RVB de la caméra, le port d’entrée
VGA, ou les images saisies de la mémoire sur un
moniteur VGA/Mac ou un projecteur LCD/DLP.
Régler pour sélectionner la sortie d’affichage RVB
(sortie VGA) ou TV (sortie vidéo
composite/s-vidéo).
Sortir le signal de la caméra ou les images
saisies de la mémoire intégrée sur le
téléviseur ou l’équipement vidéo.
de la mémoire sur le téléviseur ou l’équipement
vidéo.
saisies de la mémoire sur un moniteur LCD ou un
projecteur LCD/DLP avec interface DVI.
téléchargement d’images permettant de transférer
les images saisies depuis la mémoire intégrée de
l’AVerVision300AF et le PC et vers ces derniers.
English Deutsch Français
Italiano Español Česky
F-5
Page 68

CCoonnnneexxiioonn ddee ll’’aaddaappttaatteeuurr dd’’aalliimmeennttaattiioonn
Vous pouvez connecter l’adaptateur de puissance à une source
d’alimentation standard 100 V ~ 240 V ca.
LIGHT
BOX
VGAOUTVGAINDC12V
Adaptateur de
puissance
Fiche électrique
Prise
d’alimentation
murale
CCoonnnneexxiioonn dd’’uunn ttéélléévviisseeuurr
Localiser le port d’entrée vidéo, s-vidéo ou SCART RVB du téléviseur ou
de l’équipement vidéo (p. ex. magnétoscope) pour enregistrer la
présentation sur une bande vidéo. En cas de doute, se reporter au
manuel de l’utilisateur du téléviseur ou de l’équipement vidéo.
- S’assurer que le commutateur TV/RVG est réglé à TV.
- Pour une meilleure qualité vidéo, nous conseillons
fortement d’utiliser la connexion s-vidéo.
VIDEO S-VI DEO D VI
VIDEO S-VI DEO D VI
TV RGB
TV RGB
Entrée
Câble du S-Vidéo vers Péritel
(non fourni)
Câble S-Vidéo
Câble RCA
Câble du RCA vers Péritel
(non fourni)
SCART
S-VIDEO
VIDEO
SCART
Projecteur
Télévision
Magnétoscope
F-6
Page 69

r
CCoonnnneexxiioonn dd’’uunn mmoonniitteeuurr VVGGAA,, dd’’aaffffiicchhaaggee
MMaacc oouu dd’’uunn pprroojjeecctteeuurr LLCCDD//DDLLPP
Localiser le port d’entrée RVB (VGA) du dispositif d’affichage. En cas de
doute, se reporter au manuel de l’utilisateur de l’appareil.
S’assurer que le commutateur TV/RVG est réglé à RVB.
LIGHT
BOX
CCoonnnneexxiioonn dd’’uunn mmoonniitteeuurr VVGGAA oouu dd’’uunn
pprroojjeecctteeuurr LLCCD
VGAOUTVGAINDC12V
Monitor Adapter
(not supplied)
D
RGB (VGA) cable
(not supplied)
MAC
MAC monitor
LCD/DLP projecto
CRT monitor
LCD monitor
//DDLLPP aavveecc iinntteerrffaaccee DDVVII
Localiser le port d’entrée DVI du dispositif d’affichage. En cas de doute,
se reporter au manuel de l’utilisateur de l’appareil.
English Deutsch Français
Italiano Español Česky
S’assurer que le commutateur TV/RVG est réglé à RVB.
VIDEO S-VIDEO DVI
VIDEO S-VIDEO DVI
TV RGB
TV RGB
Moniteur LCD avec
interface DVI
Câble DVI
(non fourni)
Projecteur LCD/DLP
avec interface DVI
F-7
Page 70

CCoonnnneexxiioonn dd’’uunn PPCC ccoommppaattiibbllee IIBBMM oouu dd’’uunn
oorrddiinnaatteeuurr MMaacciinnttoossh
h
Localiser le port vidéo RVB de l’ordinateur ou du portable pour afficher la
présentation PC à l’écran. L’AVerVision300AF prend en charge la
connectivité d’intercommunication active, où le signal vidéo provenant
du port d’entrée VGA est continuellement dirigé vers le port de sortie
VGA et affiché à l’écran même quand l’AVerVision300AF est hors
tension.
LIGHT
BOX
CCoonnnneexxiioonn dd’’uunn oorrddiinnaatteeuurr ppaarr ccoonnnneexxiioonn
UUSSBB
VGAOUTVGAINDC12V
Rallonge de câble d’ordinateur
(câble VGA)
Adaptateur du Moniteur
(non fourni)
Ordinateur
Portable
Macintosh
Localiser le port USB de l’ordinateur ou du portable. Cela permet
d’utiliser l’AVerVision300AF comme caméra USB ou de tranférer les
images saisies de la mémoire intégrée vers l’ordinateur. Voir aussi «
Transférer une image de l’AVerVision300AF au PC » et se reporter au
manuel de l’utilisateur du bundle logiciel.
VIDEO S-VIDEO DVI
VIDEO S-VIDEO DVI
TV RGB
TV RGB
Ordinateur
Portable
Macintosh
Câble USB
F-8
Page 71

IInnssttaallllaattiioonn ddee llaa ttaabbllee lluummiinneeuussee eenn ooppttiioonn
La connexion d’une table lumineuse en option vous permet de visualiser
des radiographies, des transparents et des dispositives.
ALLUMER
Table Lumineus
(en option)
BRANCHEZ ICI
CCoonnnneexxiioonn ssuurr uunn mmiiccrroossccooppee
La connexion de l’AverVision300AF sur un microscope vous permet
d’examiner des objets microscopiques sur un écran plus large sans
vous fatiguer les yeux.
Coupleur microscopique
English Deutsch Français
Adaptateur
Appuyez ici sur le taquet pour
détacher le module du voyant
depuis la tête de la caméra
Module de DEL
F-9
microscopique
Microscope
Italiano Español Česky
Page 72

CCoonnffiigguurraattiioonn ddee ll’’AAVVeerrVViissiioonn330000AAFF
Cette section fournit des astuces utiles illustrées sur la façon de régler
l’AverVision300AF pour satisfaire vos besoins.
TTêêttee ddee ccaamméérraa
La tête de caméra peut être tournée de 135° de gauche à droite. Vous
pouvez également régler manuellement la mise au point ici pour
améliorer la qualité des images.
90°
BBrraass mmééccaanniiqquuee
Le bras mécanique permet de projeter une image sur toute sa hauteur
en format horizontal A4.
Réglez l’angle ici au niveau
de l’arête cannelée
45°
75°
92°
60°
Extensible jusqu’ à
122 mm (4,8 po.)
de long
120°
F-10
Page 73

MMoodduullee ddee llaa DDEELL
Le module de la DEL émet une lumière blanche ext est conçu pour
être utilisé dans des conditions d’éclairage faible.
AllumezAllumez EteignezEteignez
FFeeuuiillllee aannttii--rreefflleett
La feuille anti-reflet est un film spécial enduit qui permet d’éliminer les
reflets que vous pourriez avoir si vous affichez des objets très brillants
ou des surfaces réfléchissantes comme des magazines, des photos,
etc. Tournez simplement la face anti-reflet vers le haut et placez-la sur
le document pour réduire les reflets de lumière.
English Deutsch Français
Italiano Español Česky
F-11
Page 74

UUttiilliissaattiioonn ddee llaa ttééllééccoommmmaannddee àà iinnffrraarroouuggee
Utilisez la télécommande AverVision300AF pour améliorer votre
présentation, passez entre trois (3) modes de présentation et accédez à
diverses caractéristiques. Pour utiliser la télécommande, insérez d’abord
les piles (2 piles de taille « AAA » sont fournies) dans le compartiment à
piles au dos de la télécommande. Utilisez la figure et les descriptions
ci-dessous pour vous aider à utiliser la télécommande.
(2)
(3)
(4)
(5)
(6)
(7)
(8)
(9)
(10)
(11)
(12)
(1)
(20)
(19)
(18)
(17)
(16)
(15)
(14)
(13)
Nom Bouton Fonction
(1) POWER
(ALIMENTATION)
(2) CAMERA
MODE (MODE
CAMERA)
(3) PC MODE
(MODE PC)
(4) PLAYBACK
MODE (MODE
LECTURE)
(5) EFFECTS
(EFFETS)
(6) TIMER
(MINUTERIE)
F-12
Mettre l’appareil sous tension/hors
tension.
Afficher l’image de la caméra de
transmission de documents.
Afficher le signal vidéo du port
d’entrée RVB.
Afficher les images saisies de la
mémoire intégrée en mode 16
miniatures ou en mode plein écran.
Changer l’image en direct en noir et
blanc, négative ou couleurs (mode
caméra seulement).
Affichez, démarrez et cachez la
minuterie d’affichage écran. (voir la
fonction de minuterie pour plus de
détails)
Page 75

Nom Bouton Fonction
(7) REVERSE
(RETOURNER)
(8 & 18)
PAGE UP/DOWN
(PAGE HAUT/BAS)
(9) NIGHT VIEW
(VUE NOCTURNE)
(10) FREEZE (GEL)
(11) AUTO FOCUS
(MISE AU POINT
AUTOMATIQUE)
(12) FOCUS (MISE
AU POINT) U / V
(13) ZOOM +/ -
(14) ZOOM RESET
(15) MENU
(16) ▲ ▼ ◄ (►
ENTER)
REVERSE
PG UP
PG DN
ENTER
Faites pivoter l’image à 180°. (mode
caméra seulement)
Pour aller à la page précédente ou
suivante avec 16 autres diapos.
Allumez/Eteignez la vue nocturne.
Utilisez la vue nocturne quand vous
faites une présentation dans des
conditions d’éclairage faible.
L’image à l’écran s’affiche à une faible
fréquence de trames.
Basculer pour pauser ou réactiver
l’image à l’écran (mode caméra
seulement).
Ajuster automatiquement la mise au
point.
Ajuster manuellement la mise au
point.
Zoomez numériquement vers l’avant
et vers l’arrière sur la photo en mode
Lecture.
Quand le niveau maximal
AVERZOOM d’environ 200 % est
atteint, il est possible de continuer à
faire un zoom entrant numérique sur
l’image jusqu’à 1 600 %.
Retournez en vision normale (1x).
(REINITIALISATION DU ZOOM)
Remonter et quitter le menu principal
à l’écran et le sous-menu.
- Faire un panoramique de l’image à
gauche, à droite, en haut et en bas en
mode zoom.
- Faire une sélection dans le menu
principal et dans le sous-menu (voir
fonctions du menu pour de plus
amples détails).
- Faire une sélection dans les
images en 16 minitures et appuyer sur
pour visualiser l’image
sélectionnée.
English Deutsch Français
Italiano Español Česky
F-13
Page 76

5
Nom Bouton Fonction
(17) CAPTURE
(19) MIRROR
(MIRROIR)
(20) DELETE
(EFFACER)
Saisir une image fixe. L’image saisie
est enregistrée dans la mémoire
intégrée à une résolution de
1024 x 768.
Retournez l’image en mode caméra.
Supprimer l’image sélectionnée de la
mémoire intégrée de façon
permanente en mode Lecture.
PPaannnneeaauu ddee ccoommmmaannddee dduu bboouuttoonn ttaaccttiillee
Le panneau de commande du bouton tactile situé du côté supérieur de
l’AverVision300AF procure un accès rapide aux fonctions utilisées
couramment.
(2)
(3)
(4)
(
(6)
(1)
MODE CAMERA
(2) MODE PC
(3) MODE LECTURE
(4) CAP/SUPPR
(5) EFFET
(6) GEL
)
Fonction Description
Afficher une image de la caméra de
transmission de documents.
Afficher le signal vidéo du port d’entrée RVB.
Afficher les images saisies de la mémoire
intégrée en mode 16 miniatures ou en mode
plein écran.
Saisir une image fixe. L’image saisie est
enregistrée dans la mémoire intégrée à une
résolution de 1024 x 768. Supprimer l’image
sélectionnée de la mémoire intégrée de
façon permanente en mode Lecture.
Changer l’image en direct en noir et blanc,
négative ou couleurs (mode caméra
seulement).
Basculer pour pauser ou réactiver l’image à
l’écran (mode caméra seulement).
(1)
(10)
(9)
(8)
(7)
F-14
Page 77

Fonction Description
(7)
MISE AU POINT
AUTOMATIQUE
(8) MENU
(9) ZOOM +/ -
(10) ▲ ▼ ◄ ►
Ajuster automatiquement la mise au point.
Remonter et quitter le menu principal à
l’écran et le sous-menu.
Zoomez numériquement vers l’avant et vers
l’arrière sur la photo en mode Lecture.
Zoomez optiquement et numériquement vers
l’avant et l’arrière sur l’image en mode
caméra. Quand le niveau maximal de
l’AVERZOOM d’environ 2 fois est atteint,
vous pouvez encore continuer à zoomer
numériquement dans l’image jusqu’à 1600%.
- Faire un panoramique de l’image à
gauche, à droite, en haut et en bas en mode
zoom.
- Faire une sélection dans le menu principal
et dans le sous-menu (voir fonctions du
menu pour de plus amples détails).
- Faire une sélection dans les images en 16
miniatures et appuyer sur
visualiser l’image sélectionnée.
pour
English Deutsch Français
PPaannnneeaauu ddee DDEELL
La LED à l’avant du panneau de l’AverVision300AF indique le statut de
l’unité.
Couleur Description
Vert L’unité est opérée avec une sortie VGA.
Orange L’unité est opérée avec une sortie TV.
Rouge L’unité en en mode veille.
F-15
Italiano Español Česky
Page 78

e
FFoonnccttiioonn MMiinnuutteerriie
L’AverVision300AF vous permet de contrôler la vitesse de votre
présentation en affichant le temps restant sur l’écran de compte à
rebours. Ceci sert purement de rappel. Quand le temps est écoulé, la
minuterie disparaît dans le coin supérieur droit seulement et l’écran de
présentation ne sera pas affecté en quoi que ce soit.
Pour régler la minuterie :
1. Appuyez sur MENU pour visualiser les sélections de fonctions à
l’écran.
2. Appuyez sur les boutons▲ ou▼ pour sélectionner TIMER
(MINUTERIE).
3. Appuyez sur les boutons ► ou◄ pour régler une valeur de durée.
Vous pouvez définir une durée d’une valeur allant jusqu’à 120
minutes.
4. Après avoir sélectionné une valeur de durée, appuyez sur le bouton
MENU pour retourner au menu principal.
Pour visualiser et démarrer le compte à rebours de la minuterie :
1. Pour afficher la valeur de durée
précédemment définie, appuyez une
fois sur le bouton TIMER (MINUTERIE).
L’AVerVision300AF convertit
automatiquement vos paramètres au
format “hours:minutes:seconds”«
heures:minutes:secondes ». Le
paramètrage maximal est de 120
minutes.
2. Pour démarrer le compte à rebours,
appuyez à nouveau sur le bouton
TIMER (MINUTERIE).
3. Une fois que le compte à rebours démarre, vous pouvez basculer sur
l’écran de compte à rebours pour le faire apparaître et disparaître en
pressant sur le bouton TIMER (MINUTERIE).
TTrraannssffeerrtt ddee ll’’iimmaaggee ssaaiissiiee ddee
ll’’AAVVeerrVViissiioonn330000AAFF àà
Cela permet de transférer l’image saisie de la mémoire intégrée vers le
PC.
Les instructions ci-dessous DOIVENT être lues et
respectée AVANT de connecter le câble USB.
1. Il FAUT définir la SELECTION USB comme Téléchargement d’images avant
de connecter le câble USB.
Pour définir la SELECTION USB comme Stockage de masse, appuyer sur
MENU > sélectionner SELECTION USB et appuyer sur (►)> sélectionner
TELECHARGEMENT D’IMAGES et appuyer sur (►).
2. Quand « Téléchargement d’images » s’affiche dans le coin inférieur droit de
l’écran, il est possible de connecter un câble USB entre la caméra de
transmission de documents et l’ordinateur.
3. Après connexion du câble USB, le système détecte automatiquement la
caméra de transmission de documents comme nouveau disque amovible.
4. Il est maintenant possible de transférer l’image saisie de l’AVerVision300AF
vers l’ordinateur.
0:00:30
ll’’oorrddiinnaatteeuurr
F-16
Page 79

AArrbboorreesscceennccee ddee nnaavviiggaattiioonn ddee
ll’’aaffffiicchhaaggee ééccrraann
AFFICHAGE A L’ECRAN DE LA SORTIE VIDEO
Pour la sortie TV, la RESOLUTION ne figure pas dans la liste
du menu.
English Deutsch Français
Italiano Español Česky
F-17
Page 80

FFoonnccttiioonnss dduu mmeennuu
Les fonctions du MENU de l’AverVision300AF vous permettent d’ajuster
votre affichage écran, régler la minuterie, sélectionner la langue
d’affichage écran et plus. Appuyez sur le bouton MENU pour l’appeler
et quittez l’affichage du menu principal ou du sous-menu. Utilisez les
touches ▲ou▼ pour sélectionner les éléments dans la liste du menu.
Utilisez la touche ► pour entrer dans le sous-menu. Pour réglez les
paramètres, appuyez sur les touches ◄ou►.
Menu OSD Description
LUMINOSITE
- 50 0 50
CONTRASTE
- 50 0 50
ZOOM
LINEAIRE
RAPIDE
CHRONO - MIN
0 0 120
MODE
TEXTE
GRAPHIQUE
HIGH FRAME
LUMINOSITE
Appuyez sur les touches ►ou◄ pour
augmenter ou diminuer le niveau de luminosité
et améliorer la visibilité de l’image. Vous
pouvez régler le niveau de luminosité jusqu’à
±50.
CONTRASTE
Appuyez sur les touches ►ou◄ pour accentuer
ou réduire la différence entre les zones claires
et sombres. Vous pouvez régler le niveau de
contraste jusqu’à ±50.
ZOOM
Utilisez les touches ▲ou▼pour sélectionner
entre linéaire ou zoom rapide, puis appuyez sue
► pour faire une sélection.
En utilisant le zoom linéraire, vous pouvez
augmenter ou diminuer les valeurs du zoom de
10%. En utilisant le zoom rapide, les incréments
sont de 100%. La valeur maximale de zoom
que vous pouvez visualiser est 1600%.
CHRONO
Appuyez sur les boutons ►ou◄ pour régler une
valeur de durée. Vous pouvez définir une durée
d’une valeur allant jusqu’à 120 minutes.
(référez-vous à la section Utilisation de la
minuterie, pour plus de détails)
MODE
Utilisez les touches ▲ou▼ pour sélectionner
entre les modes Texte, Graphes et Ecran haut.
En mode texte, l’AverVision300AF corrige
l’intensité du pixel adjacent, ce qui le rend encore
plus uniforme en produisant des images plus
nettes et plus claires.
Tandis qu’en mode graphe, l’AverVision300AF
règle le gradient du pixel adjacent en le faisant
apparaître de façon à avoir une image lisse.
En condition temps réel, nous suggérons de
sélectionner le mode Ecran haut, qui peut pister
des objets animés de manière plus visuelle et
réagir rapidement. (il est préférable d’utiliser ce
mode sous un bon éclairage).
F-18
Page 81

Menu OSD Description
EFFET
COULEUR
N / B
NEGATIF
MIROIR
INVERSER
DEFAUT
NON
OUI
EXPOSITION
AUTO
MANUEL
SCINTILLEMENT
VIS. NUIT
MANUEL
03854
SCINTILLEMENT
50 Hz
60 Hz
BAL. BLANCS
AUTO
MANUEL
MANUEL
ROUGE
BLEU
AJUSTER
EFFET
Utilisez les touches▲ou▼ pour afficher l’image
capturée par la caméra en négatif, positif (couleur
vraie), monochrome (noir et blanc), image
inversée ou image pivotée à 180º.
DEFAUT
Utilisez les touches ▲ou▼ pour sélectionner OUI
pour restaurer aux paramètres par défaut d’usine
d’origine ou NON pour quitter. Appuyez sur ►
pour faire la sélection.
EXPOSITION
Utilisez les touches▲ou▼ pour sélectionner entre
Auto et Manuel.
AverVision300AF vous permet de régler
automatiquement ou manuellement la caméra
pour déterminer combien de lumière est requise.
Si vous choisissez de régler manuellement
l’exposition, appuyez sur les touches ►ou◄ pour
régler le niveau d’exposition.
Si vous faites une présentation dans des
conditions d’éclairage faible, la prise de vue
nocturne permet à l’image de l’objet d’apparaître
comme dans des conditions d’éclairage normal.
L’AverVision300AF règle automatiquement
l’exposition pour compenser pour la condition
adverse, mais l’image capturée apparaîtra au
ralenti.
SCINTILLEMENT
Utilisez les touches▲ou▼ pour sélectionner entre
50 Hz et 60 Hz. Certains dispositifs d’affichage ne
supportent pas des taux de rafraîchissement
élevés. L’image vacillera deux fois lorsque la
sortie passe à un autre taux de rafraîchissement.
Utilisez les touches▲ou▼ pour sélectionner entre
Auto et Manuel.
AverVision300AF vous permet de régler
automatiquement ou manuellement la caméra
pour convenir aux conditions d’éclairage ou de
température de couleur. Si vous sélectionnez le
réglage automatique de la balance des blancs,
vous pouvez régler le rouge, le bleu ou utiliser le
système de mesure de température des couleurs.
Pour obtenir une balance de blancs plus précise,
placez une feuille de papier blanch sous la
caméra. Sélectionner MEASURE (MESURER)
puis appuyez sur la touche ► pour calibrer la
température des couleurs. Attendez jusqu’à ce
que "MEASURE OK" « MESURE OK »
apparaisse dans le coin inférieur gauche de
l’écran de présentation.
English Deutsch Français
Italiano Español Česky
F-19
Page 82

Menu OSD Description
RESOLUTION
1024 x 768
x
800
640
ENGLISH
DEUTSCH
FRANÇAIS
ITALIANO
ESPAÑOL
PУССКИЙ
POLSKI
PORTUGUÊS
NON
OUI
PC CAM
CHARGEMENT
600
480
x
LANGUE
FORMAT
SELECT USB
RÉSOLUTION
Utilisez les boutons▲ou▼ pour choisir une
résolution d’image entre 1024 x 768, 800 x 600 et
640 x 480, puis appuyez sur ► pour faire la
sélection.
LANGUE
Utilisez les touches ▲ou▼pour sélectionner entre
langues différentes, puis appuyez sur ► pour faire
une sélection.
FORMAT IMG
Utilisez les touches ▲ou▼ pour sélectionner Non
pour quitter ou OUI pour formater et supprimer
toutes les images enregistrées dans la mémoire
incorporée, puis appuyez sur ►.
Veuillez patienter jusqu’à ce que le message
« FORMAT » disparaisse pour terminer le
processus.
SELECT USB
Utilisez les touches ▲ou▼ pour sélectionner les
fonctions USB entre la caméra de l’ordinateur et le
téléchargement d’images.
En mode Caméra PC, vous pouvez utiliser
l’AVerVision300AF comme Webcam d’ordinateur
ou avec le logiciel fourni comme enregistreur
vidéo et saisir une image fixe.
En mode téléchargement d’images, vous pouvez
télécharger les images enregistrées depuis la
mémoire incorporée de l’AverVision300AF sur
votre ordinateur.
SScchhéémmaa ddee ccoonnnneexxiioonn RRSS--223322CC
Votre AVerVision300AF peut être contrôlé avec un PC via une
connexion RS-232.
VIDEO S-VIDEO DVI
VIDEO S-VIDEO DVI
TV RGB
TV RGB
Câble S- Vidéo/RS-232
Câble RS-232
(non fourni)
F-20
Ordinateur
Portable
Page 83

CCaarraaccttéérriissttiiqquueess dduu ccââbbllee RRSS--223322CC
Vérifiez que les caractéristiques de votre câble RS-232
correspondent aux caractéristiques suivantes.
1
Port COM PC
DSUB-9P (Femelle)
12345
6789
CD
RXD
TXD
DTR
DSR
RTS
CTS
RI (CI)
2
3
4
5
SG
6
7
8
9
RRSS--223322CC CCaarraaccttéérriissttiiqquueess ddee
TTrraannssmmiissssiioonn
Bit de départ
Bit d’information
Bit d’arrêt
Bit de parité
Paramètre X
Débit en bauds (vitesse de communication)
RRSS--223322CC FFoorrmmaatt ddee CCoommmmuunniiccaattiioonn
Code Démarrage (1 Byte) : 0xFF
Code Type (1 Byte) : 0x70
Code Long (1 Byte) : 0x01
Code Donnée (1 Byte) : Consultez la table de commande pour votre référence
Code CheckSum (1 Byte) : Consultez la table de commande pour votre référence.
Format : Start + Type + DataLength + Data + CheckSum
Exemple : 0xFF + 0x70 + 0x01+ 0x80 + 0xF1 (Commande Alimentation)
1
Port AverVison RS-232
2
TXD
3
RXD
4
5
SG
6
7
8
9
:1 bit
:8 bit
:1 bit
:Aucun
:Aucun
:9600bds
DSUB-9P (Femelle)
12345
6789
English Deutsch Français
Italiano Español Česky
RRSS--223322CC TTaabblleeaauu ddee CCoommmmaannddee
CODE
DONNEES
MODE
SELECTION
MODE
PREVISUALISATION
Fonction
ALIMENTATION 0x80 0xF1
CAPTURE 0x90 0xE1
TIMER 0x8A 0xFB
VISION NOCTURNE 0x8E 0xFF
GEL DE L’IMAGE 0x91 0xE0
CAMERA 0x83 0xF2
PC 0x82 0xF3
PREVISUALISATION 0x81 0xF0
EFFACER 0x88 0xF9
HAUT de PAGE 0x8D 0xFC
BAS de PAGE 0x8F 0xFE
F-21
CODE
CHECKSUM
Page 84

ZOOM
FOCUS
OSD
EFFET
Fonction
CODE
DONNEES
AVANT 0x9A 0xEB
ARRIERE 0x9C 0xED
RESET ZOOM 0x98 0xE9
AUTO FOCUS 0x97 0xE6
PROCHE 0x9B 0xEA
LOIN 0x99 0xE8
MENU 0x94 0xE5
HAUT 0x92 0xE3
BAS 0x96 0xE7
DROIT 0x95 0xE4
GAUCHE 0x93 0xE2
MIRROIR 0x8B 0xFA
ROTATION 0x89 0xF8
COULEUR/ N&B/
NEGATIF
0x86 0xF7
CODE
CHECKSUM
DDééppaannnnaaggee
Cette section fournit des astuces utiles sur la façon de résoudre des
problèmes courants lors de l’utilisation de l’AverVision300AF.
La présentation écran n’a aucune image.
1. Vérifiez à nouveau tous les connecteurs comme indiqué dans ce manuel.
2. Vérifiez le commutateur marche/arrêt sur l’appareil de sortie d’affichage.
3. Vérifiez les paramètres de l’appareil de sortie d’affichage.
4. Si vous faites une présentation depuis un bloc-notes ou un ordinateur à
travers l’appareil de sortie d’affichage, veuillez vérifier et activer la source de
la caméra document en mode ordinateur.
J’ai installé l’AverVision300AF et vérifié toutes les connexions
selon les spécifications du manuel, mais aucune image n’apparaît
sur l’écran de présentation favori.
1. Une fois que les fiches d’alimentation sont connectées, le voyant LED(DEL)
devient RED(ROUGE) en mode veille. Commutez simplement
l’AverVision300AF sur “ON"« MARCHE » en appuyant sur le commutateur
marche/arrêt jusqu’à ce que la LED(DEL) clignote et devienne
GREEN(VERTE).
2. Les paramètres de résolution d’affichage de la caméra par défaut sont 1024 x
768. Si vous dispositif de sortie ne supporte pas cette résolution, aucune
image ne peut être projetée. Il suffit d’appuyer sur MENU et sur les touches
RIGHT(DROITE) ou LEFT(GAUCHE) pour augmenter ou diminuer les
paramètres de résolution.
3. Si votre périphérique de sortie d’affichage est le téléviseur ou un périphérique
analogique, assurez-vous que le commutateur d’affichage TV/RVB est réglé à
TV.
L’image sur l’écran de présentation est déformée ou l’image est
floue.
1. Réinitialisez tous les paramètres changés, s’il y a lieu, aux paramètres par
défaut du fabriquant d’origine (référez-vous aux fonctions du menu pour plus
de détails et les étapes à suivre).
2. Utiliser les fonctions du menu Luminosité et Contraste pour réduire la
F-22
Page 85

déformation le cas échéant.
3. Si vous découvrez que l’image est floue ou hors foyer, appuyez sur le bouton
Mise au point automatique du panneau de commande ou de la
télécommande.
La présentation écran n’a aucun signal de l’ordinateur.
1. Vérifiez toutes les connexions de câbles du dispositif d’affichage, de
l’AVerVision300AF et de votre ordinateur.
2. Connectez votre ordinateur sur l’AVerVision300AF d’abord avant de mettre
votre ordinateur sous tension.
L’écran de présentation ne montre pas l’image exacte du bureau
sur mon ordinateur ou bloc-notes après que je sois passé du mode
Caméra de document au mode Ordinateur.
1. Retourner à votre ordinateur ou bloc-notes, placez la souris sur le bureau et
cliquez droite. Choisissez “Properties”« Propriétés », choisissez l’onglet
“Setting”« Paramètres », cliquez sur le moniteur « 2 » et cochez la boîte
“Extend my Windows desktop onto this monitor”« Etendre mon bureau
Windows sur ce moniteur ».
2. Retournez ensuite une fois de plus sur votre ordinateur ou bloc-notes, placez
la souris sur le bureau et cliquez droite à nouveau.
3. Cette fois, choisissez “Graphics Options”« options graphiques », puis “Output
To”« sortie vers », puis “Intel
Dual» et ensuite “Monitor + Notebook”« Moniteur + bloc-notes ».
4. Après avoir suivi ces étapes, vous devriez pouvoir voir la même image du
bureau sur votre ordinateur ou bloc-notes ainsi que sur l’écran de
présentation.
Comment puis-je télécharger des images depuis l’AverVision300AF
sur un ordinateur ? Est-ce normal que l’AverVision300AF se
réinitialise en mode caméra après que j’ai téléchargé des images et
déconnecté le câble USB ?
Choisissez "IMG Download" « Téléchargement IMG » depuis le Menu, puis
connectez le câble USB pour télécharger les images capturées et stockées
depuis l’AverVision300AF sur votre ordinateur. Une fois que c’est terminé,
débranchez le câble USB. L’AverVision 300AF se réinitialisera automatiquement
en mode caméra.
®
Dual Display Clone”« Clone d’affichage Intel®
English Deutsch Français
Italiano Español Česky
GGaarraannttiiee LLiimmiittééee
Pour une période débutant à la date d’achat du produit concerné et étendue comme établi
dans la section 6 de cette Garantie Limitée (la « Période de Garantie »), AVerMedia
Technologies, Inc (« AVerMedia ») garantit que le produit concerné (« Produit ») est
substantiellement conforme à la documentation AVerMedia pour le produit et que sa
construction et ses composants sont exempts de défauts matériels et de main d’œuvre
dans les conditions normales d’utilisation. « Vous » tel qu’il est utilisé dans cet accord
vous représente individuellement ou représente l’entité professionnelle au nom de laquelle
vous utilisez ou installez le produit, si c’est applicable. Cette garantie limitée s’applique
uniquement à Vous en tant qu’acheteur original. A l’exception de ce qui est établi
ci-dessus, le Produit est fourni « TEL QUEL » En aucun cas AverMedia ne garantit que
vous serez capable de faire fonctionner le produit sans problèmes ou interruptions, ou que
le produit est adapté à vos besoins. Votre recours exclusif et la responsabilité entière
d’AVerMedia dans ce paragraphe doit être, au choix d’AVerMedia, la réparation ou le
remplacement du Produit par un Produit identique ou comparable. Cette garantie ne
s’applique pas aux (a) produits sur lesquels le numéro de série a été abîmé, modifié ou
retiré, et aux (b) cartons, boîtes, piles, boîtiers, bandes ou accessoires utilisés avec ce
produit. Cette garantie ne s’applique pas aux Produits qui ont subi des dommages, des
F-23
Page 86

détériorations ou dysfonctionnements dus à (a) un accident, un abus, une mauvaise
utilisation, une négligence, un incendie, l’eau, la foudre, ou d’autres phénomènes naturels,
des utilisations commerciales ou industrielles, des modifications non autorisées du produit
ou le non-respect des instructions fournies avec le produit, (b) une mauvaise opération de
dépannage effectuée par une personne autre qu’un représentant du constructeur, (c) tout
dommage du au transport (de telles plaintes doivent être portées contre le transporteur),
ou (d) d’autres causes n’ayant aucun rapport avec un défaut du produit. La Période de
Garantie de tout Produit remplacé ou réparé doit être égal à la durée de (a) la période de
garantie originale ou (b) trente (30) jours à compter de la date de livraison du produit
remplacé ou réparé.
Limites de la Garantie
AVerMedia ne donne aucune garantie aux parties tiers. Vous êtes responsable de toutes les
plaintes, dommages, accords, dépenses et frais de jugement en respect des plaintes
déposées contre Vous suite à Votre utilisation ou mauvaise utilisation du Produit. Cette
garantie s’applique uniquement si le Produit est installé, utilisé et entretenu en accord avec
les spécifications AVerMedia. Précisément, les garanties ne s’étendent pas aux pannes
provoquées par (i) un accident, une contrainte physique, électrique ou électromagnétique
inhabituelle, une négligence ou une mauvaise utilisation, (ii) des fluctuations de la source
d’alimentation au-delà des spécifications AVerMedia, (iii) l’utilisation du Produit avec des
accessoires ou options non fournies par AVerMedia ou ses agents agréés, ou (iv) une
installation, modification ou réparation du Produit effectuée par une personne autre que les
agents agréés AVerMedia.
Dénégation de Garantie
A L’EXCEPTION DE CE QUI EST EXPRESSÉMENT FOURNI ICI ET DANS LES LIMITES
DE LA LOI APPLICABLE, AVERMEDIA RÉFUTE TOUTE AUTRE GARANTIE
CONCERNANT LE PRODUIT, QU’ELLE SOIT EXPLICITE, IMPLICITE, STATUTAIRE OU
AUTRE, Y COMPRIS MAIS SANS SE LIMITER À LA QUALITÉ DE SATISFACTION, LE
COURS DE DISTRIBUTION, L’UTILISATION OU LA PRATIQUE COMMERCIALE OU
LES GARANTIES IMPLICITES DE COMMERCIALISATION, D’ADÉQUATION À UN
BESOIN PARTICULIER OU LA NON-VIOLATION DES DROITS DES PARTIES TIERS.
Limitation de Responsabilité
EN AUCUN CAS AVERMEDIA NE PEUT ÊTRE TENU POUR RESPONSABLE DES
DOMMAGES INDIRECTS, ACCIDENTELS, SPÉCIAUX, EXEMPLAIRES, RÉPRESSIFS
OU CONSÉCUTIFS D’AUCUNE NATURE QUE CE SOIT, Y COMPRIS MAIS SANS SE
LIMITER À, LA PERTE DE PROFITS, DE DONNÉES, DE REVENU, DE PRODUCTION
OU D’UTILISATION, L’INTERRUPTION D’AFFAIRES COMMERCIALES, OU LA
PRODUCTION DE BIENS DE SUBSTITUTION OU DE SERVICES SE PRODUISANT À
CAUSE DE OU EN CONNEXION AVEC CETTE GARANTIE LIMITÉE, OU L’UTILISATION
OU LA PERFORMANCE DE N’IMPORTE QUEL PRODUIT, QUE CE SOIT BASÉ SUR UN
CONTRAT OU UN TORT, Y COMPRIS LA NÉGLIGENCE, OU TOUTE AUTRE THÉORIE
LÉGALE, MÊME SI AVERMEDIA A ÉTÉ PRÉVENU DE LA POSSIBILITÉ DE TELS
DOMMAGES. LA RESPONSABILITÉ CUMULÉE ET TOTALE D’AVERMEDIA POUR
LES DOMMAGES DE TOUTE SORTE, SANS TENIR COMPTE DE LA FORME DE
L’ACTION, NE DOIT EN AUCUN CAS DÉPASSER LE MONTANT QUE VOUS AVEZ
PAYÉ À AVERMEDIA POUR CE PRODUIT SPÉCIFIQUE SUR LEQUEL LA
RESPONSABILITÉ EST BASÉE.
Lois Gouvernementales et Vos Droits
Cette garantie Vous donne des droits légaux ; Vous pouvez également bénéficier d’autres
droits garantis par les lois gouvernementales. Ces lois varient d’un état à l’autre.
Pour la période de garantie, veuillez référencer la carte de
garantie.
F-24
Page 87

AVVISO FCC (Classe A)
Questo dispositivo è conforme alla Parte 15 dei
Regolamenti FCC. Il funzionamento è soggetto
alle seguenti due condizioni: (1) questo dispositivo
accettare qualsiasi interferenza ricevuta, incluse quelle che
possono causare funzionamento indesiderato.
NOTA- Questo apparecchio è stato testato e ritenuto conforme
ai limiti dei dispositivi digitali di Classe A, ai sensi della Parte
15 dei Regolamenti FCC. Questi limiti sono stati stabiliti per
fornire una protezione adeguata contro le interferenze dannose
quando l'apparecchio viene utilizzato in un ambiente
commerciale. Questa apparecchiatura genera, usa e può
irradiare energia a radiofrequenze e, se non installata ed usata
conformemente alle istruzioni, può causare interferenze
dannose alle comunicazioni radio. L’utilizzo di questo
apparecchio in un'area residenziale potrebbe causare
interferenze dannose, in tal caso l'utente dovrà correggere
l'interferenza a proprie spese.
PRECAUZIONI SULLE MODIFICHE
Per essere conformi ai limiti per gli apparecchi digitali di Classe
A, secondo la Parte 15 dei Regolamenti FCC, il presente
dispositivo deve essere installato su un computer certificato
conforme ai limiti della Classe A. Tutti i cavi utilizzati per
collegare il computer e le periferiche, devono essere schermati
e messi a terra. L’utilizzo di computer non certificati o cavi non
schermati può provocare interferenze alla ricezione di radio o
televisione.
Cambiamenti e modifiche non approvate espressamente dal
produttore possono rendere non valida l'autorità dell'utente di
utilizzare questo apparecchio.
Dichiarazione di conformità per la Comunità
Europea (Class A)
Compatibilità Elettromagnetica.
Avviso - Questo è un prodotto di classe A. In un ambiente
domestico questo prodotto può provocare interferenze
radio, nel cui caso potrebbe essere richiesto all’utente di
prendere misure adeguate per correggere tale
interferenza.
LIBERATORIA
Non viene fornita nessuna garanzia o dichiarazione, sia essa
espressa o implicita, relativamente ai contenuti di questa
può causare interferenze dannose e (2) deve
Questo prodotto è conforme ai requisiti di
protezione espressi nella Direttiva del Concilio
Europeo 89/336/EEC emendata da 92/31/EEC in
base alle leggi degli Stati membri in relazione alla
English Deutsch Français
Italiano
Español Česky
Page 88

documentazione, alla sua qualità, prestazione, commerciabilità
o adeguatezza per un particolare scopo. Le informazioni
presentate in questa documentazione sono state controllate
attentamente per verificarne l'affidabilità, tuttavia non viene
assunta alcuna responsabilità per le imprecisioni. Le
informazioni contenute in questo documento sono soggette a
modifica senza preavviso.
In nessun caso AVerMedia è da ritenersi responsabile per
danni diretti, indiretti, speciali, accidentali o consequenziali
derivanti dall'utilizzo o dall'incapacità di utilizzo di questo
prodotto o documentazione, anche se avvisati della possibilità
di tali danni.
MARCHI DI FABBRICA
AVerMedia è un marchio registrato di AVerMedia
TECHNOLOGIES, Inc IBM PC è un marchio di registrato di
International Business Machines Corporation. Macintosh è un
marchio registrato di Apple Computer, Inc Microsoft è un
marchio registrato e Windows è un marchio registrato di
Microsoft Corporation. Tutti gli altri prodotti o nomi aziendali
menzionati nella presente documentazione servono solo a
scopo identificativo ed esplicativo e possono essere marchi di
fabbrica o marchi registrati dei rispettivi proprietari.
COPYRIGHT
© 2006 di AVerMedia Technologies, Inc. Tutti i diritti riservati.
Nessuna parte di questa pubblicazione può essere riprodotta,
trasmessa, trascritta, conservata in un sistema di recupero o
tradotta in qualsiasi lingua senza permesso scritto di
AVerMedia TECHNOLOGIES, Inc.
IL MARCHIO CON IL CESTINO A ROTELLE
CON LA CROCE SOPRA INDICA CHE
QUESTO PRODOTTO NON DEVE ESSERE
SMALTITO INSIEME AI RIFIUTI DOMESTICI.
IL DISPOSITIVO VA INVECE SMALTITO
CONSEGNANDOLO AD UN PUNTO DI
RACCOLTA PREDISPOSTO PER IL
RICICLAGGIO DEI RIFIUTI ELETTRICI E
DEGLI APPARECCHI ELETTRONICI. PER
ULTERIORI INFORMAZIONI SUI DOVE
PORTARE I PROPRI RIFIUTI ELETTRONICI
PER IL RICICLAGGIO, CONTATTARE IL
SERVIZIO LOCALE PER LO SMALTIMENTO
DEI RIFIUTI DOMESTICI O IL NEGOZIO
DOVE È STATO ACQUISTATO IL
PRODOTTO.
Page 89

IInnddiiccee
Introduzione....................................................... I-1
Contenuto della confezione ............................. I-1
Accessori opzionali........................................... I-2
Parti di AVerVision300AF.................................. I-3
Specifiche tecniche........................................... I-4
Eseguire i collegamenti .................................... I-5
Collegamento del trasformatore ...............................I-6
Collegamento al televisore .......................................I-6
Collegamento a VGA, monitor Mac o proiettore
LCD/DLP .................................................................. I-
Collegamento del computer usando la connessione
USB.......................................................................... I-
Installazione del l ight panel opzionale.......................... I-9
Collegamento ad un microscopio ............................. I-9
Installazione di AVerVision300AF .................. I-10
Testa della document camera................................. I-10
Mechanical Arm...................................................... I-10
Modulo luce LED .................................................... I-11
Antiriflesso.............................................................. I-11
Utilizzo del telecomando a infrarossi............ I-12
Pannello di controllo touch screen ............... I-14
Pannello LED ................................................... I-15
Funzione timer................................................. I-16
Trasferimento delle immagini acquisite da
AVerVision300AF al computer ....................... I-
Struttura di navigazione del menu a video... I-17
Funzioni del menu........................................... I-18
Schema di collegamento RS-232C ................ I-20
Specifiche del cavo RS-232C ......................... I-21
Specifiche di trasmissione RS-232C ............. I-21
Formato comunicazione RS-232C ................. I-21
Tabella comandi RS-232C............................... I-21
Risoluzione dei problemi................................ I-22
Garanzia limitata.............................................. I-23
16
English Deutsch Français
7
8
Italiano
Español Česky
Page 90

Page 91

A
V
®
IInnttrroodduuzziioonnee
Grazie per aver acquistato
AVerMedia®
AVerVision300AF. Questa
document camera
visualizza qualsiasi
documento, negativo,
lucido e oggetto 3D su TV,
LCD, o proiettore DLP
rendendo le presentazioni
rapide e pratiche.
AVerVision300AF è uno
strumento ideale per le
presentazioni
accademiche, di lavoro,
mediche e per la comunità
scientifica.
CCoonntteennuuttoo ddeellllaa ccoonnffeezziioonne
Foglio antiriflesso
AVerMedia® AVerVision300AF
h
s
i
l
g
n
E
F
A
0
0
3
n
o
i
s
i
V
r
®
e
V
A
h
a
i
d
e
c
M
r
e
V
A
s
t
l
a
u
n
u
a
M
r
e
e
s
U
D
s
i
a
ç
n
a
r
F
o
n
a
i
l
a
t
I
l
o
ñ
a
p
s
E
y
k
s
e
ČČ
a
i
d
e
M
r
a
e
r
e
m
a
C
t
n
e
m
u
c
o
D
l
a
t
i
g
i
D
Manuale utente
Telecomando
(batterie incluse)
Borsa per il trasporto
e
Unità CD
English Deutsch Français
Italiano
Cavo RCA
Cavo USB
Cavo elettrico
* Il cavo elettrico varia in base
Cavo S-Video
Prolunga computer
(Cavo VGA)
Cavo S-Video / RS-232
Español Česky
all'uscita standard
dell’alimentazione del paese
dove viene venduto.
Trasformatore elettrico
I-1
Page 92

AAcccceessssoorrii ooppzziioonnaalli
Adattatore per microscopio
34mm
Accoppiatore per microscopio
Lampada LED con puntatore
laser
i
Adattatore per microscopio
28mm
Light panel
I-2
Page 93

(1) Testina della
macchina
(2) Modulo luce LED
(3) Obiettivo della
macchina
(4) Pannello di controllo
(5) Braccio
(6) Pannello di sinistra
(7) Sensore IR
(8) Pannello posteriore
(9) Pannello di destra
(10) Tasto alimentazione
(11) Alloggio antifurto
(12) Porta CC 12V
(13) Porta alimentazione
luce
(14) Porta output VGA
(15) Pota input VGA
(16) Porta output
S-Video
(17) Porta output video
composito
(18) Interruttore
visualizzazione
TV/RGB
(19) Porta output DVI
(20) Porta USB
PPaarrttii ddii AAVVeerrVViissiioonn330000AAFF
La figura che segue illustra le parti di AVerVision300AF.
(1)
(2)
(3)
(4)
Pannello di destra
(10)
Pannello posteriore
(11)
LIGHT
BOX
VGAOUTVGAINDC12V
(15)(13)
Pannello di sinistra
(16)
(17)
(14)(12)
(19)
(20)
(5)
(6)
(7)
(8)
(9)
English Deutsch Français
Italiano
Español Česky
VIDEO S-VIDEODVI
(18)
TV RGB
I-3
Page 94

SSppeecciiffiicchhee tteeccnniicchhee
Immagine
Sensore Progress scan ½” CMOS
Pixel totali 3.2 Mega
Frequenza di quadro 24 fps (Max.)
Bilanciamento del bianco Manuale/Automatico
Esposizione Auto/Manuale/Sfarfallio/Visione notturna
Modalità immagine Testo/Grafica/High Frame
Effetto Colore / B/N / Negativo; Invertito; Specchio
Uscita RGB analogica
S-Video, Uscita
Composite Video
Acquisizione immagine Fino ad 80 fotogrammi
Memoria integrata Memoria flash 32MB NAND
XGA: 60 Hz, SVGA: 60 Hz, VGA: 60 Hz
NTSC / PAL
Ottiche
Lente F3.0; Fuoco manuale
Area di proiezione 320mm x 240mm (Max.);
Zoom AVERZOOM: 2x, Digitale: 8x
Alimentazione
Alimentazione DC 12V, 1.2~4A, 100-240V, 50-60 Hz
Consumo
7,44 Watt (Lampada spenta); 10,68 Watt
(Lampada accesa)
Illuminazione
Tipo di lampada Lampada LED
Ingresso/Uscita
Ingresso VGA 15-Pin D-sub (VGA)
Uscita VGA 15-Pin D-sub (VGA)
Uscita DVI Tipo di DVI
S-VIDEO Jack Mini-DIN
Video Composite Jack RCA
USB USB 2.0
Uscita CC 6V Jack alimentazione
Dimensioni
In uso
Piegato
Peso
424mm x 173.4mm x 330mm
365mm x 173.4mm x 95.85mm
2 kg (circa 4,4 libbre)
I-4
Page 95

EEsseegguuiirree ii ccoolllleeggaammeennttii
Le porte sul retro e sul il pannello laterale di AVerVision300AF
consentono di collegare l’unità ad un computer, ad un monitor di
visualizzazione grafica o ad un proiettore LCD/DLP, ad una TV o ad
altri dispositivi. In basso sono illustrate le porte posizionate sul retro e
sul pannello laterale di AVerVision300AF con le relative etichette.
I
V
D
O
E
D
(6)
I
V
-
S
O
E
D
I
V
B
G
R
V
T
(10)
(9)
(8)
(7)
(1)
(2)
D
C
12
V
L
I
G
H
T
BO
X
V
G
A
I
N
V
G
A
O
U
T
(3)
(4)
(5)
Porta Descrizione
(1) Alloggio antifurto
(2) CD 12V (input) Collegare a questa porta l'adattatore di corrente.
(3) Porta luce Collegare a questa porta la luce optional.
(4) Porta VGA IN
(5) Porta VGA OUT
(6) Interruttore
TV/RGB
(7) Porta VIDEO
(RCA/Composito)
(8) Porta S-VIDEO
(9) Porta DVI
(10) Porta USB
Collegare un lucchetto di sicurezza Kensington o
altro antifurto compatibile.
Input del segnale RGB da un computer o altre
origini ed invio pass-through attivo solo alla porta
d’output VGA.
Collegare a questa porta alla porta VGA d’output
del computer.
Output del segnale RGB della macchina sul
monitor VGA/Mac o proiettore LCD/DLP, input dalla
porta VGA, oppure delle immagini acquisite dalla
memoria.
Per selezionare l’output di visualizzazione tra RGB
(output VGA) o TV (output video composito/output
S-Video).
Output del segnale dalla macchina o delle
immagini acquisite dalla memoria integrata al
televisore o attrezzatura video.
Output del segnale dalla macchina o delle
immagini acquisite dalla memoria al televisore o
attrezzatura video.
Output del segnale video dalla macchina o delle
immagini acquisite dalla memoria allo schermo
LCD o proiettore LCD/DLP con interfaccia DVI.
Usare AVerVision300AF come una Camera USB o
Download immagini per trasferire le immagini
acquisite tra la memoria integrata di
AVerVision300AF ed il PC.
English Deutsch Français
Italiano
Español Česky
AVerMedia
I-5
Page 96

CCoolllleeggaammeennttoo ddeell ttrraassffoorrmmaattoorree
Il trasformatore può essere collegato ad un’alimentazione elettrica
standard da 100V~240V CA.
LIGHT
BOX
VGAOUTVGAINDC12V
Trasformatore
elettrico
Presa a
muro
Cavo elettrico
CCoolllleeggaammeennttoo aall tteelleevviissoorree
Trovare la porta d'input video, S-Video o SCART RGB del televisore o
attrezzatura video (e.g. videoregistratore) per registrare la presentazione
su videocassetta. In caso di dubbio, fare riferimento al manale del
televisore o dell'attrezzatura video.
- Assicurarsi che l'interruttore TV/RBG sia impostato su
TV.
- Si raccomanda di usare il collegamento S-video per
ottenere una migliore qualità video.
VIDEO S-VIDEO DVI
VIDEO S-VIDEO DVI
TV RGB
TV RGB
Uscita
S-Video verso cavo scart
(non in dotazione)
Cavo S-Video
Cavo RCA
RCA verso cavo scart
(non in dotazione)
SCART
S-VIDEO
VIDEO
SCART
Proiettore
Televisione
VCR
I-6
Page 97

CCoolllleeggaammeennttoo aa VVGGAA,, mmoonniittoorr MMaacc oo
pprrooiieettttoorree LLCCDD//DDLLPP
Trovare la porta d'input RGB (VGA) del dispositivo di visualizzazione. In
caso di dubbio, fare riferimento al manale del dispositivo.
Assicurarsi che l'interruttore TV/RBG sia impostato su RGB.
LIGHT
BOX
CCoolllleeggaammeennttoo ddii uunn mmoonniittoorr VVGGAA oo ddii uunn
pprrooiieettttoorree
VGAOUTVGAINDC12V
Cavo RGB (VGA)
(non in dotazione)
MAC
Adattatore monitor
(non in dotazione)
LLCCDD//DDLLPP ccoonn iinntteerrffaacccciiaa DDVVII
MAC monitor
Proiettore LCD/DLP
CRT monitor
LCD monitor
Trovare la porta d'input DVI del dispositivo di visualizzazione. In caso di
dubbio, fare riferimento al manale del dispositivo.
English Deutsch Français
Italiano
AVerMedia
Assicurarsi che l'interruttore TV/RBG sia impostato su RGB.
VIDEO S-VIDEO DVI
VIDEO S-VIDEO DVI
TV RGB
TV RGB
Monitor LCD con
interfaccia DVI
Cavo DVI
(non in dotazione)
Proiettore LCD/DLP
con interfaccia DVI
I-7
Español Česky
Page 98

CCoolllleeggaammeennttoo aadd uunn PPCC ccoommppaattiibbiillee
IIBBMM oo aadd uunn ccoommppuutteerr MMaacciinnttoossh
h
Trovare la porta d'output RGB del computer o portatile per visualizzare
sullo schermo la presentazione PC. AVerVision300AF supporta il
collegamento pass-through attivo, dove il segnale video dalla porta
d’input VGA è inviato in modo continuo alla porta d’output VGA e
visualizzato su schermo anche quando AVerVision300AF è spento.
LIGHT
BOX
CCoolllleeggaammeennttoo ddeell ccoommppuutteerr uussaannddoo llaa
ccoonnnneessssiioonnee UUSSBB
VGAOUTVGAINDC12V
Computer
Prolunga computer
(Cavo VGA)
Adattatore monitor
(non in dotazione)
Portatile
MAC
Trovare la porta USB del computer o del portatile. Questo permette di
usare AVerVision300AF come una Camera USB per trasferire le
immagini acquisite tra la memoria integrata ed il computer. Vedere
anche “Trasferire le immagini da AVerVision300AF al PC” e fare
riferimento alla guida del software distribuzione.
VIDEO S-VIDEO DVI
VIDEO S-VIDEO DVI
TV RGB
TV RGB
Computer
Portatile
MAC
Cavo USB
I-8
Page 99

IInnssttaallllaazziioonnee ddeell ll iigghhtt ppaanneell ooppzziioonnaallee
Collegando un light panel opzionale è possibile vedere lastre, lucidi e
negativi.
Accensione
Light panel
(opzionale)
Inserire qui
CCoolllleeggaammeennttoo aadd uunn mmiiccrroossccooppiioo
Collegando AVerVision300AF ad un microscopio è possibile esaminare
oggetti microscopici su uno schermo più grande senza sforzare la vista.
Premere la linguetta qui
per staccare il modulo luminoso
dalla testa della camera
Accoppiatore per
microscopio
Adattatore per
microscopio
English Deutsch Français
Italiano
AVerMedia
Modulo luminoso
LED
Microscopio
Español Česky
I-9
Page 100

IInnssttaallllaazziioonnee ddii AAVVeerrVViissiioonn330000AAFF
Questa sezione offre degli utili suggerimenti illustrati per regolare
AVerVision300AF in base alle proprie esigenze.
TTeessttaa ddeellllaa ddooccuummeenntt ccaammeerraa
La testa della document camera può essere ruotata di 135 gradi da
sinistra a destra. Il fuoco può anche essere regolato manualmente da
questo punto per migliorare la qualità delle immagini.
Regolare l'angolo qui,
sul lato scanalato
90°
45°
MMeecchhaanniiccaall AArrmm
Il design del braccio meccanico consente di proiettare un’immagine
nella sua altezza completa per una visualizzazione foglio A4 intero.
75°
92°
60°
Estensibile in
lunghezza
fino a 122 mm
(4,8 pollic i)
120°
I-10
 Loading...