

Avaya Scopia XT Desktop Server Installation Manual

Avaya Scopia® XT Desktop Server
Installation Guide
Release 8.3.3
Issue 1
August 2015


©
2015 Avaya Inc.
All Rights Reserved.
Notice
While reasonable efforts have been made to ensure that the
information in this document is complete and accurate at the time of
printing, Avaya assumes no liability for any errors. Avaya reserves
the right to make changes and corrections to the information in this
document without the obligation to notify any person or organization
of such changes.
Documentation disclaimer
“Documentation” means information published by Avaya in varying
mediums which may include product information, operating
instructions and performance specifications that Avaya may generally
make available to users of its products and Hosted Services.
Documentation does not include marketing materials. Avaya shall not
be responsible for any modifications, additions, or deletions to the
original published version of documentation unless such
modifications, additions, or deletions were performed by Avaya. End
User agrees to indemnify and hold harmless Avaya, Avaya's agents,
servants and employees against all claims, lawsuits, demands and
judgments arising out of, or in connection with, subsequent
modifications, additions or deletions to this documentation, to the
extent made by End User.
Link disclaimer
Avaya is not responsible for the contents or reliability of any linked
websites referenced within this site or documentation provided by
Avaya. Avaya is not responsible for the accuracy of any information,
statement or content provided on these sites and does not
necessarily endorse the products, services, or information described
or offered within them. Avaya does not guarantee that these links will
work all the time and has no control over the availability of the linked
pages.
Warranty
Avaya provides a limited warranty on Avaya hardware and software.
Refer to your sales agreement to establish the terms of the limited
warranty. In addition, Avaya’s standard warranty language, as well as
information regarding support for this product while under warranty is
available to Avaya customers and other parties through the Avaya
Support website:
http://support.avaya.com or such successor site as
designated by Avaya. Please note that if You acquired the product(s)
from an authorized Avaya Channel Partner outside of the United
States and Canada, the warranty is provided to You by said Avaya
Channel Partner and not by Avaya.
“Hosted Service” means a hosted service subscription that You
acquire from either Avaya or an authorized Avaya Channel Partner
(as applicable) and which is described further in Hosted SAS or other
service description documentation regarding the applicable hosted
service. If You purchase a Hosted Service subscription, the foregoing
limited warranty may not apply but You may be entitled to support
services in connection with the Hosted Service as described further
in your service description documents for the applicable Hosted
Service. Contact Avaya or Avaya Channel Partner (as applicable) for
more information.
Hosted Service
THE FOLLOWING APPLIES IF YOU PURCHASE A HOSTED
SERVICE SUBSCRIPTION FROM AVAYA OR AN AVAYA
CHANNEL PARTNER (AS APPLICABLE), THE TERMS OF USE
FOR HOSTED SERVICES ARE AVAILABLE ON THE AVAYA
WEBSITE,
HTTP://SUPPORT.AVAYA.COM/LICENSEINFO UNDER
THE LINK “Avaya Terms of Use for Hosted Services” OR SUCH
SUCCESSOR SITE AS DESIGNATED BY AVAYA, AND ARE
APPLICABLE TO ANYONE WHO ACCESSES OR USES THE
HOSTED SERVICE. BY ACCESSING OR USING THE HOSTED
SERVICE, OR AUTHORIZING OTHERS TO DO SO, YOU, ON
BEHALF OF YOURSELF AND THE ENTITY FOR WHOM YOU ARE
DOING SO (HEREINAFTER REFERRED TO INTERCHANGEABLY
AS “YOU” AND “END USER”), AGREE TO THE TERMS OF USE. IF
YOU ARE ACCEPTING THE TERMS OF USE ON BEHALF A
COMPANY OR OTHER LEGAL ENTITY, YOU REPRESENT THAT
YOU HAVE THE AUTHORITY TO BIND SUCH ENTITY TO THESE
TERMS OF USE. IF YOU DO NOT HAVE SUCH AUTHORITY, OR
IF YOU DO NOT WISH TO ACCEPT THESE TERMS OF USE, YOU
MUST NOT ACCESS OR USE THE HOSTED SERVICE OR
AUTHORIZE ANYONE TO ACCESS OR USE THE HOSTED
SERVICE. YOUR USE OF THE HOSTED SERVICE SHALL BE
LIMITED BY THE NUMBER AND TYPE OF LICENSES
PURCHASED UNDER YOUR CONTRACT FOR THE HOSTED
SERVICE, PROVIDED, HOWEVER, THAT FOR CERTAIN HOSTED
SERVICES IF APPLICABLE, YOU MAY HAVE THE OPPORTUNITY
TO USE FLEX LICENSES, WHICH WILL BE INVOICED
ACCORDING TO ACTUAL USAGE ABOVE THE CONTRACT
LICENSE LEVEL. CONTACT AVAYA OR AVAYA’S CHANNEL
PARTNER FOR MORE INFORMATION ABOUT THE LICENSES
FOR THE APPLICABLE HOSTED SERVICE, THE AVAILABILITY
OF ANY FLEX LICENSES (IF APPLICABLE), PRICING AND
BILLING INFORMATION, AND OTHER IMPORTANT
INFORMATION REGARDING THE HOSTED SERVICE.
Licenses
THE SOFTWARE LICENSE TERMS AVAILABLE ON THE AVAYA
WEBSITE,
HTTP://SUPPORT.AVAYA.COM/LICENSEINFO OR
SUCH SUCCESSOR SITE AS DESIGNATED BY AVAYA, ARE
APPLICABLE TO ANYONE WHO DOWNLOADS, USES AND/OR
INSTALLS AVAYA SOFTWARE, PURCHASED FROM AVAYA INC.,
ANY AVAYA AFFILIATE, OR AN AVAYA CHANNEL PARTNER (AS
APPLICABLE) UNDER A COMMERCIAL AGREEMENT WITH
AVAYA OR AN AVAYA CHANNEL PARTNER. UNLESS
OTHERWISE AGREED TO BY AVAYA IN WRITING, AVAYA DOES
NOT EXTEND THIS LICENSE IF THE SOFTWARE WAS
OBTAINED FROM ANYONE OTHER THAN AVAYA, AN AVAYA
AFFILIATE OR AN AVAYA CHANNEL PARTNER; AVAYA
RESERVES THE RIGHT TO TAKE LEGAL ACTION AGAINST YOU
AND ANYONE ELSE USING OR SELLING THE SOFTWARE
WITHOUT A LICENSE. BY INSTALLING, DOWNLOADING OR
USING THE SOFTWARE, OR AUTHORIZING OTHERS TO DO SO,
YOU, ON BEHALF OF YOURSELF AND THE ENTITY FOR WHOM
YOU ARE INSTALLING, DOWNLOADING OR USING THE
SOFTWARE (HEREINAFTER REFERRED TO
INTERCHANGEABLY AS “YOU” AND “END USER”), AGREE TO
THESE TERMS AND CONDITIONS AND CREATE A BINDING
CONTRACT BETWEEN YOU AND AVAYA INC. OR THE
APPLICABLE AVAYA AFFILIATE (“AVAYA”).
Avaya grants You a license within the scope of the license types
described below, with the exception of Heritage Nortel Software, for
which the scope of the license is detailed below. Where the order
documentation does not expressly identify a license type, the
applicable license will be a Designated System License. The
applicable number of licenses and units of capacity for which the
license is granted will be one (1), unless a different number of
licenses or units of capacity is specified in the documentation or other
materials available to You. “Software” means computer programs in
object code, provided by Avaya or an Avaya Channel Partner,
whether as stand-alone products, pre-installed on hardware products,
and any upgrades, updates, patches, bug fixes, or modified versions
thereto. “Designated Processor” means a single stand-alone
computing device. “Server” means a Designated Processor that
hosts a software application to be accessed by multiple users.
“Instance” means a single copy of the Software executing at a
particular time: (i) on one physical machine; or (ii) on one deployed
software virtual machine (“VM”) or similar deployment.
License types
Designated System(s) License (DS). End User may install and use
each copy or an Instance of the Software only on a number of
Designated Processors up to the number indicated in the order.
Avaya may require the Designated Processor(s) to be identified in
the order by type, serial number, feature key, Instance, location or
other specific designation, or to be provided by End User to Avaya
through electronic means established by Avaya specifically for this
purpose.
Concurrent User License (CU). End User may install and use the
Software on multiple Designated Processors or one or more Servers,
so long as only the licensed number of Units are accessing and using
the Software at any given time. A “Unit” means the unit on which
Avaya, at its sole discretion, bases the pricing of its licenses and can
be, without limitation, an agent, port or user, an e-mail or voice mail
account in the name of a person or corporate function (e.g.,
webmaster or helpdesk), or a directory entry in the administrative
database utilized by the Software that permits one user to interface

with the Software. Units may be linked to a specific, identified Server
or an Instance of the Software.
Database License (DL). End User may install and use each copy or
an Instance of the Software on one Server or on multiple Servers
provided that each of the Servers on which the Software is installed
communicates with no more than one Instance of the same
database.
CPU License (CP). End User may install and use each copy or
Instance of the Software on a number of Servers up to the number
indicated in the order provided that the performance capacity of the
Server(s) does not exceed the performance capacity specified for the
Software. End User may not re-install or operate the Software on
Server(s) with a larger performance capacity without Avaya’s prior
consent and payment of an upgrade fee.
Named User License (NU). You may: (i) install and use the Software
on a single Designated Processor or Server per authorized Named
User (defined below); or (ii) install and use the Software on a Server
so long as only authorized Named Users access and use the
Software. “Named User”, means a user or device that has been
expressly authorized by Avaya to access and use the Software. At
Avaya’s sole discretion, a “Named User” may be, without limitation,
designated by name, corporate function (e.g., webmaster or
helpdesk), an e-mail or voice mail account in the name of a person or
corporate function, or a directory entry in the administrative database
utilized by the Software that permits one user to interface with the
Software.
Shrinkwrap License (SR). You may install and use the Software in
accordance with the terms and conditions of the applicable license
agreements, such as “shrinkwrap” or “clickthrough” license
accompanying or applicable to the Software (“Shrinkwrap License”).
Copyright
Except where expressly stated otherwise, no use should be made of
materials on this site, the Documentation, Software, Hosted Service,
or hardware provided by Avaya. All content on this site, the
documentation, Hosted Service, and the product provided by Avaya
including the selection, arrangement and design of the content is
owned either by Avaya or its licensors and is protected by copyright
and other intellectual property laws including the sui generis rights
relating to the protection of databases. You may not modify, copy,
reproduce, republish, upload, post, transmit or distribute in any way
any content, in whole or in part, including any code and software
unless expressly authorized by Avaya. Unauthorized reproduction,
transmission, dissemination, storage, and or use without the express
written consent of Avaya can be a criminal, as well as a civil offense
under the applicable law.
Virtualization
Each product has its own ordering code and license types. Note that
each Instance of a product must be separately licensed and ordered.
For example, if the end user customer or Avaya Channel Partner
would like to install two Instances of the same type of products, then
two products of that type must be ordered.
Third Party Components
“Third Party Components” mean certain software programs or
portions thereof included in the Software or Hosted Service may
contain software (including open source software) distributed under
third party agreements (“Third Party Components”), which contain
terms regarding the rights to use certain portions of the Software
(“Third Party Terms”). As required, information regarding distributed
Linux OS source code (for those products that have distributed Linux
OS source code) and identifying the copyright holders of the Third
Party Components and the Third Party Terms that apply is available
in the products, Documentation or on Avaya’s website at:
support.avaya.com/Copyright or such successor site as designated
by Avaya. You agree to the Third Party Terms for any such Third
Party Components.
THIS PRODUCT IS LICENSED UNDER THE AVC PATENT
PORTFOLIO LICENSE FOR THE PERSONAL USE OF A
CONSUMER OR OTHER USES IN WHICH IT DOES NOT RECEIVE
REMUNERATION TO (i) ENCODE VIDEO IN COMPLIANCE WITH
THE AVC STANDARD (“AVC VIDEO”) AND/OR (ii) DECODE AVC
VIDEO THAT WAS ENCODED BY A CONSUMER ENGAGED IN A
PERSONAL ACTIVITY AND/OR WAS OBTAINED FROM A VIDEO
PROVIDER LICENSED TO PROVIDE AVC VIDEO. NO LICENSE IS
http://
GRANTED OR SHALL BE IMPLIED FOR ANY OTHER USE.
ADDITIONAL INFORMATION MAY BE OBTAINED FROM MPEG
LA, L.L.C. SEE
Note to Service Provider
The product or Hosted Service may use Third Party Components
subject to Third Party Terms that do not allow hosting and require a
Service Provider to be independently licensed for such purpose. It is
your responsibility to obtain such licensing.
Preventing Toll Fraud
“Toll Fraud” is the unauthorized use of your telecommunications
system by an unauthorized party (for example, a person who is not a
corporate employee, agent, subcontractor, or is not working on your
company's behalf). Be aware that there can be a risk of Toll Fraud
associated with your system and that, if Toll Fraud occurs, it can
result in substantial additional charges for your telecommunications
services.
Avaya Toll Fraud intervention
If You suspect that You are being victimized by Toll Fraud and You
need technical assistance or support, call Technical Service Center
Toll Fraud Intervention Hotline at +1-800-643-2353 for the United
States and Canada. For additional support telephone numbers, see
the Avaya Support website:
successor site as designated by Avaya. Suspected security
vulnerabilities with Avaya products should be reported to Avaya by
sending mail to: securityalerts@avaya.com.
Downloading Documentation
For the most current versions of Documentation, see the Avaya
Support website:
designated by Avaya.
Contact Avaya Support
See the Avaya Support website:
or Hosted Service notices and articles, or to report a problem with
your Avaya product or Hosted Service. For a list of support telephone
numbers and contact addresses, go to the Avaya Support website:
http://support.avaya.com (or such successor site as designated by
Avaya), scroll to the bottom of the page, and select Contact Avaya
Support.
Trademarks
The trademarks, logos and service marks (“Marks”) displayed in this
site, the Documentation, Hosted Service(s), and product(s) provided
by Avaya are the registered or unregistered Marks of Avaya, its
affiliates, or other third parties. Users are not permitted to use such
Marks without prior written consent from Avaya or such third party
which may own the Mark. Nothing contained in this site, the
Documentation, Hosted Service(s) and product(s) should be
construed as granting, by implication, estoppel, or otherwise, any
license or right in and to the Marks without the express written
permission of Avaya or the applicable third party.
Avaya is a registered trademark of Avaya Inc.
All non-Avaya trademarks are the property of their respective owners.
Linux® is the registered trademark of Linus Torvalds in the U.S. and
other countries.
HTTP://WWW.MPEGLA.COM.
http://support.avaya.com or such
http://support.avaya.com, or such successor site as
http://support.avaya.com for product

Contents
Chapter 1: About Scopia® XT Desktop server ...................................................................... 6
About Components of the Scopia® XT Desktop server............................................................... 6
Chapter 2: Planning your Avaya Scopia® XT Desktop Deployment.................................... 8
Minimum Requirements and Specifications of Scopia® XT Desktop server.................................. 8
Planning the Topology of Avaya Scopia® XT Series with Scopia® XT Desktop........................... 10
Deploying Scopia® XT Desktop server with Dual-NIC............................................................... 12
Estimating and Planning your Bandwidth Requirements........................................................... 13
Calculating the Bandwidth Used by Avaya Scopia® XT Desktop Participants....................... 13
Ports to Open on Avaya Scopia® XT Desktop.......................................................................... 14
Limiting Port Ranges on the Scopia® XT Desktop server.................................................... 18
Chapter 3: Installing the Scopia® XT Desktop .................................................................... 21
Chapter 4: Configuring Your Deployment............................................................................ 25
Accessing the Scopia® XT Desktop server Web Administration Interface................................... 25
Defining an Administrator Account.......................................................................................... 26
Connecting Scopia® XT Desktop with the XT Series................................................................ 26
Verifying Scopia® XT Desktop server Installation and Connection with Other Components.......... 28
Defining a Local Directory of Endpoints................................................................................... 29
Defining Bandwidth Settings in Scopia® XT Desktop server...................................................... 30
Defining Scopia® XT Desktop server Public Address and Other Client Connection Settings........ 31
Enabling Scopia® XT Desktop Client Features......................................................................... 32
Rolling-Out Scopia® XT Desktop Client to End Users............................................................... 34
Minimum Requirements for Scopia® XT Desktop Client...................................................... 34
Installing Scopia® XT Desktop Client Locally on a PC........................................................ 36
Centrally Deploying Scopia® XT Desktop Clients in your Organization................................. 38
Chapter 5: Securing Your Scopia® XT Desktop Deployment............................................. 39
Encrypting Scopia® XT Desktop server Communications.......................................................... 39
Encrypting Web Access to the Scopia® XT Desktop server................................................. 40
Generating a Unique TLS Certificate for Scopia® XT Desktop server .................................. 44
Encrypting Media over UDP between Scopia® XT Desktop server and Scopia® XT
Desktop Client................................................................................................................ 46
Protecting Meetings with a PIN............................................................................................... 48
Glossary................................................................................................................................... 49
August 2015 Avaya Scopia® XT Desktop Server Installation Guide 5
Comments on this document? infodev@avaya.com
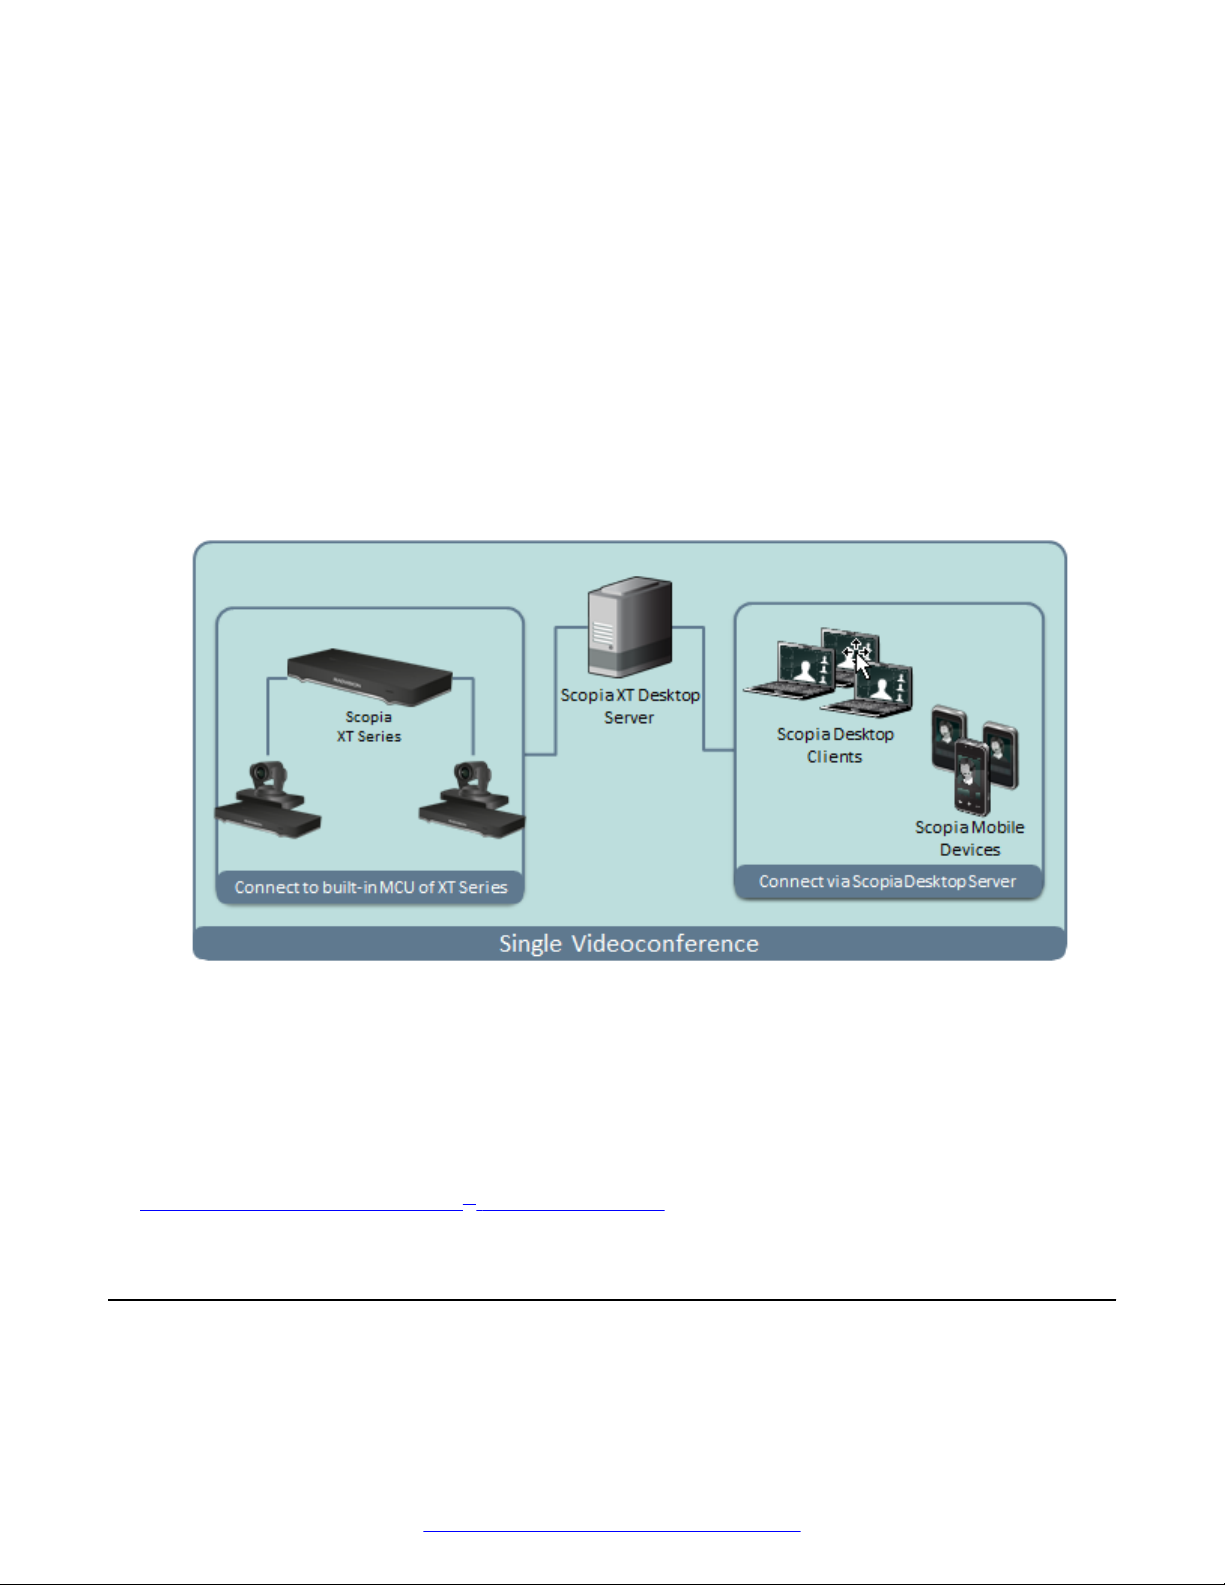
Chapter 1: About Scopia® XT Desktop
server
Scopia® XT Desktop server extends the capabilities of videoconferences hosted on the Avaya
Scopia® XT Series SMB Edition by enabling Scopia® Desktop Clients and Scopia® Mobile devices
to join.
Figure 1: Scopia® XT Desktop server extends meetings to include Scopia® Desktop Clients
The Avaya Scopia® XT Series SMB Edition solution is especially suited to the communication
requirements of Small and Medium Businesses (SMB). Built on the XT Series HD room system, with
the highest capacity embedded MCU in the industry today, the Avaya Scopia® XT Series SMB
Edition combines HD room system capabilities, embedded multi-party conferencing, desktop
conferencing and firewall traversal into the only integrated solution of its kind available.
Related Links
About Components of the Scopia® XT Desktop server on page 6
About Components of the Scopia® XT Desktop server
Scopia® XT Desktop server includes several different servers, each fulfilling its own function.
6 Avaya Scopia
®
XT Desktop Server Installation Guide August 2015
Comments on this document? infodev@avaya.com

Figure 2: Components of the Scopia® XT Desktop server
• Scopia® XT Desktop server
About Components of the Scopia® XT Desktop server
At the center of Scopia® XT Desktop, the conference server creates conferences with Scopia
Desktop Clients and Scopia® Mobile devices, relaying media to the MCU to enable transparent
connectivity with H.323 and SIP endpoints.
• Scopia® XT Desktop Application Server (Tomcat)
The underlying Scopia® XT Desktop web server and application server is implemented by
Tomcat. It serves as the update server, the Scopia® Content Slider server and the Scopia® XT
Desktop web portal.
• Scopia® Content Slider server
Part of the Tomcat Application Server, it stores the data already presented in the
videoconference and makes it available for participants to view during the meeting.
Related Links
About Scopia® XT Desktop server on page 6
®
August 2015 Avaya Scopia® XT Desktop Server Installation Guide 7
Comments on this document? infodev@avaya.com

Chapter 2: Planning your Avaya Scopia® XT
Desktop Deployment
When planning your Avaya Scopia® XT Desktop deployment, consider the following:
• Will most Scopia® XT Desktop Clients connect to videoconferences from within the enterprise,
or from outside? For example, if there are many internal Scopia® XT Desktop Clients, consider
placing a dedicated Conference Server in the enterprise.
• What is your network's security policy?
Depending on where you deploy the Scopia® XT Desktop server and other video network
devices, you may need to open different ports on the firewall.
• How much internal and external bandwidth is required, based on the number of simultaneous
users joining videoconferences? Consider also whether most users will be joining in standard
or high definition.
See the following sections for details on the different deployment options and how to plan your
bandwidth:
Related Links
Minimum Requirements and Specifications of Scopia® XT Desktop server on page 8
Planning the Topology of Avaya Scopia® XT Series with Scopia® XT Desktop on page 10
Deploying Scopia® XT Desktop server with Dual-NIC on page 12
Estimating and Planning your Bandwidth Requirements on page 13
Ports to Open on Avaya Scopia® XT Desktop on page 14
Minimum Requirements and Specifications of Scopia® XT Desktop server
This section details the system specifications of your Scopia® XT Desktop server. Refer to this data
when preparing system setup and afterwards as a means of verifying that the environment still
complies with these requirements.
Scopia® XT Desktop server Software Requirements
The minimum software requirements for the Scopia® XT Desktop server are:
8 Avaya Scopia
®
XT Desktop Server Installation Guide August 2015
Comments on this document? infodev@avaya.com

Minimum Requirements and Specifications of Scopia® XT Desktop server
Operating systems:
• Windows® 2012 Server and Windows® 2012 R2 Server (English)
• Windows® 2008 SP2 or Windows® 2008 R2, 32 and 64 bit (English, Japanese)
• Windows 7 Professional
Important:
Scopia® XT Desktop servers can be deployed using the VMware Sphere v5.5 virtual machine.
Web browsers for the Scopia® XT Desktop server administration:
Scopia® XT Desktop is tested with the latest internet browser versions available at the time of
release.
• Microsoft Internet Explorer 8 and later for Windows
• Mozilla Firefox 37 or later for Apple OS and Windows
• Apple Safari 6 or later for Apple OS
• Google Chrome 41 or later for Apple OS and Windows
Scopia® XT Desktop server Hardware Requirements
The minimum hardware requirements for Scopia® XT Desktop server are:
• Intel® Core™ i3 Processor, 2GHz and up
• 4 GB or more RAM
Scopia® XT Desktop server Audio and Video Specifications
Scopia® XT Desktop interoperates with both SIP and H.323 endpoints to provide a seamless user
experience joining the ease of use of Scopia® XT DesktopClients and Scopia® Mobile devices with
dedicated endpoints like Scopia® XT Executive and the Avaya Scopia® XT Series.
• Audio support:
- G.722.1 codec
- DTMF tone detection (in-band, H.245 tones, and RFC2833)
• Video support:
- High Definition (HD) video with a maximum resolution of 720p at 30 frames per second (fps)
- Video codec: H.264 with SVC (Scalable Video Coding) and H.264 High Profile
- Video send resolutions: Up to HD 720p
- Video receive resolution: 1080p if bandwidth is higher than 1280 kbps
- Video bandwidth: HD up to 4Mbps for 720p resolutions; standard definition up to 448 kbps
for 352p or lower
- Presentation video: H.239 dual stream
- Scopia® Content Slider can function with presentation set to H.263 or H.264 on the MCU.
August 2015 Avaya Scopia® XT Desktop Server Installation Guide 9
Comments on this document? infodev@avaya.com
Planning your Avaya Scopia® XT Desktop Deployment
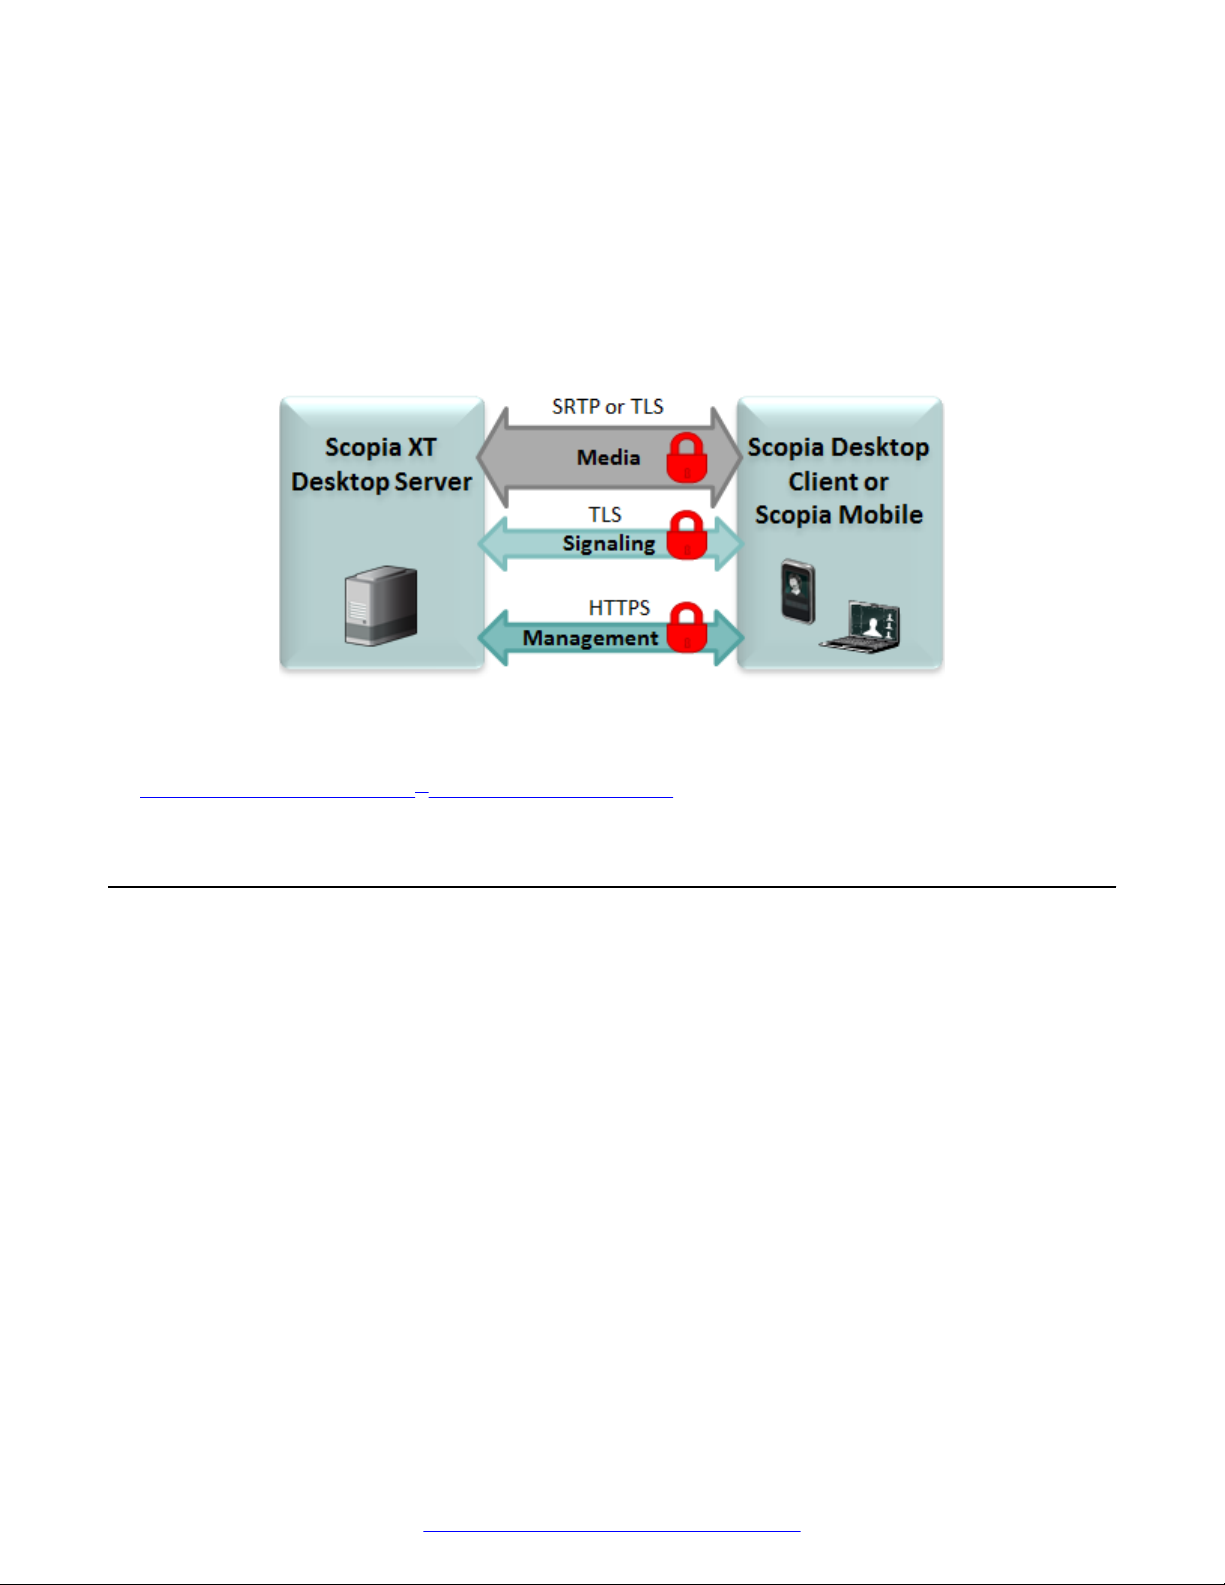
Scopia® XT Desktop server Security Specifications
Scopia® XT Desktop server has extensive support for security inside private networks as well as
across sites. In addition to a proprietary secure protocol between the client and server, Scopia® XT
Desktop server has the following security specifications:
• Using HTTPS protocol for protecting signaling, management and media over TCP data
streams between Scopia® XT DesktopClient/Scopia® Mobile and Scopia® XT Desktop server.
• Using SRTP encryption for protecting media over UDP data stream between Scopia® XT
DesktopClient/Scopia® Mobile and Scopia® XT Desktop server.
Figure 3: Securing Scopia® XT Desktop server communications
Related Links
Planning your Avaya Scopia® XT Desktop Deployment on page 8
Planning the Topology of Avaya Scopia® XT Series with Scopia® XT Desktop
Avaya Scopia® XT Series SMB Edition enables you to locally host videoconferences using its builtin MCU, and extends your videoconferences to participants joining from a computer (with Scopia
XT Desktop Client) or a mobile device (using Scopia® Mobile).
For example, when you start a videoconference with the XT Series hosting the call, you can add
other participants by asking them to connect via a web link to the Scopia® XT Desktop server, which
would automatically install and launch Scopia® XT Desktop Client on their computers, or Scopia
Mobile on their mobile devices.
The main features of the Avaya Scopia® XT Series SMB Edition include:
• Remote users can easily connect to a meeting hosted by the built-in MCU on the XT Series, by
connecting via the Scopia® XT Desktop server.
®
®
The deployment has very few components. You do not need additional hardware like an
external MCU, Avaya Scopia® PathFinder for firewall traversal, or Avaya Scopia® ECS
Gatekeeper for routing calls.
10 Avaya Scopia
®
XT Desktop Server Installation Guide August 2015
Comments on this document? infodev@avaya.com
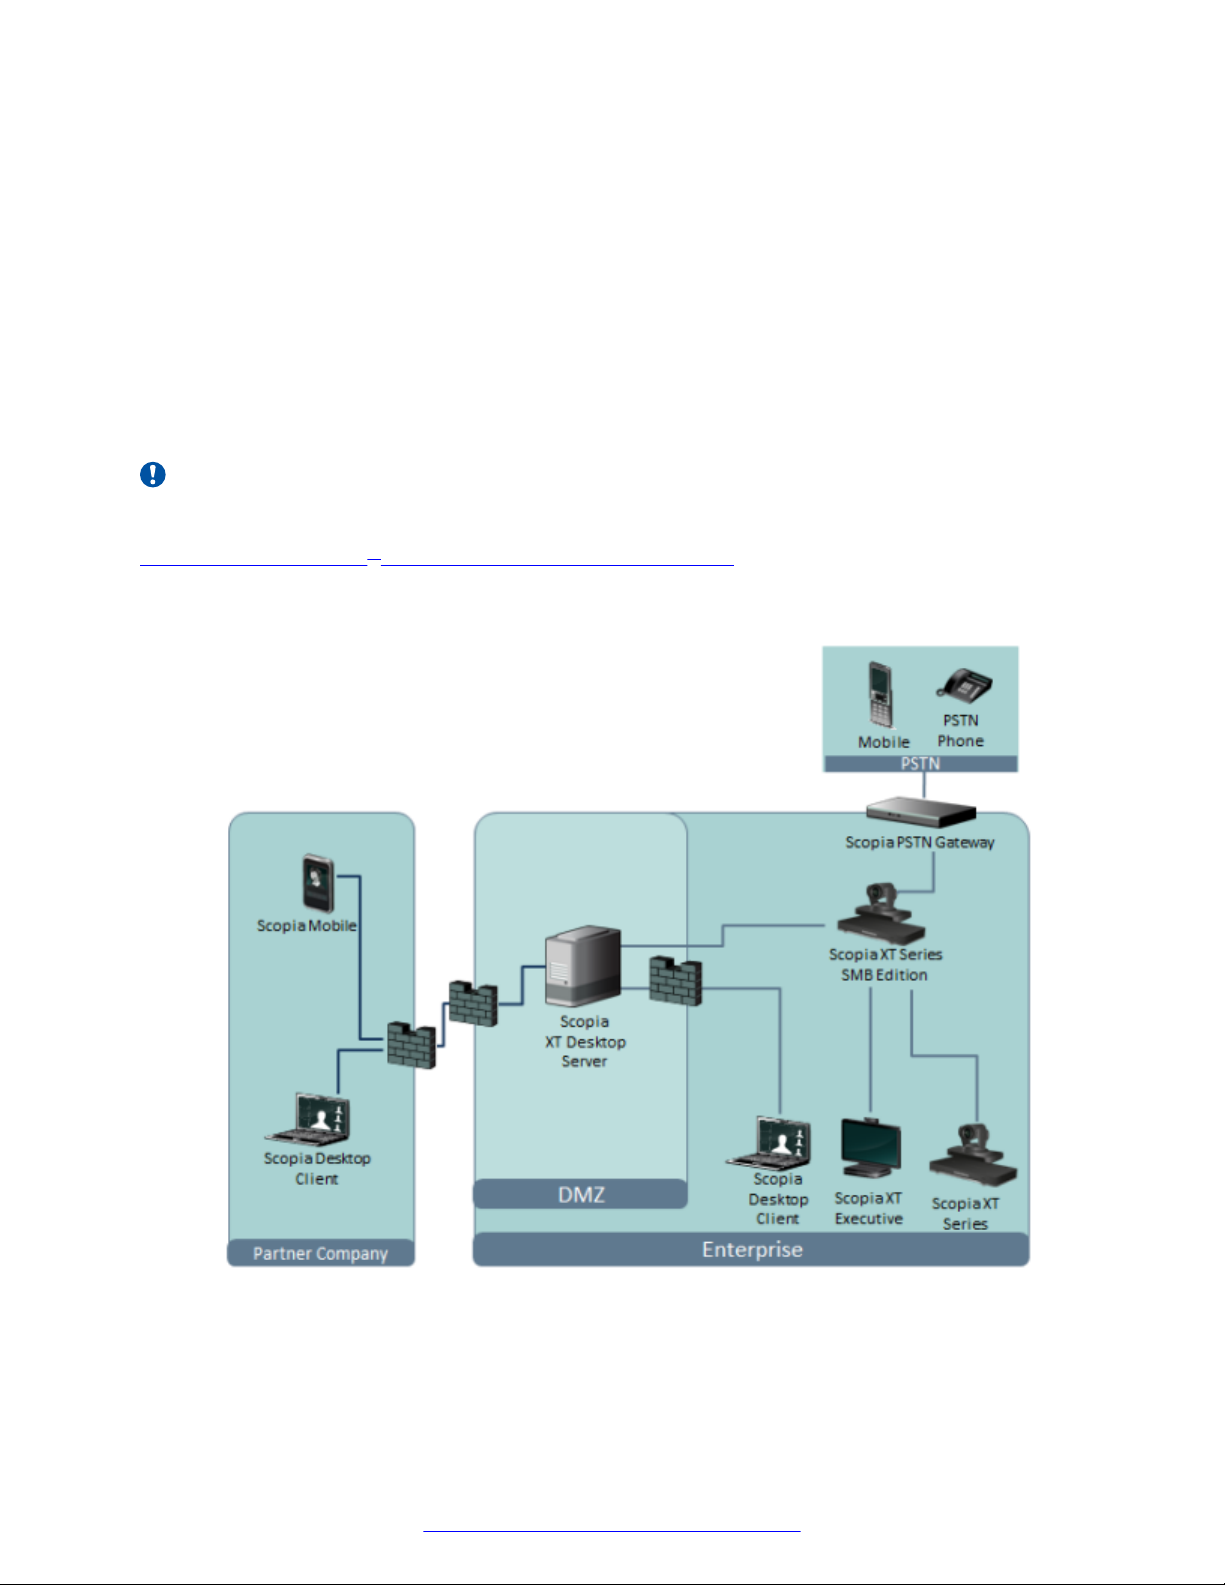
Planning the Topology of Avaya Scopia® XT Series with Scopia® XT Desktop
• The included Scopia® XT Desktop provides built-in NAT and firewall traversal functionality,
enabling secure remote connections from Scopia® Mobile and Scopia® XT Desktop Clients.
You can enable this functionality via the XT Series license.
The Avaya Scopia® XT Series SMB Edition includes the following options:
• Full SMB4 - Basic MCU level with up to four participants: one local and three remote endpoints
or PC clients.
• Full SMB9 - Advanced MCU level, with one local participant and up to eight remote endpoints
or PC clients.
There is no local endpoint if you deploy the XT Series as a video server.
Important:
The Scopia® XT Executive and Avaya Scopia® XT4300 can host up to four participants.
Figure 4: Avaya Scopia® XT Series SMB Edition Deployment on page 11 shows a typical topology
for the Avaya Scopia® XT Series SMB Edition solution. For more information, see the Solution
Guide for Scopia® Solution.
Figure 4: Avaya Scopia® XT Series SMB Edition Deployment
As you add more XT Series endpoints, you can also manage them centrally with Scopia
®
Management. This would enable centralized updating, backing up and control.
August 2015 Avaya Scopia® XT Desktop Server Installation Guide 11
Comments on this document? infodev@avaya.com

Planning your Avaya Scopia® XT Desktop Deployment
Related Links
Planning your Avaya Scopia® XT Desktop Deployment on page 8
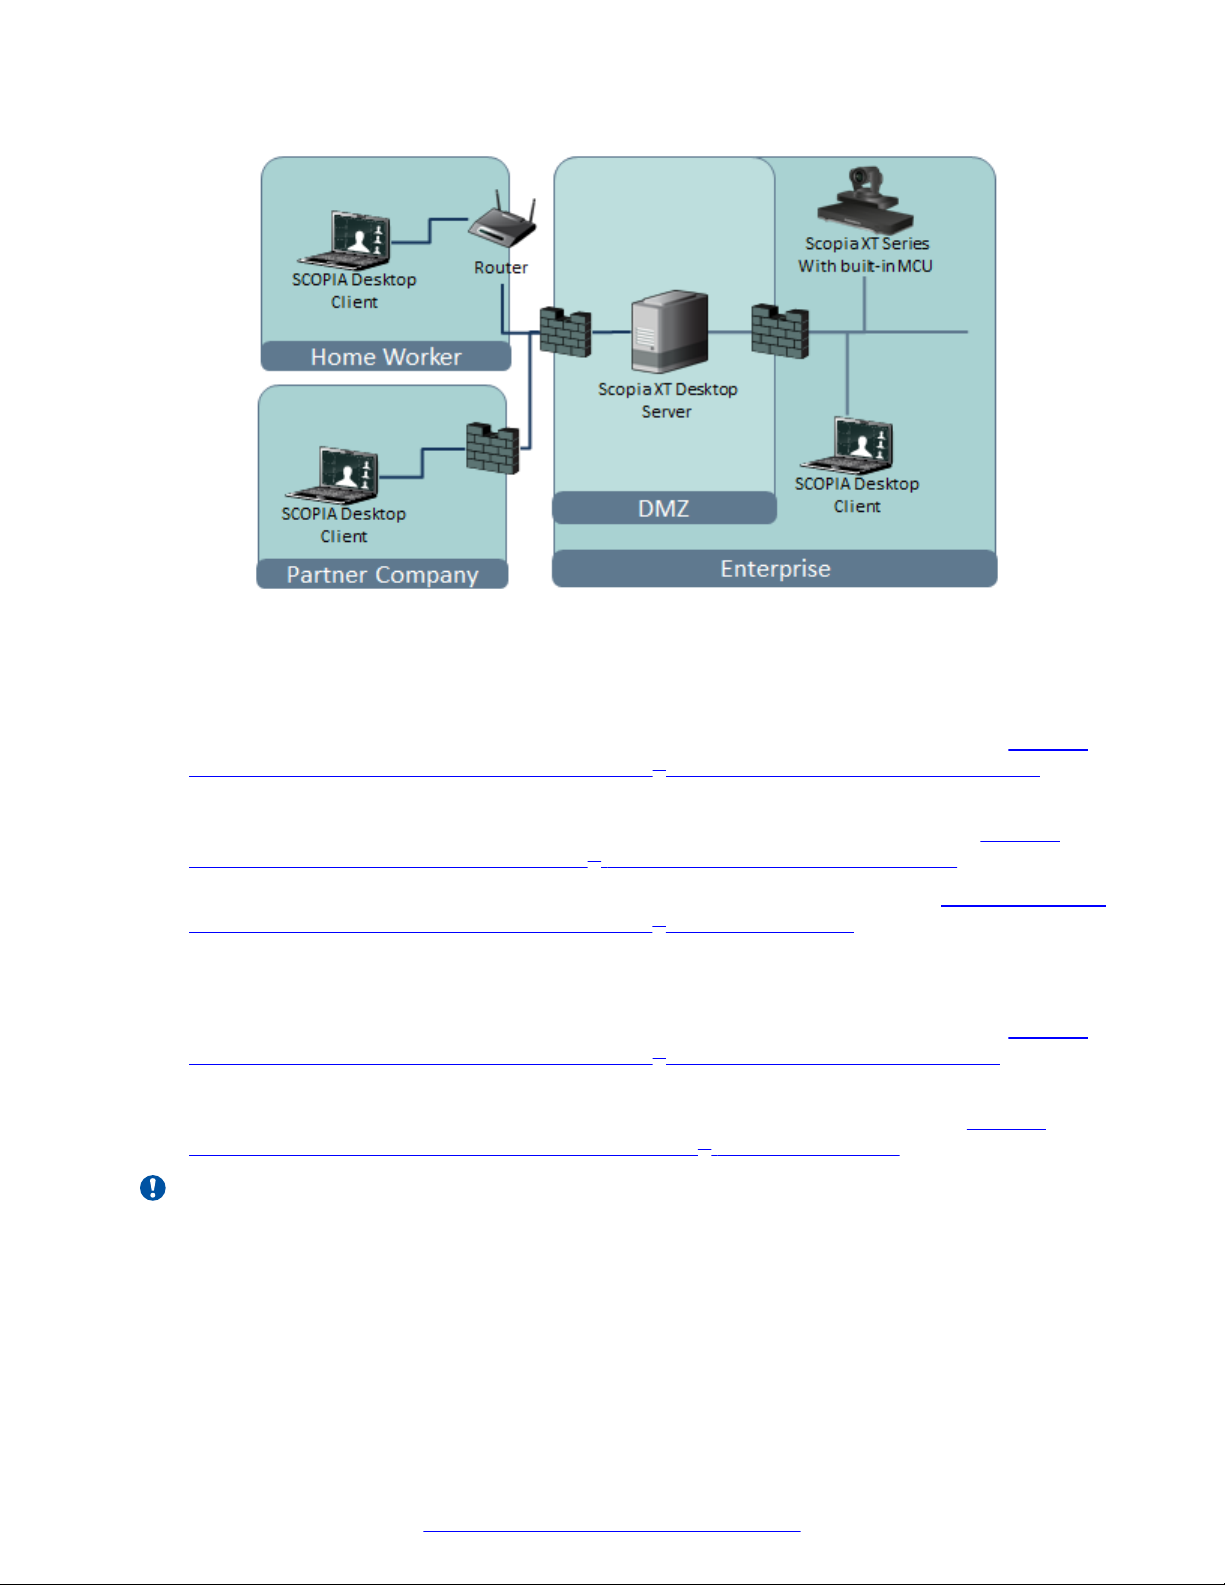
Deploying Scopia® XT Desktop server with Dual-NIC
Scopia® XT Desktop server can be installed on servers with multiple Network Interface
Cards (NICs). Depending on the deployment and network configuration, you may want to control
which NIC is used for various server communications.
Important:
The minimum requirement is to use a 100 Mbit NIC. It is recommended that you use a Gigabyte
NIC for better performance. Bandwidth shown is for Standard Definition (384 kbps) or High
Definition (1024 kbps).
For example, in secure multiple NIC deployments you can use a NIC configured behind the firewall
to communicate with the Avaya Scopia® XT Series, while using another NIC for Scopia® XT
Desktop Client connections (Figure 5: Scopia® XT Desktop with a dual-NIC deployment on
page 12). In this case, configure the Scopia® XT Desktop IP address to represent the NIC behind
the firewall. For the Scopia® XT Desktop public address, use a DNS name which resolves to the
NIC outside the firewall, and is accessible both inside and outside the enterprise.
For more information and to configure the public address, see
Defining Scopia® XT Desktop server
Public Address and Other Client Connection Settings on page 31.
Figure 5: Scopia® XT Desktop with a dual-NIC deployment
Scopia® XT Desktop Clients can connect to the Scopia® XT Desktop server either by an IP address
or a DNS name. In many deployments the Scopia® XT Desktop server IP address is not accessible
to clients outside the enterprise due to NAT or firewall restrictions. Therefore, Scopia® XT Desktop
server has a public address, which must be a DNS name resolving to the correct Scopia® XT
Desktop server IP address both inside and outside the corporate network.
12 Avaya Scopia
®
XT Desktop Server Installation Guide August 2015
Comments on this document? infodev@avaya.com

Estimating and Planning your Bandwidth Requirements
Related Links
Planning your Avaya Scopia® XT Desktop Deployment on page 8
Estimating and Planning your Bandwidth Requirements
We recommend estimating Scopia® XT Desktop's impact on bandwidth to determine if your current
infrastructure needs updating. Planning bandwidth may help reduce costs in your organization.
This section explains how to estimate the bandwidth for external Scopia® XT Desktop users
connecting to your network.
Important:
You do not need to estimate bandwidth required by users who connect from within the internal
network, because, typically, internal bandwidth is sufficient for videoconferencing.
You can allocate the bandwidth depending on the needs of your organization.
Since the Scopia® XT Desktop coordinates videoconferences between Scopia® XT Desktop Clients/
Scopia® Mobile devices and the MCU, you must plan bandwidth required by the Scopia® XT
Desktop server and by the MCU jointly. Consider the MCU resources when planning your Scopia
XT Desktop bandwidth.
®
To assess the overall bandwidth for the videoconferencing solution including other types of
endpoints, refer to the Avaya Scopia® Solution Guide.
Related Links
Planning your Avaya Scopia® XT Desktop Deployment on page 8
Calculating the Bandwidth Used by Avaya Scopia® XT Desktop Participants on page 13
Calculating the Bandwidth Used by Avaya Scopia® XT Desktop Participants
About this task
Videoconference participants consume most of the bandwidth in your Avaya Scopia® XT Desktop
deployment, because they both upload and download live media.
This section explains how to estimate the bandwidth for external Scopia® XT Desktop users
connecting to your network.
Important:
You do not need to estimate bandwidth required by users who connect from within the internal
network, because, typically, internal bandwidth is sufficient for videoconferencing.
The amount of bandwidth consumed by participants mainly depends on the chosen topology and
the maximum bandwidth you allow per participant. You configure the maximum bandwidth per
August 2015 Avaya Scopia® XT Desktop Server Installation Guide 13
Comments on this document? infodev@avaya.com

Planning your Avaya Scopia® XT Desktop Deployment
participant in the Scopia® XT Desktop server which is the maximum possible bandwidth for any
participant connecting to this server.
You calculate the maximum bandwidth used by Avaya Scopia® XT Desktop participants in the
following steps:
Procedure
1. Estimate the number of Avaya Scopia® XT Desktop participants connecting externally.
2. Decide on the maximum bandwidth per Scopia® XT Desktop Client (measured as its bitrate).
3. Calculate the peak bandwidth according to the following formula:
Peak bandwidth = peak usage x maximum bandwidth per participant
In our example of the Avaya Scopia® XT Desktop deployment, where the peak usage is 10
and the chosen maximum bandwidth is 768 Kbps, the peak bandwidth equals 7680 kbps.
This is the rough estimation of the bandwidth required for videoconference participants.
4. Add margins to make sure that even in poor network conditions video quality does not drop
below the standard you decided on.
Important:
An average margin is 20% of your fine-tuned estimation.
Related Links
Estimating and Planning your Bandwidth Requirements on page 13
Ports to Open on Avaya Scopia® XT Desktop
The Scopia® XT Desktop server is typically located in the DMZ (see Figure 6: Locating the Scopia
XT Desktop server in the DMZ on page 15) and is therefore connected to both the enterprise and
the public networks. Scopia® XT Desktop Clients can be located in the internal enterprise network,
in the public network, or in a partner network.
®
14 Avaya Scopia
®
XT Desktop Server Installation Guide August 2015
Comments on this document? infodev@avaya.com
Ports to Open on Avaya Scopia® XT Desktop
Figure 6: Locating the Scopia® XT Desktop server in the DMZ
When opening ports between the DMZ and the enterprise on the Scopia® XT Desktop server, use
the following as a reference:
• When opening ports that are both in and out of the Scopia® XT Desktop server, see Table 1:
Bidirectional Ports to Open Between the Scopia® XT Desktop server and the Enterprise on
page 16.
• When opening ports that are outbound from the Scopia® XT Desktop server, see Table 2:
Outbound Ports to Open from the Scopia® XT Desktop server to the Enterprise on page 16.
• When opening ports that are inbound to the Scopia® XT Desktop server, see Table 3: Inbound
Ports to Open from the Enterprise to the Scopia® XT Desktop server on page 17.
When opening ports between the DMZ and the public on the Scopia® XT Desktop server, use the
following as a reference:
• When opening ports that are both in and out of the Scopia® XT Desktop server, see Table 4:
Bidirectional Ports to Open Between the Scopia® XT Desktop server and the Public on
page 17.
• When opening ports that are inbound from the Scopia® XT Desktop server, see Table 5:
Inbound Ports to Open from the Public to the Scopia® XT Desktop server on page 17.
Important:
The specific firewalls you need to open ports on depends on where your Scopia® XT Desktop
and other Scopia® Solution products are deployed.
August 2015 Avaya Scopia® XT Desktop Server Installation Guide 15
Comments on this document? infodev@avaya.com

Planning your Avaya Scopia® XT Desktop Deployment
Table 1: Bidirectional Ports to Open Between the Scopia® XT Desktop server and the Enterprise
Port Range Protocol Destination Functionality Result of Blocking
Port
1024- 65535 TCP (H.
245/ Q.
931)
Avaya Scopia® XT
Series SMB
Edition
Enables
connection to
Scopia® XT
Cannot connect to
the meeting
Desktop meetings.
10000-65535 UDP
(RTP)
Avaya Scopia® XT
Series SMB
Edition or Scopia
Desktop Client
Enables media
connection to the
®
Avaya Scopia® XT
Series SMB
Edition, and the
Scopia® Desktop
Client or Scopia
Mobile.
Media cannot be
passed from the
Avaya Scopia® XT
Series SMB Edition
to Scopia® Desktop
Clients. Also,
®
connection is
tunneled via TCP
port 443 resulting in
a drop in
performance.
Required
Mandatory
To limit
range, see
Limiting the
TCP Port
Range for H.
245/Q.931 on
the Scopia
®
XT Desktop
server on
page 19
Mandatory
To limit
range, see
Limiting the
UDP Port
Range for
RTP/RTCP
on the
Scopia® XT
Desktop
server on
page 18
Table 2: Outbound Ports to Open from the Scopia® XT Desktop server to the Enterprise
Port
Range
1720 TCP Avaya Scopia
3337 TCP
3336 TCP Avaya Scopia
Protocol Destination Functionality Result of
Blocking Port
®
(XML)
XT Series SMB
Edition
Avaya Scopia
XT Series SMB
Edition
XT Series SMB
Edition
Enables connection to
Scopia® XT Desktop
meetings.
®
Enables meeting cascading
connection to the Avaya
Scopia® XT Series SMB
Edition
®
Enables meeting control
with Avaya Scopia® XT
Series SMB Edition
Cannot connect
to the meeting
Meeting
cascading
connection is
disabled
Meeting control
is disabled
Required
Mandatory
Mandatory
Mandatory
16 Avaya Scopia
®
XT Desktop Server Installation Guide August 2015
Comments on this document? infodev@avaya.com
Ports to Open on Avaya Scopia® XT Desktop
Table 3: Inbound Ports to Open from the Enterprise to the Scopia® XT Desktop server
Port
Protocol Destination Functionality Result of Blocking
Range
80 TCP
(HTTP)
443 TCP
(TLS)
Web client Provides access to the
Scopia® XT Desktop server
Web Portal (you can
configure port 443 instead)
Scopia® XT
Desktop
Clients and
®
Scopia
Mobile
Enables sending control
messages between the
Scopia® XT Desktop server
and Clients, and is also
used to tunnel RTP media
if the UDP ports are
blocked
Port
Cannot access the
Scopia® XT Desktop
server Web Portal
Scopia® XT Desktop
Client or Scopia
®
Mobile cannot connect
to the Scopia® XT
Desktop server
Required
Mandatory if
using HTTP.
You can
configure this
port during
installation. For
more
information, see
Installation
Guide for
Scopia® Desktop
server on
page 21.
Mandatory
Table 4: Bidirectional Ports to Open Between the Scopia® XT Desktop server and the Public
Port Range Protocol Destination Functionality Result of
Blocking Port
10000-65535 UDP (RTP/
RTCP)
Scopia® XT
Desktop Client
or Scopia
®
Mobile
Enables media
connection with the
Scopia® XT
Desktop Client or
Scopia® Mobile
Connection is
tunneled via TCP
port 443 and
performance is not
optimal
Table 5: Inbound Ports to Open from the Public to the Scopia® XT Desktop server
Port
Range
80 TCP
Protocol Destination Functionality Result of Blocking
Port
(HTTP)
Web client Provides access to the
web user interface (you
Cannot access the
web user interface
Required
Mandatory if using
HTTP.
Table continues…
Required
Recommended
To configure,
see Limiting
the UDP Port
Range for
RTP/RTCP on
the Scopia® XT
Desktop
server on
page 18
August 2015 Avaya Scopia® XT Desktop Server Installation Guide 17
Comments on this document? infodev@avaya.com

Planning your Avaya Scopia® XT Desktop Deployment
Port
Range
443 TCP
Protocol Destination Functionality Result of Blocking
can configure port 443
instead)
(TLS)
Scopia® XT
Desktop
Clients and
Scopia
Mobile
®
Enables sending control
messages between the
Scopia® XT Desktop
server and Clients, and is
also used to tunnel RTP
media if the UDP ports are
blocked
Related Links
Planning your Avaya Scopia® XT Desktop Deployment on page 8
Limiting Port Ranges on the Scopia® XT Desktop server on page 18
Port
Scopia® XT
DesktopClients
cannot connect to
the Scopia® XT
Desktop server
Required
You can configure
this port during
installation. For
more information,
see Installation
Guide for Scopia
Desktop server on
page 21.
Mandatory
®
Limiting Port Ranges on the Scopia® XT Desktop server
About this task
This section provides instructions of how to limit the following port ranges on the Scopia® XT
Desktop server:
Related Links
Ports to Open on Avaya Scopia® XT Desktop on page 14
Limiting the UDP Port Range for RTP/RTCP on the Scopia® XT Desktop server on page 18
Limiting the TCP Port Range for H.245/Q.931 on the Scopia® XT Desktop server on page 19
Limiting the UDP Port Range for RTP/RTCP on the Scopia® XT Desktop server
About this task
The Scopia® XT Desktop server has designated 10000-65535 as the default port range for UDP
(RTP/RTCP). To provide additional security for your firewall, you can limit this range.
To calculate approximately how many ports the Scopia® XT Desktop server uses, multiply the
number of license connections by 14, which amounts to reserving 14 ports per client.
Procedure
1. Log in to the Scopia® XT Desktop server Administrator web user interface.
2. Select Client > Settings.
18 Avaya Scopia
®
XT Desktop Server Installation Guide August 2015
Comments on this document? infodev@avaya.com
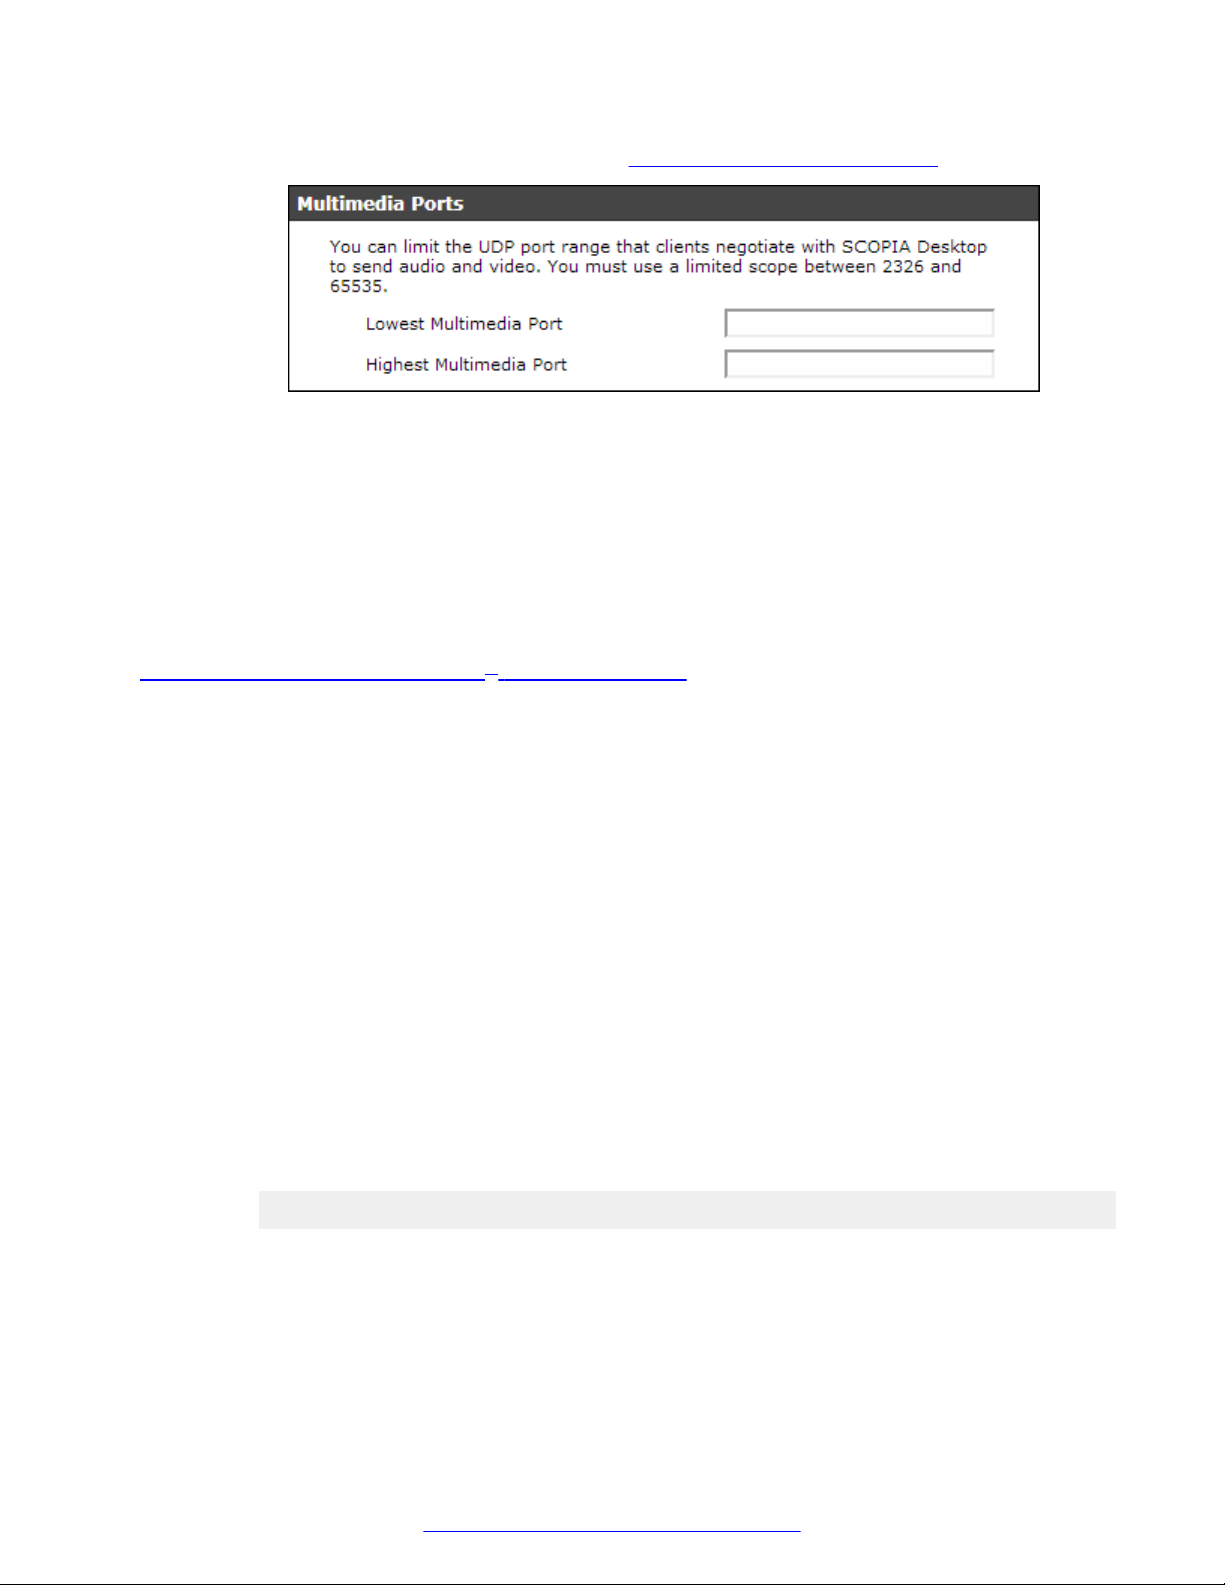
Ports to Open on Avaya Scopia® XT Desktop
3. Locate the Multimedia Ports section (see Figure 7: Multimedia Ports Area on page 19).
Figure 7: Multimedia Ports Area
4. Configure your port range (using any values between 2326 and 65535) by doing the
following:
a. Enter the base port value in the Lowest Multimedia Port field.
b. Enter the upper port value in the Highest Multimedia Port field.
5. Select OK or Apply.
Related Links
Limiting Port Ranges on the Scopia® XT Desktop server on page 18
Limiting the TCP Port Range for H.245/Q.931 on the Scopia® XT Desktop server
About this task
The Scopia® XT Desktop server has designated ports 1024-65535 for TCP for H.245 and Q.931
signaling. To provide additional security for your firewall, you can limit this range.
For each conference, the Scopia® XT Desktop server uses 2 ports. In addition, add extra ports for:
• Add 2 ports for each participating Scopia® XT Desktop Client client.
• Add 1 port per conference when presenting using the content slider.
Procedure
1. Navigate to <Scopia® XT Desktop install_dir>\ConfSrv.
2. Edit the config.val file as follows:
a. Locate the text 1 system.
b. At the bottom of that section, add two lines:
2 portFrom = <lowest range limit>
2 portTo = <highest range limit>
Where <lowest range limit> is the base port of your port range and <highest
range limit> is the upper value of your port range.
3. Access the Windows services and restart the Scopia® XT Desktop - Conference Server
service.
August 2015 Avaya Scopia® XT Desktop Server Installation Guide 19
Comments on this document? infodev@avaya.com

Planning your Avaya Scopia® XT Desktop Deployment
Related Links
Limiting Port Ranges on the Scopia® XT Desktop server on page 18
20 Avaya Scopia
®
XT Desktop Server Installation Guide August 2015
Comments on this document? infodev@avaya.com
 Loading...