

Avaya Scopia Elite MCU 6140, Scopia Elite MCU 6110, Scopia Elite MCU 6120, Scopia Elite MCU 6105 Rack Mounting Manual

Rack Mounting Guide for Avaya Scopia
Elite 6000 MCU
Release 9.0
Issue 1
January 2017

©
2014-2017, Avaya, Inc.
All Rights Reserved.
Notice
While reasonable efforts have been made to ensure that the
information in this document is complete and accurate at the time of
printing, Avaya assumes no liability for any errors. Avaya reserves
the right to make changes and corrections to the information in this
document without the obligation to notify any person or organization
of such changes.
Documentation disclaimer
“Documentation” means information published in varying mediums
which may include product information, operating instructions and
performance specifications that are generally made available to users
of products. Documentation does not include marketing materials.
Avaya shall not be responsible for any modifications, additions, or
deletions to the original published version of Documentation unless
such modifications, additions, or deletions were performed by or on
the express behalf of Avaya. End User agrees to indemnify and hold
harmless Avaya, Avaya's agents, servants and employees against all
claims, lawsuits, demands and judgments arising out of, or in
connection with, subsequent modifications, additions or deletions to
this documentation, to the extent made by End User.
Link disclaimer
Avaya is not responsible for the contents or reliability of any linked
websites referenced within this site or Documentation provided by
Avaya. Avaya is not responsible for the accuracy of any information,
statement or content provided on these sites and does not
necessarily endorse the products, services, or information described
or offered within them. Avaya does not guarantee that these links will
work all the time and has no control over the availability of the linked
pages.
Warranty
Avaya provides a limited warranty on Avaya hardware and software.
Refer to your sales agreement to establish the terms of the limited
warranty. In addition, Avaya’s standard warranty language, as well as
information regarding support for this product while under warranty is
available to Avaya customers and other parties through the Avaya
Support website:
https://support.avaya.com/helpcenter/
getGenericDetails?detailId=C20091120112456651010 under the link
“Warranty & Product Lifecycle” or such successor site as designated
by Avaya. Please note that if You acquired the product(s) from an
authorized Avaya Channel Partner outside of the United States and
Canada, the warranty is provided to You by said Avaya Channel
Partner and not by Avaya.
“Hosted Service” means an Avaya hosted service subscription that
You acquire from either Avaya or an authorized Avaya Channel
Partner (as applicable) and which is described further in Hosted SAS
or other service description documentation regarding the applicable
hosted service. If You purchase a Hosted Service subscription, the
foregoing limited warranty may not apply but You may be entitled to
support services in connection with the Hosted Service as described
further in your service description documents for the applicable
Hosted Service. Contact Avaya or Avaya Channel Partner (as
applicable) for more information.
Hosted Service
THE FOLLOWING APPLIES ONLY IF YOU PURCHASE AN AVAYA
HOSTED SERVICE SUBSCRIPTION FROM AVAYA OR AN AVAYA
CHANNEL PARTNER (AS APPLICABLE), THE TERMS OF USE
FOR HOSTED SERVICES ARE AVAILABLE ON THE AVAYA
WEBSITE,
HTTPS://SUPPORT.AVAYA.COM/LICENSEINFO
UNDER THE LINK “Avaya Terms of Use for Hosted Services” OR
SUCH SUCCESSOR SITE AS DESIGNATED BY AVAYA, AND ARE
APPLICABLE TO ANYONE WHO ACCESSES OR USES THE
HOSTED SERVICE. BY ACCESSING OR USING THE HOSTED
SERVICE, OR AUTHORIZING OTHERS TO DO SO, YOU, ON
BEHALF OF YOURSELF AND THE ENTITY FOR WHOM YOU ARE
DOING SO (HEREINAFTER REFERRED TO INTERCHANGEABLY
AS “YOU” AND “END USER”), AGREE TO THE TERMS OF USE. IF
YOU ARE ACCEPTING THE TERMS OF USE ON BEHALF A
COMPANY OR OTHER LEGAL ENTITY, YOU REPRESENT THAT
YOU HAVE THE AUTHORITY TO BIND SUCH ENTITY TO THESE
TERMS OF USE. IF YOU DO NOT HAVE SUCH AUTHORITY, OR
IF YOU DO NOT WISH TO ACCEPT THESE TERMS OF USE, YOU
MUST NOT ACCESS OR USE THE HOSTED SERVICE OR
AUTHORIZE ANYONE TO ACCESS OR USE THE HOSTED
SERVICE.
Licenses
THE SOFTWARE LICENSE TERMS AVAILABLE ON THE AVAYA
WEBSITE,
HTTPS://SUPPORT.AVAYA.COM/LICENSEINFO,
UNDER THE LINK “AVAYA SOFTWARE LICENSE TERMS (Avaya
Products)” OR SUCH SUCCESSOR SITE AS DESIGNATED BY
AVAYA, ARE APPLICABLE TO ANYONE WHO DOWNLOADS,
USES AND/OR INSTALLS AVAYA SOFTWARE, PURCHASED
FROM AVAYA INC., ANY AVAYA AFFILIATE, OR AN AVAYA
CHANNEL PARTNER (AS APPLICABLE) UNDER A COMMERCIAL
AGREEMENT WITH AVAYA OR AN AVAYA CHANNEL PARTNER.
UNLESS OTHERWISE AGREED TO BY AVAYA IN WRITING,
AVAYA DOES NOT EXTEND THIS LICENSE IF THE SOFTWARE
WAS OBTAINED FROM ANYONE OTHER THAN AVAYA, AN
AVAYA AFFILIATE OR AN AVAYA CHANNEL PARTNER; AVAYA
RESERVES THE RIGHT TO TAKE LEGAL ACTION AGAINST YOU
AND ANYONE ELSE USING OR SELLING THE SOFTWARE
WITHOUT A LICENSE. BY INSTALLING, DOWNLOADING OR
USING THE SOFTWARE, OR AUTHORIZING OTHERS TO DO SO,
YOU, ON BEHALF OF YOURSELF AND THE ENTITY FOR WHOM
YOU ARE INSTALLING, DOWNLOADING OR USING THE
SOFTWARE (HEREINAFTER REFERRED TO
INTERCHANGEABLY AS “YOU” AND “END USER”), AGREE TO
THESE TERMS AND CONDITIONS AND CREATE A BINDING
CONTRACT BETWEEN YOU AND AVAYA INC. OR THE
APPLICABLE AVAYA AFFILIATE (“AVAYA”).
Avaya grants You a license within the scope of the license types
described below, with the exception of Heritage Nortel Software, for
which the scope of the license is detailed below. Where the order
documentation does not expressly identify a license type, the
applicable license will be a Designated System License. The
applicable number of licenses and units of capacity for which the
license is granted will be one (1), unless a different number of
licenses or units of capacity is specified in the documentation or other
materials available to You. “Software” means computer programs in
object code, provided by Avaya or an Avaya Channel Partner,
whether as stand-alone products, pre-installed on hardware products,
and any upgrades, updates, patches, bug fixes, or modified versions
thereto. “Designated Processor” means a single stand-alone
computing device. “Server” means a Designated Processor that
hosts a software application to be accessed by multiple users.
“Instance” means a single copy of the Software executing at a
particular time: (i) on one physical machine; or (ii) on one deployed
software virtual machine (“VM”) or similar deployment.
License type(s)
Designated System(s) License (DS). End User may install and use
each copy or an Instance of the Software only on a number of
Designated Processors up to the number indicated in the order.
Avaya may require the Designated Processor(s) to be identified in
the order by type, serial number, feature key, Instance, location or
other specific designation, or to be provided by End User to Avaya
through electronic means established by Avaya specifically for this
purpose.
Shrinkwrap License (SR). You may install and use the Software in
accordance with the terms and conditions of the applicable license
agreements, such as “shrinkwrap” or “clickthrough” license
accompanying or applicable to the Software (“Shrinkwrap License”).
Heritage Nortel Software
“Heritage Nortel Software” means the software that was acquired by
Avaya as part of its purchase of the Nortel Enterprise Solutions
Business in December 2009. The Heritage Nortel Software is the
software contained within the list of Heritage Nortel Products located
https://support.avaya.com/LicenseInfo under the link “Heritage
at
Nortel Products” or such successor site as designated by Avaya. For
Heritage Nortel Software, Avaya grants Customer a license to use
Heritage Nortel Software provided hereunder solely to the extent of
the authorized activation or authorized usage level, solely for the
purpose specified in the Documentation, and solely as embedded in,
for execution on, or for communication with Avaya equipment.
Charges for Heritage Nortel Software may be based on extent of
activation or use authorized as specified in an order or invoice.

Copyright
Except where expressly stated otherwise, no use should be made of
materials on this site, the Documentation, Software, Hosted Service,
or hardware provided by Avaya. All content on this site, the
documentation, Hosted Service, and the product provided by Avaya
including the selection, arrangement and design of the content is
owned either by Avaya or its licensors and is protected by copyright
and other intellectual property laws including the sui generis rights
relating to the protection of databases. You may not modify, copy,
reproduce, republish, upload, post, transmit or distribute in any way
any content, in whole or in part, including any code and software
unless expressly authorized by Avaya. Unauthorized reproduction,
transmission, dissemination, storage, and or use without the express
written consent of Avaya can be a criminal, as well as a civil offense
under the applicable law.
Virtualization
The following applies if the product is deployed on a virtual machine.
Each product has its own ordering code and license types. Note that
each Instance of a product must be separately licensed and ordered.
For example, if the end user customer or Avaya Channel Partner
would like to install two Instances of the same type of products, then
two products of that type must be ordered.
Third Party Components
“Third Party Components” mean certain software programs or
portions thereof included in the Software or Hosted Service may
contain software (including open source software) distributed under
third party agreements (“Third Party Components”), which contain
terms regarding the rights to use certain portions of the Software
(“Third Party Terms”). As required, information regarding distributed
Linux OS source code (for those products that have distributed Linux
OS source code) and identifying the copyright holders of the Third
Party Components and the Third Party Terms that apply is available
in the products, Documentation or on Avaya’s website at:
support.avaya.com/Copyright or such successor site as designated
by Avaya. The open source software license terms provided as Third
Party Terms are consistent with the license rights granted in these
Software License Terms, and may contain additional rights benefiting
You, such as modification and distribution of the open source
software. The Third Party Terms shall take precedence over these
Software License Terms, solely with respect to the applicable Third
Party Components to the extent that these Software License Terms
impose greater restrictions on You than the applicable Third Party
Terms.
The following applies only if the H.264 (AVC) codec is distributed with
the product. THIS PRODUCT IS LICENSED UNDER THE AVC
PATENT PORTFOLIO LICENSE FOR THE PERSONAL USE OF A
CONSUMER OR OTHER USES IN WHICH IT DOES NOT RECEIVE
REMUNERATION TO (i) ENCODE VIDEO IN COMPLIANCE WITH
THE AVC STANDARD (“AVC VIDEO”) AND/OR (ii) DECODE AVC
VIDEO THAT WAS ENCODED BY A CONSUMER ENGAGED IN A
PERSONAL ACTIVITY AND/OR WAS OBTAINED FROM A VIDEO
PROVIDER LICENSED TO PROVIDE AVC VIDEO. NO LICENSE IS
GRANTED OR SHALL BE IMPLIED FOR ANY OTHER USE.
ADDITIONAL INFORMATION MAY BE OBTAINED FROM MPEG
LA, L.L.C. SEE
Service Provider
THE FOLLOWING APPLIES TO AVAYA CHANNEL PARTNER’S
HOSTING OF AVAYA PRODUCTS OR SERVICES. THE PRODUCT
OR HOSTED SERVICE MAY USE THIRD PARTY COMPONENTS
SUBJECT TO THIRD PARTY TERMS AND REQUIRE A SERVICE
PROVIDER TO BE INDEPENDENTLY LICENSED DIRECTLY
FROM THE THIRD PARTY SUPPLIER. AN AVAYA CHANNEL
PARTNER’S HOSTING OF AVAYA PRODUCTS MUST BE
AUTHORIZED IN WRITING BY AVAYA AND IF THOSE HOSTED
PRODUCTS USE OR EMBED CERTAIN THIRD PARTY
SOFTWARE, INCLUDING BUT NOT LIMITED TO MICROSOFT
SOFTWARE OR CODECS, THE AVAYA CHANNEL PARTNER IS
REQUIRED TO INDEPENDENTLY OBTAIN ANY APPLICABLE
LICENSE AGREEMENTS, AT THE AVAYA CHANNEL PARTNER’S
EXPENSE, DIRECTLY FROM THE APPLICABLE THIRD PARTY
SUPPLIER.
WITH RESPECT TO CODECS, IF THE AVAYA CHANNEL
PARTNER IS HOSTING ANY PRODUCTS THAT USE OR EMBED
THE G.729 CODEC, H.264 CODEC, OR H.265 CODEC, THE
HTTP://WWW.MPEGLA.COM.
https://
AVAYA CHANNEL PARTNER ACKNOWLEDGES AND AGREES
THE AVAYA CHANNEL PARTNER IS RESPONSIBLE FOR ANY
AND ALL RELATED FEES AND/OR ROYALTIES. THE G.729
CODEC IS LICENSED BY SIPRO LAB TELECOM INC. SEE
WWW.SIPRO.COM/CONTACT.HTML. THE H.264 (AVC) CODEC IS
LICENSED UNDER THE AVC PATENT PORTFOLIO LICENSE FOR
THE PERSONAL USE OF A CONSUMER OR OTHER USES IN
WHICH IT DOES NOT RECEIVE REMUNERATION TO: (I)
ENCODE VIDEO IN COMPLIANCE WITH THE AVC STANDARD
(“AVC VIDEO”) AND/OR (II) DECODE AVC VIDEO THAT WAS
ENCODED BY A CONSUMER ENGAGED IN A PERSONAL
ACTIVITY AND/OR WAS OBTAINED FROM A VIDEO PROVIDER
LICENSED TO PROVIDE AVC VIDEO. NO LICENSE IS GRANTED
OR SHALL BE IMPLIED FOR ANY OTHER USE. ADDITIONAL
INFORMATION FOR H.264 (AVC) AND H.265 (HEVC) CODECS
MAY BE OBTAINED FROM MPEG LA, L.L.C. SEE
WWW.MPEGLA.COM.
Compliance with Laws
You acknowledge and agree that it is Your responsibility for
complying with any applicable laws and regulations, including, but not
limited to laws and regulations related to call recording, data privacy,
intellectual property, trade secret, fraud, and music performance
rights, in the country or territory where the Avaya product is used.
Preventing Toll Fraud
“Toll Fraud” is the unauthorized use of your telecommunications
system by an unauthorized party (for example, a person who is not a
corporate employee, agent, subcontractor, or is not working on your
company's behalf). Be aware that there can be a risk of Toll Fraud
associated with your system and that, if Toll Fraud occurs, it can
result in substantial additional charges for your telecommunications
services.
Avaya Toll Fraud intervention
If You suspect that You are being victimized by Toll Fraud and You
need technical assistance or support, call Technical Service Center
Toll Fraud Intervention Hotline at +1-800-643-2353 for the United
States and Canada. For additional support telephone numbers, see
the Avaya Support website:
successor site as designated by Avaya.
Security Vulnerabilities
Information about Avaya’s security support policies can be found in
the Security Policies and Support section of
support.avaya.com/security.
Suspected Avaya product security vulnerabilities are handled per the
Avaya Product Security Support Flow (
support.avaya.com/css/P8/documents/100161515).
Downloading Documentation
For the most current versions of Documentation, see the Avaya
Support website:
as designated by Avaya.
Contact Avaya Support
See the Avaya Support website:
product or Hosted Service notices and articles, or to report a problem
with your Avaya product or Hosted Service. For a list of support
telephone numbers and contact addresses, go to the Avaya Support
website:
designated by Avaya), scroll to the bottom of the page, and select
Contact Avaya Support.
Trademarks
The trademarks, logos and service marks (“Marks”) displayed in this
site, the Documentation, Hosted Service(s), and product(s) provided
by Avaya are the registered or unregistered Marks of Avaya, its
affiliates, its licensors, its suppliers, or other third parties. Users are
not permitted to use such Marks without prior written consent from
Avaya or such third party which may own the Mark. Nothing
contained in this site, the Documentation, Hosted Service(s) and
product(s) should be construed as granting, by implication, estoppel,
or otherwise, any license or right in and to the Marks without the
express written permission of Avaya or the applicable third party.
Avaya is a registered trademark of Avaya Inc.
https://support.avaya.com (or such successor site as
https://support.avaya.com, or such successor site
https://support.avaya.com or such
https://
https://support.avaya.com for
HTTP://
https://

All non-Avaya trademarks are the property of their respective owners.
Linux® is the registered trademark of Linus Torvalds in the U.S. and
other countries.


Contents
Chapter 1: Introduction............................................................................................................ 7
Purpose.................................................................................................................................. 7
Chapter 2: Rack mounting preparation.................................................................................. 8
Technical specifications........................................................................................................... 8
Checking Site Suitability........................................................................................................... 9
Unpacking the Device............................................................................................................ 10
Inspecting for Damage........................................................................................................... 11
Adding a Power Supply Unit to the MCU................................................................................. 11
Chapter 3: Setting up the Device........................................................................................... 14
Choosing the Type of Rack.................................................................................................... 14
Preparing the Rack and Rails for Mounting the MCU ............................................................... 15
Mounting the Device on to the Rack........................................................................................ 17
Checking the Accessories Required for Mounting.............................................................. 17
Marking the location of the rail-fixing cage nuts.................................................................. 18
Marking the location of the MCU-fixing cage nuts............................................................... 18
Removing the Cage Nut Screws....................................................................................... 19
Mounting the rail-fixing cage nuts...................................................................................... 19
Mounting the MCU-fixing Cage Nuts................................................................................. 20
Mounting the Outer Rails on to the Rack........................................................................... 20
Mounting the Device on to the Outer Rails......................................................................... 24
Attaching the System Ground................................................................................................. 28
Connecting Cables to the Device............................................................................................ 29
Verifying the MCU Installation................................................................................................ 30
Chapter 4: Resources............................................................................................................. 32
Documentation...................................................................................................................... 32
Finding documents on the Avaya Support website............................................................. 36
Training................................................................................................................................ 36
Support................................................................................................................................ 37
Using the Avaya InSite Knowledge Base........................................................................... 37
January 2017 Rack Mounting Guide for Avaya Scopia Elite 6000 MCU 6
Comments on this document? infodev@avaya.com

Chapter 1: Introduction
Purpose
This document contains the Avaya Scopia® Elite 6000 MCU hardware installation checklist and
procedures.
This document is intended for people who install the Scopia® Elite 6000 MCU hardware at a
customer site.
January 2017 Rack Mounting Guide for Avaya Scopia Elite 6000 MCU 7
Comments on this document? infodev@avaya.com
Chapter 2: Rack mounting preparation
Technical specifications
This section details the system specifications of the MCU you purchased. Refer to this data when
preparing system setup and afterwards as a means of verifying that the environment still complies
with these requirements.
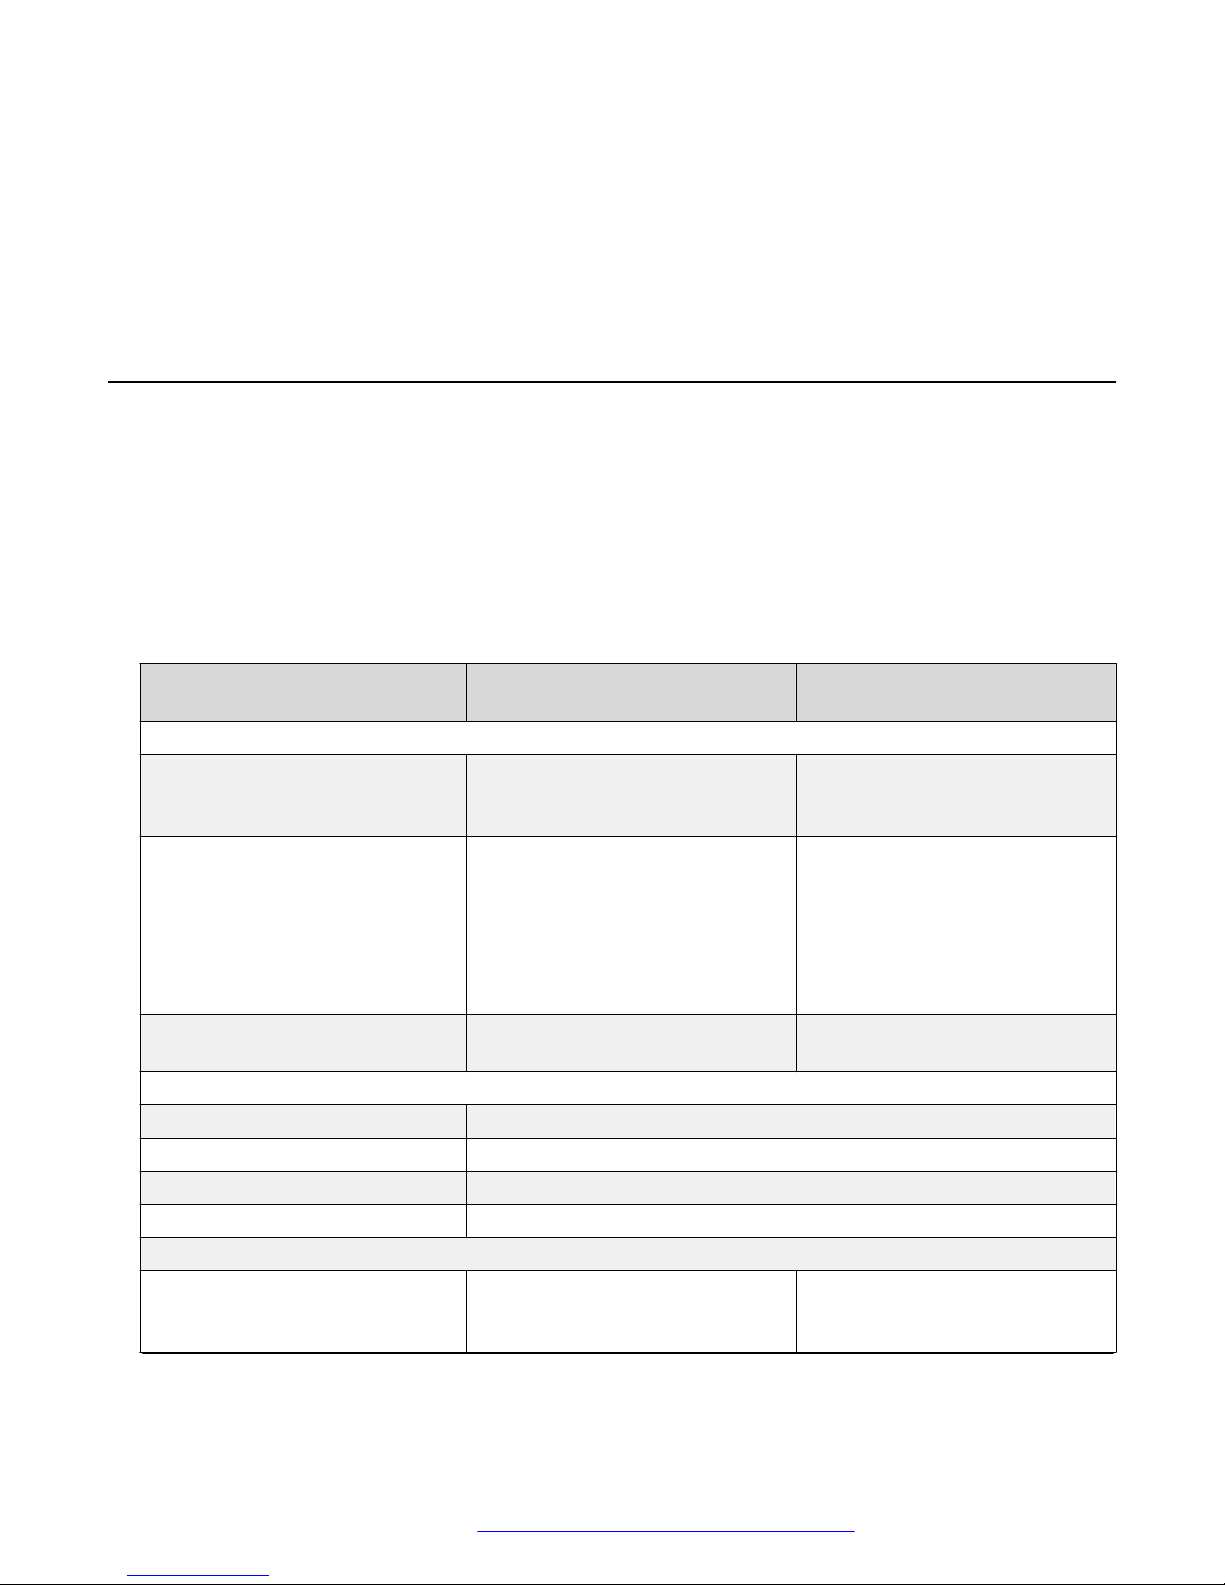
Hardware requirements
The following table refers to the physical details of the device:
Table 1: Physical device specifications
Scopia Elite MCU 6105, 6110 and
6120
System power requirements
Input 100-240 VAC, 50/60 Hz 100-240 VAC, 50/60 Hz with hot-
AC Input 600W output @ 100-240V, 7.5A,
50-60Hz
Maximum power consumption at
35°C
Environmental requirements
Operating temperature 10°C to 35°C (50°F to 95°F)
Relative humidity 5% to 90% non-condensing
Storage and transit temperature -40°C to 70°C (-40°F to 158°F), ambient
Acoustics Low noise fan speed control
Physical requirements
Dimensions Width: 437mm (17.2"); height:
200W, 250VA (682 BTU/h) 360W, 450VA (1228 BTU/h)
43mm (1.7"); depth 664mm (26.1")
Scopia Elite MCU 6140
swap redundant AC power supply
and feed (optional)
1000W output @ 100-120V,
12-10A, 50-60Hz
1200W output @ 120-140V,
12-10A, 50-60Hz
1800W output @ 200-240V,
10-8.5A, 50-60Hz
Width: 437mm (17.2"); height:
43mm (1.7"); depth: 790mm
(31.1")
January 2017 Rack Mounting Guide for Avaya Scopia Elite 6000 MCU 8
Table continues…
Comments on this document? infodev@avaya.com

Checking Site Suitability
Scopia Elite MCU 6105, 6110 and
6120
Approximate net weight 11kg (24.25lbs) 14.5kg (32lbs) with one power
Approximate gross weight (with
packaging)
Rack mounting 19-inch rack-mountable with flanges
21kg (46.3lbs) 23kg (50.7lbs)
Scopia Elite MCU 6140
supply
Software Specifications
The technical specifications of the protocols and software requirements apply to all Scopia® Elite
6000 MCU models:
• Signaling protocols:
- H.323
- SIP
- H.320 (in conjunction with Scopia H.320 Gateways)
• Audio support:
- Codecs: G.711. G.722, G.722.1, G.729, G.722.1 Annex C
- DTMF tone detection (in-band, H.245 tones and RFC2833)
• Video support:
- High Definition Continuous Presence video with a resolution of 1080p at up to 60fps
- Codecs: H.263, H.263+, H.264, H.264 SVC, H.264 High Profile
- Live video resolutions: CIF up to 1080p
- Presentation video resolution: VGA, SVGA, SXGA, XGA, 720p, 1080p, WUXGA
- Video bandwidth: up to 12Mbps for 1080p resolutions and up to 6Mbps for 720p or lower
• Web browser support:
- Microsoft Internet Explorer version 6 and later
- Microsoft Edge
- Mozilla Firefox version 3.3 and later
- Google Chrome
- Apple Safari
Checking Site Suitability
Prior to setting up your device, you need to verify your site suitability for:
• System power requirements
• System environmental requirements
January 2017 Rack Mounting Guide for Avaya Scopia Elite 6000 MCU 9
Comments on this document? infodev@avaya.com

Rack mounting preparation
• The device physical dimensions.
For more information, see Technical specifications on page 8 to learn about these requirements.
Ensure the site conforms to the listed requirements.
Unpacking the Device
About this task
We strongly recommend that you follow safety guidelines described in this section during unpacking.
Procedure
1. Inspect the shipping box to verify that it is not seriously damaged during shipping.
2. Place the shipping box on a horizontal surface paying attention to the This Side Up symbol
on the shipping box (Figure 1: This Side Up symbol on page 10).
Figure 1: This Side Up symbol
Caution:
The accessories kit is situated on top of the device inside the shipping box and can be
damaged if the box is placed upside down. Pay attention to the This Side Up symbol on
the shipping box to handle the box correctly at all times.
Caution:
To prevent injury and equipment damage, follow the lifting guidelines described in the
Safety Guide when lifting or moving the shipping box.
3. Cut the plastic straps.
Caution:
The plastic straps are tightly stretched and can hit you when you cut them. To avoid this,
make sure you do not face the side of the box secured by the straps before you cut the
straps.
4. Cut the strapping tape.
5. Open the shipping box.
6. Take the accessories kit out of the shipping box.
7. Take the device out of the shipping box.
8. Carefully open the additional boxes, remove the packing material, and remove the drives
and other contents.
January 2017 Rack Mounting Guide for Avaya Scopia Elite 6000 MCU 10
Comments on this document? infodev@avaya.com

Inspecting for Damage
Important:
We recommend keeping the packaging materials in case you need to repack the device.
9. Remove the cellophane wrapping from the server case.
10. After opening the shipping box, check the shipment is complete. Compare the contents of
the shipment with the packing list included in the box.
Inspecting for Damage
After you verify that all of the equipment is included, carefully examine the cards, power supplies
and cables for any damage resulting from shipping. If you suspect any damage from shipping,
contact your local freight carrier for procedures on damage claims. If you observe any physical
defects in the items you ordered, contact Technical Support for Return Material Authorization (RMA)
form.
Important:
Before proceeding with the installation, verify that all of the ordered parts are present and in
good condition. Keep a record of the parts and serial numbers. If any parts are missing or
damaged, contact your sales representative.
Adding a Power Supply Unit to the MCU
About this task
This section details how to set up an additional power supply unit (PSU) of the Scopia Elite MCU,
which can house two PSUs.
Important:
This applies to the 6140 model only. For details of replacing a PSU of the Scopia® Elite 5200
Series MCU, see the Administrator Guide of Scopia® Elite 5200 Series MCU version 7.7.
If one of the PSUs fails, the remaining PSU takes the full load of the system to enable continued
operation without interruption. PSUs can be hot-swapped, enabling you to replace the power unit
without powering down the device.
You can add the PSU when the MCU is functioning. However, Avaya strongly recommends to turn
off the MCU when you perform the procedure for the first time.
To remove an existing PSU from the device, see Administrator Guide for Avaya Scopia® Elite 6000
MCU.
January 2017 Rack Mounting Guide for Avaya Scopia Elite 6000 MCU 11
Comments on this document? infodev@avaya.com
Rack mounting preparation
Before you begin
Verify you have the following equipment:
• The standalone PSU that you can order from your local Avaya representative using these
references:
- Scopia Elite MCU Redundant Power Supply
- Part number 55547-00018
• An antistatic wrist strap
Procedure
1. Disconnect the power cord.
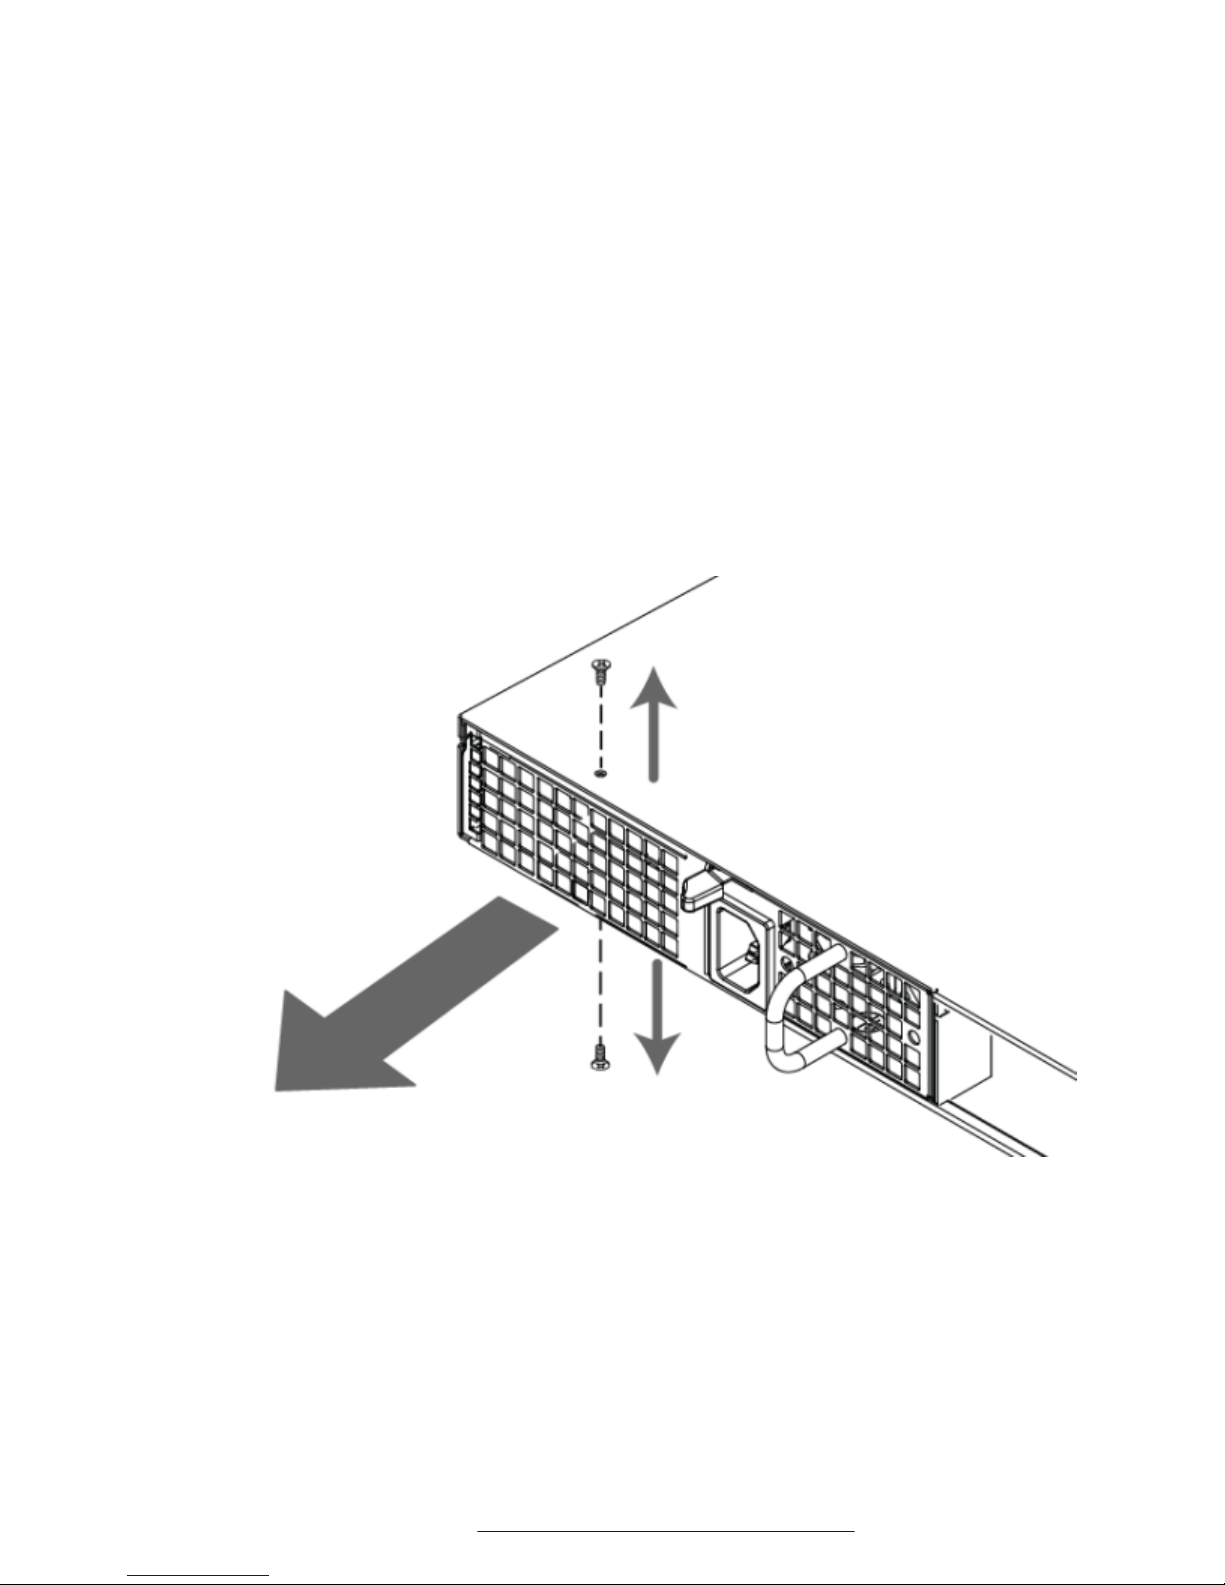
2. Remove the cover of the PSU slot if it is there.
The MCU is shipped with only one PSU fitted, while the second slot is covered by a metal
grid. Remove the grid by unscrewing the two screws, one above and one below the device.
Figure 2: Removing the cover of the second PSU slot in Scopia Elite MCU
3. Insert the new PSU into position and secure it by pressing it firmly into place until the release
tab clicks.
January 2017 Rack Mounting Guide for Avaya Scopia Elite 6000 MCU 12
Comments on this document? infodev@avaya.com
 Loading...