

Avaya S8300+G700, S8300C+G700, S8300D+G700, S8300A+G700, S8300B+G700 Replacement Manual

Job Aids for Field Replacements (FRUs) for the Avaya S8300 Server with the G700 Media Gateway
03-300528
Issue 6
May 2009

© 2009 Avaya Inc.
All Rights Reserved.
Notice
While reasonable efforts were made to ensure that the information in this
document was complete and accurate at the time of printing, Avaya Inc.
can assume no liability for any errors. Changes and corrections to the
information in this document may be incorporated in future releases.
For full legal page information, please see the complete document,
Avaya Legal Page for Hardware Documentation, Document number
03-600759.
To locate this document on our website, simply go to
http://www.avaya.com/support
number in the search box.
Documentation disclaimer
Avaya Inc. is not responsible for any modifications, additions, or deletions
to the original published version of this documentation unless such
modifications, additions, or deletions were performed by Avaya.
Customer and/or End User agree to indemnify and hold harmless Avaya,
Avaya's agents, servants and employees against all claims, lawsuits,
demands and judgments arising out of, or in connection with, subsequent
modifications, additions or deletions to this documentation to the extent
made by the Customer or End User.
Link disclaimer
Avaya Inc. is not responsible for the contents or reliability of any linked
Web sites referenced elsewhere within this documentation, and Avaya
does not necessarily endorse the products, services, or information
described or offered within them. We cannot guarantee that these links
will work all of the time and we have no control over the availability of the
linked pages.
Warr anty
Avaya Inc. provides a limited warranty on this product. Refer to your
sales agreement to establish the terms of the limited warranty. In
addition, Avaya’s standard warranty language, as well as information
regarding support for this product, while under warranty, is available
through the following Web site:
http://www.avaya.com/support
Copyright
Except where expressly stated otherwise, the Product is protected by
copyright and other laws respecting proprietary rights. Unauthorized
reproduction, transfer, and or use can be a criminal, as well as a civil,
offense under the applicable law.
Avaya support
Avaya provides a telephone number for you to use to report problems or
to ask questions about your product. The support telephone number
is 1-800-242-2121 in the United States. For additional support telephone
numbers, see the Avaya Web site:
http://www.avaya.com/support
and search for the document

Contents
Job Aid: Replacing the S8300 Server or its hard drive . . . . . . . . . . 1
Assumptions . . . . . . . . . . . . . . . . . . . . . . . . . . . . . . . . . . . . . . 1
Before you go to the site . . . . . . . . . . . . . . . . . . . . . . . . . . . . . . . 2
Identify the replacement scenario . . . . . . . . . . . . . . . . . . . . . . . . 2
Before going to the customer site . . . . . . . . . . . . . . . . . . . . . . . . 8
At the customer site . . . . . . . . . . . . . . . . . . . . . . . . . . . . . . . . . . 9
Procedure to replace the S8300 hardware . . . . . . . . . . . . . . . . . . . . 9
Job Aid: S8300 Communication Manager and co-resident SES: Replacing the
S8300C or S8300D Server or hard drive . . . . . . . . . . . . . . . . . . 19
Replacement materials . . . . . . . . . . . . . . . . . . . . . . . . . . . . . . . . 19
Hardware . . . . . . . . . . . . . . . . . . . . . . . . . . . . . . . . . . . . . . 19
Required information . . . . . . . . . . . . . . . . . . . . . . . . . . . . . . . 20
Additional information. . . . . . . . . . . . . . . . . . . . . . . . . . . . . . . 20
Before going to the customer site . . . . . . . . . . . . . . . . . . . . . . . . . . 21
Determine whether the hardware is functional . . . . . . . . . . . . . . . . . . . 21
Back up data . . . . . . . . . . . . . . . . . . . . . . . . . . . . . . . . . . . . . . 22
Power down the S8300C or S8300D . . . . . . . . . . . . . . . . . . . . . . . . . 23
Install the replacement hard drive or server . . . . . . . . . . . . . . . . . . . . . 24
Set TELNET parameters . . . . . . . . . . . . . . . . . . . . . . . . . . . . . . . . 26
Install the software. . . . . . . . . . . . . . . . . . . . . . . . . . . . . . . . . . . 27
Verify the software version . . . . . . . . . . . . . . . . . . . . . . . . . . . . . . 28
Set the time, date, and time zone . . . . . . . . . . . . . . . . . . . . . . . . . . . 29
Copy files to the server . . . . . . . . . . . . . . . . . . . . . . . . . . . . . . . . 29
Download optional language files . . . . . . . . . . . . . . . . . . . . . . . . . . 30
Install service pack, updates . . . . . . . . . . . . . . . . . . . . . . . . . . . . . 30
Configure network parameters . . . . . . . . . . . . . . . . . . . . . . . . . . . . 31
Verify connectivity to the backup files . . . . . . . . . . . . . . . . . . . . . . . . 32
Restore Data . . . . . . . . . . . . . . . . . . . . . . . . . . . . . . . . . . . . . . 32
Install the Communication Manager license and authentication files . . . . . . . 34
Reboot the server . . . . . . . . . . . . . . . . . . . . . . . . . . . . . . . . . . . 34
Integrity check . . . . . . . . . . . . . . . . . . . . . . . . . . . . . . . . . . . . . 35
If Communication Manager Messaging is installed . . . . . . . . . . . . . . . . . 35
Verify the Communication Manager Messaging IP address . . . . . . . . . . 36
Start the messaging application . . . . . . . . . . . . . . . . . . . . . . . . . 36
If the server is a LSP. . . . . . . . . . . . . . . . . . . . . . . . . . . . . . . . . . 37
Stop and start Communication Manager. . . . . . . . . . . . . . . . . . . . . 37
03-300528 Issue 6 May 2009 3

Contents
Save translations . . . . . . . . . . . . . . . . . . . . . . . . . . . . . . . . . 37
Final replacement tasks . . . . . . . . . . . . . . . . . . . . . . . . . . . . . . . . 37
Return the defective equipment . . . . . . . . . . . . . . . . . . . . . . . . . . . 38
Job Aid: Replacing the G700 Media Gateway. . . . . . . . . . . . . . . 39
Assumptions . . . . . . . . . . . . . . . . . . . . . . . . . . . . . . . . . . . . . . 39
Before you go to the site . . . . . . . . . . . . . . . . . . . . . . . . . . . . . . . 40
At the customer site . . . . . . . . . . . . . . . . . . . . . . . . . . . . . . . . . . 42
Appendix 1: Set up a TFTP Server . . . . . . . . . . . . . . . . . . . . . . . . . . 52
Appendix 2: Using the TFTP server on the
S8300 Media Server to install firmware . . . . . . . . . . . . . . . . . . . . . . . 54
Job Aid: Replacing Media, Expansion, or Octaplane Modules . . . . . . 55
Replacing Media Modules. . . . . . . . . . . . . . . . . . . . . . . . . . . . . . . 55
Replacing Avaya Expansion Modules . . . . . . . . . . . . . . . . . . . . . . . . 58
Replacing an Avaya Octaplane Stacking Module . . . . . . . . . . . . . . . . . . 59
Job Aid: Replacing the USB modem . . . . . . . . . . . . . . . . . . . . 61
Removing the old modem. . . . . . . . . . . . . . . . . . . . . . . . . . . . . . . 61
Replacing the modem . . . . . . . . . . . . . . . . . . . . . . . . . . . . . . . . . 61
Job Aid: Replacing the CompactFlash reader and card . . . . . . . . . 63
Required equipment . . . . . . . . . . . . . . . . . . . . . . . . . . . . . . . . . . 63
Removing the old card reader . . . . . . . . . . . . . . . . . . . . . . . . . . . . 63
Replacing the card reader. . . . . . . . . . . . . . . . . . . . . . . . . . . . . . . 63
Replacing the CompactFlash card . . . . . . . . . . . . . . . . . . . . . . . . . . 64
Job Aid: Supported CD/DVD-ROM drives . . . . . . . . . . . . . . . . . 65
Panasonic Digistor . . . . . . . . . . . . . . . . . . . . . . . . . . . . . . . . . . 65
TEAC . . . . . . . . . . . . . . . . . . . . . . . . . . . . . . . . . . . . . . . . . . 66
Addonics . . . . . . . . . . . . . . . . . . . . . . . . . . . . . . . . . . . . . . . . 66
Connecting to the server . . . . . . . . . . . . . . . . . . . . . . . . . . . . . . . 66
4 Job Aids for Field Replacements (FRUs) for the Avaya S8300 Server with the G700 Media Gateway

Job Aid: Replacing the S8300 Server or its hard drive
Note:
!
Important:
Note:
This job aid describes the procedures to replace an installed S8300 Server or its hard drive.
This section contains procedures to:
● Replace an S8300B server with an S8300B Server.
● Replace an S8300B hard drive.
● Replace an S8300C server with an S8300C Server (SES not enabled)
● Replace an S8300D server with an S8300D Server (SES not enabled)
● Replace an S8300C or S8300D Server hard drive (SES not enabled)
To replace an S8300C or S8300D Server with SES enabled, see Job Aid: S8300
Communication Manager and co-resident SES: Replacing the S8300C or S8300D Server or
hard drive on page 19.
Note: In this Job Aid, the term S8300 hardware refers to:
- the S8300D Server (Material ID 700447675) including its 160 GB hard disk drive
- the S8300C Server (Material ID 700407810) including its 40 GB hard disk drive
- the S8300B Server (Material ID 700394810) including its hard disk drive
Important: Always check the Avaya Support Web site for Product Correction Notices at
http://support.avaya.com
products) in the MOST POPULAR PRODUCTS IN SUPPORT section.
Note: The Avaya S8300D Server will be available after May 2009.
Assumptions
The following items are assumed for the successful completion of this replacement procedure. If
any of these assumptions do not apply to your scenario, some steps in the on-site replacement
procedures may need to be modified:
● The existing S8300 hardware may or may not be functional.
● The S8300 may be configured as a primary controller or as an LSP.
● The following information is available:
and select Product Correction Notices (All Avaya
03-300528 Issue 6 May 2009 1

Job Aid: Replacing the S8300 Server or its hard drive
Note:
!
Important:
- customer FTP server IP address, login, and password
- contents of a Pre-Installation Worksheet
● The technician is familiar with the connection and access methods to the S8300, including
setting up a direct connection to the S8300 Services port and using the Server
(Maintenance) Web page.
Note: See Installing and Upgrading the Avaya S8300 Server, 555-234-100, for detailed
information about setting up connections to the a media gateway and S8300 and
the associated laptop configurations.
Before you go to the site
There are several possible hardware replacement scenarios for S8300. You should determine
which of the scenarios applies and ensure that you have:
● Site-specific information
● Communication Manager Software Distribution CD and USB DVD/CD reader
● Service packs
● Firmware files
Identify the replacement scenario
The most common replacement scenario in this document is to replace the S8300 Server with
the same version. However, some earlier hardware versions are no longer available, requiring
these considerations:
● Replacing an S8300A with an S8300B on page 2
● Replacing an S8300A or S8300B with an S8300C on page 3
● Replacing an S8300A, S8300B, or S8300C with an S8300D on page 4
● Identify the replacement scenario on page 5
Replacing an S8300A with an S8300B
Important: Do not use this Job Aid if you need to replace an S8300 version A with version B.
Instead, refer to Installing and Upgrading the Avaya S8300 Server, 555-234-100.
2 Job Aids for Field Replacements (FRUs) for the Avaya S8300 Server with the G700 Media Gateway

An S8300 version A is replaced with an S8300 version B if:
!
Important:
● The system is a pre-2.1 release of Communication Manager running on an S8300A and
the customer placed an order to upgrade to release 2.1 or later.
● The S8300A Server the customer has is faulty and a replacement unit of an S8300A
Server is not available.
● There is Tier III approval to replace the S8300A because of an issue in the existing server
and/or the software release.
When a pre-2.1 release of Communication Manager is running on an S8300A, and you want to
upgrade to a 2.1 or later release, you must replace the S8300A with an S8300B. The B version
supports any Communication Manager release but the A version supports only pre-2.1
releases. The replacement S8300B is normally shipped without Communication Manager
software. In this case, you need to install Communication Manager software on the S8300
Server and configure the server. These procedures are covered in Installing and Upgrading the
Avaya S8300 Server, 555-234-100.
Replacing an S8300A or S8300B with an S8300C
Before you go to the site
Important: Do not use this Job Aid if you need to replace an S8300 version B with version C.
Instead, refer to Installing and Upgrading the Avaya S8300 Server, 555-234-100.
An S8300 version A is replaced with an S8300 version C if:
● The system is a pre-2.1 release of Communication Manager running on an S8300A and
the customer placed an order to upgrade to release 4.0 or later.
● The S8300A is faulty and a replacement unit of an S8300A Server is not available and only
S8300C replacement units are available.
● There is Tier III approval to replace the S8300A because of an issue in the existing server
and/or the software release.
An S8300 version B is replaced with an S8300 version C if:
● Coresident applications need to be supported on the S8300 Server and the customer
placed an order to replace the server.
● The S8300B is faulty and a replacement unit of an S8300B Server is not available and only
S8300C replacement units are available.
● There is Tier III approval to replace the S8300B because of an issue in the existing server
and/or the software release.
When a pre-4.0 release of Communication Manager is running on an S8300B, and you want to
upgrade to a 4.0 or later release, you must replace the S8300B with an S8300C. The S8300C
version supports only Communication Manager 4.0 and later releases. The replacement
S8300C is normally shipped without Communication Manager software. In this case, you need
to install Communication Manager software on the S8300C Server and configure the server.
03-300528 Issue 6 May 2009 3

Job Aid: Replacing the S8300 Server or its hard drive
!
Important:
Note:
Note:
These procedures are covered in Installing and Upgrading the Avaya S8300 Server,
555-234-100.
In addition, the S8300C does not support the CWY1 board that might be present with the
S8300A or S8300B. Refer to Installing and Upgrading the Avaya S8300 Server, 555-234-100
for proper conversion and announcement transfer procedures.
Replacing an S8300A, S8300B, or S8300C with an S8300D
Important: Do not use this Job Aid if you need to replace an S8300 version B with version C.
Instead, refer to Installing and Upgrading the Avaya S8300 Server, 555-234-100.
An S8300 version A is replaced with an S8300 version D if:
● The system is a pre-2.1 release of Communication Manager running on an S8300A and
the customer placed an order to upgrade to release 5.2.
● The S8300A is faulty and a replacement unit of an S8300A Server is not available and only
S8300D replacement units are available.
● There is Tier III approval to replace the S8300A because of an issue in the existing server
and/or the software release.
An S8300 version B is replaced with an S8300 version D if:
Note: An S8300B Server can be upgraded to Communication Manager release 5.2.
● Coresident applications need to be supported on the S8300 Server and the customer
placed an order to replace the server.
● The S8300B is faulty and a replacement unit of an S8300B Server is not available and only
S8300D replacement units are available.
● There is Tier III approval to replace the S8300B because of an issue in the existing server
and/or the software release.
An S8300 version C is replaced with an S8300 version D if:
Note: An S8300C Server can be upgraded to Communication Manager release 5.2.
● The S8300C is faulty and a replacement unit of an S8300C Server is not available and
only S8300D replacement units are available.
● Customer placed an order to replace the server in order to have an increase in processor
capability and memory is desired.
● There is Tier III approval to replace the S8300C because of an issue in the existing server
and/or the software release.
The replacement S8300 Server is normally shipped without Communication Manager software
installed. In this case, install the Communication Manager software, and configure the S8300D
4 Job Aids for Field Replacements (FRUs) for the Avaya S8300 Server with the G700 Media Gateway

Server. For more information, refer to the Installing and Upgrading the Avaya S8300 Server,
555-234-100 guide.
Identify the replacement scenario
Eight scenarios for replacing the S8300 hardware are summarized in Table 1: Replacement
scenarios on page 5. Each scenario requires a slightly different pre-installation preparation and
a slightly different installation procedure. The different scenarios depend on whether the original
(currently installed) hardware is functional, and whether the software releases installed on the
original and new hardware are the same, different, or unknown. Scenario 8 is the most common
replacement scenario for replacing the server/hard drive.
Table 1: Replacement scenarios 1 of 2
Software
Original
hardware is:
release on new
hardware is: Scenario # Replacement procedure:
Original
earlier than
New
Before you go to the site
● Upgrade software on original hardware
● Back up data
1
● Replace hardware
● Install license and authentication files
● Configure network data
● Restore all data
Functional
Original
same as
New
Original
later than
New
● Back up data
● Replace hardware
2
3
● Install license and authentication files
● Configure network data
● Restore all data
● Back up data
● Replace hardware
● Install license and authentication files
● Upgrade software on new hardware
● Configure network data
● Restore all data
1 of 2
03-300528 Issue 6 May 2009 5

Job Aid: Replacing the S8300 Server or its hard drive
Table 1: Replacement scenarios 2 of 2
Software
Original
hardware is:
release on new
hardware is: Scenario # Replacement procedure:
Original
earlier than
4
New
● Replace hardware
● Install license and authentication files
● Use IW to configure server data
● Restore only translations & Communication
Manager Messaging announcements
● Replace hardware
● Install license and authentication files
● Configure network data
● Restore all data
● Replace hardware
● Install license and authentication files
● Upgrade software on new hardware
● Configure network data
● Restore all data
● Replace hardware
● Install license and authentication files
● Upgrade new hardware to latest bug-fix load, if
needed
● Use IW to fully configure server data
● Restore only translations & Communication
Not functional
Original
same as
New
Original
later than
New
Original SW
release
unknown
5
6
7
Manager Messaging announcements
Either
functional or
not functional
No software
*
8
● Replace hardware
● Install Communication Manager software
● Check for service packs
● Configure network data
● Restore all data
● Install license and authentication files
*. A blank hard drive/CompactFlash is the common replacement scenario.
2 of 2
6 Job Aids for Field Replacements (FRUs) for the Avaya S8300 Server with the G700 Media Gateway

Description of replacement scenarios
Note:
When the S8300 hardware is replaced, you need to reconfigure the S8300 Server. The easiest
way to do this is to back up the configuration data from the original hardware and do a full
restore to the new hardware.
Scenario 8 is the common replacement scenario in which the old and new hardware and
software versions are the same.
However, for scenarios 1, 3, and 6, the original and new hardware are running different software
releases. In these scenarios, you will need to do a software upgrade (on the original hardware
for 1 and on the new hardware for 3 and 6) to make the software releases the same.
For scenario 6, since the hardware is not functional, you cannot do a backup so you will restore
the latest available backup. To do these upgrades, you need to have a CD containing the
appropriate server software load. The software load will typically be the latest release of the
software, but it could be an earlier release depending on what is required to make the software
releases the same on the original and new hardware.
For scenarios 2 and 5, the original and new hardware are running the same software release so
no upgrades are required. For scenario 5, you will restore the latest available backup.
Before you go to the site
For scenario 4, you cannot use the latest available backup to restore the configuration data.
(You cannot upgrade the original hardware or backup the configuration data because the
hardware is not functional. You cannot do a full restore of the latest available backup because
the original and new hardware have different software releases). In this scenario, you must do a
full configuration using the Avaya Installation Wizard or using Configure Server Web page on
the Communication Manager System Management Interface Web page and restore just the
translations and Communication Manager Messaging files from the latest available backup.
For scenario 7, you (and the customer) do not know the software release on the original
hardware, and you are unable to check the software release because the hardware is not
functional. In this case, you must follow the replacement procedure in scenario 4, with the
additional step of upgrading the new hardware to the latest software release, if that software
release is not already installed on the new hardware. This upgrade step ensures that the
system is not be downgraded in case the original hardware had the latest software release
installed.
Note: If you have a set of backup files which will be used to restore the server, you can
determine which Communication Manager software release was running on the
original server at the time of the backup set was created.
After the Communication Manager software is installed to the replacement S8300
server, you can use the View/Restore Data, preview capability to determine what
Communicatioin Manager software was running at the time the backup set was
created.
03-300528 Issue 6 May 2009 7

Job Aid: Replacing the S8300 Server or its hard drive
Note:
Before going to the customer site
Perform the following steps before going to the customer site:
1. Download the current license file and authentication (password) file from the RFA web site.
The license file must be associated with the serial number of the media gateway in which
the defective hardware resides. Save the license and authentication files on the laptop that
you will use at the customer site.
2. For scenarios 4 and 7 — if the original hardware is not functional, and the original hardware
has an earlier (or unknown) software release than the release installed on the new
hardware, then you need to do a full configuration (rather than a full restore).
Create a pre-installation server worksheet, which is used when configuring the S8300 after
hardware replacement. There is an electronic version and a printable version of the
pre-installation worksheet. The electronic version is used with the Avaya Installation Wizard
to directly load the configuration data onto the S8300. The printable version is used to
record the configuration data, which is then manually entered into the screens of the Avaya
Installation Wizard or the Configure Server (On the Communication Manager System
Management Interface Web page, Installation > Configure Server). The electronic version,
used with the Avaya Installation Wizard, is recommended because it simplifies the
data-entry task and is more accurate.
You can obtain the pre-installation worksheet from http://support.avaya.com/
Note: You do not need to create a pre-installation worksheet for the other scenarios (1,
.
2, 3, 5, and 6).
3. For scenario 7 — if the software release on the original hardware is unknown, check to see
if the software release on the new hardware is the latest software release. If not, obtain a
CD with the latest software release.
4. Determine backup location, user name, ftp host name, directory, and password to do an
FTP backup when on site. Keep this information handy for the restore.
5. For scenarios 1, 3, and 6 — if an upgrade is needed, obtain a CD with the appropriate
release of the server software to be used for upgrading the original or new hardware. (The
appropriate release is whatever makes the releases on the original and new hardware the
same after the upgrade).
6. For scenarios 1, 2, and 3, obtain information about the customer’s FTP backup server: IP
address, user name, password, ftp host name, and directory.
7. Determine whether software service packs will be needed and, if so, download the
appropriate software service pack to your laptop.
8. If the new hardware has a release of the server software that is later than the release
installed on the original hardware, you may need to upgrade the media gateway firmware.
8 Job Aids for Field Replacements (FRUs) for the Avaya S8300 Server with the G700 Media Gateway

● If you need to upgrade the media gateway firmware, go to the Avaya Support Web site
!
Important:
!
Important:
(http://support.avaya.com/
). Select Downloads then choose the appropriate Media
Gateway.
● For example, instructions for upgrading the G700 firmware are in Job Aid: Firmware
Download Procedure for the G700 Media Gateway, 555-245-758.
At the customer site
Use the following procedure to replace the S8300 hard drive or the S8300 Server (including its
hard drive).
Procedure to replace the S8300 hardware
At the customer site
Important: You need to perform a few steps on the Server (Maintenance) Web page before
you physically replace the S8300 hardware.
For the 5.2 release of Communication Manager, click Server (Maintenance) from the
Administration menu on the Communication Manager System Management
Interface Web page.
For a pre-5.2 release of Communication Manager, click the Launch Maintenance
Web Interface link on the Integrated Management Standard Management
Solutions Web page.
The fields referenced in this procedure are from the Server (Maintenance) Web page.
Hence, some of the fields may vary depending on the version of Communication
Manager you are using.
Important: Check if the customer requires the backup data to be stored at specific location
since backing up data is critical to ensure data restore.
1. If the S8300 hardware is still functional or can be made functional, connect your laptop to
the Services port on the S8300 and access the Server (Maintenance) Web page.
If you do not know whether the S8300 hardware is functional, perform the following
procedure to determine if it is functional:
a. Connect the customer’s laptop (with a crossover cable) to the Services port on the
S8300, open the Internet Explorer browser, and connect to http://192.11.13.6
.
b. If you do not get the Welcome screen, skip to Step f
.
03-300528 Issue 6 May 2009 9

Job Aid: Replacing the S8300 Server or its hard drive
Note:
Note:
c. If you get the Welcome screen, click Continue, log in by using your login credentials.
d. On the Administration menu, click Server (Maintenance).
e. Select Boot Partition under Server Upgrades.
- If the View Partition Status table, showing the status of the hda1 and hda6 partitions,
the S8300 hardware is functional; skip to Step 2
- If the View Partition Status table is not displayed, or you get an error message, the
S8300 hardware may not be functional; continue with Step f
f. If the previous steps indicate that the S8300 hardware may not be functional,
power-cycle the media gateway (unplug and plug-in the power cord) and repeat Steps a d above. If you do not get the Welcome screen in Step b
table is not displayed in Step e
3
.
Note: If the S8300 hardware is not functional, skip Step 2 and Step 2 and continue with
Step 3
.
, then the S8300 hardware is not functional — skip to Step
.
.
or if the View Partition Status
Note: If the server is being replaced due to some fault, it can likely not be upgraded.
The data restore process is not restricted to backups created from the same
release. The backup set created from the server being replaced must be
compatible with the software installed on the replacement server at the time of
the restore. Please contact your Project Manager to know if the backup set on the
server being replaced is compatible to a different Communication Manager
software release on the new server.
2. Back up data:
a. On the Server (Maintenance) Web page, select Backup Now under Data Backup /
Restore.
b. On the Backup Now screen, check all of the following data sets:
- If the S8300 is not an LSP, select ACP Translations; select the radio button for Save
ACP translations before backup.
- Server and System Files
- Security Files
- If Communication Manager Messaging is installed on the S8300, also select
Translations, Names, and Messages.
The Backup Method has two possible selections: Network Device or Local PC Card.
c. Select the Backup Method
● Network Device
- enter the information given by the customer
10 Job Aids for Field Replacements (FRUs) for the Avaya S8300 Server with the G700 Media Gateway

At the customer site
!
CAUTION:
Note:
-User Name
- Password
-Host Name
-Directory
- CompactFlash (S8300C only)
● Local PC Card (CompactFlash available on S8300C and S8300D)
d. Click the Start Backup button.
e. If Communication Manager Messaging is installed on the S8300, back up
announcements:
- Return to the Backup Now screen and uncheck all but Announcements for
Communication Manager Messaging.
- Select the Backup Method and enter the login destination information as in Step .
- Click the Start Backup button.
3. Install the new hard drive or S8300 Server.
CAUTION: Be sure to wear a properly grounded ESD wrist strap when handling the S8300
Server, hard drive. Place all components on a grounded, static-free surface when
working on them. When picking up the hard drive, be sure to hold it only on the
edges — do not touch the bottom of the hard drive.
Note: If you are replacing a hard drive only only and the Communication Manager
release at the time of the replacement is pre-3.0, use the FRU procedure
appropriate to the release. Then if desired, upgrade to Communication Manager
5.2 according to the appropriate Installing and Upgrading documentation.
a. Shutdown the S8300 Server using either the Web interface or the manual Shutdown
button on the S8300 faceplate.
- On the Server (Maintenance) Web page, select Shutdown Server under Server.
Select the Delayed Shutdown option, uncheck the Restart server after shutdown
checkbox, and click Shutdown.
- Alternatively, you can manually initiate a shutdown by pressing the Shutdown button
on the S8300 faceplate. Hold the button in until the green LED (OK to Remove) starts
blinking.
b. When the OK to Remove LED is on steady or when you are certain that the server has
powered down you can continue with Step c
. If you are also replacing the media gateway,
you can power it down.
03-300528 Issue 6 May 2009 11

Job Aid: Replacing the S8300 Server or its hard drive
Note:
!
Important:
c. Loosen the two thumb screws on the S8300. Disconnect the USB connected
CompactFlash reader/writer if present (S8300C, S8300D). Disconnect the USB
connected modem if present. Disconnect the USB connected DVD/CD reader if present.
Note: For example, S8300A or S8300B (with G250 or G350 only): When removing or
inserting the server, also remove or insert the space bar module together with the
server. This procedure varies with different gateways.
d. Remove the S8300 Server (may require to remove a module on the media gateway while
you remove the server. The type of media gateway determines the module to be
removed)
Important: S8300B: If you are replacing the hard drive use Step e through Step l and
Figure 1: S8300B hard drive replacement
entire S8300 Server (including its hard drive), skip to Step 5
on page 13. If you are replacing the
.
S8300C or S8300D: If you are replacing the hard drive use Step m
t
and Figure 2: S8300C hard drive replacement on page 15. If you are replacing
the entire S8300 Server (including its hard drive), skip to Step 5
through Step
.
e. S8300B: Unscrew the four screws on the bottom of the S8300 Server that attach to the
hard-drive standoffs (Refer to Figure 1: S8300B hard drive replacement
on page 13).
12 Job Aids for Field Replacements (FRUs) for the Avaya S8300 Server with the G700 Media Gateway
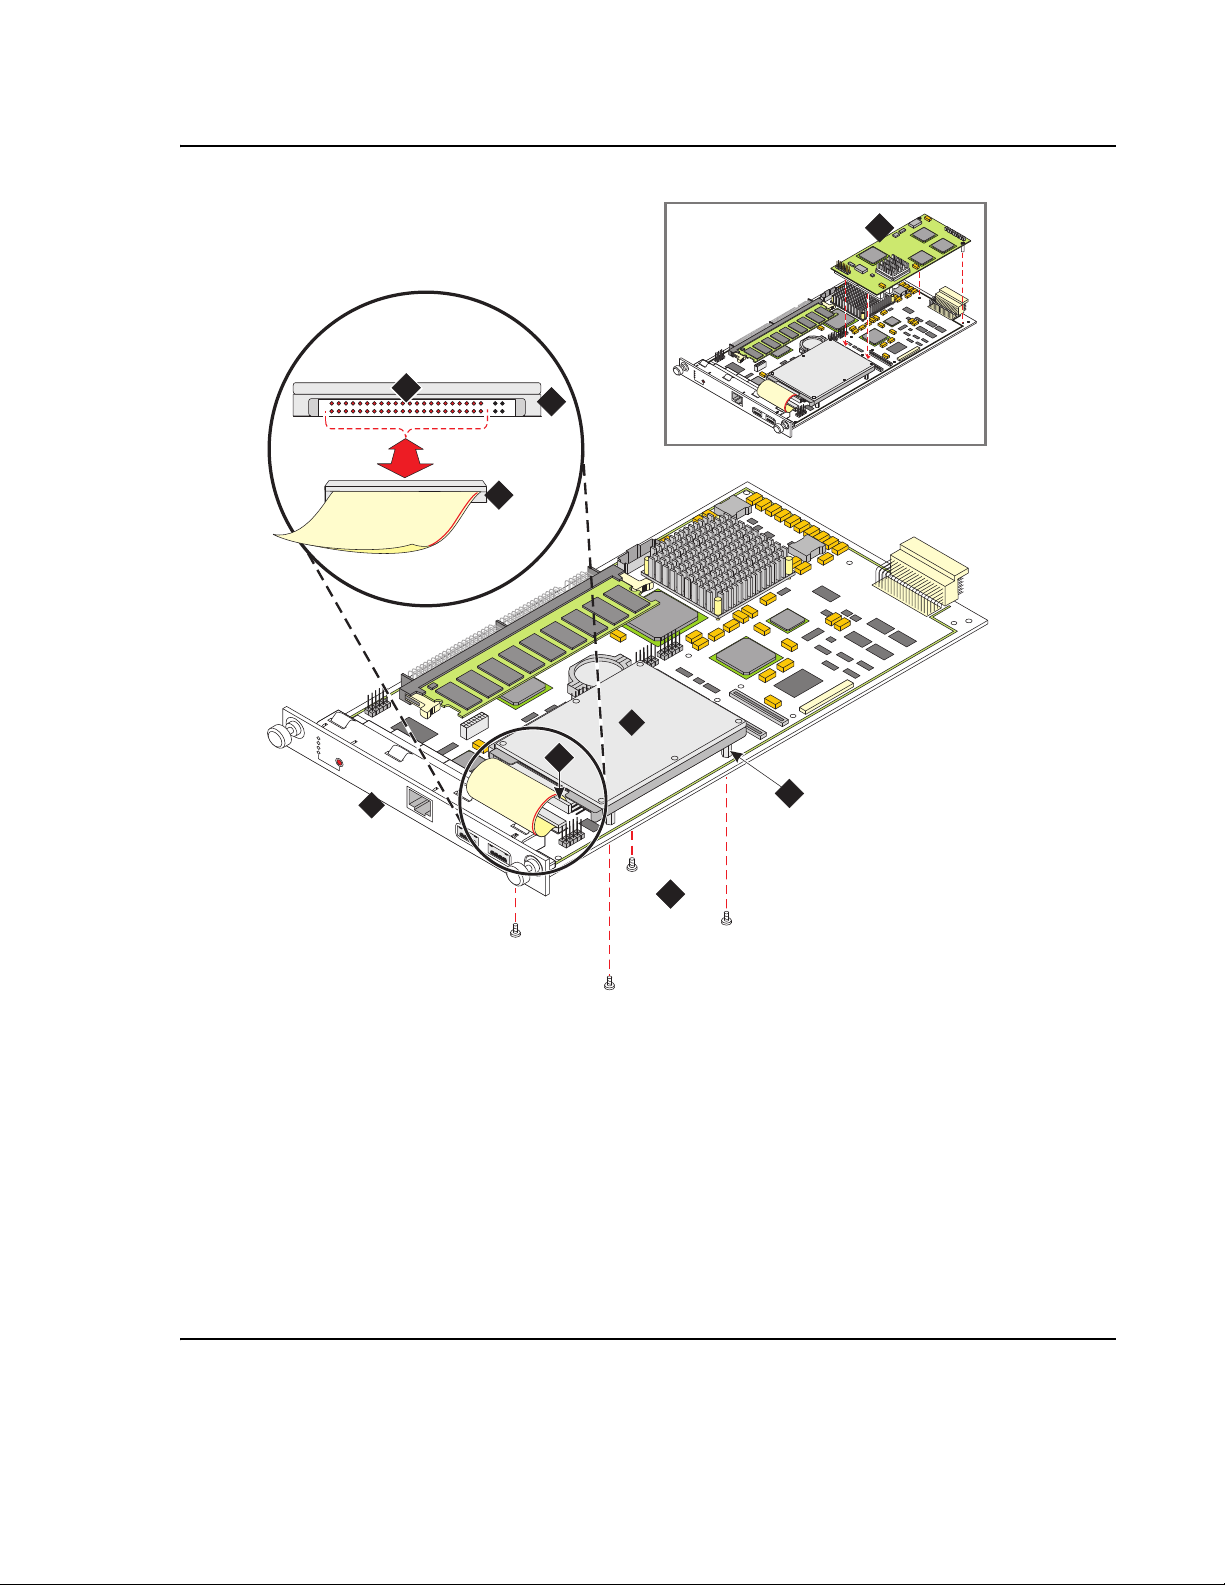
Figure 1: S8300B hard drive replacement
REMOVE
ALM
TST
ACT
OKTO
SHUTDOWN
SERVICES
USB1 USB2
indchd3 KLC 120402
1
2
3
4
6
5
2
5
R
E
M
O
V
E
A
L
M
T
S
T
A
C
T
O
K
TO
S
H
U
T
D
O
W
N
S
E
R
V
I
C
E
S
U
S
B
1
U
S
B
2
7
At the customer site
Figure notes:
1.
2.
3.
S8300 Server
Hard drive
Hard-drive standoffs
5.
6.
7.
Ribbon Cable Connector
Hard-Drive Connector Pins
Optional Communication Manager
Messaging Module. Note: this
module is unnecessary if running
Communication Manager 3.0 or
later because its functionality is
supported in software.
4.
Four (4) hard drive
mounting screws
03-300528 Issue 6 May 2009 13

Job Aid: Replacing the S8300 Server or its hard drive
Note:
!
CAUTION:
!
Important:
f. S8300B: Detach the hard-drive ribbon cable from the hard drive (leave cable attached to
the S8300 Server).
g. S8300B: Unpack and install the new hard drive on the S8300. Standoffs for the new hard
drive should be included in the new hard drive package.
Note: If standoffs are not included with the new hard drive, remove the standoffs from
the old drive and reuse them. Before screwing the standoffs into the new
hard drive, clean the threads thoroughly with a damp cloth or paper towel.
h. S8300B: Screw the standoffs into the new hard drive.
CAUTION: In Step i, be careful not to bend the pins on the hard drive. Leave the four jumper
pins to the right of the ribbon cable open and unconnected, as shown in
Figure 1: S8300B hard drive replacement
i. S8300B: Connect the open end of the hard-drive ribbon cable (which is attached to the
S8300 Server) to the replacement hard drive, as shown in Figure 1: S8300B hard drive
replacement on page 13. Connect pin number one to the end of the ribbon connector
marked with the red stripe.
on page 13.
j. S8300B: Place the hard drive on the S8300 Server with the standoffs aligned with the
screw holes.
k. S8300B: Hold the S8300 Server on its side, with the hard drive in place, and screw the
four screws through the bottom of the S8300 Server into the hard-drive standoffs.
l. S8300B: Insert the S8300 into the appropriate slot of the media gateway, but do not
completely insert the server in the slot.
For example, slot V1 of the G700. The LED panel (above slot V1) must be removed and
reinserted together with the S8300 Server. Insert both the LED panel and S8300 Server
about one-third (1/3) of the way into the guides (the guides are in slot V1 for the S8300
and above slot V1 for the LED panel). Push both the modules (together) back into the
guides, gently and firmly, until the front of each module aligns with the front of the G700.
Important: Step m through Step t apply to the S8300C or S8300D only.
m. S8300C or S8300D: From the bottom of the S8300 Server remove the two screws that
attach to the hard-drive standoffs (Refer to Figure 2: S8300C hard drive replacement
page 15).
on
14 Job Aids for Field Replacements (FRUs) for the Avaya S8300 Server with the G700 Media Gateway

Figure 2: S8300C hard drive replacement
h2dcchdr LAO 112006
REM
O
VE
ALM
APP
ACT
O
K
TO
SHUTDO
W
N
SERVICES
S8300C
C_V1
U
S
B
1
U
S
B
2
U
S
B
3
1
5
4
3
2
At the customer site
Figure notes:
1.
2.
3.
S8300C Server
Hard drive
Hard drive standoffs (2)
4.
5.
Hard drive mounting screws (2)
Hard drive connector
n. S8300C or S8300D: Detach the hard drive by pulling it directly out of the connector.
o. S8300C or S8300D: Locate the standoffs for the new hard drive. If standoffs are not
included with the new hard drive, remove the standoffs from the old drive and reuse
them.
p. S8300C or S8300D: Screw the standoffs into the new hard drive.
q. S8300C or S8300D: Connect the hard drive to the hard-drive connector
(Figure 2: S8300C hard drive replacement
on page 15).
r. S8300C or S8300D: Align the hard drive standoffs with the mounting holes on the S8300
Server.
03-300528 Issue 6 May 2009 15

Job Aid: Replacing the S8300 Server or its hard drive
s. S8300C or S8300D: Hold the S8300 Server on its side with the hard drive aligned with
the mounting holes, and screw the two screws through the bottom of the S8300 Server
into the hard-drive standoffs.
t. S8300C or S8300D: Guide the S8300 into the appropriate slot of the media gateway. For
example, slot V1 of the G700, but do not completely insert the server in the slot.
4. Before completely inserting the S8300B or S8300C or S8300D into the appropriate slot the
media gateway, connect the USB DVD-ROM/CD-R/W drive to the S8300.
5. Completely insert the S8300B or S8300C or S8300D Server in appropriate slot the media
gateway and secure the S8300 faceplate with the thumb screws. Tighten the thumb screws
with a screwdriver.
6. Power up the media gateway if the power was removed earlier.
7. Place the Communication Manager Software Distribution CD into the USB DVD-ROM/
CD-R/W reader and close the tray.
8. Install Communication Manager from the CD (refer to Installation and Upgrades for the
S8300 Server, 555-234-100).
The server reboots after installation.
9. Connect your laptop to the Services port on the S8300 and access the Server
(Maintenance) Web page.
10. Set server date and time:
a. Select Server > Server Date/Time.
The system displays the Server Date/Time screen.
b. Set the server time within five (5) minutes of the Network Timer Server (NTS) time, date
and time zone so that synchronization can occur.
11. If necessary, upgrade the server software on the new hardware:
● If the software release installed on the new hardware is earlier than the release on the
original hardware, upgrade the software on the new hardware to match the release on
the original hardware.
● If the software release on the original hardware is unknown, and the software on the new
hardware is not the latest software load, upgrade the software on the new hardware to
the latest software load.
12. S8300B Only: Disable RAM disk on the server:
a. Access the server’s command line interface using an SSH client, like PuTTY, and an IP
address of 192.11.13.6.
b. At the command line type sudo ramdisk -v -f disabled and press Enter.
The system does not display any information to the screen if there are no errors.
c. At the command line type ramdisk -v -s and press Enter to confirm the setting.
Confirm that the setting in the ecs.conf file is the desired state after the next reboot.
16 Job Aids for Field Replacements (FRUs) for the Avaya S8300 Server with the G700 Media Gateway

d. Reboot the server.
!
Important:
13. Install any software service packs required.
At the customer site
14. Configure the S8300 and restore data. Do either Step a
or Step b below:
a. If the original hardware is functional or if the software release installed on the original
hardware is the same as or later than the release installed on the new hardware, then:
● Configure the network data (Host Name, IP address, subnet mask, default gateway IP
address).
● Restore all data.
b. If the original hardware is not functional and the software release installed on the original
hardware is either unknown or earlier than the release installed on the new hardware,
then:
● Configure the S8300 as you would a new install using either the Avaya Installation
Wizard and the Pre-Installation Worksheet previously created, or using the Server
(Maintenance) Web page.
● Restore only the translations and the Communication Manager Messaging
announcements
15. If the new hardware has a later software release than the original hardware, check to see if
you need to upgrade the media gateway firmware as described in Step 8
in Before going to
the customer site on page 8.
16. Check for and resolve any new alarms.
17. Test as appropriate — for example, make station and trunk calls.
18. Save translations. If the S8300 on which you replaced the hardware is configured as an
LSP, save translations on the primary controller, not the LSP.
19. S8300B Only: Enable RAM disk on the server:
a. Access the server’s command line interface using an SSH client, like PuTTY, and an IP
address of 192.11.13.6.
b. At the command line type sudo ramdisk -v -f enabled and press Enter.
The system does not display any information to the screen if there are no errors.
c. At the command line type ramdisk -v -s and press Enter.
Confirm that the setting in the ecs.conf file is the desired state after the next reboot.
Important: DO NOT OMIT THE NEXT STEP.
20. S8300B and S8300C or S8300D: Reboot the server.
21. Install the license and authentication files.
a. Install the license file. If this server is an LSP, click Restart CM on the License File Install
Results web page before navigating away from this web page.
03-300528 Issue 6 May 2009 17
 Loading...