

Avaya Meeting Exchange 5.0, S6200, S6800 Meeting Exchange 5.0 Administration and Maintenance

Meeting Exchange® 5.0
Administration and Maintenance
S6200/S6800 Media Server
04-602167
Issue 1
August 2007

© 2007 Avaya Inc. All Right s Re served.
Notice
While reasonable efforts were made to ensure that the infor mation in this
document was complete and accurate at the time of printing, Avaya Inc. can
assume no liability for any errors. Changes and corrections to the information
in this document may be incorporated in future releases.
Documentation disclaimer
Avaya Inc. is not responsible for any modifications, addition s, or deletions to
the original published version of this Documentation unless such modifications,
additions, or deletions were performed by Avaya.
Link disclaimer
Avaya Inc. is not responsible for the contents or reliability of any linked third
party Web sites referenced elsewhere within this Documentation and Avaya
does not necessarily endorse the products, services, or information descri bed
or offered within them. We cannot guarantee that these lin ks will work all of the
time and we have no control over the availability of the linked pages.
License
USE OR INSTALLATION OF THE PRODUCT INDICATES THE END USER'S
ACCEPTANCE OF THE TERMS SET FORTH HEREIN AND THE GENERAL
LICENSE TERMS AVAILABLE ON THE AVAYA WEBSITE AT
http://support.avaya.com/LicenseInfo/
YOU DO NOT WISH TO BE BOUND BY THESE TERMS, YOU MUST
RETURN THE PRODUCT(S) TO THE POINT OF PURCHASE WITHIN TEN
(10) DAYS OF DELIVERY FOR A REFUND OR CREDIT.
Avaya grants End User a license within the scope of the license types
described below. The applicable number of licenses and units of capacity for
which the license is granted will be one (1), unless a different number of
licenses or units of capacity is specified in the Documentation or other
materials available to End User. "Designated Processor" means a single
stand-alone computing device. "Server" means a Desi gnated Processor that
hosts a software application to be accessed by multiple users. "Software"
means the computer programs in object code, originally licensed by Avaya and
ultimately utilized by End User, whether as stand-alone Products or
pre-installed on Hardware. "Hardware" means the standard hardwa re
Products, originally sold by Avaya and ultimately utilized by End User.
License Type(s):
Concurrent User License (CU). End User may install and use the Software on
multiple Designated Processors or one or more Servers, so long as only the
licensed number of Units are accessing and using the Software at any given
time. A "Unit" means the unit on which Avaya, at its sole discretion, bases the
pricing of its licenses and can be, without limitation, an agent, port or user, an
e-mail or voice mail account in the name of a person or corporate function
(e.g., webmaster or helpdesk), or a directory entry in the administrati ve
database utilized by the Product that permits one user to interface with the
Software. Units may be linked to a specific, identified Server.
Database License (DL). Customer may install and use each copy of the
Software on one Server or on multiple Servers provided that each of the
Servers on which the Software is installed communicate with no more than a
single instance of the same database.
Copyright
Except where expressly stated otherwise, the Product is protected by copyrigh t
and other laws respecting proprietary rights. Unauthorized reproduction,
transfer, and or use can be a criminal, as well as a civil, offense un der the
applicable law.
Third-party Components
Certain software programs or portions thereof included in the Product may
contain software distributed under third party agreements ("Third Party
Components"), which may contain terms that expand or limit rights to use
certain portions of the Product ("Third Party Terms"). I nformation identifying the
copyright holders of the Third Party Components and the Third Party Terms
that apply is available on Avaya's web site at:
http://support.avaya.com/ThirdPartyLicense/
For full information, please see the complete document, Avaya Third Part y
Terms, Document number 04-601558. To locate this document on the web si te,
simply go to http://www.avaya.com/support
number in the search box.
Warranty
Avaya Inc. provides a limited warranty on this product. Refer to your sales
agreement to establish the terms of the limited warran ty. In addition, Avaya’s
standard warranty language, as well as information regarding support for this
product, while under warranty, is available through the following Web site:
http://www.avaya.com/support
("GENERAL LICENSE TERMS"). IF
and search for the document
.
Avaya fraud intervention
If you suspect that you are being victimized by toll fraud and yo u need technical
assistance or support, call Technical Service Center Toll Fraud Intervention
Hotline at +1-800-643-2353 for the United States and Canada. Suspected
security vulnerabilities with Avaya Products should be reported to Avaya by
sending mail to: securityalerts@avaya.com.
For additional support telephone numbers, see the Avaya Web site:
http://www.avaya.com/support
Trademarks
Avaya and the Avaya logo are registered trademarks of Avaya Inc. in the
United States of America and ot her j urisdictions. Unless other wise provided in
this Documentation, marks identified by "®," "™" and "SM" are registered
marks, trademarks and service marks, respectively, of Avaya Inc. All other
trademarks are the property of their respective owners.
Document ordering information:
Avaya Publications Center
Voice: +1-207-866-6701
Fax: +1-207-626-7269
Write: Globalware Solutions
E-mail: totalware@gwsmail.com
Order: 04-602167 Issue 1
For the most current versions of documentation, go to the Avaya support Web
site: http://www.avaya.com/support
1-800-457-1764 (Toll-free, U.S. and Canada only)
1-800-457-1764 (Toll-free, U.S. and Canada only)
200 Ward Hill Avenue
Haverhill, MA 01835 USA
Attention: Avaya Account Manager
August 2007

Contents
Preface . . . . . . . . . . . . . . . . . . . . . . . . . . . . . . . . . . 9
Audience . . . . . . . . . . . . . . . . . . . . . . . . . . . . . . . . . . . . . . . . 9
Conventions . . . . . . . . . . . . . . . . . . . . . . . . . . . . . . . . . . . . . . 9
Related Documents . . . . . . . . . . . . . . . . . . . . . . . . . . . . . . . . . . 10
How to Get Help . . . . . . . . . . . . . . . . . . . . . . . . . . . . . . . . . . . . 11
Chapter 1: System Features . . . . . . . . . . . . . . . . . . . . . . . . 13
Introduction . . . . . . . . . . . . . . . . . . . . . . . . . . . . . . . . . . . . . . 13
Software Media Server (S6200) . . . . . . . . . . . . . . . . . . . . . . . . . . 13
Hardware Media Server (S6800) . . . . . . . . . . . . . . . . . . . . . . . . . 14
Server Hardware . . . . . . . . . . . . . . . . . . . . . . . . . . . . . . . . . . . . 14
Audioconferencing Features . . . . . . . . . . . . . . . . . . . . . . . . . . . . . 15
Attended Conferences. . . . . . . . . . . . . . . . . . . . . . . . . . . . . . . 15
Unattended Conferences . . . . . . . . . . . . . . . . . . . . . . . . . . . . . 16
Flex Conferences . . . . . . . . . . . . . . . . . . . . . . . . . . . . . . . . . 17
Conference Overbooking . . . . . . . . . . . . . . . . . . . . . . . . . . . . . 17
Sub-Conferences . . . . . . . . . . . . . . . . . . . . . . . . . . . . . . . . . 18
How Participants Access and Exit a Sub-Conference. . . . . . . . . . . . 19
Role of the Conference Moderator . . . . . . . . . . . . . . . . . . . . . . 19
Conference Scheduler. . . . . . . . . . . . . . . . . . . . . . . . . . . . . . . 20
Auto Blast . . . . . . . . . . . . . . . . . . . . . . . . . . . . . . . . . . . . . 21
Saved Roster Recordings . . . . . . . . . . . . . . . . . . . . . . . . . . . . . 21
Conference Call Modes . . . . . . . . . . . . . . . . . . . . . . . . . . . . . . . . 21
How a Conferee Is Placed in a Conference . . . . . . . . . . . . . . . . . . . 22
Dialing Out to Conferees . . . . . . . . . . . . . . . . . . . . . . . . . . . 22
Dialing In to Conferees . . . . . . . . . . . . . . . . . . . . . . . . . . . . 23
Video Conferencing Features. . . . . . . . . . . . . . . . . . . . . . . . . . . 23
Chapter 2: Using the System Management Interface . . . . . . . . . . . 25
Working with the Management Interface. . . . . . . . . . . . . . . . . . . . . . . 25
Logging In . . . . . . . . . . . . . . . . . . . . . . . . . . . . . . . . . . . . . 25
Menus and Options . . . . . . . . . . . . . . . . . . . . . . . . . . . . . . . . 26
System Maintenance Options. . . . . . . . . . . . . . . . . . . . . . . . . 28
Working with Menus and Screens . . . . . . . . . . . . . . . . . . . . . . 32
Managing User Sign-Ins. . . . . . . . . . . . . . . . . . . . . . . . . . . . . . . . 33
Creating Sign-Ins . . . . . . . . . . . . . . . . . . . . . . . . . . . . . . . . . 33
Viewing and Deleting Sign-Ins . . . . . . . . . . . . . . . . . . . . . . . . . . 35
Reservation Features . . . . . . . . . . . . . . . . . . . . . . . . . . . . . . . . . 36
Entry and Exit Announcements. . . . . . . . . . . . . . . . . . . . . . . . . . 36
Issue 1 August 2007 3

Contents
Scheduler Settings . . . . . . . . . . . . . . . . . . . . . . . . . . . . . . . . 36
Chapter 3: Configuring the System . . . . . . . . . . . . . . . . . . . . 39
Configuring Translation Tables. . . . . . . . . . . . . . . . . . . . . . . . . . . . 39
Telephone number to URI translation table . . . . . . . . . . . . . . . . . . . 40
Configuration for Web Portal . . . . . . . . . . . . . . . . . . . . . . . . . 41
URI to telephone number translation table . . . . . . . . . . . . . . . . . . . 42
Chapter 4: Configuring System-Wide Settings . . . . . . . . . . . . . . 45
Introduction . . . . . . . . . . . . . . . . . . . . . . . . . . . . . . . . . . . . . . 45
System Configuration . . . . . . . . . . . . . . . . . . . . . . . . . . . . . . . . . 45
System Supervision . . . . . . . . . . . . . . . . . . . . . . . . . . . . . . . . . . 63
Time-sensitive Operator Assistance Configuration . . . . . . . . . . . . . . . . . 67
System Date and Time. . . . . . . . . . . . . . . . . . . . . . . . . . . . . . . . . 68
Blast Dial Parameters . . . . . . . . . . . . . . . . . . . . . . . . . . . . . . . . . 70
Voice Message Configuration. . . . . . . . . . . . . . . . . . . . . . . . . . . . . 72
Operator Audio Paths . . . . . . . . . . . . . . . . . . . . . . . . . . . . . . . . . 73
Flex Configuration Settings. . . . . . . . . . . . . . . . . . . . . . . . . . . . . . 76
Chapter 5: Configuring Channels and Call Routing. . . . . . . . . . . . 79
Establishing Port Groups . . . . . . . . . . . . . . . . . . . . . . . . . . . . . . . 79
Inbound Port Groups (IPG) . . . . . . . . . . . . . . . . . . . . . . . . . . . . 79
Understanding the PortGroupsIB.txt file. . . . . . . . . . . . . . . . . . . 80
Outbound Port Groups (OPG) . . . . . . . . . . . . . . . . . . . . . . . . . . 82
Call Routing Configuration . . . . . . . . . . . . . . . . . . . . . . . . . . . . . . 84
Branding Calls using cbutil . . . . . . . . . . . . . . . . . . . . . . . . . . . . . . 86
Adding Call Branding Entries. . . . . . . . . . . . . . . . . . . . . . . . . . . 87
Modifying Call Branding Entries . . . . . . . . . . . . . . . . . . . . . . . . . 90
Deleting Call Branding Entries . . . . . . . . . . . . . . . . . . . . . . . . . . 90
Listing the Entries in the Call Branding Table. . . . . . . . . . . . . . . . . . 90
Displaying a single call branding entry . . . . . . . . . . . . . . . . . . . 91
Displaying all call entries in the call brand table . . . . . . . . . . . . . . 91
Setting the Maximum DNIS Length System Configuration . . . . . . . . . . . 92
Displaying Help for cbutil . . . . . . . . . . . . . . . . . . . . . . . . . . . 92
Using Reservation Groups . . . . . . . . . . . . . . . . . . . . . . . . . . . . 93
Adding Reservation Groups . . . . . . . . . . . . . . . . . . . . . . . . . 93
Setting up the Call Branding Table Using Reservation Groups . . . . . . 93
4 Administration and Maintenance of the S6200/S6800 Servers

Chapter 6: PINManaging Annunciator Messages . . . . . . . . . . . . . 95
Introduction . . . . . . . . . . . . . . . . . . . . . . . . . . . . . . . . . . . . . . 95
Prompt Sets . . . . . . . . . . . . . . . . . . . . . . . . . . . . . . . . . . . . . . 96
Installed prompt sets . . . . . . . . . . . . . . . . . . . . . . . . . . . . . 97
Annunciator Messages . . . . . . . . . . . . . . . . . . . . . . . . . . . . . . . . 97
Storing Annunciator Messages. . . . . . . . . . . . . . . . . . . . . . . . . . 97
S6200 . . . . . . . . . . . . . . . . . . . . . . . . . . . . . . . . . . . . . . 97
S6800 . . . . . . . . . . . . . . . . . . . . . . . . . . . . . . . . . . . . . . 98
About Annunciator Numbering . . . . . . . . . . . . . . . . . . . . . . . . . . 98
Loading prompts on to the S6800 . . . . . . . . . . . . . . . . . . . . . . . . 111
Customizing Message Prompts. . . . . . . . . . . . . . . . . . . . . . . . . . . . 112
Recording Messages . . . . . . . . . . . . . . . . . . . . . . . . . . . . . . . 113
Managing Annunciator Text. . . . . . . . . . . . . . . . . . . . . . . . . . . . . . 114
About Annunciator Performance . . . . . . . . . . . . . . . . . . . . . . . . . . . 117
Chapter 7: System Maintenance Options . . . . . . . . . . . . . . . . . 119
Contents
Configuring Network Settings . . . . . . . . . . . . . . . . . . . . . . . . . . . . 120
Port Status . . . . . . . . . . . . . . . . . . . . . . . . . . . . . . . . . . . . . 121
Load the Outbound Port Group Configuration . . . . . . . . . . . . . . . . . 121
Load the Inbound Port Group Configuration . . . . . . . . . . . . . . . . . . 122
Configuring the FDAPI . . . . . . . . . . . . . . . . . . . . . . . . . . . . . . . . 123
Specifying Flex-DAPI Channels. . . . . . . . . . . . . . . . . . . . . . . . . . 124
About Configuring Link Channels . . . . . . . . . . . . . . . . . . . . . . 125
Configuring the System Hosts File. . . . . . . . . . . . . . . . . . . . . . . . . . 126
System Re-Initialization . . . . . . . . . . . . . . . . . . . . . . . . . . . . . . . . 128
System Shutdown . . . . . . . . . . . . . . . . . . . . . . . . . . . . . . . . . . . 129
Chapter 8: Configuring Conference Scheduler . . . . . . . . . . . . . . 131
Working with the Conference Scheduler. . . . . . . . . . . . . . . . . . . . . . . 131
Configuring Warning Tones. . . . . . . . . . . . . . . . . . . . . . . . . . . . . . 139
Using External Passcode Validation . . . . . . . . . . . . . . . . . . . . . . . . . 140
Overview . . . . . . . . . . . . . . . . . . . . . . . . . . . . . . . . . . . . . . 140
Validation Process. . . . . . . . . . . . . . . . . . . . . . . . . . . . . . . . . 141
XML Data Source Configuration . . . . . . . . . . . . . . . . . . . . . . . . . 141
Validation Requests . . . . . . . . . . . . . . . . . . . . . . . . . . . . . . . . 143
HTTP GET Syntax . . . . . . . . . . . . . . . . . . . . . . . . . . . . . . . 144
Test Syntax. . . . . . . . . . . . . . . . . . . . . . . . . . . . . . . . . . . 145
Passcode Validation Response. . . . . . . . . . . . . . . . . . . . . . . . 145
Managing Leader PINs on systems configured for Flex . . . . . . . . . . 146
Issue 1 Beta May 2007 5

Contents
Mandatory billing codes for systems configured with Flex. . . . . . . . . 148
Stranded Participant Disconnect with EPV . . . . . . . . . . . . . . . . . 149
Keep Alive Response . . . . . . . . . . . . . . . . . . . . . . . . . . . . . 149
The xCalcli Test Program . . . . . . . . . . . . . . . . . . . . . . . . . . . 149
Validating PIN Codes via a web browser. . . . . . . . . . . . . . . . . . . 150
Chapter 9: Managing Files . . . . . . . . . . . . . . . . . . . . . . . . . 153
Introduction . . . . . . . . . . . . . . . . . . . . . . . . . . . . . . . . . . . . . . 153
Summary of System File Summary. . . . . . . . . . . . . . . . . . . . . . . . 154
System File Locations. . . . . . . . . . . . . . . . . . . . . . . . . . . . . . . 155
File Management Capabilities. . . . . . . . . . . . . . . . . . . . . . . . . . . 158
Working with File Lists . . . . . . . . . . . . . . . . . . . . . . . . . . . . . . 159
Deleteing files . . . . . . . . . . . . . . . . . . . . . . . . . . . . . . . . . . . 159
Automatically by the System . . . . . . . . . . . . . . . . . . . . . . . . . 159
Using the File Management Menu . . . . . . . . . . . . . . . . . . . . . . 159
Printing files . . . . . . . . . . . . . . . . . . . . . . . . . . . . . . . . . . . . 161
Viewing files . . . . . . . . . . . . . . . . . . . . . . . . . . . . . . . . . . . . 162
Hard Disk Status. . . . . . . . . . . . . . . . . . . . . . . . . . . . . . . . . . 163
Printer Management Menu . . . . . . . . . . . . . . . . . . . . . . . . . . . . 163
Canceling Print Jobs . . . . . . . . . . . . . . . . . . . . . . . . . . . . . 164
Displaying Printer Status . . . . . . . . . . . . . . . . . . . . . . . . . . . 164
Disabling Print Jobs . . . . . . . . . . . . . . . . . . . . . . . . . . . . . . 165
Enabling Print Jobs . . . . . . . . . . . . . . . . . . . . . . . . . . . . . . 165
Working with the Backup/Restore Menu. . . . . . . . . . . . . . . . . . . . . . . 165
Creating Back Up Files . . . . . . . . . . . . . . . . . . . . . . . . . . . . . . 166
Restoring Filesfrom backup . . . . . . . . . . . . . . . . . . . . . . . . . . . 167
Saved Roster Audio Files . . . . . . . . . . . . . . . . . . . . . . . . . . . . . . . 168
Configuration Files . . . . . . . . . . . . . . . . . . . . . . . . . . . . . . . . . . 168
Dial Lists . . . . . . . . . . . . . . . . . . . . . . . . . . . . . . . . . . . . . . . . 169
LAN Statistics Report . . . . . . . . . . . . . . . . . . . . . . . . . . . . . . . . . 170
Log Files . . . . . . . . . . . . . . . . . . . . . . . . . . . . . . . . . . . . . . . . 171
System Log . . . . . . . . . . . . . . . . . . . . . . . . . . . . . . . . . . . . 172
User Transaction Log . . . . . . . . . . . . . . . . . . . . . . . . . . . . . . . 173
Configuration. . . . . . . . . . . . . . . . . . . . . . . . . . . . . . . . . . 173
Modify Log . . . . . . . . . . . . . . . . . . . . . . . . . . . . . . . . . . . . . 176
External Passcode Validation Log . . . . . . . . . . . . . . . . . . . . . . . . 177
Operator Transaction Logs . . . . . . . . . . . . . . . . . . . . . . . . . . . . . . 178
Specifying Filtering for a Operator Transaction View. . . . . . . . . . . . 179
Operator commands. . . . . . . . . . . . . . . . . . . . . . . . . . . . . . 180
6 Administration and Maintenance of the S6200/S6800 Servers

Digital Record/Playback (DRP) Files . . . . . . . . . . . . . . . . . . . . . . . . . 185
DRP Information in CODRs and Conference Reports. . . . . . . . . . . . . . 187
Converting DRP Files to WAV Files . . . . . . . . . . . . . . . . . . . . . . . 188
Traffic Statistics . . . . . . . . . . . . . . . . . . . . . . . . . . . . . . . . . . . . 189
Managing System Files from a Remote Host . . . . . . . . . . . . . . . . . . . . 190
Using the Guest Account . . . . . . . . . . . . . . . . . . . . . . . . . . . . . 190
Linux Commands Summary . . . . . . . . . . . . . . . . . . . . . . . . . . . 191
Remote Login and File Transfer . . . . . . . . . . . . . . . . . . . . . . . . . 192
Registering Hosts to Use rlogin and rcp . . . . . . . . . . . . . . . . . . . 193
Using rlogin . . . . . . . . . . . . . . . . . . . . . . . . . . . . . . . . . . 193
Using Telnet . . . . . . . . . . . . . . . . . . . . . . . . . . . . . . . . . . 194
Using rcp . . . . . . . . . . . . . . . . . . . . . . . . . . . . . . . . . . . . 196
Using ftp . . . . . . . . . . . . . . . . . . . . . . . . . . . . . . . . . . . . 197
Additional Information About File Transfers. . . . . . . . . . . . . . . . . . . . . 200
DOS and Linux Filenames. . . . . . . . . . . . . . . . . . . . . . . . . . . . . 200
Creating Files Off-line for Downloading . . . . . . . . . . . . . . . . . . . . . 201
Creating Tag Files Off-Line . . . . . . . . . . . . . . . . . . . . . . . . . . 201
Creating Dial Lists Off-Line . . . . . . . . . . . . . . . . . . . . . . . . . . 201
Copying Voice Files . . . . . . . . . . . . . . . . . . . . . . . . . . . . . . . . 202
About mlcp . . . . . . . . . . . . . . . . . . . . . . . . . . . . . . . . . . . 203
Starting mlcp. . . . . . . . . . . . . . . . . . . . . . . . . . . . . . . . . . 204
Transferring Voice Files between Systems . . . . . . . . . . . . . . . . . 204
Contents
Managing the PIN Code Files . . . . . . . . . . . . . . . . . . . . . . . . . . . . . 205
Creating PIN Code Files. . . . . . . . . . . . . . . . . . . . . . . . . . . . . . 205
PIN Code File Format . . . . . . . . . . . . . . . . . . . . . . . . . . . . . 206
PIN List File Format . . . . . . . . . . . . . . . . . . . . . . . . . . . . . . 207
Copying the files to the system. . . . . . . . . . . . . . . . . . . . . . . . . . 208
Loading PIN Codes and PIN Lists to into Bridgedb . . . . . . . . . . . . . . . . . 209
Unloading PIN Codes . . . . . . . . . . . . . . . . . . . . . . . . . . . . . . . 211
Chapter 10: Managing Reports . . . . . . . . . . . . . . . . . . . . . . . 213
Working with CDRs and CODRs . . . . . . . . . . . . . . . . . . . . . . . . . . . 213
How the System Manages Detail Records . . . . . . . . . . . . . . . . . . . . 214
About CDR and CODR Formats. . . . . . . . . . . . . . . . . . . . . . . . . . 214
Configuring CDRs . . . . . . . . . . . . . . . . . . . . . . . . . . . . . . . . . 216
Configuring CODRs . . . . . . . . . . . . . . . . . . . . . . . . . . . . . . . . 226
Multiple CODRs for One Conference ID . . . . . . . . . . . . . . . . . . . 236
Printing and Viewing CDRs and CODRs . . . . . . . . . . . . . . . . . . . . . 236
Printing and Viewing CDRs . . . . . . . . . . . . . . . . . . . . . . . . . . 236
Printing and Viewing CODRs . . . . . . . . . . . . . . . . . . . . . . . . . 238
Issue 1 Beta May 2007 7

Contents
Printing CDRs and CODRs with More than 80 Columns . . . . . . . . . . 239
Alarm Report. . . . . . . . . . . . . . . . . . . . . . . . . . . . . . . . . . . . . . 239
Conference Reports . . . . . . . . . . . . . . . . . . . . . . . . . . . . . . . . . . 240
Printing and Viewing Conference Reports. . . . . . . . . . . . . . . . . . . . 241
LAN Statistics Report . . . . . . . . . . . . . . . . . . . . . . . . . . . . . . . . . 243
DRP Information in CODRs and Conference Reports. . . . . . . . . . . . . . 245
Real-time CDRs and CODRs . . . . . . . . . . . . . . . . . . . . . . . . . . . . . 246
The autocdr Process . . . . . . . . . . . . . . . . . . . . . . . . . . . . . . . 246
Record Format . . . . . . . . . . . . . . . . . . . . . . . . . . . . . . . . . . . 247
Retrieving Records . . . . . . . . . . . . . . . . . . . . . . . . . . . . . . . . 248
Checking a Connection . . . . . . . . . . . . . . . . . . . . . . . . . . . . . . 250
Auto CDR Process Flow. . . . . . . . . . . . . . . . . . . . . . . . . . . . . . 250
Preparing for Real-Time Export. . . . . . . . . . . . . . . . . . . . . . . . . . 252
Appendix A: Moderator and Participant Touchtone Commands. . . . . 253
Managing conferences using touchtone commands. . . . . . . . . . . . . . . . 254
Moderator Touchtone Commands . . . . . . . . . . . . . . . . . . . . . . 254
Participant Touchtone Commands . . . . . . . . . . . . . . . . . . . . . . 259
Managing flex conferences using touchtone commands. . . . . . . . . . . . . . 260
Modifying flex conference settings. . . . . . . . . . . . . . . . . . . . . . . . 260
Managing conferences using flex touchtone commands. . . . . . . . . . . . 262
Appendix B: System and Log Messages . . . . . . . . . . . . . . . . . 271
System Messages . . . . . . . . . . . . . . . . . . . . . . . . . . . . . . . . . . . 271
0000–0999: Status Messages . . . . . . . . . . . . . . . . . . . . . . . . . . . 274
1000–1999: User/Usage Messages . . . . . . . . . . . . . . . . . . . . . . . . 280
2000–2999: Process Interface Messages. . . . . . . . . . . . . . . . . . . . . 281
3000–3999: Linux System Error Messages . . . . . . . . . . . . . . . . . . . 283
4000–4999: Hardware and Device Messages . . . . . . . . . . . . . . . . . . 286
S6x00 Media Server Errors . . . . . . . . . . . . . . . . . . . . . . . . . . . . . . 291
Debug Process Errors. . . . . . . . . . . . . . . . . . . . . . . . . . . . . . . 291
SIP Utility Messages. . . . . . . . . . . . . . . . . . . . . . . . . . . . . . . . 292
INIT Messages . . . . . . . . . . . . . . . . . . . . . . . . . . . . . . . . . . . 294
Index . . . . . . . . . . . . . . . . . . . . . . . . . . . . . . . . . . 299
8 Administration and Maintenance of the S6200/S6800 Servers

Preface
This guide describes S6200/S6800 Media Server features and how to configure
audioconferencing and network settings for the S6200/S6800 Media Server audioconferencing
system, which is referred to as the “system” throughout the remainder of this guide unless
specified otherwise. Although this guide includes basic information about system hardware,
maintenance procedures, and tasks you can perform from the system’s Linux shell interface, it
primarily describes configuration options available from the system’s text-based management
interface and how to configure those options for your particular audioconferencing
requirements.
Audience
This guide is intended for qualified personnel who manage the system. It describes procedures
that have a direct impact on system functions. System administrators should have a working
knowledge of teleconferencing concepts, customer requirements, and, under some
circumstances, telecommunication protocols and specifications, TCP/IP protocols, and Linux
commands.
Contact a technical support representa tive if you require assistance with configuring system and
audio conference settings or require in-depth training on using the S6200/S6800 Media Server
or Avaya desktop products.
Conventions
This guide uses the following conventions:
Convention Description
SMALL CAPS Used for keystrokes. For example: Press the ESC key.
Courier
Courier Bold Used for text you enter at the command line.
Bold Used for menu options. For example: Select Call
Used for text the system displays.
For example:
For example:
Branding.
ERROR: Digit collection in progress.
rlogin host [-ec] [-8]
Issue 1 August 2007 9

Preface
Convention Description
Italic Used for references to publications. For example:
See the Bridge Talk User’s Guide.
Menu > Option Used to indicate the path to management interface options.
For example: Select System Administrator Main >
Configurations.
Note:
Note: Provides information of special importance.
Tip:
Tip: Provides information about alternative procedures or shortcuts.
!
CAUTION:
CAUTION: Provides information about actions that may disrupt or damage
system resources.
Related Documents
The following documents may provide additional information:
• Release Notes S6200/S6800 Media Server 5.0
• Installing the S6200/S6800 Media Server 5.0
• Relational Database Guide 5.0
• User’s Guide Bridge Talk 5.0
• Administration and Configuration Guide for Multi Site
10 Administration and Maintenance of the S6200/S6800 Servers

How to Get Help
Information
Telephone +1-877-742-8351
Web site http://www.avaya.com/support
US and Canada Technical Support +1-800-242-2121
International Technical Support +353-1-207-5667 (CS700/CS780)
How to Get Help
+1-877-742-8352
E-mail:
MXCustomerSupp@avaya.com
Fax: +1-978-677-5134
+353-1-207-5666 (CS7000)
E-mail: MXdubsupp@avaya.com
International Meeting Exchange
Technical Support
E-mail: MXSupport@avaya.com
Issue 1 August 2007 11

Preface
12 Administration and Maintenance of the S6200/S6800 Servers

Chapter 1: System Features
Includes system configuration, audioconferencing, and hardware features. This chapter also
describes client applications supported by the system and provides an overview of the different
ways conferees gain access to conferences.
Introduction
S6x00 media servers are SIP-based voice and web conferencing solutions that extend A vaya's
conferencing applications including reservation-less, attended, event, mobile, and web
conferencing- to support various IP network implementations. These systems offers a flexible,
comprehensive conferencing solution in a pure IP environment.
It can be configured as a software media server, or combined with an external hardware media
server. Both configurations support these capabilities:
l RFC 2833 DTMF support
l In-band DTMF support
l Up to 2016-user and 115-operator conferences
l Full support of the Media Server Interface
l Support for up to four digitally recorded music sources, which are locally stored on the
hardware media server.
l Support for one recorded music channel, and up to four connection based (FDAPI) music
channels
l Support the Meeting Exchange applications for administration and maintenance.
Software Media Server (S6200)
The S6200, provides the media resources required for up to 300 ports of G.711 a-law or u-law.
This configuration runs on a standard Linux host server.
Issue 1 August 2007 13
System Features
Hardware Media Server (S6800)
The hardware media server can be configured to support up to 2016 calls by using third party
hardware media servers. The hardware media server configuration supports any combination of
G.711 a-law or u-law, G.729, G723, G726-16, G726-24, G726-32, or G726-40 codecs. The
number of supported calls varies with system hardware and software configuration.
In a system configured with the S6800 media server, video conferencing is supported as an
optional feature. For a description of video conferencing see
page 23
Note:
Note: Currently, the system is compatible with the Convedia Media Server.
Server Hardware
Video Conferencing Features on
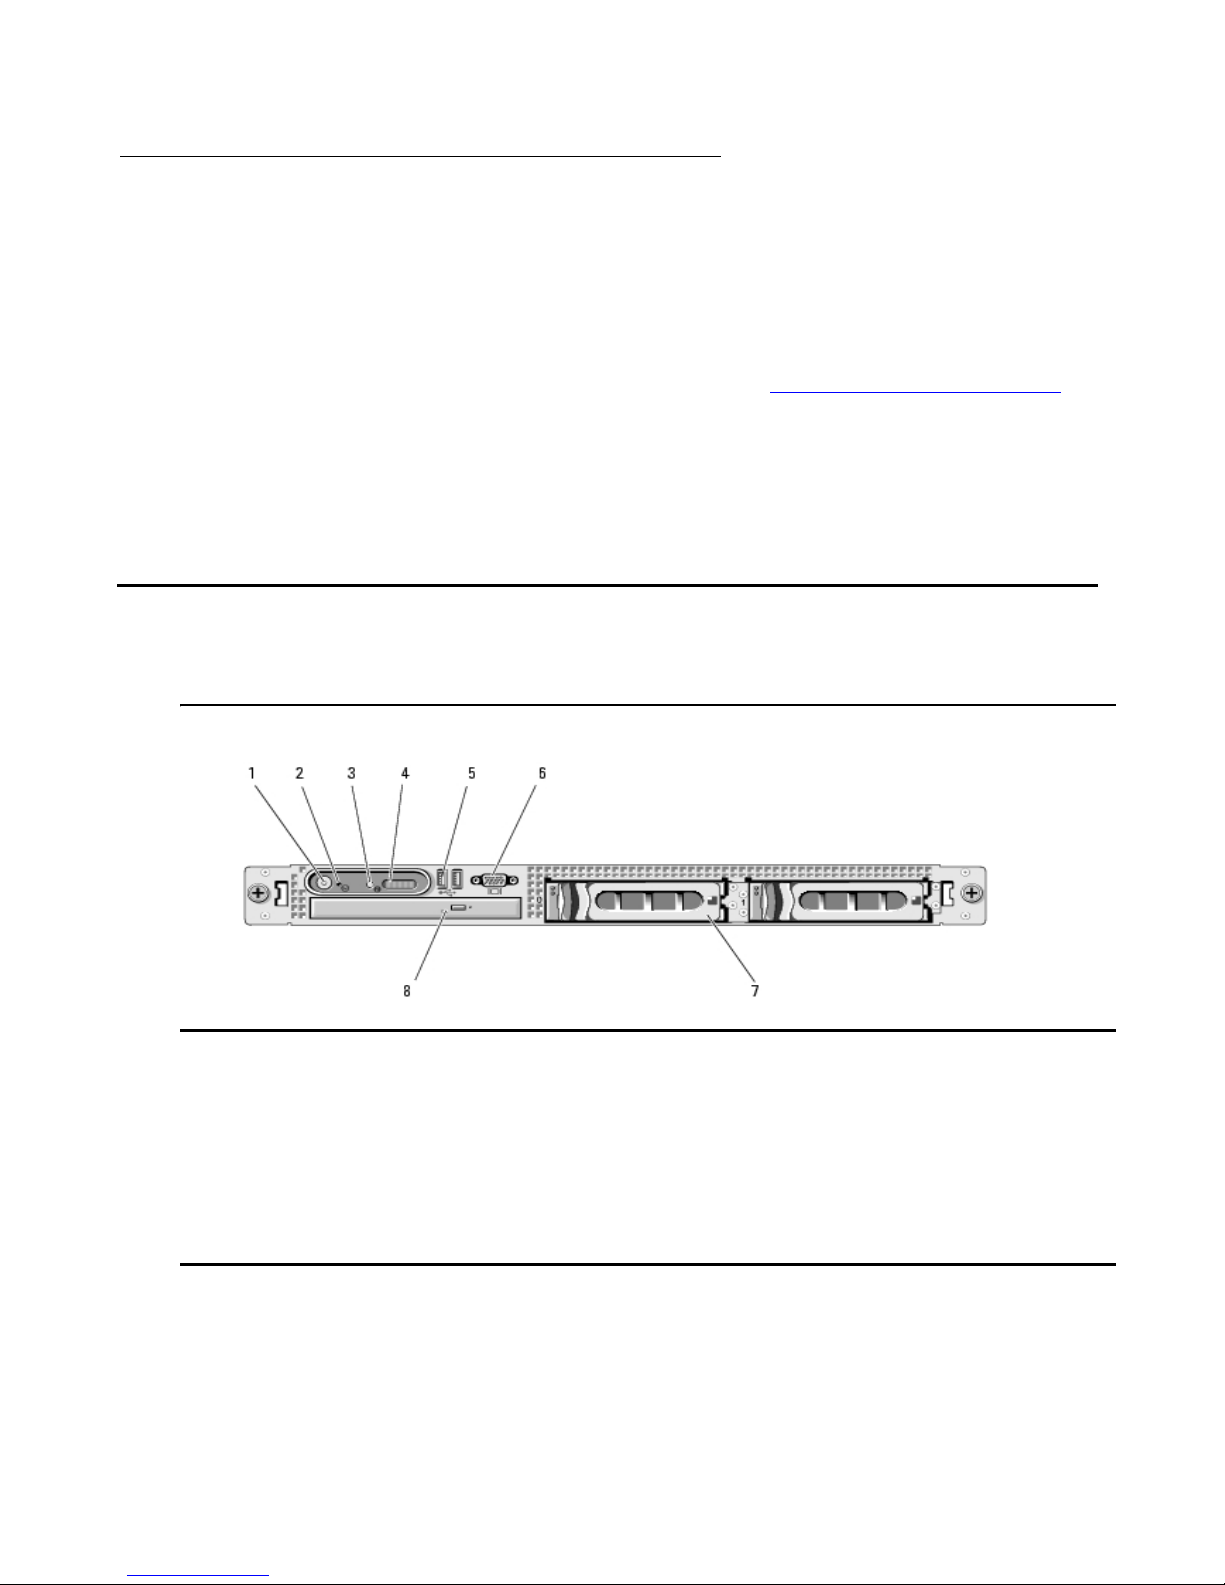
The S6200 media server consists of a single 1U Dell™ PowerEdge™ 1950 server.
Figure 1: ,Dell™ PowerEdge™ 1950 front view
Figure notes:
1. Power button
2. NMI button used for troubleshooting
3. System identification butto n
4. LCD display
5. USB connectors (2)
6. Video connector
7. Hard drives (optional)
8. Optical drive (optional)
14 Administration and Maintenance of the S6200/S6800 Servers

Figure 2: Dell™ Poweredge™ 1950, rear view
Audioconferencing Features
Figure notes:
1. Optional remote access controller
2. Serial connector
3. Video connector
4. USB Connectors (2)
5. NIC1 connector
6. NIC2 connector
7. Power supply
8. Optional power supply
9. System status indicator
10. System identification but to n
11. System status indiczator connector
12. Left PCI expansion slot (slot 2)
13. Center PCI expansion slot (slot 1)
Optionally, the server may also be configured with:
2
1
l redundant power supplies
l hard disk mirroring
Audioconferencing Features
This section provides an overview of the system’s audioconference feature set. It also
introduces concepts and terminology used throughout the remainder of this manual.
Attended Conferences
An attended conference is a conference in which an operator, using the Bridge Talk application
for managing and scheduling conferences, places callers into the conference and remains
available to assist conferees and moderators throughout its du ration. T he S6 200/S6800 can be
configured for support operators, who can manage and monitor conferences alone or as part of
Issue 1 August 2007 15

System Features
a team. They can also record annunciator messages, create and edit dial lists, dial out to
conference participants, record and playback recorded conference dialog, run question and
answer and polling sessions, and print conference reports directly from their workstations.
Attended conferences are scheduled and configured with the Conference Scheduler
application. To join an attended conference, conferees either dial in at a designated time or an
operator dials out to conferees. When dialing out, an operator can either dial a phone number
directly from the keyboard or launch an automated dialing function that dials numbers from a list
stored on the system (blast dialing).
See the Bridge Talk User’s Guide for details on the Conference Scheduler.
Unattended Conferences
An unattended conference is a conference in which conferees g ain access to and participate in
a conference without operator assistance. (Operator assistance, however, can be provided as
necessary .) When callers dial in to the unattended conference they are prompted to provide one
or more security codes to enter the conference. Once the system validates the code(s), the
caller is routed directly to the conference, but the system can also be configured to rou te callers
to a waiting queue to receive operator assistance.
Like attended conferences, specific conference features are set up using the Conference
Scheduler application from Bridge Talk. For instance, Auto Blast, a feature that enables
moderators to initiate a blast dial or enables the system to initiate a blast dial when the
moderator enters a conference is a conference-specific feature. System-wide operational
parameters for unattended conferences are specified by the Conference Scheduler
Configuration set up by a system administrator. See Chapter 8:
Configuring Conference
Scheduler on page 131 for details on configuring the Conference Scheduler and other
unattended conference features.
Other features that can be configured for unattended conferences on a system-wide basis
include:
l Auto Extend Duration — The system attempts to extend a conference beyond its
scheduled end time.
l Auto Extend Ports — The system attempts to allocate additional ports to conference to
accommodate additional conferees.
l Early Start Minutes — Conferees can enter a conference 1 to 30 minutes earlier than the
scheduled start time if ports are available.
l External Passcode Validation — An external database validates the first access code
submitted for entry to a conference and then uploads conference parameters to the
system.
l PIN Mode — Specifies whether PIN code implementation is optional, whether non-unique
PIN codes are required (all conferees enter same PIN code), or whether unique PIN codes
are required (all conferee enter a different PIN code).
16 Administration and Maintenance of the S6200/S6800 Servers

Flex Conferences
Flex is a type of unattended, on-demand conference in which participants can join a conference
directly. This “reservationless” conference uses a profile to keep track of all the selected
conference features, such as Hang up or Name Record/Playback.
Audioconferencing Features
Once the system administrator has defined the settings in a profile, participants can join Flex
conferences on a first-come, first-served basis. However, there can be only one moderator
(leader). Leaders can change profile settings before a conference begins, and create, control,
and end a conference call using DTMF telephone commands. For example, moderators can:
l SPECIFY A CONFERENCE PASSWORD. Leaders can optionally add another layer of
security by specifying a passcode that participants must enter before they can join the
conference.This password is valid only for the duration of the conference and is not stored
on the system.
Note:
Note: If Music is turned on for the conference, participants who arrive early wait on
standby. If the moderator specifies a passcode upon arrival, the waiting
participants must enter the p asscode before they are allowed into the conference.
However, if Music is turned off, participants who arrive before the moderator can
enter the conference without the passcode.
l CHANGE CONFERENCE OPTIONS. When a participant enters a leader PIN code and
assumes leader (moderator) status, the system immediately prompts the lead er to press 1
to start the conference. However, the leader can press 2 to change several conference
options before the conference starts. After changing options, the leader can press 1 to
start the conference.
l USE SPECIAL STAR COMMANDS. Flex conferences require that leaders and participan ts
use special DTMF commands during the conference. A leader can create, control, and
end a conference call using keypad star commands, which toggle on and off.
For more information on the default call flow and Flex options, see Reservation Features
page 36. For instructions on configuring bridge settings for Flex conferences, see Flex
Configuration Settings on page 76.
For more information on scheduling Flex conferences and using Flex DTMF commands, refer to
the Bridge Talk User’s Guide.
Note:
Note: Flex does not support Polling or Q&A.
Conference Overbooking
The system’s overbooking feature enables you to specify the percentage of system lines you
want available for Conference Overbooking. Overbooking enables you to schedule more
on
Issue 1 August 2007 17

System Features
conference lines than the system supports. In light of the fact that some conference p articip ants
do not attend conferences as scheduled, this feature ensures that those scheduled yet unused
lines are immediately available for other conferences.
Refer to Chapter 8:
a percentage of system lines for Conference Overbooking that will meet your requirements.
Sub-Conferences
Sub-conferencing enables a group of participants to leave a main conference to discuss topics
of a confidential nature or that are unrelated to the topic of discussion in the main conference.
The S6200/S6800 can be configured to allow a conferee, a moderator, or both to convene a
sub-conference from a main conference. Both conferees and moderators, however, can join a
sub-conference regardless of which type of conference participant started the conference.
The system allows up to nine concurrent sub-conferences to be created from a main
conference, but it does not impose any limits on the number of successive sub-conferences that
can be created. The system does not permit creation of a sub-conference from another.
See System Configuration
system.
Although it inherits most of the configuration settings of the main conference from which it is
created, a sub-conference is essentially a distinct conference:
l A sub-conference can be secured (no one allowed entry into the conference) by a
moderator in the sub-conference. Whether or not a main conference is secured has no
effect on the sub-conference.
Configuring Conference Scheduler on page 131 for details on apportioning
on page 45 for details on enabling the sub-conference feature o n the
l Once a moderator secures a main conference, participants in a sub-conference may not
rejoin the main conference until the moderator unsecures it. When the participant attempts
to rejoin a secured main conference:
l the system plays the moderator a notification message such as, “Your conference is
currently secured. A participant of the Sub Conference is requesting re-e ntry. Please turn
off security to unlock the conference.”
l the participant hears a message such as, “The main conference has been secured and
entry is not allowed at this time. The moderator has been notified of your request, please
stand by...” Once the moderator removes the security, the system plays a message such
as, “Re-entry to the main conference is now allowed.
l A sub-conference’s roster is played independently of its main conference roster.
l The system generates a Conference Detail Record (CODR) for each sub-conference
”
created from a main conference. (A CODR is a daily report that contains data from all
conferences that occurred for the day. See CODR Configuration, screen 1
on page 226 for
details.)
Important information about main and sub-conference CODRs:
18 Administration and Maintenance of the S6200/S6800 Servers

l The values for the Cross Ref fields and the values for the Conference ID fields for main
and sub-conference CODRs are identical. This enables billing or auditing personnel to
correctly associate sub-conferences with main conferences.
l The User Conf Type field in a sub-conference CODR identifies the conference as a
sub-conference.
l Sub-conferences are recorded separately from the main conference.
The following system-wide conference features applicable to a main conference are not
applicable to a sub-conference:
l Auto-Extend-Ports — The system does not extend ports for a sub-conference. Ports
added to a main conference are also available for any new or existing sub-conference
created from the main conference. Any additional participants that wish to join a
sub-conference can enter the main conference and then transfer to the sub-conference.
l Auto-Extend-Duration — The system does not extend the duration of a sub-conference.
The duration of an existing sub-conference extends as long as the main conference
duration extends.
How Participants Access and Exit a Sub-Conference
Audioconferencing Features
A conference participant (moderator or conferee uses t he keypad command, *93, to create and
transfer to and from a sub-conference:
l When a participant presses *93 plus a digit 1- 9, where the digit corresponds to the
subconference, while in the main conference, the system creates a sub-conference or, if
sub-conference has already been created, the system routes the participant to that
sub-conference.
l Participant lines are transferred to the sub-conference and thus subtracted from the main
conference. The Call Detail Record (CDR) the system generates for each line in a
conference indicates that the line was transferred.
l When a participant presses *930 while in the sub-conference, the system returns the
participant (and the line) to the main conference.
A sub-conference ends when all participants have left the sub-conference.
Role of the Conference Moderator
A sub-conference “shares” the moderator(s) from the main conference. That is, no additional
moderators are required to manage a sub-conference; moderators can enter and exit a
sub-conference at will.
The following are common questions and answers about the role of a moderator in a main
conference and a sub-conference:
Issue 1 August 2007 19

System Features
l What happens when the only or last moderator in the main conference joins a
sub-conference and the system is configured to automatically end a conference (Auto
Hang-up feature enabled) when the last moderator in the conference disconnects?
The system does not end the main conference. The feature is applicable only when the last
moderator leaves the main conference.
l What happens when the only or last moderator in the main conference disconnects from a
sub-conference and the system is configured to automatically end a conference (Auto
Hang-up feature) when the last moderator in the conference disconnects?
The system ends both the main conference and the sub-conference.
l When a moderator secures a main conference (disallows entry to any additional
participants) is the sub-conference secured as well?
No. A moderator can secure a sub-conference only while in the sub-conference.
l Can participants become stranded in a sub-conference (unable to transfer back to the
main conference) if the only moderator transfers from a secured main conference to
sub-conference?
No. An annunciator message notifies the moderator to unsecure the main conference
before transferring to the sub-conference. The moderator cannot transfer to the
sub-conference until the main conference is unsecured.
l Can participants become stranded in a sub-conference (unable to transfer back to the
main conference) if the only moderator disconnects from a secured main conference and
the Auto Hang-up feature is not in effect (the conference continues as scheduled)?
This scenario is possible. If a conference requirement is that all particip ants must b e able to
re-join a main conference before it ends, the moderator must ensure that all participants can
re-join the conference by not securing the conference prior to hanging up.
Conference Scheduler
The Conference Scheduler, which can be accessed from the Bridge Talk application, enables
you to schedule every type of conference supported by the system — attended, unattended,
and on-demand conferences. The system stores and automatically activates schedules for up
to twelve months.
The Scheduler lets you specify conference setup information such as, but not limited to, start
time, end time, and number of lines. Also, the Scheduler notifies you if it detects scheduling
conflicts such as those related to the availability of lines or security codes, and it allows you to
modify the schedule as required. You can use the Scheduler to modify scheduled conference
settings at any time prior to a conference, and you can also modify the number of lines and the
duration of the conference and its security code while a conference is in progress. The
Scheduler also enables to view and print scheduling reports, and purge expired conference
information.
See the Bridge Talk User’s Guide for Conference Scheduler details.
20 Administration and Maintenance of the S6200/S6800 Servers

Auto Blast
The optional Auto Blast feature provides blast-dial capability for moderators in unattended
conferences. From the Conference Scheduler application, Auto Blast can be disabled, set for
manual implementation, or set for automatic implementation.
l Manual implementation — The conference moderator enters *92 on the telephone keypad
to initiate the blast dial.
l Automatic implementation — The system initiates the blast dial when the first moderator
enters the conference (enters a moderator code).
The total number of blast dial recipients called from the blast dial list is dependent on the
maximum number of lines available for the conference. A system message announces to the
conference how many numbers from the dial list are dialed.
Conference Call Modes
See Blast Dial Configuration
important details on setting the CLPG (call in progress) timeout period for Auto Blast used in
unattended conferences.
on page 70 for information about blast dial settings, including
Saved Roster Recordings
The system can be configured to generate and save an audio recording of information provided
by conference participants (name, af filiation, and so on). For conferences that include the r oster
recording feature, participants provide the information in response to an audio prompt when
they attempt to enter a conference.
A raw audio file is created and saved on the system as soon as a participant records his name.
Each time a participant records his name, the information is appended to the raw audio file—so
the file grows as conference participation grows. The audio files are saved in pcm format.
See System Configuration
Roster Audio Files on page 168 for more information on roster recording files.
on page 45 for details on enabling roster recordings. See Saved
Conference Call Modes
A call mode is the method by which a conferee gains access to a conference. The system
supports several call modes to accommodate various customer requirements. A conference
can be conducted several ways. The system accommodates attended and unattended
conferences simultaneously, and even allows semi-attended calls, depending upon system
configuration.
In an attended conference, the participant is greeted by an operator who places the participant
directly into a conference. No passcode is required. In an unattended conference the p articipant
Issue 1 August 2007 21

System Features
enters a passcode to be placed directly into a conference. No operator is required. Operators
can manage participants in both attended and unattended conferences.
For example, if you have an operator, you can arrange unattended coded conferences, which
allow conferees, who forget their conference codes, to reach an operator, rather than being
automatically disconnected. In addition, you can run a conference that is unattended except for
the initial call setup, which can be a blast dial.
The system also permits combinations of certain modes. For example, the moderator of an
attended dial-in conference can ask an operator to dial out to a conferee who has not dialed in.
How a Conferee Is Placed in a Conference
Conferees gain access to conferences in eight different ways.
l Five ways involve dial-outs from the system to the conferee.
l Three ways involve dial-ins from conferees to the system.
Dialing Out to Conferees
There are different ways for operators and moderators to di al out to a participant:
Operator Dial Out
l Immediate — An operator manually dials a phone number directly from the keyboard.
l Fastdial — An operator dials participants from a list stored on the system.
l Blast Direct — An operator has the system simultaneously dial an entire list of numbers.
Conferees are automatically placed in the conference after they answer the call and enter
a “1.”
l Blast Direct to Conference—An operator invokes the system’s blast dial feature to
simultaneously dial an entire list of numbers. The system places answered lines directly
into a conference.
l Blast Coded — An operator invokes the system’s blast dial feature to simultaneously dial
an entire list of numbers. The system prompts conferees for a conference code, befo re the
system places them in the conference.
Moderator Dial Out
l Originator Dial Out (ODO) — A moderator dials out to a conferee during the conference.
l Automatic Blast—As soon as the moderator joins the conference, the system dials a pre
configured blast list.
l Manual Blast—A moderator dials a pre configured list using DTMF commands.
22 Administration and Maintenance of the S6200/S6800 Servers

Dialing In to Conferees
The system provides three methods of processing conferee calls to the system:
l Direct — The system automatically routes incoming callers directly to a specified
conference. No access code is required.
l Coded (Unattended) — The system requests that a caller enter a pre-specified access
code to enter the conference. The system automatically routes the caller to the specified
conference. An additional security layer is available by using PIN codes.
l Attended — Operator places callers into the conference.
While not all calls require an operator to respond to incoming calls, there is often the need to
have one or more operators available to initiate and/or process calls, and to be availa ble to help
moderators or conferees needing assistance.
Conference Call Modes
Table 1
summarizes the operator involvement in the various conference call modes..
Table 1: Operator Involvement in Various Conference Call Modes
Conference
Call Mode
Operator
Initiated?
Operator
Processed?
Operator
Attended?
Code
Required?
Direct No No No No
Coded No No No Yes
Dial In
Attended No Yes Yes No
Immediate Yes Yes Yes No
Fastdial Yes Yes Yes No
Blast Direct Yes No Yes No
Blast Coded Yes No Yes Yes
Dial Out
Video Conferencing Features
Point to point video conferencing is available on systems configured with the S6800 media
server. If video is enabled on your system, obtain video setting information to advise end users
of the supported connection rate. Inform end users that they can connect in video mode, as long
as resources are available. The system supports video conferencing with the following
limitations:
Issue 1 August 2007 23

System Features
l The following video endpoints are supported for the S6X00:
l The system supports G.711 and G.722 audio codecs.
l The system supports G.263 video codec for SIP video.
l Callers must connect at the bandwidth configured on the system.
l The system supports voice activated switching only.
l The number of video callers per system is limited to the video licenses purchased.
l A maximum of 16 video callers is allowed per conference.
l Video callers join the system on a first-come first-served basis.
l Once all video licenses are in use, subsequent callers join their conference in audio only
mode.
Polycom VSX3000 8.5.3
Polycom V500 8.5.3
Polycom V700 8.5.3
Conferences can have a combination of video and audio callers.
Tip:
Tip: For information on configuring video channels for the S6800 media server, see:
Meeting Exchange® 5.0
Configuring the S6200/S6800 Media Servers
24 Administration and Maintenance of the S6200/S6800 Servers

Chapter 2: Using the System Management Interface
Lists how to log in to the system’s management interface, the content and organization of
management interface menus and options, and how to work with menus and options. It also
describes how to create and manage login accounts (sign-ins) for Bridge Talk users.
In this chapter you will gain an understanding of how system configuration options are
organized in the System Management Interface menus and the keyboard operations for
selecting and setting options. This chapter describes how to use the management interface to
perform the administrative and maintenance functions.
This chapter is organized as follows:
l Working with the Management Interface on page 25 describes login options, configuration
options provided by the management interface and how they are organized, and
conventions for setting, modifying, and saving configuration parameters in management
interface screens.
l Managing User Sign-Ins on page 33 describes how to create and manage Bridge Talk
user login (sign-in) accounts.
Working with the Management Interface
The text-based management interface provides access to all conference settings.
Logging In
You can log in to the management interface from a serial terminal connected to the COM 1 port
on the system CPU card from any remote PC with Bridge Talk, or from any remote PC or
workstation with telnet or any telnet-based application. This section describes how to log in to
the management interface using the using Bridge Talk’s Session tool.
Note:
Note: See the Bridge Talk User’s Guide for more information on Bridge Talk’s Session
option.
Issue 1 August 2007 25

Using the System Management Interface
To log in to the Bridge Talk interface:
1. Select File > Session, and then click either Administrator or Maintenance. Both options
are available if you have a maintenance-level sign-in. Only the Administrator option is
available if you have an administrator-level sign-in. See Managing User Sign-Ins
page 33 for more information.
The system displays the Login dialog box.
2. Enter the login name and password.
Table 2: Default Login Accounts
Access level login name Password
Guest dcbguest abc123
Maintenance dcbmaint mlink700
Administration dcbadmin mlink700
Depending on the session you selected, the system displays either the System
Administrator Main Menu) or the System Maintenance Main Menu.
on
!
CAUTION:
CAUTION: The dcbmaint and dcbadmin logins provide read/write access to critical system
settings. Avaya recommends that you change the default passwords for the
logins to prevent unauthorized users from accessing these settings. Contact
Avaya Customer Support for assistance. (Changing default passwords requires
root access to the system’s Linux interface.)
Menus and Options
The System Maintenance Main menu and the System Administrator Main menu serve as the
gateways to the system and conference configuration options described in this manual. The
Maintenance Main menu includes all system and conference configuration options, including
those provided by the Administrator Main menu.
Management interface menus and screens are organized in a hierarchical arrangement
branching from the System Maintenance and System Administrator menus. From these menus
you can directly access configuration screens and other menus. Organization of Maintenance
Menus and Screens illustrates the organization of menus and screens available from the
System Maintenance Main Menu
organization of menus and screens available from the System Administrator Main menu. Both
illustrations serve as a quick reference for locating specific menus and screens.
, and System Administrator Main Menu illustrates the
26 Administration and Maintenance of the S6200/S6800 Servers
Working with the Management Interface
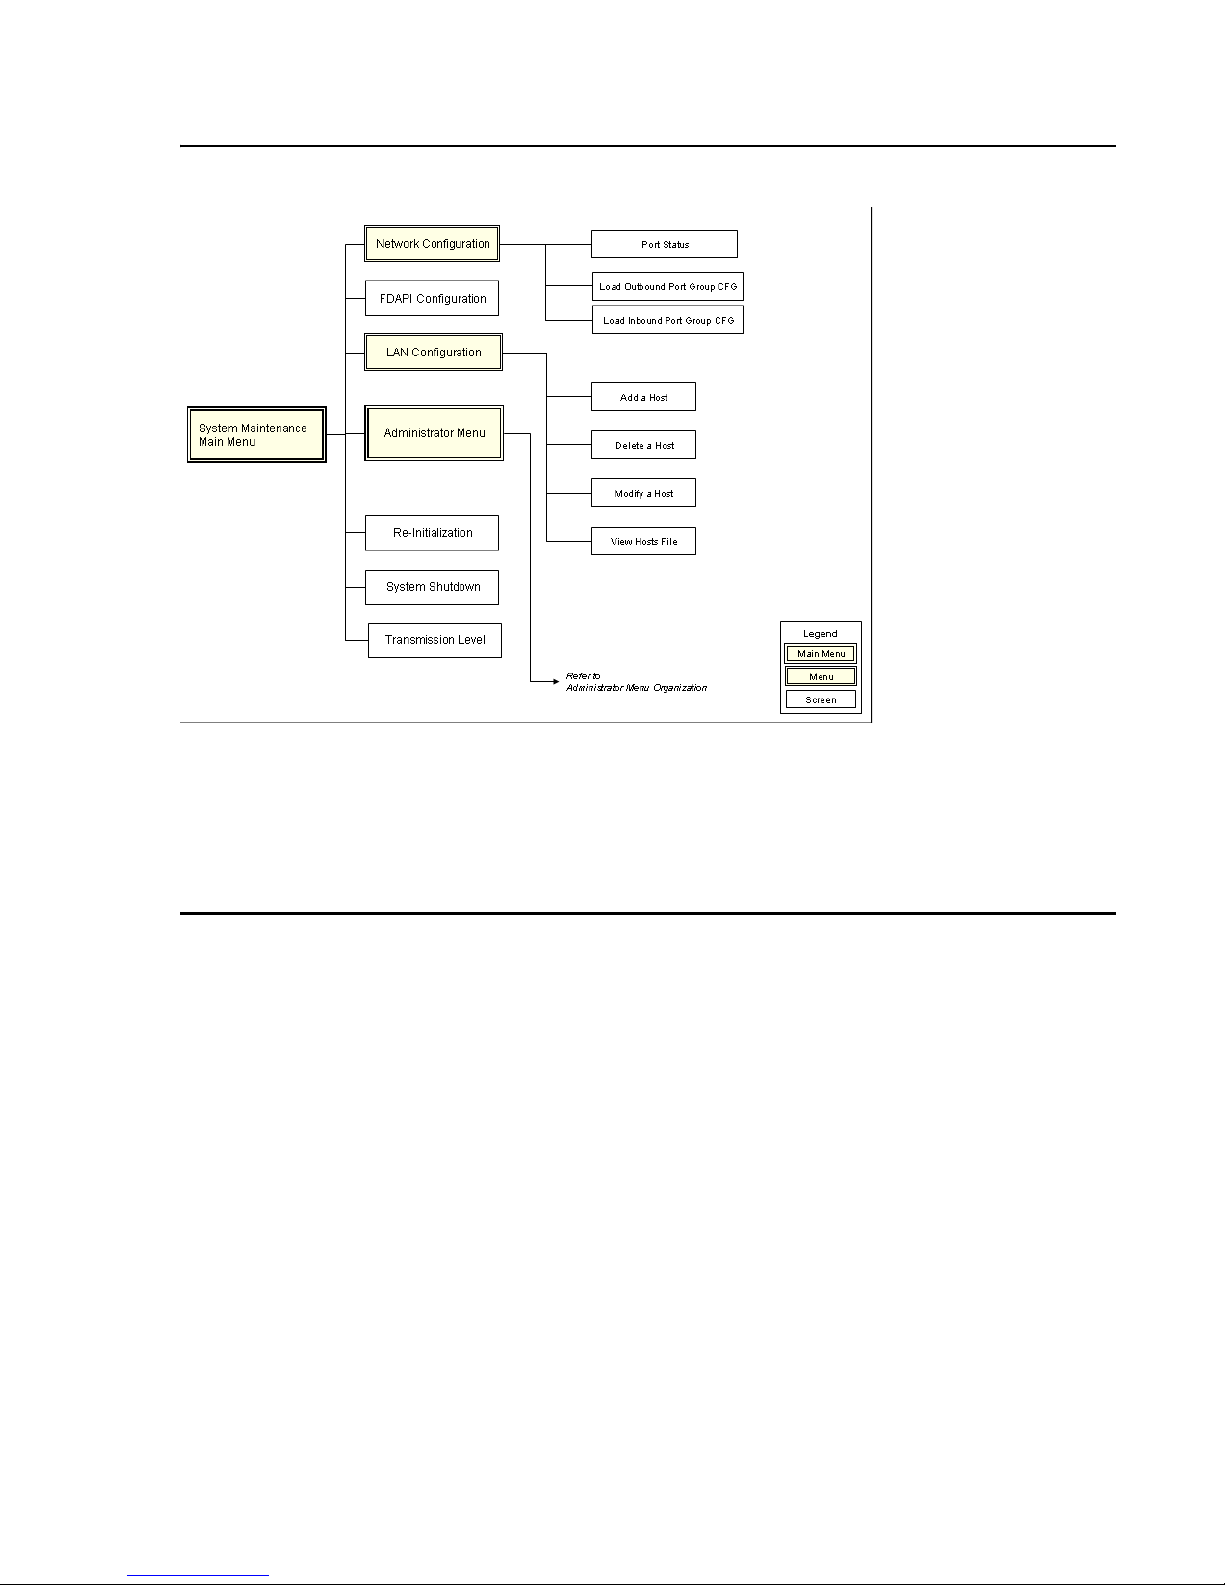
Figure 3: Organization of Maintenance Menus and Screens
Issue 1 August 2007 27
Using the System Management Interface
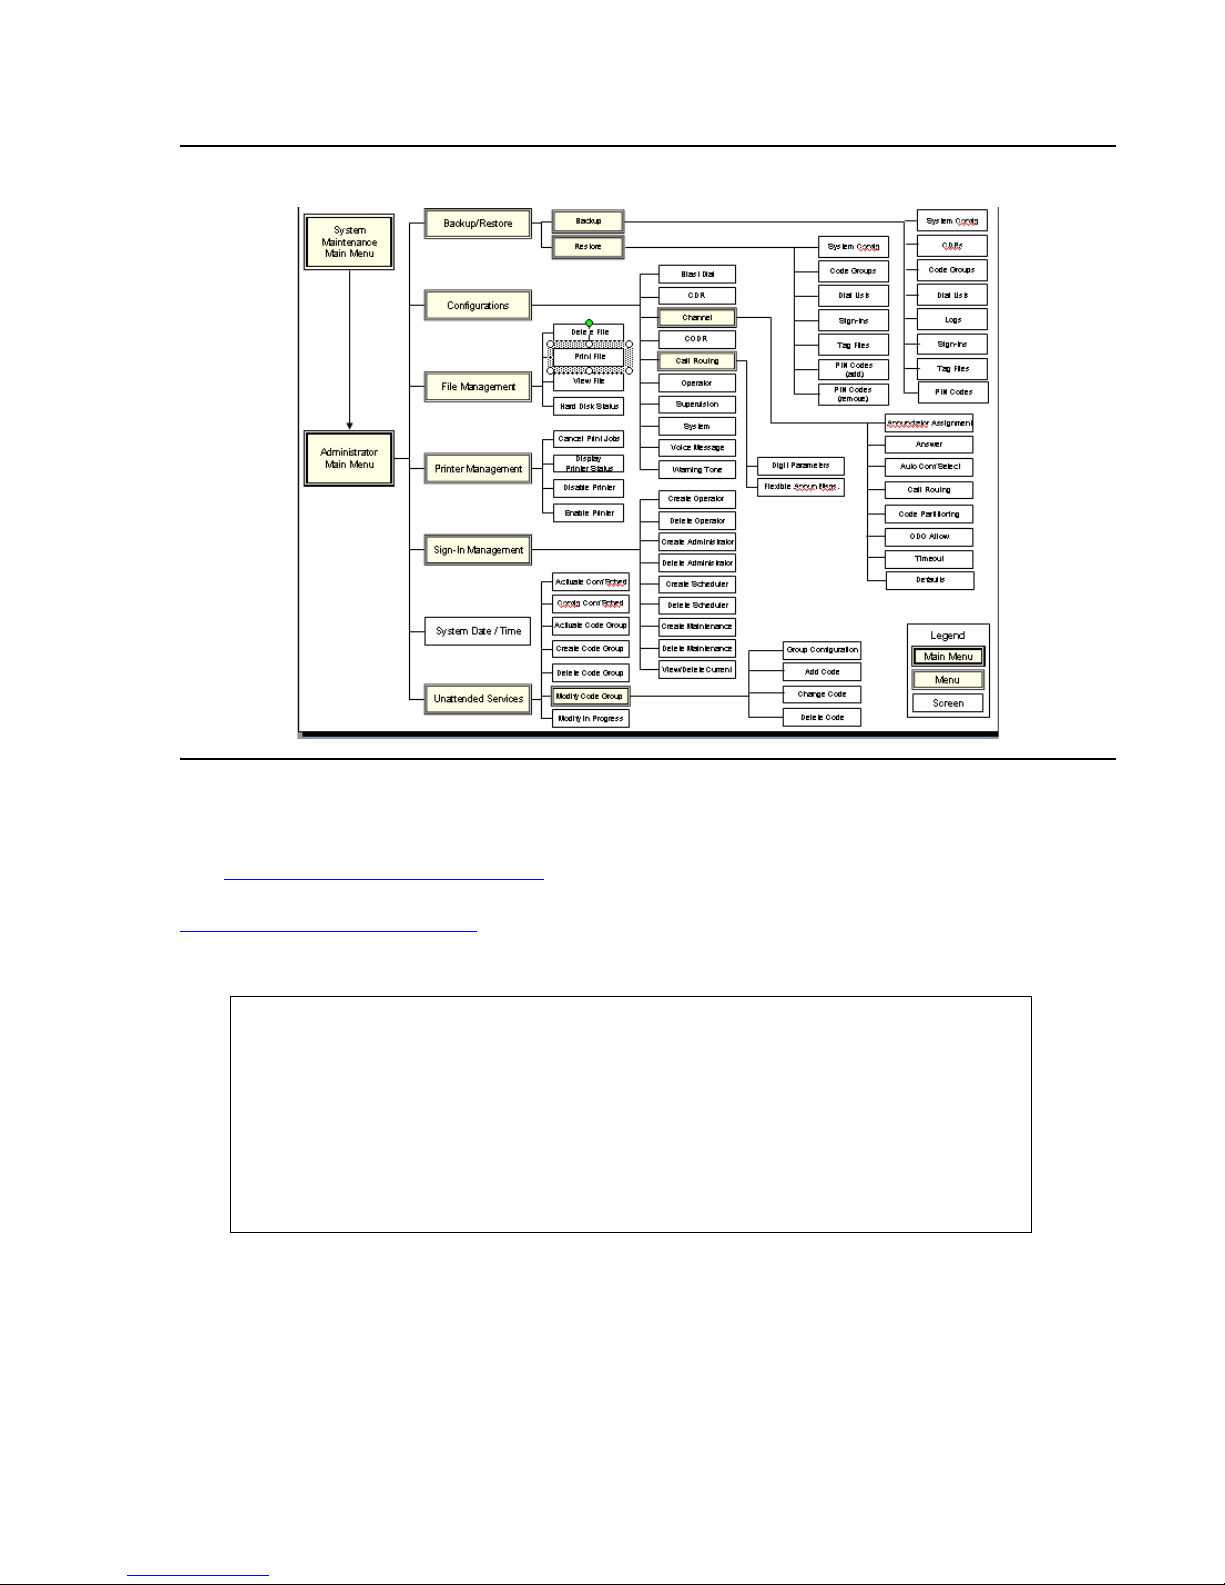
Figure 4: Organization of Administrator Menus and Screens
System Maintenance Options
The System Maintenance Main Menu includes options that enable you to configure advanced
system settings, reboot and shut down the system, and access the Administrator Menu. See
System Administrator Options on page 29 for information on Administrator Menu settings.
System Maintenance Main Menu
System Maintenance Main Menu
Network Configuration
FDAPI Configuration
LAN Configuration
Administrator Menu
Re-Initialization
System Shutdown
Transmission Level
EXIT
28 Administration and Maintenance of the S6200/S6800 Servers

Working with the Management Interface
Table 3 lists and describes System Maintenance Main Menu options.
Table 3: System Maintenance Options
Options Tasks
Network Configuration Configure, manage, and view various network layer and
physical layer network interface settings:
l Load Outbound Port Group.
l Load Inbound Port Group.
FDAPI Configuration Configure digital phone lines as auxiliary lines for
operator, music, analog record/playback, and link line
functions.
LAN Configuration Add, modify, delete, or view entries in the system hosts
file.
Administrator Menu Access System Administrator Main menu options.
Re-Initialization Re-initialize (reboot) the system.
System Shutdown Shut down the system.
Transmission Level Adjust the transmission volume (in decibels) for all lines.
System Administrator Options
The System Administrator Main Menu includes options that enable you to configure conference
and system settings.
System Administrator Main Menu
+-System Administrator Main Menu-+
¦ ¦
¦ Backup/Restore ¦
¦ Configurations ¦
¦ File Management ¦
¦ Printer Management ¦
¦ Sign-In Management ¦
¦ System Date/Time ¦
¦ Configure Scheduler ¦
¦ EXIT ¦
+--------------------------------+
Table 4
lists and describes System Administrator Main menu options.
Issue 1 August 2007 29

Using the System Management Interface
Table 4: System Administrator Options
Option Task(s)
Backup Back up various configuration files and reports:
Restore Restore various configuration files and reports:
l System Configuration
l Call Detail Records (CDRs)
l Dial Lists
l Logs
l Sign-ins
l Tag files
l Meeting Exchange
l System Configuration
l Dial Lists
l Sign-ins
l Tag files
l Meeting Exchange
Configurations Provides a menu of items used to configure these
system settings:
l Blast Dial parameters.
l Call Detail Records (CDRs) format.
l Conference Detail Records (CODRs) format.
l Call Routing parameters.
l Operator Configuration.
l Supervision Configuration.
l System Configuration.
l Timed Assist Configuration.
l Voice Messages.
l Warning Tone frequency for unattended
conferences.
30 Administration and Maintenance of the S6200/S6800 Servers
1 of 2
 Loading...