

Page 1

BCM50 Rls 6.0
Router - IP Firewall
Task Based Guide
Page 2

IP Firewall
Copyright © 2010 Avaya Inc.
All Rights Reserved.
Notices
While reasonable efforts have been made to ensure that the information in this document is complete and accurate
at the time of printing, Avaya assumes no liability for any errors. Avaya reserves the right to make changes and
corrections to the information
in this document without the obligation to notify any person or organization of such changes.
Documentation disclaimer
Avaya shall not be responsible for any modifications, additions, or deletions to the original published version of
this documentation unless such modifications, additions, or deletions were performed by Avaya. End User agree to
indemnify and hold harmless Avaya, Avaya’s agents, servants and employees against all claims, lawsuits, demands
and judgments arising out of, or in connection with, subsequent modifications, additions or deletions to this
documentation, to the extent made by End User.
Link disclaimer
Avaya is not responsible for the contents or reliability of any linked Web sites referenced within this site or
documentation(s) provided by Avaya. Avaya is not responsible for the accuracy of any information, statement or
content provided on these sites and does not necessarily endorse the products, services, or information described or
offered within them. Avaya does not guarantee that these links will work all the time and has no control over the
availability of the linked pages.
Warranty
Avaya provides a limited warranty on this product. Refer to your sales agreement to establish the terms of the
limited warranty. In addition, Avaya’s standard warranty language, as well as information regarding support for
this product, while under warranty, is available to Avaya customers and other parties through the Avaya Support
Web site: http://www.avaya.com/support
Please note that if you acquired the product from an authorized reseller, the warranty is provided to you by said
reseller and not by Avaya.
Licenses
THE SOFTWARE LICENSE TERMS AVAILABLE ON THE AVAYA WEBSITE,
HTTP://SUPPORT.AVAYA.COM/LICENSEINFO/ ARE APPLICABLE TO ANYONE WHO DOWNLOADS,
USES AND/OR INSTALLS AVAYA SOFTWARE, PURCHASED FROM AVAYA INC., ANY AVAYA
AFFILIATE, OR AN AUTHORIZED AVAYA RESELLER (AS APPLICABLE) UNDER A COMMERCIAL
AGREEMENT WITH AVAYA OR AN AUTHORIZED AVAYA RESELLER. UNLESS OTHERWISE
AGREED TO BY AVAYA IN WRITING, AVAYA DOES NOT EXTEND THIS LICENSE IF THE
SOFTWARE WAS OBTAINED FROM ANYONE OTHER THAN AVAYA, AN AVAYA AFFILIATE OR AN
AVAYA AUTHORIZED RESELLER, AND AVAYA RESERVES THE RIGHT TO TAKE LEGAL ACTION
AGAINST YOU AND ANYONE ELSE USING OR SELLING THE SOFTWARE WITHOUT A LICENSE. BY
INSTALLING, DOWNLOADING OR USING THE SOFTWARE, OR AUTHORIZING OTHERS TO DO SO,
YOU, ON BEHALF OF YOURSELF AND THE ENTITY FOR WHOM YOU ARE INSTALLING,
DOWNLOADING OR USING THE SOFTWARE (HEREINAFTER REFERRED TO INTERCHANGEABLY
AS "YOU" AND "END USER"), AGREE TO THESE TERMS AND CONDITIONS AND CREATE A
BINDING CONTRACT BETWEEN YOU AND AVAYA INC. OR THE APPLICABLE AVAYA AFFILIATE
("AVAYA").
Copyright
Except where expressly stated otherwise, no use should be made of the Documentation(s) and Product(s) provided
by Avaya. All content in this documentation(s) and the product(s) provided by Avaya including the selection,
arrangement and design of the content is owned either by Avaya or its licensors and is protected by copyright and
other intellectual property laws including the sui generis rights relating to the protection of databases. You may not
modify, copy, reproduce, republish, upload, post, transmit or distribute in any way any content, in whole or in part,
including any code and software. Unauthorized reproduction, transmission, dissemination, storage, and or use
without the express written consent of Avaya can be a criminal, as well as a civil offense under the applicable law.
Third Party Components
Certain software programs or portions thereof included in the Product may contain software distributed under third
party agreements ("Third Party Components"), which may contain terms that expand or limit rights to use certain
portions of the Product ("Third Party Terms"). Information regarding distributed Linux OS source code (for those
Products that have distributed the Linux OS source code), and identifying the copyright holders of the Third Party
Components and the Third Party Terms that apply to them is available on the Avaya Support Web site:
http://support.avaya.com/Copyright.
Trademarks
The trademarks, logos and service marks ("Marks") displayed in this site, the documentation(s) and product(s)
provided by Avaya are the registered or unregistered Marks of Avaya, its affiliates, or other third parties. Users
are not permitted to use such Marks without prior written consent from Avaya or such third party which may own
the Mark. Nothing contained in this site, the documentation(s) and product(s) should be construed as granting, by
implication, estoppel, or otherwise, any license or right in and to the Marks without the express written permission
of Avaya or the applicable third party. Avaya is a registered trademark of Avaya Inc. All non-Avaya trademarks
are the property of their respective owners.
2 NN40011-045 Issue 1.2 BCM50 Rls 6.0
Page 3

IP Firewall
Downloading documents
For the most current versions of documentation, see the Avaya Support. Web site: http://www.avaya.com/support
Contact Avaya Support
Avaya provides a telephone number for you to use to report problems or to ask questions about your product. The
support telephone number is 1-800-242-2121 in the United States. For additional support telephone numbers, see
the Avaya Web site: http://www.avaya.com/support
Copyright © 2010 ITEL, All Rights Reserved
The copyright in the material belongs to ITEL and no part of the material may
be reproduced in any form without the prior written permission of a duly
authorised representative of ITEL.
NN40011-045 Issue 1.2 BCM50 Rls 6.0 3
Page 4

IP Firewall
Table of Contents
IP Firewall .......................................................................... 5
Overview .................................................................................................. 5
BCM50 Integrated Router and Firewalls ................................................... 5
Stateful Packet Filters ........................................................................................ 5
Denial of Service (DoS) Attacks ........................................................................ 6
Default Configuration ......................................................................................... 6
Firewall Rules ........................................................................................... 6
Rule Direction .................................................................................................... 6
Rule Order ......................................................................................................... 7
Required Information ................................................................................ 7
Flow Chart ................................................................................................ 8
Accessing the Web Router GUI ................................................................ 9
From Element Manager ..................................................................................... 9
Access Directly via a Web Browser ................................................................. 14
BCM50 Integrated Router Firewall Configuration .................................... 16
Configuring the Firewall ................................................................................... 16
Inserting a Firewall Rule .................................................................................. 17
Editing Custom Ports ....................................................................................... 20
Enabling the Firewall ....................................................................................... 21
Additional Configuration ................................................ 22
Attack Alerts ........................................................................................... 22
Configuring Attack Alerts ................................................................................. 22
Attack Alert Destinations .................................................................................. 24
Firewall Considerations .......................................................................... 25
Avaya Documentation Links .......................................... 26
4 NN40011-045 Issue 1.2 BCM50 Rls 6.0
Page 5
IP Firewall
Note: This guide relates to the BCM50a/ba and BCM50e/be models only.
Note: Although the BCM50a/ba models will not be supplied with BCM 6.0, it is
possible to upgrade the variants of these models to BCM 6.0, if they were
originally supplied with BCM50 R2 or BCM50 R3 software.
Note: The BCM50 Integrated Router is almost identical to the Business
Secure Router (BSR) models. BCM50a/ba routers are based on the BSR252
and BCM50e/be routers are based on the BSR222.
IP Firewall
Overview
The BCM50 IP Firewall Filters feature is one of the security features BCM
offers to protect your network against intruders. The security and firewall
features are also used for controlling what outside resources your users will
be able to access.
BCM50 Integrated Router and Firewalls
The BCM50 Integrated Router firewall is a stateful inspection firewall and is
designed to protect against Denial of Service attacks. The BCM50 Integrated
Router’s purpose is to allow a private Local Area Network (LAN) to be
securely connected to the Internet. The BCM50 Integrated Router can be
used to prevent theft, destruction and modification of data, as well as log
events, which may be important to the security of your network. The BCM50
Integrated Router also has packet-filtering capabilities.
Stateful Packet Filters
BCM50 Integrated Router supports stateful packet filtering for IP protocols.
Stateful packet filters monitor active sessions and record session information
such as IP addresses and port numbers. They maintain state information for
each flow (TCP, UDP or ICMP). Stateful filters use the state information to
determine if a packet is responding to an earlier request that has been
validated by the rule set. If the packet is in response to a previous request, the
packet is treated in the same manner. It will either be blocked or allowed
through.
Stateful packet filters protect your network against Internet attacks such as
source spoofing, where an attacker pretends to be a trusted user by using an
IP address that is within the accepted range of IP addresses of your internal
network. BCM50 Integrated Router stateful packet filtering validates that
addresses coming from outside the network are valid outside addresses.
Stateful packet filters also protect your network from a denial-of-service
NN40011-045 Issue 1.2 BCM50 Rls 6.0 5
Page 6

IP Firewall
attack, where an attacker tries to block valid users from accessing a resource
or a server.
Stateful filtering supports TCP, UDP, IP, and ICMP. Stateful filtering supports
the following applications: H.323, FTP, HTTP, POP3, Telnet, SMTP, DNS,
DHCP, TFTP, GOPHER, FINGER, NNTP, NetBIOS, POP2, RPC, SNMP and
SUNNFS.
Denial of Service (DoS) Attacks
Denials of Service (DoS) attacks are aimed at devices and networks with a
connection to the Internet. Their goal is not to steal information, but to disable
a device or network so users no longer have access to network resources.
The BCM50e/be Integrated Router is pre-configured to automatically detect
and thwart all known DoS attacks.
Default Configuration
By default, the BCM50 Integrated Router firewall is configured to allow all
traffic originating from the LAN and deny all traffic originating from the WAN.
Any traffic responding to requests from the LAN to the WAN, e.g. http traffic is
allowed through the firewall and returned to the request originator.
The exception to WAN originating traffic is IKE requests. IKE (Internet Key
Exchange) is used to set up VPN’s (Virtual Private Network) connections.
Firewall Rules
Rule Direction
Rules can be configured for the direction of traffic in the following ways:
LAN to WAN: This direction is designed to stop some or all users on
the network accessing some services on the Internet. For example, if
certain users are less productive due to inappropriate usage of MSN
Messenger, those users (essentially IP Addresses) can be blocked
from using the MSN Messenger port (TCP port 1863).
WAN to LAN: By default, all traffic except IKE requests are blocked
from the WAN to the LAN. It is possible to allow certain traffic, e.g.
Element Manager, from a specific or multiple users based on their
WAN IP Address.
LAN to LAN: By default there are no rules configured for this option.
This allows computers on the LAN to manage the BCM50 Integrated
Router and communicate between networks or subnets connected to
the LAN interface.
WAN to WAN: By default all packets are blocked for this option. This
prevents computers on the WAN from using the BCM50 Integrated
Router as a gateway to communicate with other computers on the
WAN and/or managing the BCM50 Integrated Router.
6 NN40011-045 Issue 1.2 BCM50 Rls 6.0
Page 7

IP Firewall
Rule Order
Careful consideration should be given to the order in which rules should be
applied. For example, you should configure rules to allow specific traffic or
ports before more general rules that block traffic. Otherwise the specific traffic
will not pass through the firewall as the more general rule blocking traffic will
be applied first.
Required Information
Before configuring the Firewall, you may wish to obtain the following
information:
State the intent of the rule. For example, “This restricts all IRC access
from the LAN to the Internet.” Or, “This allows a remote Lotus Notes
server to synchronize over the Internet to an inside Notes server.”
Is the intent of the rule to forward or block traffic?
What direction of traffic does the rule apply to?
What IP services will be affected?
What computers on the LAN are to be affected (if any)?
What computers on the Internet will be affected? The more specific, the
better. For example, if traffic is being allowed from the Internet to the
LAN, it is better to allow only certain machines on the Internet to
access the LAN.
Which order should the rules be applied?
NN40011-045 Issue 1.2 BCM50 Rls 6.0 7
Page 8
IP Firewall
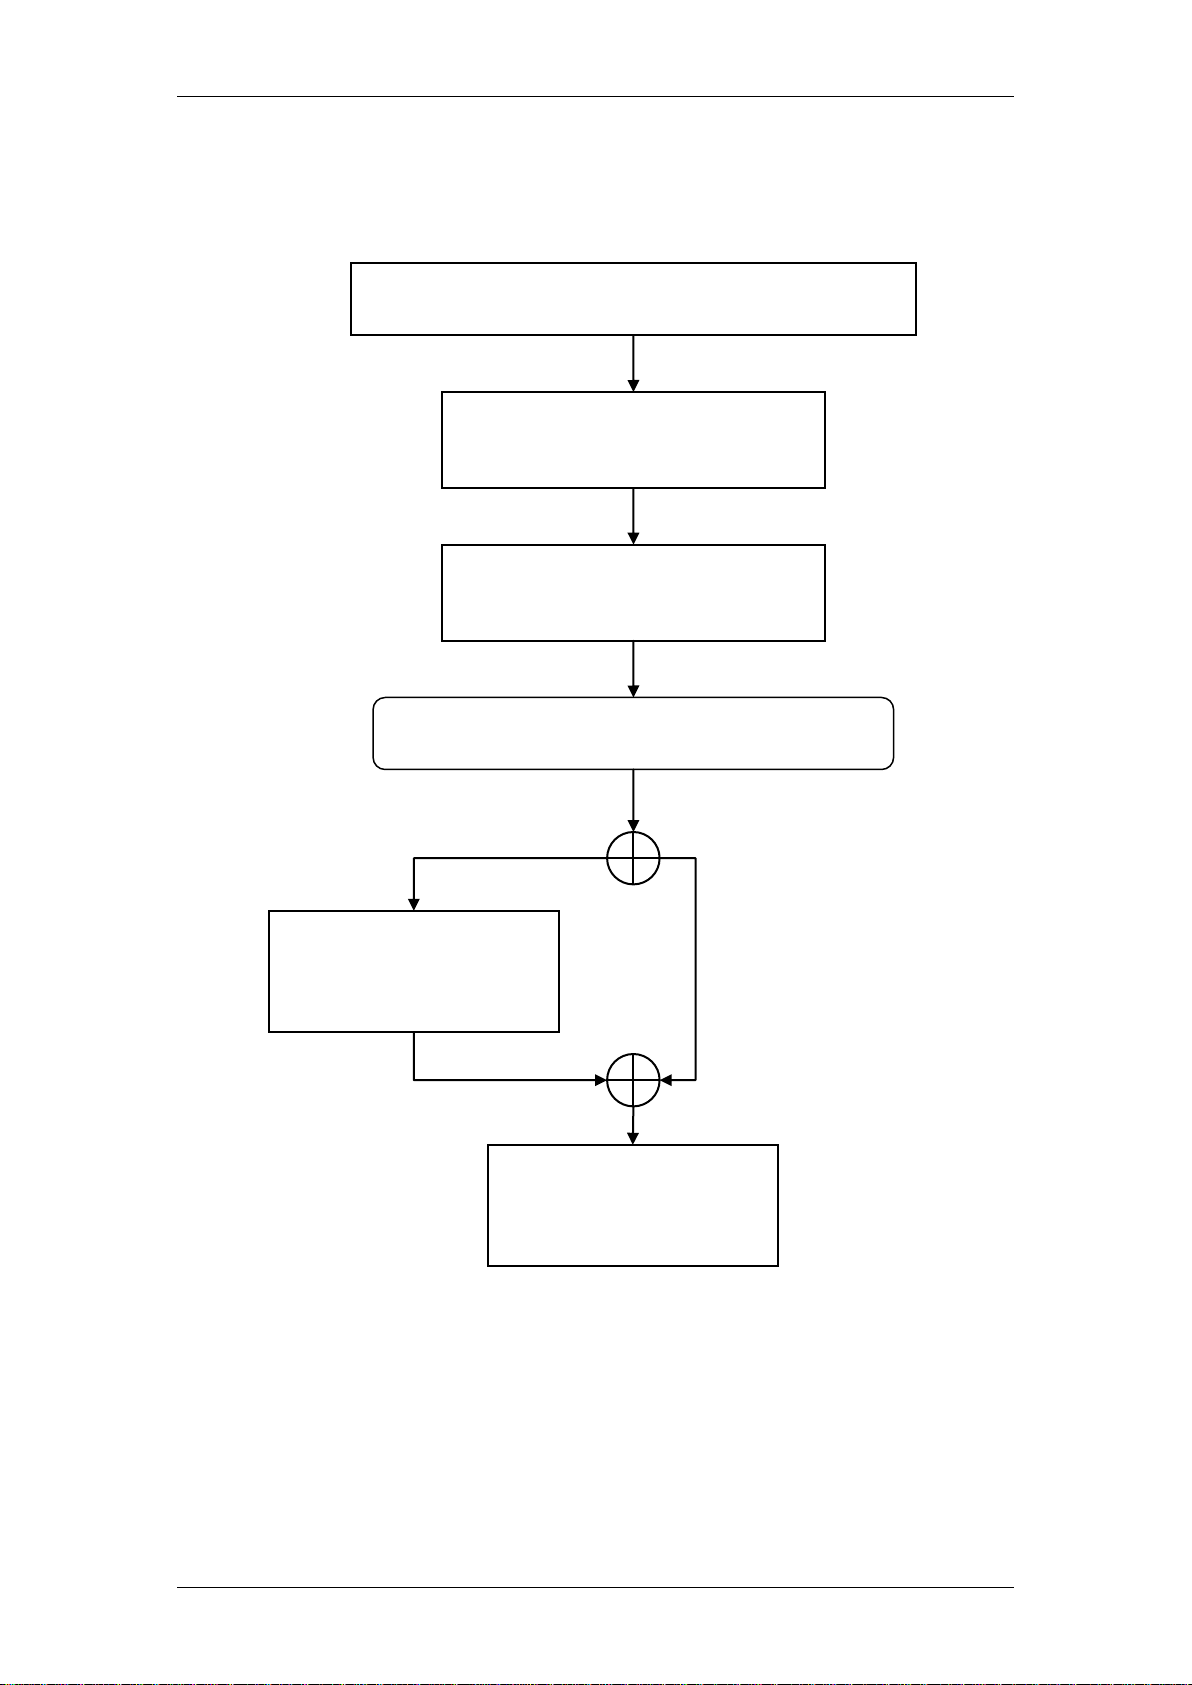
Determine what firewall rules require configuring: refer
to the Required Information section of this guide.
Configure the Firewall general
settings: refer to the Configuring
the Firewall section of this guide.
Configure the individual Firewall
rules: refer to the Inserting a
Firewall Rule section of this guide.
Do you need to define services (ports) not
currently available in the Available Services list?
Add your custom
service/port: refer to the
Editing Custom Ports
section of this guide.
Ensure the Firewall is
enabled: refer to the
Enabling the Firewall
section of this guide.
Yes
No
Flow Chart
The flow chart below shows which sections of the guide you should use.
8 NN40011-045 Issue 1.2 BCM50 Rls 6.0
Page 9
IP Firewall
Accessing the Web Router GUI
There are two methods of accessing the Web Router GUI, independent on
which model you are configuring:
Via Element Manager (management application for all BCM50 models)
Directly from a web browser
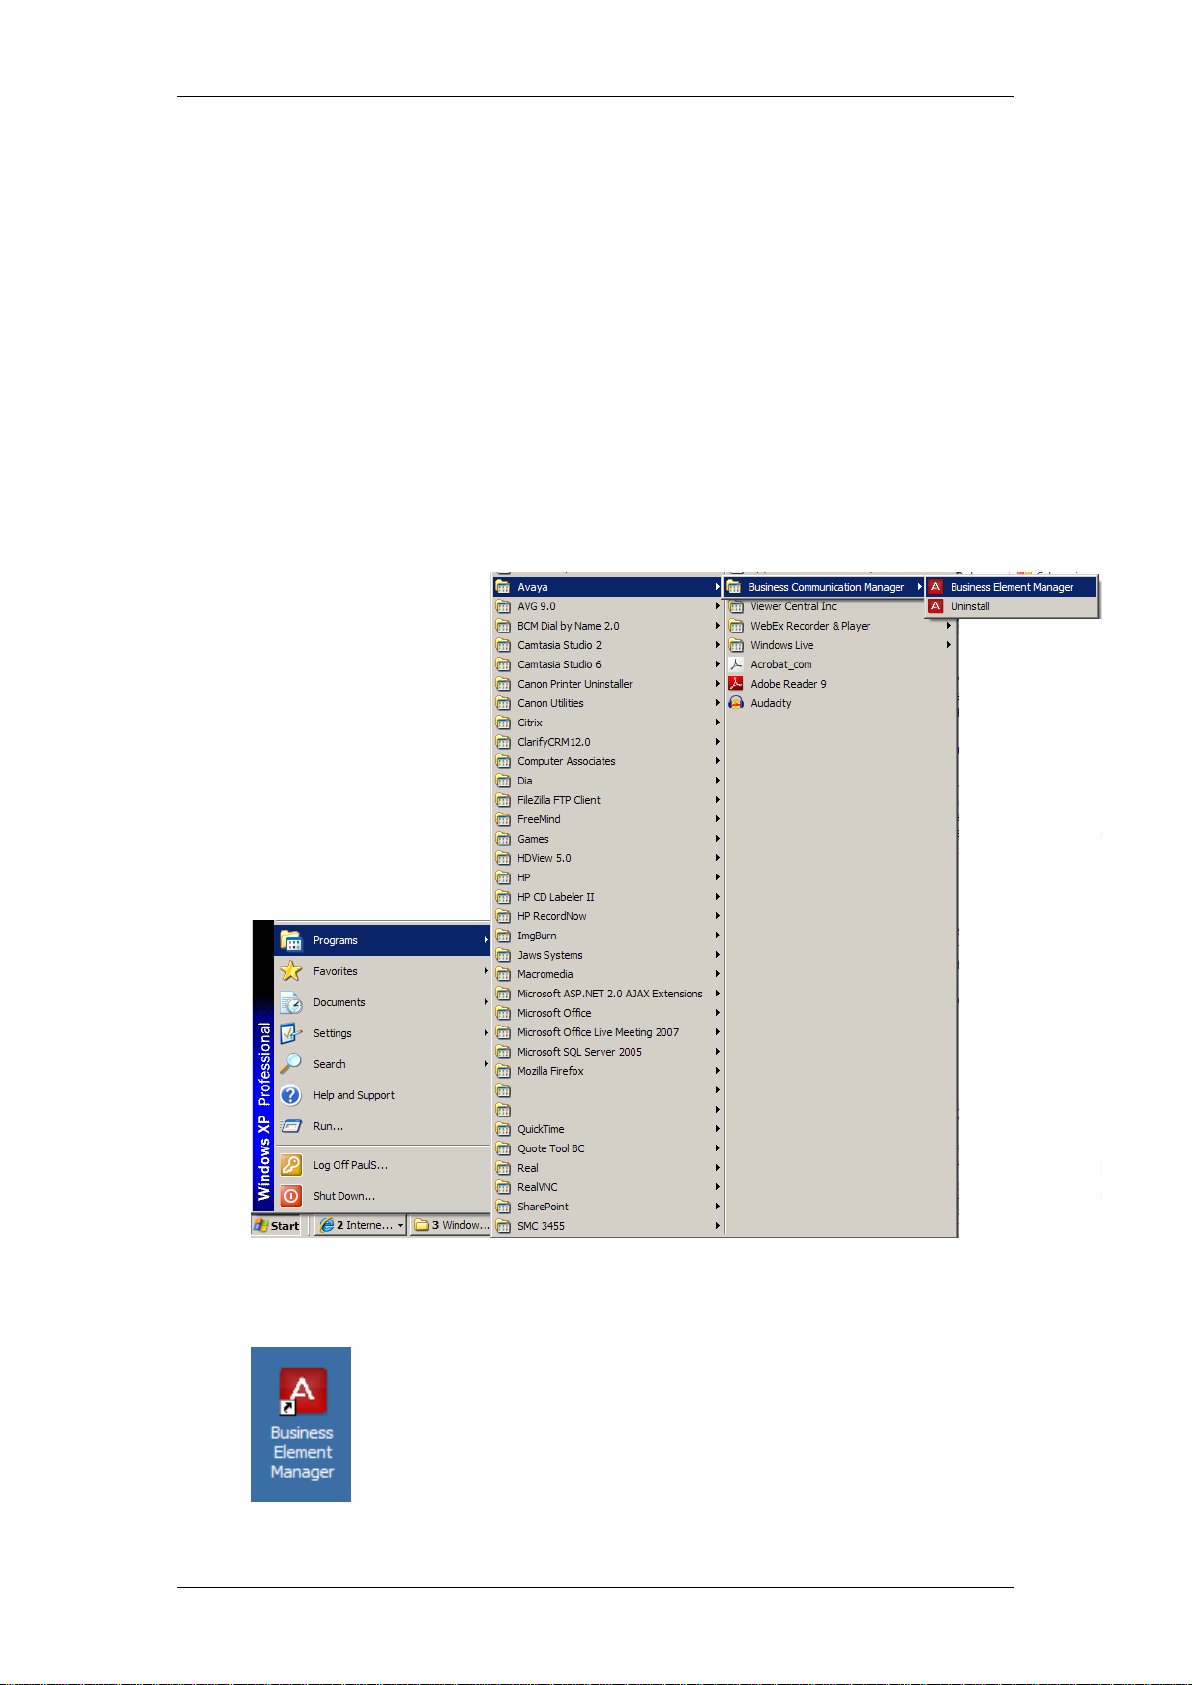
From Element Manager
1. To access the Business Element Manager application from the Start
Menu, navigate to Start, Programs, Avaya, Business
Communications Manager, Business Element Manager.
2. Alternatively, double-click on the Business Element Manager desktop
icon.
NN40011-045 Issue 1.2 BCM50 Rls 6.0 9
Page 10

IP Firewall
3. You will be presented with the Element Manager interface.
4. Open the Network Elements folder and select the IP Address of the
BCM.
5. Enter the User Name of the BCM in the User Name field, by default this
is nnadmin. Then enter the Password in the Password field, by default
the password is PlsChgMe!. Click the Connect button.
10 NN40011-045 Issue 1.2 BCM50 Rls 6.0
Page 11

6. A warning screen will appear, read the warning and click OK.
IP Firewall
7. You will be presented with the Element Manager interface.
NN40011-045 Issue 1.2 BCM50 Rls 6.0 11
Page 12

IP Firewall
Note: if the above logon details do not work, try Username = admin, and
Password = setup.
8. Click the Data Services link, select the Router link and click the
Launch Router Web GUI Tool button.
9. The Business Secure Router logon screen will be displayed. Enter the
Username (default = nnadmin) and Password (default = PlsChgMe!)
and click Login.
10. Change the password and click Apply, or click Ignore to continue.
12 NN40011-045 Issue 1.2 BCM50 Rls 6.0
Page 13

11. To replace factory certificate click Apply or Ignore to continue.
IP Firewall
12. The Main Menu screen will display.
NN40011-045 Issue 1.2 BCM50 Rls 6.0 13
Page 14

IP Firewall
Note: if the above logon details do not work, try Username = admin
Password = setup.
Access Directly via a Web Browser
1. Open your web browser. In the address bar, type in http://<router
card LAN IP Address>/ and press Enter.
2. The Business Secure Router logon screen will be displayed. Enter the
Username (default = nnadmin) Password (default = PlsChgMe!) and
click Login.
3. Change the password and click Apply, or click Ignore to continue.
14 NN40011-045 Issue 1.2 BCM50 Rls 6.0
Page 15

4. To replace factory certificate click Apply or Ignore to continue.
5. The Main Menu screen will display.
IP Firewall
NN40011-045 Issue 1.2 BCM50 Rls 6.0 15
Page 16

IP Firewall
Note: Consider carefully the order in which the rules are applied. If using
multiple rules and re-ordering is required, select the rule to move and use the
Move button to place the rule correctly.
BCM50 Integrated Router Firewall Configuration
Configuring the Firewall
Use the following procedure to configure the Firewall options on the BCM50
Integrated Router.
1. Access the Web Router GUI (refer to the Accessing the Web Router
GUI section of this guide).
2. From the Main Menu, click on Firewall.
3. On the Summary tab, configure the options as required:
Select a Packet Direction, e.g. LAN to WAN etc.
Select the Action for packets that don’t match firewall
rules for the chosen Packet Direction.
4. Click on Insert to add a new rule (refer to Inserting a Firewall Rule
below).
5. You can also Edit (for configuration instructions, refer to the Inserting
a Firewall Rule section below), or Delete existing rules.
6. Click Apply to save your settings.
16 NN40011-045 Issue 1.2 BCM50 Rls 6.0
Page 17
IP Firewall
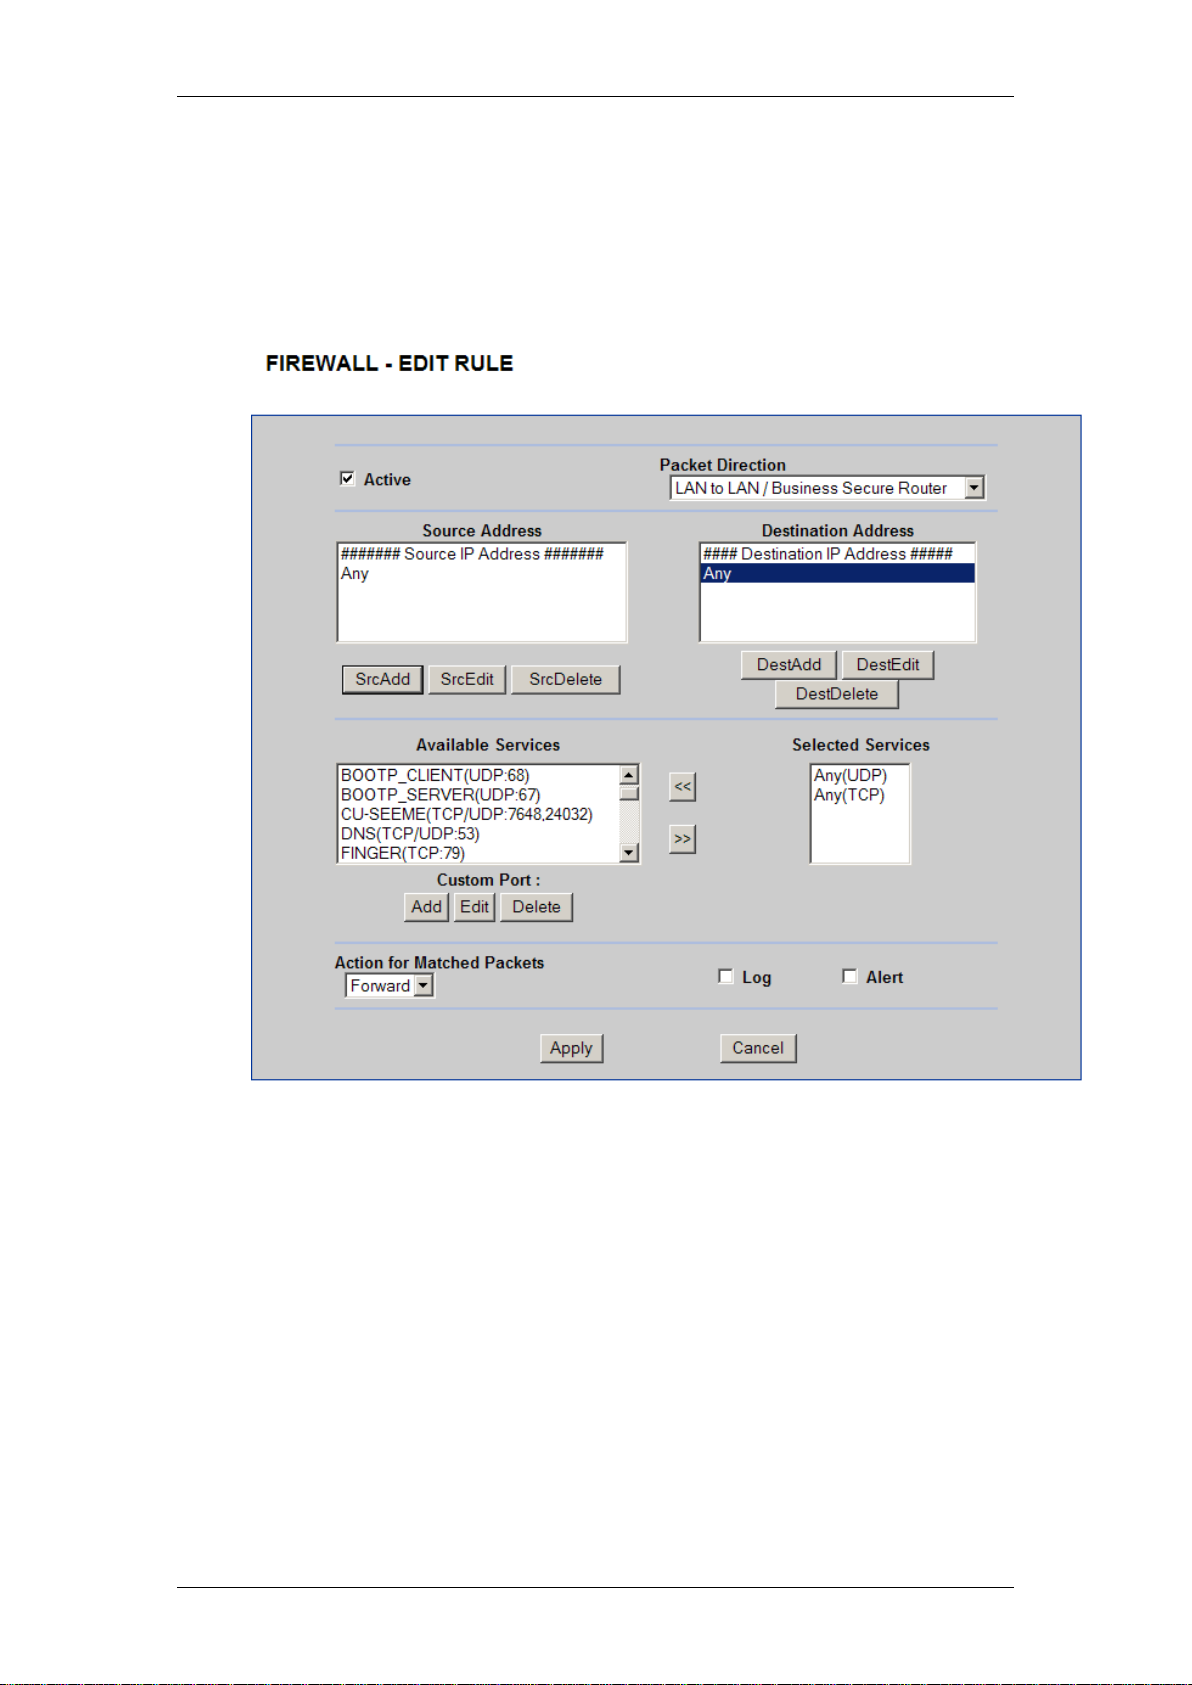
Inserting a Firewall Rule
Use the following procedure to configure individual Firewall rules.
1. In the Firewall – Summary screen, click on Insert. The Firewall – Edit
Rule screen will display.
NN40011-045 Issue 1.2 BCM50 Rls 6.0 17
Page 18

IP Firewall
2. Configure the rule as required:
Use the Add, Edit, or Delete buttons for Source or Destination
address to define where the data traffic is coming from and going to.
You may need to remove the default “Any” setting as this defines all
source/destination IP Addresses.
Select which Services the rule can use. If the service you require is
not defined in this list, refer to the Editing Available Services
section below.
Select the Action for Matched Packets (forward or block).
3. Ensure the Active checkbox is ticked if you want this rule to be
implemented.
4. Click Apply to save your settings.
18 NN40011-045 Issue 1.2 BCM50 Rls 6.0
Page 19
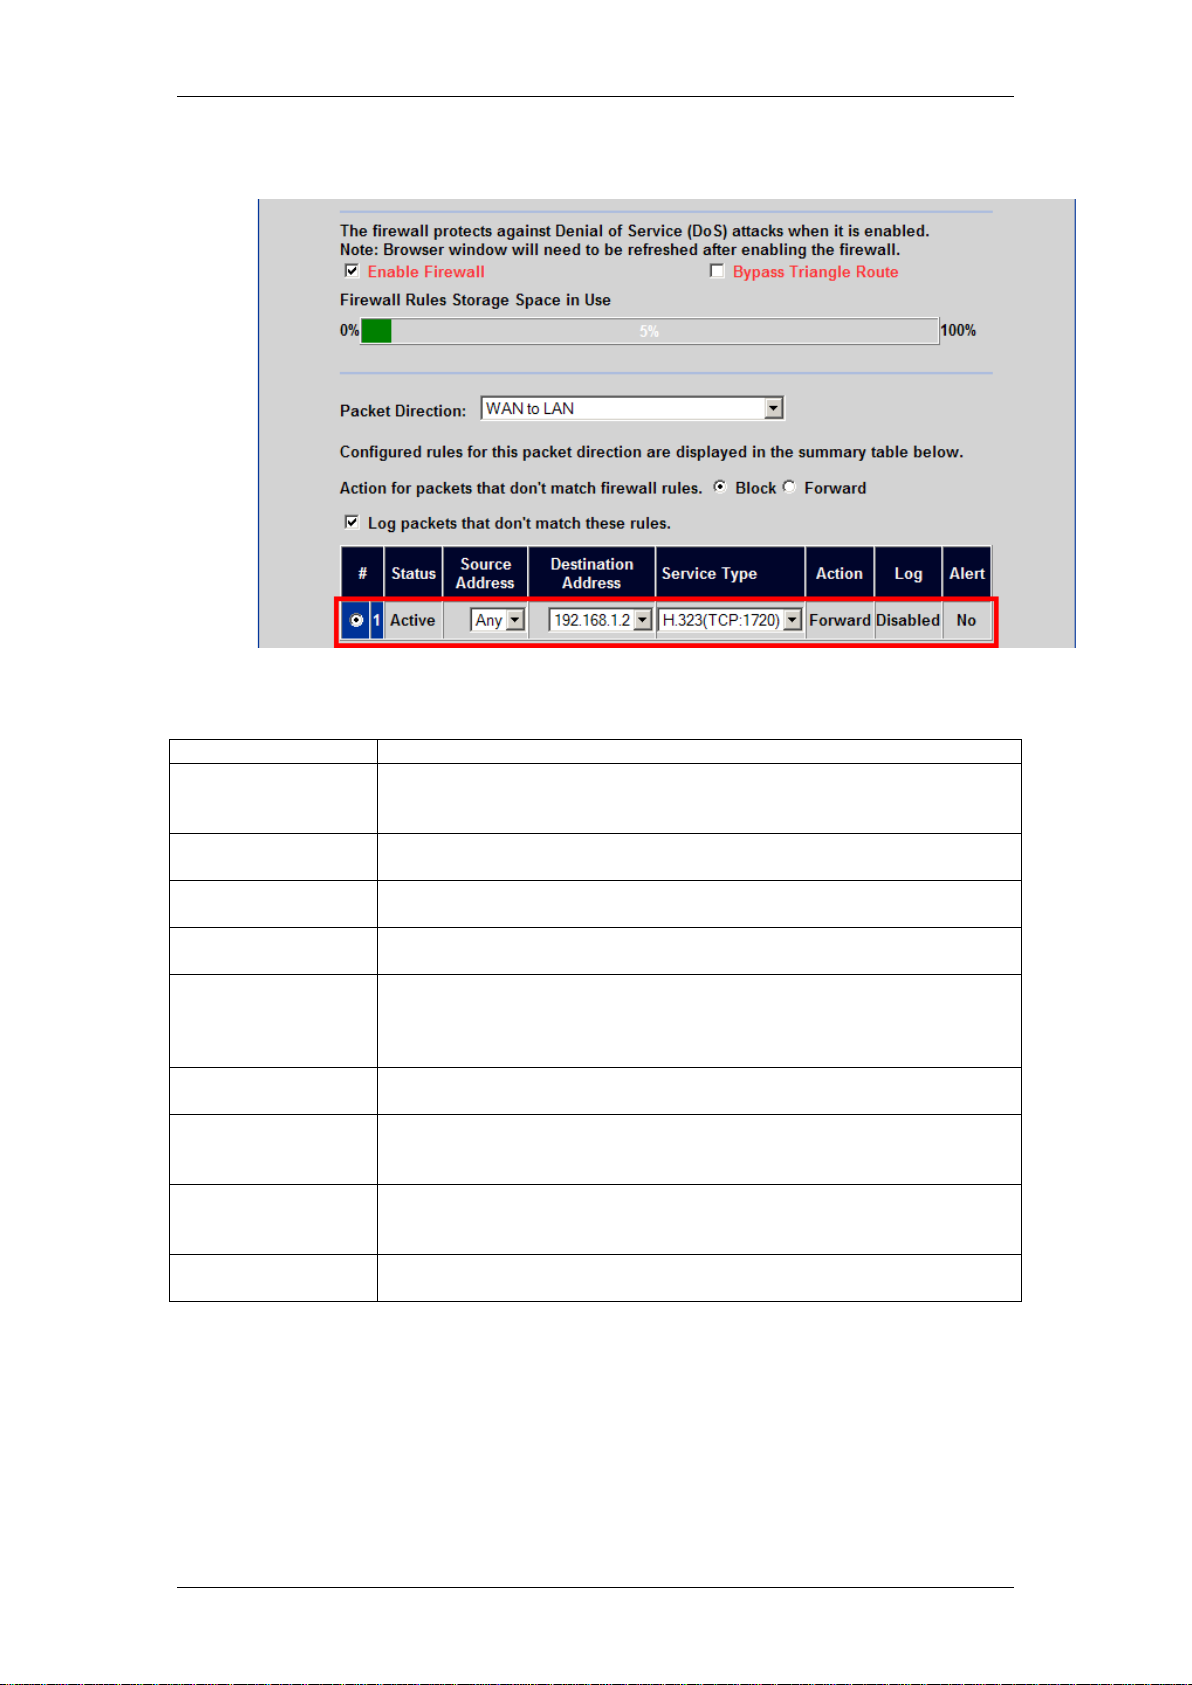
5. The rule will appear in the table.
Field
Description
Active
Select this check box to have the Business Secure Router use this
rule. Clear this check box if you do not want the Business Secure
Router to use the rule after you apply it.
Packet Direction
Use the drop-down list box to select the direction of packet travel to
which you want to apply this firewall rule.
Source Address
Click SrcAdd to add a new address, SrcEdit to edit an existing one or
SrcDelete to delete one.
Destination Address
Click DestAdd to add a new address, DestEdit to edit an existing one
or DestDelete to delete one.
Service:
Select a service in the Available Services box on the left, then click
>> to select it. The selected service shows up on the Selected
Services box on the right. To remove a service, click on it in the
Selected Services box on the right, then click <<.
Custom Port
Click this button to go to the Custom Ports screen. (see section
Editing Custom Ports in this Guide)
Action for Matched
Packets:
Use the drop down list box to select whether to Block (silently
discard) or Forward (allow the passage of) packets that match this
rule.
Log
This field determines if a log is created for packets that match the rule
(Match), don't match the rule (Not Match), match either rule (Both) or
no log is created (None).
Alert
Select the Alert check box to determine that this rule generates an
alert when the rule is matched.
IP Firewall
Firewall Rule Settings
NN40011-045 Issue 1.2 BCM50 Rls 6.0 19
Page 20
IP Firewall
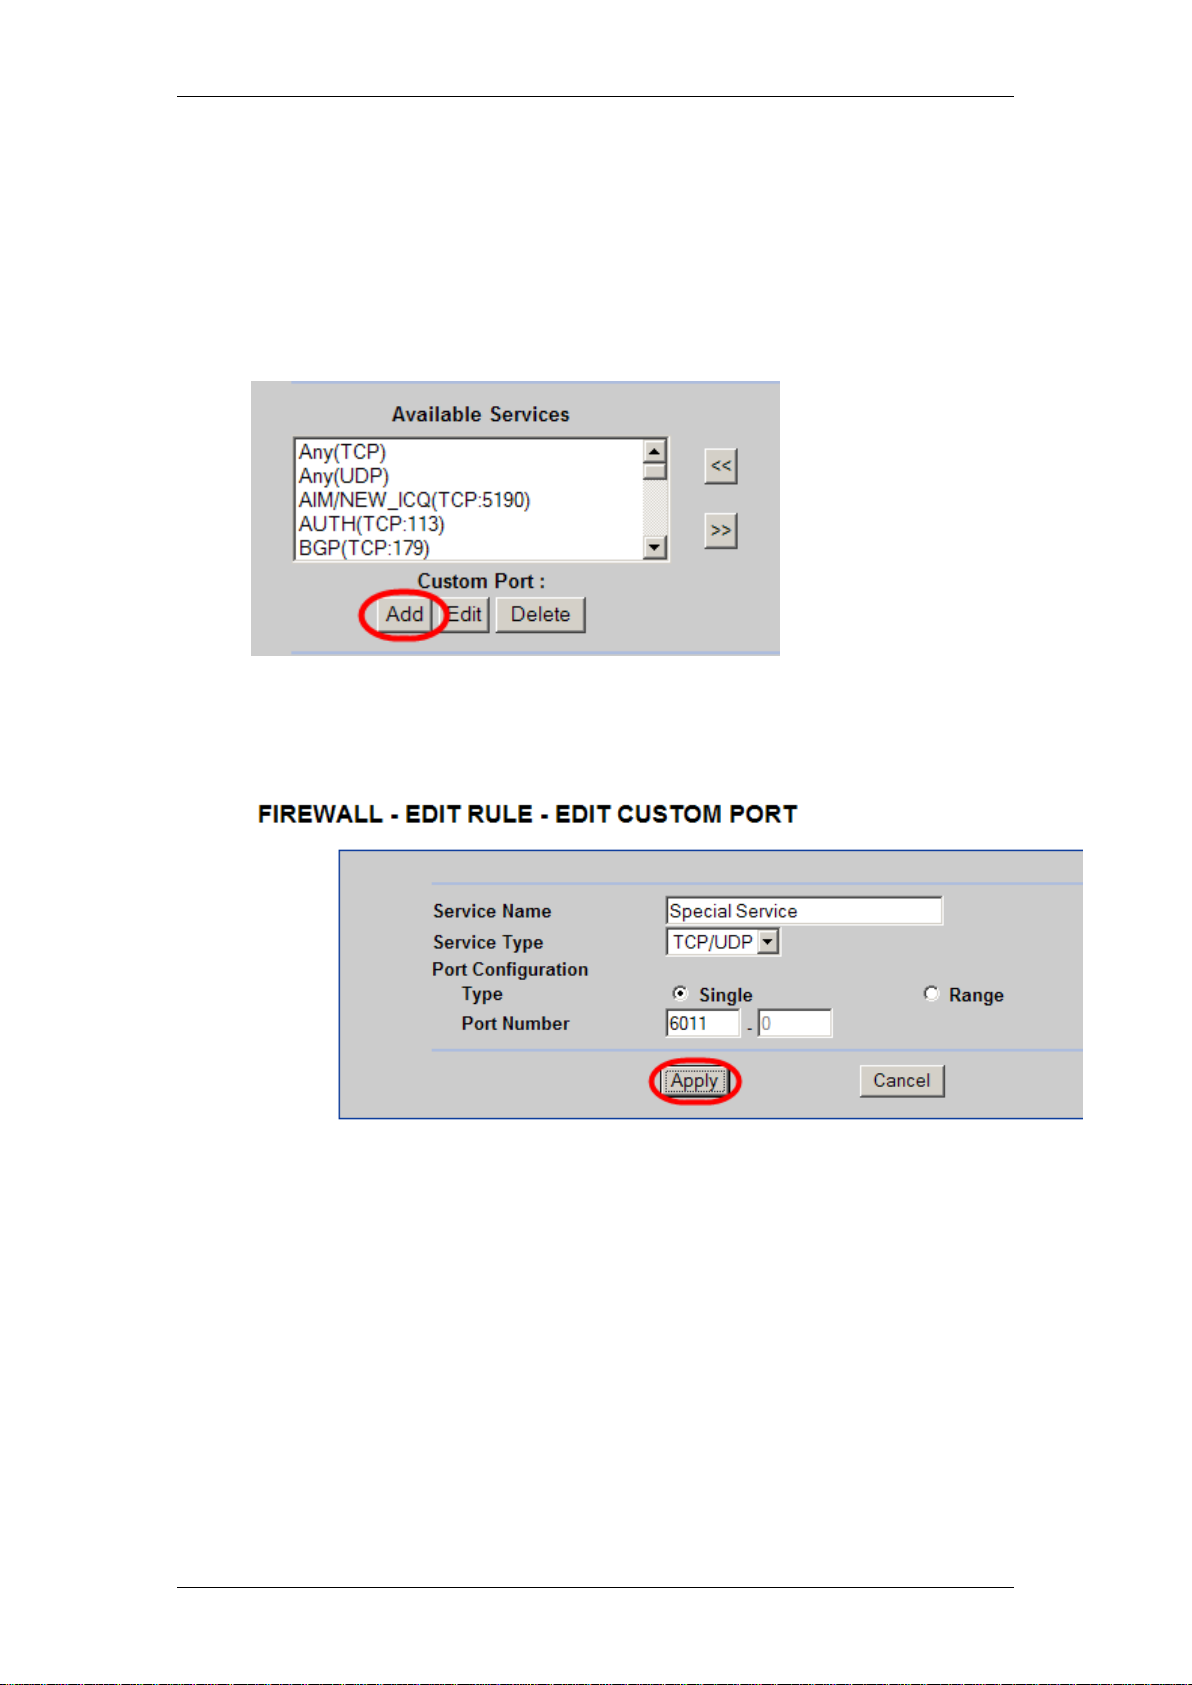
Editing Custom Ports
If the required service for the Firewall rule in the Available Services list is not
present, you can create your own service. Pre-defined Services include
Telnet, FTP, http etc.
1. Whilst in the Edit Rule screen, click on the Add button in the Custom
Ports section.
2. Enter a Name, Service Type, and either a Single port or Range of
ports that defines the service.
3. Click Apply to save your settings.
20 NN40011-045 Issue 1.2 BCM50 Rls 6.0
Page 21
IP Firewall
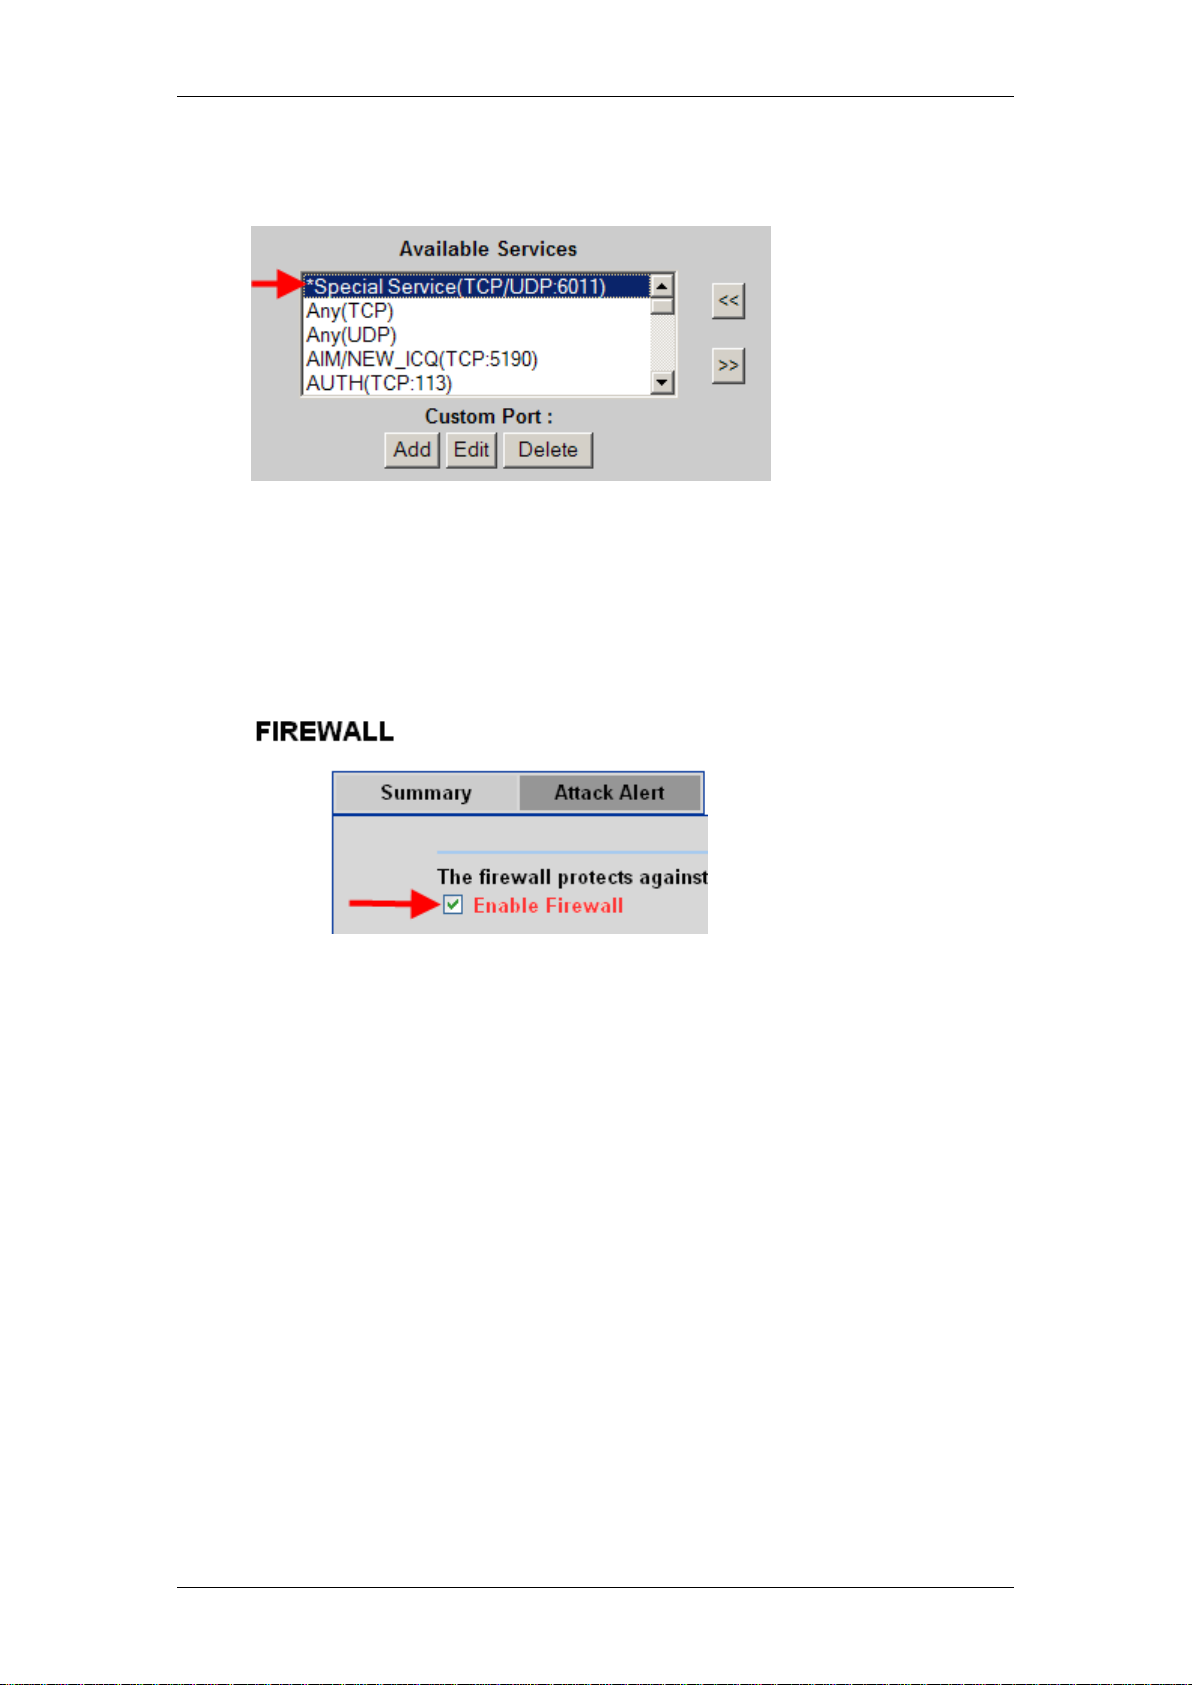
4. The service will now appear in the Available Services list. You will be
able to select this service if required.
Enabling the Firewall
After configuring the firewall rules, you should ensure the firewall is enabled.
1. Whilst in the Firewall Summary screen, ensure the Enable Firewall tick
box is selected.
NN40011-045 Issue 1.2 BCM50 Rls 6.0 21
Page 22
IP Firewall
Additional Configuration
The procedures detailed in this section are optional and not required in all
situations.
Attack Alerts
Attack alerts are the first defense against DOS attacks. In the Attack Alert
screen you may choose to generate an alert whenever an attack is detected.
For DoS attacks, the BCM50 Integrated Router uses thresholds to determine
when to drop sessions that do not become fully established. These thresholds
apply globally to all sessions.
You can use the default threshold values, or you can change them to values
more suitable to your security requirements.
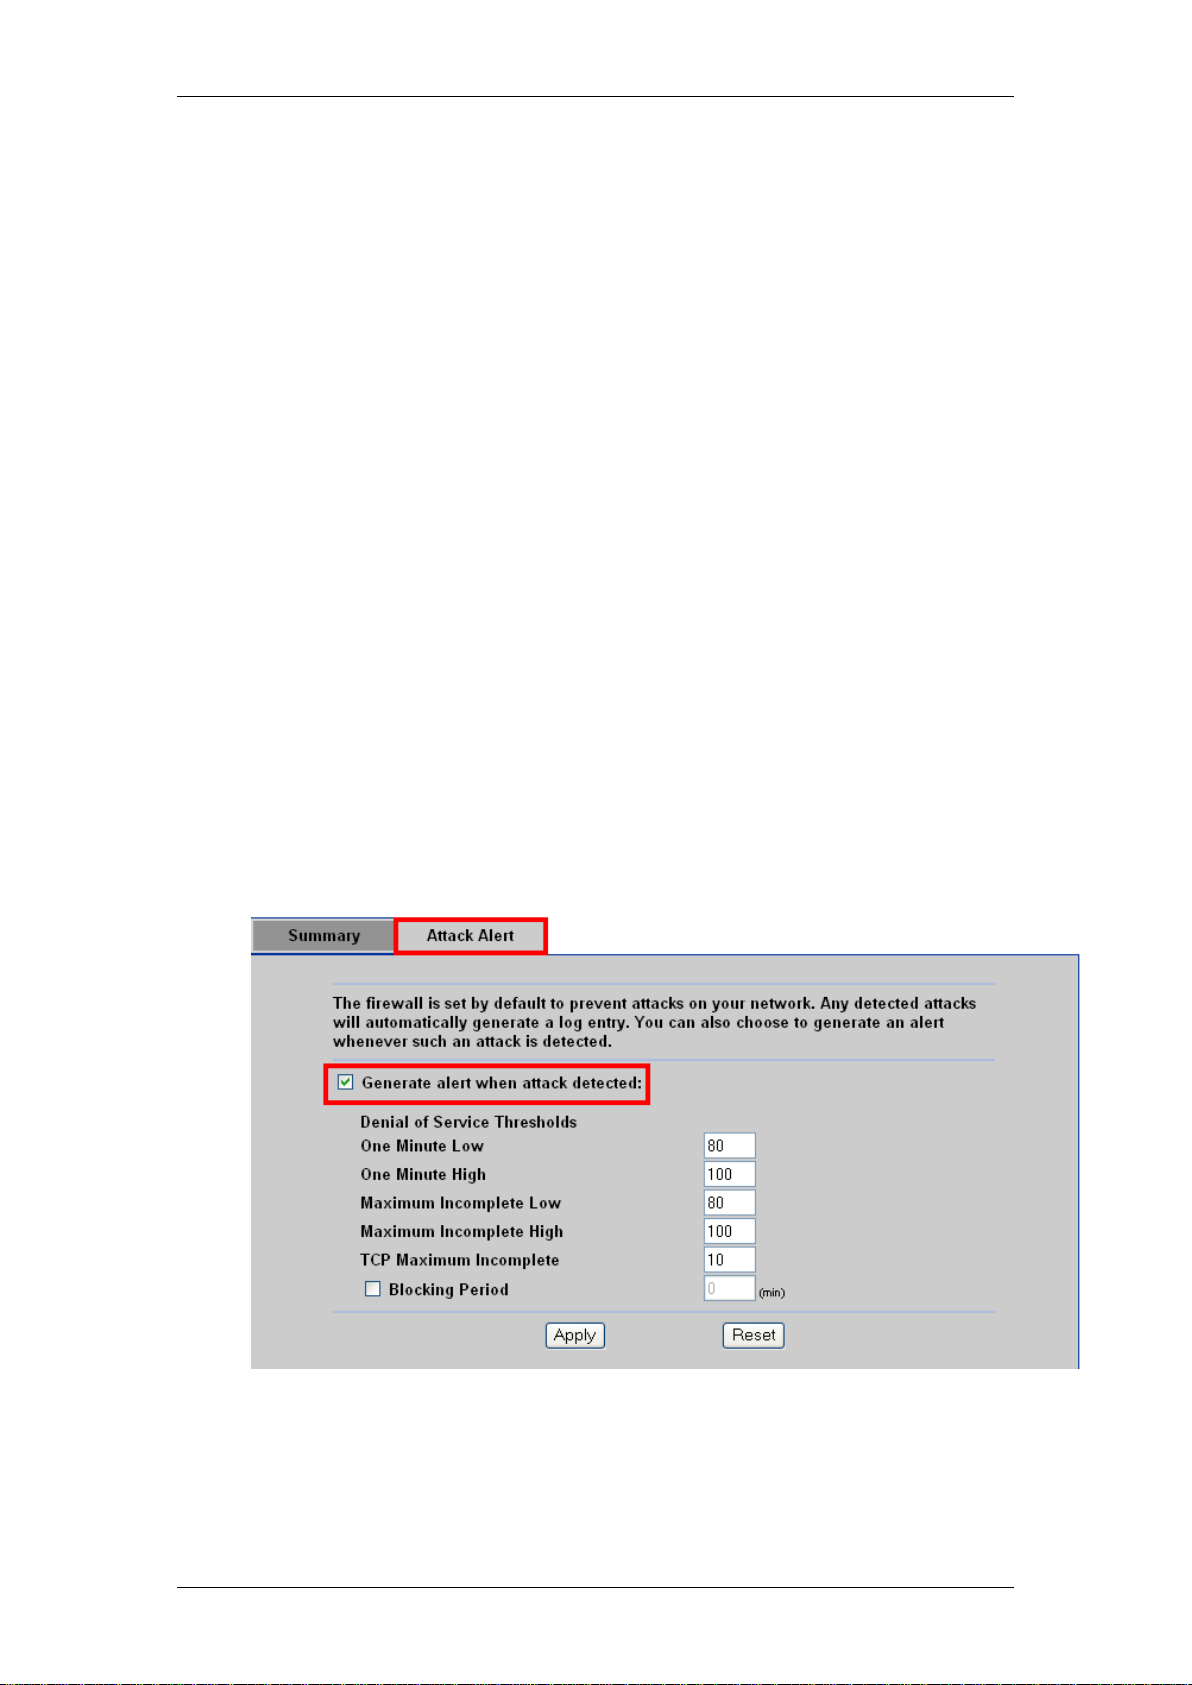
Configuring Attack Alerts
1. Access the Web Router GUI (refer to the Accessing the Web Router
GUI section of this guide).
2. From the Main Menu, click on Firewall.
3. In the Attack Alert tab, enable the Alerts function by ticking the
Generate alert when attack detected check box.
4. Configure the rest of the detail settings and click Apply to save your
settings.
22 NN40011-045 Issue 1.2 BCM50 Rls 6.0
Page 23

Attack Alert Settings
Field
Default Value
Description
One
Minute
Low
80 existing half-open
sessions.
This is the rate of new half-open sessions that causes
the firewall to stop deleting half-open sessions. The
BCM50 Integrated Router continues to delete halfopen sessions as necessary, until the rate of new
connection attempts drops below this number.
One
Minute
High
100 half-open
sessions per minute.
The above numbers
cause the BCM50
Integrated Router to
start deleting halfopen sessions when
more than 100
session establishment
attempts have been
detected in the last
minute, and to stop
deleting half-open
sessions when fewer
than 80 session
establishment
attempts have been
detected in the last
minute.
This is the rate of new half-open sessions that causes
the firewall to start deleting half-open sessions. When
the rate of new
connection attempts rises above this number, the
BCM50 Integrated Router deletes half-open sessions
as required to accommodate new connection attempts.
Maximum
Incomplete
Low
80 existing half-open
sessions.
This is the number of existing half-open sessions that
causes the firewall to stop deleting half-open sessions.
The BCM50 Integrated Router continues to delete halfopen requests as necessary, until the number of
existing half-open sessions drops below this number.
Maximum
Incomplete
High
100 existing half-open
sessions. The above
values causes the
BCM50e/be Integrated
Router to start
deleting half-open
sessions when the
number of existing
half-open sessions
rises above 100, and
to stop deleting halfopen sessions with
the number of
existing half-open
sessions drops below
80.
This is the number of existing half-open sessions that
causes the firewall to start deleting half-open sessions.
When the number of existing half-open sessions rises
above this number, the BCM50 Integrated Router
deletes half-open sessions as required to
accommodate new connection requests. Do not set
Maximum Incomplete High to lower than the current
Maximum Incomplete Low number.
TCP
Maximum
Incomplete
10 existing half-open
TCP sessions.
This is the number of existing half-open TCP sessions
with the same destination host IP address that causes
the firewall to start dropping half-open sessions to that
same destination host IP address. Enter a number
between 1 and 256. As a general rule, you should
choose a smaller number for a smaller network, a
slower system or limited bandwidth.
Blocking
Period
Select this check box
to specify a number in
minutes (min) text
box.
When TCP Maximum Incomplete is reached you can
choose if the next session should be allowed or
blocked. If you check
Blocking Period any new sessions will be blocked for
the length of time you specify in the next field (min)
IP Firewall
NN40011-045 Issue 1.2 BCM50 Rls 6.0 23
Page 24
IP Firewall
Field
Default Value
Description
and all old incomplete sessions will be cleared during
this period. If you want strong security, it is better to
block the traffic for a short time, as it will give the
server some time to digest the loading.
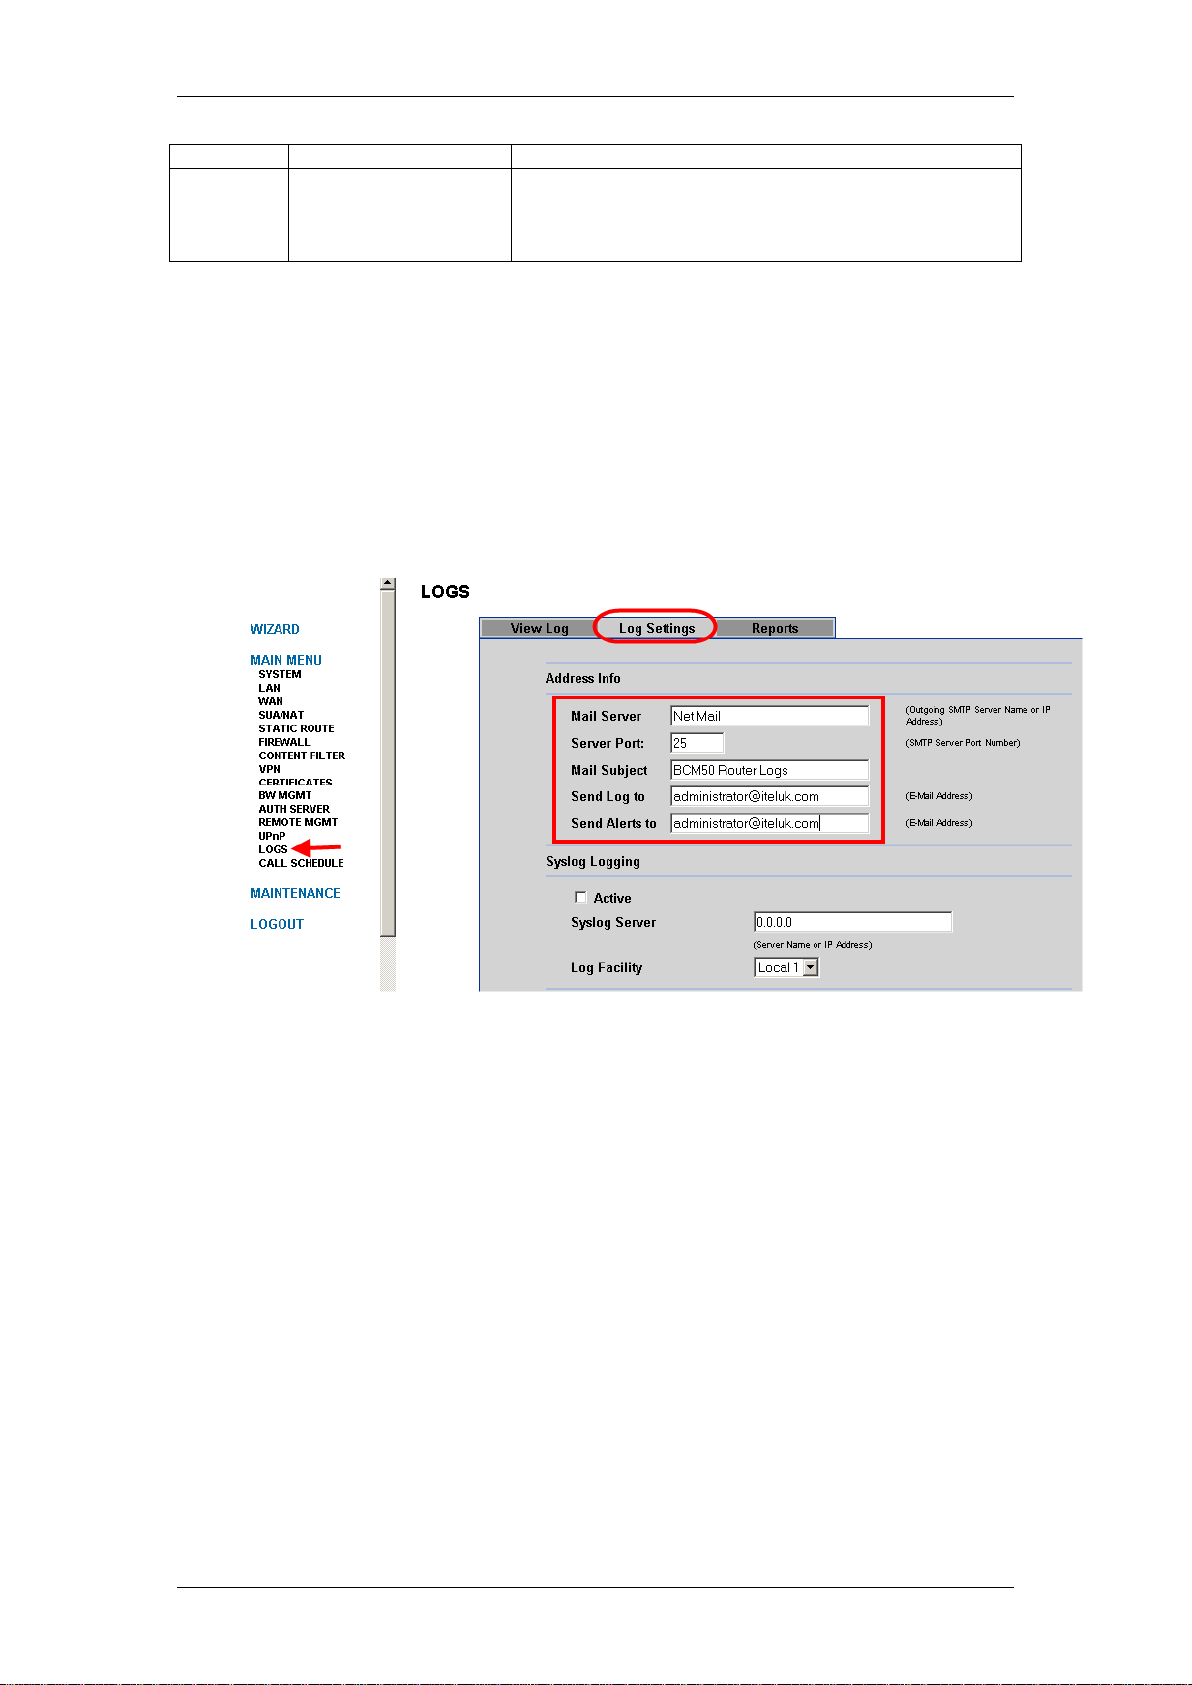
Attack Alert Destinations
You can configure an e-mail destination if you wish to be alerted about any
attacks that occur against the router. Alerts are e-mailed as soon as they
happen to the configured destination.
1. For either model router, access the Web router GUI.
2. From the Main Menu click on Logs, followed by the Log Settings tab.
3. Enter the name or IP Address of your mail server in the Mail Server
field, and ensure that you specify the e-mail address of the person to
send logs to in the Send Alerts to field.
24 NN40011-045 Issue 1.2 BCM50 Rls 6.0
Page 25
Port
Type
Description
5989
TCP
Required for running Element Manager across a firewall
25
TCP
SMTP used for Unified Messaging
143
TCP
IMAP used for Unified Messaging
161
UDP
SNMP management
162
UDP
SNMP traps
389
TCP
LDAP used for Unified Messaging
1222
TCP
LAN CTE client traffic
1718
TCP
H.323 signalling traffic
1719
TCP
H.323 signalling traffic
1720
TCP
H.323 signalling traffic
5000
UDP
QoS monitor probe packets
5060
UDP
SIP traffic
7000
UDP
Unistim IP set signalling traffic
20000-20255
UDP
Voice Path for IP telephony which is used when 28000 range
is unavailable
28000-28255
UDP
Voice Path for IP trunks
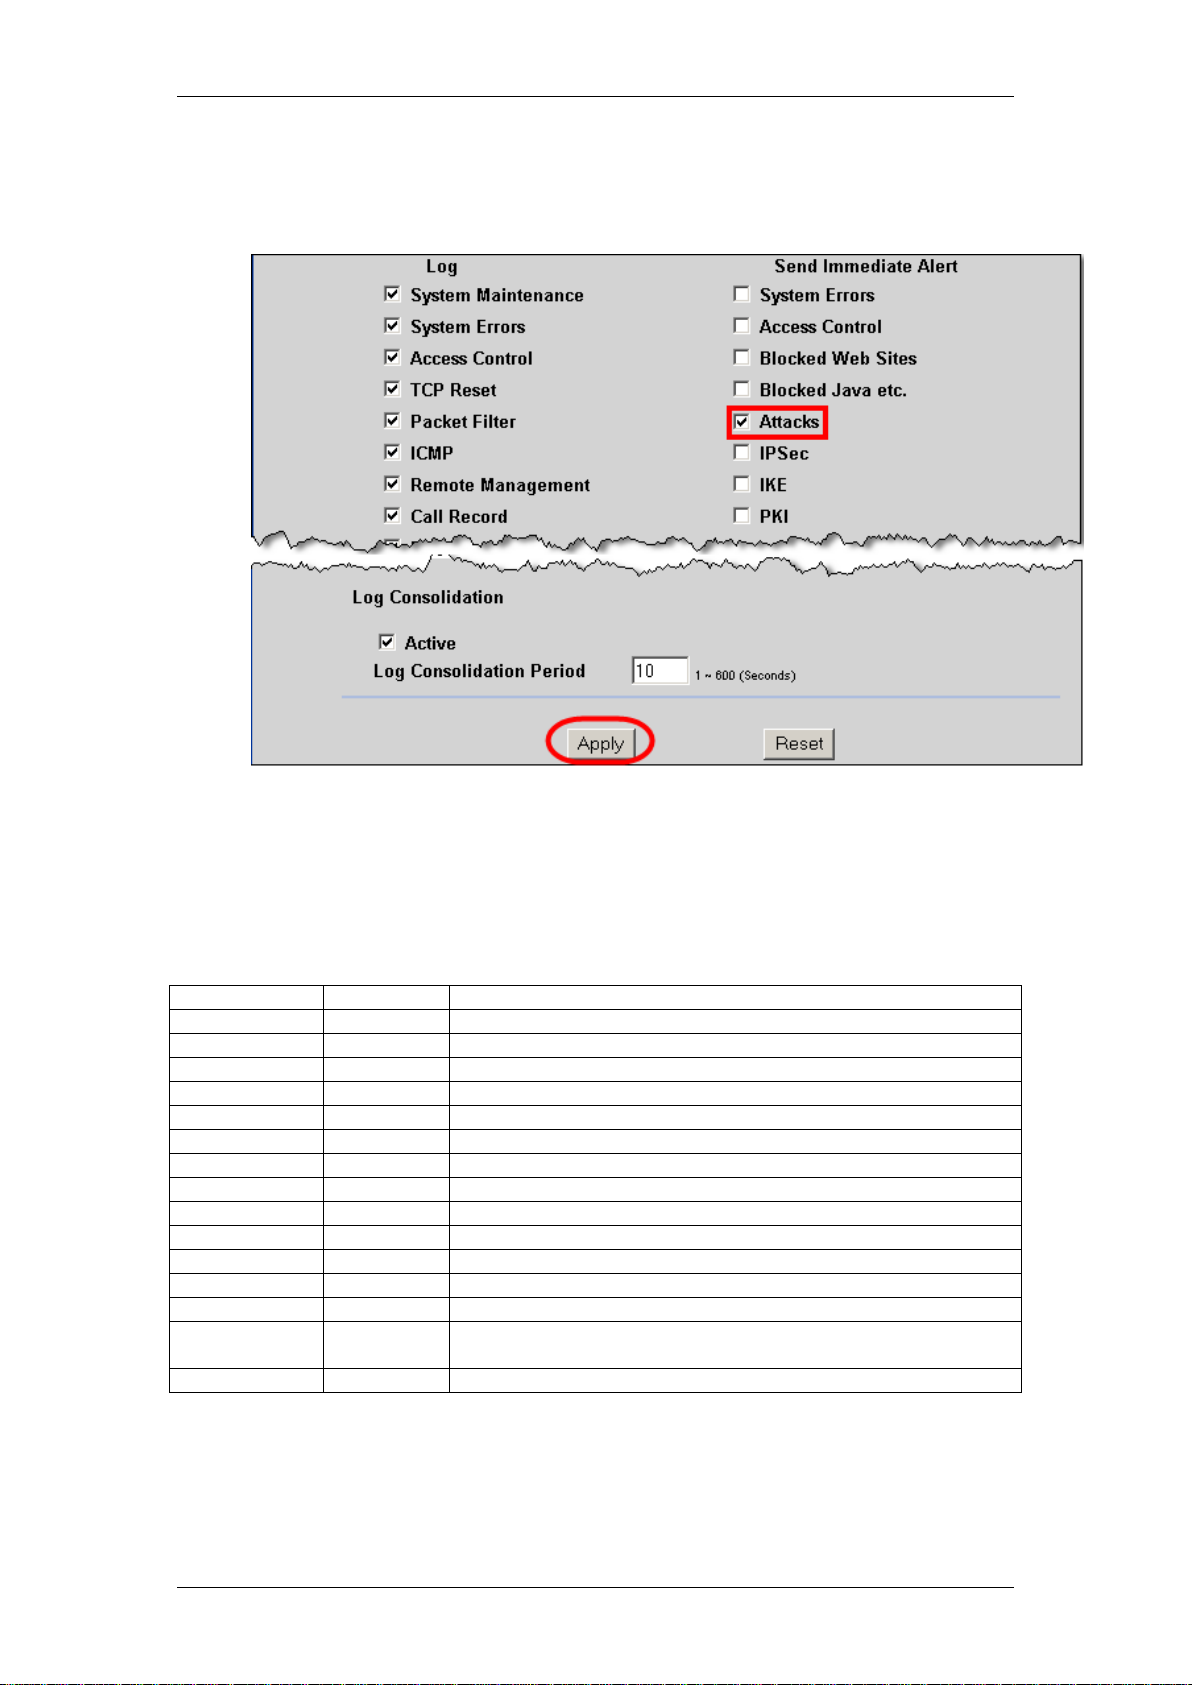
4. Next tick the Attacks option box, found further down the screen in the
Send Immediate Alert area.
IP Firewall
5. Click Apply when finished.
Firewall Considerations
The following should be allowed for the BCM50e/be/a/ba to function correctly:
NN40011-045 Issue 1.2 BCM50 Rls 6.0 25
Page 26

IP Firewall
Avaya Documentation Links
BCM50e Integrated Router Configuration – Basics
BCM50a Integrated Router Configuration – Basics
26 NN40011-045 Issue 1.2 BCM50 Rls 6.0
 Loading...