

Page 1

BCM Rls 6.0
Reporting for Contact Center
Task Based Guide
Page 2

Reporting for Contact Center
Copyright © 2010 Avaya Inc.
All Rights Reserved.
Notices
While reasonable efforts have been made to ensure that the information in this document is complete and accurate
at the time of printing, Avaya assumes no liability for any errors. Avaya reserves the right to make changes and
corrections to the information in this document without the obligation to notify any person or organization of such
changes.
Documentation disclaimer
Avaya shall not be responsible for any modifications, additions, or deletions to the original published version of
this documentation unless such modifications, additions, or deletions were performed by Avaya. End User agree to
indemnify and hold harmless Avaya, Avaya’s agents, servants and employees against all claims, lawsuits, demands
and judgments arising out of, or in connection with, subsequent modifications, additions or deletions to this
documentation, to the extent made by End User.
Link disclaimer
Avaya is not responsible for the contents or reliability of any linked Web sites referenced within this site or
documentation(s) provided by Avaya. Avaya is not responsible for the accuracy of any information, statement or
content provided on these sites and does not necessarily endorse the products, services, or information described or
offered within them. Avaya does not guarantee that these links will work all the time and has no control over the
availability of the linked pages.
Warranty
Avaya provides a limited warranty on this product. Refer to your sales agreement to establish the terms of the
limited warranty. In addition, Avaya’s standard warranty language, as well as information regarding support for
this product, while under warranty, is available to Avaya customers and other parties through the Avaya Support
Web site: http://www.avaya.com/support
Please note that if you acquired the product from an authorized reseller, the warranty is provided to you by said
reseller and not by Avaya.
Licenses
THE SOFTWARE LICENSE TERMS AVAILABLE ON THE AVAYA WEBSITE,
HTTP://SUPPORT.AVAYA.COM/LICENSEINFO/ ARE APPLICABLE TO ANYONE WHO DOWNLOADS,
USES AND/OR INSTALLS AVAYA SOFTWARE, PURCHASED FROM AVAYA INC., ANY AVAYA
AFFILIATE, OR AN AUTHORIZED AVAYA RESELLER (AS APPLICABLE) UNDER A COMMERCIAL
AGREEMENT WITH AVAYA OR AN AUTHORIZED AVAYA RESELLER. UNLESS OTHERWISE
AGREED TO BY AVAYA IN WRITING, AVAYA DOES NOT EXTEND THIS LICENSE IF THE
SOFTWARE WAS OBTAINED FROM ANYONE OTHER THAN AVAYA, AN AVAYA AFFILIATE OR AN
AVAYA AUTHORIZED RESELLER, AND AVAYA RESERVES THE RIGHT TO TAKE LEGAL ACTION
AGAINST YOU AND ANYONE ELSE USING OR SELLING THE SOFTWARE WITHOUT A LICENSE. BY
INSTALLING, DOWNLOADING OR USING THE SOFTWARE, OR AUTHORIZING OTHERS TO DO SO,
YOU, ON BEHALF OF YOURSELF AND THE ENTITY FOR WHOM YOU ARE INSTALLING,
DOWNLOADING OR USING THE SOFTWARE (HEREINAFTER REFERRED TO INTERCHANGEABLY
AS "YOU" AND "END USER"), AGREE TO THESE TERMS AND CONDITIONS AND CREATE A
BINDING CONTRACT BETWEEN YOU AND AVAYA INC. OR THE APPLICABLE AVAYA AFFILIATE
("AVAYA").
Copyright
Except where expressly stated otherwise, no use should be made of the Documentation(s) and Product(s) provided
by Avaya. All content in this documentation(s) and the product(s) provided by Avaya including the selection,
arrangement and design of the content is owned either by Avaya or its licensors and is protected by copyright and
other intellectual property laws including the sui generis rights relating to the protection of databases. You may not
modify, copy, reproduce, republish, upload, post, transmit or distribute in any way any content, in whole or in part,
including any code and software. Unauthorized reproduction, transmission, dissemination, storage, and or use
without the express written consent of Avaya can be a criminal, as well as a civil offense under the applicable law.
Third Party Components
Certain software programs or portions thereof included in the Product may contain software distributed under third
party agreements ("Third Party Components"), which may contain terms that expand or limit rights to use certain
portions of the Product ("Third Party Terms"). Information regarding distributed Linux OS source code (for those
Products that have distributed the Linux OS source code), and identifying the copyright holders of the Third Party
Components and the Third Party Terms that apply to them is available on the Avaya Support Web site:
http://support.avaya.com/Copyright.
Trademarks
The trademarks, logos and service marks ("Marks") displayed in this site, the documentation(s) and product(s)
provided by Avaya are the registered or unregistered Marks of Avaya, its affiliates, or other third parties. Users
are not permitted to use such Marks without prior written consent from Avaya or such third party which may own
the Mark. Nothing contained in this site, the documentation(s) and product(s) should be construed as granting, by
implication, estoppel, or otherwise, any license or right in and to the Marks without the express written permission
of Avaya or the applicable third party. Avaya is a registered trademark of Avaya Inc. All non-Avaya trademarks
are the property of their respective owners.
2 NN40011-024 Issue 1.2 BCM Rls 6.0
Page 3

Reporting for Contact Center
Downloading documents
For the most current versions of documentation, see the Avaya Support. Web site: http://www.avaya.com/support
Contact Avaya Support
Avaya provides a telephone number for you to use to report problems or to ask questions about your product. The
support telephone number is 1-800-242-2121 in the United States. For additional support telephone numbers, see
the Avaya Web site: http://www.avaya.com/support
Copyright © 2010 ITEL, All Rights Reserved
The copyright in the material belongs to ITEL and no part of the material may
be reproduced in any form without the prior written permission of a duly
authorised representative of ITEL.
NN40011-024 Issue 1.2 BCM Rls 6.0 3
Page 4

Reporting for Contact Center
Table of Contents
Reporting for Contact Center ........................................... 6
Overview .......................................................................................... 6
Required Information ....................................................................... 7
Flow Chart ....................................................................................... 8
Recommended Minimum PC Specification for Reporting for
Contact Center Web Host ................................ ................................ 9
Historical Report Database ................................................................................ 9
Operating System Compatibility ........................................................................ 9
Installation Pre-requisites ............................................................... 10
Checking the .Net Framework Version ............................................................ 11
Installing Internet Information Services............................................................ 12
Settings Required for Windows Vista, Windows 7 or Windows Server 2008
with IIS 7.0 ....................................................................................................... 17
Firewall Considerations - Port Numbers used by Reporting for Contact
Center .............................................................................................................. 21
Installing Reporting for Contact Center .......................................... 21
Starting Reporting for Contact Center ............................................................. 37
Exiting Reporting for Contact Center (Log Out) ............................................... 43
Reporting for Contact Center System Administration .................... 44
Changing the System Administrator‟s password ............................................. 44
Creating Users in RCC .................................................................................... 45
Assigning Skillsets to Users ............................................................................. 49
Maintenance .................................................................................. 51
System Status .................................................................................................. 51
Logging ............................................................................................................ 53
Purge Database ............................................................................................... 54
Company Details ........................................................................... 56
Reporting ....................................................................................... 58
Accessing Reporting as a System Administrator ............................................. 58
Accessing Reporting as a Standard User ........................................................ 59
Real Time Reporting ........................................................................................ 60
Wallboard Setup .............................................................................................. 70
Reports .......................................................................................... 74
Accessing Reports ........................................................................................... 74
Creating Favourites.......................................................................................... 78
Using Reports .................................................................................................. 82
Report Options ................................................................................................. 83
Report Descriptions ......................................................................................... 89
4 NN40011-024 Issue 1.2 BCM Rls 6.0
Page 5

Reporting for Contact Center
Print Schedules ............................................................................ 115
Additional Information .................................................. 125
Configuring the Windows XP Firewall .......................................... 125
Troubleshooting ............................................................ 130
Checking Internet Information Services Settings ......................... 130
Real Time Screens Not Displaying Correctly ............................... 132
Avaya Documentation Links ........................................ 134
NN40011-024 Issue 1.2 BCM Rls 6.0 5
Page 6

Reporting for Contact Center
Reporting for Contact Center
Overview
Reporting for Contact Center (RCC) is an application that allows a Contact
Center Supervisor to view and record real time and historical data relating to
Contact Center operation and Agent behaviour. RCC is optional component of
Intelligent Contact Center.
Reporting for Contact Center has the flexibility to provide reporting information
from individual skillsets and agents, right through to any combination of
Agents and Skillsets.
Information can be displayed in either Real Time or Historical report formats.
Real Time information can also be displayed on multiple colour Wallboards
and ipView SoftBoards.
Reporting for Contact Center requires one PC to be used as a Web Host PC.
Any machine on the same network as the Web Host PC can access RCC by
using Internet Explorer. Providing that a user has the correct logon
credentials, any function can be performed from any PC.
NOTE: One PC on your network should be nominated as the Web Host PC.
Only install the Reporting for Contact Center application software onto this
single PC. All other PCs on your network from which Users wish to access the
Real Time Screens, Historical Reports or the Reporting for Contact Center
user interface must be equipped with Internet Explorer.
Reporting for Contact Center provides support for thirteen different languages.
This allows RCC users to use RCC in their preferred language. It also means
that from an English RCC user, information displayed on each of the
wallboards can all be in a mixture of the languages. The thirteen languages
are UK English, North American English, French, Canadian French, Latin
American Spanish, Spanish, Brazilian Portuguese, Dutch, German, Italian,
Norwegian, Danish and Swedish.
There are two types of users that can be configured in RCC: Users and
Administrators. Users can be allowed to configure Wallboards and
SoftBoards and view real time and historical data but only Administrators have
full control over Users, Skillset assignments and fundamental settings for
RCC.
6 NN40011-024 Issue 1.2 BCM Rls 6.0
Page 7

Reporting for Contact Center
Required Information
The following details are required before commencing installation and
configuration of RCC:
The IP address of the BCM
The IP address of the Web Host PC
IP addresses for any wallboards to be configured
NN40011-024 Issue 1.2 BCM Rls 6.0 7
Page 8
Reporting for Contact Center
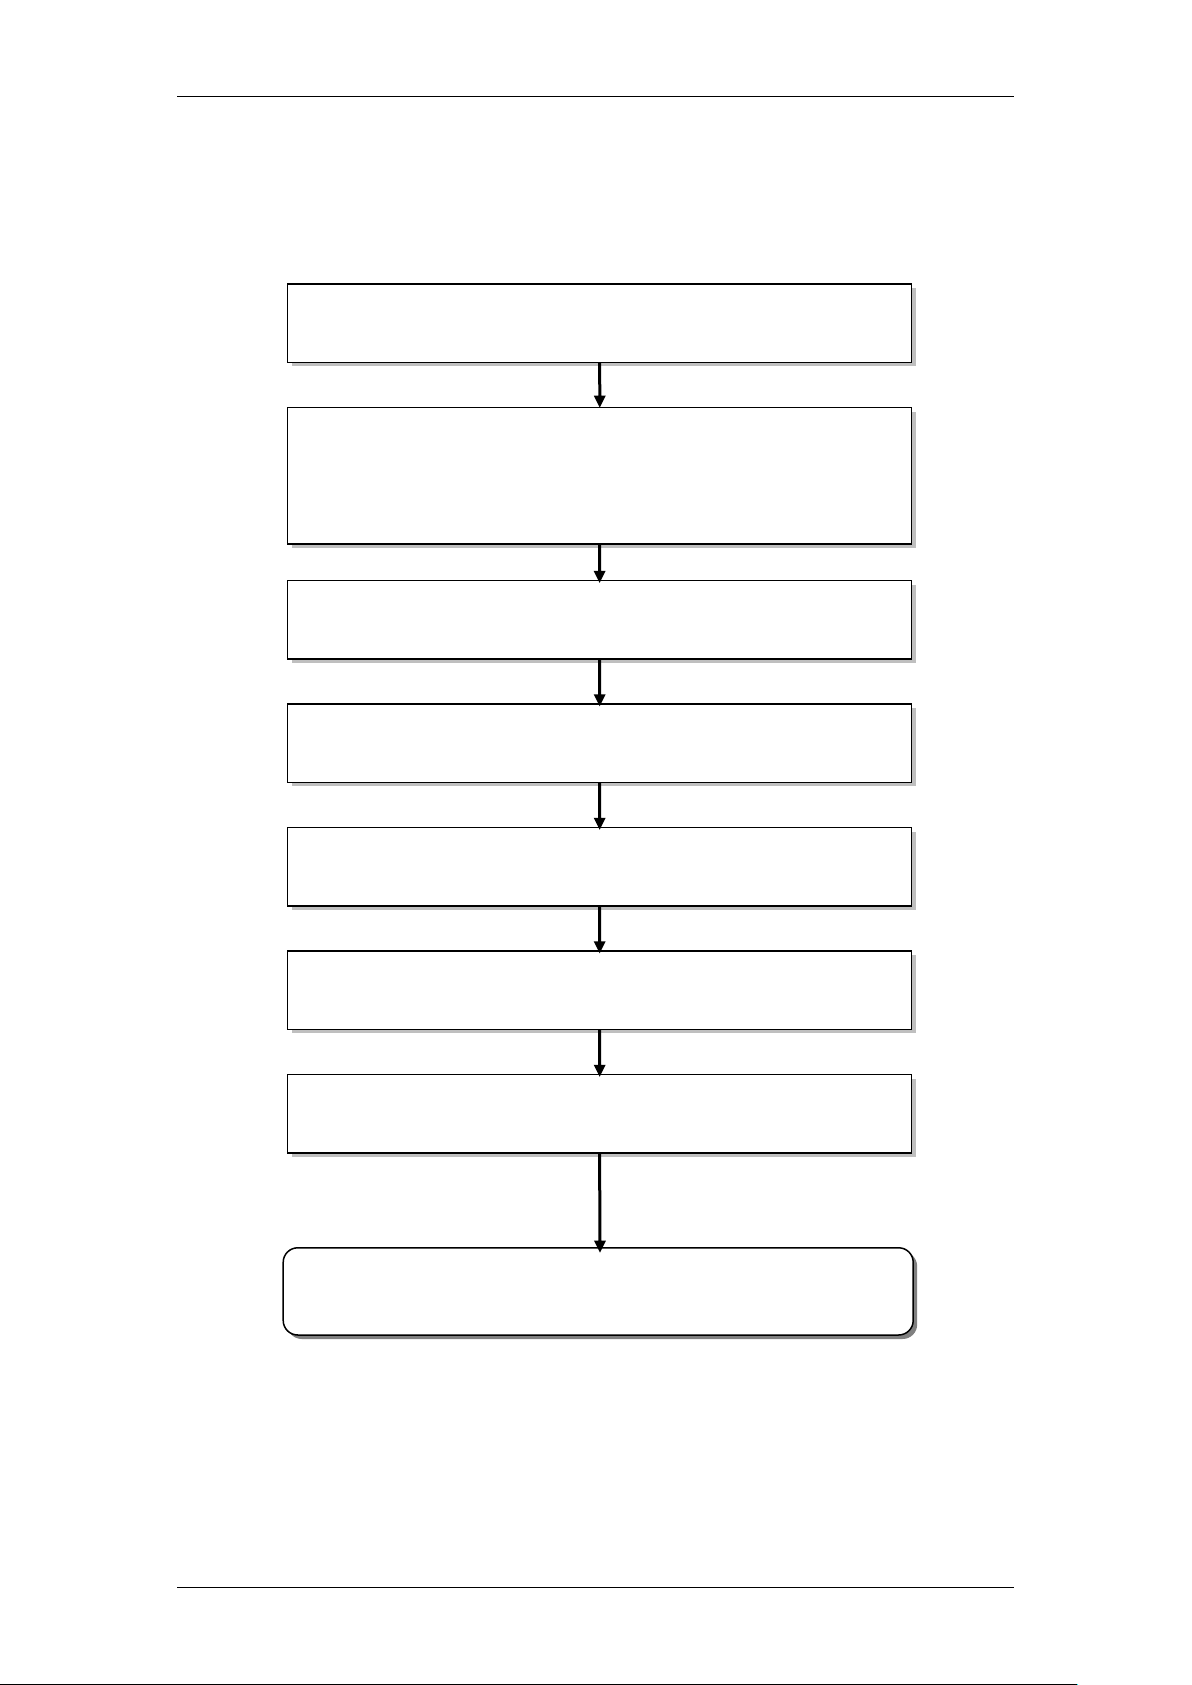
Ensure you have noted the relevant network information:
refer to the Required Information section of this guide.
Ensure the Web Host PC meets the minimum specification:
refer to the Recommended Minimum PC Specification for
Reporting for Contact Center Web Host PC section of this
guide.
Review and check the installation pre-requisites: refer to the
Installation Pre-requisites section of this guide.
Install RCC: refer to the Installing Reporting for Contact
Center section of this guide.
Configure RCC to connect to the BCM: refer to the Starting
Reporting for Contact Center section of this guide.
Add Administrators/Users to RCC: refer to the Creating
Users in RCC section of this guide.
Assign Skillsets to the Administrators/Users: refer to the
Assigning Skillsets to Users section of this guide.
You are now ready to use RCC and view Real Time
information and Historical Reports.
Flow Chart
Follow the below process to install and configure Reporting for Contact
Center.
8 NN40011-024 Issue 1.2 BCM Rls 6.0
Page 9

Reporting for Contact Center
Operating System
Version
Windows 7
Professional, Ultimate, Enterprise 32/64 bit
Windows Vista
Business, Ultimate, and Enterprise SP2 (32bit and 64-bit)
Windows XP Professional
SP3
Windows Server 2008
Standard and Enterprise SP2
Windows Server 2008 R2
Enterprise 64 bit
Windows 2003 Server
Standard Edition, SP1
Note: 32-bit version operating systems only are supported unless stated
otherwise.
Recommended Minimum PC Specification for
Reporting for Contact Center Web Host
IBM™ Compatible PC
Microprocessor - Intel® PentiumTM IV (or equivalent) minimum
Microprocessor Speed – 1.7 GHz minimum
Memory - 512 MB minimum (more memory should result in enhanced
performance, for example when generating reports)
Network Interface Card
TCP/IP protocol
SVGA display
Mouse (or other Windows®-compatible pointing device)
Web Server – Internet Information Services 5.0 or later
Microsoft Internet Explorer version 6.0 Service Pack (SP1), or later
Hard Disk
o RCC application installation: 1.4GB
o Recommended storage space for Historical data: 4GB
Historical Report Database
RCC stores Historical Report information in a standard Microsoft SQL Server
2005 Express database. If required, the SQL Server Express database can be
analysed through 3rd party reporting packages. However, software
development will have to be performed by the customer to achieve this.
Note: The database will grow through time and, if the diagnostic logging
option is turned on, the log files will require extra disk space.
Operating System Compatibility
Reporting for Contact Center is verified for correct operation on the following
operating systems:
NN40011-024 Issue 1.2 BCM Rls 6.0 9
Page 10

Reporting for Contact Center
Note: Reporting for Contact Center installation is supported on a single PC
installation per BCM, and is not intended to run on Cluster Servers like those
supported by Windows 2003 Enterprise.
Note: Please ensure that any Windows XP installations are fully updated to
Service Pack 3. Older versions may become unstable during the RCC
installation process.
Installation Pre-requisites
Before you install Reporting for Contact Center software, you must:
Ensure that Intelligent Contact Center is keycoded and configured.
Ensure that the Reporting for Contact Center keycode has been
applied to the BCM.
Ensure that the Contact Center platform is connected to, and is
operational on, the network to which the Reporting for Contact Center
Web Host PC is connected.
Ensure that the full suite of Microsoft Internet Information Services is
installed and operational on the Web Host PC, and that the Default
Web Site is enabled.
As the Reporting for Contact Center installation includes Microsoft .Net
Framework 2.0 ensure that Microsoft .Net Framework 1.2 is uninstalled
from the Web Host PC before installing Reporting for Contact Centre.
This is because Microsoft .Net Framework 1.2 is not compatible with
Microsoft SQL Server 2005 Express which is installed during the
Reporting for Contact Center installation.
The following versions of .Net Framework are compatible with RCC:
1.0, 1.1, 2.0, 3.0, 3.5.
10 NN40011-024 Issue 1.2 BCM Rls 6.0
Page 11
Reporting for Contact Center
Checking the .Net Framework Version
Use the following procedure to check and/or uninstall the incompatible
versions of .NET Framework installed on the Web Host PC:
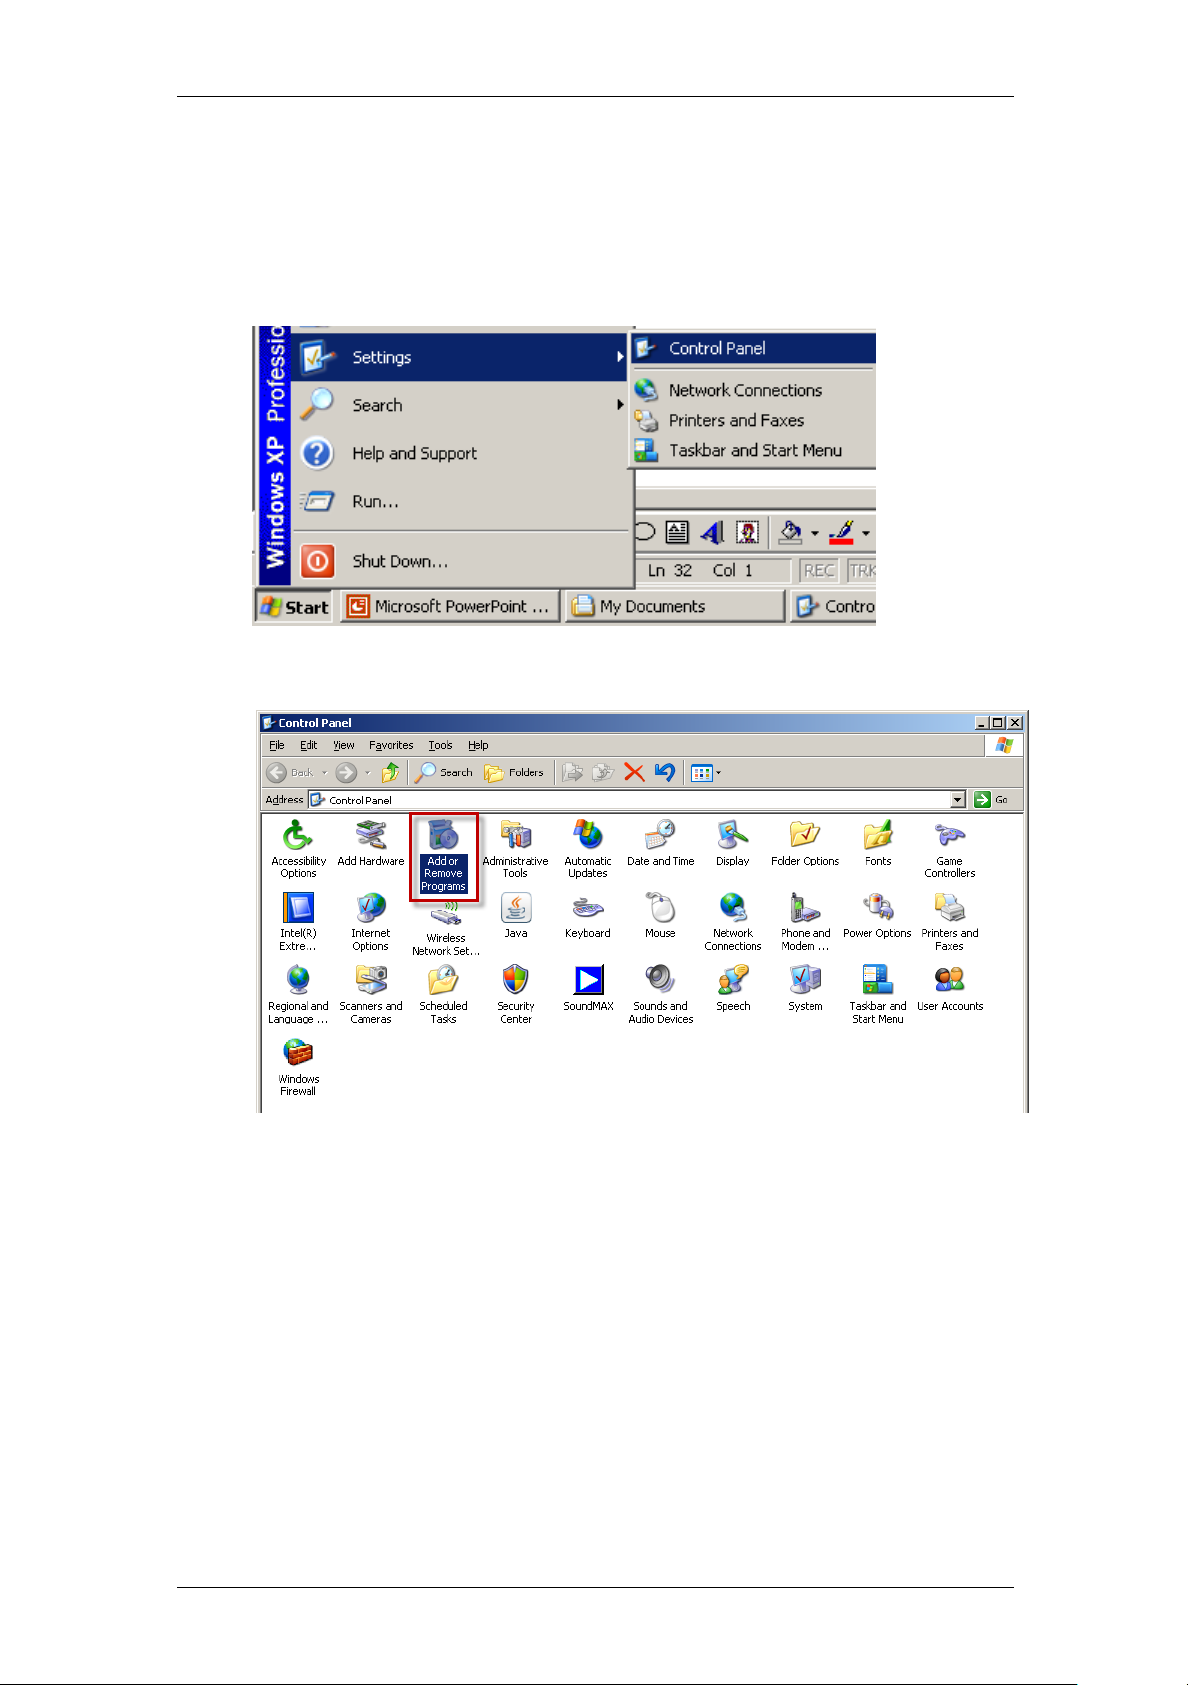
1. From the Start menu, select Settings followed by Control Panel.
2. Double-click on Add or Remove Programs.
NN40011-024 Issue 1.2 BCM Rls 6.0 11
Page 12
Reporting for Contact Center
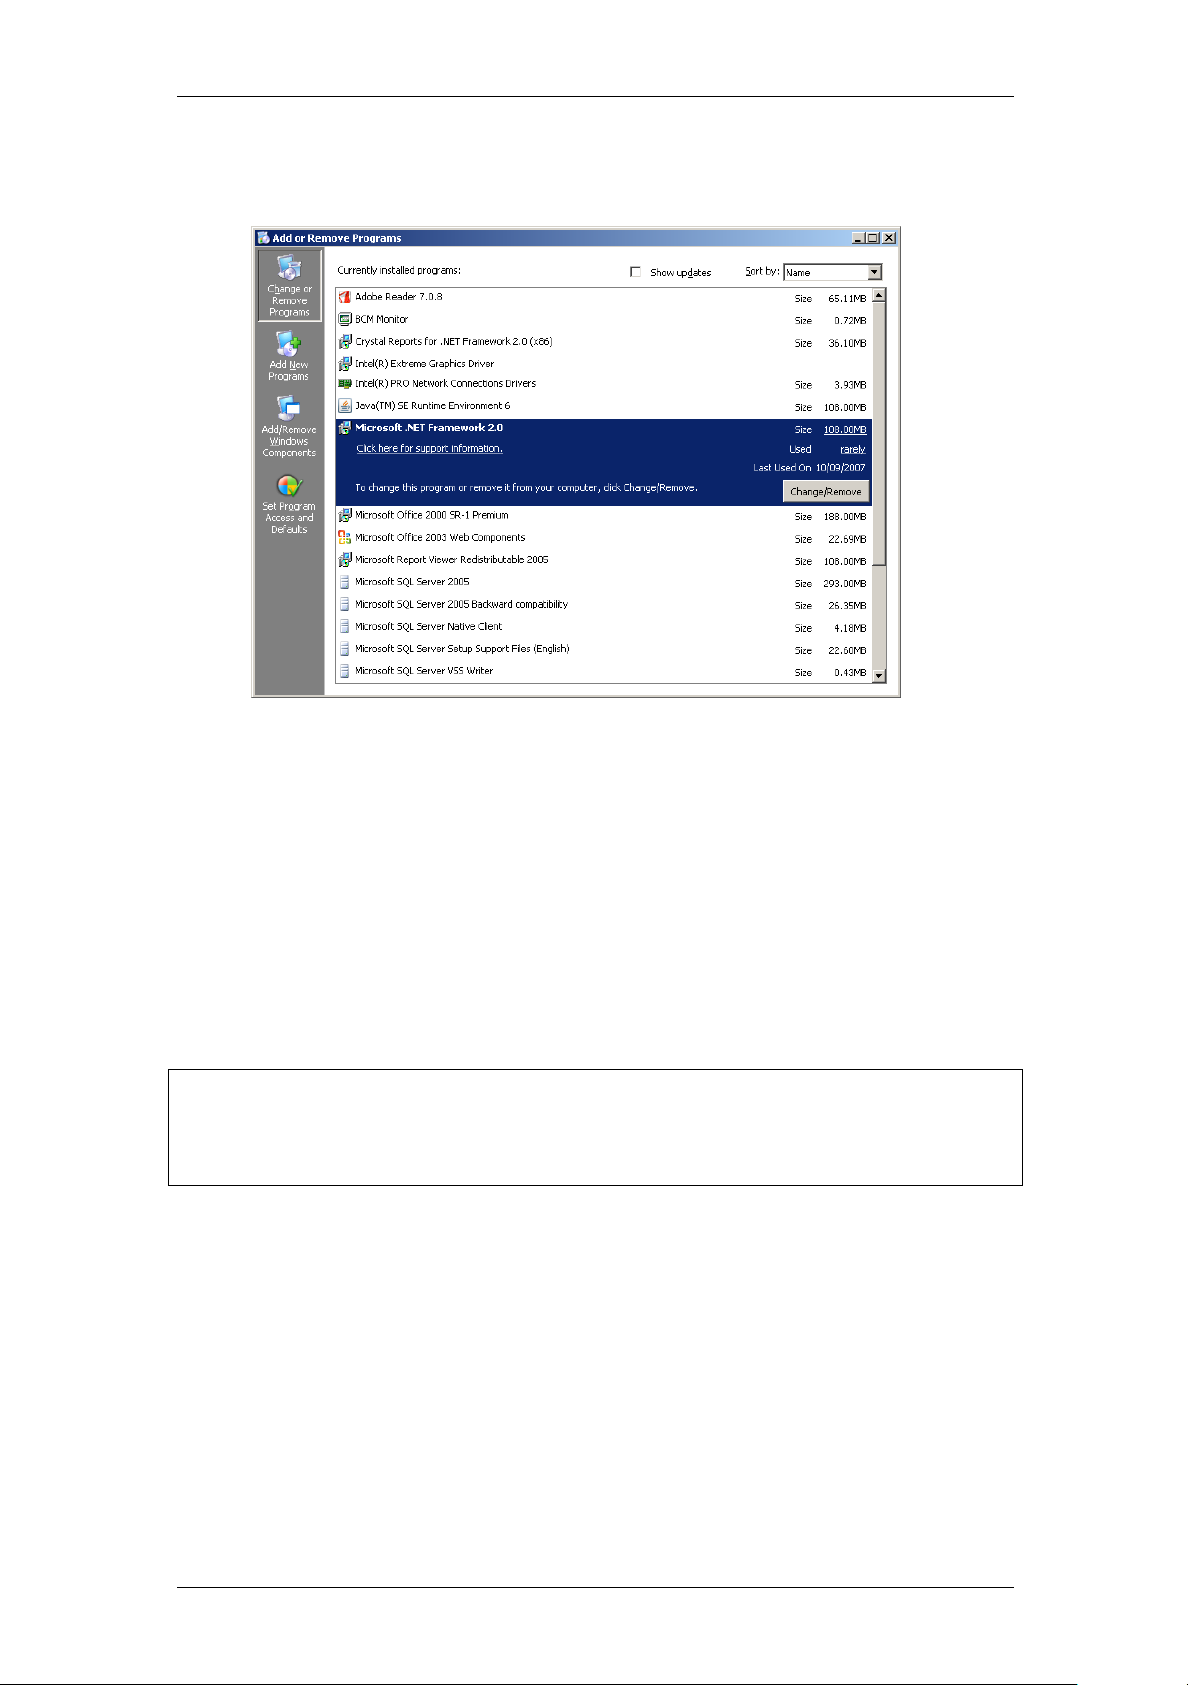
3. View the list of programs installed on the PC. If Microsoft .NET
Framework 1.2 is listed, click on the Change/Remove button.
4. Follow the InstallShield Wizard instructions to uninstall the program.
5. If the .Net version is compatible with RCC, do not click the
Change/Remove button, and simply shut down the Add or Remove
Programs window.
Installing Internet Information Services
IIS is required to be installed on the PC that is to be the Web Host PC. The
following steps are instructions of how to successfully install this Microsoft
Windows component.
Note: This example uses Windows XP Professional. Other Operating
Systems will differ in process for installing IIS. Please consult the Reporting
for Contact Center Setup and Operations Guide for further information on
installing IIS on other supported Operating Systems.
12 NN40011-024 Issue 1.2 BCM Rls 6.0
Page 13
Reporting for Contact Center
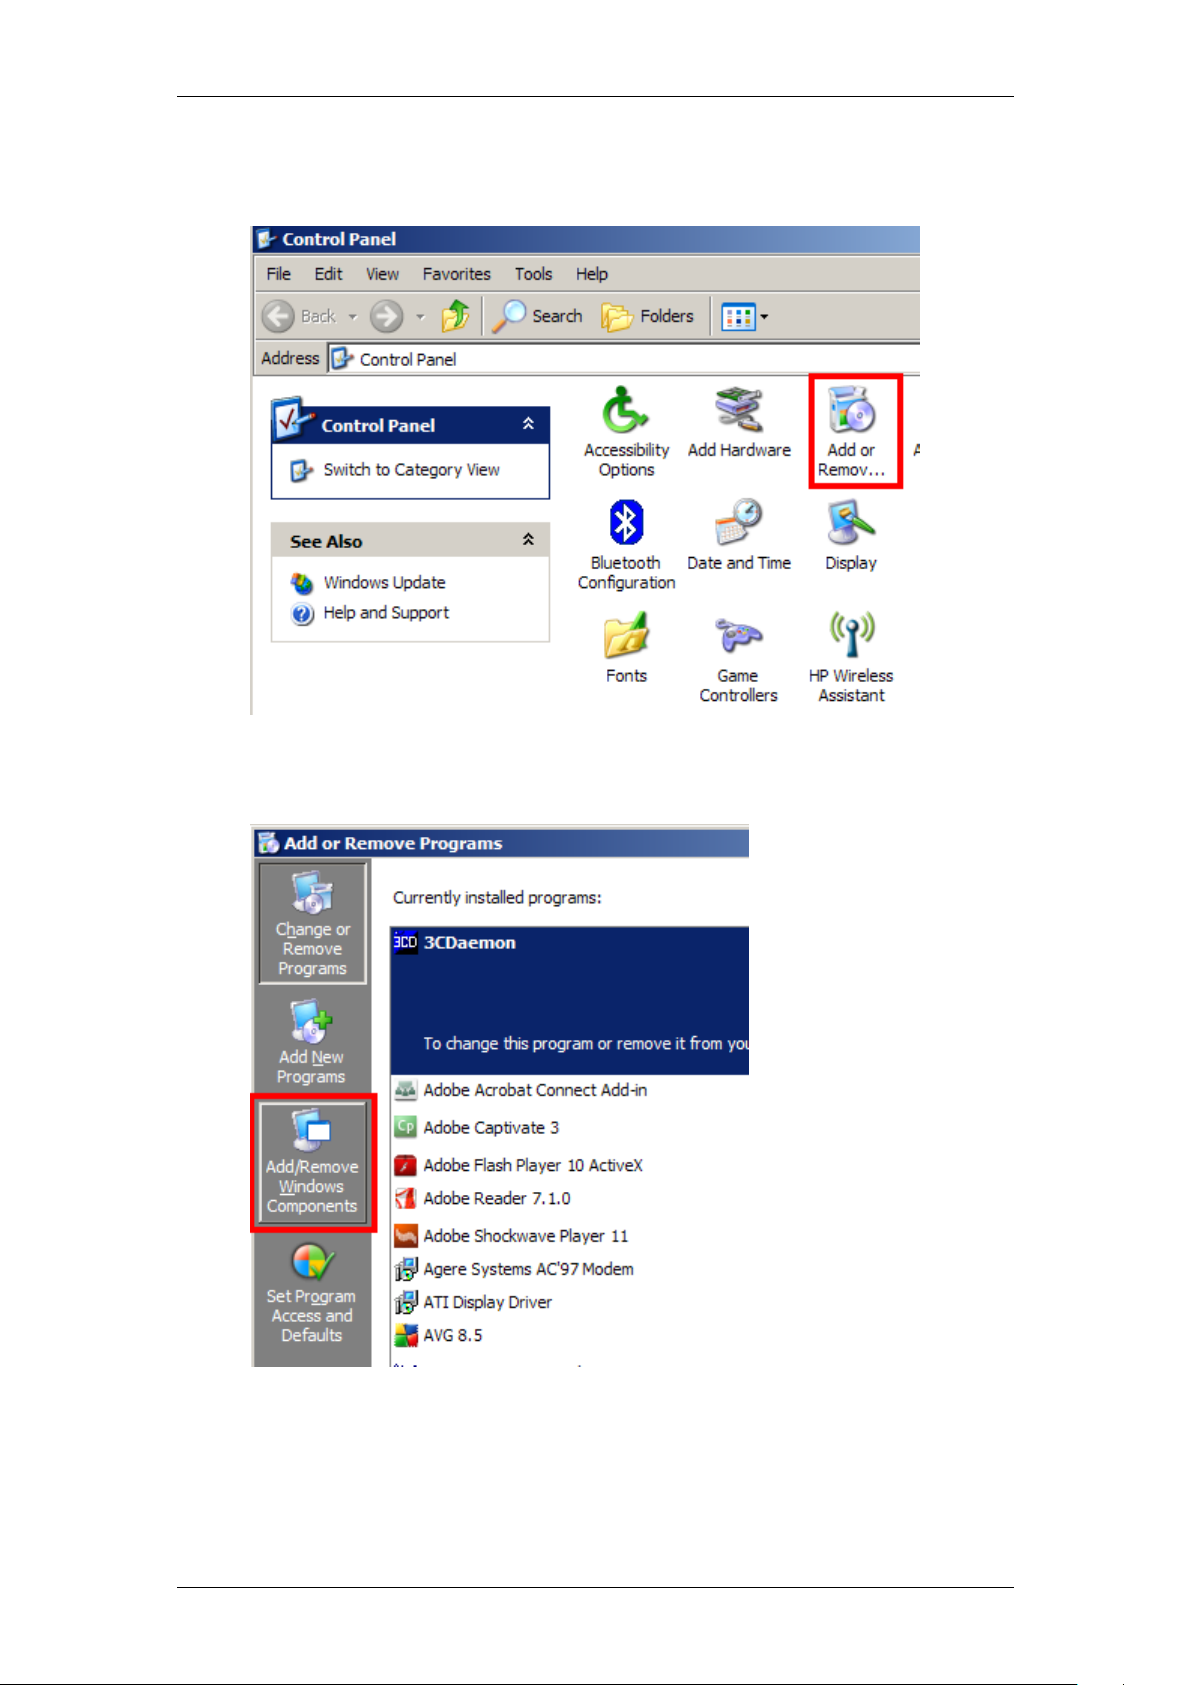
1. On the Web Host PC access the Control Panel by opening Start –
Settings – Control Panel and the Add/Remove Programs icon.
2. In the window that appears click on Add/Remove Windows
Components.
NN40011-024 Issue 1.2 BCM Rls 6.0 13
Page 14
Reporting for Contact Center
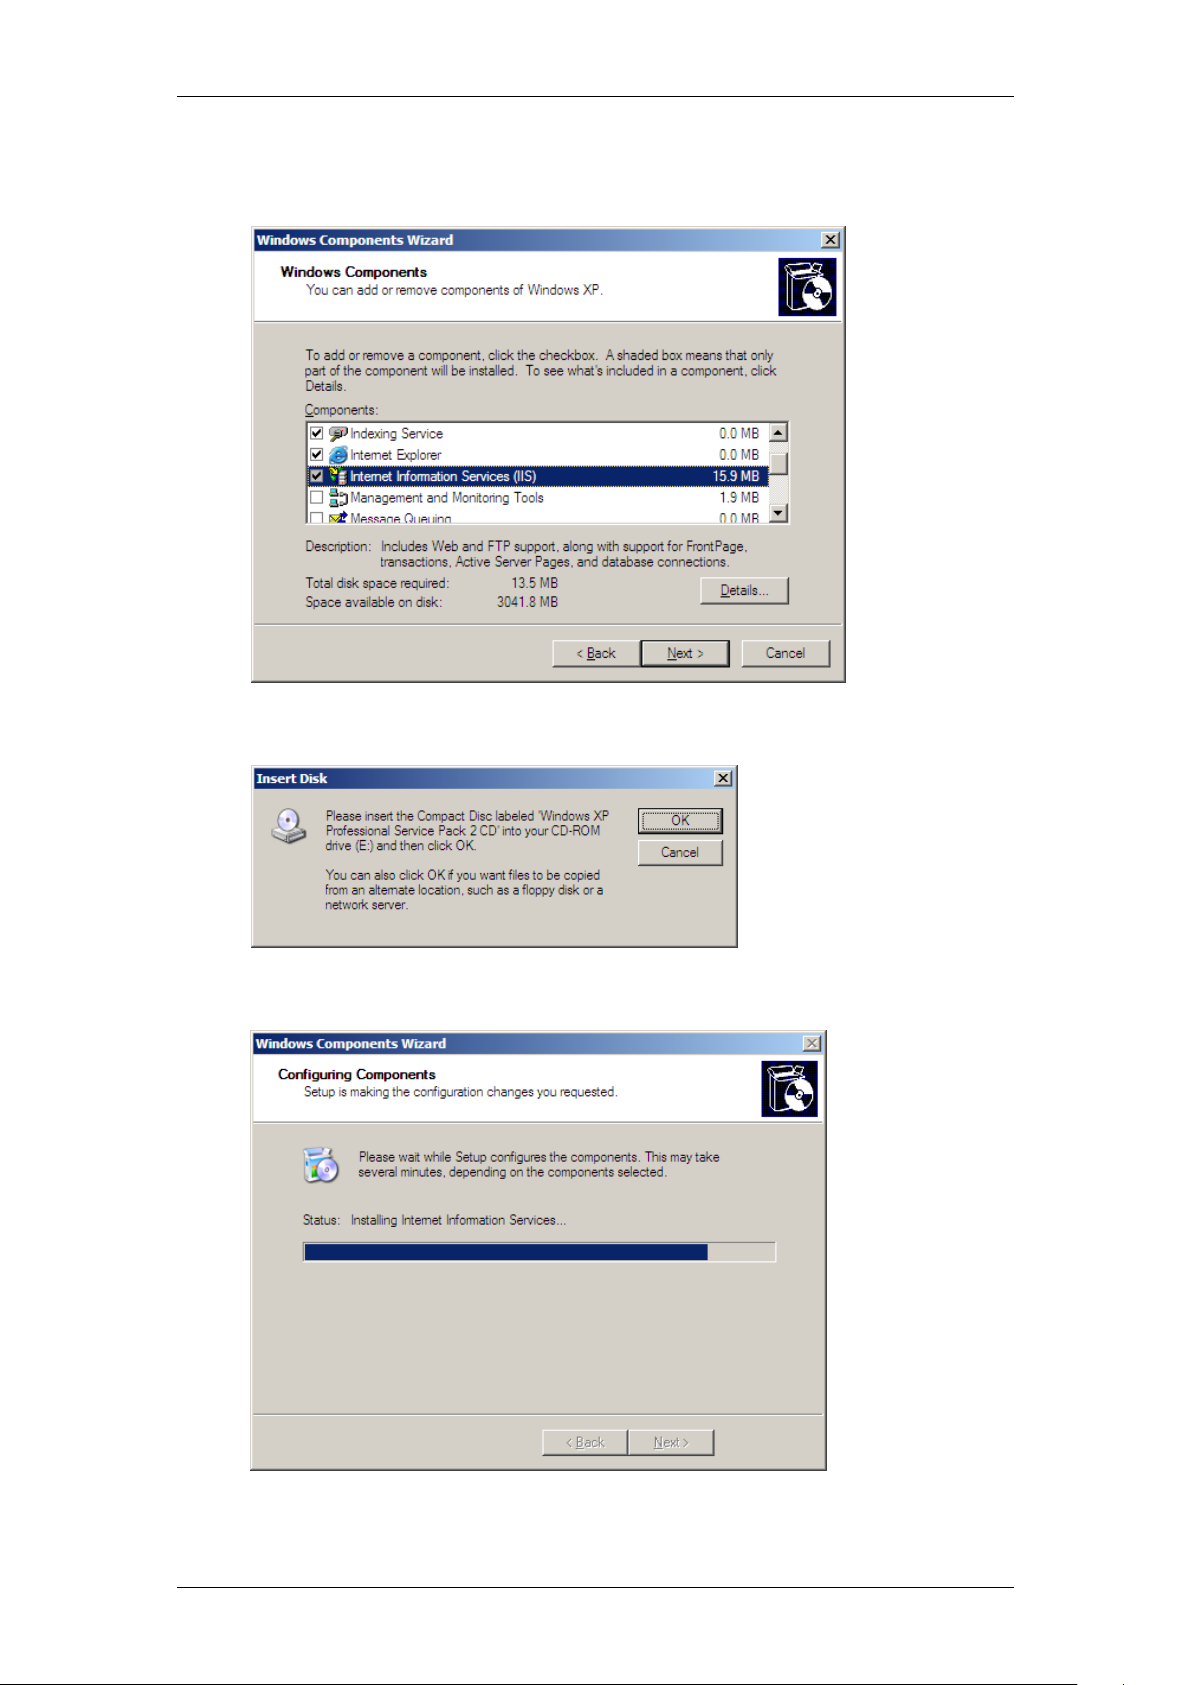
3. Ensure that Internet Information Services is ticked and then click
Next.
4. You may be requested to locate the Windows CD to install IIS.
5. Obtain the CD if required and click OK. The installation will continue.
14 NN40011-024 Issue 1.2 BCM Rls 6.0
Page 15
Reporting for Contact Center
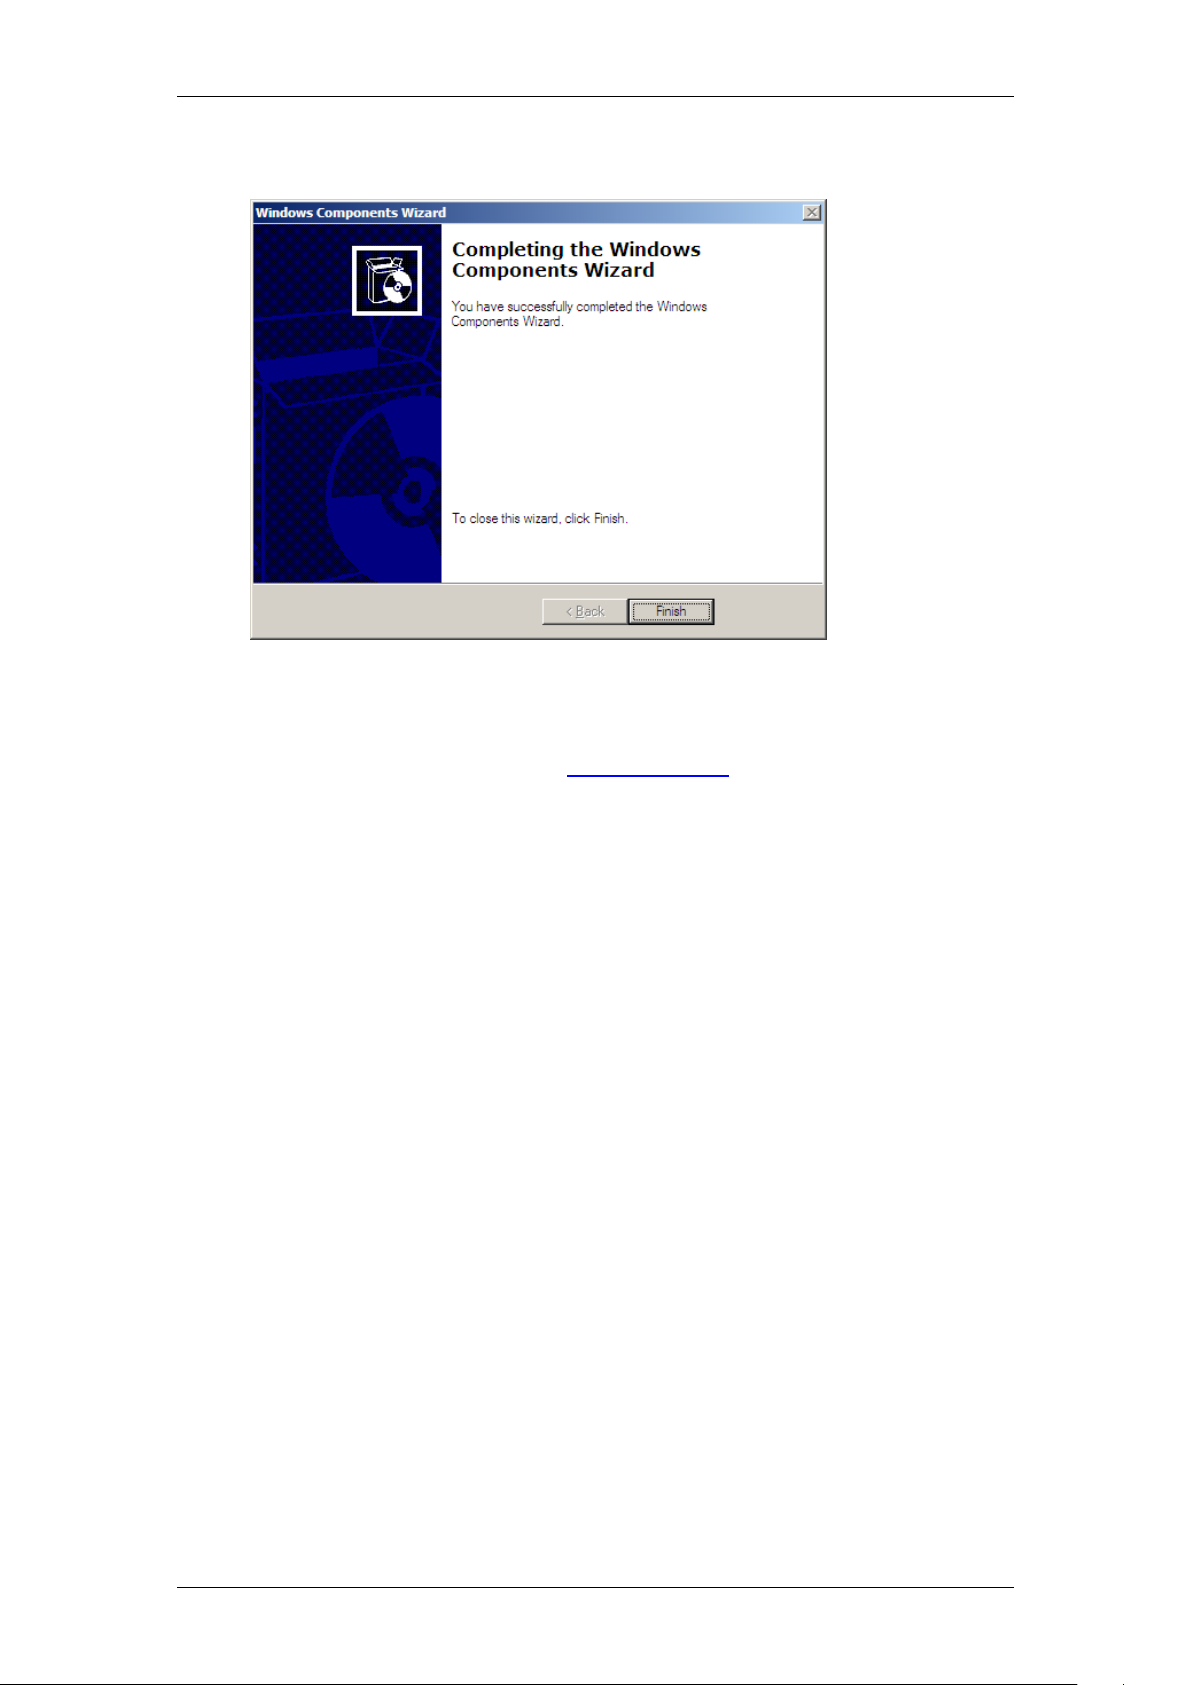
6. Click Finish.
7. Internet Information Services has now been installed.
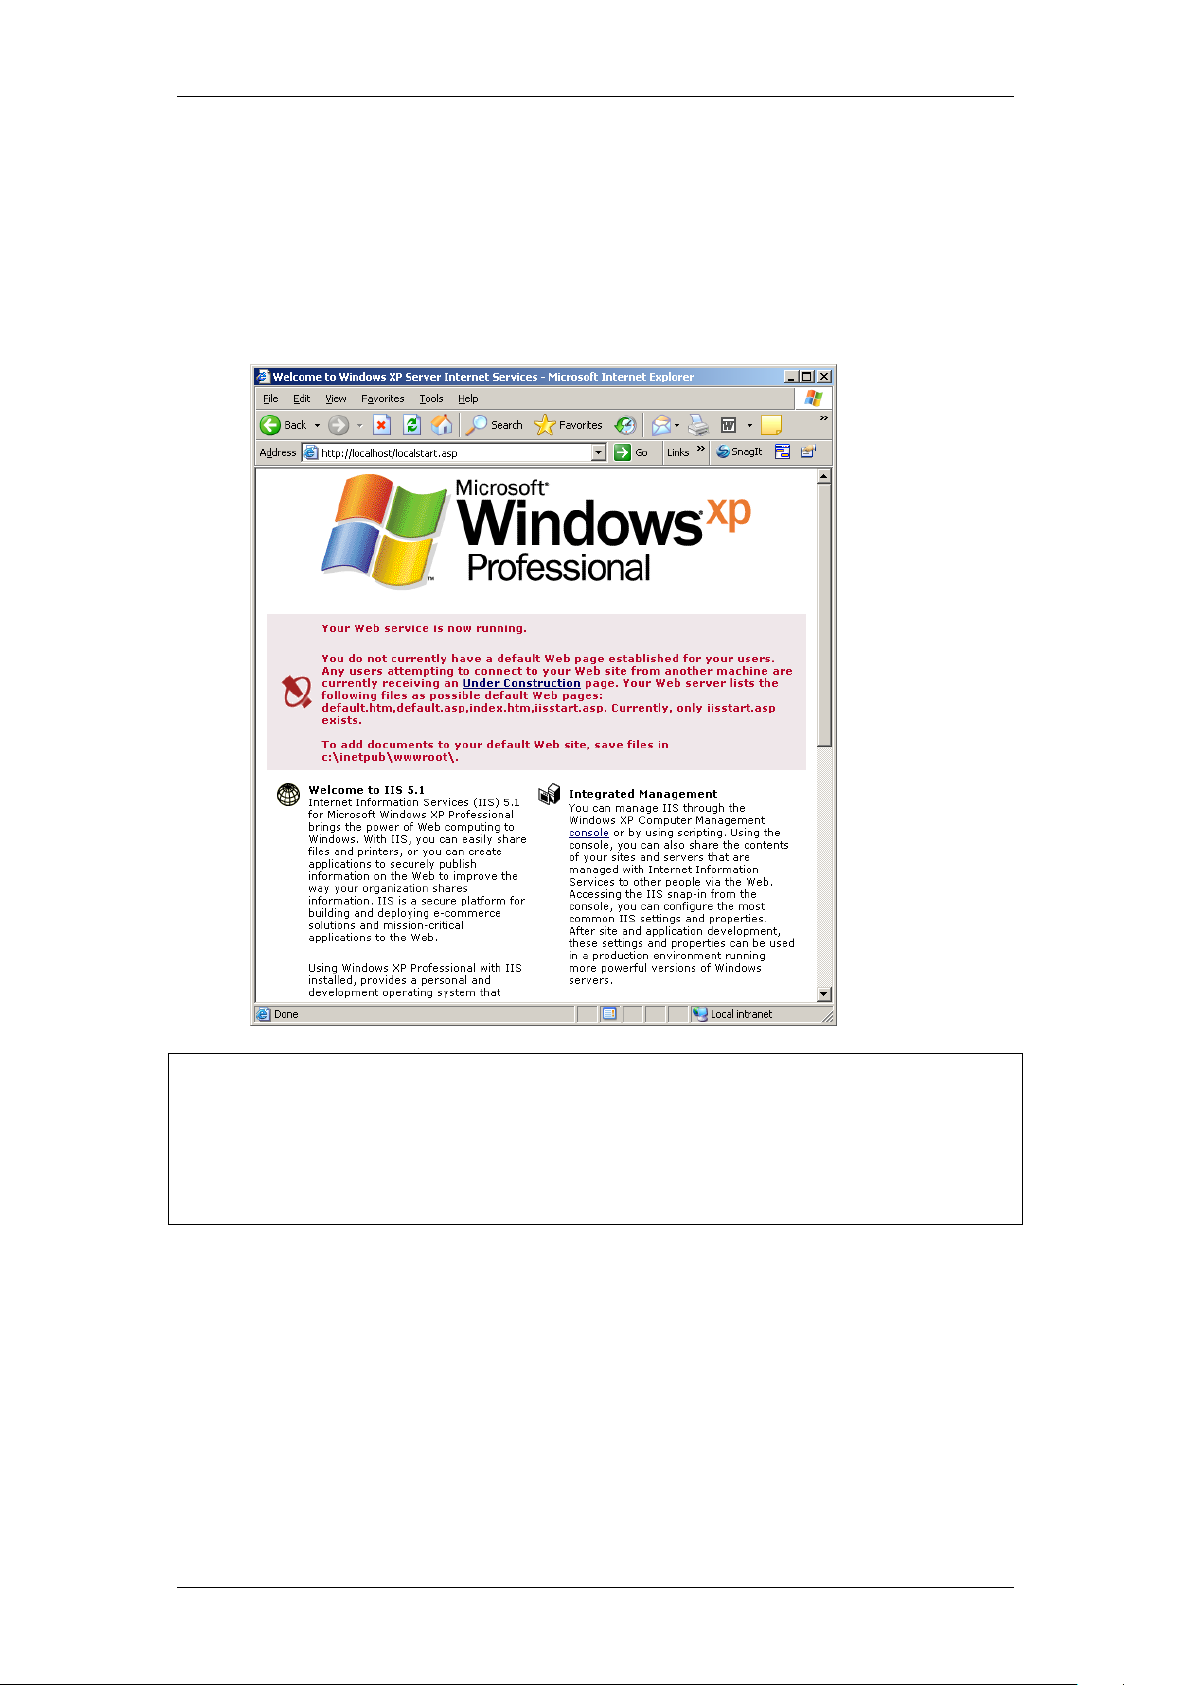
8. To test that the Internet Information Service is properly installed, open
Internet Explorer and point to http://localhost/
NN40011-024 Issue 1.2 BCM Rls 6.0 15
Page 16
Reporting for Contact Center
9. If the installation is successful, a window similar to the one below will
appear. This window also contains useful information regarding your
Internet Information Services. You can see the current version number
and additional information about where to find extended help for
Internet Information Services. If you see a Page Cannot be Displayed
screen, re-install the Internet Information Services and reboot the Web
Host PC.
Note: It is recommended that you ensure your Web Host PC Internet
Information Services installation is as secure as possible. Generally, a secure
installation involves loading security patches and/or service packs for Internet
Information Services and for the operating system of the Web Host PC. These
patches and service packs are available free of charge by Microsoft. Contact
your network administrator for further advice.
16 NN40011-024 Issue 1.2 BCM Rls 6.0
Page 17
Reporting for Contact Center
Settings Required for Windows Vista, Windows 7 or Windows
Server 2008 with IIS 7.0
In order to install Reporting for Contact Center on a Windows Vista, Windows
7, or Server 2008 operating system, some Windows Internet Information
Services (IIS) features have to be turned on.
Perform the following steps to enable Windows features on these Operating
Systems (O/S) using IIS 7.0 that are required for a Reporting for Contact
Center installation:
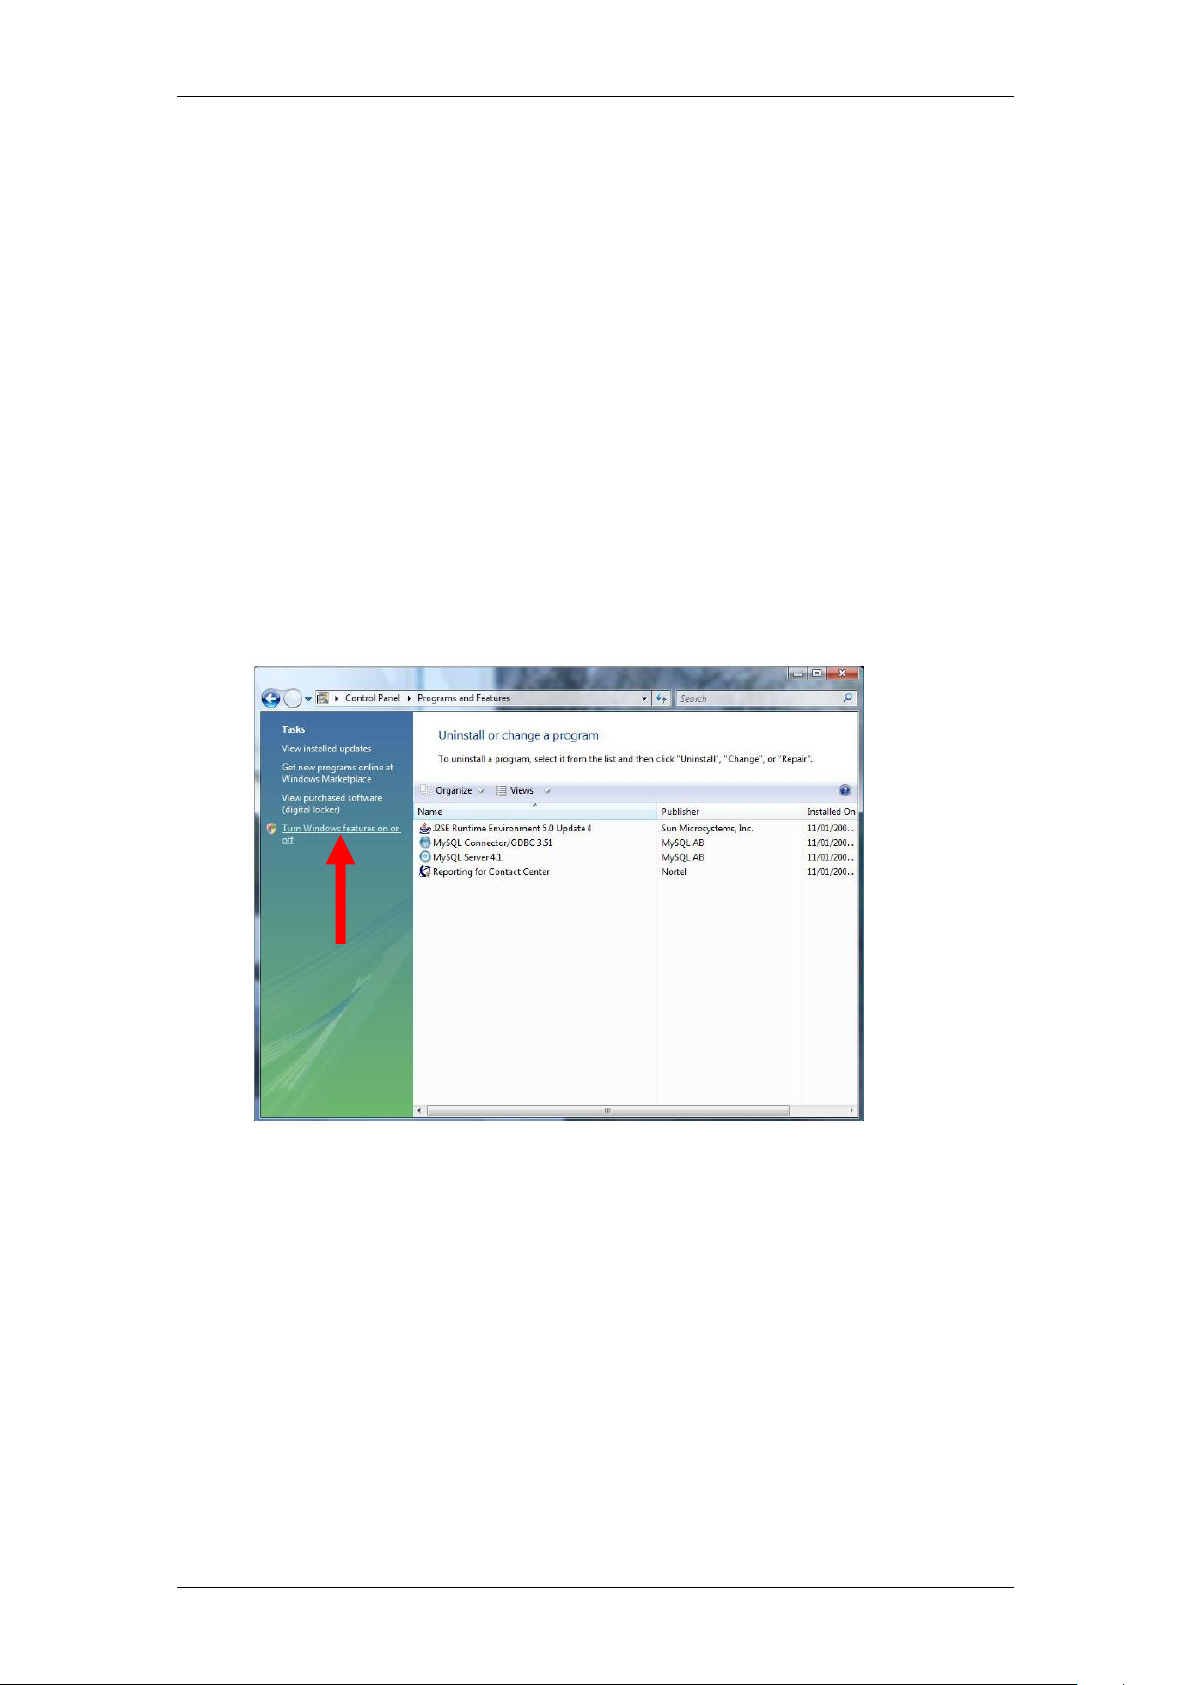
1. Click on the Start menu and select Program Files, Control Panel (or
Start, Control Panel dependant on the Start menu view).
2. Open Programs and Features.
3. From the left panel click on the Turn Windows features on or off
option.
NN40011-024 Issue 1.2 BCM Rls 6.0 17
Page 18
Reporting for Contact Center
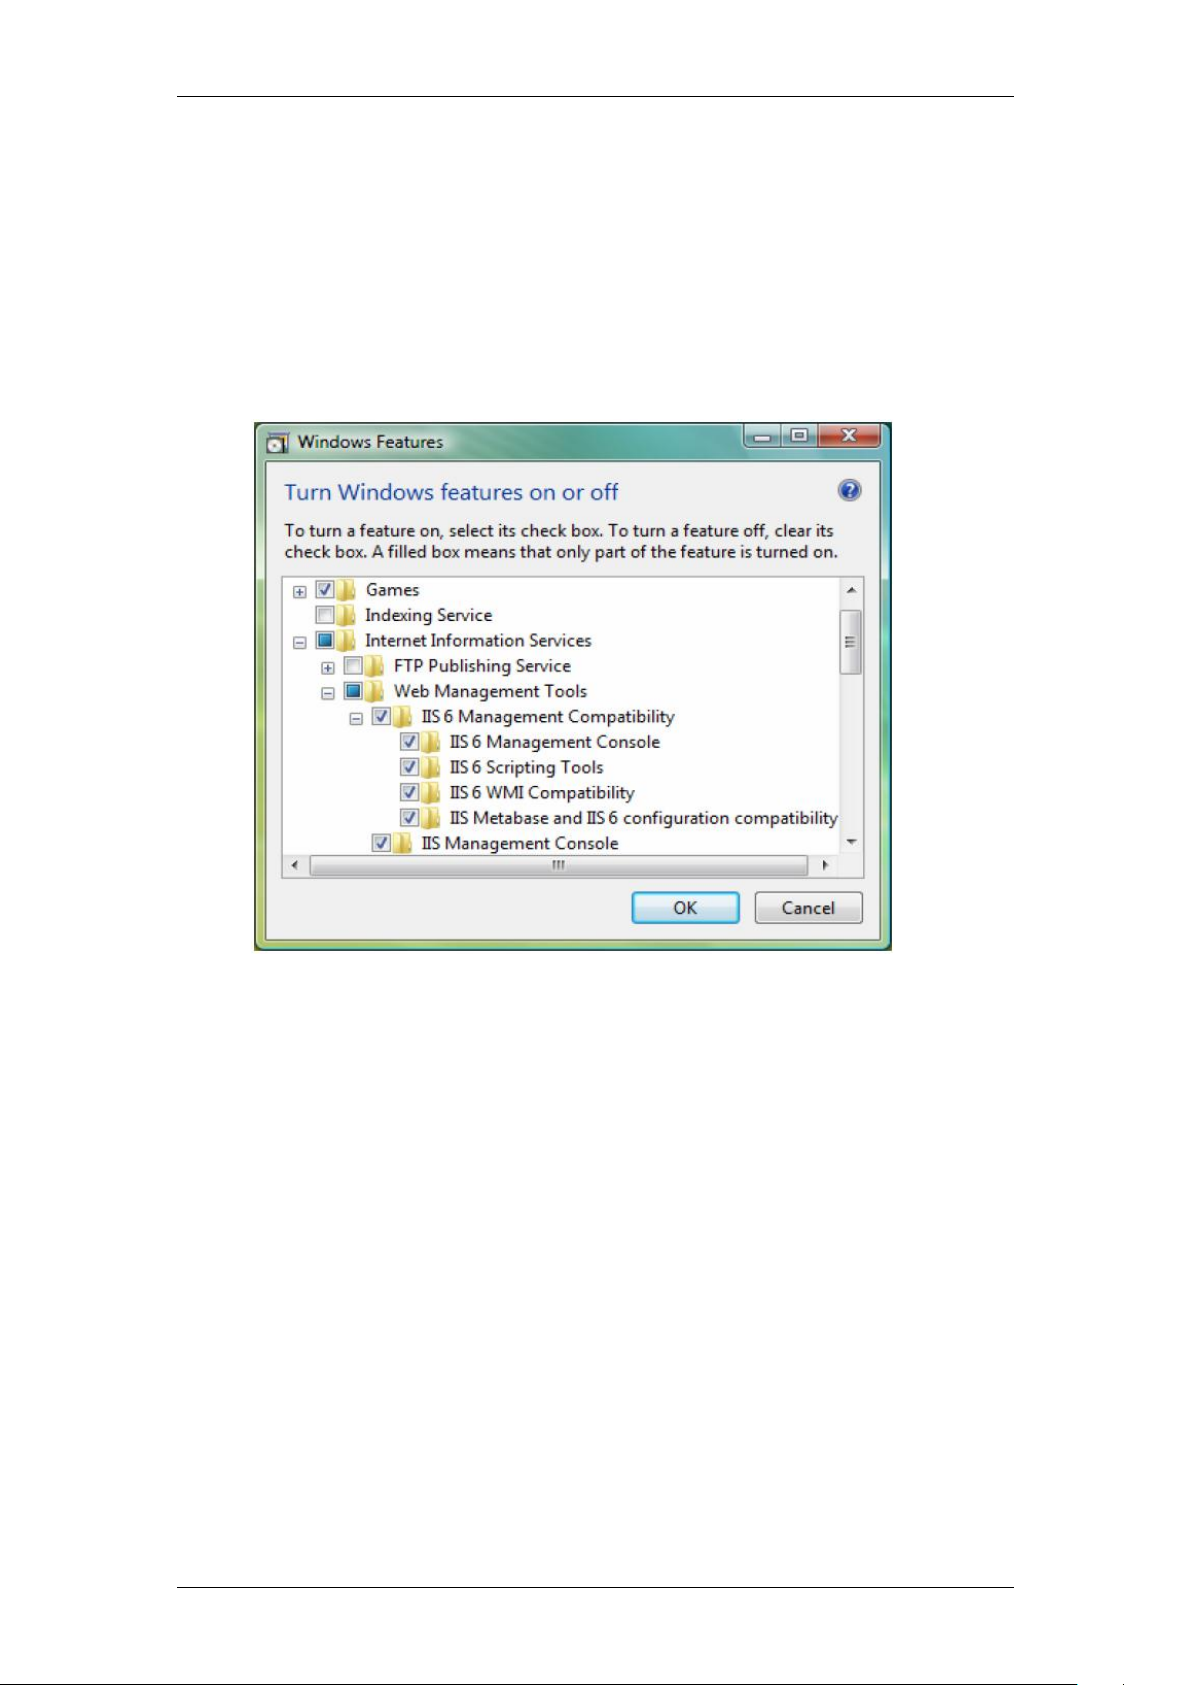
4. On a Windows Vista or Windows 7 O/S the Windows Features window
will open.
a. Navigate to Internet Information Services, Web Management
Tools, IIS 6 Management Compatibility, and select the
following:
i. IIS 6 Management Console
ii. IIS 6 Scripting Tools
iii. IIS 6 WMI Compatibility
iv. IIS 6 Metabase and IIS 6 Configuration Compatibility
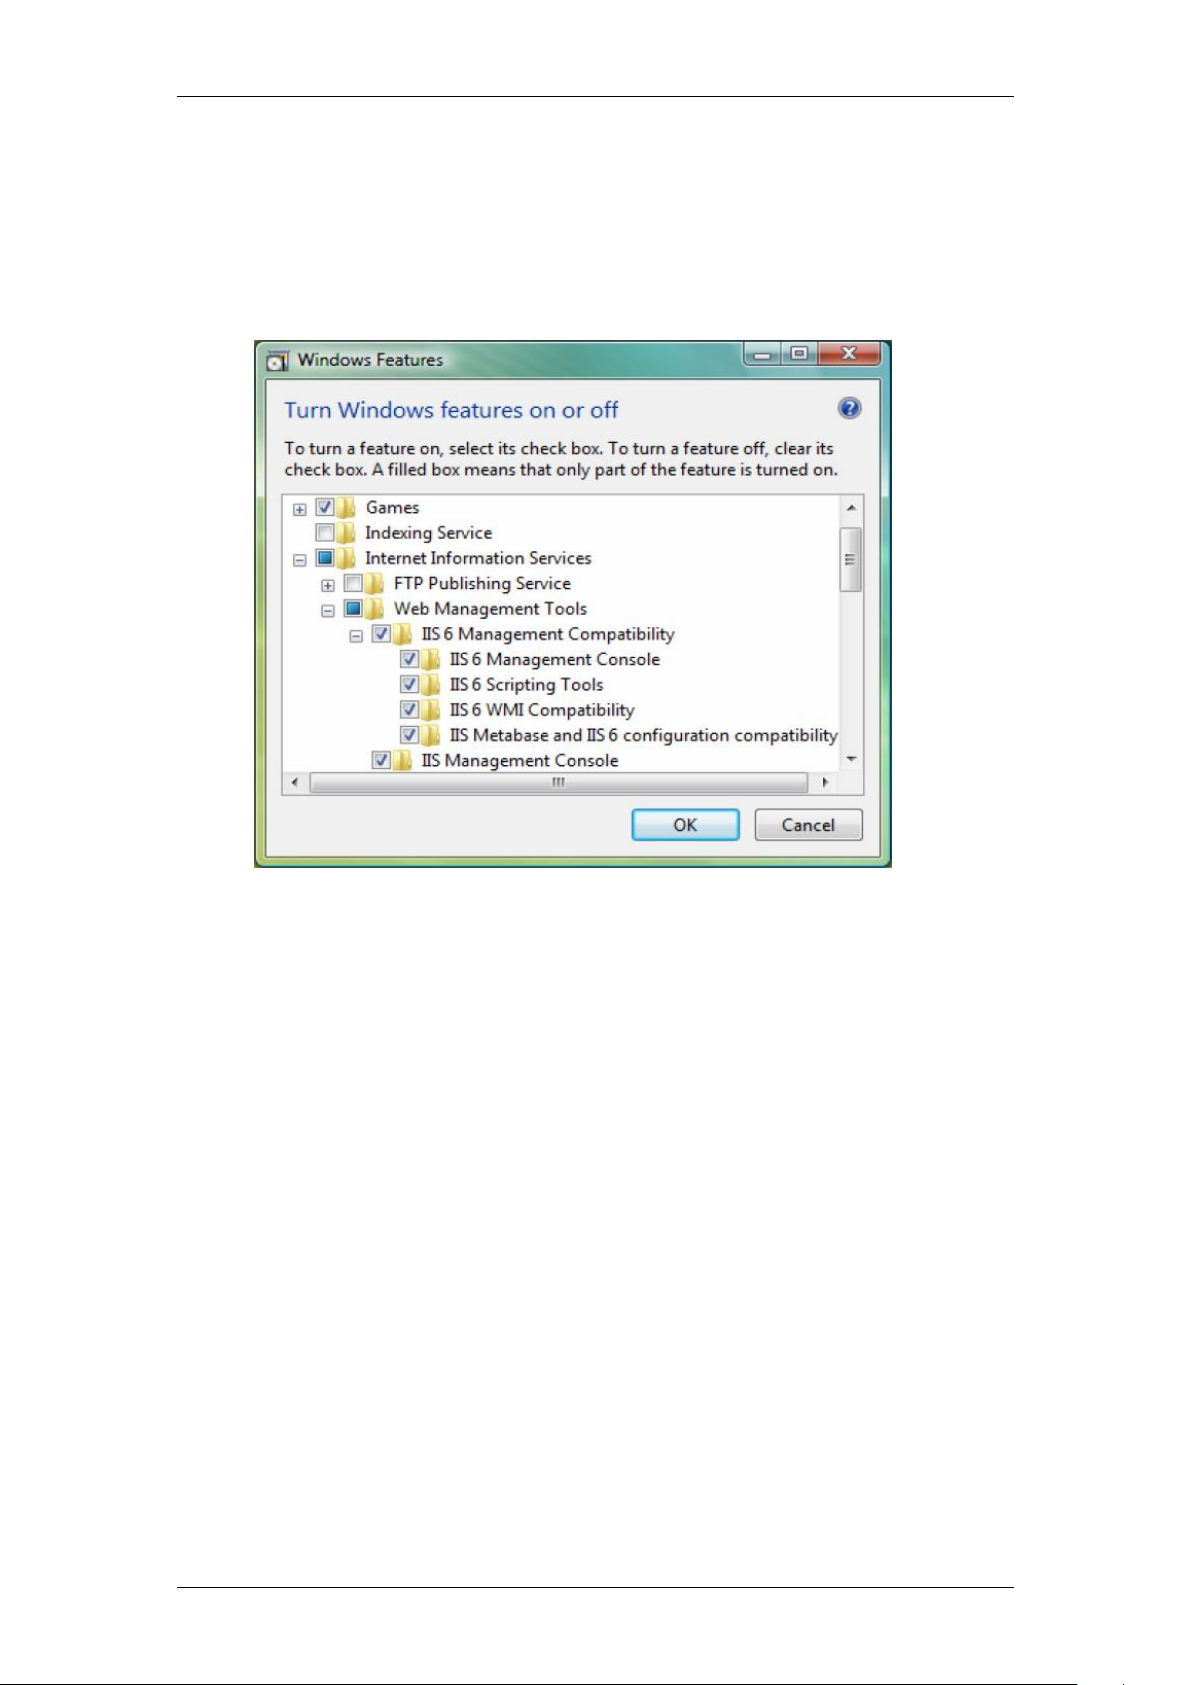
b. Now navigate to Internet Information Services, World Wide
Services, Application Development Features, and select the
following:
i. ASP
ii. ASP.Net
iii. ISAPI Extensions
iv. ISAPI Filters
c. Next navigate to Internet Information Services, World Wide
Services, Common HTTP Features, and select the following:
i. Default Document
ii. Directory Browsing
iii. HTTP Errors
iv. HTTP Redirection
v. Static Content
d. Next navigate to Internet Information Services, World Wide
Services, Security, and select the following:
i. Request Filtering
ii. Windows Authentication
18 NN40011-024 Issue 1.2 BCM Rls 6.0
Page 19

Reporting for Contact Center
e. Click OK in the Windows Features box.
5. On a Windows Server 2008 O/S, the Server Manager window will
open.
a. From the left hand pane, select Roles
b. In the Role Services area, click on Add Role Services. This
will open the Add Role Services box to add the required
Windows Features or tools.
NN40011-024 Issue 1.2 BCM Rls 6.0 19
Page 20
Reporting for Contact Center
c. Navigate to Management Tools, IIS 6 Management
Compatibility, and select the following check boxes:
i. IIS 6 Management Console
ii. IIS 6 Scripting Tools
iii. IIS 6 WMI Compatibility
iv. IIS 6 Metabase and IIS 6 Configuration Compatibility
d. Next, navigate to Web Server, Application Development, and
select the following check boxes:
i. ASP
ii. ASP.Net
iii. ISAPI Extensions
iv. ISAPI Filters
e. Next navigate to Web Server, Common HTTP Features, and
select the following check boxes:
i. Default Document
ii. Directory Browsing
iii. HTTP Errors
iv. HTTP Redirection
v. Static Content
f. Next navigate to Web Server, Security, and select the following
check boxes:
i. Request Filtering
ii. Windows Authentication
g. Click Next in the Select Role Services area of the Add Role
Services dialog box. The Confirm Installation Selections page
will be displayed. Click Install.
20 NN40011-024 Issue 1.2 BCM Rls 6.0
Page 21
Reporting for Contact Center
6. The Widows Features and tools will be installed and IIS 7.0 will now
allow RCC to be installed on the Windows Vista, Windows 7 or Server
2008 Operating System.
Firewall Considerations - Port Numbers used by Reporting for
Contact Center
The list below gives all the port numbers used by Reporting for Contact
Center on the Web Host PC:
Port 80 – this is the standard port used by the Web Server (the Web
Host PC) for Internet Information Services.
Port 8088 – used for the Reporting Server in the Business
Communications Manager.
Ports 3500-35xx – used by ipView SoftBoard to listen for incoming data
and to echo to other wallboards. ipView SoftBoard can use a number of
ports upwards of 3500 dependant on configuration (refer to the ipView
SoftBoard guide for more information)
Port 6010 – used for the Reporting for Contact Center Real Time
(RCCRT) Server.
Port 6011 – used for the Reporting for Contact Center Reporting
(RCCRPT) Server.
If these ports are blocked by firewalls, information may not be transferred
between the BCM, Web Host PC, Wallboards/SoftBoards, and/or PCs on the
network browsing to the Web Host PC.
Installing Reporting for Contact Center
Note: One PC on the network should be nominated as the Web Host PC.
Only install the Reporting for Contact Center application software onto this
single PC. It is recommended that Web Host PC should be left running once
Reporting for Contact Center has been configured.
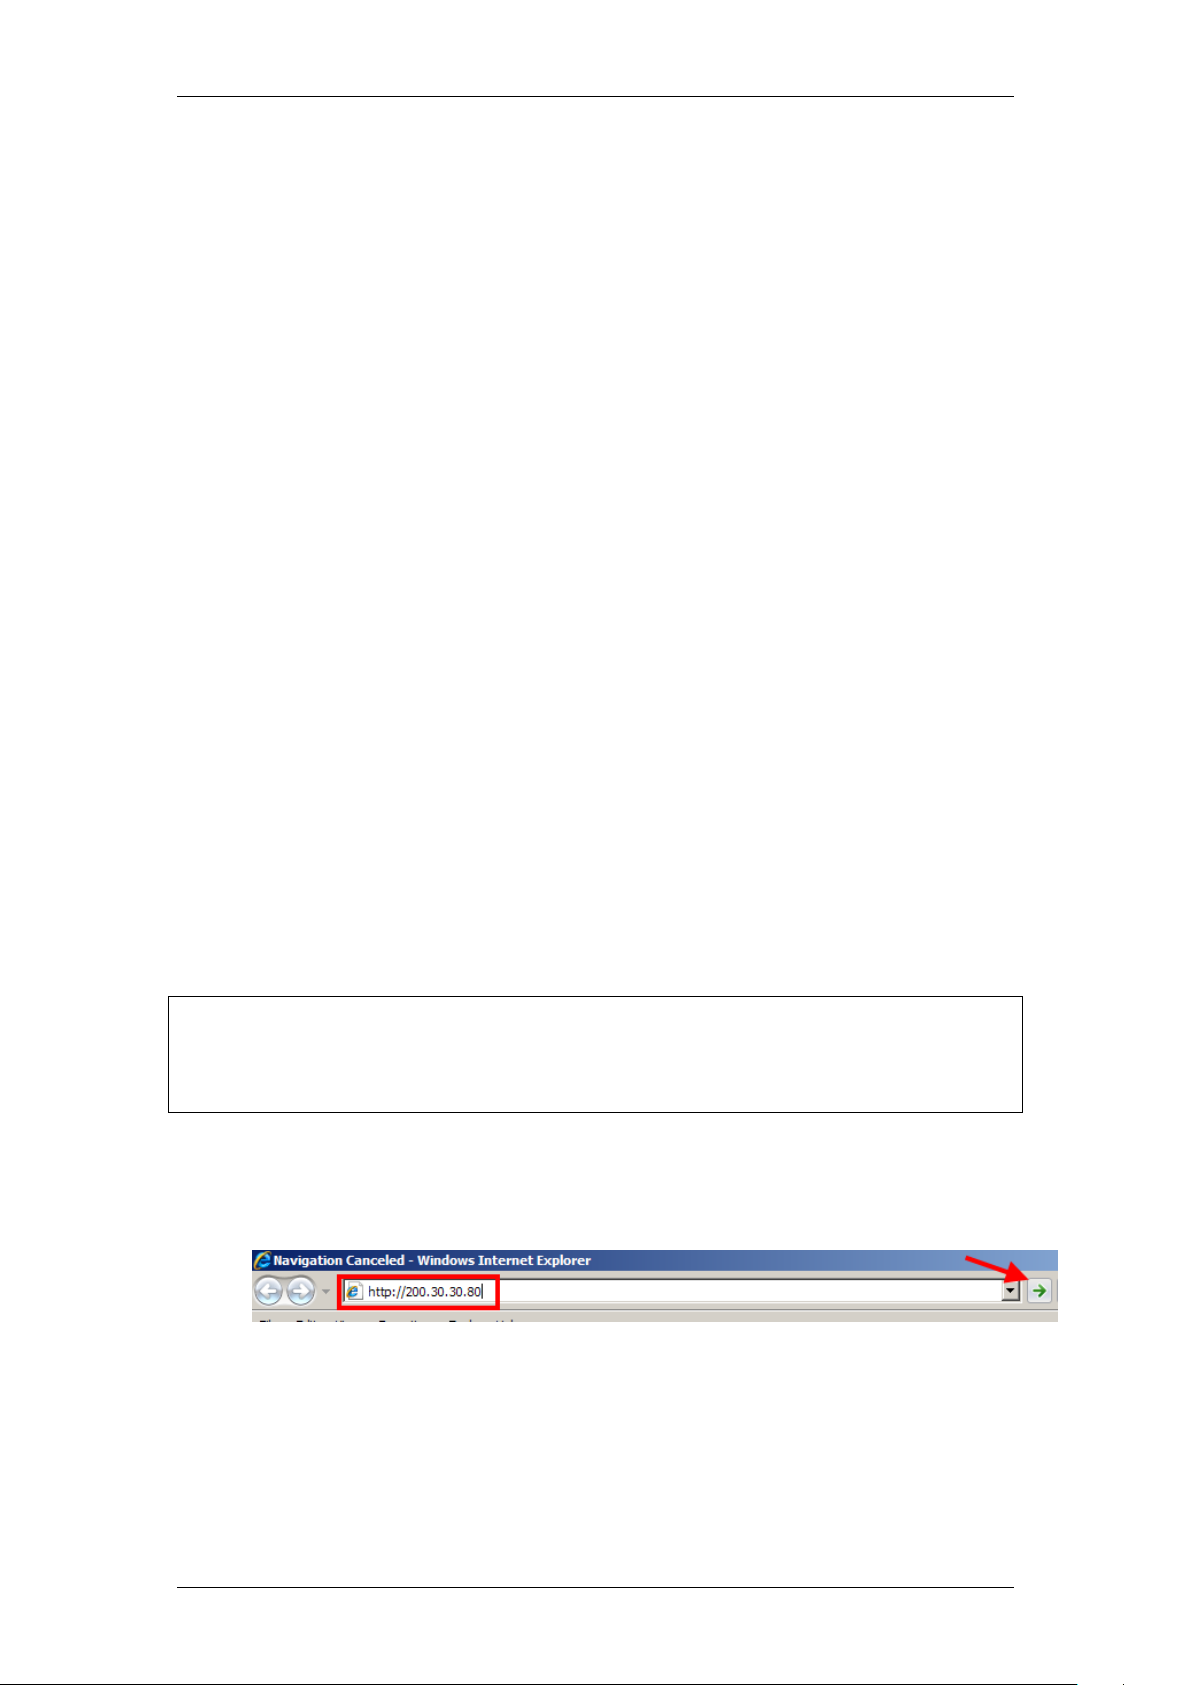
1. Open Internet Explorer.In the address field type (replacing the relevant
part with your BCM IP address): http://<bcm ip address>/
NN40011-024 Issue 1.2 BCM Rls 6.0 21
Page 22
Reporting for Contact Center
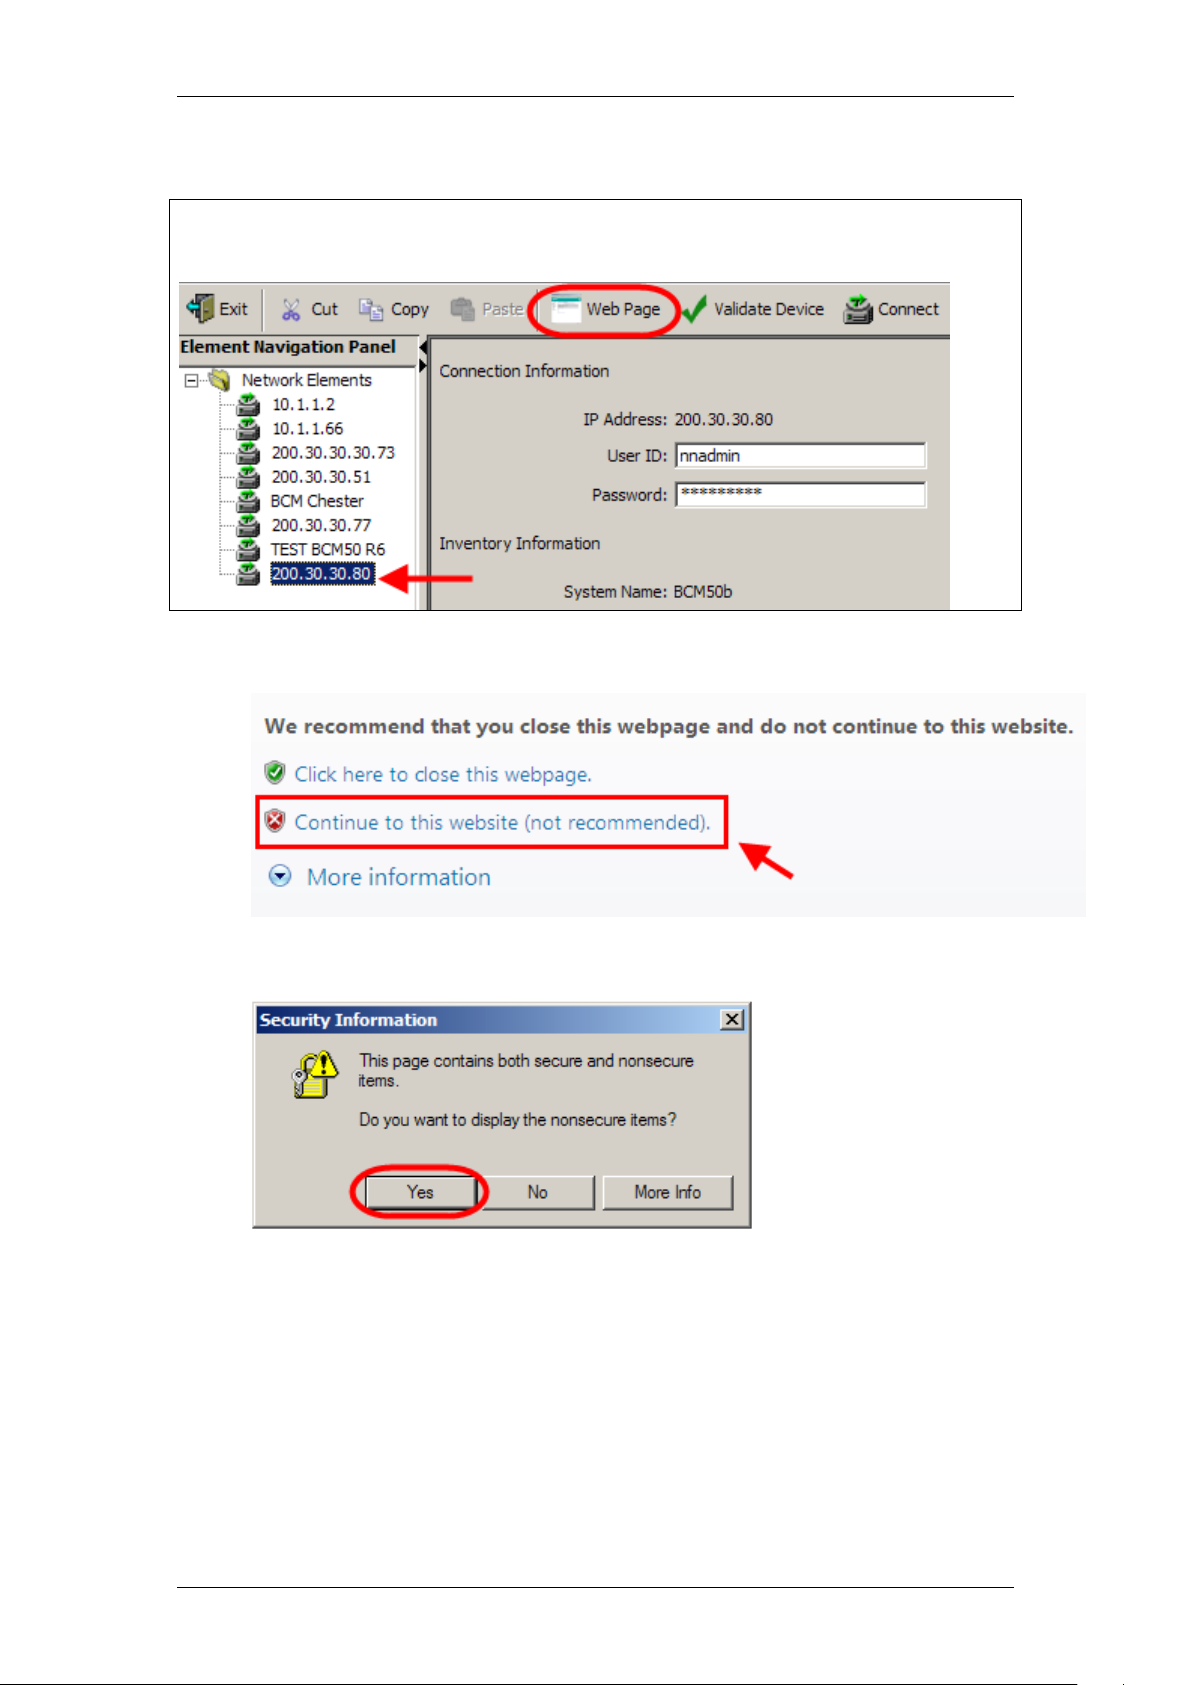
Note: You can also use the Web Page button in Element Manager to launch a
web broswer session. The BCM you wish to access must be selected in the
Element Navigation Panel to do this.
2. Click on Go, or press Return on your keyboard.
3. If you are presented with the Certificate Error window, click on
Continue to this website (not recommended).
4. Accept any further security messages that you may get presented with.
22 NN40011-024 Issue 1.2 BCM Rls 6.0
Page 23
Reporting for Contact Center
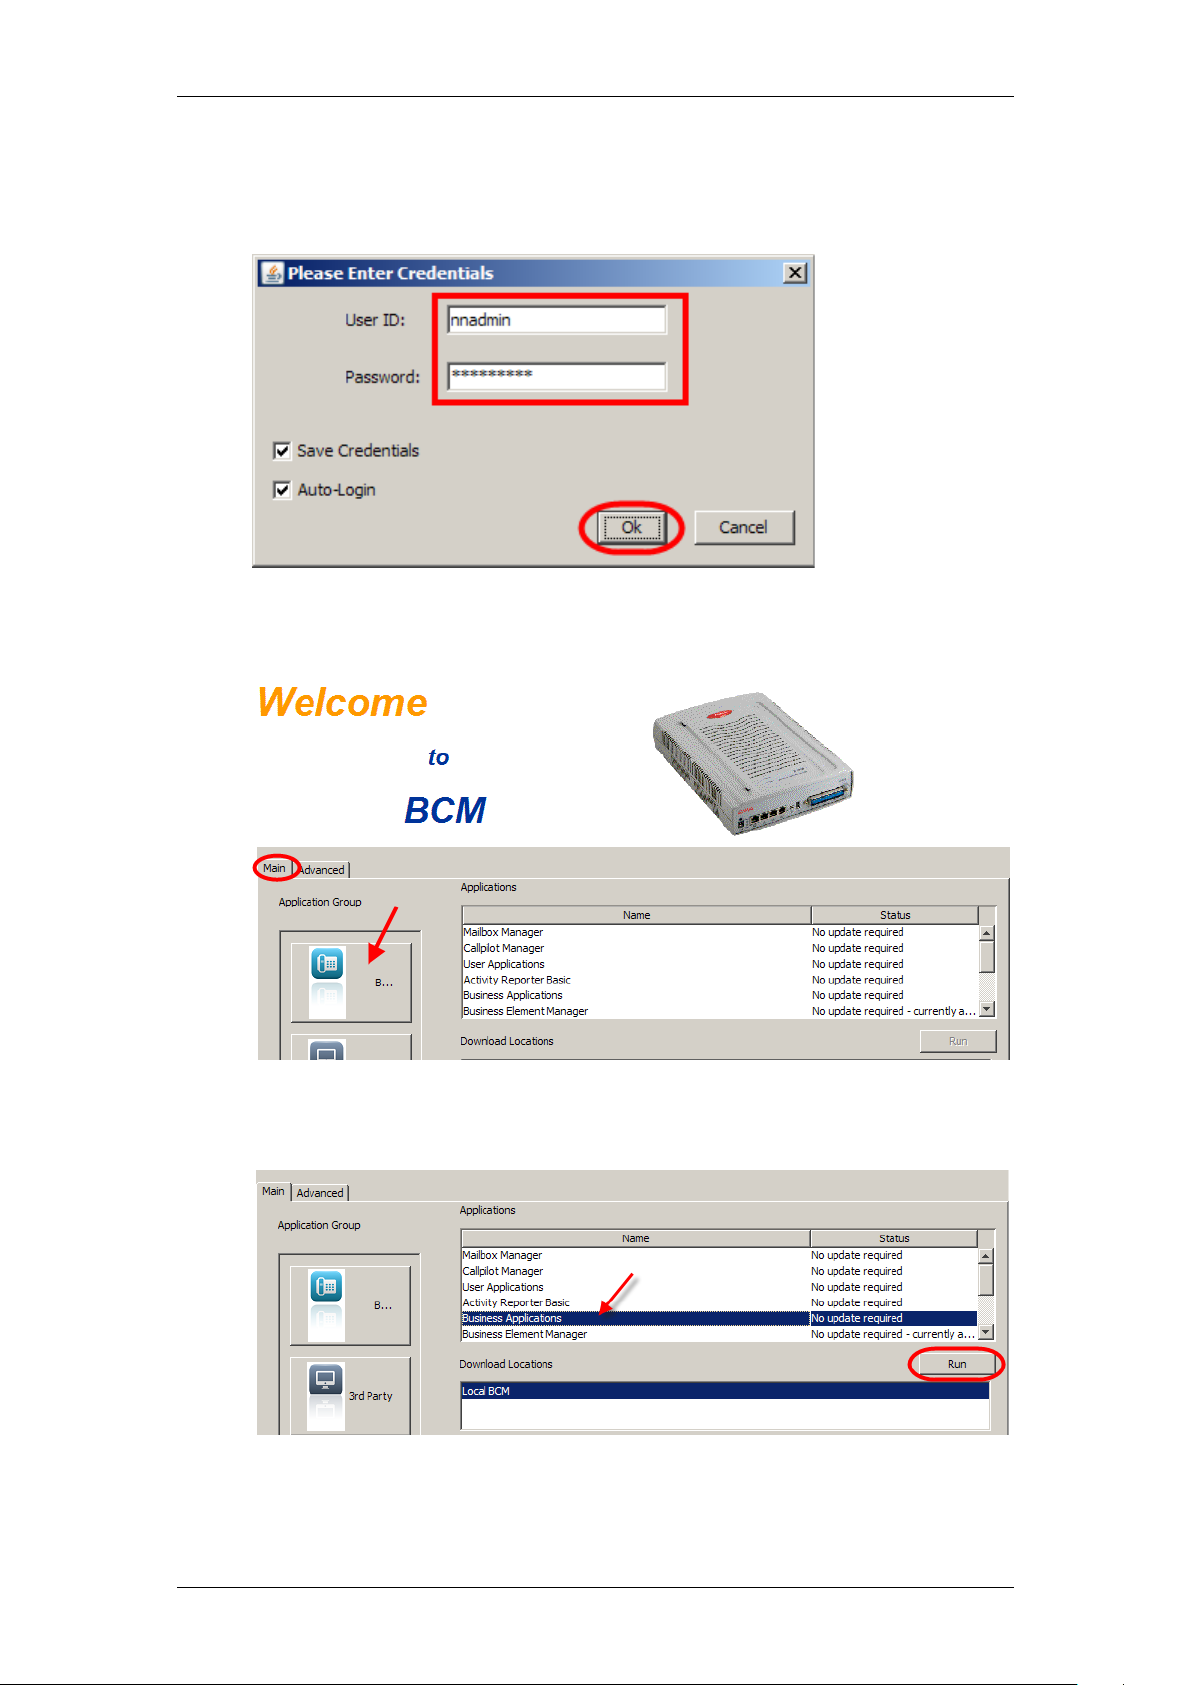
5. You will now see the login screen, enter your BCM User name and
Password. By default these are set to User ID: nnadmin Password:
PlsChgMe! Click on OK.
6. In the Welcome to BCM window, ensure the Main tab has been
selected, and the BCM button clicked.
7. From the Applications list, select Business Applications and click
Run.
7. Again, accept any security messages that appear, and if prompted
enter any login details.
NN40011-024 Issue 1.2 BCM Rls 6.0 23
Page 24
Reporting for Contact Center
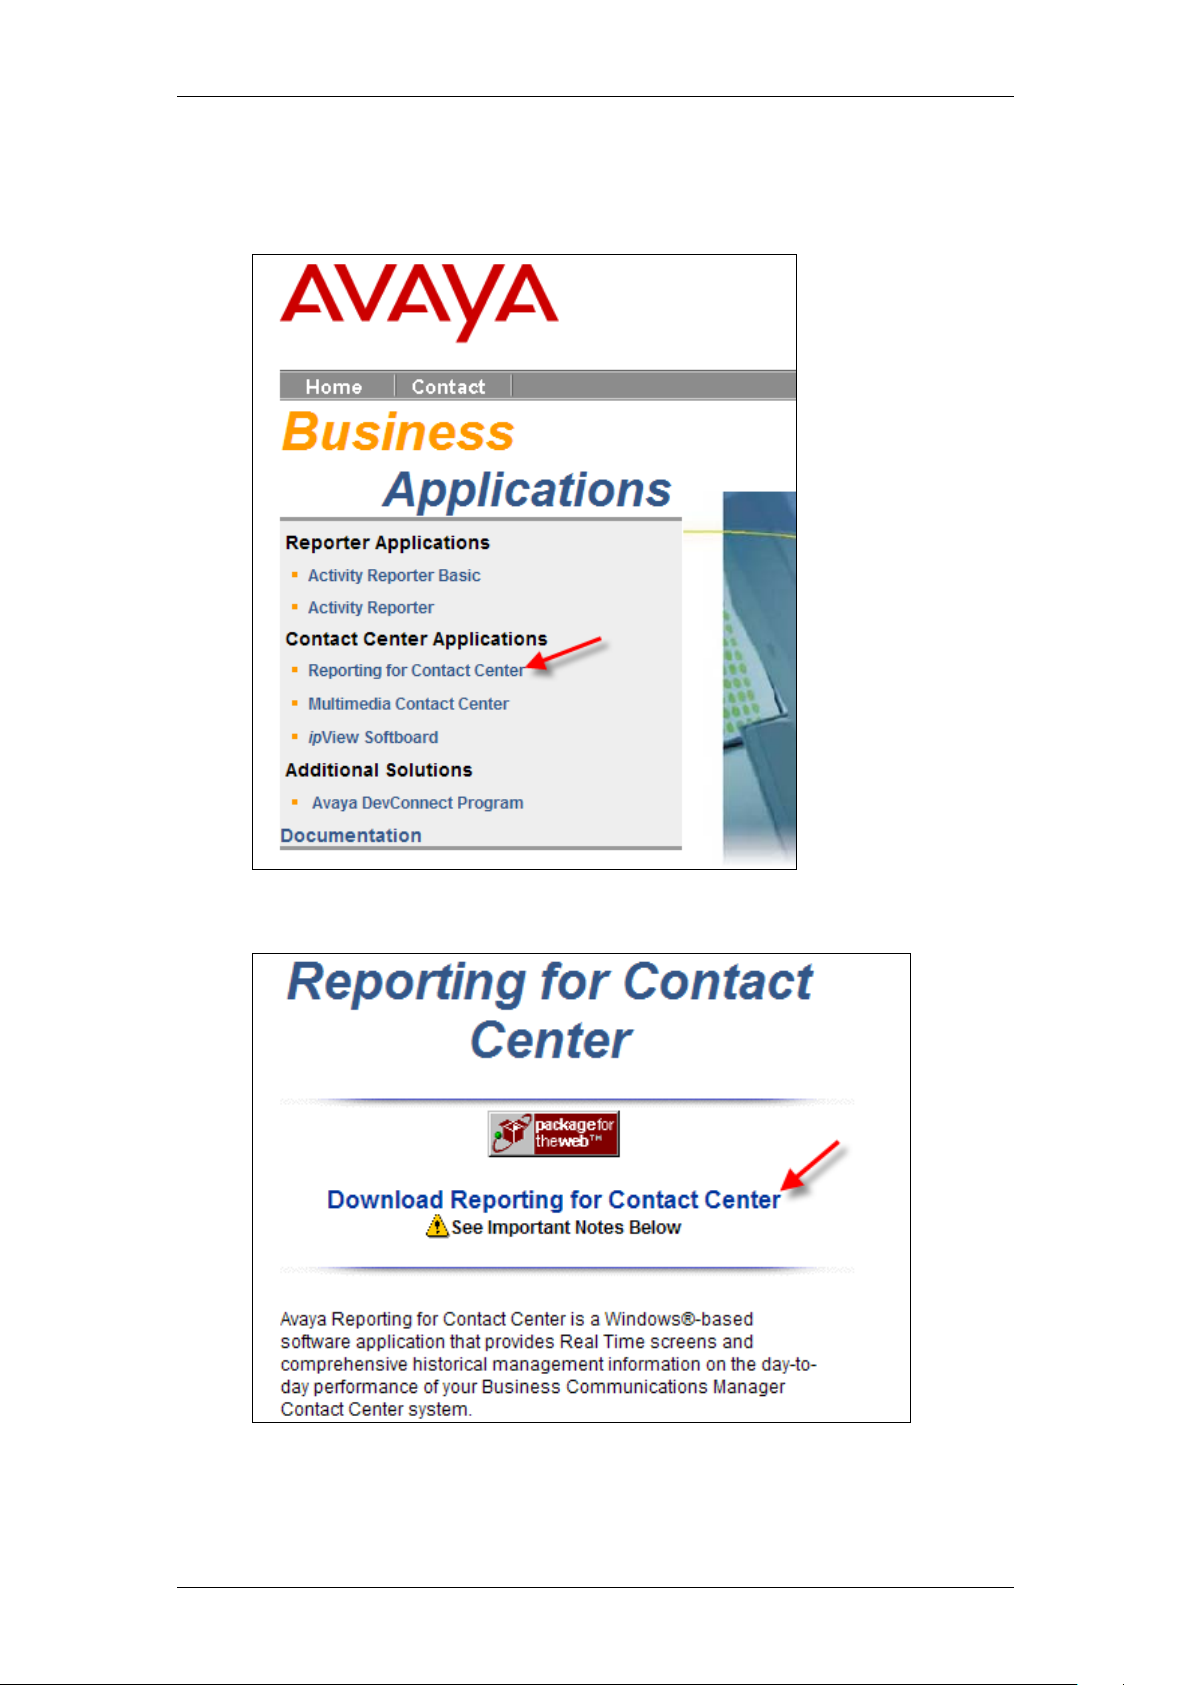
8. The Business Applications screen will be displayed. Click on the
Reporting for Contact Center link.
9. Click the Download Reporting for Contact Center link.
24 NN40011-024 Issue 1.2 BCM Rls 6.0
Page 25
Reporting for Contact Center
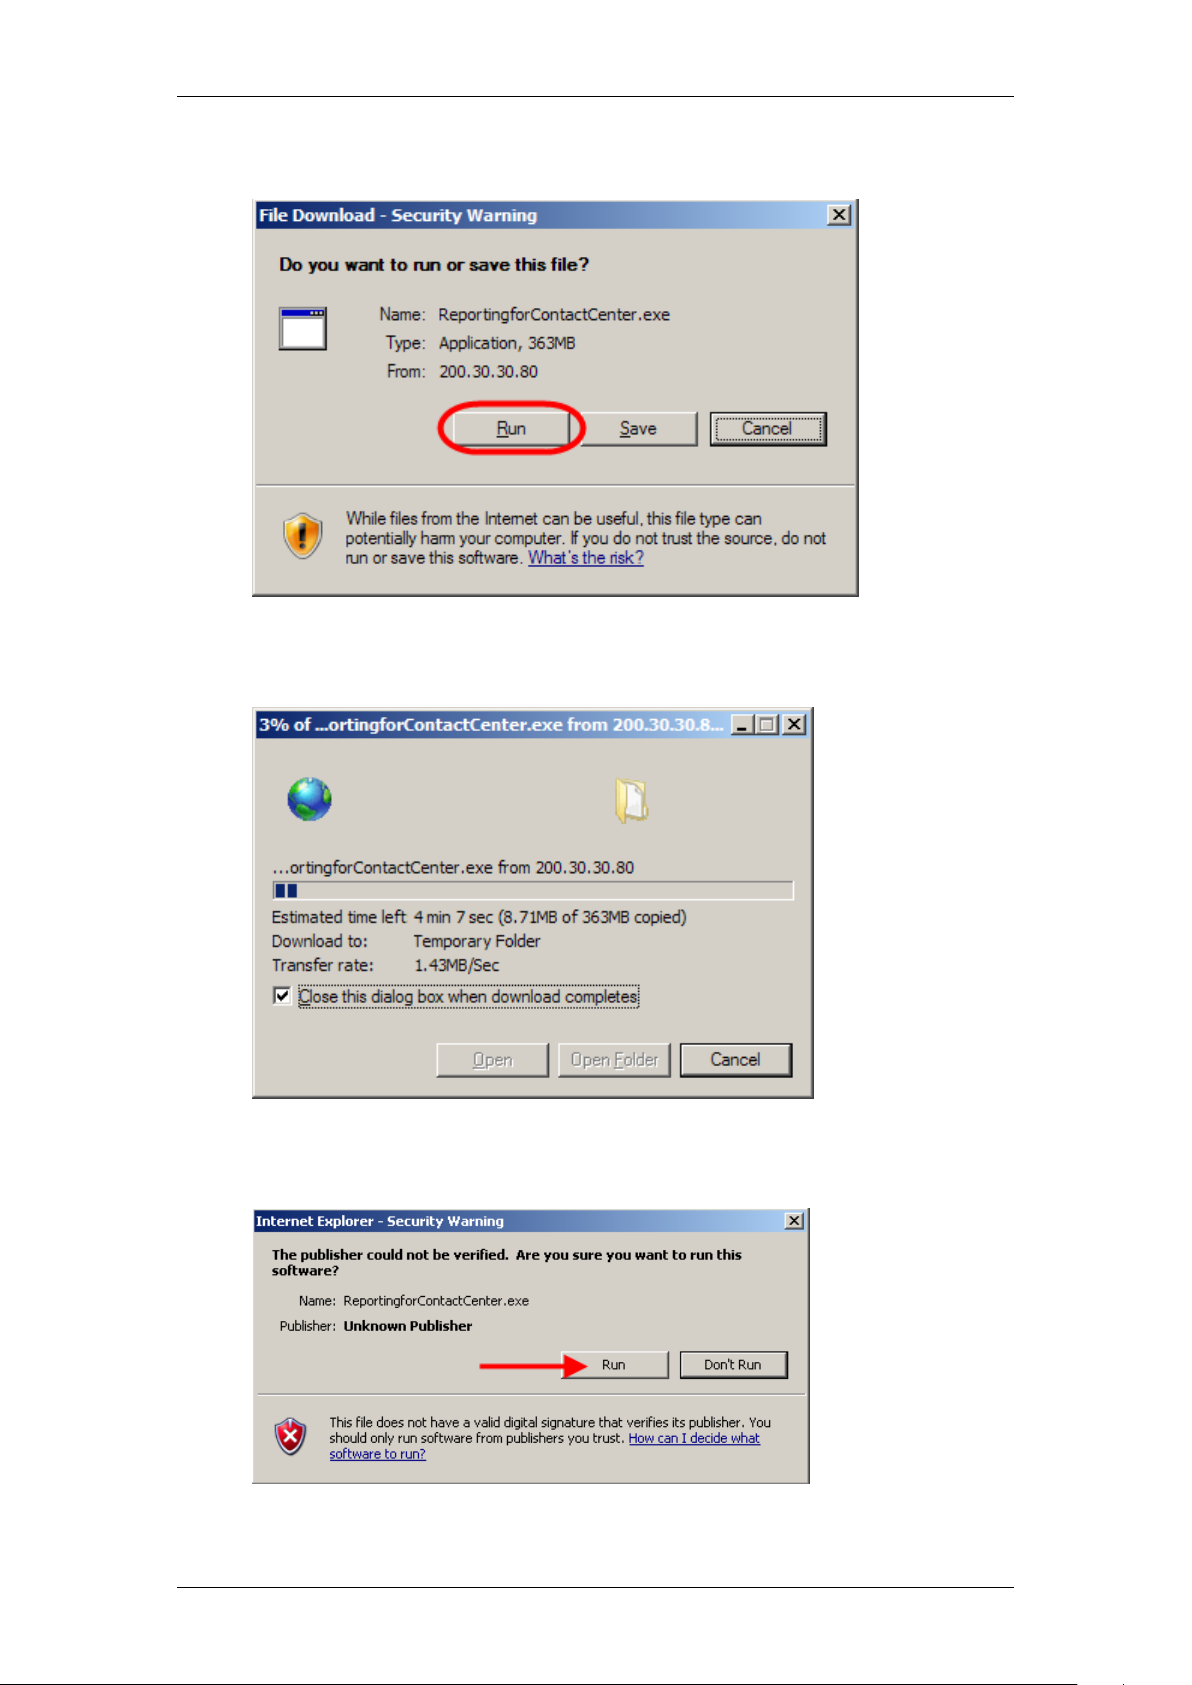
10. Now click the Run button.
11. You will see the following window as the application is downloaded.
12. The Security Warning screen will be displayed. Click on the Run
button.
NN40011-024 Issue 1.2 BCM Rls 6.0 25
Page 26
Reporting for Contact Center
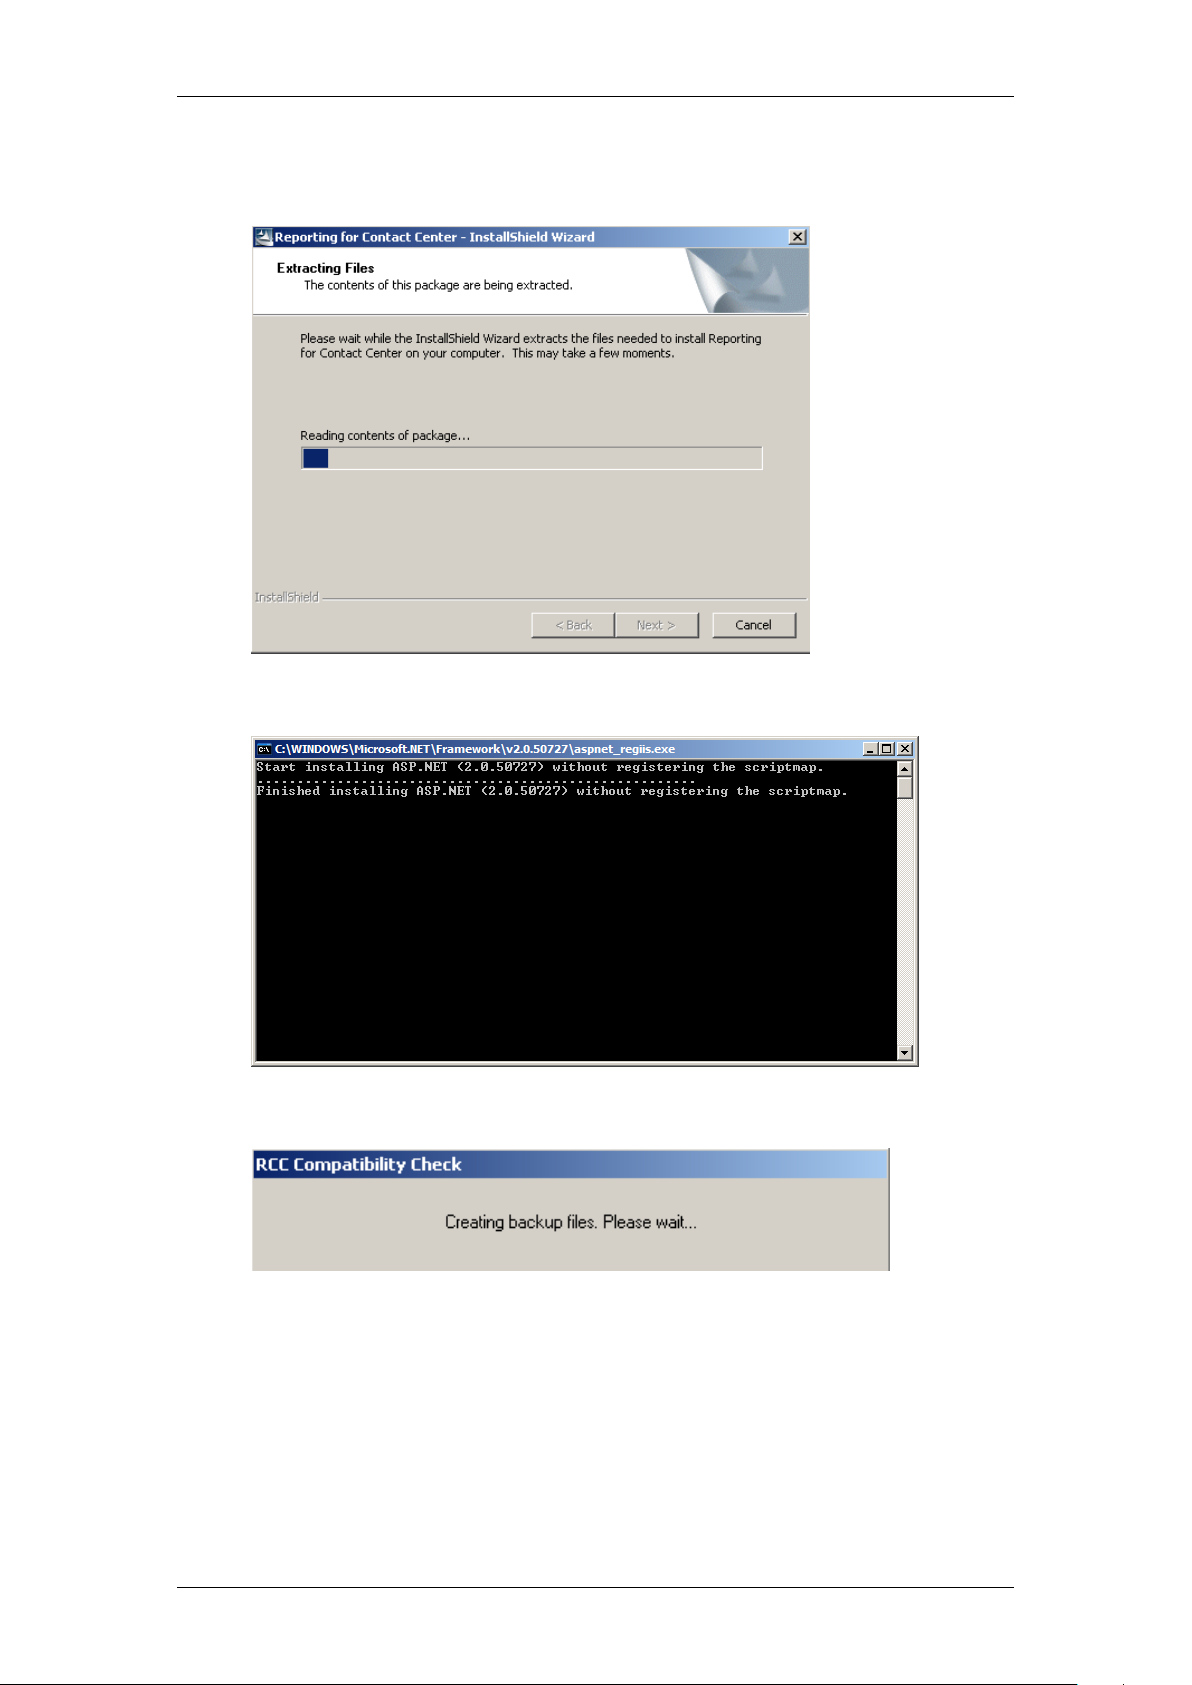
13. You will now see the following window. The installation files will be
extracted.
14. ASP.Net will be installed.
15. RCC Compatibility checks will now commence.
26 NN40011-024 Issue 1.2 BCM Rls 6.0
Page 27
Reporting for Contact Center
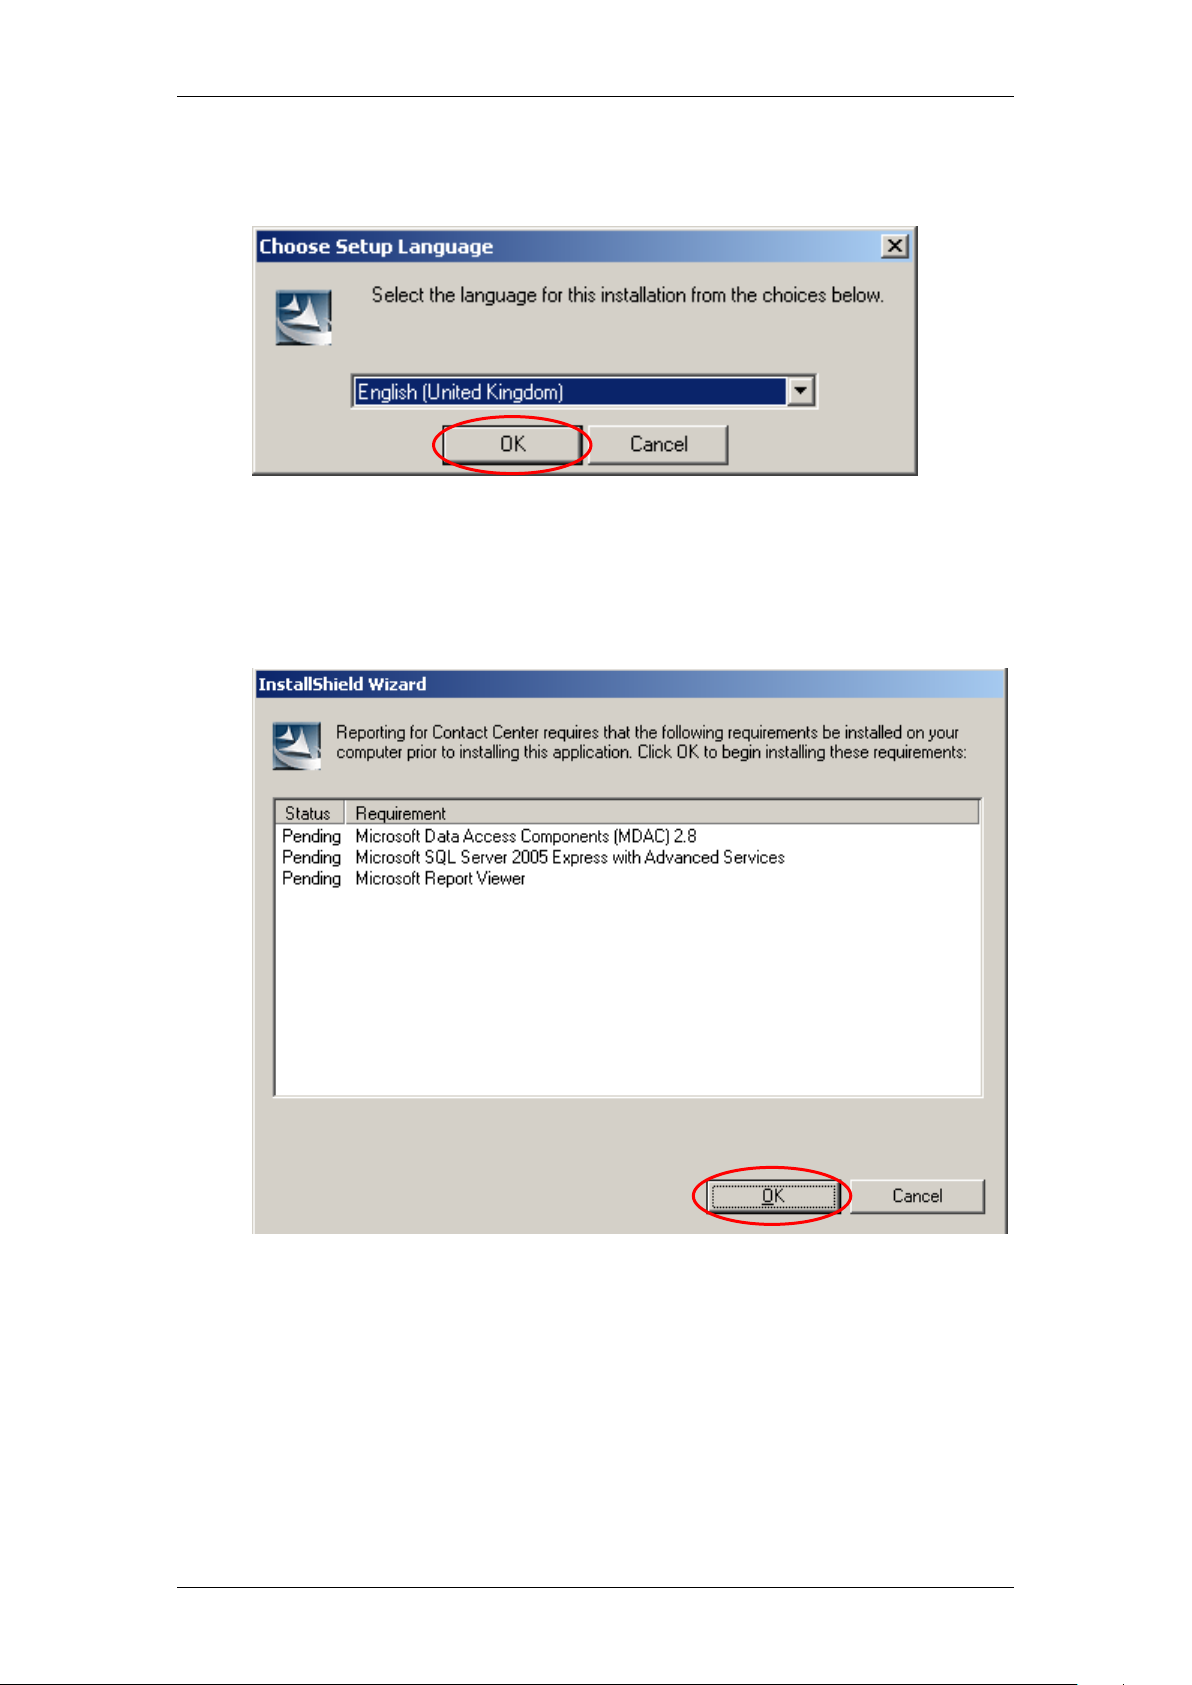
16. The language selection screen will appear. Select the appropriate
language and click OK.
17. If MDAC 2.8 is already installed on your PC, go to step 23.
18. If you do not have Microsoft Data Access Components (MDAC) 2.8
already installed on your PC, you will be prompted to install it as a
prerequisite for RCC. Click OK to install MDAC 2.8.
NN40011-024 Issue 1.2 BCM Rls 6.0 27
Page 28
Reporting for Contact Center
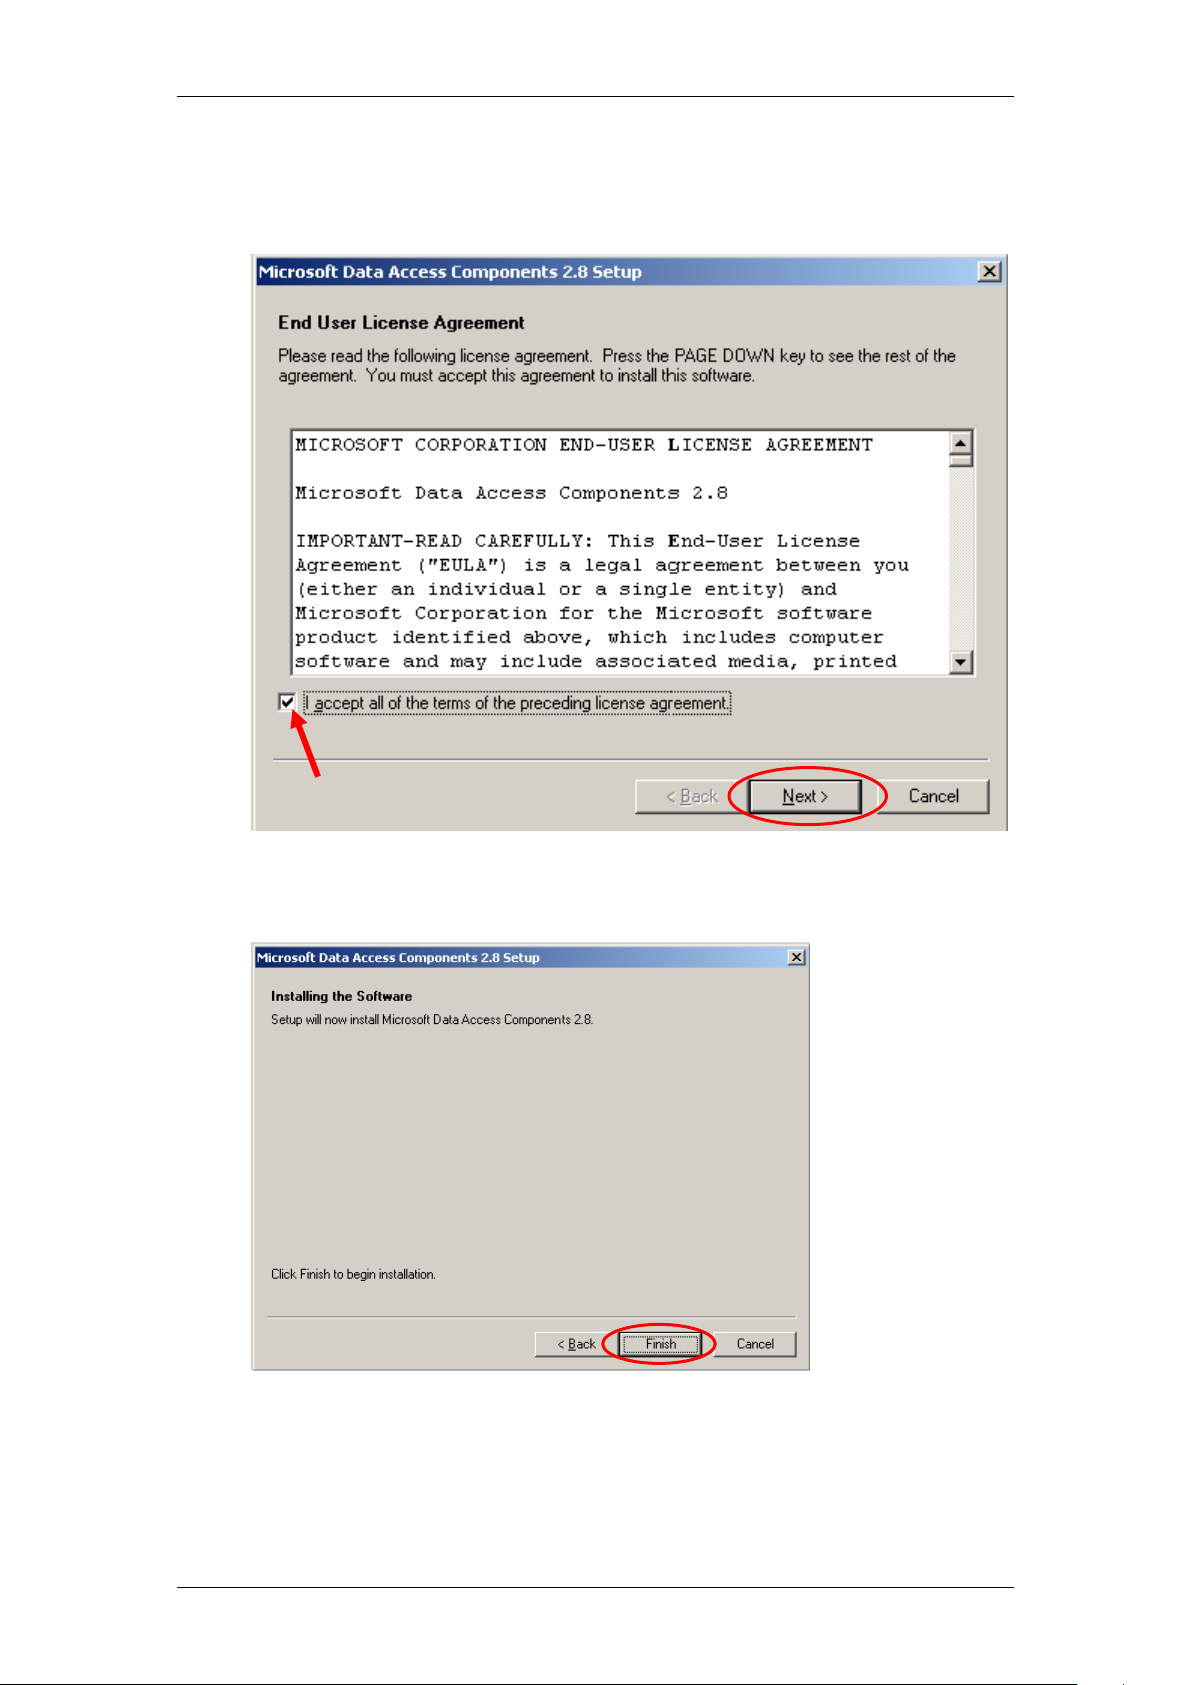
19. The MDAC 2.8 End User License Agreement dialog box appears.
Select the I accept all of the terms of the preceding license
agreement check box and click Next.
20. The setup will check for disk space, then display the MDAC installation
dialog box. Click Finish to begin the MDAC 2.8 installation.
21. After MDAC 2.8 is installed you will be asked to restart your PC for
MDAC to operate correctly. Click Finish to restart your PC.
22. After the PC has rebooted, the Reporting for Contact Center installation
will continue.
28 NN40011-024 Issue 1.2 BCM Rls 6.0
Page 29
Reporting for Contact Center
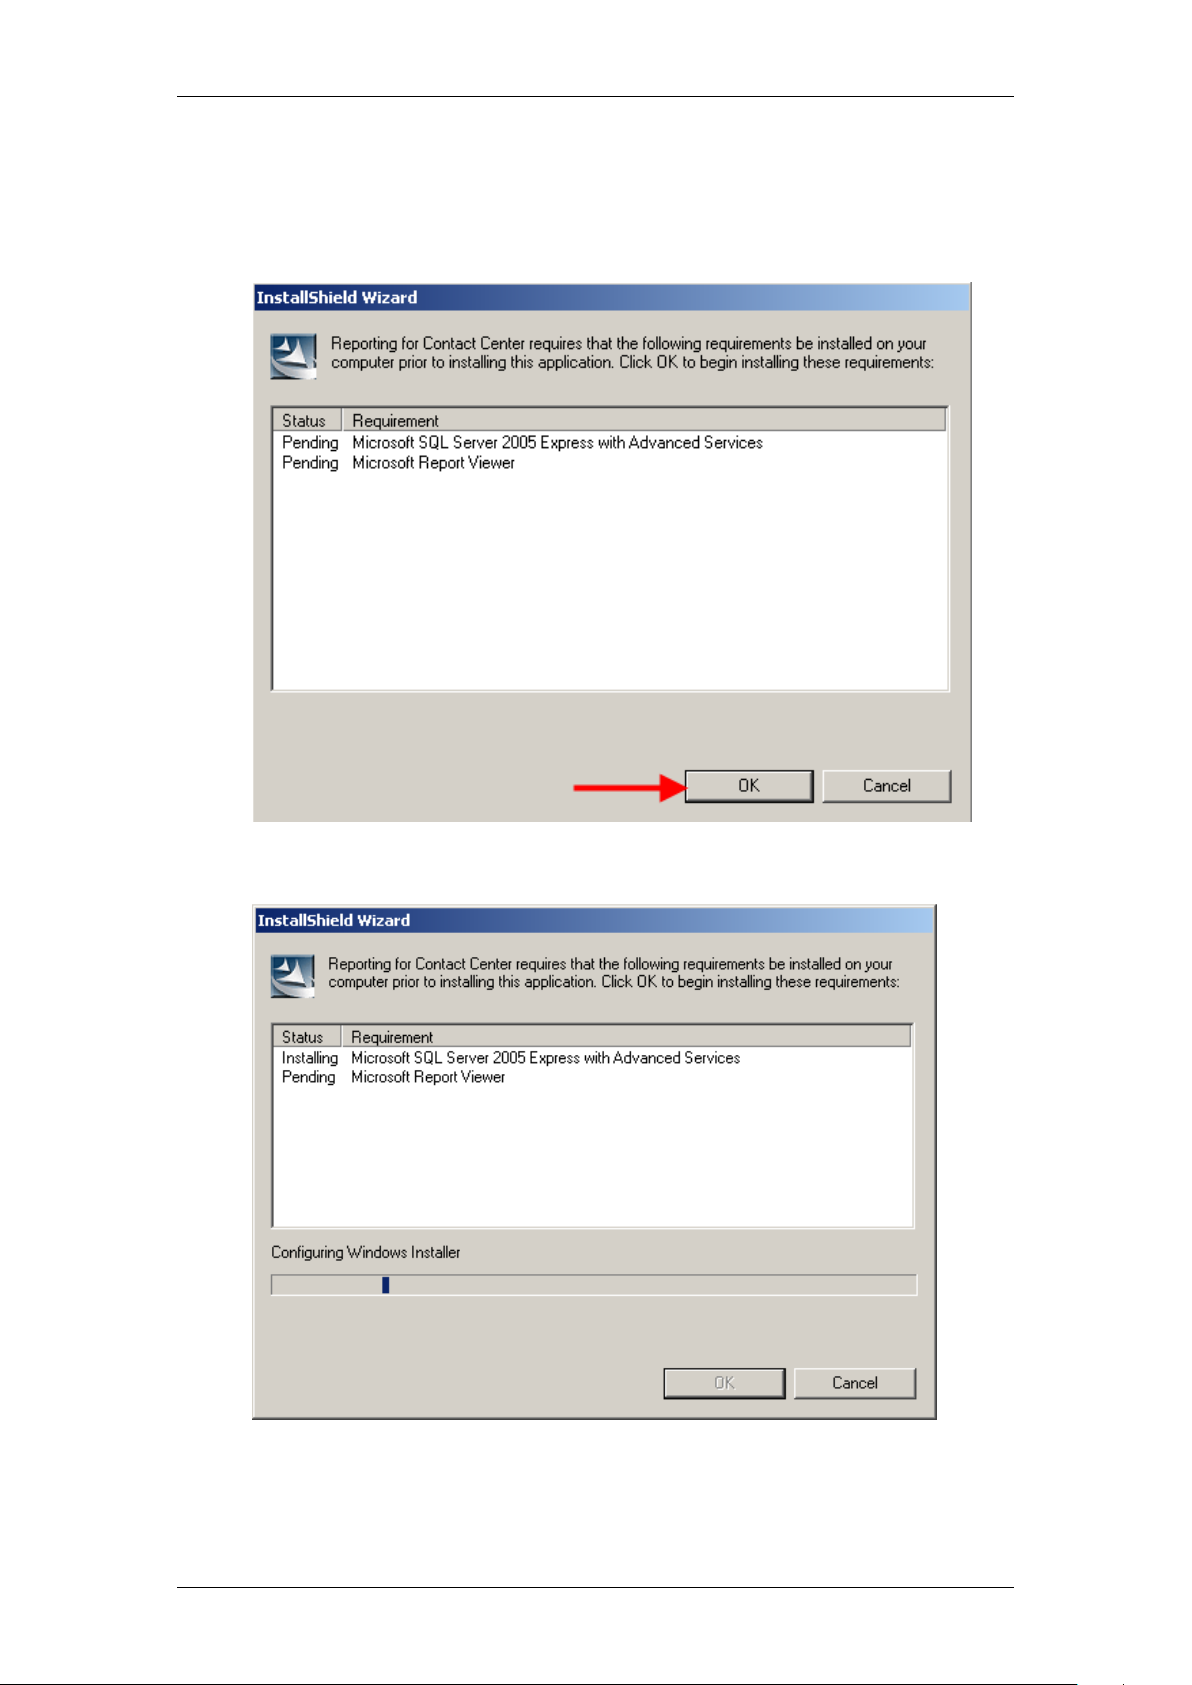
23. A screen will appear confirming that Microsoft SQL Server 2005
Express and Microsoft Report Viewer will be installed on the
computer, if they are not already installed. Click OK.
24. The Windows Installer will proceed.
NN40011-024 Issue 1.2 BCM Rls 6.0 29
Page 30
Reporting for Contact Center
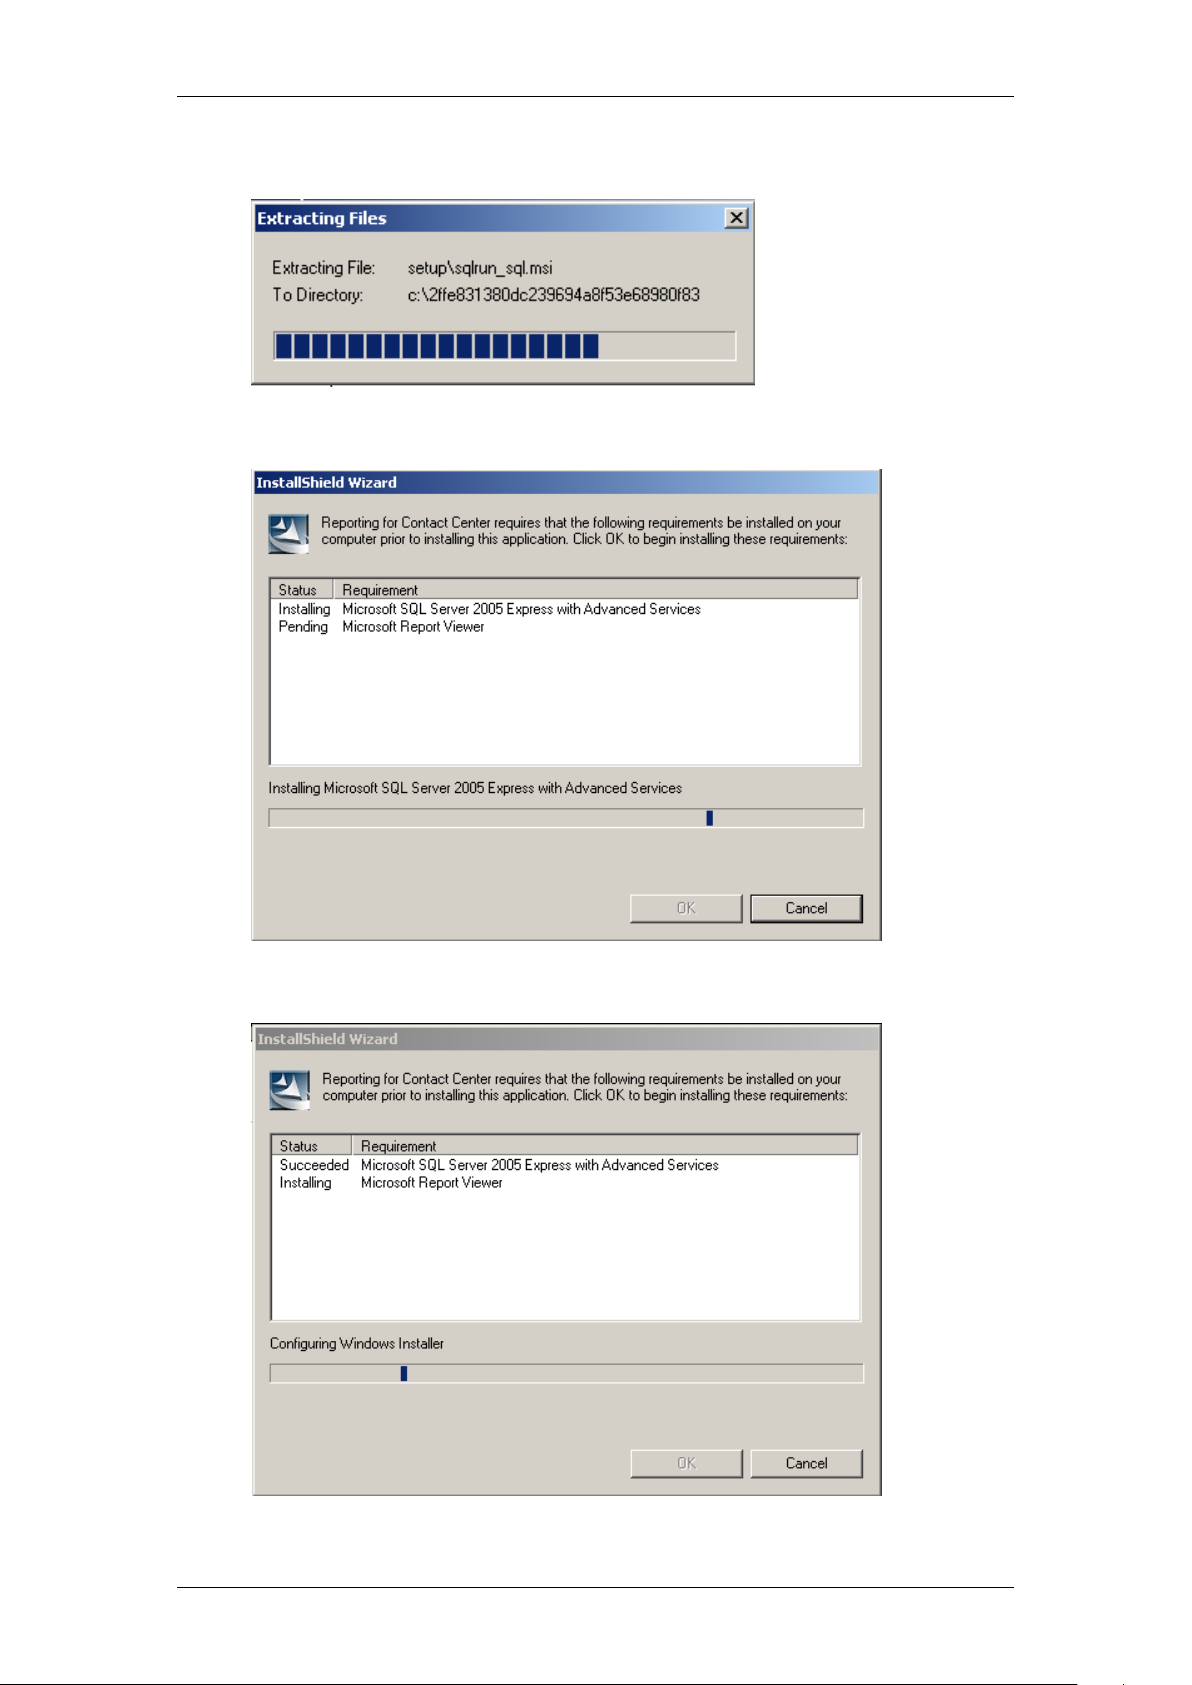
25. The files will be extracted.
26. Microsoft SQL Server 2005 Express will be installed.
27. Microsoft Report Viewer will be installed.
30 NN40011-024 Issue 1.2 BCM Rls 6.0
Page 31

28. The InstallShield window will be displayed.
Reporting for Contact Center
29. The Welcome screen will appear. Click Next.
NN40011-024 Issue 1.2 BCM Rls 6.0 31
Page 32

Reporting for Contact Center
30. The Licensing screen will appear click Yes to accept this agreement.
31. The Destination Folder screen will appear. Click Next to accept the
default destination.
32 NN40011-024 Issue 1.2 BCM Rls 6.0
Page 33

Reporting for Contact Center
32. The installation may detect some previously installed applications and
components that are already on your PC.
33. The installation will continue and you will then be presented with a
screen requesting that you restart the PC. Select the Yes, I want to
restart my computer now option and click the Finish button.
NN40011-024 Issue 1.2 BCM Rls 6.0 33
Page 34

Reporting for Contact Center
34. Once the PC has rebooted the RCC Database Installer Utility will
launch. This utility can take several minutes to execute. During the
Create Tables step, there will be a long pause of approximately five
minutes while the strings.sql table is created. This is normal and is due
to its large size.
35. Once the Database Installer Utility has completed the Install
Verification Utility (IVU) will be launched. This utility will check all of
the components of RCC to ensure that they have installed and
configured correctly. If an installation problem is detected the IVU will
prompt you to select a link to resolve the problem.
34 NN40011-024 Issue 1.2 BCM Rls 6.0
Page 35

Reporting for Contact Center
36. At the last stage of the IVU, the BCM Connection Data dialog box will
appear. Enter the IP Address or network name of the BCM in the IP
Address/ Network Name field.
37. The Port Field should be left to the default of 8088.
38. In the CCRS Password field enter the CCRS password. By default this
is CCRS in uppercase. Click OK.
]
NN40011-024 Issue 1.2 BCM Rls 6.0 35
Page 36

Reporting for Contact Center
39. The IVU will now attempt to connect to the BCM to verify its IP
Address and the CCRS password.
40. A dialog box will appear confirming the successful connection. Click
Yes to save the settings to the RCC database.
41. A Verification Message will be displayed along with a link to Launch
RCC.
36 NN40011-024 Issue 1.2 BCM Rls 6.0
Page 37

Reporting for Contact Center
42. Click the Click Here to Launch RCC link. You will be presented with
the login page. Now proceed to step 4 of the Starting Reporting for
Contact Center section of this guide.
Starting Reporting for Contact Center
After the initial installation you will be presented with the RCC Install
Verification Utility that will contain a link to launch RCC as outlined in steps 34
and 35 of the Installing Reporting for Contact Center section of this guide.
Reporting for Contact Center can also be launched from Internet Explorer as
outlined below.
For this example the IP Address of the Web Host PC is 200.30.30.179, it has
a computer name of pc32. Either the computer name or IP Address can be
utilised as part of the address that is used to login into Reporting for Contact
Center.
To start the Reporting for Contact Center application for the first time on the
PC:
1. Double-click on the Internet Explorer icon on the desktop of the Web
Host PC.
2. When Internet Explorer opens enter http://<IP Address of Web Host
PC>/rcc (e.g. http://200.30.30.179).
NN40011-024 Issue 1.2 BCM Rls 6.0 37
Page 38

Reporting for Contact Center
3. Or, when Internet Explorer opens enter http://<PCName>/rcc (e.g.
http://pc32/rcc).
4. The RCC login page will then be displayed. The default username is
admin and the default password is 0000 (4 zeros). Click Login.
5. You will then be requested to change the Administrator password. The
password can be from 1 to 10 characters, including upper and
lowercase letters, and digits. The password can be anything other than
0000. Enter and confirm the password and click Submit.
38 NN40011-024 Issue 1.2 BCM Rls 6.0
Page 39

Reporting for Contact Center
6. You will be presented with the Contact Center Connection screen.
The Contact Center Connection page allows you to specify the network
identifier (IP address or Network name) of the Contact Center platform.
Typically, the Contact Center Connection page appears only once, after you
first log on as an Administrator.
If the Contact Center Connection information is incomplete or incorrect, the
Contact Center Connection page appears each time you log on as an
Administrator.
For example, if you add a new Network Card to the Web Host PC, you must
select an IP address for the Web Host PC to communicate with the
wallboards. In this case, the Contact Center Connection page appears so that
you can select the IP address.
7. In the IP Address/Network name field, enter the IP Address or the
Network name of the Contact Center platform (BCM).
8. In the Port field you should see the default Port of 8088 displayed. If
this number is not displayed enter the port number as configured in the
CCRS, by default this is 8088 but may have been changed during
setup.
NN40011-024 Issue 1.2 BCM Rls 6.0 39
Page 40

Reporting for Contact Center
9. In the CCRS Password field enter the CCRS password (uppercase)
and confirm the password.
10. In the Make data requests every list specify how frequently the Web
Host PC communicates with the Contact Center in order to obtain
reporting data. The typical setting is 15 minutes.
11. In the Select an IP Address list, select the IP address (Network
Interface Card) with which you wish to communicate with the
wallboards. If the Web Host PC has more than one IP Address
(because it has more than one Network Interface Card configured) the
list is populated with the IP addresses configured for the Web Host PC.
Select the IP Address that is configured on the Network Interface Card
connected to the same network as the wallboards.
Note: This IP Address is not the IP Address of the wallboard. This address is
the IP Address configured for the Network Interface Card in the Web Host PC.
If you add a new Network Interface Card or other network device, such as a
USB Bluetooth device, or if you enable a disabled Network Interface Card,
then you must reboot your Web Host PC so that the new device is detected
and presented in the Select An IP Address list.
12. From the Wallboard and Refresh Real Time Interval list, select your
refresh interval for the Wallboard and Real time displays. The two
available options are 1 second (default) and 3 seconds.
13. On first installation of Reporting for Contact Center the Download
Contact Center Data options are displayed. You can determine
whether to download all data from the Contact Center by selecting All
Data, or you can select Only Data starting from and click on the
calendar icon to the right to select a start date from when data should
be downloaded from the Contact Center. Note that the warning
40 NN40011-024 Issue 1.2 BCM Rls 6.0
Page 41

displayed below will only display if the Only Data Starting from radio
button is selected.
14. Click Submit.
15. A warning screen will be displayed. Click OK.
Reporting for Contact Center
16. The following message appears. Click OK.
NN40011-024 Issue 1.2 BCM Rls 6.0 41
Page 42

Reporting for Contact Center
17. The historical reporting data will now be downloaded. A screen will
appear which shows the progress of the current download process.
18. Once the data is downloaded the Data Finished Processing window
will be displayed. Click OK.
Note: Generally 30,000 calls take between 6 and 18 hours to download,
depending on the level of network traffic and the speed of the Web Host PC.
The PC can be used as normal during the download, but do not reset it or
power it off.
Note: The browser page may time out before the download is complete. This
is not an error. Microsoft Internet Information Services has a setting that
dictates how long it waits before closing a web page. As the download
completes, you are informed of the status in the Download Status field.
19. The Contact Center Connection is now complete. You should now
configure RCC for Administrators and Users (refer to the Reporting for
Contact Center System Administration section of this guide).
42 NN40011-024 Issue 1.2 BCM Rls 6.0
Page 43

Reporting for Contact Center
Exiting Reporting for Contact Center (Log Out)
Logging out of RCC is a simple procedure. At whatever stage the user is at in
RCC the logout button can be used. This will have the affect of taking the
user back to the RCC login page.
NN40011-024 Issue 1.2 BCM Rls 6.0 43
Page 44

Reporting for Contact Center
Reporting for Contact Center System Administration
Only the RCC System Administrator has the ability to change the settings in
this section.
Changing the System Administrator’s password
1. Click on the System Administration heading.
2. Select the System Admin Settings heading.
44 NN40011-024 Issue 1.2 BCM Rls 6.0
Page 45

Reporting for Contact Center
3. If you, as the System Administrator, wish to change your password
then do so in the following fields:
Creating Users in RCC
This section is used for creating users that have the ability to log into RCC.
Users are configured and are assigned Skillsets so that the individual Users
have access only to the Skillsets that they are required to view.
Users can be granted certain powers also. A User can be allowed to view
Skillset or Contact Center real time and historical data. In addition to this they
can be given the power to administer wallboards for the Skillsets that they
have been granted access to or they can be configured as Administrators
themselves.
Note: It is recommended that an Administrator is created and assigned to all
skillsets as this account can then be used to administer other users as well as
the main „admin‟ account.
NN40011-024 Issue 1.2 BCM Rls 6.0 45
Page 46

Reporting for Contact Center
1. Under the System Administrator heading, click User Admin. In the User
Admin section, click Add.
2. The Add User screen will be displayed.
3. Enter the first name of the user in the First Name field.
4. Enter the surname of the user in the Surname field.
5. Enter the RCC Username in the RCC Username field. This will be this
user‟s username for logging in to RCC.
46 NN40011-024 Issue 1.2 BCM Rls 6.0
Page 47

Reporting for Contact Center
6. From the Language drop down list, specify the User language
preference, which dictates the language used to display the Reporting
for Contact Center Web Page.
7. If the User is able to configure wallboards (for their assigned Skillsets),
select the Assign Wallboards check box.
8. If the User is also an Administrator, select the Administrator check
box.
9. In this example a user has been created that has both administrative
and wallboard assignment privileges.
10. Click Submit.
11. A dialog box will appear asking whether you wish to add more Users. If
you choose to add more users, click on the OK button, otherwise click
on Cancel.
NN40011-024 Issue 1.2 BCM Rls 6.0 47
Page 48

Reporting for Contact Center
12. Once the user details have been submitted the created user will be
displayed.
Note: The default password is „0000‟ (zero) for every user that is created.
This must be changed when this user performs their first login.
48 NN40011-024 Issue 1.2 BCM Rls 6.0
Page 49

Reporting for Contact Center
Assigning Skillsets to Users
Each user must have Skillsets assigned to them unless they have been
configured as Administrators. A user with no Skillsets assigned will not be
able to view/modify any Real Time/Historical reports or settings.
1. Log in to RCC with administrative rights (use the admin username).
2. Click on the System Administration heading and select Skillset
Assignment. On the user that you wish to assign the Skillset(s) to,
click Assign.
NN40011-024 Issue 1.2 BCM Rls 6.0 49
Page 50

Reporting for Contact Center
3. A list of the available Skillsets will be displayed. To add all of the
Skillsets to this user click the >> symbol. To assign just one Skillset,
highlight the appropriate entry and click the > symbol. To select more
than one Skillset but not all of them, hold down the ctrl key, make
selection and click the > symbol.
4. If a mistake is made highlight the Skillset on the right hand side and
click the < symbol. To remove all Skillsets click the << symbol.
5. When the assignments are complete click Submit.
50 NN40011-024 Issue 1.2 BCM Rls 6.0
Page 51

Reporting for Contact Center
Maintenance
System Status
Information in the System Status section is only relevant to Support staff
should a problem arise with RCC. To access System Status follow these
steps:
1. Log in to RCC with a username that has administrative rights.
2. Click on the Admin link heading.
3. The Administration Menu screen appears. Click on the Maintenance
link.
NN40011-024 Issue 1.2 BCM Rls 6.0 51
Page 52

Reporting for Contact Center
4. Click on System Status.
5. The System Status window appears.
Note: You would only normally be directed to this page by Support
Personnel, who might ask you to relay to them the text contained in the
Database connection status field, for example.
52 NN40011-024 Issue 1.2 BCM Rls 6.0
Page 53

Reporting for Contact Center
Logging
Selecting the Logging option presents you with the Logging Menu Page.
Various diagnostic logs are always running when Reporting for Contact
Center is operational. The Logging Menu allows you to Archive the current log
files and download any previously archived log files.
To Archive the current log files:
Click the Archive Logs button. This will create a single .zip archive file
of the current log files. A new entry will appear in the list of archived
files table, following the Log files location on the Logging Menu page.
Recently created log file archives are indicated by a yellow star.
To stamp the Real Time log:
Click the Stamp Real Time Log button. This will stamp the Real Time
log constantly for 15 seconds. As the Real Time log can be quite large
this option is useful for tracking down a problem to a specific time.
Clicking the Stamp Real Time Log button will disable the button for 15
seconds. Stamping cannot be initiated again in this time until 15 seconds
have passed. After this time has elapsed the button will be enabled.
To download a log file archive click the Download Logs button next to the
desired archive (you would previously had to have clicked the Archive button)
and save it to a location on your computer.
NN40011-024 Issue 1.2 BCM Rls 6.0 53
Page 54

Reporting for Contact Center
Note: After the database has been purged. Reporting for Contact Center
cannot report on data prior to the date selected. Moreover, the purged data
may not be available to download from the Contact Center. The maximum
duration of data that may be purged at a time is 90 days.
Purge Database
The Purge Database page allows a user to permanently delete all data from
the database prior to a selected date.
1. Click on Maintenance then Purge Database.
54 NN40011-024 Issue 1.2 BCM Rls 6.0
Page 55

Reporting for Contact Center
2. The following screen appears. Select the date and click on the Purge
button as directed below.
3. The following message appears.
4. Click OK to proceed or Cancel to return to the previous screen.
NN40011-024 Issue 1.2 BCM Rls 6.0 55
Page 56

Reporting for Contact Center
5. The countdown is shown whilst the data is being removed.
6. Once completed a confirmation box appears, click OK to complete the
process.
Company Details
Information entered in the Company Details page is mostly just for information
for the location where the RCC is installed. However, text entered in the
Name field will be displayed at the top of each report.
1. Log in to RCC as a user that has administrative rights.
56 NN40011-024 Issue 1.2 BCM Rls 6.0
Page 57

Reporting for Contact Center
2. Click on Company Details. Enter the company information into the
fields. Click Submit when completed.
NN40011-024 Issue 1.2 BCM Rls 6.0 57
Page 58

Reporting for Contact Center
Reporting
There are two ways to access the reporting section in Reporting for Contact
Center.
Accessing Reporting as a System Administrator
Logging into RCC with and administrative user will allow the user to access
the administrative functions of RCC. To access the RCC Reporting section:
1. Log in to RCC as a user that has administrative rights.
2. Click on Reporting. This will access the Reporting section of RCC.
3. The Reporting screen will be displayed. If at any point a System
Administrator wishes to return to the Administration menu, there is an
Admin link from the Reporting Main Menu which will take you back to
the Administration screen.
58 NN40011-024 Issue 1.2 BCM Rls 6.0
Page 59

Reporting for Contact Center
Accessing Reporting as a Standard User
Logging into RCC as a standard user only allows access to the reporting
section. Upon logging in to RCC the user will immediately be in the reporting
section.
Note that there is no link into the Admin section and that in this example
this user has no Wallboard assignment privileges.
NN40011-024 Issue 1.2 BCM Rls 6.0 59
Page 60

Reporting for Contact Center
Real Time Reporting
Real Time screens under Reporting for Contact Center are updated every 1
second (set under Contact Center Connection). A standard user will only
receive real time information for Skillsets that have been assigned to them.
1. Log in to RCC with a username that has Skillsets assigned to it.
Access the Reporting section and click the Real Time heading on the
left hand side.
There are four Real Time reports available pertaining to the Skillsets that are
assigned to the user that is logged in:
Agent Summary
Agent Detail
Call Summary
Call Detail
60 NN40011-024 Issue 1.2 BCM Rls 6.0
Page 61

Reporting for Contact Center
Viewing the Real Time Displays
The Real Time Reporting screen gives the user access to the information
relating to the current activity within Skillsets and Agents in summary or in
detail.
1. Click on the Real Time heading in the Main Menu.
2. From the list of real time screens and assigned Skillsets, select the
option(s) which you wish to view in Real Time. To select more than
one Skillset but not all of them, hold down the ctrl key and make
selection. When your selection is complete click Submit.
NN40011-024 Issue 1.2 BCM Rls 6.0 61
Page 62

Reporting for Contact Center
Note: Each of the real time screens options selected will open separate
screens and not a combination of the selection. If a Client PC does not have
Java installed, on launching more than one Real Time screen, Java will try to
be installed that many times on the Client PC.
3. RCC will then display the Real Time data screen for the Skillsets that
have been selected.
Call Summary
The Real Time Call Summary Report displays the following Information:
a. Skillset: „Grouping‟ refers to all selected Skillsets. Skillset Number
and names are displayed in this column.
b. Waiting: Indicates the number of calls that are in the Skillset queue
waiting to be answered.
c. Delayed: Indicates the number of calls that are currently in a delayed
state, that is having reached the Contact Center but have not been
forwarded to a skillset.
d. Primary Alert: Indicates the number of calls in the Skillset queue that
have exceeded the Primary Alert Threshold. If at least one call in the
Skillset queue has exceeded this threshold then the background of this
cell will change to yellow.
e. Secondary Alert: Indicates the number of calls in the Skillset queue
that have exceeded the Secondary Alert Threshold. If at least one call
in the Skillset queue has exceeded this threshold then the background
of this cell will change to red.
f. Overflow: Indicates the number of calls currently in excess of the
Contact Center Skillset overflow threshold. This does not show the
number of calls that have overflowed out of the Skillset queue. It
shows the number of calls that the Contact Center is actively seeking
overflow destinations for.
g. Answered Hour/Day: Indicates the number of Incoming Contact
Center Calls that have been answered by Agents in that Skillset in the
current hour and current day.
h. Abandoned Hour/Day: Indicates the number of abandoned calls in
each Skillset for the current hour and current day.
62 NN40011-024 Issue 1.2 BCM Rls 6.0
Page 63

Reporting for Contact Center
i. Disconnected Hour/Day: Indicates the number of calls that were
disconnected by the Contact Center in the current hour and in the
current day.
j. Longest Waiting Time: Indicates the waiting time of the call in the
queue that has been waiting the longest.
k. Unread Skillset Messages Msgs: Indicates the number of messages
in the Skillset mailbox that have not been read. If there are any unread
messages the background of this cell will turn red.
l. GOS: The Grade of Service figure in the Grouping row is a means
average of the GOS values of the skillset rows displayed below the
Grouping row. For example, three skillsets are in the view, and they
had the following individual skillset values:
Skill 1 GOS = 0%
Skill 2 GOS = 100%
Skill 3 GOS = 100%
The Grouping row shows a GOS of 66%, calculated as follows:
GOS = (0 + 100 + 100) / 3 = 66%
This value shows the User what their average GOS is over all
the selected skillsets.
m. Skillset Mode: Indicates the method of operation the Skillset is
currently running in (Day or Night).
Call Detail
The following sections describe the available information for the Call Detail
Report:
a. Waiting: indicates the number of calls that are currently waiting in the
Skillset queues to be answered.
b. Delayed: indicates the number of calls that are currently in a delayed
state, that is, having reached the contact Center but have not been
forwarded to a Skillset.
c. Primary Alert: indicates the number of currently waiting Calls that
have waited in excess of the Contact Center Primary Alert. (Note that
this is mutually exclusive with the Secondary Alert). If any calls have
waited in excess of the Primary Alert, the background to this cell
changes to yellow.
d. Secondary Alert: indicates the number of currently waiting Calls that
have waited in excess of the Contact Center Secondary Alert. (Note
that this is mutually exclusive with the Primary Alert). If any calls have
NN40011-024 Issue 1.2 BCM Rls 6.0 63
Page 64

Reporting for Contact Center
waited in excess of the Secondary Alert, the background to this cell
changes to red.
e. Overflow: Indicates the number of calls currently in excess of the
Contact Center Skillset overflow threshold. This does not show the
number of calls that have overflowed out of the Skillset queue. It
shows the number of calls that the Contact Center is actively seeking
overflow destinations for.
f. Answered Hour/Day: indicates the number of calls that were
answered by the Agents in the Skillsets, in the current hour and in the
current day.
g. Abandoned Hour/Day: indicates the number of calls that were
abandoned in the Skillsets, in the current hour and in the current day.
h. Disconnected Hour/Day: indicates the number of calls that were
disconnected by the Contact Center in the current hour and in the
current day.
i. Longest Waiting Time: indicates the waiting time of the call that has
waited the longest, of the list of currently waiting calls.
j. Unread Skillset Messages: Indicates the number of voice mail
messages in the Skillset Mailbox which have not been listened to. If
any messages have not been listened to, the cell background is red.
k. Grade of Service (GOS): Indicates the grade of service currently
offered to incoming callers.
Agent Summary
The Real Time Agent Summary Report shows a selection of statistics:
a. Skillset: „Grouping‟ refers to all selected Skillsets. Skillset Number
and names are displayed in this column.
b. Logged In: Indicates the number of Agents who are logged into the
Skillsets.
c. Supervising: Indicates the number of Agents who are currently
supervising other Agents.
d. Available: Indicates the number of Agents who are available to take
Incoming Contact Center calls.
64 NN40011-024 Issue 1.2 BCM Rls 6.0
Page 65

Reporting for Contact Center
e. Not Ready: Indicates the number of Agents who are in the Not Ready
state. Not Ready can be manually invoked by the Agent or it may be
that the Agent has missed an Incoming Contact Center call and has
automatically placed in the Not Ready state.
f. Not Available: Indicates when a Contact Centre agent invokes certain
features for example F981 voice mail or performs any action that
prevents them from receiving a Contact Centre call like lifting the
receiver.
g. Ringing: The number of agents who have calls ringing on their
handset.
h. On Contact Center Calls: Indicates the number of Contact Center
Agents who are currently on Incoming Contact Center Calls.
i. Break Time: Indicates the number of Agents who are in Break Time
following the completion of an Incoming Contact Center Call.
j. On Non-Contact Center Calls: Indicates the number of Agents who
are currently on incoming calls that have not been handled by the
Contact Center.
k. On Outgoing Calls: Indicates the number of Agents who are on
Outgoing Calls.
l. On Internal Calls: Indicates the number of Agents who are currently
on Internal (Intercom) calls.
m. With All Calls Held: Indicates the number of Agents who have all of
their Current Contact Center Calls on hold.
Agent Detail
The following sections describe the available information.
a. ID: Indicates the Contact Center ID of the Agent.
b. Agent: Indicates the name of the Agent and indicates the state the
Agent is in by colouring the cell background. The state of the Agent
depends on their current activity. Further detail on the Agent state can
be seen in the Status column
NN40011-024 Issue 1.2 BCM Rls 6.0 65
Page 66

Reporting for Contact Center
c. Logged In SS: Indicates the Skillsets the Agent is currently logged in
to.
d. Status: This column provides additional detail about the Agent state,
as follows:
Incoming: An Agent is in the Incoming State when they have
answered an Incoming Contact Center Call. The information in the
Status column indicates the type of call.
Incoming Non-Contact Center: When an agent receives a call that
didn‟t originate from a Contact Center Skillset, this is termed a NonContact Center call.
Break Time: Is the term used to describe the period of time
allocated to each Agent to allow post-call completion work, also
called wrap-up.
Outgoing: When an Agent makes an Outgoing Call; the Agent is in
the Outgoing State.
Supervisory Monitoring: When an Agent who is created in the
Contact Center as a Supervisor undertakes a monitoring session
with another Agent, the Status column displays Monitoring. There
are various states associated with Monitoring:
Asked: An agent has pressed F906 to request help from the
supervisor.
Helping: The supervisor has answered the agent help request.
Monitoring: The supervisor has initiated a monitoring session
via F905.
Viewing: When in the Monitoring state via F905, the
Supervisor is selecting the Skillset of the agent to monitor.
Observing: When in the Viewing state, the Supervisor has
selected an Agent to Observe.
Available: These are Agents who are available to answer Incoming
Contact Center Calls.
Not Available: Indicates when a Contact Centre agent invokes
certain features for example F981 voice mail or performs any action
that prevents them from receiving a Contact Centre call like lifting
the receiver.
All Calls Held: An Agent has placed all of their calls on hold.
Not Ready: Represents Agents who are in the Not Ready state.
Ringing: This state will display when an Agent has a ringing call on
their handset, i.e. the Agent has been presented with a call but
hasn‟t picked up the call yet.
e. Duration: Displays a timer that represents the time the Agent has
spent in the current state. If the Agent has been in the current state for
a period in excess of the associated Agent Alarm, the background of
this cell turns red.
f. Answered Contact Center Calls Hour/Day: Answered Contact
Center Calls Hour/Day indicates the number of Contact Center Calls
that this Agent has answered in the current hour and in the current day.
g. Outgoing Calls Hour / Day: Outgoing Calls Hour/Day indicates the
number of Outgoing Calls that this Agent has made in the current hour
and in the current day.
66 NN40011-024 Issue 1.2 BCM Rls 6.0
Page 67

Reporting for Contact Center
h. Answered Non-Contact Center Calls Hour/Day: Answered Non-
Contact Center Calls Hour/Day indicates the number of Non-Contact
Center Calls that this Agent has answered in the current hour and in
the current day.
i. Check Agent Alarms: Click Check Agent Alarms to update any
Agent Alarms that had been set through Reporting for Contact Center
after the Agent Detail Real Time screen had been opened.
The below is example Agent Detail screen showing Agents in different states:
NN40011-024 Issue 1.2 BCM Rls 6.0 67
Page 68

Reporting for Contact Center
Agent Alarms
Agent Alarms allow the Contact Center Supervisor to be alerted in the Real
Time Agent Detail display, when an Agent exceeds specified parameters for
various states. Thresholds can be set and will trigger an alarm to alert the
Contact Center Supervisor of excessive call activity. For example, you can
specify a target duration for an Outgoing call and if an Agent exceeds that
duration, an alarm is raised.
Follow the steps in this section to configure Agent Alarms.
1. From the Reporting section of Reporting for Contact Center click on
Agent Alarms. Then click on Agent Alarms Setup.
68 NN40011-024 Issue 1.2 BCM Rls 6.0
Page 69

Reporting for Contact Center
2. From the list of assigned Skillsets select which one you wish to assign
Agent Alarms to. To select more than one Skillset but not all of them,
hold down the ctrl key and make selection. When selection is complete
click Assign Values.
3. The Agent Alarms Values screen will be displayed.
NN40011-024 Issue 1.2 BCM Rls 6.0 69
Page 70

Reporting for Contact Center
4. The following Agent Alarms can be configured in Reporting for Contact
Center:
a) Available: An Agent who is in an Available state for excessive
periods
b) Internal Call: An Agent who is on an Internal Call for excessive
periods
c) Outgoing Call: An Agent who is on an Outgoing call for excessive
periods
d) Incoming CC: An Agent who is on an Incoming Contact Center
Call for excessive periods
e) Incoming MMCC: An Agent who is on a Multimedia Contact
Center Call for excessive periods.
f) Incoming non CC: An Agent who is on an Incoming non Contact
Center call for excessive periods.
g) Not Ready: An Agent who is in Not Ready State for excessive
periods
5. Enter the values that you wish to apply to Agent Alarms, and click on
Submit.
Wallboard Setup
For Wallboard and ipView SoftBoard setup, configuration and use please
refer to the ipView Wallboard Guide and ipView SoftBoard Guide.
70 NN40011-024 Issue 1.2 BCM Rls 6.0
Page 71

Reporting for Contact Center
Time Bins Setup and Configuration
Time Bins are fields on the Current and Historical Reports that allow us to
categorise calls that have involved the Contact Center, and indicate when
calls are being answered or abandoned during specified time frames. There
are two types of Time Bins; Answered Time Bins and Abandoned Time
Bins.
The Answered Time Bins are a series of six time steps used in the statistical
analysis of Answered Contact Center Calls. For example, the Answered Time
Bins could be set at <10 seconds, <20 seconds, <30 seconds, <60 seconds,
<90 seconds, <120 seconds and >120 seconds. Calls answered in less than
10 seconds would be entered into the first Time Bin. A call answered in 46
seconds would fall into the fourth Time Bin (<60 second).
Abandoned Time Bins work on the same principle of Answered Time Bins
but relate to the time taken for a person to abandon a call without being
answered by a Contact Center Agent or overflowed to another destination.
To configure Answered Time Bins and Abandoned Time Bins follow these
steps:
1. From the main menu click on the Time Bins Setup link.
NN40011-024 Issue 1.2 BCM Rls 6.0 71
Page 72

Reporting for Contact Center
2. From the list of assigned Skillsets select which one you wish to setup
Answered and Abandoned Time Bins for. Notice that dual selections
cannot be made for Time Bins Setup. Time Bins are configured
exclusively to each Skillset. When selection is complete click Assign
Time Bins.
3. By default the Time Bins for both Answered and Abandoned calls are
set to 10, 20, 30, 40, 50 and 60 seconds. Alter these values to suit the
reporting requirements. When completed click Submit.
72 NN40011-024 Issue 1.2 BCM Rls 6.0
Page 73

Reporting for Contact Center
4. The below shows how the Time Bins Setup are applied to reports.
NN40011-024 Issue 1.2 BCM Rls 6.0 73
Page 74

Reporting for Contact Center
Note: If you are choosing to send the report to a printer from this window, only
printers available to the Web Host PC can be selected.
Reports
Reporting for Contact Center provides you with a flexible and easy to
understand set of reports. The reports contain information on the call traffic in
and out of your Contact Center, and on the activities of your Contact Center
Agents. Reports are listed and can be loosely grouped into the following
categories:
Agents: Reports related to Agent activity.
Calls: Reports related to calls.
Miscellaneous: All other reports, such as Supervisor reports, Activity
Code reports, System Configuration, and Call Audit reports.
Reports can be generated for any elapsed period of time. This means that if
you want to have a report that contains information from 12:00 mid-day
Tuesday to 16:15 Thursday afternoon, you can easily obtain it. There are no
pre-defined limitations on the period of time a report can include.
Accessing Reports
Use the following procedure to access the reports.
1. Click on the Reports and Schedules link.
2. Select the desired report (or multiple reports) from the list of available
reports.
3. Select required dates and times in the From Date/Time and To
Date/Time fields. You can use the calendar box for date selection.
4. You can choose to view the report(s) by simply clicking View, or send
the report(s) to a printer by clicking Print.
74 NN40011-024 Issue 1.2 BCM Rls 6.0
Page 75

Reporting for Contact Center
Note: If you have created print jobs, you can click on the View/Cancel print
jobs button to cancel any queued jobs that have not yet printed.
2
3
4
Note: Data in any of the reports is only as up to date as the last time data
was received. To ensure that all data in the reports is as up to date as
possible before viewing any reports click the Get latest Contact Center Data
under the Reports heading.
NN40011-024 Issue 1.2 BCM Rls 6.0 75
Page 76

Reporting for Contact Center
5. Once the desired report(s) is selected you may be requested to choose
which Skillset you wish to view. Once selected press Submit.
6. Some Agent reports also require the agents you want to view to be
selected.
76 NN40011-024 Issue 1.2 BCM Rls 6.0
Page 77

Reporting for Contact Center
7. A new window will now open to show the report is being generated.
8. The selected report with the desired time period will then be displayed.
NN40011-024 Issue 1.2 BCM Rls 6.0 77
Page 78

Reporting for Contact Center
Creating Favourites
For users who wish to frequently access the same report relating to multiple,
but not all of the Skillsets or Agents on varied dates, there is the ability to
create „Favourites‟.
To create a Favourite follow the instructions below.
1. Select the report that you wish to view, and click on the View button.
78 NN40011-024 Issue 1.2 BCM Rls 6.0
Page 79

Reporting for Contact Center
2. In this example a Favourite will be created to view agent activity in the
Sales and Tech Support Skillsets.
3. Select from the Skillsets that have been assigned to the user the ones
that the user wishes to group together. Once selection is complete,
click Create Favourite.
4. Enter a name that the user wishes to give to this group and click
Submit.
NN40011-024 Issue 1.2 BCM Rls 6.0 79
Page 80

Reporting for Contact Center
a
b
c d e
5. To select the Favourite:
a. Select report to be viewed
b. Adjust relevant time/date period
c. Select the printer
d. Print for output to hard copy.
Or
e. Select View to send to screen
80 NN40011-024 Issue 1.2 BCM Rls 6.0
Page 81

Reporting for Contact Center
6. Once the Select Skillsets window is open, select the Favourite by
clicking on the select button, then click Submit.
7. This is the report for Admin & Support. Has been set to request for data
between the 10th and 11th Sept 07
This report that is displayed will show only the statistics for the Skillsets that
have been selected to be in the Favourite list. Almost every report that is
selected to be viewed now will give the user the opportunity to use the
Favourite rather than select multiple Skillsets every time.
This feature is useful when each user has many Skillsets to report on. For
example, there maybe four Skillsets (Sales A, Sales B, Sales C and Sales D)
NN40011-024 Issue 1.2 BCM Rls 6.0 81
Page 82

Reporting for Contact Center
Note: The same procedure can be applied to creating favourites for Agents.
Select one of the Agent reports and repeat the process from step 3.
which the user may wish to be grouped together into a Favourite named
Sales.
Using Reports
Many reports allow the User to choose to report on any combination of the
Skillsets they have been assigned. They can report on a single Skillset, a
combination of their assigned Skillsets or all of their assigned Skillsets.
Each report will show a header of information that will contain:
a. The Company Name.
b. The Report Title.
c. The Period the report covers (start time and date and an end time and
date).
d. The time and date when the report was created.
e. The time and date when the report data was obtained from the Contact
Center.
f. The Skillsets included in the report.
82 NN40011-024 Issue 1.2 BCM Rls 6.0
Page 83

Reporting for Contact Center
Note: When printing from a report, printers local to the viewing PC can be
selected.
Report Options
Every report that is viewed has a standard layout and facilities such as
printing.
Printing Reports
To print this particular report, click the print icon.
Exporting Reports
To export this particular report to another location and format (pdf or Excel).
NN40011-024 Issue 1.2 BCM Rls 6.0 83
Page 84

Reporting for Contact Center
To scroll through
the pages of
each report
Viewing and Navigating Reports
To alter the magnification of the report being viewed
To find specific text in this report.
Reports Explained Help
Select the Reports Explained Help link to open a separate window with
descriptions of the current report parameters that are being viewed.
84 NN40011-024 Issue 1.2 BCM Rls 6.0
Page 85

Reporting for Contact Center
View Raw Data CSV
Raw data can be viewed and saved in CSV format for importing into e.g.
Excel.
1. Click the View Raw Data (CSV) link to open a new window containing
all of the report data in comma separated view (CSV) format.
2. To save the raw report data click on the Save as File button at the
bottom of the Raw Data report page.
NN40011-024 Issue 1.2 BCM Rls 6.0 85
Page 86

Reporting for Contact Center
3. Save the raw report data as a .txt file to a location of your choice. The
raw report data in CSV format can be imported to Microsoft Excel as
follows.
4. From Microsoft Excel open the saved raw report data .txt file by
selecting Data, Get External Data, Import Text File.
5. From the Import Text File dialog box Double click on the required file.
86 NN40011-024 Issue 1.2 BCM Rls 6.0
Page 87

Reporting for Contact Center
6. From the Original data type section of the screen, select the
Delimited radio button. Click Next.
7. From the Delimiters section of the screen, select Comma as the
delimiter of the raw report data. Click Next.
NN40011-024 Issue 1.2 BCM Rls 6.0 87
Page 88

Reporting for Contact Center
8. Click Finish to complete the report data export to Microsoft Excel.
9. You will be requested to confirm where the data is to be imported.
Make a selection as required and click OK.
88 NN40011-024 Issue 1.2 BCM Rls 6.0
Page 89

Reporting for Contact Center
10. The imported raw report data in CSV format can be viewed and saved
as a Microsoft Excel worksheet.
Report Descriptions
The following is a brief overview of each of the reports that are available from
Reporting for Contact Center. For a detailed description of each Report and
the parameters they contain please refer to the Reporting for Contact
Center Reports Explained document.
Agent Activity by Agent
The report displays the instances and total durations of all Contact Center
activities for each of the agents selected on the report generation screen.
As well as displaying the Login time an agent has 2 types of activity, agent
state activity and agent call activity.
Agent State Activities are non call states that are not applicable to a specific
skillset, for example if Agent 1 is logged on to skillets 1 and 2 and they invoke
Feature 908 Make Not Ready, they will be in the Not Ready state in all
skillsets they are logged on to.
The agent states include Available, Not Available, Ringing, All Calls Held,
Break Time, Not Ready and Multimedia Contact Center (MMCC) Reserved
(when an agent is reserved by the Contact Center before it makes an out
bound call to the caller).
NN40011-024 Issue 1.2 BCM Rls 6.0 89
Page 90

Reporting for Contact Center
Agent Call Activities are call states, one state is specific to a particular skillset
and this is the Contact Center (CC) Transactions Answered by Agent field.
The remaining agent call activities: CC Conference Transactions Answered by
Agent, Non CC Transactions Answered by Agent, Non CC Conference
Transactions Answered by Agent and Outgoing Calls, are not specific to a
particular skillset.
This report also displays when an agent has been borrowed into another
skillset. The term borrowed applies to any situation where a call has been
transferred (Tr), overflowed (Ov) or by some other method (Ot) passed to
another agent who is then temporarily assisting that skillset.
Note: If you request this report for an Agent, you will receive a report listing all
activities across all of the skillsets that agent has logged on to for the period
selected.
Note: This report is generated by agent selection, not skillset.
Agent Audit by Agent
This report displays the activity of an Agent broken down into specific entries
on each action performed.
This report is intended to provide a detailed picture of an Agent's activities,
covering small numbers of agents over short periods of time.
If the Agent is a multi-Skillset Agent, all of their activities will be included for all
Skillsets into which they are signed for the duration of the report.
This report is generated for the selected Agents, and is grouped by Agent
then by skillset.
90 NN40011-024 Issue 1.2 BCM Rls 6.0
Page 91

Reporting for Contact Center
Certain activities can overlap but the agent can only be performing one action
at a time, this means the activity they were performing is put on hold. This can
occur for example when a call is placed on hold and an outgoing call is made.
This overlapping is reflected in the report by indicating when the previous
activity is resumed, denoted by the Resumed keyword and the light gray color
of the text. When manually counting activity, for example, Incoming Contact
Center Calls, the items grayed out should not be counted towards the total.
Agent Average by Agent
The report displays the instances and average durations of all Contact Center
activities for each of the agents selected on the report generation screen. The
report is broken down by Agent and then grouped by skillset and shows the
activity for multi-Skillset agents for all of the Skillsets into which they were
logged on to during the report time period.
As well as displaying the Average Login time an agent has 2 types of activity,
agent state activity and agent call activity.
Agent State Activities are non call states that are not applicable to a specific
skillset, for example if Agent 1 is logged on to Skillets 1 and 2 and they invoke
Feature 908 Make Not Ready, they will be in the Not Ready state in all
skillsets they are logged on to. The agent states include Available, Not
Available, Ringing, All Calls Held, Break Time, Not Ready and Multimedia
Contact Center (MMCC) Reserved (when an agent is reserved by the Contact
Center before it makes an outbound call to the caller).
Agent Call Activities are call states, one state is specific to a particular skillset
and this is the Contact Center (CC) Transactions Answered by Agent field.
The remaining agent call activities: CC Conference Transactions Answered by
Agent, Non CC Transactions Answered by Agent, Non CC Conference
NN40011-024 Issue 1.2 BCM Rls 6.0 91
Page 92

Reporting for Contact Center
Transactions Answered by Agent and Outgoing Calls, are not specific to a
particular skillset.
This report also displays when an agent has been borrowed into another
skillset. The term borrowed applies to any situation where a call has been
transferred (Tr), overflowed (Ov) or by some other method (Ot) passed to
another agent who is then temporarily assisting that skillset.
Note: This report is generated by agent; all activity for that agent across all
skillsets will be displayed. This report is generated by agent selection, not
skillset.
Agent Capacity by Skillset
This report displays the occasions when there were no logged on agents
available to answer incoming Contact Center calls. That is, it details the
instances, the duration, and the total duration of all periods when all Agents
were occupied simultaneously. The reasons that Agents are unavailable
include they are already on an incoming call, an outgoing call, or they are Not
Ready.
The Grouping values represent the instances when all Agents were
unavailable across all selected Skillsets. For example, if in Skillset 1 all agents
become busy at 11:12 a.m. for 10 minutes, and in Skillset 2 all agents
become busy at 11:15 a.m. for 15 minutes. This means that from 11:15 to
11:22 (7 minutes) all agents were busy in both Skillset 1 and 2. This will count
towards the Grouping values.
The Agent Capacity by Skillset report indicates how often, and for how long,
the Contact Center was working at its maximum Agent capacity. It does not
consider instances when there were no Agents logged on; it only reflects
staffed periods.
92 NN40011-024 Issue 1.2 BCM Rls 6.0
Page 93

Reporting for Contact Center
The report displays the Grouping information and the Skillset information.
Note: When displaying the total there is no entry for either Start Date and
Time or End Date and Time fields.
Agent Profile by Agent
This report displays the instances and total durations of all Contact Center
activities for each of the agents selected on the report generation screen. The
report will display the profile for all Agent activity for all Skillsets into which
they were logged on for the period of the report. It is broken down by Agent,
then by skillset and finally each Login session is broken out.
As well as displaying the Login time an agent has 2 types of activity, agent
state activity and agent call activity.
Agent State Activities are non call states that are not applicable to a specific
skillset, for example if Agent 1 is logged on to Skillets 1 and 2 and they invoke
Feature 908 Make Not Ready, they will be in the Not Ready state in all
skillsets they are logged on to. The agent states include Available, Not
Available, Ringing, All Calls Held, Break Time, Not Ready and Multimedia
Contact Center (MMCC) Reserved (when an agent is reserved by the Contact
Center before it makes an out bound call to the caller).
Agent Call Activities are call states, one state is specific to a particular skillset
and this is the Contact Center (CC) Transactions Answered by Agent field.
The remaining agent call activities: CC Conference Transactions Answered by
Agent, Non CC Transactions Answered by Agent, Non CC Conference
Transactions Answered by Agent and Outgoing Calls, are not specific to a
particular skillset.
NN40011-024 Issue 1.2 BCM Rls 6.0 93
Page 94

Reporting for Contact Center
This report also displays when an agent has been borrowed into another
skillset. The term borrowed applies to any situation where a call has been
transferred (Tr), overflowed (Ov) or by some other method (Ot) passed to
another agent who is then temporarily assisting that skillset.
Note: If you request this report for an Agent, you will receive a report listing all
activities across all skillsets that agent has logged on to for the period
selected. This report is generated by agent selection, not skillset.
94 NN40011-024 Issue 1.2 BCM Rls 6.0
Page 95

Reporting for Contact Center
Call Breakdown By Agent
The Call Breakdown by Agent report provides a break down of the Contact
Center (CC) Transactions and Non CC Transactions answered by Agents.
The report demonstrates the total number of transactions answered by an
agent and breaks them down into either CC Transactions and then by Voice
and Multimedia Contact Center (MMCC), or Non CC Transactions and then
by Internal or External. An Internal Non CC Transaction is a call that
originates from within the Contact Center and an External Non CC
Transaction originates from outside the Contact Center.
The report will display all the answered transactions for the Agent for all
Skillsets into which they were logged on to for the period of the report. It is
broken down by Agent, then by skillset.
NN40011-024 Issue 1.2 BCM Rls 6.0 95
Page 96

Reporting for Contact Center
Abandoned Calls by Skillset
For each of the Skillsets included in the report, the total number of abandoned
calls is displayed. Each Abandoned Call within a Time Bin is also displayed.
This figure is also represented as a percentage of the total number of
Abandoned Calls. If a call is a Contact Center call while at the Control
Directory Number (DN) of the Skillset and the caller hangs up, the call is
classified as Abandoned. This includes direct and indirect calls to a Skillset.
This report indicates the number of calls received and how long Abandoned
Calls waited before they hung up.
Voice (PSTN) calls and Multimedia calls are listed separately and totalled for
each Skillset and for the report total. Both figures and the percentages are
provided.
The breakdown is based on Abandoned Time Bin values. The identity of
some of the abandoned callers may be held in the Abandoned CLID/DNIS
report.
Abandoned CLID/DNIS
This report displays the Calling Line Identification (CLID) (if known) and
Dialled Number Identification Service (DNIS) of Abandoned Calls.
The Abandoned CLID/DNIS Report lists information regarding the Abandoned
Calls for the Skillsets included within the report.
This report only includes Contact Center calls that incoming callers terminate
while held on a Control Directory Number (DN) and before they have reached
an Agent. This includes direct and indirect calls to the Skillset. If there is no
96 NN40011-024 Issue 1.2 BCM Rls 6.0
Page 97

Reporting for Contact Center
CLID, the report displays either the target line (or physical line, if the target
line is not known) that carried the call.
The date and the time of day at which each call was abandoned is listed,
together with the unique Key identifier, CLID (when it is known) and DNIS of
the call, the skillset, and the amount of time the caller waited before hanging
up.
CLID is not always known. When Reporting for Contact Center does not know
the CLID, it displays the channel or line number on which the call arrived.
Answered Calls by Skillset
For each of the Skillsets in a report, the total number of answered calls is
displayed. For each Time Bin, the number of calls answered within that Time
Bin is displayed. This figure is also presented as a percentage of the total
number of answered calls.
The Answered Calls by Skillset report shows how long calls wait before they
are connected to an Agent. Voice calls and Multimedia calls are listed
separately and totalled for each Skillset, and for the report total.
This report indicates the total number of Skillset answered calls included
within the report.
Voice (Public Switched Telephone Network Call (PSTN)) calls and Multimedia
calls are listed separately and totalled for each Skillset, and for the report
total. Both figures and the percentages are provided.
NN40011-024 Issue 1.2 BCM Rls 6.0 97
Page 98

Reporting for Contact Center
The breakdown is based on Answer Time Bins values. There are six Time
Bins. A seventh Time Bin, which captures all values higher than the sixth
Time Bin, is appended automatically.
A graphical representation of the number of calls in each of the Time Bins is
also included in the report.
Calls that are transferred directly between Agent sets are not included in this
report. This report covers only the time that calls waited in the Skillset queues
before being answered. It includes Direct and Indirect Contact Center calls.
98 NN40011-024 Issue 1.2 BCM Rls 6.0
Page 99

Reporting for Contact Center
Answered CLID/DNIS
This report displays the Calling Line Identification (CLID) and Dialed Number
Identification Service (DNIS) (if known) of Answered Calls.
The Answered CLID/DNIS Report lists information regarding the Answered
Calls for the Skillsets included within the report. The date and the time of day
at which each call was answered is listed, together with the unique Key
identifier, CLID (when it is known) and DNIS of the call, the skillset, and the
amount of time the caller waited before hanging up.
CLID is not always known. When Reporting for Contact Center does not know
the CLID, it displays the channel or line number on which the call arrived.
This report includes direct and indirect calls to the Skillset. If there is no CLID,
the report displays either the target line (or physical line, if the target line is not
known) that carried the call.
NN40011-024 Issue 1.2 BCM Rls 6.0 99
Page 100

Reporting for Contact Center
Call Average by Skillset
This report indicates the number and the associated averages for answered
and abandoned Contact Center calls, and for answered Transactions (that is,
transferred calls). This report is devised based on Skillset. Each Skillset is
shown on a separate line. Each line displays a total for the field and an
average time (to answer, to abandon, and the answered incoming call time)
for the call type.
The Average Time to Answer and Average Time to Abandon figures in this
report can be used to determine the appropriate settings for the Primary and
Secondary Alerts, or wallboard alarms.
Call Profile
This report provides a profile of the Transactions within the Contact Center,
broken down into Hour, Day, and Month.
This report demonstrates numbers of calls presented to the Skillsets in the
report, and the number Answered, Abandoned, Disconnected, Answered by:
Agents, Voicemail, Operator, Overflow Agents, Non-Agents and Other
Skillsets during a report period. It also presents the Service Level, expressed
as a percentage.
This report can be used to determine the fate of calls profiled in a report. A
Call Profile report can indicate the number of calls in various time slots and if
calls are Answered by Agents in a Skillset, for example.
The Call Profile report can also be used to help determine staffing levels and
call peaks on a particular day or for a particular period. A Call Profile report
100 NN40011-024 Issue 1.2 BCM Rls 6.0
 Loading...