

Page 1

Reporting for Contact Center Setup and Operations
Guide
BCM
Contact Center
Document Number: NN40040-302
Document Status: Standard
Document Version: 05.01
Date: September 2006
Page 2

Copyright © 2005–2006 Nortel Networks, All Rights Reserved
The information in this document is subject to change without notice. The statements,
configurations, technical data, and recommendations in this document are believed to be accurate
and reliable, but are presented without express or implied warranty. Users must take full
responsibility for their applications of any products specified in this document. The information
in this document is proprietary to Nortel Networks.
Trademarks
Nortel, the Nortel logo, and the Globemark are trademarks of Nortel Networks.
Microsoft, MS, MS-DOS, Windows, and Windows NT are registered trademarks of Microsoft
Corporation.
Java is a trademark of Sun Microsystems Incorporated.
All other trademarks and registered trademarks are the property of their respective owners.
Page 3

Table of Contents 3
Table of Contents
List of Figures.............................................................................................................6
List of Tables...............................................................................................................9
How to Use this Guide..............................................................................................11
Introduction ....................................................................................................................................... 11
How this guide is organized.............................................................................................................. 11
How to get Help................................................................................................................................. 12
Getting Help from the Nortel Web site......................................................................................... 12
Getting Help over the phone from a Nortel Solutions Center...................................................... 12
Getting Help through a Nortel distributor or reseller.................................................................... 12
Introduction...............................................................................................................13
Web-Based User Interface................................................................................................................ 13
Language Support ............................................................................................................................ 13
Administrators and Users.................................................................................................................. 14
Assigned Skillsets............................................................................................................................. 14
SQL Historical Database................................................................................................................... 14
System Software............................................................................................................................... 14
PC Requirements.............................................................................................................................. 15
Recommended Minimum PC Specification for BCM 4.0 and BCM50 2.0...................................15
Operating System Compatibility............................................................................................ 16
Recommended Minimum PC Specification for BCM50 2.0 with CCRS Installed........................ 16
Operating System Compatibility............................................................................................ 17
Recommended Minimum PC Specification for BCM50 2.0 on a PC with only CCRS installed.. 17
Operating System Compatibility............................................................................................ 18
Installation.................................................................................................................19
Introduction ....................................................................................................................................... 19
Upgrading to Reporting for Contact Center...................................................................................... 19
Upgrading a Previous Version of Reporting for Contact Center....................................................... 19
Deleting Temporary Internet Files ............................................................................................... 20
Installation prerequisites................................................................................................................... 21
Installing the CCRS for BCM50 2.0............................................................................................. 21
Testing and changing the configuration of CCRS................................................................. 29
Reinstalling or updating the CCRS.............................................................................................. 29
Installing Microsoft Internet Information Services........................................................................ 29
Port Numbers used by Nortel Reporting for Contact Center................................................. 35
Installing Nortel Reporting for Contact Center software................................................................... 35
TCP/IP Protocol........................................................................................................................... 36
Checking Installation of the Windows Networking Component................................................... 36
Installing Nortel Reporting for Contact Center for a Business Communications Manager Installation
.............................................................................................................................................
Settings Required for Windows XP Service Pack 2 .................................................................... 45
Settings Required for Windows 2003 Server, IIS 6..................................................................... 48
Change 1: Enable Active Server Pages................................................................................ 48
Change 2: Allow IIS 6 to see the Path to the RCC Folder .................................................... 48
Change 3: Create a new Application pool and add RCC to it............................................... 51
Upgrading Reporting for Contact Center..................................................................................... 53
37
Reporting for Contact Center Setup and Operations Guide
Page 4

4 Table of Contents
Administration...........................................................................................................55
Logging In..........................................................................................................................................55
Changing Default Password..............................................................................................................56
Contact Center Connection ..........................................................................................................58
Administration Menu..........................................................................................................................63
System Administration..................................................................................................................64
System Admin Settings..........................................................................................................65
User Admin.............................................................................................................................66
Skillset Assignment................................................................................................................73
Maintenance.................................................................................................................................76
System Status ........................................................................................................................77
Logging...................................................................................................................................78
Company Details ..........................................................................................................................81
Reporting ......................................................................................................................................82
Using Reporting for Contact Center........................................................................83
Logging On........................................................................................................................................83
Print Schedules..................................................................................................................................86
Daily Schedules............................................................................................................................87
Skillset List Selection Methods.....................................................................................................92
Adding Selections to the Favorites List ........................................................................................92
Saving your Daily Schedule..........................................................................................................94
Weekly Schedules........................................................................................................................98
Weekly Schedules Skillsets........................................................................................................102
Saving Your Weekly Schedule ...................................................................................................103
Monthly Schedules .....................................................................................................................107
Monthly Schedule Skillsets.........................................................................................................111
Saving your Monthly Schedule...................................................................................................113
Real Time.........................................................................................................................................117
Using the Real Time Options......................................................................................................117
Real Time Call Summary .....................................................................................................118
Real Time Agent Summary..................................................................................................121
Real Time Call Detail............................................................................................................122
Real Time Agent Detail ........................................................................................................124
Agent Alarms ...................................................................................................................................127
Wallboard Setup..............................................................................................................................131
Message Formats.......................................................................................................................132
Parameter Messages...........................................................................................................132
Scrolling Messages..............................................................................................................132
Summary Messages.............................................................................................................134
Using the Wallboard Options......................................................................................................134
Wallboard Assignment .........................................................................................................135
Messages.............................................................................................................................142
Alarms ..................................................................................................................................147
Schedules.............................................................................................................................153
Instant Messages .................................................................................................................158
Time Bins Setup ..............................................................................................................................161
Answer Time Bins.......................................................................................................................161
Abandon Time Bins ....................................................................................................................161
Reports .................................................................................................................... 165
Reports Introduction ........................................................................................................................165
General.......................................................................................................................................165
Reports Explained ...........................................................................................................................165
Using the Reports............................................................................................................................165
Selecting Skillsets.......................................................................................................................172
Selecting Agents.........................................................................................................................174
NN40040-302
Page 5

Table of Contents 5
Selecting Activity Codes ............................................................................................................ 175
Get Latest Contact Center Data item......................................................................................... 176
Glossary ..................................................................................................................177
References ..............................................................................................................181
Index ........................................................................................................................182
Reporting for Contact Center Setup and Operations Guide
Page 6

6 List of Figures
List of Figures
Figure 1: Internet Properties Dialog Box ........................................................................................................................20
Figure 2: Delete Files Dialog ..........................................................................................................................................21
Figure 3: BCM50 Welcome page....................................................................................................................................22
Figure 4: BCM50 Administrator Applications page.......................................................................................................23
Figure 5: BCM50 Contact Center Reporting Server page...............................................................................................23
Figure 6: CCRS Installation Welcome screen................................................................................................................. 24
Figure 7: CCRS Installation destination folder screen....................................................................................................24
Figure 8: Installing Contact Center Reporting Database screen......................................................................................25
Figure 9: MSDE installation message.............................................................................................................................25
Figure 10: Microsoft .NET Framework installation message..........................................................................................26
Figure 11: CCRS configuration tool launch message......................................................................................................26
Figure 12: Contact Center Reporting Server Config screen............................................................................................27
Figure 13: Test Complete with results and Success message box...................................................................................28
Figure 14: CCRS Setup Complete screen........................................................................................................................29
Figure 15: Add or Remove Programs..............................................................................................................................30
Figure 16: Windows Components Wizard......................................................................................................................31
Figure 17: Windows Components Wizard Installation ...................................................................................................32
Figure 18: Windows Components Wizard Installation Completed.................................................................................33
Figure 19: Internet Information Services test page..........................................................................................................34
Figure 20: Download the Reporting for Contact Center Software..................................................................................38
Figure 21: InstallShield Initialization Dialog..................................................................................................................39
Figure 22: Language Selection Dialog............................................................................................................................39
Figure 23: InstallShield Windows Installer Configuration Dialog Box..........................................................................40
Figure 24: InstallShield Wizard Start Dialog Box...........................................................................................................40
Figure 25: License Agreement Dialog Box.....................................................................................................................41
Figure 26: Choose Destination Location Dialog Box......................................................................................................41
Figure 27: Setup Status Dialog Box................................................................................................................................42
Figure 28: ODBC Driver Installation Dialog..................................................................................................................42
Figure 29: MySQL 3 Port Setter Dialog..........................................................................................................................43
Figure 30: MySQL 4 Port Setter Dialog..........................................................................................................................43
Figure 31: Database Installation Dialog..........................................................................................................................44
Figure 32: Java Installation Dialog..................................................................................................................................44
Figure 33: Installation Complete Dialog Box..................................................................................................................44
Figure 34: Windows Security Center Window................................................................................................................45
Figure 35: Windows Firewall Dialog Box ......................................................................................................................46
Figure 36: Advanced Settings Dialog Box......................................................................................................................47
Figure 37: Add a Port Dialog Box...................................................................................................................................47
Figure 38: IIS Main Window with Web Service Extensions Selected............................................................................48
Figure 39: IIS Manager with the RCC Folder Selected...................................................................................................49
Figure 40: RCC Properties Dialog Box...........................................................................................................................49
Figure 41: Application Configuration Dialog Box..........................................................................................................50
Figure 42: Options Tab....................................................................................................................................................50
Figure 43: Add New Application Pool Dialog Box.........................................................................................................51
Figure 44: Application Pool Identity Tab........................................................................................................................52
Figure 45: Selecting RCC................................................................................................................................................52
Figure 46: RCC Properties..............................................................................................................................................53
Figure 47: Login page .....................................................................................................................................................56
Figure 48: Change Password page..................................................................................................................................57
Figure 49: Contact Center Connection page....................................................................................................................58
Figure 50: Download Contact Center Data options.........................................................................................................60
Figure 51: Download Status Window .............................................................................................................................61
Figure 52: Administration Menu page ............................................................................................................................63
Figure 53: System Administration Menu page................................................................................................................64
Figure 54: System Administrator details page ................................................................................................................65
Figure 55: User Admin page...........................................................................................................................................67
Figure 56: Add User page ...............................................................................................................................................68
NN40040-302
Page 7

List of Figures 7
Figure 57: Details for new User Mary Smith...................................................................................................................70
Figure 58: Edit User page................................................................................................................................................72
Figure 59: Skillset Assignment page...............................................................................................................................74
Figure 60: Assigned Skillsets page..................................................................................................................................75
Figure 61: Skillsets Assigned to User Mary Smith..........................................................................................................76
Figure 62: Maintenance Menu page................................................................................................................................77
Figure 63: System Status page.........................................................................................................................................78
Figure 64: Logging Menu page .......................................................................................................................................79
Figure 65: Logging Menu page with logging stopped.....................................................................................................80
Figure 66: Company Details page ................................................................................................................................... 81
Figure 67: Main Menu page ............................................................................................................................................82
Figure 68: Change Password page...................................................................................................................................84
Figure 69: User Main Menu page....................................................................................................................................85
Figure 70: Print Schedules page......................................................................................................................................87
Figure 71: Your Daily Schedules page............................................................................................................................88
Figure 72: Add Daily Schedule page...............................................................................................................................89
Figure 73: Add Daily Schedule page – example settings................................................................................................90
Figure 74: Daily Schedule - Skillsets page......................................................................................................................91
Figure 75: Save Favourites page......................................................................................................................................93
Figure 76: Your Daily Schedules with a Schedule in the List.........................................................................................95
Figure 77: Edit Daily Schedule page...............................................................................................................................97
Figure 78: Your Weekly Schedules page ........................................................................................................................98
Figure 79: Add Weekly Schedule page ...........................................................................................................................99
Figure 80: Calendar for September 2003.......................................................................................................................100
Figure 81: Add Weekly Schedule page – example schedule.........................................................................................101
Figure 82: Weekly Schedules - Skillsets .......................................................................................................................102
Figure 83: Your Weekly Schedules page with a Schedule in the list............................................................................104
Figure 84: Edit Weekly Schedule page..........................................................................................................................106
Figure 85: Your Monthly Schedules page.....................................................................................................................108
Figure 86: Add Monthly Schedule page........................................................................................................................109
Figure 87: Add Monthly Schedule page with a schedule example................................................................................110
Figure 88: Monthly Schedule - Skillsets page...............................................................................................................112
Figure 89: Your Monthly Schedules page with a Schedule in the list...........................................................................114
Figure 90: Edit Monthly Schedule page........................................................................................................................115
Figure 91: Real Time page ............................................................................................................................................117
Figure 92: Real Time Call Summary Real Time Screens..............................................................................................118
Figure 93: Real Time Agent Summary Real Time Screen............................................................................................121
Figure 94: Real Time Call Detail Screen.......................................................................................................................122
Figure 95: Agent Detail Real Time................................................................................................................................124
Figure 96: Agent Alarms Menu page ............................................................................................................................127
Figure 97: Agent Alarms Setup page.............................................................................................................................129
Figure 98: Agent Alarms Values page...........................................................................................................................130
Figure 99: Wallboard Menu page..................................................................................................................................135
Figure 100: Wallboard Assignment page......................................................................................................................136
Figure 101: Add Wallboard page...................................................................................................................................137
Figure 102: Wallboard Setup page with wallboard listed..............................................................................................139
Figure 103: Edit Wallboard page...................................................................................................................................140
Figure 104: Edit Parameters page..................................................................................................................................141
Figure 105: Assigned Messages page............................................................................................................................143
Figure 106: Add Message page .....................................................................................................................................144
Figure 107: Add Message page – example text.............................................................................................................145
Figure 108: Assigned Messages List – Example Messages...........................................................................................146
Figure 109: Assigned Alarms page................................................................................................................................147
Figure 110: Add Alarm page.........................................................................................................................................148
Figure 111: Example Settings for a Multi Alarm Period Ala rm....................................................................................151
Figure 112: Assigned Alarms page with an Alarm configured......................................................................................153
Figure 113: Assigned Schedules page...........................................................................................................................154
Figure 114: Add Schedule page..................................................................................................................................... 155
Figure 115: Assigned Schedules page with Schedule added.........................................................................................156
Figure 116: Edit Schedule page.....................................................................................................................................157
Reporting for Contact Center Setup and Operations Guide
Page 8

8 List of Figures
Figure 117: Instant Messages page................................................................................................................................158
Figure 118: Composing an Instant Message..................................................................................................................159
Figure 119: Time Bin Setup Skillset selection page......................................................................................................162
Figure 120: Time Bins page..........................................................................................................................................163
Figure 121: Reports menu page.....................................................................................................................................166
Figure 122: Selecting a Date Range..............................................................................................................................168
Figure 123: Print Status page ........................................................................................................................................ 170
Figure 124: Cancel Print page.......................................................................................................................................171
Figure 125: Opening Report(s) window........................................................................................................................172
Figure 126: Select Skillsets page...................................................................................................................................173
Figure 127: Select Agents page.....................................................................................................................................174
Figure 128: Select Activity Codes page........................................................................................................................175
Figure 129: Get Latest Contact Center Data .................................................................................................................176
NN40040-302
Page 9

List of Tables 9
List of Tables
Table 1: Administrator and User Permissions......................................................................................................69
Reporting for Contact Center Setup and Operations Guide
Page 10

10 List of Tables
NN40040-302
Page 11

11
How to Use this Guide
1
Introduction
This guide is designed to allow an Administrator or User to set up and operate Nortel
Reporting for Contact Center.
How this guide is organized
The Reporting for Contact Center Setup and Operations Guide is organized as follows:
How to Use this Document Provides a brief overview identifying the organization
of this guide. This also details how to get help from
Nortel.
Introduction Provides an overview of the conceptual organization of
the Nortel Reporting for Contact Center product.
Installation Describes the minimum specification for the Personal
Computer (PC) required that hosts the Nortel
Reporting for Contact Center software. It also
describes how to install Nortel Reporting for Contact
Center and the Contact Center Reporting Server for
BCM50 2.0.
Administration Describes the required administration duties and
configuration to ensure that Nortel Reporting for
Contact Center operates correctly.
Using Reporting for Describes the use and configuration of
Contact Center Nortel Reporting for Contact Center from a user’s
perspective.
Reports Describes the reports that are available within Nortel
Reporting for Contact Center.
Glossary Describes the terms used in this guide.
References Lists documents referenced in this guide.
Index Provides a cross-reference of topics in this guide.
Reporting for Contact Center Setup and Operations Guide
Page 12

How to Use this Guide
12
How to get Help
This section explains how to get help for Nortel products and services.
Getting Help from the Nortel Web site
The best source of support for Nortel products is the Nortel Support Web site:
http://www.nortel.com/support
This site enables customers to:
• Download software and related tools
• Download technical documents, release notes, and product bulletins
• Sign up for automatic notification of new software and documentation
• Search the Support Web site and Nortel Knowledge Base
• Open and manage technical support cases
Getting Help over the phone from a Nortel Solutions Center
If you have a Nortel support contract and cannot find the information you require on the
Nortel Support Web site, you can get help over the phone from a Nortel Solutions Center.
In North America, call 1-800-4NORTEL (1-800-466-7835).
Outside North America, go to the following Web site and look up the phone number that
applies to your region:
http://www.nortel.com/callus
When you speak to the phone agent, you can reference an Express Routing Code (ERC) to
route your call more quickly to the appropriate support specialist. To locate the ERC for your
product or service, go to:
http://www.nortel.com/erc
Getting Help through a Nortel distributor or reseller
If you purchased a service contract for your Nortel product from a distributor or authorized
reseller, you can contact the technical support staff for that distributor or reseller.
NN40040-302
Page 13

13
Introduction
Nortel Reporting for Contact Center is a browser-based Real Time information and Historical
Reporting tool for the Nortel Contact Center.
Nortel Reporting for Contact Center provides:
Real Time windows showing current Contact Center activity for calls and for agents
Real Time information through hardware and software IP-enabled wallboards
A comprehensive Historical Reporting package
In this document, the phrase the Contact Center platform is used to refer to
either the Business Communications Manager or the CallPilot hardware, and
the phrase the Contact Center is used to refer to the Contact Center
application running on that platform. The platforms are referenced
!
specifically by name in areas of this document such as those that describe
the information concerning the configuration of the Contact Center
Connection page (page 58).
2
Web-Based User Interface
All the administrative and user interactions with Nortel Reporting for Contact Center are
conducted through a series of Web pages that are accessed through Internet Explorer browser
sessions.
The Web pages are hosted on a designated PC, referred to as the Web Host PC, on which the
Nortel Reporting for Contact Center software is installed. The Web Host PC communicates
directly with the Contact Center to retrieve Real Time updates (for the Real Time screens and
wallboards) and Historical information (for the reports).
Other PCs that have network access to the Web Host PC can access these Web pages.
Multiple users can, therefore, use Nortel Reporting for Contact Center without having any
software other than Internet Explorer installed on their PCs. (The Java runtime environment,
if required, and the Crystal Reports ActiveX report viewer are automatically downloaded to
the client the first time they are required.)
Language Support
Each Administrator or User of Nortel Reporting for Contact Center can specify to view their
Web user interface pages in one of the following 13 languages: North American English,
United Kingdom English, Canadian French, Latin American Spanish, Brazilian Portuguese,
Spanish, Dutch, French, German, Italian, Norwegian, Danish, and Swedish.
Each Administrator or User can also view individual wallboards in any of these languages.
NN40040-302
Page 14

Introduction
14
Administrators and Users
The two types of Nortel Reporting for Contact Center users are Administrators and Users.
In addition to having access to all the features of Nortel Reporting for Contact Center,
Administrators can specify and change fundamental configuration settings within Nortel
Reporting for Contact Center.
For security purposes and to maintain system stability, only Users with Administrator
capabilities can change the fundamental configuration settings. User interactions with Nortel
Reporting for Contact Center are limited to using the features that it provides.
While Users cannot modify the core setup of Nortel Reporting for Contact Center, they can
specify and change some personal preferences. Users can also configure any aspects of Nortel
Reporting for Contact Center that affect only themselves.
Administrators and Users view different menus when they log in.
Assigned Skillsets
Administrators create Users by providing details, such as User Name and language, to Nortel
Reporting for Contact Center. The Administrator must then assign Skillsets to Users.
The process of assigning Skillsets defines the Skillsets that each User can view in the Real
Time screens and for which the User can request Historical Reports. Skillsets can be assigned
to more than one User.
Users can choose to view the Real Time screens or Historical Reports for any of the Skillsets
assigned to them, any combination of the allocated Skillsets, or all the assigned Skillsets.
Users, including the Administrator, can save frequently used Selections of Skillsets as
Favorites and assign names to the Favorites. The User can then, with a single mouse click,
quickly locate a Skillset selection. Favorites are unique to each User. Users can create,
modify, or delete their Favorites without affecting the Favorites of other Users.
SQL Historical Database
Historical Report information is stored in a standard MySQL database. If Users have
reporting requirements that are not available through Nortel Reporting for Contact Center,
they can analyze the data using third-party reporting packages.
System Software
The software that sends data to Nortel Reporting for Contact Center is integral to the Nortel
Contact Center.
NN40040-302
Page 15

Introduction 15
Nortel Reporting for Contact Center software on the Web Host PC communicates directly
with the Contact Center to request Contact Center Historical Report statistical data and Real
Time data.
Users on other PCs can access the Real Time and Historical Report data by pointing their
Internet browsers to the Nortel Reporting for Contact Center Web pages on the Web Host PC.
Only the Web Host PC needs to communicate with the Contact Center.
One PC on your network should be designated as the Web Host PC. Install the
Nortel Reporting for Contact Center application software onto the designated
PC only.
Ensure that the PC with CCRS installed for BCM50 2.0 is switched on at all
times when the Contact Center is running so that all statistics are collected. If it
is not switched on this will result in a loss of call data.
!
All other network PCs from which Users access the Real Time screens,
Historical Reports, or the Nortel Reporting for Contact Center user interface
must be equipped with Internet Explorer. No other software is required on these
PCs.
PC Requirements
The minimum recommended requirements for the PC designated as the Nortel Reporting for
Contact Center Web Host PC for BCM 4.0 and for BCM50 2.0 without the Contact Center
Reporting Server (CCRS) installed on the Web Host PC are as follows:
Recommended Minimum PC Specification for BCM 4.0 and BCM50 2.0
IBM™ Compatible PC
Microprocessor
®
Intel
PentiumTM IV (or equivalent) minimum
Microprocessor Speed
1.7 GHz minimum
Memory
512 MB minimum
Network Interface Card
TCP/IP protocol
SVGA display
Mouse (or other Windows®-compatible pointing device)
Microsoft Internet Explorer version 5 or higher
Operating System
Microsoft Windows NT 4 Service Pack 6a
Microsoft Windows 2000 SP2
Microsoft Windows XP Professional
Reporting for Contact Center Setup and Operations Guide
Page 16

Introduction
16
Microsoft Windows Server 2003 Standard Edition
Web Server
Nortel Reporting for Contact Center has been verified with Microsoft Internet Information
Services 4, 5, and 6.
Nortel Reporting for Contact Center is supported on a single PC only and is not intended to
run on Cluster Servers like those supported by Windows 2003 Enterprise.
Hard Disk Space Required
For installation of application on Web Server: 109 MB
Storage space required for Historical Data: 4 GB minimum
Note that the database will grow through time and, if the diagnostic logging option is turned
on, the log files will require extra disk space.
Operating System Compatibility
Nortel Reporting for Contact Center is verified for correct operation on the following
operating systems:
Operating System Version
Windows NT 4.00.1381
Windows 2000 5.00.2195
Windows XP Professional Version 2002
Windows Server 2003 Standard Edition
The minimum recommended requirements for the PC designated as the Nortel Reporting for
Contact Center Web Host PC for BCM50 2.0 with the CCRS installed on the Web Host PC
are as follows:
Recommended Minimum PC Specification for BCM50 2.0 with CCRS Installed
IBM™ Compatible PC
Microprocessor
Intel® PentiumTM IV (or equivalent) minimum
Microprocessor Speed
2.0 GHz minimum
Memory
512 MB minimum
Network Interface Card
TCP/IP protocol
SVGA display
Mouse (or other Windows®-compatible pointing device)
Microsoft Internet Explorer version 5 or higher
Operating System
NN40040-302
Page 17

Introduction 17
Microsoft Windows 2000 Professional SP4
Microsoft Windows XP Professional SP2
Web Server
Nortel Reporting for Contact Center has been verified with Microsoft Internet Information
Services 4, 5, and 6.
Nortel Reporting for Contact Center is supported on a single PC only and is not intended to
run on Cluster Servers like those supported by Windows 2003 Enterprise.
Hard Disk Space Required
For the CCRS application on Web Server: 1 GB minimum
For installation of application on Web Server: 109 MB
Storage space required for Historical Data: 4 GB minimum
Note that the database will grow through time and, if the diagnostic logging option is turned
on, the log files will require extra disk space.
Operating System Compatibility
Nortel Reporting for Contact Center is verified for correct operation on the following
operating systems:
Operating System Version
Windows 2000 Professional
Windows XP Professional 2002
The minimum recommended requirements for a PC that is not the Web Host PC for BCM50
2.0 with the CCRS installed are as follows:
Recommended Minimum PC Specification for BCM50 2.0 on a PC with only CCRS installed
IBM™ Compatible PC
Microprocessor
®
PentiumTM IV (or equivalent) minimum
Intel
Microprocessor Speed
1.5 GHz minimum
Memory
256 MB minimum
Network Interface Card
TCP/IP protocol
SVGA display
Mouse (or other Windows®-compatible pointing device)
Microsoft Internet Explorer version 5 or higher
Reporting for Contact Center Setup and Operations Guide
Page 18

Introduction
18
Operating System
Microsoft Windows 2000 Professional SP4
Microsoft Windows XP Professional SP2
Web Server
Nortel Reporting for Contact Center has been verified with Microsoft Internet Information
Services 4, 5, and 6.
Nortel Reporting for Contact Center is supported on a single PC only and is not intended to
run on Cluster Servers like those supported by Windows 2003 Enterprise.
Hard Disk Space Required
For the CCRS application: 1 GB minimum
Operating System Compatibility
Nortel Reporting for Contact Center is verified for correct operation on the following
operating systems:
Operating System Version
Windows 2000 Professional
Windows XP Professional 2002
NN40040-302
Page 19

19
Installation
3
Introduction
This chapter describes the installation prerequisites and the procedure for installing the Nortel
Reporting for Contact Center software on the Windows Personal Computer that is designated
as the Web Host PC. The Web Host PC communicates with the Nortel Contact Center. The
Web Host PC also stores the Contact Center statistical database and the Nortel Reporting for
Contact Center user interface, which is configured as a web site.
Users of other network PCs can use Internet Explorer to access the Nortel Reporting for
Contact Center web site on the Web Host PC. From the web site, Users can access the
software features and can obtain Real Time displays and Reports.
Upgrading to Reporting for Contact Center
This section describes the installation of Nortel Reporting for Contact Center from Nortel
Networks Call Center Reporting on a Web Host PC.
If you are upgrading from Call Center Reporting 2.5, 3.0, or 3.5, refer to the Upgrading from
Call Center Reporting to Reporting for Contact Center document.
If you are upgrading from a previous version of Nortel Reporting for Contact Center to a later
version of Nortel Reporting for Contact Center, refer to the following section, Upgrading a
Previous Version of Reporting for Contact Center.
Upgrading a Previous Version of Reporting for Contact Center
Follow these steps to perform an upgrade of a previous installation of Nortel Reporting for
Contact Center.
1. On the Windows taskbar, select Start > Settings and then click Control Panel. The
Control Panel window appears
2. Double-click the Add or Remove Programs icon.
3. From the list of programs select Reporting for Contact Center.
4. Click the Change/Remove button to start InstallShield Wizard.
5. The InstallShield Wizard window will open up. Select the Remove option and click the
Next button.
6. Follow the on-screen instructions of InstallShield Wizard to complete the un-
installation.
7. To install the latest version of Nortel Reporting for Contact Center, double-click on the
Reporting for Contact Center .exe file.
8. InstallShield Wizard will open up. Follow the on-screen instructions to be guided
through the installation process.
NN40040-302
Page 20
Installation
20
Note: You DO NOT need to uninstall MySQL Servers and Clients 4.1.14 or the Java 2
Runtime Environment SE v.1.5.0.
If required, the Nortel Reporting for Contact Center databases are modified during the
installation. There is no loss of statistical data, but new data, tables, columns, and/or indexes
may be added to them.
Deleting Temporary Internet Files
To prevent Internet Explorer from caching old versions of the Nortel Reporting for Contact
Center web pages, delete the temporary Internet files on your computer. Follow these steps to
delete temporary Internet files.
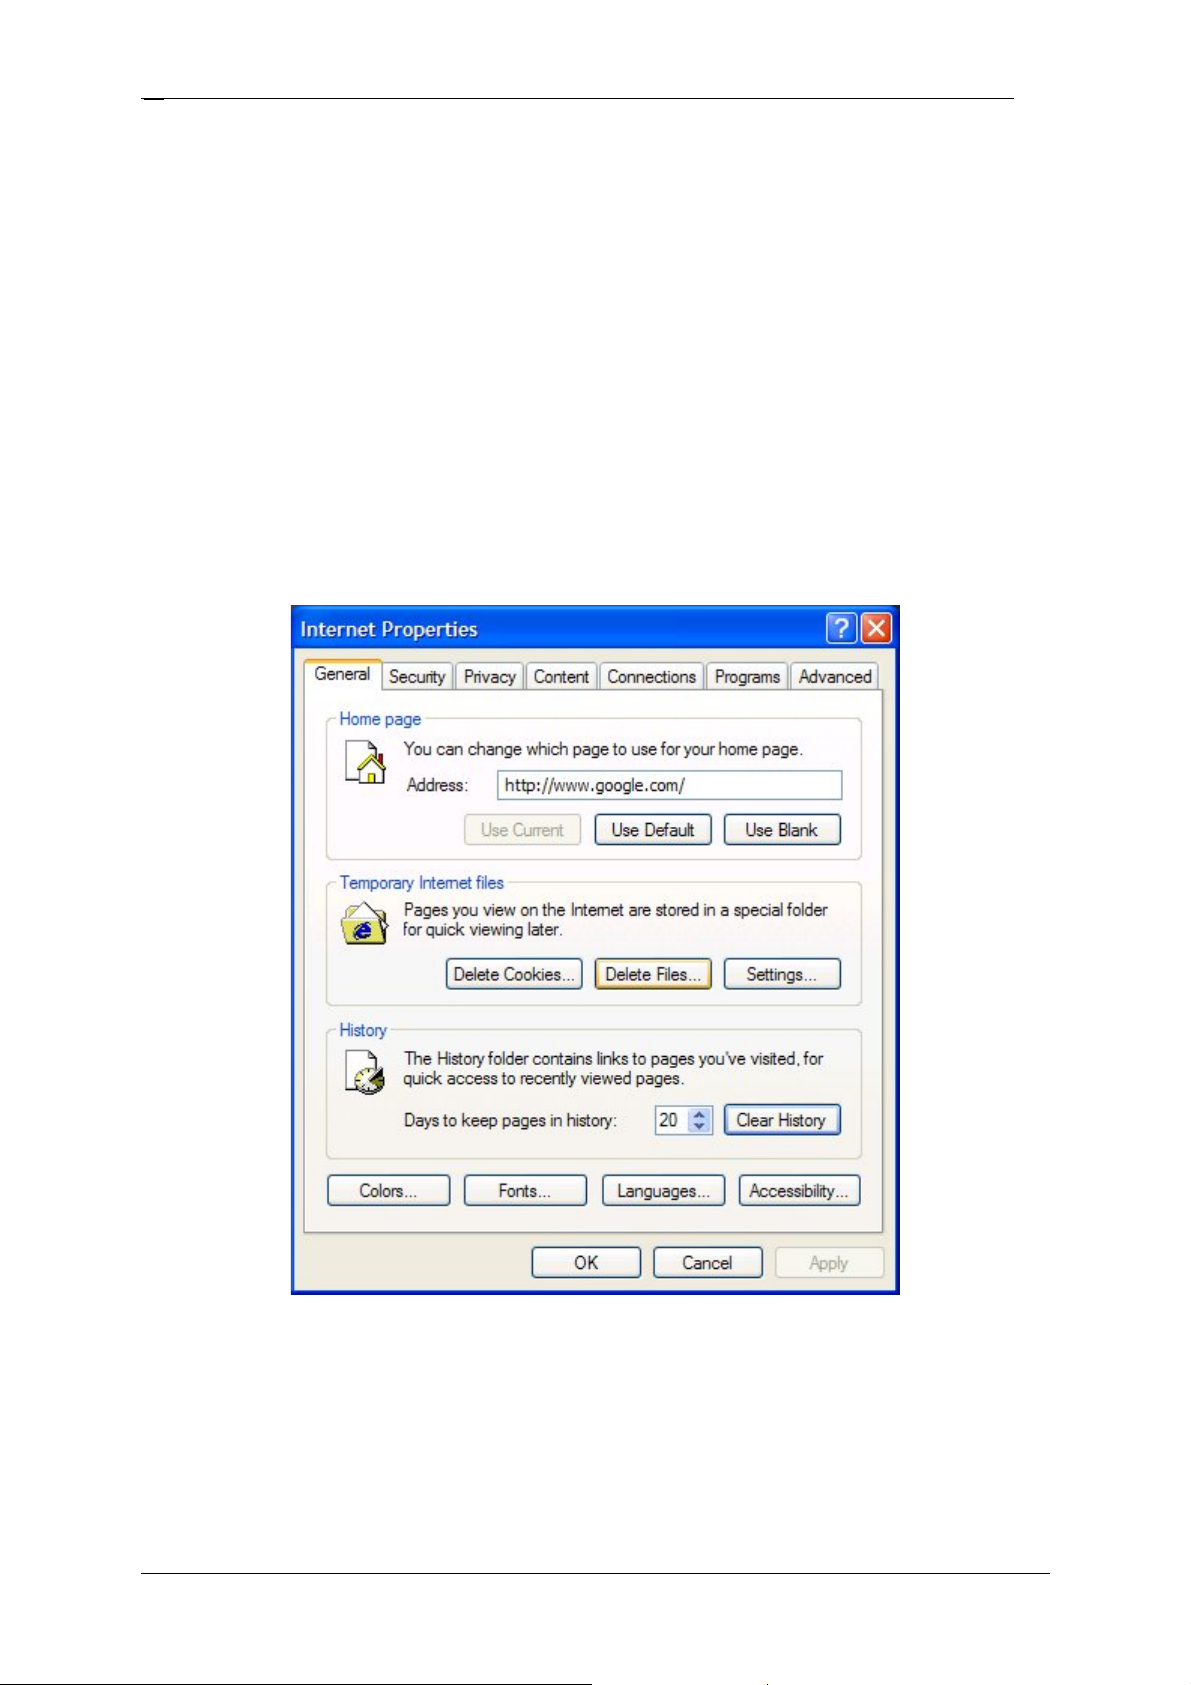
1. Click Start, then right-click the Internet Explorer icon, and select Internet
Properties. See Figure 1: Internet Properties Dialog Box.
Figure 1: Internet Properties Dialog Box
Note: If you do not see the dialog box shown in Figure 1, you have clicked a shortcut to
Internet Explorer. You must click the Internet Explorer icon in the Start menu.
2. When you see the window shown in Figure 1, click Delete Files. The Delete Files
dialog shown in Figure 2: Delete Files Dialog appears.
NN40040-302
Page 21

Installation 21
Figure 2: Delete Files Dialog
3. Select Delete all offline content, and then click OK.
4. Click OK to close the Internet Properties window.
Proceed with the installation of Nortel Reporting for Contact Center, as described in
Installation prerequisites.
It may also be necessary to clear your Java Cache when upgrading RCC. This is not strictly
necessary but should any problems be seen after the upgrade consult the Reporting for
Contact Center Troubleshooting and Maintenance Guide (NN40020-402).
Installation prerequisites
Before you install Nortel Reporting for Contact Center software, you must:
Be familiar with the Contact Center and the WindowsTM operating system used by
your Web Host PC.
Ensure that the Contact Center is installed and configured.
Ensure that the Contact Center platform is connected to, and is operational on, the
network to which the Nortel Reporting for Contact Center Web Host PC is connected.
Ensure that the full suite of Microsoft Internet Information Services is installed and
operational on the Web Host PC, and that the Default Web Site is enabled. To install
Microsoft Internet Information Services, refer to
Information Services.
For the BCM50 2.0 platform, ensure that CCRS is downloaded from the Contact
Center and installed and configured onto the Web Host PC, or any other PC on the
network to which Nortel Reporting for Contact Center Web Host PC is connected to.
To install CCRS, see
Installing the CCRS for BCM50 2.0, on page 21.
Installing the CCRS for BCM50 2.0
If the Contact Center platform is a BCM50 2.0 system the User must install the CCRS
separately onto a PC. CCRS should be installed before installing Reporting for Contact
Center.
Installing Microsoft Internet
Check the following points prior to installing CCRS:
• If you run the CCRS and the RCC reporting client on the same PC, ensure that you
configure them to use different ports. By default, RCC uses port 80 and the CCRS
uses port 8088.
Reporting for Contact Center Setup and Operations Guide
Page 22
Installation
22
• Ensure you do not have a firewall blocking the following ports used for the CCRS:
o Port 8088 – HTTP listening port
o Port 2222 - Control port
o Port 2223 - Real Time port
o Port 2224 - Historical port
Perform the following steps to install the CCRS:
1. Exit any Windows programs that are running.
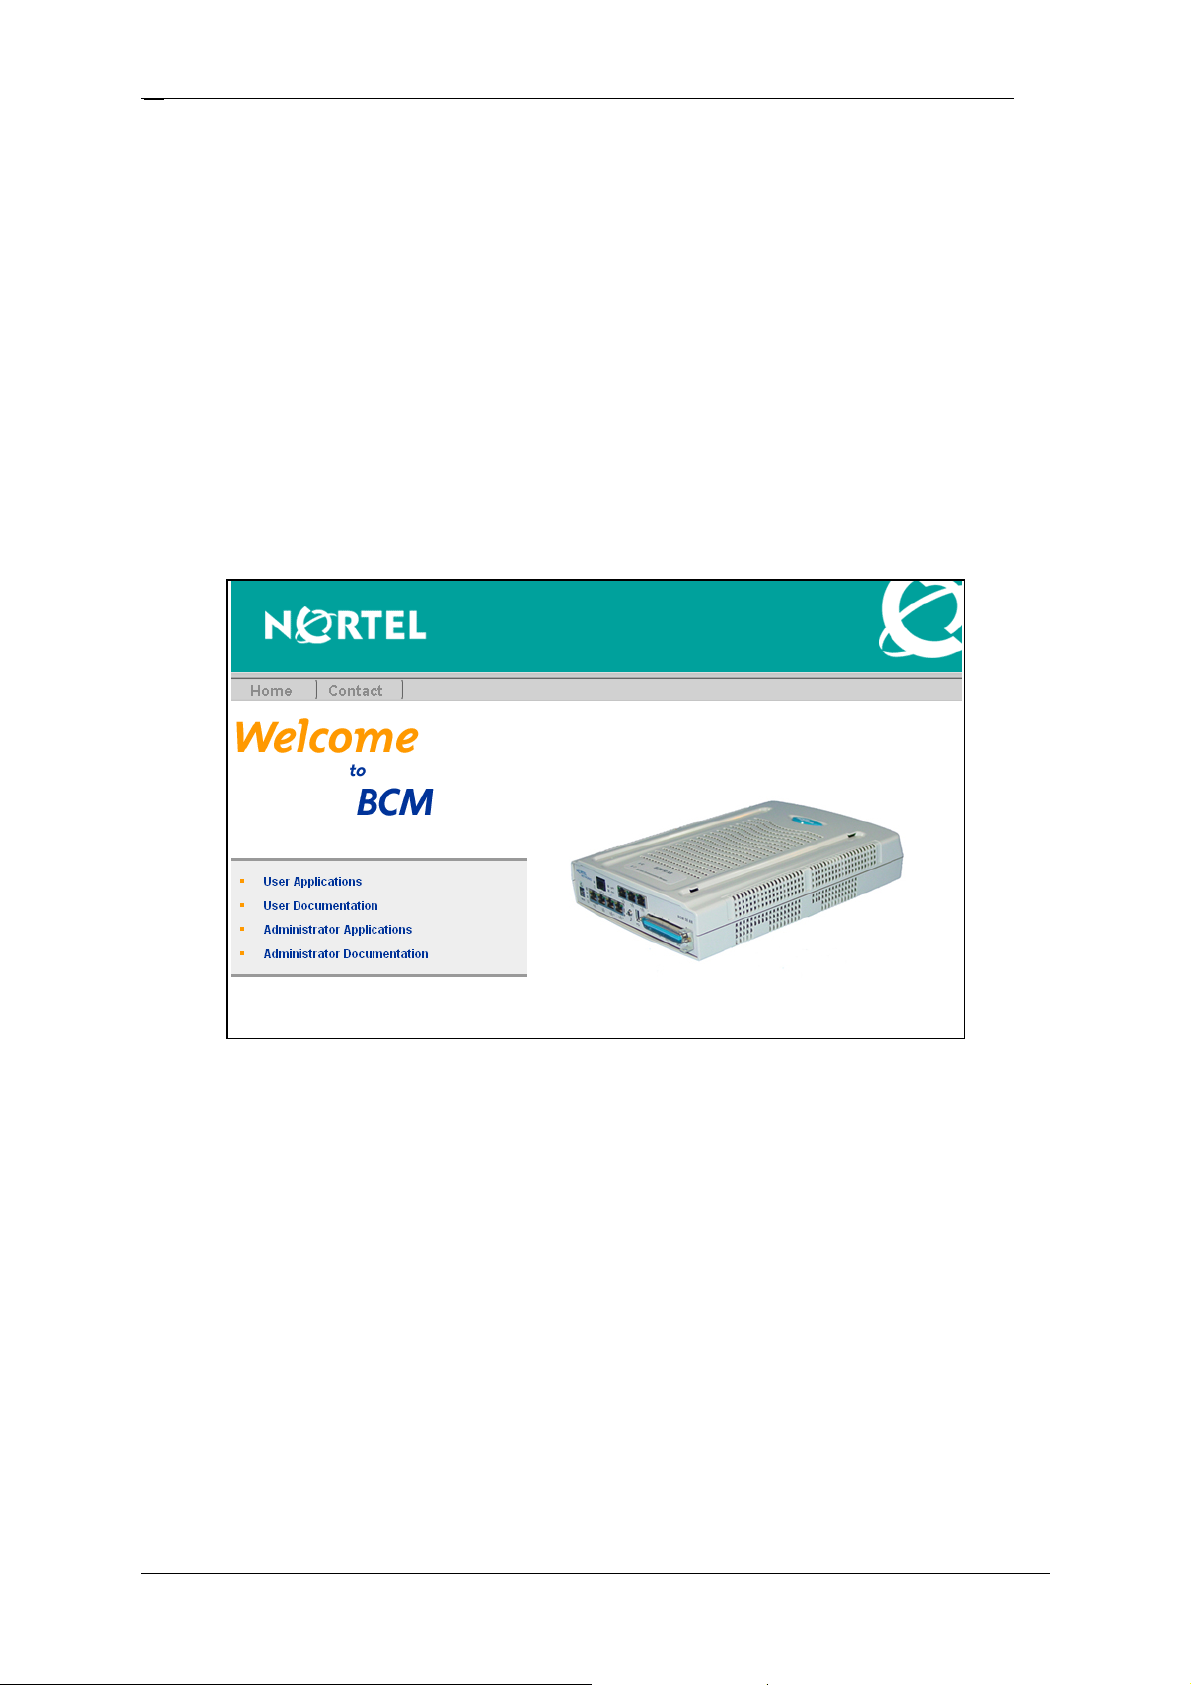
2. Start a browser session, and connect to the BCM50 Web page.
The BCM50 Login dialog box appears.
3. Enter your username and password, and click OK.
The Welcome to the BCM50 page appears, see Figure 3: BCM50 Welcome page.
Figure 3: BCM50 Welcome page
4. Click the Administrator Applications link.
The Administrator Applications page appears, see
Applications page.
NN40040-302
Figure 4: BCM50 Administrator
Page 23
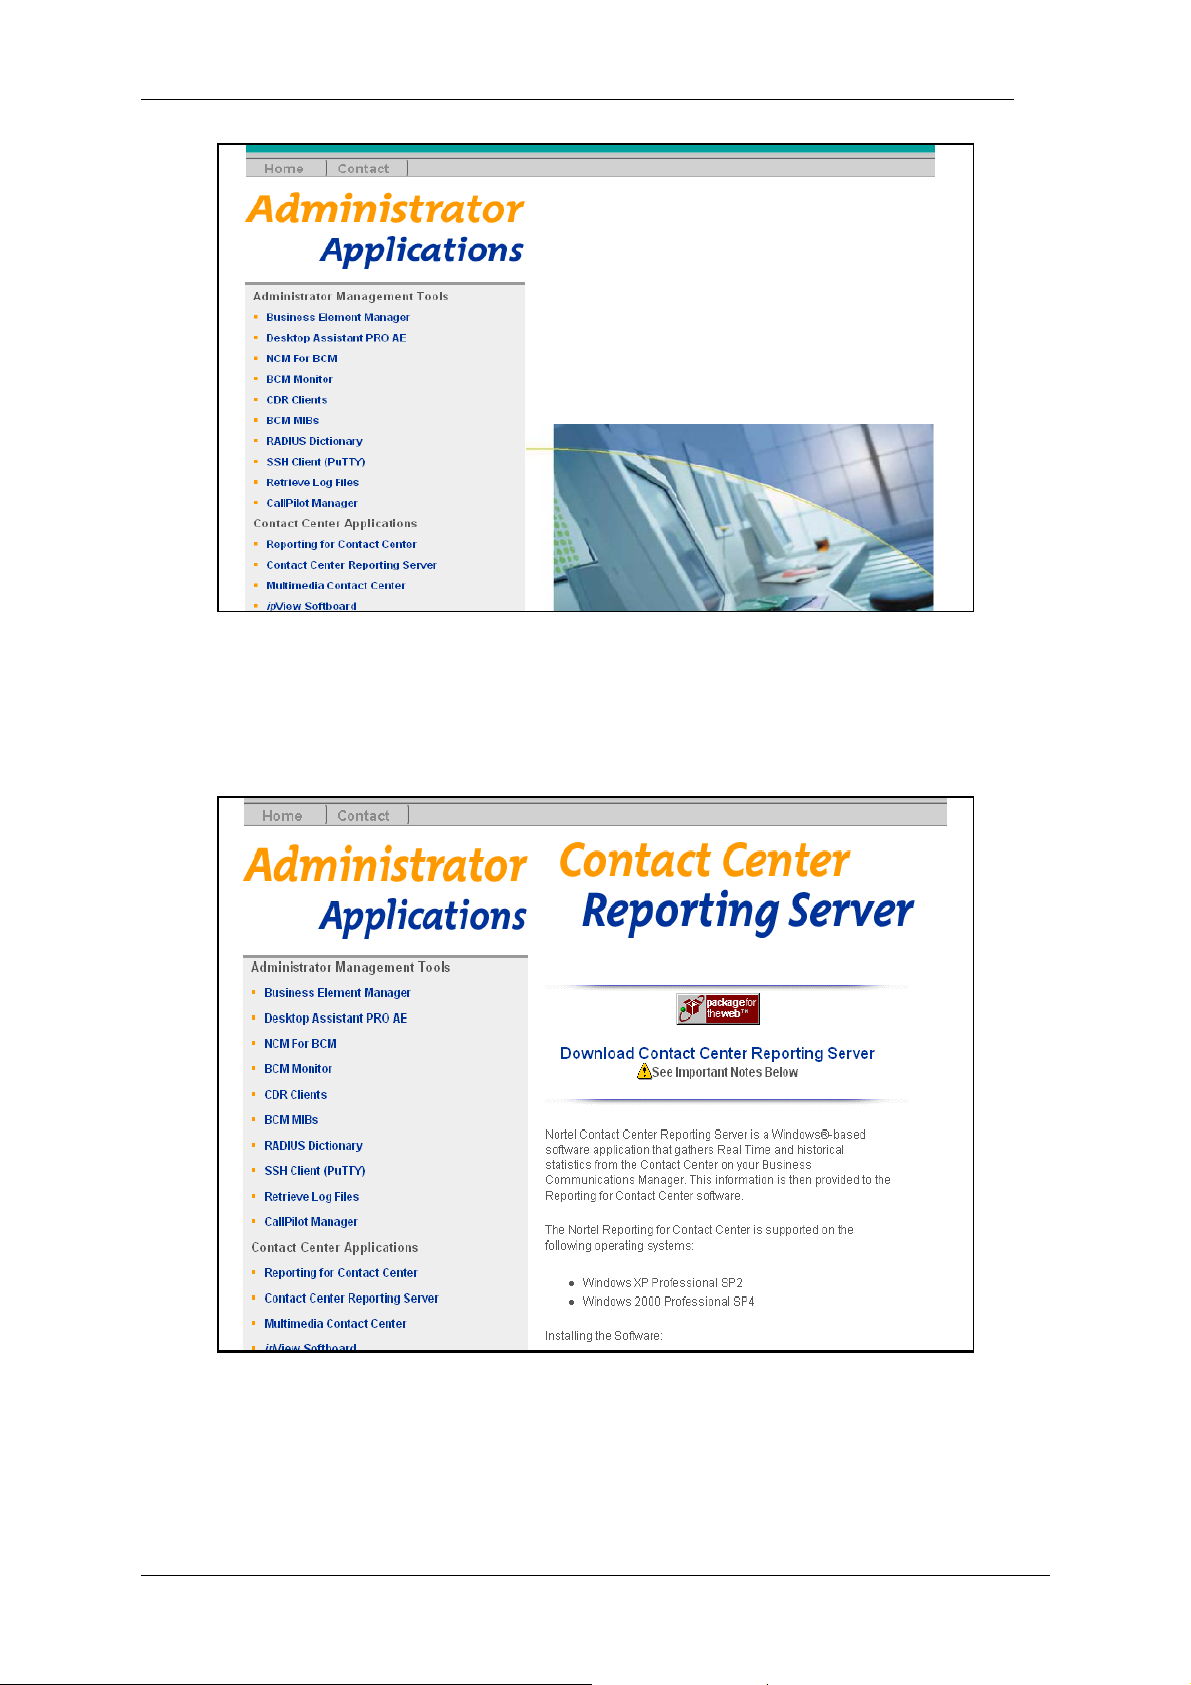
Figure 4: BCM50 Administrator Applications page
Installation 23
5. Click the Contact Center Reporting Server link.
The Contact Center Reporting Server download page appears, see Figure 5: BCM50
Contact Center Reporting Server page.
Figure 5: BCM50 Contact Center Reporting Server page
6. Click the Download Contact Center Reporting Server link.
A File Download dialog box appears.
7. Click Save, and save the application to the location from which you want to install it.
Reporting for Contact Center Setup and Operations Guide
Page 24
Installation
24
8. After the application downloads, double-click the application to launch the installation.
The Welcome screen appears as shown in Figure 6: CCRS Installation Welcome screen.
Figure 6: CCRS Installation Welcome screen
9. Click Next.
The License Agreement appears.
10. Click Yes to accept the license agreement.
The folder selection screen appears, see Figure 7: CCRS Installation destination folder
screen. Nortel recommends you install the CCRS in the default folder.
NN40040-302
Figure 7: CCRS Installation destination folder screen
Page 25
Installation 25
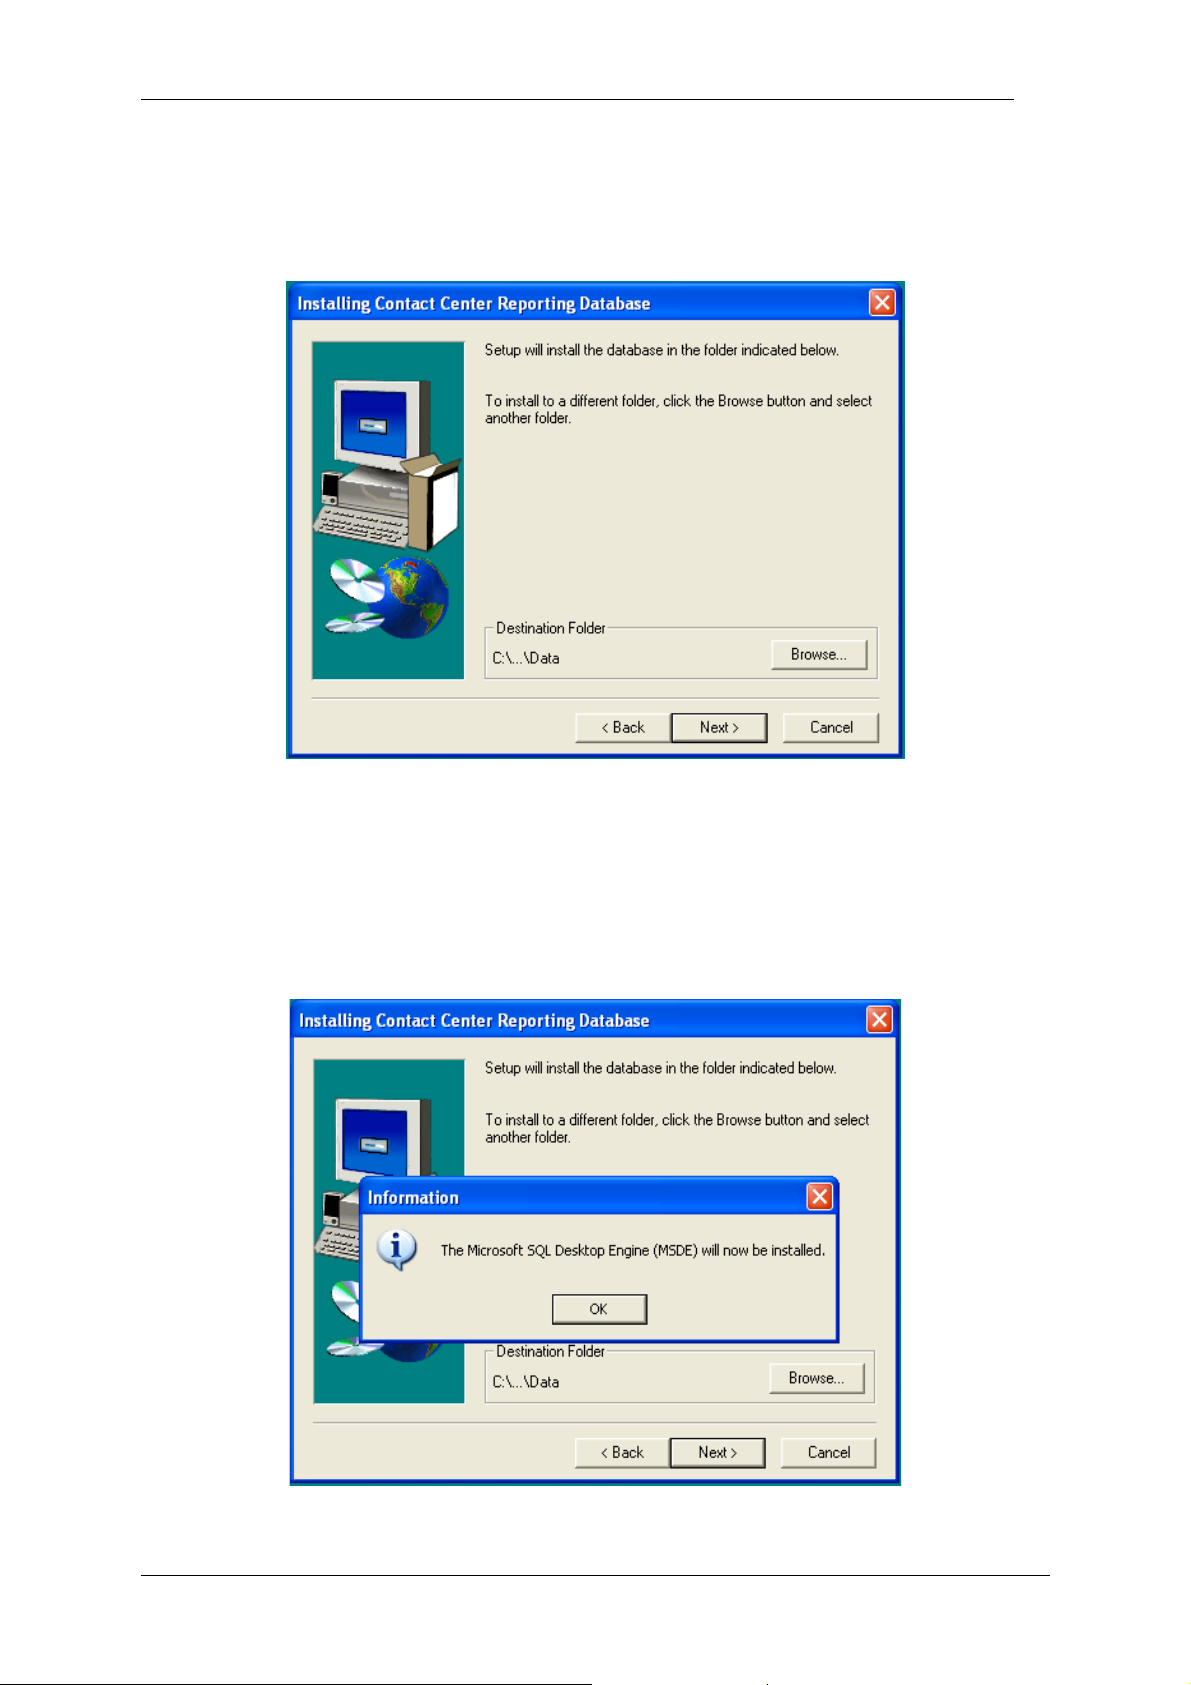
11. Click Next.
The Installing Contact Center Reporting Database screen appears to select the database
folder destination. See Figure 8: Installing Contact Center Reporting Database screen.
Figure 8: Installing Contact Center Reporting Database screen
Nortel recommends you install the database in the default folder shown.
12. Click Next to install the database.
If you do not have the Microsoft SQL Desktop Engine (MSDE) installed on your
computer, a message appears informing the user that MSDE will be installed. See Figure
9: MSDE installation message.
Figure 9: MSDE installation message
Reporting for Contact Center Setup and Operations Guide
Page 26
Installation
26
13. If you have MSDE installed, go to step 14.
or
If you do not have MSDE installed, click OK to install MSDE.
Once MSDE is installed, a message will appear informing the user to restart their PC for
the MSDE configuration changes to take effect.
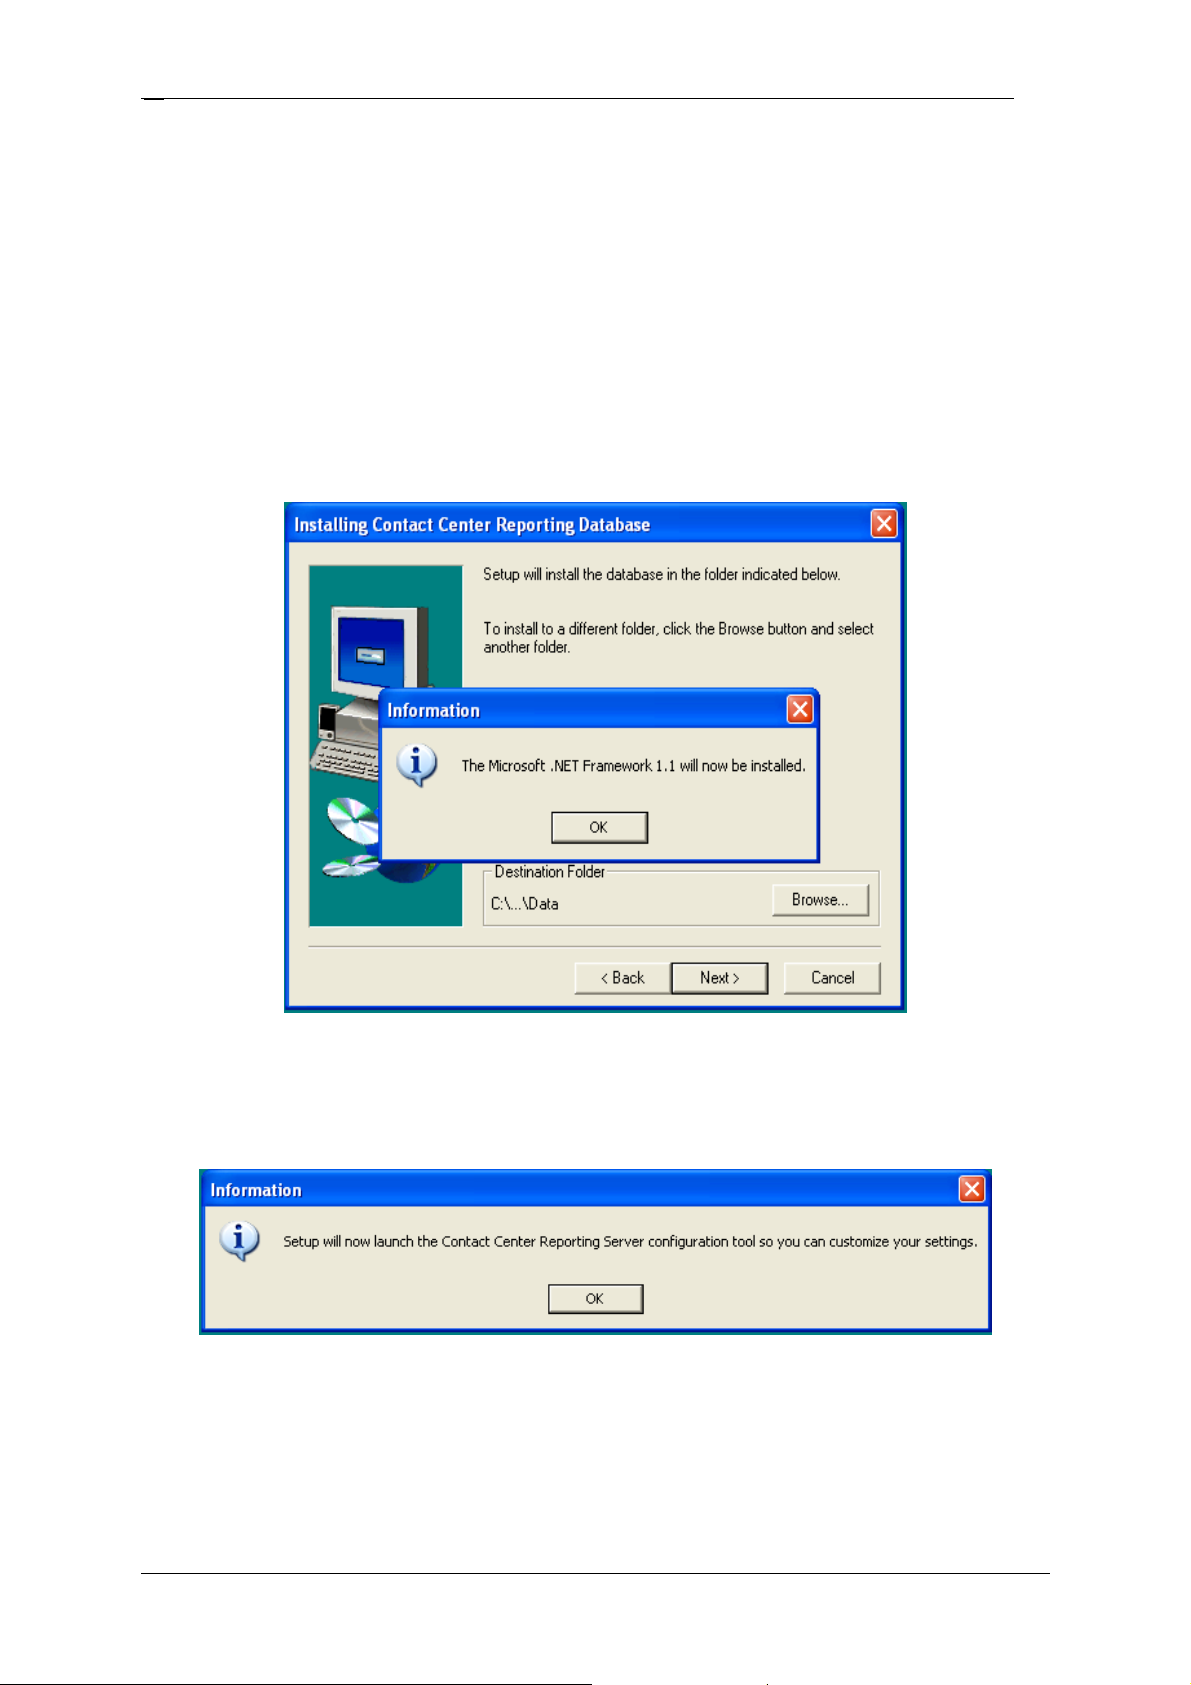
14. If you do not have Microsoft .NET Framework installed, a message appears informing
the user that Microsoft .NET Framework will be installed. See
Figure 10: Microsoft
.NET Framework installation message. Follow the information on the next six screens to
install it.
or
If you have Microsoft .NET Framework, go to step 15.
Figure 10: Microsoft .NET Framework installation message
15. A message appears that says the Contact Center Reporting Server configuration tool will
now launch, see
Figure 11: CCRS configuration tool launch message. Click OK.
Figure 11: CCRS configuration tool launch message
The Contact Center Reporting Server Config screen appears. See Figure 12: Contact Center
Reporting Server Config screen.
NN40040-302
Page 27
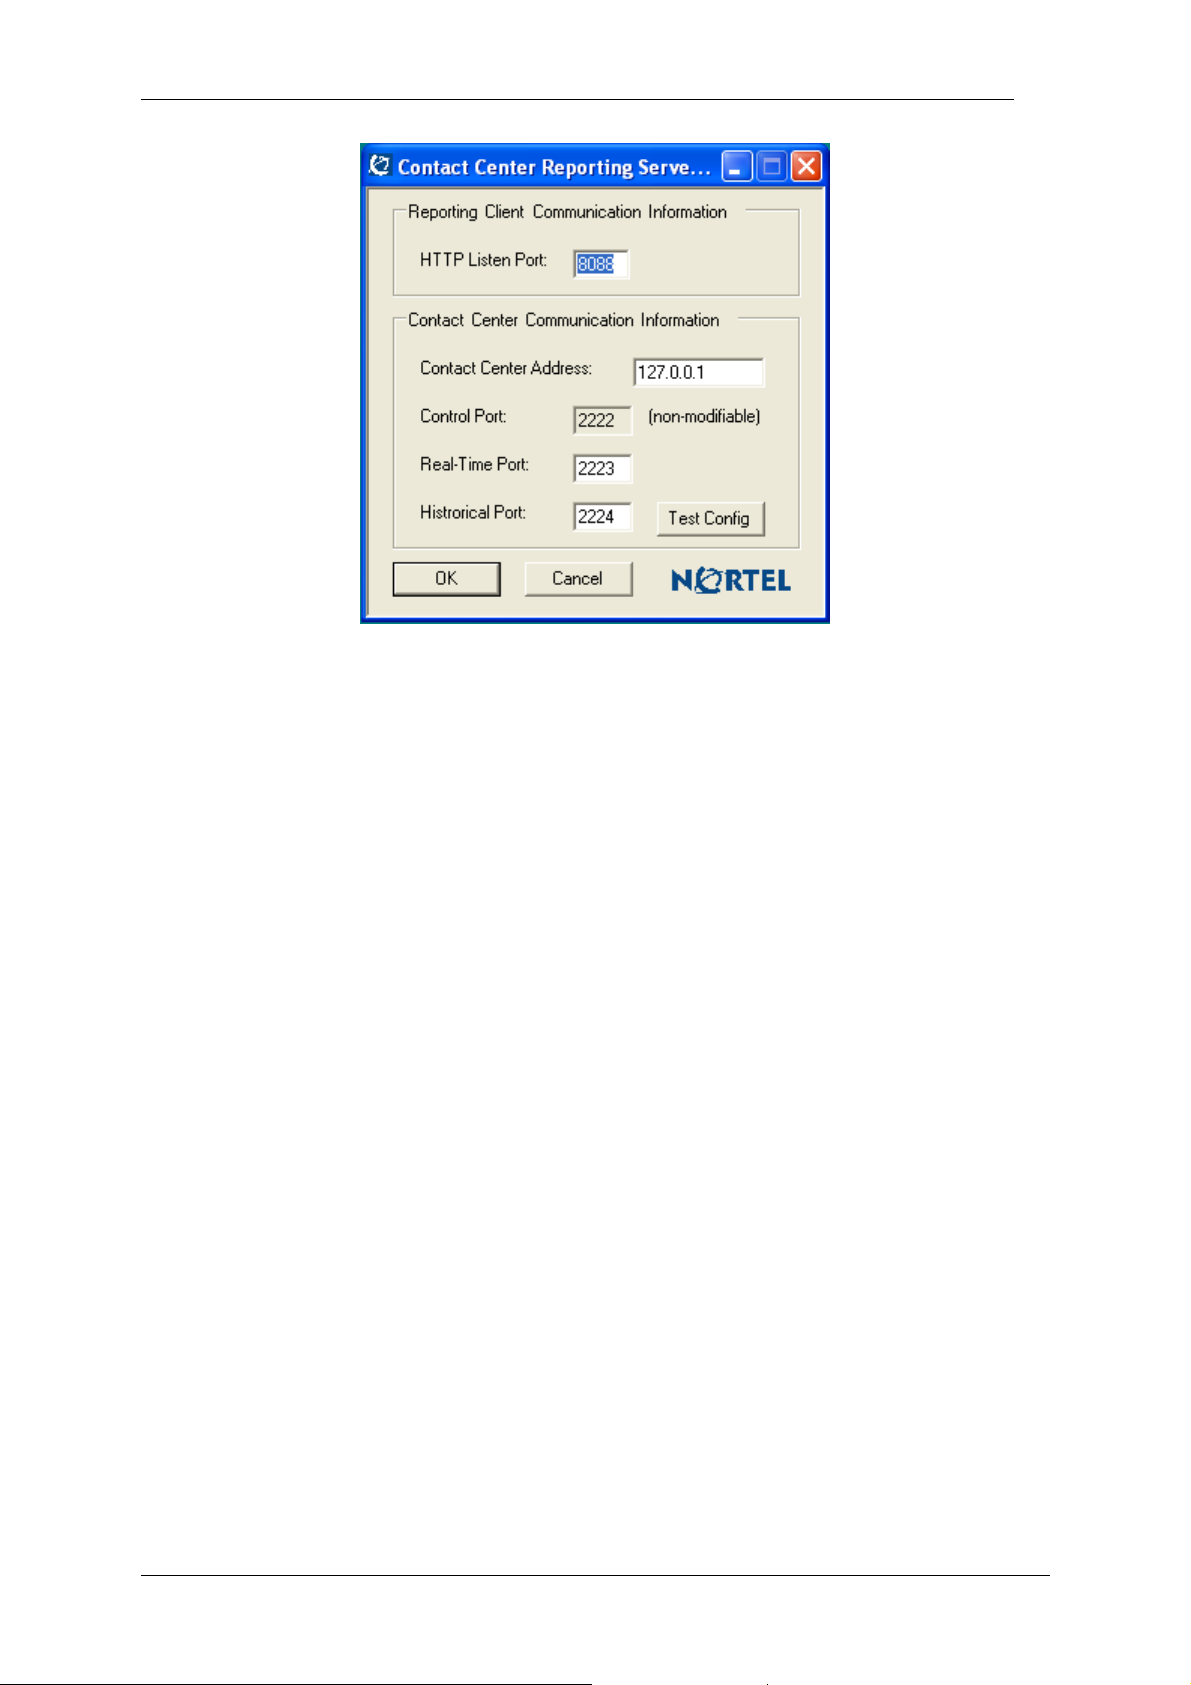
Figure 12: Contact Center Reporting Server Config screen
Installation 27
16. On the Contact Center Reporting Server Config screen:
a. In the Contact Center Address box, your local host address automatically appears.
Change the Contact Center Address to the IP address or the Fully Qualified Domain
Name (FQDN) of your BCM50 2.0 system.
b. The HTTP Listen Port default value is 8088. The Control Port default value is 2222.
Nortel recommends you do not change the Listen Port value. The Control Port value
cannot be modified. Nortel recommends you do not change the values for the RealTime or Historical Ports.
c. If you want to test your configuration settings, click Test Config.
The Test Complete dialog box appears to show the test results. When the tests are
complete, a Success message box appears. See Figure 13: Test Complete with results
and Success message box.
Reporting for Contact Center Setup and Operations Guide
Page 28
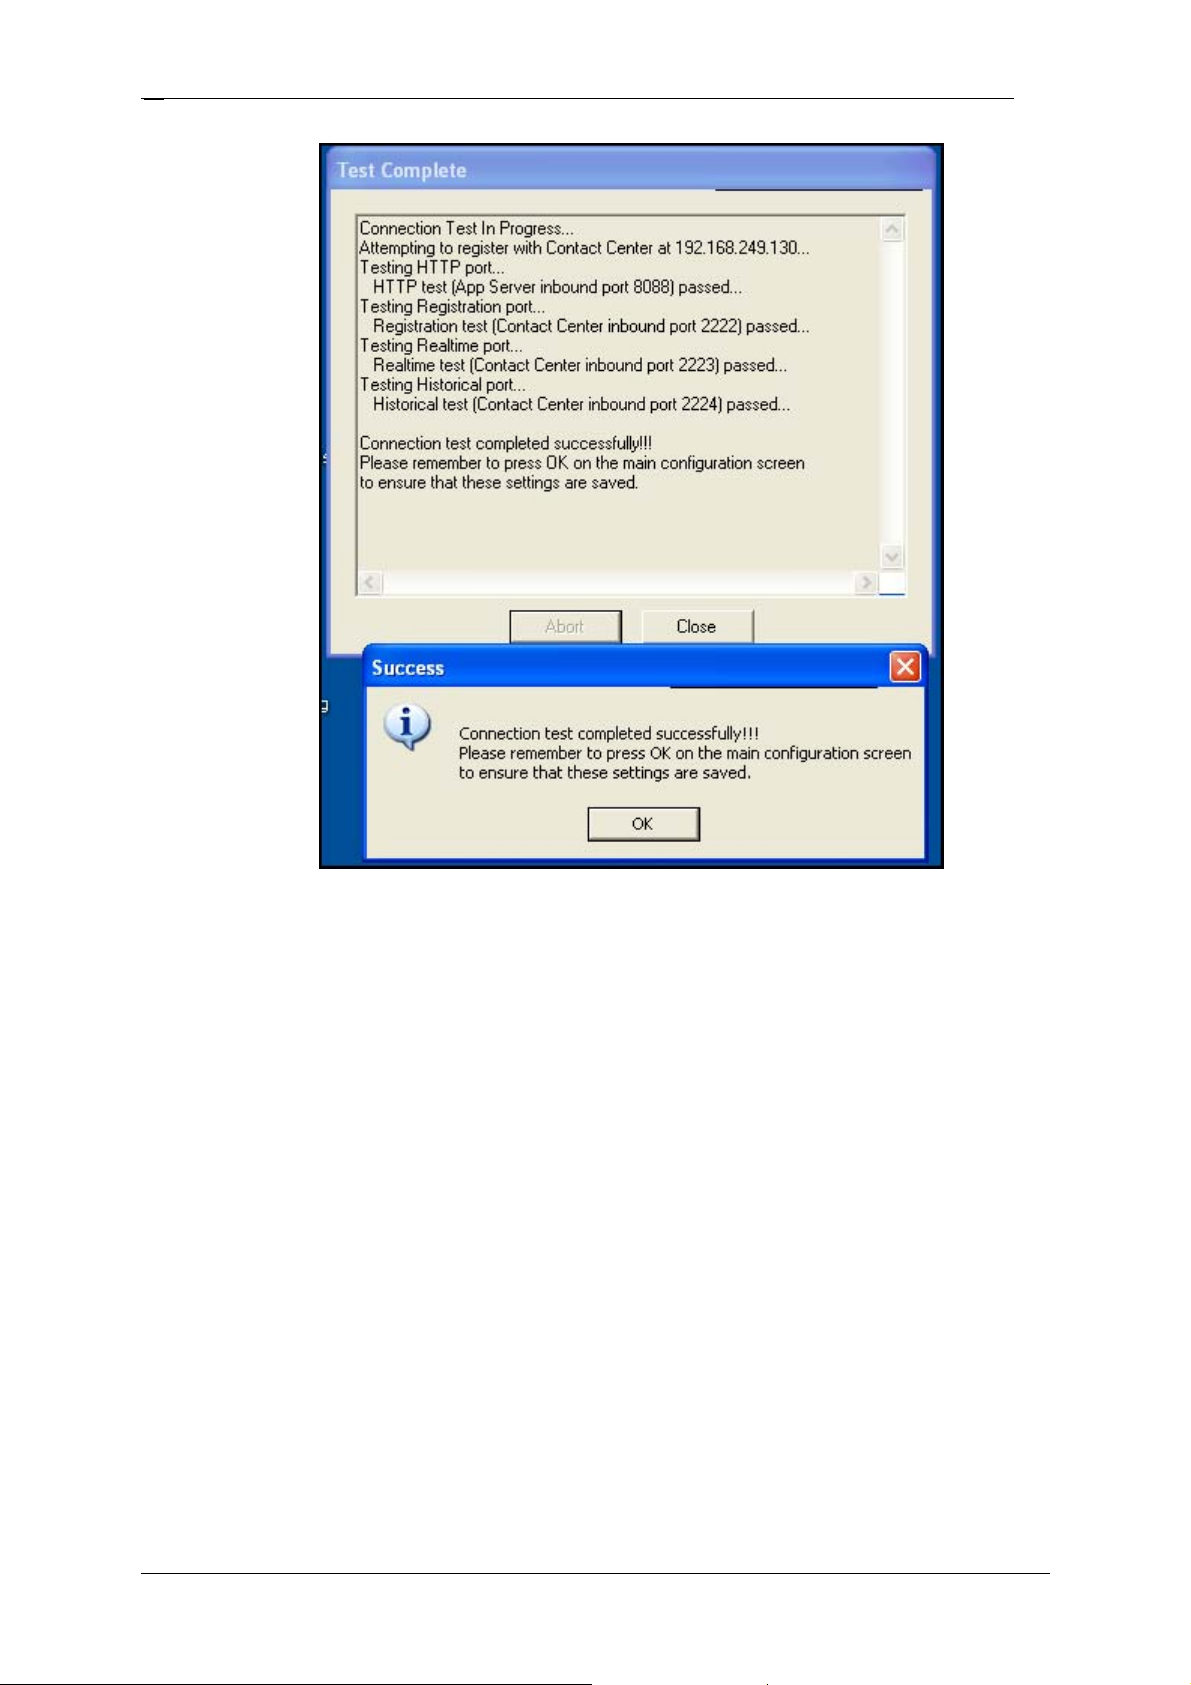
Installation
28
Figure 13: Test Complete with results and Success message box
d. In the Success message box, click OK.
e. In the Test Complete dialog box, click Close.
f. On the Contact Center Reporting Server Config screen, click OK to save your
settings.
The Setup Complete screen appears.
NN40040-302
Page 29
Installation 29
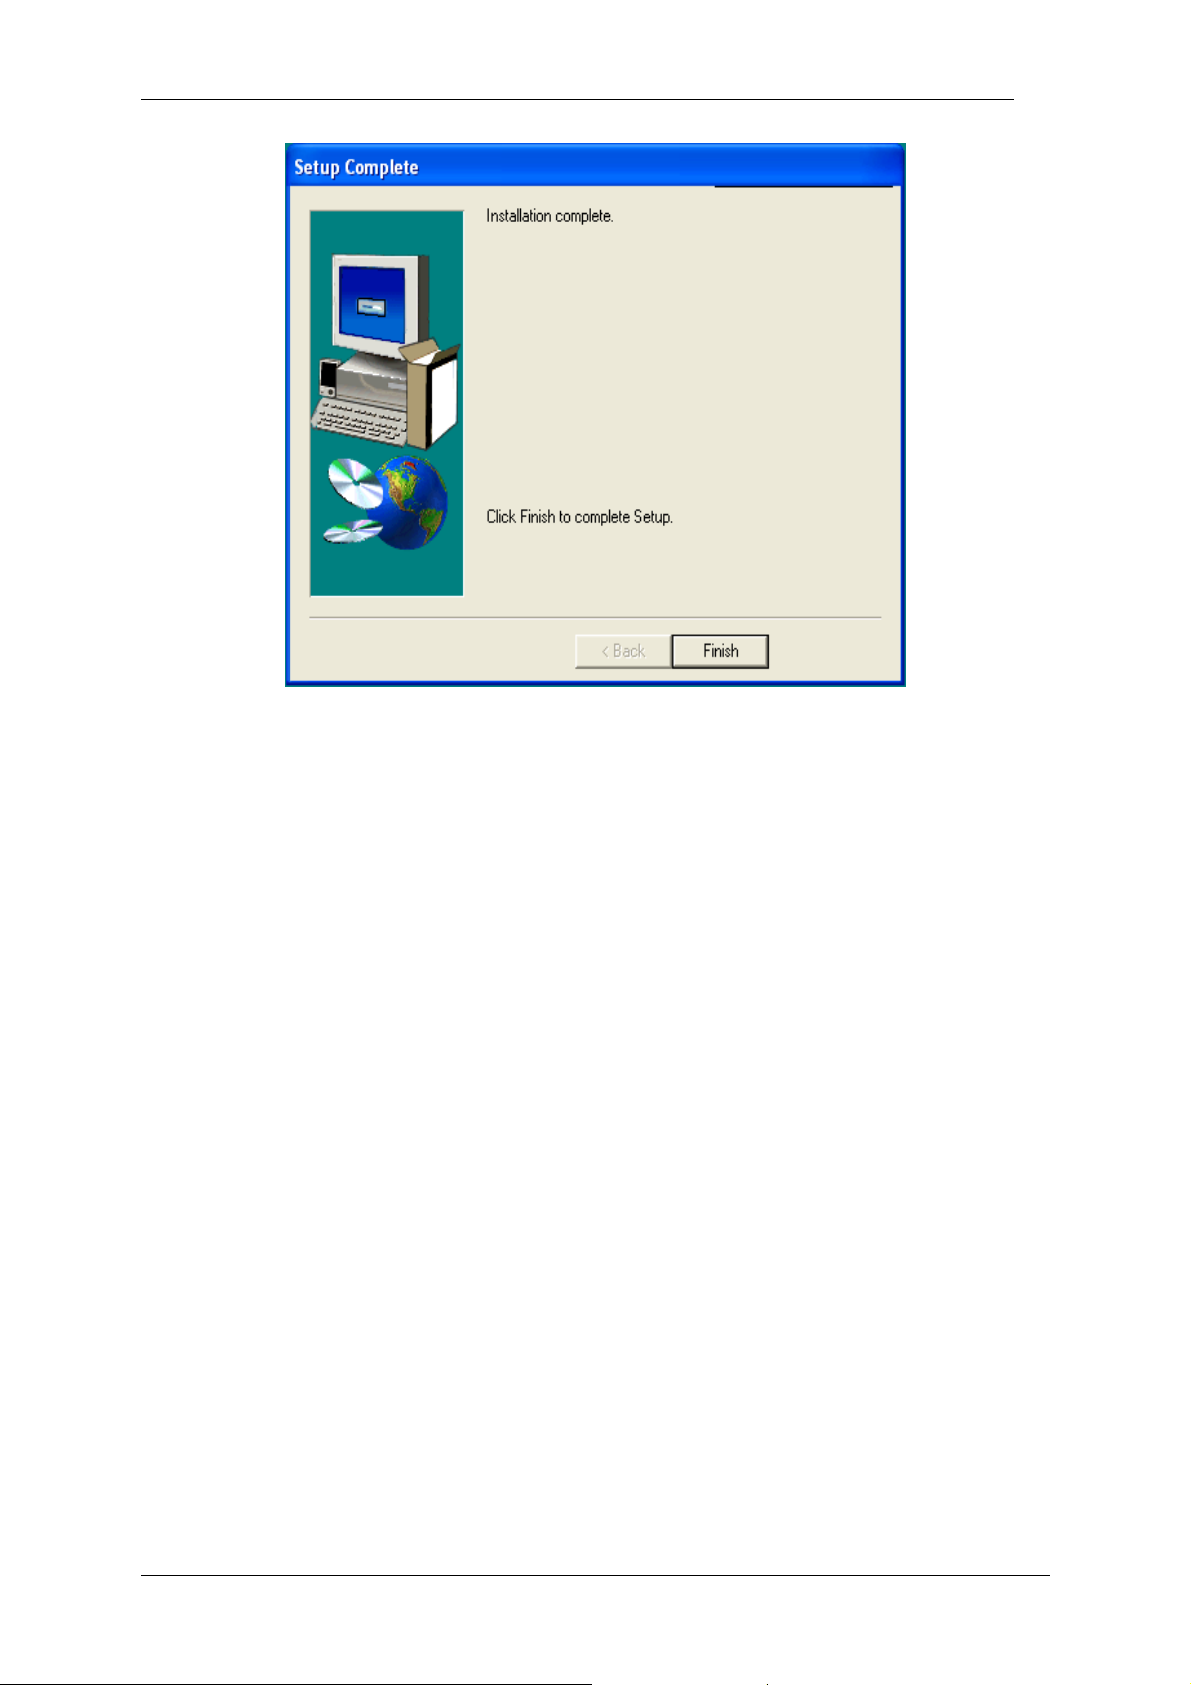
Figure 14: CCRS Setup Complete screen
17. Click Finish.
Testing and changing the configuration of CCRS
Once the installation of CCRS is complete, the port settings of the CCRS can be changed or
tested using the Contact Center Reporting Server Configuration Utility. Ensure that the
Contact Center Reporting Server service is stopped. This is done automatically during
installations and upgrades.
To launch the configuration utility perform the following steps:
1. Click on the Start menu then click All Programs > Nortel > Contact Center
Reporting Server Config.
The Contact Center Reporting Server Config screen will open. See
Figure 12: Contact
Center Reporting Server Config screen.
2. Amend the configuration of CCRS as necessary.
3. To test the new or old configuration of CCRS, click on Test Config.
4. Click OK to save your settings and close the Contact Center Reporting Server Config
screen.
Reinstalling or updating the CCRS
To reinstall or update the CCRS, you are not required to uninstall your current CCRS. You
can run the install package of the new CCRS and the install script will read your
configuration files and prompt you to keep the existing database.
Installing Microsoft Internet Information Services
Reporting for Contact Center Setup and Operations Guide
Page 30
Installation
30
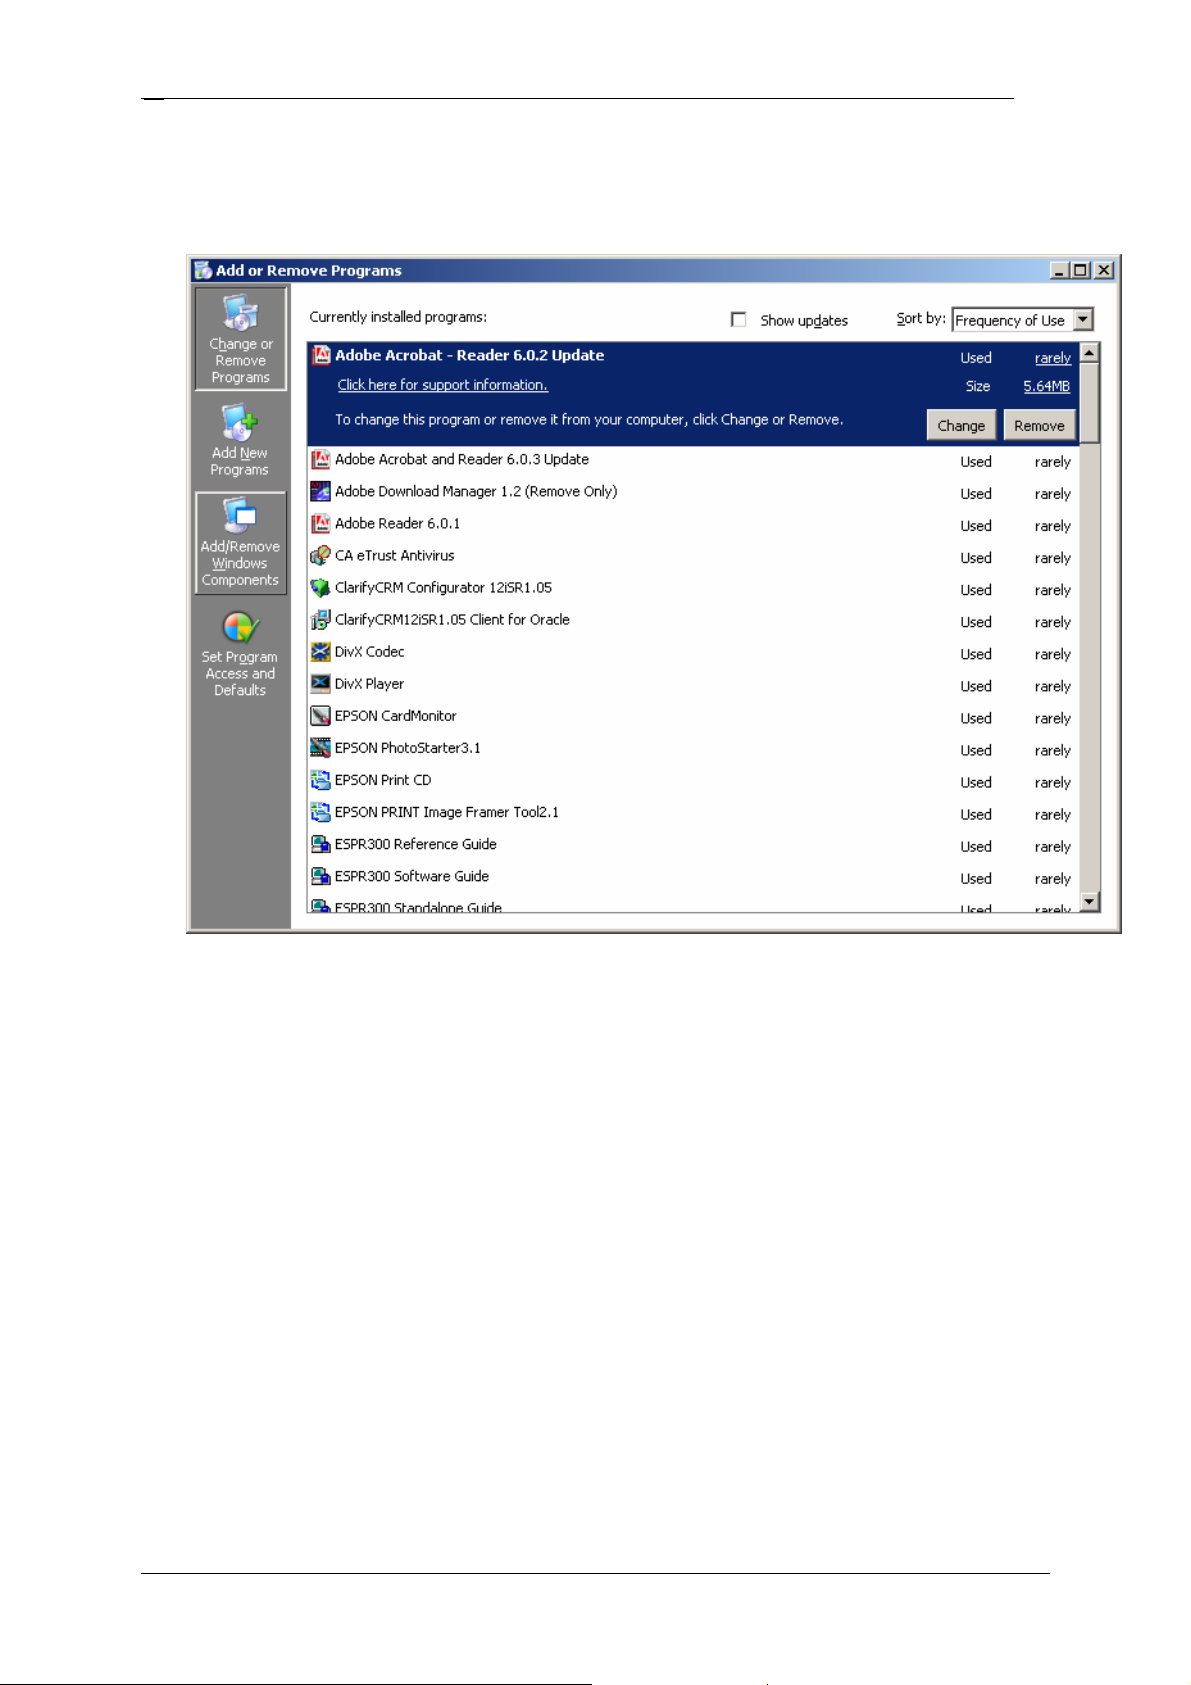
You can install Microsoft Internet Information Services through the Add or Remove
Programs dialog box, using the Add/Remove Windows Components icon. See Figure 15:
Add or Remove Programs.
Figure 15: Add or Remove Programs
Follow these steps to install Microsoft Internet Information Services.
1. On the Windows taskbar, select Start > Settings and then click Control Panel. The
Control Panel window appears
2. Double-click the Add or Remove Programs icon. The Add or Remove Programs
dialog box appears.
3. Click Add/Remove Windows Components. The Windows Components Wizard
appears, as shown in Figure 16: Windows Components Wizard.
NN40040-302
Page 31

Installation 31
Figure 16: Windows Components Wizard
4. Select Internet Information Services (IIS). The background of the check box turns
grey, indicating that only the basic components of Internet Information Services will
be installed. You do not need to install any additional components for Reporting for
Contact Center to work properly. Installing additional components is optional, and
additional components do not affect the operation of Reporting for Contact Center.
5. Click Next. The Configuring Components dialog box appears. See Figure 17:
Windows Components Wizard Installation.
Reporting for Contact Center Setup and Operations Guide
Page 32

Installation
32
Figure 17: Windows Components Wizard Installation
Windows now installs your Internet Information Services component.
You may be prompted for additional installation files (typically from a CD). If you are
prompted for additional files, insert the Windows operating system installation disk that was
used to install the Windows operating system of the Web Host PC, and click OK. If you do
not use the same disk, you cannot complete the installation.
6. When Internet Information Services installation is complete, you receive a message
that confirms successful completion. See
Figure 18: Windows Components Wizard
Installation Completed.
NN40040-302
Page 33

Installation 33
Figure 18: Windows Components Wizard Installation Completed
Click Finish to return to the Add or Remove Programs dialog box. You can close the Add
or Remove Programs dialog box and the Control Panel window.
7. To test that the Internet Information Service is properly installed, open Internet
Explorer and point to http://localhost/
If the installation is successful, a window similar to the window shown in
Figure 19:
Internet Information Services test page appears.
Reporting for Contact Center Setup and Operations Guide
Page 34

Installation
34
Figure 19: Internet Information Services test page
This window also contains useful information regarding your Internet Information
Services. You can see the current version number and additional information about
where to find extended help for Internet Information Services.
If you see a Page Cannot be Displayed screen, re-install the Internet Information
Services and reboot the Web Host PC.
Note: On Windows NT you must upgrade Internet Information Services to Version 4.
This version is available on the Windows NT Options pack CD.
NN40040-302
Page 35

Installation 35
To ensure correct operation of Nortel Reporting for Contact Center, observe the
following points:
The IP address setting for the default web site should be All Unassigned, or the
IP address setting for the default web site should be 127.0.0.1 and the host header
should be localhost.
The port should be set to 80.
Ports 3309, 3500, 6010, and 6011 must not be blocked by local firewalls.
Port Numbers used by Nortel Reporting for Contact Center
The list below gives all the port numbers used by Nortel Reporting for Contact Center on the
Web Host PC:
Port 80 – this is the standard port used by the Web Server (the Web Host PC) for
Internet Information Services.
Port 8088 – used for the Reporting Server in the Business Communications
Manager.
Port 3306 – used for MySQL Server 3.23.53 (this will be present if Reporting for
Contact Center was installed as an upgrade to a previous version of Reporting for
Call Center from BCM 3.6 or BCM 3.7).
Port 3309 – used for MySQL Server 4.1.14.
Port 3500 – used by ipView SoftBoard to listen for incoming data and to echo to
other wallboards.
Port 6010 – used for the Reporting for Contact Center Real Time (RCCRT)
Server.
Port 6011 – used for the Reporting for Contact Center Reporting (RCCRPT)
Server.
Nortel recommends that you ensure your Web Host PC Internet Information
Services installation is as secure as possible. Generally, a secure installation
!
You are now ready to install the Nortel Reporting for Contact Center software from the
Contact Center platform. See
involves loading security patches and/or service packs for Internet
Information Services and for the operating system of the Web Host PC. These
patches and service packs are available free of charge by Microsoft. Contact
your network administrator for further advice.
Installing Nortel Reporting for Contact Center software.
Installing Nortel Reporting for Contact Center software
You must have Administrator rights for the installation to be successful. If
you do not have Administrator rights for the PC on which you wish to install
!
By default, Nortel Reporting for Contact Center software creates a folder in the location
\Program Files\Nortel\Nortel Reporting for Contact Center on the installation drive of the
Web Host PC. This folder contains the application files used by Nortel Reporting for Contact
Nortel Reporting for Contact Center, the installation is halted and you are
requested to log out and log back in with Administrator rights.
Reporting for Contact Center Setup and Operations Guide
Page 36

Installation
36
Center. The folder also contains the Nortel Reporting for Contact Center configuration and
statistical database.
Note: Before Nortel Reporting for Contact Center will operate correctly, you must
enable the Contact Center Reporting Software Keycode. For Software Keycode
information, refer to the Keycode Installation Guide (NN40010-301).
TCP/IP Protocol
The Contact Center platform and Nortel Reporting for Contact Center use the industry
standard TCP/IP protocol for communication between the Contact Center and the Nortel
Reporting for Contact Center Web Host PC. The Windows Network component is required
for the Nortel Reporting for Contact Center Web Host PC. Refer to Checking Installation of
the Windows Networking Component.
The Nortel Reporting for Contact Center installation process does not install the Windows
Network component. For instructions about installing the Windows Networking component,
refer to your network or Windows documentation.
Checking Installation of the Windows Networking Component
Perform the following steps to check that the Windows Networking component is set up
properly on the PC that will operate as the Web Host PC:
Note: If your company has a network administrator, check with your administrator
before changing any network configuration parameters.
1. Start the Windows system on the PC where the Nortel Reporting for Contact Center
application is installed.
2. On the Windows taskbar, select Start > Settings and then click Control Panel. The
Control Panel window appears.
If you are using the Windows 2000 operating system, double-click Networking and
Dial-up Connections. The Networking and Dial-up Connections window appears.
If you are using the Windows XP operating system, select Start > Connect to and then
click Show All Connections. The Networking Connections window appears.
3. Double-click the Network icon. The Network window appears with the Configuration tab
displayed.
If you are using the Windows 2000 or Windows XP operating system, right-click the
Local Area Connection icon and then click Properties.
4. Check that TCP/IP appears on the list of installed network components. If TCP/IP is not
on the list, click Add to install this protocol using the Windows installation instructions,
or refer to your network administrator.
NN40040-302
Page 37

Installation 37
Installing Nortel Reporting for Contact Center for a Business Communications Manager Installation
Perform the following steps to install Nortel Reporting for Contact Center for a Business
Communications Manager installation:
1. Close any Windows programs that are open.
2. Start your Internet browser (such as Internet Explorer or Netscape) and connect to the
Business Communications Manager. In the browser Address Bar, enter the IP Address of
the Business Communications Manager in the following format: https://10.10.10.1/
Remember to substitute the IP Address of your Business Communications Manager for
the 10.10.10.1 shown in the example.
Enter the username nnadmin and password in the BCM Login window. Consult your
network administrator for the password, as this would have been changed from the default
password of PlsChgMe! On first installation of Nortel Element Manager. The Welcome
to BCM page appears.
3. Click Administrator Applications.
The Administrator Applications page appears.
4. From the Contact Center Applications list, click Nortel Reporting for Contact Center.
Information about the Nortel Reporting for Contact Center application appears. See
Figure 20: Download the Reporting for Contact Center Software.
Reporting for Contact Center Setup and Operations Guide
Page 38

Installation
38
Figure 20: Download the Reporting for Contact Center Software
5. Click Download Reporting for Contact Center on the right side of the window.
The File Download dialog box appears.
6. Select either Run to run this program from its current location, or Save to save this
program to disk.
If you select Save, the Reporting for Contact Center executable file is downloaded to your
PC, go to the location where you downloaded the file. Double-click the file to run it.
7. The Install Wizard shown in Figure 21: InstallShield Initialization Dialog appears. The
wizard extracts the installation files required to install the Nortel Reporting for Contact
Center files on the Web Host PC. Wait until the files are extracted.
NN40040-302
Page 39

Installation 39
Figure 21: InstallShield Initialization Dialog
8. Once the files are extracted click the Next button.
9. The Choose Setup Language dialog box will be displayed, as shown in Figure 22:
Language Selection Dialog, which allows you to select the default language for your
installation of Nortel Reporting for Contact Center.
Figure 22: Language Selection Dialog
Note that each User of Nortel Reporting for Contact Center is assigned a language. You
can have different languages in use by various Users at the same time.
This dialog box allows you to define the default language for the Login page and for the
default Administrator. Click on the down arrow to the right of the dropdown box to
display a list of languages. The languages to choose from are Danish, Dutch
(Netherlands), English (United Kingdom), English (United States), French (Canada),
French (France), German (Germany), Italian (Italy), Norwegian (Bokmal), Portuguese
(Brazil), Spanish (Traditional Sort), and Swedish.
When you have selected your language, click OK. To stop the installation, click Cancel.
Reporting for Contact Center Setup and Operations Guide
Page 40

Installation
40
10. The InstallShield Windows Installer Configuration dialog box shown in Figure 23:
InstallShield Windows Installer Configuration Dialog Box appears.
Figure 23: InstallShield Windows Installer Configuration Dialog Box
When prompted, click OK. The dialog box shown in
Figure 24: InstallShield Wizard Start
Dialog Box appears.
Figure 24: InstallShield Wizard Start Dialog Box
11. To proceed, click Next. The License Agreement dialog box shown in Figure 25: License
Agreement Dialog Box appears.
To cancel the installation procedure, click Cancel.
NN40040-302
Page 41

Installation 41
Figure 25: License Agreement Dialog Box
12. Read the Software License Agreement before proceeding. To proceed with the
installation, click Yes. The Choose Destination Location dialog box shown in Figure 26:
Choose Destination Location Dialog Box appears.
To cancel the installation, click No. To return to the Welcome dialog box, click Back.
Figure 26: Choose Destination Location D i al og Bo x
Reporting for Contact Center Setup and Operations Guide
Page 42

Installation
42
13. Nortel recommends that you accept the location specified in the dialog box. If you do not
wish to install Nortel Reporting for Contact Center on the default drive, C:, click Browse
to choose a new location.
To proceed with the installation, click Next. The Setup Status dialog box shown in Figure
27: Setup Status Dialog Box appears.
To cancel the installation, click Cancel. To return to the Customer Information dialog
box, click Back.
Figure 27: Setup Status Dialog Box
The Setup Status dialog box shows the progress of the installation. To cancel the
installation, click Cancel.
14. During installation, the message shown in
Figure 28: ODBC Driver Installation Dialog
appears. Wait for the installation to complete.
Figure 28: ODBC Driver Installation Dialog
15. If MySQL 3 is installed on the Web Host PC, the MySQL Port Setter dialog box is
displayed the first time the user installs Reporting for Contact Center using the MySQL
NN40040-302
Page 43

Installation 43
4.1 Server, see Figure 29: MySQL 3 Port Setter Dialog. The port number to be used by
MySQL 4 can be entered, or selected from the drop down list box, or left at the default
port number of 3309.
Figure 29: MySQL 3 Port Setter Dialog
On first installation of Reporting for Contact Center on a Web Host PC with MySQL 4
already installed, the MySQL Port Setter dialog box appears, as shown in Figure 30:
MySQL 4 Port Setter Dialog. Select the port number to be used by the MySQL 4.1 Server
from the drop down list box, or enter a new port number, otherwise the port number is set
to the defaulted value of 3309.
Figure 30: MySQL 4 Port Setter Dialog
16. Click OK to set the port number for MySQL 4.
17. The message shown in Figure 31: Database Installation Dialog appears. Wait for the
installation to complete.
Reporting for Contact Center Setup and Operations Guide
Page 44

Installation
44
Figure 31: Database Installation Dial og
Note: The MySQL database is not installed in the same folders as Nortel Reporting for
Contact Center; it is installed in \Program Files\MySQL\MySQL Server 4.1\data\mysql
on the target hard drive.
18. The message shown in Figure 32: Java Installation Dialog appears. Wait for the
installation to complete.
Figure 32: Java Installation Dialog
Note: The Java Runtime is not installed into the same folders as Nortel Reporting for
Contact Center; it is installed into \Program Files\Java on the target hard drive.
19. When installation is complete, the Installation Complete dialog box shown in Figure 33:
Installation Complete Dialog Box appears.
NN40040-302
Figure 33: Installation Complete Dialog B ox
Page 45

Installation 45
Note: Before Nortel Reporting for Contact Center can operate correctly, you must
restart your Web Host PC.
To have the installation restart the PC, click Yes, I want to restart my computer now,
and then click Finish.
To complete the installation without restarting your PC at this time, click No, I will
restart my computer later, and then click Finish.
Settings Required for Windows XP Service Pack 2
Perform the following steps to configure the settings on a Web Host PC that has Windows
XP Service Pack 2 installed:
1. From the Windows task bar, select Start > Control Panel >Security Center. The
window shown in
Figure 34: Windows Security Center Window appears.
Figure 34: Windows Security Center Window
Reporting for Contact Center Setup and Operations Guide
Page 46

Installation
46
2. Click Windows Firewall. The Windows Firewall dialog box appears. See Figure 35:
Windows Firewall Dialog Box.
Figure 35: Windows Firewall Dialog Box
3. Select the Advanced tab and select Local Area Connection.
4. Click Settings. The Advanced Settings dialog box appears with the Services tab
displayed. See Figure 36: Advanced Settings Dialog Box.
NN40040-302
Page 47

Installation 47
Figure 36: Advanced Settings Dialog Box
5. Select Web Server (HTTP) and click OK.
6. Click the Exceptions tab and click Add. The Add a Port dialog box appears. See Figure
37: Add a Port Dialog Box.
Figure 37: Add a Port Dialog Box
Reporting for Contact Center Setup and Operations Guide
Page 48

Installation
48
7. Enter RCCRPT as the name for the new port and enter 6011 for the port number. Leave
the connection type as TCP, and click OK.
8. Repeat step 6 to add another new port. Enter RCCRT as the name for the new port and
enter 6010 for the port number. Leave the connection type as TCP, and click OK.
9. Click OK to close the Windows Firewall dialog box, and then close the Security Center
Window.
Settings Required for Windows 2003 Server, IIS 6
This section describes the changes that are required for Reporting for Contact Center to
operate on Internet Information Services 6.
Change 1: Enable Active Server Pages
Perform the following steps to enable Active Server Pages:
1. Open IIS Manager.
2. Select Web Service Extensions. See Figure 38: IIS Main Window with Web Service
Extensions Selected.
Figure 38: IIS Main Window with Web Service Extensions Selected
3. In the Web Service Extension list, select Active Server Pages.
4. Click Allow.
Change 2: Allow IIS 6 to see the Path to the RCC Folder
Perform the following steps to allow IIS 6 to see the path to the RCC folder:
1. Open IIS Manager.
NN40040-302
Page 49

Installation 49
2. Double-click Web Sites.
3. Double-click Default Web Site. See Figure 39: IIS Manager with the RCC Folder
Selected.
Figure 39: IIS Manager with the RCC Folder Selected
4. Right-click RCC and select Properties. The Properties dialog box appears. See Figure
40: RCC Properties Dialog Box.
Figure 40: RCC Properties Dialog Box
2. Click Configuration. The Application Configuration dialog box appears. See Figure
41: Application Configuration Dialog Box.
Reporting for Contact Center Setup and Operations Guide
Page 50

Installation
50
Figure 41: Application Configuration Dialog Box
3. Click the Options tab to view configuration options. See Figure 42: Options Tab
Figure 42: Options Tab
4. Ensure the Enable parent paths option is selected.
NN40040-302
Page 51

Installation 51
5. Click OK.
6. From the Properties dialog box, click OK.
Change 3: Create a new Application pool and add RCC to it
Perform the following steps to create a new application pool and to add RCC to the
application pool:
1. Open the IIS Manager.
2. Right-click Application Pools and select New > Application Pool. The Add New
Application Pool dialog box appears. See Figure 43: Add New Application Pool Dialog
Box.
3. Enter Nortel in the Application pool ID field and select the Use existing application
pool as template option.
4. In the Application pool name list, select DefaultAppPool.
Figure 43: Add New Application Pool Dialog Box
5. Click OK.
6. Right-click the newly created application pool Nortel and select Properties.
7. Click the Identity tab. The Identity tab appears. See Figure 44: Application Pool Identity
Tab.
8. If the Predefined option is not selected, select it and select Local System in the list
beside the Predefined option.
Reporting for Contact Center Setup and Operations Guide
Page 52

Installation
52
Figure 44: Application Pool Identity Tab
9. Click OK, and then click Yes in the confirmation dialog box that appears.
10. In the IIS Manager window, select Web Sites and double-click Default Web Site. See
Figure 45: Selecting RCC.
NN40040-302
Figure 45: Selecting RCC
Page 53

Installation 53
11. Right-click RCC and select Properties. The RCC Properties dialog box appears. See
Figure 46: RCC Properties.
12. In the Application pool list, select Nortel.
Figure 46: RCC Properties
13. Click OK.
Upgrading Reporting for Contact Center
Following an upgrade from one release of Reporting for Contact Center to another, you must
repeat the steps in
to repeat other changes in this section
Change 2: Allow IIS 6 to see the Path to the RCC Folder. You do not need
Settings Required for Windows 2003 Server, IIS 6.
Reporting for Contact Center Setup and Operations Guide
Page 54

Installation
54
NN40040-302
Page 55

55
Administration
This chapter describes the Nortel Reporting for Contact Center features for an Administrator
user only. This includes connecting to the Contact Center as well as creating new Users and
assigning Skillsets to them.
4
Logging In
Perform the following steps to log on to Nortel Reporting for Contact Center as an
Administrator:
1. Using Internet Explorer, go to your Nortel Reporting for Contact Center Web pages
Login page.
The URL is http://NameOfWebHostPC/RCC
Where NameOfWebHostPC is the network name or IP Address of the Web Host PC.
The Login page appears. See Figure 47: Login page.
Note: If you are using the browser on the Web Host PC, you can replace
NameOfWebHostPC with localhost.
Note: You can add the Login page to your Internet Favorites. To add this page to your
favorites in Internet Explorer, press Ctrl+D when you are at the Login page, or click
Favorites, Add to favorites.
NN40040-302
Page 56

Administration
56
Figure 47: Login page
2. Enter the username admin and the default password 0000, and click Login.
You must change the default password the first time you log on. See
Changing Default
Password.
Changing Default Password
You must change the default password the first time you log on. Perform the following steps
to change the default password:
1. When you first log on, the Change Password dialog box appears. See Figure 48: Change
Password page.
NN40040-302
Page 57

Administration 57
Figure 48: Change Password page
Your password can be from 1 to 10 characters, including upper and lowercase letters, and
digits. The password can be anything other than 0000.
Enter your new password in the New password field.
2. Re-enter your password in the Confirm password field.
If the passwords you entered are not the same, you are informed that the password and
confirmation do not match, and you must re-enter the password in both fields.
3. Click Submit.
If you successfully entered the new password, the Contact Center Connection page shown
in Figure 49: Contact Center Connection page appears.
Reporting for Contact Center Setup and Operations Guide
Page 58

Administration
58
Contact Center Connection
The Contact Center Connection page allows you to specify the network identifier (IP address
or Network name) of the Contact Center platform.
Typically, the Contact Center Connection page appears only once, after you first log on as an
Administrator. If the Contact Center Connection information is incomplete or incorrect, the
Contact Center Connection page appears each time you log on as an Administrator.
For example, if you add a new Network Card to the Web Host PC, you must select an IP
address for the Web Host PC to communicate with the wallboards. In this case, the Contact
Center Connection page appears so that you can select the IP address.
If you do not select the Contact Center Connection option from the menu, the page
automatically appears after you log on, as shown in Figure 49: Contact Center Connection
page.
NN40040-302
Figure 49: Contact Center Connection page
Page 59

Administration 59
Perform the following steps to configure the Contact Center Connection page:
1. In the IP Address/Network name field, enter the IP Address or the Network name of the
Contact Center platform. If you do not know what information to enter, consult the Local
Area Network Administrator for your site.
Check that Reporting for Contact Center is configured to point at the IP
Address of the Contact Center. For BCM 4.0 systems this will be the
!
2. The Port field will be defaulted automatically to the correct port number of 8088 for
connection to a BCM 4.0 system.
If the Contact Center is a BCM50 2.0 system the User must enter the port number as
configured in the CCRS, by default this is 8088 but may have been changed during setup.
CCRS is installed separately from BCM50 2.0 and the CCRS configuration tool launches
as part of the CCRS installation where the User can change the port settings. The
configuration tool can also be launched separately by clicking the Start menu then All
Programs > Nortel > Contact Center Reporting Server Config.
network IP address of the BCM. For BCM50 2.0 systems this will be the
network IP address of the PC running the CCRS, not the BCM IP address.
If the User has upgraded from Nortel Networks Reporting for Call Center
2.1, or 2.2 to Nortel Reporting for Contact Center the Port field will be
!
3. When Nortel Reporting for Contact Center communicates with the Contact Center to
request Real Time or Historical Report data, it includes a password in the data request.
This allows the Contact Center to verify that the application requesting the data is
authorized to receive it.
This password is set within the Contact Center using CallPilot Manager. In the CCRS
password field, enter the set password.
Note: The default CCRS password is CCRS. If the default password is not accepted the
password might have been changed in the Contact Center from within CallPilot
Manager.
4. In the Confirm CCRS password field, re-enter the set password.
5. In the Make data requests every list specify how frequently the Web Host PC
communicates with the Contact Center in order to obtain reporting data. The typical
setting is 15 minutes.
6. In the Select an IP Address list, select the IP address (Network Interface Card) with
which you wish to communicate with the wallboards. If the Web Host PC has more than
one IP Address (because it has more than one Network Interface Card configured) the list
is populated with the IP addresses configured for the Web Host PC. Select which
blank. Enter the correct port to re-establish connection.
Reporting for Contact Center Setup and Operations Guide
Page 60

Administration
60
Network Interface Card to use for communication with the wallboards. The Network
Interface Cards are identified in the list by their configured IP Addresses.
Select the IP Address that is configured on the Network Interface Card connected to the
same network as the wallboards. Note that this IP Address is not the IP Address of the
wallboard. This address is the IP Address configured for the Network Interface Card in
the Web Host PC.
If you add a new Network Interface Card or other network device, such as
a USB Bluetooth device, or if you enable a disabled Network Interface
Card, then you must reboot your Web Host PC so that the new device is
!
7. From the Wallboard and Refresh Real Time Interval list, select your refresh interval
for the Wallboard and Real Time displays. The two available options are 1 second
(default) and 3 seconds.
!
detected and presented in the Select An IP Address list.
This setting applies only to the refresh rate of the display. Wallboard and
Real Time information is always calculated to the second. If, for example,
you select 3 seconds as your refresh interval, your display updates every 3
seconds but your data is calculated to the second.
Figure 50: Download Contact Center Data options
8. On first installation of Reporting for Contact Center the Download Contact Center Data
options are given, see Figure 50: Download Contact Center Data options. The User can
select whether to download all data from the Contact Center by selecting All Data, or the
User can select Only Data starting from and click on the calendar icon to the right to
select a start date from when data should be downloaded from the Contact Center.
9. Click Submit. A download status field appears to display the progress of the Contact
Center download. See
Figure 51: Download Status Window.
NN40040-302
Page 61

Administration 61
Figure 51: Download Status Window
The RCC Database Update Complete field indicates the percentage of download
completion. When Reporting for Contact Center is installed, it queries the Contact Center
for any Contact Center data that the Contact Center has accumulated.
A green Status field indicates the successful downloading of data from the Contact
Center. The Status indicator will turn red if Reporting for Contact Center encounters
problems downloading Contact Center data. An error message will be displayed directly
below the Status field, indicating the problem. Refer to the Reporting for Contact Center
Troubleshooting and Maintenance Guide (NN40020-402) on the type of error messages
that can be displayed and how to troubleshoot them.
Time is the time in hours, minutes, and seconds that the current download has been
running. This data is updated every 9-10 seconds.
Processing Calls From displays the start date and time of the current data being
processed. Reporting for Contact Center will request data from the Contact Center from
this date to the latest call data in the Contact Center. This is the download period. The
RCC Database Update Complete field indicates how far through the download period
the download process is in terms of time, not in terms of calls.
For example, if the percentage completed figure is 50% and the Calls Extracted from
Received Data is 125, this does not mean the download will be complete when the Calls
Extracted from Received Data reaches 250. Rather, it means that the download has
processed 50% of the download period and has extracted 125 calls.
Total Contact Center Calls in the Database indicates the total amount of calls stored in
the Web Host PC database, which includes the Calls Extracted from Received Data
figure.
Note: The time to download the historical data from the Contact Center and to store it in
the Web Host PC database depends on the amount of time the Contact Center has been
recording historical data prior to being connected to the Web Host PC and the amount
of call traffic that your Contact Center handles.
As a general guide, 30,000 calls take between 6 and 18 hours, depending on the level of
network traffic and the speed of your Web Host PC.
Note: You can use your PC as normal during the download, but do not reset it or power
it off.
When the download is complete, the download status field shows a 100% complete
status.
Reporting for Contact Center Setup and Operations Guide
Page 62

Administration
62
Your browser page may time out before the download is complete. This is not an error.
Microsoft Internet Information Services has a setting that dictates how long it waits before
closing a web page. As the download completes, you are informed of the status in the
Download Status field. The Administration Menu page appears, see Figure 52:
Administration Menu page.
NN40040-302
Page 63

Administration 63
Administration Menu
When an Administrator logs in (unless they are logging in with the default password of
0000), they view the Administration Menu page. See Figure 52: Administration Menu page.
Note: To remind you that you logged in as an Administrator, Administration appears
in the blue bar at the top of each Administration page.
Figure 52: Administration Menu page
The available Administrator options appear in the navigation pane on the left side of the page.
For information about the Contact Center Connection, refer to Contact Center Connection on
page 58. The following sections describe the System Administration, Maintenance, Company
Details, and Reporting options.
Reporting for Contact Center Setup and Operations Guide
Page 64

Administration
64
System Administration
Select System Administration to view the System Administration Menu page shown in
Figure 53: System Administration Menu page.
Figure 53: System Administration Menu page
The System Administration Menu provides the following options:
System Admin Settings — change the username and the password for the default
Nortel Reporting for Contact Center Administrator
User Admin — create Users
Skillset Assignment — assign Skillsets to Users
System Configuration Report — view and print the System Configuration report
NN40040-302
Page 65

Administration 65
System Admin Settings
System Admin Settings is a special utility that allows you to change the settings for the
single, pre-defined Administrator that is supplied, ready-defined, with Nortel Reporting for
Contact Center. You can use System Admin Settings to change the name of the System
Administrator or change their password, or both. In either case, you must enter the current
System Administrator password to confirm that you have authority to make these changes.
Do not use System Admin Settings to change the username and password
of other Users who are configured as Administrators. To change the
details of those Administrators, use the User Admin Edit feature,
!
Select System Admin Settings to view the System Administrator details page, shown in
Figure 54: System Administrator details page.
described in User Admin.
Figure 54: System Administrator details page
Reporting for Contact Center Setup and Operations Guide
Page 66

Administration
66
To change the name of the System Administrator, provide a new name in the Please enter
new username field, and the current Administrator password in the Please enter old
password field.
To change the password, provide the new password in the Please enter new password field,
and confirm the password by entering the same password in the Please confirm new
password field.
After you make the necessary changes, click Submit. The System Administration Menu
page shown in Figure 53: System Administration Menu page appears.
User Admin
The User Admin option allows you to add, delete, edit the settings for, or reset the password
for a User.
Note: A User is not an Agent. A User is someone you wish to have access to the Nortel
Reporting for Contact Center system, to monitor Skillsets through the Real Time
screens and to be able to obtain Historical Reports on those Skillsets.
You do not need to enter all your Contact Center Agents into Nortel Reporting for Contact
Center (although you can, if you wish). Typically, you enter Skillset Supervisors and other
Management personnel who need information about the performance of the Contact Center.
Select User Admin to view the User Admin page, shown in Figure 55: User Admin page.
NN40040-302
Page 67

Administration 67
Figure 55: User Admin page
Add Users
The first time you see this page, no Users are defined. To add users, click Add. The Add User
page, as shown in
Figure 56: Add User page appears.
Reporting for Contact Center Setup and Operations Guide
Page 68

Administration
68
Figure 56: Add User page
This page allows you to enter the details of the new User. Follow these steps:
1. In the First name and Last name fields, enter the User’s first and last names.
2. In the RCC Username field, enter the RCC Username, which is the name the User will
use to log on to Nortel Reporting for Contact Center.
3. From the Language list, specify the User language preference, which dictates the
language used to display the Nortel Reporting for Contact Center Web page.
4. If the User is able to configure wallboards (for their assigned Skillsets), select the Assign
Wallboards check box. See
Table 1: Administrator and User Permissions.
5. If the User is also an Administrator, select the Administrator check box whether the
User is a standard User or an Administrator.
NN40040-302
Page 69

Administration 69
Note: The System Administrator, Users created as Administrators, Users who can Assign
Wallboard and Standard Users have different administration capabilities regarding other
Users, Skillset Assignment, and Wallboard Assignment. See Table 1: Administrator and
User Permissions.
Permission Level Capabilities
Standard Users
These are Users who were created without either the
Administrator or the Assign Wallboards check boxes
selected. These Users cannot perform configuration of
other Users, and they cannot change their own settings.
They also cannot assign or work with Wallboards.
Standard Users have access only to the Skillsets that were
assigned to them by the System Administrator.
Users with the Assign Wallboard
Box Checked (Wallboard Users)
These are Users who were created without the
Administrator check box selected. These Users cannot
perform configuration of other Users, and they cannot
change their own settings. They can assign and work with
Wallboards. Wallboard Users have access only to the
Skillsets that were assigned to them by the System
Administrator.
Users with the Administration
Box Checked (User
Administrators)
These are Users who were created with the Administrator
check box selected. These Users can perform
configuration and editing activities on other Users,
including creating Users and assigning Skillsets to them.
They cannot change their own settings, however, apart
from resetting their own password. If the Wallboard
check box was selected when their own account was
created, they can assign and work with Wallboards. User
Administrators have access only to the Skillsets that were
assigned to them by the System Administrator. You
should designate a User as an Administrator only if the
designation is required so that the User can specify and
change fundamental configuration settings within Nortel
Reporting for Contact Center.
System Administrator
This is the default Administrator account that is created
when Nortel Reporting for Contact Center is installed.
This User has full access to the system and to all
configuration options. They can create, edit, and delete
Users, and they can assign Skillsets to Users. They can
also reset User passwords, including the System
Administrator’s password. Note that they are the only
user who can do this. The System Administrator has
access to any Skillset.
Table 1: Administrator and User Permissions
Note: The default password for all new Users is 0000. The first time they login to Nortel
Reporting for Contact Center they are prompted to change their password.
Reporting for Contact Center Setup and Operations Guide
Page 70

Administration
70
In the example shown in Figure 57: Details for new User Mary Smith, the new user Mary
Smith has been added, with the RCC Username of MaryS, she is going to receive the Web
pages in English, and, while she can configure wallboards for her assigned Skillsets, she is
not a full Administrator.
Figure 57: Details for new User Mary Smith
6. Click Submit to save the details of the newly entered User.
7. A dialog box asks whether you wish to add more Users. If you choose to add more users,
click on the OK button, otherwise click on Cancel. If you had clicked on OK, the Add
User fields are cleared and you can enter the details of your next new User. If you decide
not to add more Users at this time, you are returned to the User Admin page shown in
Figure 55: User Admin page.
The newly added User now appears in the list of configured users on the User Admin page.
To view details about a specific User, select the User’s name from the list. Click the Edit
button next to selected User to Edit the details of the user (see Edit Users). To Delete the
User from the system click on the Delete button (see Delete Users). To reset their password
NN40040-302
Page 71

Administration 71
to 0000 if they have forgotten their password click on the Reset Password button (see Reset
Password).
Reporting for Contact Center Setup and Operations Guide
Page 72

Administration
72
Edit Users
To edit User details, select the User from the list of configured users and click Edit. The Edit
user page, shown in Figure 58: Edit User page appears.
Figure 58: Edit User page
To edit User details, make any necessary changes, and then click Submit. For more
information about the fields on the Edit User page, refer to Add Users.
Delete Users
To delete a User, select the User from the list of configured users and click Delete.
Note: After you delete a User, you cannot retrieve the deleted User for later use. For
any subsequent inclusion of that User, later you must use the Add User page (see Figure
56: Add User page) and re-enter User details.
When you click Delete you are prompted to confirm that you wish to remove the User. If you
do not wish to remove the User, click Cancel; if you are certain you wish to remove the User,
click OK.
NN40040-302
Page 73

Administration 73
In either case, the User Admin page appears. See Figure 55: User Admin page. If you
removed a User, that User name no longer appears in the list of configured Users.
Reset Password
Use the Reset Password option when a User has changed their password and forgotten what
the password is.
This option allows you to reset the User password to 0000.
When the User next logs on, they use the password 0000, and they must then select a new
password.
Select the User name from the list of configured users and click Reset Password. You are
prompted to confirm that you wish to reset the password for the User. If you do not wish to
reset the password, click Cancel. To reset the password, click OK.
In either case, the User Admin page appears. See Figure 55: User Admin page.
Skillset Assignment
The Skillset Assignment option allows you to assign Skillsets to Users. Assigning Skillsets to
a User allows the User to view those Skillsets in the Real Time screens and to obtain
Historical Reports on those Skillsets.
You can assign multiple Skillsets to a User, and a Skillset can be assigned to multiple Users.
Select Skillset Assignment from System Administration Menu shown in Figure 53: System
Administration Menu page. The Skillset Assignment page shown in Figure 59: Skillset
Assignment page appears.
Reporting for Contact Center Setup and Operations Guide
Page 74

Administration
74
Figure 59: Skillset Assignment page
The Skillet Assignment page lists each configured User. In
Figure 59: Skillset Assignment
page, Mary Smith is the only configured User. Perform the following steps to assign
Skillsets:
1. Click Assign to view the Assigned Skillsets page, shown in
Figure 60: Assigned Skillsets
page.
NN40040-302
Page 75

Administration 75
Figure 60: Assigned Skillsets page
Note: The Skillset names shown in
Figure 60: Assigned Skillsets page are intended as
examples only. Your copy of Nortel Reporting for Contact Center displays the Skillset
names you have set up in the Contact Center using CallPilot Manager.
Note: The Skillset names are obtained automatically from the Contact Center. Your
copy of Nortel Reporting for Contact Center must be connected to the Contact Center
for a few moments in order for the Skillset names to appear.
2. To assign a single Skillset, select the Skillset in the Unassigned Skillsets list, then click
the right arrow button (>). The assigned Skillset appears in the Assigned Skillsets list.
3. Continue assigning Skillsets until you assign all the Skillsets you wish to assign to this
User. In the example shown in
Figure 61: Skillsets Assigned to User Mary Smith, the
User Mary Smith is assigned two Skillsets: SKILL1 and SKILL3.
Reporting for Contact Center Setup and Operations Guide
Page 76

Administration
76
Figure 61: Skillsets Assigned to User Mary Smith
4. To move a Skillset to the Unassigned Skillsets list, select the Skillset name in the
Assigned Skillsets list and click the left arrow button ( < ).
Note: Click the double right arrow button (>>) or the double left arrow button (>>) to
assign or un-assign all the Skillsets.
Note: To assign or un-assign more than one Skillset name in the Assigned Skillsets or
Unassigned Skillsets list, hold down the Control (Ctrl) key and click different Skillset
names in the list. Click the > or < button to assign or un-assign those selected Skillsets
in one step.
5. When you have assigned (or unassigned) the Skillsets for a User, click Submit. The
Skillset Assignment page shown in Figure 59: Skillset Assignment page appears.
Maintenance
The Maintenance option allows you to check the System Status and to start or stop the XML
data feed logging.
NN40040-302
Page 77

Administration 77
Select Maintenance to view the Maintenance Menu page, shown in Figure 62: Maintenance
Menu page.
Figure 62: Maintenance Menu page
The Maintenance Menu provides the following options:
System Status
Logging
System Status
Select System Status to view the System Status page shown in
Figure 63: System Status
page. This page provides a variety of information relating to the current status of Nortel
Reporting for Contact Center.
Reporting for Contact Center Setup and Operations Guide
Page 78

Administration
78
Figure 63: System Status page
You normally need to refer to this page only upon instruction of Support Personnel.
Logging
Select Logging to view the Logging Menu page shown in Figure 64: Logging Menu page.
NN40040-302
Page 79

Administration 79
Figure 64: Logging Menu page
Various diagnostic logs are always running when Nortel Reporting for Contact Center is
operational. The Logging Menu allows you to start or stop one of the diagnostic logs.
Logging is deactivated by default. To activate logging, click Activate Logging.
If logging is on, you see a Deactivate Logging button instead of the Activate Logging
button. Click Deactivate Logging to stop logging, as shown in
Figure 65: Logging Menu
page with logging stopped.
Note: You normally stop this log only upon the instruction of Support Personnel.
Reporting for Contact Center Setup and Operations Guide
Page 80

Administration
80
Figure 65: Logging Menu page with logging stopped
When logging stops, you again see the Activate Logging button. Click Activate Logging to
again start logging.
Click Clear Log Window to clear any text from the Log Data Window. Clearing the Log
Window does not affect the current state of logging.
The default log files location is set to the drive which Nortel Reporting for Contact Center
was installed to along with the location path. If the installation was on the C:\ drive the
default location path would be, C:\Program Files\Nortel\Reporting For Contact Center\Logs.
The User is able to change the log files location in the Log files location field. Clicking the
Submit button will reset the log files location. To reset the log files location to the default
path, perform the following:
1. On the Windows taskbar, select Start > Run and enter the pathway to the file called
ModifyDatabase.bat in the RunOnce folder. The RunOnce folder is in the Reporting
for Contact Center folder. If you installed Reporting for Contact Center in the default
location the path to this file will be \Program Files\Nortel\Reporting for Contact
Center\RunOnce\ModifyDatabase.bat on the drive on which you installed Reporting
for Contact Center.
NN40040-302
Page 81

Administration 81
2. Click OK to launch the ModifyDatabase.bat file. You will see a Command Prompt
window (DOS Window) open and then close.
The logging path will be reset to the default location.
Company Details
The Company Details page allows you to enter details about your company or site. See
Figure 66: Company Details page. To view the page, select Company Details.
Figure 66: Company Details page
Completing this page is not a requirement for the correct operation of Nortel Reporting for
Contact Center. The page provides a means of recording where the software is installed.
After the company details are entered, click Submit to save the details. The company details
will be available in the System Configuration report and the company name will be displayed
on all report headers.
From the Company Details page, the user will be returned back to the Administration Menu
page.
Reporting for Contact Center Setup and Operations Guide
Page 82

Administration
82
Reporting
Click Reporting to view the Main Menu page, shown in Figure 67: Main Menu page.
Figure 67: Main Menu page
This is the page all standard Users (that is, non-Administrative Users) view when they log on.
This option allows an Administrator to use the Nortel Reporting for Contact Center as though
they were a User, to view Real Time screens, and to access the Historical Reports.
For more information, refer to the following chapter Using Reporting for Contact Center.
NN40040-302
Page 83

Using Reporting for Contact Center 83
Using Reporting for Contact Center
This chapter describes how to use Nortel Reporting for Contact Center for all Users, to view
Real Time screens and access Historical Reports.
5
Logging On
Perform the following steps to log on to Nortel Reporting for Contact Center for all Users:
1. Use Internet Explorer to go to the URL of your Nortel Reporting for Contact Center Web
pages Login page.
The URL is http://NameOfWebHostPC/RCC
Where NameOfWebHostPC is the network name or IP Address of the Web Host PC.
The Login page appears. See
Note: If you are using the browser on the Web Host PC, you can replace
NameOfWebHostPC with localhost.
Figure 47: Login page.
Note: You can add the Login page URL to your Internet Favorites. To add this page to
your favorites in Internet Explorer, press Ctrl+D when you are at the Login page, or
click Favorites, Add to favorites.
2. You must provide a valid username and a password to gain access to the features of
Nortel Reporting for Contact Center. Before you attempt to log on, ensure that an
Administrator has created a username for you.
The first time you log on, your password is set to the default of 0000.
3. In the Username field, enter the Username you have been assigned. In the Password
field, enter the default password of 0000.You must change your password after you first
log on. The Change Password page shown in
Figure 68: Change Password page appears.
Reporting for Contact Center Setup and Operations Guide
Page 84

Using Reporting for Contact Center
84
Figure 68: Change Password page
In the New password field, enter a new password. The password can be from 1 to 10
characters, including upper and lowercase letters and digits. It can be anything other than
0000.
4. In the Confirm password field, re-enter your password.
5. Click Submit.
If the two passwords do not match, you receive a message that the password and
confirmation do not match. Re-enter your password in both fields.
If you entered the new password correctly in both fields, the Main Menu page shown in
Figure 69: User Main Menu page appears.
NN40040-302
Page 85

Using Reporting for Contact Center 85
Figure 69: User Main Menu page
The page shown in
Figure 69: User Main Menu page is the Main Menu for all non-
Administrative Users. Note that the word Administration is not displayed in the blue bar at
the top of each page.
Also note that Nortel Reporting for Contact Center recognizes who logs on and greets the
User accordingly. In the example shown in Figure 69: User Main Menu page, User Mary
Smith logged on, and the page displays the message “Welcome Mary”.
The options available to Users appear in the navigation pane on the left of the Main Menu
page.
The options are as follows:
Print Schedules
Real Time
Agent Alarms
Wallboard Setup
Time Bins Setup
Reports
Reporting for Contact Center Setup and Operations Guide
Page 86

Using Reporting for Contact Center
86
Print Schedules
You can configure Print Schedules so that Nortel Reporting for Contact Center automatically
prints a set of requested reports at a specified time. You can specify Print Schedules to print
Daily, Weekly, or Monthly reports.
You can configure multiple Daily, Weekly, and Monthly Schedules.
For example, you may wish to print a set of reports each day before you arrive at your desk.
In this case, you configure a Daily Schedule which prints at, for example, 08:00.
You can also have a different Daily Schedule report that refers to Agent Activity. You can
configure Nortel Reporting for Contact Center to print these reports at, for example, 16:30 so
that you can review the reports before the end of the day.
Note: If the Web Host PC is powered off over the period in which the Schedule print is
due to take place, the Schedule Print not produced. You can obtain the same reports by
using the Reports options. For more information, refer to Reports.
Note: If you select the Agent Audit Report, the Activity Code Report by Skillset, the
Agent Activity Code Report by Agent, or the Activity Code Report by # of Pegs
Reports to be included in your Print Schedule, you are prompted for the Agents and/or
the Activity Codes you wish to include in these Reports. These steps are described on
pages 176 (Agent Audit Report), 176 (Activity Code Report by Skillset), 176 (Activity
Code Report by Agents) and 176 (Activity Code report by # of Pegs).
From the User Main Menu page shown in Figure 69: User Main Menu page, select Print
Schedules to view the Print Schedules page shown in Figure 70: Print Schedules page. As
shown in the figure, the Print Schedules options are as follows:
Daily Schedules (see Daily Schedules)
Weekly Schedules (see Weekly Schedules)
Monthly Schedules (see
Monthly Schedules)
NN40040-302
Page 87

Using Reporting for Contact Center 87
Figure 70: Print Schedules page
Daily Schedules
Select Daily Schedules to view the Your Daily Schedules page, shown in
Daily Schedules page. Initially the page does not display any schedules.
Figure 71: Your
Reporting for Contact Center Setup and Operations Guide
Page 88

Using Reporting for Contact Center
88
Figure 71: Your Daily Schedules page
Perform the following steps to add a Daily Schedule:
1. Click Add. The Add Daily Schedules page shown in Figure 72: Add Daily Schedule page
appears.
NN40040-302
Page 89

Using Reporting for Contact Center 89
Figure 72: Add Daily Schedule page
The Add Daily Schedule page allows you to specify which reports you wish to have
included in the Schedule, which days are to be included in the Schedule, and when to
print the reports.
2. To set a name for your Schedule, type the name in the Schedule Name field. This is to
help you identify, and distinguish between, the different Schedules you create.
3. To select a report to be included in the Schedule, select the check box beside the report
name. Each selected report has a check mark in the check box beside its name. You can
select multiple reports.
4. To include the reports from a particular day in the Schedule, select the check box beside
that day. You can select multiple days.
Reporting for Contact Center Setup and Operations Guide
Page 90

Using Reporting for Contact Center
90
Note: Daily Reports print on the day following the day which is being reported. That is,
if you select a Daily Report Schedule for Monday, it prints on Tuesday. This ensures
that the report day has completely elapsed when the reports are generated.
5. To specify which printer generates the reports, select a printer name from the Select
printer list. This list includes all the printers that are accessible from the Web Host PC.
(The reports are generated from the databases held in the Web Host PC.)
6. The Report period start time and Report period end time lists allow you to specify the
period within each day for which the reports are generated. For example, if your Contact
Center has a working day that starts at 08:30 and finishes at 17:30, you may wish to
specify the Start Time as 08:00 (to see if you have early calls that you are missing by not
having the Contact Center open) and 18:00 (to see if a late surge of calls occurs).
Figure 73: Add Daily Schedule page – example settings shows example settings that User
Mary Smith configured for her Daily Schedule.
NN40040-302
Figure 73: Add Daily Schedule page – example settings
Page 91

Using Reporting for Contact Center 91
Mary Smith selected the Answered Calls, Abandoned Calls and CLID reports to be
printed at 08:30 each morning, for Monday through Friday. Her printouts will be
generated on Tuesday for Monday, on Wednesday for Tuesday, and so on until Friday’s
reports are printed on Saturday morning.
Her schedule is called AnswAban, and the reports start to be generated at 08:30, on the
Cannon iR5000-6000 PCL5e printer. The reports cover the period from midnight to
midnight for each day.
7. To save your Daily Schedule, click Submit. The Daily Schedule Skillsets page, shown in
Figure 74: Daily Schedule - Skillsets page appears.
To close the Add Daily Schedule page without saving your changes, click Cancel. The
Your Daily Schedules page shown in Figure 71: Your Daily Schedules page appears.
Figure 74: Daily Schedule - Skillsets page
Reporting for Contact Center Setup and Operations Guide
Page 92

Using Reporting for Contact Center
92
The Daily Schedule Skillsets page allows you to select which Skillsets you wish to
include in the generated reports that are produced by the Daily Schedule.
Skillset List Selection Methods
You can use the following techniques to select Skillsets from the Skillset List.
Click an unselected Skillset name once to select it (it will be highlighted) and remove the
highlight from any other currently selected Skillsets.
Click a selected (highlighted) Skillset name once to unselect it. Note that if other Skillsets
are selected and you click a Skillset name, you unselect all the other Skillsets.
To select multiple Skillsets, press Ctrl and click on multiple Skillsets.
Press and hold down the Shift key, then click a Skillset to select all the Skillsets between
the currently highlighted Skillset and the Skillset you clicked.
You can use Select All to select all the Skillsets at once.
Adding Selections to the Favorites List
If there are collections of the assigned Skillset for which you frequently need to review the
Daily Schedules, you can add the selection of Skillsets to the Favorites list.
When you add the selection to the Favorites list, instead of having to select a particular
collection of Skillsets each time you wish to use them, you can click Select beside the
appropriate Favorite, and the collection of Skillsets is highlighted at once. You do not need to
select a particular collection of Skillsets each time you wish to use them.
Follow these steps to add a Favorite to the Favorite List:
1. Select the Skillsets you wish to include in the Favorite List and then click Create
Favorite. The Save Favorites page appears, as shown in
Figure 75: Save Favourites page.
NN40040-302
Page 93

Using Reporting for Contact Center 93
Figure 75: Save Favourites page
2. Enter a name in the Favorite Name field, and then click Submit to save the name. (Click
Cancel to return without saving the Favorite.)
In the example shown in Figure 75: Save Favourites page, Mary Smith created a favorite
that contains the Skillsets SKILL1 and SKILL3 called “Skill1&3”. When a Favorite is
created, it appears in the Favorite List at the top of the page.
Note: Many pages within Nortel Reporting for Contact Center allow you to use S lists
and Favorites, and the techniques described here apply also to all those other pages. All
Reporting for Contact Center Setup and Operations Guide
Page 94

Using Reporting for Contact Center
94
the Favorites you create are accessible from any point within Nortel Reporting for
Contact Center that allows you to use Favorites.
Mary Smith clicked Select beside her new Favorite (Skill1&3), and the two associated
Skillsets are selected for her.
Saving your Daily Schedule
1. To save your Daily Schedule, click Submit. The Your Daily Schedules page shown in
Figure 76: Your Daily Schedules with a Schedule in the List appears. The page shows the
Daily Schedule that you created.
To leave the Daily Schedule Skillsets page without saving any changes, click Cancel.
The Your Daily Schedules page appears. See Figure 71: Your Daily Schedules page.
Note: If you included the Agent Audit Report, the Activity Code Report by Skillset,
Agent Activity Code Report by Agent, or the Activity Code Report by # of Pegs
Reports in your Print Schedule, you are prompted for the Agents and/or the Activity
Codes you wish to include in these Reports. These steps are described on pages 176
(Agent Audit Report), 176 (Activity Code Report by Skillset), 176 (Activity Code
Report by Agents) and 176 (Activity Code report by # of Pegs).
NN40040-302
Page 95

Using Reporting for Contact Center 95
Figure 76: Your Daily Schedules with a Schedule in the List
Note that each Schedule can be identified by the Schedule Name that was provided when the
Schedule was created.
Deactivate
Click Deactivate to disable the Print Schedule so that the schedule is no longer printed when
the schedule is due to run. When a schedule is disabled, the button changes from Deactivate
to Activate, and a red cross replaces the green check mark, similar to the following
illustration.
Reporting for Contact Center Setup and Operations Guide
Page 96

Using Reporting for Contact Center
96
Activate
Click Activate to enable the Print Schedule so that the schedule is printed when the schedule
is due to run. Once a schedule is enabled, the button changes from Activate to Deactivate and
a green check mark replaces the red cross, similar to the following illustration.
Edit
Click Edit to change the settings for a Schedule.
The Edit Daily Schedule page, shown in Figure 77: Edit Daily Schedule page appears.
NN40040-302
Page 97

Using Reporting for Contact Center 97
Figure 77: Edit Daily Schedule page
This page is set up exactly like the Add Daily Schedule page, except the fields and check
boxes are populated with the settings of the Schedule you are editing. In the example, you are
editing the AnswAban schedule. Make any necessary changes and click Submit. Your Daily
Schedules page appears. See Figure 76: Your Daily Schedules with a Schedule in the List
To leave the Edit Daily Schedule page without saving any changes, click Cancel. The Your
Daily Schedules page appears. See
Figure 76: Your Daily Schedules with a Schedule in the
List.
Reporting for Contact Center Setup and Operations Guide
Page 98

Using Reporting for Contact Center
98
Delete
Click Delete to remove the Schedule from the system and to remove its listing from the Your
Daily Schedules page.
You are prompted to confirm the deletion. When you confirm the deletion, the Your Daily
Schedules page appears.
Weekly Schedules
On the Print Schedules page shown in Figure 70: Print Schedules page, select Weekly
Schedules to view the Your Weekly Schedules page. See Figure 78: Your Weekly Schedules
page. Initially, the page does not show any schedules.
The Add Weekly Schedule page allows you to specify which reports you wish to include in
the Schedule and when to print the scheduled reports.
You can also specify which period of the day the reports contain. You must specify a name
for your Schedule and the printer on which you wish to generate the reports.
NN40040-302
Figure 78: Your Weekly Schedules page
Page 99

Using Reporting for Contact Center 99
Perform the following steps to add a Weekly Schedule:
1. Click Add. The Add Weekly Schedules page shown in Figure 79: Add Weekly Schedule
page appears.
Figure 79: Add Weekly Schedule page
2. To set a name for your Schedule, enter the name in the Schedule Name field. The name
helps you identify and distinguish between the different Schedules you create.
3. To select a report to include in the Schedule, click the check box beside the report name.
Selected reports have a check mark in the check box beside their name. You can select
multiple reports.
Reporting for Contact Center Setup and Operations Guide
Page 100

Using Reporting for Contact Center
100
4. The reports are generated for a calendar week. From the list, select the day on which the
Weekly Schedule reports are generated.
Note: Weekly Schedules generate reports on the specified day at the specified time.
However, the generated reports contain information from the previous calendar week.
For example, a User creates a Weekly Schedule to print on a Saturday. They create this
th
Schedule on September 10
, 2003. See Figure 80: Calendar for September 2003. On
Saturday September 13, the Weekly Schedule generates Weekly reports. These Reports
contain information relating to the week September 1
st
–September 7th. Reports
containing the information relating to the week September 8th – September 14th are
printed on Saturday, 20 September, and so on.
September 2003
Mon Tue Wed Thu Fri Sat Sun
1 2 3 4 5 6 7
8 9 10 11 12 13 14
15 16 17 18 19 20 21
22 23 24 25 26 27 28
29 30
Figure 80: Calendar for September 2003
5. In the Select printer list, select the printer on which the reports will be generated. This
list includes all the printers that are accessible from the Web Host PC. (The reports are
generated from the databases held in the Web Host PC.)
6. In the Report period start time and Report period end time fields, specify the period in
each day for which the reports are generated. For example, if your Contact Center has a
working day that starts at 08:30 and finishes at 17:30, you may wish to specify the Start
Time as 08:00 (to see if you have early calls that you are missing by not having the
Contact Center open) and 18:00 (to see if there is a late surge of calls).
Figure 81: Add Weekly Schedule page – example schedule shows how User Mary Smith
configured her Weekly Schedule.
NN40040-302
 Loading...