

Page 1

BCM Rls 6.0
Remote Access
Task Based Guide
Page 2

Remote Access
Copyright © 2010 Avaya Inc.
All Rights Reserved.
Notices
While reasonable efforts have been made to ensure that the information in this document is complete and accurate
at the time of printing, Avaya assumes no liability for any errors. Avaya reserves the right to make changes and
corrections to the information in this document without the obligation to notify any person or organization of such
changes.
Documentation disclaimer
Avaya shall not be responsible for any modifications, additions, or deletions to the original published version of
this documentation unless such modifications, additions, or deletions were performed by Avaya. End User agree to
indemnify and hold harmless Avaya, Avaya’s agents, servants and employees against all claims, lawsuits, demands
and judgments arising out of, or in connection with, subsequent modifications, additions or deletions to this
documentation, to the extent made by End User.
Link disclaimer
Avaya is not responsible for the contents or reliability of any linked Web sites referenced within this site or
documentation(s) provided by Avaya. Avaya is not responsible for the accuracy of any information, statement or
content provided on these sites and does not necessarily endorse the products, services, or information described or
offered within them. Avaya does not guarantee that these links will work all the time and has no control over the
availability of the linked pages.
Warranty
Avaya provides a limited warranty on this product. Refer to your sales agreement to establish the terms of the
limited warranty. In addition, Avaya’s standard warranty language, as well as information regarding support for
this product, while under warranty, is available to Avaya customers and other parties through the Avaya Support
Web site: http://www.avaya.com/support
Please note that if you acquired the product from an authorized reseller, the warranty is provided to you by said
reseller and not by Avaya.
Licenses
THE SOFTWARE LICENSE TERMS AVAILABLE ON THE AVAYA WEBSITE,
HTTP://SUPPORT.AVAYA.COM/LICENSEINFO/ ARE APPLICABLE TO ANYONE WHO DOWNLOADS,
USES AND/OR INSTALLS AVAYA SOFTWARE, PURCHASED FROM AVAYA INC., ANY AVAYA
AFFILIATE, OR AN AUTHORIZED AVAYA RESELLER (AS APPLICABLE) UNDER A COMMERCIAL
AGREEMENT WITH AVAYA OR AN AUTHORIZED AVAYA RESELLER. UNLESS OTHERWISE
AGREED TO BY AVAYA IN WRITING, AVAYA DOES NOT EXTEND THIS LICENSE IF THE
SOFTWARE WAS OBTAINED FROM ANYONE OTHER THAN AVAYA, AN AVAYA AFFILIATE OR AN
AVAYA AUTHORIZED RESELLER, AND AVAYA RESERVES THE RIGHT TO TAKE LEGAL ACTION
AGAINST YOU AND ANYONE ELSE USING OR SELLING THE SOFTWARE WITHOUT A LICENSE. BY
INSTALLING, DOWNLOADING OR USING THE SOFTWARE, OR AUTHORIZING OTHERS TO DO SO,
YOU, ON BEHALF OF YOURSELF AND THE ENTITY FOR WHOM YOU ARE INSTALLING,
DOWNLOADING OR USING THE SOFTWARE (HEREINAFTER REFERRED TO INTERCHANGEABLY
AS "YOU" AND "END USER"), AGREE TO THESE TERMS AND CONDITIONS AND CREATE A
BINDING CONTRACT BETWEEN YOU AND AVAYA INC. OR THE APPLICABLE AVAYA AFFILIATE
("AVAYA").
Copyright
Except where expressly stated otherwise, no use should be made of the Documentation(s) and Product(s) provided
by Avaya. All content in this documentation(s) and the product(s) provided by Avaya including the selection,
arrangement and design of the content is owned either by Avaya or its licensors and is protected by copyright and
other intellectual property laws including the sui generis rights relating to the protection of databases. You may not
modify, copy, reproduce, republish, upload, post, transmit or distribute in any way any content, in whole or in part,
including any code and software. Unauthorized reproduction, transmission, dissemination, storage, and or use
without the express written consent of Avaya can be a criminal, as well as a civil offense under the applicable law.
Third Party Components
Certain software programs or portions thereof included in the Product may contain software distributed under third
party agreements ("Third Party Components"), which may contain terms that expand or limit rights to use certain
portions of the Product ("Third Party Terms"). Information regarding distributed Linux OS source code (for those
Products that have distributed the Linux OS source code), and identifying the copyright holders of the Third Party
Components and the Third Party Terms that apply to them is available on the Avaya Support Web site:
http://support.avaya.com/Copyright.
Trademarks
The trademarks, logos and service marks ("Marks") displayed in this site, the documentation(s) and product(s)
provided by Avaya are the registered or unregistered Marks of Avaya, its affiliates, or other third parties. Users
are not permitted to use such Marks without prior written consent from Avaya or such third party which may own
the Mark. Nothing contained in this site, the documentation(s) and product(s) should be construed as granting, by
implication, estoppel, or otherwise, any license or right in and to the Marks without the express written permission
of Avaya or the applicable third party. Avaya is a registered trademark of Avaya Inc. All non-Avaya trademarks
are the property of their respective owners.
2 NN40011-032 Issue 1.2 BCM Rls 6.0
Page 3

Remote Access
Downloading documents
For the most current versions of documentation, see the Avaya Support. Web site: http://www.avaya.com/support
Contact Avaya Support
Avaya provides a telephone number for you to use to report problems or to ask questions about your product. The
support telephone number is 1-800-242-2121 in the United States. For additional support telephone numbers, see
the Avaya Web site: http://www.avaya.com/support
Copyright © 2010 ITEL, All Rights Reserved
The copyright in the material belongs to ITEL and no part of the material may
be reproduced in any form without the prior written permission of a duly
authorised representative of ITEL.
NN40011-032 Issue 1.2 BCM Rls 6.0 3
Page 4

Remote Access
Table of Contents
Remote Access ................................................................. 5
Overview .......................................................................................... 5
Required Information ......................................................................................... 5
Flow Chart ....................................................................................... 6
Modem Overview ............................................................................. 7
Accessing Element Manager ........................................................... 7
Remote Access Service ................................................................. 10
Modem Remote Access Service Specifics ...................................................... 15
Modem Compatibility ..................................................................... 17
Modem Dial-In Parameters ............................................................ 17
ISDN Dial-In Parameters ............................................................... 19
Creating a User Account ................................................................ 21
Avaya Documentation Links .......................................... 27
4 NN40011-032 Issue 1.2 BCM Rls 6.0
Page 5

Remote Access
Notes:
ISDN DASS2 and DPNSS will not support dial-up/RAS connections.
The remote configuration PC should be configured with a dial-up
networking connection. The telephone number and required User
ID’s/Passwords should be entered in this configuration.
Remote Access
Overview
BCM Administration and Diagnostics can be performed from a remote location
via a dial-up connection. This would prove useful in situations where limited
configuration is required, and therefore not necessary to send an engineer to
the customer site.
This guide describes how to prepare the BCM for remote access via ISDN or
Modem.
Required Information
Before commencing Remote Access, it would be useful to obtain the following
information:
The telephone/line number used to dial the BCM. Only the BCM line
number is required for BCM configuration. The remote end requires the
telephone number.
The User ID & Password required by the remote PC to make the
connection or the creation of a user account for this purpose. See the
Creating a User Account section of this guide.
The IP Addresses to be used at the Local and Remote ends.
NN40011-032 Issue 1.2 BCM Rls 6.0 5
Page 6
Remote Access
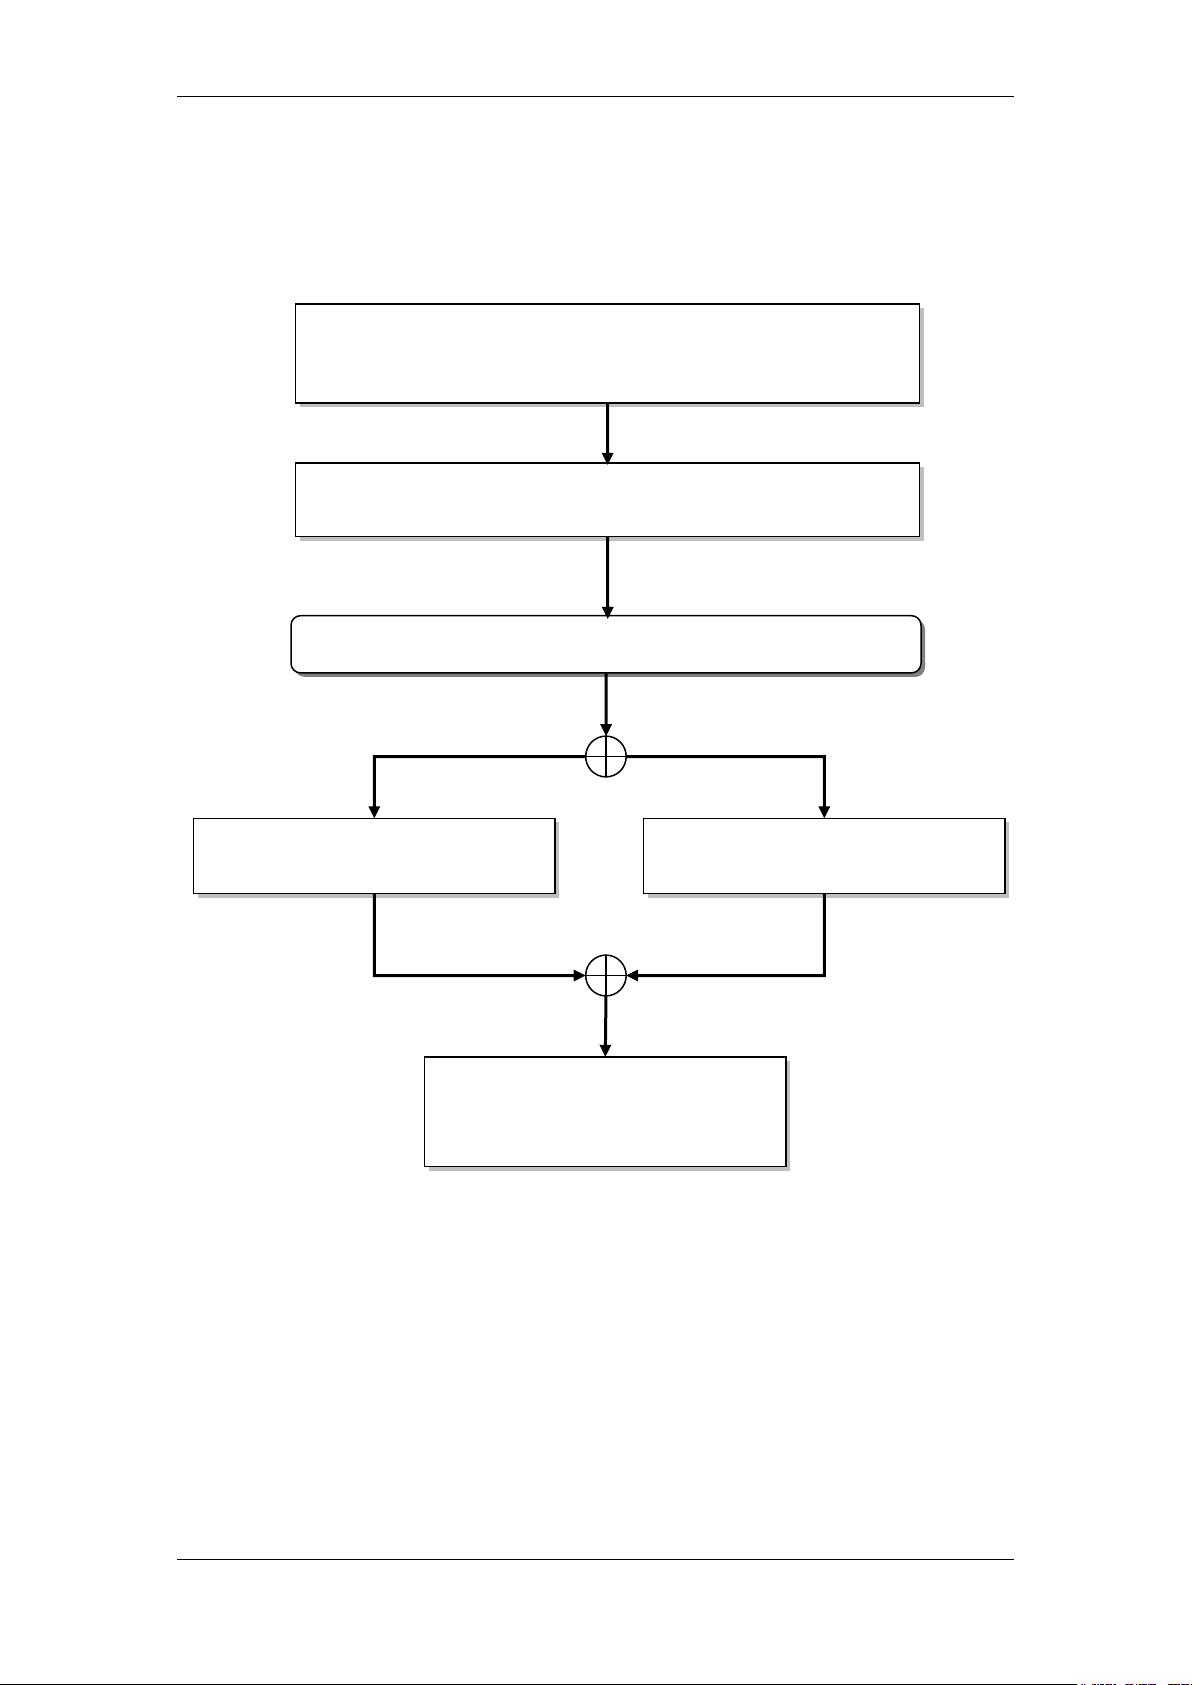
List the line numbers and IP Addresses that will be used for
Remote Access purposes: refer to the Required
Information section of this guide.
Modem
Which Remote Access method do you want to configure?
Review the process overview: refer to the Remote Access
Service section of this guide.
Refer to the Modem Dial-In
Parameters section of this guide.
Refer to the ISDN Dial-In
Parameters section of this guide.
ISDN
Set up an account for the Remote
User: refer to the Creating a User
Account section of this guide.
Flow Chart
Use the process below to navigate through the guide and configure Remote
Access capability for the BCM.
6 NN40011-032 Issue 1.2 BCM Rls 6.0
Page 7
Remote Access
Modem Overview
The modem on the BCM offers two key services:
• Remote Access allows users at a client station to connect to the BCM
across a phone line using Point to Point Protocol (PPP). This allows a
person working from home or from a remote location to connect to the
BCM LAN through a modem and a phone line.
• Auto Dial Out automatically establishes a PPP connection to a remote
location through a phone line.
Accessing Element Manager
This section describes how to access the Element Manager interface.
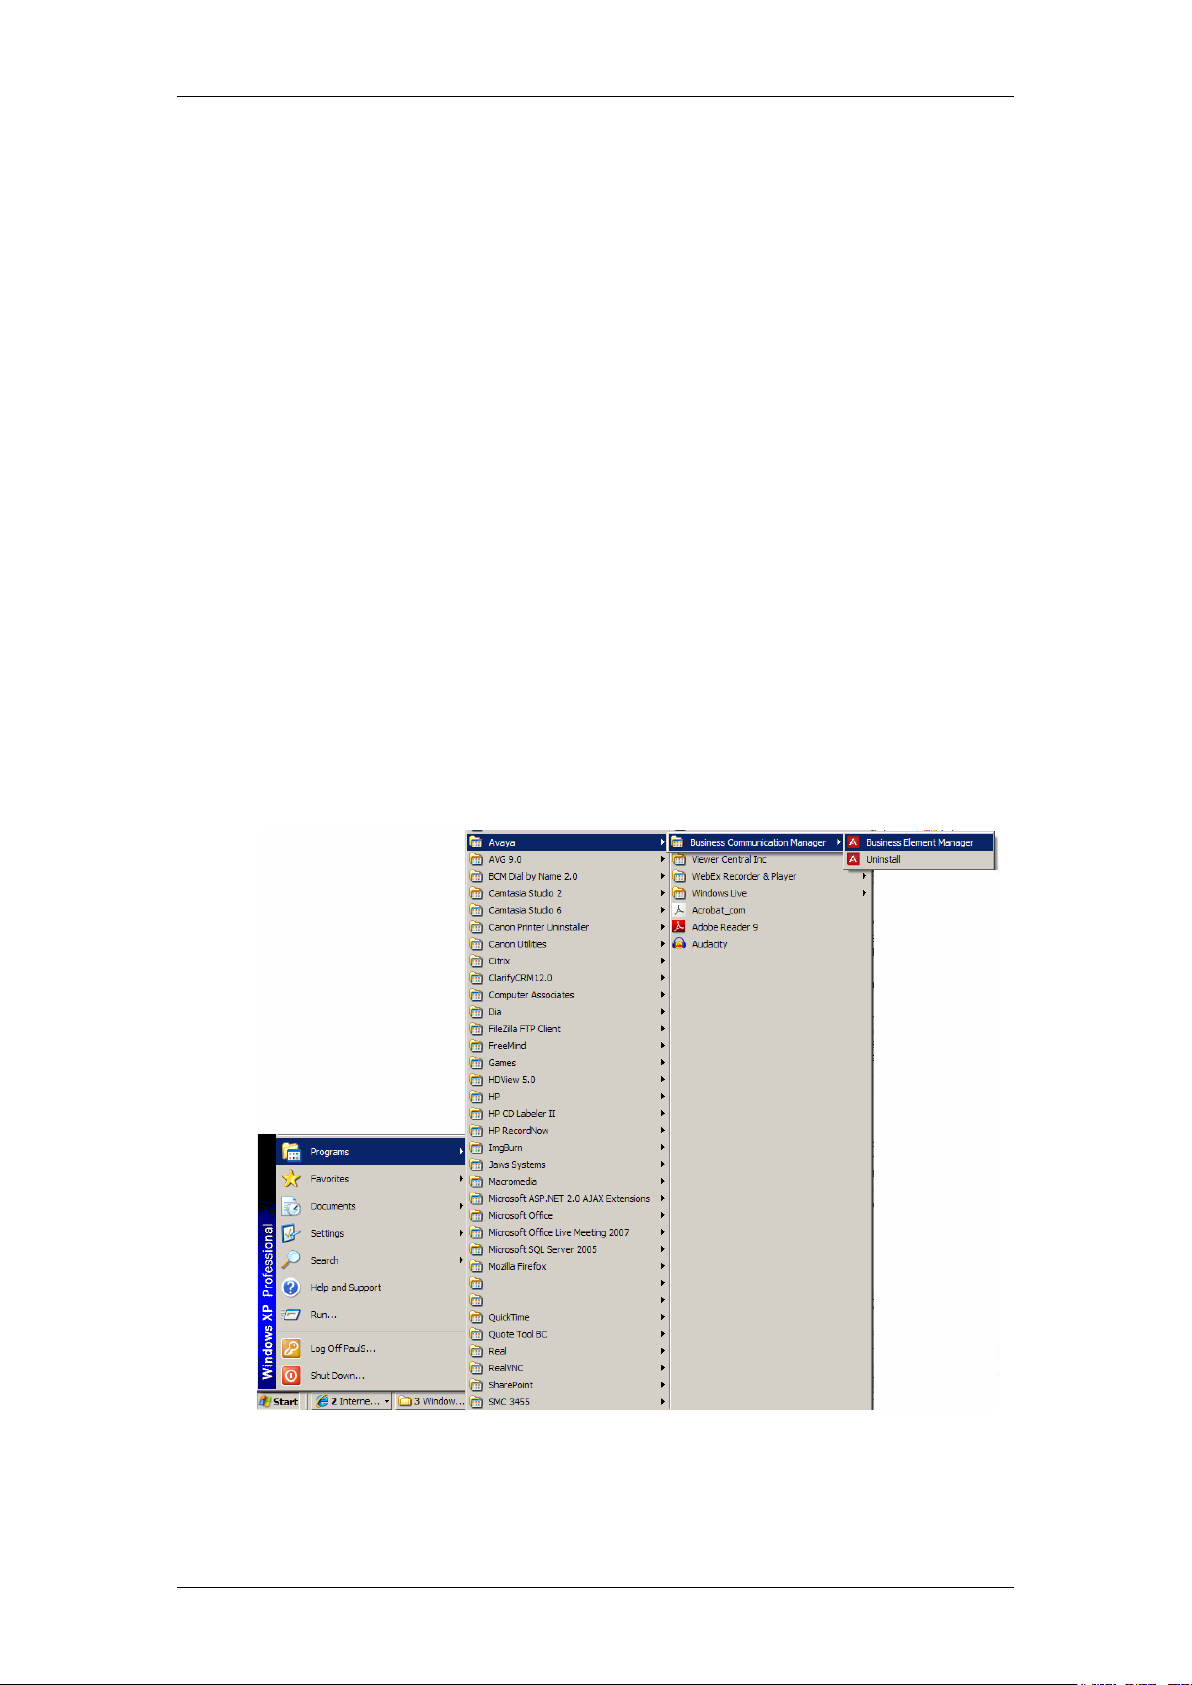
1. To access the Business Element Manager application from the Start
Menu, navigate to Start, Programs, Avaya, Business
Communications Manager, Business Element Manager.
NN40011-032 Issue 1.2 BCM Rls 6.0 7
Page 8
Remote Access
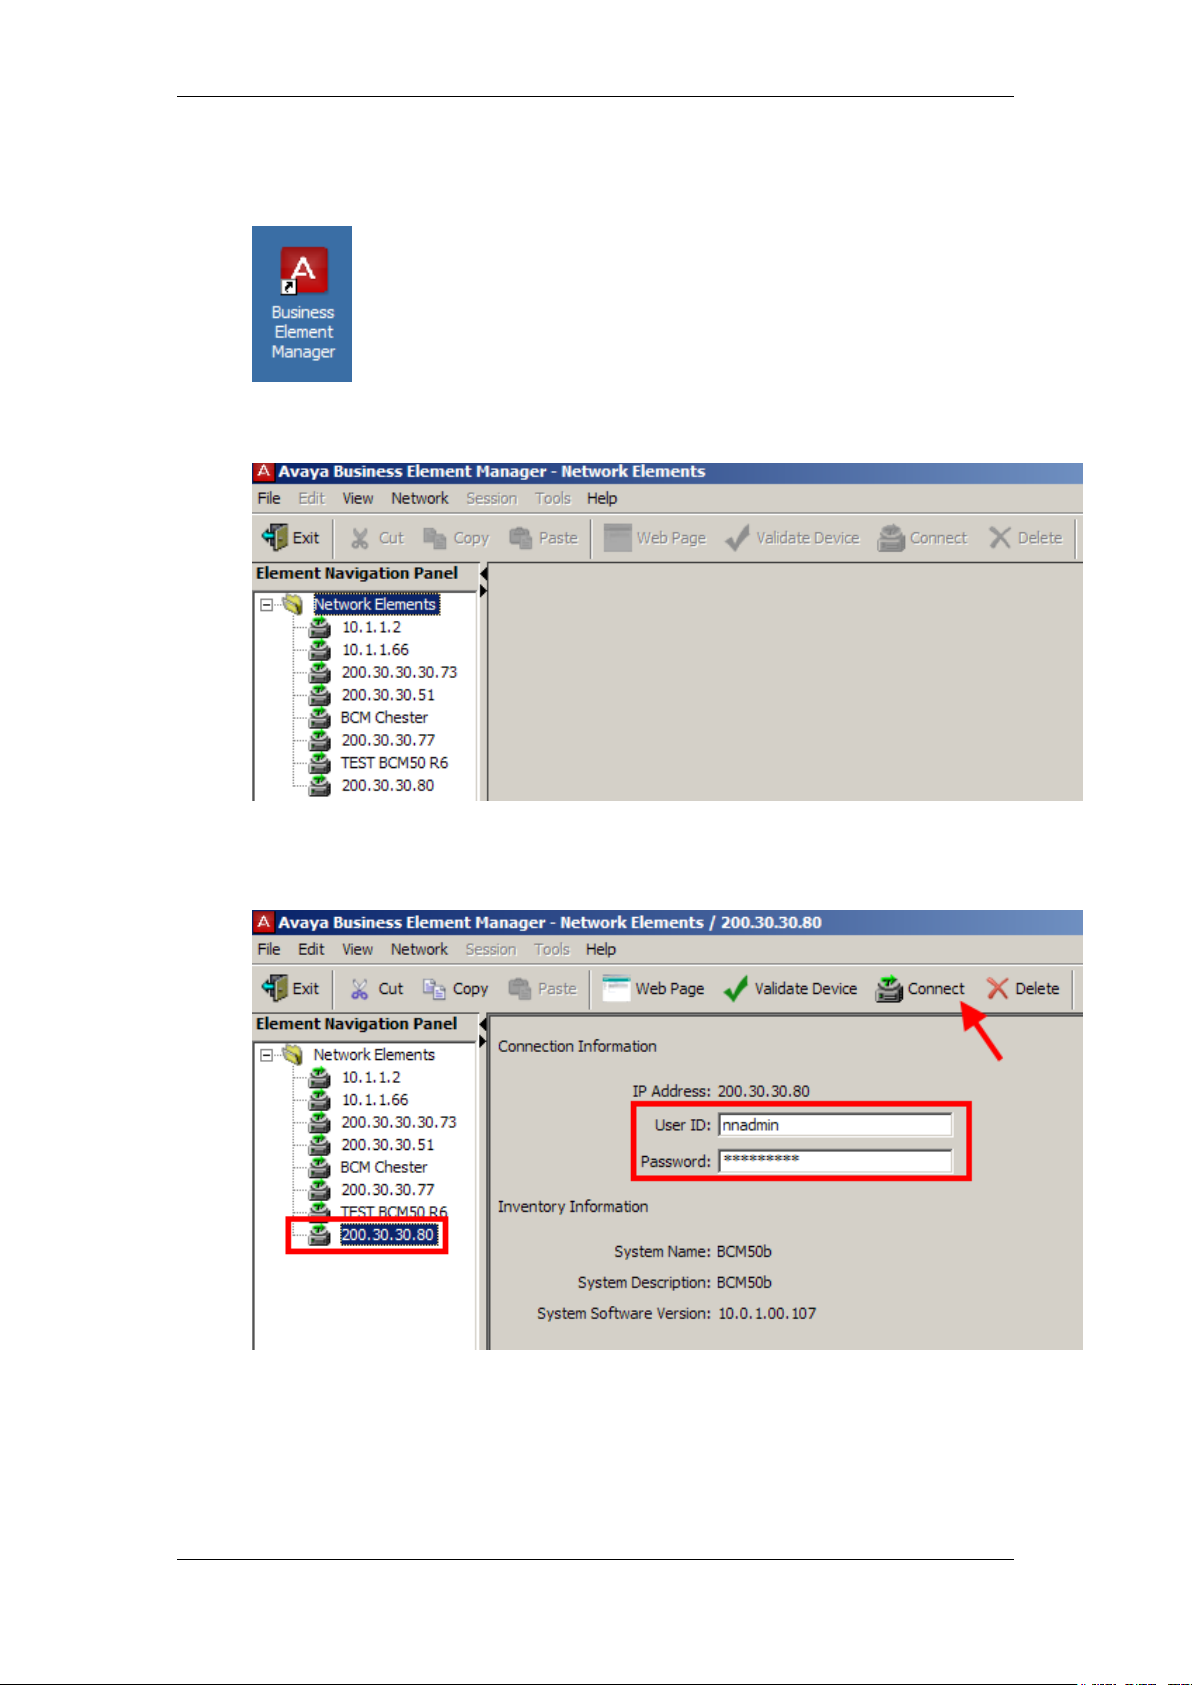
2. Alternatively, double-click on the Business Element Manager desktop
icon.
3. You will be presented with the Element Manager interface.
4. Open the Network Elements folder and select the IP Address of the
BCM.
5. Enter the User Name of the BCM in the User Name field, by default this
is nnadmin. Then enter the Password in the Password field, by default
the password is PlsChgMe!. Click the Connect button.
8 NN40011-032 Issue 1.2 BCM Rls 6.0
Page 9
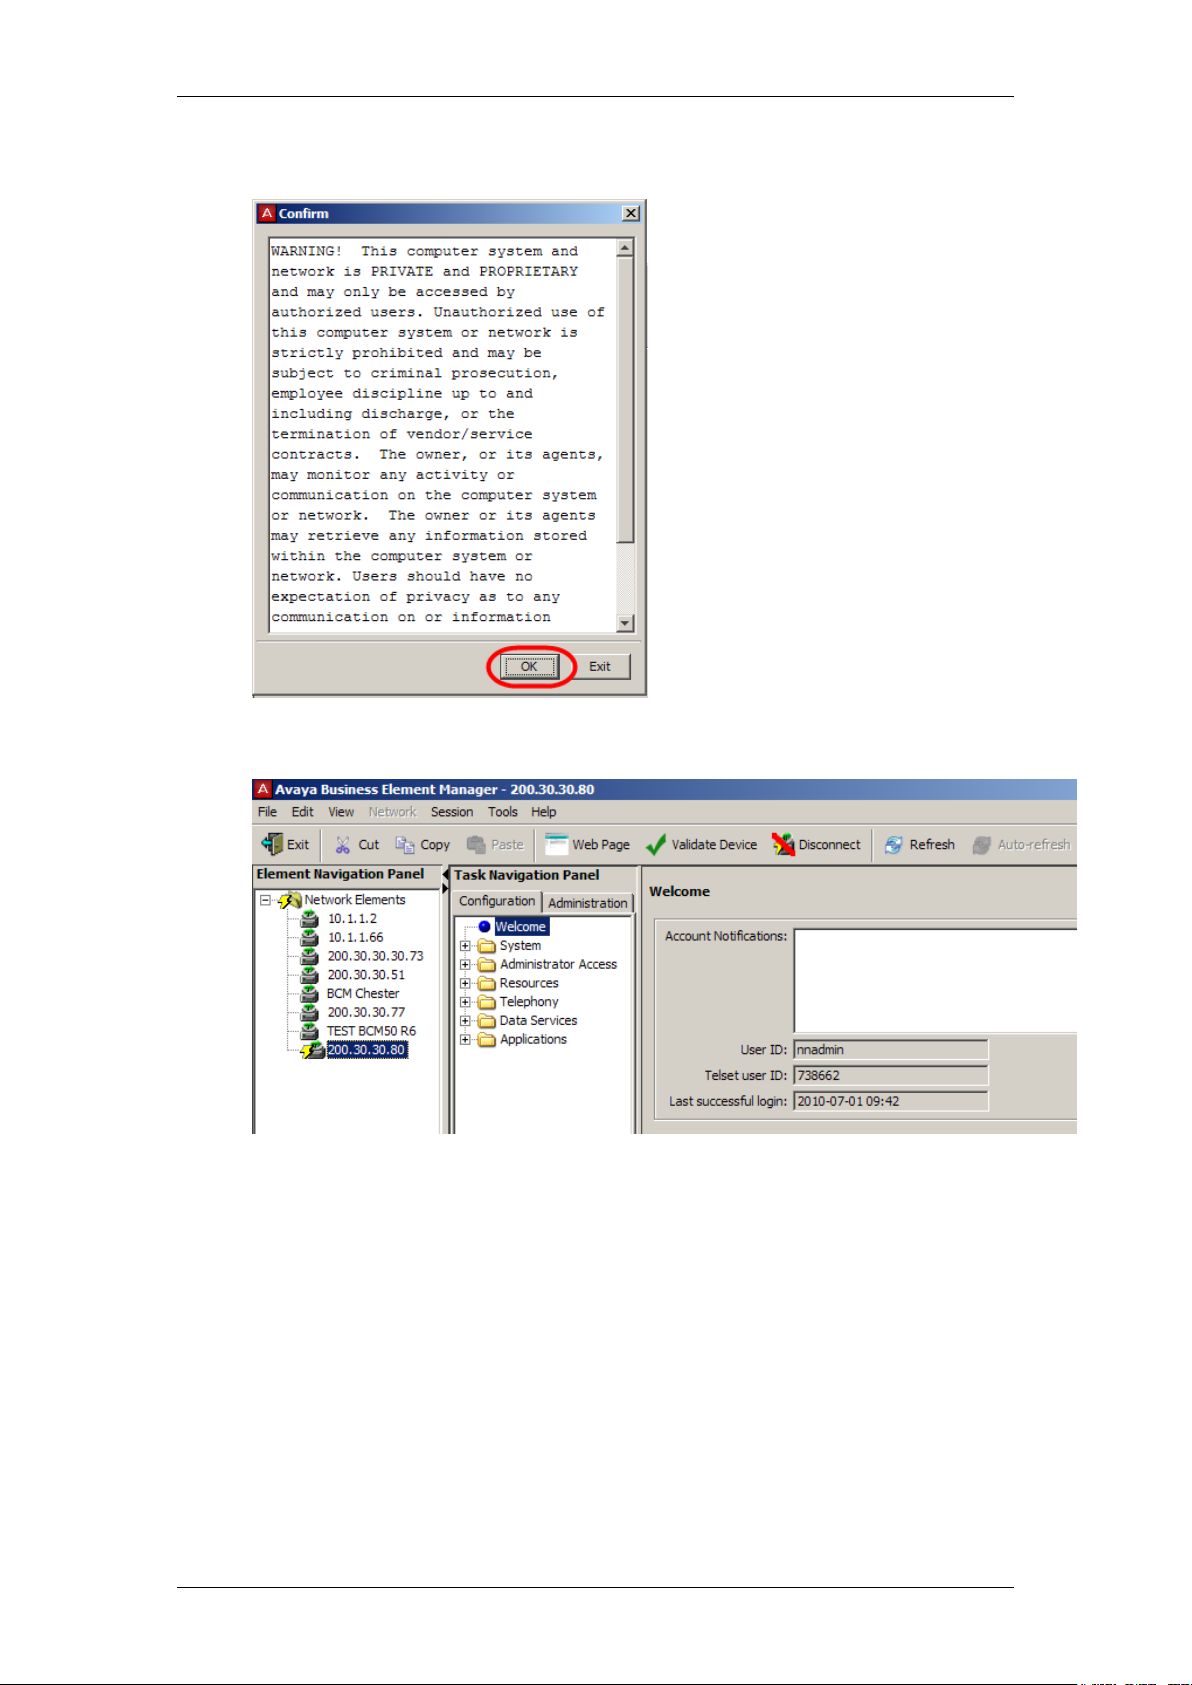
6. A warning screen will appear, read the warning and click OK.
Remote Access
7. You will be presented with the Element Manager interface.
NN40011-032 Issue 1.2 BCM Rls 6.0 9
Page 10

Remote Access
7. To access Dial-up interfaces Configuration, Resources, Dial-up
Interfaces, and access required tab to configure required remote
access settings.
Remote Access Service
Remote Access Service (RAS) allows a client system to dial a telephone
number and establish an IP link with a BCM. This link is a connection across a
telephone network, between the modem on the client system and the modem
on the BCM. Once this link is established, the client can run IP applications to
access the BCM system’s OAM server, Web Page Server or BCM Monitor.
A user must provide credentials to establish the PPP connection. The
credentials used must match the ones of a BCM account which has the PPP
Login privilege.
This section provides an overview of how to configure the Remote Access
Service. Specific field configurations can be found in the later sections of this
guide.
1. The modem or ISDN interface must be enabled for a connection to take
place. Click the Modem Dial-In Parameters or ISDN Dial-In
Parameters tab and check the Enable modem dial-in or Enable ISDN
dial-in tick box.
10 NN40011-032 Issue 1.2 BCM Rls 6.0
Page 11

Remote Access
2. The BCM can be configured with call-back users along with their callback numbers. In this scenario, the user can ask BCM to call-back
before establishing the PPP connection. The BCM will validate the
username and use the callback number associated with the account
where the username was found. The authentication will be made using
the username and password associated with the account where the
callback username was found. The modem will try to call a configurable
amount of time with a configurable delay between attempts. Open the
Administrator Access folder and select Accounts & Privileges.
Select the account to be used for Remote Access, click on the View by
Accounts tab, and to configure the Callback settings in the lower part
of the screen in the Remote Access tab.
The BCM modem/ISDN interface will automatically disconnect if there
is no traffic on the IP link for a configurable amount of time.
NN40011-032 Issue 1.2 BCM Rls 6.0 11
Page 12

Remote Access
3. The IP addresses assigned to the BCM and the remote client are
configurable. For the modem dial in, the default configuration is for the
BCM to assign itself 10.10.14.1 and assign to the remote client
10.10.14.2. The settings can be changed to have the remote client
assign itself an address or even assign the BCM an address. To
configure these settings open the Resources folder, select the Dial Up
Interfaces link and select the Modem Dial In Parameters tab.
12 NN40011-032 Issue 1.2 BCM Rls 6.0
Page 13

Remote Access
4. For ISDN dial in, the default configuration is for the BCM to assign itself
10.10.18.1for the first dial-in connection, and 10.10.18.2 for the second
dial-in connection. The BCM can have up to two simultaneous ISDN
calls in progress. The BCM will by default assign the remote end
10.10.18.10 for the first dial-in connection and 10.10.18.11 to the
second dial-in connection. The settings can be changed to have the
remote client assign itself an address or even assign the BCM an
address. To configure these settings open the Resources folder, select
the Dial Up Interfaces link and select the ISDN Dial In Parameters
tab.
NN40011-032 Issue 1.2 BCM Rls 6.0 13
Page 14

Remote Access
5. Finally, an administrator has the capability to disconnect a modem or
ISDN call if they find that a modem or ISDN call is in progress.
Remote Access settings for Modem or ISDN configurations can be viewed by
selecting:
For Modem Configurations:
Select the Configuration tab, opening the Resources folder, selecting
the Dial Up Interfaces link followed by the Modem Dial-In Parameters
tab. Refer to the Modem Dial-In Parameters section of this guide for
more information.
14 NN40011-032 Issue 1.2 BCM Rls 6.0
Page 15

For ISDN Configurations
Select the Configuration tab, opening the Resources folder, selecting
the Dial Up Interfaces link followed by the ISDN Dial-In Parameters
tab. Refer to the ISDN Dial-In Parameters section of this guide for
more information.
Remote Access
Modem Remote Access Service Specifics
For Modem dial in, the Auto-Disable feature will automatically disable the
modem if no connections are established for a configurable period of time.
The Auto-Disable feature is turned on by default and can be turned off. The
modem can be enabled through Element Manager, using Feature 9*8 or the
Startup Profile. If the modem is enabled using the Startup Profile, the AutoDisable capability is turned off.
The modem has a Directory Number (DN) associated with it. This DN can be
used to redirect a call to the modem. A call can be redirected to the modem
DN using the F70 (Transfer) feature from any sets attached to the BCM, or it
can be redirected to the modem DN using the Auto-Attendant feature. Any
user on the BCM can redirect an active call at their set by using Feature 9*0 if
they don’t know the modem DN. Feature 9*0 will also display the modem DN
on any sets with at least 1 line display.
NN40011-032 Issue 1.2 BCM Rls 6.0 15
Page 16

Remote Access
The modem can also be programmed to answer incoming lines directly after a
configurable number of rings. Please be aware the most modems are
programmed by default to give up on a connection after 60 seconds. If the
number of rings and the amount of time it takes for the 2 modems to establish
a connection take more than 60 seconds, the connection will fail.
If an administrator wants a modem to answer after a longer period than this
default timeout, the calling modem answer timeout should be changed
accordingly.
Internal calls to the modem will always be answered immediately. External
calls transferred to the modem will be answered after 10 seconds. This gives
enough time to wait and collect caller ID information which will be captured
and logged every time the modem connects.
16 NN40011-032 Issue 1.2 BCM Rls 6.0
Page 17

Remote Access
Attribute
Description
Enable Modem
Dial-In
Enable or disable modem dial-in.
Default: disabled
Connection
State:
This is a table that shows the current dial in state if connected. Note:
There is a maximum of one entry in this table (as there is only one
modem). This table will be blank if no dial in connection is currently
active.
User
Displays the user that is currently dialled in.
Local IP Address
The local IP address assigned to the dial-in connection.
Remote IP
Address
The remote IP address of the dial-in connection.
Callback
This shows if callback is enabled for this dial-in connection.
Status
The status of the dial-in connection.
Modem Compatibility
The internal modem is compatible with all V.34 modems, and has been tested
with the following modems:
• U.S. Robotics Sportster 33.6 FaxModem (external modem)
• Microcom DeskPorte 28.8P (external modem)
• PCTEL 2304WT V.92 MDC (internal modem Dell Portable)
• U.S. Robotics Sportster 56K (external modem)
Modem Dial-In Parameters
The Modem Dial-In parameters controls Dial-in to the BCM for remote access.
This panel is used to configure the modem for Dial-in. It also displays the
connection status of the modem if one is in progress.
1. To view or change the current Modem Dial-In Parameters
configuration, in Element Manager select the Configuration tab, open
the Resources folder, click on the Dial UP Interfaces link, followed by
the Modem Dial-In Parameters tab.
NN40011-032 Issue 1.2 BCM Rls 6.0 17
Page 18

Remote Access
Attribute
Description
Callback Settings
Callback retries
1-10 The number of attempts made by the BCM to dial-out to the
remote end during callback. Default: 3
Callback retry
interval(s)
0-360 Interval for successive connection attempts for dial-out during
callback.
Default: 60 seconds
PPP Configuration
Idle timeout
Idle time after which, PPP will terminate the PPP connection.
Default: 1800 seconds
Maximum
Receive Unit
128-16384 The maximum size of the packets that can be received.
Default: 500
Maximum
Transmission
Unit
128-16384 The maximum size of the packets that can be sent.
Default: 500
Authentication
support
Supported PPP authentication: PAP, CHAP, MSCHAP, MSCHAPv2.
Default: CHAP.
Dial-In Settings
Line
Line number monitored by the modem for incoming calls. Default:
blank. A value of 0 = blank. Range: Min Target Line-Max Target Line
Calling Number
Analog modem uses this Calling Number (Calling ID - CLID) to
detect an incoming data call.
Number of Rings
Number of rings after which the modem picks up an incoming call.
Default: 1
Auto-Disable
Auto-disable the dial-in for modem after use.
Default: disabled
Auto-Disable
Timer (min)
Time after which the Dial-in for the modem is disabled after use.
Default: 0 ( 0-30 Minutes)
Directory
Number
Read-only number assigned to the analog modem. Used for manual
transfer of call or by auto-attendant.
Attribute
Description
Local IP Address Specification
Remote
assigned
If selected, the BCM obtains its IP address from the remote end.
Default: disabled.
IP Address
Use this IP Address as the local IP address for the PPP connection.
This value is used when "Remote assigned" is disabled.
18 NN40011-032 Issue 1.2 BCM Rls 6.0
Page 19

Remote Access
Attribute
Description
Default: 10.10.14.1
Remote IP Address Specification
Use IP address
to remote
If selected, the BCM will assign the IP address specified in the "IP
Address" field of this section to the remote end of the connection.
Default: selected
IP Address
When the "Use IP address pool" is enabled BCM will assign to the
remote end of the connection the IP address specified in this field.
Default: 10.10.14.2
Attribute
Description
Enable ISDN
Dial-In
Enable or disable modem dial-in.
Default: disabled
Connection
State
This is a table that shows the current dial-in state if connected.
User
Displays the user that is currently dialled in.
Local IP Address
The local IP address assigned to the dial-in connection.
Remote IP
Address
The remote IP address of the dial-in connection.
Callback
This shows if callback is enabled for this dial-in connection.
Status
The status of the dial-in connection.
ISDN Dial-In Parameters
The ISDN Dial-In Parameters controls Dial-in to the BCM for remote access.
This panel is used to configure the ISDN for Dial-in. It also displays the
connection status of the ISDN connections if any are in progress. The tab and
description of the fields are below.
1. To view or change the current ISDN Dial-In Parameters configuration,
in Element Manager select the Configuration tab, open the
Resources folder, click on the Dial UP Interfaces link, followed by the
ISDN Dial-In Parameters tab.
NN40011-032 Issue 1.2 BCM Rls 6.0 19
Page 20

Remote Access
Attribute
Description
Callback Settings
Callback retries
1-10 The number of attempts made by the BCM to dial-out to the remote
end during callback. Default: 3
Callback retry
interval(s)
0-360 Interval for successive connection attempts for dial-out during
callback.
Default: 60 seconds
PPP Configuration
Idle timeout (s)
Idle time after which, PPP will terminate the PPP connection.
Default: 1800 seconds
Maximum
Receive Unit
128-16384 The maximum size of the packets that can be received.
Default: 500
Maximum
Transmission
Units
128-16384 The maximum size of the packets that can be sent.
Default: 500
Authentication
support
Supported PPP authentication: PAP, CHAP. Default: CHAP.
Dial-In Settings
Line
Line number monitored by the modem for incoming calls. Default: blank. A
value of 0 = blank. Range: Min Target Line-Max Target Line
Dial in Number
Analog modem uses this Calling Number (Calling ID - CLID) to detect an
incoming data call.
Attribute
Description
Local IP Address Specification
Remote
assigned
When enabled, BCM obtains its IP address from the remote end.
Default: disabled.
First Dial In IP
Address
The first IP address form the local pool used on the BCM for the dial-in
connection. Default: 10.10.18.1
20 NN40011-032 Issue 1.2 BCM Rls 6.0
Page 21

Remote Access
Attribute
Description
Second Dial In
IP Address
The last IP address form the local pool used on the BCM for the dial-in
connection. Default: 10.10.18.16
Remote IP Address Specification
Assign IP
Address to
Remote
When enabled, BCM will assign the IP address specified in the "Remote
Site IP Address" field of this section to the remote end of the connection.
Default: enabled.
First Dial in IP
Address
When the "Use IP address pool” is enabled, the BCM will assign to the
remote end of the connection the IP address specified in this field.
Default: 10.10.14.2
Second Dial In
IP Address
The last IP address from the local pool used on the BCM for the dial-in
connection. Default: 10.10.18.35
Creating a User Account
This section further details of how to create a User Account for Remote
Access purposes.
From the View by Accounts screens you can set up or modify User
Accounts, set the User ID & passwords for Element Manager/CallPilot
Manager, and assign User Groups to the User Account.
1. Log on to Element Manager.
2. From the Configuration tab, open the Administrator Access folder
and select Accounts & Privileges.
3. Click on the View by Accounts tab.
NN40011-032 Issue 1.2 BCM Rls 6.0 21
Page 22

Remote Access
4. Click on Add to add a new user.
5. Enter a brief description, and then a User ID & Password (ensure
password meets current Password Complexity Level (refer to the
Configuring Credential Complexity section of the User Management
Guide)).
Note: The User ID & Password must be entered by the remote user when
attempting to access the BCM.
Note: Anytime a new password is entered, you will be asked to re-enter that
password for confirmation.
22 NN40011-032 Issue 1.2 BCM Rls 6.0
Page 23

Remote Access
6. Click OK to save the new/changed details. If you have added a new
account, the account will appear in the Accounts list.
7. To assign a User Group to the selected account, click on the Group
Membership tab in the lower window. To add a User Group to this
account, click Add.
NN40011-032 Issue 1.2 BCM Rls 6.0 23
Page 24

Remote Access
8. Select the groups to be assigned to this account. For Remote Access
purposes, Administrator and Remote Access will need to be selected
(you may wish to use the shift and/or ctrl keys to select multiple
accounts), and click OK.
9. These groups will be added to the Account is Member of Groups list.
24 NN40011-032 Issue 1.2 BCM Rls 6.0
Page 25

Remote Access
Attribute
Description
Callback
Modem Callback
Number
Specifies a number the system will call to verify the dial-up user access.
Modem Callback
Passcode
Specifies the passcode the system uses to confirm the callback is
legitimate.
ISDN Callback
Number
Specifies the number the system will call to verify the ISDN user
Access.
Remote Modem Access
Enable remote
modem access
menu and CLIDs
Indicates whether the user is allowed to enable modem remotely using
Auto Attendant or Voice Mail menu. By default this is disabled.
External Modem
CLID
If the call with matching calling line identification number is received, the
BCM will redirect the call to the modem.
Low Priority
External Modem
CLID
If the call with matching calling line identification number is received, the
BCM will redirect the call to the modem.
Modem
BCM IP Address
Specifies the PPP IP address of the BCM when connecting with
10. Click on the Remote Access tab. Enter the IP Address of the BCM to
be used during Remote Access sessions. This should be in the same
range as the Local and Remote IP Addresses specified during the
Modem Dial-in Parameters and ISDN Dial-In Parameters (depending
on which method will be used by this account) configuration earlier.
View by Accounts – Remote Access Tab Settings
NN40011-032 Issue 1.2 BCM Rls 6.0 25
Page 26

Remote Access
Attribute
Description
analog modem or ISDN terminal adaptors.
NAT Rules
This section is used to allow network devices on the LAN side to be
accessed using an IP Address in the same range as the Local and
Remote IP Addresses specified in the Modem Dial-in Parameters and
ISDN Dial-In Parameters configuration screens. For example, the Dial in
side address might be 10.10.10.89 and the LAN side address might be
192.168.15.24 to allow that LAN side address to be accessed.
26 NN40011-032 Issue 1.2 BCM Rls 6.0
Page 27

Avaya Documentation Links
Configuration – System Guide
Administration & Security Guide
Remote Access
NN40011-032 Issue 1.2 BCM Rls 6.0 27
Page 28

Remote Access
28 NN40011-032 Issue 1.2 BCM Rls 6.0
 Loading...