

Page 1

Avaya Solution & Interoperability Test Lab
Application Notes for Computer Telephony Solutions
OAISYS NetSuite 4.2 with Avaya IP Office 2.0, Issue 1.0
Abstract
These Application Notes describe the configuration steps required for Computer Telephony
Solutions OAISYS NetSuite to successfully interoperate with the Avaya IP Office. The
OAISYS NetSuite is a business productivity software suite designed for small and mediumsized companies. OAISYS NetSuite features include trunk side call recording, intelligent call
routing using ANI and DNIS and a desktop phone application to allow users to make, receive
and manage calls on their existing telephone. Features and functionality were validated and
performance testing was conducted in order to verify operation under load. Information in
these Application Notes has been obtained through interoperability compliance testing and
additional technical discussions. Testing was conducted via the DeveloperConnection
Program at the Avaya Solution and Interoperability Test Lab.
SCR; Reviewed:
WCH 7/7/2004
Solution & Interoperability Test Lab Application Notes
©2004 Avaya Inc. All Rights Reserved.
1 of 39
oaisys-ipoffice.doc
Page 2

1. Introduction
These Application Notes describe the compliance-tested configuration utilizing Avaya IP Office
2.0 and Computer Telephony Solutions OAISYS NetSuite 4.2.
Computer Telephony Solutions (CTS) OAISYS NetSuite 4.2 is a business productivity software
suite designed for small and medium-sized companies. OAISYS NetSuite 4.2 includes the
following components:
OAISYS Net Server – A software server component that links to the TAPILink Pro and
DevLink Pro interfaces of the Avaya IP Office. The Net Server allows all other OAISYS
components to utilize and share the TAPILink Pro and DevLink Pro interfaces over the LAN.
OAISYS Tracer – A call-logging product that passively taps on the trunk side of the Avaya IP
Office to record telephone calls. The Tracer connects via TCP/IP to the OAISYS Net Server to
receive DevLink Pro information about calls.
OAISYS Call Router – An intelligent call routing product that allows calls to be routed to the
appropriate destination using telephone number (ANI/CallerID), DNIS, time of day, caller-
supplied information, etc. The Call Router uses the IP Office TAPILink Pro and DevLink Pro
links obtained by the Net Server to monitor calls to an Avaya IP Office route point (i.e., hunt
group number) and then immediately re-routes the calls based on the customer configuration.
OAISYS Voice Assistant – An integrated IVR product that provides a ‘voice interface’ for the
Call Router so that callers can be prompted for their main telephone number, customer number,
etc. The Voice Assistant connects to one or more analog station ports on the Avaya IP Office to
interact with callers.
OAISYS Net Phone – A desktop phone application that allows users to make, receive, and
manage calls on their existing telephone. Net Phone provides screen pops and database dialing
to/from most of the popular contact manager, CRM, PIM and database applications.
The tested configuration is shown in Figure 1.
SCR; Reviewed:
WCH 7/7/2004
Solution & Interoperability Test Lab Application Notes
©2004 Avaya Inc. All Rights Reserved.
2 of 39
oaisys-ipoffice.doc
Page 3
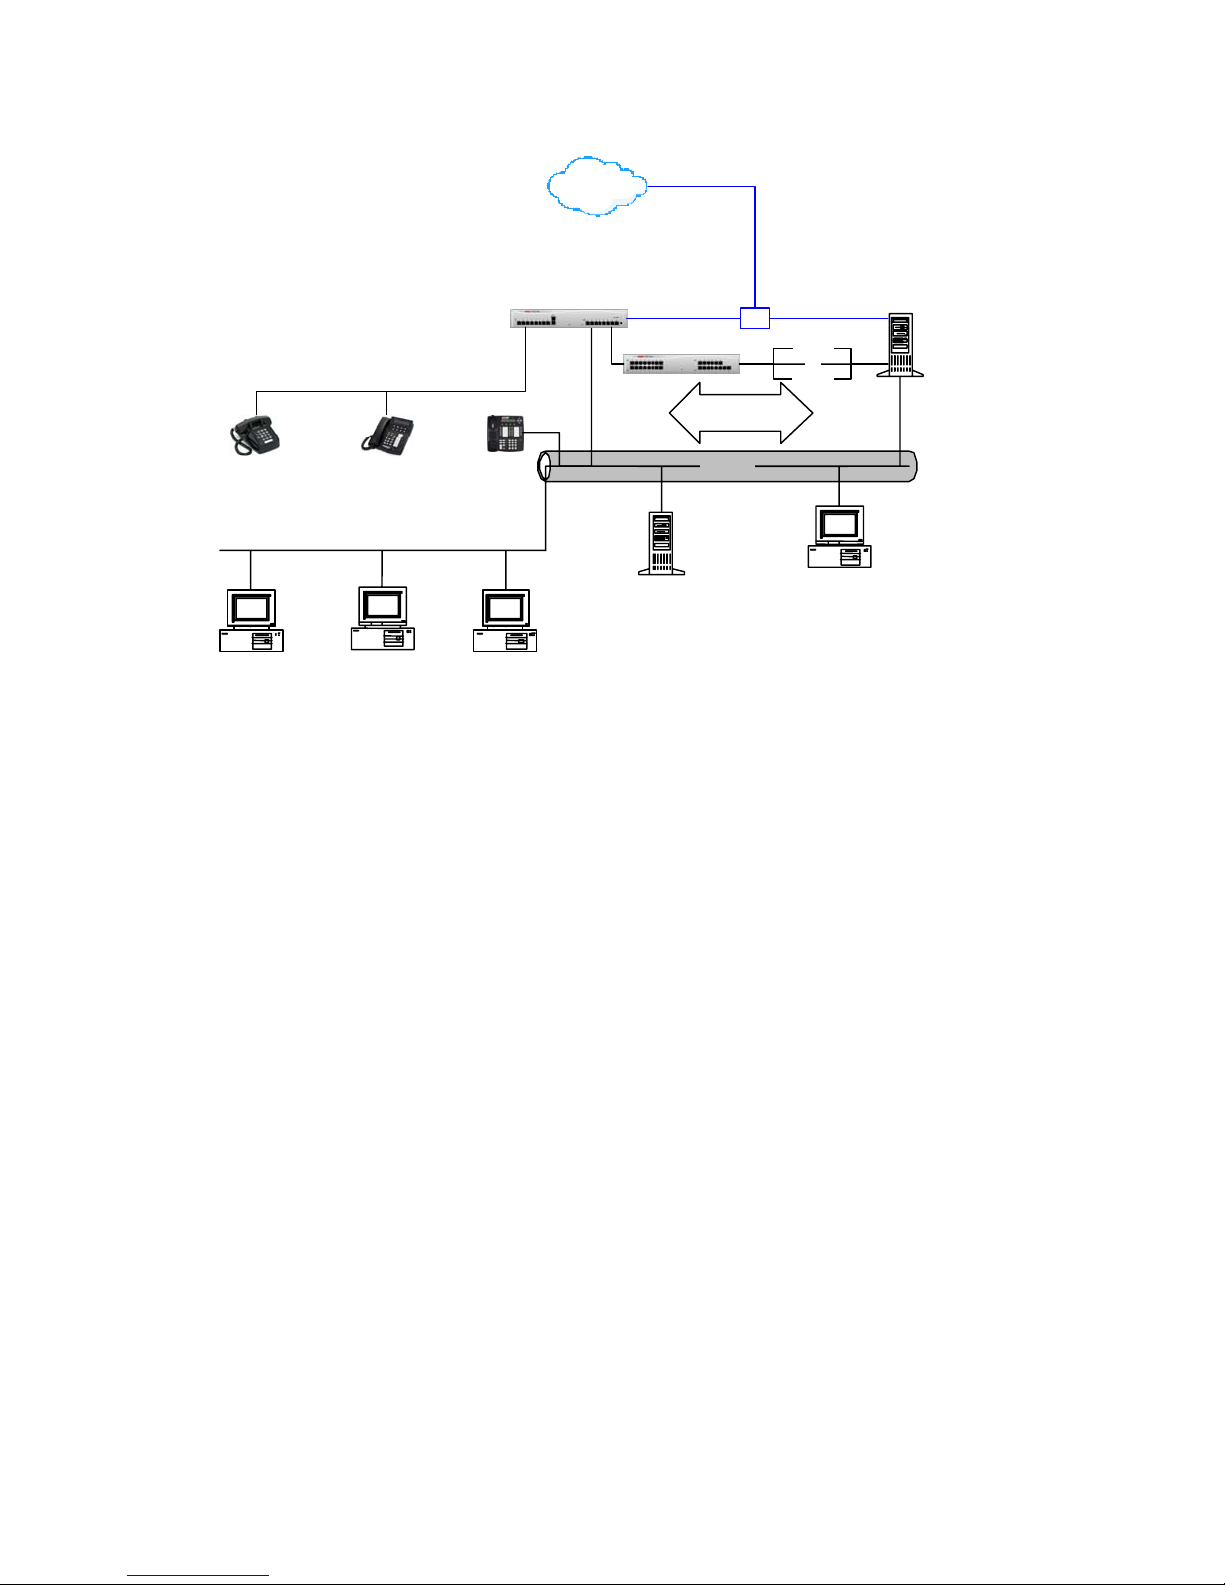
A
A
A
w
PSTN
vaya IP406
(192.45.70.191)
nalog &
T1 / PRI Trunks
breakout
box
Computer Telephony Solutions
OAISYS Voice Assistant
OAISYS Call Router
OAISYS Net Server
OAISYS Tracer
(192.45.70.225)
x2520
Analog
Phone
Client PC A
w/CTS OAISYS
NetPhone
(Sales)
x2501
Digital
Phone
Client PC B
w/CTS OAISYS
NetPhone
(Rick Sample)
(Bob Vasquez)
x2511
IP
Phone
Client PC C
/CTS OAISYS
NetPhone
vaya IP Phone 30
DevLink Pro
TAPILink Pro
Ethernet
192.45.70.x
Exchange
Server
(192.45.70.100)
x2601
...
x2608
IP Office Manager PC
License Manager PC
(192.45.70.40)
Figure 1: CTS OAISYS and Avaya IP Office Configuration
For the purpose of these Application Notes, the Avaya IP Office and CTS OAISYS components
were configured as described below. For additional information about available features, please
refer to the appropriate Avaya IP Office and/or Computer Telephony Solutions product
documentation.
Avaya IP Office:
• Four analog station ports, x225 – x228, were connected to the Dialogic 4-port analog
board for use with the OAISYS Voice Assistant.
• Hunt group named ‘CallRouteHunt’ was defined using extension 100 for use with the
OAISYS Call Router.
• All inbound calls (analog and T1 / PRI trunks) were routed to the CallRouteHunt hunt
group.
CTS OAISYS Call Router:
• Configured to monitor all calls to ‘CallRouteHunt’ hunt group extension 100 and process
as follows:
o Check incoming call information.
If the call was missing CallerID information, Call Router launched CTS
OAISYS Voice Assistant script to prompt the caller for his/her telephone
number.
o Search database for match on incoming CallerID.
SCR; Reviewed:
WCH 7/7/2004
Solution & Interoperability Test Lab Application Notes
©2004 Avaya Inc. All Rights Reserved.
3 of 39
oaisys-ipoffice.doc
Page 4

If match to ‘(732) 450-0819’ was found, Call Router diverted caller to
extension 2501.
If no match was found, Call Router launched CTS OAISYS Voice
Assistant script to prompt the caller for extension number to transfer to.
CTS OAISYS Voice Assistant:
• Configured to map each Dialogic port to the extension number assigned to the port.
CTS OAISYS Tracer:
• Passive tap was set up on PRI/T1 and analog trunks.
• Configured to record all trunk calls.
CTS OAISYS Net Phone:
• Installed on end-user’s PC.
• Configured to control end-user’s extension.
• Configured to look up incoming CallerID in end-user’s Outlook Contacts list.
1.1. Compliance Test Notes / Observations
CTS OAISYS Tracer:
• Trunk-side recording only: Station to station calls do not get recorded by Tracer. Only
calls involving a tapped trunk can be recorded. This is the case for station trigger
recordings too.
• Playback through Phone not supported: Tracer does not support playback of trunk
call recordings through user’s phone.
• Playback of recording very low: Tracer playback of analog trunk call recordings was
very low. Recording gain was increased on the card for easier listening but this required
modifications at the board driver level and restarting the driver.
• Station trigger recording fails on outbound calls: Tracer, when set up for station
trigger recording, fails to record outbound calls. Computer Telephony Solutions reports
they fixed this problem in the next version of Level2 for Avaya IP Office (1.0.6).
CTS OAISYS Call Router:
• Call Router diverts calls: Call Router ‘diverts’ or ‘forwards’ calls to destination
extensions according to previously defined rules. If the call recipient does not answer the
call, the call will go to coverage on the Call Router Hunt Group’s voicemail (if Voicemail
is left on for the hunt group), not the call recipient’s voicemail.
CTS OAISYS Net Phone:
• Initiating Conference Calls not supported: Net Phone does not support initiating
conference calls.
SCR; Reviewed:
WCH 7/7/2004
Solution & Interoperability Test Lab Application Notes
©2004 Avaya Inc. All Rights Reserved.
4 of 39
oaisys-ipoffice.doc
Page 5

2. Equipment and Software Validated
The following equipment and software were used for the sample configuration provided:
Equipment Software
Avaya IP 406 Office System 2.0(18)
Avaya CTI Link Pro License Avaya 6408D+, 6416D+M Telephones Avaya 4612, 4624 IP Telephones 1.81
CTS OAISYS Net Server
• Level2 for Avaya IP Office component (v1.0.5)
CTS OAISYS Tracer
Components:
• VAT (v2.0.58)
• TRM (v2.0.20)
• Historian (v2.0.37)
• Replay (v2.0.33)
CTS OAISYS Voice Assistant 4.0.46
CTS OAISYS Call Router 4.1.3
CTS OAISYS Net Phone 4.6.200
CTS PC Windows 2000 Professional,
AI-Logix Single T1/PRI board, DP3209 (for OAISYS
Tracer)
AI-Logix 4-port Analog board, PT409 (for OAISYS
Tracer)
Dialogic 4-port Analog board, DIALOG4 (for OAISYS
Voice Assistant)
Generic Analog Telephones -
4.2.24
2.0
Service Pack 4
2.7.1 Build 163
2.7.1 Build 163
DNA SR5.1.1 Build 30 SP1
3. Configure Avaya IP Office
These Application Notes address provisioning of the IP Office as it relates to integration of the
OAISYS NetSuite components Tracer, Call Router, Voice Assistant, and Net Phone. For all
other provisioning information such as provisioning of the trunks for outbound dialing, call
coverage, extensions, etc., please refer to the IP Office product documentation.
Step Description
IP Office License Key Physical Installation
1. Plug in the red Avaya Software Sentinel key into the parallel or USB port of the IP Office
Manager PC.
Configure License Key Server IP Address
2. Log in to the IP Office Manager PC and go to Start → Programs → IP Office →
Manager to launch the Manager application. Log in to the Manager application using the
appropriate credentials.
SCR; Reviewed:
WCH 7/7/2004
Solution & Interoperability Test Lab Application Notes
©2004 Avaya Inc. All Rights Reserved.
5 of 39
oaisys-ipoffice.doc
Page 6
Step Description
3. In the Manager window that appears, select File → Open to search for the IP Office
system in the network.
4. Log in to the IP Office system using the appropriate login credentials to receive its
configuration.
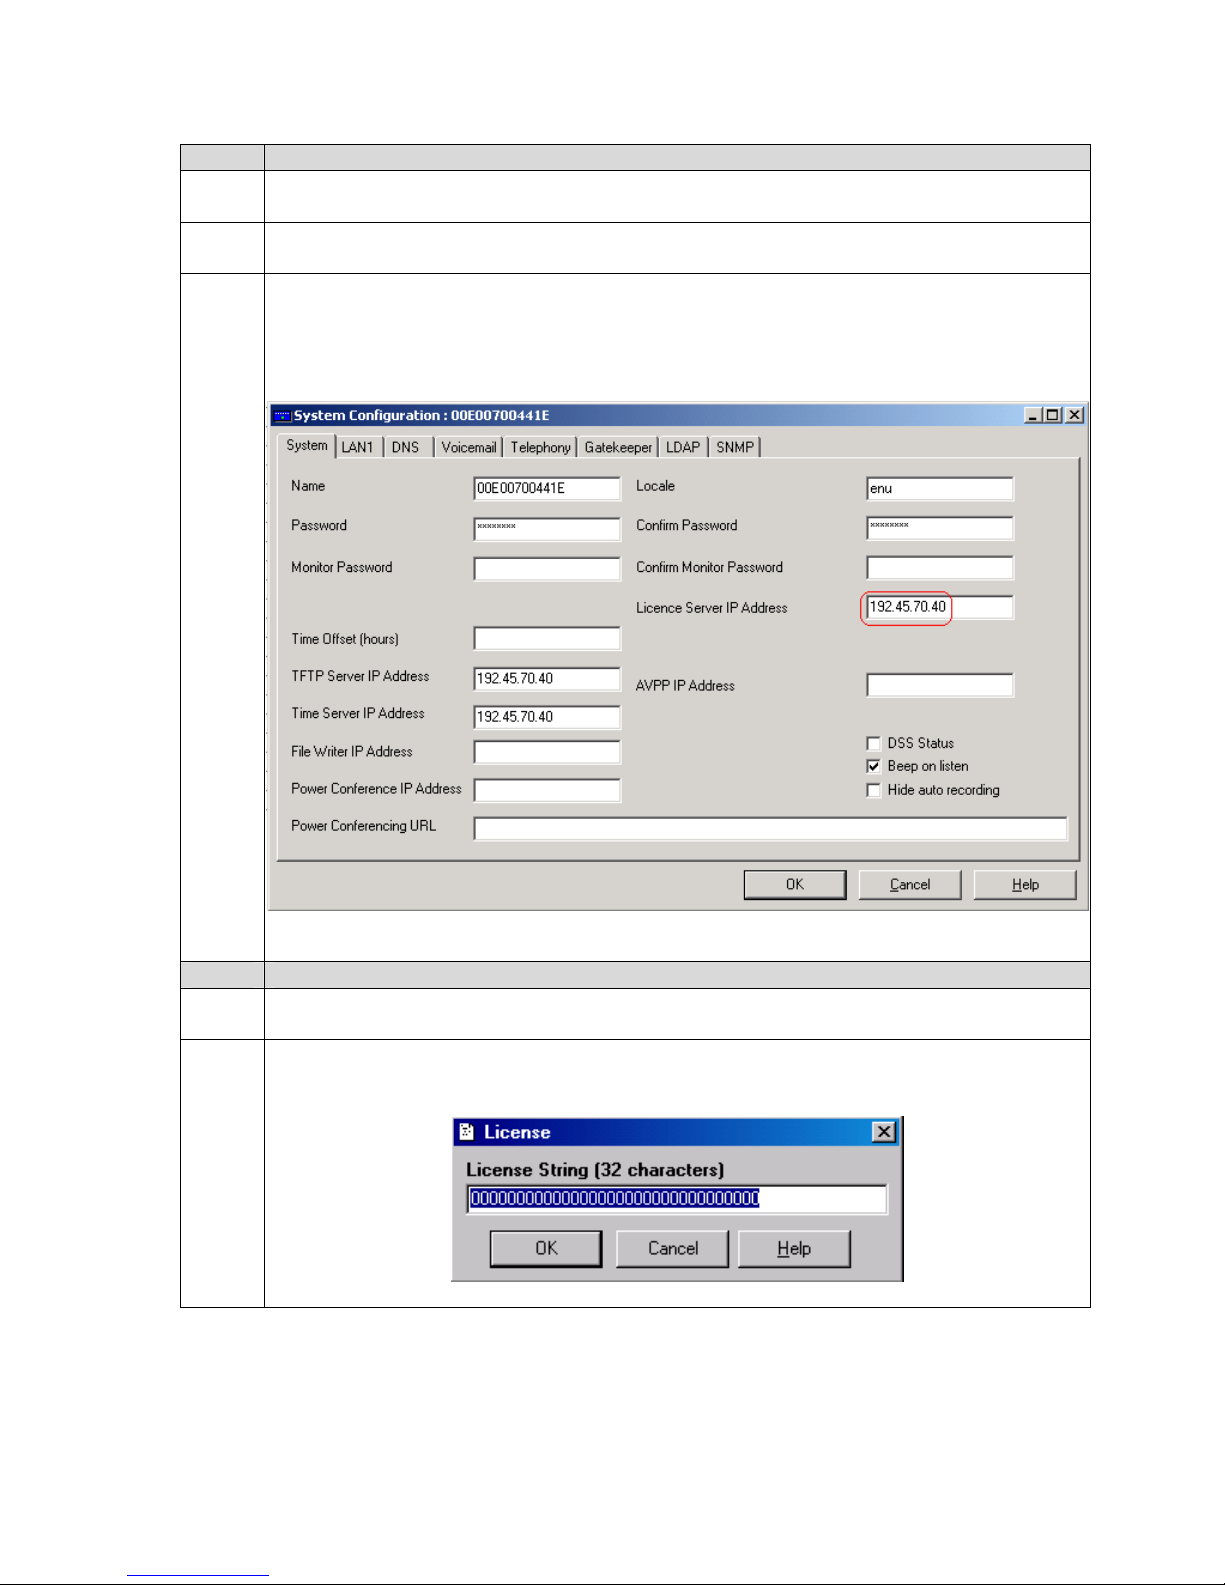
5. In the Manager window, go to the Configuration Tree and double-click System. In the
System Configuration window that appears, select the System tab and set License Server
IP Address to the IP address of the machine to which the red Avaya Software Sentinel key
is connected. This is typically the IP Office Manager PC.
Install Licenses
6. In the Manager window, go to the Configuration Tree and double-click License to open
7. Right click in the license list window and select New. In the License window that appears,
SCR; Reviewed:
WCH 7/7/2004
the list of licenses installed in the IP Office system.
enter the CTI Link Pro License Key and click OK.
Solution & Interoperability Test Lab Application Notes
©2004 Avaya Inc. All Rights Reserved.
6 of 39
oaisys-ipoffice.doc
Page 7
Step Description
8. In the Manager window, select File → Save to save the licenses to the IP Office system
and wait for the system to update.
NOTE: Before the system reloads, the new licenses will be listed with an Unknown
status. After the system reloads, the new licenses will be listed as Valid.
Configure Voice Assistant Ports
9. In the Manager window, select File → Open to search for the IP Office system in the
network.
10. Log in to the IP Office system using the appropriate login credentials to receive its
configuration.
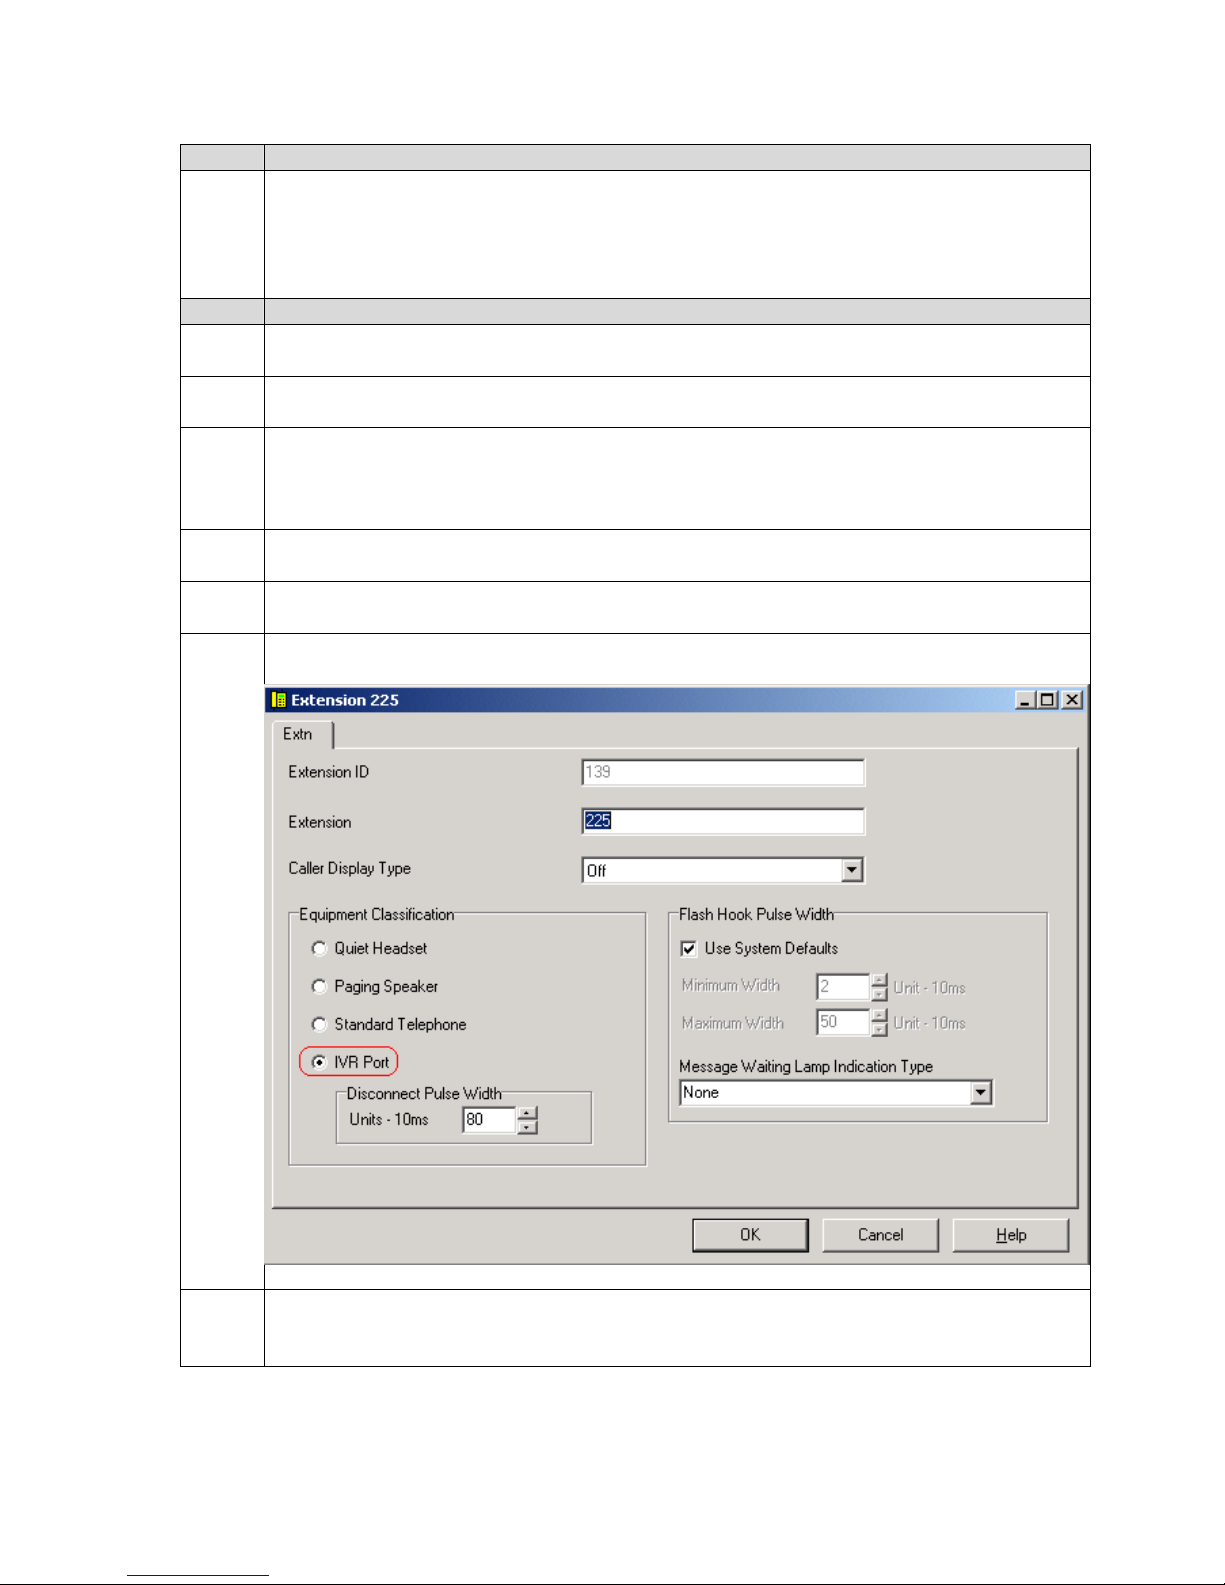
11. Select an analog station port on the IP Office Phone Expansion module that will be
connected to the Voice Assistant, and record the corresponding extension number. Verify
the extension number is correct by first attaching a phone to the Phone Expansion module
port. Place a call to the extension number and confirm the phone rings.
12. In the Manager window, go to the Configuration Tree and double-click Extension to open
the list of extensions on the IP Office.
13. Select the extension number recorded in Step 11 from the Extension list and double-click
it.
14. In the Extension window that appears, select IVR Port and click OK.
15. Repeat steps 11 - 14 for each analog station port connected to the CTS PC. For the
purpose of these Application Notes, a 4-port OAISYS Voice Assistant was used on the
CTS PC (extensions 225 – 228).
SCR; Reviewed:
WCH 7/7/2004
Solution & Interoperability Test Lab Application Notes
©2004 Avaya Inc. All Rights Reserved.
7 of 39
oaisys-ipoffice.doc
Page 8
Step Description
Configure Hunt Group
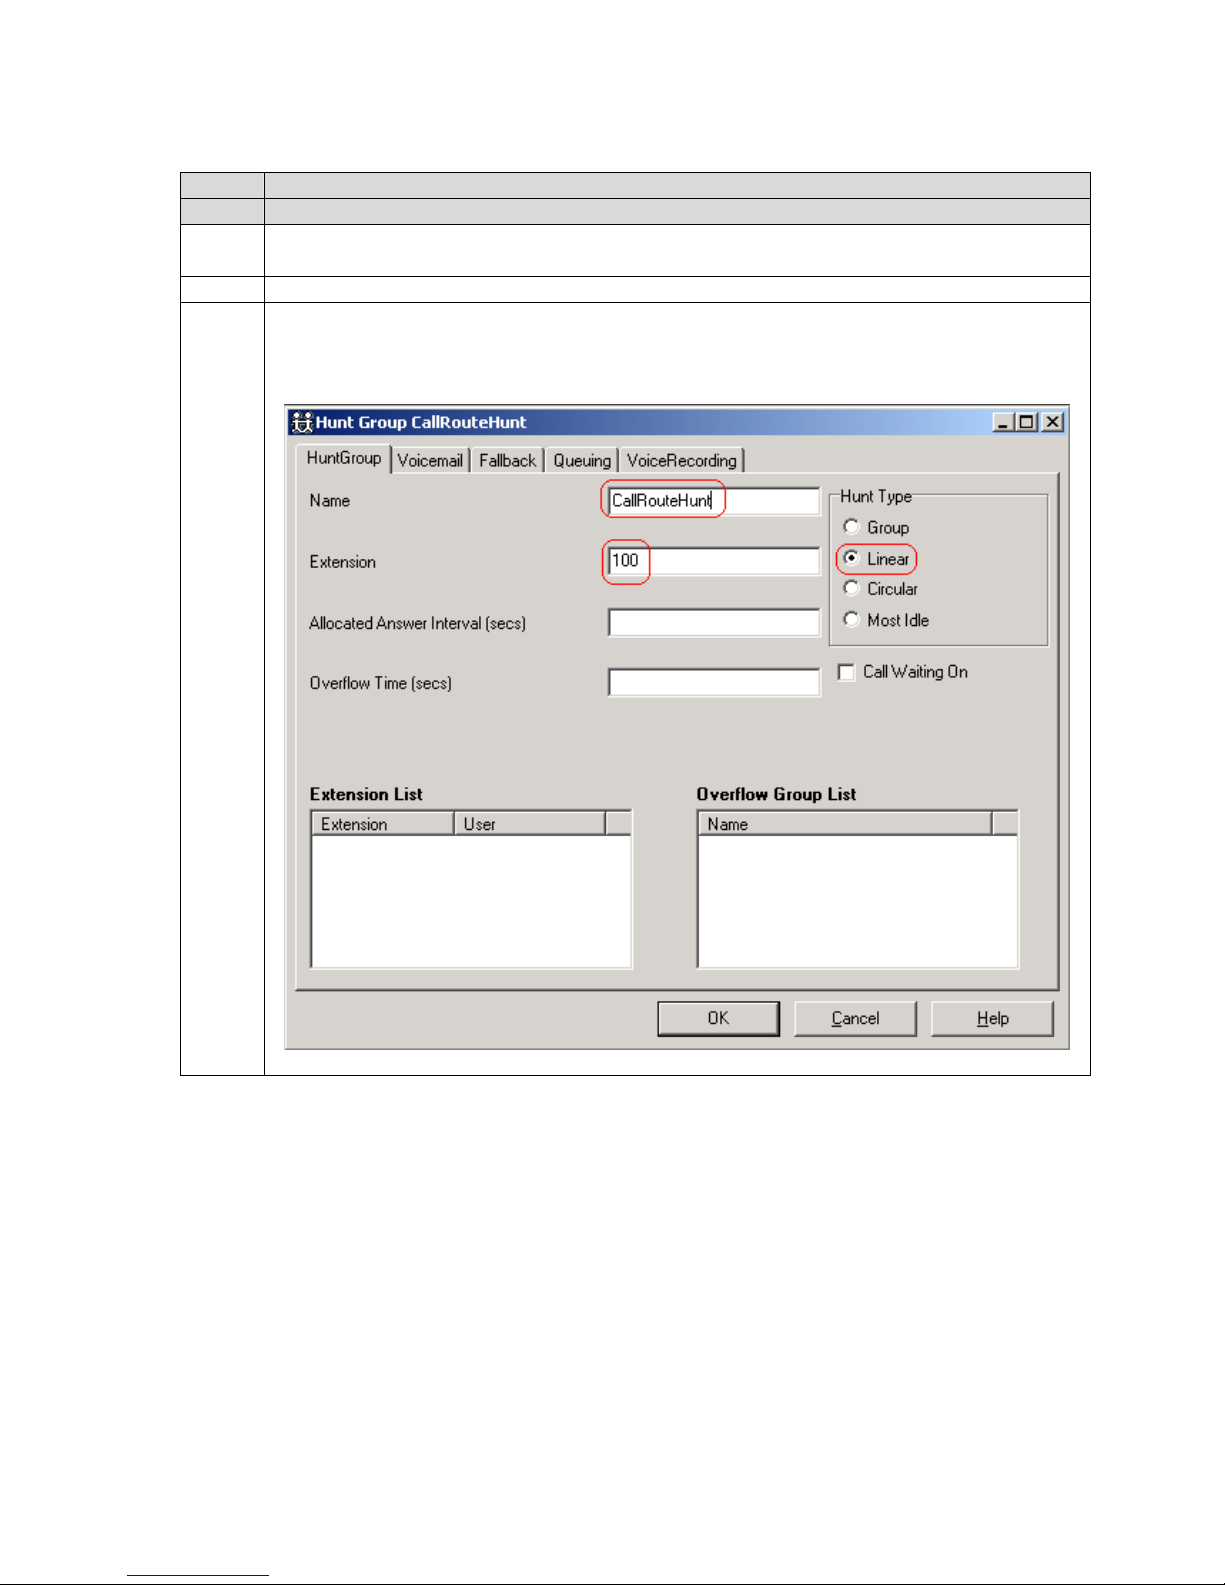
16. In the Manager window, go to the Configuration Tree and double-click Hunt Group to
17. Right click in the hunt group list window and select New.
18. In the HuntGroup tab of the Hunt Group window that appears, leave the Extension list
open the list of hunt groups on the IP Office.
empty, set Name to CallRouteHunt, Extension to 100 (or the extension number desired for
the hunt group), and Hunt Type to Linear.
SCR; Reviewed:
WCH 7/7/2004
Solution & Interoperability Test Lab Application Notes
©2004 Avaya Inc. All Rights Reserved.
8 of 39
oaisys-ipoffice.doc
Page 9
Step Description
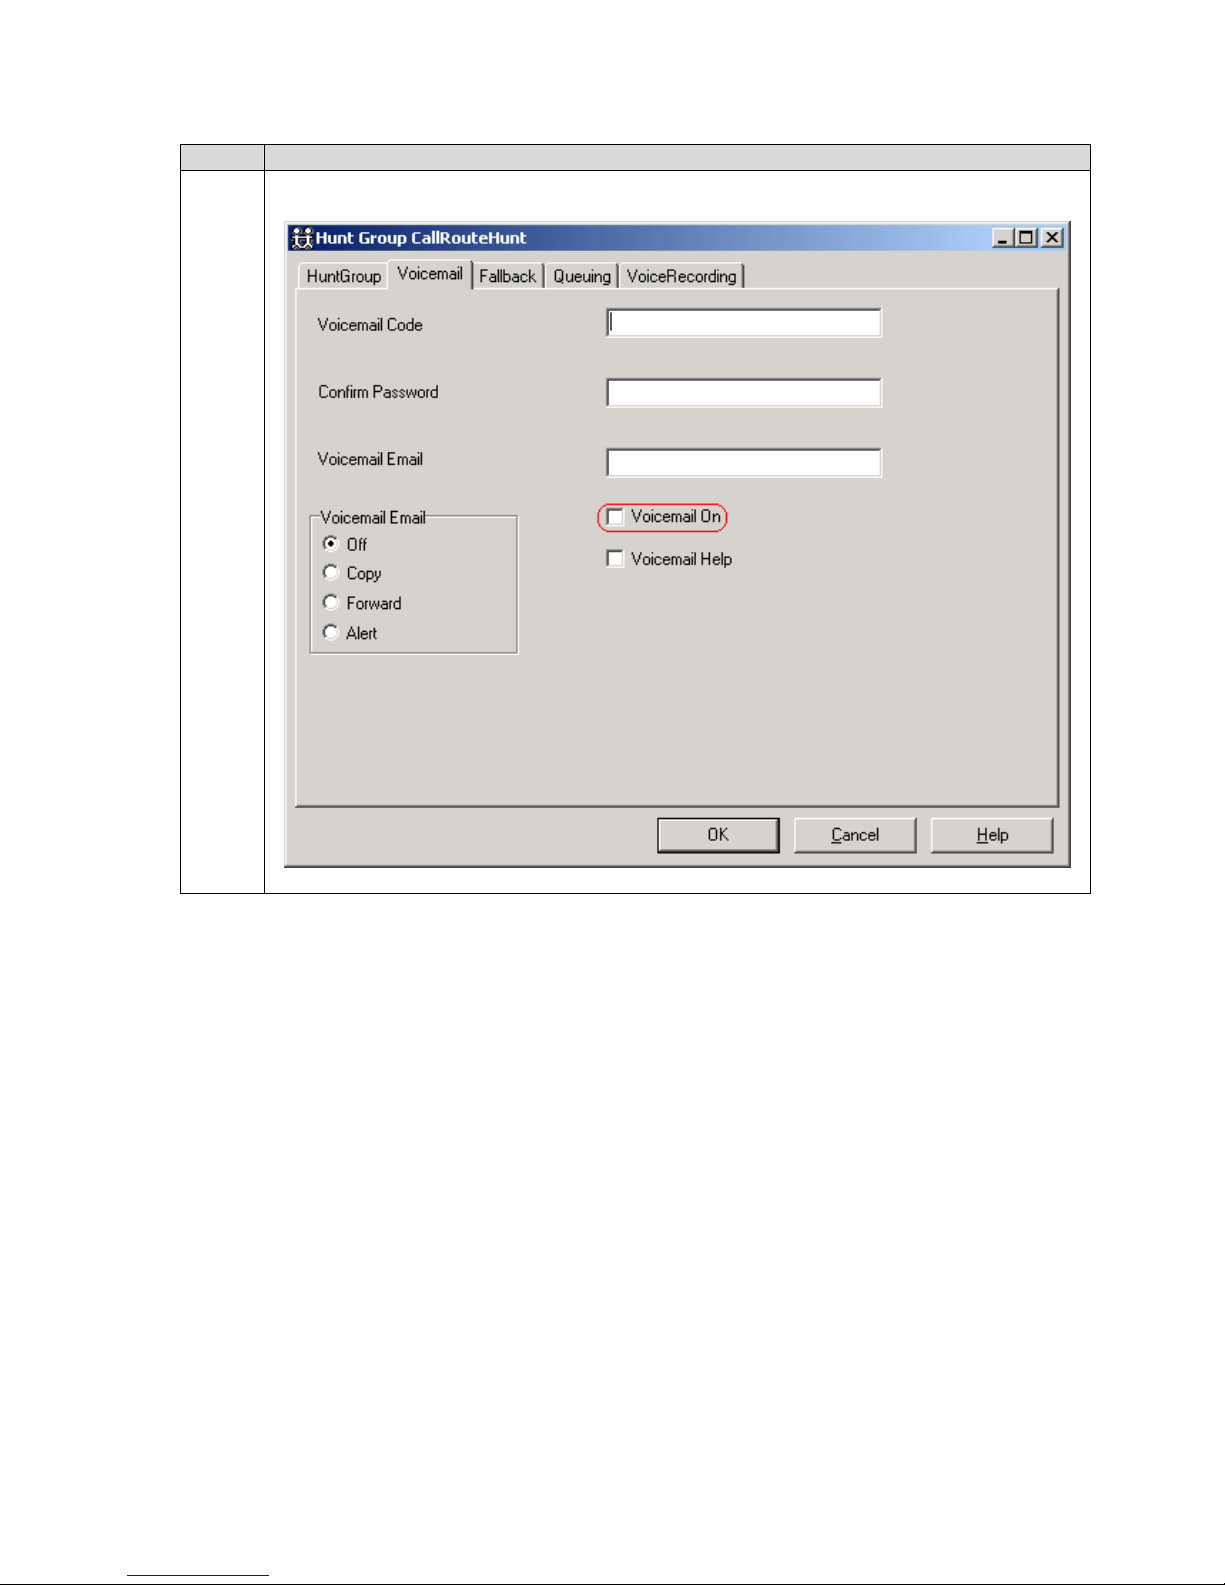
19. In the Voicemail tab of the Hunt Group window, uncheck Voicemail On.
SCR; Reviewed:
WCH 7/7/2004
Solution & Interoperability Test Lab Application Notes
©2004 Avaya Inc. All Rights Reserved.
oaisys-ipoffice.doc
9 of 39
Page 10
Step Description
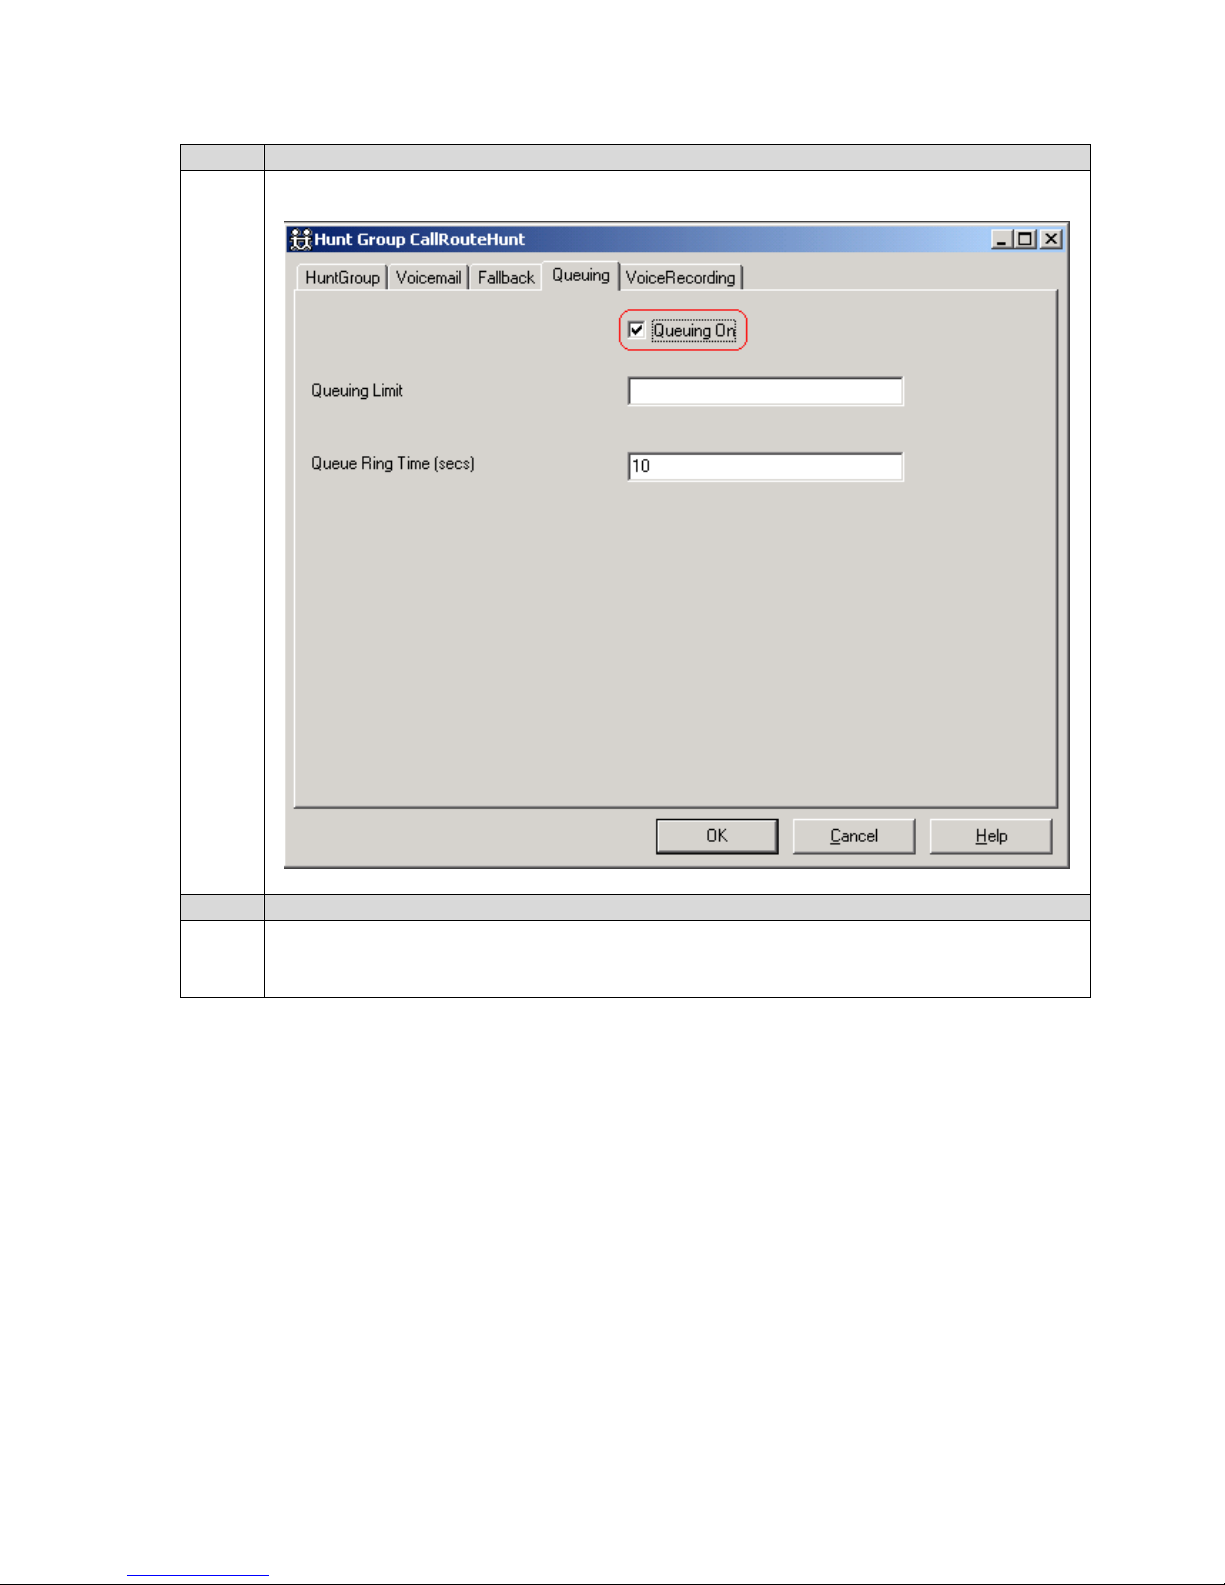
20. In the Queuing tab of the Hunt Group window, check Queuing On and click OK.
Select Inbound Call Route
21. In the Manager window, go to the Configuration Tree and double-click Incoming Call
SCR; Reviewed:
WCH 7/7/2004
Route to open the list of incoming call routes on the IP Office. Right click in the incoming
call route window and select New.
Solution & Interoperability Test Lab Application Notes
©2004 Avaya Inc. All Rights Reserved.
oaisys-ipoffice.doc
10 of 39
Page 11
Step Description
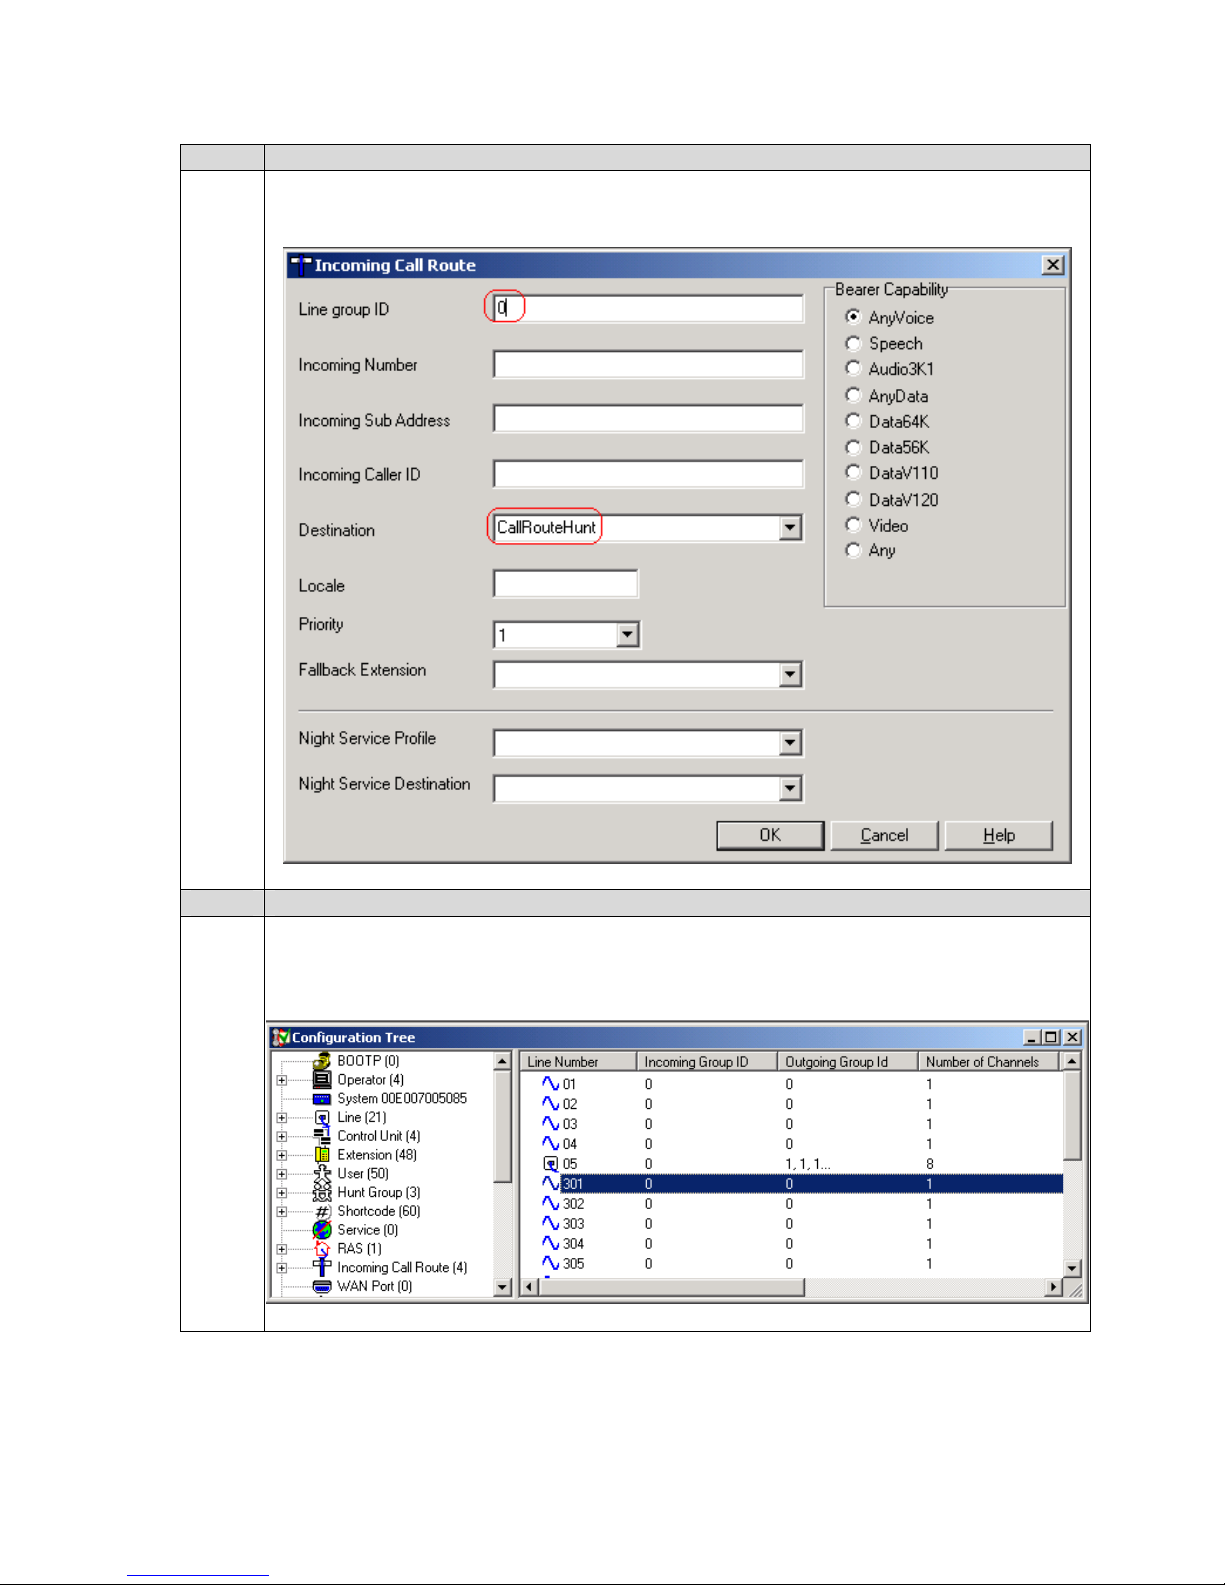
22. In the Incoming Call Route window that appears, set the Line Group ID to 0 (or the desired
number), set Destination to CallRouteHunt and click OK.
Assign Trunks to the Incoming Call Route
23. In the Manager window, go to the Configuration Tree and double-click Line to open the
SCR; Reviewed:
WCH 7/7/2004
list of lines (trunks) available on the IP Office. Double-click the Line (analog or digital)
whose incoming calls are to be routed to the CallRouteHunt hunt group, e.g., 301.
Solution & Interoperability Test Lab Application Notes
©2004 Avaya Inc. All Rights Reserved.
oaisys-ipoffice.doc
11 of 39
Page 12
Step Description
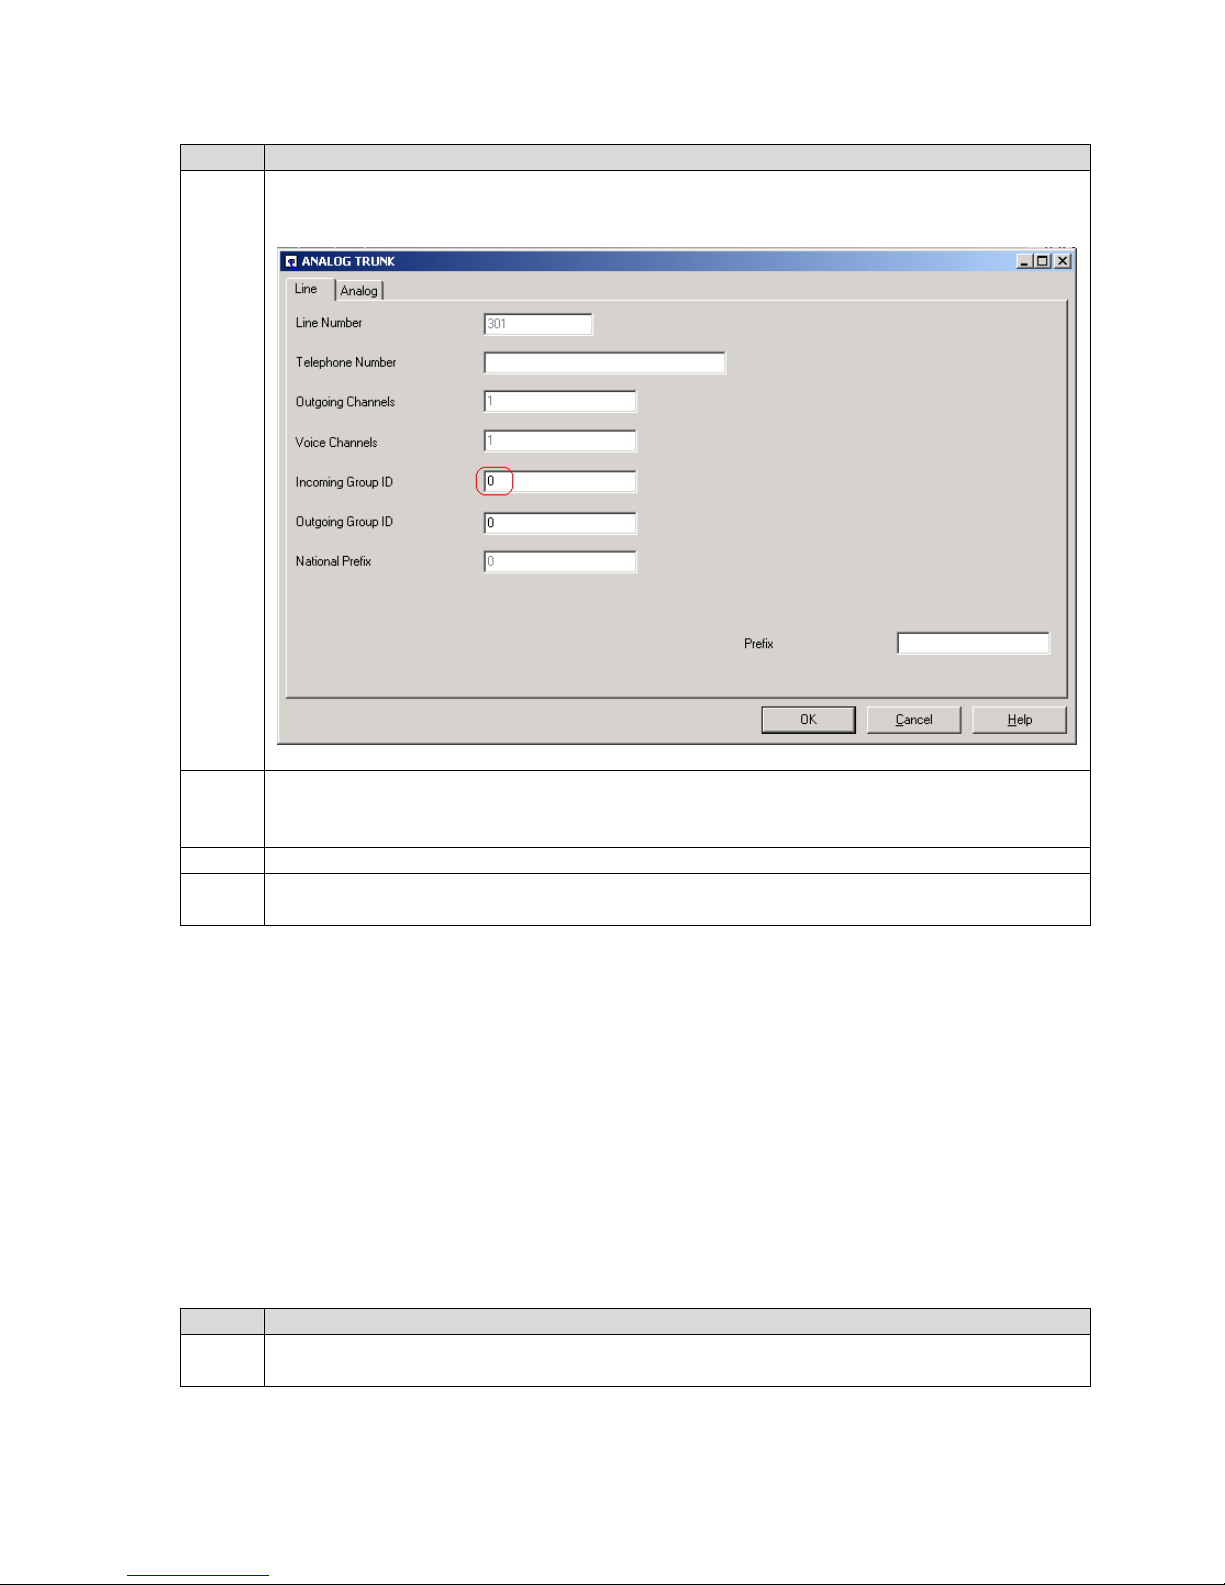
24. In the window that appears, set Incoming Group ID to the value used for Line group ID in
Step 22, e.g., 0. A similar procedure is used on the T1/PRI lines. Click OK.
25. Verify the incoming call route is properly operating by temporarily assigning a telephone
extension to the hunt group and placing calls through the selected inbound line (trunk)
until the telephone extension assigned to the hunt group rings.
26. Repeat Steps 23 – 25 for each line (trunk) assigned to the incoming call route.
27. In the Manager window, select File → Save to send the configuration to the IP Office and
wait for the unit to reboot.
4. Configure CTS OAISYS Components
This section addresses provisioning of the OAISYS components as they relate to the Avaya IP
Office. For all other provisioning information, please refer to the CTS System Guide available
on the Installation CD.
4.1. Install and Configure Avaya IP Office TAPI Service Provider (on
the CTS PC)
Please refer to the Avaya IP Office CTI Link Installation Manual, 40DHB0002UKAB – Issue 5
(10/28/2003) for additional information.
Step Description
1. Install the Avaya IP Office TAPI Service Provider driver on the CTS PC from the Avaya
IP Office User Applications CD. Do not install the Phone Manager.
SCR; Reviewed:
WCH 7/7/2004
Solution & Interoperability Test Lab Application Notes
©2004 Avaya Inc. All Rights Reserved.
12 of 39
oaisys-ipoffice.doc
Page 13

Step Description
2. After the system reboots, log in to the system again as administrator and go to Start →
Settings → Control Panel. In the Control Panel window that appears, double-click
Phone and Modem Options.
3. In the Advanced tab of the Phone and Modem Options window, double-click Avaya IP
Office TAPI2 Service Provider.
4. In the Avaya TAPI2 configuration window that appears, set Switch IP Address to the IP
Address of the IP Office, select Third Party, set Switch Password to the IP Office
password, uncheck WAV Users, check ACD Queues, and click OK.
5. Reboot the CTS PC.
6. After the system reboots, log in to the system and go to Start → Programs →
7. In the Phone Dialer window that appears, select Edit → Options.
8. In the Lines tab of the Options window that appears, select the Phone Calls: drop-down
SCR; Reviewed:
WCH 7/7/2004
Verify Connectivity with the IP Office
Accessories → Communications → Phone Dialer.
list. If one or more “IP Office Phone: XXX” (where XXX is an extension number) entries
appear, then the IP Office TAPI Driver is installed and working properly.
Solution & Interoperability Test Lab Application Notes
©2004 Avaya Inc. All Rights Reserved.
oaisys-ipoffice.doc
13 of 39
Page 14

4.2. Configure CTS OAISYS Net Server
Step Description
1. Log in to the CTS PC as administrator and click the OAISYS Net Server task on the
taskbar to open the window – OAISYS Net Server automatically launches on system boot
and runs minimized on the taskbar.
2. In the OAISYS Net Server window that appears, right-click the LVL2OAI service and
choose Show Service Window.
SCR; Reviewed:
WCH 7/7/2004
Solution & Interoperability Test Lab Application Notes
©2004 Avaya Inc. All Rights Reserved.
14 of 39
oaisys-ipoffice.doc
Page 15

Step Description
3. In the OAISYS Level2 Service window that appears, TAPI Initialized: xx lines found will
indicate a green status if the Avaya IP Office TAPI Service Provider was properly
configured in Section 5.1. Opening IP Office DevLink Stream will indicate a yellow status
until set up. Click Setup in the Avaya IP Office Connection pane.
SCR; Reviewed:
WCH 7/7/2004
Solution & Interoperability Test Lab Application Notes
©2004 Avaya Inc. All Rights Reserved.
oaisys-ipoffice.doc
15 of 39
Page 16

Step Description
4. In the IP Office Connection Setup window that appears, set IP Office Switch Hostname or
IP Address to the IP Address of the IP Office, set Password to the IP Office password,
check Use TAPI for 3
rd
Party Call Control, and click OK.
5. In the OAISYS Level2 Service window that appears, all status indicators will be green.
SCR; Reviewed:
WCH 7/7/2004
Solution & Interoperability Test Lab Application Notes
©2004 Avaya Inc. All Rights Reserved.
16 of 39
oaisys-ipoffice.doc
Page 17

4.3. Configure CTS OAISYS Voice Assistant
Step Description
1. In the OAISYS Net Server window that appears, right-click the VA_Host service and
choose Show Service Window.
2. Connect analog IVR ports (SLT) from Avaya IP 406 Office System and program Voice
Assistant with Avaya IP 406 Office System extension numbers (201 and 202) for each
port.
SCR; Reviewed:
WCH 7/7/2004
Solution & Interoperability Test Lab Application Notes
©2004 Avaya Inc. All Rights Reserved.
17 of 39
oaisys-ipoffice.doc
Page 18

4.4. Configure CTS OAISYS Call Router
Step Description
1. In the OAISYS Net Server window that appears, right-click the CALLROUTER service
and choose Show Service Window.
2. In the Call Router window that appears, click Log In.
3. In the Login to Database window that appears, log in with the password provided for the
SCR; Reviewed:
WCH 7/7/2004
database and click Okay.
Solution & Interoperability Test Lab Application Notes
©2004 Avaya Inc. All Rights Reserved.
18 of 39
oaisys-ipoffice.doc
Page 19

Step Description
4. In the Routing Exts tab of the Call Router window that appears, click Add.
SCR; Reviewed:
WCH 7/7/2004
Solution & Interoperability Test Lab Application Notes
©2004 Avaya Inc. All Rights Reserved.
19 of 39
oaisys-ipoffice.doc
Page 20

Step Description
5. In the Call Routing tab of the Change Preferences window that appears, set Routing
Extension to the hunt group extension number defined for the Call Router in the IP Office,
e.g., 100, select CallerID/ANI, set Default Destination to 2499 (click Edit to do so), and
set Run Voice Assistant Script to S,3,100,15,#,P,107 (click Edit to do so). Click Save to
save the configuration.
SCR; Reviewed:
WCH 7/7/2004
NOTE: For the purpose of these Application Notes, canned OAISYS Voice Assistant
scripts were used. These canned scripts are available for customization.
Solution & Interoperability Test Lab Application Notes
©2004 Avaya Inc. All Rights Reserved.
oaisys-ipoffice.doc
20 of 39
Page 21

Step Description
6.
In the Call Router window that appears, go to Setup → Call Router Administrator.
7. In the Call Router Administrator window that appears, set Phone Number to 7324500819,
set Destination to 2501 and click Add.
SCR; Reviewed:
WCH 7/7/2004
Solution & Interoperability Test Lab Application Notes
©2004 Avaya Inc. All Rights Reserved.
21 of 39
oaisys-ipoffice.doc
Page 22

Step Description
8. In the Call Router Administrator window, set Phone Number to 0000000000, set
Destination to S,10, (click Edit to do so), click Add. To save the configuration, click
Save.
4.5. Configure CTS OAISYS Tracer
Step Description
1. Set up passive taps to the AI-Logix boards in the CTS PC for the IP Office trunks.
2. In the OAISYS Net Server window on the CTS PC, right-click the VAT1 service and
choose Show Service Window.
SCR; Reviewed:
WCH 7/7/2004
Solution & Interoperability Test Lab Application Notes
©2004 Avaya Inc. All Rights Reserved.
22 of 39
oaisys-ipoffice.doc
Page 23

Step Description
3. In the Server Status tab of the Voice Assistant Tracer window that appears, the status
indicators should be green.
SCR; Reviewed:
WCH 7/7/2004
Solution & Interoperability Test Lab Application Notes
©2004 Avaya Inc. All Rights Reserved.
23 of 39
oaisys-ipoffice.doc
Page 24

Step Description
4. In the Pgm Vports tab of the Voice Assistant Tracer window, set Trunk ID to the Line
number that corresponds to the trunk port and click Prev or Next as appropriate. Repeat
until all analog and digital trunks that are tapped have been set up. When done, click Save.
For example, the Voice Assistant Tracer has ports 1 – 24 configured for the T1 / PRI
tapped trunks and ports 25 – 28 for the analog tapped trunks. The first tapped analog trunk
on the IP Office has line number 301
1
.
5. In the OAISYS Net Server window, right-click the TRM service and choose Show
Service Window.
1
The “Trunk ID” or Line Number of a trunk can be obtained from the Line portion of the Configuration Tree in the
Avaya IP Office Manager.
SCR; Reviewed:
WCH 7/7/2004
Solution & Interoperability Test Lab Application Notes
©2004 Avaya Inc. All Rights Reserved.
24 of 39
oaisys-ipoffice.doc
Page 25

Step Description
6.
In the Tracer Recording Manager window that appears, go to Setup → Configure.
7. In the Trunks tab of the Tracer Administrator window that appears, double-click Default.
SCR; Reviewed:
WCH 7/7/2004
Solution & Interoperability Test Lab Application Notes
©2004 Avaya Inc. All Rights Reserved.
25 of 39
oaisys-ipoffice.doc
Page 26

Step Description
8. In the Trunk Settings window that appears, selectAll Calls and click Okay.
SCR; Reviewed:
WCH 7/7/2004
Solution & Interoperability Test Lab Application Notes
©2004 Avaya Inc. All Rights Reserved.
oaisys-ipoffice.doc
26 of 39
Page 27

4.6. Configure CTS OAISYS Net Phone
Step Description
1. Install the OAISYS Net Phone client software from the OAISYS Net Suite CD on the
client PCs.
2.
Go to Start → Programs → OAISYS → Net Phone to launch the Net Phone client on the
end-user PC. In the About OAISYS Net Phone window that appears, click OK.
3. In the OAISYS NET PHONE window that appears, right-click the yellow circle on the top
SCR; Reviewed:
WCH 7/7/2004
left corner of the window and select File → Change Login.
Solution & Interoperability Test Lab Application Notes
©2004 Avaya Inc. All Rights Reserved.
27 of 39
oaisys-ipoffice.doc
Page 28

Step Description
4. In the OAISYS Net Server TSP Configuration window that appears, set Login name to the
end-user’s extension number, e.g., 2520, set Extension to the end-user’s extension number,
e.g., 2520, set Hostname to the IP Address of the CTS PC, e.g., 192.45.70.225, and click
OK.
SCR; Reviewed:
WCH 7/7/2004
Solution & Interoperability Test Lab Application Notes
©2004 Avaya Inc. All Rights Reserved.
28 of 39
oaisys-ipoffice.doc
Page 29

Step Description
5. In the OAISYS NET PHONE window that appears, the login name and extension number
configured should appear in the display.
6. In the OAISYS NET PHONE window, right-click the yellow circle on the top left corner
of the window and select Setup → Preferences → Outlook Phone Link.
SCR; Reviewed:
WCH 7/7/2004
Solution & Interoperability Test Lab Application Notes
©2004 Avaya Inc. All Rights Reserved.
29 of 39
oaisys-ipoffice.doc
Page 30

Step Description
7. In the Outlook Preferences window that appears, check Enable Outlook Integration, set
Home Area Code to the local area code, e.g., 732, check On Manual Dialing – Lookup in
Outlook, and click Setup in the Outlook Phone Link pane.
8. In the OutLook Phone Link setup window that appears, click Call Handler.
SCR; Reviewed:
WCH 7/7/2004
Solution & Interoperability Test Lab Application Notes
©2004 Avaya Inc. All Rights Reserved.
30 of 39
oaisys-ipoffice.doc
Page 31

Step Description
9. In the Add / Change Handler Rule window that appears, click Add Action.
10. In the Add / Edit Action window that appears, set Name to Lookup In Outlook, set Type
to Lookup In Outlook, check Open Contact in the ‘On Exact Match’ pane, check Pop
User Options in the ‘If NO Matches’ pane, check Display Choices in the ‘If Duplicate
Matches’ pane, and click Save.
11. In the Add / Change Handler Rule window, click OK.
12. Close the Outlook Phone Link setup window
13. In the Outlook Preferences window that appears, click Save to save the configuration.
5. Interoperability Compliance Testing
This Interoperability Compliance Test included feature, functionality and performance load
testing. Feature and functionality testing examined CTS OAISYS Net Suite components’ (Net
Server, Tracer, Call Router, Voice Assistant, and Net Phone) ability to work with Avaya IP
Office. The following Net Suite features were verified: Trunk Recording, basic IVR
SCR; Reviewed:
WCH 7/7/2004
Solution & Interoperability Test Lab Application Notes
©2004 Avaya Inc. All Rights Reserved.
31 of 39
oaisys-ipoffice.doc
Page 32

functionality, routing based on incoming CallerID, and desktop control of end-user extensions
for placing and receiving calls. Performance load tests verified the configuration continued
operating under load.
5.1. General Test Approach
Feature and functionality testing was performed manually. Inbound calls were made to the IP
Office system from analog, T1, and PRI trunks as well as internal extensions. The IP Office
routed all calls to the CallRouteHunt hunt group. The CTS OAISYS Call Router, monitoring
CallRouteHunt via TAPILink and DevLink, took over calls and routed them according to
previously defined rules and/or caller DTMF input to OAISYS Voice Assistant scripts run by
Call Router. Analog loop start trunks and PRI trunks from the central office were connected to
the IP Office. The configuration was changed to T1 for the T1 test cases.
Performance testing was accomplished by utilizing call generation tools for placing and
receiving calls from PRI to analog station ports. Analog station ports on the call generation tool
were connected to analog station ports on the IP Office Phone Expansion Module of the IP
Office. Call generation tool scripts were written to place calls to the CTS configured hunt group
on the IP Office. The first script would place a call from a PRI channel with a defined CallerID.
The OAISYS Call Router would intercept the call and route the call to one of the analog station
ports connected to the call generator based on previously defined rules. The call generation
script on the destination extension answered the call, played an audio file, and then the call
generation script would drop the call on both sides. The second script would place a call from a
PRI channel with a defined CallerID as well. However, the OAISYS Call Router would
intercept that call and on not finding a match in its database, it would launch an OAISYS Voice
Assistant script to prompt the caller for the desired extension. The call generation script would
send DTMF tones for the desired extension, the OAISYS Voice Assistant would collect the
information and pass it to Call Router, which would then divert the call to the desired extension.
The call generation script on the destination extension answered the call, played an audio file,
and then the call generation script would drop the call on both sides. Both scripts were run
simultaneously. Throughout the performance test run, OAISYS Tracer was configured to record
all calls to 2 of the 8 PRI channels used for testing. Due to time constraints, performance testing
on OAISYS Net Phone was passive and thus limited to maintaining the Net Phone client of each
analog station port used for performance testing open on the end-user desktops. Outlook
contacts list look ups were set up so the Net Phone clients would look up the CallerID of
incoming calls and display matched names.
5.2. Test Results
Most feature, functionality, and performance test cases passed successfully. All issues and/or
observations noted during testing were presented in Section 1.1 of these Application Notes.
Overnight performance testing at a rate of 1060 BHCA was conducted on the CTS PC provided
for compliance testing. Performance statistics were captured on the CTS PC to ensure that it was
able to handle the call volume.
SCR; Reviewed:
WCH 7/7/2004
Solution & Interoperability Test Lab Application Notes
©2004 Avaya Inc. All Rights Reserved.
32 of 39
oaisys-ipoffice.doc
Page 33

6. Verification Steps
The following steps can be used to verify system operation after a field installation:
OAISYS Net Server: Avaya IP Office Connection and OAISYS Net Server links should
connect and display a Green Light.
OAISYS Call Router: OAI Server Connection link should connect and display a Green Light.
SCR; Reviewed:
WCH 7/7/2004
Solution & Interoperability Test Lab Application Notes
©2004 Avaya Inc. All Rights Reserved.
33 of 39
oaisys-ipoffice.doc
Page 34

OAISYS Voice Assistant: Net Server and OAI links should connect and display a Green
Light.
OAISYS Net Phone: The display should show the extension number that you login with.
SCR; Reviewed:
WCH 7/7/2004
Solution & Interoperability Test Lab Application Notes
©2004 Avaya Inc. All Rights Reserved.
oaisys-ipoffice.doc
34 of 39
Page 35

AISYS Tracer: The Net Server and License Information should connect and display a Green
O
Light.
SCR; Reviewed:
WCH 7/7/2004
Solution & Interoperability Test Lab Application Notes
©2004 Avaya Inc. All Rights Reserved.
35 of 39
oaisys-ipoffice.doc
Page 36

Tracer Recording Manager (Access tab): The Net Server and CTI should connect and display
a Green Light.
SCR; Reviewed:
WCH 7/7/2004
Solution & Interoperability Test Lab Application Notes
©2004 Avaya Inc. All Rights Reserved.
36 of 39
oaisys-ipoffice.doc
Page 37

Tracer Recording Manager (VAT Status tab): All the Recording Ports should display Green –
‘Idle’.
7. Support
Customers should call the Computer Telephony Solutions Customer Service Center when having
problems related to the OAISYS Net Suite product components. Computer Telephony Solutions
will then determine the nature of the problem and recommend the best plan to the customer
whether it is to:
Fix the problem through remote access.
Dispatch, at Computer Telephony Solutions’ discretion, on-site technical support.
For technical support on OAISYS Net Suite product components, contact the Computer
Telephony Solutions Customer Service Center at (480) 496-9040. Technical support email can
be sent to
Support@oaisys.com.
8. Conclusion
These Application Notes describe the required configuration steps for Computer Telephony
Solutions’ OAISYS Net Suite components (Net Server, Tracer, Call Router, Voice Assistant, and
SCR; Reviewed:
WCH 7/7/2004
Solution & Interoperability Test Lab Application Notes
©2004 Avaya Inc. All Rights Reserved.
37 of 39
oaisys-ipoffice.doc
Page 38

Net Phone) to successfully interoperate with Avaya IP Office. Features, functionality, and
performance were successfully validated.
9. Additional References
Avaya IP Office Installation Manual, 40DHB0002USCL, Issue 8 (03/07/2003)
Avaya IP Office CTI Link Installation Manual, 40DHB0002UKAB – Issue 5 (10/28/2003)
Computer Telephony Solutions OAISYS Voice Assistant – Operations Manual (Version 3.0)
Computer Telephony Solutions OAISYS Net Server For IP Office – Operations Manual (Version
3.0)
Computer Telephony Solutions OAISYS Call Router - Operations Manual (Version 3.0)
Computer Telephony Solutions OAISYS Net Phone – Online HELP
Computer Telephony Solutions OAISYS Tracer – System Administration Manual (Version 1.1)
SCR; Reviewed:
WCH 7/7/2004
Solution & Interoperability Test Lab Application Notes
©2004 Avaya Inc. All Rights Reserved.
38 of 39
oaisys-ipoffice.doc
Page 39

©
2004 Avaya Inc. All Rights Reserved.
Avaya and the Avaya Logo are trademarks of Avaya Inc. All trademarks identified by ® and ™
are registered trademarks or trademarks, respectively, of Avaya Inc. All other trademarks are the
property of their respective owners. The information provided in these Application Notes is
subject to change without notice. The configurations, technical data, and recommendations
provided in these Application Notes are believed to be accurate and dependable, but are
presented without express or implied warranty. Users are responsible for their application of any
products specified in these Application Notes.
Please e-mail any questions or comments pertaining to these Application Notes along with the
full title name and filename, located in the lower right corner, directly to the Avaya
DeveloperConnection Program at
devconnect@avaya.com.
SCR; Reviewed:
WCH 7/7/2004
Solution & Interoperability Test Lab Application Notes
©2004 Avaya Inc. All Rights Reserved.
39 of 39
oaisys-ipoffice.doc
 Loading...