

Avaya M770, M770 ATM Manager User Manual

Avaya M770 ATM
Manager User Guide
March 2001

Avaya M770 ATM Manager User Guide
Copyright Avaya Inc. 2002 ALL RIGHTS RESERVED
The products, specifications, and other technical information regarding the products
contained in this document are subject to change without notice. All information in this
document is believed to be accurate and reliable, but is presented without warranty of any
kind, express or implied, and users must take full responsibility for their application of any
products specified in this document. Avaya disclaims responsibility for errors which may
appear in this document, and it reserves the right, in its sole discretion and without notice, to
make substitutions and modifications in the products and practices described in this
document.
Avaya™, Cajun™, P550™, LANstack™, CajunView™, and SMON™ are trademarks of
Avaya Inc.
ALL OTHER TRADEMARKS MENTIONED IN THIS DOCUMENT ARE PROPERTY OF THEIR
RESPECTIVE OWNERS.
Release 3.018

Avaya M770 ATM Manager User Guide iii
Table of Contents
Preface . . . . . . . . . . . . . . . . . . . . . . . . . . . . . . . . . . . . . . . . . . . . . . . . . .vi
The Purpose of this Guide . . . . . . . . . . . . . . . . . . . . . . . . . . . . . . . . . vi
Who Should Use This Guide . . . . . . . . . . . . . . . . . . . . . . . . . . . . . . . vi
Organization of this Guide . . . . . . . . . . . . . . . . . . . . . . . . . . . . . . . . vi
Chapter 1 — Introduction . . . . . . . . . . . . . . . . . . . . . . . . . . . . . . . . . . . 1
Starting Avaya M770 ATM Manager . . . . . . . . . . . . . . . . . . . . . . . . .1
Running Avaya M770 ATM Manager from Avaya MultiService Console
. . . . .1
Running Avaya M770 ATM Manager from HP-OV for Windows
. . . . . . . . . .2
Running Avaya M770 ATM Manager from HP NNM for (Windows NT and Solaris)
.2
Using Chassis View . . . . . . . . . . . . . . . . . . . . . . . . . . . . . . . . . . . . . . .3
Selecting Elements . . . . . . . . . . . . . . . . . . . . . . . . . . . . . . . . . . . .3
Using Chassis View Features . . . . . . . . . . . . . . . . . . . . . . . . . . . .4
Toolbar . . . . . . . . . . . . . . . . . . . . . . . . . . . . . . . . . . . . . . . . . . . . .5
Chapter 2 — Agent Configuration . . . . . . . . . . . . . . . . . . . . . . . . . . . . 6
Overview of Master Agent and Sub Agents . . . . . . . . . . . . . . . . . . . .6
Overview of Agent Configuration . . . . . . . . . . . . . . . . . . . . . . . . . . .7
Downloading New Agent Software . . . . . . . . . . . . . . . . . . . . . . .7
Viewing Agent Configuration Information . . . . . . . . . . . . . . . . . . . .8
Designating Managers . . . . . . . . . . . . . . . . . . . . . . . . . . . . . . . . . . . .8
Viewing the Managers Table . . . . . . . . . . . . . . . . . . . . . . . . . . . .9
Adding Managers to the Managers Table . . . . . . . . . . . . . . . . . .9
Removing Managers from the Managers Table . . . . . . . . . . . . .10
Editing the Managers Table . . . . . . . . . . . . . . . . . . . . . . . . . . . .10
Chapter 3 — ATM Device Configuration . . . . . . . . . . . . . . . . . . . . . . 11
Viewing ATM Device Information . . . . . . . . . . . . . . . . . . . . . . . . . .12
Viewing Module Configuration Information . . . . . . . . . . . . . . . . . .13
Viewing Port Configuration . . . . . . . . . . . . . . . . . . . . . . . . . . . . . . .14
Enabling Physical Ports . . . . . . . . . . . . . . . . . . . . . . . . . . . . . . .15
Disabling Physical Ports . . . . . . . . . . . . . . . . . . . . . . . . . . . . . . .16
Viewing the Virtual Port Table . . . . . . . . . . . . . . . . . . . . . . . . . . . . .17
Adding a Virtual Port . . . . . . . . . . . . . . . . . . . . . . . . . . . . . . . .18
Editing a Virtual Port . . . . . . . . . . . . . . . . . . . . . . . . . . . . . . . . .19
Deleting a Virtual Port . . . . . . . . . . . . . . . . . . . . . . . . . . . . . . . .19
Viewing Port PNNI Information . . . . . . . . . . . . . . . . . . . . . . . . . . . .20

iv Avaya M770 ATM Manager User Guide
Table of Contents
Resetting Elements . . . . . . . . . . . . . . . . . . . . . . . . . . . . . . . . . . . . . .21
Resetting the ATM Device . . . . . . . . . . . . . . . . . . . . . . . . . . . . .21
Resetting the Module . . . . . . . . . . . . . . . . . . . . . . . . . . . . . . . .21
Viewing Neighbor Information . . . . . . . . . . . . . . . . . . . . . . . . . . . . .22
Chapter 4 — Fault Management . . . . . . . . . . . . . . . . . . . . . . . . . . . . 24
Configuring Traps . . . . . . . . . . . . . . . . . . . . . . . . . . . . . . . . . . . . . . .25
Viewing Traps . . . . . . . . . . . . . . . . . . . . . . . . . . . . . . . . . . . . . . . . . .25
Viewing Traps in a Dialog Box . . . . . . . . . . . . . . . . . . . . . . . . . .26
Viewing Traps in the Event Log . . . . . . . . . . . . . . . . . . . . . . . . .26
Assigning Severity Degrees . . . . . . . . . . . . . . . . . . . . . . . . . . . . . . . .26
Accessing Severity Degrees . . . . . . . . . . . . . . . . . . . . . . . . . . . .26
Editing Severity Degrees . . . . . . . . . . . . . . . . . . . . . . . . . . . . . .27
Editing Severity Degrees System-Wide . . . . . . . . . . . . . . . .27
Editing Severity Degrees for Specific Devices . . . . . . . . . . .27
Chapter 5 — Monitoring Performance. . . . . . . . . . . . . . . . . . . . . . . . 29
Viewing Port Counters . . . . . . . . . . . . . . . . . . . . . . . . . . . . . . . . . . .30
Viewing CPU Counters . . . . . . . . . . . . . . . . . . . . . . . . . . . . . . . . . . .31
Viewing Virtual Channel (VC) Counters . . . . . . . . . . . . . . . . . . . . .32
Viewing LECS Statistics . . . . . . . . . . . . . . . . . . . . . . . . . . . . . . . . . .33
Viewing Management LEC Counters . . . . . . . . . . . . . . . . . . . . . . . .34
Viewing DS3 Current Counters . . . . . . . . . . . . . . . . . . . . . . . . . . . .35
Viewing DS3 Total Counters . . . . . . . . . . . . . . . . . . . . . . . . . . . . . . .36
Chapter 6 — Managing Switch VCs . . . . . . . . . . . . . . . . . . . . . . . . . . 37
Viewing All VC Connections for a Device . . . . . . . . . . . . . . . . . . . .37
Viewing All VCs on a Port . . . . . . . . . . . . . . . . . . . . . . . . . . . . . . . .38
Chapter 7 — Managing LANE Services. . . . . . . . . . . . . . . . . . . . . . . . 39
Resilient LANE . . . . . . . . . . . . . . . . . . . . . . . . . . . . . . . . . . . . . . . . .39
Choosing the LES Address for a LEC . . . . . . . . . . . . . . . . . . . . . . . .39
Setting Up the LECS . . . . . . . . . . . . . . . . . . . . . . . . . . . . . . . . . . . . .40
Configuring the Local LECS . . . . . . . . . . . . . . . . . . . . . . . . . . . .40
Viewing Resilient LECS Table . . . . . . . . . . . . . . . . . . . . . . . . . .41
Configuring the LECS ELANs Table . . . . . . . . . . . . . . . . . . . . . .42
Viewing the LECS ELANs Table . . . . . . . . . . . . . . . . . . . . .42
Adding ELANs . . . . . . . . . . . . . . . . . . . . . . . . . . . . . . . . . . .43
Updating the LECS ELANs Table . . . . . . . . . . . . . . . . . . . .43
Deleting ELANs . . . . . . . . . . . . . . . . . . . . . . . . . . . . . . . . . .44
Viewing Registered LESs . . . . . . . . . . . . . . . . . . . . . . . . . . . . . .44
Configuring the LES/BUS Table . . . . . . . . . . . . . . . . . . . . . . . .45
Adding LESs . . . . . . . . . . . . . . . . . . . . . . . . . . . . . . . . . . . .45
Updating the LES/BUS Table . . . . . . . . . . . . . . . . . . . . . . .46
Deleting LESs . . . . . . . . . . . . . . . . . . . . . . . . . . . . . . . . . . .46
Viewing LANE Clients . . . . . . . . . . . . . . . . . . . . . . . . . . . .47

Avaya M770 ATM Manager User Guide v
Table of Contents
Chapter 8 — Managing Routing. . . . . . . . . . . . . . . . . . . . . . . . . . . . . 48
Managing the Static Routes Table . . . . . . . . . . . . . . . . . . . . . . . . . .48
Viewing the Static Routes table . . . . . . . . . . . . . . . . . . . . . . . . .49
Updating the Static Routes Table . . . . . . . . . . . . . . . . . . . . . . . .50
Managing the PNNI Table . . . . . . . . . . . . . . . . . . . . . . . . . . . . . . . . .51
Viewing the PNNI Node Table . . . . . . . . . . . . . . . . . . . . . . . . . .51
Editing the PNNI Summary Table . . . . . . . . . . . . . . . . . . . . . . .52
Appendix A — Avaya M770 ATM Switch Manager Menus . . . . . . . 54
Configuration Menu . . . . . . . . . . . . . . . . . . . . . . . . . . . . . . . . . . . . .54
Performance Menu . . . . . . . . . . . . . . . . . . . . . . . . . . . . . . . . . . . . . .55
Administer Menu . . . . . . . . . . . . . . . . . . . . . . . . . . . . . . . . . . . . . . .56
Help Menu . . . . . . . . . . . . . . . . . . . . . . . . . . . . . . . . . . . . . . . . . . . .56
Appendix B — Configuration Fields. . . . . . . . . . . . . . . . . . . . . . . . . . 57
Appendix C — Counter Fields. . . . . . . . . . . . . . . . . . . . . . . . . . . . . . . 74
Appendix D — Trap Fields. . . . . . . . . . . . . . . . . . . . . . . . . . . . . . . . . . 77
Index. . . . . . . . . . . . . . . . . . . . . . . . . . . . . . . . . . . . . . . . . . . . . . . . . . . 78

Avaya M770 ATM Manager User Guide vi
Preface
Welcome to Avaya M770 ATM Manager. This chapter provides an
introduction to the structure and assumptions of this guide. It includes
the following sections:
• The purpose of this guide - A description of the goals of the
guide.
• Who should use this guide - A description of the intended
audience of this guide.
• Organization of this guide - A brief description of the subjects
contained in the various chapters of the guide.
The Purpose of this Guide
The Avaya M770 ATM Manager guide contains the information needed
to use the system efficiently and effectively.
Who Should Use This Guide
This guide is intended for network managers familiar with network
management and its fundamental concepts.
Organization of this Guide
This guide contains the following subjects:
• Preface - Describes the guide’s purpose and organization.
• Introduction - Provides instructions on starting the A vaya M770
ATM Manager and using the Avaya M770 ATM Manager Chassis
View.
• Agent Configuration - Describes the Master Agent and Sub
Agents and explains how to view agent configuration and
designate managers.

Avaya M770 ATM Manager User Guide vii
Preface
• ATM Switch Configuration - Explains how to view and modify
different Avaya M770 ATM Device configuration parameters.
• Fault Management - Explains how to configure traps and view
traps sent by the agent.
• Monitoring Performance - Explains how to view Port counters,
CPU counters, VC counters, Management LEC counters, and LECS
statistics.
• Managing Switch VCs - Explains how to list all SVC connections
for a switch.
• Managing LANE Services - Provides an overview of LANE
services and their use with the Avaya M770 ATM Device.
• Managing Routing - Explains how to manage the static routes
table and PNNI.
• Avaya M770 ATM Switch Manager Menus - Provides the
structure of the menus in Avaya M770 ATM Manager.
• Configuration Fields - Provides a description of the
configuration fields.
• Counter Fields - Provides a description of the counter fields.
•Trap Fields - Provides a description of the trap fields.

Avaya M770 ATM Manager User Guide 1
1
Introduction
This chapter provides instructions on starting the Avaya M770 ATM
Manager, and for using the Chassis View. It includes the following
sections:
• Starting Avaya M770 ATM Manager - Instructions on
accessing Avaya M770 ATM Manager from your management
platform.
• Using the Chassis View - A brief introduction to the
Avaya M770 ATM Manager Chassis View, including instructions
for selecting elements, and for using the menu bar and the
toolbar buttons.
Starting Avaya M770 ATM Manager
The following sections provide instructions for starting the
Avaya M770 ATM Manager from the various supported management
umbrellas.
Running Avaya M770 ATM Manager from A vaya MultiService
Console
To start Avaya M770 Manager from Avaya MultiService Console:
1. Select the Avaya M770 ATM Device you wish to work with.
2. Double-click the row representing the Avaya M770 ATM Device.
Or
Select
Tools > Device Manager.

Avaya M770 ATM Manager User Guide 2
Introduction
Running Avaya M770 ATM Manager from HP-OV for Windows
To start Avaya M770 ATM Manager from HP OpenView for Windows:
1. Select the Avaya M770 ATM Device you wish to work with.
2. Double-click the row representing the Avaya M770 ATM Device.
Or
Select
Avaya > Device Manager.
Running Avaya M770 ATM Manager from HP NNM for
(Windows NT and Solaris)
To start Avaya M770 ATM Manager from HP NNM (Windows NT and
UNIX):
1. From the management platform map, select an Avaya M770 ATM
Device.
2. Click in the OpenView toolbar.
Or
Select
Tools > Avaya > Device Manager.
Or
1. Right-click on an Avaya M770 ATM Device.
2. Select
Avaya > Device Manager.

Chapter 1
3 Avaya M770 ATM Manager User Guide
Using Chassis View
The A vaya M770 A TM Chassis V iew displays only the modules installed in
the ATM de vice currently being managed. This does not inclu de DomainX
modules and ATM modules of another device in the same chassis.
In order to manage DomainX modules, change the overall device
configuration, and view hardware configuration:
Click .
Or
Select
Administer > Launch Hub Manager. The Avaya M770
Manager application opens.
For more information, refer to the Avaya M770 Manager User Guide or online help.
Selecting Elements
Within the Chassis View, you can select the following elements:
• Modules
• Ports
To select an element, click it using the left mouse button. The selected
element is highlighted. To select multiple elements, press the CTRL key
while clicking on each element to be selected.

Avaya M770 ATM Manager User Guide 4
Introduction
Using Chassis View Features
The Chassis View consists of a graphical representation of the device, a
Menu bar, and a Toolbar.
Figure 1-1. Chassis View
Chapter 1
5 Avaya M770 ATM Manager User Guide
Toolbar
The Toolbar provides shortcuts to the main Chassis View functions. In a
Windows environment the toolbar may be displayed as a floating
horizontal toolbar or as a fixed, vertical toolbar. To display the toolbar,
select
Administer > ToolBar. A check is placed next to the Toolbar option
when it is activated. To dock the toolbar, drag it to the edge of th e Chassis
View. To hide the toolbar, select
Administer > ToolBar.
The table below describes the Toolbar buttons and gives the equivalent
menu options.
When you place the cursor on a toolbar icon for a second, a label appears
with the name of the button.
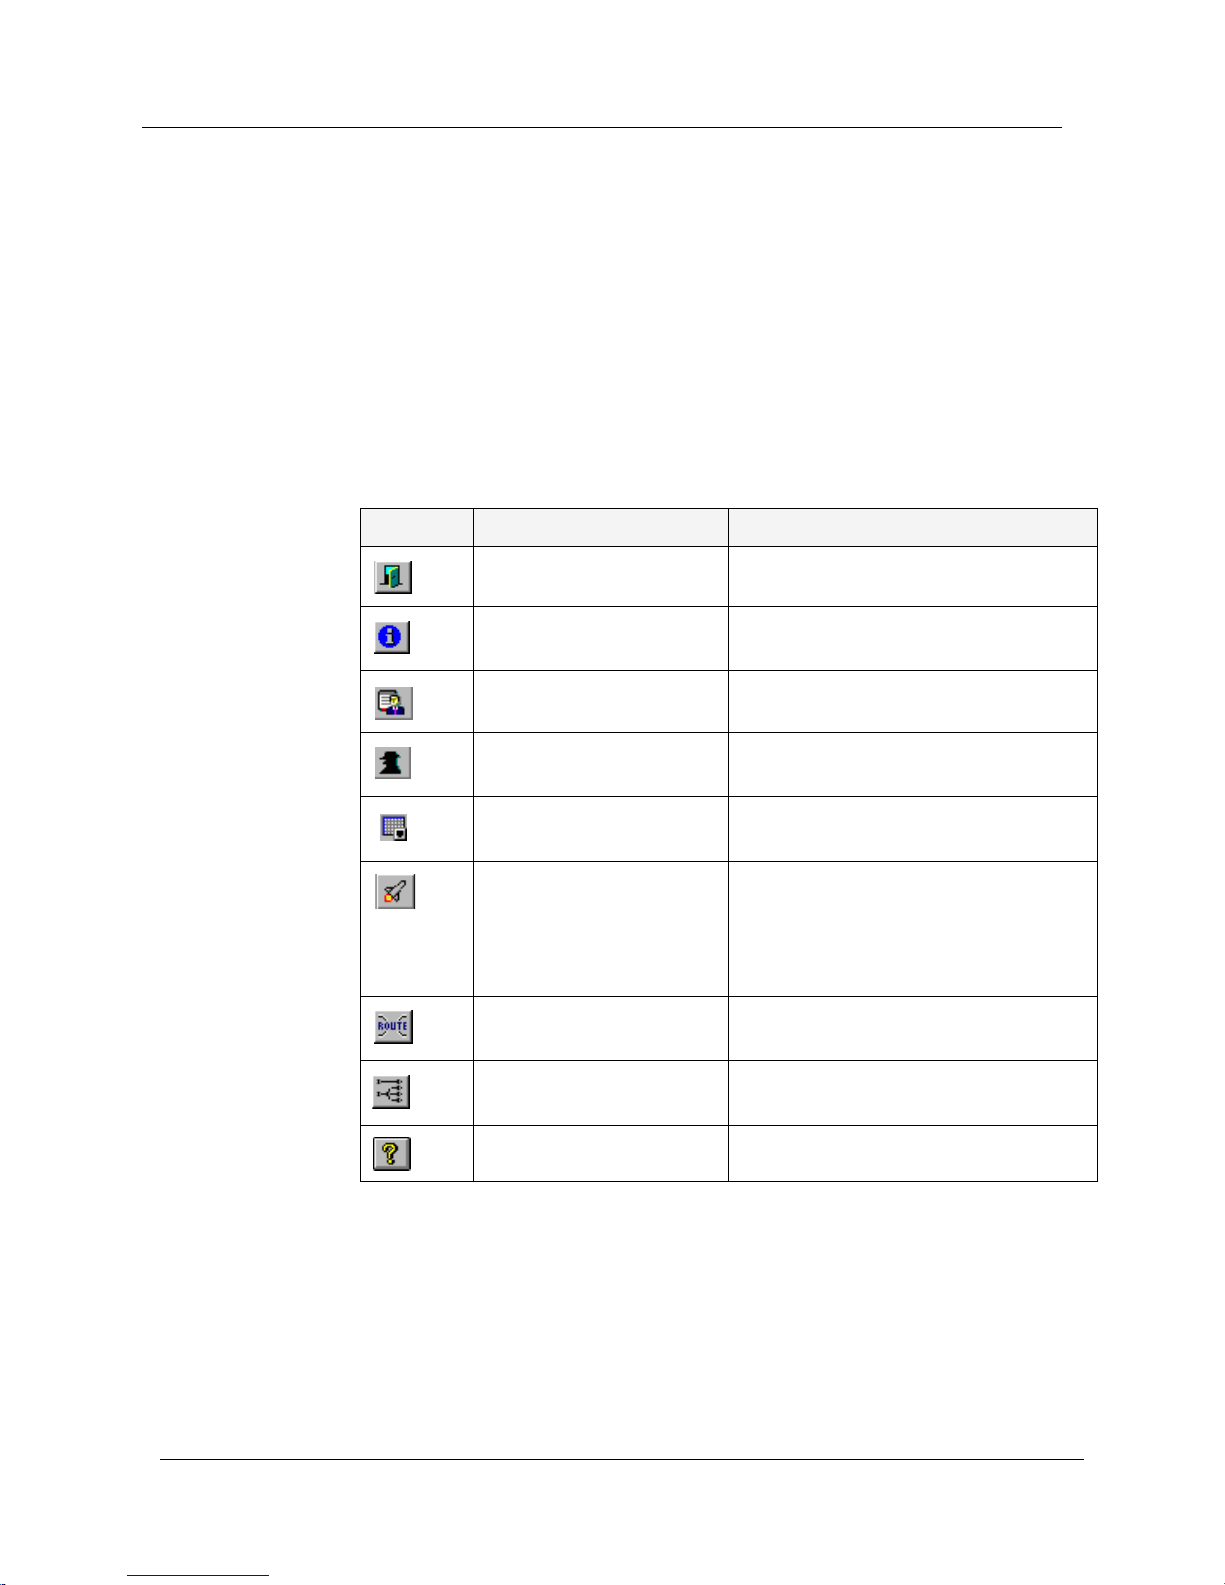
Table 1-1. Chassis View Toolbar
Icon Description Menu Item
Exit the application. Configuration > Exit Zoom
View Avaya M770 ATM
Device information.
Configuration > Device Information
View the Managers table. Configuration > Managers Table
View Avaya M770 ATM
agent information.
Configuration > Agent
View Avaya M770 ATM
virtual port information.
Configuration > Virtual Port Table
Launch Avaya M770
Manager for viewing
Ethernet modules, device
information, and power
supply configuration.
Administer > Launch Hub Manager
View Static Routes
information.
Configuration > Static Routes
View Switch VCs
information.
Configuration > Switch VCs
Open on-line Help. Help > Contents

Avaya M770 ATM Manager User Guide 6
2
Agent Configuration
This chapter provides you with information for managing your agent.
The following sections are included:
• Overview of Master Agent and Sub Agents - Provides
information about master and sub agents.
• Overview of Agent Configuration- Provides information
about the Agent Configuration.
• Viewing Agent Configuration Information- Provides
information about viewing the Agent Information window.
• Designating Managers - Provides information about viewing
the Manager’s list.
* Note: To ensure that your network or Avaya M770 ATM Device
works properly, your network agent must be configured
correctly.
Overview of Master Agent and Sub Agents
The Avaya M770 ATM Device is a fully distributed switch. Each module
has its own switching and CPU power supply. In order to present the
device as a single and united entity, one module is automatically elected
as a Master Agent while the other modules are Sub Agents. The NMA
(Network Management Agent) LED is lit on the elected Master Agent
module.
The Master Agent hosts the Management LEC with all of its functionality
including the device’s IP Address and switch-wide information.
All the information configured on the Master Agent is backed up by the
Sub Agents. If the Master Agent is removed or reset, another module is
elected, and all previous configuration settings are saved.

Chapter 2
7 Avaya M770 ATM Manager User Guide
Overview of Agent Configuration
The Master Agent manages the modules contained in the devices. The
Master Agent enables handling many of the Avaya M770 ATM Manager
features including:
• Statistical reporting
• Configuration information
• Trap reporting
If your agent is not properly configured for your network or cannot
communicate with Avaya MultiService Network Manager, your network
will not achieve its maximum functionality. Therefore, it is essential that
your agent is configured correctly.
Downloading New Agent Software
Download agent software using the Avaya MultiService Software Update
Manager. For instructions, refer to the on-line help for the
Avaya MultiService Software Update Manager, or the Avaya MultiService
Software Update Manager User’s Guide.
Avaya M770 ATM Manager User Guide 8
Agent Configuration
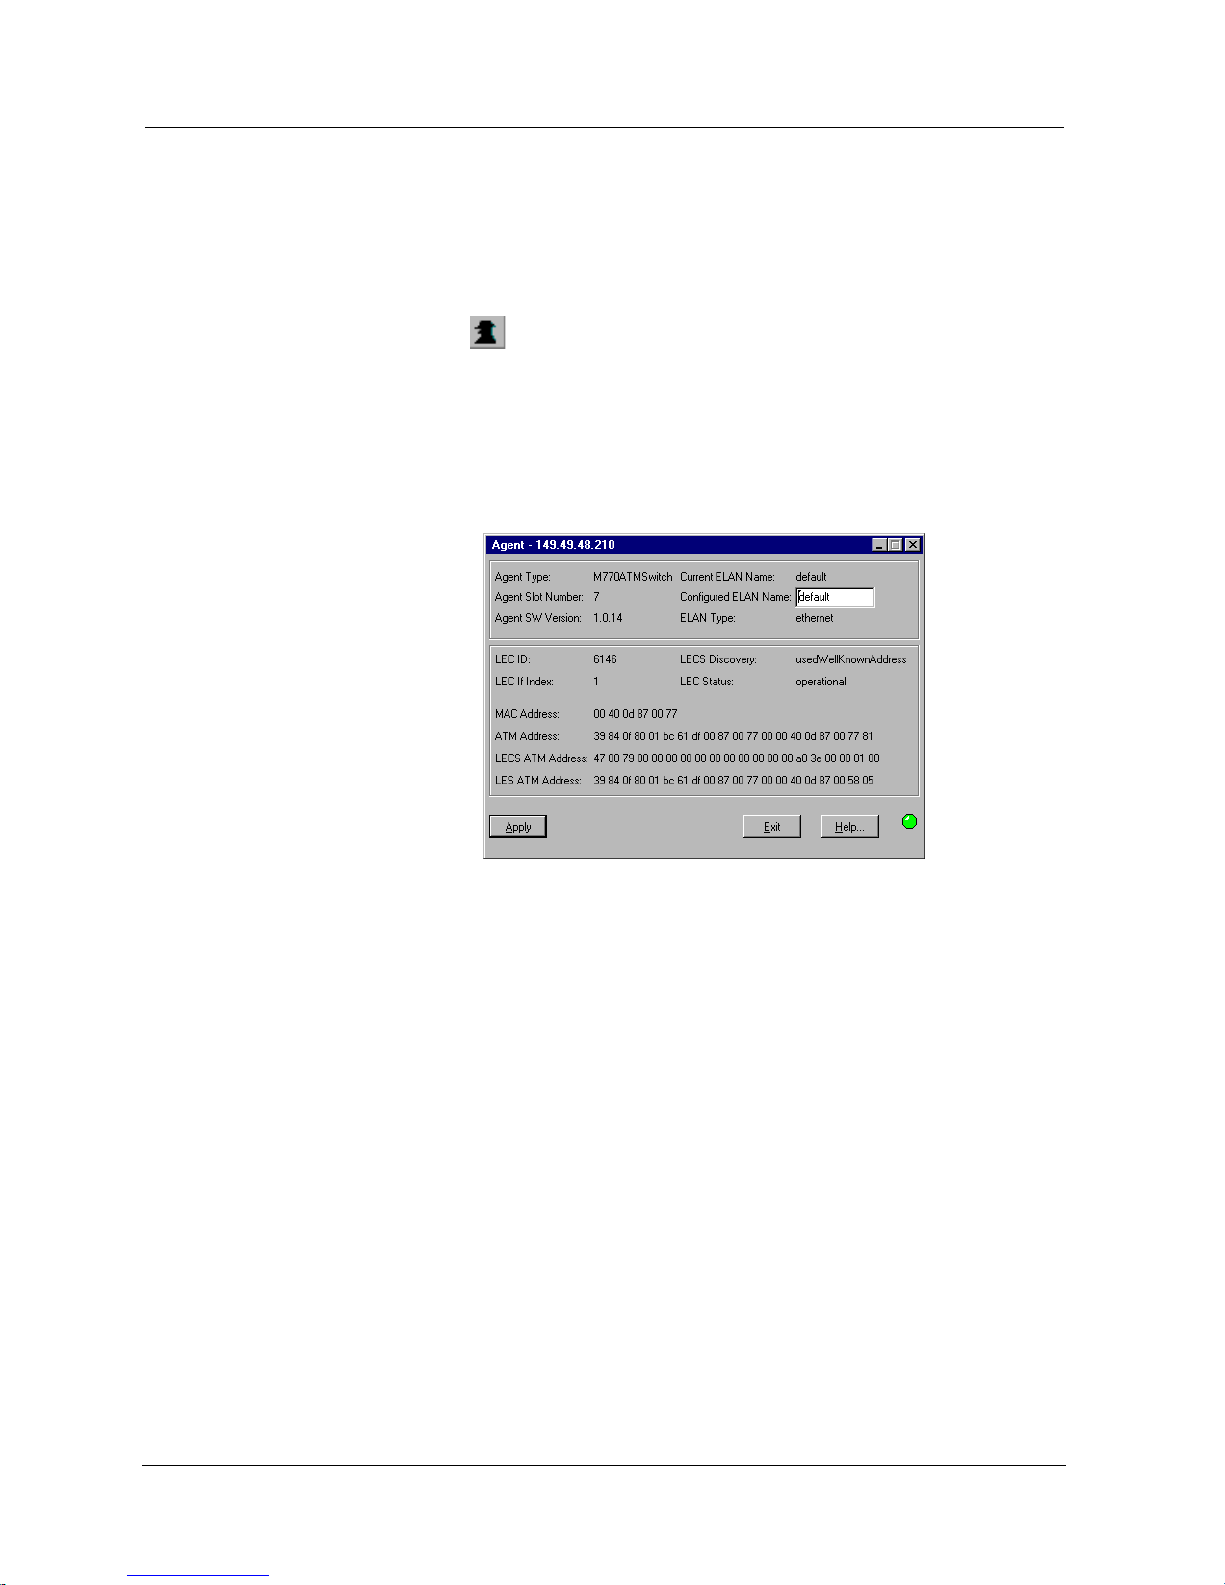
Viewing Agent Configuration Information
Every agent has an Agent Information window that provides details about
the agent. To view the configuration of an agent:
Click .
Or
Select
Configuration > Agent. The Agent Information window
opens.
Figure 2-1. Agent Information Window
The Agent Information window provides details about the agent such as
the agent type, the versions of its software, the agent’s addresses, and LEC
information.
For a full description of the configuration fields in the Agent Information
window, refer to Appendix B, Configuration Fields.
Designating Managers
Agents send alarms to Manager workstations that are included in the
agent's Manager list. Alarms are not sent to any other network
management stations (NMS).
To properly manage an ATM device, your station should be one of its
designated Managers. The Manager can be an A vaya M770 A TM Manager
station or any other SNMP (Simple Network Management Protocol)
management console.
* Note: Refer to the Avaya M770 ATM User’s Guide for a method of
editing the Managers list using the command line interface.
Chapter 2
9 Avaya M770 ATM Manager User Guide
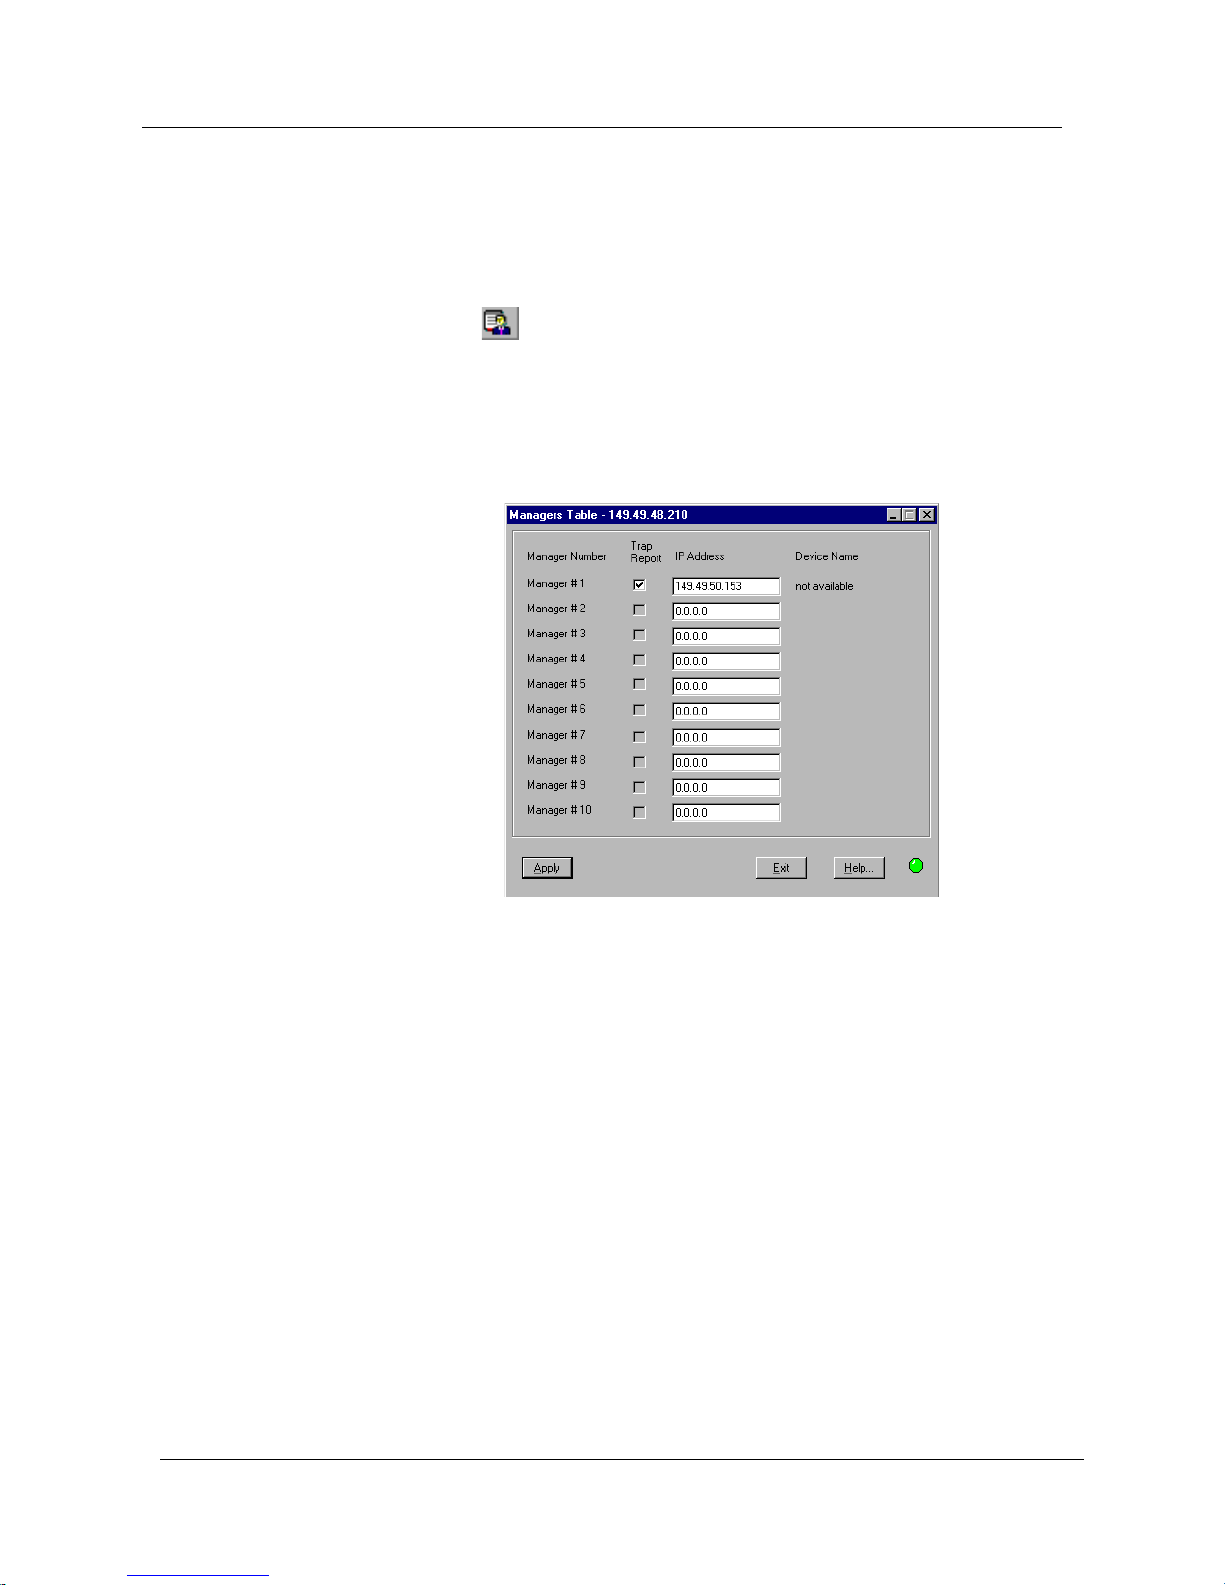
Viewing the Managers Table
To view the Managers list of an Avaya M770 ATM Device:
1. Open the Avaya M770 ATM Chassis View.
2. Click .
Or
Select
Configuration > Managers Table. The Managers Table opens.
Figure 2-2. Managers Table
The Managers Table lists the IP addresses and device names of the
managers, and their trap reporting status.
Adding Managers to the Managers Table
To add managers to the list:
1. Click on the IP address field and enter the IP address of the
designated management station. After the changes take effect, the
management station’s name displays automatically in the
Device
Name
column, if available.
2. Repeat the procedure for each manager.
3. Click
Apply. The change takes effect immediately.

Avaya M770 ATM Manager User Guide 10
Agent Configuration
Removing Managers from the Managers Table
To remove managers from the list:
1. Click on the IP address field.
2. Enter 0.0.0.0.
Or
Press DEL.
3. Repeat the procedure for each manager.
4. Click
Apply. The managers are removed from the managers table.
Editing the Managers Table
To edit the managers list:
1. Click on the IP address field and change the IP address of the
designated management station. After the changes take effect, the
management station’s name displays automatically in the
Device
Name
column, if available.
2. Click
Apply. The change takes effect immediately.
3. Repeat the procedure for each manager.
* Note: It is recommended to keep the list limited to actual and
relevant managers, so as not to place undue stress on the
agent.
* Note: The indicated manager receives trap reports only when the
Trap Report check box for that manager is checked.

Avaya M770 ATM Manager User Guide 11
3
ATM Device Configuration
This chapter explains viewing and setting the various configuration
parameters relevant to the ATM Devices on your network. This chapter
includes the following sections:
• Viewing ATM Device Information - Provides a detailed
description of viewing the Avaya M770 ATM Device information.
• Viewing Module Configuration Information - Provides a
detailed description of viewing the Avaya M770 ATM
configuration information.
• Viewing Port Configuration - Provides a detailed description of
viewing port specific configuration information on Avaya M770
ATM mo dules.
• Viewing the Virtual Port Table
- Provides a detailed
description of viewing virtual port information.
• Viewing Port PNNI Information - Provides a detailed
description of viewing PNNI information specific to a selected
port.
• Resetting Elements - Provides a detailed description of resetting
various elements of the Avaya M770 ATM Device.
• Viewing Neighbor Information - Provides a detailed
description of viewing the neighbor device connected to a port.
* Note: To view agent configuration, refer to Chapter 2, Agent
Configuration.
Avaya M770 ATM Manager User Guide 12
ATM Device Configuration
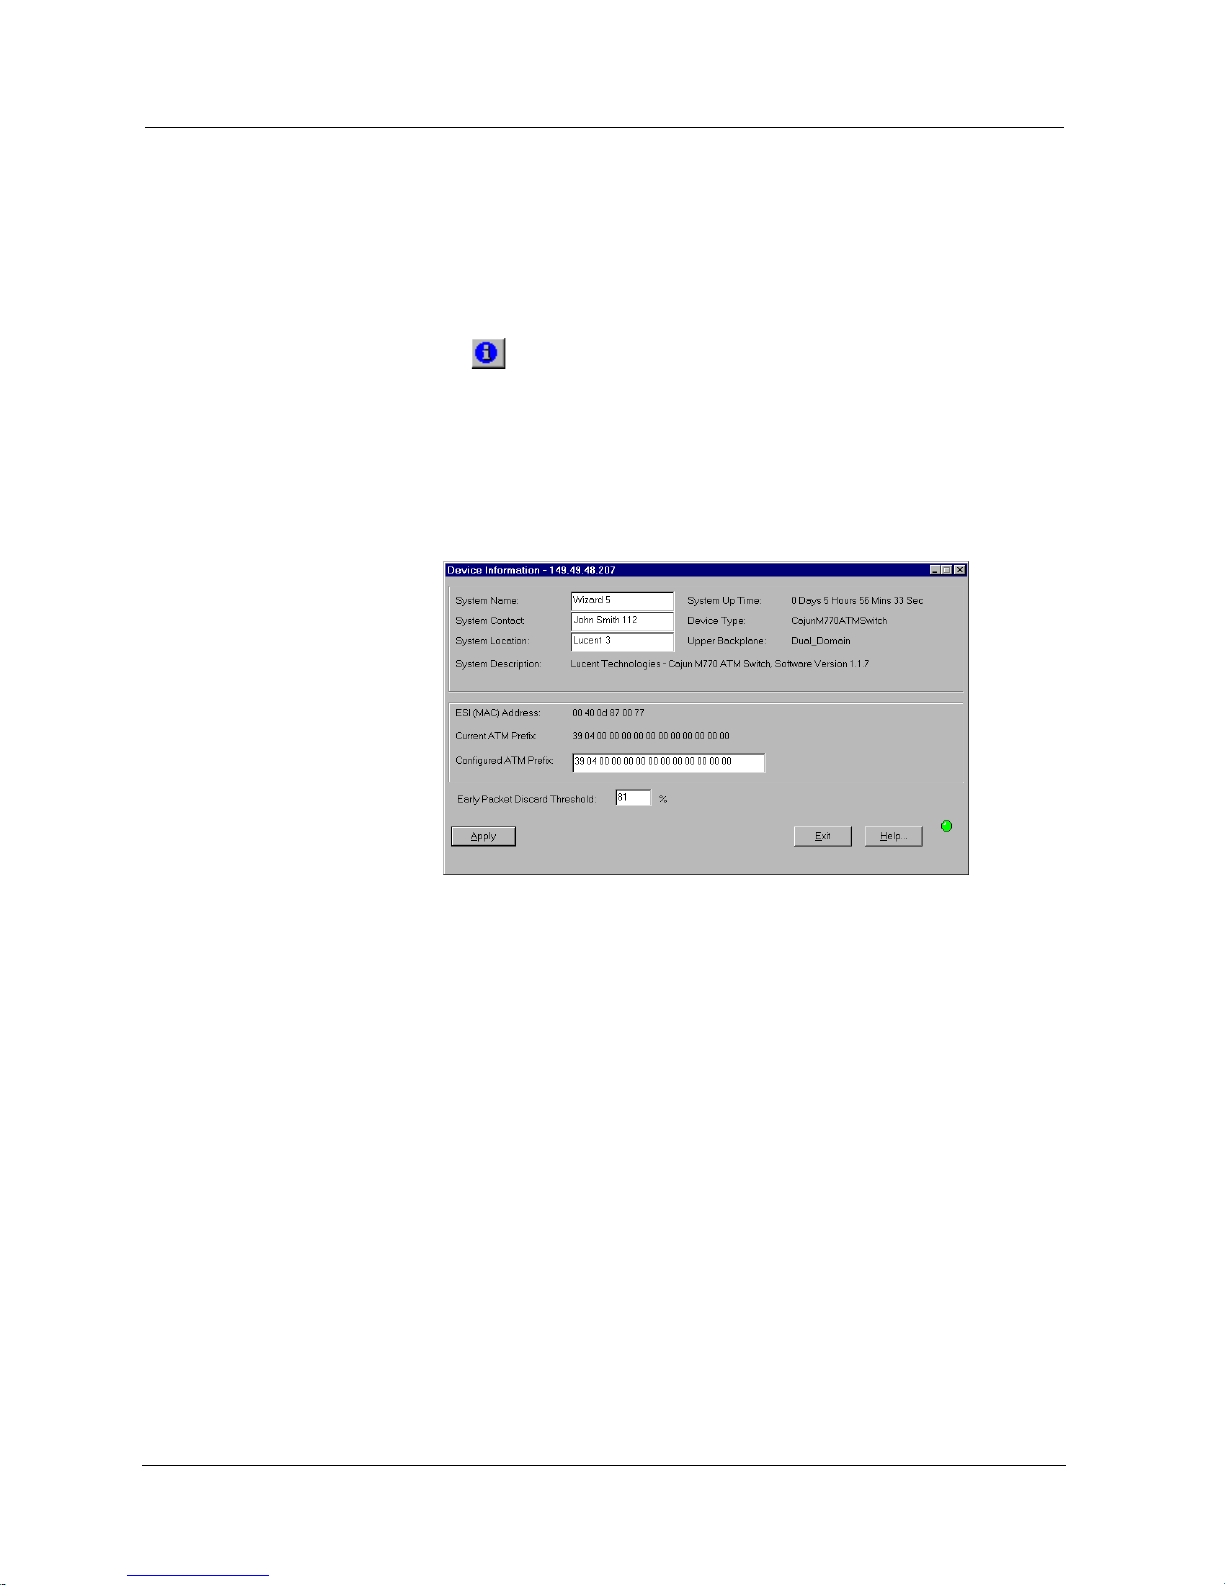
Viewing ATM Device Information
The Device Information dialog box provides high level information about
the Avaya M770 ATM Device. To view information about the Avaya
M770 ATM Device:
Click .
Or
Select
Configuration > Device Information. The Device Information
dialog box opens.
Figure 3-1. Device Information Dialog Box
The Device Information dialog box provides high level switch
information, such as the ATM device type, system name, contact,
location, description, and its ESI (MAC) address.
* Note: The Current ATM Prefix is only updated with the Configured
ATM Prefix after the device is reset.
For a full description of the fields in the Device Information dialog box,
refer to Appendix B, Configuration Fields.
Chapter 3
13 Avaya M770 ATM Manager User Guide
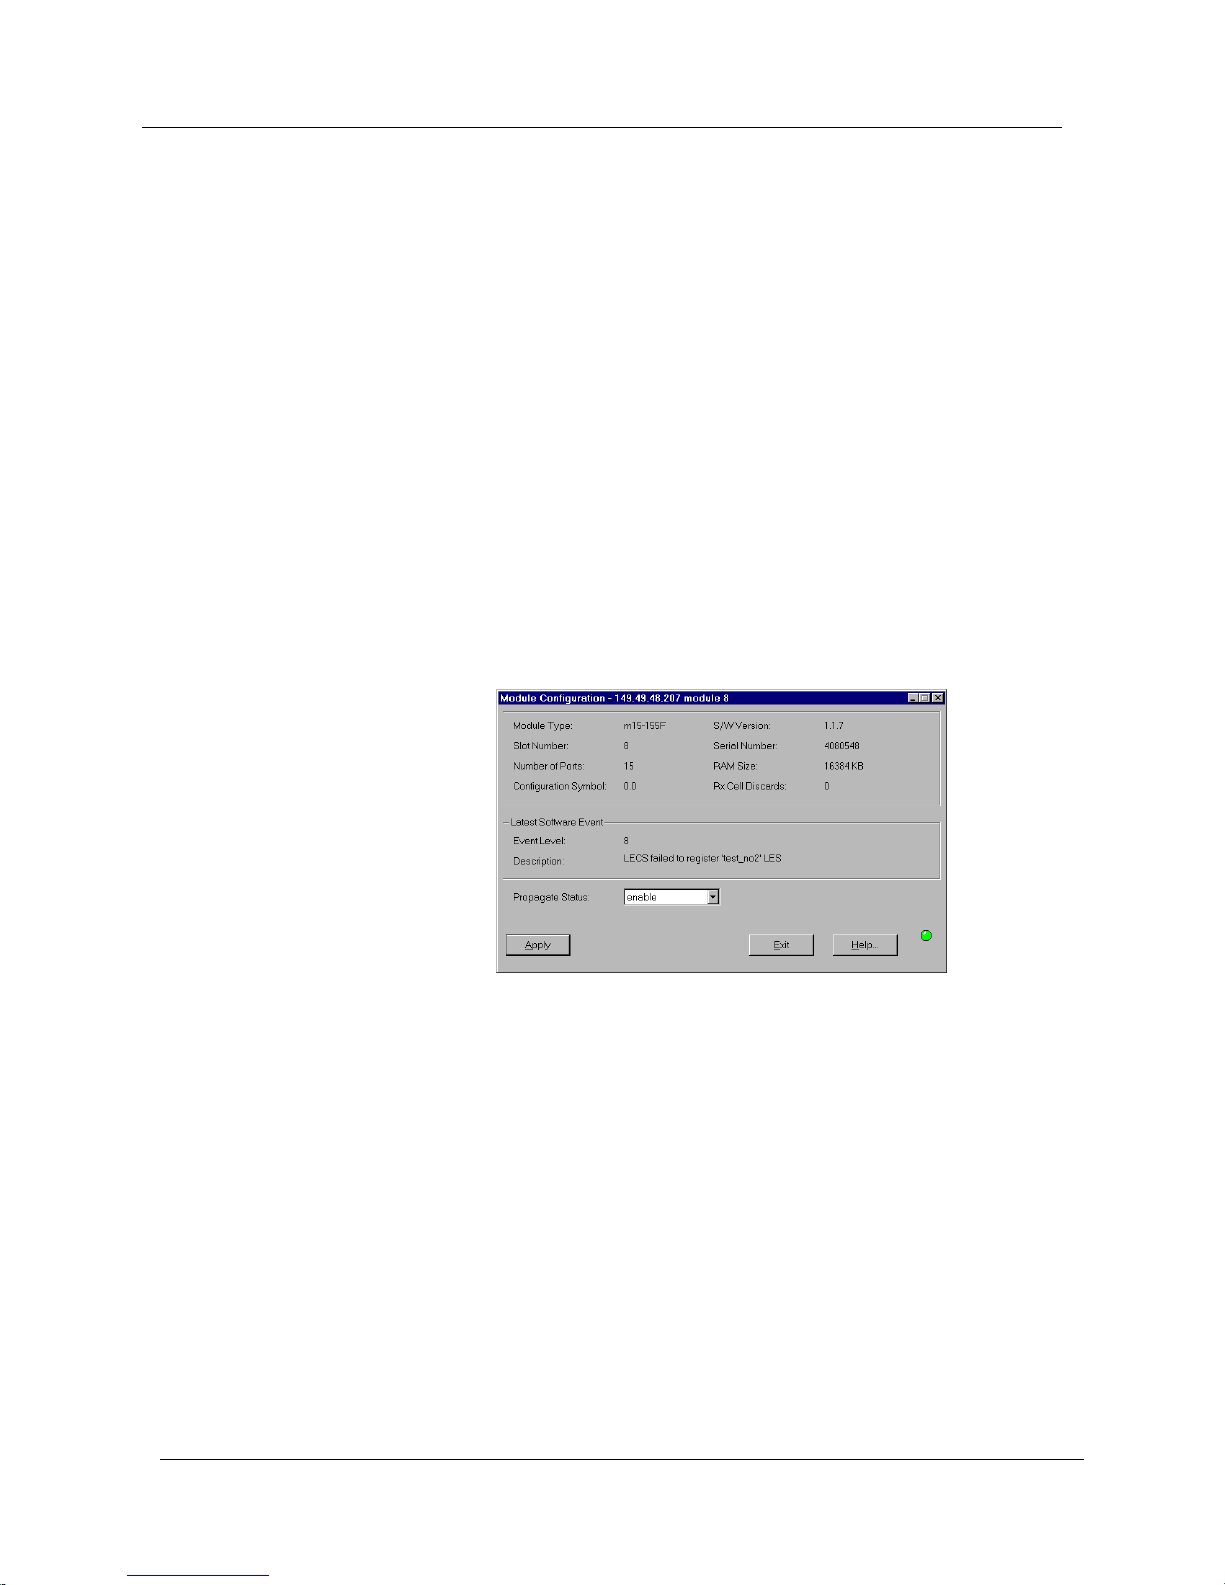
Viewing Module Configuration Information
The Module Configuration dialog box provides information about the
selected module. To view the configuration of an Avaya M770 ATM
module:
1. Select a module by clicking its label.
2. Select
Configuration > Module.
Or
Double-click the module label.
Or
Right-click the module’s label and select
Module Configuration. The
Module Configuration dialog box opens.
Figure 3-2. Module Configuration Dialog Box
The Module Configuration dialog box provides module information such
as the module type and software version, slot number, serial number, and
other information about the module’s configuration.
For a full description of the fields in the Module Configuration dialog box,
refer to Appendix B, Configuration Fields
Avaya M770 ATM Manager User Guide 14
ATM Device Configuration
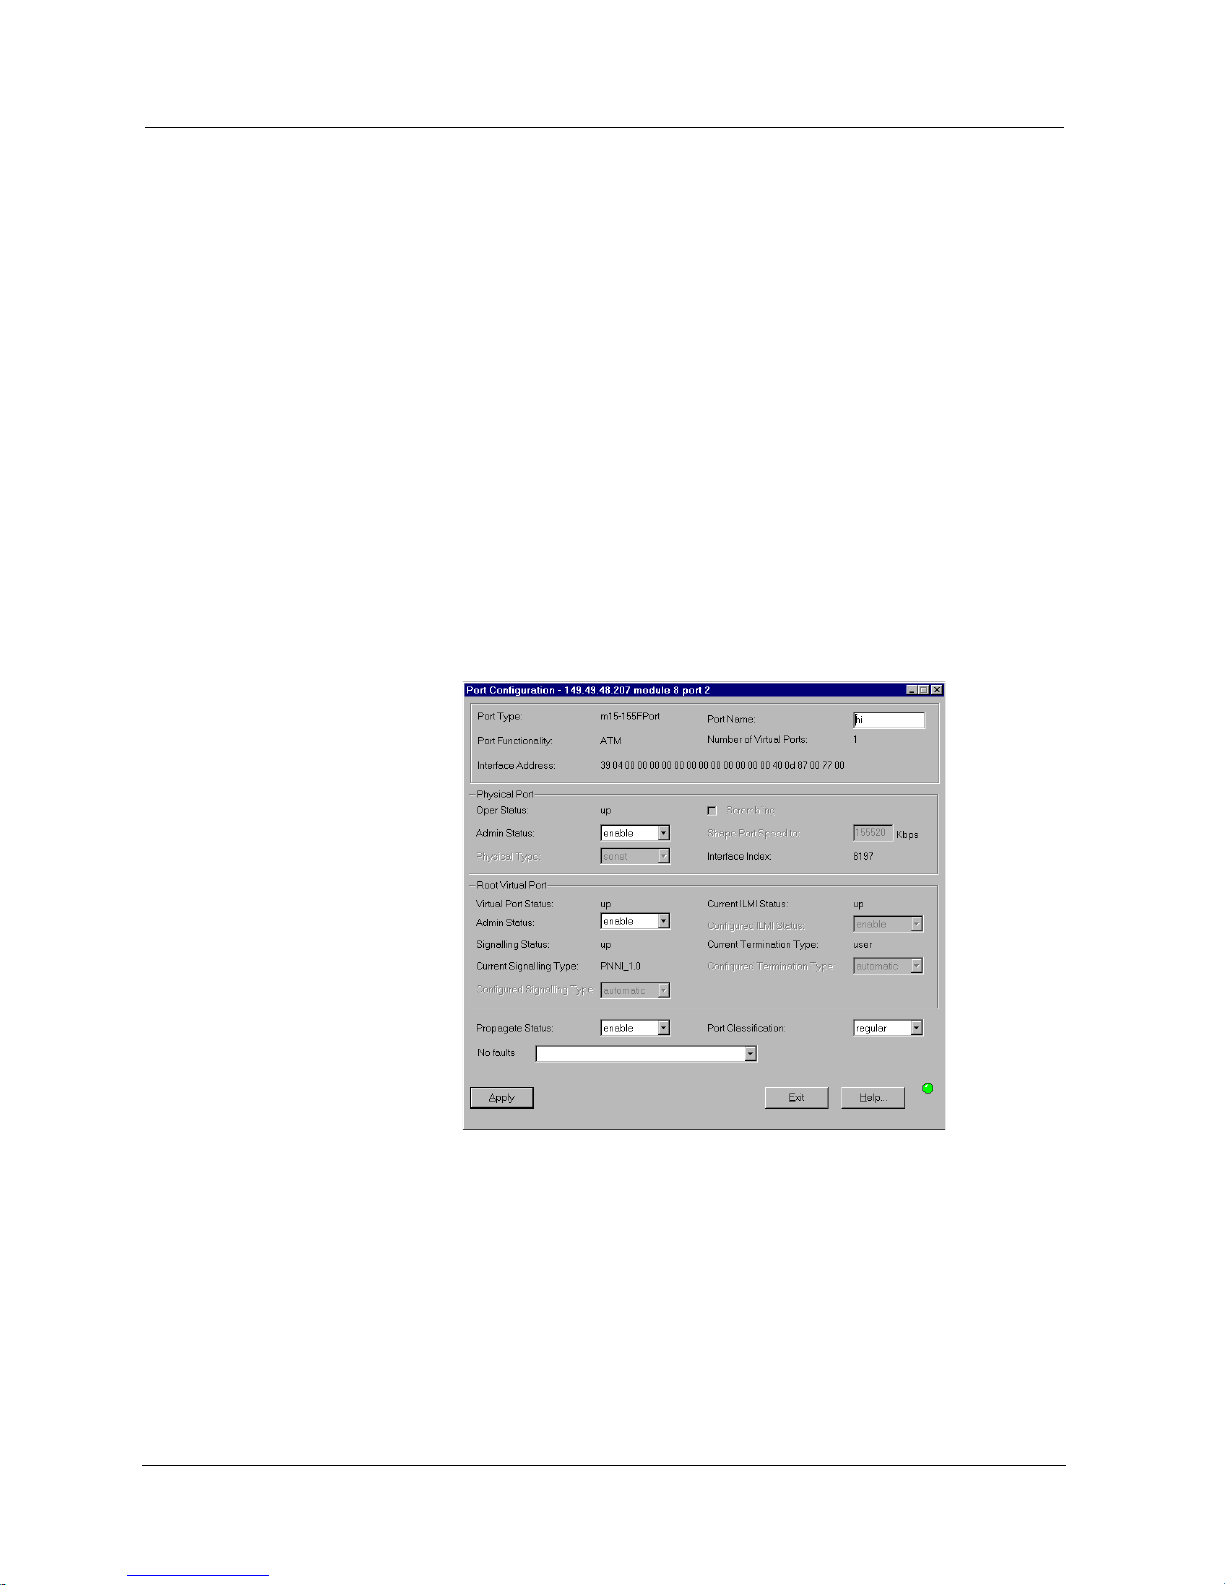
Viewing Port Configuration
The Port Configuration dialog box provides information specific to a
selected port. To view the configuration of a port:
1. Select a port by clicking its symbol.
2. Select
Port > Configuration.
Or
Double-click a port symbol.
Or
Right-click a port and select
Port Configuration. The Port
Configuration dialog box opens.
Figure 3-3. Port Configuration Dialog Box
The Port Configuration dialog box provides information such as the type
of port and functionality, the current state of the physical port and the
virtual port, and any faults that occurred on the port. The fields in the
Port Configuration dialog box may change according to the type of port
selected.
* Note: To change the physical parameters of a port, the
Physical Port
Admin Status
must be set to disable. To change the root virtual
parameters of a port, the
Root Virtual Port Admin Status must be
set to
disable.

Chapter 3
15 Avaya M770 ATM Manager User Guide
For a full description of the fields in the Port Configuration dialog box,
refer toAppendix B, Configuration Fields.
Enabling Physical Ports
To enable a port:
1. Select the port in the Chassis View.
2. Select
Configuration > Enable Port. A confirmation box opens.
3. Click
Yes.
Or
1. Right-click the port and select
Enable Port. A confirmation box
opens.
2. Click
Yes.
Or
1. Open the Port Configuration dialog box.
2. Change the
Admin Status of the Physical Port to enable and click
Apply. The selected port is enabled.
To enable more than one port:
1. Select multiple ports by holding down the CTRL key as you click
the ports.
2. Select
Configuration > Enable Port. A confirmation box opens.
3. Click
Yes. The selected ports are enabled.

Avaya M770 ATM Manager User Guide 16
ATM Device Configuration
Disabling Physical Ports
To disable a port:
1. Select the port in the Chassis View.
2. Select
Configuration > Disable Port. A confirmation box opens.
3. Click
Yes.
Or
1. Right-click the port and select
Disable Port. A confirmation box
opens.
2. Click
Yes.
Or
1. Open the Port Configuration dialog box.
2. Change the
Admin Status of the Physical Port to disable and click
Apply. The selected port is disabled.
To disable more than one port:
1. Select multiple ports by holding down the CTRL key as you click
the ports.
2. Select
Configuration > Disable Port. A confirmation box opens.
3. Click
Yes. The selected ports are disabled.
Chapter 3
17 Avaya M770 ATM Manager User Guide
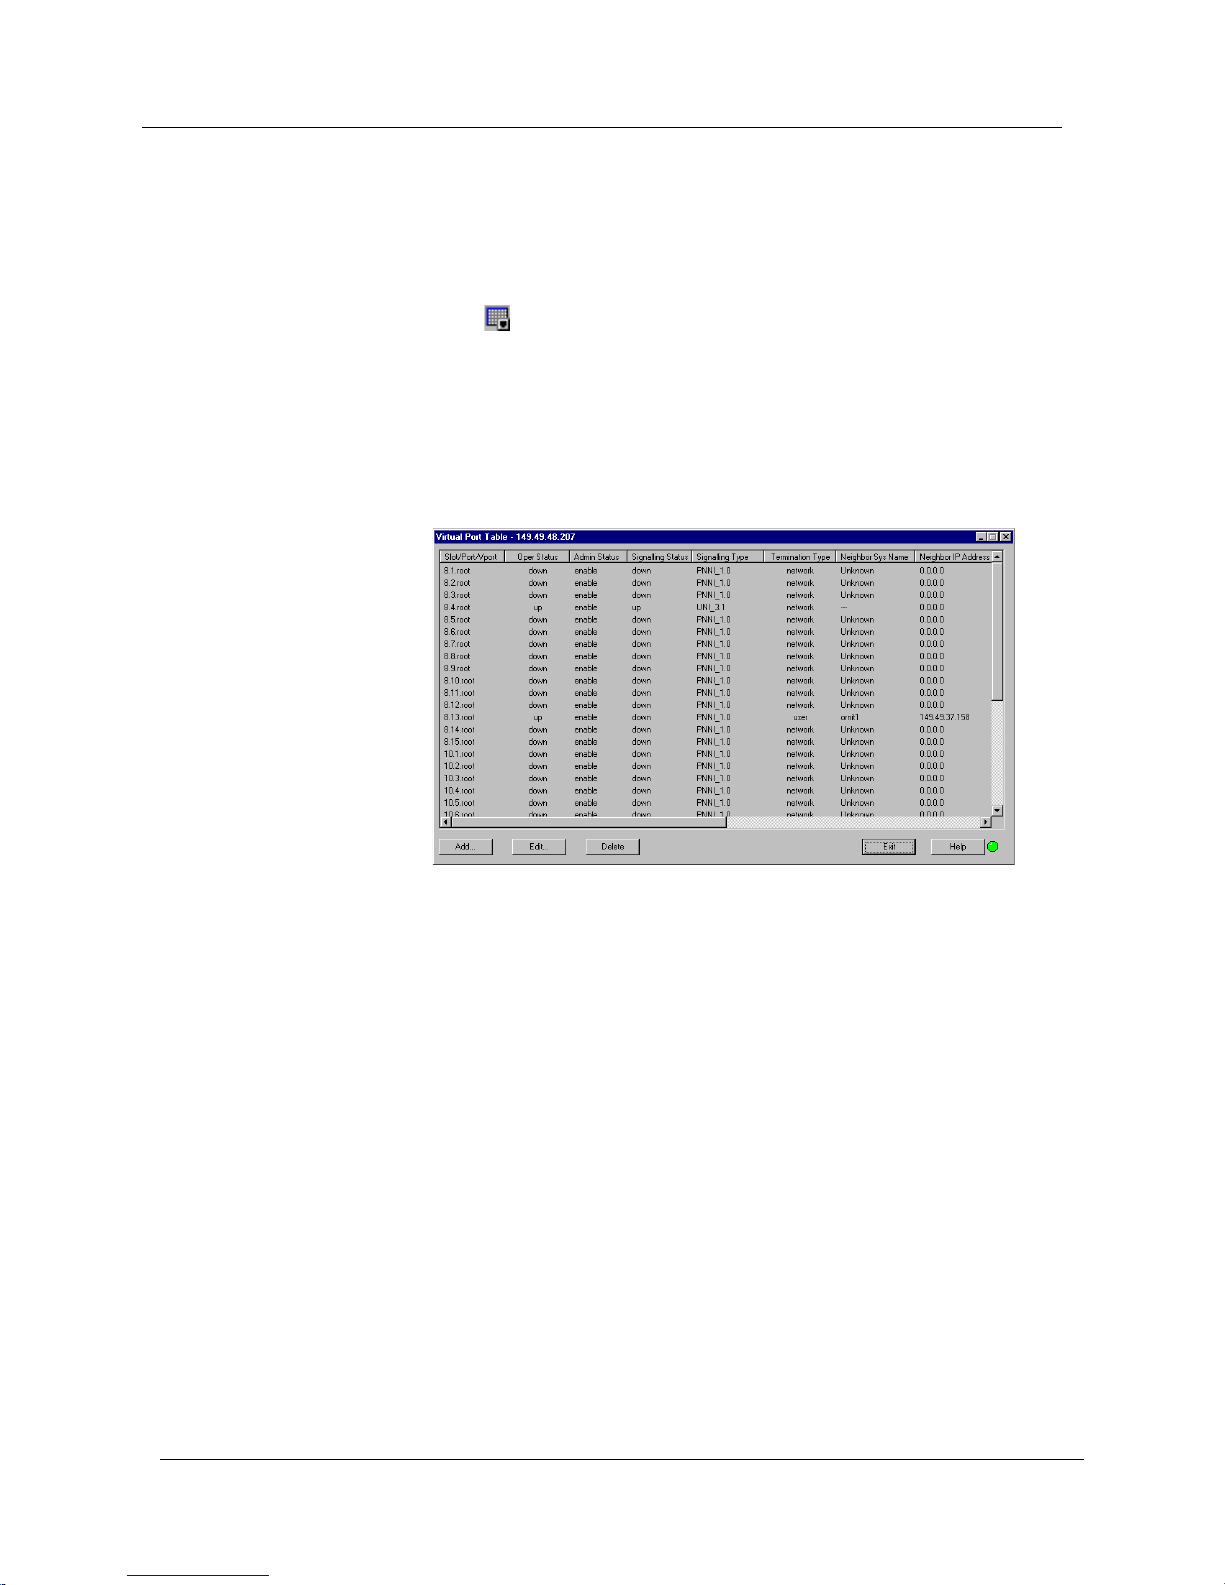
Viewing the Virtual Port Table
The Virtual Port Table provides a consolidated view of all of the virtual
ports on the Avaya M770 ATM Device. To view the Virtual Port Table:
Click .
Or
Select
Configuration > Virtual Port Table. The Virtual Port Table
opens.
Figure 3-4. Virtual Port Table
The Virtual Port Table provides information such as the source port and
module, statuses, signalling and termination types, and neighbor
information for each virtual port. You can add, edit, and delete virtual
ports in the Virtual Port Table.
* Note: The
Admin Status must be set to disable to edit or add a virtual
port. For more information about changing the
Admin Status,
refer to “Editing a Virtual Port” on page 19.
For a full description of the fields in the Virtual Port Table, refer to
Appendix B, Configuration Fields.
Avaya M770 ATM Manager User Guide 18
ATM Device Configuration
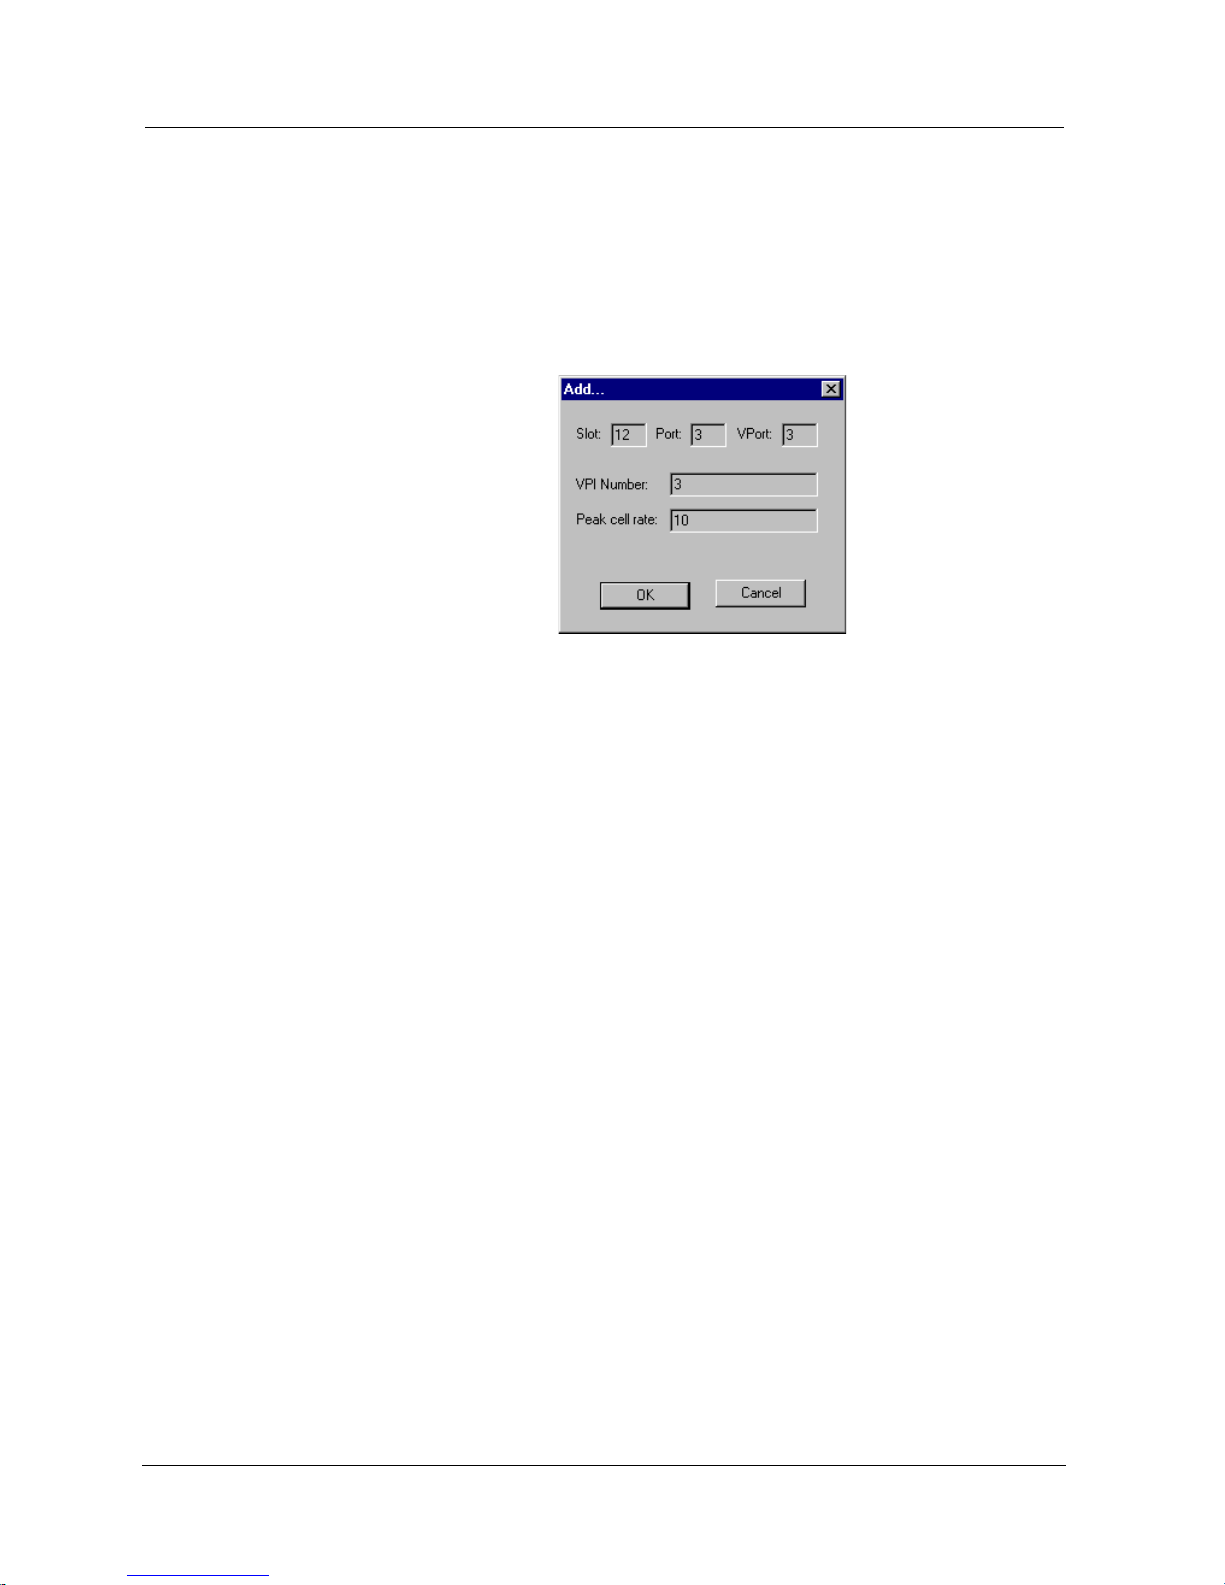
Adding a Virtual Port
To add a virtual port to the Virtual Port Table:
1. Click
Add. The Add dialog box appears.
Figure 3-5. Add Dialog Box
2. Define the fields in the Add dialog box. For a full description of the
fields in the Add dialog box, refer to Appendix B, Configuration
Fields.
3. Click
OK. The new virtual port is saved to the Virtual Port Table.
* Note: To add a new virtual port, you must first assign a VPI range
and the root virtual port VPI range must reduced. For more
information about setting the VPI range, refer to “Editing a
Virtual Port” on page 19.
Chapter 3
19 Avaya M770 ATM Manager User Guide
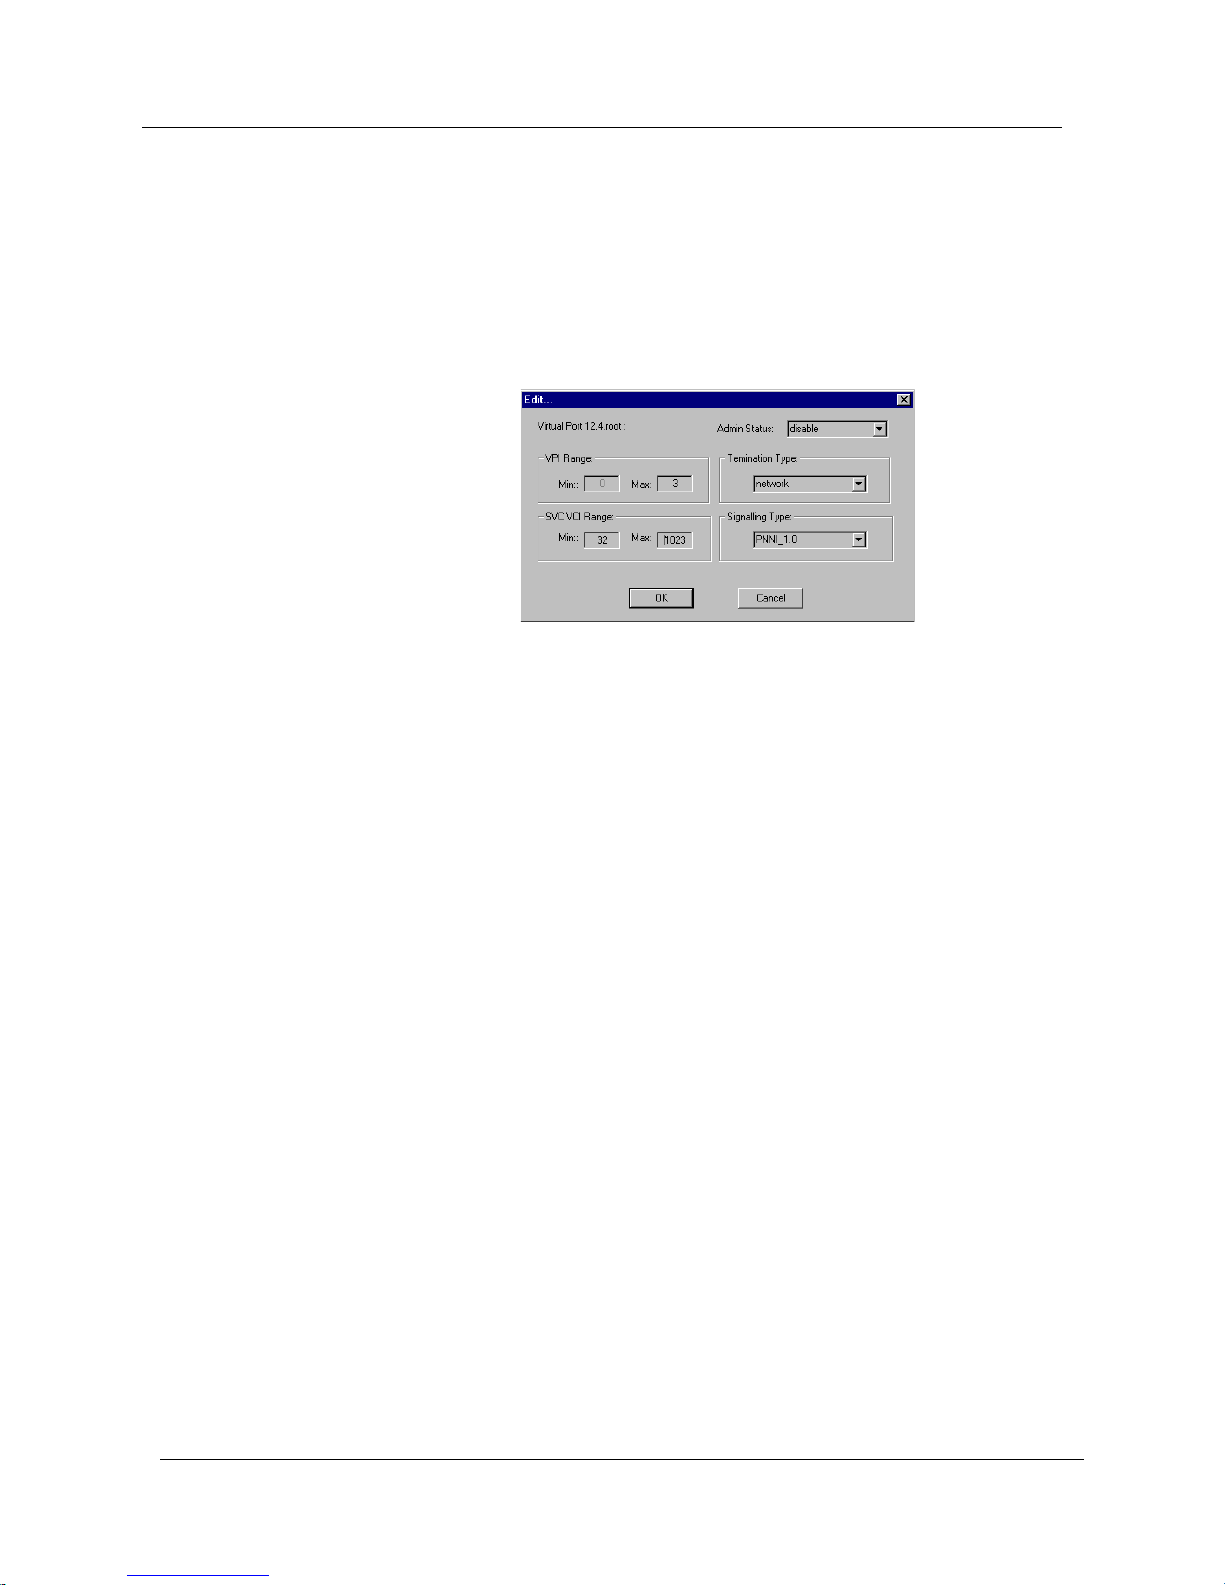
Editing a Virtual Port
To edit a virtual port in the Virtual Port Table:
1. Select a row in the Virtual Port Table, and click
Edit. The Edit dialog
box appears.
Figure 3-6. Edit Dialog Box
2. Define the fields in the Edit dialog box. For a full description of the
fields in the Edit dialog box, refer to Appendix B, Configuration
Fields.
3. Click
OK. The changes are saved to the Virtual Port Table.
Deleting a Virtual Port
To delete a virtual port from the Virtual Port table, select a row in the
Virtual Port table, and click
Delete. The virtual port is deleted from the
Virtual Port table.
* Note: Root Virtual (Slot.Port.root) cannot be deleted from the
Virtual Port table. You can only delete the non-root virtual
port. For example, Slot 12 port 1.root cannot be deleted, but
its non-virtual port 3 can be deleted.
Avaya M770 ATM Manager User Guide 20
ATM Device Configuration
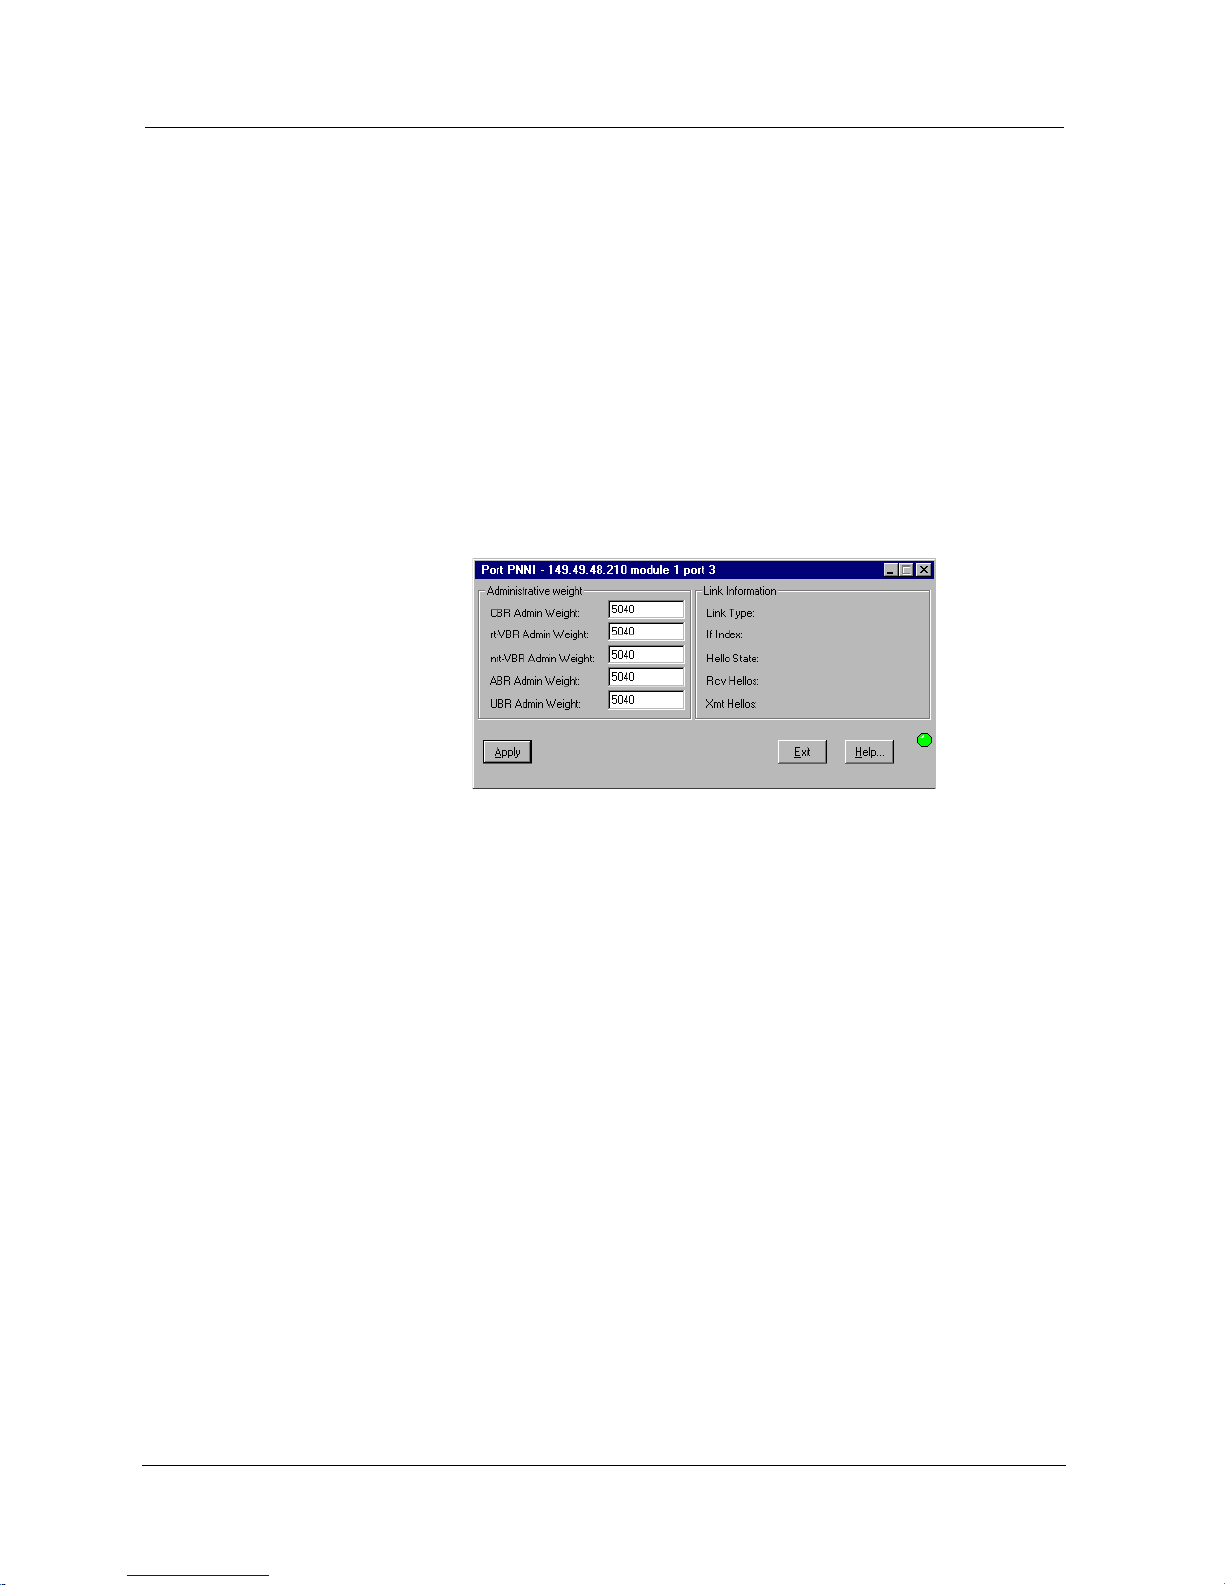
Viewing Port PNNI Information
The Port PNNI dialog box provides PNNI information specific to the
selected port. To view the Port PNNI dialog box:
1. Select a port by clicking its symbol.
2. Select
Configuration > Port > PNNI.
Or
Right-click a port and select
PNNI. The Port PNNI dialog box opens.
Figure 3-7. Port PNNI Window
The Port PNNI dialog box provides information about the port’s link type,
number of Hellos sent and received, and information about the
calculation of the cost of routing to and from the port. The weight of
various cost factors may be edited in the dialog box. T o apply an y changes
to the fields in the dialog box, click
Apply.
For a full description of the fields in the Port PNNI dialog box, refer to
Appendix B, Configuration Fields.
 Loading...