

Page 1

Installing and Administering Avaya J100
Series IP Phones
Release 4.0
Issue 2
December 2018
Page 2

©
2018, Avaya Inc.
All Rights Reserved.
Note
Using a cell, mobile, or GSM phone, or a two-way radio in close
proximity to an Avaya IP telephone might cause interference.
Documentation disclaimer
“Documentation” means information published in varying mediums
which may include product information, operating instructions and
performance specifications that are generally made available to users
of products. Documentation does not include marketing materials.
Avaya shall not be responsible for any modifications, additions, or
deletions to the original published version of Documentation unless
such modifications, additions, or deletions were performed by or on
the express behalf of Avaya. End User agrees to indemnify and hold
harmless Avaya, Avaya's agents, servants and employees against all
claims, lawsuits, demands and judgments arising out of, or in
connection with, subsequent modifications, additions or deletions to
this documentation, to the extent made by End User.
Link disclaimer
Avaya is not responsible for the contents or reliability of any linked
websites referenced within this site or Documentation provided by
Avaya. Avaya is not responsible for the accuracy of any information,
statement or content provided on these sites and does not
necessarily endorse the products, services, or information described
or offered within them. Avaya does not guarantee that these links will
work all the time and has no control over the availability of the linked
pages.
Warranty
Avaya provides a limited warranty on Avaya hardware and software.
Refer to your sales agreement to establish the terms of the limited
warranty. In addition, Avaya’s standard warranty language, as well as
information regarding support for this product while under warranty is
available to Avaya customers and other parties through the Avaya
Support website:
https://support.avaya.com/helpcenter/
getGenericDetails?detailId=C20091120112456651010 under the link
“Warranty & Product Lifecycle” or such successor site as designated
by Avaya. Please note that if You acquired the product(s) from an
authorized Avaya Channel Partner outside of the United States and
Canada, the warranty is provided to You by said Avaya Channel
Partner and not by Avaya.
“Hosted Service” means an Avaya hosted service subscription that
You acquire from either Avaya or an authorized Avaya Channel
Partner (as applicable) and which is described further in Hosted SAS
or other service description documentation regarding the applicable
hosted service. If You purchase a Hosted Service subscription, the
foregoing limited warranty may not apply but You may be entitled to
support services in connection with the Hosted Service as described
further in your service description documents for the applicable
Hosted Service. Contact Avaya or Avaya Channel Partner (as
applicable) for more information.
Hosted Service
THE FOLLOWING APPLIES ONLY IF YOU PURCHASE AN AVAYA
HOSTED SERVICE SUBSCRIPTION FROM AVAYA OR AN AVAYA
CHANNEL PARTNER (AS APPLICABLE), THE TERMS OF USE
FOR HOSTED SERVICES ARE AVAILABLE ON THE AVAYA
WEBSITE,
HTTPS://SUPPORT.AVAYA.COM/LICENSEINFO UNDER
THE LINK “Avaya Terms of Use for Hosted Services” OR SUCH
SUCCESSOR SITE AS DESIGNATED BY AVAYA, AND ARE
APPLICABLE TO ANYONE WHO ACCESSES OR USES THE
HOSTED SERVICE. BY ACCESSING OR USING THE HOSTED
SERVICE, OR AUTHORIZING OTHERS TO DO SO, YOU, ON
BEHALF OF YOURSELF AND THE ENTITY FOR WHOM YOU ARE
DOING SO (HEREINAFTER REFERRED TO INTERCHANGEABLY
AS “YOU” AND “END USER”), AGREE TO THE TERMS OF USE. IF
YOU ARE ACCEPTING THE TERMS OF USE ON BEHALF A
COMPANY OR OTHER LEGAL ENTITY, YOU REPRESENT THAT
YOU HAVE THE AUTHORITY TO BIND SUCH ENTITY TO THESE
TERMS OF USE. IF YOU DO NOT HAVE SUCH AUTHORITY, OR IF
YOU DO NOT WISH TO ACCEPT THESE TERMS OF USE, YOU
MUST NOT ACCESS OR USE THE HOSTED SERVICE OR
AUTHORIZE ANYONE TO ACCESS OR USE THE HOSTED
SERVICE.
Licenses
THE SOFTWARE LICENSE TERMS AVAILABLE ON THE AVAYA
WEBSITE, HTTPS://SUPPORT.AVAYA.COM/LICENSEINFO,
UNDER THE LINK “AVAYA SOFTWARE LICENSE TERMS (Avaya
Products)” OR SUCH SUCCESSOR SITE AS DESIGNATED BY
AVAYA, ARE APPLICABLE TO ANYONE WHO DOWNLOADS,
USES AND/OR INSTALLS AVAYA SOFTWARE, PURCHASED
FROM AVAYA INC., ANY AVAYA AFFILIATE, OR AN AVAYA
CHANNEL PARTNER (AS APPLICABLE) UNDER A COMMERCIAL
AGREEMENT WITH AVAYA OR AN AVAYA CHANNEL PARTNER.
UNLESS OTHERWISE AGREED TO BY AVAYA IN WRITING,
AVAYA DOES NOT EXTEND THIS LICENSE IF THE SOFTWARE
WAS OBTAINED FROM ANYONE OTHER THAN AVAYA, AN AVAYA
AFFILIATE OR AN AVAYA CHANNEL PARTNER; AVAYA
RESERVES THE RIGHT TO TAKE LEGAL ACTION AGAINST YOU
AND ANYONE ELSE USING OR SELLING THE SOFTWARE
WITHOUT A LICENSE. BY INSTALLING, DOWNLOADING OR
USING THE SOFTWARE, OR AUTHORIZING OTHERS TO DO SO,
YOU, ON BEHALF OF YOURSELF AND THE ENTITY FOR WHOM
YOU ARE INSTALLING, DOWNLOADING OR USING THE
SOFTWARE (HEREINAFTER REFERRED TO
INTERCHANGEABLY AS “YOU” AND “END USER”), AGREE TO
THESE TERMS AND CONDITIONS AND CREATE A BINDING
CONTRACT BETWEEN YOU AND AVAYA INC. OR THE
APPLICABLE AVAYA AFFILIATE (“AVAYA”).
Avaya grants You a license within the scope of the license types
described below, with the exception of Heritage Nortel Software, for
which the scope of the license is detailed below. Where the order
documentation does not expressly identify a license type, the
applicable license will be a Designated System License as set forth
below in the Designated System(s) License (DS) section as
applicable. The applicable number of licenses and units of capacity
for which the license is granted will be one (1), unless a different
number of licenses or units of capacity is specified in the
documentation or other materials available to You. “Software” means
computer programs in object code, provided by Avaya or an Avaya
Channel Partner, whether as stand-alone products, pre-installed on
hardware products, and any upgrades, updates, patches, bug fixes,
or modified versions thereto. “Designated Processor” means a single
stand-alone computing device. “Server” means a set of Designated
Processors that hosts (physically or virtually) a software application
to be accessed by multiple users. “Instance” means a single copy of
the Software executing at a particular time: (i) on one physical
machine; or (ii) on one deployed software virtual machine (“VM”) or
similar deployment.
License types
Designated System(s) License (DS). End User may install and use
each copy or an Instance of the Software only: 1) on a number of
Designated Processors up to the number indicated in the order; or 2)
up to the number of Instances of the Software as indicated in the
order, Documentation, or as authorized by Avaya in writing. Avaya
may require the Designated Processor(s) to be identified in the order
by type, serial number, feature key, Instance, location or other
specific designation, or to be provided by End User to Avaya through
electronic means established by Avaya specifically for this purpose.
Shrinkwrap License (SR). You may install and use the Software in
accordance with the terms and conditions of the applicable license
agreements, such as “shrinkwrap” or “clickthrough” license
accompanying or applicable to the Software (“Shrinkwrap License”).
Heritage Nortel Software
“Heritage Nortel Software” means the software that was acquired by
Avaya as part of its purchase of the Nortel Enterprise Solutions
Business in December 2009. The Heritage Nortel Software is the
software contained within the list of Heritage Nortel Products located
https://support.avaya.com/LicenseInfo under the link “Heritage
at
Nortel Products” or such successor site as designated by Avaya. For
Heritage Nortel Software, Avaya grants Customer a license to use
Heritage Nortel Software provided hereunder solely to the extent of
the authorized activation or authorized usage level, solely for the
purpose specified in the Documentation, and solely as embedded in,
for execution on, or for communication with Avaya equipment.
Charges for Heritage Nortel Software may be based on extent of
activation or use authorized as specified in an order or invoice.
Page 3

Copyright
Except where expressly stated otherwise, no use should be made of
materials on this site, the Documentation, Software, Hosted Service,
or hardware provided by Avaya. All content on this site, the
documentation, Hosted Service, and the product provided by Avaya
including the selection, arrangement and design of the content is
owned either by Avaya or its licensors and is protected by copyright
and other intellectual property laws including the sui generis rights
relating to the protection of databases. You may not modify, copy,
reproduce, republish, upload, post, transmit or distribute in any way
any content, in whole or in part, including any code and software
unless expressly authorized by Avaya. Unauthorized reproduction,
transmission, dissemination, storage, and or use without the express
written consent of Avaya can be a criminal, as well as a civil offense
under the applicable law.
Virtualization
The following applies if the product is deployed on a virtual machine.
Each product has its own ordering code and license types. Unless
otherwise stated, each Instance of a product must be separately
licensed and ordered. For example, if the end user customer or
Avaya Channel Partner would like to install two Instances of the
same type of products, then two products of that type must be
ordered.
Third Party Components
“Third Party Components” mean certain software programs or
portions thereof included in the Software or Hosted Service may
contain software (including open source software) distributed under
third party agreements (“Third Party Components”), which contain
terms regarding the rights to use certain portions of the Software
(“Third Party Terms”). As required, information regarding distributed
Linux OS source code (for those products that have distributed Linux
OS source code) and identifying the copyright holders of the Third
Party Components and the Third Party Terms that apply is available
in the products, Documentation or on Avaya’s website at:
support.avaya.com/Copyright or such successor site as designated
by Avaya. The open source software license terms provided as Third
Party Terms are consistent with the license rights granted in these
Software License Terms, and may contain additional rights benefiting
You, such as modification and distribution of the open source
software. The Third Party Terms shall take precedence over these
Software License Terms, solely with respect to the applicable Third
Party Components to the extent that these Software License Terms
impose greater restrictions on You than the applicable Third Party
Terms.
The following applies only if the H.264 (AVC) codec is distributed with
the product. THIS PRODUCT IS LICENSED UNDER THE AVC
PATENT PORTFOLIO LICENSE FOR THE PERSONAL USE OF A
CONSUMER OR OTHER USES IN WHICH IT DOES NOT RECEIVE
REMUNERATION TO (i) ENCODE VIDEO IN COMPLIANCE WITH
THE AVC STANDARD (“AVC VIDEO”) AND/OR (ii) DECODE AVC
VIDEO THAT WAS ENCODED BY A CONSUMER ENGAGED IN A
PERSONAL ACTIVITY AND/OR WAS OBTAINED FROM A VIDEO
PROVIDER LICENSED TO PROVIDE AVC VIDEO. NO LICENSE IS
GRANTED OR SHALL BE IMPLIED FOR ANY OTHER USE.
ADDITIONAL INFORMATION MAY BE OBTAINED FROM MPEG LA,
L.L.C. SEE
Service Provider
THE FOLLOWING APPLIES TO AVAYA CHANNEL PARTNER’S
HOSTING OF AVAYA PRODUCTS OR SERVICES. THE PRODUCT
OR HOSTED SERVICE MAY USE THIRD PARTY COMPONENTS
SUBJECT TO THIRD PARTY TERMS AND REQUIRE A SERVICE
PROVIDER TO BE INDEPENDENTLY LICENSED DIRECTLY FROM
THE THIRD PARTY SUPPLIER. AN AVAYA CHANNEL PARTNER’S
HOSTING OF AVAYA PRODUCTS MUST BE AUTHORIZED IN
WRITING BY AVAYA AND IF THOSE HOSTED PRODUCTS USE
OR EMBED CERTAIN THIRD PARTY SOFTWARE, INCLUDING
BUT NOT LIMITED TO MICROSOFT SOFTWARE OR CODECS,
THE AVAYA CHANNEL PARTNER IS REQUIRED TO
INDEPENDENTLY OBTAIN ANY APPLICABLE LICENSE
AGREEMENTS, AT THE AVAYA CHANNEL PARTNER’S EXPENSE,
DIRECTLY FROM THE APPLICABLE THIRD PARTY SUPPLIER.
WITH RESPECT TO CODECS, IF THE AVAYA CHANNEL
PARTNER IS HOSTING ANY PRODUCTS THAT USE OR EMBED
THE H.264 CODEC OR H.265 CODEC, THE AVAYA CHANNEL
HTTP://WWW.MPEGLA.COM.
https://
PARTNER ACKNOWLEDGES AND AGREES THE AVAYA
CHANNEL PARTNER IS RESPONSIBLE FOR ANY AND ALL
RELATED FEES AND/OR ROYALTIES. THE H.264 (AVC) CODEC
IS LICENSED UNDER THE AVC PATENT PORTFOLIO LICENSE
FOR THE PERSONAL USE OF A CONSUMER OR OTHER USES
IN WHICH IT DOES NOT RECEIVE REMUNERATION TO: (I)
ENCODE VIDEO IN COMPLIANCE WITH THE AVC STANDARD
(“AVC VIDEO”) AND/OR (II) DECODE AVC VIDEO THAT WAS
ENCODED BY A CONSUMER ENGAGED IN A PERSONAL
ACTIVITY AND/OR WAS OBTAINED FROM A VIDEO PROVIDER
LICENSED TO PROVIDE AVC VIDEO. NO LICENSE IS GRANTED
OR SHALL BE IMPLIED FOR ANY OTHER USE. ADDITIONAL
INFORMATION FOR H.264 (AVC) AND H.265 (HEVC) CODECS
MAY BE OBTAINED FROM MPEG LA, L.L.C. SEE
WWW.MPEGLA.COM.
Compliance with Laws
You acknowledge and agree that it is Your responsibility for
complying with any applicable laws and regulations, including, but not
limited to laws and regulations related to call recording, data privacy,
intellectual property, trade secret, fraud, and music performance
rights, in the country or territory where the Avaya product is used.
Preventing Toll Fraud
“Toll Fraud” is the unauthorized use of your telecommunications
system by an unauthorized party (for example, a person who is not a
corporate employee, agent, subcontractor, or is not working on your
company's behalf). Be aware that there can be a risk of Toll Fraud
associated with your system and that, if Toll Fraud occurs, it can
result in substantial additional charges for your telecommunications
services.
Avaya Toll Fraud intervention
If You suspect that You are being victimized by Toll Fraud and You
need technical assistance or support, call Technical Service Center
Toll Fraud Intervention Hotline at +1-800-643-2353 for the United
States and Canada. For additional support telephone numbers, see
the Avaya Support website:
successor site as designated by Avaya.
Security Vulnerabilities
Information about Avaya’s security support policies can be found in
the Security Policies and Support section of
support.avaya.com/security.
Suspected Avaya product security vulnerabilities are handled per the
Avaya Product Security Support Flow (https://
support.avaya.com/css/P8/documents/100161515).
Downloading Documentation
For the most current versions of Documentation, see the Avaya
Support website:
as designated by Avaya.
Contact Avaya Support
See the Avaya Support website:
product or Hosted Service notices and articles, or to report a problem
with your Avaya product or Hosted Service. For a list of support
telephone numbers and contact addresses, go to the Avaya Support
website:
designated by Avaya), scroll to the bottom of the page, and select
Contact Avaya Support.
Regulatory Statements
Australia Statements
Handset Magnets Statement:
Industry Canada (IC) Statements
RSS Standards Statement
https://support.avaya.com (or such successor site as
Danger:
The handset receiver contains magnetic devices that can
attract small metallic objects. Care should be taken to avoid
personal injury.
https://support.avaya.com, or such successor site
https://support.avaya.com or such
https://support.avaya.com for
HTTP://
https://
Page 4

This device complies with Industry Canada licence-exempt RSS
standard(s). Operation is subject to the following two conditions:
1. This device may not cause interference, and
2. This device must accept any interference, including
interference that may cause undesired operation of the
device.
Le présent appareil est conforme aux CNR d'Industrie Canada
applicables aux appareils radio exempts de licence. L'exploitation est
autorisée aux deux conditions suivantes:
1. L'appareil ne doit pas produire de brouillage, et
2. L'utilisateur de l'appareil doit accepter tout brouillage
radioélectrique subi, même si le brouillage est susceptible
d'en compromettre le fonctionnement.
Radio Transmitter Statement
Under Industry Canada regulations, this radio transmitter may only
operate using an antenna of a type and maximum (or lesser) gain
approved for the transmitter by Industry Canada. To reduce potential
radio interference to other users, the antenna type and its gain
should be so chosen that the equivalent isotropically radiated power
(EIRP) is not more than that necessary for successful
communication.
Conformément à la réglementation d'Industrie Canada, le présent
émetteur radio peut fonctionner avec une antenne d'un type et d'un
gain maximal (ou inférieur) approuvé pour l'émetteur par Industrie
Canada. Dans le but de réduire les risques de brouillage
radioélectrique à l'intention des autres utilisateurs, il faut choisir le
type d'antenne et son gain de sorte que la puissance isotrope
rayonnée équivalente ne dépasse pas l'intensité nécessaire à
l'établissement d'une communication satisfaisante.
This Class B digital apparatus complies with Canadian ICES-003.
Cet appareil numérique de la classe B est conforme à la norme
NMB-003 du Canada.
Radiation Exposure Statement
This equipment complies with FCC & IC RSS102 radiation exposure
limits set forth for an uncontrolled environment. This equipment
should be installed and operated with minimum distance 20cm
between the radiator & your body. This transmitter must not be colocated or operating in conjunction with any other antenna or
transmitter.
Cet équipement est conforme aux limites d'exposition aux
rayonnements ISEDétablies pour un environnement non contrôlé.
Cet équipement doit être installé et utilisé avec un minimum de 20
cm de distance entre la source de rayonnement et votre corps.
Industry Canada (IC) Statements
This Class B digital apparatus complies with Canadian ICES-003.
Cet appareil numérique de la classe B est conformeà la norme
NMB-003 du Canada.
Japan Statements
Class B Statement
This is a Class B product based on the standard of the VCCI Council.
If this is used near a radio or television receiver in a domestic
environment, it may cause radio interference. Install and use the
equipment according to the instruction manual.
Denan Power Cord Statement
Danger:
Please be careful of the following while installing the
equipment:
• Please only use the connecting cables, power cord, and
AC adapters shipped with the equipment or specified by
Avaya to be used with the equipment. If you use any
other equipment, it may cause failures, malfunctioning,
or fire.
• Power cords shipped with this equipment must not be
used with any other equipment. In case the above
guidelines are not followed, it may lead to death or
severe injury.
本製品を安全にご使用頂くため、以下のことにご注意ください。
• 接続ケーブル、電源コード、AC アダプタなどの部品は、必ず
製品に同梱されております添付品または指定品をご使用くだ
さい。添付品指定品以外の部品をご使用になると故障や動作
不良、火災の原因となることがあります。
• 同梱されております付属の電源コードを他の機器には使用し
ないでください。上記注意事項を守らないと、死亡や大怪我
など人身事故の原因となることがあります。
México Statement
The operation of this equipment is subject to the following two
conditions:
1. It is possible that this equipment or device may not cause
harmful interference, and
2. This equipment or device must accept any interference,
including interference that may cause undesired operation.
La operación de este equipo está sujeta a las siguientes dos
condiciones:
1. Es posible que este equipo o dispositivo no cause
interferencia perjudicial y
2. Este equipo o dispositivo debe aceptar cualquier
interferencia, incluyendo la que pueda causar su operación
no deseada.
Power over Ethernet (PoE) Statement
This equipment must be connected to PoE networks without routing
to the outside plant.
U.S. Federal Communications Commission (FCC) Statements
Compliance Statement
The changes or modifications not expressly approved by the party
responsible for compliance could void the user’s authority to operate
the equipment.
To comply with the FCC RF exposure compliance requirements, this
device and its antenna must not be co-located or operating to
conjunction with any other antenna or transmitter.
This device complies with part 15 of the FCC Rules. Operation is
subject to the following two conditions:
1. This device may not cause harmful interference, and
2. This device must accept any interference received,
including interferences that may cause undesired
operation.
This equipment has been tested and found to comply with the limits
for a Class B digital device, pursuant to Part 15 of the FCC Rules.
These limits are designated to provide reasonable protection against
harmful interferences in a residential installation. This equipment
generates, uses and can radiate radio frequency energy and, if not
installed and used in accordance with the instructions, may cause
harmful interference to radio communications. However, there is no
guarantee that interference will not occur in a particular installation. If
this equipment does cause harmful interferences to radio or
television reception, which can be determined by turning the
equipment off and on, the user is encouraged to try to correct the
interference by one or more of the following measures:
• Reorient or relocate the receiving antenna.
Page 5

• Increase the separation between the equipment and receiver.
• Connect the equipment into an outlet on a circuit different from
that to which the receiver is connected.
• Consult the dealer or an experienced radio/TV technician for
help.
Radiation Exposure Statement
This equipment complies with FCC radiation exposure limits set forth
for an uncontrolled environment . This equipment should be installed
and operated with minimum distance of 8 in or 20 cm between the
radiator and your body. This transmitter must not be co-located or
operating in conjunction with any other antenna or transmitter.
ENERGY STAR® compliance statement
As an ENERGY STAR partner, Avaya Inc. has determined that this
product meets the ENERGY STAR guidelines for energy efficiency.
Information on the ENERGY STAR program can be found at
www.energystar.gov. ENERGY STAR and the ENERGY STAR mark
are registered trademarks owned by the U.S. Environmental
Protection Agency.
EU Countries
This device when installed complies with the essential requirements
and other relevant provisions of EMC Directive 2014/30/EU and LVD
Directive 2014/35/EU. A copy of the Declaration may be obtained
http://support.avaya.com or Avaya Inc., 4655 Great America
from
Parkway, Santa Clara, CA 95054–1233 USA.
WiFi transmitter
• Frequencies for 2412-2472 MHz, transmit power: 17.8 dBm
• Frequencies for 5180-5240 MHz, transmit power: 19.14 dBm
General Safety Warning
• Use only the Avaya approved Limited Power Source power
supplies specified for this product.
• Ensure that you:
- Do not operate the device near water.
- Do not use the device during a lightning storm.
- Do not report a gas leak while in the vicinity of the leak.
Trademarks
The trademarks, logos and service marks (“Marks”) displayed in this
site, the Documentation, Hosted Service(s), and product(s) provided
by Avaya are the registered or unregistered Marks of Avaya, its
affiliates, its licensors, its suppliers, or other third parties. Users are
not permitted to use such Marks without prior written consent from
Avaya or such third party which may own the Mark. Nothing
contained in this site, the Documentation, Hosted Service(s) and
product(s) should be construed as granting, by implication, estoppel,
or otherwise, any license or right in and to the Marks without the
express written permission of Avaya or the applicable third party.
Avaya is a registered trademark of Avaya Inc.
All non-Avaya trademarks are the property of their respective owners.
Linux® is the registered trademark of Linus Torvalds in the U.S. and
other countries.
Device Usage Consent
By using the Avaya device you agree that Avaya, from time to
time,may collect network and device data from your device and may
use suchdata in order to validate your eligibility to use the device.
Page 6

Contents
Chapter 1: Introduction.......................................................................................................... 11
Purpose................................................................................................................................ 11
Chapter 2: Avaya J100 Series IP Phones overview............................................................. 12
J100 Series IP Phone models................................................................................................ 12
Hardware specifications......................................................................................................... 13
Power specifications.............................................................................................................. 14
Supported codecs................................................................................................................. 15
Safety instructions................................................................................................................. 16
Button modules overview....................................................................................................... 16
Avaya J100 Expansion Module upgrade............................................................................ 17
Debugging the expansion module..................................................................................... 18
Chapter 3: Phone installation................................................................................................ 21
Hardware setup..................................................................................................................... 21
Wi-Fi overview................................................................................................................ 21
Wall mounting Avaya J100 Series IP Phones..................................................................... 28
Wall mounting Avaya J100 Expansion Module................................................................... 29
Software installation.............................................................................................................. 31
Phone installation process............................................................................................... 31
Chapter 4: Configuring the phone using web interface...................................................... 41
Enabling access to web interface of the phone........................................................................ 41
Enabling access to the web interface through the Phone Administration menu..................... 41
Enabling web interface access through the settings file...................................................... 42
Viewing IP address of the phone....................................................................................... 42
Logging in and logging out of the web interface........................................................................ 43
Configuring network settings.................................................................................................. 43
Network settings field description...................................................................................... 44
Configuring Ethernet settings................................................................................................. 46
Ethernet settings field descriptions.................................................................................... 47
Configuring Wi-Fi settings...................................................................................................... 52
Wi-Fi settings field descriptions........................................................................................ 52
Configuring SIP settings......................................................................................................... 57
SIP settings field descriptions........................................................................................... 57
Configuring Settings.............................................................................................................. 66
Settings field descriptions................................................................................................. 67
Configuring date and time...................................................................................................... 78
Configuring management settings........................................................................................... 80
Management settings field descriptions............................................................................. 81
Changing the password of the web interface and the phone admin............................................ 83
Debugging............................................................................................................................ 84
December 2018 Installing and Administering Avaya J100 Series IP Phones 6
Comments on this document? [email protected]
Page 7

Contents
Debugging field descriptions............................................................................................ 85
Configuring certificates.......................................................................................................... 88
Certificates field descriptions............................................................................................ 89
Configuring Environment Settings........................................................................................... 92
Configuring Background and Screen Saver of the Phone.......................................................... 93
Background Image and Screen Saver field description....................................................... 94
Configuring Calendar of the phone.......................................................................................... 95
Exchange Calendar field description................................................................................. 95
Restarting your phone through web interface........................................................................... 96
Resetting the phone to Default............................................................................................... 96
Chapter 5: Configuring servers and VLAN........................................................................... 97
Server configuration.............................................................................................................. 97
File Server configuration.................................................................................................. 97
DHCP server configuration............................................................................................. 104
Configuration through LLDP................................................................................................. 105
LLDPDU transmitted by the phones................................................................................ 105
TLV impact on system parameter values......................................................................... 107
Configuration through DHCP................................................................................................ 108
DHCP Site Specific Option............................................................................................. 109
DHCP options............................................................................................................... 110
Virtual LAN (VLAN) overview................................................................................................ 114
VLAN separation........................................................................................................... 115
External switch configuration.......................................................................................... 117
Exceptions to the VLAN forwarding rules......................................................................... 118
Special considerations................................................................................................... 118
VLAN parameters.......................................................................................................... 119
IPv4 and IPv6 overview....................................................................................................... 122
Configuring IPv4 from the phone menu........................................................................... 123
Configuring IPv4 from the web interface.......................................................................... 123
IPv6 configuration.......................................................................................................... 124
Configuring IPv6 from the phone menu........................................................................... 125
Configuring IPv6 from the web interface.......................................................................... 126
IPv6 limitations.............................................................................................................. 127
Multiple Device Access ....................................................................................................... 127
Multi Device Access operation in dual-stack mode........................................................... 128
Shared control.............................................................................................................. 129
Microsoft Exchange Server integration.................................................................................. 129
Chapter 6: Avaya Aura configuration for phones.............................................................. 132
SIP phone administration on Communication Manager........................................................... 132
Administering emergency numbers....................................................................................... 133
SIP phone administration on Session Manager...................................................................... 134
About controllers................................................................................................................. 135
Chapter 7: Security............................................................................................................... 136
December 2018 Installing and Administering Avaya J100 Series IP Phones 7
Comments on this document? [email protected]
Page 8

Contents
Security overview................................................................................................................ 136
Access control and security.................................................................................................. 137
Certificate management....................................................................................................... 138
Phone identity certificates.............................................................................................. 139
Trusted certificates........................................................................................................ 141
OCSP trust certificates................................................................................................... 141
Configuration for secure installation...................................................................................... 142
Chapter 8: Phone administration and configuration......................................................... 144
Accessing the Admin menu during phone startup................................................................... 144
Parameters for managing Admin menu........................................................................... 144
Accessing the Admin menu after log in.................................................................................. 145
Accessing the Ethernet IPv4 settings.................................................................................... 146
IP configuration field description..................................................................................... 146
Using the debug mode......................................................................................................... 147
Setting the Ethernet interface control.................................................................................... 148
Group identifier................................................................................................................... 149
Setting the group identifier............................................................................................. 149
Setting event logging........................................................................................................... 150
Administering enhanced local dialing.................................................................................... 150
Restarting the phone........................................................................................................... 153
Configuring SIP settings....................................................................................................... 153
Setting Site Specific Option Number (SSON)......................................................................... 154
Using the VIEW administrative option................................................................................... 155
VIEW field description.................................................................................................... 155
Setting the 802.1x operational mode..................................................................................... 156
Chapter 9: Feature configuration........................................................................................ 158
Contacts list........................................................................................................................ 158
Configuring Groups list by using the web interface........................................................... 158
Contacts list configuration.............................................................................................. 158
Recents.............................................................................................................................. 159
Recents configuration.................................................................................................... 159
Presence............................................................................................................................ 160
Configuring Presence by using the web interface............................................................. 160
Presence configuration.................................................................................................. 160
Calendar............................................................................................................................. 162
Calendar configuration................................................................................................... 162
Guest login......................................................................................................................... 165
Guest Login configuration.............................................................................................. 165
Multiple Level Precedence and Preemption........................................................................... 166
MLPP configuration....................................................................................................... 166
Call Forward....................................................................................................................... 167
Configuring Call Forwarding on the phone web interface.................................................. 168
Call Forwarding configuration......................................................................................... 168
December 2018 Installing and Administering Avaya J100 Series IP Phones 8
Comments on this document? [email protected]
Page 9

Contents
Call Pickup......................................................................................................................... 169
Call pickup configuration................................................................................................ 170
Call Park............................................................................................................................. 170
Auto Intercom group code.................................................................................................... 170
Team Button....................................................................................................................... 170
Team Button configuration.............................................................................................. 171
Whisper Page..................................................................................................................... 172
Exclusion............................................................................................................................ 172
Send All Calls..................................................................................................................... 172
Extension to Cellular ........................................................................................................... 172
Limit Number of Concurrent Calls......................................................................................... 172
Hunt Group Busy Position.................................................................................................... 173
Automatic Callback.............................................................................................................. 173
Automatic Callback configuration.................................................................................... 173
Priority Call......................................................................................................................... 173
Priority Call configuration............................................................................................... 174
Voicemail............................................................................................................................ 174
Configuring Voicemail by using the web interface............................................................. 174
Voicemail configuration.................................................................................................. 175
Malicious call tracing............................................................................................................ 175
Calling party number blocking.............................................................................................. 175
Calling party number unblocking........................................................................................... 176
Chapter 10: Failover and survivability................................................................................ 177
Redundancy with IP phone and Avaya Aura
®
......................................................................... 177
Detection of loss of connection............................................................................................. 177
Failover to a backup proxy................................................................................................... 178
Restoring the phone to the primary proxy.............................................................................. 178
Proxy determination when the connection to the primary proxy is lost...................................... 179
Simultaneous registration..................................................................................................... 179
Limitations during failover or failback..................................................................................... 180
Preserved call..................................................................................................................... 180
Limitations of call preservation........................................................................................ 180
Limitations after a successful failover.................................................................................... 181
Indications of redundancy.................................................................................................... 182
Supported non Avaya Aura® proxies for redundancy.............................................................. 182
Parameters for redundancy provisioning............................................................................... 183
Redundancy in a non-Avaya proxy environment.................................................................... 187
Chapter 11: Maintenance...................................................................................................... 188
Resetting system values...................................................................................................... 188
Device upgrade process...................................................................................................... 189
User profile backup on Personal Profile Manager (PPM)......................................................... 189
User profile parameters for backup................................................................................. 189
SLA Mon™ agent................................................................................................................ 190
December 2018 Installing and Administering Avaya J100 Series IP Phones 9
Comments on this document? [email protected]
Page 10

Contents
Chapter 12: Troubleshooting............................................................................................... 192
SLA Mon™ agent................................................................................................................ 192
Phone displays Acquiring Service screen.............................................................................. 192
Chapter 13: Appendix........................................................................................................... 194
List of configuration parameters............................................................................................ 194
Chapter 14: Resources........................................................................................................ 273
Documentation.................................................................................................................... 273
Finding documents on the Avaya Support website........................................................... 275
Avaya Documentation Portal navigation.......................................................................... 275
Viewing Avaya Mentor videos............................................................................................... 276
Support.............................................................................................................................. 277
December 2018 Installing and Administering Avaya J100 Series IP Phones 10
Comments on this document? [email protected]
Page 11

Chapter 1: Introduction
Purpose
This document focuses on preparing Avaya J100 Series IP Phones for installation, initial
administration, and administration tasks.
This document is intended for the administration engineers or support personnel who install,
administer, and maintain Avaya J100 Series IP Phones.
The administration engineers or the support personnel must have the following knowledge, skills,
and tools:
Knowledge
• DHCP
• SIP
• Installing and configuring Avaya Aura® components
• Installing and configuring IP Office components
• 802.1x and VLAN
Skills
Administering and configuring:
• Avaya Aura® Session Manager
• Avaya Aura® Communication Manager
• Avaya Aura® Presence Services
• Avaya Aura® Session Border Controller
• IP Office
• DHCP server
• HTTP or HTTPS server
• Microsoft Exchange Server
Tools
• Avaya Aura® System Manager
• IP Office Manager
• IP Office Web Manager
December 2018 Installing and Administering Avaya J100 Series IP Phones 11
Comments on this document? [email protected]
Page 12

Chapter 2: Avaya J100 Series IP Phones
overview
Avaya J100 Series IP Phones provide a range of applications and features for unified
communications. The phones leverage the enterprise IP network and eliminate the need of a
separate voice network. The phones offer superior audio quality with the amplified handsets and
customization with low power requirements in a Session Initiation Protocol (SIP) environment.
Avaya J100 Series IP Phones work with Avaya Aura®, IP Office, and third-party call control
environments to provide a flexible architecture where you can:
• Make conference calls more efficiently and enhance customer interactions with high-quality
audio.
• Gain access to information quickly through easy-to-read and high-resolution displays.
• Create a survivable, scalable infrastructure that delivers reliable performance and flexible
growth as business needs change.
• Increase performance by deploying Gigabit Ethernet within your infrastructure.
• Reduce energy costs by using efficient Power-over-Ethernet (PoE) including sleep mode,
which lowers energy consumption significantly.
• Enhance audio quality by using amplified handset mode.
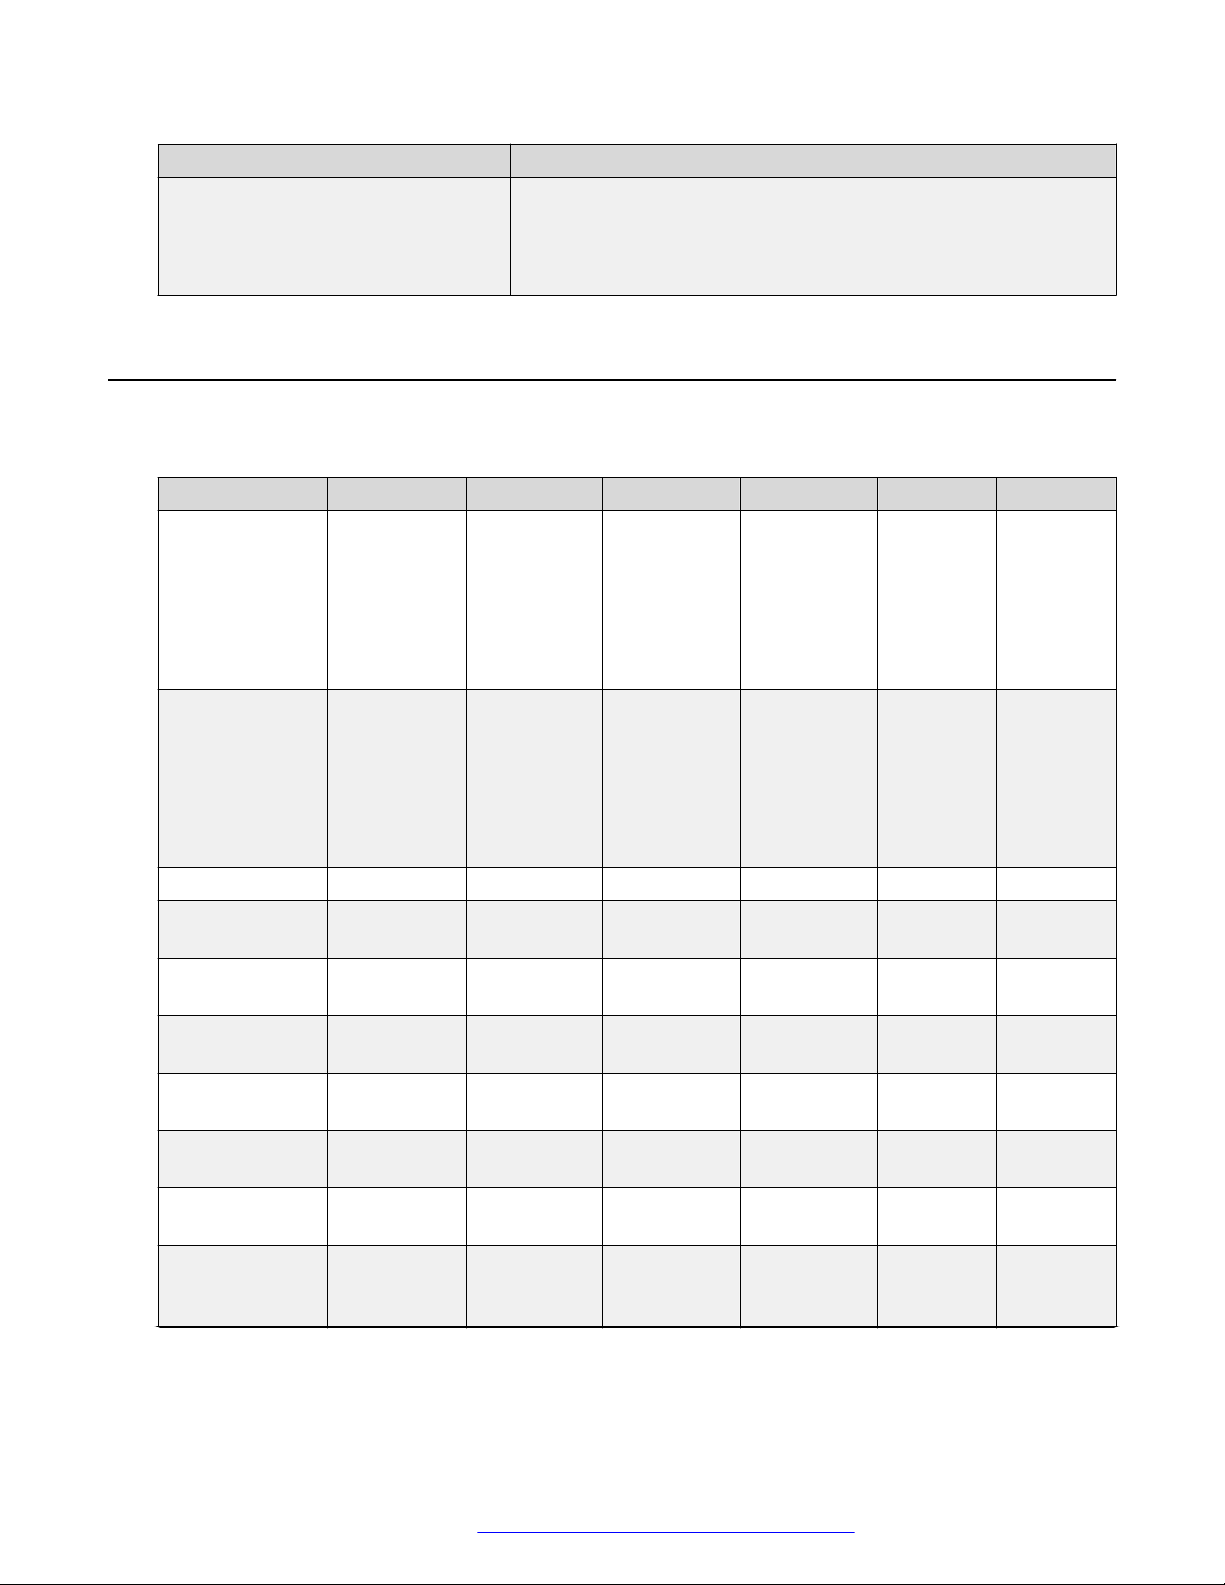
J100 Series IP Phone models
Phone model
J129 IP Phone A SIP-based phone with a monochrome display that supports
J139 IP Phone A SIP-based phone with a color display that supports four call
J169 IP Phone A SIP-based phone with a grayscale display that supports eight
Description
single line call appearance.
appearances with two lines of call display.
call appearances with four lines of call display.
The phone can also support up to three button modules each
supporting 24 application lines.
Table continues…
December 2018 Installing and Administering Avaya J100 Series IP Phones 12
Comments on this document? [email protected]
Page 13
Hardware specifications
Phone model Description
J179 IP Phone A SIP-based phone with a color display that supports eight call
appearances with four lines of call display.
The phone can also support up to three button modules each
supporting 24 application lines.
Hardware specifications
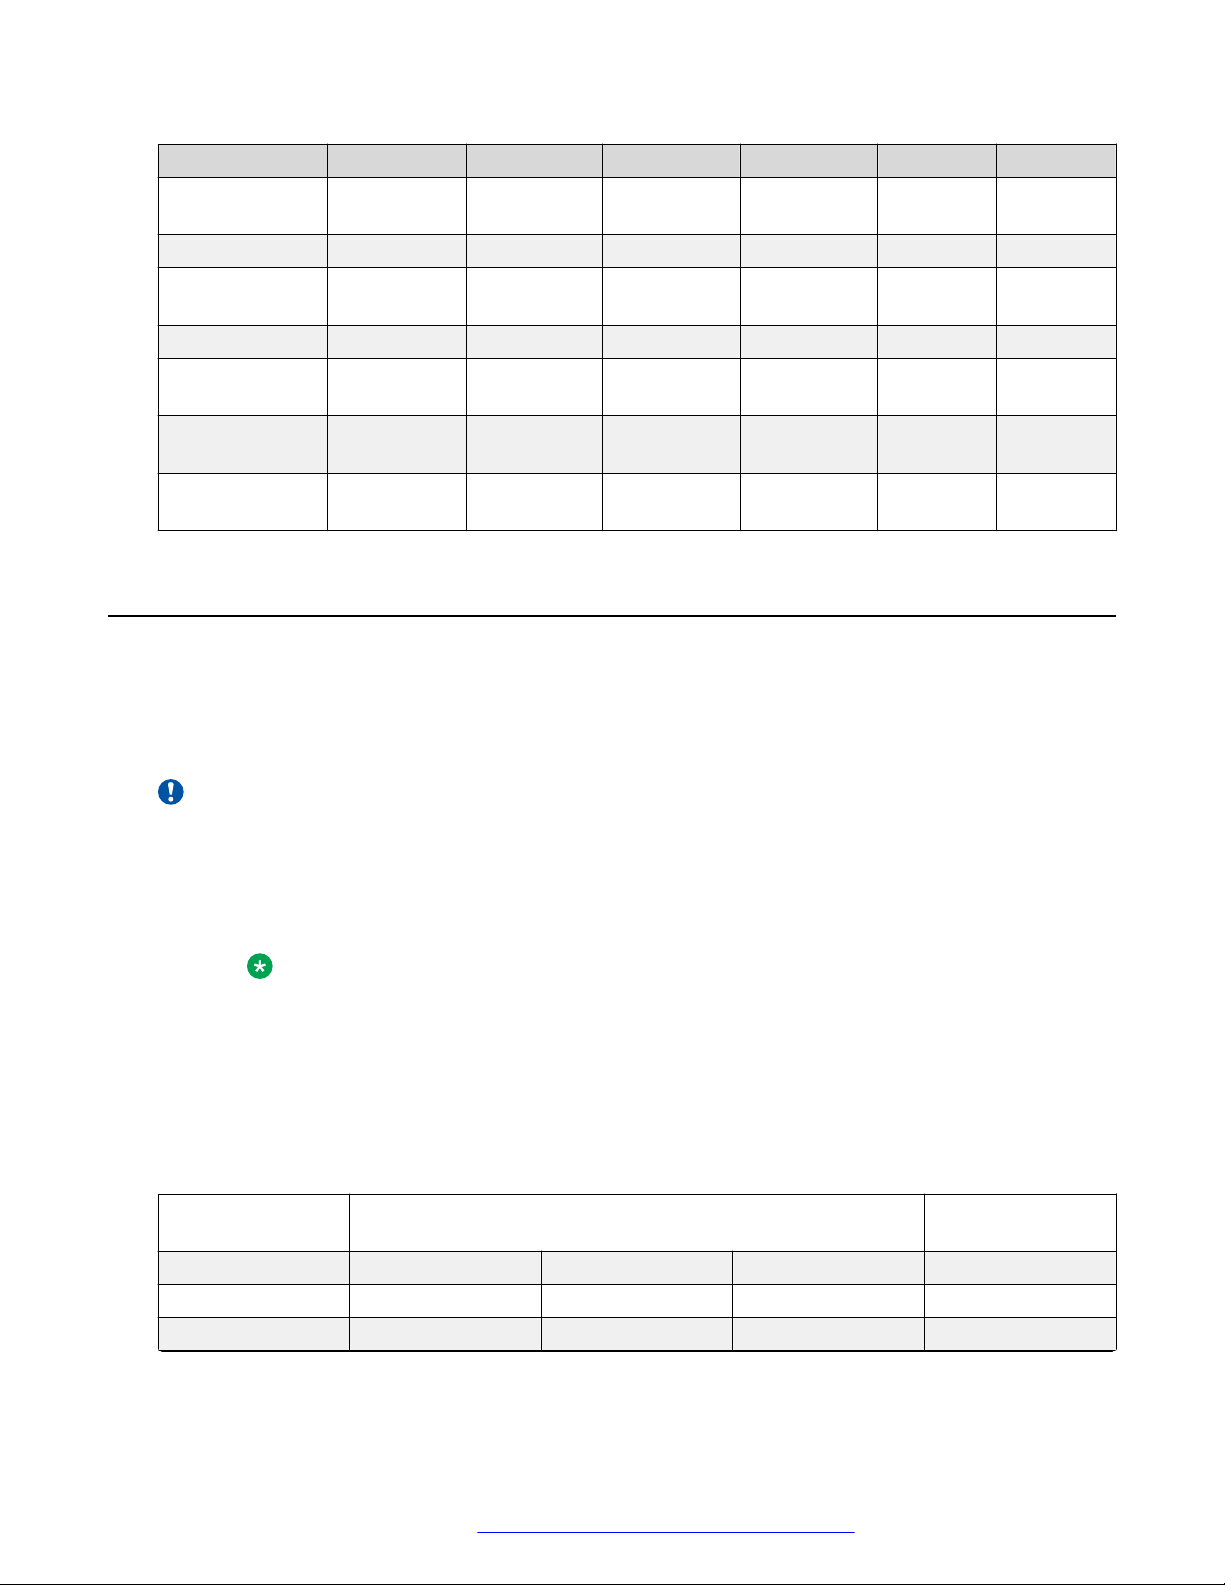
Avaya J100 Series IP Phones support the following hardware specifications:
Standard J129 J139 J169 J179 JBM24 JEM24
Phone
dimensions with
the stand in high
position
Phone
dimensions with
the wall mount
Wall mountable Yes Yes Yes Yes Yes Yes
Stand Dual position Dual position Dual position Dual position Dual
Call
appearances
Display type Monochrome Color Grayscale Color Grayscale Grayscale
Display 2.3”, 128 x
Dual color call
indicator
Ethernet switch Dual 10/100 Dual
Wi-Fi support Yes (As an
156 mm (6.1
in) Wide x
170 mm (6.7
in) Deep x
175mm (6.9
in) Tall
156 mm (6.1
in) Wide x
100 mm (3.9
in) Deep x
198 mm (7.8
in) Tall
1 4 8 8 N/A N/A
32 pixels
0 4 8 8 24 24
optional
module)
179 mm (7.0
in) Wide x
170 mm (6.7
in) Deep x
177mm (7.0
in) Tall
179 mm (7.0
in) Wide x
100 mm (3.9
in) Deep x
219 mm (8.6
in) Tall
2.8”, 320 x
240 pixels
10/100/1000
No No Yes (As an
187 mm (7.4
in) Wide x
175 mm (6.9
in) Deep x
183 mm (7.2
in) Tall
187 mm (7.4
in) Wide x
100 mm (3.9
in) Deep x
225 mm (8.9
in) Tall
3.5”, 320 x
240 pixels
Dual
10/100/1000
187 mm (7.4
in) Wide x
175 mm (6.9
in) Deep x
183 mm (7.2
in) Tall
187 mm (7.4
in) Wide x
100 mm (3.9
in) Deep x
225 mm (8.9
in) Tall
3.5”, 320 x
240 pixels
Dual
10/100/1000
optional
module)
88.2 mm
(3.4 in)
Wide x 175
mm (6.9 in)
Deep x
224.3 mm
(8.8 in) Tall
88.2 mm
(3.4 in)
Wide x 100
mm (3.9 in)
Deep x
224.3 mm
(8.8 in) Tall
position
3.3”, 160 x
320 pixels
N/A N/A
N/A N/A
115.5 mm
(4.5 in)
Wide x 175
mm (6.9 in)
Deep x
173.64 mm
(6.8 in) Tall
115.5 mm
(4.5 in)
Wide x 100
mm (3.9 in)
Deep x
173.64 mm
(6.8 in) Tall
Dual
position
and color
4.3”, 272 x
480 pixels
Table continues…
December 2018 Installing and Administering Avaya J100 Series IP Phones 13
Comments on this document? [email protected]
Page 14
Avaya J100 Series IP Phones overview
Standard J129 J139 J169 J179 JBM24 JEM24
Softkeys call
control
Wired Handset Yes Yes Yes Yes N/A N/A
Amplified
Handset mode
Wired Headset No Yes Yes Yes N/A N/A
Expansion
module capable
Optional DC
Power
GSPPoE power
adapter
3 4 4 4 N/A two paging
Yes, with
20dB of gain
No No Yes (3) Yes (3) N/A N/A
No Yes Yes Yes N/A N/A
Yes Yes Yes Yes N/A N/A
Yes, with
20dB of gain
Yes, with
20dB of gain
Yes, with
20dB of gain
N/A N/A
Power specifications
buttons
Avaya J100 Series IP Phones can be powered using Power over Ethernet (PoE) or 5V DC
adapter. You must purchase the power adapter separately.
Avaya J100 Series IP Phones are ENERGY STAR® compliant.
Important:
• J129 and J179 phones support Wi-Fi module.
• J139 is a single-class phone and does not support peripherals.
• J169 and J179 phones support JBM24 and JEM24 button modules. You can connect a
maximum of three button modules of the same model simultaneously.
Note:
The simultaneous connection of different button module types is not supported.
• For J169 and J179 phones, use power adapter when you connect more than two button
modules.
• If you are using the power adapter, disable PoE on the Ethernet connection.
The following table provides the power measurement of the phones, adjuncts, and peripherals.
Phone model Avaya standard power measurements (in Watts) Energy Star values
(in Watts)
Conservation Typical Maximum Stand by
J129 2.20 2.73 3.45 1.04
J139 1.40 1.67 2.24 1.55
Table continues…
December 2018 Installing and Administering Avaya J100 Series IP Phones 14
Comments on this document? [email protected]
Page 15

Supported codecs
J169 1.72 1.84 2.34 1.85
J179 1.74 2.10 2.71 1.85
JBM24 0.19 0.69 1.35 NA
JEM24 1.70 1.90 2.00 NA
BT/Wi-Fi module NA NA 0.90 NA
BT only NA NA 0.10 NA
The power requirements of the phone vary depending on the connected peripherals. The following
table provides the correlation between the connected peripherals and power requirements.
Phone model PoE Class
J129 • IEEE 802.3af PoE Class 1 without any peripheral.
• IEEE 802.3af PoE Class 2 with a Wi-Fi module.
J139 • IEEE 802.3af PoE, Class 1 device.
J169 • IEEE 802.3af PoE Class1 without button module.
• IEEE 802.3af PoE Class 2 for up to two button
modules.
• 5V DC adapter for three button modules.
J179 • IEEE 802.3af PoE Class1 without Wi-Fi module or
button module.
• IEEE 802.3af PoE Class 2 for up to two button
modules.
• 5V DC adapter for three button modules.
Note:
Use 5V DC adapter if you simultaneously
connect a Wi-Fi module along with one or
more button modules.
Supported codecs
Avaya J100 Series IP Phones supports the following codecs and call control protocol:
Codecs
Call control
protocol
Codecs • G.711a
J129 J139 J169 J179
SIP SIP SIP SIP
• G.711µ
• G.729
• G.711a
• G.711µ
• G.729
• G.711a
• G.711µ
• G.729
• G.711a
• G.711µ
• G.729
Table continues…
December 2018 Installing and Administering Avaya J100 Series IP Phones 15
Comments on this document? [email protected]
Page 16

Avaya J100 Series IP Phones overview
Codecs J129 J139 J169 J179
• G.729a
• G.729a
• G.729a
• G.729a
• G.729ab
• G.726
• G722
• OPUS
• G.729ab
• G.726
• G722
• OPUS
• G.729ab
• G.726
• G722
• OPUS
• G.729ab
• G.726
• G722
• OPUS
Safety instructions
When using Avaya J100 Series IP Phones, always adhere to the following safety precautions to
reduce the risk of fire, electric shock, and injury to persons.
• Read and understand all instructions.
• Follow all warnings and instructions marked on the phone.
• Do not immerse Avaya J100 Series IP Phones in water and do not use the phone when you
are wet. If you accidentally drop the phone into water, do not retrieve it until you have first
unplugged the line cord from the modular wall jack. Then call service personnel to ask about
a replacement. Never spill liquid of any kind on the phone. If liquid is spilled, however, refer
servicing to proper service personnel.
• Do not use Avaya J100 Series IP Phones during electrical storms in your immediate area to
prevent the risk of electric shock from lightning. Keep urgent calls brief. In spite of protective
measures to limit electrical surges, absolute protection from lightning is impossible.
• Report suspected natural gas leak immediately, but use a telephone away from the area in
question. The phone’s electrical contacts could generate a tiny spark, which could ignite
heavy concentrations of gas.
• Never push objects of any kind into Avaya J100 Series IP Phones through housing slots. The
objects may touch hazardous voltage points or short out parts resulting in electric shock.
Button modules overview
On Avaya J100 Series IP Phones, the number of call appearances and feature / application
buttons can be extended with the JBM24 Button Module (JBM24) and the Avaya J100 Expansion
Module (JEM24).
Note:
The button modules are supported only by Avaya J169/J179 IP Phones.
JBM24 Button Module provides 24 additional lines for incoming calls, outgoing calls, autodialing,
and calling features. The Avaya J100 Expansion Module provides 72 additional lines.
You can connect up to three button modules to Avaya J100 Series IP Phones. Each button
module can be placed in both stand and wall mount positions together with the phone.
December 2018 Installing and Administering Avaya J100 Series IP Phones 16
Comments on this document? [email protected]
Page 17
Button modules overview
Important:
Hot plugging is not supported in Avaya J100 Expansion Module. Connect all the expansion
modules to the phone before connecting the phone to a power source.
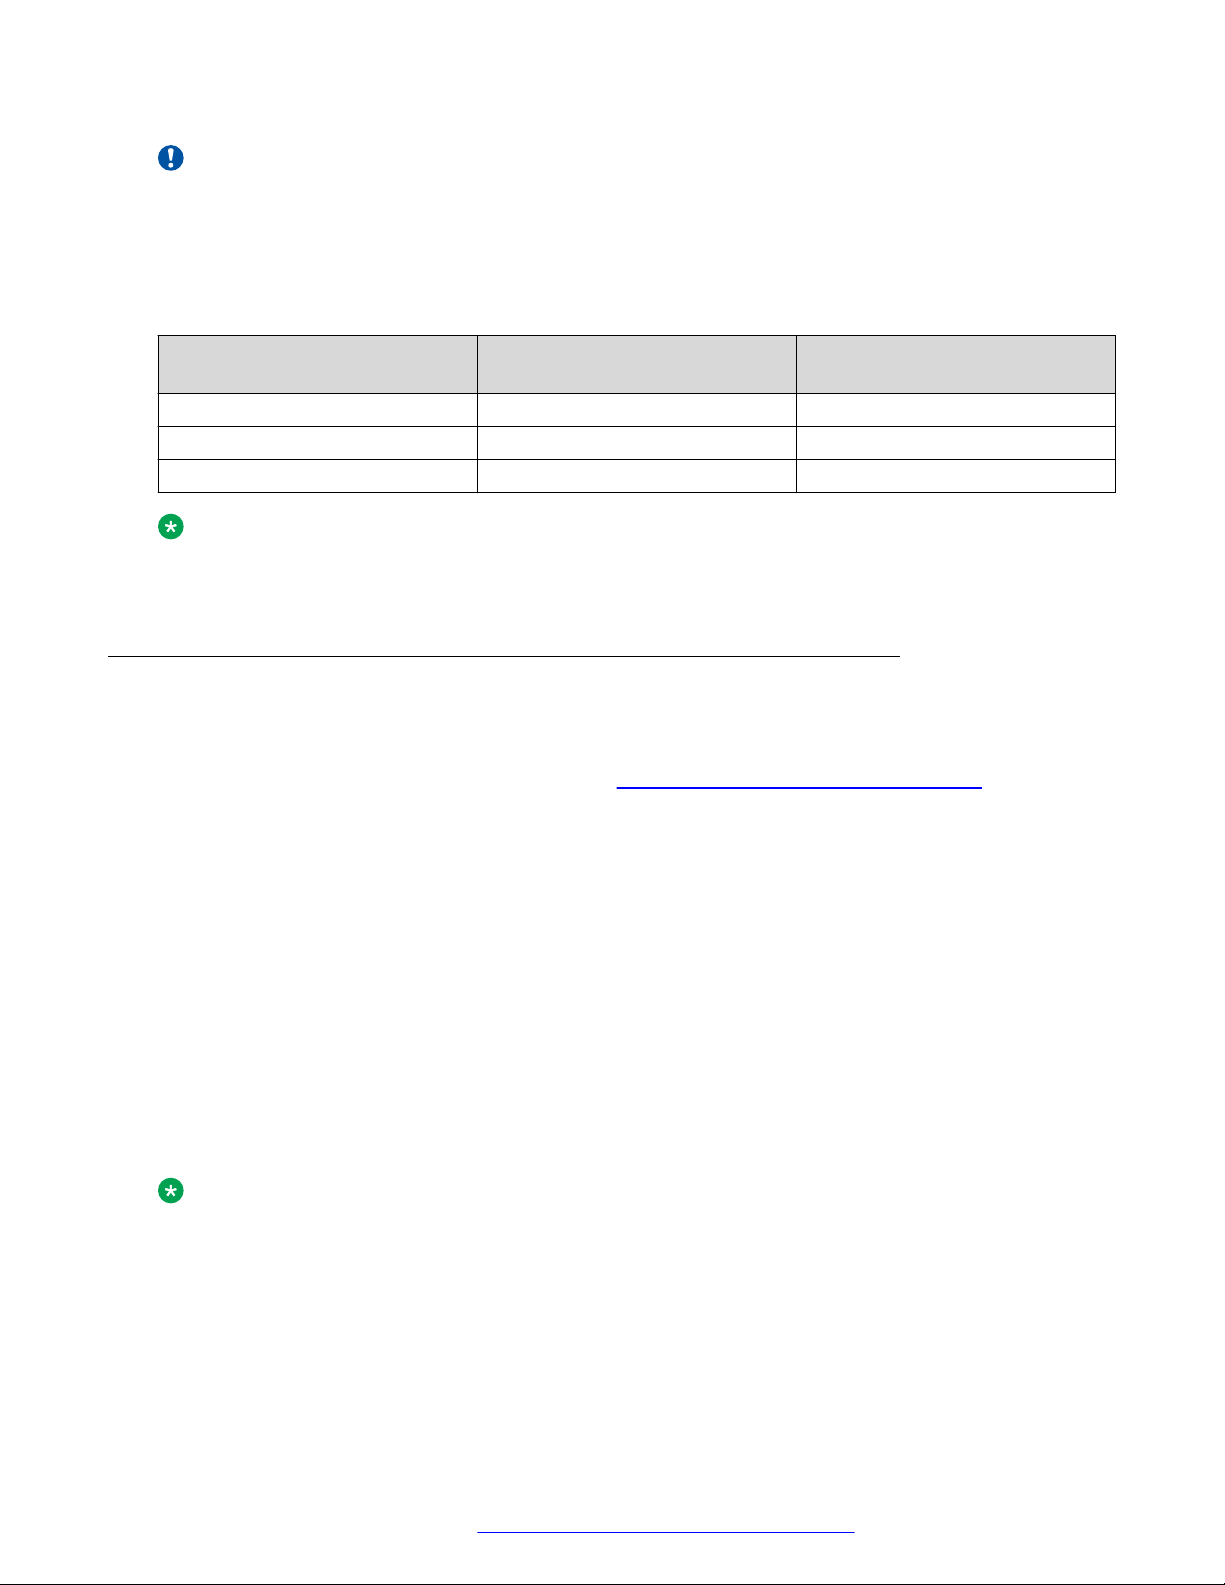
The following table shows the number of button modules attached to the phone and the
corresponding number of lines available on JBM24 Button Module / Avaya J100 Expansion
Module:
Button modules Call lines / Features /
Applications
1 24 / 72 (24 on each page) No / Yes
2 24 No
3 24 No
Switching between pages
Note:
If an Avaya J100 Expansion Module is attached to the Avaya J169 IP Phone, the display
screen changes to gray scale.
Avaya J100 Expansion Module upgrade
You can upgrade the Avaya J100 Expansion Module firmware to a new version using Avaya J100
Series IP Phones software distribution package. For more information about downloading and
extracting a software distribution package, see
page 101.
During the boot-up, the phone will download the new firmware for the Avaya J100 Expansion
Module. The Updating software notification will be displayed.
After the phone downloads the expansion module firmware, the upgrade process will continue in
the background. The Upgrading status is displayed in Main Menu > Administration > View >
Button modules.
Downloading and saving the software on
The upgrade procedure for an Avaya J100 Expansion Module takes up to 4 hours for each
attached module. During this time, the expansion module is operable, you can make and receive
calls with it and have access to other functionality.
When the upgrade is complete, the Avaya J100 Expansion Module displays the following
notification: “This device will be out of service for 3 minutes to apply the
update”. Press the corresponding line button for Apply now or Apply tonight option to select
the suitable upgrade time.
Note:
When the Upgrade notification is displayed, the expansion module screen saver is disabled
and the backlight is not turned off.
December 2018 Installing and Administering Avaya J100 Series IP Phones 17
Comments on this document? [email protected]
Page 18

Avaya J100 Series IP Phones overview
Upgrading the expansion module
About this task
Use this task to upgrade Avaya J100 Expansion Module firmware to a new version.
Before you begin
Download Avaya J100 Series IP Phones software distribution package from the https://
support.avaya.com/ website. See Downloading and saving the software on page 101 for more
details.
Procedure
1. Extract the zipped file with the expansion module firmware and save it at an appropriate
location on the file server.
2. Set the expansion module firmware file name in J100Supgrade.txt.
3. Reboot the phone. The expansion module will reboot automatically.
Debugging the expansion module
Avaya J100 Expansion Module log files contain all messages that are sent to and received from
the phone. You can view the log files to monitor the user’s actions on the expansion module like
configuring labelled keys, making and receiving calls, enabling and disabling features, etc.
Note:
The maximum size of Avaya J100 Expansion Module log file is 5 Mb. When this size is
exceeded, a bak prefix is added to its file name, for example, BMLog_bak.txt. The
initial .txt file is cleared and writing starts from the beginning.
The log files can be generated using bm_cli debug tool which can be accessed through the phone
command line.
Note:
An SSH connection must be established via an SSH client to access the phone command
line. For more details, contact Avaya support at https://support.avaya.com/.
Important:
To generate log files, set log categories and levels, connect Avaya J100 Expansion Module to
the phone. If the expansion module is not connected, you will get the following error message:
“Phone doesn't have JEM24 with specified id”.
The following table shows the list of commands available through the bm_cli debug tool:
Command
help
Description
To print bm_cli help.
Table continues…
December 2018 Installing and Administering Avaya J100 Series IP Phones 18
Comments on this document? [email protected]
Page 19
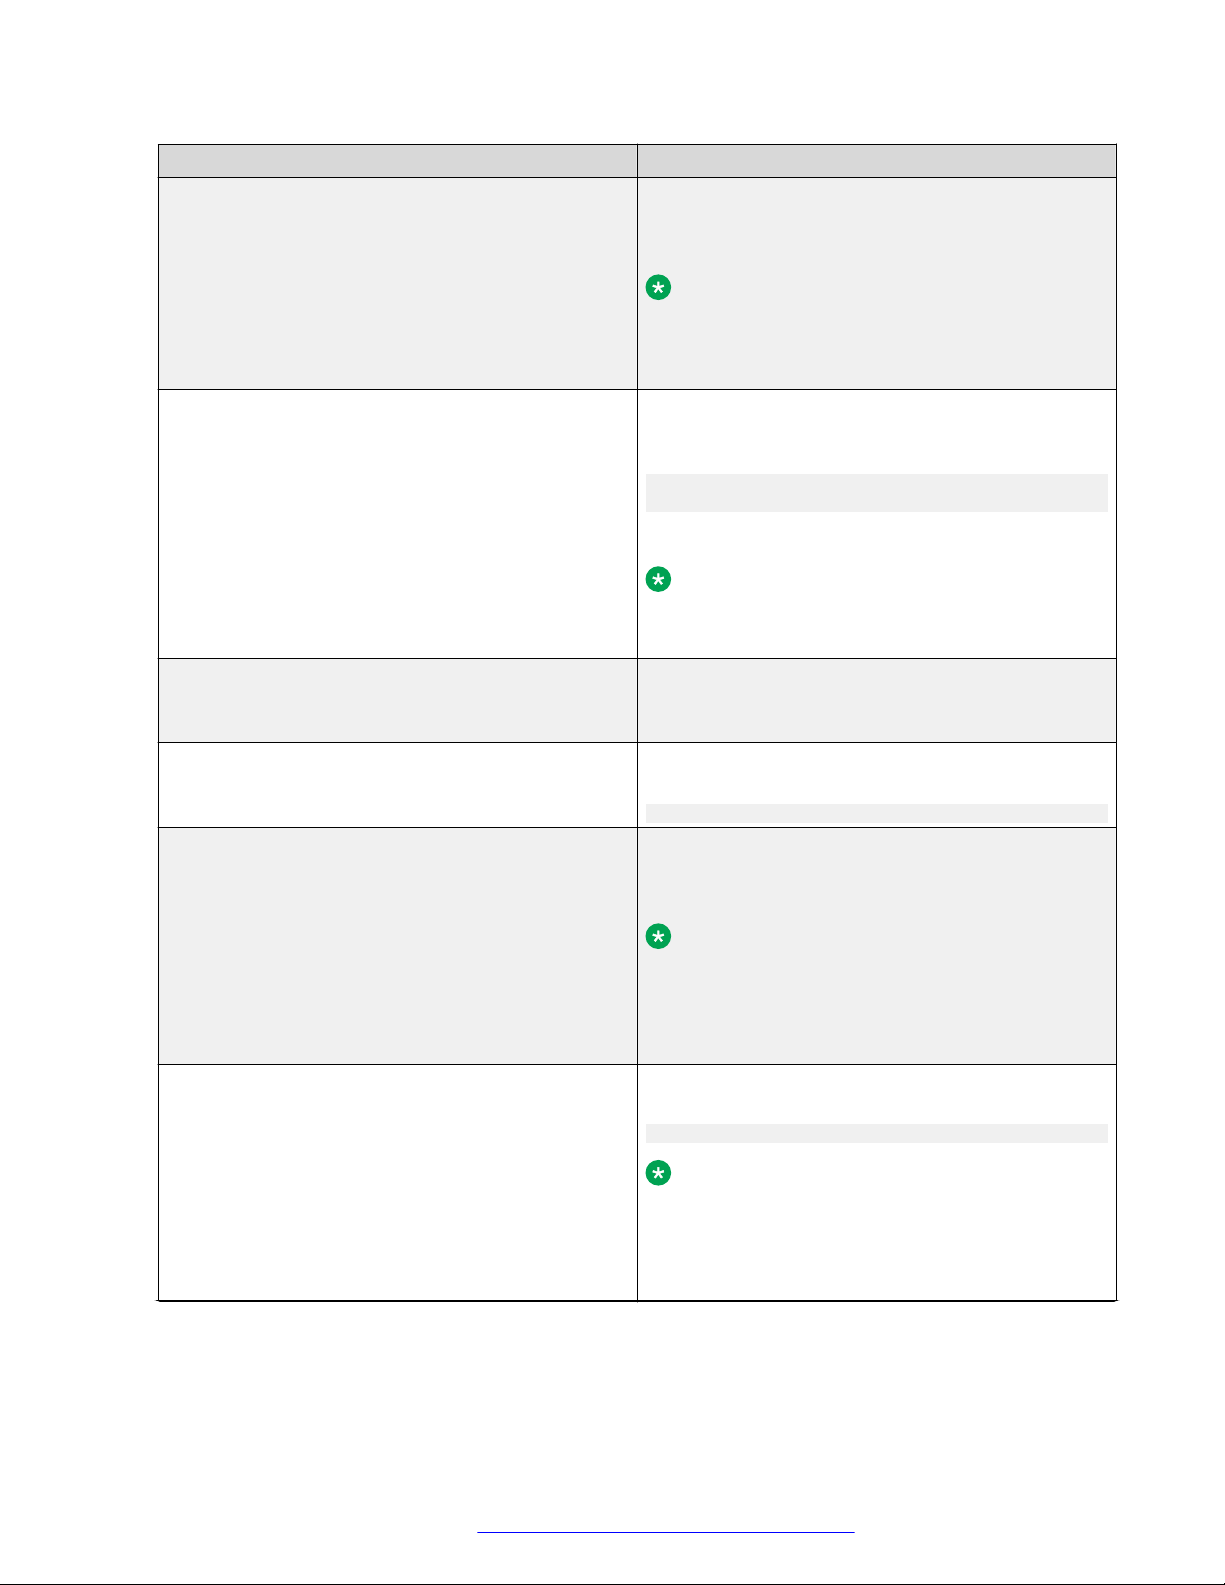
Command Description
create_authfile
To install and activate authfile.txt. Specify the
expansion module ID, for example:
create_authfile 1
Note:
By default, the expansion modules are
numbered in the order as they are connected
to the phone, i.e.: 1, 2, 3.
get_file
To retrieve the specified file. Specify the expansion
module ID and the path for the file you want to
retrieve, for example:
get_file 1 “/AvayaDir/var/log/bm/
avaya_phone.log.1.gz”
Use -c argument to activate GZIP compression.
Note:
Add /bm to the file path as set in the example
to ensure no empty files are created.
list_files
To view the list of log files of the selected expansion
module in the specified directory, for example:
list_files 1 “/AvayaDir/var/log”
remove_authfile
To deactivate authfile.txt for the selected
expansion module, for example:
remove_authfile 1
set_log_category
To set a log category for the selected expansion
module, for example:
set_log_category 1 AUDIO
Button modules overview
Note:
The full list of available log categories and their
description is provided in your
46xxsettings.txt file. View allowed values
for the LOG_CATEGORY parameter.
set_log_level
To set a log level for the selected expansion
module, for example:
set_log_level 1 0
Note:
The full list of available log levels and their
description is provided in your
46xxsettings.txt file. View allowed values
for the LOCAL_LOG_LEVEL parameter.
Table continues…
December 2018 Installing and Administering Avaya J100 Series IP Phones 19
Comments on this document? [email protected]
Page 20

Avaya J100 Series IP Phones overview
Command Description
trigger_phone_report
To generate a log report for the selected expansion
module, for example:
trigger_phone_report 1
December 2018 Installing and Administering Avaya J100 Series IP Phones 20
Comments on this document? [email protected]
Page 21

Chapter 3: Phone installation
Hardware setup
Wi-Fi overview
The Wi-Fi module enables the phone to connect to a network through a wireless network. If the
phone loses connection to one Wi-Fi network, it continues to operate with another redundantly
configured wireless network or Ethernet network. A Wi-Fi status icon displays when Wi-Fi is in
use. If the phone is connected to Ethernet switch and the Ethernet link goes down, a pop-up
message displays to change network connectivity to Wi-Fi.
You can configure Wi-Fi network by:
• Setting Wi-Fi parameters by using the 46xxsettings.txt file
• Configuring Wi-Fi from the phone UI
• Configuring Wi-Fi parameters from the web UI
Note:
VLAN and LLDP functionalities are not supported over a wireless network.
J100 wireless module
Avaya J129 IP Phone and Avaya J179 IP Phone support wireless module. The wireless module is
an optional component and you can order this module separately.
Note:
Avaya J139 IP Phone and Avaya J169 IP Phone do not support J100 wireless module.
Installing the wireless module
Before you begin
Obtain the following items:
• Phillips #1 screw driver to install the screw of the J100 Wireless Module.
• A flat screw driver that fits in the opening of the module panel.
December 2018 Installing and Administering Avaya J100 Series IP Phones 21
Comments on this document? [email protected]
Page 22
Phone installation
Procedure
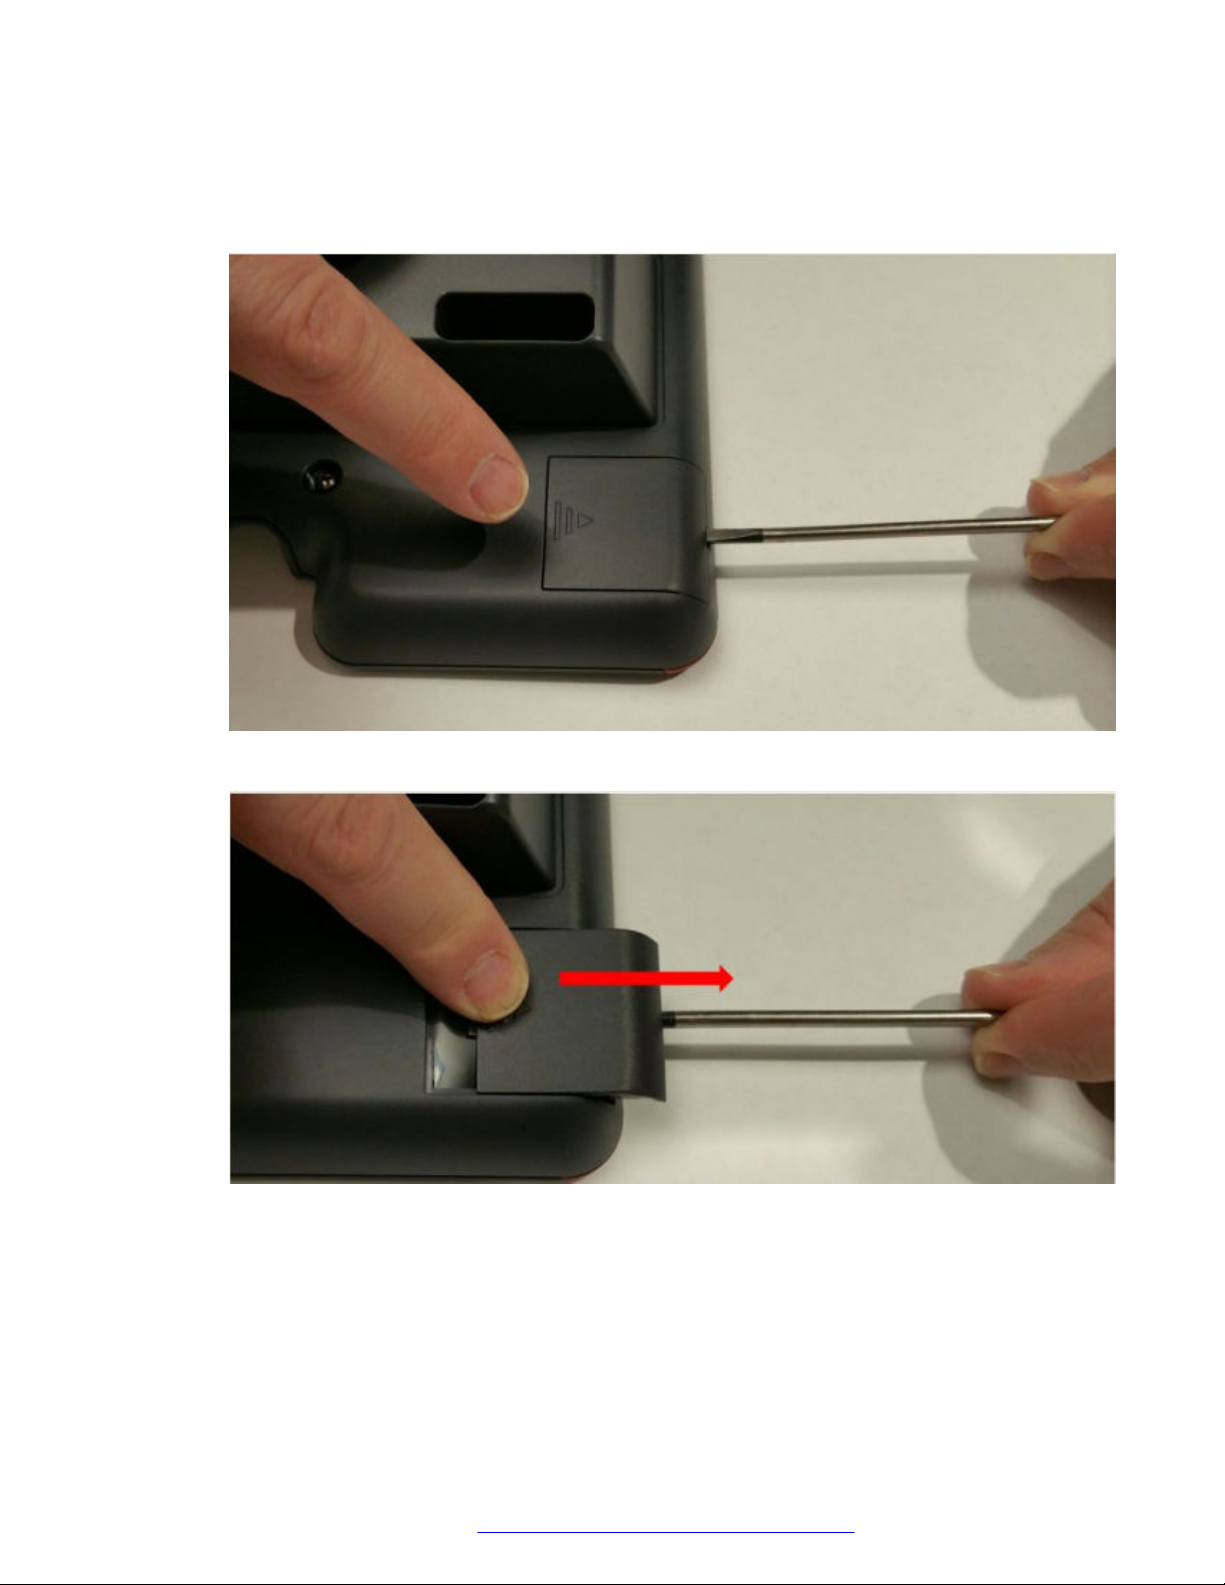
1. Insert the screw driver in the opening of the module panel to release the latch. Do not pry
open the panel.
2. To remove the module panel, slide the panel out in the direction of the arrow.
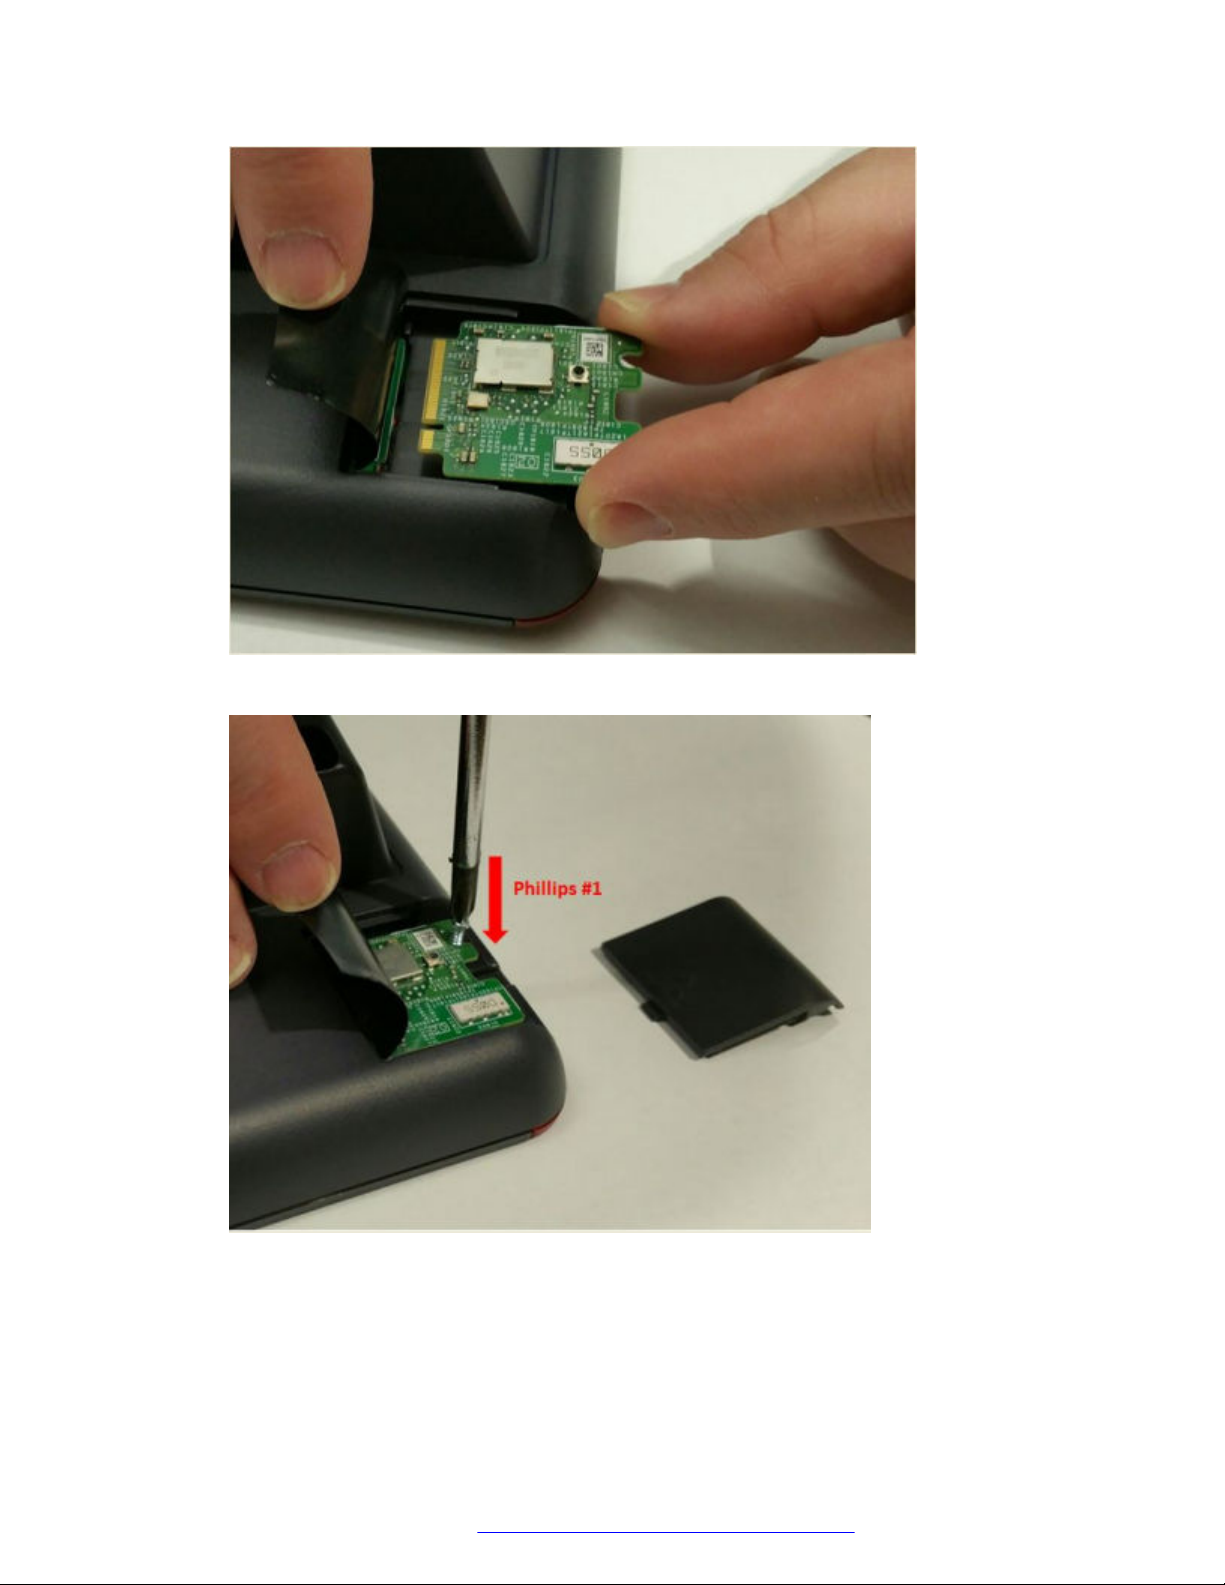
3. Insert the J100 Wireless Module to the edge connector.
December 2018 Installing and Administering Avaya J100 Series IP Phones 22
Comments on this document? [email protected]
Page 23
Hardware setup
4. Use the Phillips #1 screwdriver to fasten the module.
5. Slide the module panel inward to close.
December 2018 Installing and Administering Avaya J100 Series IP Phones 23
Comments on this document? [email protected]
Page 24

Phone installation
Configuring Wi-Fi using phone UI
About this task
Use this procedure to configure a Wi-Fi network by using phone UI. Note that switching networks
causes a reboot of the phone.
Procedure
1. Navigate to Main Menu > Administration.
2. In the Access code field, enter the administration password.
The default access code is 27238.
3. Press Enter.
4. Select Network Interfaces.
5. Use the right arrow key to change Network mode to Wi-Fi.
6. Configure the following parameters:
• Network config: Specifies if the WLAN is connected automatically or manually.
• SSID: Specifies the network name for the WLAN you are using. Use the navigation key
to select another SSID.
• Wi-Fi networks: Displays available WLAN.
7. Use the navigation key to select a WLAN, and press Connect.
8. Press one of the following:
• Save
• Cancel
• Change
List of Wi-Fi configuration parameters
Parameter Name
WIFISTAT
Default Value Description
1
Specifies the network interface to
be used for network connectivity.
Value operation:
• 0: Phone connects to only
Ethernet network.
• 1: Phone connects to Ethernet
network, unless manually
switched to Wi-Fi
• 2: Phone connects to the Wi-Fi
network with the SSID defined
Table continues…
December 2018 Installing and Administering Avaya J100 Series IP Phones 24
Comments on this document? [email protected]
Page 25

Hardware setup
Parameter Name Default Value Description
in the 46xxsettings.txt
parameter WLAN_ESSID
ENABLE_NETWORK_CONFIG_
BY_USER
1
Enables network configuration to
be modified by the user.
Value operation:
• 0: Disabled
• 1: Enabled
WLAN_ESSID N/A Specifies the wireless network to
be used.
The name of the SSID ranges up
to 32 characters.
WLAN_SECURITY none Specifies the security standard to
be used for the wireless network.
Value operation:
• none: No security standard is
defined.
• wep: WEP security standard is
defined.
• wpa2psk: WPA2 security
standard with pre-shared key is
defined.
• wpapsk: WPA security standard
with pre-shared key is defined.
• wpa2e: WPA enterprise security
standard is defined.
WEP_DEFAULT_KEY N/A Specifies the index of WEP
default key.
Value operation:
1
•
2
•
3
•
4
•
WLAN_COUNTRY
US
Specifies the ISO country code
representing the Wi-Fi regulatory
domain.
WLAN_ENABLE_80211D
0
Enables the phone to configure
its Wi-Fi regulatory domain to
match the 802.11d.
Table continues…
December 2018 Installing and Administering Avaya J100 Series IP Phones 25
Comments on this document? [email protected]
Page 26

Phone installation
Parameter Name Default Value Description
Value operation:
• 0: Disable
• 1: Enable
WEP_KEY_LEN
128 bit
Specifies the length of the WEP
key.
Value operation:
40 bit
•
64 bit
•
128 bit
•
WLAN_PASSWORD N/A Specifies the pre-configured Wi-Fi
network password. This
parameter is applicable if the
WIFISTAT is enabled and
WLAN_SECURITY is wpa2psk,
or WLAN_SECURITY is wpa2e,
WLAN_WPA2E_EAP_METHOD
is PEAP and
WLAN_WPA2E_EAP_PHASE2 is
MSCHAPV2.
The password must be from 8 to
63 characters. Note that the
space and ASCII 0x20 are not
supported.
WEP_KEY_1 to WEP_KEY_4 N/A Specifies the name of the WEP
key.
The name of the 40 bit key and
128 bit key are of 10 hex digits
and 26 hex digits respectively.
WLAN_WPA2E_EAP_METHOD
PEAP
Specifies the pre-configured
802.1x EAP method. This
parameter is applicable if
WIFISTAT parameter is enabled
and WLAN_SECURITY is set as
wpa2e.
Value operation:
PEAP
•
TLS
•
WLAN_WPA2E_IDENTITY N/A Specifies the 802.1x name of pre-
configured Wi-Fi network. This
parameter is applicable if
Table continues…
December 2018 Installing and Administering Avaya J100 Series IP Phones 26
Comments on this document? [email protected]
Page 27

Parameter Name Default Value Description
WIFISTAT parameter is enabled
and WLAN_SECURITY is set as
wpa2e.
The name must be from one to 32
characters.
Note that the space character and
ASCII 0x20 are not supported.
WLAN_WPA2E_ANONYMOUS_I
DENTITY
N/A Specifies the 802.1x anonymous
name of pre-configured Wi-Fi
network. This parameter is
applicable if WIFISTAT parameter
is enabled,
WLAN_WPA2E_EAP_METHOD
is set to PEAP and
WLAN_SECURITY is set as
wpa2e.
The name must be from one to 32
characters.
Hardware setup
WLAN_L2QUAD
WLAN_DSCPAUD
WLAN_L2QSIG
SET WLAN_DSCPSIG
6
46
3
34
Note that the space character and
ASCII 0x20 are not supported.
Specifies the layer 2 priority value
for audio frames generated by the
telephone.
Valid value is from 0 to 7.
Specifies the layer 3
Differentiated Services (DiffServ)
Code Point for audio frames
generated by the telephone.
Valid value is from 0 to 63.
Specifies the layer 3
Differentiated Services (DiffServ)
Code Point for audio frames
generated by the telephone.
Valid value is from 0 to 63.
Specifies the layer 3
Differentiated Services (DiffServ)
Code Point for signaling frames
generated by the telephone.
Valid value is from 0 to 63.
December 2018 Installing and Administering Avaya J100 Series IP Phones 27
Comments on this document? [email protected]
Page 28
Phone installation
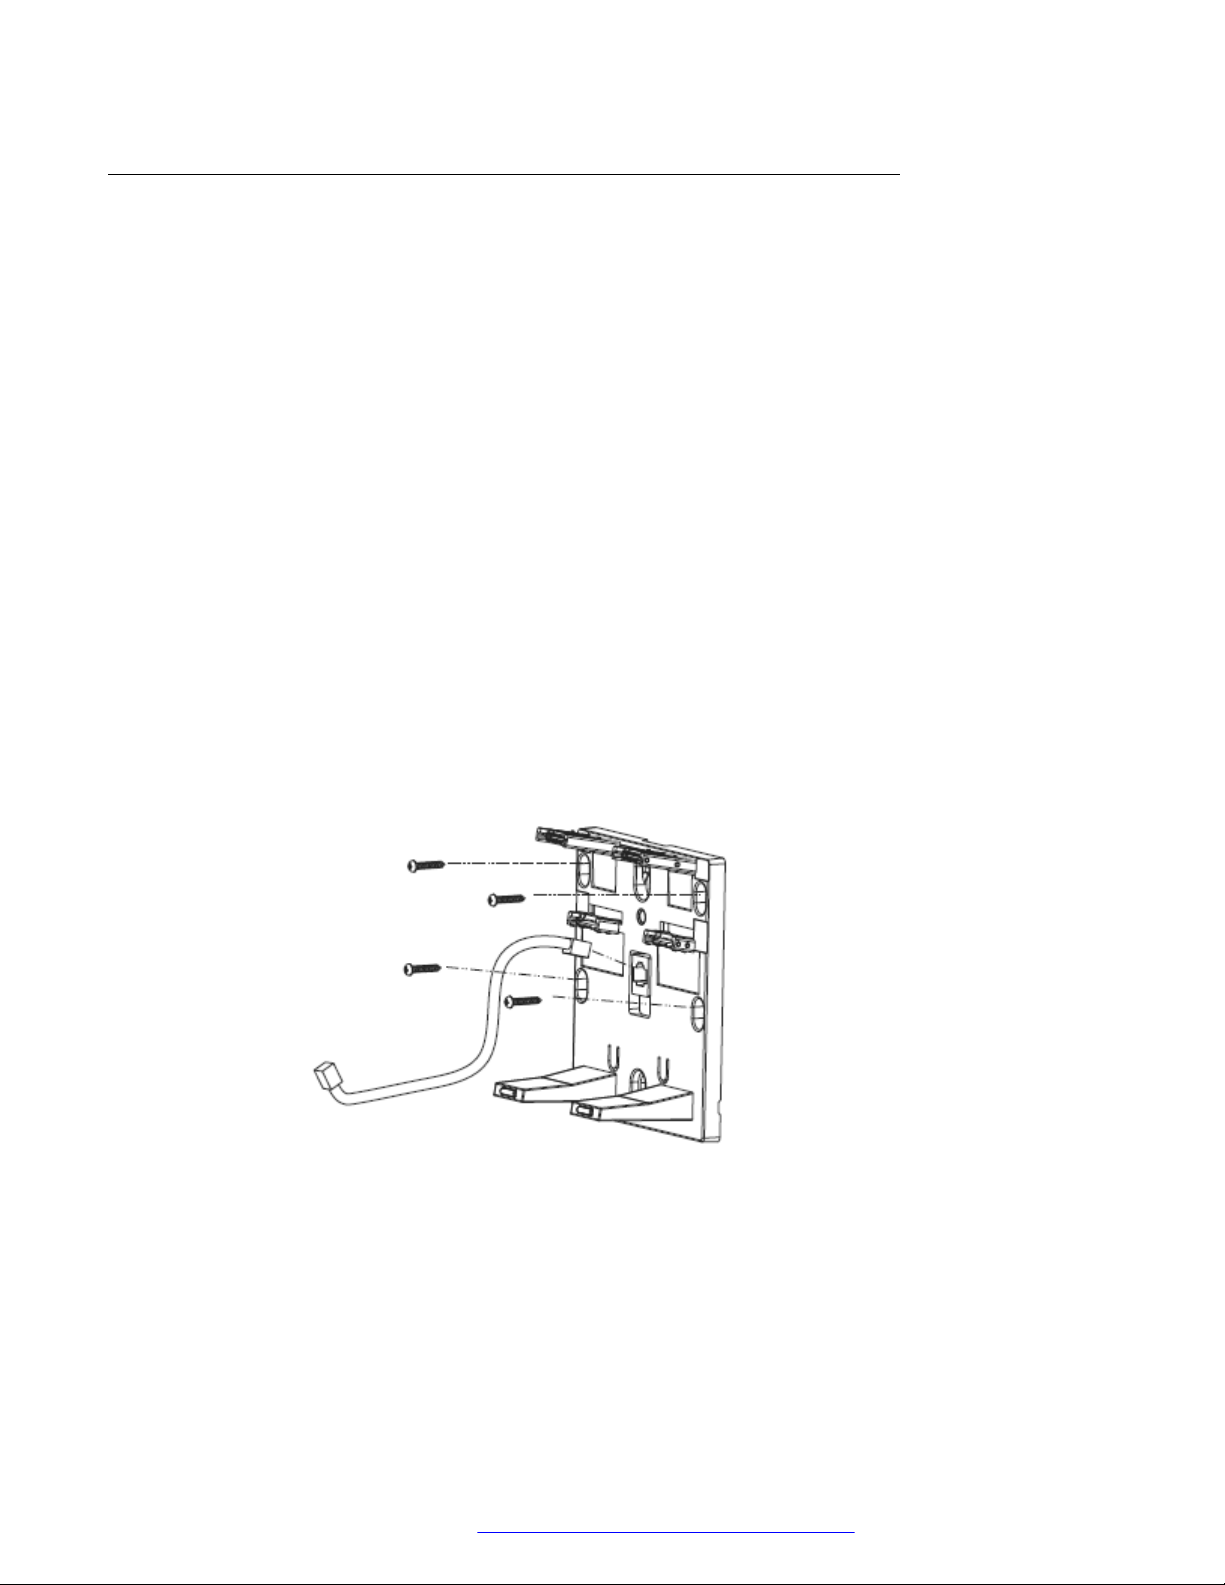
Wall mounting Avaya J100 Series IP Phones
About this task
The wall mounting procedure for all Avaya J100 Series IP Phones is similar. Wall mounting
brackets look different for Avaya J169/J179 IP Phone and Avaya J129 IP Phone.
You can order the kit separately, using the part numbers that correspond to the phone model. For
example, the part number of the wall mount bracket is 700512707. The procedure describes the
wall mounting procedure with illustrations as reference.
The following procedure describes Avaya J100 Series IP Phones wall mounting with typical
illustrations provided as reference.
Before you begin
Obtain the following items:
• Wall mounting kit that contains a wall mount bracket, and an Ethernet cable.
• Four #8 screws. The screws are not provided with the wall mounting kit.
Procedure
1. Do one of the following:
• Place the bracket on the wall, drill holes, and then affix the #8 screws.
• If there is a pre-installed wall plate, place the wall mount bracket over the wall plate. In
this case, you do not need the screws.
December 2018 Installing and Administering Avaya J100 Series IP Phones 28
Comments on this document? [email protected]
Page 29
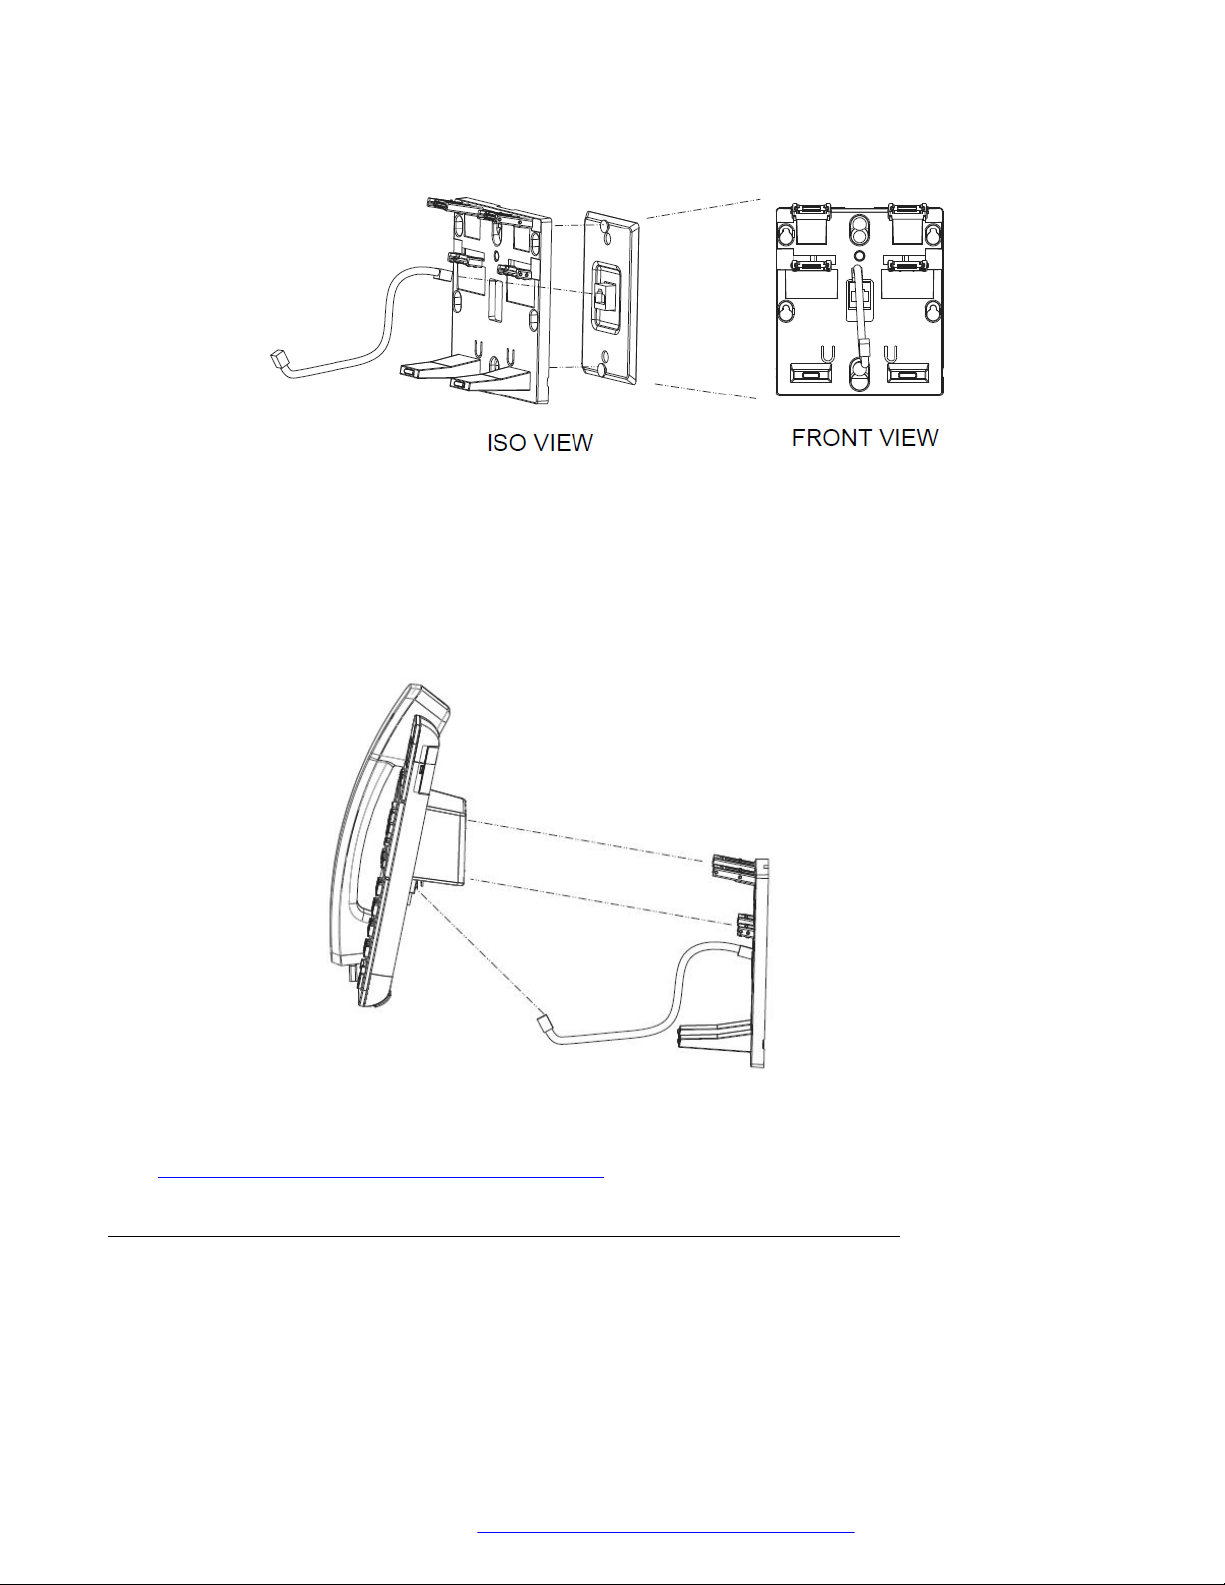
Hardware setup
2. Attach an Ethernet cable to the network port of the phone and to the wall jack.
3. Attach the phone to the wall mount bracket by inserting the two upper tabs of the wall
mount bracket into the slots on the back of the phone. The lower pair of tabs rest against
the back of the phone and ensure that the phone does not move when the keys are
pressed.
Related links
Wall mounting Avaya J100 Expansion Module on page 29
Wall mounting Avaya J100 Expansion Module
About this task
Wall mounting procedure for an Avaya J100 Expansion Module is similar to the one for Avaya
J100 Series IP Phones.
December 2018 Installing and Administering Avaya J100 Series IP Phones 29
Comments on this document? [email protected]
Page 30
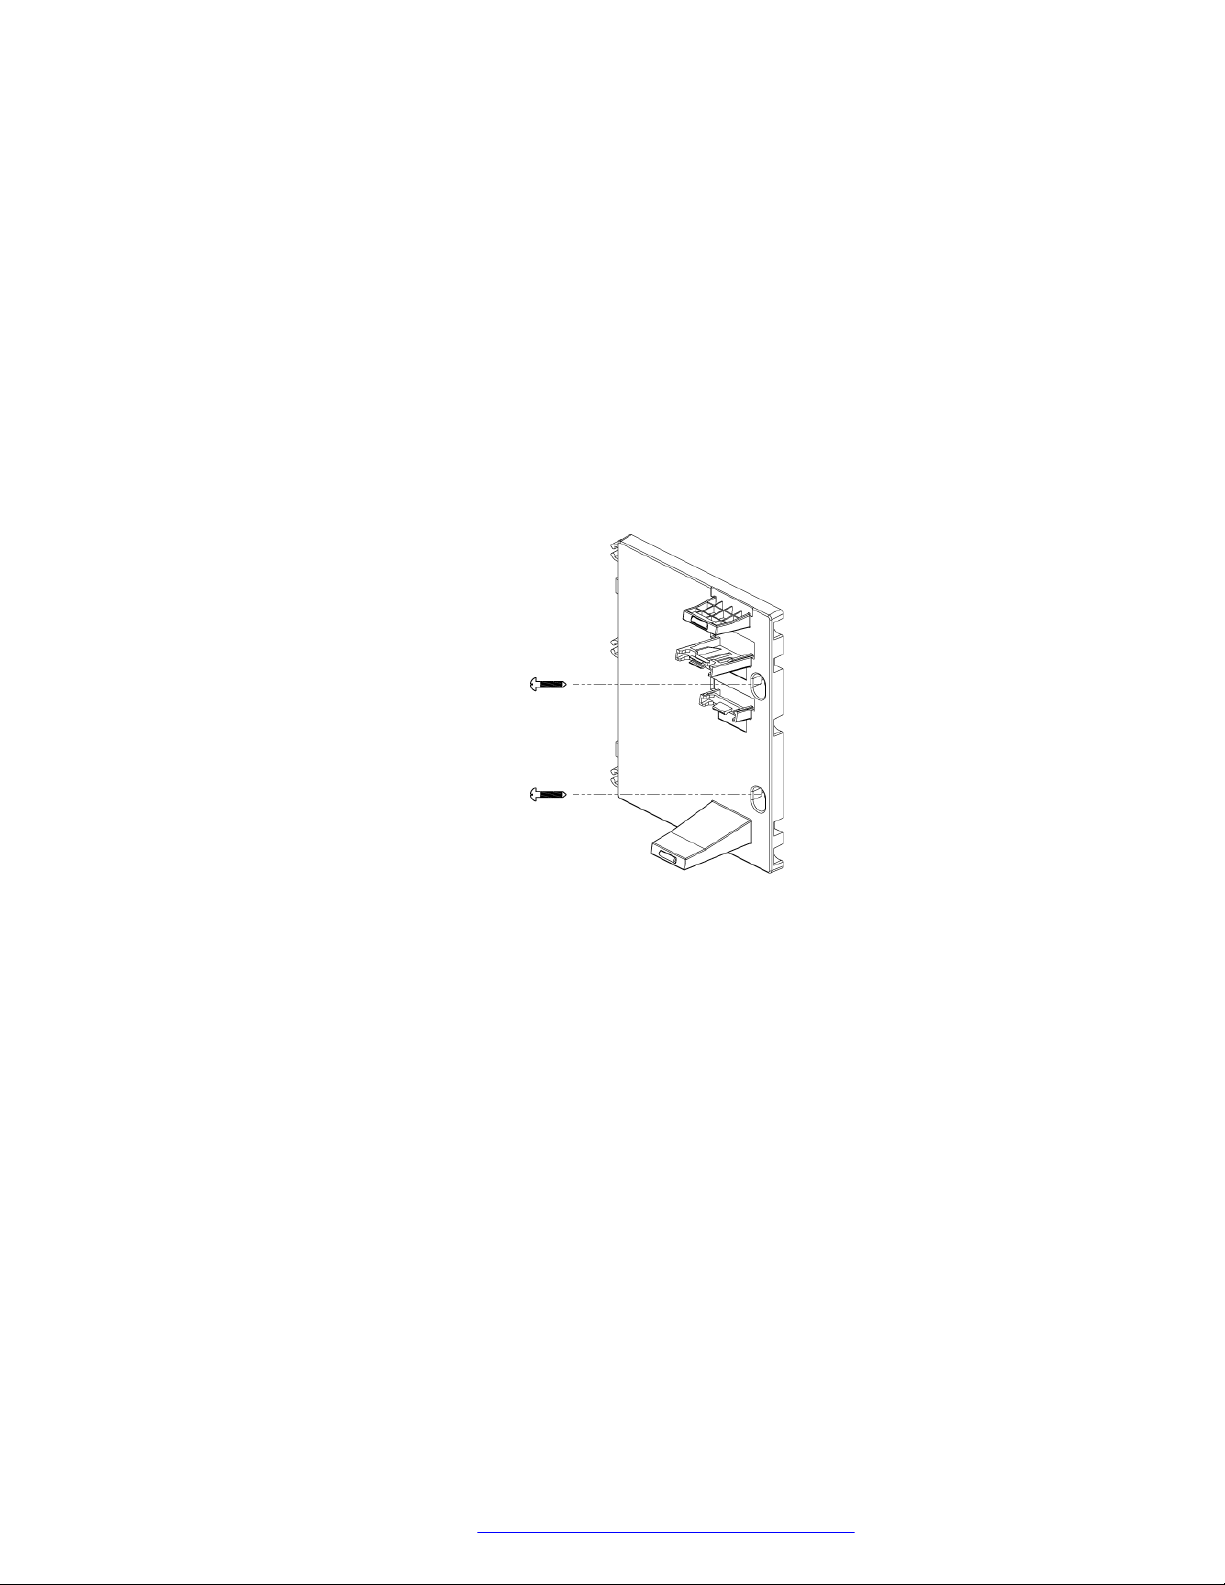
Phone installation
You can order the wall mounting bracket for Avaya J100 Expansion Module separately, along with
the kit. The part number of the wall mount bracket is 700514338.
Before you begin
Obtain the following items:
• Wall mounting kit that contains a wall mount bracket.
• Two #8 screws. The kit does not include the screws.
Procedure
1. Remove the phone from the wall mount bracket.
2. Place the expansion module bracket on one level to the right of the phone bracket, drill
holes, and then affix the #8 screws.
December 2018 Installing and Administering Avaya J100 Series IP Phones 30
Comments on this document? [email protected]
Page 31

Software installation
3. Attach the Avaya J100 Expansion Module to the wall mount bracket by inserting the upper
tab of the wall mount bracket into the slot on the back of the expansion module.
4. Attach the phone to the wall mount bracket. See Wall mounting Avaya J100 Series IP
Phones on page 28 for more details.
Related links
Wall mounting Avaya J100 Series IP Phones on page 28
Software installation
Phone installation process
You can install Avaya J100 Series IP Phones in the following ways:
• With the Device Enrollment Server (DES) discovery process: The installation process begins
after the phone is connected to a network. This is an automated process.
• Without the DES discovery process: The installation process includes a series of preconfiguration tasks.
Phone installation with DES
DES server
Device Enrollment Service (DES) is an Avaya cloud service used to automate the deployment of
phones, especially during initial deployment. DES exposes interfaces to allow different entities to
interact with the service.
December 2018 Installing and Administering Avaya J100 Series IP Phones 31
Comments on this document? [email protected]
Page 32

Phone installation
Installing the phone by using DES eliminates the need for manual configuration of a provisioning
server. Device Enrollment Service is available at des.avaya.com.
The DES phone interface
The phone which supports DES comes from the factory with a unique device certificate that is
known to the DES server. The phone’s firmware includes a list of trusted root certificates of wellknown public certificate authorities. The phone is programmed with the identity of the DES service,
des.avaya.com.
Installing the phone using the DES server
During initial boot-up, the phone prompts the user to select if he wants to contact the DES server.
The Do you want to activate Auto Provisioning now notification is displayed on the
phone.
The user has 60 seconds to select Yes or No options or the timeout will be activated.
The following options are available:
• Yes: This option indicates that the phone should use only DES for server discovery instead of
a local network.
If the phone can contact DES and is able to obtain the configuration server URL, it will
contact the configuration server to get the settings. If the phone fails to contact the
configuration server, it will prompt the user to enter the configuration server information
manually.
If the phone can contact DES, but there is no configuration server assigned to the phone on
DES, it will prompt the user to enter the enrollment code.
When the user enters the enrollment code, the phone will contact DES again to obtain data
on its configuration server and will contact the configuration server for downloading the
settings.
The user can cancel the operation of entering the enrollment code. In this case, he will be
prompted to enter the configuration server manually.
• No: This option indicates that the phone should not use DES and should discover the
configuration server using the existing mechanism based on DHCP option 242. If the phone
fails to discover the configuration server using DHCP option 242, it will prompt the user to
enter a configuration server manually.
• Timeout: After the interval of 60 seconds, if no option is selected, the phone will use the
existing mechanism based on DHCP option 242. If the phone fails to discover the
configuration server in this case, it will contact DES to get the configuration server URL.
The following diagram shows the flow of DES discovery procedure:
December 2018 Installing and Administering Avaya J100 Series IP Phones 32
Comments on this document? [email protected]
Page 33

Activate
auto config?
DHCP Option 242
DES
Config URL
found?
Connect to
config URL
Config URL
found?
DHCP Option 242
Config URL
found?
Connect to
config URL
Done
Enrollment
code?
Connect to
config URL
Success?
Prompt for
Config URL
Code
Yes
Yes
Yes
Yes
Yes
Cancel
Bootup
Timeout
No
No
No
No
No
Software installation
December 2018 Installing and Administering Avaya J100 Series IP Phones 33
Comments on this document? [email protected]
Page 34

Phone installation
Disabling DES
During the first boot-up, the administrator can disable the DES discovery in either of the following
ways:
• by setting DES_STAT as 0 or 1 in DHCP option 242
• by setting DES_STAT as 0 or 1 in the 46xxsettings.txt file
• by disabling DES Discovery in the phone web interface (Management > Device Enrollment
Service > DES Discovery)
Phone installation without DES
This section describes the procedure to install the phone without invoking the DES discovery
process.
Initial setup checklist
Use this checklist to gather, record, and verify the information during the installation.
No. Task Reference
1 Check the
prerequisites.
2 Configure system
manager user profile.
3 Configure the servers. See Server configuration on page 97 for more
5 Configure LLDP. See Configuration through LLDP on page 105
6 Configure VLAN. See Virtual LAN (VLAN) overview on page 114
9 Install the phone. See Installing the phone on page 39 for more
See Hardware and software prerequisites on
page 34 for more information.
See Avaya Aura System Manager user profile
worksheet on page 37 for more information.
information.
for more information.
for more information.
information.
Hardware and software prerequisites
Check the prerequisites to ensure that you have the required software and hardware before you
install the Avaya J100 Series IP Phones .
Hardware prerequisites
Ensure that the LAN:
• Uses Ethernet Category 5e or Ethernet Category 6 cabling
• Has one of the following specifications:
- 802.3af PoE
- 802.3af PoE injector
You can also power the phone using the Avaya DC 5 volt AC power adapter which you can order
with the device.
December 2018 Installing and Administering Avaya J100 Series IP Phones 34
Comments on this document? [email protected]
Page 35

Software installation
Software prerequisites
Ensure that your network already has the following components installed and configured:
• Avaya Aura® Session Manager 6.3.8 or later
• Avaya Aura® Communication Manager 6.3.6 or later
• Avaya Aura® System Manager 6.3.8 or later
• If applicable, Avaya Aura® Presence Services 6.2.4 or later
• If applicable, Avaya Aura® Session Border Controller 7.0 or later
• If applicable, IP Office IPO 11.0.0 or later
• A DHCP server for providing dynamic IP addresses to the Avaya J100 Series IP Phones.
• A file server, an HTTP, HTTPS, or the Avaya Aura® Utility Services for downloading the
software distribution package and the settings file
IPv6 deployment requires Avaya Aura® Session Manager v7.1 or later, Avaya Aura
®
Communication Manager v7.1 or later, Avaya Aura® System Manager v7.1 or later, and Avaya
Aura® Session Border Controller v7.1 or later. For more information about installing and
configuring the components, see their respective documentation.
Administration methods
You can use the following methods to administer the devices. The following table lists the
configuration parameters that you can administer through each of the corresponding methods.
Method
IP
addresses
DHCP —
LLDP — — —
Settings file —
Avaya Aura® System Manager and IP
Office
Administration menu on the phone — —
Web UI
— — — —
Tagging
and VLAN
Can administer
Network
Time
Server
Quality of
Service
Applicationspecific
parameters
Precedence of administration methods
Most of the parameters are configured through multiple methods. If you configure a parameter
through more than one method, the device applies the settings of the method that has a higher
December 2018 Installing and Administering Avaya J100 Series IP Phones 35
Comments on this document? [email protected]
Page 36

Collect configuration data for the following components
DHCP Server
DHCP
Deskphone
Network Server /
Switch (LLDP)
File Server
File Server
2
3
4
5
1
Configure the servers
NTP Server
NTP
NTP Server
NTP
Configure the following servers
DHCP Server
DHCP
Network Server /
Switch (LLDP)
File Server
File Server
User, Session &
Communication Profile
Connect IP Phone
to the network
User, Session &
Communication Profile
Unpack and assemble
Configure security
certificates
Phone installation
precedence. The following list shows the precedence of the methods in the highest to lowest
order:
1. Administration menu on the phone. When the parameter USE_DHCP is set to 1, the phone
gets the DHCP values from the DHCP rather than Administration menu of the phone.
2. Administering the phone from the web UI.
3. Avaya Aura® System Manager and IP Office.
4. 46xxsettings.txt file
5. DHCP.
6. LLDP. There is an exception of LLDP getting a higher precedence than the Settings file
and DHCP when the layer 2 parameters, such as L2QVLAN, L2Q, L2QAUD, L2QVID,
L2QSIG, DSCPAUD, DSCPSIG, DSCPVID, and PHY2VLAN are set through LLDP.
Note:
When parameters of the 46xxsettings.txt file are removed, or are not used, they reset to
their default value.
Diagram: Phone deployment process
December 2018 Installing and Administering Avaya J100 Series IP Phones 36
Comments on this document? [email protected]
Page 37

Diagram: IP phone setup
IP PHONE
IP PHONE
D H C P
Provides IP address
& sets configurable
parameters for
provisioning
46xxsettings.txt
Sets the system
parameters for
configuration
Configures user, communication,
and session profile
Manages power
and provides
configurable
parameters
for provisioning
Provides Software
distribution package
and Settings file
F i l e
S e r v er
Network server /
Switch (LLDP)
Manages power
& provides configurable
parameters for
provisioning
D N S
Provides domain name
server address
R o u t er
Avaya Aura
System Manager
Avaya Aura
Session Manager
Avaya Aura
Communication Manager
Primary setup
®
Avaya Aura
Branch Session Manager
Avaya IP Office
Branch Mode
Survivable setup
Software installation
Avaya Aura® System Manager user profile worksheet
Populate the values in the corresponding fields before stating the installation process of the
phone.
Data for
System Manager User Profile
Identity tab
Presence Profile
December 2018 Installing and Administering Avaya J100 Series IP Phones 37
Field Value Notes
Login Name
Localized Display Name
Endpoint Display Name
Language Preference
Time Zone
System
IM Gateway SIP Entity
Publish Presence with
AES collector
Comments on this document? [email protected]
Table continues…
Page 38

Phone installation
Data for Field Value Notes
Communication Profile
tab
Communication Profile
section
Communication Profile
Password
Session Manager
Profile section
Primary Session
manager
Secondary Session
Manager
Survivability Server
CM Endpoint Profile
section
System
Profile Type
Use Existing Endpoints
Extension
Endpoint Template
Voice Mail Number
Presence server
Conference server
Messaging Profile
Optional
section
System
Mailbox Number
Template
Password
SIP settings For registering phones.
SIP controller list
SIP domain
File server address To download the
software distribution
package and the
Settings file.
HTTP server or TLS
server
Set the appropriate file
server address in the
46xxsettings.txt
file, LLDP and DHCP.
December 2018 Installing and Administering Avaya J100 Series IP Phones 38
Comments on this document? [email protected]
Page 39

Note:
For information about IP Office preinstallation data gathering, see Avaya IP Office Platform
10.0 SIP Telephone Installation Notes.
Installing the phone
Before you begin
You must do the following:
• Configure the file server.
• Download and extract the firmware zip file to your file server.
• Configure the 46xxsettings.txt file.
Procedure
1. Set up the phone hardware.
2. Plug the Ethernet cable to the phone.
The phone powers up and starts to initialize.
3. The initialization procedure consists of the following processes:
Software installation
a. The phone checks for LLDP messages.
b. The phone sends a DHCP DISCOVER message to discover the DHCP server in the
network and invokes the DHCP process.
If the phone does not receive a provisioning server address from the configuration
setup, the phone displays the Configure Provision Server screen.
c. In the Configure Provision Server screen, press the Config softkey and enter the
address of the provisioning server. The provisioning server address can be in the form
of IP address or a Fully Qualified Domain Name (FQDN). To enter the dot symbol (.)
in the field, press the alphanumeric softkey to toggle to the alphanumeric mode.
d. The phone verifies the VLAN ID, and starts tagging the data and voice packets
accordingly.
e. The phone sends and identifies an upgrade script file, gets the Settings file, the
language files, and any firmware updates.
• If configured to use simple certificate enrollment protocol (SCEP), the phone
downloads a valid device certificate.
• The phone displays only the Admin softkey for 15 seconds, and then the Admin
and the Login softkeys.
Note:
For subsequent restarts, if the user login is automatic and the supplied
credentials are valid, the Login softkey is not displayed.
December 2018 Installing and Administering Avaya J100 Series IP Phones 39
Comments on this document? [email protected]
Page 40

Phone installation
4. Do one of the following:
• To access the user login screen, press the Login softkey.
• To access the Admin menu, press the Admin softkey and enter the admin menu
password.
Post installation checklist
To ensure that the phone is properly installed and running properly, verify that the following
requirements are complete.
No. Task Reference
1 Has the phone acquired an IP address? N/A
2 Are you able to make a call from the
phone?
3 Are you able to modify the phone's
Settings file parameters and end user
settings.
4 Are you able to upgrade your phone? Device upgrade
5 For security considerations, have you
configured the phone setup with TLS
signaling? Have you installed the
appropriate private network
authentication certificates?
6 It is critical that you verify Emergency
calling is working properly in your
network. It may be necessary to make
arrangements with the appropriate
authorities to test this functionality.
For more information, see
device specific using
guide.
List of configuration
parameters on page 194
process on page 189
Certificate
management on page 138
For more information, see
Administering emergency
numbers
Note:
For more information about IP Office specific installation, see the following IP Office
documents:
• Avaya IP Office™ Platform Solution Description
• Avaya IP Office™ Platform Feature Description
December 2018 Installing and Administering Avaya J100 Series IP Phones 40
Comments on this document? [email protected]
Page 41

Chapter 4: Configuring the phone using
web interface
Enabling access to web interface of the phone
Administrators can enable access to the web interface of the phone through one of the following
methods:
• By using the phone Administration menu.
• By setting the required parameter in the 46xxsettings.txt file.
Related links
Enabling access to the web interface through the Phone Administration menu on page 41
Enabling web interface access through the settings file on page 42
Viewing IP address of the phone on page 42
Enabling access to the web interface through the Phone Administration menu
Procedure
1. On the phone, press Main Menu.
2. Scroll to Administration, and press Select.
3. In the Access code field, enter the administration password.
The default access code is 27238.
4. Press Enter.
5. Scroll to Web Server, and press Select.
You can enable or disable access to the web interface only in third-party call control set up.
6. Scroll to Web on HTTP, and Toggle to Yes.
7. Press one of the following:
• Save
• OK
December 2018 Installing and Administering Avaya J100 Series IP Phones 41
Comments on this document? [email protected]
Page 42

Configuring the phone using web interface
Related links
Enabling access to web interface of the phone on page 41
Enabling web interface access through the settings file
Use the 46xxsettings.txt file to set the following parameter:
Parameter Value Description
ENABLE_WEBSERVER 1 Enables web administration of the
phone.
Related links
Enabling access to web interface of the phone on page 41
Viewing IP address of the phone
About this task
Use this procedure to obtain the IP address of the phone to log in to the web interface.
Procedure
1. On the phone, press Main Menu.
2. Scroll to Administration, and press Select.
3. In the Access code field, enter the administration password.
The default access code is 27238.
4. Press Enter.
5. Scroll to IP Configuration, and press Select.
6. Scroll to Ethernet IPv4, and press Select.
7. Scroll to Phone.
The IP address is displayed next to the Phone.
Related links
Enabling access to web interface of the phone on page 41
December 2018 Installing and Administering Avaya J100 Series IP Phones 42
Comments on this document? [email protected]
Page 43

Logging in and logging out of the web interface
Logging in and logging out of the web interface
About this task
Use this procedure to log in or log out of the web interface. Note that the system prompts you to
change your default password only after the first log in.
Procedure
1. In your browser, enter the IP address of the phone and press Enter.
2. On the login page, type the following:
• Username: The user name is always admin.
• Password: The default password is 27238.
3. Click Login.
The system displays the Change Default Password dialog box.
4. In the Change Default Password dialog box, type the following:
• Current password
• New password
• Confirm password
5. Click Update.
The system displays the login page.
6. Log in by entering the username and the new password.
7. To log out of the web UI, click Logout.
Configuring network settings
About this task
Avaya J100 Series IP Phones display the details of the configuration fields in the Description
section.
Procedure
1. Log in to the web interface as an administrator.
2. In the navigation pane, click Network.
3. Configure the following areas:
• Network
• DNS
• ICMP
December 2018 Installing and Administering Avaya J100 Series IP Phones 43
Comments on this document? [email protected]
Page 44

Configuring the phone using web interface
• TCP
• TLS
• Web Server
4. Click one of the following:
• Save: To save the configuration changes.
• Reset to Default: To revert to the default values.
Related links
Network settings field description on page 44
Network settings field description
Name Description
Network
Network Mode of Operation Specifies the network mode used by the phone.
The operations are:
• Ethernet only
• Ethernet (preferred, but manual override
allowed from Phone UI) (default)
• Wi-Fi (preferred, but manual override allowed
from Phone UI)
DNS
DNS Server Specifies the IP addresses of the DNS servers
added to the network.
Valid value is IP addresses in dotted-decimal
format, separated by commas without any
intervening spaces.
The default value is empty.
Note:
You can add up to 16 DNS servers.
DNS Domain Specifies the domain name of the DNS server.
Valid value must be in the DNS name format. The
default value is empty.
ICMP
Destination Unreachable Message Control Specifies the type of the ICMP destination
unreachable messages.
Table continues…
December 2018 Installing and Administering Avaya J100 Series IP Phones 44
Comments on this document? [email protected]
Page 45

Configuring network settings
Name Description
The options are:
• No
• Limited Port Unreachable messages (default)
• Protocol and Port Unreachable messages
Redirect Message Control Specifies whether the ICMP redirect messages are
processed or not.
The options are:
• Yes
• No (default)
TCP
Send TCP Keep Alive Message Specifies whether the TCP/IP keep-alive messages
are enabled or disabled in the system.
The options are:
• Enable (default)
• Disable
TCP Keep Alive Time Specifies the wait time interval in seconds of the
phone before sending out the TCP keep-alive
message (TCP ACK message) to the far-end.
Valid value is an integer from 10 to 3600. The
default option is 60 seconds.
TCP Keep Alive Interval Specifies the TCP keep-alive packet re-
transmission interval.
Valid value is an integer from 5 to 60. The default
option is 10 seconds.
TLS
Use TLS Version Specifies the TLS versions used in the network.
The options are:
• 1.0 and 1.2 (default)
• Only 1.2
Web Server
Web Server On HTTP Specifies whether HTTP access to the web
interface is enabled or disabled.
The options are:
• Yes (default)
• No
Table continues…
December 2018 Installing and Administering Avaya J100 Series IP Phones 45
Comments on this document? [email protected]
Page 46

Configuring the phone using web interface
Name Description
HTTP Listen Port Specifies the port number of the web server when
the web interface is accessed using HTTP.
The valid value is an integer from 80 to 65535. The
default port number is 80.
HTTPS Listen Port Specifies the port number of the web server when
the web interface is accessed using HTTPS.
The valid value range is from 443 to 65535. The
default port number is 443.
The valid value is an integer from 443 to 65535.
Use certificate for Web Server Specifies which server certificate will be used when
the web interface is accessed using HTTPS.
The options are:
• Factory Certificate (default)
• Custom Certificate
Related links
Configuring network settings on page 43
Configuring Ethernet settings
About this task
Avaya J100 Series IP Phones display the details of the configuration fields in the Description
section.
Procedure
1. Log in to the web interface as an administrator.
2. In the navigation pane, click Ethernet.
3. Configure the following areas:
• IP Configuration
• IPv4 Configuration
• IPv6 Configuration
• 802.1X Supplicant Operating Mode
• VLAN
• QoS
• LLDP
December 2018 Installing and Administering Avaya J100 Series IP Phones 46
Comments on this document? [email protected]
Page 47

• Ethernet Interface
4. Click one of the following:
• Save: To save the configuration changes.
• Reset to Default: To revert to the default values.
Related links
Ethernet settings field descriptions on page 47
Ethernet settings field descriptions
Name Description
IP Configuration
IP Mode Specifies the IP mode.
The options are:
• IPv4 only
Configuring Ethernet settings
• Dual mode (default)
• IPv6 only
Dual Mode Operation
Preference
Extended Re-bind Time Specifies the time in seconds for which you can continue to use the
IPv4 Configuration
Use DHCP Specifies whether to enable/disable DHCP as a source in IPv4 network.
Continue to use DHCP
information after lease expiry
Specifies the preference of the operation mode.
The options are:
• IPv4 (default)
• IPv6
assigned IP address after the DHCP lease expires.
The valid value is an integer from 0 to 999. The default value is 60
seconds.
The options are:
• Yes (default): To assign the IPv4 address automatically to your
phone.
• No: To assign the IPv4 address manually to your phone.
Note:
To assign the IP address manually, you must also configure the IP
Address, Subnet Mask, and Gateway IP Address fields
manually.
Specifies whether the DHCP information can be used after the lease
expires.
Table continues…
December 2018 Installing and Administering Avaya J100 Series IP Phones 47
Comments on this document? [email protected]
Page 48

Configuring the phone using web interface
Name Description
The options are:
• Yes (default): To use the assigned IP address after the DHCP lease
expires.
• No: To stop using the assigned IP address after the DHCP lease
expires.
IPv4 Address Specifies the IP address of the phone. You can enter the IP address in
this field.
The valid value is an IP address in the dotted decimal name format.
The maximum number of characters is 15.
Subnet Mask Specifies the network mask address. To assign the network mask
address manually to your phone, type the address in this field.
The valid value is an IP address in the dotted decimal name format.
The maximum number of characters is 15.
IPv4 Gateway Specifies the IP address of the gateway.
The valid value is an IP address in the dotted decimal name format.
The maximum number of characters is 15.
IPv6 Configuration
DHCPv6 Client Status Specifies whether DHCPv6 Client is enabled or disabled.
The options are:
• DHCPv6 client enabled (default)
• DHCPv6 client disabled
Use DHCPv6 Specifies whether to use DHCPv6 as a source in IPv6 network.
The options are:
• Yes (default): To assign the IPv4 address automatically to your
phone.
• No: To assign the IPv4 address manually to your phone.
Continue to use DHCPv6
information after lease expiry
Specifies whether the DHCPv6 will comply with the IETF RFC 3155
standard and immediately stop using an IPv6 address if the address
valid lifetime expires.
The options are:
• Yes (default)
• No
IPv6 Address Specifies the IPv6 address of the phone.
Value format: eight groups of four hexadecimal digits. The default value
is null.
IPv6 Link Local Address Specifies the link local address.
Table continues…
December 2018 Installing and Administering Avaya J100 Series IP Phones 48
Comments on this document? [email protected]
Page 49

Configuring Ethernet settings
Name Description
Value format: eight groups of four hexadecimal digits. The default value
is null.
IPv6 Gateway Specifies the IP address of the gateway.
Value format: eight groups of four hexadecimal digits. The default value
is null.
Use SLAAC Specifies whether to use Stateless Auto-Configuration.
The options are:
• Yes (default)
• No
Privacy SLAAC Mode Specifies the preference for Privacy Extensions in SLAAC.
The options are:
• Disabled, stable address generated from MAC
• Stable private address (default)
• Temporary address
SLAAC Addresses SLAAC (stateless auto configuration) IPv6 addresses.
Value format: eight groups of four hexadecimal digits. The default value
is null.
802.1X Supplicant Operating Mode
Supplicant Operating Mode Specifies the 802.1X supplicant operating mode.
The options are:
• Disable (default)
• Enable (responds only to unicast EAPOL messages)
• Enable (responds to unicast and multicast EAPOL messages)
802.1x Pass-through
Operating Mode
Specifies the 802.1X pass-through operating mode.
Pass-through refers to the forwarding of EAPOL frames between the
phone's Ethernet line interface and the secondary PC Ethernet
interface.
The options are:
• Without proxy logoff (default)
• With proxy logoff
• Disabled
Authentication Method Specifies the authentication method to be used by 802.1X.
The options are:
• MD5 (default)
• TLS
Table continues…
December 2018 Installing and Administering Avaya J100 Series IP Phones 49
Comments on this document? [email protected]
Page 50

Configuring the phone using web interface
Name Description
VLAN
VLAN Specifies whether the VLAN tagging is enabled or disabled.
The options are:
• Auto (default): To support VLAN functionality by using the phone
network.
• On: To support the VLAN functionality by using the internal switch of
the phone.
• Off: To disable the VLAN functionality of the phone.
VLAN ID Specifies the VLAN ID. To assign a VLAN ID, type the VLAN ID.
Configure this parameter if the phone uses a different VLAN than the
default data VLAN.
The valid value is an integer from 0 to 4094. The default value is 0.
VLAN Separation Mode Specifies the VLAN separation mode.
The options are:
• Enabled (default)
• Disabled
VLAN Test - Wait Time for
DHCP Offer
Specifies the wait time interval in seconds to receive a DHCPOFFER
on a non-zero VLAN.
The valid value is an integer from 0 to 999. The default value is 60
seconds.
PC Port VLAN ID Specifies the VLAN ID of the computer port.
The valid value is an integer from 0 to 4094. The default value is 0.
Tags to PC Ethernet Interface Specifies whether the VLAN tags are stripped from Ethernet frames
that leave the computer port.
The options are:
• Do not remove
• Remove (default)
QoS
Audio Priority (Layer 2) Specifies the Layer 2 priority value for audio (RTP and RTCP) streams.
The valid value is an integer from 0 to 7. The default value is 6.
Signaling Priority (Layer 2) Specifies the Layer 2 priority value for signaling protocol messages.
The valid value is an integer from 0 to 7. The default value is 6.
Audio DiffServ (Layer 3) Specifies the layer 3 Differentiated Services (DiffServ) code point for
audio frames generated by the phone.
The valid value is an integer from 0 to 63. The default value is 46.
Table continues…
December 2018 Installing and Administering Avaya J100 Series IP Phones 50
Comments on this document? [email protected]
Page 51

Configuring Ethernet settings
Name Description
Signaling DiffServ (Layer 3) Specifies the layer 3 Differentiated Services (DiffServ) code point for
signaling frames generated by the phone.
The valid value is an integer from 0 to 63. The default value is 34.
LLDP
LLDP Specifies the status of LLDP.
The options are:
• Disabled
• Enabled
• Enabled- only if LLDP frame is received (default)
Ethernet Interface
Ethernet Specifies the speed and duplex settings for the Ethernet line interface.
The options are:
• Auto-negotiate (default)
• 10Mbps half-duplex
• 10Mbps full-duplex
• 100Mbps half-duplex
• 100Mbps full-duplex
PC Ethernet Specifies the speed and duplex settings for the secondary (PC)
Ethernet interface.
The options are:
• Disable
• Auto-negotiate (default)
• 10Mbps half-duplex
• 10Mbps full-duplex
• 100Mbps half-duplex
• 100Mbps full-duplex
PC Ethernet auto-MDIX Specifies the status of the auto-MDIX on PHY2.
The options are:
• Enable (default)
• Disable
Related links
Configuring Ethernet settings on page 46
December 2018 Installing and Administering Avaya J100 Series IP Phones 51
Comments on this document? [email protected]
Page 52

Configuring the phone using web interface
Configuring Wi-Fi settings
About this task
Avaya J100 Series IP Phones display the details of the configuration fields in the Description
section.
Procedure
1. Log in to the web interface as an administrator.
2. In the navigation pane, click Wi-Fi.
3. Configure the following areas:
• WiFi Control
• WiFi Setting
• IP Configuration
• WEP
• WPA2 Enterprise (802.1x)
• QoS
4. Click one of the following:
• Save: To save the configuration changes.
• Reset to Default: To revert to the default values.
Related links
Wi-Fi settings field descriptions on page 52
Wi-Fi settings field descriptions
Name
WiFi Control
WLAN Network Configuration Mode Specifies the Wi-Fi network configuration mode.
WiFi Setting
Country Specifies the country code to define the Wi-Fi radio parameters
Description
The options are:
• Automatic (default)
• Manual
permitted by the local regulatory domain.
Value format: two-character country code. The default value is
US.
Table continues…
December 2018 Installing and Administering Avaya J100 Series IP Phones 52
Comments on this document? [email protected]
Page 53

Configuring Wi-Fi settings
Name Description
Use of 802.11d Configures the 802.11d specifications automatically to the local
regulatory domain for the WLAN network.
The options are:
• Disable (default)
• Enable
WLAN Active SSID Displays active SSID when Wi-Fi is active. This is an internal
parameter.
Value format: a sting from 0 to 32 characters. The default value
is empty.
SSID Specifies the SSID string of the Wi-Fi network.
Value format: alphanumeric characters and special symbols.
Note:
The space character (ASCII 0x20) is not supported.
The default value is empty.
Security Specifies the WLAN security standard for your Wi-Fi network.
The options are:
• None (default)
• WEP Security
• WPA/WPA2 security (pre-shared key) security
• WPA2 Enterprise security (802.1x auth.)
WLAN Max Authentication Retires Specifies the number of retries that will be attempted to
establish a secure connection upon receiving authentication
failures.
The options are:
• 0
• 1
• 2
• 3 (default)
• 4
IP Configuration
Use DHCP Specifies whether DHCP is used in the Wi-Fi network.
The options are:
• Yes (default)
• No
Table continues…
December 2018 Installing and Administering Avaya J100 Series IP Phones 53
Comments on this document? [email protected]
Page 54

Configuring the phone using web interface
Name Description
IP Address Specifies the IP address of the phone.
The valid value is the IP address in the dotted decimal name
format. The maximum number of characters is 15.
The default value is “0.0.0.0”.
Subnet Mask Specifies the Wi-Fi network mask address.
The valid value is the IP address in the dotted decimal name
format. The maximum number of characters is 15.
The default value is “0.0.0.0”.
Gateway IP Address Specifies the IP address of the gateway in the Wi-Fi network.
The valid value is the IP address in the dotted decimal name
format. The maximum number of characters is 15.
The default value is “0.0.0.0”.
WEP
WEP Key Length Specifies the passcode key length for WEP security.
The options are:
• 64 bit
• 128 bit (default)
WEP Default Key Specifies the default key in your Wi-Fi network.
The options are:
• WEP Key 1 (default)
• WEP Key 2
• WEP Key 3
• WEP Key 4
WEP Key 1 Specifies the WEP key values in the Wi-Fi network.
The valid value is up to 26 alphanumeric characters that can be
the following:
• Blank
• 0 – 9
• A – F
The value must include 10 hexadecimal digits for 64 bit keys
and 26 hexadecimal digits for 128 bit keys. The default value is
empty.
WEP Key 2 Specifies the WEP key values for the Wi-Fi network.
Table continues…
December 2018 Installing and Administering Avaya J100 Series IP Phones 54
Comments on this document? [email protected]
Page 55

Configuring Wi-Fi settings
Name Description
The valid value is up to 26 alphanumeric characters that can be
the following:
• Blank
• 0 – 9
• A – F
The value must include 10 hexadecimal digits for 64 bit keys
and 26 hexadecimal digits for 128 bit keys. The default value is
empty.
WEP Key 3 Specifies the WEP key values for the Wi-Fi network.
The valid value is up to 26 alphanumeric characters that can be
the following:
• Blank
• 0 – 9
• A – F
The value must include 10 hexadecimal digits for 64 bit keys
and 26 hexadecimal digits for 128 bit keys. The default value is
empty.
WEP Key 4 Specifies the WEP key values for the Wi-Fi network.
The valid value is up to 26 alphanumeric characters that can be
the following:
• Blank
• 0 – 9
• A – F
The value must include 10 hexadecimal digits for 64 bit keys
and 26 hexadecimal digits for 128 bit keys. The default value is
empty.
WPA2 Enterprise (802.1x)
EAP Authentication Method Specifies the type of EAP authentication method.
The options are:
• PEAP (default)
• TLS
EAP Phase 2 Authentication Method Specifies the type of EAP Phase 2 authentication method.
The options are:
• None (default)
• MSCHAPV2
Authentication Identity Specifies the authentication identity.
Table continues…
December 2018 Installing and Administering Avaya J100 Series IP Phones 55
Comments on this document? [email protected]
Page 56

Configuring the phone using web interface
Name Description
The valid value is a string of up to 32 alphanumeric characters
and special symbols. The default value is blank.
Note:
The space character (ASCII 0x20) is not supported.
Password Specifies the password for the Authentication identity.
The valid value is a string of 8 to 63 characters for WPA/
WPA2PSK and of 1 to 32 characters for 802.1x EAP. The
default value is blank.
Value format: alphanumeric characters and special symbols.
Note:
The space character (ASCII 0x20) is not supported.
Authentication Anonymous Identity Specifies the Authentication identity.
The valid value is a string of up to 32 alphanumeric characters
and special symbols. The default value is blank.
Note:
The space character (ASCII 0x20) is not supported.
QoS
Audio Priority (Layer 2) Specifies the Layer 2 priority value for RTP and RTCP audio
streams.
The options are from 0 to 7. The default value is 6.
Signaling Priority (Layer 2) Specifies the Layer 2 priority value for signaling protocol
messages.
The options are from 0 to 7. The default value is 3.
Audio DiffServ (Layer 3) Specifies the layer 3 Differentiated Services (DiffServ) code
point for audio frames generated by the phone.
The valid value is an integer from 0 to 63. The default value is
46.
Signaling DiffServ (Layer 3) Specifies the layer 3 Differentiated Services (DiffServ) code
point for signaling frames generated by the phone.
The valid value is an integer from 0 to 63. The default value is
34.
Related links
Configuring Wi-Fi settings on page 52
December 2018 Installing and Administering Avaya J100 Series IP Phones 56
Comments on this document? [email protected]
Page 57

Configuring SIP settings
Configuring SIP settings
About this task
Avaya J100 Series IP Phones display the details of the configuration fields in the Description
section.
Procedure
1. Log in to the web interface as an administrator.
2. In the navigation pane, click SIP.
3. Configure the following areas:
• SIP Account
• XSI
• Busy Lamp Field (BLF)
• SIP Global Settings
• Codecs and DTMF
• RTP
• SRTP
• Timers and Count
• Local Port
• Miscellaneous
4. Click one of the following:
• Save: To save the configuration changes.
• Reset to Default: To revert to the default values.
Related links
SIP settings field descriptions on page 57
SIP settings field descriptions
Name
SIP Account
Registration Status Displays the SIP account status. The field is automatically populated.
Description
The status can be the following:
• Not Configured
• Not Registered
Table continues…
December 2018 Installing and Administering Avaya J100 Series IP Phones 57
Comments on this document? [email protected]
Page 58

Configuring the phone using web interface
Name Description
• Registered
SIP User ID Specifies the SIP user ID used to log in to the phone.
You can also type the SIP user ID, which is a combination of the following
values:
• Upper and lower case characters.
• Numbers from 0 to 9.
• Spaces.
• Special characters. The allowed characters are the following: . , : ; “” ‘’ / ()
{} [] ` ~ * _ ! ? + - ^ # = <> | & $ —
The default value is empty.
Authentication User ID Specifies the authentication ID.
You can also type the authentication user ID in this field if authentication is
enabled on the SIP server.
The authentication user ID is a combination of the following values:
• Upper and lower case characters.
• Numbers from 0 to 9.
• Spaces.
• Special characters. The allowed characters are the following: . , : ; “” ‘’ / ()
{} [] ` ~ * _ ! ? + - ^ # = <> | & $ —
Authentication Password Specifies the authentication password.
You can also type the password in this field if authentication is enabled on
the SIP server.
Note:
The password can contain maximum 31 ASCII characters.
The default value is empty.
XSI
XSI State Specifies the status of XSI.
The values are:
• Initializing
• Success
• Failure
XSI URL Specifies the FQDN or the IP address, HTTP or HTTPS mode and the port
of the XSP server.
The valid value is a string of 0 to 255 ASCII characters.
Table continues…
December 2018 Installing and Administering Avaya J100 Series IP Phones 58
Comments on this document? [email protected]
Page 59

Configuring SIP settings
Name Description
XSI Event Channel
Duration
Specifies the time duration in minutes for XSI event channel. The phone
will ask XSP server to maintain the established Comet HTTP connection
for the specified period of time. After 50% of this time phone will reestablish
Comet HTTP connection.
The valid value is an integer from 60 to 1440. The default value is 60
minutes.
XSI Event Channel
HeartBeat
Specifies the time interval in seconds to send heartbeat messages over
Comet HTTP connection to XSP server of BroadWorks.
The valid value is an integer from 1 to 999. The default value is 15
seconds.
XSI User Id Specifies the BroadSoft user ID which the phone must use for XSI
authentication.
BroadSoft user Id is the SIP user Id excluding at (@) and domain.
The valid value is a string of 0 to 255 ASCII characters.
XSI Web Password Specifies the BroadSoft's web portal password which the phone must use
for XSI web authentication.
If the value is null, SIP authentication method is used.
Busy Lamp Field( BLF)
Allow User to Change BLF
List
Specifies the control to provide the user permissions to add and remove
BLF monitored users from the phone.
The values are:
• User is allowed to add or delete BLF monitored users
• User is allowed to add BLF monitored users
• User is allowed to delete BLF monitored users
• User is allowed to add and delete BLF monitored users (default)
SIP Global Settings
SIP Domain Specifies the SIP domain used for SIP registration.
The valid value is a string of 0 to 255 ASCII characters.
Enable PPM as source of
Proxy Server
Specifies whether PPM is used as a source of SIP proxy server
information.
Note:
This is an Avaya Aura® setting which is ignored in the 3PCC
environment.
The options are:
• Yes (default)
• No
Table continues…
December 2018 Installing and Administering Avaya J100 Series IP Phones 59
Comments on this document? [email protected]
Page 60

Configuring the phone using web interface
Name Description
Proxy Policy Specifies whether SIP proxy servers are read-only or can be edited.
The options are:
• Manual (Use Phone Admin Menu or WEB to configure): To configure
SIP proxy server manually by using the phone or the web interface.
• Automatic (Can be set from DHCP, LLDP, Settings File, PPM)
(default): To use the SIP proxy server settings received from the
46xxsettings.txt file or PPM.
SIP Proxy Server Specifies the SIP proxy server domain.
The valid value is a string of 0 to 255 ASCII characters, for example:
148.147.158.185:5061;transport=tls,alphagreensm01.avaya
.com:5061;transport=tls
SIP Proxy Server
(Automatic)
Specifies the SIP proxy server settings as received from the
46xxsettings.txt file or PPM.
Register to Proxy Server Specifies whether the phone registers simultaneously to a proxy server.
The options are:
• Simultaneous (default)
• Alternate
Number of proxy server to
register simultaneously
Specifies the number of SIP proxy controllers that the phone can register
simultaneously.
The options are:
• 1
• 2
• 3 (default)
Registration Interval Specifies the time interval in seconds between two registrations to the SIP
proxy.
The valid value is an integer from 30 to 86,400. The default value is 900
seconds.
Un-registration Wait Timer
(seconds)
Specifies the time in seconds during which the phone waits before
terminating all SIP dialog and SIP registrations.
The valid value is an integer from 4 to 3,600. The default value is 32
seconds.
Registration Wait Timer
(seconds)
Specifies the time in seconds during which the phone waits for a response
message from registration. If no response message is received within this
time, the phone tries to register again.
The valid value is an integer from 4 to 3,600. The default value is 32
seconds.
Table continues…
December 2018 Installing and Administering Avaya J100 Series IP Phones 60
Comments on this document? [email protected]
Page 61

Configuring SIP settings
Name Description
Signaling IP Preference This parameter is used by SIP signaling only on a dual mode phone (phone
with both IPv4 and IPv6 addresses configured) to select the preferred SIP
controller IP addresses.
The default value is IPv4.
Media IP Preference Specifies the preference of SDP media group lines and the SDP answer/
offer format when phone is in dual mode.
The default value is IPv4.
Codecs and DTMF
OPUS Specifies whether the OPUS codec capability of the phone is enabled or
disabled.
The options are:
• Disabled
• Enabled WIDEBAND_20K (default)
• Enabled NARROWBAND_16K
• Enabled NARROWBAND_12K
G.722 Specifies whether the G.722 codec is enabled.
The options are:
• Disable
• Enable (default)
G.726 Specifies whether the G.726 codec is enabled.
The options are:
• Disable
• Enable (default)
G.729 Specifies whether the G.729A codec is enabled.
The options are:
• Disable
• Enable without Annex B support (default)
• Enable with Annex B support
G.711u law Specifies whether the G.711u law codec is enabled.
The options are:
• Disable
• Enable (default)
G.711a law Specifies whether the G.711a law codec is enabled.
Table continues…
December 2018 Installing and Administering Avaya J100 Series IP Phones 61
Comments on this document? [email protected]
Page 62

Configuring the phone using web interface
Name Description
The options are:
• Disable
• Enable (default)
Send DTMF Specifies whether the phone sends DTMF tones in-band as regular audio,
or out-of-band using RFC 2833 procedures.
The options are:
• In-band
• Out-of-band (default)
OPUS Payload Dynamically specifies the RTP payload type to be used for OPUS codec.
The parameter is used when the media request is sent to the far-end in an
INVITE or 200 OK when INVITE with no Session Description Protocol
(SDP) is received.
The valid value is an integer from 96 to 127. The default value is 116.
G.726 Payload Specifies the RTP payload type to be used for the G.726 codec.
The valid value is an integer from 96 to 127. The default value is 110.
DTMF Payload Specifies the RTP payload type to be used for RFC 2833 signaling.
The valid value is an integer from 96 to 127. The default value is 120.
RTP
Play Tone till RTP Specifies whether the locally generated ringback tone stops when SDP is
received for an early media session, or whether it continues until RTP is
actually received from the far-end party.
The options are:
• Yes (default)
• No
Symmetric RTP Specifies whether the phone must receive RTP if the UDP source port
number is not same as the UDP destination port number.
The options are:
• Disable
• Enable (default)
RTCP_XR Specifies whether VoIP Metrics Report Block as defined in RTP Control
Protocol Extended Reports (RTCP XR) (RFC 3611) is sent as part of the
RTCP packets to a remote peer or an RTCP monitoring server.
The options are:
• Yes
• No (default)
SRTP
Table continues…
December 2018 Installing and Administering Avaya J100 Series IP Phones 62
Comments on this document? [email protected]
Page 63

Configuring SIP settings
Name Description
Media Encryption Specifies the crypto suite and session parameters for media encryption.
The options are:
• aescm128-hmac80
• aescm128-hmac32
• aescm128-hmac80-unauth
• aescm128-hmac32-unauth
• aescm128-hmac80-unenc
• aescm128-hmac32-unenc
• aescm128-hmac80-unenc-unauth
• aescm128-hmac32-unenc-unauth
• none (default)
• aescm256-hmac80
• aescm256-hmac32
Note:
You should not use unauthenticated media encryption (SRTP) files.
Encrypt RTCP Specifies whether RTCP packets are encrypted or not.
The options are:
• Yes: SRTCP is enabled.
• No (default): SRTCP is disabled.
Enforce "SIPS" URI for
SRTP
Specifies whether a SIPS URI must be used for SRTP.
The options are:
• Yes (default): Enforced
• No: Not enforced.
SDP Negotiation
Capability
Specifies the Session Description Protocol (SDP) negotiation capability.
• Yes (default)
• No
Timers and Count
SIP Timer T1 Specifies an estimate in milliseconds for the Round Trip Time (RTT).
The valid value is an integer from 500 to 10,000.
The default value is 500 milliseconds.
SIP Timer T2 Specifies the maximum retransmit interval in milliseconds for non-INVITE
requests and INVITE responses.
The valid value is an integer from 2,000 to 40,000.
Table continues…
December 2018 Installing and Administering Avaya J100 Series IP Phones 63
Comments on this document? [email protected]
Page 64

Configuring the phone using web interface
Name Description
The default value is 4,000 milliseconds.
SIP Timer T4 Specifies the maximum duration in milliseconds for which a message
remains in the network.
The valid value is an integer from 2,500 to 60,000.
The default value is 5,000 milliseconds.
INVITE Response Timeout Specifies the maximum number of seconds that the phone waits for
another response after receiving a SIP 100 Trying response.
The valid value is an integer from 30 to 180.
The default value is 60 seconds.
Failed Session Removal
Timer
Specifies the time in seconds to automatically remove a failed call session.
The valid value is an integer from 5 to 999.
The default value is 60 seconds.
Outbound Subscription
Duration Request
Specifies the Outbound subscription request duration in seconds.
The valid value is an integer from 60 to 31,53,600.
The default value is 86,400 seconds.
Controller Search Interval Specifies the time in seconds that the phone waits to complete the
maintenance check for monitored controllers.
The valid value is an integer from 4 to 3,600.
The default value is 16 seconds.
Active subscription wait
time for "avaya-cmfeature-status"
Specifies the time in seconds that the phone waits to validate an active
subscription when it subscribes to the avaya-cm-feature-status package.
The valid value is an integer from 16 to 3,600.
The default value is 60 seconds.
Remote Data Source initial
retry time
Specifies the number of seconds that the phone waits for the first time
before trying to contact the PPM server again after a failed attempt. Each
subsequent retry is delayed by double the previous delay time.
The valid value is an integer from 2 to 60.
The default value is 2 seconds.
Remote Data Source
maximum retry time
Specifies the maximum delay interval in seconds after which the phone
stops to contact the PPM server.
The valid value is an integer from 2 to 3,600.
The default value is 600 seconds.
Remote Data Source initial
retry attempts
Specifies the number of attempts the PPM adaptor must try to download
from PPM before it stops connecting to the PPM server.
The valid value is an integer from 1 to 30.
The default value is 15 attempts.
Table continues…
December 2018 Installing and Administering Avaya J100 Series IP Phones 64
Comments on this document? [email protected]
Page 65

Configuring SIP settings
Name Description
Local Port
RTP Port (minimum) Specifies the lower limit of a port range.
• RTP
• RTCP
• SRTP
• SRTCP
The valid value is an integer from 1024 to 65,503.
The default value is 5004.
RTP Port (range) Specifies the port range to be used by the following connections:
• RTP
• RTCP
• SRTP
• SRTCP
The valid value is an integer from 32 to 64,511.
The default value is 40.
SIP Signaling Port
(minimum)
Specifies the lower limit of a port range to be used for SIP signaling.
The valid value is an integer from 5062 to 65,503.
The default value is 5062.
SIP Signaling Port (range) Specifies the port range to be used for SIP signaling.
The valid value is an integer from 32 to 60,473.
The default value is 60473.
Miscellaneous
Conference Factory URI Specifies the URI for Avaya Aura® Conferencing or network conferencing in
third-party call control environments.
The valid value is a string of up to 255 ASCII characters.
Subscribe Event Packages Specifies a comma-separated list of event packages to subscribe to after
registration.
Possible values are:
reg
•
dialog
•
mwi
•
ccs
•
• message-summary, which is identical to mwi
• avaya-ccs-profile, which is identical to ccs
Table continues…
December 2018 Installing and Administering Avaya J100 Series IP Phones 65
Comments on this document? [email protected]
Page 66

Configuring the phone using web interface
Name Description
For IP Office, you must use the following:
reg
•
• message-summary, which is identical to mwi
• avaya-ccs-profile, which is identical to ccs
For the third-part call control setup, you can use message-summary.
Voice Mail Access Code Specifies the number to access the voice mail in a non-Avaya environment.
100rel Specifies whether the 100rel option tag is included in the SIP INVITE
header field.
The options are:
• Disable: The tag is not included.
• Enable (default): The tag is included.
Validate Incoming
messages
Specifies whether AOR received in Request-URI of an incoming call must
be validated with the contact header published by phone during
registration.
The options are:
• Disable (default)
• Enable
‘Privacy’ header in
Incoming message
Specifies whether AOR received in Request-URI of an incoming call must
be private in the contact header published by the phone during registration.
The options are:
• Display CallerID information (default)
• Display ‘Restricted’
Related links
Configuring SIP settings on page 57
Configuring Settings
About this task
Avaya J100 Series IP Phones display the details of the configuration fields in the Description
section.
Procedure
1. Log in to the web interface as an administrator.
2. In the navigation pane, click Settings.
December 2018 Installing and Administering Avaya J100 Series IP Phones 66
Comments on this document? [email protected]
Page 67

3. Configure the following areas:
• Language
• Feature Access
• Phone Menu Options
• Call Log
• Contacts
• Emergency Call
• Phone Lock
• Other
• Audio
• Dialing
• Enhanced Local Dialing Rules
• Admin
• MLPP
Configuring Settings
• Guest Login
• Save Extension
• Bluetooth
• CCMS
• Brightness
4. Click one of the following:
• Save: To save the configuration changes.
• Reset to Default: To revert to the default values.
Related links
Settings field descriptions on page 67
Settings field descriptions
Language
Name
Language
Available Language File Specifies the name of the default system language file used in
Description
the phone.
Table continues…
December 2018 Installing and Administering Avaya J100 Series IP Phones 67
Comments on this document? [email protected]
Page 68

Configuring the phone using web interface
Name Description
You can delete the default language file by clicking Delete.
Import Language File Browse and import a language file from your local machine by
clicking Browse > Import.
Language file to upload Specifies the language files to be installed on the phone.
The valid value is a sting of up to 1024 characters. The default
value is empty.
Phone Language Specifies the language used in phone system.
Value format: complete language file name from 0 to 32
characters, for example: Korean.xml.
The default value is empty.
Feature Access
Call Forward Specifies the status of the Call Forwarding feature.
The options are:
• Off (default)
• Unconditional
• Busy
• Unconditional and Busy
• No answer
• Unconditional and No answer
• Busy and No answer
• Unconditional, No answer and Busy
Number of Ring cycle before Call
Forward
Specifies the number of ring cycles before the call is forwarded.
The valid value is an integer from 0 to 20. The default number
of ring cycles is 1.
Do Not Disturb Specifies the status of the Do Not Disturb feature.
The options are:
• Do Not Allow
• Allow (default)
DND Priority over Call Forward
(Unconditional, Busy)
Specifies the priority between the Do Not Disturb and Call
Forward (Unconditional/Busy) features when both are activated
by the user.
The options are:
• Yes
• No (default)
Auto Answer Specifies the status of the Auto Answer feature.
Table continues…
December 2018 Installing and Administering Avaya J100 Series IP Phones 68
Comments on this document? [email protected]
Page 69

Configuring Settings
Name Description
The options are:
• Do Not Allow (default)
• Allow
Mute on Auto Answer Specifies muting when the Auto Answer feature is enabled.
The options are:
• Yes (default)
• No
Hold Reminder Timer Specifies the time in seconds after which the phone plays the
hold reminder tone.
The valid value is an integer from 0 to 999. The default value is
0 seconds.
Transfer on Conference hangup Specifies whether a conference call continues after the host
hangs up.
The options are:
• Yes
• No (default)
Presence Specifies the status of the Presence feature.
The options are:
• Do Not Allow
• Allow (default)
Phone Menu Options
Settings Specifies whether the Settings menu is displayed on the phone.
The options are:
• Do Not Allow
• Allow (default)
Network Info Screen Specifies whether the Network Information screen is displayed
on the phone.
The options are:
• Do Not Allow
• Allow (default)
SIP User Logout Specifies whether the Logout feature is provided to the user.
The options are:
• Do Not Allow
• Allow (default)
Table continues…
December 2018 Installing and Administering Avaya J100 Series IP Phones 69
Comments on this document? [email protected]
Page 70

Configuring the phone using web interface
Name Description
SSL Version Specifies the version of the SSL certificate.
UDP Transport Specifies whether UDP transport is allowed.
The options are:
• Do Not Allow (default)
• Allow
Network Configuration by User Specifies whether the network configuration can be modified by
the user.
The options are:
• Do Not Allow to Modify
• Allow to Modify (default)
Call Log
Call Log Specifies whether to enable or disable the Call Log application
on the phone.
The options are:
• Do Not Allow
• Allow (default)
Redial Softkey Specifies whether the Redial softkey is available.
The options are:
• Do Not Allow
• Allow (default)
Redial in Phone Menu Specifies whether phone redials the last number or displays the
list of recently dialed numbers.
The options are:
• Do Not Allow (default)
• Allow
Redial Softkey Options Specifies whether to show a list or one number on the Redial
softkey.
The options are:
• List (Redial out of list)
• One number (default)
Contacts
Local Contacts Specifies whether to enable or disable the Contacts application
on the phone.
The options are:
• Do Not Allow
Table continues…
December 2018 Installing and Administering Avaya J100 Series IP Phones 70
Comments on this document? [email protected]
Page 71

Configuring Settings
Name Description
• Allow (default)
Contact Name Format Specifies the format of the contact name to be displayed in the
Contacts list.
The options are:
• 'Last Name' 'First Name' (default)
• 'First Name' 'Last Name'
Contact Name display logic Specifies how to match a dialed string on an incoming call with
the users contacts.
The options are:
• Match the number completely (default)
• Match shorter number completely to the rightmost digits
of longer number
• Match at least 4 rightmost digits
Emergency Call
Emergency Numbers Specifies the emergency contact number.
Note:
Emergency calls are not supported in the 3PCC
environment.
Emergency Softkey Specifies whether the Emergency softkey is displayed after the
phone is registered.
The options are:
• Do Not Display
• Display without Confirmation
• Display with Confirmation (default)
Softkey Emergency Number Specifies the number(s) which is dialed when the Emergency
softkey is pressed.
The valid value is up to 30 dialable characters. The default
value is empty.
Value format: digits from 0 to 9, *, #.
Emergency Softkey on
Unregistration
Specifies whether the Emergency softkey is displayed when
the phone is not registered.
The options are:
• Do Not Display
• Display without Confirmation
• Display with Confirmation (default)
Phone Lock
Table continues…
December 2018 Installing and Administering Avaya J100 Series IP Phones 71
Comments on this document? [email protected]
Page 72

Configuring the phone using web interface
Name Description
Enable Phone Lock Specifies whether the Lock feature is enabled on the phone.
The options are:
• Do Not Allow (default)
• Allow
Phone Lock Idle Time Specifies the idle time in minutes after which the phone is
locked.
The valid value is an integer from 0 to 10080. The default value
is 0 minutes.
Other
Softkey Configuration Specifies which feature will show up on which softkey on the
phone screen.
Note:
This setting applies only to Avaya J129 IP Phone.
The following numbers are assigned to the features:
• 0 – Redial
• 1 – Contacts
• 2 – Emergency
• 3 – Recents
• 4 – Voicemail
Value format: numbers from 0 to 4 and a comma (,).
The default value is “0,1,2”.
Branding Volume Specifies the volume level at which the Avaya audio brand is
played.
The options are:
• 12db below nominal
• 9db below nominal
• 6db below nominal
• 3db below nominal
• Nominal (default)
• 3db above nominal
• 6db above nominal
• 9db above nominal
Phone Mute Alert Specifies whether the Mute Alert feature is blocked.
Table continues…
December 2018 Installing and Administering Avaya J100 Series IP Phones 72
Comments on this document? [email protected]
Page 73

Configuring Settings
Name Description
The options are:
• Unblocked
• Blocked (default)
Extend Ringtone Specifies the audio files to customize the ring tone.
Value format: the list of file names in .xml format separated by
commas.
The default value is empty.
Group Number Specifies group numbers if available.
The valid value is an integer from 0 to 999. The default value is
0.
Minimum delay to backup volume
level to PPM
Specifies the minimal time in seconds between backups of the
volume levels to the PPM service when the phone is registered
to Avaya Aura® Session Manager.
The valid value is an integer from 0 to 900. The default value is
2.
Audio
Call Progress Tone Country Specifies the country of operation.
The valid value is a sting of 0 to 255 characters. The default
value is USA.
AGC Handset Specifies the Automatic Gain Control setting for the handset.
The options are:
• Disable
• Enable (default)
AGC Headset Specifies the Automatic Gain Control setting for the headset
interface.
The options are:
• Disable
• Enable (default)
AGC Speaker Specifies the Automatic Gain Control setting for the speaker.
The options are:
• Disable
• Enable (default)
Handset Sidetone Level Specifies the level of side tone in the handset.
The options are:
• Normal level (default)
Table continues…
December 2018 Installing and Administering Avaya J100 Series IP Phones 73
Comments on this document? [email protected]
Page 74

Configuring the phone using web interface
Name Description
• Three levels softer than Normal
• Off
• One level softer than Normal
• Two levels softer than Normal
• Four levels softer than Normal
• Five levels softer than Normal
• Six levels softer than Normal
• One level louder than Normal
• Two levels louder than Normal
Ringtone Style Specifies the style of the classic ring tone.
The options are:
• North America (default)
• European
Handset Profiles Specifies an ordered list of names to be displayed for handset
audio profile selection.
The list contains audio profiles set in the web interface, the
46xxsettings.txt file and internally, for example:
Default,Normal,Amplified,Hearing Aid.
The default value is empty.
Handset Profile Default Specifies the number of the default handset audio profile.
The options are from 1 to 20. The default value is 1.
Dialing
Dial Plan Specifies the dial plan used in the phone.
Value format: a sting of 0 to 1023 characters without any
intervening spaces.
The default value is empty.
No Digit Dial Timer Specifies the time in seconds during which the phone waits for
a digit to be dialed after going off-hook and before generating a
warning tone.
The valid value is an integer from 0 to 60. The default value is
20 seconds.
Inter-digit Wait Timer Specifies the time in seconds during which phone waits after a
digit is dialed before sending a SIP INVITE.
The valid value is an integer from 0 to 10. The default value is 5
seconds.
Table continues…
December 2018 Installing and Administering Avaya J100 Series IP Phones 74
Comments on this document? [email protected]
Page 75

Configuring Settings
Name Description
Dial Local Area Code Specifies whether the user must dial the area code of calls
within the same area code regions.
The options are:
• No (default)
• Yes
Local Area Code Indicates the phone local area code which allows the user to
dial local numbers with more flexibility.
The valid value is a sting of 5 digits ranged from 0 to 9. The
default value is empty.
Enhanced Local Dialing Rules
Enable Local Dialing Rules Specifies whether the algorithm defined by parameters in this
section is used during certain dialing procedures.
The options are:
• Disable
• Enable without Contacts (default)
• Enable with Contacts
Country Code Specifies the country code of the phone.
The valid value is an integer from 1 to 999. The default value is
1.
International Access Code Specifies the international access code.
The valid value is up to 4 dialable characters. The default value
is 011.
Value format: digits from 0 to 9, *, #.
Long Distance Access Code Specifies the long distance access code.
The valid value range is a sting of integers from 0 to 9, and
empty. The default value is 1.
Internal Extension Number Length Specifies the length of an internal extension number.
The valid value is an integer from 3 to 13. The default value is
5.
National Telephone Number Length Specifies the length of a national phone number.
The valid value is an integer from 5 to 15. The default value is
10.
Outside Line Access Code Specifies the number for making an outside call, i.e. a local call
in a public network.
The valid value is up to 2 dialable characters. The default value
is 9.
Value format: digits from 0 to 9, *, #.
Table continues…
December 2018 Installing and Administering Avaya J100 Series IP Phones 75
Comments on this document? [email protected]
Page 76

Configuring the phone using web interface
Name Description
Remove PSTN access prefix from
outgoing number
Allows dialing digits during failover and removing of the PSTN
access prefix from the outgoing number.
The options are:
• No (default)
• Yes
Admin
Admin Access allowed from Phone Specifies whether the craft procedures are used for the phone
configuration.
The options are:
• Yes (default)
• No
Admin Login fail attempt allowed Specifies the number of failed attempts to enter the
Administration access code before the login is locked.
The options are from 1 to 20. The default value is 10.
Admin Login Locked Time after fail
attempt
Specifies the time interval in minutes to re-enter the
Administration access code after the login is locked.
The valid value is an integer from 5 to 1440. The default value
is 10 minutes.
MLPP
Enable MLPP Specifies whether the MLPP feature is enabled.
The options are:
• Disable (default)
• Enable
Maximum Precedence Level Specifies the maximal allowed precedence level for the user.
The options are from 1 to 5. The default value is 1.
MLPP Network Domain Specifies the MLPP Network Domain.
The valid values are: empty, “uc” and “dsn”. The default value is
empty.
MLPP Precedence Domain Specifies the MLPP Precedence Domain.
The valid value is a sting of alphanumeric characters. The
default value is “000000”.
Enable Precedence Softkey Controls whether the Precedence soft key should be displayed
on idle line appearances on the phone screen.
The options are:
• Disable
• Enable (default)
Table continues…
December 2018 Installing and Administering Avaya J100 Series IP Phones 76
Comments on this document? [email protected]
Page 77

Configuring Settings
Name Description
Guest Login
Guest Login Enable Specifies whether the Guest Login feature is available on the
phone.
The options are:
• Disable (default)
• Enable
Guest Login Session Duration
(hours)
Specifies the time interval in hours before a guest or a visiting
user will be automatically logged off if the telephone is idle.
The valid value is an integer from 1 to 12. The default value is 2
hours.
Guest Login Session Warning Time
(minutes)
Specifies the time interval in minutes before a warning of the
automatic logoff is initially displayed for a guest or a visiting
user.
The valid value is an integer from 1 to 15. The default value is 5
minutes.
Save Extension
Show Last Extension Specifies whether the extension is displayed after logging out.
The options are:
• Disable (default)
• Enable
Bluetooth
Bluetooth Enable Specifies whether Bluetooth can be enabled in the phone menu.
The options are:
• Disable
• Enable (default)
CCMS
Media Preservation Specifies whether a call will be preserved when there is no SIP
connectivity to IP Office.
This setting is applied only in the Avaya Aura® environment.
The options are:
• Disable
• Enable (default)
Preserved Call Duration Specifies the time interval in minutes during which the call is
preserved. To apply this setting, Enable IP Office should be set
to CCMS and Media Preservation should be enabled.
Table continues…
December 2018 Installing and Administering Avaya J100 Series IP Phones 77
Comments on this document? [email protected]
Page 78

Configuring the phone using web interface
Name Description
Note:
This setting is applied only in the Avaya Aura
environment.
The valid value is an integer from 10 to 120. The default value
is 120 minutes.
Brightness
Display Brightness Adjusts the brightness of the phone display.
The options are from 1 to 5. The default value is 4.
Button Module #1 Display Brightness Adjusts the display brightness of the first attached button
module.
Note:
If no button modules are attached to the phone, this field is
disabled.
The options are from 1 to 5. The default value is 4.
Button Module #2 Display Brightness Adjusts the display brightness of the second attached button
module.
®
Note:
If no button modules are attached to the phone, this field is
disabled.
The options are from 1 to 5. The default value is 4.
Button Module #3 Display Brightness Adjusts the display brightness of the third attached button
module.
Note:
If no button modules are attached to the phone, this field is
disabled.
The options are from 1 to 5. The default value is 4.
Related links
Configuring Settings on page 66
Configuring date and time
About this task
Avaya J100 Series IP Phones display the details of the configuration fields in the Description
section.
December 2018 Installing and Administering Avaya J100 Series IP Phones 78
Comments on this document? [email protected]
Page 79

Procedure
1. Log in to the web interface as an administrator.
2. In the navigation pane, click Date & Time.
3. In the SNTP area, configure the following:
• SNTP Server: Type the SNTP server IP address.
• SNTP SYNC Interval: Type the SNTP synchronization time interval in minutes to resynchronize the phone’s local time . The valid value is from 60 to 2880 minutes. The
default synchronization time is 1440 minutes.
• GMT Offset: Type the time between the local standard time and Greenwich Mean Time
(GMT) in hours and minutes. The valid value is from 0:00 to ±12:59.
4. In the Daylight Saving section, configure the following:
• Daylight Saving Mode: Select one of the following options:
- No daylight saving time
- Manual daylight savings activated (time set to DSTOFFSET)
Configuring date and time
- Automatic daylight savings adjustments (as specified by DSTSTART and
DSTSTOP) (default)
• DST Offset: Specifies the time in hours between the standard time and daylight savings
time. Select one of the following options:
- 0
- 1 hour (default)
- 2 hours
• DST Start: Specifies when to apply the offset for daylight savings time. The value format
must be either odddmmmht or Dmmmht, where:
- o represents a one-character ordinal adjective. For example, 1 for first, 2 for second,
3 for third, 4 for fourth, or L for last.
- D represents 1 or 2 ASCII digits or characters representing the date of the month.
- ddd represents three characters containing the English abbreviation for the day of the
week. For example, Sun for Sunday, Mon for Monday, etc.
- mmm represents a three-character English abbreviation for the month. For example,
Jan for January, Feb for February, etc.
- h represents a one-numeric digit representing the time to make the adjustment at
hAM (0h00 in military format).
The valid values of h are from 0 to 9.
- t represents one character for the time zone to which the changes are applied. For
example, “L” for local time or “U” for Universal Time.
December 2018 Installing and Administering Avaya J100 Series IP Phones 79
Comments on this document? [email protected]
Page 80

Configuring the phone using web interface
• DST Stop: Specifies when to stop the offset for daylight saving time. The value format
must be either odddmmmht or Dmmmht, where:
- o represents a one-character ordinal adjective. For example, 1 for first, 2 for second,
3 for third, 4 for fourth, or L for last.
- D represents 1 or 2 ASCII digits or characters representing the date of the month.
- ddd represents three characters containing the English abbreviation for the day of the
week. For example, Sun for Sunday, Mon for Monday, etc.
- mmm represents a three-character English abbreviation for the month. For example,
Jan for January, Feb for February, etc.
- h represents a one-numeric digit representing the time to make the adjustment at
hAM (0h00 in military format).
The valid values of h are from 0 to 9.
- t represents one character for the time zone to which the changes are applied. For
example, “L” for local time or “U” for Universal Time.
5. Click one of the following :
• Save: To save the configuration changes.
• Reset to Default: To revert to the default values.
Configuring management settings
About this task
Avaya J100 Series IP Phones display the details of the configuration fields in the Description
section.
Procedure
1. Log in to the web interface as an administrator.
2. In the navigation pane, click Management.
3. Configure the following areas:
• Device Enrollment Server
• HTTP Provisioning Server
• HTTPS Provisioning Server
• Configuration
• Firmware
• Backup/Restore User Data
December 2018 Installing and Administering Avaya J100 Series IP Phones 80
Comments on this document? [email protected]
Page 81

Configuring management settings
4. Click one of the following:
• Save: To save the configuration changes.
• Reset to Default: To revert to the default values.
Related links
Management settings field descriptions on page 81
Management settings field descriptions
Name Description
Device Enrollment Service
DES Discovery Specifies the DES Discovery mode.
The options are:
• Enable (default)
• Disable
• Disable and Restored with Reset to Default
Embedded Public Certificates Specifies whether to trust the embedded public
certificates.
The options are:
• Trusted only if Trustcerts is empty (default)
• Always Trusted
HTTP Provisioning Server
HTTP Server Address Specifies the IP address of the of the provisioning
file server.
The valid value is the IP address in the dotted
decimal name format, DNS name format or colonhex.
The default value is “0.0.0.0”.
HTTP Server Directory Path Specifies the path all configurations and data files
the device might request when starting up. This
path is relative to the root of the HTTP file server, to
the directory in which the device configuration and
date files are stored.
The valid value is a sting of up to 127 ASCII
characters without spaces. The default value is
empty.
HTTP Port Specifies the HTTP port address.
Table continues…
December 2018 Installing and Administering Avaya J100 Series IP Phones 81
Comments on this document? [email protected]
Page 82

Configuring the phone using web interface
Name Description
The valid value is an integer from 0 to 65535. The
default port number is 80.
HTTPS Provisioning Server
HTTPS Server Address Specifies the IP address of the HTTPS provisioning
file server.
The valid value is the IP address in the dotted
decimal name format, DNS name format or colonhex.
The default value is “0.0.0.0”.
HTTPS Server Directory Path Specifies the path all configurations and data files
the device might request when starting up. This
path is relative to the root of the HTTPS file server,
to the directory in which the device configuration
and date files are stored.
The valid value is a sting of up to 127 ASCII
characters without spaces. The default value is
empty.
HTTPS Port Specifies the HTTPS port address.
The valid value is an integer from 0 to 65535. The
default is 443.
Configuration
Configuration Server Access Mode Specifies the server access mode of the
provisioning server.
The options are:
• HTTP
• HTTPS (default)
Note:
Use HTTPS if the SIP transport mode is TLS,
otherwise, use HTTP.
Download configuration file using HTTPS only Specifies whether only HTTPS is used to download
the settings file.
The options are:
• Yes
• No (default)
Import Configuration File Enables the user to import the settings file. To
import the settings file, click Browse to browse your
local PC or any PC connected to the network.
Select the file and click Import.
Table continues…
December 2018 Installing and Administering Avaya J100 Series IP Phones 82
Comments on this document? [email protected]
Page 83

Changing the password of the web interface and the phone admin
Name Description
Note:
Restart the phone for new parameters from the
settings file to take effect.
Export Configuration File Enable user to export a configuration file. To export
the configuration file, click Export .
Firmware
Software Version Displays the version of the SIP software.
The default value is empty.
Backup Software Version Displays the backup software version.
The default value is empty.
Firmware Upgrade Enables the user to import the firmware upgrade file
from a local PC or any PC connected to the
network.
To upload the firmware upgrade file, click Browse
to browse your PC, select the file and click
Upgrade.
The phone reboots after you select Yes in the
prompt.
Backup/Restore User Data
User store Address for Backup/Restore Specifies the IP address or the DNS name used for
HTTP(S) data backup and retrieval.
The valid value starts with http:// or https://
and contains either an IP address or a DNS name
without any intervening spaces. The maximal value
length is 255 characters.
Related links
Configuring management settings on page 80
Changing the password of the web interface and the
phone admin
About this task
Use this procedure to change the administrator password for the phone Administration menu and
the web interface.
Your administration password must be between 8 to 31 alphanumeric characters including upper,
lower, and special characters. Your password must contain at least 2 digits. You can use special
characters such as: tilde (~), exclamation mark (!), at (@), pound (#), dollar ($), percent (%), carat
December 2018 Installing and Administering Avaya J100 Series IP Phones 83
Comments on this document? [email protected]
Page 84

Configuring the phone using web interface
(^), ampersand (&), asterisk (*), underscore(_), minus (-), plus (+), equal (=), back quote (`), pipe
(|), back slash (\), parenthesis (()), braces ({}), brackets ([]), colon (:), semicolon (;), single quote
('), lesser than (<), greater than (>), comma (,), period (.), question mark (?), forward slash (/).
Procedure
1. Log in to the web interface by using your username and current password.
2. In the navigation pane, click Password.
3. In the Web Admin Password section, do the following:
a. Enter your current password in the Current Password field.
b. Enter your new password in the New Password field.
c. Re-enter your new password in the Confirm Password field.
d. Click Save.
4. In the Phone Administration Menu Password section, do the following:
a. Enter your web administrator password in the Web Administrator Password field.
b. Enter your new password in the New Password field.
c. Re-enter your new password in the Confirm Password field.
d. Click Save.
Debugging
About this task
Avaya J100 Series IP Phones display the details of the configuration fields in the Description
section.
Procedure
1. Log in to the web interface as an administrator.
2. In the navigation pane, click Debugging.
3. Configure the fields in the following areas:
• Log
• SNMP
• RTCP Monitoring
• Phone Report
• SSH
• SLA Monitor
• Other
December 2018 Installing and Administering Avaya J100 Series IP Phones 84
Comments on this document? [email protected]
Page 85

4. Click one of the following:
• Save: To save the configuration changes.
• Reset to Default: To revert to the default values.
Related links
Debugging field descriptions on page 85
Debugging field descriptions
Name Description
Log
Logging Specifies the logging status.
The options are:
• Off (default)
• On
Syslog Server Specifies the IP or the DNS address of the Syslog server.
Debugging
The valid value is a string of up to 255 ASCII characters. The default
value is empty.
Syslog Level Specifies the severity level of the syslog messages. Events with the
selected severity level and above are logged.
The options are:
• Emergencies (default)
• Alerts
• Critical
• Errors
• Warnings
• Notices
• Information
• Debug
Log Categories Specifies the list of log categories.
Select the appropriate log category. For example, select category
Audio for generating audio logs.
The default value is empty.
Enhanced Debugging Specifies the status of enhanced debugging.
The options are:
• Enable
Table continues…
December 2018 Installing and Administering Avaya J100 Series IP Phones 85
Comments on this document? [email protected]
Page 86

Configuring the phone using web interface
Name Description
• Disable (default)
SNMP
SNMP String Specifies the SNMP community name string.
The valid value is a string of up to 32 ASCII characters. The default
value is empty.
SNMP Address Specifies the IP addresses for SNMP queries.
The valid value is a string of up to 255 ASCII characters without any
intervening spaces.
The default value is empty.
RTCP Monitoring
RTCP Monitor Address Specifies the IP or DNS address of the RTCP monitor.
The valid value is a string of up to 255 ASCII characters. The default
value is empty.
RTCP Monitor Port Specifies the RTCP monitor port number.
Valid value is an integer from 0 to 65535. The default value is 5005.
RTCP Monitoring Report
Period
Specifies the time interval in seconds for sending out RTCP monitoring
reports.
Valid value is an integer from 5 to 30. The default value is 5 seconds.
Phone Report
Phone Report Server Address Specifies the file server address to send the phone report. Click on
Generate Phone Report.
The valid value is a string of up to 255 ASCII characters.
SSH
SSH Allowed Specifies whether Secure Shell (SSH) is supported.
The options are:
• Enable
• Disable (default)
• Configured using local craft procedure
SSH Idle Timeout Specifies the time in minutes after which SSH is disabled.
The valid value is an integer from 1 to 32767. The default value is 10
minutes.
SSH Banner File Specifies the file name or the URL for a custom SSH banner file.
The valid value is a string of up to 255 ASCII characters. The default
value is empty.
Table continues…
December 2018 Installing and Administering Avaya J100 Series IP Phones 86
Comments on this document? [email protected]
Page 87

Debugging
Name Description
EASG site certificates Specifies the list of EASG site certificates. Support technicians use
these certificates to generate EASG responses for SSH login without
access to the Avaya network.
The valid value is a string of up to 64 ASCII characters. The default
value is empty.
Note:
You can add maximum four certificates.
EASG site Authentication
Factor code
Specifies the Site Authentication Factor code associated with the
EASG site certificate installed.
Valid value is a string of 10 to 20 alphanumeric characters. The default
value is empty.
Days before EASG certificates
expiration warning
Specifies the number of days before the expiration of EASG product
certificate that a warning message first appears on the phone screen.
Valid value is an integer from 90 to 730. The default value is 365.
SLA Monitor
SLA Monitor Agent Specifies the status of the SLA Monitor Agent.
The options are:
• Enable
• Disable (default)
SLA Monitor Server Address Specifies the IP address of the SLA Monitor server.
Valid value is in the dotted decimal name format. The default value is
“0.0.0.0:0”.
Packet Capture (sniffing) Specifies whether the SLA Monitor agent supports packet capture.
The options are:
• Disable (default)
• Enable with payloads removed from RTP packets
• Enable with payloads included in RTP packets
• Controlled from Admin Menu
Device Control Specifies whether the SLA Monitor agent supports device control.
The options are:
• Disable (default)
• Enable
• Controlled from Admin Menu
Device Performance
Monitoring
Specifies whether the SLA Monitor agent supports access to phone
performance data.
Table continues…
December 2018 Installing and Administering Avaya J100 Series IP Phones 87
Comments on this document? [email protected]
Page 88

Configuring the phone using web interface
Name Description
The options are:
• Enable
• Disable (default)
UDP Port for discovery and
test messages
Other
Serial Port Specifies if the port for network traffic is enabled or disabled.
Specifies the port used to receive packets from an SLA Monitor server.
Valid value is an integer from 6000 to 65535. The default value is
50011.
The options are:
• Enable
• Disable (default)
Related links
Debugging on page 84
Configuring certificates
About this task
Avaya J100 Series IP Phones display the details of the configuration fields in the Description
section.
Procedure
1. Log in to the web interface as an administrator.
2. In the navigation pane, click Certificates.
3. Configure the following areas:
• Certificates
• Online Certificates Status Protocol (OCSP)
• SCEP
• PKCS12
• Web Server
4. Click one of the following:
• Save: To save the configuration changes.
• Reset to Default: To revert to the default values.
Related links
Certificates field descriptions on page 89
December 2018 Installing and Administering Avaya J100 Series IP Phones 88
Comments on this document? [email protected]
Page 89

Configuring certificates
Certificates field descriptions
Name Description
Certificates
Available Trusted Certificate Displays the file names of available certificates for authentication.
Upload Trusted Certificate Specifies the trusted certificate used by the phone. You can also
browse and upload the certificates from the local PC by clicking
Browse > Import.
Trusted Certificates file to upload Specifies the name of the certificate file to be uploaded.
The valid value is a string os up to 255 ASCII characters. File
names must be separated by commas without any intervening
spaces.
The default value is empty.
Match Identity to trust certificate Specifies the status of the TLS server identification.
The options are:
• Yes (default)
• No
Server Certificate re-check hours Specifies the time interval in hours for rechecking the expiration
and revocation status of the certificates used to establish any
existing TLS connections.
The valid value is an integer from 0 to 32767. The default value is
24 hours.
Warning on number of days
before Certificate expiration
FQDN IP Mapping Specifies a FQDN contained in the certificate when an IP address
Online Certificate Status Protocol (OCSP)
Enable OCSP Specifies the status of OSCP.
Specifies the number of days before the expiration of a certificate
that a warning must first appear on the phone screen.
The valid value is an integer from 0 to 99. The default value is 60
days.
is used to establish the connection. The parameter is a commaseparated list of names or value pairs where the name is an FQDN
and the value is an IP address.
The valid value is a string of up to 255 characters without any
intervening spaces. The default value is empty.
The options are:
• Disable (default)
• Enable
Table continues…
December 2018 Installing and Administering Avaya J100 Series IP Phones 89
Comments on this document? [email protected]
Page 90

Configuring the phone using web interface
Name Description
Action on Unknown Revocation
Status
Specifies whether a certificate is authenticated when its revocation
status cannot be determined.
The options are:
• Certificate revocation operation will accept certificates
(default)
• Certificate is considered to be revoked and TLS connection
is closed
Nonce in OCSP Request Specifies whether a nonce is added to OCSP requests and
expected in OCSP responses.
The options are:
• Do not add
• Add (default)
OCSP Address Specifies a URI for an OCSP responder. The URI can be an IP
address or a host name.
The valid value is a string of up to 255 characters without any
intervening spaces. The default value is empty.
OCSP Address Preferred Specifies the preferred OCSP responder URI.
The options are:
• Use OCSP address configured first and then OCSP field of
AIA extension of the certificate being checked (default)
• Use OCSP field of AIA extension of the certificate being
checked first and then OCSP address configured
OCSP Trusted Certificates Specifies the trusted OCSP certificates to be downloaded. It also
acts as a separate trusted certificate repository for the OCSP
Trusted Responder Model and contains certificates that the OCSP
responder can trust.
This value is required if the OCSP responder uses a different CA
for the server certificate than the root CA.
The valid value is a string of up to 255 characters without any
intervening spaces. The default value is empty.
OCSP Hash Algorithm Specifies the hashing algorithm for an OCSP request. value
operation. discuss
The options are:
• SHA-1 (default)
• SHA-256
Use OCSP Caching Specifies whether OCSP caching is in use.
Table continues…
December 2018 Installing and Administering Avaya J100 Series IP Phones 90
Comments on this document? [email protected]
Page 91

Configuring certificates
Name Description
The options are:
• Yes (default)
• No
OCSP Cache Expiry Specifies the time interval in minutes for the OCSP cache expiry.
The valid value is an integer from 60 to 10080. The default value is
2880 minutes.
SCEP
SCEP Server Specifies the URL address of the SCEP server.
The valid value is a string of up to 255 ASCII characters without
any intervening spaces. The default value is empty.
Common Name Specifies the common name for the subject in an SCEP certificate
request.
The valid value is a string of up to 255 ASCII characters without
any intervening spaces. The default value is “$SERIALNO”.
Subject Specifies the part of SUBJECT in an SCEP certificate request that
is common for requests from different device. For example,
Organizational Unit, Organization, Location, State, and Country.
The valid value is a string of up to 255 ASCII characters without
any intervening spaces. The default value is empty.
CA Identifier Specifies the Certificate Authority Identifier.
Certificate Authority servers may require a specific CA Identifier
string to accept GetCA requests. If the device works with such a
Certificate Authority, the CA identifier string can be set through this
parameter.
The valid value is a string of up to 255 ASCII characters without
any intervening spaces. The default value is “CAIdentifier”.
Initiate renewal on % of Validity
Interval
Specifies the percentage of the identity certificate’s Validity interval
after which renewal procedures will be initiated.
If the renewal time interval has elapsed, the phone starts to contact
the SCEP server periodically to renew the certificate.
The valid value is an integer from 1 to 90. The default value is 90
percent.
Phone behavior on Pending
request
Specifies the functioning of the device when performing certificate
enrolment.
The options are:
• Poll SCEP server periodically in background
• Wait until a certificate is received or rejected (default)
SCEP Password Specifies a challenge password to use with SCEP.
Table continues…
December 2018 Installing and Administering Avaya J100 Series IP Phones 91
Comments on this document? [email protected]
Page 92

Configuring the phone using web interface
Name Description
The valid value is a string of up to 255 ASCII characters without
any intervening spaces. The default value is “$SERIALNO”.
PKCS12
PKCS12 Address Specifies the IPv4 or IPv6 URL address, or FQDN from where a
PKCS#12 file is to be downloaded.
The valid value is a string of up to 255 ASCII characters without
any intervening spaces. The default value is empty.
PKCS12 Password Retry Count Specifies the number of attempts allowed for password entry.
The valid value is an integer from 0 to 100. The default value is 3
attempts.
Available Identity Certificate Specifies the trust certificates used as trust points for TLS
connections.
Upload Identity Certificate Displays available trust certificates for the phone.
You can also browse and upload the certificates from the local PC
by clicking Browse > Import.
Web Server
Available Webserver Certificate Specifies the trust certificates used as trust points for TLS
connections.
The valid value must be in .pem or .p12 formats.
Upload Custom Webserver
Certificate
Password for Custom Webserver
Certificate
Specifies the custom certificates to be uploaded.
You can also browse and upload the certificates from the local
machine by clicking Browse > Import
Specifies the password to decrypt the uploaded certificate.
Related links
Configuring certificates on page 88
Configuring Environment Settings
About this task
Avaya J100 Series IP Phones display the details of the configuration fields in the Description
section.
Procedure
1. Log in to the web interface as an administrator.
2. In the navigation pane, click Environment Settings.
December 2018 Installing and Administering Avaya J100 Series IP Phones 92
Comments on this document? [email protected]
Page 93

Configuring Background and Screen Saver of the Phone
3. In the Environment Setting area, enable the required environment:
• AURA environment: To set Avaya Aura as your environment.
• Discover AVAYA environment: To discover whether the phone supports Avaya Aura
SIP AST feature.
• IP Office Environment: To set IP Office as your environment.
• 3PCC Environment: To set a third-party call controller as your environment.
• 3PCC Server Mode: To set an operation mode in the third-party call control
environment.
4. Click one of the following:
• Save: To save the configuration changes.
• Reset to Default: To revert to the default values.
Configuring Background and Screen Saver of the Phone
About this task
Avaya J100 Series IP Phones display the details of the configuration fields in the Description
section.
Procedure
1. Log in to the web interface as an administrator.
2. In the navigation pane, click Background and Screen Saver.
3. Configure the following sections:
a. Background Image
b. Screen Saver
4. Click one of the following:
• Save: To save the configuration changes.
• Reset to Default: To revert to the default values.
Related links
Background Image and Screen Saver field description on page 94
December 2018 Installing and Administering Avaya J100 Series IP Phones 93
Comments on this document? [email protected]
Page 94

Configuring the phone using web interface
Background Image and Screen Saver field description
Name Description
Background Image
Background Image Selectable by User Specifies whether the user can select a background
image.
The options are:
• Enable (default)
• Disable
Selected Background Image Specifies the file name of the selected background
image. The file name must be from the list of
background images (see Background Image List
below).
The valid value is a string of up to 255 characters.
The default value is empty.
Background Image List Specifies the list of background images.
The valid value is a string of up to 255 characters
separated by commas without any intervening
spaces. The default value is empty.
Screen Saver
Screen Saver Image Selectable by User Specifies whether the user can select the screen
saver image.
The options are:
• Enable (default)
• Disable
Selected Screen Saver Image Specifies the file name of the selected screen saver
image. The file name must be from the list of screen
saver images (see Screen Saver Image List
below).
The valid value is a string of up to 255 characters.
The default value is empty.
Screen Saver Image List Specifies the list of screen saver images.
The valid value is a string of up to 255 characters
separated by commas without any intervening
spaces. The default value is empty.
Related links
Configuring Background and Screen Saver of the Phone on page 93
December 2018 Installing and Administering Avaya J100 Series IP Phones 94
Comments on this document? [email protected]
Page 95

Configuring Calendar of the phone
Configuring Calendar of the phone
About this task
Avaya J100 Series IP Phones display the details of the configuration fields in the Description
section.
Procedure
1. Log in to the web interface as an administrator.
2. In the navigation pane, click Calendar.
3. Configure Exchange Calendar.
4. Click one of the following:
• Save: To save the configuration changes.
• Reset to Default: To revert to the default values.
Related links
Exchange Calendar field description on page 95
Exchange Calendar field description
Name
Exchange Calendar
Provide Exchange Calendar Specifies whether the Exchange Calendar menu is
Exchange User Domain Specifies the user domain for the Microsoft
Exchange Email Domain Specifies the email domain for the Microsoft
Exchange Server List Specifies the list of Microsoft Exchange Server IP or
Description
available on the phone.
The options are:
• Enable
• Disable (default)
Exchange Server.
The valid value is a string of up to 255 characters.
The default value is empty.
Exchange Server.
The valid value is a string of up to 255 characters.
The default value is empty.
DNS addresses.
The valid value must be in the dotted decimal name
format or DNS name format without any intervening
Table continues…
December 2018 Installing and Administering Avaya J100 Series IP Phones 95
Comments on this document? [email protected]
Page 96

Configuring the phone using web interface
Name Description
spaces. The maximal value length is 255
characters.
The default value is empty.
Exchange Server Secure Mode Specifies the exchange server mode.
The options are:
• HTTP
• HTTPS (default)
Related links
Configuring Calendar of the phone on page 95
Restarting your phone through web interface
Procedure
1. Log in to the web interface as an administrator.
2. In the navigation pane, click Restart.
3. In the confirmation window Phone will restart if the phone is in idle
state. Do you want to continue?, click OK.
Resetting the phone to Default
Procedure
1. Log in to the web interface as an administrator.
2. In the navigation pane, click Reset to Default.
3. In the confirmation window Phone will restart and reset all parameters
values to factory default if in idle state. Do you want to
continue?, click OK.
December 2018 Installing and Administering Avaya J100 Series IP Phones 96
Comments on this document? [email protected]
Page 97

Chapter 5: Configuring servers and VLAN
Server configuration
To install Avaya J100 Series IP Phones in your telephony environment, you must configure the
following servers:
• DHCP server: To dynamically assign IP addresses to the devices and provide the device
configuration parameters. The DHCP server also provides the device with the addresses of
the SIP controller and file server.
• HTTP or HTTPS file server: To download and save the software distribution package and the
settings file.
In a Device Enrollment Services environment, the DHCP server is used to assign IP addresses to
the devices. The device receives the file server address from Device Enrollment Services.
Related links
File Server configuration on page 97
DHCP server configuration on page 104
File Server configuration
A file server is an HTTP or an HTTPS server that is required to download and save the software
distribution package and the Settings file.
On restarting, the phone checks for software updates and Settings files on the specified file
servers.
You can provide the file server addresses to phones through one of the following methods:
• DHCP
• LLDP
• Administration menu on the phone
• Settings file
December 2018 Installing and Administering Avaya J100 Series IP Phones 97
Comments on this document? [email protected]
Page 98

PHONE
D H C P
Provides IP address
& sets configurable
parameters for
provisioning
Provides the
software distribution
package and Settings
file (configurable
parameters for
provisioning)
46xxsettings.txt
Sets the system
parameters for
configuration
Configures user, communication, and session profile
Manages power
and provides
configurable
parameters
for provisioning
Network server /
Switch (LLDP)
F I L E
S E RV E R
Avaya Aura
®
Communication
Manager
Avaya Aura
®
Session Manager
Primary
Avaya Aura
®
Session Manager
Secondary
Avaya Aura
®
System Manager
Avaya Aura System Manager
®
Configuring servers and VLAN
Figure 1: Diagram: Phone setup in Avaya Aura® environment
December 2018 Installing and Administering Avaya J100 Series IP Phones 98
Comments on this document? [email protected]
Page 99

PHONE
D H C P
Provides IP address
& sets configurable
parameters for
provisioning
Provides the software
Software distribution
package and Settings
file (configurable
parameters for
provisioning)
1
2
46xxsettings.txt
Sets the system
parameters for
configuration
Configures user, communication, and session profile
Manages power
and provides
configurable
parameters
for provisioning
Network server /
Switch (LLDP)
F I L E
S E RV E R
3
Avaya IP
Office Manager
Primary
Avaya IP
Office Manager
Secondary
Avaya Aura
®
System Manager
Avaya IP Office Manager
Server configuration
Related links
Setting up a file server
Figure 2: Diagram: Phone setup in IP Office environment
Server configuration on page 97
Setting up a file server on page 99
Software distribution package on page 100
Downloading and saving the software on page 101
Contents of the settings file on page 101
Modifying the Settings file on page 103
About this task
Use this procedure to configure an HTTP or HTTPS file server. You can use the file server to
download and store distribution packages and settings files for the phones.
Procedure
1. Install the HTTP or HTTPS server software according to the software vendor’s instructions.
For HTTPS connections, you must initially install a trust certificate through an HTTP server
and then transfer to an HTTPS server. Ensure that the TRUSTCERTS parameter includes
the root CA certificate of the HTTPS file server identity certificate.
December 2018 Installing and Administering Avaya J100 Series IP Phones 99
Comments on this document? [email protected]
Page 100

Configuring servers and VLAN
2. Download the software distribution package and the 46xxsettings.txt settings file.
3. Extract the distribution package, and save the extracted files and the 46xxsettings.txt
settings file on the file server.
Related links
File Server configuration on page 97
Software distribution package
Note:
For any new software release, ensure that you download the latest software distribution
package and read any Product Support Notices (PSNs) associated with the new release. Both
are available on the
Review the release notes and any Read Me files associated with a distribution package.
Ensure that the Settings file is not cached in your browser. To do this, clear the browser
cache before downloading the Settings file from the Avaya support Web site, so that you
don’t get an old version.
Software distribution package containing the files needed to operate the Avaya J100 Series IP
Phones are packaged together in a ZIP format. You can download the package from the Avaya
support website.
Avaya support website
Note:
From IP Office R 10.0 SP3 or later, the software distribution package for the Avaya J100
Series IP Phones is part of the IP Office admin CD.
SIP software distribution package contains:
• One or more software files
• One upgrade file (J100Supgrade.txt)
• Language files. For example, Mlf_J129_BrazilianPortuguese.xml,
Mlf_J129_Chinese.xml.
• Files av_prca_pem_2033.txt and av_sipca_pem_2027.txt that contain a copy of the Avaya
Product Root Certificate Authority certificate in PEM format that may be downloaded to
phones based on the value of the TRUSTCERTS parameter.
• File named release.xml that is used by the Avaya Software Update Manager application.
Avaya Software Update Manager upgrades and maintains firmware for Avaya managed
devices.
Note:
Settings files are not included in the software distribution packages because they would
overwrite your existing files and settings.
Two configuration files that are important to understand are as follows:
• The upgrade file, J100Supgrade.txt that tells the phone whether the phone needs to
upgrade software. The phones attempt to read this file whenever they reset. The upgrade
file is also used to point to the Settings file.
December 2018 Installing and Administering Avaya J100 Series IP Phones 100
Comments on this document? [email protected]
 Loading...