

Page 1

DECT Messenger Installation and
Commissioning — Book 2
Avaya Communication Server 1000
NN43120-301, 03.02
7.5
March 2012
Page 2

©
2012 Avaya Inc.
All Rights Reserved.
Notice
While reasonable efforts have been made to ensure that the
information in this document is complete and accurate at the time of
printing, Avaya assumes no liability for any errors. Avaya reserves the
right to make changes and corrections to the information in this
document without the obligation to notify any person or organization of
such changes.
Documentation disclaimer
Avaya shall not be responsible for any modifications, additions, or
deletions to the original published version of this documentation unless
such modifications, additions, or deletions were performed by Avaya.
End User agree to indemnify and hold harmless Avaya, Avaya's agents,
servants and employees against all claims, lawsuits, demands and
judgments arising out of, or in connection with, subsequent
modifications, additions or deletions to this documentation, to the
extent made by End User.
Link disclaimer
Avaya is not responsible for the contents or reliability of any linked Web
sites referenced within this site or documentation(s) provided by Avaya.
Avaya is not responsible for the accuracy of any information, statement
or content provided on these sites and does not necessarily endorse
the products, services, or information described or offered within them.
Avaya does not guarantee that these links will work all the time and has
no control over the availability of the linked pages.
Warranty
Avaya provides a limited warranty on this product. Refer to your sales
agreement to establish the terms of the limited warranty. In addition,
Avaya’s standard warranty language, as well as information regarding
support for this product, while under warranty, is available to Avaya
customers and other parties through the Avaya Support Web site:
http://www.avaya.com/support. Please note that if you acquired the
product from an authorized Avaya reseller outside of the United States
and Canada, the warranty is provided to you by said Avaya reseller and
not by Avaya.
Licenses
THE SOFTWARE LICENSE TERMS AVAILABLE ON THE AVAYA
WEBSITE, HTTP://SUPPORT.AVAYA.COM/LICENSEINFO/ ARE
APPLICABLE TO ANYONE WHO DOWNLOADS, USES AND/OR
INSTALLS AVAYA SOFTWARE, PURCHASED FROM AVAYA INC.,
ANY AVAYA AFFILIATE, OR AN AUTHORIZED AVAYA RESELLER
(AS APPLICABLE) UNDER A COMMERCIAL AGREEMENT WITH
AVAYA OR AN AUTHORIZED AVAYA RESELLER. UNLESS
OTHERWISE AGREED TO BY AVAYA IN WRITING, AVAYA DOES
NOT EXTEND THIS LICENSE IF THE SOFTWARE WAS OBTAINED
FROM ANYONE OTHER THAN A V A Y A, AN A V A Y A AFFILIA TE OR AN
AVAYA AUTHORIZED RESELLER, AND AVAYA RESERVES THE
RIGHT TO TAKE LEGAL ACTION AGAINST YOU AND ANYONE
ELSE USING OR SELLING THE SOFTWARE WITHOUT A LICENSE.
BY INST ALLING, DOWNLOADING OR USING THE SOFTW ARE, OR
AUTHORIZING OTHERS TO DO SO, YOU, ON BEHALF OF
YOURSELF AND THE ENTITY FOR WHOM YOU ARE INSTALLING,
DOWNLOADING OR USING THE SOFTWARE (HEREINAFTER
REFERRED TO INTERCHANGEABL Y AS “YOU” AND “END USER”),
AGREE TO THESE TERMS AND CONDITIONS AND CREATE A
BINDING CONTRACT BETWEEN YOU AND AVAYA INC. OR THE
APPLICABLE AVAYA AFFILIATE (“AVAYA”).
Copyright
Except where expressly stated otherwise, no use should be made of
materials on this site, the Documentation(s) and Product(s) provided
by Avaya. All content on this site, the documentation(s) and the
product(s) provided by Avaya including the selection, arrangement and
design of the content is owned either by Avaya or its licensors and is
protected by copyright and other intellectual property laws including the
sui generis rights relating to the protection of databases. You may not
modify, copy, reproduce, republish, upload, post, transmit or distribute
in any way any content, in whole or in part, including any code and
software. Unauthorized reproduction, transmission, dissemination,
storage, and or use without the express written consent of Avaya can
be a criminal, as well as a civil, offense under the applicable law.
Third-party components
Certain software programs or portions thereof included in the Product
may contain software distributed under third party agreements (“Third
Party Components”), which may contain terms that expand or limit
rights to use certain portions of the Product (“Third Party Terms”).
Information regarding distributed Linux OS source code (for those
Products that have distributed the Linux OS source code), and
identifying the copyright holders of the Third Party Components and the
Third Party Terms that apply to them is available on the A vaya Support
Web site: http://www.avaya.com/support/Copyright/.
Preventing toll fraud
“T oll fraud” is the unauthorized use of your telecommunications system
by an unauthorized party (for example, a person who is not a corporate
employee, agent, subcontractor, or is not working on your company's
behalf). Be aware that there can be a risk of toll fraud associated with
your system and that, if toll fraud occurs, it can result in substantial
additional charges for your telecommunications services.
Avaya fraud intervention
If you suspect that you are being victimized by toll fraud and you need
technical assistance or support, call Technical Service Center Toll
Fraud Intervention Hotline at +1-800-643-2353 for the United States
and Canada. For additional support telephone numbers, see the Avaya
Support Web site:
vulnerabilities with Avaya products should be reported to Avaya by
sending mail to: securityalerts@avaya.com.
Trademarks
The trademarks, logos and service marks (“Marks”) displayed in this
site, the documentation(s) and product(s) provided by Avaya are the
registered or unregistered Marks of Avaya, its affiliates, or other third
parties. Users are not permitted to use such Marks without prior written
consent from Avaya or such third party which may own the Mark.
Nothing contained in this site, the documentation(s) and product(s)
should be construed as granting, by implication, estoppel, or otherwise,
any license or right in and to the Marks without the express written
permission of Avaya or the applicable third party.
Avaya is a registered trademark of Avaya Inc.
All other trademarks are the property of their respective owners.
Downloading documents
For the most current versions of documentation, see the Avaya Support
Web site:
Contact Avaya Support
Avaya provides a telephone number for you to use to report problems
or to ask questions about your product. The support telephone number
is 1-800-242-2121 in the United States. For additional support
telephone numbers, see the Avaya Web site:
support
http://www.avaya.com/support/. Suspected security
http://www.avaya.com/support
http://www.avaya.com/
2 DECT Messenger Installation and Commissioning — Book 2 March 2012
Comments? infodev@avaya.com
Page 3

Contents
Chapter 1: Module - eSMTP................................................................................................
Initialization...............................................................................................................................................
Output program activity.............................................................................................................................
Logging.....................................................................................................................................................
Relaying and Routing................................................................................................................................
Windows SMTP server.....................................................................................................................
Domino (Lotus Notes)......................................................................................................................
Chapter 2: Module - eSMTP_server...................................................................................
Keyword processing..................................................................................................................................
Initialization...............................................................................................................................................
Activity of eSMTP_server..........................................................................................................................
Logging.....................................................................................................................................................
Chapter 3: Module - eSNMP...............................................................................................
Architecture...............................................................................................................................................
Send SNMP Message for Win32..............................................................................................................
Send SNMP Message for Web.................................................................................................................
Send SNMP Message for iSeries..............................................................................................................
Chapter 4: Module - eTM....................................................................................................
Shutting down eTM_HA............................................................................................................................
Chapter 5: Module - eTM_HA.............................................................................................
Overview...................................................................................................................................................
Publisher and Subscriber..........................................................................................................................
Registry settings eTM...............................................................................................................................
Registry settings eTM_HA........................................................................................................................
Merging registry files.................................................................................................................................
Check tasks...............................................................................................................................................
Shutting down eTM_HA...................................................................................................................
Publisher...................................................................................................................................................
Keeping track of states..............................................................................................................................
Subscriber........................................................................................................................................
Publisher..........................................................................................................................................
Recommendation.............................................................................................................................
XML image.......................................................................................................................................
SQL script.........................................................................................................................................
Switch back......................................................................................................................................
Conclusion................................................................................................................................................
Chapter 6: Module - eVBVOICE.........................................................................................
Introduction...............................................................................................................................................
Inbound calls....................................................................................................................................
Outbound calls.................................................................................................................................
VBV4.INI Hardware-specific settings...............................................................................................
Chapter 7: Module - eVBVOICE AHVR..............................................................................
Introduction...............................................................................................................................................
Configuration.............................................................................................................................................
15
15
17
19
22
24
25
27
29
29
32
36
41
41
47
48
49
51
63
65
65
67
68
73
79
81
82
84
87
87
87
88
90
91
92
92
95
95
97
104
114
121
121
122
DECT Messenger Installation and Commissioning — Book 2 March 2012 3
Page 4

Chapter 8: Module - eWEB.................................................................................................
Sign-on procedure.....................................................................................................................................
Sign-off procedure............................................................................................................................
Send DMS-API Message..........................................................................................................................
Send SMTP Message...............................................................................................................................
Send Server Message...............................................................................................................................
Send Group Message...............................................................................................................................
Send User Message..................................................................................................................................
Send Script Message................................................................................................................................
Set Script..........................................................................................................................................
Trace Active Script...........................................................................................................................
Cancel Script....................................................................................................................................
Trace Ended Script...........................................................................................................................
Alarm Inquiry.............................................................................................................................................
Device Inquiry...........................................................................................................................................
Group Inquiry............................................................................................................................................
Table View.................................................................................................................................................
Work with Groups......................................................................................................................................
Change Password.....................................................................................................................................
Info............................................................................................................................................................
Sign off......................................................................................................................................................
Plug-in Support.........................................................................................................................................
Plug-in module MyPortal@Net.........................................................................................................
Chapter 9: Module - Web Administrator...........................................................................
Authentication...........................................................................................................................................
Work with Users........................................................................................................................................
Chapter 10: Module - Web Administrator User Guide.....................................................
Authorization level.....................................................................................................................................
Log in................................................................................................................................................
Log out.............................................................................................................................................
Send a message..............................................................................................................................
Change password............................................................................................................................
Reports of active alarms...................................................................................................................
Reports of ended alarms..................................................................................................................
Reports on alarms............................................................................................................................
Configuration of basic group members............................................................................................
Configuration of basic alternative devices........................................................................................
Configuration basic overview...........................................................................................................
Supervisor........................................................................................................................................
Work with scripts - activate script.....................................................................................................
Work with Scripts - End Script..........................................................................................................
Reporting active scripts....................................................................................................................
Reporting ended scripts...................................................................................................................
Administrator....................................................................................................................................
Send an SNMP trap.........................................................................................................................
Advanced configuration....................................................................................................................
Configuration of advanced facilities..................................................................................................
127
127
128
129
130
131
133
134
136
136
137
137
138
138
139
139
139
139
142
142
142
143
143
145
145
146
147
148
152
153
153
159
159
160
161
162
164
167
167
168
170
170
171
172
172
174
174
4 DECT Messenger Installation and Commissioning — Book 2 March 2012
Page 5

Configuration of advanced devices..................................................................................................
Configuration of advanced groups...................................................................................................
Configuration of advanced users......................................................................................................
Expert...............................................................................................................................................
Chapter 11: Table: eASYNC................................................................................................
eASYNC parameters.................................................................................................................................
eASYNC_Site_id_n..........................................................................................................................
eASYNC_Area_id_n.........................................................................................................................
eASYNC_Type_str...........................................................................................................................
eASYNC_Provider_str......................................................................................................................
eASYNC_Password_str...................................................................................................................
eASYNC_COM_Port_str..................................................................................................................
eASYNC_Settings_str......................................................................................................................
eASYNC_Telnr_str...........................................................................................................................
eASYNC_Init_str..............................................................................................................................
eASYNC_Retry_intv_n.....................................................................................................................
eASYNC_Retry_count_n..................................................................................................................
eASYNC_Send_depth_n..................................................................................................................
eASYNC_Send_time_n....................................................................................................................
eASYNC_ALA_Prty_DTMF_Confirm_n...........................................................................................
eASYNC_Silence_intv_n..................................................................................................................
eASYNC_Comments_str..................................................................................................................
Chapter 12: Table: eBACKUP.............................................................................................
eBACKUP parameters..............................................................................................................................
BU_Site_id_n...................................................................................................................................
BU_From_Path_str...........................................................................................................................
BU_From_File_str............................................................................................................................
BU_To_Path_str...............................................................................................................................
BU_To_File_str.................................................................................................................................
BU_Comments_str...........................................................................................................................
Sample Data.............................................................................................................................................
Chapter 13: Table: eCAP_generic......................................................................................
eCAP_generic parameters........................................................................................................................
eCAPG_Inpgm_id_n........................................................................................................................
Chapter 14: Table: eDMSAPI..............................................................................................
eDMSAPI parameters...............................................................................................................................
eDMSAPI_site_id_n.........................................................................................................................
eDMSAPI_Area_id_n.......................................................................................................................
eDMSAPI_Seats_count_n................................................................................................................
eDMSAPI_eKERNEL_Seats_count_n.............................................................................................
eDMSAPI_External_Seats_count_n................................................................................................
eDMSAPI_External_Address_str.....................................................................................................
eDMSAPI_External_Port_str............................................................................................................
eDMSAPI_ALA_Prty_UMSG_n........................................................................................................
eDMSAPI_ALA_Prty_EMSG_n........................................................................................................
eDMSAPI_api_address_str..............................................................................................................
eDMSAPI _API_port_str...................................................................................................................
175
178
180
182
187
187
187
187
187
188
188
189
189
189
190
190
190
190
191
191
192
192
193
193
193
193
193
193
194
195
195
197
197
197
207
207
207
207
208
208
208
208
209
209
209
210
210
DECT Messenger Installation and Commissioning — Book 2 March 2012 5
Page 6

eDMSAPI _PBX_address_str...........................................................................................................
eDMSAPI_PBX_port_str..................................................................................................................
eDMSAPI_PBX_type_str..................................................................................................................
eDMSAPI_PBX_licence_str.............................................................................................................
eDMSAPI_Guarding_Polling_intv_n................................................................................................
eDMSAPI_Guarding_Retry_intv_n...................................................................................................
eDMSAPI_Msg_dly_n......................................................................................................................
eDMSAPI_GeneralTimeOut_n.........................................................................................................
eDMSAPI_Ack2TimeOut_n..............................................................................................................
eDMSAPI_DataPathDelay_n...........................................................................................................
eDMSAPI_Comments_str................................................................................................................
Chapter 15: Table: eDMSAPI_INBOUND...........................................................................
eDMSAPI_inbound parameters................................................................................................................
eDMSAPII_Site_id_n........................................................................................................................
eDMSAPII_Area_id_n......................................................................................................................
eDMSAPII_Called_dev_str...............................................................................................................
eDMSAPII_Type_str.........................................................................................................................
eDMSAPII_Comments_str...............................................................................................................
Chapter 16: Table: eDMSAPI_INBOUND_EVENT.............................................................
eDMSAPI_inbound_event parameters.....................................................................................................
eDMSAPIIE_Site_id_n.....................................................................................................................
eDMSAPIIE_Area_id_n....................................................................................................................
eDMSAPIIE_Called_dev_str............................................................................................................
eDMSAPIIE_Calling_dev_str...........................................................................................................
eDMSAPIIE_Ala_id_Normal_n.........................................................................................................
eDMSAPIIE_Ala_id_Urgent_n.........................................................................................................
eDMSAPIIE_Comments_str.............................................................................................................
Chapter 17: Table: eDMSAPI_INBOUND_RESULT...........................................................
eDMSAPI _inbound_result parameters....................................................................................................
eDMSAPIIR_Site_id_n.....................................................................................................................
eDMSAPIIR_Area_id_n....................................................................................................................
eDMSAPIIR_IC_Called_dev_str......................................................................................................
eDMSAPIIR_Calling_dev_str...........................................................................................................
eDMSAPIIR_GRP_Name_str...........................................................................................................
eDMSAPIIR_Msg_str.......................................................................................................................
eDMSAPIIR_Descr_str.....................................................................................................................
eDMSAPIIR_Comments_str.............................................................................................................
Chapter 18: Table: eESPA...................................................................................................
eESPA parameters....................................................................................................................................
eESPA_Site_id_n.............................................................................................................................
eESPA_Area_id_n............................................................................................................................
eESPA_Link_Type_str......................................................................................................................
eESPA_ControlStation_b.................................................................................................................
eESPA_Polling_intv_n......................................................................................................................
eESPA_Polling_address_list_str......................................................................................................
eESPA_LocalAddress_n..................................................................................................................
eESPA_ExternalAddress_n..............................................................................................................
210
210
211
211
211
211
212
212
212
212
212
213
213
213
213
213
213
214
217
217
217
217
217
218
218
218
219
221
221
221
221
221
222
222
222
223
223
225
225
225
225
226
226
226
226
227
227
6 DECT Messenger Installation and Commissioning — Book 2 March 2012
Page 7

eESPA_DataId_Group_str................................................................................................................
eESPA_Group_default_str...............................................................................................................
eESPA_DataId_Msg_str...................................................................................................................
eESPA_Msg_default_str...................................................................................................................
eESPA_DataId_Ala_descr_str..........................................................................................................
eESPA_Ala_descr_default_str.........................................................................................................
eESPA_Remove_after_str................................................................................................................
eESPA_NAK_retry_cnt_n.................................................................................................................
eESPA_Timeout_n...........................................................................................................................
eESPA_Handshaking_n...................................................................................................................
eESPA_OUT_Call_type_default_str.................................................................................................
eESPA_OUT_Nmbr_transm_default_str..........................................................................................
eESPA_Comments_str.....................................................................................................................
Chapter 19: Table: eESPA_OUTBOUND_CFG..................................................................
eESPA_outbond_cfg parameters..............................................................................................................
eESPAO_Site_id..............................................................................................................................
eESPAO_Area_id_n.........................................................................................................................
eESPAO_ALA_Prty_from_n.............................................................................................................
eESPAO_ALA_Prty_to_n.................................................................................................................
eESPAO_BeepCode_str..................................................................................................................
eESPAO_Priority_str........................................................................................................................
eESPAO_Comments_str..................................................................................................................
Chapter 20: Table: eIO_MODULE.......................................................................................
eIO_modules parameters..........................................................................................................................
eIOM_Site_id_n................................................................................................................................
eIOM_Area_id_n..............................................................................................................................
eIOM_Module_str.............................................................................................................................
eIOM_Type_str.................................................................................................................................
eIOM_Url_str....................................................................................................................................
eIOM_Contact_cnt_n.......................................................................................................................
eIOM_Comments_str.......................................................................................................................
Chapter 21: Table: eIO_AI...................................................................................................
eIO_AI parameters....................................................................................................................................
eIOAI_Site_id_n...............................................................................................................................
eIOAI_Area_id_n..............................................................................................................................
eIOAI_Module_str............................................................................................................................
eIOAI_Contact_str............................................................................................................................
eIOAI_Min_S_str..............................................................................................................................
eIOAI_Min_R_str..............................................................................................................................
eIOAI_Max_R_str.............................................................................................................................
eIOAI_Max_S_str.............................................................................................................................
eIOAI_ALA_Descr_str......................................................................................................................
eIOAI_GRP_Name_str.....................................................................................................................
eIOAI_MSG_str................................................................................................................................
eIOAI_Comments_str.......................................................................................................................
Chapter 22: Table: eIO_DI...................................................................................................
eIO_DI parameters....................................................................................................................................
227
229
229
231
231
233
233
234
234
235
235
236
237
239
239
239
239
239
240
241
241
241
243
243
243
243
243
244
244
244
245
247
247
247
247
247
248
248
249
249
250
250
251
251
251
255
255
DECT Messenger Installation and Commissioning — Book 2 March 2012 7
Page 8

eIODI_Site_id_n...............................................................................................................................
eIODI_Area_id_n..............................................................................................................................
eIODI_Module_str............................................................................................................................
eIODI_Contact_str............................................................................................................................
eIODI_ContactType_str....................................................................................................................
eIODI_ALA_Descr_str......................................................................................................................
eIODI_GRP_Name_str.....................................................................................................................
eIODI_MSG_str................................................................................................................................
eIODI_Comments_str.......................................................................................................................
Chapter 23: Table: eIO_DO.................................................................................................
eIO_DO parameters..................................................................................................................................
eIODO_Site_id_n.............................................................................................................................
eIODO_Area_id_n............................................................................................................................
eIODO_Module_str..........................................................................................................................
eIODO_Contact_str..........................................................................................................................
eIODO_Seconds_n..........................................................................................................................
eIODO_Comments_str.....................................................................................................................
Chapter 24: Table: eKERNEL_AREA.................................................................................
eKERNEL_area parameters.....................................................................................................................
AREA_Site_id_n...............................................................................................................................
AREA_Area_id_n.............................................................................................................................
AREA_Area_Descr_str.....................................................................................................................
AREA_Area_Comments_str.............................................................................................................
Chapter 25: Table: eKERNEL_ALARM..............................................................................
eKERNEL_alarm parameters....................................................................................................................
ALA_id_n..........................................................................................................................................
ALA_Descr_str.................................................................................................................................
ALA_Remove_after_str....................................................................................................................
ALA_Prty_n......................................................................................................................................
ALA_to_ringing_n.............................................................................................................................
ALA_to_Connect_n..........................................................................................................................
ALA_to_Queued_n...........................................................................................................................
ALA_Silence_intv_n.........................................................................................................................
ALA_Scroll_state_str........................................................................................................................
ALA_Scroll_intv_n............................................................................................................................
ALA_Group_delivery_str..................................................................................................................
ALA_Confirm_action_str..................................................................................................................
ALA_Repeat_intv_n.........................................................................................................................
ALA_Length_n..................................................................................................................................
ALA_Trace_b....................................................................................................................................
ALA_Trace_dayToKeep_n................................................................................................................
ALA_Comments_str.........................................................................................................................
Chapter 26: Table: eKERNEL_DEVICE..............................................................................
eKERNEL_DEVICE parameters...............................................................................................................
DEV_site_id_n..................................................................................................................................
DEV_Area_id_n................................................................................................................................
DEV_id_str.......................................................................................................................................
255
255
255
256
256
256
257
257
257
259
259
259
259
259
260
260
260
263
263
263
263
264
264
265
265
265
267
268
269
269
269
270
270
270
271
271
271
272
272
272
273
273
277
277
277
277
278
8 DECT Messenger Installation and Commissioning — Book 2 March 2012
Page 9

DEV_OUTPGM_str..........................................................................................................................
DEV_OUTPGM_facility_str..............................................................................................................
DEV_Visual_dnr_str.........................................................................................................................
DEV_Descr_str.................................................................................................................................
DEV_PinCode_str............................................................................................................................
DEV_Prty_n......................................................................................................................................
DEV_Retry_count_ALT_DEV_id_n..................................................................................................
DEV_Monitor_b................................................................................................................................
DEV_IoRegister_b............................................................................................................................
DEV_Div_Site_id_n..........................................................................................................................
DEV_Div_Area_id_n........................................................................................................................
DEV_Div_OUTPGM_Appl_str..........................................................................................................
DEV_Div_OUTPGM_Facility_str......................................................................................................
DEV_Ras_Site_b.............................................................................................................................
DEV_Ras_Area_b............................................................................................................................
DEV_Comments_str.........................................................................................................................
Chapter 27: Table: eKERNEL_DEVICE_ALT.....................................................................
eKERNEL_DEVICE_ALT parameters.......................................................................................................
ALT_Dev_Site_id_n..........................................................................................................................
ALT_Dev_Area_id_n........................................................................................................................
ALT_Dev_id_str................................................................................................................................
ALT_OUTPGM_Appl_str..................................................................................................................
ALT_Sequence_n.............................................................................................................................
ALT_Alt_DEV_Site_id_n...................................................................................................................
ALT_Alt_DEV_area_id_n..................................................................................................................
ALT_Alt_dev_id_str..........................................................................................................................
ALT_Alt_OUTPGM_Appl_str............................................................................................................
ALT_Alt_OUTPGM_Facility_str........................................................................................................
ALT_descr_str..................................................................................................................................
ALT_Comments_str..........................................................................................................................
Chapter 28: Table: eKERNEL_DEVICE_FORMAT.............................................................
eKERNEL_DEVICE_FORMAT parameters..............................................................................................
FMT_OUTPGM_Appl_str.................................................................................................................
FMT_OUTPGM_Facility_str.............................................................................................................
FMT_Bytes_line1_n.........................................................................................................................
FMT_Bytes_line2_n.........................................................................................................................
FMT_Bytes_line3_n.........................................................................................................................
FMT_Page_ind_n.............................................................................................................................
FMT_Page_more_ind_n...................................................................................................................
FMT_Concatination_b......................................................................................................................
FMT_Scroll_depth_n........................................................................................................................
FMT_AllowEmergency_b.................................................................................................................
FMT_Descr_str.................................................................................................................................
FMT_Comments_str.........................................................................................................................
Chapter 29: Table: eKERNEL_GROUP..............................................................................
eKERNEL_GROUP parameters...............................................................................................................
GRP_id_str.......................................................................................................................................
278
279
279
279
279
280
280
281
281
281
281
282
282
282
282
283
285
285
285
285
285
286
286
286
286
286
287
287
287
287
289
289
289
289
290
290
291
291
291
292
292
292
293
293
295
295
295
DECT Messenger Installation and Commissioning — Book 2 March 2012 9
Page 10

GRP_InPGM_id_n............................................................................................................................
GRP_Name_str................................................................................................................................
GRP_Descr_str................................................................................................................................
GRP_Comments_str........................................................................................................................
Chapter 30: Table: eKERNEL_GROUP_AUTH..................................................................
eKERNEL_GROUP_AUTH parameters....................................................................................................
GRPA_GRP_id_str...........................................................................................................................
GRPA_UserID_str............................................................................................................................
GRPA_Comments_str......................................................................................................................
Chapter 31: Table: eKERNEL_GROUP_MEMBER............................................................
eKERNEL_GROUP_MEMBER parameters..............................................................................................
GRPM_GRP_id_str..........................................................................................................................
GRPM_Dev_id_str...........................................................................................................................
GRPM_Dev_Site_id_n.....................................................................................................................
GRPM_Dev_Area_id_n....................................................................................................................
GRP_OUTPGM_Appl_str.................................................................................................................
GRP_From_str.................................................................................................................................
GRP_To_str......................................................................................................................................
GRP_Mon_b.....................................................................................................................................
GRP_Tue_b......................................................................................................................................
GRP_Wed_b....................................................................................................................................
GRP_Thu_b.....................................................................................................................................
GRP_Fri_b.......................................................................................................................................
GRP_Sat_b......................................................................................................................................
GRP_Sun_b.....................................................................................................................................
GRP_Holiday_b................................................................................................................................
GRPM_Activate_timestamp_str.......................................................................................................
GRPM_Desactivate_timestamp_str.................................................................................................
GRP_Comments_str........................................................................................................................
Chapter 32: Table: eKERNEL_GUARDING........................................................................
eKERNEL_GUARDING parameters.........................................................................................................
GUA_INPPGM_id_n.........................................................................................................................
GUA_From_str.................................................................................................................................
GUA_To_str......................................................................................................................................
GUA_Mon_b.....................................................................................................................................
GUA_Tue_b......................................................................................................................................
GUA_Wed_b....................................................................................................................................
GUA_Thu_b.....................................................................................................................................
GUA_Fri_b.......................................................................................................................................
GUA_Sat_b......................................................................................................................................
GUA_Sun_b.....................................................................................................................................
GUA_Timeout_n...............................................................................................................................
GUA_msg_str...................................................................................................................................
GUA_GRP_Name_str......................................................................................................................
GUA_ALA_id_n................................................................................................................................
GUA_Comments_str........................................................................................................................
Chapter 33: Table: eKERNEL_HOLIDAY...........................................................................
296
296
297
297
299
299
299
299
300
301
301
301
302
303
303
303
304
304
305
305
305
305
306
306
306
306
307
307
307
309
309
309
309
310
310
310
311
311
311
311
311
312
312
312
312
313
315
10 DECT Messenger Installation and Commissioning — Book 2 March 2012
Page 11

eKERNEL_HOLIDAY parameters.............................................................................................................
Holiday_str.......................................................................................................................................
Holiday_Comments_str....................................................................................................................
Chapter 34: Table: eKERNEL_INPGM...............................................................................
eKERNEL_INPGM parameters.................................................................................................................
INPGM_id_n.....................................................................................................................................
INPGM_Site_id_n.............................................................................................................................
INPGM_Area_id_n...........................................................................................................................
INPGM_Appl_str..............................................................................................................................
INPGM_Manufacturer_str................................................................................................................
INPGM_Model_str............................................................................................................................
INPGM_Bidir_b................................................................................................................................
INPGM_Resource_str......................................................................................................................
INPGM_Settings_str.........................................................................................................................
INPGM_AutoCreateGRP_b..............................................................................................................
INPGM_Default_DEV_OUTPGM_str...............................................................................................
INPGM_Default_DEV_OUTPGM_facility_str...................................................................................
INPGM_Descr_str............................................................................................................................
INPGM_Comments_str....................................................................................................................
Chapter 35: Table: eKERNEL_MESSAGE_FORMAT........................................................
eKERNEL_MESSAGE_FORMAT parameters..........................................................................................
Msg_Ala_id_n...................................................................................................................................
Msg_Msg_str....................................................................................................................................
Msg_VBVoice_phrase_str................................................................................................................
Msg_descr_str..................................................................................................................................
Msg_Comments_str.........................................................................................................................
Chapter 36: Table: eKERNEL_SITE...................................................................................
eKERNEL_SITE parameters.....................................................................................................................
CFG_site_id_n.................................................................................................................................
Chapter 37: Table: eKERNEL_TCPCLIENT.......................................................................
eKERNEL-TCPCLIENT parameters.........................................................................................................
TCPCLIENT_site_id_n.....................................................................................................................
Chapter 38: Table: eLOCATION..........................................................................................
eLOCATION parameters...........................................................................................................................
eLOC_Site_id_n...............................................................................................................................
eLOC_Area_id_n..............................................................................................................................
eLOC_LA_address_str.....................................................................................................................
eLOC_LA_port_str...........................................................................................................................
eLOC_GeneralTimeOut_n................................................................................................................
eLOC_Retry_count_n.......................................................................................................................
eLOC_Retry_intv_n..........................................................................................................................
eLOC_Polling_intv_n........................................................................................................................
eLOC_Comments_str.......................................................................................................................
Chapter 39: Table: eLOCATION INBOUND RESULT.........................................................
eLOCATION_INBOUND_RESULT parameters........................................................................................
eLOCIR_Inpgm_id_n........................................................................................................................
eLOCIR_Called_dev_str..................................................................................................................
315
315
316
317
317
317
318
318
318
319
319
320
320
321
321
322
322
322
323
325
325
325
326
326
326
327
329
329
329
337
337
337
343
343
343
343
343
344
344
344
345
345
345
347
347
347
347
DECT Messenger Installation and Commissioning — Book 2 March 2012 11
Page 12

eLOCIR_Calling_dev_str..................................................................................................................
eLOCIR_eLOC_Site_id_n................................................................................................................
eLOCIR_eLOC_Area_id_n...............................................................................................................
eLOCIR_GRP_Name_str.................................................................................................................
eLOCIR_Msg_str..............................................................................................................................
eLOCIR_Comments_str...................................................................................................................
Chapter 40: Table: eLOCATION RPN.................................................................................
eLOCATION_RPN parameters.................................................................................................................
eLOCRPN_Site_id_n.......................................................................................................................
eLOCRPN_Area_id_n......................................................................................................................
eLOCRPN_RPN_str.........................................................................................................................
eLOCRPN_Message_str..................................................................................................................
eLOCRPN_Comments_str...............................................................................................................
Chapter 41: Table: eOAI......................................................................................................
eOAI parameters.......................................................................................................................................
eOAI_Site_id_n................................................................................................................................
eOAI_Area_id_n...............................................................................................................................
eOAI_Framework_Address_str........................................................................................................
eOAI_Framework_Port_n.................................................................................................................
eOAI_ALA_Prty_DTMF_Confirm_n.................................................................................................
eOAI_Silence_intv_n........................................................................................................................
eOAI_Comments_str........................................................................................................................
Chapter 42: Table: eOAP....................................................................................................
eOAP parameters.....................................................................................................................................
eOAP_Site_id_n...............................................................................................................................
eOAP_Area_id_n.............................................................................................................................
eOAP_Framework_Address_str.......................................................................................................
eOAP_Framework_Port_n...............................................................................................................
eOAP_ALA_Prty_DTMF_Confirm_n................................................................................................
eOAP_Silence_intv_n......................................................................................................................
eOAP_Comments_str......................................................................................................................
Chapter 43: Table: eSMTP_CLIENT...................................................................................
eSMTP_CLIENT parameters....................................................................................................................
eSMTP_Site_id_n............................................................................................................................
eSMTP_Area_id_n...........................................................................................................................
eSMTP_srv_ip_str............................................................................................................................
eSMTP_srv_port_str........................................................................................................................
eSMTP_srv_domain_str...................................................................................................................
eSMTP_ALA_Prty_DTMF_Confirm_n..............................................................................................
eSMTP_Silence_intv_n....................................................................................................................
eSMTP_From_address_str..............................................................................................................
eSMTP_Comments_str....................................................................................................................
Chapter 44: Table: eSMTP_SERVER.................................................................................
eSMTP_SERVER parameters..................................................................................................................
eSMTP_Site_id_n............................................................................................................................
eSMTPS_Area_id_n.........................................................................................................................
eSMTPS_Email_dir_str....................................................................................................................
348
348
348
348
349
349
351
351
351
351
351
352
352
353
353
353
353
353
353
354
354
354
355
355
355
355
355
355
356
356
356
357
357
357
357
357
358
358
358
359
359
359
361
361
361
361
361
12 DECT Messenger Installation and Commissioning — Book 2 March 2012
Page 13

eSMTPS_Poll_intv_n.......................................................................................................................
eSMTPS_Email_dir_processed.......................................................................................................
eSMTPS_Email_keep_processed_n................................................................................................
eSMTPS_Email_dir_error_str..........................................................................................................
eSMTPS_Email_keep_error_n.........................................................................................................
eSMTPS_Delivery_text_str..............................................................................................................
eSMTPS_NonDelivery_text_str........................................................................................................
eSMTPS_ALA_id_n.........................................................................................................................
eSMTPS_Comments........................................................................................................................
Chapter 45: Table: eWEB....................................................................................................
eWEB parameters.....................................................................................................................................
eWEB_Address_str..........................................................................................................................
eWEB_Site_id_n..............................................................................................................................
eWEB_Area_id_n.............................................................................................................................
eWEB_eKERNEL_address_str........................................................................................................
eWEB_Branding_str.........................................................................................................................
eWEB_Comments_str......................................................................................................................
Chapter 46: Table: eWEB_SCRIPT....................................................................................
eWEB parameters.....................................................................................................................................
WSC_Site_id_n................................................................................................................................
WSC_Area_id_n...............................................................................................................................
WSC_Script_id_n.............................................................................................................................
WSC_Script_Descr_str....................................................................................................................
WSC_GRP_Name_str......................................................................................................................
WCS_ALA_id_n...............................................................................................................................
WSC_Msg_str..................................................................................................................................
WSC_Min_dev_cnt_str.....................................................................................................................
WSC_Max_Active_n........................................................................................................................
WSC_Currently_Active_n.................................................................................................................
WSCA_Comments_str.....................................................................................................................
Chapter 47: Table: eWEB_SCRIPT_SET_AUTH...............................................................
eWEB_SCRIPT_SET_AUTH parameters.................................................................................................
WSSA_Site_id_n..............................................................................................................................
WSSA_Area_id_n............................................................................................................................
WSSA_Script_id_n...........................................................................................................................
WSSA_UserID_str............................................................................................................................
WSSA_Comments_str.....................................................................................................................
Chapter 48: Table: eWEB_SCRIPT_TRACE_AUTH..........................................................
eWEB_SCRIPT_TRACE_AUTH parameters............................................................................................
WSTA_Site_id_n..............................................................................................................................
WSTA_Area_id_n.............................................................................................................................
WSTA_Script_id_n...........................................................................................................................
WSTA_UserID_str............................................................................................................................
WSTA_Auth_str................................................................................................................................
WSTA_Comments_str......................................................................................................................
Chapter 49: Table: eWEB_SCRIPT_CANCEL_AUTH.......................................................
eWEB_SCRIPT_CANCEL_AUTH parameters.........................................................................................
362
362
363
363
363
364
364
364
364
365
365
365
365
366
366
366
366
367
367
367
367
367
368
368
368
369
369
369
369
370
371
371
371
371
371
372
372
373
373
373
373
374
374
374
374
375
375
DECT Messenger Installation and Commissioning — Book 2 March 2012 13
Page 14

WSCA_Site_id_n..............................................................................................................................
WSCA_Area_id_n............................................................................................................................
WSCA_Script_id_n...........................................................................................................................
WSCA_UserID_str...........................................................................................................................
WSCA_Comments_str.....................................................................................................................
Chapter 50: Table: eWEB_SNDGRPMSG..........................................................................
eWEB_SNDGRPMSG parameters...........................................................................................................
WGM_Site_id_n...............................................................................................................................
WGM_Area_id_n..............................................................................................................................
WGM_GRP_Name_str.....................................................................................................................
WGM_Sequence_n..........................................................................................................................
WGM_Message_str..........................................................................................................................
WGM_AlA_id_n................................................................................................................................
WGM_Comments_str.......................................................................................................................
Chapter 51: Table: eWEB_SNDUSRMSG..........................................................................
eWEB_SNDUSRMSG parameters...........................................................................................................
WUM_User_id_str............................................................................................................................
WUM_Sequence_n..........................................................................................................................
WUM_Message_str..........................................................................................................................
WUM_AlA_id_n................................................................................................................................
WGM_Comments_str.......................................................................................................................
Chapter 52: Table: eWEB_TOC..........................................................................................
eWEB_TOC parameters...........................................................................................................................
WTC_Site_id_n................................................................................................................................
WTC_Group_n.................................................................................................................................
WTC_Item_n....................................................................................................................................
WTC_Language_str.........................................................................................................................
WTC_Text_str...................................................................................................................................
WTC_Link_str...................................................................................................................................
WTC_Sec_n.....................................................................................................................................
WTC_Comments_str........................................................................................................................
Chapter 53: Table: eWEB_USER_AUTH............................................................................
EWEB_USER_AUTH parameters.............................................................................................................
USERA_UserID_str..........................................................................................................................
USERA_Password_str.....................................................................................................................
USERA_Sec_level_n.......................................................................................................................
USERA_Description_str...................................................................................................................
USERA_Email_str............................................................................................................................
USERA_Allobj_b..............................................................................................................................
USERA_Secadm_b..........................................................................................................................
USERA_Service_b...........................................................................................................................
USERA_Language_str.....................................................................................................................
USERA_Comments_str....................................................................................................................
Index.....................................................................................................................................
375
375
375
376
376
377
377
377
377
377
378
378
378
379
381
381
381
381
382
382
382
385
385
385
385
385
386
386
386
387
388
391
391
391
391
392
392
392
393
393
393
394
396
397
14 DECT Messenger Installation and Commissioning — Book 2 March 2012
Page 15
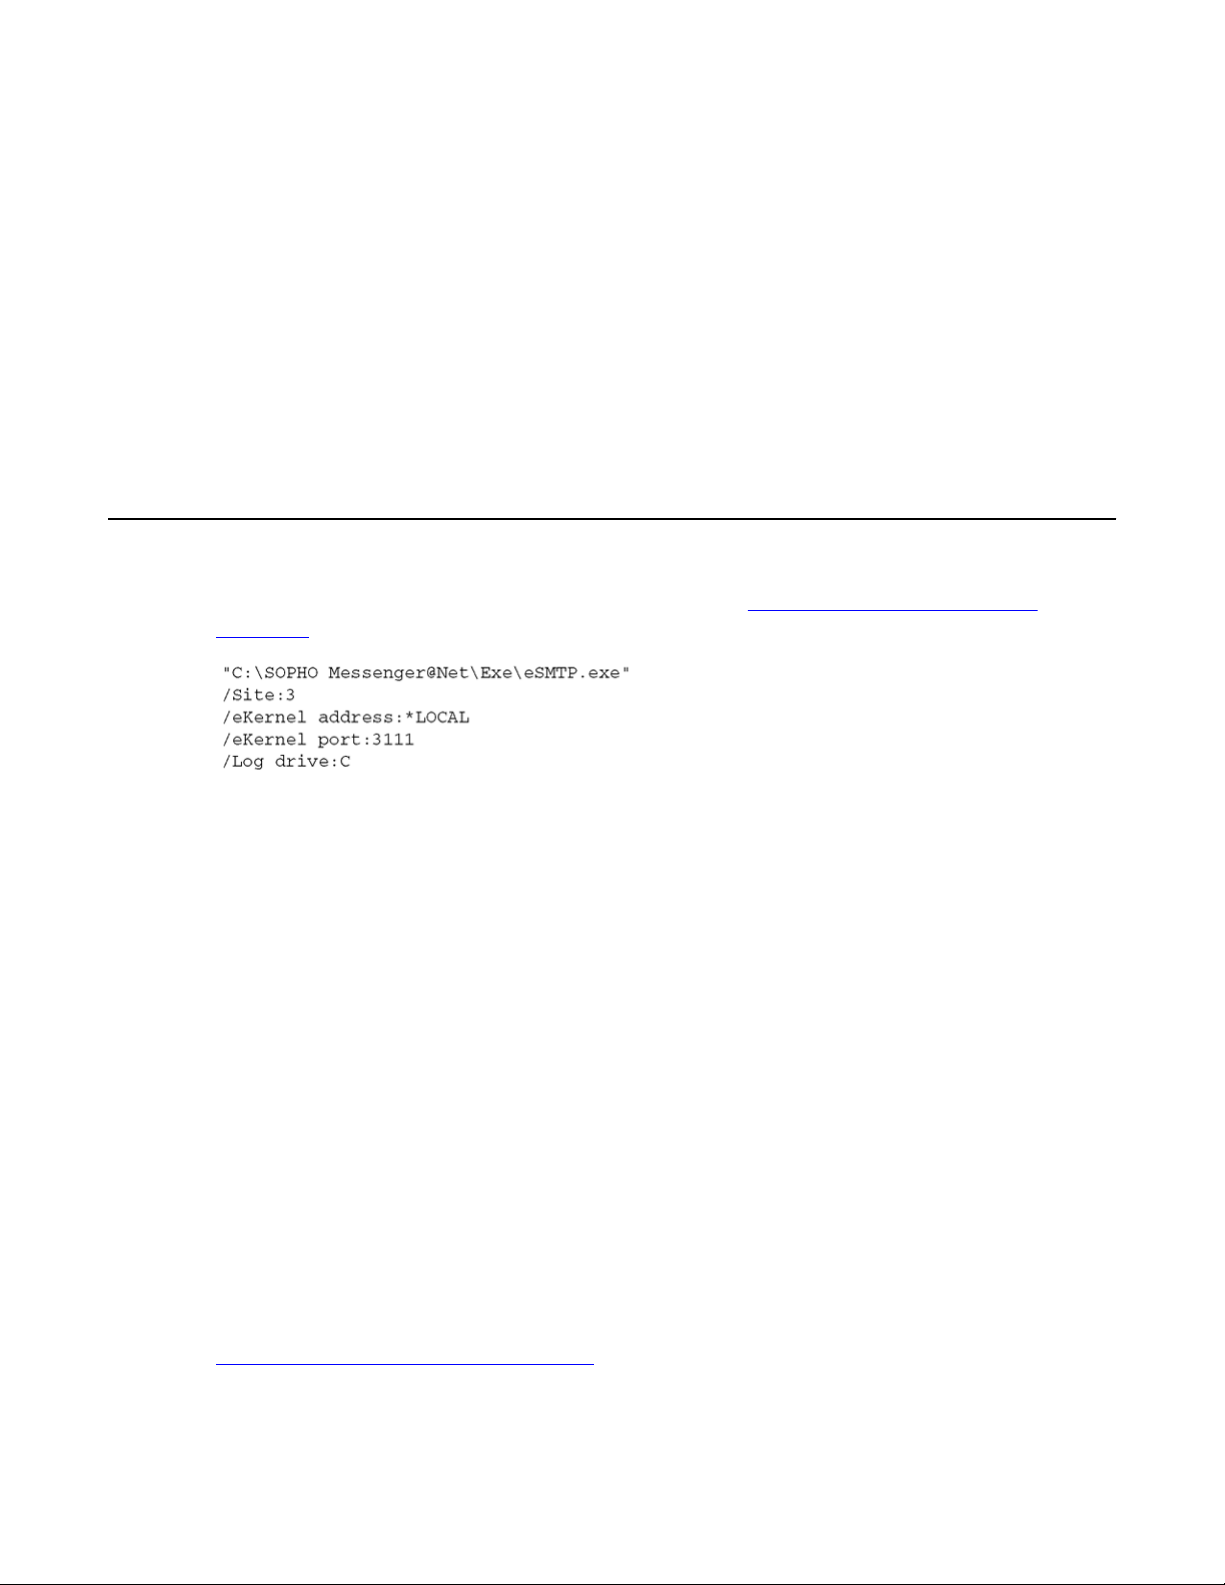
Chapter 1: Module - eSMTP
The eSMTP module is an output program that receives message requests from the eKERNEL module.
The eSMTP connects to an SMTP server, and delivers mail requests to the mail server according to the
RFC821 specifications. This involves a sockets connection between eSMTP and the SMTP server of
choice. For such a connection, eSMTP is TCP client and the SMTP server is TCP server, listening on port
25.
Initialization
The eSMTP module is started by means of a shortcut.
keywords on page 15 shows an example of the required keywords:
Figure 1: Example of required keywords
The following keywords are used:
• Site
The Site keyword denotes the site that is assigned to the eSMTP module.
• eKERNEL address
The eKERNEL address keyword denotes the IP address that is assigned to the eKERNEL
module. The eSMTP contacts this IP address to connect to the eKERNEL.
• eKERNEL por
The eKERNEL port keyword denotes the port number that is assigned in the configuration
for the eSMTP client instance.
Figure 1: Example of required
On startup, the eSMTP application attempts to connect to the eKERNEL. This is performed
based upon the address and port information obtained from the shortcut.
At connection, the eSMTP requests the eKERNEL to provide additional configuration settings.
This is known as a configuration request. The eKERNEL in turn authenticates the client and
responds with a configuration reply.
Figure 2: eSMTP configuration request on page 16 shows the configuration request.
DECT Messenger Installation and Commissioning — Book 2 March 2012 15
Page 16
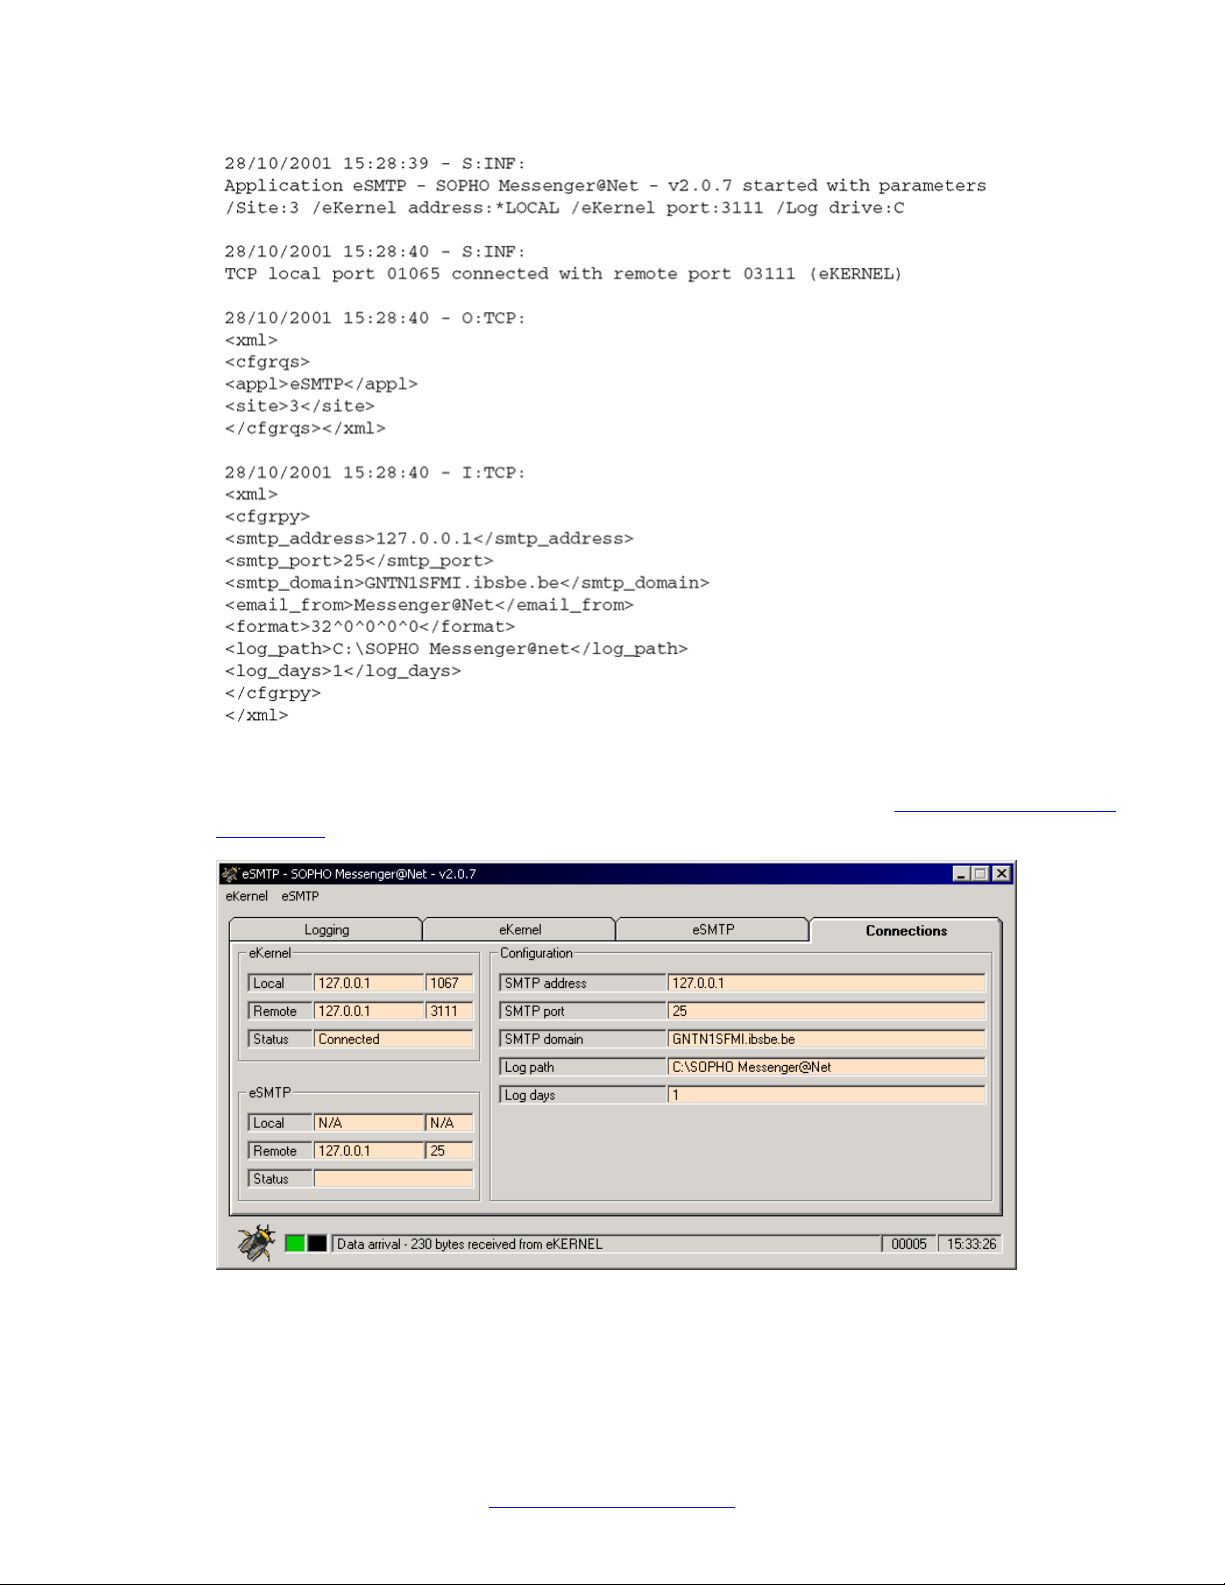
Module - eSMTP
Figure 2: eSMTP configuration request
When the configuration is received, a window similar to the one shown Figure 3: Configuration
information on page 16 opens. The configuration can be viewed in the Connections tab.
Figure 3: Configuration information
16 DECT Messenger Installation and Commissioning — Book 2 March 2012
Comments? infodev@avaya.com
Page 17
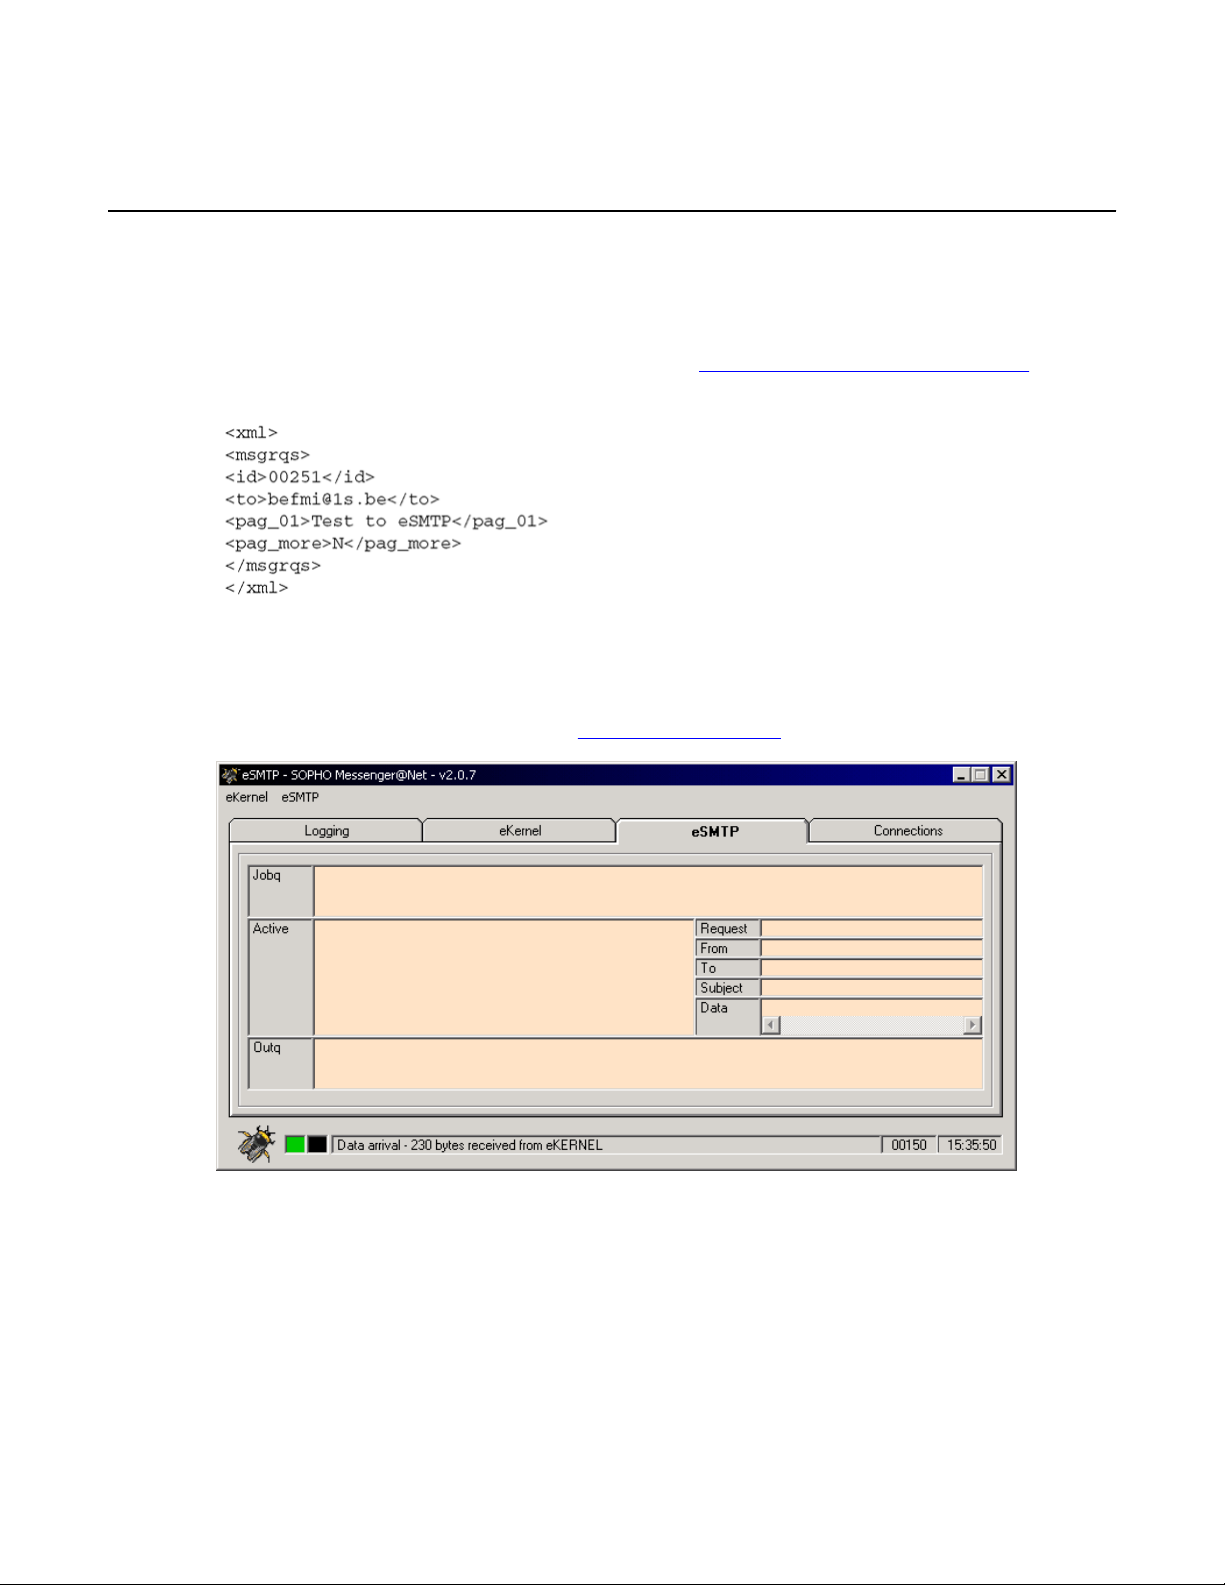
Output program activity
The eSMTP module is now ready to receive message requests from eKERNEL. These
requests are handled on a first-in first-out basis.
Output program activity
The requests are received in the format shown in
page 17.
Figure 4: Message request format
The message requests are executed one at a time, by means of a TCP sockets connection to
the SMTP server of choice. The actual dialog box with the SMTP server can be monitored
through the eSMTP tab, as shown in
Figure 5: eSMTP tab on page 17.
Figure 4: Message request format on
Figure 5: eSMTP tab
The eSMTP tab provides an overview of the requests that are waiting to be processed. This
is visible in the top area (referred to as the job queue). Requests are handled as follows:
DECT Messenger Installation and Commissioning — Book 2 March 2012 17
Page 18
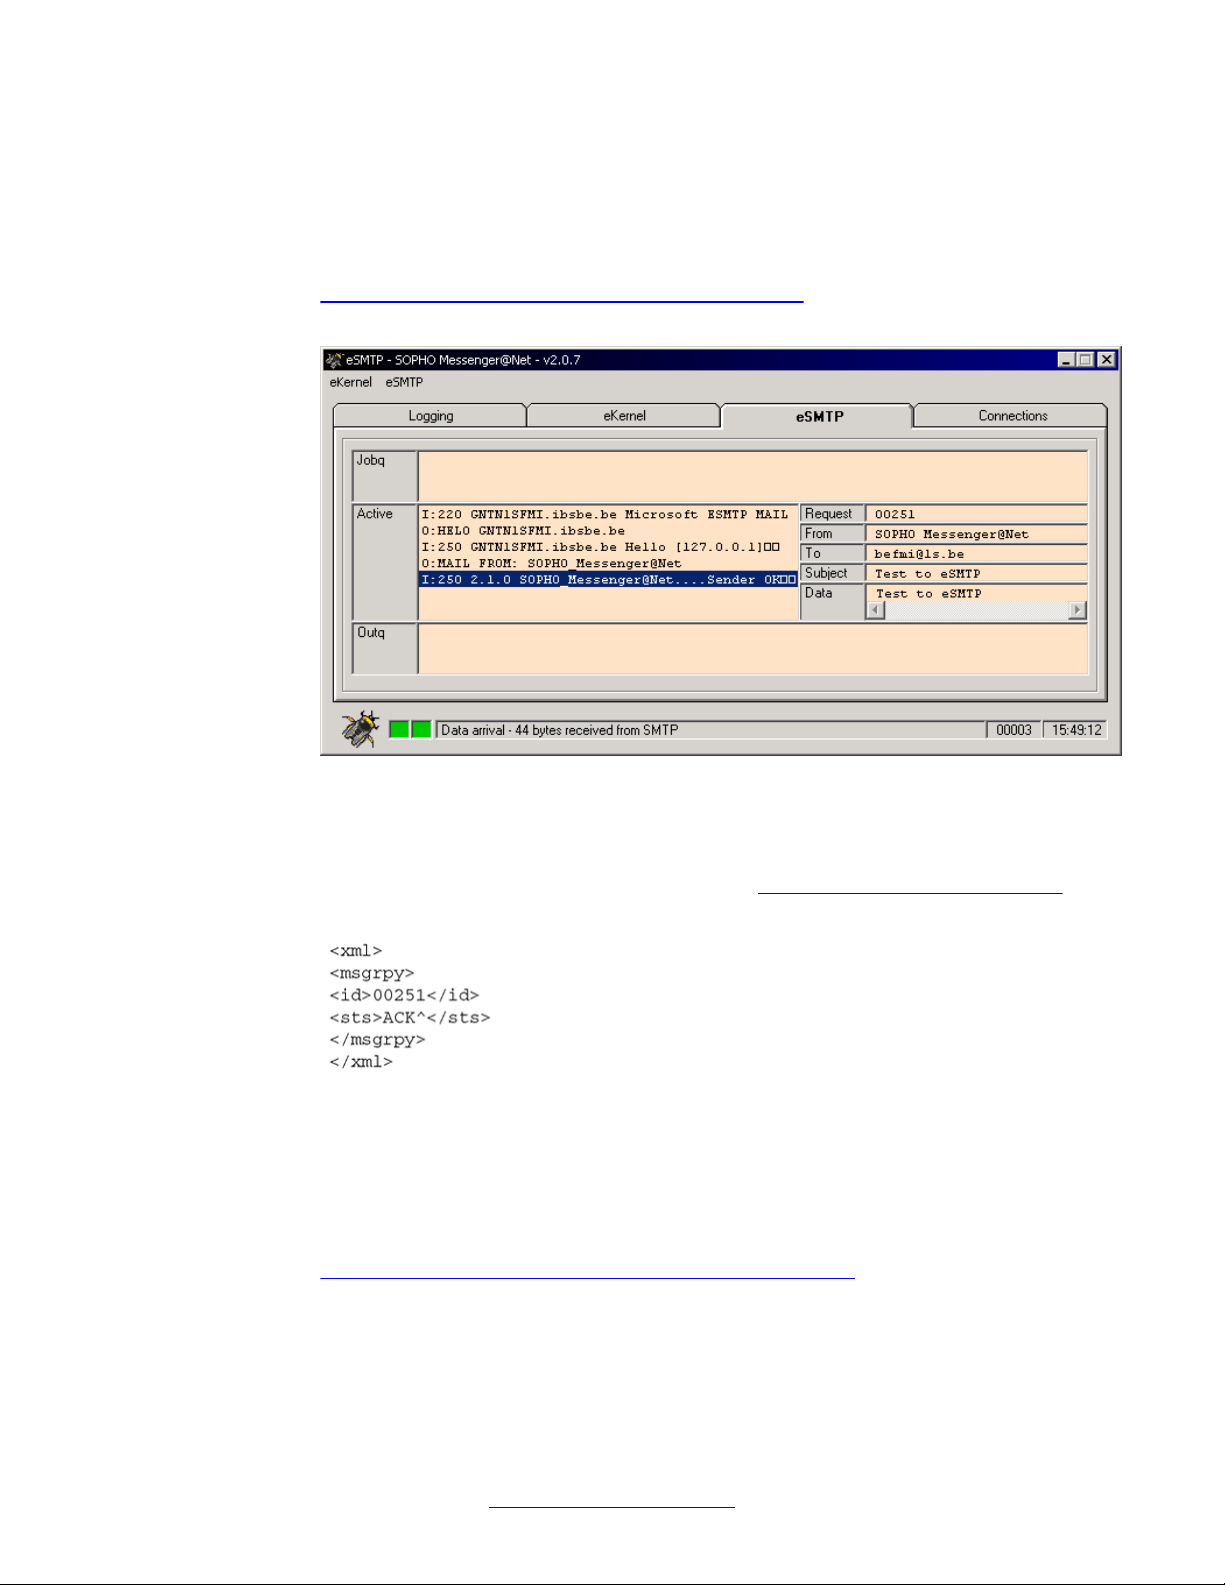
Module - eSMTP
Request handling
1. The request is analyzed and the required keywords are extracted and shown to the
right.
The left-hand side of the window shows the actual dialog with the SMTP server . See
Figure 6: Request queue with extracted keywords on page 18 for an example of
an active message.
Figure 6: Request queue with extracted keywords
2. The eSMTP module sends the status of the request back to the eKERNEL. This
status can either indicate a positive acknowledge or a negative acknowledge.
The format of the message reply is shown in
Figure 7: Message reply format on
page 18.
Figure 7: Message reply format
3. The e-mail message is delivered to the mailbox of the destination user.
Note that intermediate processing on the external SMTP server or servers is
responsible for message delivery. This process is completely out of the control of
the eSMTP application.
Figure 8: Example of mail produced by eSMTP module on page 19 shows an
example of the mail that is produced by the eSMTP module, when viewed using
Microsoft Outlook Express.
18 DECT Messenger Installation and Commissioning — Book 2 March 2012
Comments? infodev@avaya.com
Page 19
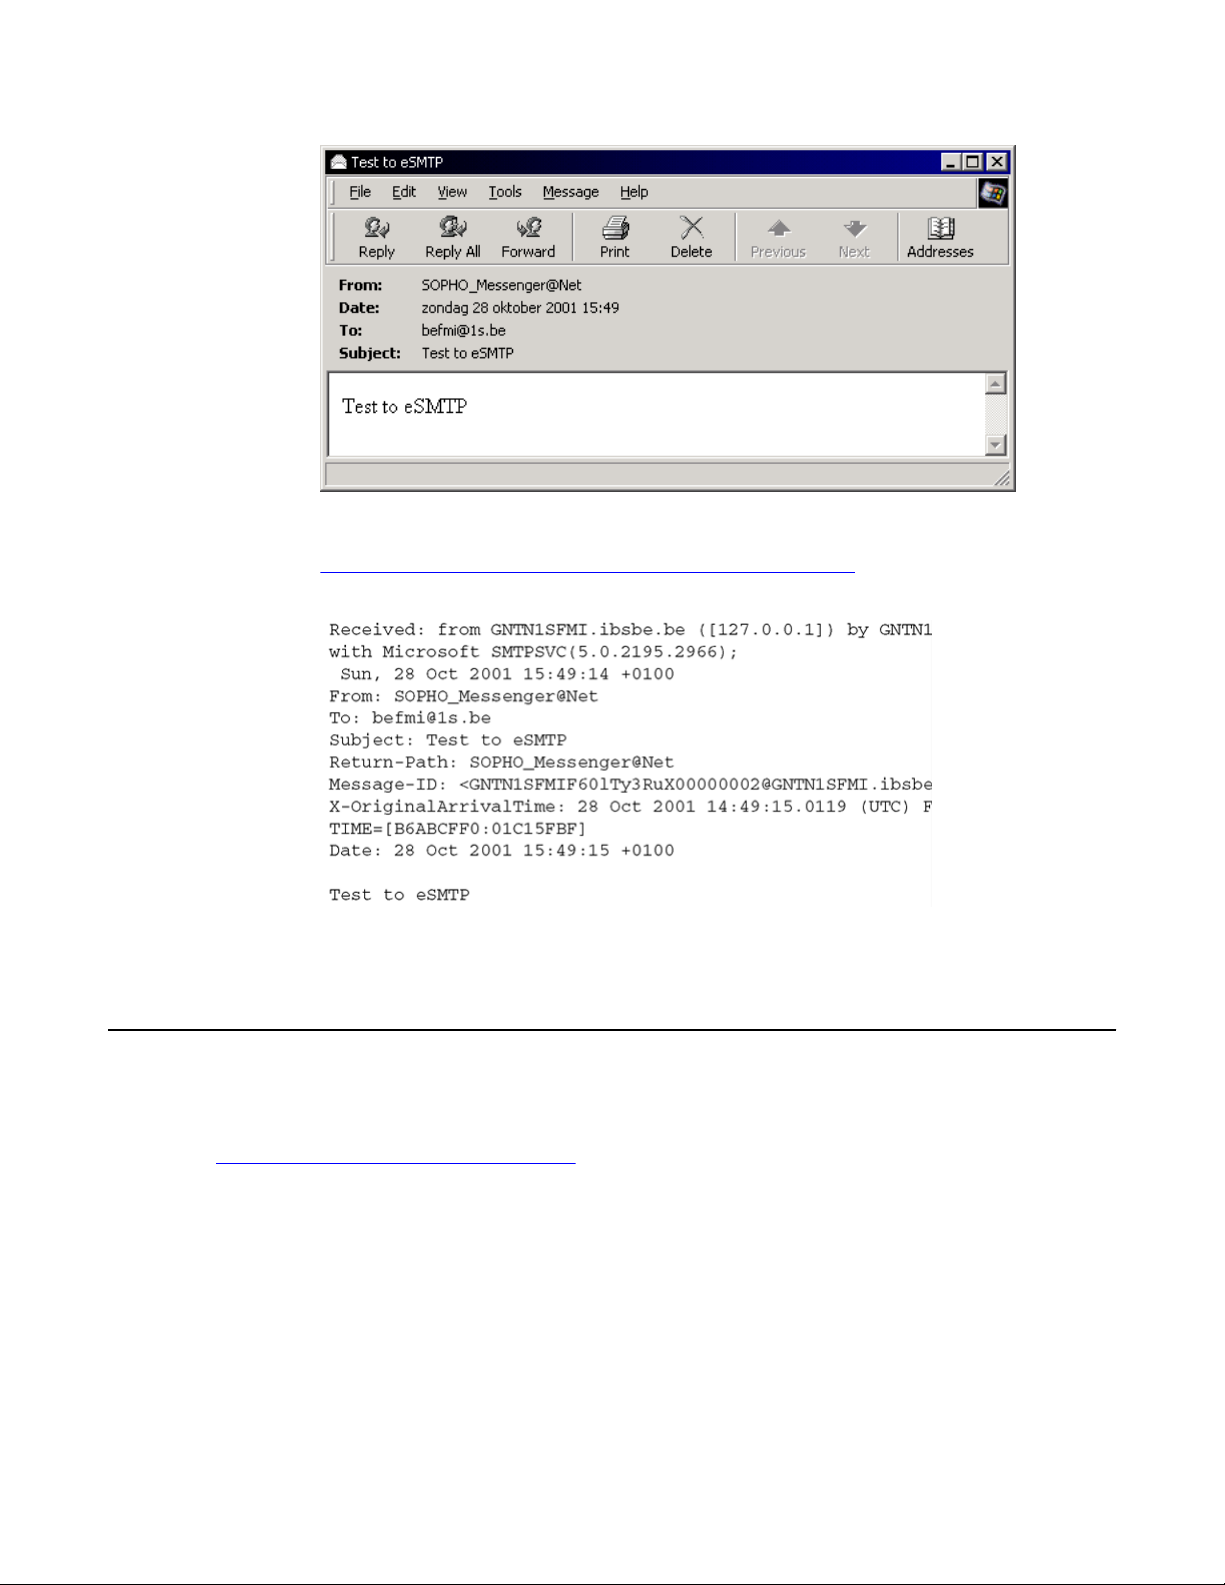
Logging
Figure 8: Example of mail produced by eSMTP module
Figure 8: Example of mail produced by eSMTP module on page 19 shows an
example of the raw data of the mail that is produced by the eSMTP module.
Figure 9: Raw data of mail produced by eSMTP module
Logging
The eSMTP application provides logging both on-screen and on disk.
Figure 10: eSMTP on-screen logging on page 20 shows the on-screen logging, displayed
on the Logging tab.
DECT Messenger Installation and Commissioning — Book 2 March 2012 19
Page 20
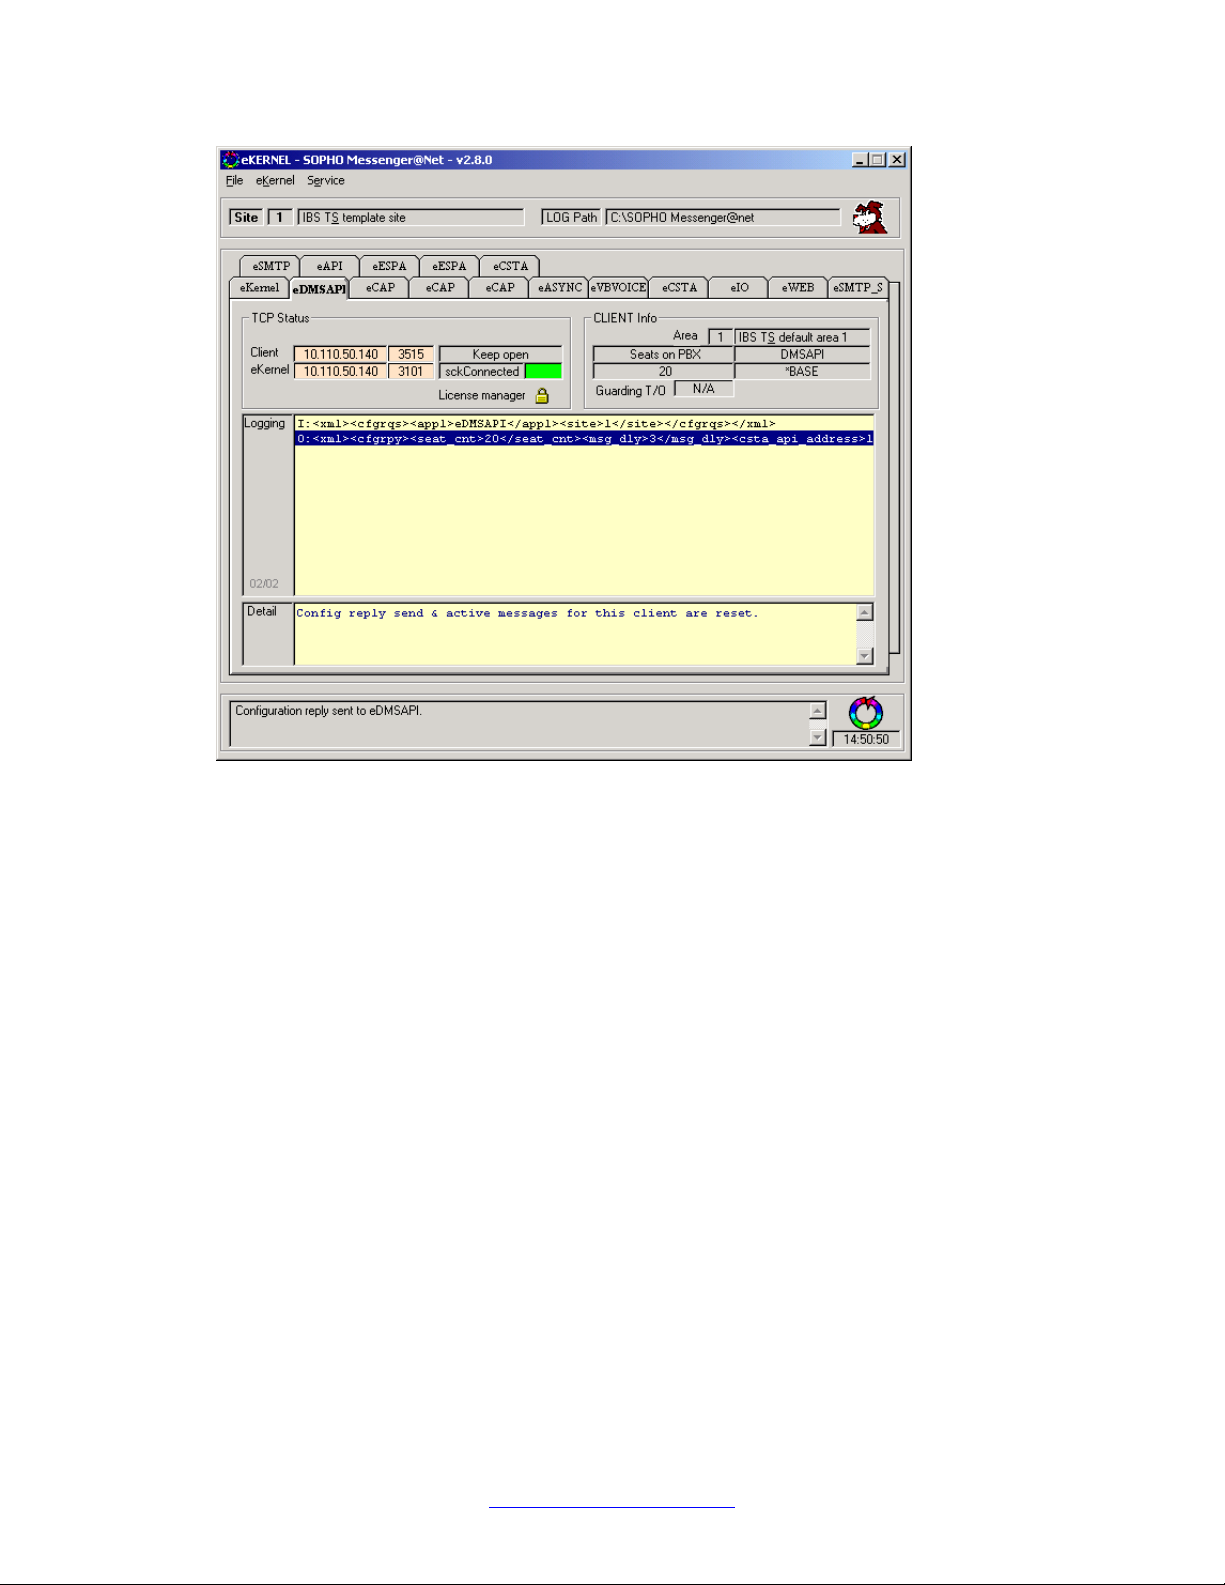
Module - eSMTP
Figure 10: eSMTP on-screen logging
The following two figures show an example of a log file on disk, as viewed with a text editor.
20 DECT Messenger Installation and Commissioning — Book 2 March 2012
Comments? infodev@avaya.com
Page 21
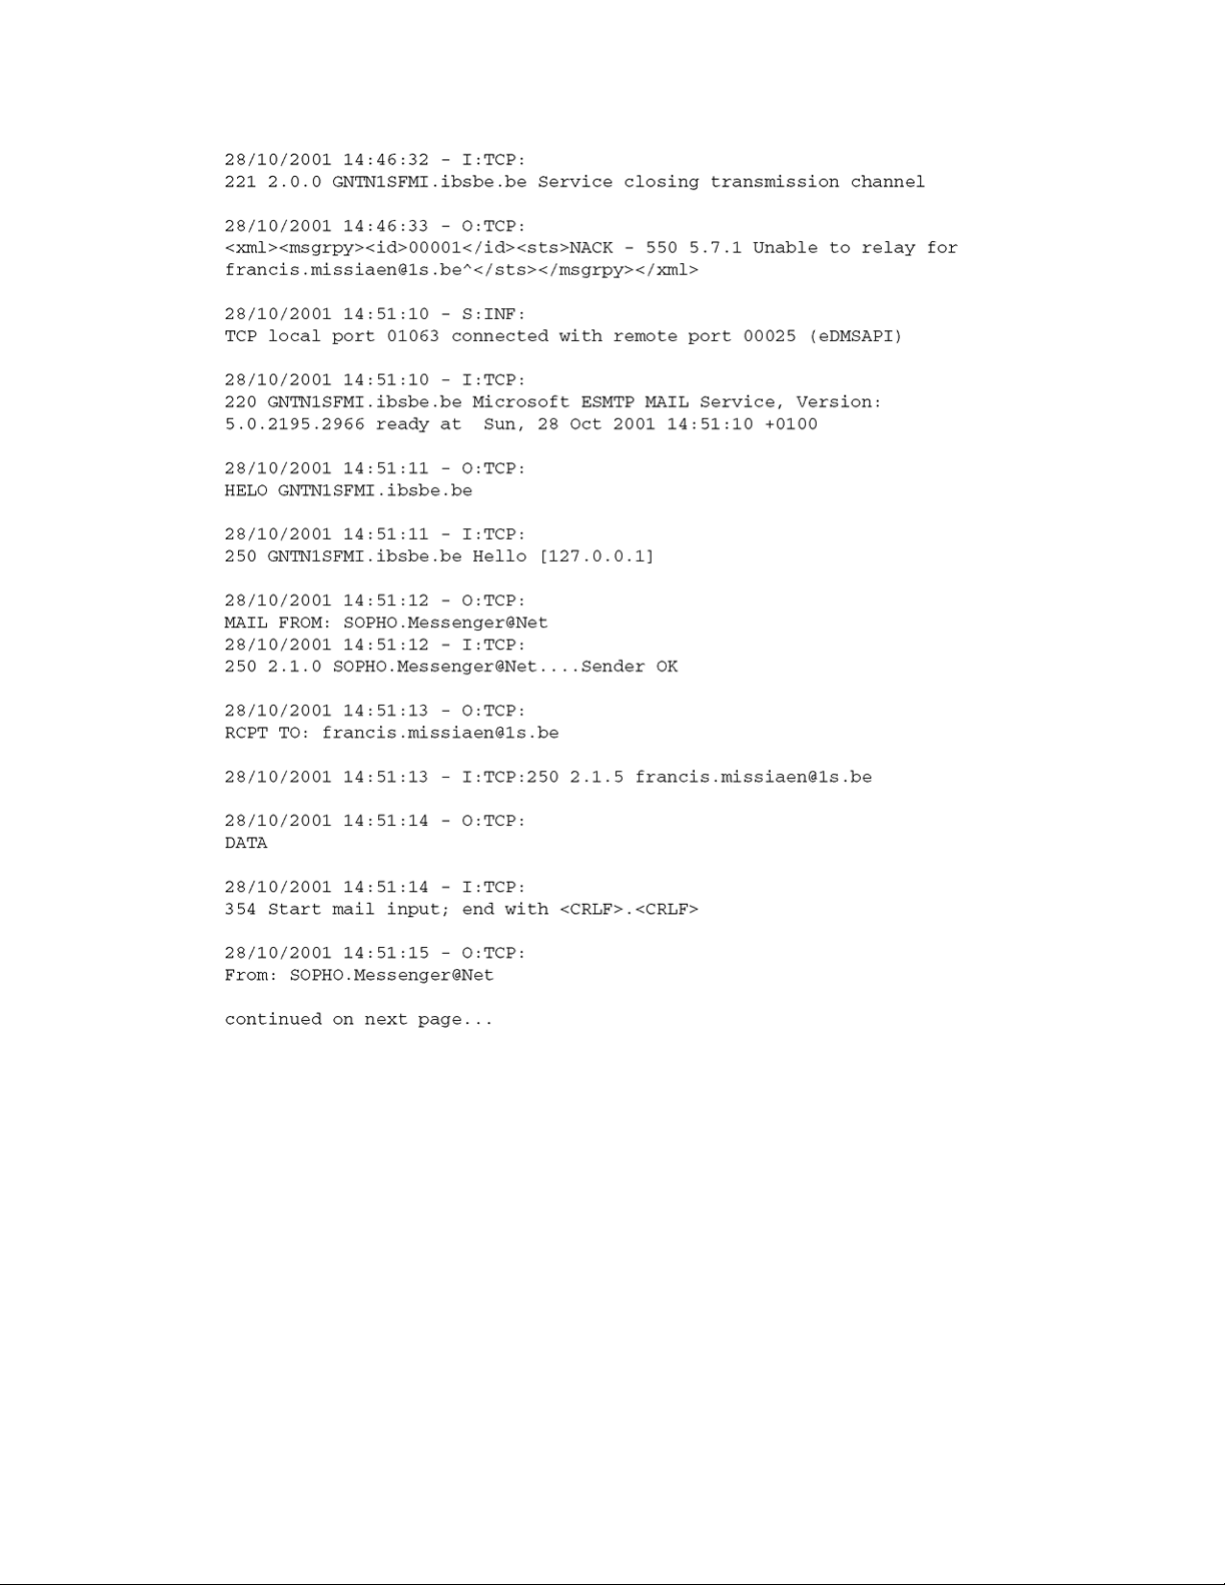
Logging
Figure 11: Log files on hard disk — part 1
DECT Messenger Installation and Commissioning — Book 2 March 2012 21
Page 22
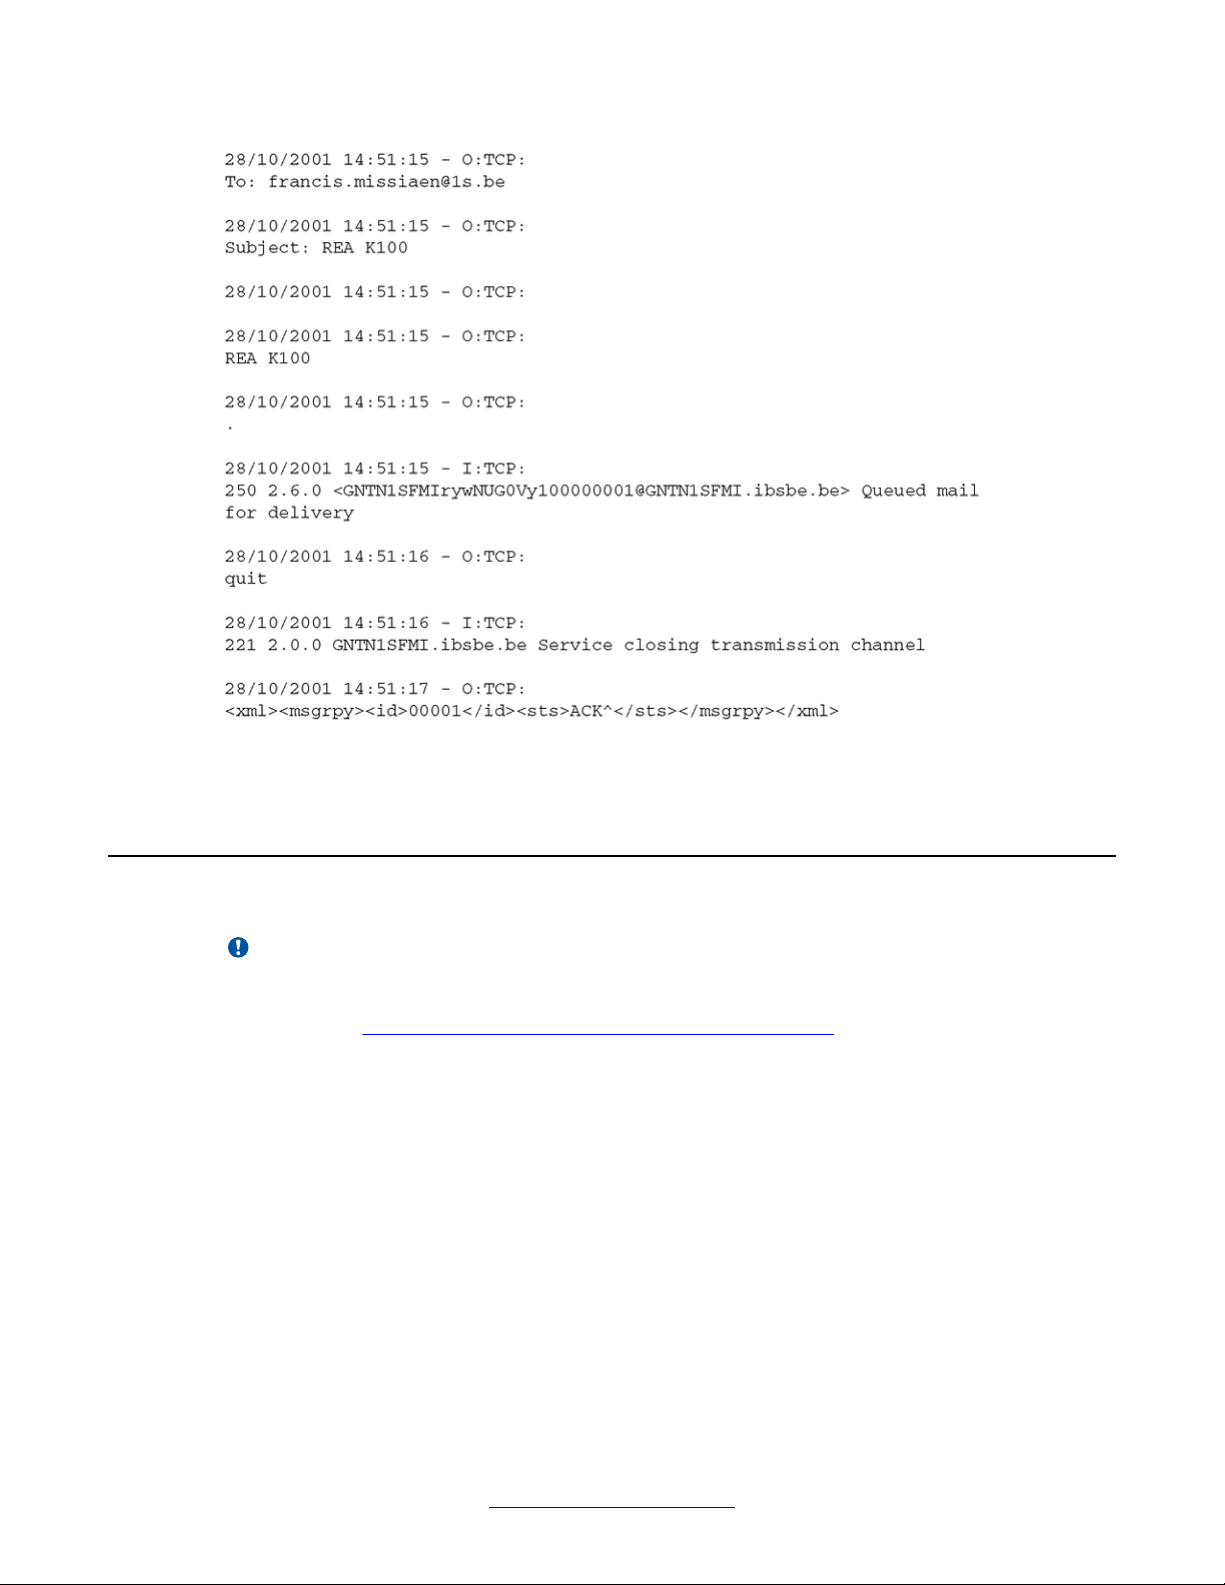
Module - eSMTP
Figure 12: Log files on hard disk — part 2
Relaying and Routing
Important:
A common configuration error, related to relaying and routing settings, occurs when eSMTP
tries to deliver a message to a mail destination user that is not residing in the same domain,
as shown in Figure 13: Relaying and Routing error on-screen on page 23.
22 DECT Messenger Installation and Commissioning — Book 2 March 2012
Comments? infodev@avaya.com
Page 23
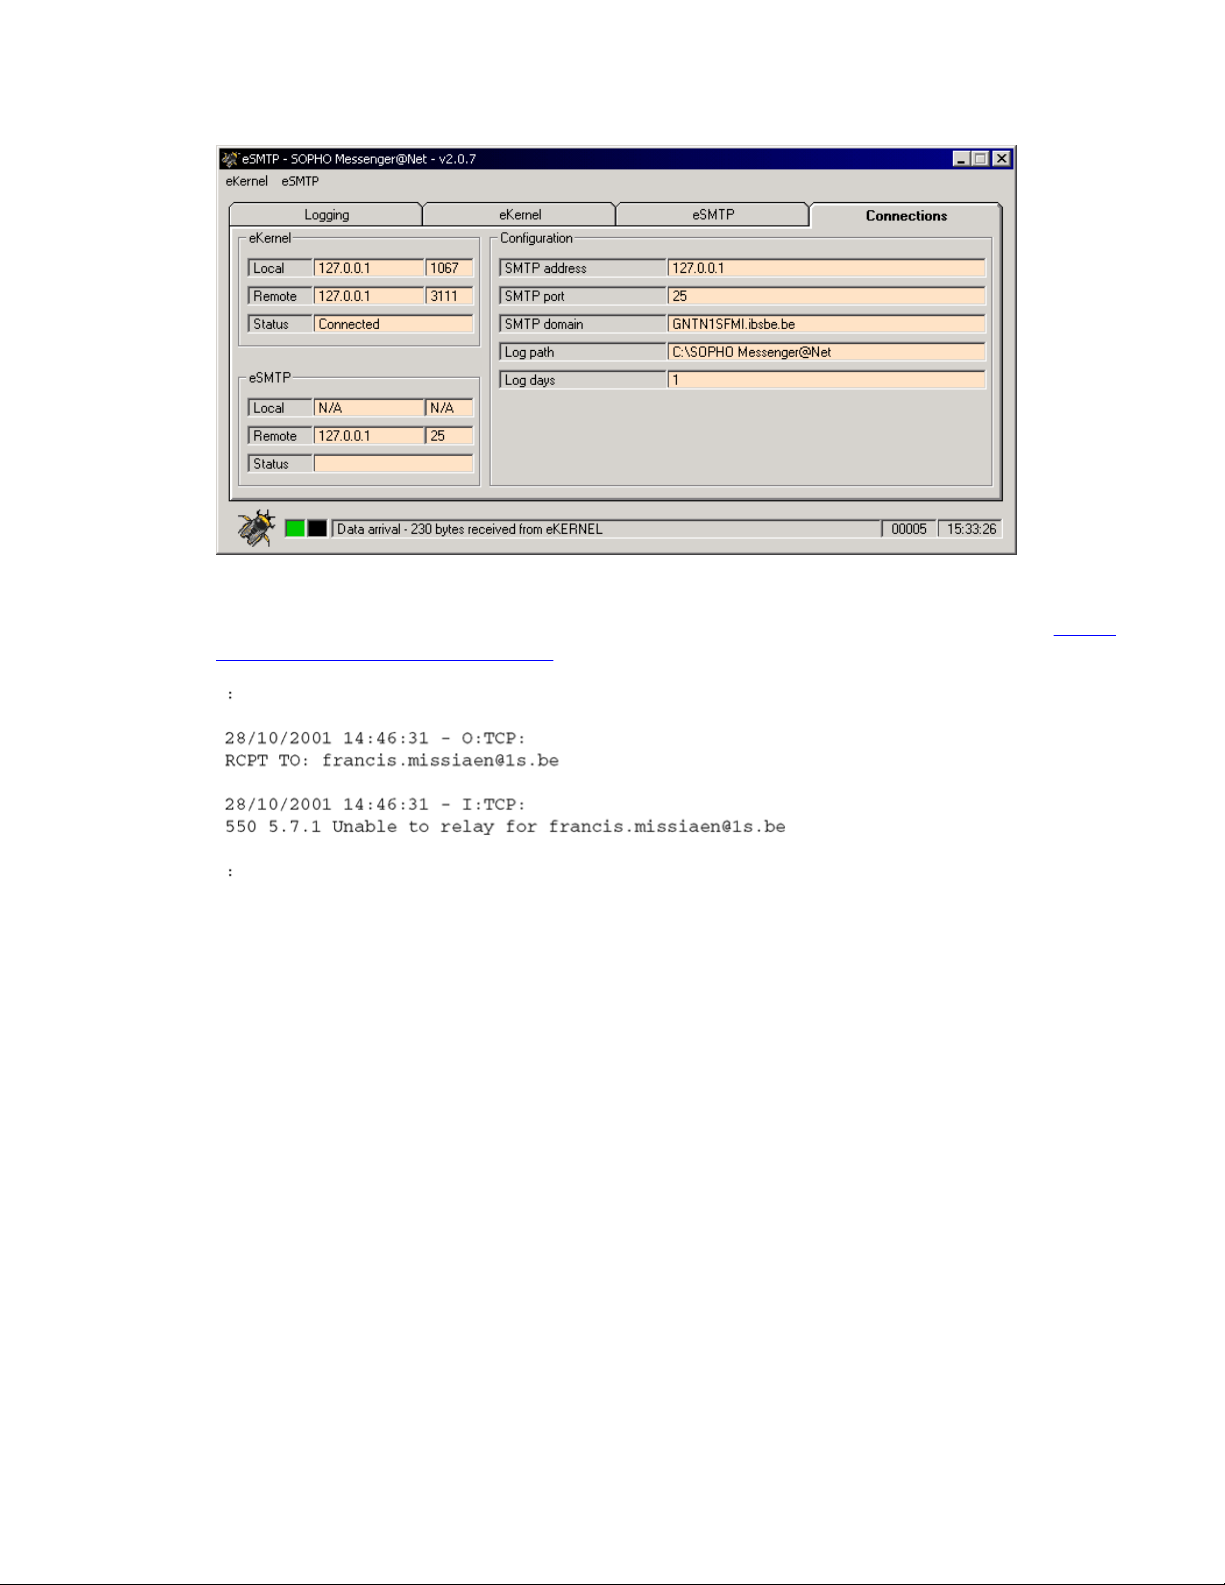
Relaying and Routing
Figure 13: Relaying and Routing error on-screen
The error is usually recorded in the log files with a message similar to the one shown in Figure
14: Relaying error log (relay failed) on page 23.
Figure 14: Relaying error log (relay failed)
Other messages can be shown instead, for example, 550 - prohibited, 550 - Unable to relay,
and so on.
To correct this issue, consult with the system administrator regarding the rights granted for
routing and relaying in the module. Avaya recommends that the IP address of eSMTP be
defined in the SMTP server of the mail platform, so that eSMTP is allowed to send mail to
destinations that are not in the local domain.
The related configuration issues are beyond the scope of this document. In the following pages,
configuration information is shown for illustration only. Look for a more detailed discussion of
relaying and routing issues in the official documentation for your SMTP server (Windows 2000,
Exchange, Domino, iSeries 400, and so on).
DECT Messenger Installation and Commissioning — Book 2 March 2012 23
Page 24
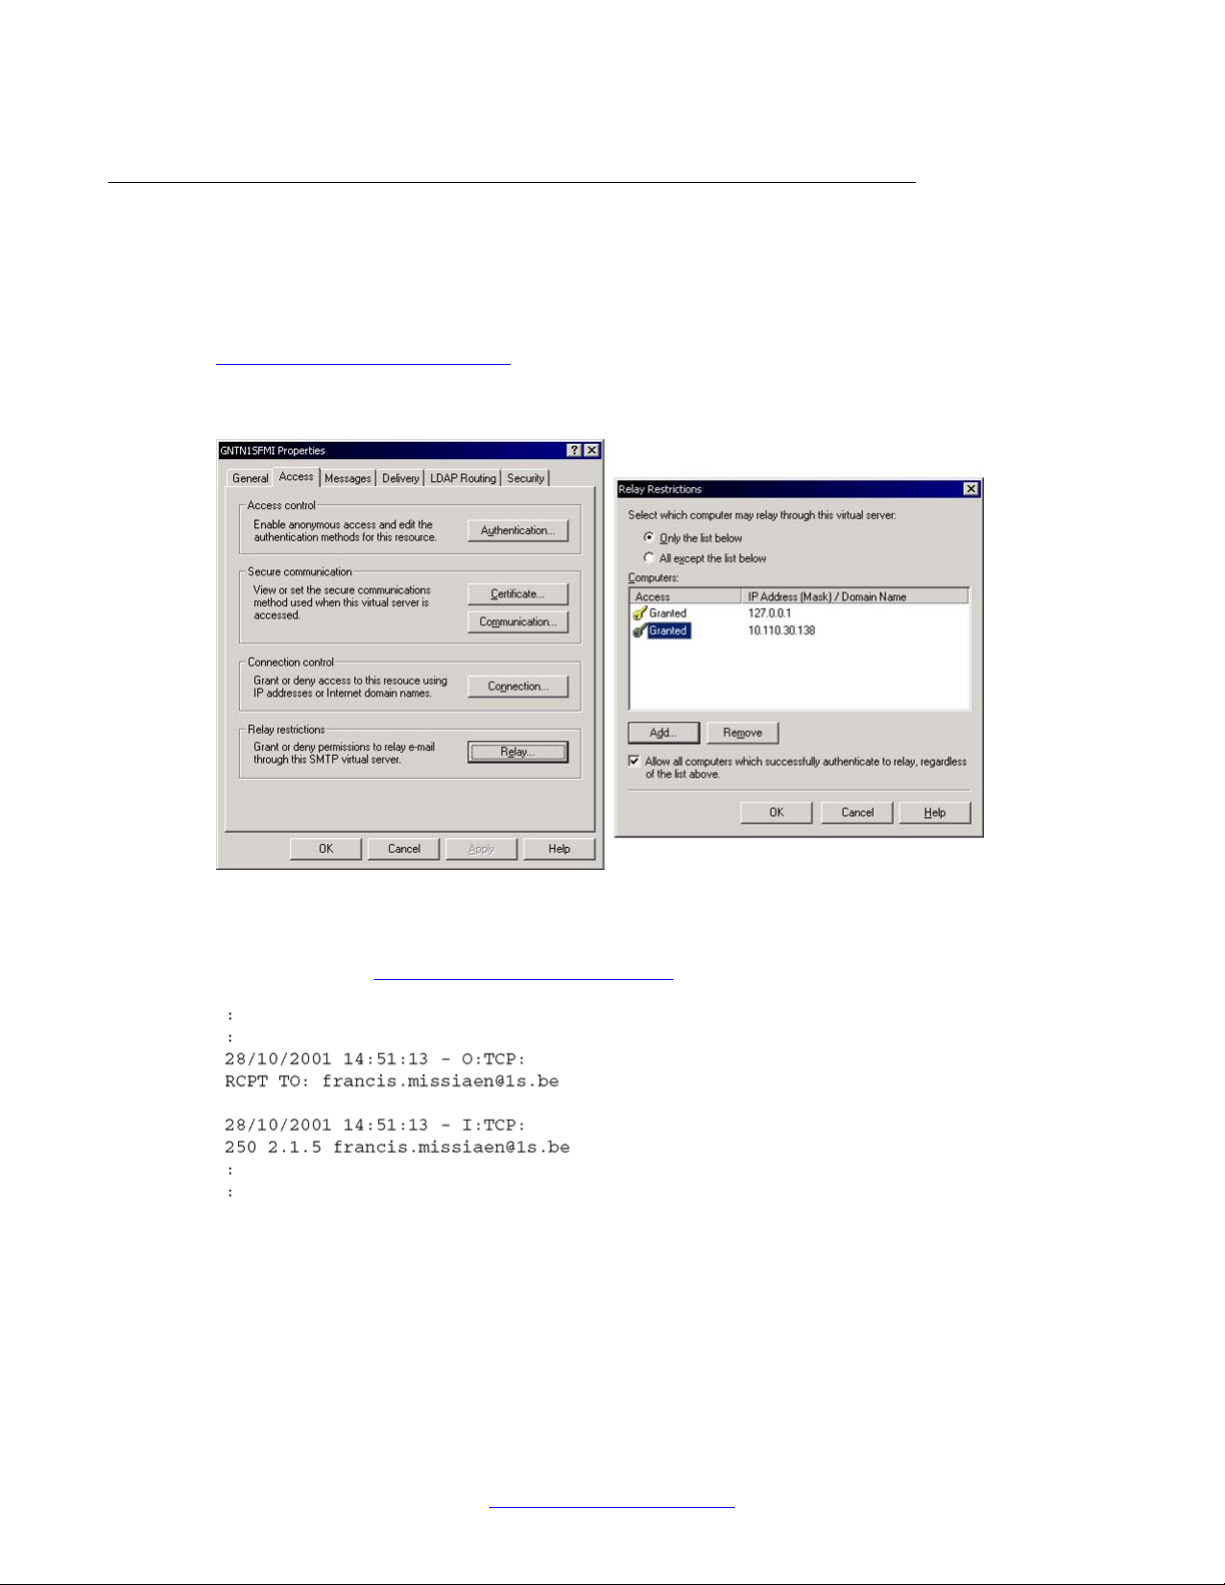
Module - eSMTP
Windows SMTP server
In Windows SMTP Server (part of the Internet Information Server), you can for instance grant
access by clicking Start on the Windows task-bar, and choosing Settings > Control Panel >
Administrative Tools > Properties > Internet Service Manager.
Figure 15: Setting SMTP relay on page 24 illustrates the settings needed to grant the SMTP
server access to relay from both 127.0.0.1 and 10.110.50.138. These addresses are the
addresses where eSMTP modules reside.
Figure 15: Setting SMTP relay
eSMTP can send mail to users that do not reside in the local domain. This is indicated in the
log as shown in Figure 16: Relaying successful on page 24.
Figure 16: Relaying successful
24 DECT Messenger Installation and Commissioning — Book 2 March 2012
Comments? infodev@avaya.com
Page 25
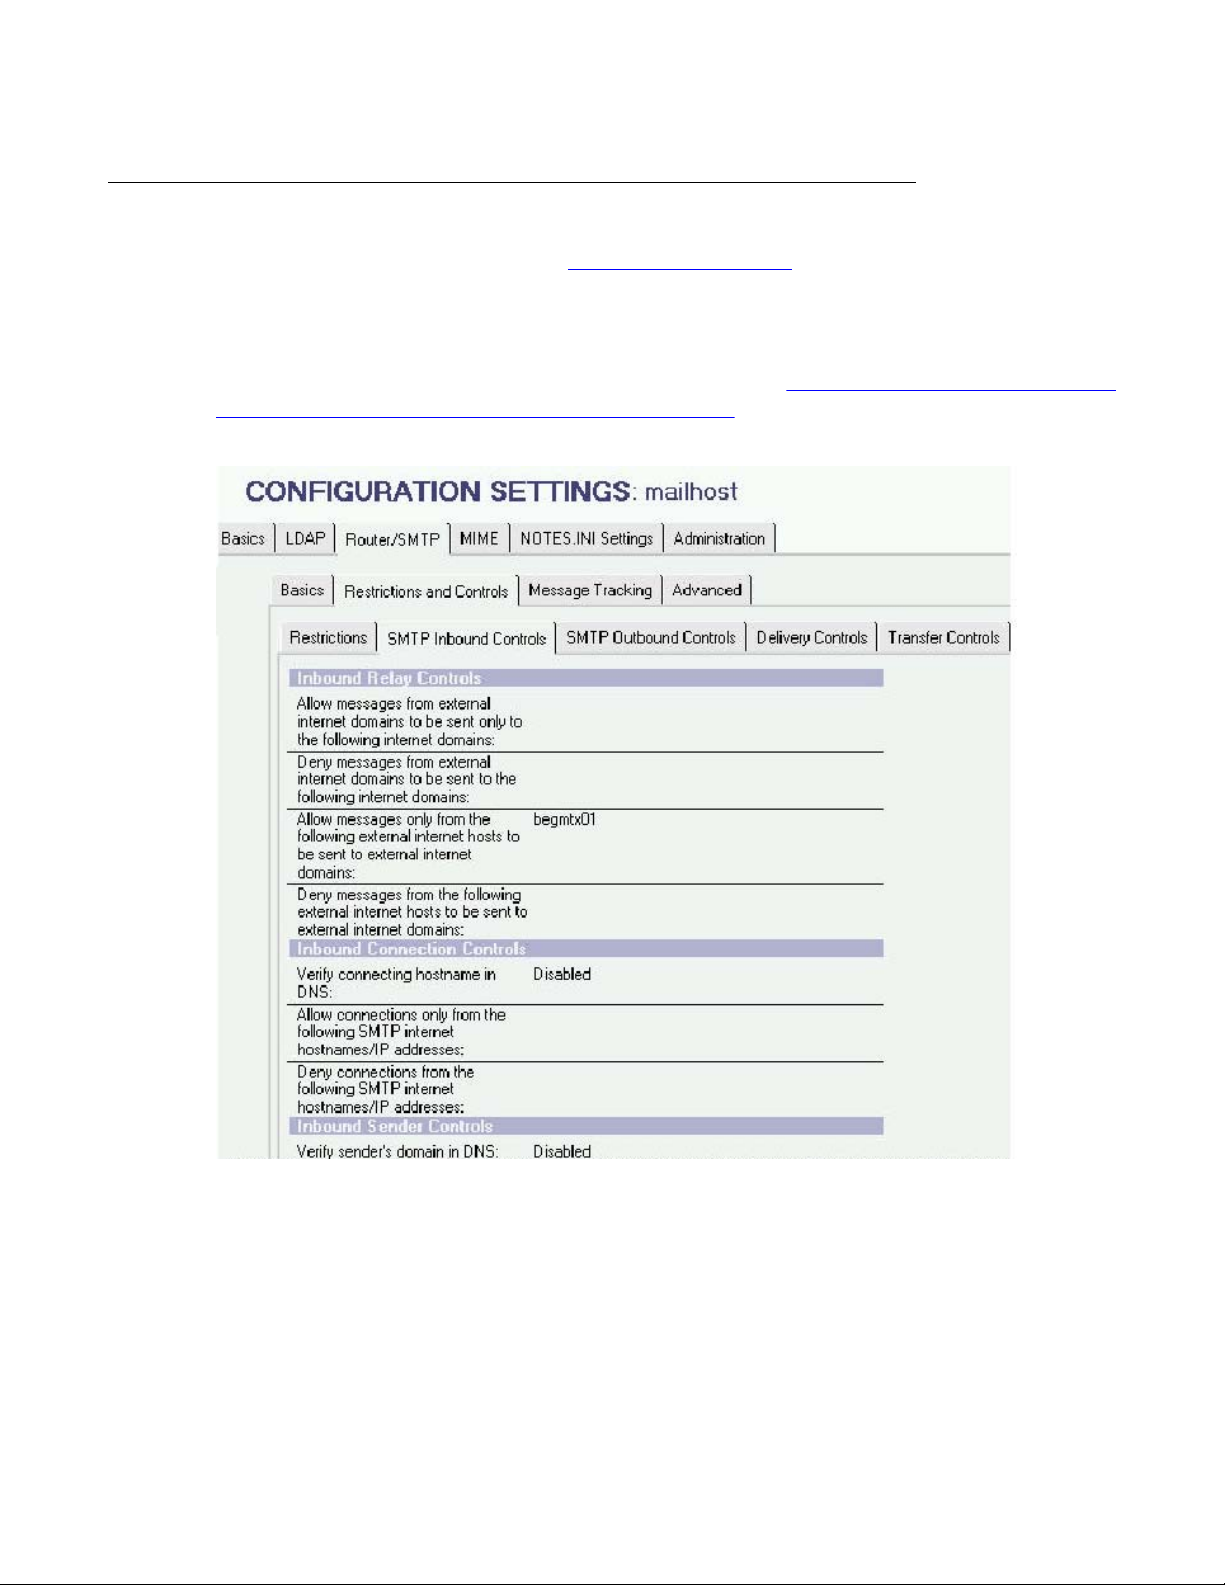
Domino (Lotus Notes)
Relaying and Routing
The same techniques discussed for
on other SMTP servers. For example, in Domino (Lotus Notes), you can allow inbound SMTP
requests from other parties (eSMTP).
To configure inbound SMTP options, click Router/SMTP > Restrictions and Controls >
SMTP Inbound Controls > Allows messages only from
external hosts to be sent to external Internet domains on page 25 illustrates the settings
needed to allow messages from external hosts to be sent to external Internet domains.
Windows SMTP server on page 24 can be implemented
Figure 17: Enable messages from
Figure 17: Enable messages from external hosts to be sent to external Internet domains
Consult with your network administrator for more information on configuration aspects and
network design.
DECT Messenger Installation and Commissioning — Book 2 March 2012 25
Page 26

Module - eSMTP
26 DECT Messenger Installation and Commissioning — Book 2 March 2012
Comments? infodev@avaya.com
Page 27

Chapter 2: Module - eSMTP_server
The eSMTP_server module is a member of the input program family. Therefore, the eSMTP_server is
capable of generating alarms to eKERNEL.
The name eSMTP_server can be rather confusing. In fact, there is no SMTP server functionality
implemented in the module. This means the application is not acting as an SMTP server, and is not
listening on port 25 for inbound SMTP requests.
The module eSMTP_server must always be seen in conjunction with the SMTP Server component that
is shipped with Windows, as part of the Internet Information Server software.
The actual role of SMTP server (handling inbound sockets connections on port 25) is played by the
Microsoft component. This component stores inbound mails in a directory structure, as specified during
configuration of the Microsoft component.
A typical configuration sends inbound mails to the directory c:\inetpub\mailroot\drop.
These e-mail files are in fact readable text-files that can be opened with a text editor, such as Notepad.
Figure 18: Example of inbound e-mail on page 28 shown an example of an inbound e-mail:
DECT Messenger Installation and Commissioning — Book 2 March 2012 27
Page 28
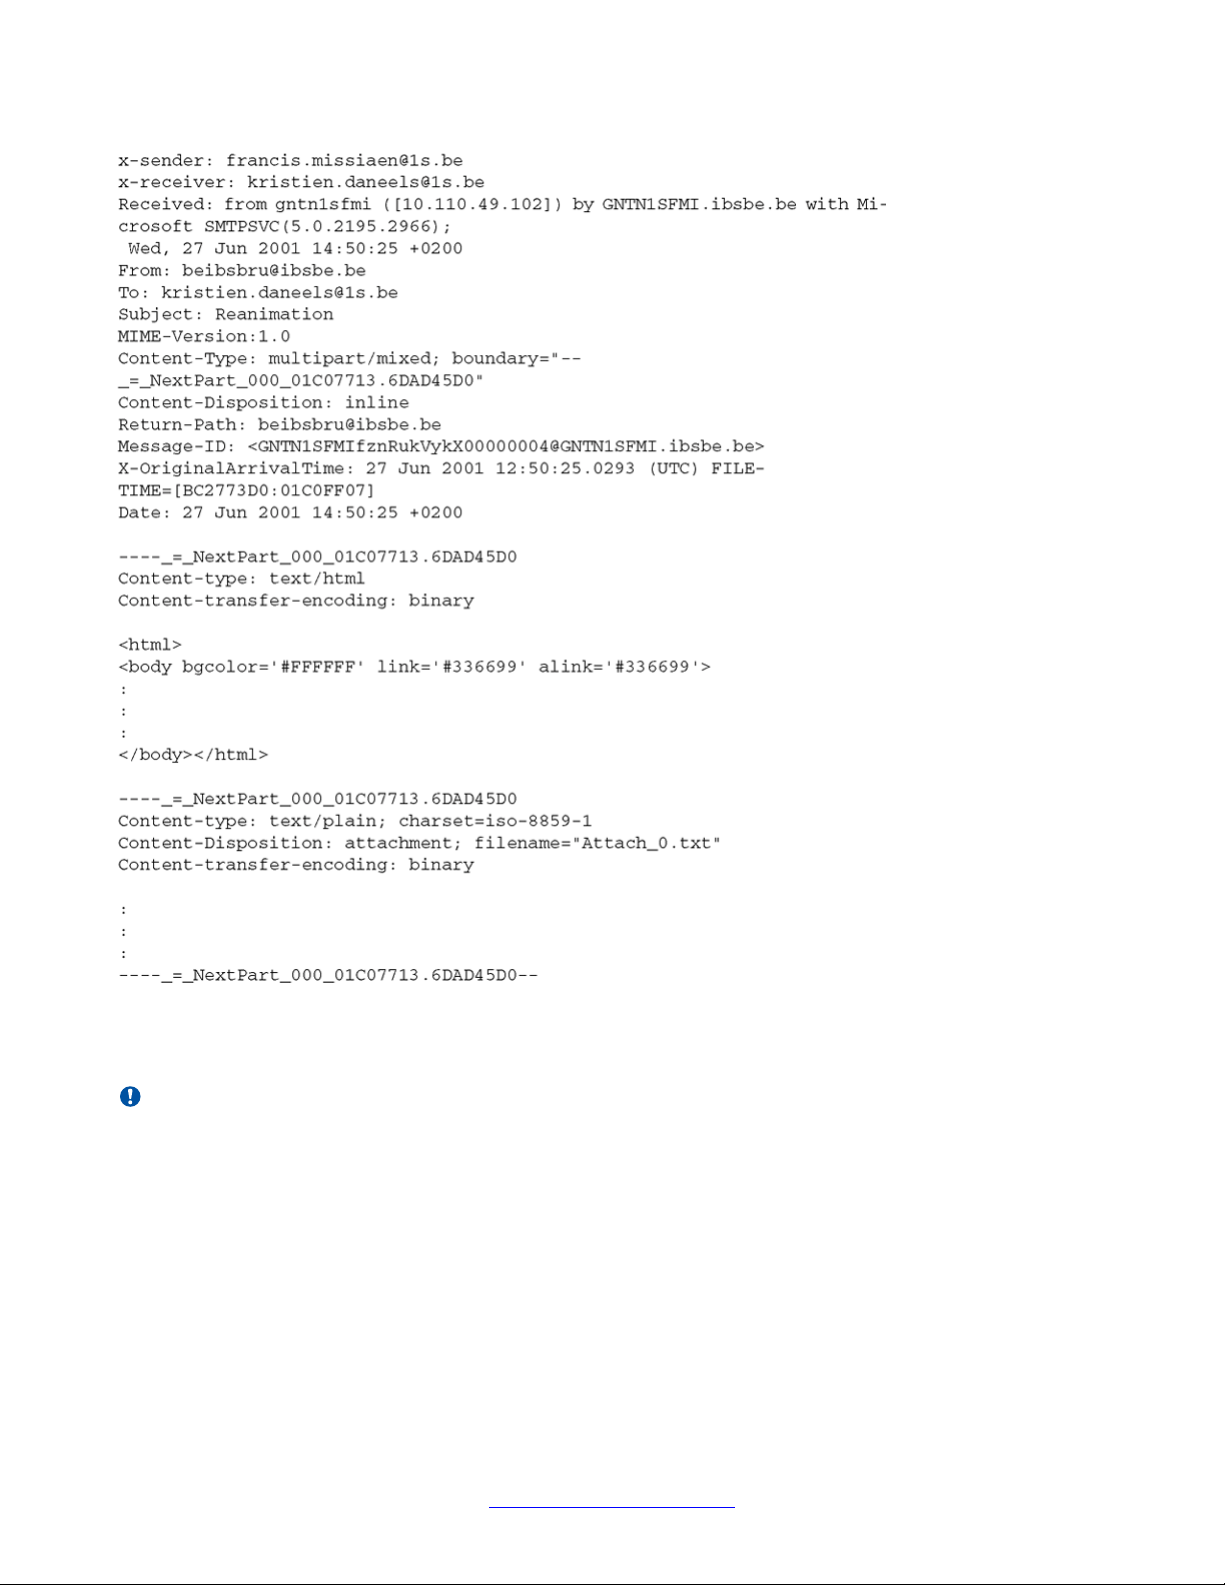
Module - eSMTP_server
Figure 18: Example of inbound e-mail
Important:
There are many competing specifications for mail formatting. A basic implementation is specified in
RFC821. Many other specifications were added, for example, RFC1251 described the MIME format.
The current release of eSMTP_server is not designed to be fully compatible with all available
functionality embedded in e-mail messages. Future releases of the eSMTP_server can be enhanced
with, for instance, functionality that is capable of detaching media streams (for example, BASE64
encoded audio/wave contents).
28 DECT Messenger Installation and Commissioning — Book 2 March 2012
Comments? infodev@avaya.com
Page 29
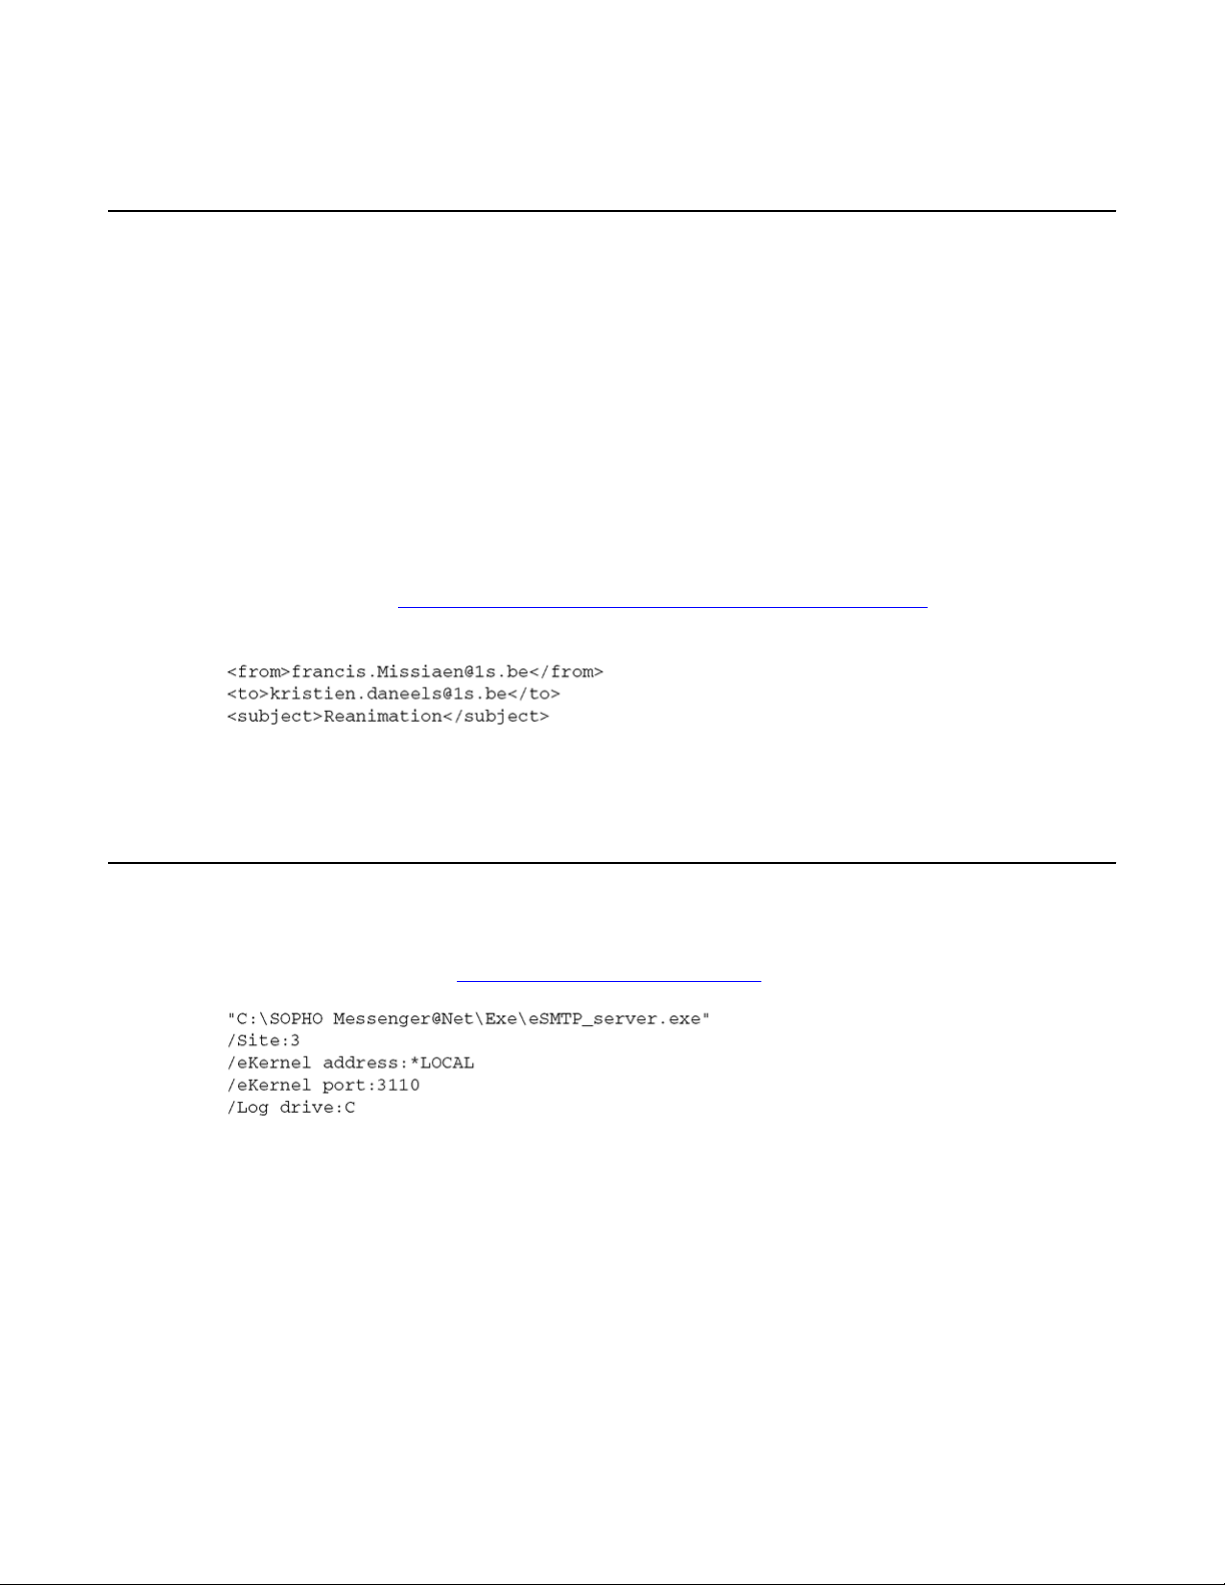
Keyword processing
For the purpose of illustration, examples in this chapter ignore all mail contents, and process
only the following keywords:
• x-sender. The value of the x-sender tag is stored.
• x-receiver. The value of the x-receiver tag is stored.
• Subject. The value of the Subject: tag is stored.
Because the x-sender and x-receiver tags are Microsoft proprietary , the module eSMTP_server
also looks for Fromand Tokeywords, if the x-sender and x-receiver tags are missing. Although
not officially supported, it is possible to use the eSMTP_server in environments that work with
other SMTP Servers than the one officially supported (Microsoft Internet Information Server).
The information in Figure 19: Keyword processing of selected e-mail tags on page 29 is
stored for further processing.
Keyword processing
Figure 19: Keyword processing of selected e-mail tags
Initialization
The eSMTP_server is started by means of a shortcut. This shortcut contains required
parameters illustrated in
Figure 20: Shortcut parameters
The following keywords are used:
• Site
The Site keyword denotes the site that is assigned to the eSMTP_server module.
• eKERNEL
Figure 20: Shortcut parameters on page 29.
DECT Messenger Installation and Commissioning — Book 2 March 2012 29
Page 30
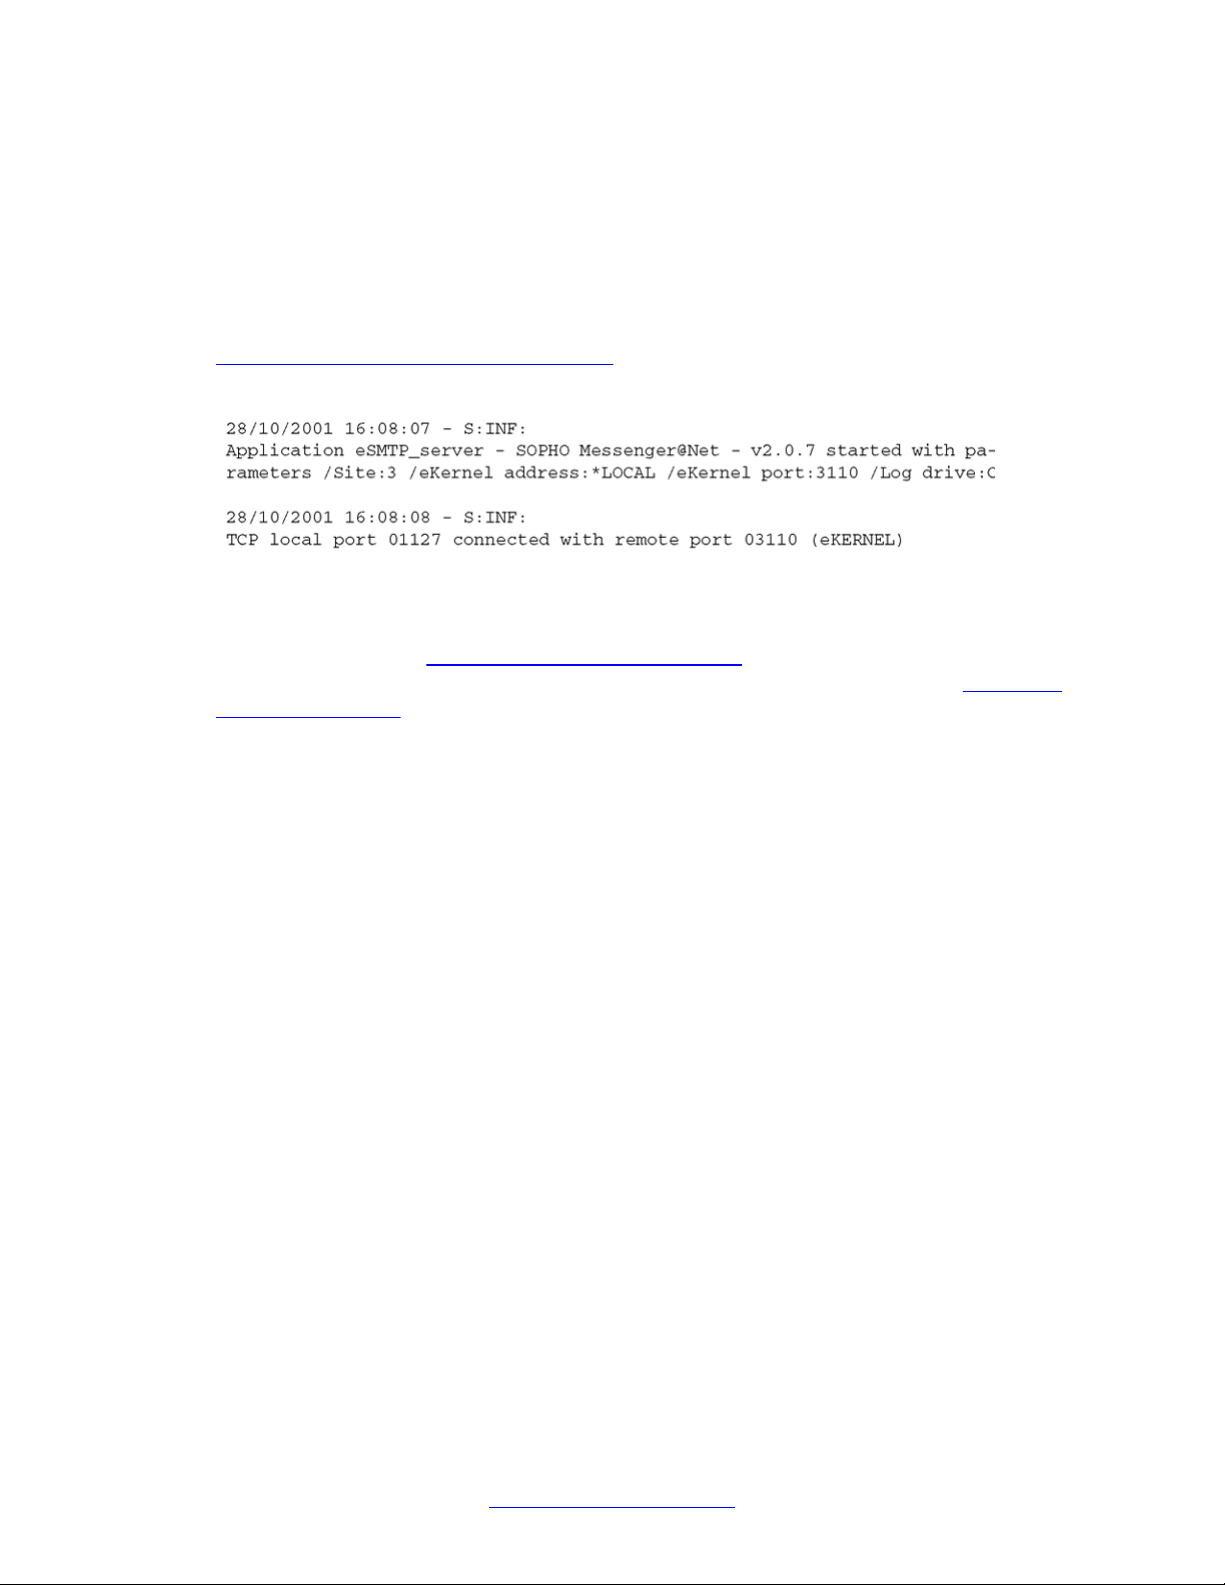
Module - eSMTP_server
The eKernel address keyword denotes the IP address that is assigned to the eKERNEL
module. The eSMTP_server contacts this IP address to connect to the eKERNEL.
• eKERNEL Port
The eKernel Port keyword denotes the port number that is assigned in the configuration
for the eSMTP_server instance.
On startup, the eSMTP_server application attempts to connect to the eKERNEL, as shown in
Figure 21: eKERNEL connection attempt on page 30. This is performed based upon the
address and port information obtained from the Shortcut.
Figure 21: eKERNEL connection attempt
At connection, the eSMTP_server requests the eKERNEL to provide additional configuration
settings, as shown in Figure 22: Configuration request on page 31. The eKERNEL
authenticates the client and responds with a configuration reply, as shown in Figure 23:
Configuration reply on page 31.
30 DECT Messenger Installation and Commissioning — Book 2 March 2012
Comments? infodev@avaya.com
Page 31

Figure 22: Configuration request
Initialization
Figure 23: Configuration reply
When the configuration is received, the Connections tab of the eSMTP_server module is
updated with information similar to what is shown the panel shown in
Figure 24: Updated
eSMTP Connection information on page 31.
Figure 24: Updated eSMTP Connection information
DECT Messenger Installation and Commissioning — Book 2 March 2012 31
Page 32

Module - eSMTP_server
Activity of eSMTP_server
The eSMTP_server module is now ready to send message requests to eKERNEL. These
requests are sent on a first-in first-out basis.
Click the eSMTP_server tab to view request processing, as shown in
processing shown on the eSMTP_server tab on page 32.
Figure 25: Request processing shown on the eSMTP_server tab
As specified in the configuration reply , the eSMTP_server polls the specified directory for new
inbound mail messages at fixed intervals. This interval is usually 10 seconds. The default
directory is C:\Inetpub\mailroot\Drop, as shown in Figure 26: Default inbound mail (drop)
directory on page 33.
Figure 25: Request
32 DECT Messenger Installation and Commissioning — Book 2 March 2012
Comments? infodev@avaya.com
Page 33

Figure 26: Default inbound mail (drop) directory
Activity of eSMTP_server
Inbound mail messages are processed one by one. During processing, a window opens similar
to the one shown in
Figure 27: Mail processing
Figure 27: Mail processing on page 33.
The Mail processing window shows:
• Request identifier
DECT Messenger Installation and Commissioning — Book 2 March 2012 33
Page 34

Module - eSMTP_server
This is a long filename and refers to the filename of the e-mail message that is being
processed. These names were generated by the Microsoft SMTP Server component.
• From field
Isolated from the <x-receiver> tag.
• To field
Isolated from the <x-sender> tag.
• Subject field
Isolated from the Subject: tag.
With these values, the eSMTP_server produces a message request for eKERNEL, as shown
Figure 28: eSMTP message request for eKERNEL on page 34.
in
Figure 28: eSMTP message request for eKERNEL
The eKERNEL then validates the message request, and either accepts or refuses the request.
During the validation process, the eSMTP_server is considered as an input program, so all
configuration settings must be defined correctly. One major criterion is whether for this input
program the auto-create group is activated. Without auto creation of groups, both From and To
must be known in the database.
• Message Accepted
If the message is accepted, a reply is sent, as shown in
Figure 29: Message reply:
accepted on page 34.
Figure 29: Message reply: accepted
Upon receiving this acknowledgement, the eSMTP_server moves the original mail message
to a processed location, unless the target directory is set to a value of *NONE. Figure 30:
Specifying the location to file accepted messages on page 35 shows the target folder for
accepted messages.
34 DECT Messenger Installation and Commissioning — Book 2 March 2012
Comments? infodev@avaya.com
Page 35

Figure 30: Specifying the location to file accepted messages
Activity of eSMTP_server
• Message Rejected
If the message is not accepted in eKERNEL, a negative reply is sent, as shown in
Figure 31:
Message reply: rejected on page 35.
Figure 31: Message reply: rejected
Refer to the log files of eKERNEL (see the eKERNEL > Logging tab) to find out why the
message was not accepted. Following is an example of the informational message that is
shown:
S: Alarm not processed. Unknown group in eKERNEL_GROUP table! Auto create
group for eSMTP_server is set to False.
Upon reception of this negative acknowledge (NACK), the eSMTP_server moves the original
mail message to an error location, unless the target directory is set to a value of *NONE. Figure
32: Specifying the error target directory on page 36 shows the target folder for rejected
messages.
DECT Messenger Installation and Commissioning — Book 2 March 2012 35
Page 36

Module - eSMTP_server
Figure 32: Specifying the error target directory
Logging
The eSMTP_server application provides logging both on-screen and on disk.
Figure 33: On-screen logging on page 37 shows the on-screen logging that can be found in
the Logging tab.
Note:
Because these rejected inbound mail messages are still available online, you can let the
administrator determine the cause of the problem, and if necessary adjust the configuration
settings. In many cases, the problems are related to wrong configuration, or processing of
unexpected mail messages (spawn mail, hackers, and so on). After the configuration is fixed,
the messages in error can be either deleted or moved back to the Dropped directory for
reprocessing.
36 DECT Messenger Installation and Commissioning — Book 2 March 2012
Comments? infodev@avaya.com
Page 37

Figure 33: On-screen logging
Figure 36: Log file on disk — part 3 on page 40 shows the log file stored on disk.
Logging
DECT Messenger Installation and Commissioning — Book 2 March 2012 37
Page 38

Module - eSMTP_server
Figure 34: Log file on disk — part 1
38 DECT Messenger Installation and Commissioning — Book 2 March 2012
Comments? infodev@avaya.com
Page 39

Logging
Figure 35: Log file on disk — part 2
DECT Messenger Installation and Commissioning — Book 2 March 2012 39
Page 40

Module - eSMTP_server
Figure 36: Log file on disk — part 3
40 DECT Messenger Installation and Commissioning — Book 2 March 2012
Comments? infodev@avaya.com
Page 41

Chapter 3: Module - eSNMP
Important:
Due to the ongoing development of the DECT Messenger product suite, some modules that provide
additional functionality may become available after the initial release of DECT Messenger 4.0.
The following modules are described in this document but are not available at initial General
Availability.
• eFR
• eLICENSE
• eLOCATION
• eSMS
• eSNMP
• eVBVOICE
The eFR module is an add-on module and is licensed separately through the eLICENSE module. Some
of the modules listed in this attention box are available only on a site-specific basis.
Architecture
The eSNMP module is able to receive SNMPv1 and SNMPv2 traps sent from an external
SNMP trap sender to DECT Messenger . The eSNMP module uses an SNMP trap receiver. As
a result of a received SNMP trap, an alarm is activated or deactivated on the Messenger
platform.
At startup, eSNMP contacts eKERNEL to request the configuration of eKERNEL. The IP
address and port of eSNMP is configured in the shortcut. When parameters are absent, the
startup values are prompted, as shown in the following figure.
DECT Messenger Installation and Commissioning — Book 2 March 2012 41
Page 42

Module - eSNMP
Figure 37: eSNMP parameters missing
The module eKERNEL responds to the <cfgrqs> with <cfgrpy>. This configuration is taken
from the Messenger_CFG database table eSNMP. The Messenger_CFG database table
contains, for example, the port number 162 that is used to receive SNMPv1 and SNMPv2 traps.
See the following figure.
Figure 38: Messenger_CFG database table
Figure 39: eSNMP connections
The SNMP traps are shown under the eSNMP tab. SNMP traps are ASN.1 BER-encoded. In
the eSNMP, the received data is represented in an XML-style way to improve readability. See
the following figure.
42 DECT Messenger Installation and Commissioning — Book 2 March 2012
Comments? infodev@avaya.com
Page 43

Architecture
Figure 40: eSNMP traps
The eSNMP module can determine the originator of the SNMP trap. For example, in Figure
40: eSNMP traps on page 43, an SNMPv1 trap was received from 10.128.84.22. The SNMP
trap also contains some “header” information, such as the following.
• community, for example public
• enterprise oid, for example 1.3.6.1.4.1.28088.32.1
• generic trap (value between 0 and 6)
• specific trap (0 or >0)
• a timestamp
Optionally , additional parameters can be received. The eSNMP module can handle up to nine
additional parameters or varbind parameters. Each varbind parameter is up to 32 characters
long.
When an SNMPv1 or SNMPv2 trap is received, a message is sent to eKERNEL. eKERNEL
considers the eSNMP modules as an input program, and requires the typical parameters
needed for generating a message. See the following figure.
DECT Messenger Installation and Commissioning — Book 2 March 2012 43
Page 44

Module - eSNMP
Figure 41: Parameters used by eKERNEL to generate a message
The eKERNEL module has two configuration tables to support the eSNMP module.
The eSNMP table provides configuration items for an instance of eSNMP, and provides the
information in <cfgrqs> and <crgryp> parameter exchange. The eSNMP table can also define
automatic creation of trap definitions in the eSNMP_TRAPS table, and provides default values
for those automatically created definitions in eSNMP_TRAPS. These parameters include
action, alarm identifier, group, message text, and so on. See the following figure.
Figure 42: eSNMP table
Figure 43: eSNMP
The other configuration table that the eKERNEL module uses to support the eSNMP module
is eSNMP_TRAPS. This module defines the traps that are processed by the eSNMP module.
44 DECT Messenger Installation and Commissioning — Book 2 March 2012
Comments? infodev@avaya.com
Page 45

Architecture
When the eSNMP table specifies auto-configuration, the eSNMP_TRAPS are automatically
populated with definitions as new traps are received. This allows system administrators to
gradually optimize configurations by updating the definitions, and associating alarm identifiers,
groups and message. See the following figure.
Figure 44: eSNMP_TRAPS table
Figure 45: eSNMP_TRAPS
The eSNMP module is designed to handle the parameters available in SNMPv1 traps, such
as community , enterprise OID, generic trap, and specific trap. These fields are considered keyfields, and allow the eSNMP module to associate.
• Action (*SET or *RESET)
• Alarm identifier (as specified in eKERNEL_ALARM table)
• Group (as specified in eKERNEL_GROUP and eKERNEL_GROUP_MEMBER)
• Message
DECT Messenger Installation and Commissioning — Book 2 March 2012 45
Page 46

Module - eSNMP
The message can be a combination of fixed text and replacement values. In many cases,
SNMP traps provide a list of variable binding parameters.
The eSNMP module supports up to nine varbind parameters. The value of those parameters
can be embedded in the resulting message. The following figure shows a sample of such a
definition.
Figure 46: Message with varbind parameters
Supported replacement values are listed in the following figure.
Figure 47: Supported replacement values
When the SNMPv2 syntax is used, the parameters enterprise OID, generic trap, specific trap,
and timestamp are not available. These missing parameters are provided as value 0 so that
the existing implementation can also handle SNMPv2 traps. You must specify 0 in the
corresponding fields to preserve the unique key.
The definitions are related to site and area. This means every instance of eSNMP can have
an appropriate definition. The IP address of the sender is included in the key.
When no GenericTrap field is available, the value 0 is used. The use of the value 0 allows a
flexible filtering of alarms; for example, ignore one or more traps by not specifying the
corresponding alarm and, for example, assigning priorities.
Note that generic traps are reserved values in SNMP protocol, as shown in the following
figure.
Figure 48: Generic traps
46 DECT Messenger Installation and Commissioning — Book 2 March 2012
Comments? infodev@avaya.com
Page 47

Send SNMP Message for Win32
A sample program of Send SNMP Message is available on the DECT Messenger CD in the
directory 09-Add-ons\Send SNMP Message.
When you install the program, it resides in the directory C:\Program Files\Send SNMP
Message\Exe and is called Send SNMP Message.
When the program is launched, a window appears and defaults to IP address 127.0.0.1 and
port 162. If Send SNMP Message is installed on the same PC as the eSNMP module, the
default value should not be changed. If Send SNMP Message is installed on a different PC,
adjust the IP address and port to match the PC where eSNMP runs.
The window contains several input-capable fields that allow you to configure every parameter.
When you click the Sendbutton, an SNMPv1 trap is sent to eSNMP.
Send SNMP Message for Win32
Figure 49: Send SNMP Message
The Send SNMP Message program is provided on an “as-is” basis.
DECT Messenger Installation and Commissioning — Book 2 March 2012 47
Page 48

Module - eSNMP
Send SNMP Message for Web
The Web Administrator provides a web-based interface to send SNMPv1 traps from the Web
Administrator to the module eSNMP.
The implementation is based upon PHP script and hosted in the Apache HTTP Server on the
Messenger platform.
Since sending SNMPv1 traps is reserved for system administrators, the SNMP trap is reserved
for Web Administrator users with a security level equal to administrator. Security level equal
to administrator refers to users in the eWEB_AUTH table defined with USERA_Sec_level of
50 or above.
Figure 50: Send an SNMP trap
48 DECT Messenger Installation and Commissioning — Book 2 March 2012
Comments? infodev@avaya.com
Page 49

Send SNMP Message for iSeries
A similar program called Send SNMP Message is available for the IBM eServer iSeries
platform. This program is also referred to as IBM AS/400 or IBM i5.
This Send SNMP Message for iSeries features a command line interface, and is easily
embedded in existing legacy code written on CLP, RPG, RPG/LE an so on.
Send SNMP Message for iSeries
Figure 51: Send SNMP message (SNDSNMPMSG)
Contact Avaya product support to obtain more details.
DECT Messenger Installation and Commissioning — Book 2 March 2012 49
Page 50

Module - eSNMP
50 DECT Messenger Installation and Commissioning — Book 2 March 2012
Comments? infodev@avaya.com
Page 51

Chapter 4: Module - eTM
The module eTM is an application that is represented as a small icon in the system tray on the bottom
right-hand side of the desktop. This tray is usually populated with other applications, as shown in Figure
52: System Tray on page 51, where the eTM icon is shown to the immediate left of the clock.
Figure 52: System Tray
When the mouse is moved over the icon in the system tray, right-click to open the menu shown in
53: Open Task Manager on page 51.
Figure 53: Open Task Manager
The menu option Open T ask Manager restores the main menu, and can be opened to monitor the tasks
in detail. This menu also provides options to Start, Stop, or Pause processing. Use the Exit menu option
to terminate the eTM module and all associated tasks.
Select the Open Task Manager menu option in the pop-up menu, to open the Task Manager, as shown
Figure 54: eTM Task Manager on page 52.
in
Figure
DECT Messenger Installation and Commissioning — Book 2 March 2012 51
Page 52

Module - eTM
Figure 54: eTM Task Manager
Note:
The window contents vary according to your configuration settings.
The window is composed of the following sections:
• The upper section presents a tree-view of the environment, and contains a hierarchical overview of
all configured tasks. Every task has the following keywords and values:
- The keyword PID denotes the process identifier of the task. This identifier is formatted as a 10digit numeric value. The PID is the value that is also shown when the system supplied Task
Manager of Microsoft is used to represent the processes. A special value 0000000000 is shown
when the task is not running.
- The keyword Window style denotes the style of the window of the task. Supported values are
described in
Table 1: Supported window styles on page 52.
Table 1: Supported window styles
Value
0 Window is hidden and focus is passed to the hidden window.
1 Window has focus and is restored to its original size and position.
2 Window is displayed as an icon with focus.
Description
3 Window is maximized with focus.
52 DECT Messenger Installation and Commissioning — Book 2 March 2012
Comments? infodev@avaya.com
Page 53

Value Description
4 Window is restored to its most recent size and position. The currently
active window remains active.
6 Window is displayed as an icon. The currently active window remains
active.
- The keyword Shortcut denotes the command line parameter that is used to launch the
process.
• The second section shows a log of the changes in the state of the tasks.
• The third section shows some additional logging information, and is updated when, for instance, a
task is terminated from within the eTM application.
• The bottom section shows on the left a small icon that denotes the current state of the eTM. This
application can be started, paused or stopped.
The eTM is launched by means of the following command:
Table 2: Launch eTM Command
C:\SOPHO Messenger@Net\Exe\eTM.exe
In most cases there is only one environment configured, and the eTM uses this default configuration.
When there is more than one environment configured, a selection window opens that allows you to specify
the environment that must be started, as shown in
Figure 55: Specify the eTM environment (when more
than one is configured) on page 53.
Figure 55: Specify the eTM environment (when more than one is configured)
If there is more than one environment configured, you can choose to automatically select a startup
environment. This can be accomplished by extending the launch command with the keyword /Site:xxxxx,
where xxxxx is to be replaced by the configured environment name. For example, the following command
automatically launches the eTM for environment GNTN1SFMI.
Table 3: Launch ETM command
C:\SOPHO Messenger@Net\Exe\eTM.exe /Site:GNTN1SFMI
DECT Messenger Installation and Commissioning — Book 2 March 2012 53
Page 54

Module - eTM
The Windows Registry Editor (regedit or regedt32) can be used to maintain the configuration of the
eTM.
Figure 56: Sample eTM configuration registry entry on page 54 shows a sample configuration, as
represented in the system registry as a result of the configuration process.
Figure 56: Sample eTM configuration registry entry
Figure 57: Sample eTM configuration on page 54 shows a sample configuration for the eTM module
that defines the following:
• One instance of CSTA_Service.exe
• One instance of eKERNEL.exe
The text file represented in
Figure 57: Sample eTM configuration on page 54 has a filename with
extension .reg and can be created with a text editor (for example, Notepad).
Figure 57: Sample eTM configuration
Files with .reg extension can be merged to the registry.
54 DECT Messenger Installation and Commissioning — Book 2 March 2012
Comments? infodev@avaya.com
Page 55

Merging .reg files
1. Select the Mergecommand.
In Windows Explorer:
• Locate the file you wish to merge.
• Right-click the file.
• Choose Merge from the pop-up menu, as follows:
2. Confirm that you wish to merge the registry.
Click Yes to continue.
3. Confirm completion of the registry merge.
Click OK.
DECT Messenger Installation and Commissioning — Book 2 March 2012 55
Page 56

Module - eTM
The command RegEdit or RegEdt32 can be used to verify the configuration, or to apply changes to an
existing configuration.
A future release of DECT Messenger will provide automatic procedures for configuring the Task Manager
from the Configurator module.
In Release 4, the eGRID module features a command button Generate registry files for eTM. Click this
button to read the eKERNEL_TCPCLIENT table and automatically generate the required shortcuts for
each site and environment, as shown in
Generate shortcuts on page 56.
Generate shortcuts
1. Use eGRID to generate registry files for eTM.
Launch eGRID and click Generate registry files for eTM.
2. Review the information provided, and acknowledge completion of the process.
Click OK to continue.
Figure 58: Example of configuration of four environments on page 57 shows a configuration of four
environments.
56 DECT Messenger Installation and Commissioning — Book 2 March 2012
Comments? infodev@avaya.com
Page 57

Figure 58: Example of configuration of four environments
• Site 1
- Environment GNTN1SFMI
- Environment GNTN1SKDS
• Site 2
- Environment *LOCAL
• Site 3
- Environment *LOCAL
The first two environments reside on site 1, the other environments reside on other sites. In this example,
the modules of site 1 are distributed across two environments (two separate PC platforms). The PC with
DECT Messenger Installation and Commissioning — Book 2 March 2012 57
Page 58

Module - eTM
environment GNTN1SFMI contains a full-featured installation with one or more instances of each module;
the second environment GNTN1SKDS contains a subset of the modules only. Figure 59: eTM - Site 1 -
Environment GNTN1SFMI.reg on page 58 shows the registry file corresponding to the foregoing
example.
58 DECT Messenger Installation and Commissioning — Book 2 March 2012
Comments? infodev@avaya.com
Page 59

Figure 59: eTM - Site 1 - Environment GNTN1SFMI.reg
DECT Messenger Installation and Commissioning — Book 2 March 2012 59
Page 60

Module - eTM
Figure 60: eTM - Site 1 - Environment GNTN1SKDS.reg
Figure 61: eTM - Site 2 - Environment LOCAL.reg
60 DECT Messenger Installation and Commissioning — Book 2 March 2012
Comments? infodev@avaya.com
Page 61

Figure 62: eTM - Site 3 - Environment LOCAL.reg
At startup, the eTM retrieves the configuration, and launches all tasks that are defined in the environment
according to the configuration. As shown in the example in Figure 62: eTM - Site 3 - Environment
LOCAL.reg on page 61, the environment GNTN1SCTI launches the DECT Messenger modules CSTA
Server, and the module eKERNEL.
When a task is successfully launched, the logging section features a green icon indicating a normal
condition, as shown in
Figure 63: Green icon indicates Normal Condition
Figure 63: Green icon indicates Normal Condition on page 61.
When the tasks is ended — for example, by means of the Alt-F4 keystroke combination — the eTM detects
this and relaunches the missing task. This is indicated in the log as shown in
Figure 64: Red icon indicates
a task that is no longer running on page 61.
Figure 64: Red icon indicates a task that is no longer running
eTM checks every five seconds to ensure that each task is still running. When the eTM is paused or
stopped, the routine that verifies and restarts the process is temporarily interrupted.
DECT Messenger Installation and Commissioning — Book 2 March 2012 61
Page 62

Module - eTM
This interruption usually occurs during maintenance of one of more of the programs that are guarded by
the eTM. Such a temporary condition is shown in the log as illustrated in Figure 65: Yellow icon indicates
a task that is paused on page 62.
Figure 65: Yellow icon indicates a task that is paused
A system administrator can also terminate a task from within the eTM_HA environment using a Terminate
process API-call.
Note:
Using the Terminate process API-call can cause data loss, as this does not provide any graceful
cleanup or shutdown of the associated program.
To terminate a process, use the menu Kill task option, as shown in Figure 66: Kill Task on page 62. The
Kill task option is available only when the tree-view is expanded and the mouse is right-clicked on the
PID:xxxxxxxxxx line.
Figure 66: Kill Task
When Kill task is clicked, the running task is terminated, as shown in
Figure 67: A task is terminated on
page 63.
62 DECT Messenger Installation and Commissioning — Book 2 March 2012
Comments? infodev@avaya.com
Page 63

Shutting down eTM_HA
Figure 67: A task is terminated
Note:
When the eTM is running, the system relaunches the terminated tasks within 10 seconds.
When the eTM form is closed through the control box on the right top of the form, the application does not
shut down, but is instead minimized to an icon in the system tray . This function is designed to prevent the
user from accidentally closing the eTM and associated tasks. This approach is similar to monitoring
applications of other vendors, such as the Apache Monitor or the SQL Server Service Manager.
Shutting down eTM_HA
The eTM can be shut down by opening the pop-up menu shown in Figure 53: Open Task
Manager on page 51, and choosing the Exit menu option.
Important:
Avaya recommends that you close applications using shut down, exit or close options in the
applications themselves, to ensure a clean shutdown. This helps to protect volatile data,
properly close down serial and sockets communications, free resources, clean up garbage,
and so on. T o stop processes gracefully , follow the steps described in Shutting down eTM on
page 63.
Shutting down eTM
1. Open the eTM_HA pop-up menu.
DECT Messenger Installation and Commissioning — Book 2 March 2012 63
Page 64

Module - eTM
Right-click the eTM_HA icon in the system tray.
2. Stop the eTM_HA.
• Choose the menu item Task Manager - Stop.
• Choose the menu item Exit.
The following confirmation prompt is shown; do not click OK or Cancel yet:
Note:
The application also responds to a system Log off or Shut down event.
3. Shut down the applications.
Close down all programs using the program specific instructions. In most cases this
means closing the main form of each application by clicking the Close box on the
top right of each form. However, some applications require specific shutdown
procedures.
4. Confirm the eTM termination warning dialog box.
Click OK.
Because all associated tasks were already manually ended gracefully, no more
processing is involved.
Any associated tasks still running are terminated through a Terminate process APIcall for each task that is launched from within the eTM and finally shuts down the
eTM module too.
64 DECT Messenger Installation and Commissioning — Book 2 March 2012
Comments? infodev@avaya.com
Page 65

Chapter 5: Module - eTM_HA
Important:
Setting up the eTM_HA module in a networked environment is a complex task, and requires training to
set up, maintain, and use in the DECT Messengerenvironment. Read the following documentation
closely, and refer to the training session on eTM_HA for more details.
Overview
The module eTM_HA is the high-availability implementation of the eTM module. If you wish to
migrate your system from eTM to eTM_HA, you must update the system registry.
The module eTM_HA is an application that is represented as a small icon in the system tray
on the bottom right-hand side of the desktop. This tray is usually populated with other
applications, as shown in
icon is shown to the immediate left of the clock.
Figure 68: Windows System Tray on page 65, where the eTM_HA
Figure 68: Windows System Tray
Move the mouse over the icon in the system tray, then right-click to open the menu shown in
Figure 69: Open Task Manager on page 65.
Figure 69: Open Task Manager
The menu option Open T ask Manager restores the main menu, and can be opened to monitor
the tasks in detail. This menu also provides options to Start, Stop, or Pause processing. Use
the Exit menu option to terminate the eTM_HA module and all associated tasks.
When the Open T ask Manager menu option of the pop-up menu is selected, a window similar
to
Figure 70: eTM-HA Task Manager - Overview tab on page 66 opens. The Overview tab
shows the configuration, which is fetched from the registry.
DECT Messenger Installation and Commissioning — Book 2 March 2012 65
Page 66

Module - eTM_HA
Figure 70: eTM-HA Task Manager - Overview tab
The Logging tab provides data as shown in
Figure 71: eTM-HA Logging tab on page 67.
66 DECT Messenger Installation and Commissioning — Book 2 March 2012
Comments? infodev@avaya.com
Page 67

Publisher and Subscriber
Figure 71: eTM-HA Logging tab
Note:
The information shown in Figure 69: Open Task Manager on page 65 is intended as an
example. The exact information for your system differs according to your configuration
settings.
Publisher and Subscriber
A typical eTM_HA environment involves one system configured be Publisher , and one or more
system configured as Subscribers. Although eTM_HA can run stand-alone (just one publisher),
there is no value in activating an eTM_HA when there are no Subscribers. If there are no
Subscribers, use eTM instead of eTM_HA.
In the Publisher and Subscriber model, the Publisher is the site where the Messenger_CFG
configuration database is centralized. This is often called the main site. All configuration must
reside on this centralized database only, so eCONFIG maintenance and eKERNEL must all
reside on this same site.
The eTM_HA software can also be installed on distributed systems, intended to launch tasks
on the distributed system. These systems launch, for instance, eCAP and eDMSAPI modules,
all of them referring to the central eKERNEL residing on the Publisher site.
DECT Messenger Installation and Commissioning — Book 2 March 2012 67
Page 68

Module - eTM_HA
The eTM_HA software must be installed on both the Publisher and the Subscriber site. Based
upon configuration settings in the registry, the instance behaves as Publisher or as
Subscriber.
The following functionality is available:
• eTM functionality
• eTM_HA specific functionality on Publisher
- Launch tasks associated with an environment
- Keep track of running processes of an environment
- Restart tasks that are missing
- TCP server, listening on an administration port (default 7000)
- Handling KeepAlive requests from Subscriber
- Handling GetImage requests from Subscriber
- Keeping track of state of Publisher and Subscriber
- Changing the environment depending on the Publisher and Subscriber states
• eTM_HA specific functionality on Subscriber
- TCP client, connecting to Publisher administration port
- Sending KeepAlive requests to Publisher
- Sending GetImage requests to Publisher
- Keeping track of state of Publisher and Subscriber
- Changing the environment depending on the Publisher and Subscriber states
During a change of environment, all running tasks of a previous environment are ended, and
new tasks of the new environment are launched. During such an event, the Subscriber applies
the last database image received from the Publisher and optionally applies changes defined
in an SQL Script.
Registry settings eTM
The configuration of environments and tasks is stored in the following section:
[HKEY_CURRENT_USER\Software\Philips\SOPHO Messenger@Net\eTM]
This section contains definitions of environments and tasks, as described in the documentation
of module eTM, Module - eTM on page 51. These settings can be entered manually of can be
generated by the eCONFIG or eGRID modules.
68 DECT Messenger Installation and Commissioning — Book 2 March 2012
Comments? infodev@avaya.com
Page 69

Registry settings eTM
Important:
If the environment names for eTM_HA are not defined with a name containing the local IP
address, rename the registry structure generated by eGRID or eCONFIG, so that the IP
address is available in the name.
The eTM structure can contain one or multiple environments. If you launch the eTM_HA.exe
without additional parameters, the program analyzes the available environments of the registry ,
and prompts for an initial environment at startup.
Figure 72: Example of two environments on page 69 shows an example, with two
environments defined. One environment is called Site 1 – Environment 10.110.50.138. The
other is called Site 1 – Environment 10.110050.138 (backup).
Figure 72: Example of two environments
If eTM_HA.exe is launched without additional parameters on a system with local IP address
10.110.50.138; then a prompt appears as follows:
"C:\SOPHO Messenger@Net\Exe\eTM_HA.exe"
Figure 73: Selecting an environment when more than one is defined
Note:
Because the objective of this module is to provide high availability , Avaya recommends that
you suppress this prompt. This can be accomplished by adding a parameter on the
command line of the shortcut specifying the initial environment to select. This is performed
by means of the optional keyword /Environment.
Create a shortcut for eTM_HA in the startup group specifying the initial environment, as follows:
"C:\SOPHO Messenger@Net\Exe\eTM_HA.exe" / Environment:Site 1 – Environment
10.110.50.138
DECT Messenger Installation and Commissioning — Book 2 March 2012 69
Page 70

Module - eTM_HA
Note:
In eTM.exe a similar function existed, but the keyword was called /Site. In eTM_HA the
keyword is renamed to /Environment.
eTM registry entries accept the following parameters:
• PID
• Windowstyle
The keyword PID denotes the process identifier of the task. This identifier is formatted as
a 10-digit numeric value. The PID is also shown when Microsoft Task Manager is used to
represent the processes. A special value 0000000000 is shown when the task is not
running.
The keyword Windowstyle denotes the style of the window of the task. The supported
values are shown in Table 4: Supported window styles on page 70.
Table 4: Supported window styles
Value Description
0 Window is hidden and focus is passed to the hidden window.
1 Window has focus and is restored to its original size and position.
2 Window is displayed as an icon with focus.
3 Window is maximized with focus.
4 Window is restored to its most recent size and position. The currently
active window remains active.
6 Window is displayed as an icon. The currently active window remains
active.
• Shortcut
The keyword Shortcut denotes the command line parameter that is used to launch the
process.
Figure 74: Sample registry file of the eTM, illustrating a Publisher site — part 1 on page 71
shows a sample (exported) registry file of the eTM section, and refers to a Publisher site,
usually containing an eKERNEL reference.
70 DECT Messenger Installation and Commissioning — Book 2 March 2012
Comments? infodev@avaya.com
Page 71

Registry settings eTM
Figure 74: Sample registry file of the eTM, illustrating a Publisher site — part 1
Figure 75: Sample registry file of the eTM, illustrating a Publisher site — part 2
Figure 76: Sample registry file, illustrating a Subscriber section in production mode on
page 72 shows another example, illustrating a Subscriber section in production mode. There
DECT Messenger Installation and Commissioning — Book 2 March 2012 71
Page 72

Module - eTM_HA
is no eKERNEL reference in this example, as all modules refer to the eKERNEL on the
publisher system.
Figure 76: Sample registry file, illustrating a Subscriber section in production mode
Figure 77: Sample registry file, illustrating a Subscriber section in backup mode on page 73
shows another example, illustrating a Subscriber section in backup mode. Here an eKERNEL
reference is shown, as the environment runs when the publisher is unavailable. All modules
refer to the local eKERNEL on the subscriber system.
72 DECT Messenger Installation and Commissioning — Book 2 March 2012
Comments? infodev@avaya.com
Page 73

Registry settings eTM_HA
Figure 77: Sample registry file, illustrating a Subscriber section in backup mode
Registry settings eTM_HA
The configuration of environments and tasks is stored in the following section:
[HKEY_CURRENT_USER\Software\Philips\SOPHO Messenger@Net\eTM_HA]
This section contains additional configuration settings that are needed for configuring the highavailability functionality that is added in eTM_HA.
DECT Messenger Installation and Commissioning — Book 2 March 2012 73
Page 74

Module - eTM_HA
Figure 78: Registry settings: General section
The General section defines the following parameters:
• Interval CheckAvailability
• Interval CheckTasks
• Interval KeepAlive
• Interval GetImage
• Timeout KeepAlive
• Timeout GetImage
• Timeout Task
• Log days
• Publisher database
• Subscriber database
• Subscriber workspace
• Subscriber image
The Publisher section contains a structure as shown
section on page 75:
Figure 79: Registry settings: Publisher
74 DECT Messenger Installation and Commissioning — Book 2 March 2012
Comments? infodev@avaya.com
Page 75

Figure 79: Registry settings: Publisher section
Registry settings eTM_HA
The same information is represented in the eTM_HA Overview tab, as illustrated in Figure 80:
Registry settings: Publisher overview in eTM_HA on page 76.
DECT Messenger Installation and Commissioning — Book 2 March 2012 75
Page 76

Module - eTM_HA
Figure 80: Registry settings: Publisher overview in eTM_HA
The Subscribers section contains a structure as illustrated in
Figure 81: Registry settings:
Subscribers (0) section on page 76 and Figure 82: Registry settings: Subscribers (1)
section on page 77.
Figure 81: Registry settings: Subscribers (0) section
76 DECT Messenger Installation and Commissioning — Book 2 March 2012
Comments? infodev@avaya.com
Page 77

Figure 82: Registry settings: Subscribers (1) section
Registry settings eTM_HA
The same information is represented in the eTM_HA Overview tab, as illustrated in Figure 83:
Registry settings: Subscribers overview in eTM_HA on page 78.
DECT Messenger Installation and Commissioning — Book 2 March 2012 77
Page 78

Module - eTM_HA
Figure 83: Registry settings: Subscribers overview in eTM_HA
The General section contains a structure as illustrated in
Figure 84: Registry settings:
General on page 78.
Figure 84: Registry settings: General
The same information is shown in the eTM_HA Overview tab, as shown in Figure 85: Registry
settings: General in eTM_HA on page 79.
78 DECT Messenger Installation and Commissioning — Book 2 March 2012
Comments? infodev@avaya.com
Page 79

Merging registry files
Figure 85: Registry settings: General in eTM_HA
Merging registry files
Use the steps in
Merging .reg files
1. Select the Merge command.
Merging .reg files on page 79 to merge registry files.
In Windows Explorer:
• Locate the file you wish to merge.
• Right-click the file.
• choose Merge from the pop-up menu, as follows:
DECT Messenger Installation and Commissioning — Book 2 March 2012 79
Page 80

Module - eTM_HA
2. Confirm that you wish to merge the registry.
Choose Yes to continue.
3. Confirm completion of the registry merge.
Click OK.
The command RegEdit or RegEdt32 can be used to verify the configuration, or to apply
changes to an existing configuration.
80 DECT Messenger Installation and Commissioning — Book 2 March 2012
Comments? infodev@avaya.com
Page 81

Check tasks
Future releases of DECT Messenger will provide automatic procedures for configuring the T ask
Manager from the Configurator module.
The eGRID module features a command button Generate registry files for eTM. Click this
button to read the eKERNEL_TCPCLIENT table and automatically generate the required
shortcuts for each site and environment, as shown in
Generate shortcuts on page 81.
Generate shortcuts
1. Use eGRID to generate registry files for eTM.
Launch eGRID and click Generate registry files for eTM.
2. Review the information provided, and acknowledge completion of the process.
Click OK to continue.
Note:
Do not forget to verify that the names of the environments in the eTM registry keys contain
the IP address; if not, rename the key to include the IP address. Avaya recommends that
you use the following naming conventions in the registry: Site n - Environment x.x.x.x and
Site n - Environment x.x.x.x - backup.
Check tasks
The program verifies all tasks with a time interval specified in the registry (usually 5
seconds).
DECT Messenger Installation and Commissioning — Book 2 March 2012 81
Page 82

Module - eTM_HA
When the eTM_HA is paused or stopped, the routine that verifies and restarts the process is
temporarily interrupted.
This usually occurs during maintenance of one of more of the programs that are guarded by
the eTM_HA. This temporary condition is shown in the logging.
A system administrator can also terminate a task from within the eTM_HA environment using
a Terminate process API-call.
Note:
Using the Terminate process API-call can cause data loss, as this does not provide any
graceful cleanup or shutdown of the associated program.
T o terminate a process in the Task Manager, use the Kill task menu option as shown in Figure
86: Kill Task on page 82. The Kill task option is available only when the tree-view is expanded
and the mouse is right-clicked on the PID:xxxxxxxxxx line.
Figure 86: Kill Task
Note:
When the eTM is running, the system relaunches the terminated tasks within 10 seconds.
When the eTM form is closed through the control box on the right top of the form, the application
does not shut down, but is instead minimized to an icon in the system tray. This function is
designed to prevent the user from accidentally closing the eTM and associated tasks. This
approach is similar to monitoring applications of other vendors, such as the Apache Monitor
or the SQL Server Service Manager.
Shutting down eTM_HA
The eTM can be shut down by means of the pop-up menu shown in
Manager on page 65, using the Exit menu option.
Important:
Avaya recommends that you close applications using shut down or exit/close options in the
applications, to ensure a clean shutdown. This helps to protect volatile data, properly close
Figure 69: Open Task
82 DECT Messenger Installation and Commissioning — Book 2 March 2012
Comments? infodev@avaya.com
Page 83

Check tasks
down serial and sockets communications, free resources, clean up garbage, and so on. To
stop the processes gracefully, follow the steps in Shutting down eTM_HA on page 83.
Shutting down eTM_HA
1. Open the eTM_HA pop-up menu.
Right-click the eTM_HA icon in the system tray.
2. Stop the eTM_HA.
• Choose the menu item Task Manager - Stop.
• Choose the menu item Exit.
The following confirmation prompt is shown; do not click OK or Cancel yet:
Note:
The application also responds to a system Log off or Shut down event.
3. Shut down the applications.
Close down all programs using the program specific instructions. In most cases this
means closing the main form of each application by clicking the close box on the
top right of each form. However, some applications require specific shutdown
procedures.
4. Confirm the eTM termination warning dialog box.
Click OK.
Because all associated tasks were already manually ended gracefully, no more
processing is involved.
Any associated tasks still running are terminated through a Terminate process
API-call for each task that is launched from within the eTM and finally shuts down
the eTM module as well.
DECT Messenger Installation and Commissioning — Book 2 March 2012 83
Page 84

Module - eTM_HA
Publisher
The publisher instance of eTM_HA features a TCP Server listing on a port specified in the
registry. Typically, port 7000 is used as the default port. The TCP Server is a multiple-accept
model, so multiple clients can connect at the same time. The number of simultaneous
connections is also defined in the registry. Specify a number at least as great as the number
of subscribers. Avaya recommends specifying a value that equals the number of subscribers
multiplied by three, to provide room for recovery in case of bad connection attempts.
The netstat command can be used on the Publisher to verify that the TCP Server is listening
(sample data is shown in Figure 87: Sample netstat command and returned data on
page 84).
Figure 87: Sample netstat command and returned data
Important:
The TCP Server is used for internal processing only. Do not attempt to access the server
unless instructed to do so.
The TCP Server is to be accessed from the Subscribers only. You can test this connection
(from the subscriber PCs only) with Internet Explorer. An HTTP request to port 7000 must reply
with the error code shown in Figure 88: TCP Server Error response on page 85.
84 DECT Messenger Installation and Commissioning — Book 2 March 2012
Comments? infodev@avaya.com
Page 85

Publisher
Figure 88: TCP Server Error response
In an operational environment, the eTM_HA instances of the Subscribers send these two
requests to the publisher on a regular basis: KeepAlive, and GetImage.
• KeepAlive
A KeepAlive request is exchanged between subscriber and publisher, and allows both
parties to verify the presence of the other. Interval and timeout between attempts are
defined in the registry.
Figure 89: TCP Server Keep Alive response on page 85 shows an example of what is
sent during this exchange. To test this response, Avaya recommends using Internet
Explorer on the Subscriber.
Figure 89: TCP Server Keep Alive response
• GetImage
The GetImage request is sent from each Subscriber to the Publisher on a regular time
interval, as specified in the registry. The publishing system responds to such a request
with an XML image of the Messenger_CFG database.
Figure 90: TCP Server Get Image
response on page 86 shows an example.
DECT Messenger Installation and Commissioning — Book 2 March 2012 85
Page 86

Module - eTM_HA
Figure 90: TCP Server Get Image response
The XML image file provided by the GetImage request can be expanded and collapsed
with the plus (+) and minus (-) signs, as shown in Figure 91: Expanded information on
page 86. For more information on the XML image, see
XML image on page 90.
Figure 91: Expanded information
Note:
Messenger_CFG contains sensitive data, and is exchanged as plain text in XML format. To
prevent security exposure, HTTP requests from external systems are rejected with an
authentication error. This test is performed based upon the IP address of the requester.
Note:
In a WAN environment, a test with a Browser can lead to rejection, even from the subscriber
system. The most common cause is a proxy server that masks the IP address of the
86 DECT Messenger Installation and Commissioning — Book 2 March 2012
Comments? infodev@avaya.com
Page 87

subscriber. During tests with Internet Explorer, you must disable the proxy server for local
addresses or specify the IP address of the publisher in the bypass list.
Keeping track of states
Both publisher and subscriber keep track of the state of the other party. This leads to a socalled "image" of Boolean settings of publisher and subscriber.
Subscriber
On the subscriber level, there is a state represented by P:0 and P:1, indicating whether the
publisher can be reached. P:1 denotes the publisher is available, P:0 denotes the publisher is
unavailable.
Appropriate registry settings associate an environment to each image. Optionally an SQL script
can be defined to run during switching environments.
Keeping track of states
The registry definitions are shown in Figure 92: Registry definitions on page 87.
Figure 92: Registry definitions
In Figure 92: Registry definitions on page 87, an example is shown with one Publisher and two
Subscribers; Subscriber 0 has an image for handling P:0 and P:1. This example shows the
settings when the subscriber cannot connect to the publisher. The environment Site 1 –
Environment 10.110.50.140 (backup) is associated and SQL script Messenger_CFG_sql is
defined.
Publisher
On the publisher level, a similar registry image is used. However, as a Publisher is often in
contact with multiple subscribers, the available images grow exponentially, as the state of
publisher and every subscriber forms a number of combinations for each Boolean state.
DECT Messenger Installation and Commissioning — Book 2 March 2012 87
Page 88

Module - eTM_HA
Figure 93: Example of an image at the publisher level on page 88 shows a network where
one Publisher and two Subscribers lead to eight images, and depend on each Boolean state
of available (1) or unavailable (0).
The syntax for images on publisher level are similar to P:1:S0:1-S1:1. Each section is
separated by a minus sign (-).
• The P:1 or P:0 denotes the state of the publisher
• The S0:1 or S0:1 denotes the state of first subscriber
• The S1:1 or S1:1 denotes the state of second subscriber
Figure 93: Example of an image at the publisher level
The registry keys are to be entered manually.
Recommendation
Avaya recommends that you begin with a definition on the Publisher level that refers to the
same environment for each image, and with a definition on the Subscriber level that refers to
the same environment for each image.
In this initial setup no environment changes occur, and initial testing can take place.
In a later stage you can modify environments. A copy of the production environment is usually
made at the Subscriber sites, for example, Site 1 – Environment 10.110.50.140 and Site 1 –
Environment 10.110.50.140 (backup). In this backup environment, the tasks can be altered,
for example, an eKERNEL instance can be added, and eKERNEL_address refers to a local
instance of eKERNEL.
88 DECT Messenger Installation and Commissioning — Book 2 March 2012
Comments? infodev@avaya.com
Page 89

Keeping track of states
Figure 94: Example: Site 1 - Environment 147.93.169.130
DECT Messenger Installation and Commissioning — Book 2 March 2012 89
Page 90

Module - eTM_HA
Figure 95: Example: Site 1 - Environment 147.93.169.130 (backup)
XML image
The Subscriber receives the result of the GetImage in a flat-file repository, located in the
following directory:
C:\SOPHO Messenger@Net\Xml
Important:
This directory must be created manually on Subscriber systems. Also a copy of the
Messenger_CFG.mdb with the exact layout of the database of the publisher must be created
in this directory. If the database is missing or has incorrect layout, system malfunction
results. An update of eKERNEL on the Publisher site must always be synchronized with the
same update on subscribers systems, and the eKERNEL can automatically add changes to
90 DECT Messenger Installation and Commissioning — Book 2 March 2012
Comments? infodev@avaya.com
Page 91

the database at startup. Therefore, after applying a new version of eKERNEL, you must first
start eKERNEL, and then copy the Messenger_CFG.mdb database.
If you install new versions of eKERNEL, you must synchronize the eKERNEL modules on all
systems. Also the latest layout of Messenger_CFG of publisher (after automatic upgrade
changes at first run) must be manually placed in the directory of the Subscribers.
GetImage puts a file Messenger_CFG.xml in the same directory, and replaces this file on
receipt of a GetImage result.
If you want to review this file, make a copy in another location before doing so, for example,
C:\Temp. You can, for example, launch the Internet Explorer and associate XML files to this
program, as Internet Explorer has built-in functionality to parse XML documents.
Do not open the file in the C:\SOPHO Messenger@Net\Xml, because the file can be
allocated by the viewer, and must be replaced when the next KeepAlive result is received.
SQL script
Keeping track of states
Warning:
When a Subscriber detects a change between P:1 and P:0:
1. The Subscriber ends all running tasks associated with the current environment.
At this time, Messenger functionality is disrupted, and pending and new alarms can
be lost.
2. The SQL image in C:\SOPHO Messenger@Net\Xml repository
Messenger_CFG.xml is imported to the workspace C:\SOPHO Messenger@Net
\Xml access database Messenger_CFG.mdb. For this reason, the
Messenger_CFG.mdb on Publisher and Subscriber sites must always use the same
layout.
Thus the following repositories exist:
• (original database on publisher)
C:\SOPHO Messenger@Net\Mdb\Messenger_CFG.mdbat publisher
• (transferred as XML images through HTTP)
C:\SOPHO Messenger@Net\Xml\Messenger_CFG.xmlat subscriber
• (converted into MDB on subscriber)
C:\SOPHO Messenger@Net\Xml\Messenger_CFG.mdbat subscriber
• (processed through optional SQL script, described in Figure 96: Sample SQL script on
page 92)
DECT Messenger Installation and Commissioning — Book 2 March 2012 91
Page 92

Module - eTM_HA
• (activated on subscriber)
Figure 96: Sample SQL script
Use this (optional) SQL script to modify the contents of the database, as arrived from the
operational publisher system. In some environments no changes are required; in more
demanding customer environments complex scenarios can be set up to allow applying
changes to the database. This can include changing .COM ports, IP address, group members,
and so on. Review your SQL changes carefully.
C:\SOPHO Messenger@Net\Xml\Messenger_CFG.mdbat subscriber
C:\SOPHO Messenger@Net\Mdb\Messenger_CFG.mdbat subscriber
Switch back
When Publisher or Subscribers detect a change in the availability image, a switch to another
environment – or switch-back to the original environment – can be appropriate.
Conclusion
Careful planning and testing is required. Avaya recommends you simulate every configured
scenario, and analyze in detail the possible impact of every scenario. An off-site testing
procedure in a lab environment is usually appropriate, to prevent loss of alarms (during change
in image, eKERNEL and other modules are stopped and all alarms can be lost).
Also, take into account that having a high-availability solution in place affects change
management. Changes applied to eKERNEL must be synchronized, and (automatic) database
upgrade changes to Messenger_CFG.MDB must be handled manually by the system
administrator.
Finally, note that configuration changes with eCONFIG, eGRID, eWEB, or another
configuration tool can affect the total environment. For example, a divert to another device
does not work in a backup environment if the destination device in not available, or the module
is unavailable. Therefore, due to the nature of such an architecture, and maintenance issues
92 DECT Messenger Installation and Commissioning — Book 2 March 2012
Comments? infodev@avaya.com
Page 93

Conclusion
and customer specific factors that are beyond our control, the authors of eTH_HA cannot
accept responsibility for malfunction of the software.
DECT Messenger Installation and Commissioning — Book 2 March 2012 93
Page 94

Module - eTM_HA
94 DECT Messenger Installation and Commissioning — Book 2 March 2012
Comments? infodev@avaya.com
Page 95

Chapter 6: Module - eVBVOICE
Important:
Due to the ongoing development of the DECT Messenger product suite, some modules that provide
additional functionality may become available after the initial release of DECT Messenger 4.0.
The following modules are described in this document but are not available at initial General A vailability
of Release 4.0.
• eFR
• eLICENSE
• eLOCATION
• eSMS
• eSNMP
• eVBVOICE
The eFR module is an add-on module and is licensed separately through the eLICENSE module. Some
of the modules listed in this attention box are available only on a site-specific basis.
Introduction
Within every eVBVOICE application there are two different call types.
• Inbound calls
In an inbound call where the user dials a specific number related to the eVBVOICE
application, messages can be set (*SET), reset (*RESET), and confirmed (*CONFIRM).
Y ou can also record (*RECORD) wave files related on a specific menu option or recording
general wave files.
• Outbound calls
The eVBVOICE application can set up a call to a device and play a wave file linked to a
specific alarm. The eVBVOICE application is used to inform the device of a user that a
specific alarm is activated. The alarm is audio and not visual.
DECT Messenger Installation and Commissioning — Book 2 March 2012 95
Page 96

Module - eVBVOICE
Figure 97: eVBVOICE inbound call
Figure 98: eVBVOICE outbound call
96 DECT Messenger Installation and Commissioning — Book 2 March 2012
Comments? infodev@avaya.com
Page 97

Inbound calls
General configuration parameters
General parameters for each eVBVOICE application are specified in the eVBVOICE table.
Figure 99: General configuration parameters
An eVBVOICE application must be unique for every site + area.
Introduction
Functionality
The telephone number when a user calls eVBVOICE can be a group number, or a direct
number, as defined in the telephone switch.
The users hears the Welcome message, eVBV_Welcome_str and then can select specific
menu options. The menu options are described in the following configuration tables. All menu
selections are generated with DTMF keystrokes, and every option must be terminated by the
pound (#) key.
DECT Messenger Installation and Commissioning — Book 2 March 2012 97
Page 98

Module - eVBVOICE
eVBVOICE menu option level 1
Figure 100: Menu option level 1
Figure 101: Menu option level 1 - General tab
Depending on the data entered in the configuration table for the first menu,
eVBVOICE_MENU_L1, the user can select an option by pressing the corresponding keystroke
or dtmf tone. The users hears the wave file linked with that option.
98 DECT Messenger Installation and Commissioning — Book 2 March 2012
Comments? infodev@avaya.com
Page 99

Introduction
When a user hears the Welcome message, and presses 1 and #, for example, the users hears
the wave file AlarmConfirmation.wav.
There are 4 different types of menu options possible for eVBVM_L1_Menu_Type_str =
• *CONFIRM
• *SET
• *RESET
• *RECORD
CONFIRM
For menu type = *CONFIRM for confirmation of alarms, there are no entries possible in the
eVBVOICE_MENU_L2 table.
With the eVBVOICE application, users can confirm messages with a personal pincode
(DEV_PinCode_str in eKernel_device).
If a message that is sent contains a message that must be confirmed, the user can make a
call to the eVBVOICE application to confirm the alarm.
The user hears a welcome message when connected and must select the menu option for
confirmation of alarms (*CONFIRM). The user is prompted to enter his pincode
(eVBVM_L1_Menu_Wavfile_str ).
This pincode is related to a device configured in the DEVICE table in the configuration database
(DEV_PinCode_str in eKernel_device table).
The eKernel application checks the database for the devices related to this pincode, and
informs the eVBVOICE application of the number of devices. If the pincode is unknown in the
database, the "WrongPincode message" (eVBV_WrongPincode_str) plays.
If there are no alarms active for this pincode, the user hears a message that no messages are
active for this pincode (VBV_Nomess_str).
If the confirmation is successful, all the active alarms for all the devices related to this pincode
are cleared. The wave file entered in the eVBV_Confirm_str field plays.
If a wave file entered in the configuration tables does not exist, the wave file entered in the
eVBV_NoWavFile_str field plays.
It is not possible to confirm an alarm during an outbound call in the current release. When a
person receives a message through eVBVOICE, for example a call at home, the user cannot
confirm the alarm or alarms during the same call. In the current release you must make a new
call, particularly to confirm alarms.
SET and RESET
For menu type (eVBVM_L1_Menu_Type_str) = *SET and *RESET (set and reset of alarms),
a link to the eVBVOICE_MENU_L2 table is necessary.
DECT Messenger Installation and Commissioning — Book 2 March 2012 99
Page 100

Module - eVBVOICE
Menu option level 2
SET and RESET
For menu types *SET and *RESET, the related alarms must be specified in the
eVBVOICE_MENU_L2 table.
Figure 102: eVBVOICE option level 2
100 DECT Messenger Installation and Commissioning — Book 2 March 2012
Comments? infodev@avaya.com
 Loading...