

Page 1

DECT 4025
Nortel DECT Handset 4025
User Guide
Page 2

Page 3

Revision history
October 2005
Standard 2.00. This document is up-issued to support Nortel
Communication Server 1000 Release 4.5.
February 2005
Standard 1.00. This document is up-issued to support Nortel
Communication Server 1000 Release 4.0.
Revision history
3
Page 4

Revision history
4
Page 5

Contents
Important safety information . . . . . . . . . . . . . . . . . . . . . . . . . 9
Sensitive electronic equipment . . . . . . . . . . . . . . . . . . . . . . . . . 9
Safety precautions . . . . . . . . . . . . . . . . . . . . . . . . . . . . . . . . . 10
About the handset . . . . . . . . . . . . . . . . . . . . . . . . . . . . . . . . 11
Basic features . . . . . . . . . . . . . . . . . . . . . . . . . . . . . . . . . . . . . 11
Setting up the handset . . . . . . . . . . . . . . . . . . . . . . . . . . . . . 12
Installing the charger . . . . . . . . . . . . . . . . . . . . . . . . . . . . . . . 12
Installing the batteries . . . . . . . . . . . . . . . . . . . . . . . . . . . . . . . 14
Important battery information . . . . . . . . . . . . . . . . . . . . . . 15
Charging the batteries . . . . . . . . . . . . . . . . . . . . . . . . . . . . . . 15
Charging guidelines . . . . . . . . . . . . . . . . . . . . . . . . . . . . . 16
Operating times . . . . . . . . . . . . . . . . . . . . . . . . . . . . . . . . 16
Charge display . . . . . . . . . . . . . . . . . . . . . . . . . . . . . . . . . 16
Contents
Subscribing the handset to a DECT system . . . . . . . . . . . . . . 17
Handset controls . . . . . . . . . . . . . . . . . . . . . . . . . . . . . . . . . 20
Switching the handset on/off . . . . . . . . . . . . . . . . . . . . . . . . . 22
Keys and display . . . . . . . . . . . . . . . . . . . . . . . . . . . . . . . . . . 22
Icon/text line . . . . . . . . . . . . . . . . . . . . . . . . . . . . . . . . . . . 22
Text line . . . . . . . . . . . . . . . . . . . . . . . . . . . . . . . . . . . . . . 23
Soft key line . . . . . . . . . . . . . . . . . . . . . . . . . . . . . . . . . . . 24
Handset illumination . . . . . . . . . . . . . . . . . . . . . . . . . . . . . . . . 26
Key Lock . . . . . . . . . . . . . . . . . . . . . . . . . . . . . . . . . . . . . . . . . 26
Calling features . . . . . . . . . . . . . . . . . . . . . . . . . . . . . . . . . . . 27
Making a call . . . . . . . . . . . . . . . . . . . . . . . . . . . . . . . . . . . . . . 27
Dialing . . . . . . . . . . . . . . . . . . . . . . . . . . . . . . . . . . . . . . . 27
Using the Pre-Dial option . . . . . . . . . . . . . . . . . . . . . . . . . 27
5
Page 6

Contents
Using Quick Call . . . . . . . . . . . . . . . . . . . . . . . . . . . . . . . . 28
Using Handsfree . . . . . . . . . . . . . . . . . . . . . . . . . . . . . . . 28
Making an SOS call . . . . . . . . . . . . . . . . . . . . . . . . . . . . . 29
Answering a call . . . . . . . . . . . . . . . . . . . . . . . . . . . . . . . . . . . 29
Muting the ringer . . . . . . . . . . . . . . . . . . . . . . . . . . . . . . . . . . . 29
Changing settings during a call . . . . . . . . . . . . . . . . . . . . . . . 29
Adjusting the earpiece/speaker volume . . . . . . . . . . . . . . 30
Muting the handset during a call . . . . . . . . . . . . . . . . . . . 30
Transferring a call . . . . . . . . . . . . . . . . . . . . . . . . . . . . . . . . . . 30
Using Voice Mail . . . . . . . . . . . . . . . . . . . . . . . . . . . . . . . . . . 31
Preconfiguring Voice Mail . . . . . . . . . . . . . . . . . . . . . . . . . . . . 31
Accessing Voice Mail . . . . . . . . . . . . . . . . . . . . . . . . . . . . . . . 32
Using the Telephone Book . . . . . . . . . . . . . . . . . . . . . . . . . 34
Keypad layout . . . . . . . . . . . . . . . . . . . . . . . . . . . . . . . . . . . . . 34
Adding a new entry . . . . . . . . . . . . . . . . . . . . . . . . . . . . . 36
Editing an entry . . . . . . . . . . . . . . . . . . . . . . . . . . . . . . . . 36
Deleting an entry . . . . . . . . . . . . . . . . . . . . . . . . . . . . . . . 38
Deleting all entries . . . . . . . . . . . . . . . . . . . . . . . . . . . . . . 38
Using Quick Call . . . . . . . . . . . . . . . . . . . . . . . . . . . . . . . . . . . 39
Assigning a Quick Call number . . . . . . . . . . . . . . . . . . . . 39
Deleting a Quick Call assignment . . . . . . . . . . . . . . . . . . 40
Transferring phone numbers to the Telephone Book . . . . 41
Using the Redial List . . . . . . . . . . . . . . . . . . . . . . . . . . . . . . 42
Dialing a number from the Redial List . . . . . . . . . . . . . . . . . . 42
Transferring a number to the Telephone Book . . . . . . . . . . . . 42
Using the Caller List . . . . . . . . . . . . . . . . . . . . . . . . . . . . . . . 44
Calling a number from the Caller List . . . . . . . . . . . . . . . . . . 45
Transferring a number to the Telephone Book . . . . . . . . . . . . 45
6
Page 7

Contents
Audio settings . . . . . . . . . . . . . . . . . . . . . . . . . . . . . . . . . . . . 47
Adjusting the ringer volume . . . . . . . . . . . . . . . . . . . . . . . . . . 47
Selecting the ringer melody . . . . . . . . . . . . . . . . . . . . . . . . . . 47
Setting earpiece/speaker volume . . . . . . . . . . . . . . . . . . . . . . 49
Telephone Options . . . . . . . . . . . . . . . . . . . . . . . . . . . . . . . . 50
Accessing the Telephone Options menu . . . . . . . . . . . . . . . . 50
Setting the User Name . . . . . . . . . . . . . . . . . . . . . . . . . . . 51
Selecting the handset language . . . . . . . . . . . . . . . . . . . . 51
Setting the Emergency Call SOS number . . . . . . . . . . . . 52
Configuring Attention Tones . . . . . . . . . . . . . . . . . . . . . . . 53
Activating/deactivating Charger Answer . . . . . . . . . . . . . 54
Activating/deactivating Silent Charging . . . . . . . . . . . . . . 55
Adjusting Display Contrast . . . . . . . . . . . . . . . . . . . . . . . . 55
System . . . . . . . . . . . . . . . . . . . . . . . . . . . . . . . . . . . . . . . . . . 57
Accessing the System menu . . . . . . . . . . . . . . . . . . . . . . . . . 57
Subscribing the handset . . . . . . . . . . . . . . . . . . . . . . . . . . 57
Manually selecting the DECT system . . . . . . . . . . . . . . . 58
Enabling automatic DECT system selection . . . . . . . . . . 58
Deleting a system . . . . . . . . . . . . . . . . . . . . . . . . . . . . . . . 60
Editing the system name and phone number . . . . . . . . . . 61
Security functions . . . . . . . . . . . . . . . . . . . . . . . . . . . . . . . . 63
Accessing the Security menu . . . . . . . . . . . . . . . . . . . . . . . . . 63
Resetting the handset . . . . . . . . . . . . . . . . . . . . . . . . . . . 64
Clearing the Telephone Book . . . . . . . . . . . . . . . . . . . . . . 64
Changing the PIN . . . . . . . . . . . . . . . . . . . . . . . . . . . . . . . 65
Activating Read-Only . . . . . . . . . . . . . . . . . . . . . . . . . . . . 66
Accessories . . . . . . . . . . . . . . . . . . . . . . . . . . . . . . . . . . . . . 68
Terms you should know . . . . . . . . . . . . . . . . . . . . . . . . . . . 69
Index . . . . . . . . . . . . . . . . . . . . . . . . . . . . . . . . . . . . . . . . . . . 71
7
Page 8

Contents
8
Page 9
Important safety information
Important safety information
Read the following information before using the Nortel DECT Handset
4025.
CAUTION
Like all cordless telephones, this handset
uses radio signals, which do not
guarantee a connection setup under all
circumstances. Generally, you should not
rely exclusively on cordless telephones
when making indispensable calls (such as
medical emergencies).
The CE symbol on the product certifies its conformity with the technical
guidelines concerning user safety and electromagnetic compatibility valid
at the time of approval in accordance with European directive No.
91\263\EEC.
This product complies with IP50, according to IEC 529/EN60 529. Use
only in countries where authorized.
Sensitive electronic equipment
Any radio-based equipment can potentially cause interference with other
equipment and can receive interference from other equipment. This
potential also applies for DECT equipment. However, due to the very low
transmission power used by DECT equipment, the risk of interference is
very small.
9
Page 10
Important safety information
Safety precautions
Observe the following
WARNING
Do not open the handset or charger. Doing so could
expose you to high voltages. Have all repairs carried out
by authorized service personnel.
CAUTION
• Do not allow the handset and charger to come into
contact with water or chemicals.
• Do not allow the charger and the battery contacts to
come into contact with conductive objects such as
keys, paper clips, rings, or bracelets.
• This product contains magnetic material. Be aware
that small metallic objects may stick (for example) to
the loudspeaker. This may deteriorate the audio
quality and can be harmful.
10
WARNING
Do not use the handset in a vehicle or hazardous
location.
CAUTION
• Use only the plug-in AC adapter and battery type
supplied.
• Ensure the adapter voltage is the same as the
electrical outlet voltage.
• Do not use AC adapters that are visibly damaged
(cracked or broken housing), and keep the ventilation
slits on the AC adapters free of obstruction.
Page 11

About the handset
About the handset
The DECT Handset 4025 brings a high level of functionality to in-building
mobile workers.
Basic features
The handset supports the following features:
• LED backlit display
• volume control
• loudspeaker for hands free calling
• soft keys (self-labeled) providing access to handset features
• two specialized fixed keys:
— R (Recall) key
— Info key
• three call processing fixed keys:
— C (Cancel) key
— Handsfree key
— Hook key
11
Page 12
Setting up the handset
Setting up the handset
Before you use the handset, it is important that you read the safety
information and perform the following steps:
1. Install the charger.
2. Install the batteries.
3. Charge the batteries.
4. Subscribe the handset to the DECT system.
Installing the charger
Place the charger on a flat, even surface. To operate the charger, a mains
connection is required. Ensure that the mains voltage matches the
adapter mains voltage. Connect the charger to the mains connection.
1. Connect the cable on the plug-in AC adapter to the terminal on the
bottom of the charger.
2. Plug the AC adapter into the mains socket outlet.
CAUTION
Do not install the charger, handset, and accessories
near:
• water, moisture, or dampness
• sources of heat and direct sunlight
• devices that generate strong magnetic fields,
electrical appliances, fluorescent lamps, computers,
radios, televisions, or fax and telephone terminals
12
Page 13
Setting up the handset
CAUTION
Do not install the charger, handset, and accessories in:
• areas where the handset can be covered, or in
locations with poor ventilation
• areas where there is excessive dust and areas
subject to vibration, shock, or extreme temperature
fluctuations
CAUTION
Keep the charger, handset, and accessories out of
reach of small children.
Your handset is operational only after the batteries have been charged.
You can then use the handset to make and receive calls.
13
Page 14
Setting up the handset
Installing the batteries
The battery compartment is on the back of the handset. It takes the three
type AAA batteries that are supplied. Please refer to “Important battery
information” on page 15.
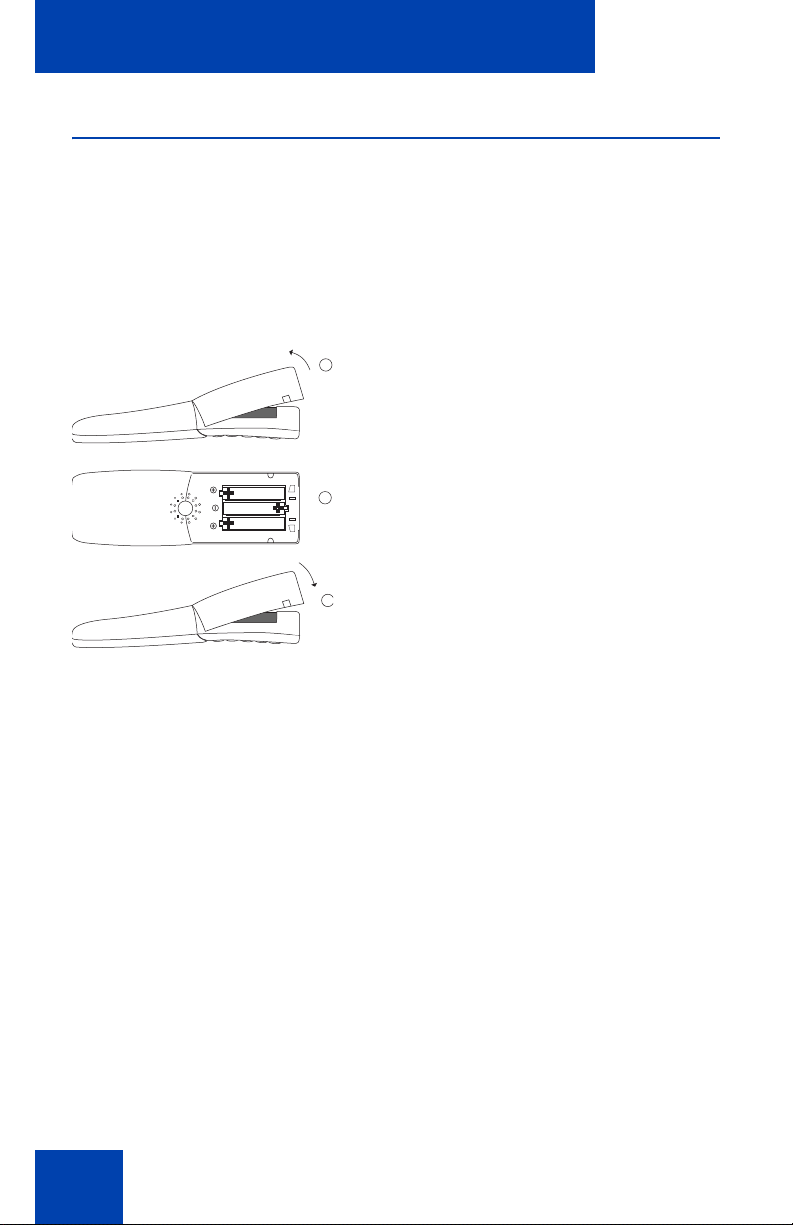
Figure 1 illustrates how to insert batteries in the DECT Handset 4025.
Figure 1: Inserting the batteries
1
2
3
1. Insert a small item, such as the top of a ballpoint pen, into the hole at
the bottom of the compartment cover. Push in and lift the cover at the
same time, as shown in Figure 1.
2. Insert the batteries in the battery compartment, taking care to observe
the correct polarity. Make sure that the + - poles of the batteries
correspond to the + - markings in the battery compartment.
3. Replace the cover by placing it on the compartment at a slight angle
and pressing it down until it clicks into place.
14
Page 15
Setting up the handset
Important battery information
Heat or cold reduces the performance and service life of the batteries. It is
possible that a handset with hot or cold batteries can be temporarily out of
operation even if the batteries are fully charged.
WARNING
Do not dispose of the batteries in a fire. Recycle or
dispose of batteries in accordance with local
regulations.
WARNING
Do not replace the batteries in potentially explosive
environments, such as rooms where flammable liquids
or gases are present.
CAUTION
Do not charge the batteries unless you use the supplied
charger and the proper batteries.
Charging the batteries
Place the handset in the charger.
CAUTION
Use only rechargeable AAA NiMh batteries of typical 800
mAh, 1.2 V.
CAUTION
The batteries can become hot during the first charge
cycle.
15
Page 16

Setting up the handset
CAUTION
Avoid placing the handset in the charger when fullycharged batteries have been removed from the handset
and inserted again. They can become overcharged.
Charging guidelines
• Charge the batteries for at least six to seven hours before using the
handset for the first time. This protective measure extends the service
life of the batteries.
• The maximum power output is attained only after three to five
charging and discharging cycles.
• Do not leave the handset connected to the charger longer than one
month without using.
• The batteries can be charged and discharged hundreds of times, but
eventually they will be worn out. If the operating time (that is, talk and
standby time) is significantly shorter than usual, it is time to replace
the batteries.
• To maintain optimum operating time, the batteries should be
discharged from time to time by not placing the handset in the
charger but leaving it switched on until it switches itself off. Use only
this method to discharge the batteries.
• Extreme temperatures influence the charging capability of the
batteries.
Operating times
• Empty batteries require six to seven hours to fully charge.
• When a fully-charged handset is switched off, it discharges in
approximately one week.
• When batteries are fully charged, the handset has approximately 20
hours of talk time or approximately 200 hours of standby time.
Charge display
The handset display screen shows the battery charge status. When the
battery capacity is almost exhausted, an alert tone sounds in the form of
16
Page 17

Setting up the handset
three short “beep” signals (only during a call). This indicates that
approximately five minutes of talk time remains.
See Figure 2 for battery charge status definitions.
Figure 2: Battery charge status
Fully charged - 75 to 100%
Partially charged - 50 to 74%
Partially charged - 25 to 49%
Partially charged- 0 to 24%
Batteries are empty.
An alert tone sounds and the icon (frame) flashes.
Note: When new batteries are inserted, a charge status icon does not
display until a complete charge cycle has occurred. However, when
partially charged batteries are inserted, then the charge status icon
displays immediately.
Subscribing the handset to a DECT system
The handset must be subscribed to at least one DECT system before it
can be used.
Before you subscribe to a DECT system, acquire the following information
from your system administrator:
• PABX-PIN — this code is used to access the DECT system
• DECT system name
• local phone number assigned to your DECT handset
• PARK-Code (a PARK-Code system ID that should be used only if
more than one DECT system overlaps in your location)
17
Page 18

Setting up the handset
u
u
u
d
In order to carry out the following steps, you must be familiar with the use
of the handset controls; see “Handset controls” on page 20.
Menu
System
OK
Subscription
OK
Subscribe HS
1. Press the Menu soft key.
2. Press the arrow keys to scroll and highlight the
System option.
3. Press the OK soft key.
4. Press the arrow keys to scroll and highlight the
Subscription option.
5. Press the OK soft key.
6. Press the arrow keys to scroll and highlight the
Subscribe HS option.
18
OK
PABX-PIN
7. Press the OK soft key.
8. Use the keypad to enter the authentication code
at the PABX PIN prompt and press the OK soft
key.
Note: The PABX PIN is required to access the
DECT system.
Page 19

u
Cancel
u
u
dOKdOKd
Subscribe
Use Park-Code
Setting up the handset
9. Choose one of the following three options:
— press the arrow keys to scroll and highlight
the Cancel option.
— if you are at a location where there is only
one DECT system, press the arrow keys to
scroll and highlight the Subscribe option.
— if you are at a location where two DECT
systems overlap, press the arrow keys to
scroll and highlight the Use PARK-Code
option, and use the keypad to enter a
system ID.
Note 1: A system ID should only be entered if
you are at a location where two DECT systems
overlap.
Note 2: The handset can be operated with a
maximum of five DECT systems.
10. Press the OK soft key.
11. Use the keypad to enter the System Name at
the Enter name prompt and press the OK soft
key.
12. Use the keypad to enter the phone number
OK
You can now use the handset to make and receive calls.
assigned to your handset at the Internal No.
prompt and press the OK soft key.
19
Page 20
Handset controls
Handset controls
This section will help you become familiar with the following:
• “Keys and display” on page 22
• “Icon/text line” on page 22
• “Text line” on page 23
• “Handset illumination” on page 26
• “Handset illumination” on page 26
• “Key Lock” on page 26
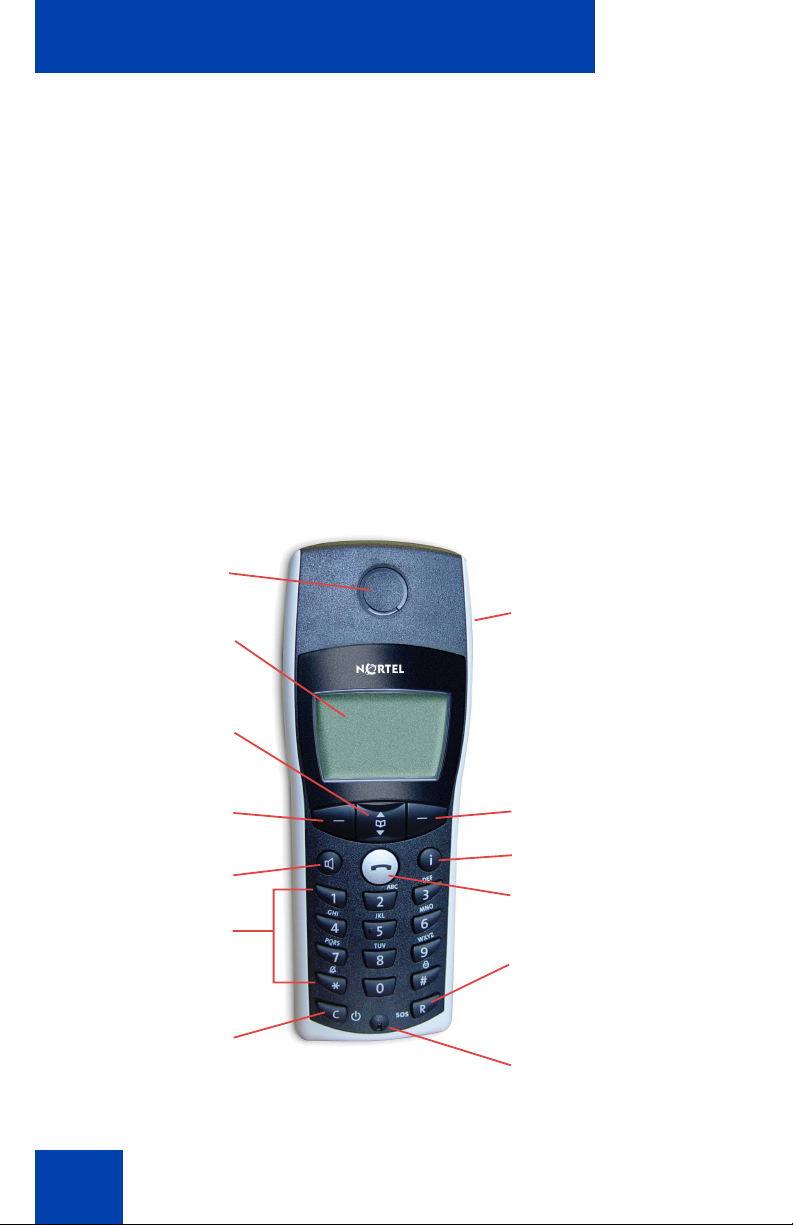
See Figure 3 for an illustration of the handset layout.
Figure 3: DECT Handset 4025
Earpiece
Rear:
Display
Loudspeaker
Up and Down keys
Soft key
Handsfree key
Dialing Pad
"c" Cancel key
Power on/off
20
Soft key
Info key
Hook key
R key (Recall)
Microphone
Page 21
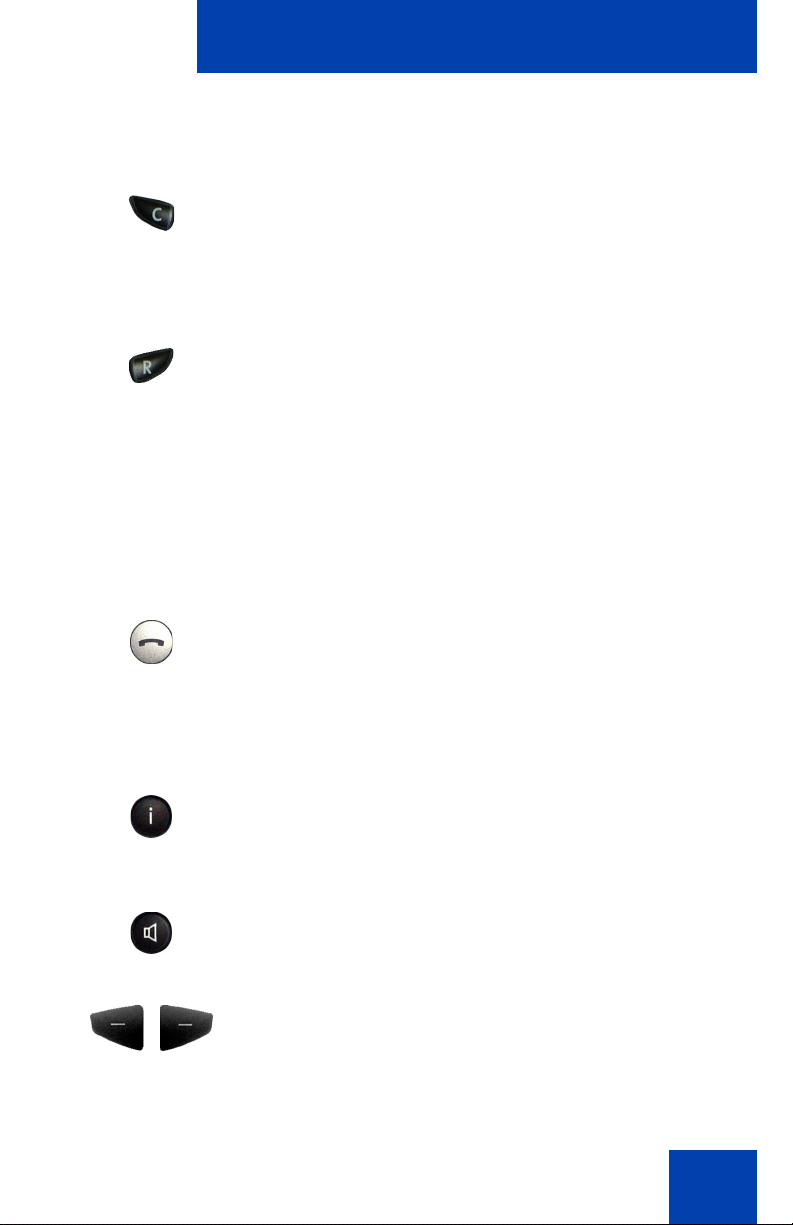
Use the C (Cancel) key to:
• power On/Off
• delete characters or entire entries
• edit characters
Use the R (Recall) key to:
• place an Emergency/SOS call
• place a call on hold
• retrieve a call on hold
• transfer a call
• set up a conference call
Use the Hook key to:
Handset controls
• make a call
• answer a call
• end a call
Use the Info key to:
• access the Caller List
• access Voice Mail
Press the Speaker key to activate handsfree.
Use the soft keys to control handset functions and
features.
21
Page 22

Handset controls
Press the arrow (up/down) keys to select menu items
and to access the Telephone Book.
Switching the handset on/off
e
• Switch the handset ON by pressing C for
more than one second, or place the handset
in the charger.
• Switch the handset OFF by pressing C for
more than one second when it is in an idle
state.
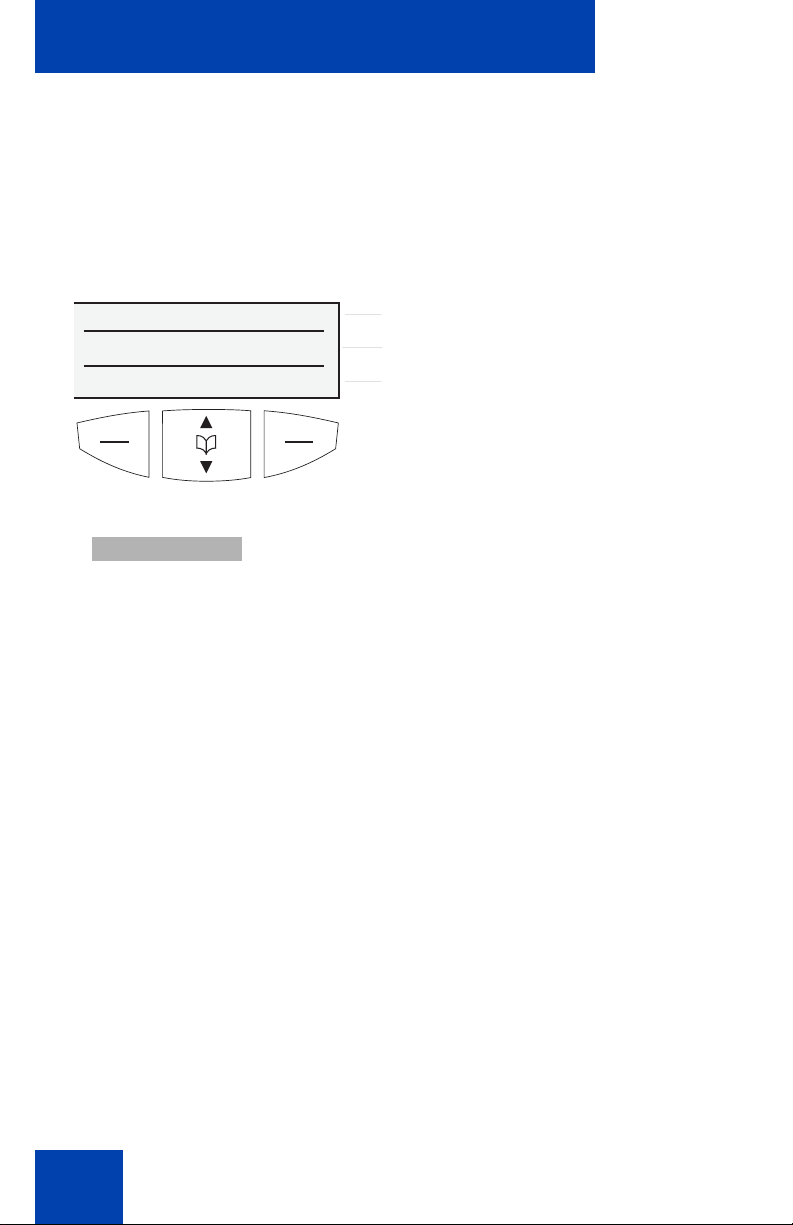
Keys and display
The handset has three major display areas:
x [
544
Menu b r
Icon/text line
The function of this line changes as follows:
• During a telephone call or while in idle mode, the Icon/text line
displays the current status of the handset.
— Icon/text line
— Text line
— soft key line
• When using the menus, the Icon/text line displays the name of the
active menu.
• When the handset is in an idle state, this line is replaced with an icon
line, which displays various handset status symbols as shown in
Table 1 on page 23.
22
Page 23

Table 1: Symbols indicating handset status
Symbol Status
Handset controls
n
x
g
=
V
k
[
q
Text line
The middle line of the display provides information which varies with the
current state of the handset.
Ringer deactivated
At least 2 bars: Good radio link
On: Handset has a connection
Flashing: Handset has an incoming call
On: Handsfree is activated
Flashing: Voice message waiting indication
Steady: Microphone is muted
Charge status of the batteries
Steady: Keypad is locked
23
Page 24
Handset controls
b
r
Soft key line
Soft keys are located below the handset display screen.The functions
allocated to the keys are shown on the bottom line of the display, as
illustrated in Figure 4. The key functions change automatically according
to the operation state of the handset.
Figure 4: Soft key line
x [
544
Menu b r
Menu
OK soft key
Use the OK soft key to confirm the selected function. The OK soft key is
used to switch between two options in a function. In the display area, only
active settings are indicated by a check mark (
Use the Menu soft key to access the Menu list.
Use the Telephone Book soft key to access the
Telephone Book.
Use the Redial soft key to access the Redial List.
Icon/text line
Text line
Soft key line
o).
Options soft key
Use the Options soft key to perform actions on the selected item in the
current menu.
24
Page 25

Handset controls
s
a
c
Esc soft key
Use the Esc soft key to quit the current menu selection. The selection of
the previous menu branch or the current idle/connection display is shown.
Press the Esc soft key for approximately two seconds to quit the present
menu and return to the idle display.
Arrow soft keys
Symbols displayed above the arrow keys (up and down keys) identify the
respective functionality of the arrow keys.
If continuous text is displayed (such as a message),
the text can be scrolled up/down using the arrow
keys.
When a selection list (such as Telephone Book of
Menu) is displayed, the arrow keys move the cursor
to the desired entry.
When entering telephone numbers and names,
move the cursor keys left or right using the arrow
keys.
25
Page 26

Handset controls
#
#
Handset illumination
The display is automatically illuminated when there is an incoming call or
a key is pressed. The display illumination automatically switches off after
ten seconds if no key is pressed.
Key Lock
Use the Key Lock feature to disable key input and prevent any accidental
operation.
Turning on Key Lock:
Menu
Turning off Key Lock:
OFF
1. Press the Menu soft key.
2. Press the # key.
1. Press the OFF soft key.
2. Press the # key.
26
Page 27

Calling features
hdd
h
This section explains:
• “Making a call” on page 27
• “Answering a call” on page 29
• “Muting the ringer” on page 29
• “Changing settings during a call” on page 29
• “Transferring a call” on page 30
Making a call
Choose one of these options to make a call:
Dialing
Calling features
1. Press the Hook key.
2. Use the keypad to enter the phone number.
Using the Pre-Dial option
1. Use the keypad to enter the phone number.
2. Press the Hook key.
Note: Long press the # key to insert P (for pause) when entering a
number in pre-dial mode.
27
Page 28

Calling features
d
fdf
Using Quick Call
Use the Quick Call feature to place calls by dialing a one-digit code.
Press the number key assigned to the phone
number and hold it down for a second or two while
the handset is idle.
Using Handsfree
To enable several people in a room to listen to a call, the handset
includes a Handsfree feature.
1. Press the Speaker key to activate
Handsfree.
2. Use the keypad to enter the phone number.
3. Press the Speaker key to end the call.
Note: When the Handsfree function is active, the hook icon is
replaced by the loudspeaker icon –
For best results:
• Place the handset upright on a smooth, flat surface, leaving the
loudspeaker and microphone free of obstruction.
• Keep approximately 0.5 metres away from the handset when
speaking.
28
=.
Page 29

Calling features
p
h
Making an SOS call
This handset can be used to make emergency calls to a specific
telephone number.
Press and hold the R key for more than two
seconds to dial the SOS number.
To store an SOS number, see “Setting the Emergency Call SOS number”
on page 52.
Answering a call
When the ringer sounds and the call alert w symbol flashes, there is an
incoming call.
• Press the Hook key to answer the call.
Note: If Charger Answer is enabled, and the
handset is in the charger, answer a call by
lifting the handset off the charger.
Reject
• Press the Reject soft key to reject the
incoming call.
Muting the ringer
Silence
•Press the Silence soft key to mute the ringer
alert signal during a call alert.
Changing settings during a call
During a call, you can adjust the earpiece/speaker volume and mute the
handset.
29
Page 30

Calling features
p
d
p
h
Adjusting the earpiece/speaker volume
During a call, you can change the volume of the
earpiece or speaker with the arrow keys. When
the minimum or maximum volume is reached, a
beep sounds. A bar in the display increases or
decreases to indicate the actual volume setting.
Muting the handset during a call
Mute
Unmute
• Press the Mute soft key to deactivate the
microphone of your handset.
• Press the Unmute soft key to activate the
microphone again.
Transferring a call
Use this option to consult another caller during a connection (enquiry
call).
1. Press the R (Recall) key to hold the first call.
2. Use the keypad to dial the phone number of
the party to whom you are transferring the
call.
3. Press the R key to switch back to the first
caller.
Note: You can use the R key to speak to the
two callers in an alternating fashion.
30
4. Press the Hook key to transfer the call.
Page 31

Using Voice Mail
u
Using Voice Mail
Use the Voice Mail feature to listen to voice messages left by calling
parties. New voice messages are indicated by:
•The V (Voice Mail) symbol flashes on the display screen (the symbol
disappears after the voice message is played).
• Voice Message is displayed on the display screen.
Note: When the handset is switched OFF, or is out of the coverage
zone, the Info and Loudspeaker keys flash and the V (Voice Mail)
symbol appears when the handset is turned ON, or re-enters the
coverage zone.
For automated access to your voice messages, Nortel recommends you
preconfigure the following:
• Voice Mail access number
• voice box number
• voice box password
Preconfiguring Voice Mail
Use this option to preconfigure the handset to automatically dial the Voice
Mail access number, and automatically enter your voice box number and
password.
1. Access the Telephone Options menu as
described in “Accessing the Telephone Options
menu” on page 50.
2. Press the arrow keys to scroll and highlight the
Voice Box option.
Voice Box
31
Page 32

Using Voice Mail
d
u
OK
3. Press the OK soft key.
4. Use the keypad to enter the following:
a. Voice Mail access number
b. P (long pause) — hold down “#” key for
longer than 2 seconds
c. voice box number
d.
#
e. voice box password (optional) followed by
#
OK
5. Press the OK soft key.
Accessing Voice Mail
Use this option to automatically access voice mail messages using a
preconfigured Voice Mail access number, voice box number, and
password.
32
1. Access the Telephone Options menu as
described in “Accessing the Telephone Options
menu” on page 50.
2. Press the arrow keys to scroll and highlight the
Voice Box option.
Voice Box
Page 33

3. Choose one of the following:
h
Using Voice Mail
OK
— Press the OK soft key.
— Press the Hook key.
The Voice Mail access number is automatically
dialed, and your voice box number and password
are automatically entered.
Note: Press the Esc key at any time to abort
this procedure.
33
Page 34

Using the Telephone Book
Using the Telephone Book
Use the Telephone Book menu for the following:
• “Adding a new entry” on page 36
• “Editing an entry” on page 36
• “Deleting an entry” on page 38
• “Assigning a Quick Call number” on page 39
• “Deleting a Quick Call assignment” on page 40
The Telephone Book allows you to store a maximum of 50 phone
numbers and names, which can be searched alphabetically. The
following restrictions apply:
• Each entry must have a unique name.
• A telephone number can be stored more than once if a different name
is used each time.
• Each entry can have a maximum of 16 characters in the name, and a
maximum of 32 digits in the telephone number. However, when
viewing an entry, only 14 characters of the name are visible.
• A dashed line indicates the beginning and end of the Telephone Book
list.
• If a call is received from a caller whose number is in the Telephone
Book, then the caller’s name appears on the display.
Keypad layout
Use the keypad to:
• enter a telephone number
• add or edit Telephone Book entries
• create or edit text messages
34
Page 35

Using the Telephone Book
To enter a character, press a key from 0 to 9. For example, press the 4
key twice to enter the character H. Press
* to toggle between upper-
and lowercase letters. See Table 2 for handset keypad references.
Table 2: Handset keypad reference
Keypad Alphabet equivalent
1 ? ! 1 - + * / = ( ) % ¿ i ? ! 1 - + * / = ( ) % ¿ i
2 A B C 2 Ä Å À Á Æ Ç a b c 2 ä å à á æ ç
3 D E F 3 Ë È É Ê d e f 3 ë è é ê
4 G H I 4 Ï Ì Í Î g h i 4 ï ì í î
5J K L 5 j k l 5
6 M N O 6 Ö Ò Ó Ô Õ Ø m n o 6 ö ò ó ô õ ø
7 P Q R S 7 ß p q r s 7 ß
8 T U V 8 Ü Ù Ú Û t u v 8 ü ù ú û
9 W X Y Z 9 w x y z 9
0 (space) , . 0 : ; _ “ ‘ ^ ~ (space) , . 0 : ; _ “ ‘ ^ ~
*A -> a a -> A
# # @ € $ £ ¥ § < > {|} [\] # @ € $ £ ¥ § < > {|} [\]
Note: While entering characters, the first display line shows all
characters assigned to the key. The actual position is marked by the
> < symbols.
35
Page 36

Using the Telephone Book
a
u
dOKdOKa
u
Adding a new entry
1. Press the Telephone Book soft key.
2. Press the arrow keys to scroll and highlight the
New Entry option.
New Entry
OK
Editing an entry
3. Press the OK soft key.
4. Use the keypad to enter the phone number.
5. Press the OK soft key.
6. Use the keypad to enter the name.
7. Press the OK soft key.
1. Press the Telephone Book soft key.
2. Press the arrow keys to scroll and highlight the
entry you wish to edit.
36
Options
3. Press the Options soft key.
Page 37

u
Edit
e
dOKe
Using the Telephone Book
4. Press the arrow keys to scroll and highlight the
Edit option.
OK
5. Press the OK soft key.
6. To delete the phone number, either:
• Short press the C (Cancel) key to delete the
individual digits from the number.
• Long press the C key to delete the entire
number.
Note: Move the cursor to the beginning or end
of the entry using the arrow (
Note: Press Esc if you do not wish to change a
phone number or a name.
7. Use the keypad to enter the new number.
8. Press the OK soft key.
9. To delete the old name, either:
c) keys.
• Short press the C key to delete the individual
letters from the name.
• Long press the C key to delete the entire name.
Note: Move the cursor to the beginning or end
of the entry using the arrow (
Note: Press Esc if you do not wish to change a
phone number or a name.
c) keys.
37
Page 38

Using the Telephone Book
dOKa
u
u
10. Use the keypad to enter the new name.
11. Press the OK soft key.
Deleting an entry
1. Press the Telephone Book soft key.
2. Press the arrow keys to scroll and highlight the
entry you wish to delete.
Options
Delete
OK
3. Press the Options soft key.
4. Press the arrow keys to scroll and highlight the
Delete option.
5. Press the OK soft key.
Deleting all entries
To delete all entries from the Telephone Book, see “Clearing the
Telephone Book” on page 64.
38
Page 39

Using the Telephone Book
a
u
u
d
Using Quick Call
Use the Quick Call feature to place calls by dialing a one-digit code. You
can store a maximum of nine Quick Call numbers, one each for the nine
keys on the keypad. Quick Call numbers are assigned to phone numbers
already stored in the Telephone Book. To learn how to make a call using
Quick Call, see “Using Quick Call” on page 28.
Assigning a Quick Call number
1. Press the Telephone Book soft key.
2. Press the arrow keys to scroll and highlight the
entry to which you wish to assign a Quick Call
number.
Quick Call
Options
OK
OK
3. Press the Options soft key.
4. Press the arrow keys to scroll and highlight the
Quick Call option.
5. Press the OK soft key.
6. Assign a Quick Key by entering a one-digit
number from 1 to 9 as your quick call number.
7. Press the OK soft key.
Note: The Telephone Book entry shows the
assigned Quick Call number in front of the
name.
39
Page 40

Using the Telephone Book
a
u
u
u
d
Deleting a Quick Call assignment
1. Press the Telephone Book soft key.
2. Press the arrow keys to scroll and highlight the
entry to which you wish to assign a Quick Call
number.
Options
Quick Call
OK
Delete
OK
3. Press the Options soft key.
4. Press the arrow keys to scroll and highlight the
Quick Call option.
5. Press the OK soft key.
6. Press the arrow keys to scroll and highlight the
Delete option.
7. Press the OK soft key.
8. Use the keypad to enter the Quick Call number
you wish to delete.
40
OK
9. Press the OK soft key.
Page 41

Using the Telephone Book
Transferring phone numbers to the Telephone Book
Every number in the Redial List and Caller List can be transferred to the
Telephone Book. For more information, see:
• “Transferring a number to the Telephone Book” on page 42 to
transfer a number from the Redial List.
• “Transferring a number to the Telephone Book” on page 45 to
transfer a number from the Callers List.
41
Page 42

Using the Redial List
r
u
hru
Using the Redial List
The Redial List stores the last ten internal and external parties dialed.
Use the Redial List to:
• dial a number from the Redial list
• transfer numbers to the Telephone Book
Dialing a number from the Redial List
1. Press the Redial soft key.
2. Press the arrow keys to scroll and highlight a
telephone number.
3. Press the Hook key.
Transferring a number to the Telephone Book
Use this option to transfer any number from the Redial List to the
Telephone Book, where the number is treated as a new entry.
1. Press the Redial soft key.
2. Press the arrow keys to scroll and highlight a
telephone number.
42
Page 43

Using the Redial List
u
u
Options
Add To
OK
Telephone Book
OK
3. Press the Options soft key.
4. Press the arrow keys to scroll and highlight the
Add to option.
5. Press the OK soft key.
6. Press the arrow keys to scroll and highlight the
Telephone Book option.
7. Press the OK soft key.
43
Page 44

Using the Caller List
Using the Caller List
The Caller List automatically stores a maximum of 20 accepted or missed
calls. After 20 entries are stored in the Caller List, each additional call
overwrites the oldest entry.
Use the Caller List to:
• call a number from the Callers List
• transfer numbers to the Telephone Book
The following are features of the Caller List:
• When a call has not been answered, the text “Missed Calls” is shown
in the display.
• When a call back is successfully executed for a Caller List entry, the
entry is removed from the Caller List.
• When an incoming call is from a caller who is listed in the Telephone
Book, the name is displayed in the Caller List.
Table 3 defines symbols that appear in front of Caller List entries to
indicate the type of call.
Table 3: Caller List symbols
Symbol Type of call
J
o
/
44
Missed call
Accepted call
Rejected call
Page 45

Using the Caller List
i
uhi
u
Calling a number from the Caller List
1. Press the Info soft key.
Caller List
OK
2. Press the arrow keys to scroll and highlight the
Caller List option.
3. Press the OK soft key.
4. Press the arrow keys to scroll and highlight a
telephone number.
5. Press the Hook key to dial the number.
Transferring a number to the Telephone Book
Use this option to transfer any number from the Caller List to the
Telephone Book, where the number is treated as a new entry.
1. Press the Info soft key.
Caller List
OK
2. Press the arrow keys to scroll and highlight the
Caller List option.
3. Press the OK soft key.
45
Page 46

Using the Caller List
u
u
Options
Add To
OK
Telephone Book
OK
4. Press the Options soft key.
5. Press the arrow keys to scroll and highlight the
Add to option.
6. Press the OK soft key.
7. Press the arrow keys to scroll and highlight the
Telephone Book option.
8. Press the OK soft key.
46
Page 47

Audio settings
u
u
Audio settings
You can configure the audio preferences with the following options:
• “Adjusting the ringer volume” on page 47
• “Selecting the ringer melody” on page 47
• “Setting earpiece/speaker volume” on page 49
Adjusting the ringer volume
Menu
Ringer Settings
OK
Volume Settings
OK
1. Press the Menu soft key.
2. Press the arrow keys to scroll and highlight the
Ringer Settings option.
3. Press the OK soft key.
4. Press the arrow keys to scroll and highlight the
Volume Settings option.
5. Press the OK soft key.
Selecting the ringer melody
Menu
1. Press the Menu soft key.
47
Page 48

Audio settings
u
u
u
u
Ringer Settings
2. Press the arrow keys to scroll and highlight the
Ringer Settings option.
OK
Melody
OK
Incoming Calls
Incoming CallsX
OK
3. Press the OK soft key.
4. Press the arrow keys to scroll and highlight the
Melody option.
5. Press the OK soft key.
6. Press the arrow keys to scroll and highlight the
Incoming Calls option.
7. Press the arrow keys to scroll and highlight the
Incoming CallsX option.
8. Press the OK soft key.
48
Page 49

Audio settings
u
u
Setting earpiece/speaker volume
Use the Volume Settings menu option to set the volume for the speaker
or the earpiece.
Menu
Earpiece
Handsfree
OK
OK
1. Press the Menu soft key.
2. Press the arrow keys to scroll and highlight one
of the following:
— Earpiece
— Handsfree
3. Press the OK soft key.
4. Press the arrow keys to increase or decrease
the volume.
Note: Alternatively, change the voice volume in
7 increments using digits 1 through 7 on the
keypad (
5. Press the OK soft key.
d).
49
Page 50

Telephone Options
u
Telephone Options
Use the Telephone Options menu to perform the following:
• “Setting the User Name” on page 51
• “Selecting the handset language” on page 51
• “Setting the Emergency Call SOS number” on page 52
• “Configuring Attention Tones” on page 53
• “Activating/deactivating Charger Answer” on page 54
• “Activating/deactivating Silent Charging” on page 55
• “Adjusting Display Contrast” on page 55
Accessing the Telephone Options menu
Menu
Telephone Options
OK
50
1. Press the Menu soft key.
2. Press the arrow keys to scroll and highlight the
Telephone Options option.
3. Press the OK soft key.
Page 51

Telephone Options
u
d
u
Setting the User Name
Use the User Name option to store a name which appears on the idle
display. The name can consist of a maximum 12 characters. For help on
using the keypad to enter characters, see “Keypad layout” on page 34.
1. Access the Telephone Options menu as
described in “Accessing the Telephone Options
menu” on page 50.
2. Press the arrow keys to scroll and highlight the
User Name option.
User Name
OK
OK
3. Press the OK soft key.
4. Use the key pad to enter the user name.
5. Press the OK soft key.
Selecting the handset language
Use the Language option to set the display language. You can select
from 12 different languages.
1. Access the Telephone Options menu as
described in “Accessing the Telephone Options
menu” on page 50.
2. Press the arrow keys to scroll and highlight the
Language option.
Language
51
Page 52

Telephone Options
u
u
d
OK
OK
3. Press the OK soft key.
4. Press the arrow keys to scroll and highlight the
language you wish to use.
5. Press the OK soft key.
Setting the Emergency Call SOS number
Use the Emergency Call SOS option to store a number that can be dialed
in the event of an emergency. To learn how to dial the emergency
number, see “Making an SOS call” on page 29.
1. Access the Telephone Options menu as
shown in “Accessing the Telephone Options
menu” on page 50.
2. Press the arrow keys to scroll and highlight the
Emergency Call option.
Emergency Call
52
OK
Options
3. Press the OK soft key.
4. Use the keypad to enter the SOS number.
5. Press the Options soft key.
Page 53

u
Save
u
Telephone Options
6. Press the arrow keys to scroll and highlight the
Save option.
OK
7. Press the OK soft key.
Configuring Attention Tones
Use the Attention Tones option to configure the handset to emit an
acoustic warning when:
• a key is pressed (Key click)
• a setting is confirmed (Confirm tones)
• the end of a menu is displayed (End of menu)
• the battery charge is too low (Battery alarm)
• there is a danger of losing the radio link (Coverage warning)
1. Access the Telephone Options menu as
described in “Accessing the Telephone Options
menu” on page 50.
2. Press the arrow keys to scroll and highlight the
Attention Tones option.
Attention Tones
OK
3. Press the OK soft key.
53
Page 54

Telephone Options
u
u
4. Press the arrow keys to scroll and highlight one
of the following:
Key Click
Coverage Warn
Battery Alarm
Confirm Tones
End of Menu
OK
— Key click
— Coverage warning
— Battery alarm
— Confirm tones
— End of menu
5. Press the OK soft key.
Note: A check mark indicates the selected
option is activated.
Activating/deactivating Charger Answer
Activate Charger Answer if you wish to be able to answer incoming calls
by lifting the handset out of the charger. The call is ended when the
handset is returned to the charger.
1. Access the Telephone Options menu as
described in “Accessing the Telephone Options
menu” on page 50.
Charger Answer
OK
54
2. Press the arrow keys to scroll and highlight the
Charger Answer option.
3. Press the OK soft key.
Note: A check mark indicates the selected
option is activated.
Page 55

Telephone Options
u
u
Activating/deactivating Silent Charging
Use the Silent Charging option to automatically turn off the ringer while
the handset is charging.
1. Access the Telephone Options menu as
described in “Accessing the Telephone Options
menu” on page 50.
2. Press the arrow keys to scroll and highlight the
Silent Charging option.
Silent Charging
OK
3. Press the OK soft key.
Note: A check mark indicates the selected
option is activated. The first display line shows
”Silent Charging” when the handset is placed in
the charger.
Adjusting Display Contrast
Use the Display Contrast option to adjust the display contrast.
1. Access the Telephone Options menu as
described in “Accessing the Telephone Options
menu” on page 50.
2. Press the arrow keys to scroll and highlight the
Disp. Contrast option.
Disp. Contrast
OK
3. Press the OK soft key.
55
Page 56

Telephone Options
u
4. Press the arrow keys to increase or decrease
the display contrast.
OK
5. Press the OK soft key.
56
Page 57

System
u
System
Before you can make a telephone call using the DECT handset, the
handset must be subscribed to a DECT system. The handset can be
operated with a maximum of five DECT systems.
Note: When the handset is not yet subscribed to the system, the
display shows “Please, subscribe”.
Use the System menu to perform the following:
• “Manually selecting the DECT system” on page 58
• “Enabling automatic DECT system selection” on page 58
• “Deleting a system” on page 60
• “Editing the system name and phone number” on page 61
In order to carry out the following steps, you must be familiar with the use
of the handset controls; see “Handset controls” on page 20.
Accessing the System menu
Menu
System
OK
Subscribing the handset
See “Subscribing the handset to a DECT system” on page 17.
1. Press the Menu soft key.
2. Press the arrow keys to scroll and highlight the
System option.
3. Press the OK soft key.
57
Page 58

System
u
u
u
Manually selecting the DECT system
If the handset has been subscribed to several DECT systems, use this
option to select which system the handset will use.
1. Access the System menu as shown in
“Accessing the System menu” on page 57.
2. Press the arrow keys to scroll and highlight the
Subscription option.
Subscription
OK
Options
Select
OK
3. Press the OK soft key.
4. Press the arrow keys to scroll and highlight the
system name.
5. Press the Options soft key.
6. Press the arrow keys to scroll and highlight the
Select option.
7. Press the OK soft key.
Note: A check mark indicates the selected
system is activated.
Enabling automatic DECT system selection
If you have subscribed your handset to several DECT systems and the
auto search function is enabled, the handset automatically selects one of
the systems. As a result, your handset is automatically ”logged-in” to
another of your subscribed DECT systems as soon as you move out of
58
Page 59

System
u
u
the effective range of the current system. This function is disabled if a
specific system is selected using the option “Manually selecting the DECT
system” on page 58.
1. Access the System menu as shown in
“Accessing the System menu” on page 57.
2. Press the arrow keys to scroll and highlight the
Subscription option.
Subscription
OK
Auto Search
OK
3. Press the OK soft key.
4. Press the arrow keys to scroll and highlight the
Auto Search option.
5. Press the OK soft key.
59
Page 60

System
u
u
u
Deleting a system
Use this function to remove a DECT system registration from your
handset.
Note: Be careful when deleting DECT systems from the handset. The
handset must be subscribed to at least one DECT system or it will not
work.
1. Access the System menu as shown in
“Accessing the System menu” on page 57.
2. Press the arrow keys to scroll and highlight the
Subscription option.
Subscription
OK
Options
Delete
Yes
No
3. Press the OK soft key.
4. Press the arrow keys to scroll and highlight the
system name.
5. Press the Options soft key.
6. Press the arrow keys to scroll and highlight the
Delete option.
7. At the Sure? prompt, choose one of the
following:
— Press the Yes soft key to delete the
selected DECT system.
— Press the No soft key to cancel changes.
60
Page 61

System
u
u
u
d
Editing the system name and phone number
Use this option to change the system name or phone number on the
handset:
1. Access the System menu as shown in
“Accessing the System menu” on page 57.
2. Press the arrow keys to scroll and highlight the
Subscription option.
Subscription
OK
Options
Edit
OK
OK
3. Press the OK soft key.
4. Press the arrow keys to scroll and highlight the
system name.
5. Press the Options soft key.
6. Press the arrow keys to scroll and highlight the
Edit option.
7. Press the OK soft key.
8. Use the keypad to enter the new system name.
9. Press the OK soft key.
61
Page 62

System
d
10. Use the keypad to enter the new local phone
number.
OK
11. Press the OK soft key.
62
Page 63

Security functions
u
d
Security functions
The security functions are protected by a four-digit Personal Identification
Number (PIN). The PIN is needed only when the Read-Only option is
switched on.
Use the Security menu for the following:
• “Resetting the handset” on page 64
• “Clearing the Telephone Book” on page 64
• “Changing the PIN” on page 65
• “Activating Read-Only” on page 66
If you have forgotten your PIN, contact your system administrator.
Accessing the Security menu
Menu
Security
OK
1. Press the Menu soft key.
2. Press the arrow keys to scroll and highlight the
Security option.
3. Press the OK soft key.
4. Use the keypad to enter the PIN.
Note: In the delivery state the PIN is set to
0000. For additional security, **** is displayed
when entering the PIN.
63
Page 64

Security functions
u
OK
5. Press the OK soft key.
Resetting the handset
Use Handset Reset to return all settings to the delivery state, with the
exception of the Telephone Book, the PIN and system registrations.
1. Access the Security menu as shown in
“Accessing the Security menu” on page 63.
2. Press the arrow keys to scroll and highlight the
Default Setting option.
Default Setting
OK
Yes
No
3. Press the OK soft key.
4. At the Sure? prompt, choose one of the
following:
— Press the Yes soft key to Reset the
handset.
— Press the No soft key to cancel changes.
Clearing the Telephone Book
Use this option to permanently delete all telephone entries.
1. Access the Security menu as shown in
“Accessing the Security menu” on page 63.
64
Page 65

u
Clear Phonebook
u
u
Security functions
2. Press the arrow keys to scroll and highlight the
Clear Phonebook option.
OK
Yes
No
3. Press the OK soft key.
4. At the Sure? prompt, choose one of the
following:
— Press the Yes soft key to clear the
Telephone Book.
— Press the No soft key to cancel changes.
Changing the PIN
Use the Change PIN option to reset the pin to a number you will
remember. The numbers you enter are displayed as ****. For additional
security, the new PIN must be entered twice.
1. Access the Security menu as shown in
“Accessing the Security menu” on page 63.
2. Press the arrow keys to scroll and highlight the
Change PIN option.
Change PIN
OK
3. Press the OK soft key.
4. Use the keypad to enter the old PIN.
65
Page 66

Security functions
u
u
u
OK
OK
OK
5. Press the OK soft key.
6. Use the keypad to enter the new PIN.
7. Press the OK soft key.
8. Use the keypad to re-enter the new PIN.
9. Press the OK soft key.
Activating Read-Only
Activating the Read-Only option prevents other users from making
changes to the handset settings. All menu functions are activated, but
personal settings are protected.
1. Access the Security menu as shown in
“Accessing the Security menu” on page 63.
66
Read-Only
OK
2. Press the arrow keys to scroll and highlight the
Read-Only option.
3. Press the OK soft key.
Page 67

Security functions
4. At the Sure? prompt, choose one of the
following:
Yes
No
— Press the Yes soft key to activate Read-
Only.
— Press the No soft key to cancel changes.
67
Page 68

Accessories
Accessories
Table 4 lists accessories that are available for the DECT Handset 4025.
Table 4: Accessories
Item Order Code
4025 Carry Case N0010676
Desk Top Charger A0541122
Charger Rack A0541124
Belt Clip A0541133
68
Page 69

Terms you should know
Terms you should know
Off-hook
Any line that is selected to either make a call or receive an
incoming call. The term off-hook is applied, regardless of whether
the user actually (a) lifts the handset, (b) presses a line key, (c)
the call is automatically answered at the set, or (d) a line is
automatically selected for an outgoing call.
Handsfree
A method of conversing with the party on the other end of the line
without lifting your handset.
Off-hook
Any line selected to make a call or receive an incoming call.
The term off-hook is applied whether (a) the end-user lifts up the
handset, (b) the end-user presses a line key, (c) the call is
automatically answered at the set, or (d) a line is automatically
selected for an outgoing call.
Soft keys (self-labeled)
A set of keys programmed by your system administrator. These
keys are located directly below the display area, and have four
programmable layers. The layers are accessed through the
More... key. These keys are also used to configure parameters in
the Telephone Option menu.
User Interface
Screen displays that interact with the user as a result of an action
or event.
Quick Call
A telephone number programmed to a single Quick Call key for
one-touch dialing.
69
Page 70

Terms you should know
70
Page 71

Index
Index
A
Adjusting the earpiece/speaker
volume 30
Adjusting the ringer volume 47
Answering a call 29
Arrow soft keys 25
Assigning a quick call number 39
Attention tones 53
Audio settings 47
B
Battery charge display 16
Battery operating times 16
C
Caller list 44
Calling 27
Calling a number from the caller list
45
Changing the PIN 65
Charger 12
Charger answer 54
Charging guidelines 16
Charging the batteries 15
Clearing the telephone book 64
D
DECT system 57
Deleting a DECT system 60
Deleting a quick call assignment
40
Dialing a number from the redial
list 42
Dialing the phone 27
Display contrast 55
E
Editing the system name and
phone number 61
Enabling automatic DECT system
selection 58
Esc soft key 25
F
Features 11
H
Handset controls 20
Handset illumination 26
Handsfree 28, 69
I
Important battery information 15
Installing the batteries 14
K
Key lock 26
Keypad 34
Keys and display 22
L
Language 51
71
Page 72

Index
M
Making an SOS call 29
Muting 29
Muting the handset during a call 30
Muting the ringer 29
O
Off-hook 69
OK soft key 24
Options soft key 24
P
Pre-dialing 27
Q
Quick call 39
R
Read-only 66
Registering the handset 17
Reset the handset 64
Resetting the handset 64
23
T
Telephone book 34
Text line 23
Transfer a call 30
Transferring a number to the tele-
phone book 42
Transferring a number to the tele-
phone book from the caller list 45
U
User name 51
Using the redial list 42
V
Voice mail 31
S
Safety information 9
Security functions 63
Selecting the DECT system 58
Setting earpiece/speaker volume
49
Silent charging 55
Soft keys 26
SOS 52
Switching the handset on/off 22
Symbols indicating handset status
72
Page 73

Page 74

Nortel Communication Server 1000
Nortel DECT Handset 4025
User Guide
Copyright © Nortel Networks Limited 2005
All Rights Reserved
Information is subject to change without notice. Nortel reserves the right
to make changes in design or components as progress in engineering
and manufacturing may warrant.
Nortel, Nortel (Logo), the Globemark, This is the Way, This is Nortel
(Design mark), SL-1, Meridian 1, and Succession are trademarks of
Nortel Networks.
Order Number: NTTQ38BA (N0010677)
Publication Number: N0035521
Document Release: Standard 2.00
Date: October 2005
Produced in Canada
Internet address
http://www.nortel.com
 Loading...