

Page 1

Configuring Data Encryption Services
BayRS Version 12.10
Site Manager Software Version 6.10
Part No. 117386-B Rev 00
February 1998
Page 2

4401 Great America Pa rkw ay 8 Federal S treet
Santa Clara, CA 95054 Billerica, MA 01821
Copyright © 1998 Bay Networks, Inc.
All rights reserved. Printed in the USA. February 1998.
The information in this document is subject to change without notice. The statements, configurations, technical data,
and recommendations in this document are believed to be accurate and reliable, but are presented without express or
implied warranty. Users must take full responsibility fo r th eir a pplic a tio ns of any products specified in this document.
The information in this document is proprietary to Bay Networks, Inc.
The software described in this document is furnished under a license agreement and may only be used in accordance
with the terms of that licen se. A summary of the Software License is included in this document.
Trademarks
AN, BN, and Bay Networks are registered trademarks and Advanced Remote Node, ARN, ASN, System 5000, and
the Bay Networks logo are trademarks of Bay Networks, Inc.
All other trademarks and registered trademarks are t he property of their respective owners.
Restricted Rights Legend
Use, duplication, or disclosure by the United States Government is subject to restrictions as set forth in subparagraph
(c)(1)(ii) of the Rights in Technical Data and Computer Sof tware clause at DFARS 252.227-7013.
Notwithstanding any other license agreement that may pertain to, or accompany the delivery of, this computer
software, the rights of the United States Government regarding its use, reproduction, and disclosure are as set forth in
the Commercial Computer Software-Restricted Rights cl ause at FAR 52. 227-19.
Statement of Conditions
In the interest of improving internal design, operational function, and/or reliability, Bay Networks, Inc. reserves the
right to make changes to the pr oducts described in this document without notice.
Bay Networks, Inc. does not assume any liability that may occur du e to the use or application of the product(s) or
circuit layout(s) described herein.
Portions of the code in this software product may be Copyright © 1988, Regents of the University of California. All
rights reserved. Redistribution and use in source and binary forms of such portions are permitted, provided th at the
above copyright notice and this paragraph are duplicated in all such forms and that any docu mentation, advertising
materials, and other materials related to such distribution and use acknowledge that su ch portions of the software were
developed by the University of California, Berkeley. The name of the University may not be used to endorse or
promote products derived from such portions of the software without specific prior written permission.
SUCH PORTIONS OF THE SOFTWARE ARE PROVIDED “AS IS” AND WITHOUT ANY EXPRESS OR
IMPLIED WARRANTIES, INCLUDING, WITHOUT LIMITATION, THE IMPLIED WARRANTIES OF
MERCHANTABILITY AND FITNESS FOR A PARTICULAR PURPOSE.
In addition, the program and information containe d herein are licensed only pursuant to a license agreement that
contains restricti ons on use and disclosure (that may incorporate by reference certain li mitations and notices imposed
by third parties).
ii
117386-B Rev 00
Page 3

Bay Networks, Inc. Software License Agreement
NOTICE: Please carefully read this license agre ement before copying or using the accompanying software or
installing the hardware unit with pre-enabled software (each of which is referred to as “Software” in this Agreement).
BY COPYING OR USING THE SOFTWARE, YOU ACCEPT ALL OF THE TERMS AND CONDITIONS OF
THIS LICENSE AGREEMENT. THE TERMS EXPRESSED IN THIS AGREEMENT ARE THE ONLY TERMS
UNDER WHICH BAY NETWORKS WILL PERMIT YOU TO USE THE SOFTWARE. If you do not accept these
terms and conditions, return the product, unused and in the original shipping container, within 30 days of purchase to
obtain a credit for the full purchase price
1. License Grant. Bay Networks, Inc. (“Bay Networks”) grants the end user of the Software (“Licensee”) a personal,
nonexclusive, nontransferable license: a) to use the Software either on a single computer or, if applicable, on a single
authorized device identified by host ID, for which it was originally acquired; b) to copy the Software solely for backup
purposes in support of authorized use of the Software; and c) to use and copy the associated user manual solely in
support of authorized use of the Software by Licensee. This license applies to the Software only and does not extend
to Bay Networks Agent software or other Bay Networks software pro ducts. Bay Networks Agent software or other
Bay Networks software products are licensed for use under the terms of the applicable Bay Networks, Inc. Software
License Agreement that accomp anies such software and upon payment by the end user of the applicable license fees
for such software.
2. Restrictions on use; reservation of rights. The Software and user manuals are protected und er copyright laws.
Bay Networks and/or it s licensors retain all title and ownership in both the Software and user manuals, including any
revisions made by Bay Networks or i ts licensors. The copyright notice must be reproduced and included wi th any
copy of any portion of the Software or user manuals. Licensee may not modify, translate, decompile, disassemble, use
for any competitiv e analysis, re v erse engineer , distrib ute, or create deriv ati ve works from the Softwa re or user manuals
or any copy, in whole or in part. Except as expressly provided in this Agreement, Licensee may not copy or transfer
the Software or user manuals, in whole or in part. The Software and user manuals embody Bay Networks’ and its
licensors’ confidential and proprietary intellectual property. Licensee shall not sublicense, assign, or otherwise
disclose to any third party the Software, or any information about the operation, design, performance, or
implementation of the Software and user manuals that is confidential to Bay Networks and its licensors; however,
Licensee may grant permission to its consultants, subcontractors, a nd agents to use the Softw are at Licensee’s facility ,
provided they have agreed to use the Software only in accordance with the terms of this license.
3. Limited warranty. Bay Networks warrants each item of Software, as delivered by Bay Networks and properly
installed and operated on Bay Networks hardware or other equipment it is originally licensed for, to function
substantially as described in its accompanying user manual during its warranty period, which begins on the date
Software is first shipped to Licensee. If an y item of S oftware f ails to so function d uring its w arranty period, as the sole
remedy Bay Networks will at its discretion provide a suitable fix, patch, or workaround for the problem that may be
included in a future Software release. Bay Network s fur ther w arra nts to Licen see that the medi a on which the
Software is provided will be free from defec ts in materials and wo rkman ship under no rmal use for a peri od of 90 da ys
from the date Software is first shipped to Licensee. Bay Networks will replace defective media at no cha rge if it is
returned to Bay Netw orks during the warran ty perio d alon g with proof of the date of shipment . This war ranty do es not
apply if the media has been dam aged as a resul t of acci dent, misuse , or ab use. The Licen see assumes all re sponsibilit y
for selection of the Software to achieve Licensee’s intended results and for the installation, use, and results obtained
from the Software. Bay Networks does not warrant a) that the functions contained in the software will meet the
Licensee’ s requireme nts, b) that the Software will operate in the hardware or software combinations tha t the L icens ee
may select, c) that the operation of the Softw a re will be uninterru pte d or error free, or d) that all defec ts in the
operation of the Software will be corrected. Bay Networks is not obligated to remedy any Software defect that cannot
be reproduced with the latest Software release. These warranties do not apply to the So ftw are if i t has been (i) altered,
except by Bay Netwo rks or in a ccordance with its instru ction s; (ii) used in con junc tion with another v en dor’s product,
resulting in the defect; or (iii) damaged by improper environment, abuse, misuse, accident, or negligence. THE
FOREGOING WARRANTIES AND LIMITATIONS ARE EXCLUSIVE REMEDIES AND ARE IN LIEU OF ALL
OTHER WARRANTIES EXPRESS OR IMPLIED, INCLUDING W ITHOUT LIMITATION ANY WARRANTY OF
MERCHANTABILITY OR FITNESS FOR A PARTICULAR PURPOSE. Licensee is responsible for the security of
117386-B Rev 00
iii
Page 4

its own data and information and for maintaining adequate procedures apart from the Software to reconstruct lost or
altered files, data, or programs.
4. Limitation of liability. IN NO EVENT WILL BAY NETWORKS OR ITS LICENSORS BE LIABLE FOR ANY
COST OF SUBSTITUTE PROCUREMENT; SPECIAL, INDIRECT, INCIDENTAL, OR CONSEQUENTIAL
DAMAGES; OR ANY DAMAGES RESULTING FROM INACCURATE OR LOST DATA OR LOSS OF USE OR
PROFITS ARISING OUT OF OR IN CONNECTION WITH THE PERFORMANCE OF THE SOFTWARE, EVEN
IF BAY NETWORKS HAS BEEN ADVISED OF THE POSSIBILITY OF SUCH DAMAGES. IN NO EVENT
SHALL THE LIABILITY OF BAY NETWORKS RELATING TO THE SOFTWARE OR THIS AGREEMENT
EXCEED THE PRICE PAID TO BAY NETWORKS FOR THE SOFTWARE LICENSE.
5. Government Licensees. This provision applies to all Software and documentation acquired directly or indirectly
by or on behalf of the United States Government. The Software and documentation are commercial products, licensed
on the open market at market prices, and were developed entirely at private expense and without the use of any U.S.
Government funds. The license to the U.S. Government is granted only with restricted rights, and use, duplication, or
disclosure by the U.S. Government is subject to the restrictions set forth in subparagraph (c)(1) of the Commercial
Computer Software––Restricte d Rig hts cla u se o f FAR 52.227-19 and the limita tio ns set o ut in this license for civilian
agencies, and subparagraph (c)(1)(ii ) of the Rights in Technical Data and Computer Software clause of DFARS
252.227-7013, for agencies of t he Department of Defense or their successors, whichever is applicable.
6. Use of Software in the European Community. This provision applies to all Software acquired for use within the
European Community. If Licensee uses the Software within a country in the European Community, the Software
Directive enacted by the Council of European Commun ities Directive dated 14 May, 1991, will apply to the
examination of th e Software to facilitate interoperability. Licensee agrees to notify Ba y Networks of any such
intended examination of the Software and may procure support and assistance from Bay Networks.
7. Term and termination. This license is effective until terminated; however, all of the restrictions with respect to
Bay Networks’ copyright in the Software and user manuals will cease being effective at the date of expiration of the
Bay Networks copyright; those restrictions relating to use and disclosure of Bay Network s’ confidential informati on
shall continue in effect. Licensee may terminate this license at any time. The license will automatically terminate if
Licensee fails to comply with any of the terms and conditions of the license. Upon termination for any reason,
Licensee will immediately destroy or return to Bay Networks the Software, user manuals, and all copies. Bay
Networks is not liable to Licensee for damages in any form solely by reason of the termination of this license.
8. Export and Re-export. Licensee agrees not to export, directly or indirectly, t he S oftware or related technical data
or information without first obtaining any required export licenses or other governmental approvals. Without limiting
the foregoing, Licensee, on behalf of itself and its subsidiaries and affiliates, agrees that it will not, without first
obtaining all export licenses and approvals required by the U.S. Government: (i) export, re-export, transfer, or divert
any such Software or technical data, or any direct product thereof, to any country to which such exports or re-exports
are restricte d or em b argoed under United States ex po r t con t rol laws and regulations, or to any national or resident of
such restricted or embargoed countries; or (ii) provide the Software or related technical data or information to any
military end user or for any military end use, including the design, development, or production of any chemical,
nuclear, or biological weapons.
9. General. If any provision of this Agreement is held to be invalid or unenforceable by a court of competent
jurisdiction, the remainder of the provisions of this Agreement shall remain in full force and effect. This Agreement
will be governed by the laws of the state of California.
Should you have any questions concerning this Agreement, contact Bay Networks, Inc., 4401 Great America Parkway,
P.O. Box 58185, Santa Clara, California 95054-8185.
LICENSEE ACKNOWLEDGES THAT LICENSEE HAS READ THIS AGREEMENT, UNDERSTANDS IT, AND
AGREES TO BE BOUND BY ITS TERMS AND CONDITIONS. LICENSEE FURTHER AGREES THAT THIS
AGREEMENT IS THE ENTIRE AND EXCLUSIVE AGREEMENT BETWEEN BAY NETWORKS AND
LICENSEE, WHICH SUPERSEDES ALL PRIOR ORAL AND WRITTEN AGREEMENTS AND
COMMUNICATIONS BETWEEN THE PARTIES PERTAINING TO THE SUBJECT MATTER OF THIS
AGREEMENT. NO DIFFERENT OR ADDITIONAL TERMS WILL BE ENFORCEABLE AGAINST B AY
NETWORKS UNLESS BAY NETWORKS GIVES ITS EXPRESS WRITTEN CONSENT, INCLUDING AN
EXPRESS WAIVER OF THE TERMS OF THIS AGREEMENT.
iv
117386-B Rev 00
Page 5

Contents
About This Guide
Before You Begin .............................................................................................................. xi
Conventions ................................................. ............................................. ........................xii
Acronyms ........................... .......................... .......................... ......................... .................xiii
Bay Networks Technical Publications ..............................................................................xiii
Bay Networks Customer Service .....................................................................................xiv
How to Get Help ..............................................................................................................xiv
Bay Networks Educational Ser v ic es ..... ....................................... ...... ....... ...... ....... .......... xv
Chapter 1
Data Encryption Overview
Data Encryption Architecture ..........................................................................................1-1
Data Encryption Standard (DES) .............................................................................1-2
40-Bit and 56-Bit Encryption Strengths .............................................................1-2
Message Digest 5 (MD5) .........................................................................................1-3
WAN Encryption Protocol (WEP) .............................................................................1-3
Security and Data Encryption .........................................................................................1-3
Site Security .............................................................................................................1-4
Configuration Security ..............................................................................................1-4
Encryption Keys ..............................................................................................................1-4
Random Number Generator (RNG) .........................................................................1-5
Node Protection Key (NPK) ......................................................................................1-6
Generating an NPK ...........................................................................................1-6
Entering the NPK on the Router ........................ ....... ...... ...... .............................1-6
Choosing a Secure Shell Password ...................................................................1-7
Entering the NPK into Site Manager ..................................................................1-7
Long-Term Shared Secret (LTSS) ............................................................................1-7
Master Encryption Key (MEK) ..................................................................................1-8
Traffic Encryption Key (TEK) ....................................................................................1-8
117386-B Rev 00
v
Page 6

Chapter 2
Considerations Before You Enable Encryption
Requirements for Enabling Encryption ...........................................................................2-1
Selecting Encr yp tio n Strengt h ........................................ ....... ...... ...................................2-1
Synchronizing Router Clocks .........................................................................................2-2
Using Encryption with AN Routers ...........................................................................2-2
Encryption and Performance ..........................................................................................2-2
Maintenance Considerations for the NPK .......................................................................2-3
Using Floppy Disks to Store Key Files ............................................................................2-3
Reading Key Files on PC Floppy Disk from UNIX ....................................................2-3
Configuring Encryption with Dial Backup ........................................................................2-4
Chapter 3
Enabling Encryption
Before You Begin ............................................................................................................3-1
Modifying Encryption Parameters Using Technician Interface ........................................3-1
Starting Encryption .........................................................................................................3-2
Creating Seeds ...............................................................................................................3-2
Creating Seeds on a PC ..........................................................................................3-3
Changing the Path to the Key Files ...................................................................3-3
Changing the Length of the LTSS Key Generator ..............................................3-3
Running the wfkseed Command ......................................................................3-3
Creating Seeds on a UNIX Platform ........................................................................3-5
Each of these steps is detailed in the following sections. ..................................3-5
Setting a Path to the Key Files ...........................................................................3-5
Changing the Length of the LTSS Key Generator ..............................................3-5
Running the WEP wfkseed Command .............................................................3-6
Creating Seeds on the Router ..................................................................................3-7
Creating NPKs and LTSSs .............................................................................................3-7
Creating NPKs .........................................................................................................3-7
Creating LTSSs ........................................................................................................3-8
Entering an NPK on a Router .........................................................................................3-9
Changing NPKs ............................................................................................................3-10
Monitoring NPKs ...........................................................................................................3-10
Changing an NPK on a Router ...............................................................................3-11
Changing an NPK in the MIB .................................................................................3-11
vi
117386-B Rev 00
Page 7

Changing LTSSs ...........................................................................................................3-11
Creating TEKs ..............................................................................................................3-11
Starting Encryption for PPP ..........................................................................................3-13
Starting Encryption for Frame Relay .............................................................................3-16
Configuring WEP Parameters .......................................................................................3-19
Configuring WEP Line Parameters ........................................................................3-19
Configuring WEP Interface Parameters .................................................................3-21
Disabling Encryptio n ................ .............................................. ...... ...... ...........................3-23
Deleting Encryption from an Interface ..........................................................................3-24
Deleting Encryption from a Router ...............................................................................3-25
Appendix A
Encryption Parameters
PPP and Frame Relay Encryption Parameters .............................................................. A-1
WEP Line Parameters ................................................................................................... A-4
WEP Circuit Interface Parameters ................................................................................. A-5
Appendix B
Definitions of k Commands
Index
117386-B Rev 00
vii
Page 8

Page 9

Figures
Figure 1-1. Hierarchy of Encryption Keys ...................................................................1-5
117386-B Rev 00
ix
Page 10

Page 11

About This Guide
If you are responsible for configuring and managing Bay Networks® routers, read
this guide to learn how to configure data encryption.
If you want to Go to
Learn about data encryption services Chapter 1
Read implementation notes Chapter 2
Start encryption services Chapter 3
Obtain information about Site Manager parameters (this is the same
information you obtain using Site Manager online Help)
Learn about k commands Appendix B
Appendix A
Before You Begin
Before using this guide, you must complete the following procedures. For a new
router:
• Install the router (refer to the installation guide that came with your router).
• Connect the router to the network and create a pilot configuration file (see
Quick-Starti ng Router s , Conf igur ing BaySt ac k Remote Acc ess , or Connecting
ASN Routers to a Network).
Make sure that you are running the latest version of Bay Networks Site Manager
and router software. For instructions, refer to Upgrading Routers from Version
7–11.xx to Version 12.00.
117386-B Rev 00
xi
Page 12

Configuring Data Encryption Se rvices
.
.
Conventions
angle brackets (< >) Indicate that you choose the text to enter based on the
description inside the brackets. Do not type the
brackets when entering the command.
ping
Example: if command syntax is
you enter
ping 192.32.10.12
<ip_address>
,
bold text
Indicates text that you need to enter, command names,
and buttons in menu paths.
Example: Enter
Example: Use the
wfsm &
dinfo
command.
Example: ATM DXI > Interf ace s > PVCs identifies the
PVCs button in the window that appears when you
select the Interfaces option from the ATM DXI menu.
brackets ([ ]) Indicate optional elements. You can choose none, one,
or all of the options.
.
ellipsis points Horizontal (. . .) and ve rtic al ellipsis points indicat e
()
omitted info rmation.
italic text Indicates variable values in command syntax
descriptions, new terms, file and directory names, and
book titles.
quotation marks (“ ”) Indicate the title of a chapter or section within a book.
screen text Indicates data that appears on the screen.
Example:
Set Bay Networks Trap Monitor Filters
separator ( > ) Separates menu and option names in instructions and
internal pin-to-pin wire connections.
Example: Protocols > AppleTalk identifies the
AppleTalk option in the Protocols menu.
Example: Pin 7 > 19 > 20
vertical line (
) Indicates that you enter only one of the parts of the
|
command. The vertical line separates choices. Do not
type the vertical line when entering the command.
Example: If the command syntax is
show at routes
show at routes
xii
nets
, you enter either
|
show at nets
or
, but not both.
117386-B Rev 00
Page 13

Acronyms
About This Guide
ANSI American National Standards Institute
DES Data Encryption Standard
DLCI data link connection identifier
IETF Internet Engineering Task Force
ISDN Integrated Services Digital Network
LTSS long-term shared secret
MD5 Message Digest 5
MEK Master Encryption Key
MIB management information base
NPK Node Protection Key
NTP Network Time Protocol
pcfs personal computer file system
PPP Point-to-Point Protocol
PVC permanent virtual circuit
PRI Primary Rate Interface
RNG random number generator
SEO strong encryption option
TEK Traffic Encryption Key
WAN wide area network
WEP WAN Encryption Protocol
Bay Networks Technical Publications
You can now print technical manuals and release notes free, directly from the
Internet. Go to
products for which you need documentation. The n locate the s pecific c ategory and
model or version for your hardware or software product. Using Adobe Acrobat
Reader, you can open the manuals and release notes, search for the sections you
need, and print them on most s tandard prin ters. You can do wnload Ac robat Reader
free from the Adobe Systems Web site,
Documentation sets and CDs are a vailable through your local Bay Networ ks sales
office or account representative.
117386-B Rev 00
support.baynetworks.com/library/tpubs
www.adobe.com
. Find the Bay Networks
.
xiii
Page 14

Configuring Data Encryption Se rvices
Bay Networks Customer Service
You can purchase a support contract from your Bay Networks distributor or
authorized reseller, or directly from Bay Ne tworks Services. For information
about, or to purchase a Bay Networks service contract, either call your local Bay
Networks field sales office or one of the following numbers:
Region Telephone number Fax number
United States and
Canada
Europe 33-4-92-96-69-66 33-4-92-96-69-96
Asia/Pacific 61-2-9927-8888 61-2-9927-8899
Latin America 561-988-7661 561-988-7550
Information about customer service is also available on the World Wide Web at
support.baynetworks.com.
How to Get Help
If you purchased a service contract for your Bay Networks product from a
distributor or authorized reseller, contact the technical support staff for that
distributor or reseller for assistance.
If you purchased a Bay Networks service program, call one of the following Bay
Networks Technical Solutions Centers:
800-2LANW AN; th en enter Expr ess Routing
Code (ERC) 290, when prompted, to
purchase or renew a service contract
978-916-8880 (direct)
978-916-3514
xiv
Technical Solutions Center Telephone number Fax number
Billerica, MA 800-2LANWAN 508-916-3514
Santa Clara, CA 800-2LANWAN 408-495-1188
Valbonne, France 33-4-92-96-69-68 33-4-92-96-69-98
Sydney, Australia 61-2-9927-8800 61-2-9927-8811
Tokyo, Japan 81-3-5402-0180 81-3-5402-0173
117386-B Rev 00
Page 15

Bay Networks Educational Services
Through Bay Networks Educa tional Services , you can attend cl asses and purcha se
CDs, videos, and computer-based training programs about Bay Networks
products. Training programs can take place at your site or at a Bay Networks
location. For more information about training programs, call one of the following
numbers:
Region Telephone number
United States and Canada 800-2LANWAN; then enter Express Routing Code (ERC)
282 when prompted
978-916-3460 (direct)
Europe, Middle East, and
Africa
Asia/Pacific 61-2-9927-8822
Tokyo and Japan 81-3-5402-7041
33-4-92-96-15-83
About This Guide
117386-B Rev 00
xv
Page 16

Page 17

Chapter 1
Data Encryption Overview
Bay Networks data encryption services enable you to protect sensitive traffic on
your network. Encryption prevents unauthorized persons from reading, changing,
or replaying data that travels between Bay Networks routers.
Data encryption services include:
®
• Software-based enc ryption for PPP dedicated links for the BN
ASN™, System 5000™ router modules, and all serial interfaces. This includes
encryption on multiline and multilink.
, AN®, ARN
™,
• Software-based encryption for frame relay circuits that have one permanent
virtual circuit (PVC) per service record. This includes encryption on
multiline.
• Encryption configurable on a line or circuit basis.
• Encryption independent or combined with data compression.
You can configure PPP dial backup for a frame relay circuit that uses data
encryption. Be aware, however, that if the primary circuit fails, data that travels
over the backup circuit is unencrypted.
Data Encryption Architecture
Bay Networks uses the following standards and protocols to provide encryption
services:
• Data Encryption Standard (DES)
• Message Digest 5 (MD5)
• WAN Encryption Protocol (WEP), proprietary to Bay Networks
117386-B Rev 00
1-1
Page 18

Configuring Data Encryption Se rvices
Data Encryption Standard (DES)
Bay Networks bases encryption services on DES, which the United States
government has ado pte d to protect sen si ti v e b ut nonclas sif i ed data. The Ameri can
National Standards Institute (ANSI), the Internet Engineering Task Force (IETF),
and various banking and financial standards groups have also incorporated DES
into security standards.
DES describes the process that transforms 64-bit blocks of data from readable
plaintext to scrambled ciphertext. A 40-bit or 56-bit number that you generate,
known as a key, controls the scrambling and unscrambling. Both ends of a link
must use the same key value for one end to be able to decipher the data that the
other end sends.
DES is designed so that e ven if someone knows some of the plai nte xt da ta and t he
corresponding ciphertext, there is no way to determine the key without trying all
possible keys. The strength of encryption-based security rests on the size of the
key, and on properly protecting the key.
Because DES is a public standard, the encryption is secure only if the
communicating routers and the management station keep the DES key secret and
protected from unauthorized change.
1-2
40-Bit and 56-Bit Encryption Strengths
Bay Networks offers two encryption strengths:
• The standard router software includes encryption that uses 40-bit DES keys.
This version provides reasonably strong security.
• A strong encryption option (SEO) for router software that uses 56-bit DES
keys.
SEO software is generally available only in the United States and Canada. U.S.
law allows export of the SEO only with a U.S. export license. For more
information on the export, import, and use of SEO outside the United States and
Canada, refer to the SEO software license agreement.
117386-B Rev 00
Page 19

Message Digest 5 (MD5)
MD5 is a secure hash algorithm, and is a componen t in a number of IETF standard
protocols. MD5 opera te s o n data of varying lengths, and produces from it a single
128-bit output called the digest. It is very difficult, given one message and its
digest, to fabricate another message that has the same digest.
This property enables MD5 to function like a checksum to detect errors in the
integrity of a message. When a message that contains a secret key is hashed, the
resulting digest also authenticates the origin of the message: only a source that
possesses the secret key could have calculated the digest. This technique is called
keyed MD5.
Bay Networks encryption uses MD5 to:
• Authenticate the originator of the message, that is, to verify that the source
possesses the secret key.
• Verify the integrity of the DES keying material.
• Create new keys as part of a process that changes key values.
Data Encryption Overview
WAN Encryption Protocol (WEP)
WEP employs the DES algorithm, combined with MD5 and the appropriate key,
to encrypt data and add protocol information the receiver requires to identify the
data as encrypted. This encryption protocol is proprietary to Bay Networks.
WEP begins by establishing the security of the link and verifying that both ends
have the same key. The two sides of the link issue connection request and
acknowledgment messages. They use keyed MD5 to exchange and authenticate
these messages. If the negotiation fails, data communication does not occur on
that circuit.
Security and Data Encrypti on
To use data encryption effectively, you must take precautions to protect the
security of your network equipment and the configuration process.
117386-B Rev 00
1-3
Page 20

Configuring Data Encryption Se rvices
Site Security
Carefully r estrict unauthorized access to rout ers that encrypt data and the
workstations you use to configure encryption. Because DES is a public standard,
data is secure only if you properly protect the encryption keys. The configuration
files that contain these keys include safeguards to prevent unauthorized access.
However, a good strategy is to physically protect your equipment.
Configuration Security
You store the k e y managemen t f il es th at Bay Ne tw orks encrypt ion se rvice s use o n
removable media, such as floppy disks, and you should store this media in a
secure place. Thi s is the eas iest way t o prevent unauthorized per sons f rom gain ing
access to these files.
You should always configure the node protection keys (NPKs) locally, not over a
network. When you connect a computer to a router’s console port to configure
encryption, use a computer that is not connected to any other equipment.
You can, however, configure long term shared secrets (LTSSs) remotely because
LTSSs are encrypted.
Follow recommendations about network security in this guide.
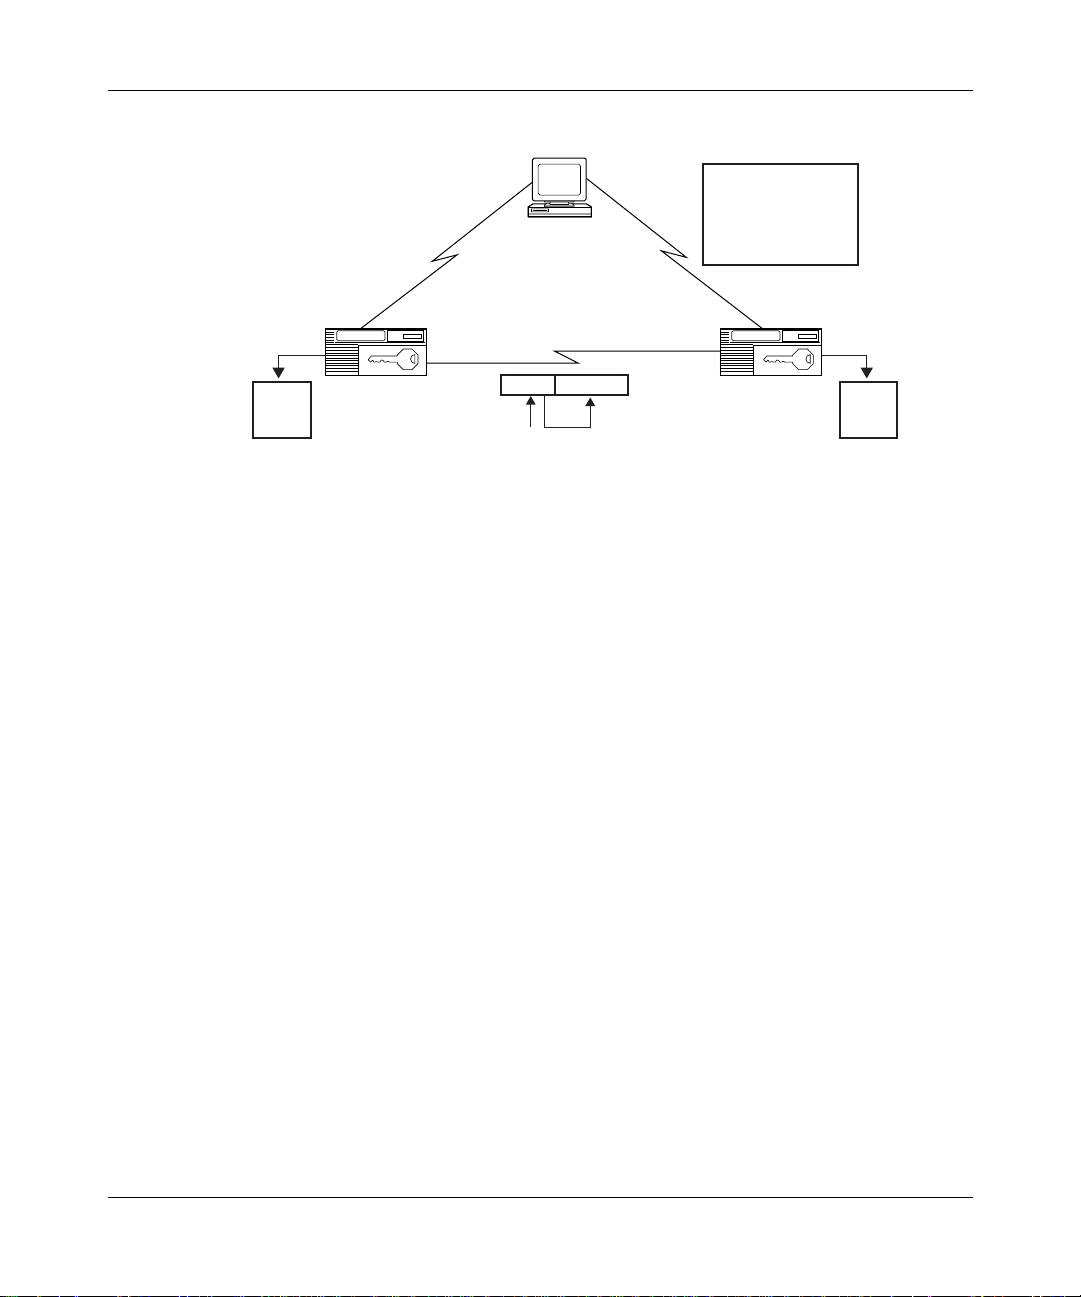
Encryption Keys
Figure 1-1 illustrates the hierarchy of keys that Bay Networks encryption uses to
protect and transmit data.
1-4
117386-B Rev 00
Page 21
Data Encryption Overview
LTSS
LTSS
LTSS
NPK
12
23
24
2
Santa Clara
Site Manager
MEK=(LTSS , TIME)
FR or PPP
TEK Data
12
Billerica: NPK
Santa Clara: NPK
Billerica-SC: LTSS
Billerica-NY: LTSS
.....
Billerica
1
2
12
13
NPK
LTSS
LTSS
LTSS
WEP0001A
1
12
13
14
Figure 1-1. Hierarchy of Encryption Keys
The keys are the:
• Node Protection Key (NPK). It encrypts the LTSS.
• Long-Term Shared Secret (LTSS). It is the source for the Master Encryption
Key.
• Master Encryption Key (MEK). It encrypts the Traffic Encryption Key.
• Traffic Encryption Key (TEK). The TEK encrypts the data that travels across
the network.
Random Number Generator (RNG)
The Bay Networks key management software uses an RNG in Site Manager to
generate values for the keys. These values are statistically random. An RNG uses
as its source a seed that you supply. For instructions, see “Creating Seeds” on
page 3-2.
Site Manager also uses its RNG to generate NPKs, and LTSSs.
The router software uses the RNG to generate TEKs.
117386-B Rev 00
1-5
Page 22

Configuring Data Encryption Se rvices
Node Protection Key (NPK)
The NPK encrypts and decrypts LTSSs. The NPK is stored in the router’s
nonvolatile memory and its fingerprint , which is a 128-bit version of the NPK
generated by the hash algorithm, is in the management information base (MIB).
The NPK and its fingerprint must match for encryption to occur.
You should create a nd use a different NPK for each secure router on your netw ork.
Caution:
The NPK is the most critical key in the hierarchy. If the NPK is
compromised, all encrypted data on the router could be compromised. Protect
the files that store the NPKs, preferably by using removable media that you
store securely. Also protect the routers on which the NPKs reside.
The process of generating and using NPKs is as follows:
1.
The key management software uses an RNG in Site Manager to generate as
many NPKs as your network requires, and you specify a name for each NPK.
2.
You use the Technician Interface to enter an NPK value in the router’s
nonvolatile memory. You do this for each secure router.
3.
You enter the same NPK in the Site Manager PPP or frame relay Node
Protection Key parameter for that rou ter.
Generating an NPK
To generate an NPK you must:
1.
Use the WEP software to create a seed that initializes the random number
generator for the NPKs.
2.
Use the WEP NPK Key Manager in Site Manager to generate NPKs.
1-6
Entering the NPK on the Router
You enter the NPK into a router lo cally using t he conso le port an d the se cur e shel l
section of the Technician Int erfa ce. A passw ord pr otects ac cess to t he sec ure shell .
117386-B Rev 00
Page 23

Data Encryption Overview
The easiest way to enter the NPK is to use a text editor in read-only mode to
display the contents of the file that contains your NPKs. Examples of editors
include vi or emacs on a UNI X platf orm a nd EDIT on a PC. Copy the value of the
appropriate NPK, and paste it into the Technician Interface command line.
You should never use a terminal server to enter the NPK. Instead, you
Note:
should enter the NPK in each router using a laptop computer that you attach
directly to the router.
The NPK is stored in the rout er’s nonv olatile memor y. You cannot access the NPK
or the password by means of the MIB or by using normal Technician Interface
debug commands. Nor can you invoke the secure shell in a TELNET session.
Choosing a Secure Shell Password
The Secure Shell password protects all of the secret data in the router that WEP
uses. Select a password of at least 10 to 12 characters. Do not use anything
obvious, like your nickname, family birthdates, or your social security number.
Change this password often and randomly.
Entering the NPK into Site Manager
You must also enter the NPK into Site Manager using the PPP or frame relay
Node Protection K ey parameter. When you enter an NPK, its value is visible only
until you click on the Apply button. When you modify the security configuration
for a router, you must enter the NPK exactly as you entered it when you first
configured encryption; otherwise, you cannot make changes.
Long-Term Shared Secret (LTSS)
The LTSS is the source for the Master Encryption Key (MEK). It consists of 128
to 248 bits of secret data t hat each end of a secure l ink shares . The LTSS resides in
the MIB, encrypted by the NPK, which you must ha ve pr e viously e ntered i nto Site
Manager. You need a different LTSS for each circuit that you configure to use
encryption.
117386-B Rev 00
1-7
Page 24

Configuring Data Encryption Se rvices
The key manager uses an RNG to generate LTSSs, and you specify a name for
each of these v alues. Aft er you cre ate a f ile of LTSS ke ys, you assign the same k ey
to each end of a secure circuit.
Note:
Store the files of NPKs and LTSSs on removable media, such as floppy
disks, and store that media in a safe place.
Master Encryption Key (MEK)
The MEK encrypts the Traffic Encryption Key (TEK). The LTSS for a circuit,
combined with the current time, is the source of its MEK. You do not actually
generate, enter , or vie w th e MEK. The WEP software automati cally calcul ates this
value. Like the LTSS, the MEK must be the same on each end of a link.
The value of an individual MEK periodically changes according to the value of
the MEK Change parameter.
For the encrypt ion software to generate identical MEKs, and for the MEKs to
remain identical on both s ides of a link as t heir values change, they must change at
approximately the same time. That can only happen if:
• The MEK Change parameter is set to the same value on each end of a link.
For more inform ation, see the description of this parameter on page A-3.
• The clocks on both routers are synchronized. For further information about
router clocks in relation to encryption, see the section “Synchronizing Router
Clocks” on page 2-2.
Traffic Encryption Key (TEK)
The TEK encrypts the data that travels across the network. The RNG on a
transmitting router cr eates the TEK. WEP then encr ypts the TEK, using the MEK.
At the receiving router, WEP decrypts the TEK, and uses it to decrypt the data.
The TEK that the standard encryption software generates is 40 bits long. The
strong encryption option (SEO) can generate both 40-bit and 56-bit TEKs.
1-8
117386-B Rev 00
Page 25

Data Encryption Overview
The TEK automatically changes according to the values in the TEK Change
Seconds and TEK Change Bytes parameters. A sending router generates a new
TEK, and WEP encrypts it. The receiving router notes the change, decrypts it,
replaces the old TEK with the new one, and uses the new one to decrypt current
and future data until the TEK changes again.
Each router has its own TEK and TEK Change attributes that it uses to protect
data that it sends. A link therefore has two TEKs which are different, and which
change independently of each other. For more information on configuring key
change attributes, refer to Appendix A, “Encryption Parameters.”
117386-B Rev 00
1-9
Page 26

Page 27

Considerations Before You Enable Encryption
This chapter presents some essential points that you should consider in preparing
to configure encryption at your site.
Requirements for Enabling Encryption
To configure encryption, you must configure WEP parameters and either PPP or
frame relay encryption parameters. You must enable encryption for bo t h the line
and circuit WEP parameters, and for either PPP or frame relay.
Chapter 2
If you enable encryption for the WEP line and circuit, but not for a PPP or fr ame
relay protocol, data does not travel over the network.
If you enable encryption for the line, circuit, and protocol, and some other
attribute for encryption is misconfigured, WEP drops data rather than sending it
unencrypted.
Selecting Encryption Strength
Both sides of a link must use the same encryption strength. Note that you can
select both encryption strengths, enabling a router that has 56-bit encryption
strength to use 40-bit encryption with a router that has only 40-bit encryption.
117386-B Rev 00
2-1
Page 28

Configuring Data Encryption Se rvices
Synchronizing Router Clocks
The Master Encryption Key (MEK) must be the same at both ends of a link.
Therefore, the MEK Change parameter value, which sets the amount of time
between changes in th e v a lue of the MEK, must also be t he sa me. F or the se values
to be the same routinely, the MEK changes must occ ur a t a ppr oxi mately the same
time, which requires that the routers use the same date and time. If the routers’
clocks differ by more than the MEK Change value, WEP drops all packets.
To synchronize the routers, you can use either or both of these options:
• Network Time Protocol (NTP).
• MEK Change parameter. Set to a value large enough to accommodate
differences between the routers’ clocks.
Caution:
routers. If anyone changes the date on either of the routers, traffic stops.
You should disable TELNET access of any kind between secure
Using Encryption with AN Routers
AN router models earlier than Version 8.12/2.12 lose both date and time if they
are powered off. To use encryption with these older ANs, you must synchronize
the router clocks before you configure encryption.
Newer models have a battery that maintains the ro uter clock. If your AN has a
model number in the format AE xxxxxx x, it is a new, BayStack
battery.
Encryption and Performance
Using encryption requires substantial resources, and reduces router throughput.
Consider this when you se lect the interfaces on which to use encryption. You can,
however, lower the cost of using encryption by using data compression with
encryption. You can configure both hardware- and software-based data
compression over PPP and frame relay networks running encryption.
™
AN, and it has the
2-2
117386-B Rev 00
Page 29

Considerations Before You Enable Encryption
Enabling compression im proves bandwidth efficiency by eliminating redundant
strings in d ata streams. This, in turn, improves network r esponse times and
reduces line costs. H ardware compression is particularly effective in improving a
router’s throughput when you use encryption.
When you use encryption with compression, the software compresses the data
before it encrypts it.
For instructions on how to use data compression, refer to Configuring Data
Compression Services.
Maintenance Considerations for the NPK
Your configuration file includes a fingerprint of the Node Protection Key (NPK).
The NPK in the MIB must match the NPK in the router’s nonvolatile memory, or
encryption cannot occur. This means that if you want to change anything in your
encryption configuration after you have exited from the original configuration
session, you must reen ter the NPK exactly as you en tered it initially. For
instructions on how to enter an NPK on a router, see page 3-9.
If you install a new CPU board on a router, or swap boards between routers, you
must reenter the NPK on the affected routers.
The NPK remains on a boar d that you remov e fr om a route r using d ata encr yption.
For security reasons, you need to plan ahead to make sure that an NPK you are
using resides only on a router that carries encrypted traffic.
Using Floppy Disks to Store Key Files
For security reasons, you should use removable media such as floppy disks to
store key files.
Reading Key Files on PC Floppy Disk from UNIX
You can use the same floppy disks on both PCs and UNIX platforms if you have
UNIX personal computer file system (pcfs) compatibility, which allows UNIX
platforms to access data on floppy disks formatted for PCs. Issue the follow ing
series of commands:
117386-B Rev 00
2-3
Page 30

Configuring Data Encryption Se rvices
1.
Log on as superuser.
su
%
2.
Enter the superuser password.
<password>
password
3.
Move to the root file system.
cd /
$
4.
Make a mount point directory.
mkdir
$
5.
Mount the floppy disk.
mount -t pcfs /dev/fd0
$
<directory_name>
<directory_name>
Configuring Encryption with Dial Backup
You can configu re a fram e relay PVC that use s encryp tion wit h a PPP dial backup
circuit. If the primary line fails, traffic travels unencrypted over the PPP backup
circuit.
PPP dial backup does not work with PPP circuits that you configure for
encryption. Further, if a PPP primary circuit includes values in any PPP
encryption parameters, whether or not the circuit uses encryption, PPP dial
backup does not work.
Frame relay dial backup does not work with frame relay circuits that you
configure for encryption.
2-4
117386-B Rev 00
Page 31

This chapter describes how to configure data encryption.
Before You Begin
Before you can start data encryption, you must start Site Manager and:
1.
Create and save a configuration file that has at least one PPP or frame relay
interface.
Chapter 3
Enabling Encryption
2.
Specify router hardware, if this is a local mode configuration file.
3.
Retrieve the configuration file in local, remote, or dynamic mode.
4.
Reboot the router.
Modifying Encryption Parameters Using T e c hnician Interface
set
and
3-1
117386-B Rev 00
The Technician Interface allows you to modify parameters by issuing
commit
process is equivalent to modifying parameters using Site Manager. For more
information about us ing the Technician Interf ace to access t he MIB, ref er to Using
Technician Interface Software.
Caution:
parameter values you enter. Entering an invalid value can corrupt your
configuration.
commands with the managemen t inf ormati on base (MIB) obj ect I D. This
Unlike using Site manager, the Technician Interface does not verify
Page 32

Configuring Data Encryption Se rvices
Starting Encryption
To enable Bay Networks data encryption on your network, you must:
1.
Create the seeds that the randon number generator (RNG) uses as source
values for the node protection keys (NPKs) and long-term shared secrets
(LTSSs).
2.
Create an NPK for each secure router.
3.
Create an LTSS for each secure line or interface.
4.
Enter an NPK on each secure router using the console interface.
5.
Create the seeds that are source values for Traffic Encryption Keys (TEKs).
6.
Enter the NPK in the PPP or frame relay Node Protection Key parameter.
7.
Enter the LTSS in the PPP or frame relay and LTSS Value parameters.
You can also customize encryption by editing the PPP or frame relay encryption
parameters, as well as the WEP line and interface parameters.
Creating Seeds
3-2
From the management console (a PC or UNIX workstation) on which you have
installed Site Manager, you create two seeds to initialize the RNG that generates
keys. Site Manager 6.00 or higher includes software that enables you to create
these seeds.
Site Manager for the PC inclu des an e n vi ronment v ariable that def ines the loc ation
where the fil es that will contai n the NPKs a nd LTSSs reside. On a UNIX pl atform,
you must set this path.
From the Technician Interface, you create one seed for the NPK for each router.
The following sec tions pro vide informati on about creati ng seeds for the NPKs and
LTSSs. The section “
Creating TEKs,” later in this cha pter, describes how to cr eate
the seed for a TEK.
117386-B Rev 00
Page 33

Creating Seeds on a PC
To us e a PC to create seeds that the WEP software uses to ge nerate NPKs and
LTSSs, you issue the
for the key file path and the length of the LTSS key. If you want to change either
value, you must do so before you create the seeds. Instructions follow.
Changing the Path to the Key Files
WF_KEY_FILE_PATH is an environment variable that resides in the Site Manager
initialization (\windows\siteman.ini) file. It defines the location, or path, to which
WEP can write the seeds, and from which Site Manager can both retrieve the
seeds, and write the generated keys to NPK and LTSS files. The default value of
the path is n:, where n is assigned to a drive with removable media.
If you want to change the storage place for your generated key files, use an editor
such as Notepad to edit the WF_KEY_FILE_PATH line.
Note:
Store the fil es containi ng NPKs and LTSSs on remov able medi a, such as
floppy disks, and store that media in a safe place.
wfkseed
Enabling Encryption
command at the DOS prompt. Default values exist
117386-B Rev 00
Changing the Length of the LTSS Key Generator
You can set the lengt h of the LTSSs to a value other than the default of 128 bi ts by
editing the WF_LTSS_KEY_GEN_LEN line in the Site Manager initialization
(\windows\siteman.ini) file. Use an editor such as Notepad. You can enter a value
from 128 to 248.
Running the
wfkseed
The
wfkseed
command creates the seed that enables WEP to generate random
Command
numbers. You run this command twice to create seeds, once for the NPK key file
and and once for the LTSS key file.
1.
Insert your choice of removable media (such as floppy disk) in an
available drive on your PC.
2.
At the DOS prompt, enter:
wfkseed
3-3
Page 34

Configuring Data Encryption Se rvices
WEP asks:
Do you wish to create the LTSS or NPK Key File? [LTSS]:
3.
Press Return to create the LTSS key file.
WEP displays this message:
Enter the path of the key path:
4.
Enter
<n>:
where n is the letter assigned to a drive with the removable media that you are
using to store the key files.
WEP then disp lays this message:
To initialize the seed for the cryptographic random number
generator, please now enter a series of characters which you
would consider to be 'random.' As you enter them, dots '.' will
be displayed to indicate progress. If your string is not
'random' enough, questions '?' will be displayed. In that case,
modify the pattern you are entering. When enough data is input,
you will be prompted to stop (near 3 lines of input)...
3-4
5.
Type a series of random characters.
The screen displays a dot for each 5 keystrokes that WEP accepts.
... .... .... .... ....
.
.... .... .... .... ....
.... .... .... ..
If your keystrokes are not random enough, the screen displays ???
After you enter a sufficient number of random keystrokes, WEP displays a
completion message, and returns you to the prompt.
All done, thank you!
6.
Enter the
wfkseed
command again to generate the NPK key file.
WEP asks
Do you wish to create the LTSS or NPK Key File? [LTSS]:
7.
8.
npk,
Type
and press Return
Repeat Steps 3 and 4 above to generate the NPK key file.
.
117386-B Rev 00
Page 35

Creating Seeds on a UNIX Platform
To create a seed on a UNIX platform:
1.
Set the environmen t variable for the path to the key files.
2.
If you want to set a length other than the default value (128 bits) for the
LTSSs, change the value before you generate the seeds.
Enabling Encryption
3.
Enter the WEP
wfkseed
command.
Each of these steps is detailed in the following sections.
Setting a Path to the Key Files
You must set an environment variable to establish a location for the key files.
Note:
Store the fil es containi ng NPKs and LTSSs on remov able medi a, such as
floppy disks, and store that media in a safe place.
1.
Insert your choice of removable media in an available drive attached to
the UNIX workstation.
2.
At the C shell prompt, enter:
setenv WF_KEY_FILE_PATH
<n>
where n is a removable disk that you are using to store the key files.
Changing the Length of the LTSS Key Generator
You can set the l ength of the RNGs for the LTSSs to a value other than the def au lt
of 128 bits.
117386-B Rev 00
At the C shell prompt, enter:
setenv WF_LTSS_KEY_GEN_LEN
<number of bits, from 128 to 248>
3-5
Page 36

Configuring Data Encryption Se rvices
Running the WEP
The
wfkseed
command creates the seed that enables you to generate random
wfkseed
Command
numbers. You run this command twice to create seeds, once for the NPK key file
and once for the LTSS key file.
To create the LTSS seed:
1.
At the C shell prompt, enter:
wfkseed
WEP asks:
Do you wish to create the LTSS or NPK Key File? [LTSS]:
2.
Press Return to create the LTSS key file.
WEP displays this message:
To initialize the seed for the cryptographic random number
generator, please now enter a series of characters which you
would consider to be 'random.' As you enter them, dots '.' will
be displayed to indicate progress. If your string is not
'random' enough, questions '?' will be displayed. In that case,
modify the pattern you are entering. When enough data is input,
you will be prompted to stop (near 3 lines of input)...
3.
Type a series of random characters.
3-6
The screen displays a dot for each 5 keystrokes that WEP accepts.
... .... .... .... ....
.
.... .... .... .... ....
.... .... .... ..
If your keystrokes are not random enough, the screen displays ???
After you enter a sufficient number of random keystrokes, WEP displays a
completion message, and returns you to the prompt.
All done, thank you!
4.
Enter the
wfkseed
command again to generate the NPK key file.
WEP asks
Do you wish to create the LTSS or NPK Key File? [LTSS]:
5.
Type npk
6.
Repeat Step 3 to generate the NPK key file.
and press Return
.
117386-B Rev 00
Page 37

Creating Seeds on the Router
Enabling Encryption
Using the Technician Interface, you create one seed for the NPK using the
command. To store the seed in nonvolatile memory, execute the
command. If you do not e x ecute both of these commands, the e ncrypt ion so ftw are
will not run.
Creating NPKs and LTSSs
After you generate the NPK and LTSS seeds, you open Site Manager on your
router’s management console and use the WEP Key Manager tool to generate
NPKs and LTSSs. You enter an NPK on each router , an d in the Site Manager NPK
parameter. You enter the LTSSs in the MIBs of each router on a link.
Creating NPKs
To generate an NPK:
1.
Start Site Manager.
Note that you open Site M anager after you set the path to the key files.
2.
Select Tools > WEP Key Manager > NPK Manager.
3.
In the NPK name box, type a name for the NPK.
kset npk
kseed
117386-B Rev 00
Specify a name that identifies this router, perhaps by location, for example,
Boston.
4.
Click on Generate.
5.
Click on Add.
The NPK name and value appear in the NPK list box.
6.
Repeat Steps 3, 4, and 5 to generate as many NPKs as you need.
7.
After you finish, click on OK.
Site Manager sa ves the NPKs on the removable media you selected when you
set the key file path.
3-7
Page 38

Configuring Data Encryption Se rvices
The file name that stores NPKs on both PC and UNIX platforms is wep_npk.dat
Caution:
invalid.
Creating LTSSs
To generate an LTSS:
1.
2.
3.
4.
5.
6.
Do not attempt to edit this file. If you do, the NPKs may become
Start Site Manager.
Note that you open Site M anager after you have set the path to the key files.
Select Tools > WEP Key Manager > LTSS Manager.
In the LTSS name box, type a name for the LTSS.
Remember that the routers on both ends of a link share the LTSS. Choose a
name that identifies the link, perhaps by locations, for example,
Boston_Sacramento.
Click on Generate.
Click on Add.
The LTSS name and value appear in the LTSS list box.
Repeat Steps 3, 4, and 5 to generate as many LTSSs as you need.
3-8
7.
After you finish, click on OK.
Site Manager sa ves the LTSSs on the r emov abl e media you s elected wh en you
set the key file path.
The file name that stores LTSSs on a PC or UNIX platform is wep_ltss.dat.
Caution:
Do not attempt to edit this file. If you do, the LTSS may become
invalid.
117386-B Rev 00
Page 39

Entering an NPK on a Rou ter
The router stores its NPK in nonvolatile memory. To enter the NPK, you work in
the secure shell of the router. Follow these instructions to copy the NPK to the
router from the file you created using the Site Manager WEP tool. You enter an
NPK on each secure router.
Note:
These instructions assume that you have connected a PC or UNIX
computer directly to the console port of the router. For instructions on
connecting a comput er t o the router c onsole port, refer to the inst allat ion guide
that came with your router.
To enter an NPK on a router:
1.
At the Technician Interface, enter:
ksession
You enter the secure shell, which prompts you for the password.
2.
Enter the password.
Enabling Encryption
117386-B Rev 00
If you have not yet created a password, enter:
kpassword
<password>
If you have already created a password, enter:
<password>
Your password should be at least 10 to 12 characters long. It should not be
anything obvious. Change it often u sing the
kpassword
command.
The prompt changes to SSHELL>, indicating that you are in the secure shell.
3.
To view NPKs, display the
wep_npk_file
, created by the
wfkseed
command.
On a PC, use an editor such as EDIT or Notepad.
On a Unix platform, use an editor such as vi or em acs in read-only mode. For
example:
vi -R a:/wep_npk_file
4.
Using a text editor, copy the NPK for this router.
3-9
Page 40

Configuring Data Encryption Se rvices
5.
At the SSHELL prompt, enter the
and paste in the NPK.
kset npk 0x
You must enter the NPK v al ue in he xa decimal f orm, and you must in clude the
0x notation.
6.
Save the configuration file.
7.
Exit the secure shell by entering:
kexit
You return to the regular prompt.
Changing NPKs
To maintain security, you should change NPKs on a router periodic al ly. For many
applications, a period of three to six months is appropriate.
To change an NPK, issue the
Entering an NPK on a Router” on page 3-9. The new NPK overwrites its
“
predecessor, and WEP now uses the new NPK value. Remember that you must
also enter the new NPK in the PPP or frame relay Node Protection key parameter
the next time you want to change your encryption configuration.
<NPK_value>
kset
command followed by a space,
kset NPK command as described in the section
Monitoring NPKs
If the NPK on a router does not match the NPK in the MIB, encryption does not
work. This situation occu rs most frequently when you change a CPU board on one
slot of a router, and that slot therefore lacks the current NPK.
You can view the log notes to make sure that the NPK for each slot matches the
value of the NPK in the MIB. If they do not match, you can change either the
router NPK value or the MIB NPK value by working in the secure shell of the
router.
To view the log notes, in the Technician Interface enter:
log -ffwidt -eKEYMGR
3-10
117386-B Rev 00
Page 41

Changing an NPK on a Router
To change the router NPK val ue, follow the procedure in the section, “ Ente ri ng an
NPK on a Router” on page 3-9.
Changing an NPK in the MIB
To change the NPK value in the MIB:
1.
At the Technician Interface, enter:
ksession
You enter the secure shell, which prompts you for the password.
2.
Enter the password:
The prompt changes to SSHELL.
3.
Enter:
Enabling Encryption
ktranslate
The MIB now has the same NPK as the router.
4.
Save the configuration file.
Changing LTSSs
You should change LTSSs periodically. To change LTSSs, create new ones using
the WEP Key Manager to ol as described in the section “
LTSSs” on page 3-7.
Creating TEKs
The router stores its TEK see d in non v olat ile memory. WEP uses and manages the
TEK to encrypt data. Your only task is to create a seed for the RNG that generates
TEKs.
Note:
These instructions assume that you have connected a PC or UNIX
computer directly to the console port of the router. For instructions on
connecting a comput er t o the router c onsole port, refer to the inst allat ion guide
that came with your router.
<old_NPK_value>
Creating NPKs and
117386-B Rev 00
3-11
Page 42

Configuring Data Encryption Se rvices
The kseed command creates the seed that enables WEP to generate random
numbers. To create a TEK seed, you work in the secure shell of the router.
1.
At the C shell prompt on a UNIX platform, or at the DOS prompt on a
PC, enter:
ksession
You enter the secure shell, which prompts you for the password.
2.
Enter the password:
Your password should be at least 10 to 12 characters long. It should not be
anything obvious. Change it often.
The prompt changes to SSHELL>, indicating that you are now in the secure
shell.
3.
Enter the
kseed
command and press Return.
WEP asks:
Do you wish to create the TEK Key File?
4.
Press Return to create the TEK key file.
WEP displays:
To initialize the seed for the cryptographic random number
generator, please now enter a series of characters which you
would consider to be 'random.' As you enter them, dots '.' will
be displayed to indicate progress. If your string is not
'random' enough, questions '?' will be displayed. In that case,
modify the pattern you are entering. When enough data is input,
you will be prompted to stop (near 3 lines of input)...
As you type, the screen displays a dot for each keystroke the WEP accepts:
.
... .... .... .... ....
.... .... .... .... ....
.... .... .... ..
If your keystrokes are not random enough, the screen displays ???
When you have entered a sufficient number of random keystrokes, WEP
displays a message telling you you’re done, and returns you to the prompt.
3-12
All done, thank you!
117386-B Rev 00
Page 43

5.
Exit the secure shell by entering:
kexit
You return to the regular prompt.
Starting Encryption for PPP
To configure encryption for PPP:
1.
Insert the floppy disk or other removable media that contains your NPK
and LTSS files.
Note:
Take the following precaution to make sure that your NPK and LTSS
source files are the ones you generated: When you enter values for the NPK,
the LTSS Value, and LTSS Name parameters following the directions in the
steps below, make sure that the path that appears in the top bar of the
Configuration Manager window, the WEP NPK window, and the WEP LTSS
window is the path that you set for your NPK and LTSS files.
Enabling Encryption
2.
Select the WEP protocol.
Site Manager Path
You do this System responds
1. Select a port to configure for PPP. The Add Circuit window opens.
2. Click on
3. Choose
4. Scroll down to choose
. The WAN Protocols window opens.
OK
and click on OK. The Select Protocols window opens.
PPP
WEP
. Click on
You return to the Configuration Manager.
OK.
117386-B Rev 00
3-13
Page 44

Configuring Data Encryption Se rvices
3.
Enter the NPK.
You need to do this once for each router or configuration file.
You do this System responds
Site Manager Path
1. Set the
Click on
description on page A-1.
2. Click on
Node Protection Key
or see the param eter
Help
. The PPP Interface Lists window remains
Apply
parameter.
open.
After you enter the NPK, the remaining parameters become available. If you
are editing a conf i gurati on file that you created during a pre vi ous s essio n, you
must enter exactly the same NPK that you used before.
4.
Enter the value for the LTSS Value and LTSS Name parameters.
When you enter the LTSS Value, you automatically enter the LTSS Name.
Site Manager Path
You do this System response
1. Set the
or see the parameter description on
Help
page A-3.
2. Click on
LTSS Value
Apply
parameter. Click on
. The PPP Interface Lists window remains
open.
3-14
117386-B Rev 00
Page 45

Enabling Encryption
5.
Set the Encrypt Enable parameter to Enable.
The Encrypt Enable parameter defaults to Disable. Both the Encrypt Enable
parameter for PPP and the WEP Enable parameter must be set to Enable for
WEP to functi on. (Instruction on setting the WEP Enable parameter is
provided in “
You do this System responds
Configuring WEP Parameters” on page 3-19.)
Site Manager Path
1. Select the
Click on
description on page A-2.
2. Click on
6.
Set a change time for the MEK.
Encrypt Enable
or see the param eter
Help
. The PPP Interface Lists window remains
Apply
parameter.
open.
The MEK Change parameter sets the amount of time, in minutes, between
changes in the MEK. The value for this attribute must be the same on both
sides of a link.
Site Manager Path
You do this System responds
1. Set the
or see the parameter description on
Help
page A-3
2. Click on
MEK Change
Apply
parameter. Click on
. You hav e entered a v alue y ou ente red f or
the MEK Change parameter. The PPP
Interface Lists window remains open.
117386-B Rev 00
7.
Click on Done to exit the window.
8.
Configure the WEP parameters.
For instructions, see the section “
page 3-19
.
Configuring WE P Parameters,” on
3-15
Page 46

Configuring Data Encryption Se rvices
Starting Encryption for Frame Relay
To configure encryption for frame relay:
1.
Insert the floppy disk or other removable media that contains your NPK
and LTSS files.
Note:
Take the following precaution to make sure that your NPK and LTSS
source files are the ones you generated: When you enter values for the NPK,
the LTSS Value, and the LTSS Name parameters follo wing the directions in the
steps below, make sure that the path that appears in the top bar of the
Configuration Manager window, the WEP NPK window, and the WEP LTSS
window is the path that you set for your NPK and LTSS files.
2.
Select the WEP protocol.
Site Manager Path
You do this System responds
1. Select a port to configure for Frame Relay. The Add Circuit window opens.
2. Click on
3. Select
4. Scroll down to select
. The WAN Protocols window opens.
OK
Frame Relay
and click on OK. The Select Protocols window opens.
. Click on
WEP
OK.
You return to the Configuration Manager.
3-16
117386-B Rev 00
Page 47

Enabling Encryption
3.
Enter the NPK.
You need to do this once for each router or configuration file.
Site Manager Path
You do this System responds
1. In the Configuration Manager window,
select
Protocols > Frame Relay
Services.
2. Click on
3. Click on
4. Enter a DLCI number. For instructions,
see
Configuring Frame Relay Services
(published by Bay Networks). Click on OK.
5. Set the
Click on
description on page A-1.
6. Click on
. The FR PVC List window opens.
PVCs
. The FR PVC Add window opens.
Add
Node Protection Key
or see the param eter
Help
. The Frame Relay PVC List window
Apply
>
parameter.
The Frame Relay Servic e List window
opens.
You return to the FR PVC List window.
The NPK Values that you generated
previously appear in the WEP NPK
window.
remains open.
After you enter the NPK, the remaining parameters become available. If you
are editing a conf i gurati on file that you created during a pre vi ous s essio n, you
must enter exactly the same NPK that you used before.
4.
Enter the values for the LTSS Value and LTSS Name parameters.
When you enter the LTSS Value, you automatically enter the LTSS Name.
Site Manager Path
117386-B Rev 00
You do this System response
1. Set the
or see the parameter description on
Help
page A-3.
2. Click on
LTSS Value
Apply
parameter. Click on
. The Frame Relay PVC List window
remains open.
3-17
Page 48

Configuring Data Encryption Se rvices
5.
Set the Enable Encryption parameter to Enable.
The Encrypt Enable parameter defaults to Disable. You must set both the
frame relay E ncrypt Enable parameter and the WEP Enable parameter to
Enable for WEP to function. (Instruction on setting the WEP Enable
parameter is provided in “
You do this System responds
Configuring WEP Parameters” on page 3-19.)
Site Manager Path
1. Set the
on
on page A-2.
2. Click on
6.
Set a change time for the MEK.
Encrypt Enable
or see the parameter description
Help
. The Frame Relay PVC List window
Apply
parameter. Click
remains open.
The MEK Change parameter sets the amount of time, in minutes, between
changes in the MEK. The value for this attribute must be the same on both
sides of a link.
Site Manager Path
You do this System responds
1. Set the
Help
page A-3.
2. Click on
7.
Click on Done to exit the window.
MEK Change
or see the parameter description on
Apply
parameter. Click on
. The Frame Relay PVC List window
remains open.
3-18
8.
Configure the WEP parameters.
For instructions, see the section “
page 3-19
.
Configuring WE P Parameters” on
117386-B Rev 00
Page 49

Configuring WEP Parameters
WEP has both line and circuit inte rf ace para meters . WEP parameter s ha v e def ault
values. To customize WEP for your network, you can edit those values.
Configuring WEP Line Parameters
1.
Enable encryption on this line:
The WEP Enable parameter defaul ts to Enable when you select WEP from the
Protocols menu. Both the WEP Enable parameter and the PPP or frame relay
Enable paramete r mus t be set t o Enabl e f or WEP to fu nct ion. ( Instr uctio ns for
setting the Enable parameter for PPP can be found in the section “
Encryption for PPP” on 3-13. Inst ructions for setting this parameter for frame
relay can be found in the section “
page 3-16
You do this System responds
.)
Enabling Encryption
Starting
Starting E ncryption fo r Frame Rel ay” on
Site Manager Path
117386-B Rev 00
1. In the Configuration Manager window,
choose
2. Choose
3. Choose
4. Set the
or see the parameter description on
page A-4.
5. Click on
2.
Select the encryption str engt h for this line.
Protocols
WEP
Lines
Enable
Apply
.
. The WEP menu opens.
. The WEP Line Parameters window
parameter. Click on
. The WEP Line Parameters window
Help
The Protocols menu opens.
opens.
remains open
Encryption is available in two versions, regular and strong. The standard
router softw are inc ludes en crypti on that uses r e gular en cryption , that is, 40 -bit
keys. Bay Networks also offers a strong encryption option that uses 56-bit
keys. Strong encryption is generally available only in the United States and
Canada.
3-19
Page 50

Configuring Data Encryption Se rvices
Select the encryption strength that is appropriate for your network. Note that
you can select both encryption strengths. This option enables a system that
has 56-bit encryption strength to support secure links with either 40-bit and
56-bit strength encryption sites. If you select both, WEP uses 56-bit
encryption if both sides of the link can support it.
You do this System responds
Site Manager Path
1. Set the
Click on
description on page A-4.
2. Click on
3.
Set the change rates for the TEK.
Cipher Mode Mask
or see the param eter
Help
. The WEP Line Parameters window
Apply
parameter.
remains open.
The TEK changes depending on the values of the TEK Change Seconds
parameter and TEK Change (Bytes) parameter.
The TEK Change Bytes parameter sets the number of bytes between changes
in the value of th e TEK.
To set the TEK Change Bytes parameter for a line:
Site Manager Path
You do this System responds
1. Set the
Click on
description on page A-5.
2. Click on
TEK Change (Bytes)
or see the param eter
Help
. The WEP Line Parameters window
Apply
parameter.
remains open.
3-20
The TEK Change Seconds parameter sets the number of seconds between
changes in the value of the TEK.
117386-B Rev 00
Page 51

Enabling Encryption
To set the TEK Change Seconds parameter for a line:
Site Manager Path
You do this System responds
1. Set the
parameter. Click on
parameter description on page A-5.
2. Click on
4.
Click on Done to exit the window.
TEK Change (Seconds)
or see the
Help
. The WEP Line Parameters window
Apply
Configuring WEP Interface Parameters
1.
Enable encryption on this interface:
The WEP Enable parameter defaul ts to Enable when you select WEP from the
Protocols menu. Both the WEP Enable parameter and the PPP or frame relay
Enable paramete r mus t be set t o Enabl e f or WEP to fu nct ion. ( Instr uctio ns for
setting the Enable parameter for PPP can be found in the section “
Encryption for PPP” on 3-13. Inst ructions for setting this parameter for frame
relay can be found in the section “
page 3-16
You do this System responds
).
Site Manager Path
remains open.
Starting
Starting E ncryption fo r Frame Rel ay” on
117386-B Rev 00
1. In the Configuration Manager window,
choose
2. Choose
3. Choose
4. Set the
or see the parameter description on
page A-4.
5. Click on
Protocols
WEP
Lines
Enable
Apply
.
. The WEP menu opens.
. The WEP Line Parameters window
parameter. Click on
. The WEP Line Parameters window
Help
The Protocols menu opens
opens.
The options available for the Enable
parameter appear.
remains open.
3-21
Page 52

Configuring Data Encryption Se rvices
2.
Select the encryption str engt h for this interface.
Encryption is available in two versions, regular and strong. The standard
router softw are inc ludes en crypti on that uses r e gular en cryption , that is, 40 -bit
keys. Bay Networks also offers a strong encryption option that uses 56-bit
keys. Strong encryption is generally available only in the United States and
Canada.
Select the encryption strength that is appropriate for your network. Note that
you can select both encryption strengths. This option enables a system that
has 56-bit encryption strength to support secure links with either 40-bit and
56-bit strength encryption sites. If you select both, WEP uses 56-bit
encryption if both sides of the link can support it.
You do this System responds
Site Manager Path
1. Set the
Click on
description on page A-6.
2. Click on
3.
Set the change rates for the TEK.
Cipher Mode Mask
or see the param eter
Help
. The WEP Line Parameters window
Apply
parameter.
remains open.
The TEK changes depending on the values of the TEK Change Seconds and
TEK Change Bytes parameters.
The TEK Change Bytes parameter sets the number of bytes between changes
in the value of th e TEK.
To set the TEK Change Bytes parameter for an interface:
Site Manager Path
You do this System responds
1. Select the
parameter. Click on
parameter description on page A-6.
2. Click on
TEK Change (Bytes)
or see the
Help
. The WEP Line Parameters window
Apply
remains open.
3-22
117386-B Rev 00
Page 53

Enabling Encryption
The TEK Change Seconds parameter sets the number of seco nds betwee n changes
in the value of th e TEK.
To set the TEK Change Seconds parameter for an interface:
Site Manager Path
You do this System responds
1. Set the
parameter. Click on
parameter description on page A-7.
2. Click on
4.
Click on Done to exit the window.
TEK Change (Seconds)
Apply
Disabling Encryption
To disable data encryption on a PPP circuit, follow these instructions:
You do this System responds
1. In the Configuration Manager window,
choose
2. Choose
3. Choose
4. Click on
5. Set the
Disable
parameter description on page A-2.
6. Click on
7. Click on
Protocols
. The PPP menu opens
PPP
Interfaces
Lines
Encrypt Enable
. For help, click on
Apply
Done.
or see the
Help
. The WEP Line Parameters window
remains open.
Site Manager Path
The Protocols window opens.
.
. The PPP Interfaces window opens.
. The PPP Line Lists window opens.
parameter to
or see the
Help
. The PPP Interface Lists window remains
open.
117386-B Rev 00
3-23
Page 54

Configuring Data Encryption Se rvices
To disable data encryption on a frame relay circuit, follow these instructions:
You do this System responds
Site Manager Path
1. In the Configuration Manager window,
select
Protocols > Frame Relay
Services.
2. Click on
3. Click on
4. Set the
Disable. For help, click on
parameter description on page A-2.
5. Click on
6. Click on
. The FR PVC List window opens.
PVCs
. The FR PVC Add window opens.
Add
Encrypt Enable
. The Frame Relay PVC List window
Apply
Done.
parameter to
Help
>
or see the
Deleting Encryption from an Interface
To de lete encryption from an interface on which it is currently configured:
1.
In the Configuration Manager window, select Circuits > Edit Circuits.
The Circuit List window opens.
2.
Click on Edit.
The Circuit Definition window opens.
The Frame Relay Servic e List window
opens.
remains open.
3-24
3.
Select Protocols > Add | Delete.
The Select Protocols window opens.
4.
Deselect WEP and click on OK.
Encryption is no longer operating on the interface.
117386-B Rev 00
Page 55

Deleting Encryption from a Router
To delete encryption from all circuits on which it is currently configured:
1.
In the Configuration Manager window, select Protocols > WEP > Delete
WEP.
A window opens and prompts:
Do you REALLY want to delete WEP?
2.
Click on OK.
You return to the Configuration Manager. Encryption is no longer operating
on the router.
Enabling Encryption
117386-B Rev 00
3-25
Page 56

Page 57

Encryption Parameter s
This appendix contains parameter descr iptions for PPP an d frame relay encryption
parameters, and for WEP lin e and circuit i nterface parameters.
PPP and Frame Relay Encrypt ion Parameters
Encryption parameters for PPP and frame relay are the same, but Site Manager
paths and MIB object IDs differ.
Appendix A
Parameter: Node Protection Key
Path: PPP: Configuration Manager > Protocols > PPP > PPP Interface Lists window
Frame Relay: Configuration Manager > Protocols > Frame Relay > Services >
Frame Relay Service List window > PVCs > Add
Default: None
Options: 16 hexadecimal digits
Function: 1) Protects LTSSs on Site Manager.
2) Encrypts and decrypts long-ter m shared sec rets (LTSSs) stored in the router’ s
management information base (MIB).
3) Works as a password. The router compares the Node Protection Key (NPK)
from RAM to the NPK entered in Site Manager; this ensures that the MIB
values are encrypted under the same NPK.
Each router or configuration file requires an NPK.
Instructions: Select the NPK from the list in the Site Manager WEP NPK window. Refer to
instructions in Chapter 3.
117386-B Rev 00
A-1
Page 58

Configuring Data Encryption Se rvices
Parameter: Encrypt Enable
Path: PPP: Configuration Manager > Protocols > PPP > PPP Interface Lists window
Frame Relay: Configuration Manager > Protocols > Frame Relay > Services >
Frame Relay Service List window > PVCs > Add
Default: Disable
Options: Enable
Disable
|
Function: Enables or disables encryption services on this port.
Instructions: Set to Enable if you w ant to u se encryp tion on t his int erface. E ncrypt ion will not
work unless bo th this parameter and the WEP Enable parame ter are set to
Enable.
If you select WEP in the Protocols menu, but set this parameter t o Disable, data
does not travel over this circuit.
MIB Object ID: PPP: 1.3.6.1.4.1.18.3.4.28.5.1.2
Frame Relay: 1.3.6.1.4.1.18.3.4.28.4.1.2
Parameter: LTSS Name
Path: PPP: Configuration Manager > Protocols > PPP > PPP Interface Lists window
Frame Relay: Configuration Manager > Protocols > Frame Relay > Services >
Frame Relay Service List window > PVCs > Add
Default: None
Options: A string of up to 29 characters
Function: Distinguishes this long-term shared secret (LTSS) from others.
Instructions: Select the LTSS from the list in the Site Manager WEP LTSS window. Refer to
instructions in Chapter 3. When you enter the LTSS Value, you automatically
enter the LTSS Name it represents.
A-2
117386-B Rev 00
Page 59

Encryption Parameters
Parameter: LTSS Value
Path : PPP: Configuration Manager > Protocols > PPP > PPP Interface Lists window
Frame Relay: Configuration Manager > Protocols > Frame Relay > Services >
Frame Relay Service List window > PVCs > Add
Default: None
Options: 32 through 62 hexadecimal characters
Function: Creates the Master Encryption Key (MEK).
Instructions: Select the LTSS from the list in the Site Manager WEP LTSS window. Refer to
instructions in Ch apt er 3. The long-term shared secret (LTSS) must be the same
on both sides of the link. When you enter the LTSS Value, you automatically
enter the LTSS Name.
MIB Object ID: PPP: 1.3.6.1.4.1.18.3.4.28.5.1.5
Frame Relay: 1.3.6.1.4.1.18.3.4.28.4.1.8
Parameter: MEK Change
Path: PPP: Configuration Manager > Protocols > PPP > PPP Interface Lists window
Frame Relay: Configuration Manager > Protocols > Frame Relay > Services >
Frame Relay Service List window > PVCs > Add
Default: 60 minutes
Options: 1 through 65,535 minutes
Function: Sets the amount of time, in minut es, betwe en change s in the value of the Master
Encryption Key (MEK).
Instructions: Accept the default, or select another value within the specif ied range. The value
for this parameter must be the same on both sides of a link.
If the router cl ocks are not synch ronized a nd you w ant to us e encrypt ion, set this
parameter to a value large enough to compensate for the time difference
between the routers . This ensure s that t he MEKs ar e th e same o n both si des of a
link.
MIB Object ID: PPP: 1.3.6.1.4.1.18.3.4.28.5.1.6
Frame Relay: 1.3.6.1.4.1.18.3.4.28.4.1.9
117386-B Rev 00
A-3
Page 60

Configuring Data Encryption Se rvices
WEP Line Parameters
Parameter: Enable
Path: Configuration Manager > Protocols > WEP > Lines
Default: Enable
Options: Enable | Disable
Function: Enables or disables encr yption on this line. Def aults to Ena ble on ly if you s elect
WEP in the Protocols menu.
Instructions: Accept the default, Enable, to use encryption on this line. Remember to enable
either the PPP or frame relay Encrypt Enable parameter also.
MIB Object ID: 1.3.6.1.4.1.18.3.4.28.1.1.2
Parameter: Cipher Mode Mask
Path: Configuration Manager > Protocols > WEP > Lines
Default: DES (40 bit keys)
Options: DES (40 bit keys) | DES (56 bit keys) | Both
Function: Determines whether this line uses 40-bit or 56-bit encryption.
Instructions: Accept the default DES, at 40 bit keys, unless you have the strong encryption
option (SEO) that e nables you to use 56-bit e ncryption . Selec t the Both option if
you have 56-bit encryption and don’t know the value on the other side of the
link. If you select Bot h, the link u ses 56-bit encryption i f both sid es support it; if
not, it uses 40-bit encryption.
The Site Manager screen displays the value of this parameter in hexadecimal
notation:
0x 10000000 = 56-bit encryption
0x 20000000 = 40-bit encryption
0x 30000000 = Both
MIB Object ID: 1.3.6.1.4.1.18.3.4.28.1.1.5
A-4
117386-B Rev 00
Page 61

Encryption Parameters
Parameter: TEK Change (Bytes)
Path: Configuration Manager > Protocols > WEP > Lines
Default: 65,535 bytes
Options: 256 through 2,147,483,647 bytes
Function: Sets the number of data bytes between changes in the value of the TEK.
Instructions: Accept the default or select another value wit hin the specified range.
MIB Object ID: 1.3.6.1.4.1.18.3.4.28.1.1.6
Parameter: TEK Change (Seconds)
Path: Configuration Manager > Protocols > WEP > Lines
Default: 10 seconds
Options: 1 through 65,535 seconds
Function: Sets the number of se conds betw een changes i n the value of the Traffic
Encryption Key (TEK).
Instructions: Accept the default or select another value wit hin the specified range.
MIB Object ID: 1.3.6.1.4.1.18.3.4.28.1.1.7
WEP Circuit Interface Parameters
Parameter: Enable
Path: Configuration Manager > Protocols > WEP > Circuit Interface
Default: Enable
Options: Enable | Disable
Function: Enables or disables encryption on this interface. Defaults to Enable only if you
select WEP in the Protocols menu.
Instructions: Accept the default, Enable, to use encryption on this interface. Remember to
enable either the PPP or frame relay Encrypt Enable par ameter also.
MIB Object ID: 1.3.6.1.4.1.18.3.4.28.2.1.2
117386-B Rev 00
A-5
Page 62

Configuring Data Encryption Se rvices
Parameter: Cipher Mode Mask
Path: Configuration Manager > Protocols > WEP > Circuit Interface
Default: Inherit from Line
Options: Inherit from Line | 40 | 56 | Both
Function: Determines whether this line uses 40-bit or 56-bit encryption.
Instructions: Accept the def ault , Inher it f rom Line, o r select anothe r opti on. To select another
option, first deselect Inherit from Line, and then select either 40-bit or 56-bit
encryption or the Both oprion.
Accept the default, 40, unless you ha ve the strong encrypt ion option that ena bles
you to use 56-bit encryption. Select the Both option if you have 56-bit
encryption and don’t know the value on the other side of the link. If you select
the Both option, the link use s 56- bit encryption if both sides support it; if not, it
uses 40-bit encryption.
The Site Manager screen displays the value of this parameter in hexadecimal
notation:
0x 10000000 = 56-bit encryption
0x 20000000 = 40-bit encryption
0x 30000000 = Both
0x 40000000 = Inherit from Line
MIB Object ID: 1.3.6.1.4.1.18.3.4.28.2.1.4
Parameter: TEK Change (Bytes)
Path: Configuration Manager > Protocols > WEP > Lines
Default: 65,535 bytes
Options: 256 through 2,147,483,647 bytes
Function: Sets the number of data bytes between changes in the value of the Traffic
Encryption Key (TEK).
Instructions: Accept the default, or select another value within the specified range.
MIB Object ID: 1.3.6.1.4.1.18.3.4.28.1.1.6
A-6
117386-B Rev 00
Page 63

Encryption Parameters
Parameter: TEK Change (Seconds)
Path: Configuration Manager > Protocols > WEP > Lines
Default: 10 seconds
Options: 1 through 65,535 seconds
Function: Sets the number of se conds betw een changes i n the value of the Traffic
Encryption Key (TEK).
Instructions: Accept the default, or select another value within the specified range.
MIB Object ID: 1.3.6.1.4.1.18.3.4.28.1.1.7
117386-B Rev 00
A-7
Page 64

Page 65

Appendix B
Definitions of k Commands
This appendix contains definitions of the “k” commands that you use to work in
the secure shell of the router. Use these commands at the Technicain Interface.
Command System Response
kexit
kget
<subcommand>
kpassword
kseed
ksession
kset
<subcommand>
[
<flags>
]
ktranslate
<old_NPK>
Exits the secure shell.
Obtains a parameter in the secure shell.
Example:
PPP circuit 21.
Example: kget fr
frame relay circuit
Changes the pass word of the secure shell.
Initializes the cryptographic random number generator
while in the secure shell.
Initiates a secure shell session.
Sets parameter values in the secure shell.
Example: kset npk
Protection Key.
Translates a configuration from an old Node Protection
Key (NPK) value to the current NPK value.
Example: ktranslate
kget ppp s21 obtains parameter values for
<arguments>
<arguments>.
<value>
<old_npk> <ne w _np k>
obtains parameters for
sets the router Node
117386-B Rev 00
B-1
Page 66

Page 67

Numbers
40-bit and 56-bit encryption, 1-2, 2-1
A
AN routers, using encryption, 2-2
authentication, 1-3
C
changing
an LTSS, 3-11
an NPK, 3-10
the length of the RNGs for LTSSs
on a PC, 3-3
on a UNIX platform, 3-5
the path to the key files on a PC, 3-3
Cipher Mode Mask
WEP circuit interface, A-6
Cipher Mode Mask parameter
WEP line, A-4
configuring
frame relay encryption, 3-16
PPP encryption, 3-13, 3-16
WEP, 3-1 9
creating seeds, 3-2 to 3-6
customer support
programs, xiv
Technical Solutions Centers, xiv
D
data, 1-1
data compression, 2-2
data encryption
40- and 56-bit , 1-2
Index
architecture, 1-1
keys, 1-2
starting, 3-2
Data Encryption Standard (DES), 1-1
deleting encr yption, 3-24
disks, floppy, for storing key files, 1-8, 2-3
dropping traffic, 2-1
E
EDIT, using to enter an NPK, 1-7
editing encryption, 2-3
editors, using to enter an NPK on a ro uter, 1-7
emacs, using to enter an NPK, 1-7
Enable parameter
WEP circuit interface, A-5
WEP line, A-4
enabling encryption
frame relay, 3-18
PPP, 3-15
requirements, 2-1
WEP, 3-19, 3-21
Encrypt Enable parameter, 3-15, 3-18, A-2
encryption
40- and 56-bit, 1-2
architecture, 1-1
disabling telnet access when using, 2-2
keys, 1-2
starting, 3-2
using with AN routers, 2-2
encryption strength, selecting 40-bit or 56-bit, 2-1,
3-19, 3-22
entering an NPK on a router, 3-9
117386-B Rev 00
Index-1
Page 68

F
N
floppy disks, for storing key files, 1-8, 2-3
G
generating
a TEK, 3-11
an LTSS, 3-8
an NPK, 3-7
K
k commands, B-1
key file s
security, 1-8
setting a path to (UNIX), 3-5
keys, 1-2
integrity of, 1-3
LTSS, 1-7
MEK, 1-8
NPK, 1-6
summary, 1-4
TEK, 1-8
L
LTSS
changing, 3-11
creating a seed for
on a PC, 3-3
on a UNIX platform, 3-5
defined, 1-7
function, A-3
generating, 3-8
storing on removable media, 3-3
LTSS Name parameter, 1-8, 3-17, A-2
LTSS Value parameter, 3-17, A-3
M
Management Encryption Key (MEK), 1-8
MEK Change parameter, 3-15, 3-18, A-3
Message Digest 5 (MD5), 1-3
Node Protection Key (NPK), defined, 1-6
Node Protection Key parameter, A-1
NPK
changing, 3-10
creating a seed for
on a PC, 3-3
on a UNIX platform, 3-5
entering in MIB, 1-7
entering on rout er, 1-6, 3-9
function, A-1
generating, 3-7
in nonvolatile RAM, 3-9
overwriting, 3-10
selecting, 2-3
storing on removable media, 3-3
O
opening Site Manager, 3-7, 3-8
overwriting an NPK, 3-10
P
password, sec u r e sh e ll, 1- 7
pcfs utility, 2-3
performance, effect of encryption on, 2-2
R
Random Number Generator (RNG), 1-5
removable media, for storing key files, 1-8, 3-3
routers, synchronizing dates and times, 2-2
S
secure shell, 3-9
secure shell password, 1-7, 3-12
security, 1-2, 1-3, 1-8
seeds
creating, 3-2 to 3-6
seeds, defined, 1-5
SEO software license agreement, 1-2
Index-2
117386-B Rev 00
Page 69

setting a path to the key files (UNIX platform), 3-5
setting change rates
MEK, 3-15, 3-18
TEK, 3-20, 3-22
starting encryption
frame relay, 3-16
PPP, 3-13, 3-16
summary of requirements, 3-2
storing NPKs and LTSSs, 3-3
strong encryption option (SEO), 1-2
synchronizing routers, 2-2
T
Technical Solutions Centers, xiv
T echnician Interface, 3-1
TEK
function, 1-8
generating, 3-11
TEK Change Bytes para meter, 1-8, 3-20, 3-22
WEP circuit interface, A-6
WEP line, A-5
TEK Change Seconds parameter
WEP circuit interface, A-7
WEP line, A-5
TEK Change Time parameter, 1-8, 3-20, 3-23
TELNET access, disabling when using encryption, 2-2
throughput, effect of encryption on, 2-2
Traffic Encryption Ke y (TEK ), de fined, 1-8
overview, 1-3
parameters, 3-19
security of the link, 1-3
WEP Enable parameter, 3-19, 3-21
wep_ltss.dat, 3-8
WF_KEY_FILE_PATH environment variable, 3-3, 3-5
WF_LTSS_KEY_GEN_LEN environment variable,
3-3, 3-5
wfkseed command, 3-3, 3-6
U
United States law and encryption, 1-2
V
vi editor, using to enter an NPK, 1-7
W
WAN Encryption Proto col ( WEP), defined, 1-3
WEP
configuring, 3-19
117386-B Rev 00
Index-3
Page 70

 Loading...