


User Manual
Customer Interaction Express 1.0
WebClient
Edition: 1.1
02/21/2007
COMPAS ID: 116797

© Copyright Comergo GmbH
All rights reserved
User Manual
Customer Interaction Express 1.0 WebClient
Edition: 02/21/2007
Reproduction and disclosure of information contained in this copyright-protected document, in any form or by any
means, graphical, electronic or mechanical by photocopying, recording on disk or tape or storage in a data retrieval
system, even in part, require the prior written consent of Comergo GmbH 2006.
All technical data, information and properties of the product described in this document have been compiled to the
best of our knowledge at the time of going to print.
Subject to modification and improvements to the product in the course of technical developments.

Contents
About this manual 1
Questions about this manual......................................................................................................1
Who is part of the target group?..................................................................................1
What information is provided here?............................................................................1
What kind of information is not provided?..................................................................1
How is this manual organized?..................................................................................................2
Which edition of the manual are you reading?............................................................2
Changes since the last edition?....................................................................................2
Where can you find additional information?...............................................................3
Where can you get additional help? ............................................................................3
Meet the WebClient module 4
What is WebClient? ...................................................................................................................4
UMR WebClient: Properties .......................................................................................4
Prerequisite..................................................................................................................5
Limitation....................................................................................................................5
Logging in..................................................................................................................................6
What do you need to know in order to log in? ............................................................6
Prerequisites ................................................................................................................6
Opening in the user interface.......................................................................................6
Opening in Internet Explorer.......................................................................................7
Structure of the module .............................................................................................................8
Illustration and explanation of areas on UMR WebClient screen ...............................8
Menus and commands.................................................................................................9
Tool bar.....................................................................................................................10
Status bar...................................................................................................................11
Icons: Document status..............................................................................................12
Transmission job status (Outbox folder only)...........................................................13
Icons:.........................................................................................................................13
Format, Font, Font size..............................................................................................14
Mailbox folders .........................................................................................................14
Processing status display...........................................................................................16
Action bar..................................................................................................................17
Agent status indicator................................................................................................19
Email display area and processing area.....................................................................19
Operation 20
Logging in, taking a break, and logging out............................................................................20
Signing on .................................................................................................................20
Starting a break..........................................................................................................20
Ending a break...........................................................................................................20
Log out ......................................................................................................................21
Getting help and displaying information .................................................................................22
Opening the Help function........................................................................................22
Displaying information..............................................................................................22
Configuring mailbox folders....................................................................................................23
Available mailbox folders......................................................................................... 23
Setting visible folders................................................................................................24
User Manual CIE 1.0 WebClient Contents • iii

Displayed columns configuration..............................................................................24
Sorting columns.........................................................................................................26
Changing the column width.......................................................................................26
Adapting the work area .............................................................................................26
Logging into or out of an agent group.....................................................................................27
Logging in and out: option 1.....................................................................................27
Logging in and out: option 2.....................................................................................27
Processing documents (mailbox folders).................................................................................28
Mailbox folders: Inbox..............................................................................................28
Special features of documents...................................................................................29
Special features of documents assigned in the CIE system.......................................31
Special features of directly addressed incoming documents .....................................33
Special features of new outgoing documents............................................................33
Mailbox folders: Deferred.........................................................................................33
Mailbox folders: Drafts............................................................................................. 33
Mailbox folders: Sent................................................................................................35
Mailbox folders: Deleted...........................................................................................35
Mailbox folders: Overview........................................................................................35
Mailbox folders: Completed......................................................................................37
Mailbox folder: Archive............................................................................................38
All mailbox folders: Search function.........................................................................39
Scrolling in folders....................................................................................................40
Processing documents (mail header) .......................................................................................41
Sender addresses........................................................................................................41
Using addressing options...........................................................................................42
Using the address books ..........................................................................................................45
Types of address books .............................................................................................45
Search fields in the address books .............................................................................46
Search........................................................................................................................47
Displaying and changing transmission settings.........................................................47
Displaying and changing a distribution list...............................................................48
Configuring options.................................................................................................................49
Configuring updates ..................................................................................................49
Available options.......................................................................................................49
Setting the options.....................................................................................................51
Importing personal address books ..........................................................................................52
Limitations.................................................................................................................52
Error handling............................................................................................................52
Import files................................................................................................................52
Creating templates for CSV files...............................................................................54
Importable columns ...................................................................................................55
Importing...................................................................................................................56
Processing documents..............................................................................................................57
Creating a new document..........................................................................................57
Sending a document ..................................................................................................57
Replying to the sender of a document.......................................................................58
Replying with or without the original text.................................................................58
Forwarding a document.............................................................................................59
Picking up a document ..............................................................................................59
Delegating a document..............................................................................................60
Completing the processing of a transaction...............................................................60
Creating a signature...................................................................................................60
Allocating a job code.................................................................................................61
Adding an attachment................................................................................................61
Configuring transmission options..............................................................................62
Holding and resubmitting a document.......................................................................63
Saving a document temporarily.................................................................................64
Repeating a failed transmission.................................................................................64
Resending a document...............................................................................................65
Printing a document...................................................................................................65
iv • Contents User Manual CIE 1.0 WebClient

Editing attachments...................................................................................................66
Viewing processes and transmission status .............................................................................67
Displaying the processes ...........................................................................................67
Displaying a transmission status................................................................................67
Using the spell checker............................................................................................................68
How is an entry identified if it is not in the dictionary?............................................68
Supported languages for the spell check................................................................... 68
Performing a spell check...........................................................................................69
Functions and settings for the spell check.................................................................69
Working with text blocks.........................................................................................................71
Prerequisite................................................................................................................71
Structure of the text block view.................................................................................71
Inserting a text block.................................................................................................72
Editing a dictionary..................................................................................................................73
Prerequisite................................................................................................................73
Administrating a dictionary.......................................................................................73
Importing a dictionary...............................................................................................75
Tips and tricks .........................................................................................................................77
Sound (clicks)............................................................................................................77
Right mouse button (pop-up menu)...........................................................................77
What are privileges?..................................................................................................78
Tracking messages....................................................................................................79
Viewing the properties of a message.........................................................................80
Glossary 81
Index 85
User Manual CIE 1.0 WebClient Contents • v


About this manual
Questions about this manual
Before you start reading you might have questions regarding this document. We
will answer some questions to start with.
CIE stands for Customer Interaction Express.
Who is part of the target group?
This manual is aimed at anyone who would like to work with the UMR
WebClient. It makes no difference whether you are using this document in
printed or online form.
What information is provided here?
This document contains information on how to operate the WebClient module.
What kind of information is not provided?
This document does not provide information on the installation, configuration
and administration of the CIE system.
User Manual CIE 1.0 WebClient About this manual • 1

How is this manual organized?
This document provides a systematic introduction to the use of the UMR
WebClient. Once you have read a few pages you will notice that the chapters are
structured similarly. Usually, an introduction to the topic is provided first.
Prerequisites or necessary skills are often described next, followed by
instructions. Illustrations or examples further clarify the topic.
Which edition of the manual are you reading?
The following table lists information about this edition:
Information Explanation
Compiled on February 21, 2007
Based on: UMR WebClient
CIE 1.0
Editors Andreas Marquardt
Available as: Acrobat Reader file (PDF)
HTML file
Changes since the last edition?
The following table shows the history of this document:
Version Date Change
1.0
10/26/2006 Final version
1.0
01/08/2007 Orthography
2 • About this manual User Manual CIE 1.0 WebClient

Where can you find additional information?
This document describes the necessary knowledge and prerequisites, and
provides the instructions you need in order to operate the WebClient module.
For additional information on the CIE system please refer to:
• Customer Interaction Express 1.0 System Administration manual
• Customer Interaction Express 1.0 Arc hiving manual
• Customer Interaction Express 1.0 Task Flow Editor manual
• Customer Interaction Express 1.0 Configuration manual
Where can you get additional help?
You can get additional support on the Internet.
Information on the Internet
Refer to the following Internet sites for information:
www
http://www.avaya.com
http://www.comergo.com
User Manual CIE 1.0 WebClient About this manual • 3

Meet the WebClient module
What is WebClient?
The WebClient module is a web-based graphical user interface component of
the CIE system. Using this user interface, agents at a call center can log into and
out of the CIE system, log into or out of agent groups, go into break mode and
read and process emails assigned to them.
UMR WebClient: Properties
The WebClient module has the following properties. These properties are
broken down into agent functions, supervisor functions and system functions.
Agent functions
An agent can use the following functions. To use all the functions you need the
relevant privileges.
• Log into and out of the CIE system
• Log into or out of an agent group
• Start and end a break
• Accept emails
• Process emails
• Send emails
• Forward emails
• Delegate (assign) emails
• Delete emails
• Print emails
• Check spelling
• Import a personal address book
• Use address books
• Use text blocks
4 • Meet the WebClient module User Manual CIE 1.0 WebClient

Supervisor functions
When working as a supervisor, you can use the following functions. As a
supervisor you need to have the relevant privileges.
• Display agent and topic mailboxes
• Delegate, process and delete documents in the Overview folder.
• Delegate and delete documents in the Deleted folder.
• Import and administrate dictionaries
System functions
You can use the following system functions.
• Display the status of agents
• Display server status
• Display active, interrupted, held and completed emails
• Display drafts
• Display emails in the following formats: ASCII, HTML, RTF
• Display archived emails
Prerequisite
A screen resolution of 1024x768 pixels is required for the WebClient module.
Limitation
The web-based graphical user interface does not allow you to use the Windows
drag-and drop function for files or data.
User Manual CIE 1.0 WebClient Meet the WebClient module • 5

Logging in
In order to use the WebClient module, you must first log in.
What do you need to know in order to log in?
Your system administrator will supply you with the following information to
allow you to log into the WebClient module. You can select the user interface
language.
• Your login name (e.g. John Smith)
• Your password
• Web address for logging in (only for openi ng the WebClient
module in Internet Explorer)
Prerequisites
For you to use the WebClient module, the following requirements must be met.
• You must be using Internet Explorer 6.0 or higher.
• You must turn off your pop-up blocker.
Opening in the user interface
Proceed as follows to open the module in the user interface:
1. You have opened the user interface. In the task bar, click
.
2. The WebClient module appears in the user interface.
6 • Meet the WebClient module User Manual CIE 1.0 WebClient

Opening in Internet Explorer
Your system administrator determines whether you use http or https. Please
consult your system administrator if you have questions.
security
To increase security, the module can be set up to access the Web server via https.
However, you can log in as usual and will then be forwarded automatically to the
relevant secure https connection.
Signing on
Proceed as follows to log in:
1. Enter the Web address in Internet Explorer 6.0. Example: http://<
Host Name>:8080/umrwebclient
replacing < Host Name> with the relevant host name: Ask your
system administrator.
The login window appears.
2. In the Login name field, enter the name that you received from
your system administrator (e.g. smith).
3. In the Password field, enter the password that you received from
your system administrator.
4. As an option, you can choose a language for the user interface.
5. Click Login. The WebClient module appears in Internet Explorer
6.0. You can now work with the WebClient module.
User Manual CIE 1.0 WebClient Meet the WebClient module • 7
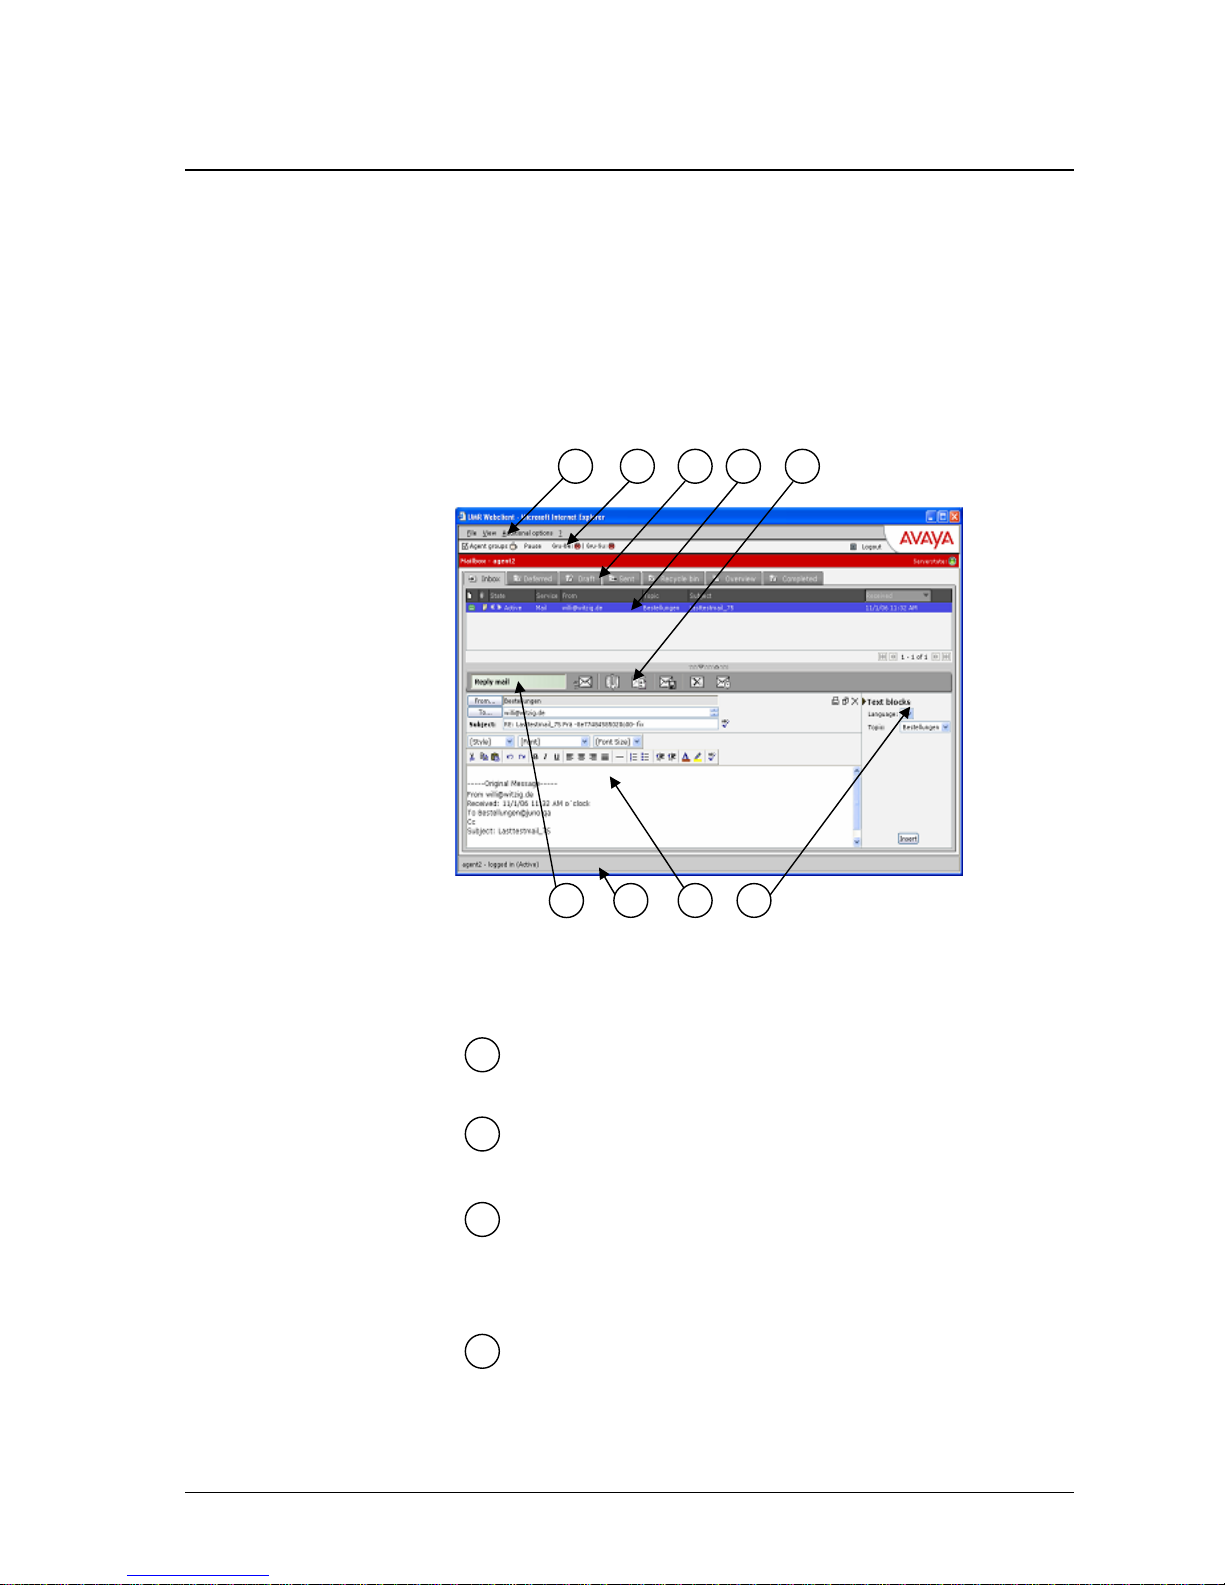
Structure of the module
Just like other Windows applications, the WebClient module has menus,
commands, and a tool bar.
Illustration and explanation of areas on UMR
WebClient screen
Illustration
The illustration below shows the WebClient module and the various areas on
the screen.
1 2 3 4 5
6 7 8 9
Areas
The illustration above shows the following screen areas.
1
Menu bar (File, View, Additional options, ?)
Tool bar and status bar (Select AG, Pause, Status indicator for the agent
groups, Logoff, Mailbox with your name, Server status indicator)
2
Mailbox folders (default: Inbox, Deferred, Drafts, Overview, Completed).
For the Deferred mailbox folder, you need the “Place emails on hold”
privilege.
3
4
Document list
8 • Meet the WebClient module User Manual CIE 1.0 WebClient

5
Action bar
6
Processing status indicator
7
Agent status
8
Display and processing area
9
Text blocks
WebClient module in Internet Explorer
Once you have logged in, the WebClient m
odule appears in the Internet
Explorer.
Menus and commands
The table below shows the available menus and commands.
Menu Command Explanation
File Import Address Book You can import address book entries
from a CSV file. This command is only
shown if you have the relevant privilege.
File Generate Address Import
File
You can create a template CVS file for
importing addresses or distributors.
File Dictionary
Administration
You can manage the dictionaries
See also: Editing a dictionary
File Import dictionary You cannot import a dictionary.
See also: Importing a dictionary
File Log Out Log out of the UMR system (the login
window is displayed again)
File Exit Exits the WebClient module. The
WebClient module is closed in Internet
Explorer.
View Visible Folders You can select which folders are to be
displayed. You cannot hide the Inbox
folder.
View Columns... Specify which columns are to be
displayed in the WebClient module.
View Update Options... You can set a value between 0 and 60
seconds for updates to the currently
selected mailbox folder.
The mailbox folder is refreshed at the
specified intervals.
You usually use the defaults.
User Manual CIE 1.0 WebClient Meet the WebClient module • 9
Menu Command Explanation
Addition
al
options
Options Shows the options. You can activate
notifications and set a time for them to be
displayed.
Addition
al
options
Signature
You can create a signature and select it.
Addition
al
options
Empty recycle bin
Deletes all documents from the recycle
bin.
Addition
al
options
Display Search Filter Opens the Search Filter dialog, which
allows you to narrow your search to
specific information in a folder.
? Help... Opens the Online help.
? Info Shows the following information:
• Name of the software
• Version number
• Copyright and year
• User name
• Mode (e.g. CallCenter mode)
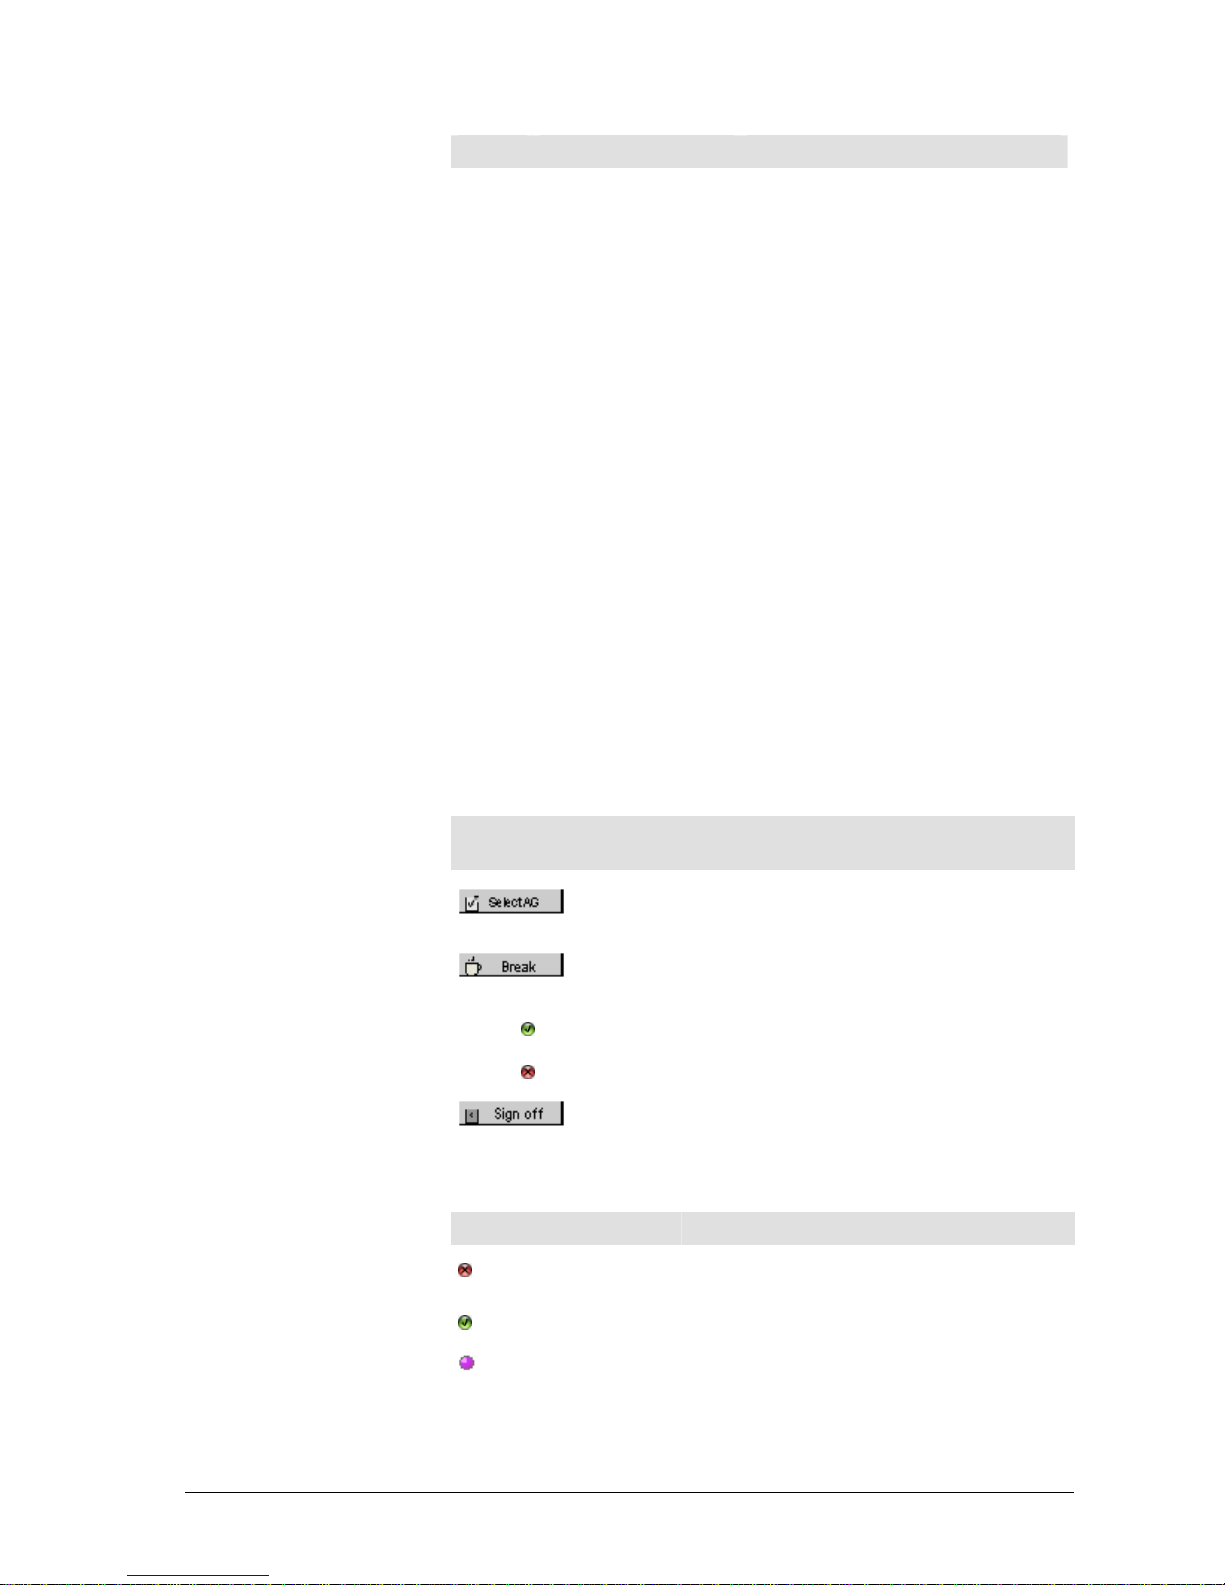
Tool bar
The following table shows the buttons on the tool bar.
Indicators/
buttons
Explanation
When you click this button, a window is displayed. Select the
check box against the required agent group to log into that
group. Then click on Accept.
Click this button to signal the start of a break or when you
return from your break.
Agent
group 1
,
Agent
group 2
Displays the agent groups. An LED indicates their status.
Click this button to log out of the UMR system. The login
window is displayed.
Status of agent groups
The table below shows the possible statuses of the agent groups.
LED Color Explanation
Red
The agent is not logged into the corresponding
agent group .
Green
The agent is logged into the corresponding agent
group.
Purple
The agent is taking a .
10 • Meet the WebClient module User Manual CIE 1.0 WebClient

Status bar
The table below shows the information that can be displa yed on the status bar.
Element
displayed
(example)
Explanation
Mailbox Smith, John
The display indicates, in bold, that this is a mailbox. This is
followed by a hyphen and the last name and first name of the
mailbox owner.
Server status Shows the status of the server.
Status of server
The table below shows the possible statuses of the agent groups.
LED Color Explanation
Green
A connection to the server exists. You can work
normally.
Yellow
Limited functions: Documents (emails/SMS text
messages/faxes) can be read but not processed.
Red
The connection to the system is interrupted. The
functionality of the UMR WebClient module is no
longer available.
User Manual CIE 1.0 WebClient Meet the WebClient module • 11
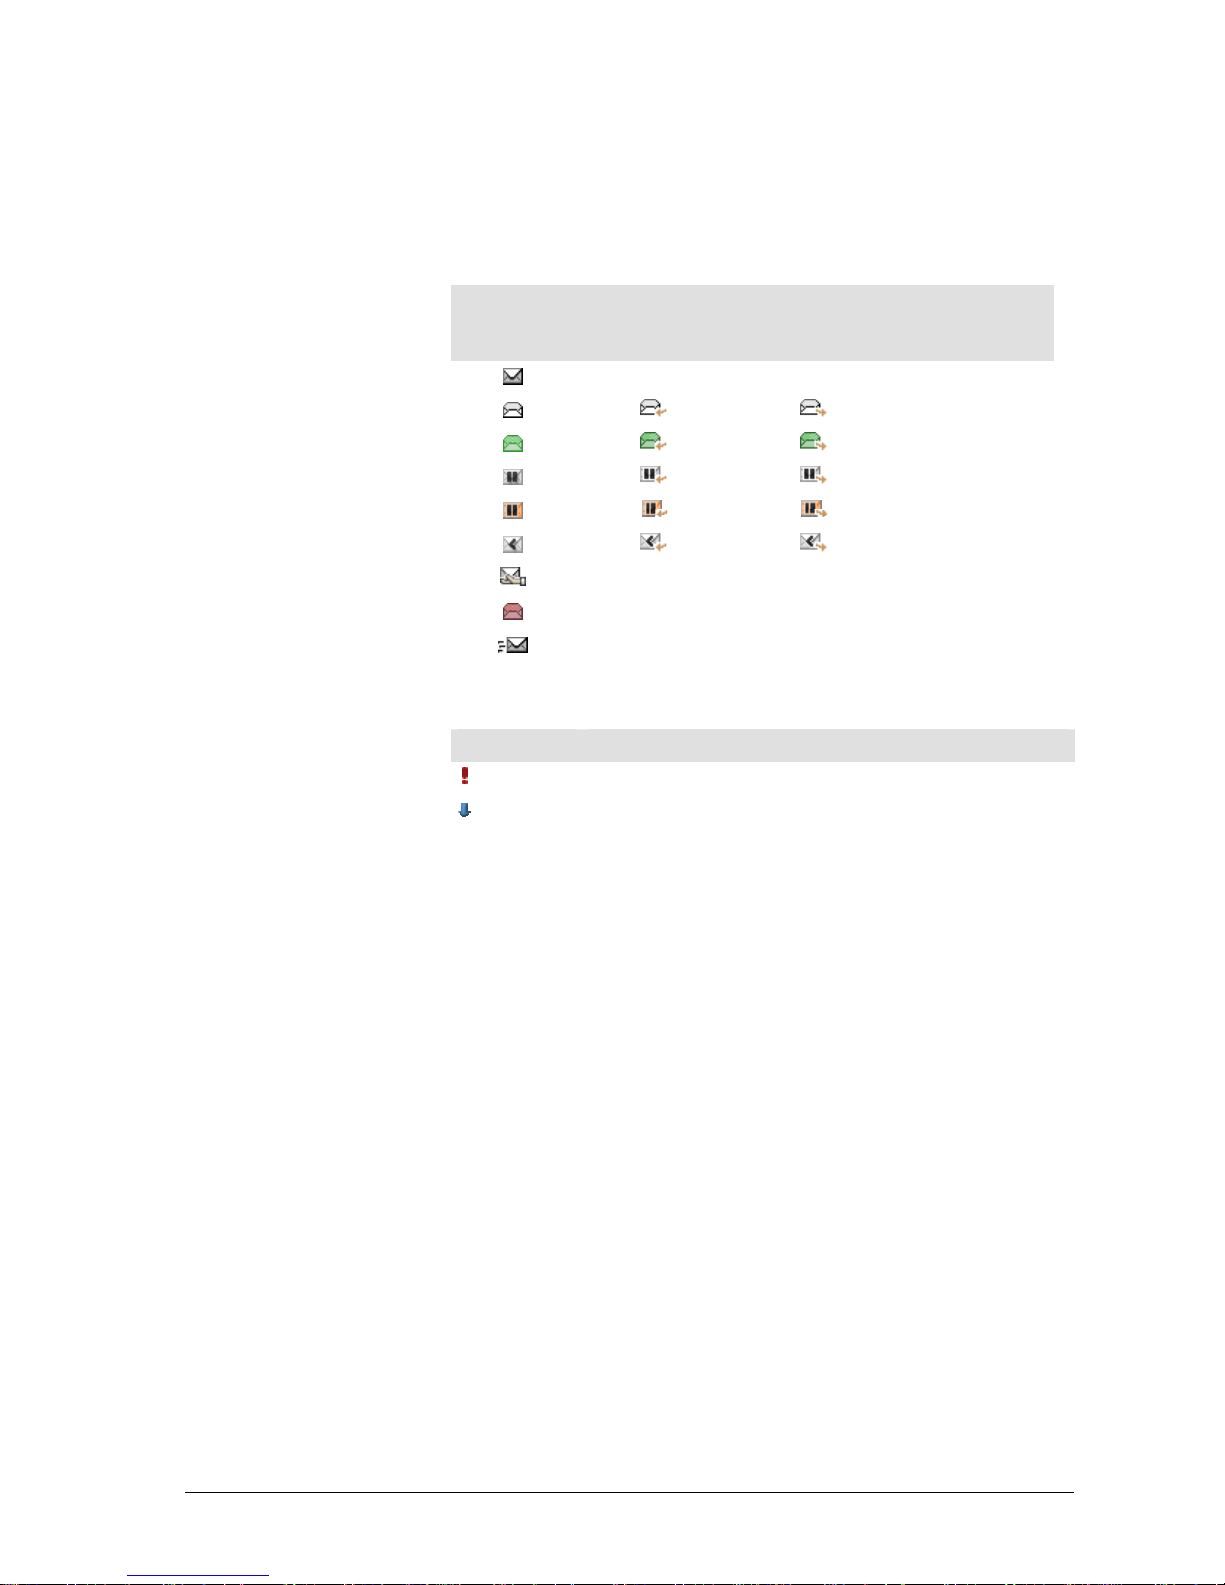
Icons: Document status
Document status
The table below shows the icons that may be displayed to indicate the status of
documents.
Default
icon
Icon with
active reply
Icon with
active
forwarding
Explanation
- - New
Read
active
Interrupted
Resubmitted
Deferred
- - Delegated
- - Job code missing
- - Outgoing email
Priority
The table shows the icons for document priority.
Icon Explanation
High priority
Low priority
No icon No icon means that the email has normal priority.
12 • Meet the WebClient module User Manual CIE 1.0 WebClient
Transmission job status (Outbox folder only)
The table below explains the meaning of the icons used to indicate the status of
transmission jobs.
Icon Color Transmission job status
Green Successful
Red Error occurred
Yellow Active/being processed
Orange Waiting/previously attempted
Blue Stopped
Displays
Proceed as follows to see the transmission job status:
1. Click on the Outbox folder.
A colored LED is displayed in the Status (Icon) column.
2. The color of the LED indicates the status of the transmission job.
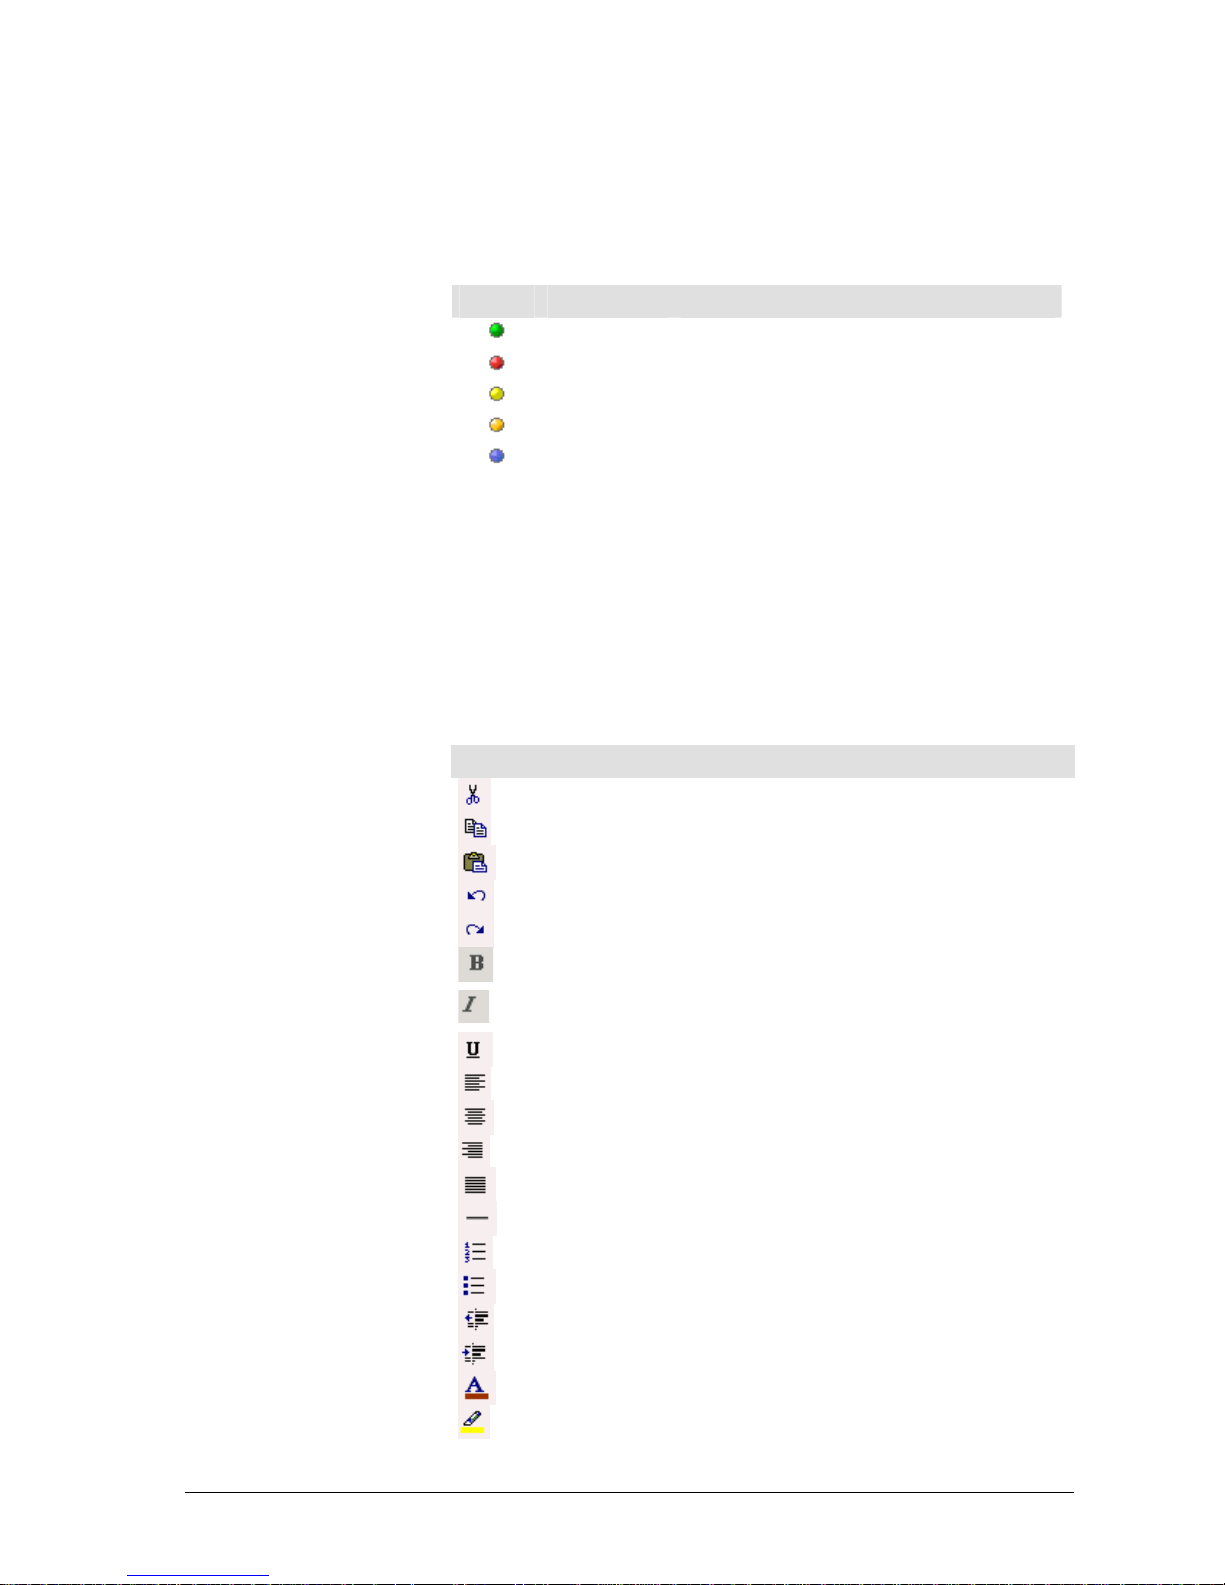
Icons:
You can use the following icons when you create a new email. You can format
the text of the document any way you want it.
Icon
Explanation
Cut
Copy
Paste
Undo
Redo
Bold
Italics
Underline
Align left
Center
Align right
Justify
Horizontal line
Numbering
Bullets
Decrease indent
Increase indent
Font color
Highlight
User Manual CIE 1.0 WebClient Meet the WebClient module • 13

Icon
Explanation
Check spelling
Format, Font, Font size
You can use the following functions to change the formatting of a text.
list box Explanation
Format Style
The options are:
Paragraph
Heading 1
Heading 2
Heading 3
Heading 4
Heading 5
Heading 6
Address
Formatted
Use paragraph for normal body text.
Heading 1 is the largest header size and Heading 6 is
the smallest.
Use Address to format an address.
Use Formatted for special markup (italics)
Font Select the relevant characters.
The options are:
Arial
Courier New
Times New Roman
Verdana
Font size Select the relevant characters.
The options are:
Extra small
Small
Normal
Large
Greater than
X-Large
XX-Large
Mailbox folders
The following mailbox folders are available for doc uments (emails/SMS text
messages/faxes). A figure in brackets after the name of the folder indicates the
number of unread documents.
14 • Meet the WebClient module User Manual CIE 1.0 WebClient

Icon
Name of mailbox
folder
Explanation
Inbox The Inbox folder contains all incoming
documents.
Deferred The Deferred folder contains document s that
will be automatically re-submitted to the Inbox
at the specified date and time.
This folder only appears if you have the “Place
emails on hold” privilege.
Drafts The Drafts folder contain s documents that you
have not yet sent.
Sent The Sent folder contains all the documents that
you have already sent.
Deleted The Deleted folder contains documents that
you have deleted.
Overview The Overview folder contains all the
documents for the various topics.
If you are working as an agent, you can view
and pickup the documents in the Overview
folder. You cannot edit documents directly.
If you are working as a Supervisor, you can
delete documents in the Overview folder and
delegate them to topics or agents. A Supervisor
possesses the UMR-Supervisor privilege.
Note that you need to possess the relevant
privileges for the topics. Your system
administrator configures the privileges using
the Configuration application.
Completed The Completed folder contains all completed
documents that remain in the UMR database.
Outbox The Outbox folder shows all sent documents.
Depending on the privilege, this folder shows
the documents of an agent or also of topics.
You can forward a document, change the send
status, or view the properties by means of a
pop-up menu.
Archive The Archive folder provides an overview of all
completed documents that have already been
moved from the Runtime database to an
external database during an archiving run.
The archive is only available if a transfer of
completed documents to an external archive
database is planned and the
UMRClientAdapter is configured accordingly.
In this case, this folder can be accessed by all
agents.
To display the documents, click on the relevant mailbox folder tab.You will find
more information about mailbox folders in Adapting the work area. That
section explains which actions you can perform on the documents in each
mailbox folder.
User Manual CIE 1.0 WebClient Meet the WebClient module • 15

Processing status display
In the action bar on the far left of each document window you can see the
processing status of the document. This area has a slightly darker background.
When a new document is created, this indicator is initially empty.
Processing statuses
The following table shows each possible processing status.
Processing status Explanation
Multiple selection You have selected multiple documents.
Creating email You are composing a new, outgoing email.
Answering email
You are writing a reply to a CC email.
(CC=CallCenter)
Forwarding email
You are preparing a CC email for forwarding.
(CC=CallCenter)
Sent email You are displaying an email that has already been sent.
Enter job code
You must input a job code before the email can be
closed out.
Answering non-CC
email
You are writing a reply to an email that was not
assigned to you by CallCenter.
Forwarding non-CC
email
You are preparing an email for forwarding that was not
assigned to you by CallCenter.
Non-CC email Viewing a non-CC email that has been received.
Preview
Email/task has not yet been activated. Therefore only a
preview is allowed.
Document does not
exist
System error: The selected document is not available.
More information
The Processing status display also shows whether a document has already been
answered or forwarded.
Processing status Explanation
Answered:
Email has not yet been answered.
Email has been answe red.
Forwarded:
Email has not yet been forwarded.
Email has been forwarded.
16 • Meet the WebClient module User Manual CIE 1.0 WebClient
Action bar
The action bar allows you to perform various actions.
Actions on documents (email/SMS/fax)
The order in which the buttons are displayed varies for the individual actions.
The first button (from left to right) is always Send document.
For a detailed description of the individual actions, see Processing documents
(actions).
Button Explanation
Create a new document.
Send document.
Reply to the sender of a document.
Save document.
If you are writing a new email, it is saved to the Drafts folder.
Put document on hold.
A document is held until the designated date and time. It then
re-appears in the Inbox folder.
When you click this button, a window is displayed in which
you can enter a date and time and a note. The Note icon is
then displayed in the second column of the document list. To
read the note, click on the Note icon.
Forward document
Repeat transmission of a do cument (following a transmission
error only).
If the transmission failed (e.g. when attempting to send a fax)
the document is transmitted again.
Send another copy of the document (for any document).
The document is loaded in edit mode. You can edit the
document, change the subject line or recipient, if applicable,
then send the document again (using the Send button).
Delegate document (assign) and add a note to it.
Pick up the document.
Completing the processing of a transaction. The archived
document is closed and moved to the Completed folder.
Allocate a job code.
A job code is required.
User Manual CIE 1.0 WebClient Meet the WebClient module • 17
Button Explanation
Add an attachment to the document.
Configure transmission options.
Document transmission actions
Button Explanation
Stop the transmission job
General actions
Button Explanation
Note
You can add a note when delegating a document or putting it
on hold (for resubmission). The Note icon appears in the
document list and in the mail header of a document.
To read the note, click on this icon in the mail header of the
document.
Print document
Maximize work area
Reduce work area
Close document
If you have made changes to the document, the following
message is displayed:
Document was changed.
To save the document to the Drafts folder, click on OK.
To discard the changes, click on Cancel.
18 • Meet the WebClient module User Manual CIE 1.0 WebClient

Agent status indicator
You can see the indicator for the status of agents in the bottom left-hand corner
of the window.
• If the agent is logged in, the indicator looks as follows (example
only):
Smith, John - logged in (Active)
• If the agent is on a break, the indicator changes as follows
(example only):
Smith, John - logged on (Break)
Email display area and processing area
In this area, located below the action bar, you process your documents. If you are
replying to an email, the following two areas are displayed (top to bottom)
• Email display area
• Processing area (e.g. the reply to an email that you are in the
process of writing)
User Manual CIE 1.0 WebClient Meet the WebClient module • 19

Operation
Logging in, taking a break, and logging out
To start working in the CIE system, you must start the WebClient module and
log in. If you need to, you can interrupt what you are doing and take a break.
When you have finished working, you log out.
Familiarize yourself with the WebClient module. For further information please
refer to: Structure of the module
Signing on
For details of how to log in, see Logging in.
Starting a break
Prerequisite
The agent's status must be Active. You would like to briefly interrupt your work.
Taking a break
1. Click on the Pause button.
2. This puts you in break mode. The LED for the logged-in agent
groups changes to purple.
Agent group
LED
Color Explanation
Purple
The agent is in the Pause mode.
3. When you are taking a break, you remain logged in to the agent
group but you are unreachable. Consequently, no documents are
sent to you during your break.
Note
If your status changes to Paused while you have an active document, the status
of the document changes to Interrupted.
Documents cannot be processed while you are in the Paused state.
CIE-style pause codes are not supported.
Ending a break
Prerequisite
The agent is in the Paused state.
Ending a break
20 • Operation User Manual CIE 1.0 WebClient

To end a break, do the following:
1. Click on the Pause button.
2. This ends the break and you are free to resume working. The LED
in the logged-in agent groups changes to green.
Agent group
LED
Color Explanation
Green
The agent is logged in to the
corresponding agent group.
Note
When your status changes from Paused to Logged in, you need to re-activate a
document with a status of Interrupted before you can process it.
In the Logged in state you can resume processing documents.
Log out
To finish working in the UMR system, do the following:
1. You normally log out from the agent groups. For further
information please refer to: Logging into or out of an agent
group.
2. Click Logout. The login dialog appears.
3. To close the dialog box, click
.
User Manual CIE 1.0 WebClient Operation • 21

Getting help and displaying information
The WebClient module provides a Help function for all menus, commands, and
dialogs. You can search for information on a certain topic.
Opening the Help function
You can use the online Help to familiarize yourself with the WebClient
module, to look up individual topics, or to search for individual index entries.
Open
To open the online Help, do the following:
1. Select Help from the ? menu. The Online help opens.
2. Click a text to obtain further information about the topic.
Displaying information
Information
You can display the following information .
• Name of the software
• WebClient module version
• Copyright and year
• User name
• Mode (e.g. CallCenter mode)
Displays
To display the information, do the following:
1. Select Info from the ? menu. The About UMR WebClient dialog
box opens.
2. Click Close to end the dialog.
UMR WebClient module version
You will also find the version number in the login dialog when you start the
UMR WebClient module.
22 • Operation User Manual CIE 1.0 WebClient
 Loading...