

Page 1
Installation Manual
Com4Tel Client/Server
Page 2

© 2008 Avaya Inc.
All Rights Reserved.
Notice
While reasonable efforts were made to ensure that the information in this
document was complete and accurate at the time of printing, Avaya Inc. can
assume no liability for any errors. Changes and corrections to the information
in this document may be incorporated in future releases.
For full legal page information, please see the complete document, Avaya
Legal Page for Software Documentation, Document number 03-600758.
To locate this document on the website, simply go to
http://www.avaya.com/support and search for the document number in
the search box.
Documentation disclaimer
Avaya Inc. is not responsible for any modifications, additions, or deletions to
the original published version of this documentation unless such modifications,
additions, or deletions were performed by Avaya. Customer and/or End User
agree to indemnify and hold harmless Avaya, Avaya's agents, servants and
employees against all claims, lawsuits, demands and judgments arising out of,
or in connection with, subsequent modifications, additions or deletions to this
documentation to the extent made by the Customer or End User.
Link disclaimer
Avaya Inc. is not responsible for the contents or reliability of any linked Web
sites referenced elsewhere within this documentation, and Avaya does not
necessarily endorse the products, services, or information described or offered
within them. We cannot guarantee that these links will work all of the time and
we have no control over the availability of the linked pages.
Warranty
Avaya Inc. provides a limited warranty on this product. Refer to your sales
agreement to establish the terms of the limited warranty. In addition, Avaya’s
standard warranty language, as well as information regarding support for this
product, while under warranty, is available through the following Web site:
http://www.avaya.com/support
Copyright
Except where expressly stated otherwise, the Product is protected by copyright
and other laws respecting proprietary rights. Unauthorized reproduction,
transfer, and or use can be a criminal, as well as a civil, offense under the
applicable law.
Avaya support
Avaya provides a telephone number for you to use to report problems or to ask
questions about your product. The support telephone number
is 1-800-242-2121 in the United States. For additional support telephone
numbers, see the Avaya Web site:
http://www.avaya.com/support
Page 3

Contents
About this Manual 7
Questions about this manual......................................................................................................7
How do you get a printed copy? .............................................................................................. 10
Action and components 11
Action ......................................................................................................................................11
Components............................................................................................................................. 13
Who is the manual for?................................................................................................7
What kind of information is provided here?................................................................ 7
What kind of information is not provided here?.......................................................... 7
How is this manual structured? ................................................................................... 8
Which font styles are used?.........................................................................................8
Which version are you reading? .................................................................................. 8
What has changed?......................................................................................................8
Where can you find additional information?...............................................................9
Requirements............................................................................................................. 10
Printing the manual ...................................................................................................10
Printing problems ...................................................................................................... 10
Figure: Client server solution .................................................................................... 11
Features of the client-server solution.........................................................................12
Com4Tel Client ......................................................................................................... 13
License server............................................................................................................ 13
Com4Tel Server ........................................................................................................13
Address book server (ADB server) ...........................................................................13
Route Info Server (RIS).............................................................................................13
Com4Tel Web@dmin................................................................................................14
Update Server............................................................................................................ 14
DB server................................................................................................................... 14
LNA server................................................................................................................ 14
OmniNames............................................................................................................... 14
Database: Sybase ASE ..............................................................................................14
Telephony connection (TOM server) ........................................................................ 14
conneCTIon............................................................................................................... 15
PABX ........................................................................................................................ 15
Telephones.................................................................................................................15
Phone books ..............................................................................................................15
Quick reference guide 16
Preparation............................................................................................................................... 16
Installing .................................................................................................................................. 17
Commissioning........................................................................................................................ 19
Commissioning the server components 20
Requirements ........................................................................................................................... 20
Hardware ................................................................................................................... 20
Software ....................................................................................................................21
PABX ........................................................................................................................ 21
Installation Manual Com4Tel Client/Server Contents • 3
Page 4

Connecting to Microsoft groupware ........................................................................................ 22
Requirements............................................................................................................. 22
Further measures ....................................................................................................... 22
Connecting to IBM Lotus Notes groupware............................................................................ 23
Requirements............................................................................................................. 23
Releasing the LDAP access....................................................................................... 23
Starting the LDAP service......................................................................................... 24
Further measures ....................................................................................................... 24
Connecting to Novell GroupWise groupware.......................................................................... 25
Requirements............................................................................................................. 25
Further measures ....................................................................................................... 25
Guidelines................................................................................................................................26
Restriction .................................................................................................................26
One-server system ..................................................................................................... 26
Networked system ..................................................................................................... 27
What if an earlier version of conneCTIon is available?........................................................... 29
Data storage in conneCTIon......................................................................................29
Updating conneCTIon ............................................................................................... 29
Data matching from conneCTIon 3.0........................................................................29
How do I transfer data from an earlier version? ...................................................................... 31
Backing-up the database cc .......................................................................................31
Further action ............................................................................................................31
Installing the server components ............................................................................................. 32
Checking the operating system requirements............................................................32
TTrace .......................................................................................................................32
OmniNames............................................................................................................... 32
License server............................................................................................................ 32
License admin tool ....................................................................................................33
Module Manager .......................................................................................................33
Sybase 12.5.3............................................................................................................. 34
Database .................................................................................................................... 35
conneCTIon............................................................................................................... 36
Com4Tel Server ........................................................................................................36
Java development kit ................................................................................................. 36
Route info server .......................................................................................................37
Address book server .................................................................................................. 37
TomCat...................................................................................................................... 38
Web@dmin ...............................................................................................................38
WebPresence .............................................................................................................38
Watchdog ..................................................................................................................39
Issuing the licenses ..................................................................................................................40
Licenses..................................................................................................................... 40
Issue via license server .............................................................................................. 40
Starting the services and processes.......................................................................................... 41
Which services have to be started?............................................................................ 41
Checking....................................................................................................................41
Administration with Com4Tel Web@dmin............................................................................. 41
Use a certificate for data protection and security.....................................................................42
Procedure................................................................................................................... 42
Create a certificate keystore ......................................................................................43
Copy the .keystore file...............................................................................................44
Change the configuration for Tomcat........................................................................ 44
Exit and restart the Apache Tomcat service ..............................................................45
How to start Web@dmin with SSL? ......................................................................... 45
Importing the certificate at the client......................................................................... 46
Installing a client 47
The client's requirements ......................................................................................................... 47
Hardware ................................................................................................................... 47
4 • Contents Installation Manual Com4Tel Client/Server
Page 5

Client software ..........................................................................................................48
Installing client software.......................................................................................................... 49
Requirements............................................................................................................. 49
Database .................................................................................................................... 49
Installing client software ...........................................................................................49
Uninstalling ...............................................................................................................50
Change....................................................................................................................... 50
Installing client software via parameters (automatic installation) ........................................... 51
Parameters for installation.........................................................................................51
Silent Setup (client) ................................................................................................... 52
Adding the buttons for Lotus Notes.........................................................................................53
Symbols for Lotus Notes...........................................................................................53
Adding the buttons for Lotus Notes R5..................................................................... 53
Adding the buttons for Lotus Notes R6 or R7........................................................... 53
Changing the firewall settings for Windows XP Service Pack 2............................................. 54
What does the firewall do? ........................................................................................ 54
We advise you to use the firewall..............................................................................54
Requirements............................................................................................................. 54
Changing the settings ................................................................................................54
Maintenance 56
Backing-up the database .......................................................................................................... 56
What is a backup server?...........................................................................................56
Guidelines for backing up the master database .........................................................56
Guidelines for backing up the database.....................................................................56
Backing-up the database............................................................................................ 57
Restoring the database...............................................................................................58
Load........................................................................................................................... 59
Online help for Sybase .............................................................................................. 59
Call number mapping ..............................................................................................................60
Folder ........................................................................................................................60
Start parameters.........................................................................................................60
User ...........................................................................................................................60
Tip .............................................................................................................................60
Start parameters of the cticonfig process................................................................................. 61
Remote maintenance using PC-Anywhere .............................................................................. 61
Tips and tricks 62
Updating Web@dmin.............................................................................................................. 62
Using the Watchdog application.............................................................................................. 63
Recommendation....................................................................................................... 63
Watchdog configuration ............................................................................................ 63
Creating a connection profile for Sybase Central .................................................................... 64
Advantage.................................................................................................................. 64
Create ........................................................................................................................64
Call number mapping with the task planner ............................................................................ 65
Configure................................................................................................................... 65
Special tip.................................................................................................................. 65
OmniNames does not start....................................................................................................... 66
Possible cause............................................................................................................ 66
Remedying the error..................................................................................................66
Working with TTrace ..............................................................................................................67
Display of process statuses........................................................................................ 67
Archiving log files.....................................................................................................67
Configuring behavior at the client.............................................................................67
Configuring behavior at the server............................................................................ 68
More than 100 users use Com4Tel ..........................................................................................69
Check memory ..........................................................................................................69
Example: Check necessary Memory for 500 user ..................................................... 70
Installation Manual Com4Tel Client/Server Contents • 5
Page 6

Example: Add memory and user connections ........................................................... 70
Adjust Default Data Cache........................................................................................70
Glossary 73
Index 75
6 • Contents Installation Manual Com4Tel Client/Server
Page 7

About this Manual
Questions about this manual
Before you start reading you might have questions regarding this document. We
will answer some questions to start with.
Who is the manual for?
This manual is intended for people who want to install Com4Tel. It makes no
difference whether you are using this document in printed or online form.
Use this manual as you see fit, whether as a reference for individual items or to
get comprehensively inform yourself about installing Com4Tel.
What kind of information is provided here?
This manual contains all the information required to install Com4Tel.
What kind of information is not provided here?
This manual does not contain any information about the administration and use
of Com4Tel.
Installation Manual Com4Tel Client/Server About this Manual • 7
Page 8

How is this manual structured?
The structure of this manual provides a step by step guide to use of Com4Tel.
Once you have read a few pages you will notice that each topic has a similar
structure. Most start with an introduction to the topic. The necessary
requirements or knowledge are then often described next. These are followed by
instructions. A figure or an example provides more in-depth information.
Which font styles are used?
The following font styles are used in this manual.
Font style Explanation
Bold
Italics Denotes special concepts.
Default Denotes explanations. This style is used for most texts.
1., 2., 3. etc. Denotes an instruction. Proceed step-by-step as described to
Denotes proper names (example: Com4Tel), menus,
commands, buttons and names of dialogs.
use a certain feature.
Which version are you reading?
The following table shows information about this version of the manual.
Compiled on: April 9, 2008
Basis Com4Tel version 2.0.2.xxx
Editors Andreas Marquardt
Available as Online Help
Acrobat Reader file
What has changed?
The following table shows the history of this document.
Version 2.00.xxx
Version Date Changes
2.00.015 10.5.2006 Completely revised
2.00.015 23.6.2006 New chapter: Quick reference guide
2..0.1.150 30.5.2007 C3000
2.0.1.150 21.6.2007 More than 100 users use Com4Tel
2.0.1.150 12.7.2007 Installing client software via parameters
(automatic installation)
2.0.2.xxx 9.4.2008 Corrections
8 • About this Manual Installation Manual Com4Tel Client/Server
Page 9

Where can you find additional information?
This manual describes the necessary knowledge and requirements and includes
instructions you need to install Com4Tel.
The following manuals contain information on the administration and use of
Com4Tel. You can also use these documents in printed form or online.
Com4Tel Web@dmin User Manual
Com4Tel Client/Server User Manual
Installation Manual Com4Tel Client/Server About this Manual • 9
Page 10

How do you get a printed copy?
You would rather read these instructions on paper than on the PC screen? No
problem! You can print the manual. This document is prepared for being printed.
Printing this file provides you with a conventional manual.
The manual is printed in A4 format. The printed manual has about 74 pages.
Requirements
The following requirements must be fulfilled to print this manual.
• You need the CTI CD CD-ROM.
• An Acrobat Reader Version 5 or higher must be installed on your
PC. The necessary software is also provided on the CTI CD CDROM.
• A graphics-capable printer must be connected to your PC.
Printing the manual
You want to print the manual.
1. In the file manager, switch to the doc folder on the CD-ROM.
2. Double-click the com4tel_install_en.pdf file. The Acrobat Reader
application opens and displays the manual.
3. Select Print in the File menu of the Acrobat Reader application.
The file is printed.
Printing problems
If you cannot print the manual, please consult your system administrator. Your
system administrator can print a copy for you.
10 • About this Manual Installation Manual Com4Tel Client/Server
Page 11
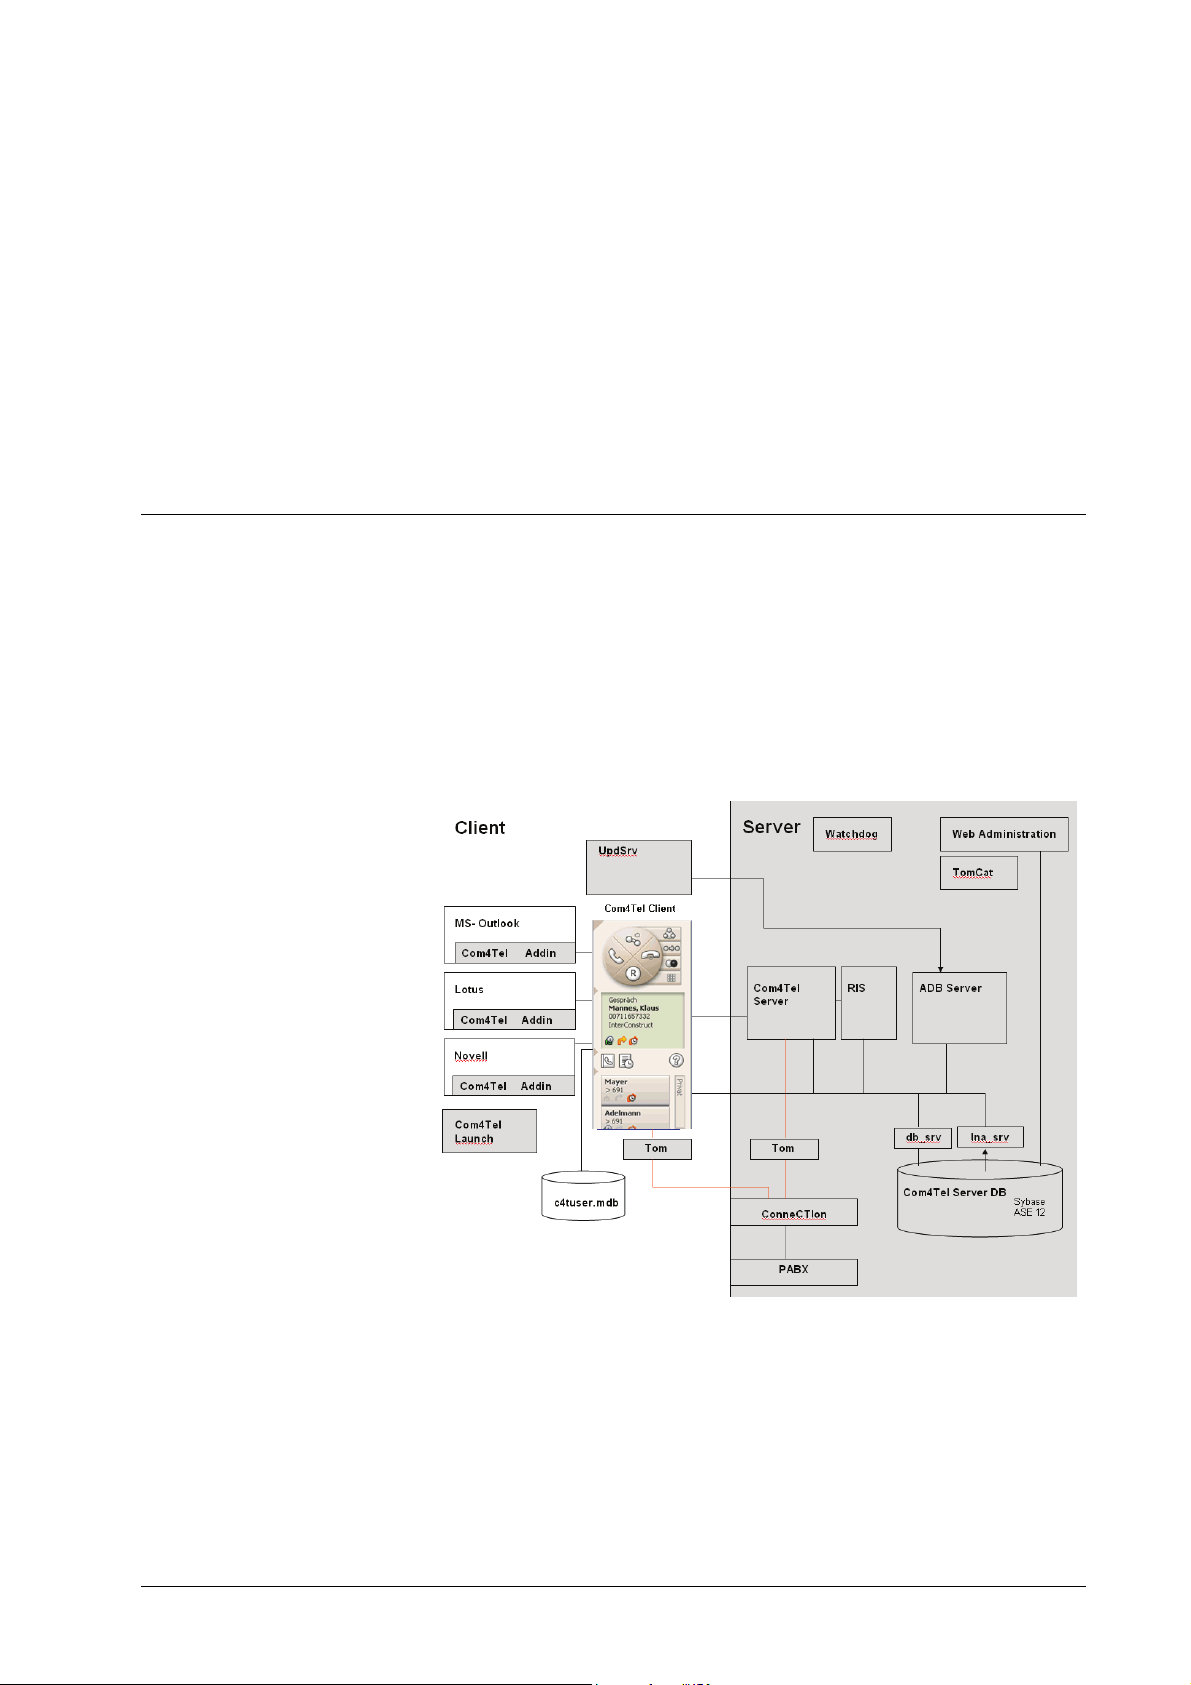
Action and components
Action
Com4Tel is a so-called client-server solution. Each Com4Tel client uses central
components of the Com4Tel-server. This ensures that the relevant data and
settings can be maintained centrally (Com4Tel server) and each Com4Tel client
receives the relevant information.
Figure: Client server solution
The following figure shows a schematic diagram of the interaction between the
individual components.
Installation Manual Com4Tel Client/Server Action and components • 11
Page 12

Features of the client-server solution
The client-server solution (network solution) has the following features.
• The telephone connection is made via 3
in conjunction with conneCTIon.
• Administration takes place centrally (Com4Tel server). A
Com4Tel user can also configure their keys to their own
requirements.
• Access to the telephone books takes place centrally (Com4Tel
server).
• Each Com4Tel user (client) can use telephone books set up at the
server.
• A journal shows the Com4Tel user (client) who phoned when and
how often, whom they phoned, whom they reached and did not
reach and with whom they spoke.
• Licensing takes place via a central server.
rd
party call control (RPC)
12 • Action and components Installation Manual Com4Tel Client/Server
Page 13

Components
In order to use Com4Tel, you must install and configure various components.
Familiarize yourself with the components for Com4Tel.
Com4Tel Client
Com4Tel Client is a PC application for telephony. A user manages all their
telephone traffic with Com4Tel.
Not only the configuration settings but also the journal data and personal
telephone book are saved in the local database. Changes to the local
configuration are replicated from the Com4Tel client to the server when the
client is quit. Vice versa, when the Com4Tel client is started this configuration
data is collected from the server, just like the data on the calls that have arisen
(journal).
License server
Com4Tel requires valid licenses. The license server controls licensing.
When started the components connect with the license server and test the
necessary licenses. The relevant license files must therefore be available on the
license server.
Issuing the licenses" on page 40
See: "
Com4Tel Server
The Com4Tel server monitors telephony state of configured users and creates a
call history for them (journal). Additionally the Com4Tel server holds the
presence/absence states of all partners. All clients are notified about telephony
and presence states of partners.The Com4Tel server's connection with the PABX
is realized via TOM and conneCTIon (3rd party call control/RPC).
Address book server (ADB server)
An Address book server is used to read in address data, normalize the call
numbers, merge address book entries from different address books and deposit
them, access optimized, in the database. The Com4Tel client uses the address
book server in the event of accesses for data retrieval or address book inquiries
by the users.
Route Info Server (RIS)
The Route Info Server processes requests of Com4Tel server how to handle
incoming calls for a user. Route Info Server knows all rules that a user
administrated using presence management.
Installation Manual Com4Tel Client/Server Action and components • 13
Page 14

Com4Tel Web@dmin
You use the administration tool Com4Tel Web@dmin to edit the settings of
Com4Tel. Com4Tel Web@dmin is web-based. To edit the settings you will
need a browser on a personal computer within the network.
The administration tool Com4Tel Web@dmin enables you to do the following.
• Adjust the system properties
• Configure and edit the users
• Configure and edit the telephone books
• Import users
Update Server
The update server is used for automatic mapping of the call numbers in the
configured telephone books. This call number mapping ensures flexible phone
number identification. Access to the address data is optimized (faster search
options).
The data in the original telephone books is not changed. The mapped telephone
numbers are maintained in a so-called shadow database.
An update server runs both on the clients (for the local address books) and on the
server (for the central address books).
You can also manually start call number mapping using the call number
mapping tool.
A client can only perform call number mapping for their own contacts.
DB server
The DB_SRV process controls access to the database for the Com4Tel Server.
LNA server
Com4Tel core processes register at LNA_SRV process to be notified about
changes in database.
OmniNames
A Corba naming service (OmniNames) is required and used for the components'
communication. Other Avaya products also use a Corba naming service. You
can also use an already used naming service/server.
Database: Sybase ASE
The Sybase database is used as a relational database management system.
Telephony connection (TOM server)
The TOM server serves as an interface between Com4Tel and the telephony. A
TOM server provides several providers (RPC, TAPI, IP). The Com4Tel server
as well as Com4Tel clients use that uniform telephony interface.
14 • Action and components Installation Manual Com4Tel Client/Server
Page 15

conneCTIon
The name conneCTIon stands for the interface connection between the telephone
and data worlds. CTI means computer aided telephoning (computer-telephony
interface).
PABX
The application supports the Avaya PABX: I33/I55, I5 and ACM. The PABXs
are modular systems. They are specifically put together to satisfy the customer's
individual requirements.
Telephones
Com4Tel supports the current Avaya telephones in the PABXs I33/I55, I5 and
ACM. You can also use other phones on a project-related basis.
Phone books
Com4Tel can use the following data sources as telephone books.
• Microsoft Exchange 2000/2003 (Active Directory): Global address
book
• Microsoft Exchange: Public folder
• Microsoft Exchange: Shared mailboxes
• Microsoft Outlook: Own contacts
• Lotus Domino (LDAP)
• Lotus Notes: Contacts
• Novell GroupWise (server) (LDAP)
• Novell GroupWise (client): Contacts
• Customer databases (ODBC)
• Personal telephone book
• All LDAP sources in accordance with LDAP V3
Installation Manual Com4Tel Client/Server Action and components • 15
Page 16

Quick reference guide
The following tables provide brief instructions for the corresponding topics. If
you have already set up several systems and have the necessary experience, you
can use the tables as a memory aid. This quick reference guide is intended for
experienced users.
The tables contain the necessary steps and notes on settings in a short form.
Detailed instructions are given under the corresponding topics.
Preparation
Please note the requirements. Complete the preparatory actions first.
Step Action Note
1. Update conneCTIon
2. Backup cc database
3. Install groupware
If you are already using an earlier
version of conneCTIon, you must
update it to the version 4.0.
If you are already using an earlier
version of Com4Tel 2 you must
back up the cc database.
Before you perform the setup for
the Com4Tel client you must
install and configure the required
groupware.
16 • Quick reference guide Installation Manual Com4Tel Client/Server
Page 17

Installing
Install the components as described.
Step Action Note
1. Install TTrace Setup type: Complete
2. OmniNames Setup type: Complete
3. License server -
4. License admin tool -
5. Module Manager I33/I55
Input:
Type of ISDN card (number of
channels)
Access type: I33/I55 CSTA (CTI
server, ACD, CallCenter...)
Access No, user and password for
CSTA access to the PABX
I5
Input:
Type of ISDN card (number of
channels)
Access type: I3/I5 CTI (TLP,
CSAT)
6. Sybase 12.5.3 SQL server name: Hostname
Password for the user sa: at least 6
characters long.
Select ODBC Support and
jConnect (JDBC) options
Restart the computer after
installation.
7. Database
8. conneCTIon -
Requirement: Sybase SQL server
and Sybase BCKServer services are
running
Upgrade
If you are using an earlier version
of Com4Tel and would like to
transfer the data, upgrade the
database using the
UpgradeTool.exe tool.
Input:
Password for the user sa.
Installation
Input:
User name (sa) and password for
the user of the data database server
Setup type: Complete
hostname of the Corba naming
service
Hostname of the TTrace server
Installation Manual Com4Tel Client/Server Quick reference guide • 17
Page 18

9. Com4Tel server Input:
Hostname and port of the Corba
naming service
Hostname and port of the Tomcat
server
10. Java development kit -
11. Route info server Input:
Hostname of the license server
Hostname of the TTrace server
Hostname of the Corba naming
service
Hostname of the database cc
12. Address book server Input:
Hostname of the TTrace server
Hostname of the Corba naming
service
Administrative password: Password
of the user sa
Guideline value for the size of the
address book server database: for
100000 addresses 1GB
13. TomCat Choose components: Full
14. Web@dmin -
15. WebPresence -
16. Watchdog Setup type: Complete
Input:
Hostname of the TTrace server
17. Com4Tel client Input:
Groupware
application scenario: Client/Server
(3rd party)
Hostname of the Com4Tel servers
18 • Quick reference guide Installation Manual Com4Tel Client/Server
Page 19

Commissioning
Start the system as follows.
Step Action Note
1. Check services
2. Administrating Com4Tel
3. Switch Apache Tomcat to SSL Procedure:
4. If necessary:
Adding the buttons for Lotus
Notes
5.
Change the firewall settings in
Windows XP SP2
The following services must have
been started and set to Automatic:
Apache Tomcat
Avaya Tenovis Watchdog
Avaya omniORB Naming Service
Communication manager
Sybase BCKServer_Hostname_BS
Sybase SQLServer_Hostname
Tenovis CTI server
Tenovis license server
With the help of Com4Tel
Web@dmin
Create a certificate keystore
Copy the .keystore file
Change the configuration for
Apache Tomcat
Exit and restart the Apache Tomcat
service
If necessary: Import the certificate
at the client
-
Exceptions:
com4tel.exe
updsrv.exe
tomsrv.exe
Installation Manual Com4Tel Client/Server Quick reference guide • 19
Page 20

Commissioning the server components
Requirements
The following requirements must be fulfilled to enable you to successfully install
and use all the components of Com4Tel.
Hardware
You need the following hardware for the server components. You can install all
the components on a personal computer.
• PC (SATA/ATA/EISA bus or SCSI)
• Intel processor Pentium III 650 MHz or higher (or comparable
processor)
• at least 512 MB RAM
• Hard disk with sufficient memory capacity (8 GB)
• CD-ROM drive (optional)
• Keyboard
• Pointer (mouse)
• Network card (Ethernet card)
• Screen
• ISDN card (optional for linking to PABXs via module manager)
• USB connection 1.1 or higher (optional for license server)
Please note:
IF THEN
You use other applications. you may require larger server hardware
(CPU and RAM) dimensions
accordingly.
You use more than 100 Com4Tel
clients with the server.
20 • Commissioning the server components Installation Manual Com4Tel Client/Server
you must provide appropriately larger
dimensions for the server hardware
based on the project.
Page 21

Software
You need the following software for the server components.
Server Software components
Operating system Microsoft Windows XP Professional with Service
Pack 2
or
Microsoft Windows 2003 Server
Avaya software (is
installed with Com4Tel)
Software from external
manufacturers (installed
with Com4Tel)
Software for
administrations
toolWeb@dmin
Basic setup with: cc database, TTrace, Omniorb,
DB server, LNA server and Watchdog.
Com4Tel Server
Update server (application of the CTI framework for
call number mapping)
TOM (telephony components of the CTI
framework)
Web@dmin (JAR)
conneCTIon 4.x (link with the telephony)
License server
SUN SDK with Java Virtual Machine 1.5.0
Apache TomCat 5.x (web server)
Sybase ASE 12.5
Microsoft XML Parser (XSXML 2.0)
Microsoft Data Access Components (MDAC 2.5 or
higher) (is already part of Windows XP and 2003
Server)
Corba naming service (Omniorb)
Microsoft Internet Explorer 6 or higher
PABX
The PABX must fulfill the following requirements.
PABX Explanation
I5 from software release 2.150
I33/55 from software release E07
I55/L02 -
Avaya ACM from Version 3.1
Other
manufacturers
Installation Manual Com4Tel Client/Server Commissioning the server components • 21
Other-manufacturers' PABX can be operated on a projectrelated basis.
Page 22

Connecting to Microsoft groupware
You can use Microsoft groupware with Com4Tel.
Requirements
Com4Tel can be connected to the following Microsoft groupware. Special
settings are not required for operation with Com4Tel, either at the client or at the
server. The groupware must be started to enable it to be used with Com4Tel.
Client software
• Microsoft Outlook 2000
• Microsoft Outlook 2002 (XP)
• Microsoft Outlook 2003
Server software
• Microsoft Exchange 2000
• Microsoft Exchange 2003
Further measures
Client
You do not have to carry out any other measures at the client for the Com4Tel
add-ons.
Configuration
You must use the Web@dmin application to appropriately configure the
telephone books.
22 • Commissioning the server components Installation Manual Com4Tel Client/Server
Page 23

Connecting to IBM Lotus Notes groupware
You can use IBM groupware with Com4Tel.
To use IBM Lotus Notes, you must activate the LDAP access at the Domino
server. If LDAP is not installed, please install these components retrospectively.
Requirements
Com4Tel can be connected to the following IBM groupware. The groupware
must be started to enable it to be used with Com4Tel.
Client software
• IBM Lotus Notes R5
• IBM Lotus Notes R6
Server software
• IBM Lotus Notes R5
• IBM Lotus Notes R6
Domino server requirement
Com4Tel accesses the public address book of the Domino server via LDAP.
This requires the following at the Domino server.
• LDAP must be installed. If LDAP is not installed, please install
these components retrospectively
Releasing the LDAP access
In order to access the public address book from Com4Tel via the LDAP access,
the LDAP access must be activated and the LDAP service must have been
started. Enable LDAP access as follows.
1. Open the Domino Administrator application.
2. Click the Configuration tab.
3. Under
CONFIGURATION SETTINGS dialog appears.
4. Select Use these setting as the default setting for all servers. The
LDAP tab also appears.
5. Click Edit Server Configuration to edit the configuration.
6. Click the LDAP tab.
Server Configuration, double-click All Servers. The
7. Click
8. Select Person under Form.
9. Click Show Fields.
10. The following fields must exist in the List of queriable fields
field.
List of queriable fields
CellPhoneNumber
CompanyName
Department
Installation Manual Com4Tel Client/Server Commissioning the server components • 23
. The LDAP Field List dialog appears.
Page 24

List of queriable fields
FirstName
HomeFAXPhoneNumber
InternetAddress
LastName
OfficeCity
OfficeCountry
OfficeFAXPhoneNumber
OfficePhoneNumber
OfficeState
OfficeStreetAddress
OfficeZIP
PhoneNumber
ShortName
11. Edit the list accordingly using Add and Remove.
12. Click OK.
13. Click Save and Close to save your changes.
Starting the LDAP service
You must then start the LDAP service. Do this as follows.
1. In the Lotus Domino Server prompt, enter the following
commands.
>tell ldap quit
>load ldap
If the LDAP access is activated for a specific Notes user, you must enter the
User Name and Password access data in the Web@dmin tool.
Further measures
Client
After installing the Com4Tel client you must then carry out the following
measures at the client.
1. Adding the buttons for Lotus Notes
Configuration
You must use the Web@dmin application to appropriately configure the
telephone books.
24 • Commissioning the server components Installation Manual Com4Tel Client/Server
Page 25

Connecting to Novell GroupWise groupware
You can use Novell groupware with Com4Tel.
Requirements
Com4Tel can be connected to the following Novell groupware. Special settings
are not required for operation with Com4Tel, either at the client or at the server.
The groupware must be started to enable it to be used with Com4Tel.
Client software
• Novell GroupWise 6.5
• Novell GroupWise 7
Server software
• Novell GroupWise 6.5
• Novell GroupWise 7
Further measures
Client
You do not have to carry out any other measures at the client for the Com4Tel
add-ons.
Configuration
You must use the Web@dmin application to appropriately configure the
telephone books.
Installation Manual Com4Tel Client/Server Commissioning the server components • 25
Page 26

Guidelines
You can install the server components for Com4Tel on a personal computer or
distribute it among several personal computers in a network. You can also use
already installed components, e.g. a license server.
Restriction
Com4Tel and C3000 can not used on one server.
One-server system
If you would like to use a personal computer as a server for Com4Tel, you must
install the following components in the listed order. Com4Tel assists you by
providing convenient guideline installation.
1. TTrace
2. OmniNames
3. License server
4. License admin tool
5. Module Manager
6. Sybase
7. Database
8. conneCTIon
9. Com4Tel server
10. Java development kit
11. Route info server
12. Address book server
13. TomCat
14. WebAdmin
15. WebPresence
16. Watchdog
26 • Commissioning the server components Installation Manual Com4Tel Client/Server
Page 27

Networked system
In a networked system, you can distribute and use the components on several
personal computers. As a networked system provides diverse possibilities, we
would like to explain the installation using two examples.
Example 1: Use of two personal computers
You would like to distribute the components for Com4Tel on two personal
computers or a customer is already using conneCTIon. The scenario is as
follows.
Personal computer Installed components Explanation
Hostname (example):
romeo
Hostname (example):
julia
License server
License admin tool
Module Manager
conneCTIon
TTrace
OmniNames
Sybase
Database
Com4Tel server
Java development kit
Route info server
Address book server
TomCat
WebAdmin
WebPresence
Watchdog
You can also use already
installed components.
When the Com4Tel
server is installed the
license server's hostname
is preset (in the example:
romeo).
When you install the
Route Info server you
must enter the license
server's hostname (in the
example: romeo).
Installation Manual Com4Tel Client/Server Commissioning the server components • 27
Page 28

Example 2: Use of three personal computers
You would like to distribute the components for Com4Tel among three personal
computers. The scenario is as follows.
Personal computer Installed components Explanation
Hostname (example):
hero
Hostname (example):
claudio
Hostname (example):
borachio
License server
License admin tool
Module Manager
conneCTIon
OmniNames
Sybase
Database
Route info server
Address book server
Watchdog
TTrace
Com4Tel server
Java development kit
TomCat
WebAdmin
WebPresence
Watchdog
You can also use already
installed components.
When you install the
database you must enter
the TTrace server's
hostname (in the example:
borachio).
When you install the
Route Info server you
must enter the host names
of the license server (in
the example: hero) and
the TTrace server (in the
example: borachio).
Note: The Watchdog
must be adapted to the
relevant scenario (path
details, etc.)
When you install the
Com4Tel server you must
enter the hostnames of the
license server (in the
example: hero), the
database server (in the
example: claudio) and the
Corba naming service
(OmniNames) (in the
example: claudio).
28 • Commissioning the server components Installation Manual Com4Tel Client/Server
Page 29

What if an earlier version of conneCTIon is available?
It is possible that an earlier version of conneCTIon is already being used. Um To
use Com4Tel, you must update the earlier version to Version 4.0.
Data storage in conneCTIon
conneCTIon 2.5
In conneCTIon 2.5 the configuration data is stored in the Windows registry.
From conneCTIon 3.0
With conneCTIon 3.0, the configuration data is also stored in the database. The
database serves as the master.
Updating conneCTIon
If a customer is already using an earlier version of conneCTIon and has already
configured relevant groups and users, you will usually want to continue to use
this configuration. To do this, you must only update the version of conneCTIon.
Attention: In order to use the data from the previous version of
conneCTIon, you must not uninstall the version.
Update conneCTIon before you install Com4Tel. No special settings or
measures are required.
Data matching from conneCTIon 3.0
After you have updated conneCTIon, install Com4Tel as described.
Figure showing the components involved
The following schematic diagram shows the components involved.
conneCTIon Browser
Windows
registry
cticonfig.exe
Datenbank
Web@dmin
The CTI server data is also stored in the Windows Registry. An independent
process performs the data matching. Thus, a very loose coupling is achieved so
that conneCTIon continues to work even if there is no access to the database.
Com4Tel is configured using the Web@dmin application and the data is stored
in the database.
Installation Manual Com4Tel Client/Server Commissioning the server components • 29
Page 30

Data matching
Data matching runs through a start up when the cticonfig.exe process is started.
The startup does not begin until a connection has been established with the
database and conneCTIon. All missing or differing data is updated in
conneCTIon so that it is the same as the database data. Additional data in
conneCTIon is added in the database. The startup is then complete. Each change
to data records in the database is immediately configured in conneCTIon (notify
link).
30 • Commissioning the server components Installation Manual Com4Tel Client/Server
Page 31

How do I transfer data from an earlier version?
If you are already using an earlier version of Com4Tel, you must back up the
database first. Sybase 12.5.2 is used in the previous version of Com4Tel.
Backing-up the database cc
Back up the database as follows. You can back the database up onto a tape drive
or a data carrier. We advise you to use a data carrier (e.g. hard disk) for the
backup.
Please note that this instruction applies to Sybase 12.5.3.
Requirement
The Sybase BCKServer_Hostname service must have been started.
Backing-up
1. Start Sybase Central Java Edition.
2. In the Extra menu, select the item Connect. The Connect to
Adaptive Server Enterprise dialog appears.
3. Log on with the user name sa and the corresponding password.
Ensure the hostname is entered under Server name. Click OK.
4. Click Databases. Right-click the database cc. A context-menu
appears. Select Backup.
5. The cc Backup – Select type of backup dialog appears. Select
Backup the entire database. Click Next.
6. The cc Backup – Select Dump Devices dialog appears. Click
Add.
7. The Select Dump Devices dialog appears. Select
dump device. Enter the physical data carrier, e.g. c:\temp\c4t115.
Click OK.
8. Accept the default and click Next.
9. The cc Backup – Select backup name dialog appears. Accept the
defaults and click Next.
10. The cc Backup – Choose the dump performance option dialog
appears. Accept the defaults and click Finish. Depending on the
quantity of data involved the backup takes up to 10 minutes.
11. In the Backup Messages dialog, check the messages for errors.
Close the window (
Further action
Explicit
).
After you have backed up the database, install the server components as
described. The server components are overwritten by the current version.
Important: Do not remove the installations manually.
After you have installed all the server components, update the database.
For further information see: “
Installation Manual Com4Tel Client/Server Commissioning the server components • 31
Backing-up the database” on page 56
Page 32

Installing the server components
If you install all the server components on a personal computer, you can execute
the following installations one after the other. Com4Tel assists you with the
installation by providing a guideline installation.
Checking the operating system requirements
The following requirements must be fulfilled in order to successfully installed
the server components for Com4Tel.
• You must log on as the administrator and have administrator rights.
• The personal computer must be known in the domain.
• Other Windows applications are closed.
TTrace
Install TTrace as follows.
1. The guideline installation is started. Switch to the TTrace tab.
Click Install.
2. The Welcome dialog appears. Click Next.
3. The Choose Setup Type dialog appears. Click Complete.
4. The Ready to Install dialog appears. Click Install. The
components for TTrace are installed.
5. The Completing dialog appears. Click Finish to finish the
installation.
OmniNames
Install OmniNames as follows.
1. The guideline installation is started. Switch to the OmniNames tab.
Click Install.
2. The Welcome dialog appears. Click Next.
3. The Choose Setup Type dialog appears. Click Complete.
4. The Ready to Install dialog appears. Click Install. The
components for OmniNames are installed.
5. The Completing dialog appears. Click Finish to finish the
installation.
License server
Install the license server. Further information is provided in the licensing user
manual.
You do not have to make any special settings for Com4Tel.
32 • Commissioning the server components Installation Manual Com4Tel Client/Server
Page 33

License admin tool
Install the license admin tool. Further information is provided in the licensing
user manual.
You do not have to make any special settings for Com4Tel.
Module Manager
The module manager is not required for a CTI link via IP.
When you install the module manager you must differentiate between the PABX
to be used. You must enter the settings depending on the PABX.
PABX I33/I55
1. The guideline installation is started. Switch to the Module
Manager tab. Click Install.
2. The Select a setup-language dialog appears. Select a language and
click OK.
3. The Communication Manager dialog appears. Click Next.
PABX I5
4. The Select Destination Path dialog appears. Accept the default
and click Next.
5. The Select Program Folder dialog appears. Accept the default and
click Next.
6. The ISDN adapter type dialog appears. Select your ISDN card
type (number of channels). Click Next.
7. The B Channel Selection dialog appears. Accept the default and
click Next.
Note: If you have selected 30 B channels in the Isdn Adapter
Type Selection dialog, the Select Access Type dialog appears
immediately.
8. The Select Access Type dialog appears. Select I33/I55 CSTA
(CTI server, ACD, CallCenter...). Click Next.
9. The Configuration CSTA for PABX I33xE dialog appears. Enter
the access No., user and password. Click PBX-> to accept the data.
Click Next.
10. The Trace system dialog appears. Accept the default and click
Next. The components for the module manager are installed.
11. The Maintenance Operations Finished dialog appears. Click
Finish to finish the installation.
1. The guideline installation is started. Switch to the Module
Manager tab. Click Install.
2. The Select a setup-language dialog appears. Select a language and
click OK.
3. The Communication Manager dialog appears. Click Next.
4. The Select Destination Path dialog appears. Accept the default
and click Next.
5. The Select Program Folder dialog appears. Accept the default and
click Next.
Installation Manual Com4Tel Client/Server Commissioning the server components • 33
Page 34

6. The ISDN adapter type dialog appears. Select your ISDN card
type (number of channels). Click Next.
7. The B Channel Selection dialog appears. Accept the default and
click Next.
8. The Select Access Type dialog appears. Select I3/I5 CTI (TLP,
CSTA). Click Next.
9. The Configuration for PABX I3 / I5 dialog appears. Accept the
default and click Next.
10. The Trace system dialog appears. Accept the default and click
Next. The components for the module manager are installed.
11. The Maintenance Operations Finished dialog appears. Click
Finish to finish the installation.
Sybase 12.5.3
The Sybase database is used as a relational database management system.
Installation
You must be logged on as the system administrator. Install the Sybase database
as follows.
1. The guideline installation is started. Switch to the Sybase tab.
Click Install.
2. The Sybase ASE installer dialog appears.
3. Select the drive you want to install Sybase on.
4. Enter the computer name as SQL server name.
Note: Problems occur with the database connection if you do not
use the computer name.
You must assign a password for the user sa. This must be at least 6
characters long (Avaya convention).
5. The ODBC Support and jConnect (JDBC) support options must
be selected.
6. Click Install. The database is installed. The installation takes
around 30 minutes.
7. The Installation successfully finished dialog appears. Click OK.
8. Restart the computer.
Checking the installation
Check whether you can start Sybase Central Java Edition and whether access
is possible as user sa.
1. Start Sybase Central Java Edition.
2. Select Connect under Extra.
3. Log on with the user name sa and the corresponding password.
4. Click OK.
34 • Commissioning the server components Installation Manual Com4Tel Client/Server
Page 35

Database
You must install the database cc for Com4Tel.
Requirements
The following requirements must be fulfilled in order to successfully install the
database components.
• The Sybase database must be installed.
• The Sybase SQL Server service must be started.
• The Sybase BCKServer service must be started.
Upgrade
If you have used an earlier version of Com4Tel and want to transfer the data you
must upgrade the database. Do this as follows
1. Insert the CTI Components CD1 CD in your CD-ROM drive.
2. Start UpgradeTool.exe in the folder Database – UpgradeTool.
The Upgrade Tool dialog appears. Accept the defaults for the
database server and the username. Enter the password for the user
sa. Click OK.
3. The Databases hosted by Computer name dialog appears. Click
Upgrade. The upgrade process starts. The process takes up to 30
minutes depending on the size of the database.
4. The conversion to unicode successfully finished dialog appears.
Click OK. Click Exit to complete the unicode conversion.
Note: For safety, backup the database. See “
database
5. To continue with the upgrade, switch to the guidelines in the
Database tab. Click Install.
6. The Please enter the administrative login data for the database
server dialog appears. Enter the user name sa and the
corresponding password. Click OK.
7. Click Upgrade. The conversion to unicode successfully finished
dialog appears. The upgrade is now completed.
Installation
If you have not yet used a version of Com4Tel, install the database cc as
follows.
1. The guideline installation is started. Switch to the Database tab.
Click Install.
2. The Please enter the administrative login data for the database
server dialog appears. Enter the user name sa and the
corresponding password. Click OK.
” on page 57.
Backing-up the
3. The MultiVantage Customer Interaction Express Database
dialog appears. Click Next.
4. The Choose Setup Type dialog appears. Click Complete.
5. The Sybase Database Setup dialog appears. Enter the hostname of
the CORBA naming service and the hostname of the TTrace
system server. You usually accept the defaults. Click Next.
6. The Sybase Device Setup dialog appears. Apply the defaults. Click
Next.
Installation Manual Com4Tel Client/Server Commissioning the server components • 35
Page 36

7. The Ready to Install dialog appears. Click Install.
8. The Installing Database dialog appears. The installation takes
around 30 minutes. Click Finish to finish the installation.
conneCTIon
Install conneCTIon. Further information is provided in the conneCTIon user
manual. You do not have to enter any special settings for Com4Tel.
Please read the topic: "
on page
29
What if an earlier version of conneCTIon is available?"
Com4Tel Server
Install the Com4Tel server. Do this as follows.
1. The guideline installation is started. Switch to the Com4Tel C
Server tab. Click Install.
2. The Com4Tel Server dialog appears. Click Next.
3. The End-User License Agreement dialog appears. Select
accept the terms in the license agreement. Click Next.
4. The Choose Setup Type dialog appears. Click Complete.
5. The General settings dialog appears. Enter the hostname of the
Corba naming service and the Tomcat server. If all the components
are installed on one computer, accept the defaults. Accept the
defaults for the port of the Corba naming service and the port of the
Tomcat server. Click Next.
6. The Ready to install dialog appears. Click Install. The
components for the Com4Tel server are installed.
7. The Com4Tel Server dialog appears. Click Finish to finish the
installation.
I
Java development kit
Install the Java development kit. Do this as follows.
1. The guideline installation is started. Switch to the Java
Development Kit tab. Click Install.
2. Agree to the license agreement and accept the defaults.
36 • Commissioning the server components Installation Manual Com4Tel Client/Server
Page 37

Route info server
Install the Route Info server. Do this as follows.
1. The guideline installation is started. Switch to the Route Info
Server tab. Click Install.
2. The Welcome dialog appears. Click Next.
3. The License Agreement dialog appears. Select
terms in the license agreement. Click Next.
4. The Destination Folder dialog appears. Accept the default and
click Next.
5. The Configuration dialog appears (license server, TTrace, Corba).
Enter the hostname of the license server, the TTrace server and the
Corba naming service. If all the components are installed on one
computer, accept the defaults. Accept the default for the port of the
Corba naming service. Click Next.
6. The Configuration dialog appears (database cc). Enter the
hostname of the database cc. If all the components are installed on
one computer, accept the defaults. Accept the defaults for the port
of the database cc and the time interval for a database update. Click
Next.
7. The Ready to install the program dialog appears. Click Install.
The components for the Route Info server are installed.
8. The Install Shield Wizard Completed dialog appears. Click
Finish to finish the installation.
Address book server
Install the address book server. Do this as follows.
I accept the
1. The guideline installation is started. Switch to the Address Book
Server tab. Click Install.
2. The Welcome dialog appears. Click Next.
3. The License Agreement dialog appears. Select
terms in the license agreement. Click Next.
4. The Destination Folder dialog appears. Accept the default and
click Next.
5. The Configuration dialog appears (TTrace, Corba). Enter the
hostname of the TTrace server and the Corba naming service. If all
the components are installed on one computer, accept the defaults.
Accept the default for the port of the Corba naming service. Click
Next.
6. The Configuration dialog appears (database cc). Apply the
defaults. You must enter the password for the user sa as the
Administrative password. Click Next.
7. The Configuration dialog appears (ADB database). Enter the size
of the address book server database. 500 MB is set as a default. The
guideline value is: 1 GB is reasonable for 100000 addresses.
Accept the default for the installation path. Click Next.
8. The Ready to install the program dialog appears. Click Install.
The components for the address book server are installed.
I accept the
Installation Manual Com4Tel Client/Server Commissioning the server components • 37
Page 38

9. The Install Shield Wizard Completed dialog appears. Click
Finish to finish the installation.
TomCat
Install TomCat. Do this as follows.
1. The guideline installation is started. Switch to the TomCat tab.
Click Install.
2. The Welcome dialog appears. Click Next.
3. The License Agreement dialog appears. Click I Agree.
4. The Choose Components dialog appears. Select Full in the
selection box. Click Next.
5. The Choose Install Location dialog appears. Accept the default
and click Next.
6. The Configuration dialog appears. Accept the defaults and click
Next.
7. The Java Virtual Machine dialog appears. Accept the default and
click Install. The components for TomCat are installed.
8. The Completing dialog appears. Click Finish to finish the
installation.
Web@dmin
Install Web@dmin. Do this as follows.
1. The guideline installation is started. Switch to the WebAdmin tab.
Click Install.
2. The Welcome dialog appears. Click Next.
3. The Ready to Install the Program dialog appears. Click Install.
The components for WebAdmin are installed.
4. The Install Shield Wizard Completed dialog appears. Click
Finish to finish the installation.
WebPresence
Install the presence management WebPresence. Do this as follows.
1. The guideline installation is started. Switch to the WebPresence
tab. Click Install.
2. The Welcome dialog appears. Click Next.
3. The Ready to Install the Program dialog appears. Click Install.
The components for WebPresence are installed.
4. The Install Shield Wizard Completed dialog appears. Click
Finish to finish the installation.
38 • Commissioning the server components Installation Manual Com4Tel Client/Server
Page 39

Watchdog
The Watchdog application is used to put the software back into service in the
event of a complete or partial system failure, as soon as the required components
are available again.
Installing
1. The guideline installation is started. Switch to the Watchdog tab.
Click Install.
2. The Welcome dialog appears. Click Next.
3. The Choose Setup Type dialog appears. Click Complete.
4. The Avaya - Tenovis Watchdog Settings dialog appears. Enter
the name of the TTrace server. Click Next.
5. The Ready to Install dialog appears. Click Install. The
components for Watchdog are installed.
6. The Completing dialog appears. Click Finish to finish the
installation.
Configuration
When the components are installed, two import files (German and English) are
automatically generated. These files contain the relevant settings for the
Watchdog application. You must distribute the contents of the relevant file. Do
this as follows.
1. Start the Watchdog Config application under Start – Programs -
Avaya – Watchdog.
2. Select Open under File.
3. Open the en_com4telc_watchdog.xml file.
4. Select Distribute under File. The Distribute Configuration File
dialog appears. Click Distribute Now.
5. Click OK to save your changes.
Note: The path details in the configuration files refer to the default paths.
Watchdog tips and tricks
See also: "
Using the Watchdog application" on page 63
Installation Manual Com4Tel Client/Server Commissioning the server components • 39
Page 40

Issuing the licenses
You need valid licenses to use Com4Tel. The issue of licenses is usually
controlled by a license server.
Licenses
The following licenses are necessary to operate Com4Tel and for telephony
functions. The licenses are usually managed by your system administrator.
Please inform your system administrator if error messages indicate license
problems.
License In relation to Explanation
Com4telc2prof
or
Com4telc2office
Com4telc2server Server This license is required to run the
Client Each Com4Tel user requires a license.
However, like Com4telc2prof, you
cannot use rule-based presence
management.
Com4Tel server.
Issue via license server
A license server usually deals with the issuing of the necessary licenses for
Com4Tel. When you install the server you must enter the hostname of the
relevant license server. When you start the applications they request an
appropriate license from the license server.
License server
The CTI CD contains the necessary components of a license server.
License
The relevant files (*.ltx) contain the licenses.
You use conneCTIon
If you use conneCTIon for applications other than Com4Tel, you must license
these applications separately.
40 • Commissioning the server components Installation Manual Com4Tel Client/Server
Page 41

Starting the services and processes
A Com4Tel Server requires several services and processes. The services are
usually started automatically. You must start the processes.
Which services have to be started?
To use the Com4Tel Server, the following services must be working.
• Apache Tomcat
• Avaya Tenovis Watchdog
• Avaya omniORB Naming Service
• Communication manager
• Sybase BCKServer_Hostname_BS
• Sybase SQLServer_Hostname
• Tenovis CTI server
• Tenovis license server
Checking
The start type for services is usually set to Automatic. Check the status and the
start type. You can manually quit or start the services at any time.
Administration with Com4Tel Web@dmin
Once Com4Tel Server is ready to use, you must configure the properties. Use
the tool Com4Tel Web@dmin. The procedure and use is described in the user
manual and the online help for Com4Tel Web@dmin.
Installation Manual Com4Tel Client/Server Commissioning the server components • 41
Page 42

Use a certificate for data protection and security
What is SSL?
SSL is a technology, which enables the web server (Apache Tomcat) and
browser (client) to exchange their data via a secure connection. This means that
data sent is encrypted by one side, transferred and then decoded by the other
side. This process is a two-way process. Data to be sent is encrypted beforehand
by the web server and by the browser. All data traffic is encrypted in this way
and is therefore secure.
Data traffic sent and received via the https protocol.
Documentation
Apache Tomcat has its own documentation. View this as follows.
1. In the installation path of Apache TomCat (usually C:\Program
Files\Apache Software Foundation\Tomcat 5.5), switch to the
directory \webapps\tomcat-docs.
2. The SSL documentation is located under ssl-howto.html.
Procedure
You must complete the following steps to switch Apache Tomcat to SSL. Ensure
you follow the set procedure and enter all the required entries.
1. Create a certificate keystore.
2. Copy the .keystore file.
3. Change the configuration for Apache Tomcat.
4. Exit the Apache Tomcat service and then restart it.
5. If necessary you can import the certificate at the client.
42 • Commissioning the server components Installation Manual Com4Tel Client/Server
Page 43

Create a certificate keystore
Apache Tomcat only works with so-called JKS format keystores. This is a
standard format in JAVA. An appropriate tool for this exists under JAVA. JDK
contains this tool. You use this tool to create a .keystore file.
Create the file as follows. Please ensure you note and enter the relevant entries.
Web@dmin only works under SSL if you enter the relevant entries.
1. Open a command prompt (DOS box).
2. Switch to the folder C:\Program Files\Java\jre1.5.0_05\bin.
3. Enter the following command.
C:\Program Files\Java\jre1.5.0_05\bin\keytool -genkey -alias tomcat
-keyalg RSA -validity 20000
4. Press the Enter key. The following display appears.
Enter the Keystore password:
5. Enter a keystore password, e.g. Password123. Please note that
Password123 is only an example. You must also use this password
in the configuration of Apache Tomcat. Press the Enter key. The
following display appears.
What is your first and last name?
[Unknown]:
6. Enter the Hostname of the personal computer, on which Apache
Tomcat is working. Press the Enter key. The following display
appears.
What is the name of your organizational unit?
[Unknown]:
7. Do not enter anything. Press the Enter key. The following display
appears.
What is the name of your organization?
[Unknown]:
8. Do not enter anything. Press the Enter key. The following display
appears.
What is the name of your town/city or district?
[Unknown]:
9. Do not enter anything. Press the Enter key. The following display
appears.
What is the name of your state or province?
[Unknown]:
10. Do not enter anything. Press the Enter key. The following display
appears.
What is the country code (two letters) for this unit?
[Unknown]:
11. Do not enter anything. Press the Enter key. The following display
appears.
Is CN=Hostname, OU=Unknown, O=Unknown, L=Unknown, ST=Unknown,
C=Unknown correct?
[No]:
12. Enter yes. Press the Enter key. The following display appears.
Enter the password for <tomcat>. (Enter key if password is the same
as for Keystore):
13. Do not enter anything. Press the Enter key. The .keystore file is
created in the folder of the logged on user.
Installation Manual Com4Tel Client/Server Commissioning the server components • 43
Page 44

Copy the .keystore file
You must copy the .keystore file into the Apache Tomcat folder.
1. The .keystore file created is located in the folder of the logged on
user (under Documents and Settings).
2. Copy the .keystore file into the Apache Tomcat folder. Example:
C:\Program Files\Apache Software Foundation\Tomcat 5.5
Change the configuration for Tomcat
You must switch to the https protocol in the Tomcat configuration. Do this as
follows.
1. Use NOTEPAD to open the server.xml file in the Apache
Software Foundation\Tomcat 5.5\conf folder. Go to the
following section.
2. You must switch off the connector for http without SSL by
annotating the relevant section (<!-- at the beginning and --> at the
end). You must remove the annotation for http with SSL in the
connector.
3. In addition, you must enter the password used
(keystorePass="password123") and the folder
(keystoreFile="c:\Program Files\Apache Group\Tomcat
4.1\.keystore") in which the .keystore is located. The following
sections show the relevant sections before and after.
4. Save the changes.
Before:
<!-- Define a non-SSL HTTP/1.1 Connector on port 8080 -->
<Connector port="8080" maxHttpHeaderSize="8192"
maxThreads="150" minSpareThreads="25"
maxSpareThreads="75"
enableLookups="false" redirectPort="8443"
acceptCount="100"
connectionTimeout="20000" disableUploadTimeout="true"/>
<!-- Note : To disable connection timeouts, set
connectionTimeout value to -1 -->
<!-- Define a SSL Coyote HTTP/1.1 Connector on port 8443 -->
<!-<Connector port="8443" maxHttpHeaderSize="8192"
maxThreads="150" minSpareThreads="25"
maxSpareThreads="75"
enableLookups="false" disableUploadTimeout="true"
acceptCount="100"
scheme="https" secure="true" clientAuth="false"
sslProtocol="TLS"/>
-->
44 • Commissioning the server components Installation Manual Com4Tel Client/Server
Page 45

After:
<!-- Define a non-SSL HTTP/1.1 Connector on port 8080 -->
<!-<Connector port="8080" maxHttpHeaderSize="8192"
maxThreads="150" minSpareThreads="25"
maxSpareThreads="75"
enableLookups="false" redirectPort="8443"
acceptCount="100"
connectionTimeout="20000" disableUploadTimeout="true"/>
-->
<!-- Note : To disable connection timeouts, set
connectionTimeout value to -1 -->
<!-- Define a SSL Coyote HTTP/1.1 Connector on port 8443 -->
<Connector port="8443" maxHttpHeaderSize="8192"
maxThreads="150" minSpareThreads="25"
maxSpareThreads="75"
enableLookups="false" disableUploadTimeout="true"
acceptCount="100"
scheme="https" secure="true" clientAuth="false"
sslProtocol="TLS"/>
Exit and restart the Apache Tomcat service
To accept the changes you must stop and then restart the Apache Tomcat
service.
1. Start the computer management.
2. Exit the Apache Tomcat service.
3. Start the Apache Tomcat service.
How to start Web@dmin with SSL?
To start the Web@dmin with SSL tool you must enter the protocol and the
relevant port.
Syntax:
https://hostname:8443/com4teladmin
If you start Web@dmin with SSL, the Security prompt dialog appears. You
must acknowledge this with Yes. You can import the certificate to prevent this
security prompt from appearing with each start.
The Microsoft Internet Explorer display the
the bottom right-hand side.
symbol for a secure connection in
Installation Manual Com4Tel Client/Server Commissioning the server components • 45
Page 46

Importing the certificate at the client
When you start the site for Web@dmin at the client, if you are working with
SSL the Certificate dialog appears. If necessary you can import the certificate at
the client. Do this as follows. The Certificate dialog then no longer appears.
1. In Microsoft Internet Explorer, double-click
right-hand side. The Certificate dialog appears.
2. Click Install Certificate. The Certificate Import Assistant dialog
appears.
3. Click Next. The Certificate Storage dialog appears.
4. Accept the default. Click Next. The Finish the Assistant dialog
appears.
5. Click Finish. The Master Certificate Storage dialog appears.
6. Click Yes to import the certificate. The The import process was
successful dialog appears.
in the bottom
46 • Commissioning the server components Installation Manual Com4Tel Client/Server
Page 47

Installing a client
The client's requirements
The following hardware and software requirements must be fulfilled to enable
you to successfully install and use all the client components of Com4Tel.
Hardware
You need the following hardware for the client components.
• PC (SATA/ATA/EISA bus or SCSI)
• Intel processor Pentium III 650 MHz or higher (or comparable
processor)
• At least 256 MB RAM for Com4Tel and Microsoft Outlook
• Hard disk with sufficient memory capacity (4 GB)
• CD-ROM drive
• 3.5 inch disk drive (optional)
• Keyboard
• Pointer (mouse)
• Network card (optional)
• Screen (recommended resolution: 1024 x 768 Pixel)
Please note: If you use other applications you may have to larger server
hardware (CPU and RAM) dimensions accordingly.
Installation Manual Com4Tel Client/Server Installing a client • 47
Page 48

Client software
You need the following software for the client components.
Client Software components
Operating system Microsoft Windows 2000 with Service Pack 4
or
Microsoft Windows XP with Service Pack 2
Software Microsoft Outlook 2000 (Service Pack 1 or higher)
Microsoft Outlook 2002 (XP)
Microsoft Outlook 2003
or
Lotus Notes RG 5
Lotus Notes RG 6
or
Avaya software
(is installed with
Com4Tel)
External
manufacturer's
software
(is installed with
Com4Tel)
Software for
administrations
toolWeb@dmin
Novell GroupWise
TCP/IP protocol stack
RPC protocol stack
Com4Tel client
Update server (application of the CTI framework for call
number mapping)
TOM (telephony components of the CTI framework)
Microsoft Data Access Components (MDAC) 2.5 or higher
(is already part of Windows XP)
Active Directory Services Interface (ADSI) 2.5 or higher (is
already part of Windows XP)
Microsoft XML Parser (XSXML 2.0)
Microsoft Internet Explorer 6 or higher
48 • Installing a client Installation Manual Com4Tel Client/Server
Page 49

Installing client software
You have read the requirements for the client installation and would like to
install the relevant software. You can install Com4Tel as client/server (3rd
party), standalone (1st party) or client/server and standalone (special application
for experienced users). This manual only refers to the client/server (3
installation.
Requirements
The following requirements must be fulfilled in order to successfully installed
the client components for Com4Tel.
• You must have administration rights. If another user is working
with Com4Tel they do not require administration rights.
• The required groupware is installed and configured.
• All Windows applications are closed.
rd
party)
Database
When installing Com4Tel, you can enter in the Destination Folder dialog
where the database is saved. The default folder is ...Documents and
Settings\User Name\Application Data\... The advantage is that all data in this
folder is backed up on a server (in a network). As the storage space available to a
user on a server is often limited, it is also possible to solely save the database
locally on the computer. In this case you must select ...Documents and
Settings\User Name\Local Settings \Application Data\... as the storage
location for the database.
Installing client software
Install the client components as follows.
Note: If you are already using an earlier version of Com4Tel, your data will be
transferred.
1. Insert the CTI Components CD1 CD in your CD-ROM drive.
2. Start the setup.exe in the client\Com4Tel folder. The Select a
setup-language dialog appears. Select the required language and
click OK.
3. The Welcome dialog appears. Click Next.
4. The License Agreement dialog appears. Accept the license
agreements and click Next.
5. The Destination Folder dialog appears. Accept the default and
click Next.
6. The Groupware dialog appears. Select the groupware you want to
use. Click Next.
7. The Application Scenarios dialog appears. Select Client/Server
(3rd Party). Click Next.
8. The Client / Server Configuration dialog appears. Enter the
computer name of the Corba naming service. Accept the setting for
the port number of the Corba naming service. Click Next.
9. The Ready to Install Program dialog appears. Click Install.
Installation Manual Com4Tel Client/Server Installing a client • 49
Page 50

10. Com4Tel is installed. The Install Shield Wizard Complete dialog
appears. Click Finish. Installation of Com4Tel is now finished.
Uninstalling
You can uninstall the client software as usual.
Change
If you open the setup again you change the groupware and computer name and
port of the Com4Tel server under the Change Program option.
50 • Installing a client Installation Manual Com4Tel Client/Server
Page 51

Installing client software via parameters (automatic installation)
You can control installation of the client software via parameters. You can either
make the client software available in the network and preassign specific settings
for the installation or have the complete client installation automatically
executed.
Parameters for installation
The following table shows the parameters if you Com4Tel users or if the users
are already using an earlier version of Com4Tel.
The parameters are given in alphabetical order in the table.
Parameters Explanation
/s Installation occurs without interface (silent
mode). This setting is mandatory.
/v The arguments are transferred to msiexec. This
setting is mandatory.
/qn Installation occurs without user interface. This
setting is mandatory. Alternatively you can use
/qb. Then only the progress and error messages
are displayed.
A_C4T_SERVICE_NAME=“
stulab102“
A_C4T_SERVICE_PORT=“
2809“
INSTALLDIR= “C:\Program
Files\Avaya\Com4TelC“
A_SELECT_GROUPWARE=“
OL“
A_SELECT_SCENARIO=“3“ Shows which scenario you want to install (in
Specifies the hostname of Corba naming
service (in the example this is stulab102). Is
only required for 3rd party.
Specifies the port of Corba naming service.
(default 2809). Is only required for 3rd party.
Shows the installation path. The default is
C:\Program Files\Avaya\Com4TelC. This entry
is optional.
Gives the groupware used (in the example this
is Outlook). This entry is optional.
OL = Microsoft Outlook (default)
LOTUS = Lotus Notes
GW = GroupWise
““ = no groupware used
the example this is 3rd Party). This entry is
optional.
3 = 3rd Party (default)
1 = 1st Party
4 = 3rd Party and 1st Party
A_DISPLAY_NUMBER=“22
2“
A_INT_CALL=“00“ Gives the country code prefix (in the example
A_COUNTRY_CODE=“49“ Gives the country code (in the example this is
Installation Manual Com4Tel Client/Server Installing a client • 51
Gives the extension number (in the example
this is 222). This entry is optional.
this is 00). This entry is optional.
Page 52

Parameters Explanation
49). This entry is optional.
A_NAT_CALL=“0“ Gives the area code prefix (in the example this
is 0). This entry is optional.
A_AREA_CODE=“89“ Gives the area code without 0 (in the example
this is 89). This entry is optional.
A_APPEND_AREA_CODE=“
0“
States whether the area code is to be added or
not (in the example 0). This entry is optional.
0 = Do not add area code.
1 = Add area code.
A_PABX_NUMBER=“615205“ Gives the PABX number (in the example this is
615205). This entry is optional.
A_AKZ=“0“ Gives the external line code (in the example
this is 0). This entry is optional.
A_CURRENCY=“0.06“ Gives the charge factor in Euro (in the example
this is 0.06 €). This entry is optional.
ADDLOCAL=“TTrace“ Specifies a list of features to be installed (in the
example TTrace). This setting is mandatory.
Features: Com4TelCClient, Bases, TTrace,
Tom, bin, db, redemption, Party_1st, Party
3_rd and groupware
Note: Only ADDLOCAL is evaluated for an
upgrade.
Silent Setup (client)
You can automate the installation at the client. The complete installation then
takes place in the background. All parameters are preassigned accordingly. At
the end of the setup the client's personal computer is automatically shut down
and restarted.
What do you have to do?
1. You must enter the start parameters for com4tel_client.exe.
Example
com4tel_client.exe /S /v" /qb A_C4T_SERVICE_NAME="Example"
A_C4T_SERVICE_PORT="2809" INSTALLDIR="c:\programme\Avaya\Com4TelC"
A_SELECT_GROUPWARE="OL"
ADDLOCAL="Com4TelCClient,Bases,TTrace,Tom,bin,db,redemption,Groupwa
re,Party_3rd""
pause
Other examples
Other examples are given in the client's installation folder.
52 • Installing a client Installation Manual Com4Tel Client/Server
Page 53

Adding the buttons for Lotus Notes
Unlike Microsoft Outlook or Novell GroupWise, you must manually integrate
the additional symbols in Lotus Notes.
Symbols for Lotus Notes
The following three symbols integrate Com4Tel in IBM Lotus Notes. This
enables you to establish or end a connection for a call directly in IBM Lotus
Notes without changing applications.
Symbol Explanation
If you have selected or opened an e-mail you can call the sender.
Ends a connection.
If you have selected or opened an e-mail, use this function to switch
to the corresponding contact card.
Adding the buttons for Lotus Notes R5
Add the buttons for Com4Tel in Lotus Notes R5 as follows.
1. Open Lotus Notes.
2. Select File
dialog appears. The symbols
Available Symbols.
3. Use Drag&Drop to assign the symbols (pull to the right-hand side).
4. Click OK. The symbols appear in the Lotus Notes symbol bar.
Default SmartIcons. The Smart Icons Setting
, and are displayed under
Adding the buttons for Lotus Notes R6 or R7
Add the buttons for Com4Tel in Lotus Notes R6 or R7 as follows.
1. Open Lotus Notes.
2. Select File
dialog appears.
Default Symbol Bar. The Symbol Bar Defaults
3. Click
4. Click Import.
5. Import the c4tsmarticons.smi file from the C:\program
files\avaya\Com4Tel\Groupware folder.
6. Select
7. Click OK to save your settings.
Installation Manual Com4Tel Client/Server Installing a client • 53
Symbol Bars.
Com4TelSISet as Visible.
Page 54

Changing the firewall settings for Windows XP Service Pack 2
If you use Com4Tel on a client with the operating system Windows XP and
Service Pack 2, you must edit the firewall settings accordingly for an active
firewall.
What does the firewall do?
The firewall limits communication between the personal computer and other
personal computers in the network. To run Com4Tel, you must allow the
programs Com4TelC, tomsrv and Updsrv to communicate with the Com4Tel
server.
We advise you to use the firewall
Like Microsoft, we advise you to activate the firewall. You must configure the
firewall to ensure that Com4Tel works.
Requirements
The following requirements must be fulfilled in order to make the necessary
settings.
• Operating system Windows XP Service Pack 2 or higher
• Active firewall (recommended)
Changing the settings
Set the firewall for operation of Com4Tel as follows.
1. Click Start – Settings - Control Panel – Security Centre. The
Windows Security Centre dialog appears.
2. Click Windows Firewall. The Windows Firewall dialog appears.
3. Select
4. Click the Exceptions tab.
5. Click Program. The Add a Program dialog appears.
6. Click Browse. The programs for Com4Tel are usually located in
the folder C:\Program Files\Avaya\Com4TelC\bin.
7. You must select the programs Com4TelC (com4telc.exe) and
Updsrv (updsrv.exe).
8. Click Browse. You must select the TOM server. The program
(tomsrv.exe) is usually located in the folder C:\Program
Files\Shared Files\Avaya\Tom.
Active (recommended).
9. You must select the tomsrv program (tomsrv.exe).
10. The list of exceptions must contain the following entries.
Com4TelC
tomsrv
Updsrv
54 • Installing a client Installation Manual Com4Tel Client/Server
Page 55

11. Select Com4TelC.
12. Click Edit. The Edit Program dialog appears.
13. Click Change Area. The Change Area dialog appears.
14. Enter the IP address and the computer's sub-screen under which
Com4Tel is installed under
User-Defined List.
15. Click OK to save the area.
16. Click OK to save the program's properties.
17. Repeat steps 11 to 16 for the programs tomsrv and Updsrv.
18. Click OK to save your settings.
Installation Manual Com4Tel Client/Server Installing a client • 55
Page 56

Maintenance
Backing-up the database
You can back-up data to a file or tape. Please note the relevant requirements.
You can also make a backup while the system is running.
What is a backup server?
The backup server is used to carry out local or remove backups (backup dump)
and to restore (restore, load) certain databases and transaction logs for the
Adaptive Server Enterprise.
A Backup server must run in the same system as the respective installation of the
Adaptive Server Enterprise.
Guidelines for backing up the master database
Back up the master database after each change. Each process concerning hard
disks, memory, databases or segments leads to changes in the system tables of
the master database. Back-up the master database after creating the database and
after increasing the size of the database.
Guidelines for backing up the database
Back-up the database after the following events:
• Right after creating the database to ensure you have a basic backup
copy. Then back up the database according to a fixed schedule.
Minimum standard is the daily backup of the transaction log and
weekly backup of the database.
• After reducing the size of the transaction log without creating a
backup copy.
• Before each upgrade.
56 • Maintenance Installation Manual Com4Tel Client/Server
Page 57

Backing-up the database
You can back-up the database to a DAT tape or to free hard drive space. To do
this, use the Sybase Central Java Edition administration tool.
You can back-up the cc database in a file and import a new database.
Note
Please note that this instruction applies to Sybase 12.5.3.
Requirement
The Sybase BCKServer_Hostname service must have been started.
Backing-up
Back-up a database as follows.
1. Start Sybase Central Java Edition.
2. In the Extra menu, select the item Connect. The Connect to
Adaptive Server Enterprise dialog appears.
3. Log on with the user name sa and the corresponding password.
Ensure the computer name is entered under Server name. Click
OK.
4. Click Databases. Right-click the database cc. A context-menu
appears. Select Backup.
5. The cc Backup – Select type of backup dialog appears. Select
Backup the entire database. Click Next.
6. The cc Backup – Select Dump Devices dialog appears. Click
Add.
7. The Select Dump Devices dialog appears. Select
dump device. Enter the physical data carrier, e.g. c:\temp\c4t115.
Click OK.
8. Accept the default and click Next.
9. The cc Backup – Select backup name dialog appears. Accept the
defaults and click Next.
10. The cc Backup – Choose the dump performance option dialog
appears. Accept the defaults and click Finish. Depending on the
quantity of data involved the backup takes up to 10 minutes.
11. In the Backup Messages dialog, check the messages for errors.
Close the window (
).
Explicit
Installation Manual Com4Tel Client/Server Maintenance • 57
Page 58

Restoring the database
To restore a database you must restore it and then switch it online.
Note
Please note that this instruction applies to Sybase 12.5.
Requirement
The following requirements must be fulfilled in order to restore a database.
• The Watchdog service must be inactive (has not been started). Exit
the Watchdog service.
• Please not that the size of the restored database must be the same as
the size of the backed up database. The settings for Size of the
database device, Size of the log device and Size of the temp
device must be the same.
Restore
Restore a database as follows.
1. Start Sybase Central Java Edition.
2. In the Extra menu, select the item Connect. The Connect to
Adaptive Server Enterprise dialog appears.
3. Log on with the user name sa and the corresponding password.
Ensure the computer name is entered under Server name. Click
OK.
4. Click Databases. Right-click the database cc. A context-menu
appears. Select Restore.
5. The cc Restore – Select type of restore dialog appears. Select
Restore the entire database. Click Next.
6. The cc Restore – Select Dump Devices dialog appears. Click
Add.
7. The Select Dump Devices dialog appears. Select
dump device. Enter the physical data carrier, e.g. c:\temp\c4t115.
Click OK.
8. Accept the default and click Next.
9. The cc Restore – Select restore name dialog appears. Accept the
defaults and click Next. Depending on the quantity of data
involved the restore process takes up to 10 minutes.
10. In the Backup Messages dialog, check the messages for errors.
Close the window (
).
Explicit
58 • Maintenance Installation Manual Com4Tel Client/Server
Page 59

Activating the database
After you have restored the database you must switch it online again.
1. Start Sybase Central Java Edition.
2. In the Extra menu, select the item Connect. The Connect to
Adaptive Server Enterprise dialog appears.
3. Log on with the user name sa and the corresponding password.
Ensure the computer name is entered under Server name. Click
OK.
4. Click Databases. Right-click the database cc. A context-menu
appears. Select Online. The database is now online.
Load
During installation, threshold values are defined in the database for the load
(filled capacity) of the database after transaction logs. When the load (filled
capacity) in the database area exceeds 90%, an error message is written into the
sybase errorlog. If the space available in the transcription log fall below 20,000
pages (2k each), an error message will also be written into the sybase errorlog.
The space available in the transaction log is checked every ten minutes.
Online help for Sybase
The online Help for Sybase with searching by error numbers can be found under:
http://manuals.sybase.com/onlinebooks/group-as/asg1500e
Installation Manual Com4Tel Client/Server Maintenance • 59
Page 60

Call number mapping
Use the updsrv.exe program for call number mapping.
Folder
The updsrv.exe program is located in the following folder.
C:\Program Files\Avaya\Com4TelC\bin
Start parameters
We recommend use of the following start parameters.
• –C4TSilent
• –C4Tall
Example:
C:\Program Files\Avaya\Com4TelC\bin\updsrv.exe –C4TSilent –C4Tall
User
Please note which Windows user runs the updsrv.exe program. This Windows
user must have access to the available telephone books, otherwise you cannot
successfully complete the call number mapping.
Tip
You can start the updsrv.exe program under another user. Do this as follows.
1. Create a link for the updsrv.exe program.
2. Open the link's properties (right-click).
3. Select
4. Click OK to save your settings.
5. If you double-click the link the Run under another user ID dialog
appears.
6. Enter the user name, password and domain.
7. Click OK.
Run under another user name.
60 • Maintenance Installation Manual Com4Tel Client/Server
Page 61

Start parameters of the cticonfig process
The cticonfig process is used for data matching between the database and
conneCTIon Registry.
You can use the following start parameters for the cticonfig process.
Parameters Default Description
-P - After starting the set parameters are output.
-du ccuser Specifies the database user name.
-dp ****** Specifies the encrypted password for the
database.
-dc - Specifies the name of the database.
-tt localhost Specifies the hostname of the TTrace server.
-e 5005 Specifies the RPC port of conneCTIon.
-n localhost Specifies the hostname of the CTI server.
-cpt 0 Specifies the time in seconds after which the
conneCTIon configuration is read and matched
(poll).
Remote maintenance using PC-Anywhere
Avaya offers remote maintenance services on the basis of the product
PCAnywhere. Further details of this are availalbe from your responsible sales
employee. Please use Version 10.5 or higher.
Installation Manual Com4Tel Client/Server Maintenance • 61
Page 62

Tips and tricks
Updating Web@dmin
You can update the Web@dmin application on the TomCat web server. Do this
as follows. Please ensure the folders are the same as the defaults.
1. Exit the Apache Tomcat service.
2. In the C:\Program Files\Apache Software Foundation\Tomcat
5.5\webapps folder, delete the com4admin.war file.
3. In the C:\Program Files\Apache Software Foundation\Tomcat
5.5\webapps folder, delete the com4teladmin folder.
4. Copy the new com4admin.war file into the C:\Program
Files\Apache Software Foundation\Tomcat 5.5\webapps folder.
5. Start the Apache Tomcat service. The service automatically
unpacks the war file. You can then use the new version of
Web@dmin.
62 • Tips and tricks Installation Manual Com4Tel Client/Server
Page 63

Using the Watchdog application
You have installed and configured the Watchdog application. You use the
application for the Com4Tel components.
Recommendation
We recommend you also start the following service via the Watchdog
application.
• Config CTI-Server
Watchdog configuration
Configure the Watchdog as follows. This manual only gives the most important
settings.
Recommended order:
1. DB server
2. LNA server
3. CTI-Config
4. TOM server
CTI-Config
Start executable cticonfig.exe
Program arguments
Installation Manual Com4Tel Client/Server Tips and tricks • 63
Page 64

Creating a connection profile for Sybase Central
You can create a connection profile for Sybase Central.
Advantage
The advantage of a connection profile is that you can start Sybase Central
without user identification.
Create
Create a connection profile for the database cc with the user sa as follows.
1. Sybase Central Java Edition is open. In the Extras menu, select
the item Connection profile.
2. The Connection Profile dialog appears. Click New.
3. The Create New Profile dialog appears. Enter a name for the
connection profile, e.g. cc. Click OK.
4. The Connect to Adaptive Server Enterprise dialog appears.
Enter the user name sa and the corresponding password. Ensure
the computer name is entered under Server name. Click OK.
5. Select the connection profile you created. Click Start Release.
6. Click Close. The profile is now created.
64 • Tips and tricks Installation Manual Com4Tel Client/Server
Page 65

Call number mapping with the task planner
You can use the operating system's task scheduler to schedule call number
mapping at any time you choose. Call number mapping is then performed as a
scheduled event.
Configure
Perform call number mapping, e.g. at a specific time on workdays as follows.
1. Opened Scheduled Tasks in Control Panel.
2. Double-click Add Scheduled Task. The Scheduled Task
Assistant dialog appears.
3. Click Next.
4. Click Browse.
5. Open the updsrv.exe file in the C:\Program
Files\Avaya\Com4TelC\bin folder.
6. Follow the instructions on the screen. Select: Open advanced
properties for this task when I click "Finish".
7. Click Finish.
8. Supplement the start parameters with: –C4TSilent –C4Tall. This is
case-sensitive. Example:
C:\Program Files\Avaya\Com4TelC\bin\updsrv.exe –C4TSilent –C4Tall
9. Click OK. Call number mapping is now performed automatically
for all telephone books at the scheduled event time.
Special tip
If you are appropriately set up as a user, i.e. if you are allowed to perform call
number mapping for all telephone books (used in the Com4Tel system), you can
use call number mapping to update all data. You then do not have to perform call
number mapping at the server. In addition, you can use the Task Scheduler to
automate this call number mapping. You can also execute the Task Scheduler
under another user.
Installation Manual Com4Tel Client/Server Tips and tricks • 65
Page 66

OmniNames does not start
It is possible that the Corba naming service does not start.
Possible cause
If the Corba naming service does not start, it can be due to the following causes.
• Hardware has changed
• Network settings have been changed
Remedying the error
You must delete the log files and start the Corba naming service with special
start parameters. Do this as follows.
1. Delete the omninames_hostname.log and
omninames_hostname.bak files in the C:\Documents and
Settings\All Users\Application Data\OmniORB folder.
2. Delete the omninames.errlog file in the folder C:\Program
Files\Avaya\OmniORB.
3. Start a command prompt (DOS box).
4. Switch to the OmniORB folder.
C:\>cd C:\Program Files\Avaya\OmniORB
5. Start the omninames.exe file with the given start parameters.
C:\Program Files\Avaya\OmniORB>omninames.exe -start 2809 -logdir
"C:\Documents and Settings\All Users\Application Data\omniORB\." errlog omniNames.errlog
6. Close the command prompt.
7. Start as usual.
66 • Tips and tricks Installation Manual Com4Tel Client/Server
Page 67

Working with TTrace
You can use the TTraceDisplay and TTraceLogToZip applications to make
working with TTrace and the processes convenient.
Display of process statuses
To obtain a fast overview of the process statuses, you can use the
TTraceDisplay application. This application gives you fast and clear
information on processes working locally and even those working on other PCs.
A green or red LED indicates the state of a process.
Start the TTraceDisplay application as follows.
1. Switch to the C:\Program Files\Avaya\TTrace folder.
2. Double-click tt_display.exe. The TTraceDisplay application
starts. You must enter a hostname and a port.
3. The display shows the process statuses.
Recommendation
We recommend including the TTraceDisplay application in Autostart. Then the
statuses will be displayed after the PC is started.
Archiving log files
TTrace creates log files. You can archive these log files easily using the
TTraceLogToZip application.
Start the TTraceLogToZip application as follows.
1. Switch to the C:\Program Files\Avaya\TTrace folder.
2. Double-click tt_log2zip.exe. The TTraceLogToZip application
starts.
3. The TTraceLogToZip application automatically looks for a
working TTrace system and displays the log files.
4. You can specify a period, enter the name for the archive file and
select the files to be archived.
Configuring behavior at the client
When started the categories are switched off for the complete server share. You
can switch on the categories manually in the TTrace application.
If you want all traces to appear in the start phase you must set the following key
in the Windows Registry.
HKCU\Software\Tenovis\Com4TelC
Key Type Settings
TTraceLevelC4TApp String If the value = 1, then TC_C4TC,
TC_Statphone and TC_RemAcc are active.
If the value = 0, the categories are switched
off.
Installation Manual Com4Tel Client/Server Tips and tricks • 67
Page 68

Key Type Settings
TTraceLevelC4TSrv String If the value = 1, then TC_Server and
TC_RemAcc are active.
If the value = 0, the categories are switched
off.
TTraceLevelC4Tadp String If the value = 1, then TC_Provider,
TC_Converter, TC_C4TadapterCnt and
TC_C4TAdapterADO are active.
If the value = 0, the categories are switched
off.
TTraceLevelProxy String 0 or 1
TTraceLevelRemAcc String 0 or 1
HKLM\Software\tenvis\ctiFramework
Key Type Settings
PrivDumpUPU String User-User privileges
0 or 1
To activate, enter the value = 1 and switch
on the TC_DEBUG category.
Configuring behavior at the server
If you want all traces to appear in the start phase you must set the following key
in the Windows Registry.
LOCAL_MACHINE\Software\Tenovis\CTIFramework
Key Type Settings
TTraceLevelPSrv String 0, 1 or 2 (2 is with very many)
TTraceLevelRemAcc String 0 or 1
PrivDumpUPU String User-User privileges
0 or 1
To activate, enter the value = 1 and switch
on the TC_DEBUG category.
If the privilege DLL is working in the partner server the level of the partner
server is decisive.
Traces of the partner service can also be diverted to other TT servers via the
Windows Registry entries.
68 • Tips and tricks Installation Manual Com4Tel Client/Server
Page 69

More than 100 users use Com4Tel
If more than 100 users use Com4Tel, you must change the default settings for
Sybase.
Check memory
Check memory space. Use ISQL as user sa. Do this as follows.
1>
sp_configure 'memory'
2> go
Msg 5861, Level 16, State 2:
Server 'wc01035', Procedure 'sp_configure', Line 209:
Configuration option is not unique.
Parameter Name Default Memory Used Config Value
Run Value Unit Type
------------------------------ ----------- ----------- ------------
----------- -------------------- --------- additional network memory 0 0 0
0 bytes dynamic
allocate max shared memory 0 0 0
0 switch dynamic
heap memory per user 4096 0 4096
4096 bytes dynamic
lock shared memory 0 0 0
0 switch static
max memory 33792 102400 51200
51200 memory pages(2k) dynamic
memory alignment boundary 2048 0 2048
2048 bytes static
memory per worker process 1024 4 1024
1024 bytes dynamic
Memory Use 0 0 0
0 not applicable NULL
messaging memory 400 0 400
400 memory pages(2k) dynamic
Physical Memory 0 0 0
0 not applicable NULL
shared memory starting address 0 0 0
0 not applicable static
total logical memory 33792 98422 49191
49211 memory pages(2k) read-only
total physical memory 0 98382 0
49191 memory pages(2k) read-only
(1 row affected)
An additional 3978 K bytes of memory is available for reconfiguration. This
is
the difference between 'max memory' and 'total logical memory'.
(return status = 1)
3978 K bytes of memory is available.
Msg 17411, Level 16, State 1:
Installation Manual Com4Tel Client/Server Tips and tricks • 69
Page 70

Example: Check necessary Memory for 500 user
Check the necessary used memory as follows.
1> sp_helpconfig 'number of user connections', '500'
2> go
number of user connections sets the maximum number of user connections that
can
be connected to SQL Server at one time.
Minimum Value Maximum Value Default Value Current Value Memory Used
Unit Type
------------- ------------- ------------- ------------- -----------
-------------------- --------- 5 32767 25 200 18051
number dynamic
Configuration parameter, 'number of user connections', will consume 44617K
of
memory if configured at 500.
Changing the value of 'number of user connections' to '500' increases the
amount
of memory ASE uses by 31868 K.
About 31,5 MB are needed.
Example: Add memory and user connections
The following example shows the settings for 500 users. Do this as follows.
1> setup..set_number_of_user_connections 500
2> go
Parameter Name Default Memory Used Config Value
Run Value Unit Type
------------------------------ ----------- ----------- ------------
----------- -------------------- --------- max memory 33792 142000 71000
71000 memory pages(2k) dynamic
(1 row affected)
Configuration option changed. The SQL Server need not be rebooted since the
option is dynamic.
Changing the value of 'max memory' does not increase the amount of memory
Adaptive Server uses.
Parameter Name Default Memory Used Config Value
Run Value Unit Type
------------------------------ ----------- ----------- ------------
----------- -------------------- --------- number of user connections 25 44617 500
500 number dynamic
(1 row affected)
Configuration option changed. The SQL Server need not be rebooted since the
option is dynamic.
Changing the value of 'number of user connections' to '500' increases the
amount
of memory ASE uses by 31868 K.
(return status = 0)
Adjust Default Data Cache
Adjust the Default Data Cache. Do this as follows.
70 • Tips and tricks Installation Manual Com4Tel Client/Server
Page 71

1> setup..set_default_data_cache
2> go
6860 Kilobytes added successfully to named cache (default data cache).
Change
takes effect immediately.
(return status = 0)
Installation Manual Com4Tel Client/Server Tips and tricks • 71
Page 72

Page 73

Glossary
3rd Party Call Control
A large range of functions can be achieved with so-called 3rd Party Call Control.
Here, CTI software controls not just one single telephone, but a PBX. As all
information about the telephones is saved in the PBX, a direct connection
between the computer and the telephone is not necessary. Instead, the PBX has
to have a CTI interface to which a CTI server can be connected. The telephony
software which controls the PBX can be divided into two parts: Firstly, there is
control software on the CTI server which communicates directly with the PBX.
Secondly, a telephony program runs on each PC and establishes the connection
with the CTI application. Apart from the functions offered by 1st Party Call
Control applications, 3rd Party Call Control applications provide a range of othe
rfeatures, for example the switching of incoming calls to specific extensions
based on the caller's phone number or database queries. With 3rd Party Call
Control, certain features of the supported telephones cannot be used. With
Com4Tel C you use the CTI software conneCTIon.
RPC
RPC is the abbreviation for Remote Procedure Call: . An RPC is a call for a
procedure in a module or task, which takes place on a (possibly) remote
computer. To be precise, a procedure is called up on one computer (local host)
which is executed on the other computer (remote host), any results and the fact
that the procedure has finished are fed back to the first computer (local host).
Socket
Socket is a mechanism which enables a virtual connection between two
processes. It is activated via a socket address. The socket address consists of a
port number and a host address.
SSL
SSL stands for Secure Socket Layer and is technology for secure data exchange
between a web server and client.
TAPI
TAPI is the abbreviation for Telephony Application Programming Interface: .
TAPI is a telephony software interface from Microsoft.
Installation Manual Com4Tel Client/Server Glossary • 73
Page 74

Page 75

Index
conneCTIon 29
F
Figure
Client-server solution 11
conneCTIon 29
Firewall 54
Font style 8
G
Groupware 22, 23, 25, 49
Guideline installation 26, 32
A
Acrobat Reader 10
Address book server 37
Administration rights 49
Administrator 32
B
Back up 31, 56, 57
Backup server 56
Buttons
Lotus Notes R5 53
Lotus Notes R6 53
C
Call number mapping 14, 60, 65
CD-ROM 20, 47
Certificate 42, 46
Client server solution 11, 12
Client software 51
Com4Tel Client 13
Com4Tel Server 13, 36
Components 13
conneCTIon 12, 15, 29, 36, 40
Connection profile 64
Corba naming service 14, 66
cticonfig 61
Customer database 15
D
Data matching 30
Database 31, 35, 49, 56
activate 59
restore 58
DB_SRV 14
Documentation 42
Domain 32
H
Hard disk 20, 47
Hardware 20, 47
History 8
I
IBM 23
Interface 14
IP 14
J
Java development kit 36
L
LDAP 15, 23
LDAP access 23
License admin tool 33
License server 13, 32, 40
Licenses 13, 40
LNA_SRV 14
Load 59
Lotus Domino 15
Lotus Notes 15, 23, 53
M
Microsoft 22
Microsoft Exchange 15, 22
Microsoft Outlook 15, 22
Module manager 33
N
Networked system 27
Novell 25
Novell GroupWise 15, 25
E
O
Earlier version
Com4Tel 31
Installation Manual Com4Tel Client/Server Index • 75
ODBC 15
OmniNames 32
Online Help 41, 59
Page 76

Operating system 21, 48, 54
P
PABX 15
Paper 10
Parameters 51
Personal computer 10, 26, 27, 32
Personal telephone book 15
Phone books 15, 22, 24, 25
Phone number identification 14
Phone traffic 13
Presence management 38
print 10
Processes 41
Processor 20, 47
Protocol 42
R
RAM 20, 47
Remote maintenance 61
Requirements
Database 35
Installation, client components 47, 49
Installation, server components 20
operating system 32
PABX 21
print 10
Requirements, Domino server 23
Route info server 37
RPC 12, 14
Upgrade 35
User 60
User Manual 41
V
Version 8
W
Watchdog 39, 63
Web server 42
Web@dmin 14, 22, 24, 25, 29, 38, 41, 43, 45, 62
Web-based 14
WebPresence 38
Windows registry 29
S
Server components 26, 31, 32
Services 41
Silent setup 52
Software 21, 48, 49
SSL 42, 43, 45
Start parameters
Call number mapping 60
cticonfig 61
Structure 8
Sybase 14, 31, 34, 69
System administrator 10, 40
T
Table 51
TAPI 14
Task scheduler 65
Telephones 15
TOM server 14
TomCat 38, 43, 44
TTrace 32, 67
U
Update Server 14
76 • Index Installation Manual Com4Tel Client/Server
 Loading...