

Page 1

Business Communications Manager
Central Answering Position
User Card
© 2001 Nortel Networks
P0941603 Issue 01
Page 2

Page 3
The Central Answering Position (CAP)
Why use the
CAP?
What is a CAP
module?
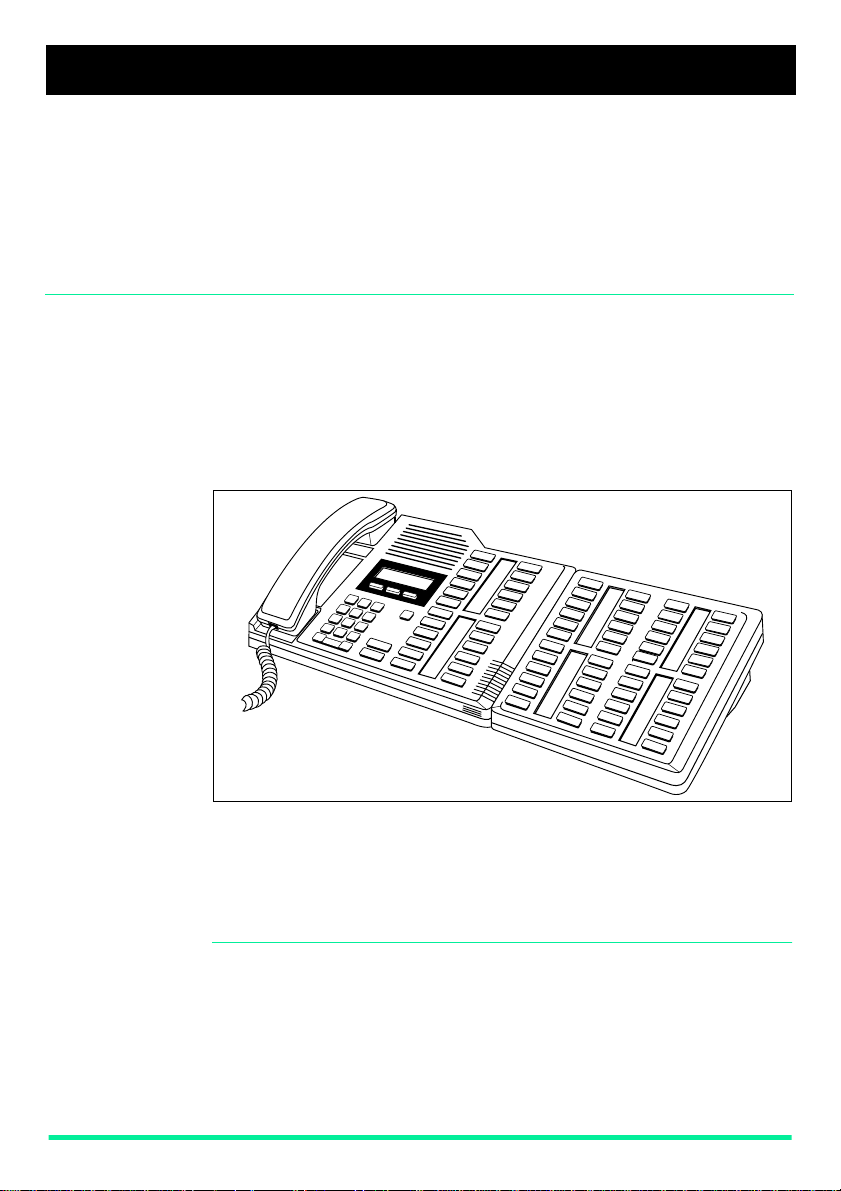
The Business Communications Manager Central Answ ering Position
(CAP) consists of an M7324 Telephone and one or tw o CAP modules.
The CAP allows you to:
• answer calls m ade from outside yo ur s ystem
• check the bus y/n ot busy or Do Not Disturb status of the telephon es in
your system
• transfer calls to your co-workers’ telephones
• use many more features and autodial numbers with one-touch access
A CAP module is an add-on device which provides 48 extra memory or
line buttons for the M7324 Telephone. A CAP module is conne cte d to the
side of the M7324; a second CAP module can be connected to the first
CAP module. See the Business C om m unications Manager Cent ral
Answering Position Installer Card for instructions on installation. When
two CAP modules are connected to an M7324 Telephone, they provide a
total of 96 extra memory or line buttons f or the M7324 Telephone.
Business Communications Manager M7324 Telephone with a CAP module
By pressing a ringing line button on your CAP module and lifting the
handset, you can answer a call made from outside your Business
Communications Manager system. Pressing the appropriate
programmed memory button allo w s you to automatical ly di al an internal
or external number, or use a feature.
Note:A headset may be plug ged in to t he botto m of th e M73 24 Telephone
when Handsfree has been administered.
Page 3
Page 4

Checking the pre-assigned CAP module buttons
About preassigned buttons
Checking th e preassigned CAP
module buttons
Customizing your
CAP module
When one or two CAP modules are first plugged into your telephon e,
each CAP module button is pre-assigned either to select a line or dial an
internal number.
If you ha ve been assigned up to 8 lines, you c an s elect them by press ing
the buttons in the le ft-hand co lumn of yo ur M7324 Telephone. Rema ining
lines are assigned to bu tton s on the CAP module(s) , beginning at the top
left-hand corner of the first CAP module and moving down.
After lines are assigned, any remaining buttons on your CAP module(s)
become Internal A ut odi al buttons, starting with the lowest default internal
number. These internal numbers can be between two and seven digits.
The numbering length is controlled in programming.
Note:In order for lines to be automatical ly as signed to buttons on your
CAP module, your telephone must first be designated as a CAP in
programming.
1. Replace the hands et.
2. Press
3. Press the buttons you want to check and read the display.
4. Ensure that y ou label all pre-ass igned line b uttons and Internal A utodial
5. Press
You can program an y of the b uttons on your CAP module that do not
select lines. These buttons can be programmed to automatically dial
internal or external numbers . You can also pro gram fea tures onto CAP
module buttons. If you want more line buttons programmed, see your
System Administrator.
Ä¥â
buttons correctly in the space provided beside each button.
Ä
.
when you are finished.
Page 4
Your CAP module will be most effective if you use it along with the Call
Park, Transfer, Conference/Transfer, Camp-On, Message, or Voice Call
features.
Make sure that these features are programmed on your CAP module by
following the steps presented in this card.
Page 5

Programming CAP module buttons
Programming
CAP module
buttons
External Autodial
1. Replace the hands et.
2. Press
3. Press a CAP module button.
4. Dial the external num be r.
5. Press OK
6. Label your new button.
Erasing memory buttons
1. Replace the hands et.
2. Press
3. Press the memory button you
4. Press OK
Moving external line buttons
1. Replace the hands et.
2. Press
3. Press the line button that you
4. Press the memory button on
5. Label your new button.
Ä¥Ú
to store the number.
Ä¥Ú
want to erase.
to erase the button.
Ä¥¡Ú
want to move.
your telephon e or CAP module
to which you w a nt th e line
moved.
.
.
.
Internal Autodial
1. Replace the handset.
2. Press
3. Press a CAP module button.
4. Dial the internal number.
5. Label your ne w button.
Features
1. Replace the handset.
2. Press
3. Press a CAP module button.
4. Press
5. Label your ne w button.
Ä¥Û
Ä¥Ü
Ä
feature code.
.
.
and the
Monitoring
Internal Autodial
indicators
It is important that you pay attention to the ind ic ators beside the Internal
Autodial buttons on your CAP modu le. This tells y ou the status of an
Business Commun ic ati ons Manager telephone when you answ er a n
external c all.
An indicator appears:
• when the telephone is active
on an internal or external lin e
OR
• when the telephone is using
the Do Not Disturb feature
The status of an Business C om munications Manager telephone cannot
be monitored by your CAP module if an Internal Autodial button has not
been program med.
No indicator appears:
• when the telephone is idle
OR
• when the telephone is ringing
OR
• when the telephone has one
or more calls on hold, but is
not connected to any active
calls
Page 5
Page 6

Answering and transferring a call
Answering and
transf erring a cal l
Other Business
Communications
Manager
documents
Most of the telephone calls which you deal with should involve the
following procedures:
1. Answer a ca ll ma de fr om ou tsi de the system.
2. Determine whom the call is for .
3. Check the status of the destination system telephone on the CAP
module.
4. If the indicator is OFF, tran sfer the call to that telephone.
OR
If the indicator is ON, use the Send Message, Ring Again on Busy, or
Camp-On feature.
Note:If your telephone has been assigne d as a CAP in progra mming, y ou
can send up to 30 messages. If your telephone has not been
assigned as a CAP, you can send up to four messages .
Be sure to read your Business Comm unications Manager M732 4 Us er
Card and your Business Communication s Manager Prime Telephone
User Card (if applicable). The y conta in i nf ormation which shou ld h elp you
to use Business Communications Manager features more effectiv ely with
your CAP.
Page 6
Page 7

Installation Note s
Installing the CAP The Business Communications Manager Station Auxiliary Power Supply
is required to operate the CAP modu le.
initializing the
CAP
You must initialize each CAP module individually during the first ten
seconds after powering up to establish the default setting for the
programmable memory buttons.
Once a module is initialized, the programming is retained regardless if it
is moved or a second CAP module is connected to it.
If the CAP module indicators have stopped flashing, unplug the module
and then reconnect it. The indicators should turn on and flash for ten
seconds.
To initialize the CAP module:
While the CAP indicators are flashing, simultaneously press the two
buttons on the lower left side and the lower right side of the CAP module.
1
2
3 4
The indicators turn on one at a time in sequence, beginning at the lower
right corner of the module. The indicators then turn off. After all the
indicators turn off, the CAP module is initialized and ready to use.
P0941603 Issue 01 Page 7
 Loading...