

Page 1
CallPilot Fax User Guide
Avaya Business Communications Manager
Release 6.0
Document Status: Standard
Document Number: NN40080-100
Document Version: 03.02
Date: October 2010
Page 2

© 2010 Avaya Inc.
All Rights Reserved.
Notices
While reasonable efforts have been made to ensure that the information in this document is complete and accurate at the time of printing,
Avaya assumes no liability for any errors. Avaya reserves the right to make changes and corrections to the information in this document
without the obligation to notify any person or organization of such changes.
Documentation disclaimer
Avaya shall not be responsible for any modifications, additions, or deletions to the original published version of this documentation
unless such modifications, additions, or deletions were performed by Avaya. End User agree to indemnify and hold harmless Avaya,
Avaya’s agents, servants and employees against all claims, lawsuits, demands and judgments arising out of, or in connection with,
subsequent modifications, additions or deletions to this documentation, to the extent made by End User.
Link disclaimer
Avaya is not responsible for the contents or reliability of any linked Web sites referenced within this site or documentation(s) provided by
Avaya. Avaya is not responsible for the accuracy of any information, statement or content provided on these sites and does not
necessarily endorse the products, services, or information described or offered within them. Avaya does not guarantee that these links will
work all the time and has no control over the availability of the linked pages.
Warra nty
Avaya provides a limited warranty on this product. Refer to your sales agreement to establish the terms of the limited warranty. In
addition, Avaya’s standard warranty language, as well as information regarding support for this product, while under warranty, is
available to Avaya customers and other parties through the Avaya Support Web site: http://www.avaya.com/support
Please note that if you acquired the product from an authorized reseller, the warranty is provided to you by said reseller and not by Avaya.
Licenses
THE SOFTWARE LICENSE TERMS AVAILABLE ON THE AVAYA WEBSITE, HTTP://SUPPORT.AVAYA.COM/LICENSEINFO/
ARE APPLICABLE TO ANYONE WHO DOWNLOADS, USES AND/OR INSTALLS AVAYA SOFTWARE, PURCHASED FROM
AVAYA INC., ANY AVAYA AFFILIATE, OR AN AUTHORIZED AVAYA RESELLER (AS APPLICABLE) UNDER A
COMMERCIAL AGREEMENT WITH AVAYA OR AN AUTHORIZED AVAYA RESELLER. UNLESS OTHERWISE AGREED TO
BY AVAYA IN WRITING, AVAYA DOES NOT EXTEND THIS LICENSE IF THE SOFTWARE WAS OBTAINED FROM ANYONE
OTHER THAN AVAYA, AN AVAYA AFFILIATE OR AN AVAYA AUTHORIZED RESELLER, AND AVAYA RESERVES THE
RIGHT TO TAKE LEGAL ACTION AGAINST YOU AND ANYONE ELSE USING OR SELLING THE SOFTWARE WITHOUT A
LICENSE. BY INSTALLING, DOWNLOADING OR USING THE SOFTWARE, OR AUTHORIZING OTHERS TO DO SO, YOU,
ON BEHALF OF YOURSELF AND THE ENTITY FOR WHOM YOU ARE INSTALLING, DOWNLOADING OR USING THE
SOFTWARE (HEREINAFTER REFERRED TO INTERCHANGEABLY AS "YOU" AND "END USER"), AGREE TO THESE
TERMS AND CONDITIONS AND CREATE A BINDING CONTRACT BETWEEN YOU AND AVAYA INC. OR THE
APPLICABLE AVAYA AFFILIATE ("AVAYA").
Copyright
Except where expressly stated otherwise, no use should be made of the Documentation(s) and Product(s) provided by Avaya. All content
in this documentation(s) and the product(s) provided by Avaya including the selection, arrangement and design of the content is owned
either by Avaya or its licensors and is protected by copyright and other intellectual property laws including the sui generis rights relating
to the protection of databases. You may not modify, copy, reproduce, republish, upload, post, transmit or distribute in any way any
content, in whole or in part, including any code and software. Unauthorized reproduction, transmission, dissemination, storage, and or
use without the express written consent of Avaya can be a criminal, as well as a civil offense under the applicable law.
Third Party Components
Certain software programs or portions thereof included in the Product may contain software distributed under third party agreements
("Third Party Components"), which may contain terms that expand or limit rights to use certain portions of the Product ("Third Party
Terms"). Information regarding distributed Linux OS source code (for those Products that have distributed the Linux OS source code),
and identifying the copyright holders of the Third Party Components and the Third Party Terms that apply to them is available on the
Avaya Support Web site: http://support.avaya.com/Copyright.
Trademarks
The trademarks, logos and service marks ("Marks") displayed in this site, the documentation(s) and product(s) provided by Avaya are the
registered or unregistered Marks of Avaya, its affiliates, or other third parties. Users are not permitted to use such Marks without prior
written consent from Avaya or such third party which may own the Mark. Nothing contained in this site, the documentation(s) and
product(s) should be construed as granting, by implication, estoppel, or otherwise, any license or right in and to the Marks without the
express written permission of Avaya or the applicable third party. Avaya is a registered trademark of Avaya Inc. All non-Avaya
trademarks are the property of their respective owners.
Downloading documents
For the most current versions of documentation, see the Avaya Support. Web site: http://www.avaya.com/support
Contact Avaya Support
Avaya provides a telephone number for you to use to report problems or to ask questions about your product. The support telephone
number is 1-800-242-2121 in the United States. For additional support telephone numbers, see the Avaya Web site: http://
www.avaya.com/support
Page 3

Task List
CallPilot Fax User Guide . . . . . . . . . . . . . . . . . . . . . . . . . . . . . . . . . . . . . . . . 7
To check which mailbox interface you use ....................................................................11
To record a mailbox greeting .........................................................................................13
To transfer a fax call to your mailbox.............................................................................14
To open your mailbox — Norstar Voice Mail .................................................................15
To open your mailbox — CallPilot .................................................................................15
To assign a preset fax machine.....................................................................................17
To print all fax messages...............................................................................................18
To print an individual fax message ................................................................................19
To print fax messages from a fax telephone .................................................................20
To send a fax message to a personal mailbox ..............................................................21
To forward a fax message to a mailbox — Norstar Voice Mail......................................23
To forward a fax message to a mailbox — CallPilot ......................................................24
To forward a fax message to an external number — Norstar Voice Mail ......................24
To forward a fax message to an external number — CallPilot ......................................26
To send a Fax Group message — Norstar Voice Mail ..................................................28
To send a Fax Group Message — CallPilot ..................................................................28
3
CallPilot Fax User Guide
Page 4

4 Task List
NN40080-100NN40080-100
Page 5

Contents
Chapter 1
CallPilot Fax User Guide . . . . . . . . . . . . . . . . . . . . . . . . . . . . . . . . . . . . . . . . . 7
About this guide . . . . . . . . . . . . . . . . . . . . . . . . . . . . . . . . . . . . . . . . . . . . . . . . . . . . . . . 7
Audience . . . . . . . . . . . . . . . . . . . . . . . . . . . . . . . . . . . . . . . . . . . . . . . . . . . . . . . . . . . . 7
Symbols and text conventions . . . . . . . . . . . . . . . . . . . . . . . . . . . . . . . . . . . . . . . . . . . . 8
Telephone buttons . . . . . . . . . . . . . . . . . . . . . . . . . . . . . . . . . . . . . . . . . . . . . . . . . . . . . 9
Related Publications . . . . . . . . . . . . . . . . . . . . . . . . . . . . . . . . . . . . . . . . . . . . . . . . . . 10
Learning about Fax . . . . . . . . . . . . . . . . . . . . . . . . . . . . . . . . . . . . . . . . . . . . . . . . . . . 10
About the Express Messaging Line . . . . . . . . . . . . . . . . . . . . . . . . . . . . . . . . . . . . 10
Checking which mailbox interface you use . . . . . . . . . . . . . . . . . . . . . . . . . . . . . . . . . 11
Telling callers about fax in your mailbox greeting . . . . . . . . . . . . . . . . . . . . . . . . . . . . 12
Receiving a fax message . . . . . . . . . . . . . . . . . . . . . . . . . . . . . . . . . . . . . . . . . . . . . . 13
Transferring a fax call to your mailbox . . . . . . . . . . . . . . . . . . . . . . . . . . . . . . . . . 14
Opening your mailbox . . . . . . . . . . . . . . . . . . . . . . . . . . . . . . . . . . . . . . . . . . . . . . 15
Printing fax messages . . . . . . . . . . . . . . . . . . . . . . . . . . . . . . . . . . . . . . . . . . . . . . . . . 15
About destinations for printing fax messages . . . . . . . . . . . . . . . . . . . . . . . . . . . . 16
Assigning a preset fax machine . . . . . . . . . . . . . . . . . . . . . . . . . . . . . . . . . . . . . . 16
To print all your fax messages . . . . . . . . . . . . . . . . . . . . . . . . . . . . . . . . . . . . . . . 17
Fax cover page . . . . . . . . . . . . . . . . . . . . . . . . . . . . . . . . . . . . . . . . . . . . . . . . . . . . . . 21
Sending fax messages . . . . . . . . . . . . . . . . . . . . . . . . . . . . . . . . . . . . . . . . . . . . . . . . 21
Forwarding fax messages . . . . . . . . . . . . . . . . . . . . . . . . . . . . . . . . . . . . . . . . . . . . . . 22
About Fax Group messages . . . . . . . . . . . . . . . . . . . . . . . . . . . . . . . . . . . . . . . . . . . . 26
Adding special characters to a fax telephone number . . . . . . . . . . . . . . . . . . . . . . . . . 30
5
CallPilot Fax User Guide
Page 6

6 Contents
NN40080-100NN40080-100
Page 7
Chapter 1
CallPilot Fax User Guide
About this guide
The CallPilot Fax User Guide explains how to use CallPilot Fax with your personal mailbox. It
explains how to receive, print, and send fax messages.
To use this guide, you must determine which phone interface you use, and follow the procedures
for that interface. For information about determining which interface you use, see “Checking
which mailbox interface you use” on page 11.
Note: If you need information about other CallPilot features, see the CallPilot
Reference Guide or ask your system administrator.
7
Audience
This guide is for CallPilot Fax users.
CallPilot Fax User Guide
Page 8
8 Chapter 1 CallPilot Fax User Guide
Symbols and text conventions
These symbols are used to Highlight critical information for the <Product Name short> system:
Caution: Alerts you to conditions where you can damage the equipment.
Danger: Alerts you to conditions where you can get an electrical shock.
Warning: Alerts you to conditions where you can cause the system to fail or work
improperly.
Note: A Note alerts you to important information.
Tip: Alerts you to additional information that can help you perform a task.
Security note: Indicates a point of system security where a default should be changed,
or where the administrator needs to make a decision about the level of security required
!
for the system.
Warning: Alerts you to ground yourself with an antistatic grounding
strap before performing the maintenance procedure.
Warning: Alerts you to remove the <Product Name short> main unit
and expansion unit power cords from the ac outlet before performing any
maintenance procedure.
NN40080-100NN40080-100
Page 9
Telephone buttons
All one line and two line display telephones provide CallPilot voice prompts. On telephones with
display buttons, the voice prompts are delayed for five seconds. If you do not see an option on
your telephone display, wait for the voice prompt to announce the additional options.
To use Fax features, press the display buttons or the dialpad buttons on your telephone.
Chapter 1 CallPilot Fax User Guide 9
When you see a display button like this: PLAY
, or a dialpad button like this: ¤, press either button
to activate the CallPilot feature. This guide shows you both methods.
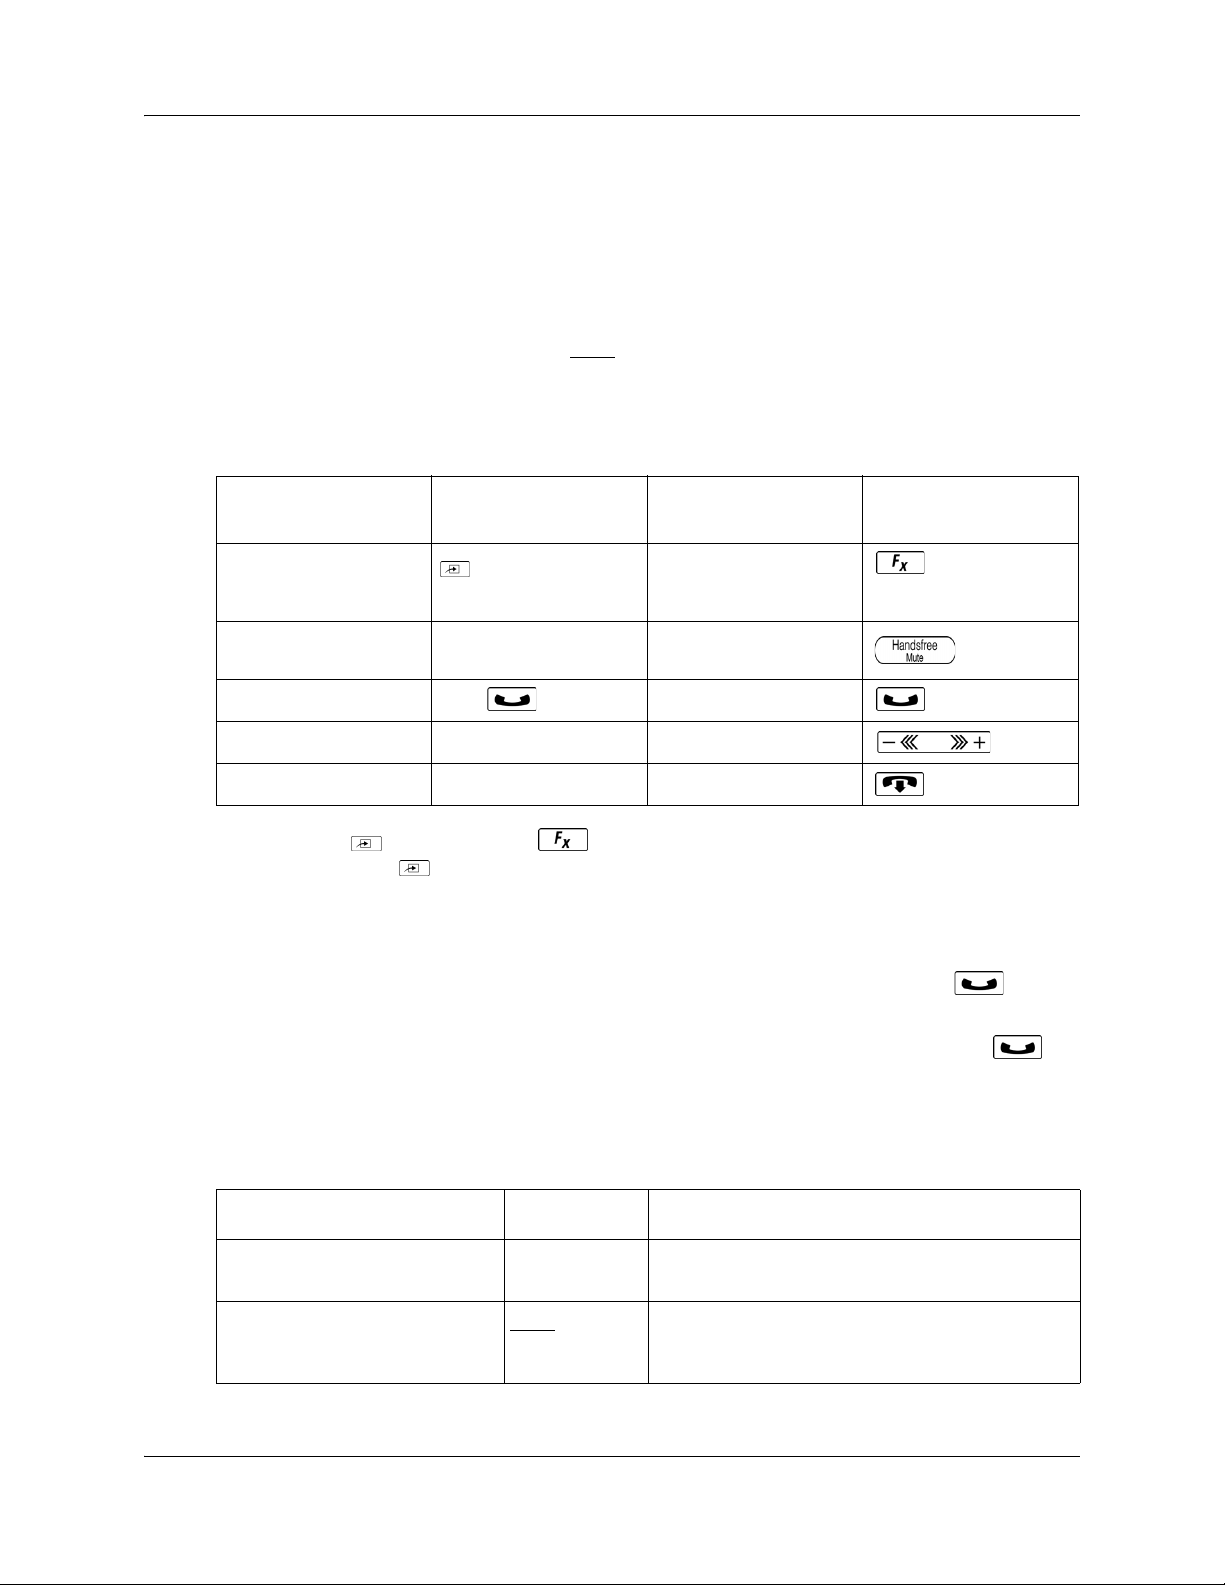
This table shows the Business Series Terminal buttons. Use the buttons that pertain to the type of
telephone you use.
Avaya 7000 Series
Button name
Feature
Handsfree Bottom right-hand
Hold
Volume Control
Release
Digital Deskphones
button
≥ ˙
√ √
® ®
M7100, M7208, M7310,
M7324
ƒ
©
M7100N, M7208N,
M7310N, M7324N
You can enter , ƒ or and the code to use a feature.
For example, press ·°⁄ to access your mailbox.
The Avaya 7100 Digital Deskphone works differently from other telephones on your system
because it does not have line buttons. Where other telephones require that you select a line button
to answer a call, on the Avaya 7100 Digital Deskphone terminal you pick up the handset. Where
other telephones require you to select a line button to take a call off hold, you press on the
Avaya 7100 Digital Deskphone terminal.
On Avaya 7100 Digital Deskphone terminals, you can answer a second call by pressing .
Your active call is put on hold and you connect to the waiting call. You can have no more than two
active calls at one time.
These conventions and symbols are used to represent the Business Series Terminal display and
dialpad.
Convention Example Used for
Word in a special font (shown in
the top line of the display)
Underlined word in capital letters
(shown in the bottom line of a two
line display telephone)
Pswd:
PLAY
Command line prompts on display telephones.
Display option. Available on two line display
telephones
option on the display to proceed.
. Press the button directly below the
CallPilot Fax User Guide
Page 10

10 Chapter 1 CallPilot Fax User Guide
Convention Example Used for
Dialpad buttons
Related Publications
This section provides a list of additional documents referred to in this guide.
CallPilot Reference Guide (NN40090-100)
Learning about Fax
With CallPilot Fax you can access Fax features from your personal mailbox.
A fax document in a mailbox is called a fax message. Fax messages can have a voice introduction.
This means that a caller can leave a fax message with or without an introductory voice message in
your personal mailbox.
You can:
• retrieve and print the fax message on a fax machine
• forward the fax message to another mailbox
£
Buttons you press on the dialpad to select a
particular option.
About the Express Messaging Line
You can have an Express Messaging Line assigned to your mailbox. An Express Messaging Line
allows you to send only a fax message when the fax only option is selected or to send voice and
fax messages when the fax only option is not selected. A fax message sent to the Express
Messaging Line bypasses the Automated Attendant and is sent immediately to your mailbox. You
access the fax message the same way you access other fax messages. For more information about
accessing fax messages, see “Receiving a fax message” on page 13.
Ask your System Administrator for the telephone number of your Express Messaging Line. Then
you can inform people of your direct fax line number.
NN40080-100NN40080-100
Page 11

Chapter 1 CallPilot Fax User Guide 11
Checking which mailbox interface you use
The CallPilot supports two interfaces: Norstar Voice Mail and CallPilot. The System
Administrator determines which interface is assigned to your mailbox.
Use this procedure to check which mailbox interface you use, then follow the procedures in the
guide that apply to the interface you use.
Some procedures apply to both interfaces.
To check which mailbox interface you use
1 Press ·°⁄.
Follow the voice prompts or the display button options to open
your mailbox.
2 Check the display to see which interface you use:
0 new 0 saved
PLAY REC ADMIN
No messages
COMP MBOX E XIT
This is the Norstar Voice Mail interface.
This is the CallPilot interface.
3 Press ® to end the session.
CallPilot Fax User Guide
Page 12

12 Chapter 1 CallPilot Fax User Guide
Telling callers about fax in your mailbox greeting
In your mailbox greeting, tell callers that they can leave fax messages in your mailbox. Tell callers
that they must call from a fax machine telephone to send you a fax message. The caller must press
START/SEND on the fax machine. CallPilot automatically receives and stores the fax message in
your mailbox. This is an example of a Personal mailbox greeting:
“Hello. You have reached Brian Purdy with Ideal Office Machines. I am in the office today, but I
am currently away from the phone. Please leave your name, telephone number and a brief
message after the tone. If you want to send me a fax and you are calling from a fax machine
telephone, press the START/SEND button on the fax machine now, or when this message ends.”
For more information about mailbox greetings, see the CallPilot Reference Guide or ask your
System Administrator.
Note: Recorded greetings count towards the storage capacity of a mailbox. Avoid
recording long greetings if possible. If recorded greetings are long, there will be less
storage time in the mailbox for messages.
NN40080-100NN40080-100
Page 13

To record a mailbox greeting
1 Press ·°⁄.
Follow the voice prompts or the display button options to open
your mailbox.
2 If you use the CallPilot interface:
• Press °¤ to open the Greetings Options menu
•Go to step 3
If you use the Norstar Voice Mail interface:
Chapter 1 CallPilot Fax User Guide 13
Greeting options
REC
CHOOSE CFWD
Greeting:
PRIME ALT PERS
Record now?
YES
NO QUIT
Record greeting:
RETRY OK
Accept greeting?
RETRY PLAY OK
• Press ADMIN
• Press GREET
•Go to step 3
3 Press REC
or ⁄.
4 Press PRIME
or
press ALT
5 Press YES
6 Press OK
7 Press OK
or ¤ to record the Alternate greeting.
or ⁄ and record your greeting at the tone.
or £ to end the recording.
or £ to accept the recording
or
press PLAY
or
press RETRY
or °
or ¤
or ⁄ to record the Primary greeting
or ⁄ to listen to the greeting
or ¤ to re-record the greeting.
8 Press ® to end the session.
Receiving a fax message
Fax messages can contain a voice message that a caller records to introduce the fax message, or
they can contain just the fax message.
A caller can send a fax message to your personal mailbox by using the autosend feature on their
fax machine. If the call is answered by the Automated Attendant, the call transfers to the
designated Fax answering extension. If the call is answered by a mailbox, the fax message is
placed in the mailbox. If you answer the call, you hear a fax tone. Transfer the fax call to your
mailbox.
CallPilot Fax User Guide
Page 14

14 Chapter 1 CallPilot Fax User Guide
Transferring a fax call to your mailbox
If you answer a call and hear a fax tone, a caller is attempting to send a fax message to your
mailbox. You can transfer the call to your mailbox.
To transfer a fax call to your mailbox
1 Press ·°fl.
Do not put the call on hold.
2 Enter your mailbox number.
The fax message is left in your mailbox.
When you receive a message in your mailbox, your telephone display shows:
Message for you
MSG
This display indicates that you have a new voice message or a fax message in your mailbox.
To check for messages, you must open your mailbox.
NN40080-100NN40080-100
Page 15

Opening your mailbox
To open your mailbox — Norstar Voice Mail
1 Press ·°⁄.
Chapter 1 CallPilot Fax User Guide 15
Pswd:
OTHR RETRY OK
1 new 1 saved
PLAY REC ADMIN
2 Enter your mailbox password and press OK
or
if you are at another extension, or if you are using a Guest
mailbox, press OTHR
this prompt appears, enter your mailbox number and password.
Your mailbox number is usually the same as your extension.
3 After you open your mailbox, the telephone display shows how
many new and saved messages you have.
A voice prompt announces how many new and saved voice and
fax messages you have.
In this example there is one new message and one saved
message.
To open your mailbox — CallPilot
1 Press ·°⁄.
Mbox:
RETRY OK
2 Press £
or
if you are at another extension, enter your mailbox number and
then press OK
Your mailbox number is usually the same as your extension.
or £.
or £
or • to display the Log: prompt. When
Pswd:
RETRY OK
Printing fax messages
You can print the fax messages in your mailbox on any fax machine. You can print all of your fax
messages at once or individually.
An average text fax message uses 10 seconds of mailbox message time per page. A fax message
that contains graphics can use as much as two minutes of mailbox message time per page. Because
fax messages can take up a lot of mailbox space, after you print or forward your fax messages,
delete them from your mailbox.
3 Enter your mailbox password and press OK
After you open your mailbox, the telephone display shows how
many new messages you have.
A voice prompt announces how many new and saved fax
messages you have.
or £.
CallPilot Fax User Guide
Page 16

16 Chapter 1 CallPilot Fax User Guide
If you print all your fax messages at once, you cannot listen to any voice introductions that are
included with the fax messages. If you do not listen to a voice introduction, the fax message
remains “new” in your mailbox and you can listen to the voice introduction later.
If you print each fax message individually, you can listen to the introduction before you print the
fax message.
About destinations for printing fax messages
When you print a fax message, you can print it from:
Print msg
PRESET OTHR MANU
Table 1 Fax destinations
Preset
Other When you send a fax message to print and you select Other, you must enter a phone or
Manual Select Manual if you are printing from a fax telephone. The fax messages are printed on the
You can set up a fax machine as the default destination. When you print and you select
Preset, the fax machine prints at the default destination. Unless you specify Other, faxes
print at the default destination.
extension number as the destination.
fax machine you use to access your mailbox.
Fax messages are preceded by a cover page if you select Preset or Other. A cover page is not added
for fax messages you print from a fax telephone. For more information see “Fax cover page” on
page 21.
Assigning a preset fax machine
If you assign a preset fax machine, your fax messages print at the same fax machine every time.
NN40080-100NN40080-100
Page 17

To assign a preset fax machine
1 Press ·°⁄.
Follow the voice prompts or the display button options on your
telephone to open your mailbox.
2 If you use the CallPilot interface:
• Press °‚ to open the Mailbox Options menu
• Press ‹ to open the Fax Options menu
• Go to step 3
If you use the Norstar Voice Mail interface:
Chapter 1 CallPilot Fax User Guide 17
No Preset
Destination:
PHONE EXT
Ph:
RETRY OK
<x>
ADD OK
• Press ADMIN
or °
• Press ‡
• Go to step 3
3 This display appears if there is no preset fax machine.
If the fax machine is preset, the display shows: Preset fax.
If you want to assign a different machine as the preset fax
machine, press CHNG
4 Press PHONE
or ⁄ to assign the phone number of a fax machine
.
or
press EXT
or ¤ to assign the extension number of a fax
machine.
This example shows assigning the phone number of a fax
machine.
5 Enter the fax telephone number and press OK
6 Press OK
or £ to accept the fax telephone number represented
or £.
by the <x>
or
press ADD
to add special characters to the fax telephone number
and follow the prompts.
After you add special characters press OK
or £.
7 Press ® to end the session.
To print all your fax messages
Use this procedure if you want to print all your new or saved messages.
If you want to print just one message, see “To print an individual fax message” on page 19.
CallPilot Fax User Guide
Page 18

18 Chapter 1 CallPilot Fax User Guide
To print all fax messages
1 Press ·°⁄.
2 If you use the CallPilot interface:
3 If you use the CallPilot interface:
Follow the voice prompts or the display button options on your
telephone to open your mailbox.
• Press ‡‡ to open the Print Command menu
• Go to step 3
If you use the Norstar Voice Mail interface:
• Press ⁄
• Go to step 3
Print msg
PRESET OTHR MANU
Destination:
PHONE EXT
• Press MSG
or ⁄ to print an individual message
or
• press NEW
or ¤ to print all unprinted fax messages
or
• press ALL
or ‹ to print all faxes with their attachments
If you use the Norstar Voice Mail interface and you have new
fax messages:
• Press NEW
or ⁄ to print all your new fax messages
or
• press SAVED
or ¤ to print all your saved fax messages
If you do not have any new fax messages the display in
step 4 appears.
4 Press PRESET
or ⁄ if you want to print on the preset fax
machine and go to step 8
or
press OTHR
or ¤ if you want to print on a fax machine other
than the preset fax machine and go to step 5.
5 Press PHONE
or ⁄ to print fax messages at a fax telephone
number
or
press EXT
or ¤to print fax messages at a fax extension number.
This example shows entering the phone number of a fax
machine.
Ph:
RETRY OK
NN40080-100NN40080-100
6 Enter the fax telephone number and press OK
or £.
Page 19

Chapter 1 CallPilot Fax User Guide 19
<x>
ADD OK
7 Press OK
by <x>
or £ to accept the fax telephone number represented
or
press ADD
to add special characters to the fax telephone number
and follow the voice prompts.
Printed <x> msgs
8 The display shows the number of fax messages printed.
9 Press ® to end this session.
After you end the session, CallPilot prints the fax messages on the preset fax machine.
For information about changing the preset fax machine, see “Assigning a preset fax machine” on
page 16.
To print an individual fax message
Use this procedure if you want to print an individual fax message.
1 Press ·°⁄.
Follow the voice prompts or the display button options on your
telephone to open your mailbox.
<date> Fax:1
<<< STOP >>>
Print msg
PRESET OTHR MANU
Printed msg
End of message
CO PY ER ASE N EXT
2 If you use the CallPilot interface:
• Press ‡‡ to open the Print Command menu
• Go to step 3
If you use the Norstar Voice Mail interface:
• Press fl until you locate the fax you want to print
• Go to step 3
3 Wait until the prompt announces the Fax ID number, and then
press ⁄ to print the fax message.
4 Press PRESET
or ⁄ to print on the preset fax machine
or
press OTHR
or ¤ if you want to specify another fax machine to
print the message on, and then enter the number of the fax
machine.
5 The display shows the message is printed.
6 Press ® to end this session.
After you end the session, CallPilot prints the fax message on the fax machine you specified.
CallPilot Fax User Guide
Page 20

20 Chapter 1 CallPilot Fax User Guide
To print fax messages from a fax telephone
1 From a fax machine telephone, call into a line that is answered by the Automated Attendant.
2 Press ••, or in the UK press °°, to access your mailbox while the Automated
Attendant Greeting plays.
3 Log on to your mailbox:
• If you use the Norstar Voice Mail interface, enter your mailbox number and password and
press £
• If you use the CallPilot interface, enter your mailbox number and press £, then enter
your password and press £
4 Send the fax message to print:
• If you use the Norstar Voice Mail interface, press ⁄ to print your fax messages
• If you use the CallPilot interface, press ‡‡ to print your fax messages
5 If you have new and saved fax messages, you can print either all new or saved fax messages:
• press ⁄ to print all new fax messages
•press¤to print all saved fax messages
Step 5 is bypassed if you have only new fax messages or only saved fax messages.
6 Press ‹ to use the Manual option to print the new fax messages.
7 Press START/SEND on the fax machine.
8 Replace the fax machine telephone handset.
The session ends when all the faxes are printed.
CallPilot prints the fax messages on the assigned fax machine.
NN40080-100NN40080-100
Page 21

Fax cover page
A fax cover page prints with each fax message you print using the Preset and Other feature.
The fax cover page shows:
• the date and time the fax prints
• the name and telephone number of the mailbox owner
• the destination fax number
• the Fax ID number (if you print a single fax message)
• the number of pages to follow
Note: A fax cover sheet is not added if you print a fax from a fax telephone.
Sending fax messages
To send a fax message to a personal mailbox you must call from a fax machine telephone.
You can include a voice introduction to a fax message you send to a personal mailbox. The voice
introduction must be at least three seconds long. The system times out after five seconds of silence.
Chapter 1 CallPilot Fax User Guide 21
To send a fax message to a personal mailbox
1 Place the document that you want to send in the fax machine.
2 From the fax machine telephone dial the CallPilot telephone number of the person you want to
send a fax to.
3 Wait for the mailbox greeting or let the CallPilot operator transfer you to the mailbox to leave
a fax message. If the person you are calling answers their telephone, tell them to transfer you
to their mailbox so you can send a fax.
4 After the mailbox greeting plays, wait for a beep and record an introduction for the fax
message. Do not hang up the telephone.
5 Press START/SEND on the fax machine.
6 Replace the fax machine telephone handset. The session ends when the transmission is
complete.
CallPilot Fax User Guide
Page 22

22 Chapter 1 CallPilot Fax User Guide
Forwarding fax messages
You can forward a fax message that you have received to another mailbox and add a voice
introduction. If you record a voice message it must be longer than three seconds. The system times
out after five seconds of silence.
The message appears as a fax message in the recipient’s mailbox. If you cannot forward a fax
message, ask your System Administrator if your mailbox is set up to allow you to forward fax
messages.
You can send the same fax message to more than one person, but not to a Group List.
For information about forwarding a fax message to an external number, see “To forward a fax
message to a mailbox — Norstar Voice Mail” on page 23.
When you forward a fax message, a new cover page is added to the original fax message,
becoming part of the new message. If the fax message already has a CallPilot-generated fax
forward cover page, it is replaced by a new fax forward cover page.
Fax forward cover page
A fax forward cover page contains the same information as a fax cover page plus:
• the recipient’s name
• the Fax ID number if the fax is forwarded to an external number
NN40080-100NN40080-100
Page 23

Chapter 1 CallPilot Fax User Guide 23
To forward a fax message to a mailbox — Norstar Voice Mail
1 Press ·°⁄.
Follow the voice prompts or the display button options on your
telephone to open your mailbox.
<date> Fax:1
<<< STOP >>>
End of message
COPY
ERASE NEXT
Copy fax
MBOX OTHR
Record Intro?
YES NO
Record message:
RETRY PAUSE OK
Accept rec?
RETRY PLAY OK
2 Press PLAY
or ¤ if you have a new fax message
or
press fl to review your messages until you find a saved fax
message you want to forward.
3 The date received and the Fax ID number appear on the display.
4 Press COPY
5 Press MBOX
or fi.
or ⁄ to forward the fax message to another
mailbox.
6 Press YES
or ⁄ to record an introduction to the fax message
or
press NO
or ¤ and go to step 10 if you do not want to record an
introduction to the forwarded fax message.
7 Record the introduction and press OK
or £ to end the recording
or
press RETRY
or ⁄ to re-record the introduction
or
press PAUSE
8 Press OK
or ¤ to pause while you record the introduction.
or £ to accept the recording.
Mbox:
DIR QUIT
Wayne, Paul
OPTS CC SEND
Another copy?
YES QUIT
9 Enter the mailbox number you want to forward the fax
message to
or
press DIR
10 Press SEND
or £ to search the Company Directory.
or £ to forward the message without a delivery
option
or
press OPTS
or ‹ to assign message delivery options. For
information about delivery options see the CallPilot Reference
Guide.
11 To send this message to another mailbox owner,
press YES
or ⁄ and repeat steps 6 to 11
or
press QUIT
to end the session.
CallPilot Fax User Guide
Page 24

24 Chapter 1 CallPilot Fax User Guide
To forward a fax message to a mailbox — CallPilot
1 Press ·°⁄.
Follow the voice prompts or the display button options on your
telephone to open your mailbox.
End message
COPY ERASE NEXT
End message
PRINT DEL NEXT
To:
NAME SPEC C NCL
To:<xxxx>
RETRY OK
Empty
REC
Msg options
URG PRIV OTHR
2 Press ¤ to play the first message
or
press fl until you find the fax message you want to forward.
3 Press ‡‹ to forward the message.
4 Enter the mailbox number you want to forward the fax message
to and press OK
or £
or
press NAME
5 Press OK
6 If you want to attach a voice message, press REC
or ⁄⁄ to search the Company Directory.
or £ to end the list of addresses.
or fi and
record your message.
7 If you want to attach message options, press ‡‚ to assign
message options.
8 Press ‡· to send the message.
To forward a fax message to an external number —
Norstar Voice Mail
You can forward a received fax message to an external number. However, you cannot add an
introductory voice message to the fax message.
2 new 0 saved
PLAY REC ADMIN
<date> Fax:1
<<< STOP >>>
NN40080-100NN40080-100
9 Press ® to end the session.
1 Press ·°⁄.
Follow the voice prompts or the display button options on your
telephone to open your mailbox.
2 Press PLAY
or ¤ to play the first message
or
press fl until you find the fax message you want to forward.
3 The date received and the Fax ID number appear on the display.
Page 25

Chapter 1 CallPilot Fax User Guide 25
End of message
COPY
ERASE NEXT
Copy fax
MBOX OTHR
Name:
RETRY BKSP OK
Destination:
PHONE
EXT
Ph:
RETRY OK
<x>
ADD OK
4 Press COPY or fi.
5 Press OTHR
or ¤.
6 Enter the recipient’s name. The name can be a maximum of eight
characters. Using the telephone dialpad, enter the name of the
recipient. After each letter, press £ to enter the next letter.
If you make an error in the name, press RETRY
and re-enter the
name.
Press OK
7 Press PHONE
8 Enter the fax telephone number and press OK
9 Press OK
to accept the name.
or ⁄ to enter the fax telephone number.
or £.
or £ to accept the fax telephone number represented
here by <x>
or
press ADD
to add special characters to the fax telephone number.
For information about adding special characters, see “Adding
special characters to a fax telephone number” on page 30.
Msg sent
Another copy?
YES QUIT
10 CallPilot forwards the fax message.
11 Press YES
or ⁄ and repeat steps 6 to 11 to send this message to
another external number
or
press QUIT
if you are done.
12 Press ® to end the session.
CallPilot Fax User Guide
Page 26

26 Chapter 1 CallPilot Fax User Guide
To forward a fax message to an external number — CallPilot
1 Press ·°⁄.
Follow the voice prompts or the display button options on your
telephone to open your mailbox.
End message
COPY ERASE NEXT
Print
MSG NEW ALL
Print msg
PRESET OTHR
Destination:
PHONE EXT
Ph:
RETRY OK
<xxxx>
ADD OK
Printed msg
MANU
2 Press ‡‡ to open the Print Command menu.
3 Press
MSG or ⁄ to forward the current message
or
press
NEW or ¤ to forward all your new fax messages
or
press
ALL or ‹ to forward all your new and saved fax messages.
4 Press OTHR
or ¤ to specify the fax machine you are forwarding
the fax message to.
5 Press
PHONE or ⁄.
6 Enter the phone number of the fax machine you are forwarding the
fax message to.
7 Press OK
or £ to accept the phone number
or
ADD or ¤ to add special characters.
press
8 The display shows the message is printed.
9 Press ® to end the session.
About Fax Group messages
Send a Fax Group message if you want to send a group a fax message that pertains to them. Fax
Group Lists are created by the System Administrator.
Fax Group Lists
If you frequently fax information to the same group of people, use a Fax Group List.
A Fax Group List is a collection of fax machines at other locations. When you send a fax message
to a Fax Group List, you enter only the address of the list, but each fax machine in the Fax Group
List receives the fax message. Ask your System Administrator for a list of fax machines in each
Fax Group List.
NN40080-100NN40080-100
Page 27

Chapter 1 CallPilot Fax User Guide 27
If you need a Fax Group List, ask your System Administrator to create one for you. When you give
the System Administrator the information, include:
• the names of the recipients
• a list of the fax machine numbers
• the Fax Group List name
Before you send a Fax Group message, be sure your System Administrator has created the Fax
Group List, and the list contains all the fax machines that are to receive the fax message.
CallPilot Fax User Guide
Page 28

28 Chapter 1 CallPilot Fax User Guide
To send a Fax Group message — Norstar Voice Mail
1 Press ·°⁄.
Follow the voice prompts or the display button options on your
telephone to open your mailbox.
<date> Fax:1
<<< STOP >>>
End of message
COPY
ERASE NEXT
Copy fax
MBOX
OTHR
Record Intro?
YES NO
Mbox:
DIR QUIT
<GList name>
OPTS CC SEND
2 Press PLAY
or ¤ to play the current message
or
press fl until you find the fax message you want to forward.
3 The date received and the Fax ID number appear on the display.
4 Press COPY
5 Press MBOX
6 Press NO
or fi.
or ⁄ to forward the fax message to another mailbox.
or ¤.
Do not record an introduction because Fax Group List recipients
do not hear voice introductions.
7 Enter the Fax Group List number.
8 Press SEND
or £ to send the fax message
or
press OPTS
or ‹ to assign message delivery options
or
press CC
to send the message to another recipient.
For information about delivery options see the CallPilot Reference
Guide.
To send a Fax Group Message —
End message
CO PY ER ASE N EXT
End message
PRINT DEL NEXT
NN40080-100NN40080-100
9 Press ® to end the session.
CallPilot
1 Press ·°⁄.
Follow the voice prompts or the display button options on your
telephone to open your mailbox.
2 Press PLAY
or
press fl until you find the fax message you want to forward.
3 Press ‡‹ to forward the message.
or ¤ to play the current message
Page 29

Chapter 1 CallPilot Fax User Guide 29
To:
NAME SPEC C NCL
To:
NAME SPEC C NCL
Empty
REC
Msg options
URG PRIV OTHR
Msg delivered
4 Enter the Group List number and press OK or £.
5 Press ‡‹ when you have entered all the addresses you want to
send the message to.
6 If you want to attach a voice message, press REC
or fi and record
your message.
External Group List recipients do not receive voice introductions
to fax messages.
7 If you want to attach message options, press ‡‚ to assign
message options.
8 Press ‡· to send the message.
9 Press ® to end the session.
CallPilot Fax User Guide
Page 30

30 Chapter 1 CallPilot Fax User Guide
Adding special characters to a fax telephone number
Follow the voice prompts or press ADD to add special characters to a fax telephone number.
Note: If you are adding special characters, do not press the dialpad buttons
£ to enter #, or • to enter *. Press the button directly below the option on a two line
display telephone, or listen to the voice prompts.
Press To
¤ or DIGS
‹or PAUS
›
fi or OTHR #
fl or OTHR *
TONE recognize dial tone (behind PBX).
•
resume adding digits to the destination phone number.
enter a timed pause that appears as P on the display.
Pauses are four seconds long.
recognize dial tone (behind PBX).
The Recognize Dial Tone special character appears as
enter #.
enter *.
The Recognize Dial Tone special character appears as
cancel and retry.
D on the display.
D on the display.
NN40080-100NN40080-100
 Loading...