

Page 1

TM
CallPilot
Release 2.5
Desktop Messaging User Guide
for Microsoft Outlook
Page 2

Updates to the
Desktop Messaging User Guides
Internet Clients
Page 7 Call the sender of a message
Call the sender of a message is not supported.
Page 7 Access web-based My CallPilot to view user information and change your
feature settings
My CallPilot is not supported.
Page 8 About this guide
The Internet mail clients that are supported are:
• Microsoft Outlook 2000 (Internet mail mode)
• Microsoft Outlook 2002 (XP) (Internet mail mode)
• Microsoft Outlook 2003 (Internet mail mode)
• Microsoft Outlook Express - 5.x and 6.x
• Netscape Messenger (Netscape Communicator) - 6.2x
• Netscape Mail - 7.0x
• Qualcomm Eudora Pro - 6.1.2
Citrix (Terminal server) functionality is supported.
Page 11 CallPilot Player
The Call the sender button is not available.
Page 11 To select your telephone or computer to play voice messages
If your telephone is call forwarded to voicemail, cancel this feature before you access your
messages from CallPilot Player.
Page 29 Linking to My CallPilot
Linking to My CallPilot is not supported.
About forwarding Desktop Messaging messages
Do not use the right-click menu to forward a Desktop Messaging message. To forward a
message, either:
• open the message and forward it from the CallPilot window
or
• for Outlook, select the message in the Outlook Inbox and forward it from the Outlook
toolbar.
Business Communications Manager & CallPilot 100/150
Page 3

Outlook, Lotus Notes, GroupWise
Page 7 Call the sender of a message
Call the sender of a message is not supported.
Page 7 Access web-based My CallPilot to view user information and change your feature settings
My CallPilot is not supported.
Page 8 About this guide
The groupware e-mail clients that are supported are:
• Lotus Notes - 5.x and 6.x
• GroupWise - 6.x
• Microsoft Outlook 2000, 2002 (XP), and 2003
Citrix (Terminal server) functionality is supported.
Page 11 (Page 12 Lotus Notes) CallPilot Player
The Call the sender button is not available.
Page 11 (Page 12 Lotus Notes) To play a message from your telephone
If your telephone is call forwarded to voicemail, cancel this feature before you access your messages from
CallPilot Player.
Page 14 (Page15 Lotus Notes) Composing fax and text messages
On the Compose Fax dialog box you can use the Subject field to add additional information to the fax cover page
(for example, the name of the recipient) when you send a fax directly to a fax machine. The maximum length you
can enter in the Subject field is 80 characters.
Page 27 (Page 28 Lotus Notes) Calling the sender of a message
Calling the sender of a message is not supported.
Page 28 (Page 29 Lotus Notes) Setting message options
Delivery Receipt is not supported.
Page 31 (Page 34 Lotus Notes and Microsoft Outlook) Personal distribution lists
Personal Distribution lists are not supported.
Page 37 (Page 40 Lotus Notes and Page 39 Microsoft Outlook) Linking to My CallPilot
Linking to My CallPilot is not supported.
Copyright
umadd N0027223 04.00
1-800-4 NORTEL
www.nortel.com
© Nortel Networks Limited 2005
All rights reserved.
Page 4

i
Page 5

CallPilot Desktop Messaging User Guide
for Microsoft Outlook
Product releases: 2.5
Document release: Standard 1.0
Date: October 2003
Copyright © 2003, Nortel Networks Nortel Networks, All Rights Reserved
Information is subject to change without notice. Nortel Networks reserves the right to make
changes in design or components as progress in engineering and manufacturing may
warrant.
The process of transmitting data and call messaging between CallPilot and its servers,
switches or system is proprietary to Nortel Networks. Any other use of the data and the
transmission process is a violation of the user license unless specifically authorized in
writing by Nortel Networks prior to such use. Violations of the license by alternative usage of
any portion of this process or the related hardware constitutes grounds for an immediate
termination of the license and Nortel Networks reserves the right to seek all allowable
remedies for such breach.
Nortel Networks and third-party trademarks appear on the following pages:
ii
Page 6

Nortel Networks, the Nortel Networks logo, the Globemark, and Unified Networks, BNR,
CallPilot, DMS, DMS-100, DMS-250, DMS-MTX, DMS-SCP, DPN, Dualmode, Helmsman,
IVR, MAP, Meridian, Meridian 1, Meridian Link, Meridian Mail, Norstar, SL-1, SL-100,
Succession, Supernode, Symposium, Telesis, and Unity are trademarks of Nortel Networks.
3COM is a trademark of 3Com Corporation.
ACCENT is a trademark of Accent Software International Ltd.
ADOBE is a trademark of Adobe Systems Incorporated.
AMDEK is a trademark of Amdek Corporation.
AT&T is a trademark of American Telephone and Telegraph Corporation.
ATLAS is a trademark of Quantum Corporation.
ATRIA is a trademark of Pure Atria Corporation.
BLACKBERRY is a trademark of Research in Motion Limited.
CASEWARE is a trademark of Caseware International, Inc.
CONTINUUS is a trademark of Continuus Software Corporation.
CRYSTAL REPORTS is a trademark of Seagate Software Inc.
DEFINITY is a trademark of Avaya Inc.
DIALOGIC, INTEL and VOICEBRIDGE are trademarks of Intel Corporation.
DIVX is a trademark of DivXNetworks, Inc.
EUDORA and QUALCOMM are trademarks of Qualcomm, Inc.
eTrust and InoculateIT are trademarks of Computer Associates Think Inc.
DIRECTX, EXCHANGE.NET, FRONTPAGE, INTERNET EXPLORER, LINKEXCHANGE,
MICROSOFT, MICROSOFT EXCHANGE SERVER, MS-DOS, NETMEETING, OUTLOOK,
POWERPOINT, VISUAL STUDIO, WINDOWS, WINDOWS MEDIA, and WINDOWS NT are
trademarks of Microsoft Corporation.
GROUPWISE and NOVELL are trademarks of Novell Inc.
HITACHI is a trademark of Hitachi Limited.
LOGITECH is a trademark of Logitech, Inc.
LUCENT is a trademark of Lucent Technologies, Inc.
MATRA is a trademark of Matra Hachette.
MCAFFEE and NETSHIELD are trademarks of McAfee Associates, Inc.
MYLEX is a trademark of Mylex Corporation.
NET2PHONE is a trademark of Net2Phone, Inc.
NETOPIA is a trademark of Netopia, Inc.
NETSCAPE COMMUNICATOR is a trademark of Netscape Communications Corporation.
NOTES is a trademark of Lotus Development Corporation.
NORTON ANTIVIRUS and PCANYWHERE are trademarks of Symantec Corporation.
POWERQUEST is a trademark of PowerQuest Corporation.
iii
Page 7

PROMARK and RHOBOT are trademarks of DMI Promark, Inc.
QUICKTIME is a trademark of Apple Computer, In.
RADISYS is a trademark of Radisys Corporation.
ROLM is a trademark of Siemens ROLM Communications Inc.
SLR4, SLR5, and TANDBERG are trademarks of Tandberg Data ASA.
SONY is a trademark of Sony Corporation.
SYBASE is a trademark of Sybase, Inc.
TEAC is a trademark of TEAC Corporation.
UNIX is a trademark of X/Open Company Limited.
US ROBOTICS, the US ROBOTICS logo, and SPORTSTER are trademarks of US
Robotics.
WINAMP is a trademark of Nullsoft, Inc.
WINRUNNER is a trademark of Mercury Interactive Corporation.
WINZIP is a trademark of Nico Mark Computing, Inc.
iv
Page 8

Contents
Welcome to CallPilot . . . . . . . . . . . . . . . . . . . . . . . . . . . . . . . . . . .7
Getting started . . . . . . . . . . . . . . . . . . . . . . . . . . . . . . . . . . . . . . . .8
Logging in . . . . . . . . . . . . . . . . . . . . . . . . . . . . . . . . . . . . . . . . . . .9
Working with your CallPilot messages . . . . . . . . . . . . . . . . . . . . .10
Playing voice messages . . . . . . . . . . . . . . . . . . . . . . . . . . . . . . .11
Viewing fax messages . . . . . . . . . . . . . . . . . . . . . . . . . . . . . . . . .12
Composing voice messages . . . . . . . . . . . . . . . . . . . . . . . . . . . .13
Composing fax and text messages . . . . . . . . . . . . . . . . . . . . . . .14
Creating and sending fax batch messages . . . . . . . . . . . . . . . . .15
Using custom fax Cover Pages . . . . . . . . . . . . . . . . . . . . . . . . . .22
Calling the sender of a message . . . . . . . . . . . . . . . . . . . . . . . . .27
Forwarding and replying to messages . . . . . . . . . . . . . . . . . . . . .27
Adding attachments to messages . . . . . . . . . . . . . . . . . . . . . . . .28
Setting message options . . . . . . . . . . . . . . . . . . . . . . . . . . . . . . .28
Addressing messages . . . . . . . . . . . . . . . . . . . . . . . . . . . . . . . . .29
Personal distribution lists . . . . . . . . . . . . . . . . . . . . . . . . . . . . . . .34
Changing your mailbox settings . . . . . . . . . . . . . . . . . . . . . . . . . .35
Changing mail delivery settings . . . . . . . . . . . . . . . . . . . . . . . . . .36
Changing your address book settings . . . . . . . . . . . . . . . . . . . . .37
Changing audio settings . . . . . . . . . . . . . . . . . . . . . . . . . . . . . . .38
Linking to My CallPilot . . . . . . . . . . . . . . . . . . . . . . . . . . . . . . . . .39
Working offline . . . . . . . . . . . . . . . . . . . . . . . . . . . . . . . . . . . . . . .40
Document information . . . . . . . . . . . . . . . . . . . . . . . . . . . . . . . . .41
v
Page 9

vi
Page 10

Welcome to CallPilot
CallPilot from Nortel Networks is an advanced business communications
system that offers exceptional flexibility for managing your messaging
needs.
You can work with CallPilot from your telephone or your computer.
Desktop Messaging gives you access to your CallPilot mailbox through
your Microsoft Outlook e-mail. Here are some of the many ways you can
use CallPilot with your e-mail:
Listen to voice messages.
View and print fax messages.
Record and send voice messages.
Create and send fax messages, including batch faxes.
Forward and reply to voice and fax messages.
Call the sender of a message.
Add message options such as urgent and private.
Add voice, fax, or text file attachments to messages.
Create personal distribution lists.
Change your CallPilot password.
Access web-based My CallPilot to view user information
and change your feature settings.
Some features mentioned in this guide may not be available for your
CallPilot mailbox. For details, refer to the Feature availability topic in the
Desktop Messaging online Help, or ask your administrator.
7
Page 11

Getting started
About this guide
This user guide describes how to use CallPilot with your Microsoft Outlook e-mail.
The instructions and screen images shown in this guide provide general information for
using CallPilot with your e-mail. Specific details may vary depending on your
computer’s operating system, the version of Outlook you are using, and the features
available for your CallPilot mailbox.
For further assistance in using CallPilot, refer to the Desktop Messaging online Help.
What you need
Before you start to use CallPilot, your administrator ensures that your e-mail account is
correctly configured for CallPilot. Your computer must be set up according to the
following requirements:
CallPilot Player to play and record voice messages
Nortel Fax Driver to create faxes
Microsoft Outlook 98 or 2000 (SR-2) in corporate mode, or Microsoft Outlook
2002 (SR-2) groupware e-mail clients
Windows 98 SE, Windows 2000 Professional, or Windows XP
Monitor with 256-color 800 x 600 capability
15 Mbytes of free disk space to install software
Sound card and speakers for playing voice messages on your computer
A microphone connected to your computer, or a telephone situated near your
computer, for recording voice messages
A LAN (Ethernet), ISDN, ADSL, or dial-up modem connection to the CallPilot
server for accessing CallPilot messages
Internet Explorer 5.x and 6.x, or Netscape 6.2x and above, to access My CallPilot
8
Page 12

Logging in
When you log in to your e-mail, you can log in to CallPilot at the same time.
To log in from Microsoft Outlook
1 Open your Microsoft Outlook
e-mail. The CallPilot Logon
dialog box appears.
2 In Mailbox, type or select your
mailbox number.
3 In Password, type your CallPilot
password.
4 Check Remember password if
you want CallPilot to log in
automatically.
5 Click OK.
Note: Do not leave the Remember password box checked on a shared computer.
To log out
When you exit Microsoft Outlook, you automatically log out from CallPilot.
Remote login
You can log in to your mailbox from any computer that has CallPilot installed and
configured in the same way as your office computer. For example, you can use a
computer set up for guest access, or your home computer with a dial-up connection to
the server.
9
Page 13

Working with your CallPilot messages
When you open your e-mail with CallPilot installed, your CallPilot messages appear in
the CallPilot Message Store. The Message Store contains folders for your CallPilot
Inbox, Outbox, Sent Items, and Deleted Items.
Your CallPilot Inbox
CallPilot
Message Store
New message
Urgent
message
Attached files
voice, fax, text
To check for new messages
The CallPilot message waiting indicator on your screen turns red when you have
a new message. To turn the indicator on or off, see Changing mail delivery
settings, page 39. New messages appear in bold.
To open a message
To open a CallPilot message, double-click anywhere on the message line. See Playing
voice messages, page 11, and Viewing fax messages, page 12.
To delete a message
To delete a CallPilot message in your Inbox, click on the message to select it,
then click the Delete icon on the toolbar. You can also click the Delete icon in an
open CallPilot message. The deleted message moves to the Deleted Items
folder. When you log out or click Exit from Outlook, your CallPilot messages in the
Deleted Items folder are immediately deleted without confirmation.
To organize your messages
To organize your messages, you can create new CallPilot folders in the CallPilot
Message Store, and move or copy your messages to these folders. You can access
these message when you log in by telephone or through My CallPilot.
Call the sender
Compose new
message
Message was
opened by the
recipient
Message was
received
10
Page 14

Playing voice messages
When you open a voice-only message, the CallPilot Player appears. In mixed
voice and fax or text messages, click the Voice icon to open the CallPilot Player.
To select your telephone or computer to play voice messages
You can choose to play your voice messages from your telephone or your computer. To
change from one to the other, or to change the telephone number that CallPilot dials,
see Changing audio settings, page 42. You can also click the Telephone or Computer
icon on the CallPilot Player to change the setting.
To play a message from your telephone
1 To play a voice message when your telephone is selected for playback, double-
click the message in your CallPilot Inbox and answer your telephone when it rings.
2 Use the buttons on the CallPilot Player to play or stop the message, go backward
and forward, and call the sender.
3 When you are finished, hang up and close the message.
To play a message from your computer
1 To play a voice message when your computer is selected for playback, double-
click the message in your CallPilot Inbox. The message plays through your
computer’s speakers or your headphones.
2 Use the buttons on the CallPilot Player to play or stop the message, go backward
and forward, adjust the volume and speed, and call the sender.
3 When you are finished, close the message.
Position in
message
Play/
Re-play
Stop
Play messages
from telephone
Play messages
from computer
Adjust
volume
Go to start/
Skip back
Go to end/
Skip forward
Adjust
speed
Close
message
Open
next or
previous
message
Forward
Reply to All
Reply
Delete
message
Status
Disconnect
Call the
sender
11
Page 15

Viewing fax messages
Note: In order to receive faxes, your CallPilot administrator must enable fax
capability for your mailbox.
To view a fax message
1 Double-click a fax message in your CallPilot Inbox. When you open a fax-only
message, the fax image appears right away. In mixed voice and fax or text
messages, click the Fax icon to view the fax.
2 While viewing the fax, you can enlarge or reduce the image, rotate or move it,
print it, delete it, save it, add a voice annotation to the saved file, forward it and
reply to it.
3 When you are finished, close the message.
Print
Delete
message
Select part of
image
Drag/scroll
image
Close
message
Open
next or
previous
message
Forward
Reply to All
Reply
Change page
views
Go to next or
previous page
Rotate left
Rotate right
Zoom in
Zoom out
12
Page 16

Composing voice messages
You can record a voice message from the computer or the telephone, then address and
send it the same way as an e-mail message.
To record and send a voice message
1 In your CallPilot Inbox, click the New CallPilot Message icon .
2 On the new message form, click the Telephone icon in the toolbar to open the
CallPilot Player, if it is not already open.
3 On the CallPilot Player, click the red Record button to start recording.
4 If you are recording from the computer, record your message into the
microphone. Click Stop to end the recording. Click Play to review it. To add to the
recording, click Record, speak again, then click Stop.
If you are recording from the telephone, answer when it rings. At the tone,
record your message. Click Stop to end the recording. Click Play to review it.
5 Click To… to address from the CallPilot, e-mail, or any Address Book. See
Addressing messages, page 31. Or type a formatted address in the To... field.
6 Add attachments and options if required. See Adding attachments to messages,
page 30, and Setting message options, page 30.
7 On the toolbar, click the Send Message icon.
Send message
Save message
Address
message
Set options
Playback slider
Play
Stop
Record from
telephone
Record from
computer
Record
Adjust volume
Go to start/
Skip back
Go to end/
Skip forward
Adjust speed
To save a newly created voice message as a file
1 On a new message form, record a message, and on the File menu, click Save as... .
2 In the File name box, type a name for the file, select a folder to keep the file in,
then click Save. Save voice files as .vbk files. Note: CallPilot automatically
converts .vbk files to .wav files when sending to non-CallPilot users. See
Changing mail delivery settings, page 39.
13
Attach file
Telephone icon
opens CallPilot
Player
Page 17

Composing fax and text messages
To create and send a single fax message
To create a fax, your CallPilot mailbox must have the fax capability enabled. The
CallPilot recipients of your fax must also have fax capability to view the fax on their
computer. If your recipients access their messages from their telephone, they can view
the fax only by printing it. You can also send your fax to a fax machine.
1 Open the document that you want to fax. It must be 8.5 in. (21.5 cm) wide or less.
2 On the File menu, select Print.
3 From the list of printers, select Nortel Fax, then click Print or OK.
4 The Compose Fax dialog box appears. Before sending the fax, you can add
more documents by repeating steps 1 to 3. You can also choose to include a
cover page, view the fax, and save it as a file for later transmission.
5 Select an appropriate Send using... option.
To send a simple fax, type the fax machine number(s) or CallPilot mailbox
number (‘m’ plus number, for example, m7366) in the Fax machine(s) field, type
a subject in the Subject field, then click Send.
To send your fax as an attachment to a new CallPilot message, select CallPilot
Desktop Messaging for MS Outlook under Send using, then click Send.
File name
Send fax
options
View
before
sending
Delete
before
sending
Change
order of
files to be
faxed
Confirmation
of Delivery
Save to send
later
A new message form opens with your fax file attached. Address the message
from the CallPilot, e-mail, or any Address Book. See Addressing messages, page
31. Or type the formatted address in the To... field.
14
Page 18

6 Add attachments and options if required. See Adding attachments to messages,
page 30, and Setting message options, page 30.
7 Click Send Message.
To create and send a text message
To create a text message, open a new CallPilot message form and type or paste plain
text into it, address the message, then click the Send Message icon.
15
Page 19

Creating and sending fax batch messages
To send customized CallPilot fax messages to multiple recipients you can use Microsoft
Word's Mail Merge and send your print job to the Nortel Fax Batch printer. You must be
familiar with Microsoft Word's Mail Merge functionality to use this feature. Consult your
MS Word documentation. Note that the CallPilot Fax Batch feature is only available to
CallPilot Desktop and Web users who install the Nortel Fax Batch Print Driver.
To use Mail Merge with CallPilot, you will need your main document (the file you want to
send to your recipients) and a data source document which contains recipient
information such as names and fax numbers.
Your Callpilot Desktop Messaging installation includes an example Microsoft Word data
source named Data.doc and an example Microsoft Word main document named
Sample.doc. Each of these are examined below to explain the batch fax procedure.
Accessing and modifying the example Data source document
The Data.doc file consists of a Microsoft Word table. It is organized in columns, with one
row for each recipient. The following column headers exist in the sample: ToFax,
ToName, DelReceipt, DelType, ToCompany, and ToPhone. These column headers can
be modified, deleted and new columns can be added. The column header names
serve as tags that can be inserted into the main document to customize the fax for each
recipient or to direct CallPilot how to handle the fax.
1 Go to \Program Files\Nortel Networks\CallPilot\nda directory and open the
Data.doc file.
16
Page 20

2 Add new columns or subtract existing ones, as required. For new columns, chose
a meaningful column header name.
3 Add the required data under each column header. The data source can be
created by any means available to populate a Microsoft Word table, including
importing information from existing files.
If you edit the recipient list using the Mail Merge utility (i.e. click on Edit in the Data
source section of the MS Mail Merge Helper), the Data Form window opens and
lists all the entries from the data source table. You can add, delete, modify and
search for records in this window. Any column headers that you added or modified
in the data source file will automatically appear in this window. Note that the ToFax
field is the only mandatory field for CallPilot.
The following parameters and characters are supported in the To Fax field:
Maximum supported length for the fax phone number is 120 characters.
Numbers 0 through 9 are supported.
Upper and lower case P and the comma are used when a pause is
necessary.
The Pound sign (#) is used by some fax servers and is supported.
Common phone number symbols such as left and right parentheses and the
dash are supported.
Spaces are supported.
Upper and lower case M used in front of a CallPilot mailbox number to
designate the address as a CallPilot mailbox are supported.
The other fields are optional and are used to customize the fax or to direct CallPilot
how to handle it. Three specific CallPilot fields and their parameters are:
ToName : This is the fax recipient’s name and can be up to 256 characters
in length.
DelReceipt: You can use this tag to receive a Delivery Receipt in the form
of a CallPilot message in your CallPilot mailbox when the fax is delivered to
the recipient. If the DelReceipt field is set to “1”, then a delivery receipt will
be generated. If DelReceipt is set to '0', a delivery receipt will not be
generated for that recipient. If the DelReceipt field is empty or the field is not
in Data.doc, then no delivery receipt will be generated.
DelType: This field may be used to set a delivery priority for each recipient.
If the DelType field is set to '0' or is left empty (or if it is not present in your
Data.doc), the message will be tagged for Normal delivery. If DelType is set
to “1”, then the message will be tagged for Economy delivery. If DelType is
set to “2”, then the message will be tagged for Urgent delivery. Messages
sent to non-CallPilot recipients with the Delivery Type set to Economy will
be delivered on a schedule defined by the CallPilot server for Economy
delivery. Note that messages sent to CallPilot mailboxes will not be affected
by the Economy designation and will be sent as Normal messages.
Transmission of messages tagged as Normal or Urgent will begin
immediately. Urgent messages will display the Urgent icon when displayed
17
Page 21

from My CallPilot or a Desktop Messaging client and a voice prompt will
identify the message as Urgent from the CallPilot telephone interface.
Messages sent Urgent are treated as Normal when they are sent to
non-CallPilot addresses.
4 Once the table has been updated, save all changes. You would normally supply
a unique name for your data file here, but for the remainder of these procedures
the name Data.doc will be used.
5 Close the document. The Data.doc file can now be used as a data source by MS
Mail Merge.
Accessing and modifying the example Main document
The Sample.doc file is an example of a Microsoft Word main document.
1 From the \Program Files\Nortel Networks\CallPilot\nda directory, open
Sample.doc in MS Word.
This document contains tagged fields corresponding to those in the example Data.doc
file. You can use this as a template for your own fax or just to practise with. If you
modified the column header names in Data.doc, you will have to modify them in your
main document as well.
First page
The first page of the main document is a special page and does not become part of the
final fax. Sample.doc is installed with the first page setup correctly.
18
Page 22

The purpose of this page is to provide a location to map information in the data source
to each customized fax document. To signal CallPilot that this as a Fax Batch file and to
prevent this page from becoming part of the fax, two special control codes must be
present on the first page:
$SOJ$ Start of Job. This control signals the fax driver to start processing and
can be placed anywhere on the first page.
/zz Skip this page. This control can be placed anywhere on the first page
and prevents the first page from becoming part of the fax message.
The CallPilot desktop software will retrieve the Fax Number from the first page of the
document. Additionally, CallPilot desktop software will retrieve the Recipient Name, the
Delivery Receipt and the Delivery Type, if they exist on the first page.
/tp Fax Number. Used to address the fax message. This field is required.
/dr Delivery Receipt. A Delivery Receipt can be turned on or off for each
recipient. This field is optional.
/tn Name of Recipient. This name is used to identify the record in the Nortel
Fax Batch Status dialog if the fax number is either missing or invalid.
This field is optional.
/dt Delivery Type. Used to mark messages for Normal, Economy or Urgent
delivery. This field is optional.
To complete the page, the Fax Number column header (i.e. <<ToFax>>) must be
inserted after the /tp control using the Mail Merge insert function. Likewise, the Delivery
Receipt column header (i.e. <<DelReceipt>>) may be inserted after the /dr control, the
Name of Recipient field (i.e. <<ToName>>) may be inserted after the /tn control and the
Delivery Type field (i.e. <<DelType>>) may be inserted after the /dt control.
Note: all Fax Batch controls are case sensitive.
As an advanced fax addressing feature, users can also modify all data in a single
column without actually modifying the data source file. For example, if an existing data
source table contains fax numbers for a large number of recipients, but the external
access number '9' is missing, this number can be added to all fax numbers by modifying
the control on the first page of the document as follows:
/tp9<<ToFax>>
In this example, a '9' will be added to the beginning of each phone number during fax
batch processing. The data source remains unchanged and could be used from a
different location which does not require a '9' for external access.
Second page
Once the data source document and the first page of the main document have been
created, you can begin to customize your fax. Note that it must be equal to or less than
8.5 inches in width.
You can use all of the data source column header tags to customize the document. The
following is an example using the Sample.doc file:
19
Page 23

In this example, the document is customized for each recipient. Data source column
headers are inserted into the document using the MS Word Mail Merge utility Insert
function. After the main document has been customized, it is ready to be merged with
the information in the Data.doc file. Consult your MS Word Mail Merge help for more
details on inserting data source fields into the document.
Merging data from the Data Source into the Main Document
When you are ready to merge data from the data source file into your main document:
1 Start Mail Merge from the MS Word Too ls menu. Depending on which version of
MS Word you are using, Mail Merge will be under different menu headings.
a. In the Office XP version, select Tools>Letters and Mailings>Mail Merge
Wizard.
b. In Office 2000 select Tools / Mail Merge.
2 Verify that Sample.doc is currently selected as the main document and that
Data.doc is currently selected as the data source.
20
Page 24

3 Select Merge to Printer and then select the Nortel Fax Batch driver from the
Print dialog box that appears.
Note: Ensure that MS Word is not set up to print pages in reverse order.
4 Click OK in the Print dialog box to initiate the batch fax process.
When the document is merged, data values from the data source file will be merged
into the main document at the appropriate tag positions and a separate fax TIF file for
each recipient is created. CallPilot desktop software will address and transfer the fax
files to the server. The CallPilot server is responsible for actually sending the fax to the
recipients.
Once the process starts, the Print Status dialog appears. The page number increments
as each page is converted to a TIF file. Since the first page is skipped, this page is not
included in the count. For example, if a three page fax is sent to 10 recipients, the dialog
box will display "Printing page 1", "Printing page 2", and so on up to "Printing page 20."
Only 20 pages are printed because the first page of each document is skipped.
Problems that occur while creating the fax images or with the fax addresses will be
displayed in a separate Nortel Fax Batch Status dialog box such as:
Problems such as a missing fax address or an unsupported fax address format are
checked. However, problems such as a wrong fax number will not be identified,
provided the number is in a valid format. A wrong fax number will however result in the
sending of a non-Delivery receipt to the user's CallPilot mailbox by the CallPilot server.
When you click the OK button, the batch process ends and no faxes are sent. You must
then fix the fax address(es) and resubmit the job.
If all faxes and addresses were created properly, a dialog appears while the faxes are
being addressed and transferred to the CallPilot Server. It indicates the status of the
batch job. If you press Cancel in this dialog box before the job is completed, another
dialog box appears asking you to confirm the cancellation. If you select Yes, all
temporary files will be deleted and the process ends. However, all faxes that have
already transferred to the CallPilot server will be sent.
21
Page 25

If a problem occurs while transferring the fax, a dialog similar to the following appears:
If you select Yes, an attempt is made to resend the fax to the server. If you select No,
the current fax is skipped and processing begins on the next fax in the list. The fax that
was skipped will not be sent. If you select Cancel, another dialog box appears asking
you to confirm the cancellation. If you choose Yes, all temporary files will be deleted and
the process ends. Any faxes that have already been transferred to the CallPilot server
will be sent. If you choose No, the failure dialog box shown above will be displayed
again, allowing you to make a different choice.
After all the faxes have been successfully transferred to the server, a dialog box will
confirm this.
22
Page 26

Using custom fax Cover Pages
Callpilot users can choose to include a cover page with their faxes. These are typically
designed and managed by the server administrator. The user simply chooses the
desired style of cover page (if more than one is available).
Cover pages generally include the following information:
From Information: Title Name Department Company
Phone number Fax number
To Information: Title Name Department Company
Phone number Fax number
Number of Pages
Sent Date & Time
A Cover Sheet Memo section
CallPilot Configuration
The CallPilot Desktop Messaging Configuration page includes an option labelled
"Include cover page when forwarding fax message". The default value for this is
unchecked, meaning that a cover page will not be added to the message.
If you select this option, you can then choose and set a default cover page from a list of
available cover pages. Use the Browse… button to choose the location where the cover
23
Page 27

pages are stored. The default location is: \\Program Files\Nortel Networks\
CallPilot\cvrpages.
CallPilot Desktop Messaging Custom form
The CallPilot Desktop Messaging Custom Fax Forward form contains a menu item
named Cover page, which contains two submenus items: Add and Modify.
The Add menu displays a list of existing cover pages available to use. You can select
one of these and click OK.
The Modify menu displays the current cover page content and lets you modify it. From
the "Modify" window, you can also preview the current cover page.
If you enabled the Include cover page… option, CallPilot Desktop Messaging will add
the selected cover page to the Fax Forward form. The cover page will appear as the first
attachment on the list of attachments (left pane). The Attachment's view (right pane) will
contain only the Cover Sheet Memo section of the cover page. You can include any
additional required information here.
24
Page 28

Nortel Fax Printer Driver form
You can use the Nortel Fax Printer form to send a fax message using either a CallPilot
Desktop messaging client (such as MS Outlook) or the QuickFax feature. The
QuickFax feature allows you to send a fax directly from the print dialog box. If you
choose to send your fax using a CallPilot Desktop Messaging client, the cover page will
be available from the CallPilot Custom form.
25
Page 29

If you choose to send
your fax to a specific
destination (for
example, a fax
machine), the Cover
page field becomes
active and lets you
browse for a cover
page and/or select
one from the
dropdown list. You
can then modify its
contents. This
provides functionality
similar to the Custom
form. (Refer to the
following section for
details.) You can also
choose not to include
a cover page by
selecting the No
cover page option from the Use fax cover page dropdown list.
Note that you can also include a Subject line here. The Subject field information will
however only be displayed in the e-mail portion of the fax. It will not be displayed on a
hard copy of the fax.
Modify and Preview cover page
You can preview the current cover page and modify its contents from both the CallPilot
26
Page 30
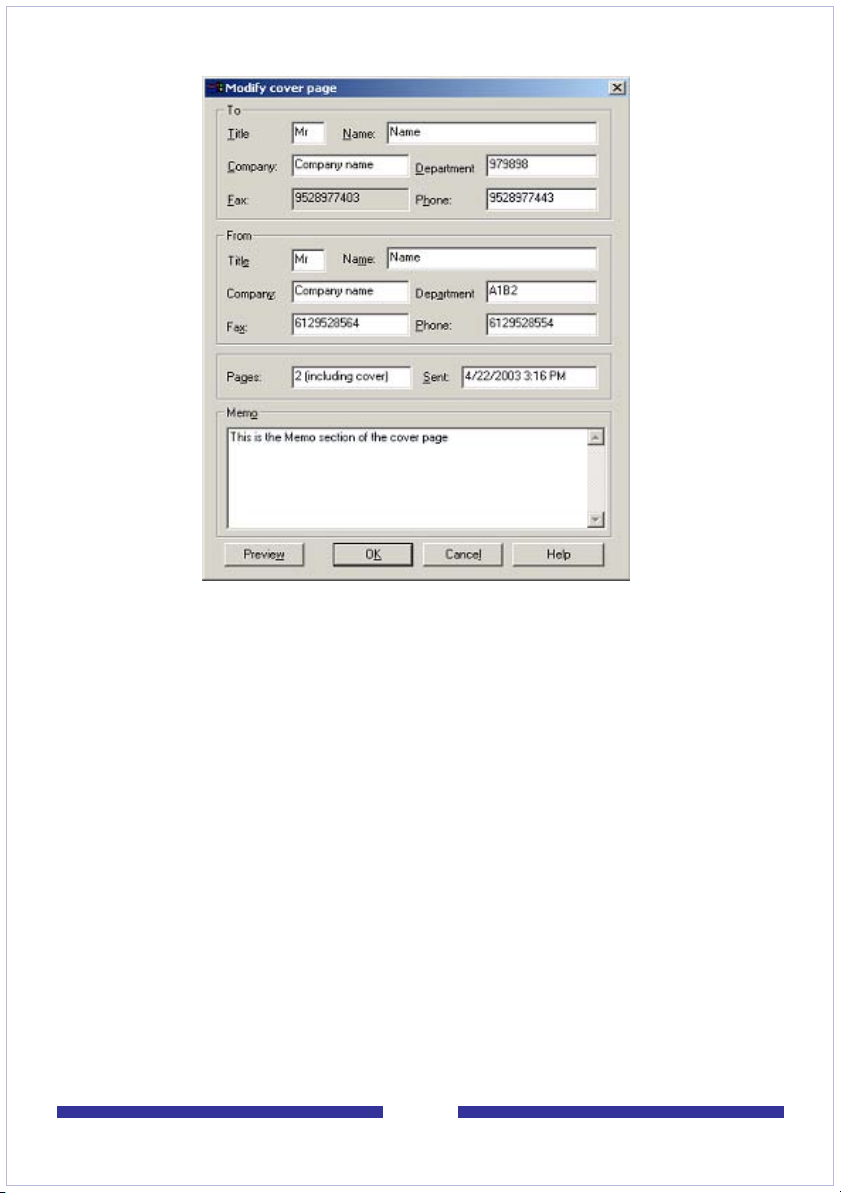
Custom form and the Nortel Fax Printer driver application.
Click on Preview to view the current state of the cover page.
27
Page 31

The first time you access this page, CallPilot Desktop Messaging will try to fill in the
From section using information from the registry. Desktop Messaging will remember the
data that you entered into this section and automatically complete those fields the next
time you use this page. Although the From information is automatically populated from
the registry, you can still change it.
In the To section, one field will always be read only - the Fax field. CallPilot will populate
it using address information from the Custom or Fax Driver forms. The Name field is
read-only if the cover page is used from the Custom form. In this case, CallPilot will
automatically fill it using the recipient's name. If you use the Fax Printer driver instead,
this field is left empty and you can complete it.
If a cover page is used from the Fax Printer driver, CallPilot Desktop Messaging
computes the number of pages and enters this information in the Pages field. When you
use the Custom form, the Pages field is left empty. You can modify this field in either
case.
The Sent field uses the current time and date by default. This field is also editable.
The Memo section is in synch with the Memo section of the Custom form.
Note that the maximum length of all cover page fields except the Memo fied is 30
characters. The maximum length of the Memo field is 2500 characters.
28
Page 32

Calling the sender of a message
You can respond to a CallPilot message or an MS Outlook message with a telephone
call instead of a recorded message.
Note: When the message is answered from within MS Outlook, that program must
be able to find the sender of the e-mail message within an existing address book.
This works well whenever a message originates from an MS Exchange Server.
However, MS Outlook may not be able to determine the sender when an Outlook
message originates from an external SMTP server.
1 Select a message in your CallPilot or Microsoft Outlook Inbox.
2 Click the Call Sender toolbar icon. .
Since the e-mail sender’s address book entry may contain multiple numbers, all
telephone numbers that can be found for the sender are presented to you in the
Call Sender dialog. Choose the appropriate number and press the Call Sender
button. The CallPilot Desktop client will attempt to remember changes you make.
3 Answer the telephone when it rings. CallPilot immediately calls the sender of the
message.
4 When you finish the call, hang up the telephone or click Disconnect .
Forwarding and replying to messages
You can forward a message, and append an introduction to it. You can also compose a
reply to the sender of a message, or to the sender and all recipients of a message.
To forward or reply to a message
1 In an open message, click
Forward, Reply, or Reply to All.
2 On the new message form,
compose a voice, fax, or text
message.
3 Address forwarded messages the
same way as a new message.
Replies are addressed
automatically.
4 Add attachments, set options, and
change the subject line if required.
5 Click the Send Message icon.
Note: Your administrator may block messages forwarded to external e-mail addresses.
29
Compose voice message
Compose text message
Attach file
Page 33

Adding attachments to messages
Before sending a message, you can attach a voice, fax, or text file to it. Voice files can
be .vbk or .wav format for CallPilot recipients; CallPilot can automatically convert .vbk
files to .wav files when sending to non-CallPilot users. See Changing mail delivery
settings, page 39. Fax files must be .tif format. Text files must be .txt format.
To attach a file to a message
1 On a new message form, click the
Attach File icon.
2 In the Open dialog box, select or
type the name of the file that you
want to attach.
3 Click Open to attach the file and
return to the new CallPilot
message.
Setting message options
Before sending a message, you can set options for handling and delivery.
To set message options
1 On a new message form, select Delivery, Sensitivity, and Receipt options, as
required.
For Delivery, select Urgent, or leave the setting as Normal.
For Sensitivity, select Private, or leave the setting as Public.
Note that when you send a message marked Private, your recipient may still
forward it to someone else, if they are not a CallPilot user. Also, recipients in nonCallPilot systems will not be informed of Private settings. In your message, tell the
recipient that the message is Private.
For Receipt acknowledgment, check Read receipt to request acknowledgment
that your recipient opened the message. Check Delivery receipt to request
acknowledgment that your recipient received the message.
2 Continue to compose, address, and send the message as usual.
30
Page 34

Addressing messages
Entries in the Microsoft Outlook Contacts list contain information such as: e-mail
addresses, fax numbers, and telephone numbers. CallPilot allows you to use the fax
and telephone number fields in the Outlook Contacts list when the e-mail address is not
a Microsoft Exchange Server or CallPilot Server address.
To address a message from an Address Book
You can address a CallPilot message from the Address Book on the server, or you can
select addresses from any available Address Book.
The CallPilot Address Book on the server is maintained by your organization, and
contains the addresses of the CallPilot users and distribution lists that you are
allowed to use. You cannot edit this list. You can download the Address Book to
your computer so that you can work in offline mode. See Changing your address
book settings, page 41.
Your Personal Address Book is the list of e-mail addresses that you maintain on
your computer. You can add CallPilot addresses to this list.
31
Page 35

1 In a new CallPilot message, click To… .
2 In the Show names list, select CallPilot Address Book, Personal Address
Book or Outlook Address Book - Contacts..
3 Select the name of the recipient or distribution list.
4 Click To ->. You can select one or more addresses, clicking To -> after each one.
5 Click OK to return to the new CallPilot message once the recipients have been
chosen.
E-mail addresses versus Fax/Telephone numbers
The CallPilot Desktop client will always attempt to find a CallPilot or MS Exchange
Server address when sending a message to a recipient. Using either a CallPilot or MS
Exchange Server address is the safest mechanism for message transmission, since it
guarantees the entire message can be sent and requires no user interaction. However,
if a CallPilot or MS Exchange Server address cannot be found, the desktop client
determines the message data type (voice, TIF, and/or text) and takes one of the
following actions:
Mixed Media messages
If mixed media is detected (voice/TIF or voice/text; note that TIF/text is not considered
mixed media), the message will be sent to the recipient's e-mail address. If an e-mail
address cannot be found, a Non-Delivery Notification (NDN) is generated for that
recipient. The desktop client cannot send mixed media messages to a telephone or fax
number.
Single Media messages
If voice only or tif/text only data is detected, the desktop client scans the recipient for an
e-mail address and telephone/fax numbers. The desktop client scans for telephone
numbers if the data is voice only or for fax numbers if the data is tif/text only.
If an e-mail address is found without telephone/fax numbers, the message will be sent
without additional user interaction. If neither an e-mail address nor a telephone/fax
number can be found, an NDN is generated.
If a telephone or fax number is found, the CallPilot Recipient dialog box is displayed and
you will be prompted to pick the final destination. You must modify the selected number
in the Verify number field to ensure proper delivery. You can also pick an e-mail
address (if available), but cannot modify it.
Validating Telephone and Fax Numbers
The original telephone or fax number may contain any alphanumeric character. This
includes special dialing prefixes such as + for international numbers or abbreviations
such as ESN to denote internal calls. However, you must modify the selected number in
the Verify number field of the CallPilot Recipient dialog box to ensure proper delivery.
The modified number can only contain the following alphanumeric characters:
Numeric characters 0123456789
Numeric Delimiters ( ) Pause characters Pp,
Octothorpe #
32
Page 36

White space
The CallPilot Desktop client will attempt to remember changes you make. This should
prevent you from repeatedly having to make the same changes each time the same
telephone or fax number is used.
Note that the ability to dial any telephone or fax number may be restricted by the
CallPilot server.
Note also that the ability to scan for telephone or fax numbers is only available in the
CallPilot Custom form. The standard e-mail form will not scan for these numbers. If a
CallPilot or e-mail address is missing from a recipient in the standard e-mail form, an
NDN is generated for that recipient.
To address a message manually
You can type an address directly into the To field of a new message. Enclose the
address in square brackets. Refer to the Required format for a CallPilot E-mail address
section on page 34 for the correct addressing formats.
To add CallPilot addresses to your Personal Address Book or Outlook Contacts
You can add CallPilot addresses and distribution lists to your e-mail Personal Address
Book. You may want to distinguish between CallPilot and e-mail addresses by adding
CallPilot after the recipient’s name.
1 Open the address book from Microsoft Outlook and click on the New Entry
toolbar icon.
2 You will then be prompted to select the entry type. Select New Contact to create
a new entry in the Microsoft Outlook Contacts.
A new Untitled - Contact dialog box is displayed. The two areas used by
33
Page 37

CallPilot are the contact information and e-mail fields.
3 You can choose to enter a CallPilot address in the E-mail field or fax/telephone
numbers in the contact fields. You can fill in all fields, but the desktop client will
ignore all fax and telephone numbers if the E-mail field contains a Microsoft
Exchange Server or CallPilot Server address.
Required format for a CallPilot E-mail address
If you choose to enter a CallPilot addresses in the E-mail field, it must be entered in the
following format:
[CALLPILOT:XXXXYYYY@ZZZZ]
Where:
XXXX = SMTP/VPIM prefix
YYYY = CallPilot Mailbox number
ZZZZ = CallPilot Server FQDN (server and domain)
For example, suppose CallPilot server “na42349” in the domain “us.nortel.com” with
VPIM/SMTP prefix “1952897” contains mailbox “7404”. Then the CallPilot address for
that mailbox would be:
[CALLPILOT:19528977404@na42349.us.nortel.com]
Required format for Fax and Telephone Numbers
If you choose to enter a fax or telephone number in the contact field(s), it must be
entered as an alphanumeric string. Pause (P p ,) and octothorpe (#) characters are
supported.
The required format is:
34
Page 38

[CALLPILOT:XXXX@ZZZZ]
Where:
XXXX = Telephone or fax number
ZZZZ = CallPilot Server FQDN (server and domain)
Examples of valid fax and telephone number formats are:
[CALLPILOT:7404@na42349.us.nortel.com]
[CALLPILOT:(416) 697-7321@na42349.us.nortel.com]
[CALLPILOT:(416) 697-7321,7404@na42349.us.nortel.com]
[CALLPILOT:(416) 697-7321p7404@na42349.us.nortel.com]
[CALLPILOT:(800) 921-1342#123123@na42349.us.nortel.com]
Microsoft Outlook supports telephone and fax contact numbers for business, home, car,
etc. Some contact numbers are not supported. Note that contact numbers are a feature
of Microsoft Outlook; CallPilot Desktop Messaging cannot hide or alter unsupported
items. The supported and unsupported numbers are shown following:
35
Page 39

Personal distribution lists
There are two types of Personal Distribution Lists (PDL) you can use:
CallPilot PDL, which can be created using My CallPilot or the telephone
Local distribution lists which can be created from MS Outlook in personal
address books. Note that this type is not accessible from telephone interface.
To use existing CallPilot personal distribution lists
You can address messages using CallPilot personal distribution lists that you created in
My CallPilot or on your telephone. In Outlook, select these lists from the CallPilot
Address Book or add them to your personal Address Book.
To create a personal distribution list in Outlook
You create a CallPilot personal distribution list in Outlook the same way that you create
an e-mail personal distribution list. After you create a list, it appears in your e-mail
Personal Address Book so that you can select the list to address a message. You
cannot access a list created in Outlook from your telephone or from My CallPilot.
1 In your Inbox, on the Tools menu, click Address Book.
2 Select Personal Address Book, and from the File menu, click New Entry.
3 Select Personal Distribution List, and click OK.
4 In New Personal Distribution List Properties, in Name, type a list name.
5 Click Add/Remove Members… to display Edit New Personal Distribution List
Members.
6 Scroll to CallPilot Address Book and select it. Select names to add to the
Distribution List, clicking Members -> after each name.
7 Click OK when you have finished entering names.
36
Page 40

8 Click OK after viewing the list.
You can add or delete names for this list at any time.
37
Page 41

Changing your mailbox settings
To view or change your CallPilot access settings
Your administrator enters the default CallPilot access information for you. You can
change these settings if required. Refer to the online Help for a detailed explanation.
1 In your e-mail Inbox, on the Tools menu, click Services (or E-mail accounts if
you are using XP), and open CallPilot Desktop Messaging configuration.
(Or, on the CallPilot Player, select View > Options.)
2 Click the General tab to display your current access settings.
3 Make any changes required, then click OK.
To change your CallPilot password
This is the same password that you use from the telephone.
1 Repeat steps 1 and 2 above,
then click Change Password.
2 In the Old password field, type
your current password.
3 In the New password field, type
your new password.
4 In the Retype new field, type
your new password again.
5 Click OK to save the change.
6 Click OK to exit the General
settings.
38
Page 42

Changing mail delivery settings
To view or change your mail settings
Your administrator enters the default mail settings for you. You can change them if
required. Refer to the online Help for a detailed explanation.
1 In your e-mail Inbox, on the Tools menu, click Services (or E-mail accounts if
you are using XP), and open CallPilot Desktop Messaging configuration.
2 Click the Mail tab to display the current mail settings.
3 The default settings shown here are recommended for most users:
Path - This is the location of the database file used to store CallPilot messages
on your computer.
Notification - You can set CallPilot to update your message list automatically,
manually, or at intervals such as every 5 minutes. (Choose Manually to save
costs on long distance or ISDN connections.)
Use CallPilot form - Your CallPilot messages appear on a CallPilot form instead
of an e-mail form.
Include message header when forwarding/replying - The header information of
the original message appears in a reply or forwarded message.
Include cover page when forwarding a fax - Refer to the CallPilot Configuration
section on page 23 for information on adding and/or modifying cover pages.
39
Page 43

Convert voice messages to WAV for non-CallPilot users - Your recorded
messages are automatically converted from .vbk to .wav files when you send
them to non-CallPilot users.
Show message waiting indicator (MWI) on taskbar - The CallPilot telephone icon
on the Windows taskbar turns red when you have a new message.
4 Make any changes required, then click OK.
40
Page 44
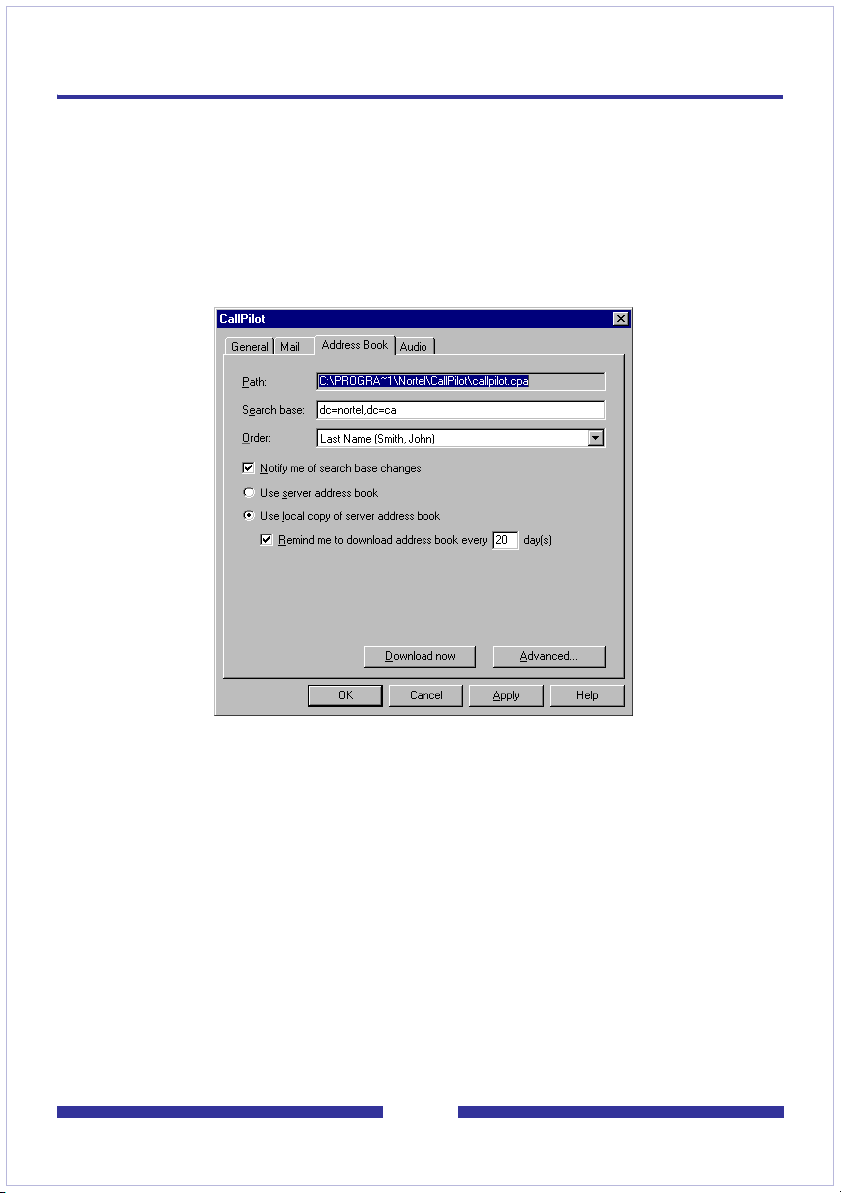
Changing your address book settings
To view or change your Address Book settings
Your administrator enters the default Address Book settings for you. You can change
them if required. Refer to the online Help for a detailed explanation.
1 In your e-mail Inbox, on the Tools menu, click Services (or E-mail accounts if
you are using XP), and open CallPilot Desktop Messaging configuration.
2 Click the Address Book tab to display the current Address Book settings.
3 Make any changes required, then click OK.
To download the Address Book to your computer
You can download the CallPilot address book from the server to your computer so that
you can work offline.
1 Select the Address Book tab as described previously.
2 Click Download now. The server address book downloads to your computer.
3 Select Use local address book. From now on, when you click To… in a CallPilot
message, whether working online or offline, you go to the address book that you
downloaded to your computer.
4 Check Remind me… to remember to update this list by downloading it from the
server occasionally. Set the number of days between reminders.
5 Click OK.
Whenever you want to address directly from the server again, reselect Use server
address book.
41
Page 45

Changing audio settings
To change the audio device and volume
You can play and record your messages from your telephone or your computer.
1 In your e-mail Inbox, on the Tools menu, click Services (or E-mail accounts if
you are using XP), and open CallPilot Desktop Messaging configuration.
(Or, on the CallPilot Player, select View > Options.)
2 Click the Audio tab to display the current Audio settings.
3 In Device, click Telephone if you want to play and record your voice messages
from your telephone. Make sure the correct telephone number appears.
Or, click Computer if you want to play and record your voice messages through
your computer’s speakers and microphone.
Note: You can also change your audio device on the CallPilot Player.
4 In Vol ume, check the Volu me and Level check boxes if you want to coordinate
your CallPilot volume settings with your computer’s speaker and microphone
volumes.
5 If you want a reminder to check these settings before playing or recording voice
messages, check Confirm settings... .
42
Page 46

6 If you want to download voice messages to your computer before playing them,
check Download file... . This option is useful if you are using a modem.
43
Page 47
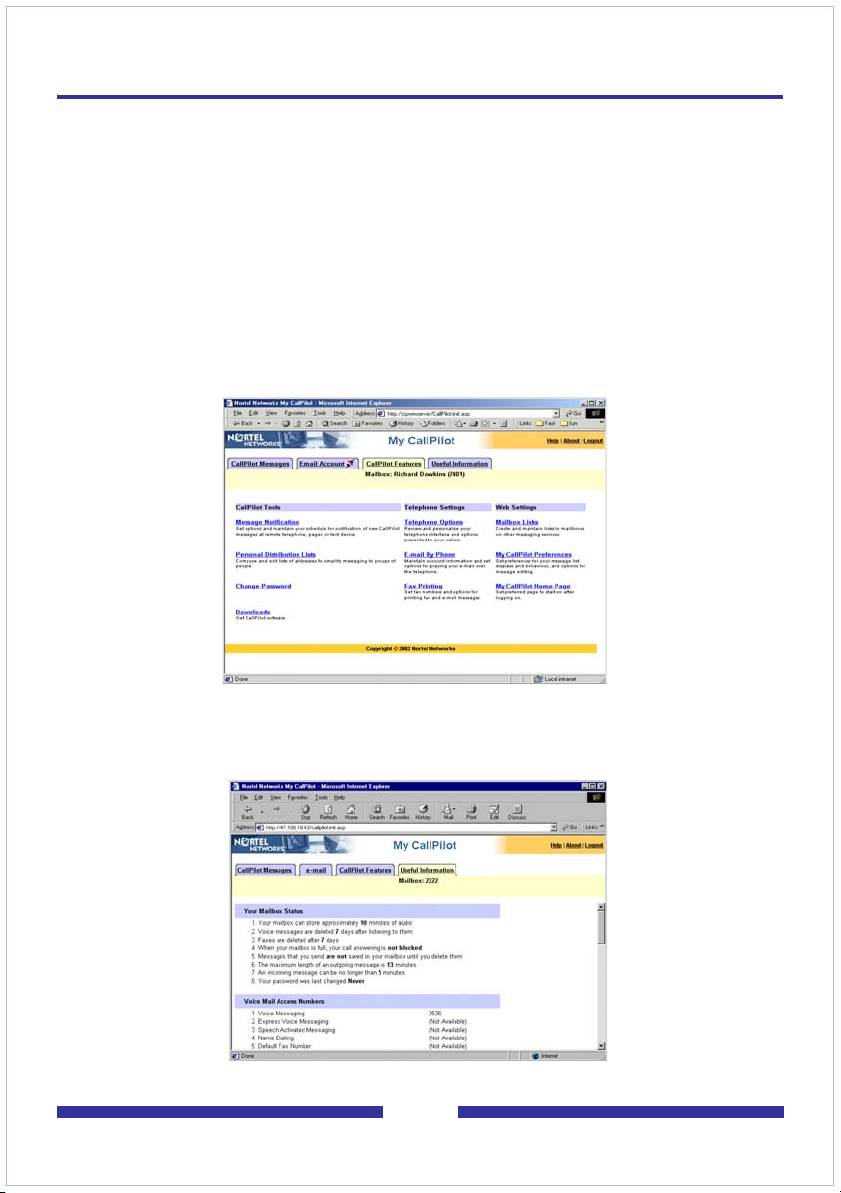
Linking to My CallPilot
Desktop Messaging provides links to the web-based resources in My CallPilot. To view
or change the URL for My CallPilot, see Changing your mailbox settings, page 38. For
more information on My CallPilot, refer to the My CallPilot User Guide.
1 In your e-mail Inbox, on the Tools menu, click CallPilot Desktop Messaging
Tools > My CallPilot.
2 Select one of the tabs.
To view or change your CallPilot feature settings
1 In My CallPilot, click the CallPilot Features tab.
2 Select any feature and make changes to your setup as required. Any changes
you make to a feature go into effect immediately whether you use CallPilot from
your computer or from your telephone.
To view user information
In My CallPilot, click the Useful Information tab to view online user information
specific to your mailbox.
44
Page 48

Working offline
To work offline, you need a computer that has CallPilot installed and configured in the
same way as your office computer. You can download your messages and addresses
to this computer before working offline.
1 (Optional) You may want to download your CallPilot messages to the computer
that you will use offline. Log in to your e-mail and CallPilot, and on the Too ls
menu, click CallPilot Desktop Messaging, then click Download all CallPilot
Messages. When your messages are downloaded, log out.
2 (Optional) You may want to download the server Address Book to your computer.
See Changing your address book settings, page 41.
3 Open your e-mail while not connected to the network, and wait for the CallPilot
Logon window to appear. You do not need to enter your password.
4 Click Cancel.
You can then work offline, reviewing your messages and recording and addressing new
messages. You must use your computer’s speakers and microphone to play and record
messages offline; you cannot use a telephone for offline access.
CallPilot stores your recorded messages in your Outbox and sends them the next time
you log in to the CallPilot server.
Message security in offline mode
If you share your computer with others, you should password-protect your messages in
Outlook. Since Outlook automatically sends messages stored in the Outbox when you
reconnect to the network, another user who has access to your Outlook profile can
send messages in offline mode that will be transmitted without your knowledge. To
protect your mailbox, assign a password to your Outlook .cst file. For details, refer to the
Desktop Messaging online Help.
45
Page 49

Document information
CallPilot Desktop Messaging User Guide
for Microsoft Outlook
Copyright © 2003, Nortel Networks, All Rights Reserved
Information is subject to change without notice. Nortel Networks
reserves the right to make changes in design or components as
progress in engineering and manufacturing may warrant.
This user guide is distributed in soft copy only.
Product release: 2.5
Document issue: Standard 1.0
Date: October 2003
46
 Loading...