

Avaya P120, Cajun P120 Manager User Manual

Cajun P120 Manager
User Guide
March 2001

Cajun P120 Manager User Guide
Copyright Avaya Inc. 2001 ALL RIGHTS RESERVED
The products, specifications, and other technical information regarding the products contained
in this document are subject to change without notice. All information in this document is
believed to be accurate and reliable, but is presented without warranty of any kind, express or
implied, and users must take full responsibility for their application of any products specified in
this document. Avaya disclaims responsibility for errors which may appear in this document,
and it reserves the right, in its sole discretion and without notice, to make substitutions and
modifications in the products and practices described in this document.
Avaya, Cajun, CajunDocs, OpenTrunk, P550, CajunView, LANstack, 3LS, SMONMaster,
LANEMaster, VLANMaster, ConfigMaster, UpdateMaster, QIP, and RealNet are trademarks of
Avaya Inc.
Microsoft, Windows, Windows NT, Windows 95, Windows 98, and Internet Explorer are
trademarks or registered trademarks of Microsoft Corporation in the U.S. and/or other
countries.
Netscape and Netscape Navigator are registered trademarks of Netscape Communications
Corporation in the United States and other countries.
Sybase is a registered trademark of Sybase, Inc.
Novell, NDS, Netware, and Novell Directory Services are registered trademarks of Novell, Inc.
Solaris is a trademark of Sun Microsystems, Inc.
Intel and Pentium are registered trademarks of Intel Corporation.
ALL OTHER TRADEMARKS MENTIONED IN THIS DOCUMENT ARE PROPERTY OF THEIR
RESPECTIVE OWNERS.

Table of Contents
Preface . . . . . . . . . . . . . . . . . . . . . . . . . . . . . . . . . . . . . . . . . . . . . . . . . viii
The Purpose of this Guide . . . . . . . . . . . . . . . . . . . . . . . . . . . . . . . . viii
Who Should Use This Guide . . . . . . . . . . . . . . . . . . . . . . . . . . . . . . viii
Organization of this Guide . . . . . . . . . . . . . . . . . . . . . . . . . . . . . . . viii
Chapter 1 — Introduction . . . . . . . . . . . . . . . . . . . . . . . . . . . . . . . . . . . 1
Starting the Cajun P120 Manager . . . . . . . . . . . . . . . . . . . . . . . . . . .1
Cajun P120 Manager as Part of CajunView . . . . . . . . . . . . . . . . .1
Running Cajun P120 Manager from CajunView Console . .2
Running Cajun P120 Manager Using
HP-OVWin . . . . . . . . . . . . . . . . . . . . . . . . . . . . . . . . . . . . . .2
Running Cajun P120 Manager Using HP NNM
(Solaris and Windows NT) . . . . . . . . . . . . . . . . . . . . . . . . . .2
Cajun P120 Manager as a Standalone Management Application 3
Managing Different Devices . . . . . . . . . . . . . . . . . . . . . . . . .3
The User Interface . . . . . . . . . . . . . . . . . . . . . . . . . . . . . . . . . . . . . . . .4
Tree View . . . . . . . . . . . . . . . . . . . . . . . . . . . . . . . . . . . . . . . . . . .5
Chassis View . . . . . . . . . . . . . . . . . . . . . . . . . . . . . . . . . . . . . . . .6
GBIC Ports . . . . . . . . . . . . . . . . . . . . . . . . . . . . . . . . . . . . . .7
Selecting Elements . . . . . . . . . . . . . . . . . . . . . . . . . . . . . . . .8
Application Tabs . . . . . . . . . . . . . . . . . . . . . . . . . . . . . . . . . . . . .8
Application Toolbar . . . . . . . . . . . . . . . . . . . . . . . . . . . . . . . . . . .9
Get/Set Toolbar . . . . . . . . . . . . . . . . . . . . . . . . . . . . . . . . . . . . .10
Dialog Area . . . . . . . . . . . . . . . . . . . . . . . . . . . . . . . . . . . . . . . .11
Desktop . . . . . . . . . . . . . . . . . . . . . . . . . . . . . . . . . . . . . . . . . . .11
Status Line . . . . . . . . . . . . . . . . . . . . . . . . . . . . . . . . . . . . . . . . .11
Cajun P120 Modes . . . . . . . . . . . . . . . . . . . . . . . . . . . . . . . . . . . . . .12
Using Dialog Boxes and Tables . . . . . . . . . . . . . . . . . . . . . . . . . . . . .13
Managing Tables . . . . . . . . . . . . . . . . . . . . . . . . . . . . . . . . . . . . . . . .13
Using Cajun P120 Help . . . . . . . . . . . . . . . . . . . . . . . . . . . . . . . . . . .14
Opening the Help to the Contents Page . . . . . . . . . . . . . . . . . .14
Opening the Help to a Topic of Interest . . . . . . . . . . . . . . . . . . .14
Chapter 2 — Device Configuration. . . . . . . . . . . . . . . . . . . . . . . . . . . 16
Viewing Device Information . . . . . . . . . . . . . . . . . . . . . . . . . . . . . . .17
Viewing LAG Configuration . . . . . . . . . . . . . . . . . . . . . . . . . . . . . . .18
Viewing Port Configuration . . . . . . . . . . . . . . . . . . . . . . . . . . . . . . .19
Resetting the Device . . . . . . . . . . . . . . . . . . . . . . . . . . . . . . . . . . . . .20
Cajun P120 Manager User Guide v

Table of Contents
Chapter 3 — Port RMON . . . . . . . . . . . . . . . . . . . . . . . . . . . . . . . . . . . 22
Displaying the Port RMON Window . . . . . . . . . . . . . . . . . . . . . . . .23
The Port RMON Window . . . . . . . . . . . . . . . . . . . . . . . . . . . . . . . . .23
The Pie Chart . . . . . . . . . . . . . . . . . . . . . . . . . . . . . . . . . . . . . . .24
The Traffic Graph . . . . . . . . . . . . . . . . . . . . . . . . . . . . . . . . . . . .24
Viewing Traffic Statistics . . . . . . . . . . . . . . . . . . . . . . . . . . .24
Zooming In and Out of the Graph . . . . . . . . . . . . . . . . . . .24
Scrolling within the Graph . . . . . . . . . . . . . . . . . . . . . . . . .24
Traffic Selection . . . . . . . . . . . . . . . . . . . . . . . . . . . . . . . . . . . . .24
Chapter 4 — VLANs . . . . . . . . . . . . . . . . . . . . . . . . . . . . . . . . . . . . . . . 25
Creating and Editing VLANs . . . . . . . . . . . . . . . . . . . . . . . . . . . . . . .25
Viewing the VLANs Dialog Box . . . . . . . . . . . . . . . . . . . . . . . . .26
Configuring VLANs . . . . . . . . . . . . . . . . . . . . . . . . . . . . . . . . . .27
Editing VLAN Member Switch Ports . . . . . . . . . . . . . . . . . . . . .27
Editing VLAN Tagging Parameters . . . . . . . . . . . . . . . . . . . . . . .28
Updating the Device . . . . . . . . . . . . . . . . . . . . . . . . . . . . . . . . . . . . .28
Chapter 5 — Link Aggregation Groups . . . . . . . . . . . . . . . . . . . . . . . 29
LAGs Overview . . . . . . . . . . . . . . . . . . . . . . . . . . . . . . . . . . . . . . . . .29
Viewing the LAG Table . . . . . . . . . . . . . . . . . . . . . . . . . . . . . . . . . . .30
Creating LAGs . . . . . . . . . . . . . . . . . . . . . . . . . . . . . . . . . . . . . . . . . .31
Editing LAGs . . . . . . . . . . . . . . . . . . . . . . . . . . . . . . . . . . . . . . . . . . .31
Deleting LAGs . . . . . . . . . . . . . . . . . . . . . . . . . . . . . . . . . . . . . . . . . .31
Chapter 6 — IP Multicast Filtering . . . . . . . . . . . . . . . . . . . . . . . . . . . 32
IP Multicast Filtering Overview . . . . . . . . . . . . . . . . . . . . . . . . . . . .32
Configuring IP Multicast Filtering . . . . . . . . . . . . . . . . . . . . . . . . . .33
Chapter 7 — Port Redundancy . . . . . . . . . . . . . . . . . . . . . . . . . . . . . . 36
Overview of Port Redundancy . . . . . . . . . . . . . . . . . . . . . . . . . . . . .36
Viewing the Port Redundancy Table . . . . . . . . . . . . . . . . . . . . . . . .37
Adding a Port Redundancy . . . . . . . . . . . . . . . . . . . . . . . . . . . . . . . .38
Deleting Port Redundancies . . . . . . . . . . . . . . . . . . . . . . . . . . . . . . .38
Updating the Device . . . . . . . . . . . . . . . . . . . . . . . . . . . . . . . . . . . . .39
Chapter 8 — Port Mirroring . . . . . . . . . . . . . . . . . . . . . . . . . . . . . . . . 41
Configuring Port Mirroring . . . . . . . . . . . . . . . . . . . . . . . . . . . . . . . .41
Chapter 9 — Trap Managers Configuration . . . . . . . . . . . . . . . . . . . 43
Trap Manager Overview . . . . . . . . . . . . . . . . . . . . . . . . . . . . . . . . . .43
Viewing the Managers Table . . . . . . . . . . . . . . . . . . . . . . . . . . . . . .44
Editing the Trap Managers Table . . . . . . . . . . . . . . . . . . . . . . . . . . .44
vi Cajun P120 Manager User Guide

Table of Contents
Chapter 10 — Switch Connected Addresses . . . . . . . . . . . . . . . . . . . 47
Viewing the Switch Connected for Device Window . . . . . . . . . . . .47
Sorting the List of Stations . . . . . . . . . . . . . . . . . . . . . . . . . . . . . . . .48
Chapter 11 — Security. . . . . . . . . . . . . . . . . . . . . . . . . . . . . . . . . . . . . 49
Security Overview . . . . . . . . . . . . . . . . . . . . . . . . . . . . . . . . . . . . . .49
Configuring Port Security . . . . . . . . . . . . . . . . . . . . . . . . . . . . . . . . .50
Appendix A — Menus . . . . . . . . . . . . . . . . . . . . . . . . . . . . . . . . . . . . . 51
File Menu . . . . . . . . . . . . . . . . . . . . . . . . . . . . . . . . . . . . . . . . . . . . .51
View Menu . . . . . . . . . . . . . . . . . . . . . . . . . . . . . . . . . . . . . . . . . . . .51
Actions Menu . . . . . . . . . . . . . . . . . . . . . . . . . . . . . . . . . . . . . . . . . .52
Help Menu . . . . . . . . . . . . . . . . . . . . . . . . . . . . . . . . . . . . . . . . . . . .52
Appendix B — Configuration Fields . . . . . . . . . . . . . . . . . . . . . . . . . . 53
Appendix C — Traffic Types . . . . . . . . . . . . . . . . . . . . . . . . . . . . . . . . 58
Index. . . . . . . . . . . . . . . . . . . . . . . . . . . . . . . . . . . . . . . . . . . . . . . . . . . 60
Cajun P120 Manager User Guide vii

Preface
Welcome to Cajun P120 Device Manager. This chapter provides an
introduction to the structure and assumptions of this manual. It includes
the following sections:
The Purpose of this Guide
•
guide.
Who should use this Guide
•
guide.
Organization of this Guide
•
contained in the various sections of this guide.
The Purpose of this Guide
The Cajun P120 Manager manual contains information needed to use
the management system efficiently and effectively.
- A description of the goals of this
- The intended audience of this
- A brief description of the subjects
Who Should Use This Guide
This guide is intended for network managers familiar with network
management and its fundamental concepts.
Organization of this Guide
This guide is structured to reflect the following conceptual divisions:
Preface
•
audience, and organization.
Introduction
•
including instructions on starting the Cajun P120 Manager and
using the on-line help, and a description of the Cajun P120
Manager user interface.
Device Configuration
•
configuration.
- This section describes the guide’s purpose, intended
- An introduction to the Cajun P120 Manager
- Viewing and modifying the device’s
Cajun P120 Manager User Guide viii

Port RMON
•
- Viewing graphical representations of the traffic on
the ports of the Cajun P120 Device.
VLANs
•
Link Aggregation Groups
•
- Viewing and editing VLAN information.
information.
Port Redundancy
•
- Configuring port redundancy for ports in a
Cajun P120 Device.
Port Mirroring
•
- Setting up port mirroring for ports in a
Cajun P120 Device.
IP Multicast Filtering
•
- Viewing and editing IP Multicast filtering
information.
Trap Managers
•
- Viewing and modifying the Trap Managers
Table.
Switch Connected Addresses
•
selected ports.
Preface
- Viewing and editing LAG
- View devices connected to
Security
•
•
Menus
- Viewing and modifying the Port Security Table.
- The full menu structure of the menus in the Cajun P120
Manager.
Configuration Fields
•
and their descriptions.
Traffic Types
•
- A description of the types of traffic that can be
viewed using Port RMON.
- All fields referenced in the application
Cajun P120 Manager User Guide ix

1
Introduction
This chapter provides an introduction to the Cajun P120 Manager. It
includes the following sections:
Starting Cajun P120 Manager
•
Cajun P120 Manager from your management umbrella
application.
The User Interface
•
Manager user interface, including instructions on selecting
elements and use the toolbar buttons.
Cajun P120 Modes
•
configuration and Port RMON modes in the Cajun P120 Device
Manager.
Using Dialog Boxes and Tables
•
found in the dialog boxes, and tables described in the manual.
- An introduction to the Cajun P120
- Instructions on switching between the
- Instructions on accessing the
- A explanation of the icons
Managing Tables
•
table rows.
Using Cajun P120 Help
•
accessing on-line help in the Cajun P120 Manager.
- An explanation of the symbols used to label
- An explanation of the options for
Starting the Cajun P120 Manager
This section provides instructions for starting the Cajun P120 Manager.
Cajun P120 Manager as Part of CajunView
If you have installed the Cajun P120 Manager as part of the CajunView
suite, the following sections will provide instructions for starting Cajun
P120 Manager.
Cajun P120 Manager User Guide 1

Introduction
Running
Cajun P120
Manager
from
CajunView
Console
Running
Cajun P120
Manager
Using
HP-OVWin
From the management platform map:
1.
Double-click the label representing the Cajun P120 Device you
want to manage.
Or
1.
Select the label representing the Cajun P120 Device you want to
manage.
2.
Select
From the management platform map:
1.
Double-click the icon representing the Cajun P120 Device with
which you want to work.
Or
1.
Select a Cajun P120 Device.
Tools > Device Manager
.
Running
Cajun P120
Manager
Using HP
NNM
(Solaris and
Windows NT)
2.
Select
From the management platform map:
1.
Select a Cajun P120 Device.
2.
Click .
Or
Select
Or
1.
Right-click on a Cajun P120 Device.
2.
Select
Avaya > Device Manager
Tools > Avaya > Device Manager
Avaya > Device Manager
.
.
.
Cajun P120 Manager User Guide 2
Chapter 1
Cajun P120 Manager as a Standalone Management
Application
If you have installed Cajun P120 Manager as a standalone management
application, the following are instructions for starting Cajun P120
Manager:
1.
Double-click on the Cajun P120 Manager icon. The Device
Parameters dialog box opens.
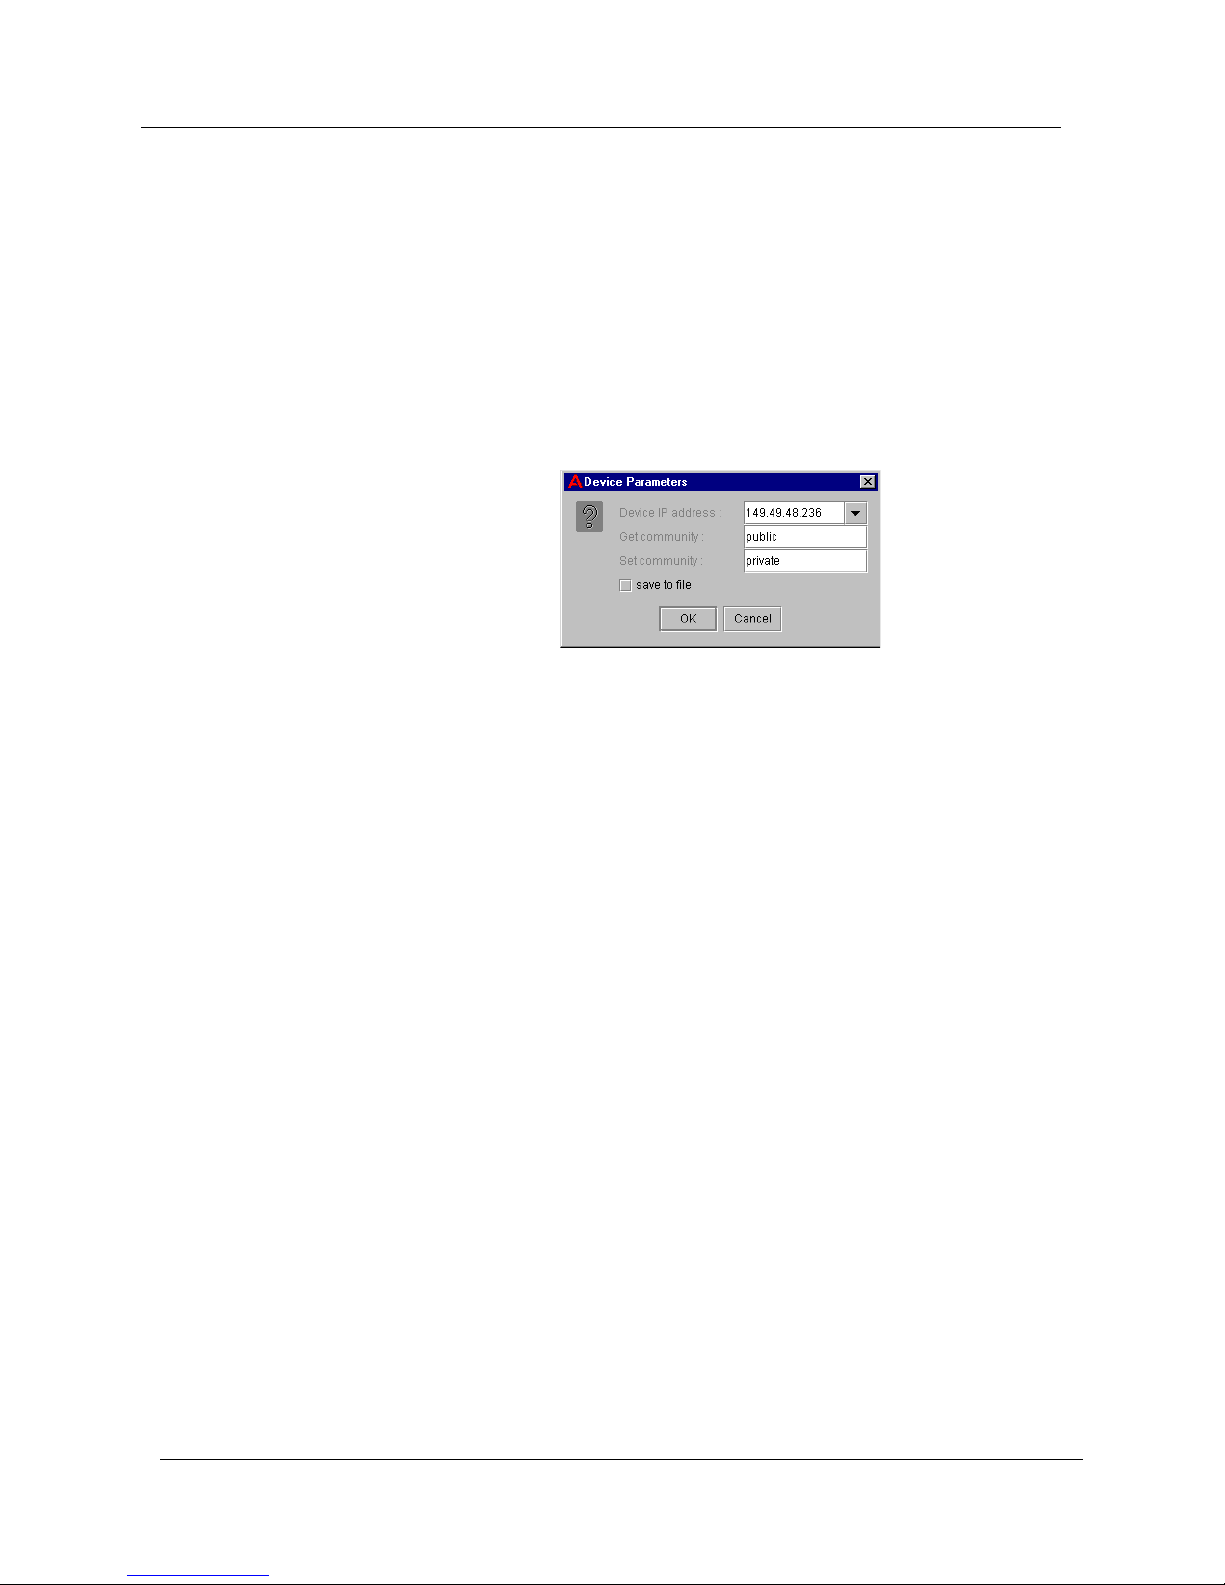
Figure 1-1. Device Parameters Dialog Box
Managing
Different
Devices
2.
Enter the IP address of the Cajun P120 Device you want to manage
in the
3.
Enter the read community name in the
4.
Enter the write community name in the
5.
To save the parameters, check the
configurations will appear in the
box.
6.
Click
Or
1.
Double-click on the Cajun P120 Manager icon. The Device
Parameters dialog box appears.
2.
Select an IP address from the
3.
Click
To manage a different device:
1.
From the Cajun P120 Manager, select
Parameters dialog box opens.
Device IP Address
OK
. The Cajun P120 Device Manager opens.
OK
. The Cajun P120 Device Manager opens.
field.
Get Community
Set Community
save to file
Device IP Address
Device IP Address
File > Change IP
field.
field.
checkbox. Saved
dropdown list
dropdown list box.
. The Device
2.
3 Cajun P120 Manager User Guide
Follow the instructions above to select a different Cajun P120
Device to manage.

Introduction
* Note:
This feature is only available if you have installed the
Cajun P120 Manager as a standalone management
application.
The User Interface
The user interface consists of the following elements:
Application Tabs
•
the Cajun P120 Device.
Tree View
•
representation of the modules and ports of the Cajun P120 Device.
Chassis View
•
Device.
Menu Bar
•
functions.
Application Toolbar
•
management functions.
- Tabs for switching between the various views of
- A resizeable window containing a hierarchical
- A graphical representation of the Cajun P120
- Menus for accessing Cajun P120 management
- Toolbar buttons for accessing Cajun P120
Get/Set Toolbar
•
- Toolbar buttons for viewing and changing port
and LAG configuration.
Dialog Area
•
- A resizeable window where all dialog boxes and
tables first appear.
•
Desktop
- A resizeable window where the Chassis View and all
floating and minimized dialog boxes and tables are displayed.
Status Line
•
- Displays the communication status between the
Cajun P120 Manager and the Cajun P120 Device.
Cajun P120 Manager User Guide 4

Chapter 1
The figure below shows the user interface, with its various parts labeled.
Figure 1-2. Cajun P120 User Interface
When you hold the cursor over a port’s icon in the Chassis View, a label
appears with the port number, its VLAN ID, and the current fault that
occurred on the port.
Tree View
To resize the three main areas of the user interface, the Tree View, the
Chassis View, and the Dialog Area, use the splitter bars and their arrows.
The Tree View shows a hierarchical representation of the structure of the
Cajun P120 Device. To select ports or modules, click on their icons in the
Tree View. When an element is selected in the Tree View, the
corresponding element is selected in the Chassis View.
The highest level of the Tree View shows the device’s module. The second
level shows ports. This includes ports on an expansion module.
To expand the view of a contracted element in the tree or to contract the
view of an expanded element in the tree:
Double-click the element.
Or
Click the
+
or - symbol next to the element you want to expand or
contract.
5 Cajun P120 Manager User Guide

Chassis View
Introduction
The Chassis View is a graphical representation of the Cajun P120 Device.
The Chassis View shows all of the device’s ports, including ports on the
expansion module (when present). The color of the modules and ports in
the Chassis View reflects their status.
When viewing selected tables, the color of the port indicates the standing
of the port with regard to the application. For example: When creating a
Link Aggregation Group (LAG), ports that can be selected appear white in
the Chassis View. The port selected to be the base port appears dark blue.
The ports selected to be additional ports appear cyan.
The following table provides a list of the possible port colors in the Chassis
View and their meaning.
Table 1-1. Chassis View Port Colors
Color Meaning
Green The port is enabled, and its status is Okay.
Yellow The port is enabled, and its status is Warning.
Red The port is enabled, and its status is Fatal.
Light Gray The port is disabled.
Dark Gray The port is not associated with the selected VLAN.
White The port is logically available for assignment.
Dark Blue The port has been assigned the primary position in an
application.
Cyan The port has been assigned the secondary position in an
application.
Cajun P120 Manager User Guide 6
Chapter 1
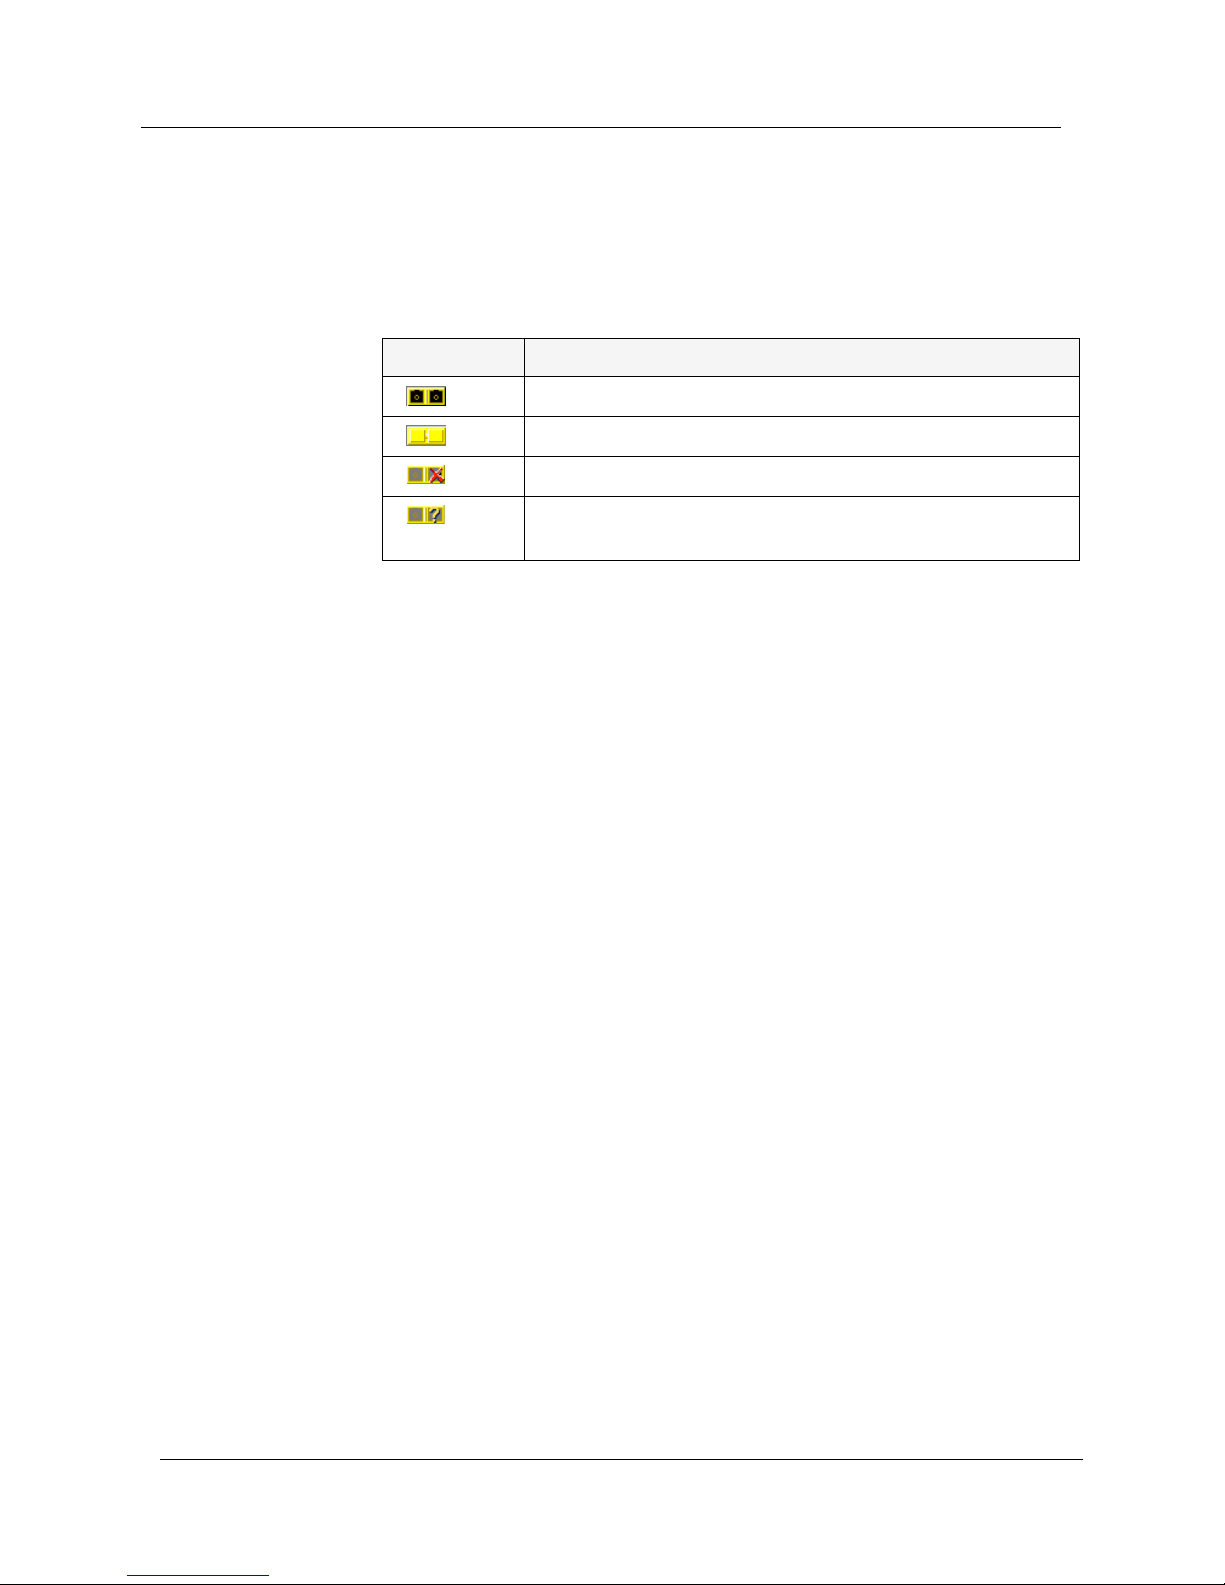
GBIC Ports
Some Cajun P120 expansion modules contain GBIC (GigaBit Interface
Converter) ports that house removable transceiver modules. The Chassis
View reflects the management status of the ports. The following table
shows the possible appearances of these ports in the Chassis View and
provides the corresponding management status of the port.
Table 1-2. GBIC Port Status
GBIC Port Status
The GBIC port contains a supported transceiver module.
There is no transceiver module present in the GBIC port.
The transceiver module in the GBIC port is not supported.
The transceiver module in the GBIC port is of an unknown
type.
GBIC ports that contain the following types of transceiver modules can be
configured:
• Supported transceiver modules.
• No transceiver modules.
• Unknown transceiver modules.
GBIC ports that contain unsupported transceiver modules can not be
configured.
7 Cajun P120 Manager User Guide

Introduction
Selecting
Elements
You can select modules and ports.
To select a module:
1.
In the Chassis View, click the module’s label.
Or
In the Tree View, click the module’s icon. The module’s label is
highlighted in the Chassis View and the Tree View.
To select a port:
In the Chassis View, click the port.
To select multiple ports, press
—
additional ports to be selected.
Or
In the Tree View, click the port’s icon. The port is highlighted in the
Chassis View and the Tree View.
CTRL
while clicking the
Application Tabs
You can access different views of the device using the Application Tabs.
The application tabs in the Cajun P120 Manager include:
To switch to a different view of the Cajun P120 Device, click the
appropriate application tab. The selected view opens.
* Note:
Device Manager
•
device configuration and Port RMON.
Device SMON
•
for the Cajun P120 Device.
If Cajun SMONMaster for the Cajun P120 is not installed on
your system, the
- View the Cajun P120 Device Manager for
- View SMON (Switch Monitoring) information
Device SMON
tab does not appear.
Cajun P120 Manager User Guide 8

Chapter 1
Application Toolbar
The Application Toolbar provides shortcuts to the main Chassis View
functions.
The table below describes the buttons on the Application Toolbar and
gives the equivalent menu options.
Button Description Menu Item
Table 1-3. Application Toolbar
Sets the device manager to
Configuration mode.
Sets the device manager to Port
RMON mode.
Displays the Device Information
dialog box.
Displays the VLAN window.
View > Configuration
View > Port RMON
Actions > Device
Information
Actions > Virtual LANs
Displays the LAG table.
Displays the Port Redundancy
table.
Starts the Port Mirroring wizard.
Displays the IP Multicast Filtering
dialog box.
Displays the Managers Trap Table.
Displays addresses of devices
connected to the switch.
Displays the Security table.
Opens the on-line help.
Selects a VLAN. Ports that are not
on the selected VLAN appear
dark gray in the Chassis View.
Actions > Link Aggregation
Actions > Port Redundancy
Actions > Port Mirroring
Actions > IP Multicast
Filtering
Actions > Manager Trap
Table
Actions > Switch
Connected Addresses
Actions > Security
Help > Contents
When you place the cursor on a toolbar icon for one second, a label
appears with the name of the button.
9 Cajun P120 Manager User Guide
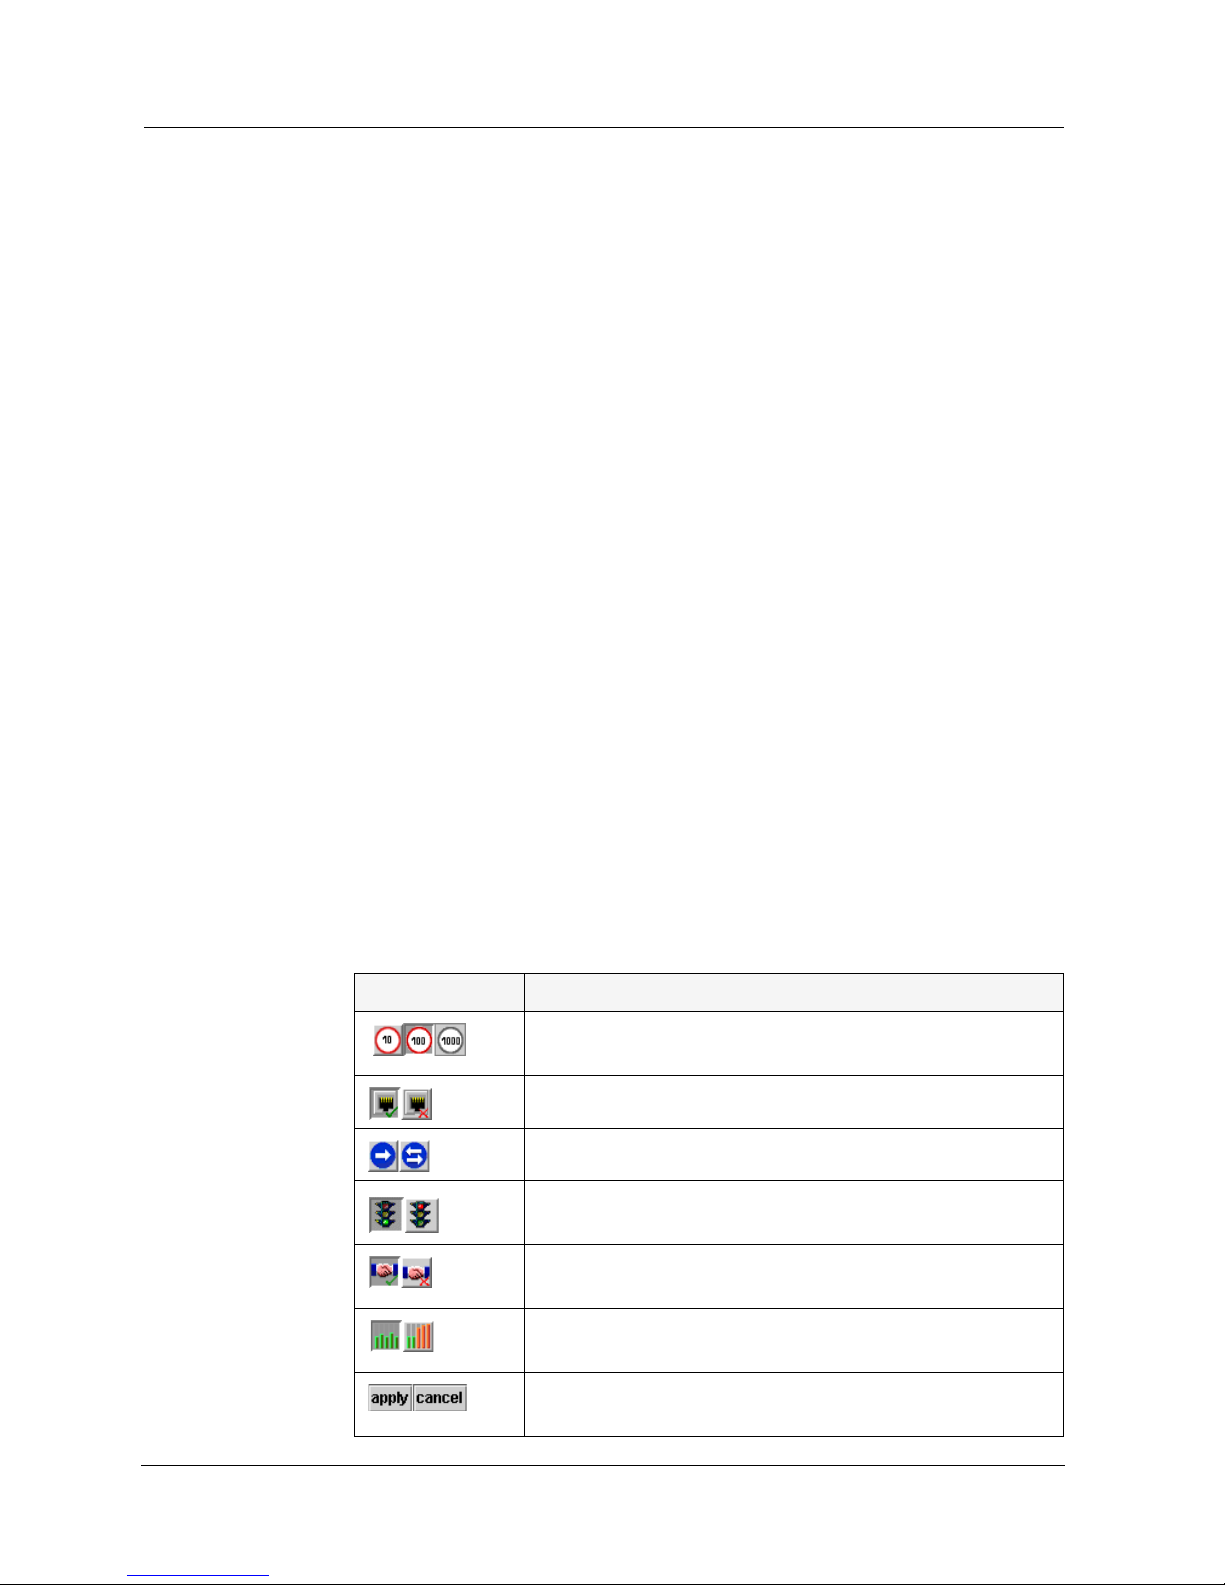
Get/Set Toolbar
The Get/Set Toolbar provides buttons for getting and setting configuration
parameters for selected ports.When a port is selected, its configuration is
reflected on the Get/Set Toolbar. Each group of buttons represents the
various possible states of a configuration parameter. For example: The first
group of buttons represents the possible speed of a port - 10 Mbps, 100
Mbps, or 1000 Mbps. If the center button is depressed, the port is
currently configured to operate at 100 Mbps.
Selected ports can be configured using the Get/Set Toolbar. To change the
configuration of a port, click the button representing the value of the
parameter you want to apply to the port. Click
with the changes. Click
applicable to the selected port are dimmed.
Multiple ports can be simultaneously configured using the
Get/Set Toolbar. When multiple ports whose configurations are not
identical are selected, only the parameters whose settings are identical on
the selected ports are reflected in the Get/Set Toolbar. For example, if a
port operating at full duplex and a port operating at half duplex are
selected, neither of the duplex mode buttons on the Get/Set Toolbar are
depressed.
apply
to update the device
cancel
to discard the changes. Options not
Introduction
The table below displays the buttons on the Get/Set Toolbar and explains
their functions and settings.
Table 1-4. Get/Set Toolbar
Button Description
Get and set the port’s speed: 10 Mbps, 100 Mbps, 1000
Mbps.
Get and set the port’s status: Enabled, Disabled.
Get and set the port’s mode: Half duplex, Full duplex.
Get and set the port’s Flow Control mode:
FlowControl on, FlowControl off.
Get and set the port’s auto-negotiation status:
Auto-negotiation Enabled, Auto-negotiation Disabled.
Get and set the port’s priority: Regular priority, High
priority.
Apply or cancel the configuration changes made with the
Get/Set Toolbar.
Cajun P120 Manager User Guide 10
Chapter 1
Dialog Area
Desktop
The area to the right of the Chassis View is where all dialog boxes, tables,
and wizards first open. This area can be resized by dragging the vertical
splitter bar with the mouse. When a dialog box, table, or wizard opens, it
replaces the current dialog box open in the Dialog Area. To view more
than one dialog box or table simultaneously, click on the pushpin in
the upper right-hand corner of the dialog box. The dialog box becomes a
floating dialog box and moves to the Desktop.
To restore a dialog box to the Dialog Area, click on the toolbar button or
symbol that opened the dialog box. The dialog box returns to the Dialog
Area.
The central section of the application window is the Desktop. This area
can be resized by dragging the vertical splitter bar with the mouse.
Floating dialog boxes and tables can be resized. The Chassis View and
floating dialog boxes and tables can also be minimized. Minimized
windows are shown at the bottom of the Desktop.
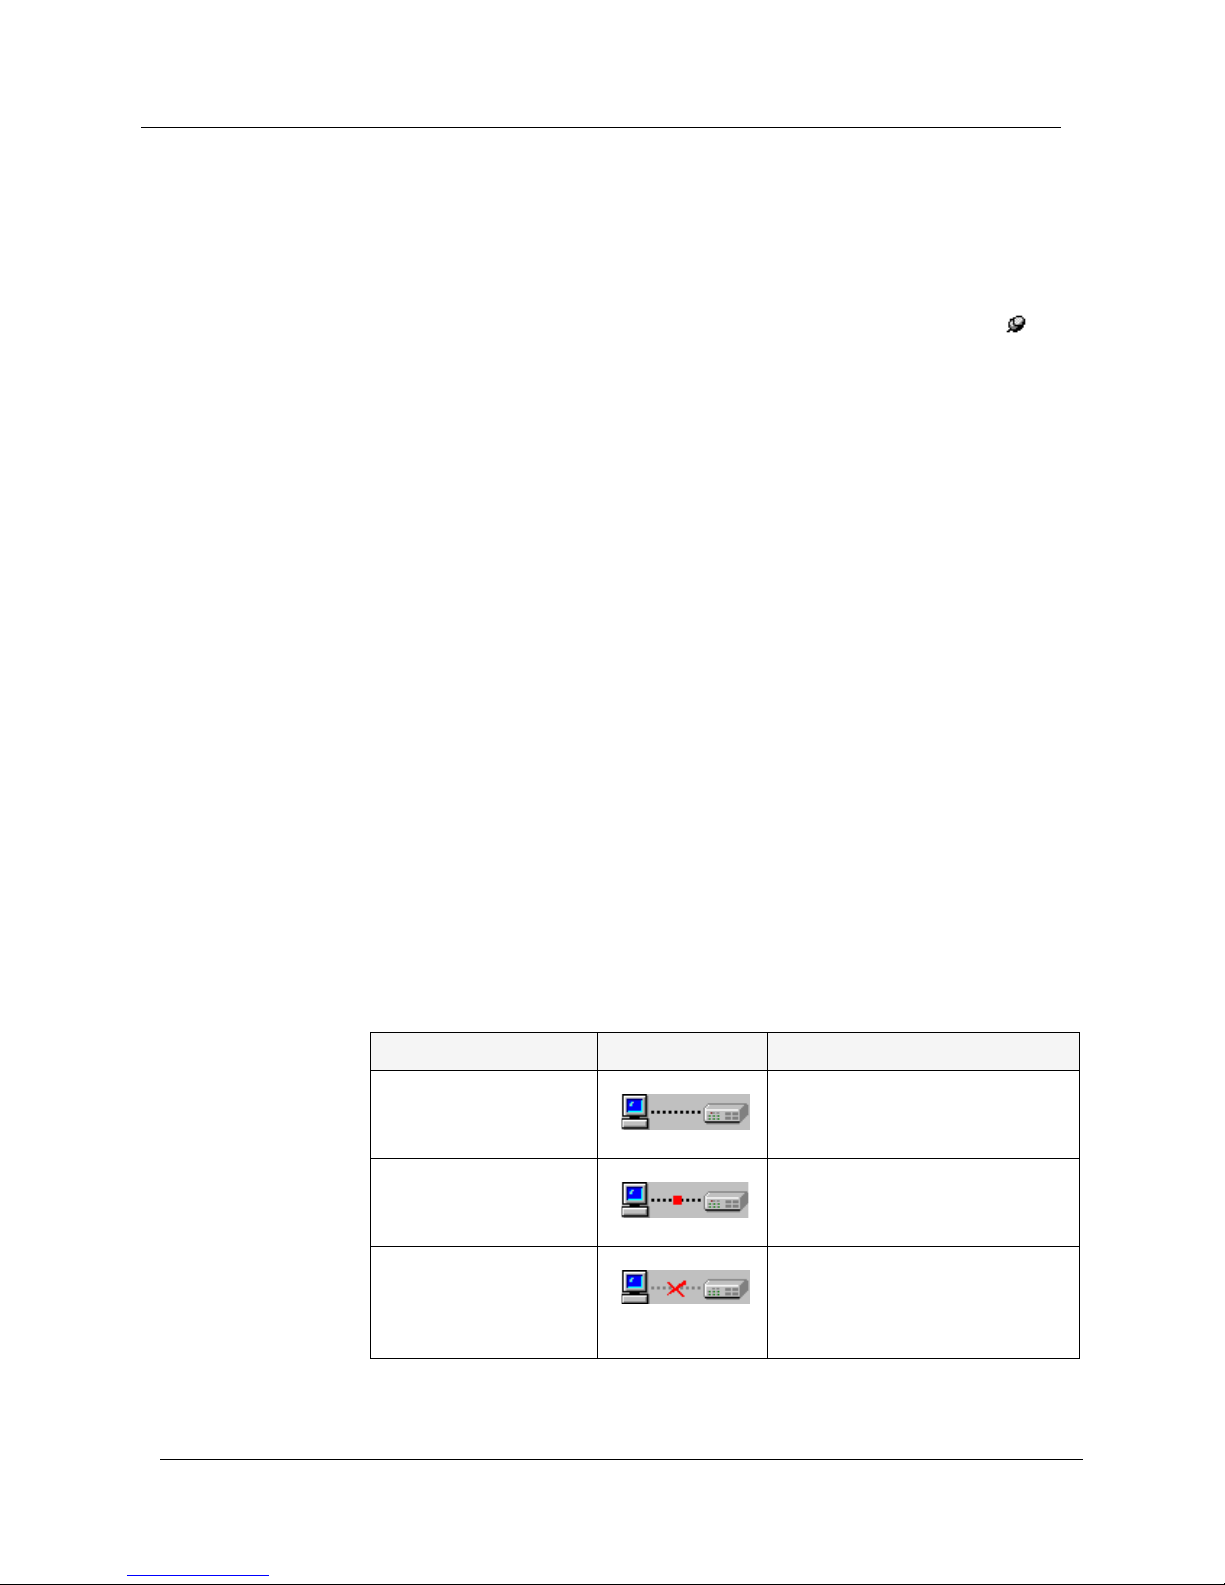
Status Line
The Status Line shows the communication status between the application
and the Cajun P120 Device. The Status Line displays a status message and
an appropriate graphic. The table below shows the possible statuses with
their corresponding graphics, and gives a short explanation for each
status.
Table 1-5. Communication Statuses
Status Graphic Description
Ready The application is ready to
communicate with the
Cajun P120 Device.
Communicating The application is currently
communicating with the
Cajun P120 Device.
Communication Error The last attempted
communication with the
Cajun P120 Device was not
successful.
11 Cajun P120 Manager User Guide

Cajun P120 Modes
The Cajun P120 application has two modes: Configuration mode and Port
RMON mode. When in configuration mode, you can view and change the
configuration of the Cajun P120 Device and individual ports. When in
Port RMON mode, you can view graphical representations of the traffic
on individual ports.
To switch to configuration mode:
Click .
Or
Introduction
Select
To switch to Port RMON mode:
Click .
Or
Select
View > Configuration
View > Port RMON
.
.
Cajun P120 Manager User Guide 12
 Loading...