

Page 1

Enterprise Edge
Feature Programming
Telephone Guide
© 1999 Nortel Networks
P0908510 Issue 02
Page 2

Page 3

Contents
Chapter 1 Getting Started 11
Using this guide 11
Before you start 11
What you’ll need to do programming 11
Understanding the telephone buttons 12
Using the buttons under the display 12
The M7410 Cordless Telephone (CT) 14
Chapter 2 Answering calls 15
Answering incoming calls with Hunt Groups 15
Answering an incoming call 15
Line buttons 15
What line indicators mean 16
Rings you may hear 16
Answering calls at a prime telephone 16
Using a central answering position (CAP) module 17
Customizing your CAP module 17
Monitoring telephones with the CAP module 17
Release button 18
Hearing aid compatibility 18
Viewing information about a call on the display 18
Using Call Information for a particular call 18
Displaying Call Information before or after answering 19
Displaying Call Information for a call on hold 19
Making Call Display information appear automatically at a telephone
19
Changing which information is shown first about a call 20
Picking up a call ringing at another telephone 20
Answering any ringing telephone using Directed Pickup 20
Answering any ringing telephone using Group Pickup 20
Changing a telephone’s pickup group 21
Trunk Answer 21
Answering a call using Trunk Answer 22
Answer buttons 22
Creating a Conference Call 23
Disconnecting one party 23
Independently holding two calls 24
Putting a conference on hold 24
Removing yourself from a conference 25
Listening to a call as a group 26
P0908510 Issue 02 Enterprise Edge Feature Programming Telephone Guide
Page 4

4 Contents
Canceling Group Listening 26
Using Handsfree/Mute 26
Answering calls without lifting the receiver 26
Making calls without lifting the receiver 27
Muting Handsfree 27
Changing a regular call to handsfree 27
Changing a handsfree to a regular call 27
Using Handsfree 27
Changing Handsfree for a telephone 28
Handsfree Answerback 28
Turning Privacy on or off for a call 29
Creating a conference by releasing privacy 29
Making a call private 29
Checking call length using Call Duration Timer 29
Disconnecting by accident 30
Time 30
Chapter 3 Making calls 31
Choosing a line using a line button 32
Line pools 32
Using a line pool to make a call 33
Programming a memory button with a line pool feature code 33
Changing how you dial your calls 34
Using Standard dial 34
Using Automatic dial 34
Using Pre-dial 34
When the internal number you have called is busy 35
Priority Call 35
Making a priority call 35
Giving a telephone the ability to make priority calls 35
Using Ring Again 36
Turning on Ring Again 36
Canceling Ring Again 36
Chapter 4 Time savers for making calls 37
Storing a number on a memory button for Autodial 37
Adding an autodial button 37
Choosing a line for Autodial 37
Using intercom as the line for Autodial 38
Using Last Number Redial 39
Preventing a telephone from using Last Number Redial 39
Using Speed Dial 39
Making a speed dial call 40
Changing and adding System Speed Dials 40
Enterprise Edge Feature Programming Telephone Guide P0908510 Issue 02
Page 5

Adding or changing User Speed Dial 40
Using Saved Number Redial 41
Saving a number 41
Dialing a saved number 42
Preventing a telephone from using Saved Number Redial 42
Chapter 5 Handling many calls at once 43
Using Hold 43
Retrieving a held call 43
Holding automatically 43
Listening on hold 43
Holding a call exclusively 44
Using Call Queuing 44
Chapter 6 Transferring calls 45
Using the transfer feature 45
Transferring a call 45
Transferring external calls 45
Canceling a transfer 46
Using Camp-on 47
Parking a call 48
Retrieving a parked call 48
Using Call Park 48
Using Callback 50
Contents 5
Chapter 7 Forwarding your calls 51
Forwarding your calls to another telephone 51
Canceling Call Forward 51
Using Call Forward at your telephone 51
Overriding Call Forward 52
Changing the automatic Call Forward settings for a telephone 52
Changing Forward no answer 52
Changing the delay before a call is forwarded 52
Forward on busy 52
DND on Busy 53
Call Forward and voice mail 53
Line Redirection 54
Turning on Line Redirection 54
Canceling Line Redirection 55
Allowing a telephone to redirect calls 55
Turning the redirect ring for a telephone on or off 55
How Line Redirection is different from Call Forward 57
Using Line Redirection 57
P0908510 Issue 02 Enterprise Edge Feature Programming Telephone Guide
Page 6

6 Contents
Chapter 8 Communicating in the office 59
Paging 59
Making a page announcement 59
Activating and deactivating the ability to page 59
Creating page zones 60
Using Page with external paging equipment 61
Sending messages 61
Sending a message 61
Canceling a message you have sent 62
Viewing your messages 62
Replying to a message 62
Replying to a message using an analog telephone connected to an
ASM 63
Removing items from your message list 63
Removing items from your message list using an analog telephone
connected to an ASM 64
V iewing messages you have sent 64
Using Voice Call 65
Making a Voice Call 65
Muting Voice Call tones 65
Answering a Voice Call without touching your telephone 65
Preventing Voice Calls to your telephone using Voice Call Deny 66
Canceling Voice Call Deny 66
Chapter 9 Tracking your incoming calls 67
Using Call Log 67
Call Log options 68
Logging a call manually 68
Deleting old log items 68
V iewing your Call Log 68
Viewing a Call Log item 69
Erasing log items 69
Making a call using Call Log 69
Creating a password to your Call Log 70
Changing your Call Log password 70
Deleting an assigned password 70
Programming a telephone to log calls automatically 71
Using voice mail 72
Chapter 10 Customizing your telephone 73
Finding out what a button does using Button Inquiry 73
Making the display darker or lighter using Contrast adjustment 73
Changing the language on the display 74
English 74
French 74
Enterprise Edge Feature Programming Telephone Guide P0908510 Issue 02
Page 7

Spanish 74
Programming a feature code onto a memory button 74
Programming feature buttons 74
Erasing a feature button 75
Applying button cap labels 76
Types of button caps 76
Identifying the telephones 76
Enterprise Edge default button assignments 77
Rules of default button assignment 77
M7310 telephone button defaults 78
M7324 telephone button defaults 79
M7100 telephone button defaults 79
Moving line buttons 79
Changing the type of ring 80
Adjusting the Ring volume 80
Hiding the message or calls indication 81
Restoring the messages and calls indication 81
Contents 7
Chapter 11 Hunt Groups 83
Members of the group 84
Distribution mode 84
Chapter 12 Telephone features 85
Installing Enterprise Edge telephones 85
Naming a telephone or a line 86
Moving telephones 87
Stopping calls from ringing at your telephone using Do Not Disturb
(DND) 87
Stopping calls 87
Refusing to answer a call 87
Canceling Do Not Disturb 87
Using Do Not Disturb 88
Using Background Music 88
Turning Background Music off 88
Chapter 13 ISDN PRI 89
Benefits 89
ISDN PRI features 89
Network Name Display for PRI 89
Name and number blocking for PRI 90
Emergency 911 Dialing 90
2-way DID 90
Call by Call service selection for PRI 91
P0908510 Issue 02 Enterprise Edge Feature Programming Telephone Guide
Page 8

8 Contents
Dialing Plan and PRI 91
Service provider features 92
Call Forward 92
Canceling Call Forward 92
Calling the number your calls are forwarded to 92
Automatic Call Back 92
Automatic Recall 93
ISDN applications for PRI 93
V ideoconferencing and video telephony 93
Desktop conferencing 93
File transfer 93
Telecommuting 93
Group 4 fax 93
Remote LAN access 93
Leased line backup 93
LAN to LAN bridging 94
Internet and database access 94
Chapter 14 Using System features 95
Using alternate or scheduled services 95
Preventing certain calls from being made 95
Making additional telephones ring 95
Changing the lines used by outgoing calls 95
Turning Services on and off 95
Turning Services on and off using feature codes 96
Viewing the active Services from a two-line display telephone 96
Viewing the active Services from a one-line display telephone 97
User passwords 98
Registration password 98
Clearing a Call Log password 98
Using special telephones 98
Direct-dial 98
Changing the direct-dial telephone assignments 99
Hotline 99
Bypassing a Hotline 99
Making a telephone a hotline telephone 99
Control telephone 100
Using Set lock 100
Changing Set Lock programming for a telephone 100
Using an auxiliary ringer 101
Turning the auxiliary ringer for a telephone on or off 101
Using Host System dialing signals 101
Link 101
Preventing a telephone from using Link 101
Pause 102
Enterprise Edge Feature Programming Telephone Guide P0908510 Issue 02
Page 9

Long Tones 102
Programmed Release 102
Run/Stop 103
Wait for Dial Tone 103
Using pulse dialing for a call 103
Using your Enterprise Edge system from an external location 103
Controlling access to your Enterprise Edge system 104
Direct inward system access (DISA) 104
Class of Service (COS) 104
Maintaining security 105
Accessing Enterprise Edge remotely over the public network 105
Tones 105
Using Class of Service (COS) passwords 106
Changing your Class of Service 106
Chapter 15 General System features 107
Pulse or tone dialing 107
Disconnect supervision 107
Hunt Groups 107
Internal numbers 107
Line assignment 107
Target line 108
Line pools 108
Overflow call routing 108
M7100 telephone 109
Memory buttons 109
One-line display 109
Prime line 110
Private lines 110
Volume bar 110
Wall mounting 110
Contents 9
Chapter 16 Hospitality Services 111
Alarm time (AL) feature 111
Hospitality Services admin alarm feature 113
Room occupancy (RO) 114
Room condition (RC) 114
Hospitality programming 116
Chapter 17 Companion Features 117
Using your portable telephone 117
Using Enterprise Edge features 118
Using new features 119
Supporting additional features for portables 120
P0908510 Issue 02 Enterprise Edge Feature Programming Telephone Guide
Page 10

10 Contents
Chapter 18 Troubleshooting 121
Using the alarm telephone 121
Reporting and recording alarm codes 121
Testing the telephone 121
Testing the telephone display 122
Testing the telephone buttons 122
Testing the speaker in the telephone handset 122
Testing the telephone headset 123
Testing the telephone speaker 123
Testing the power supply to a telephone 123
Chapter 19 Common feature displays 125
Chapter 20 Appendix A: Feature Codes 129
Chapter 21 Index 135
Enterprise Edge Feature Programming Telephone Guide P0908510 Issue 02
Page 11
Getting Started
Your Enterprise Edge telephone system has many powerful features that can be
customized to keep up with changes in your workplace.
Using this guide
This guide provides information on personal programming, which is done from the
user’s telephone set, such as personal speed dials, transferring a call, and so on.
Before you start
Before you begin programming, plan what changes you want to make. Record the
changes so that you have the information at hand. For example, if you are going to
program system speed dial numbers, create a record so that you have all the
numbers and codes handy once you start programming.
What you’ll need to do programming
1
Personal programming is done right on your telephone by pressing the ƒ
button followed by an activation code. For your convenience, a summary of all the
Feature button programming is provided in Appendix A.
System programming is done using the Unified Manager. The Unified Manager is
the tool used to program settings for the Ent erprise Edge telephony features, as well
as settings for individual telephones and external lines. Multiple levels of
programming are accessible through the Unified Manager. You access the
Enterprise Edge Unified Manager from your web browser. For more information
about navigation and making selections using the Unified Manager, see the
Enterprise Edge Programming Operations Guide.
Emergency 911 Dialing
Emergency 911 Dialing is the capability to access a public emergency response
system by dialing the digits “9-1-1”
Emergency 911 Dialing
State and local requirements for support of Emergency 911 Dialing service by
Customer Premises Equipment vary. Consult your local telecom munications
service provider regarding compliance with applicable laws and regul ations.
P0908510 Issue 02 Enterprise Edge Feature Programming Telephone Guide
Page 12
12 Getting Started
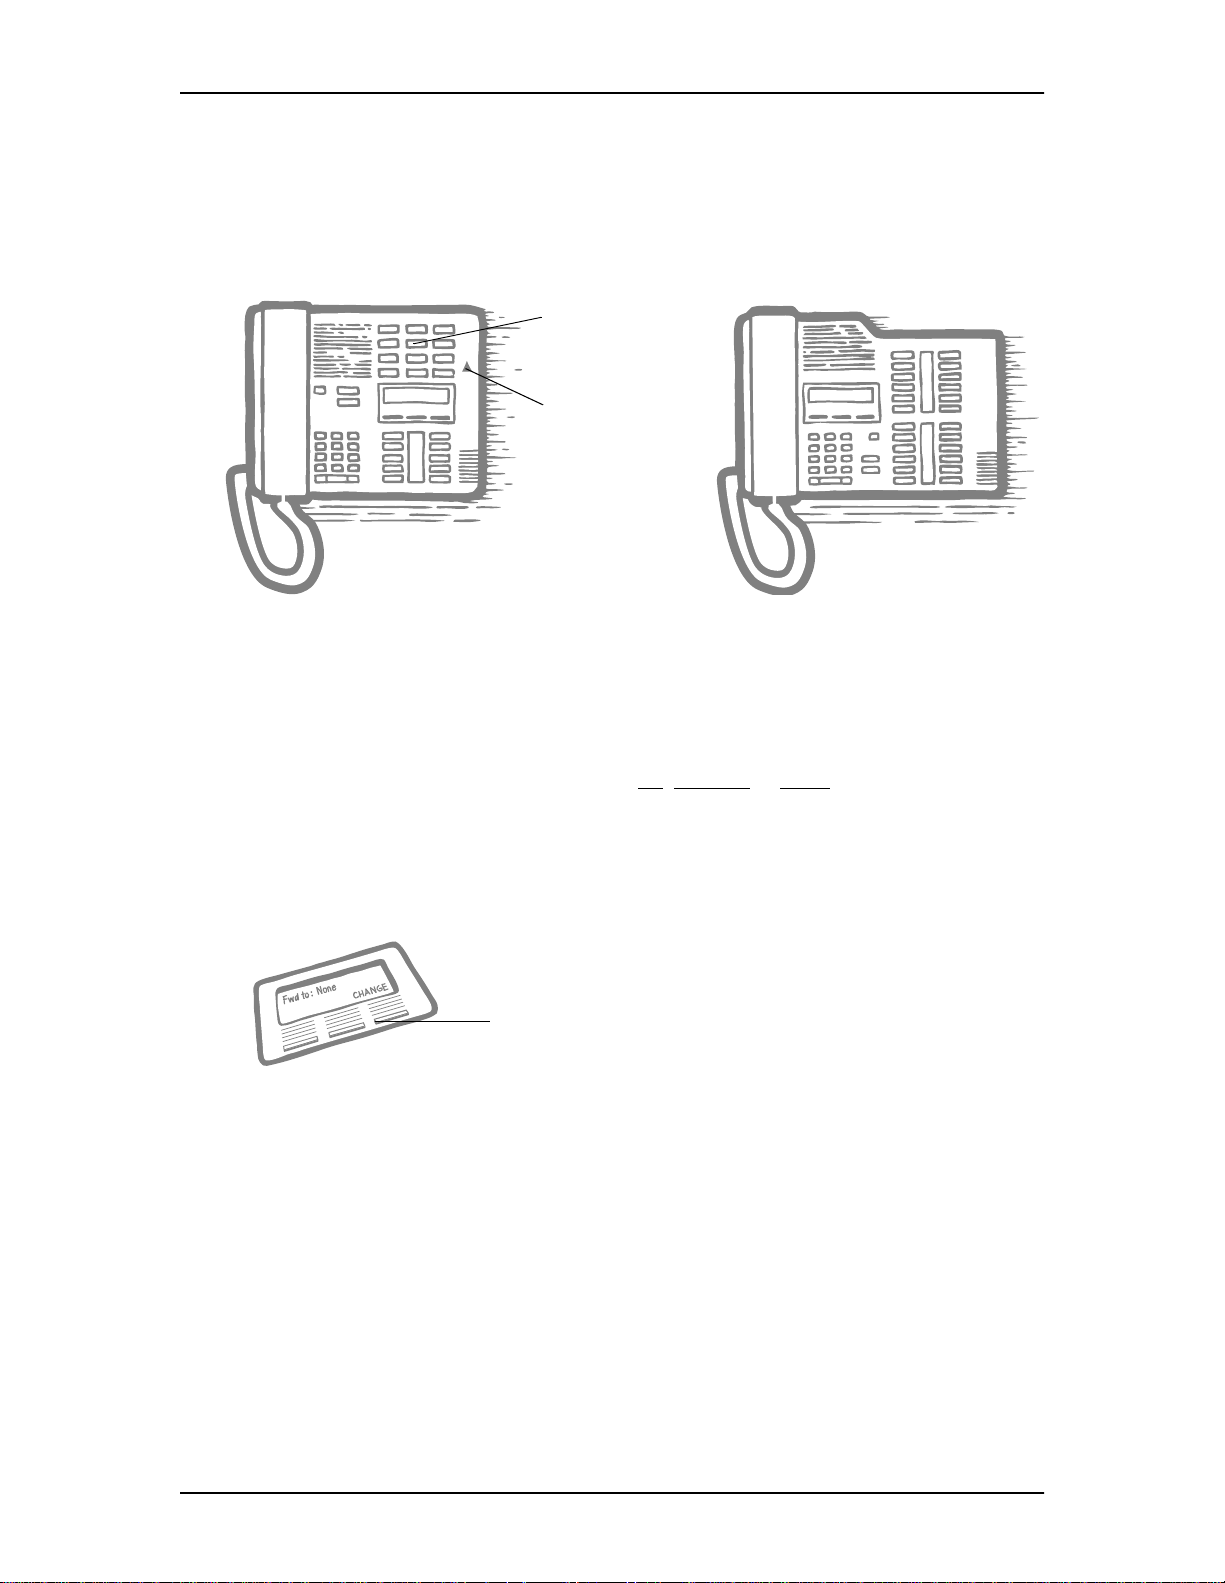
Understanding the telephone buttons
Take a few minutes to study the telephone buttons. The M7324 is different from the
M7310 and M7208 in two ways: it does not have dual memory buttons or a shift
button.
Dual memory
buttons
Shift button
M7310 M7324
Using the buttons under the display
The three display buttons are used for telephone features but what each button does
depends on what the display shows. Some display instructions that you may see
when making changes on the system are OK,
CHANGE
or
COPY
. In this guide, display
button instructions are underlined.
Display buttons
Display button
Enterprise Edge Feature Programming Telephone Guide P0908510 Issue 02
Page 13
M7310
Getting Started 13
9
7
8
1
4
1
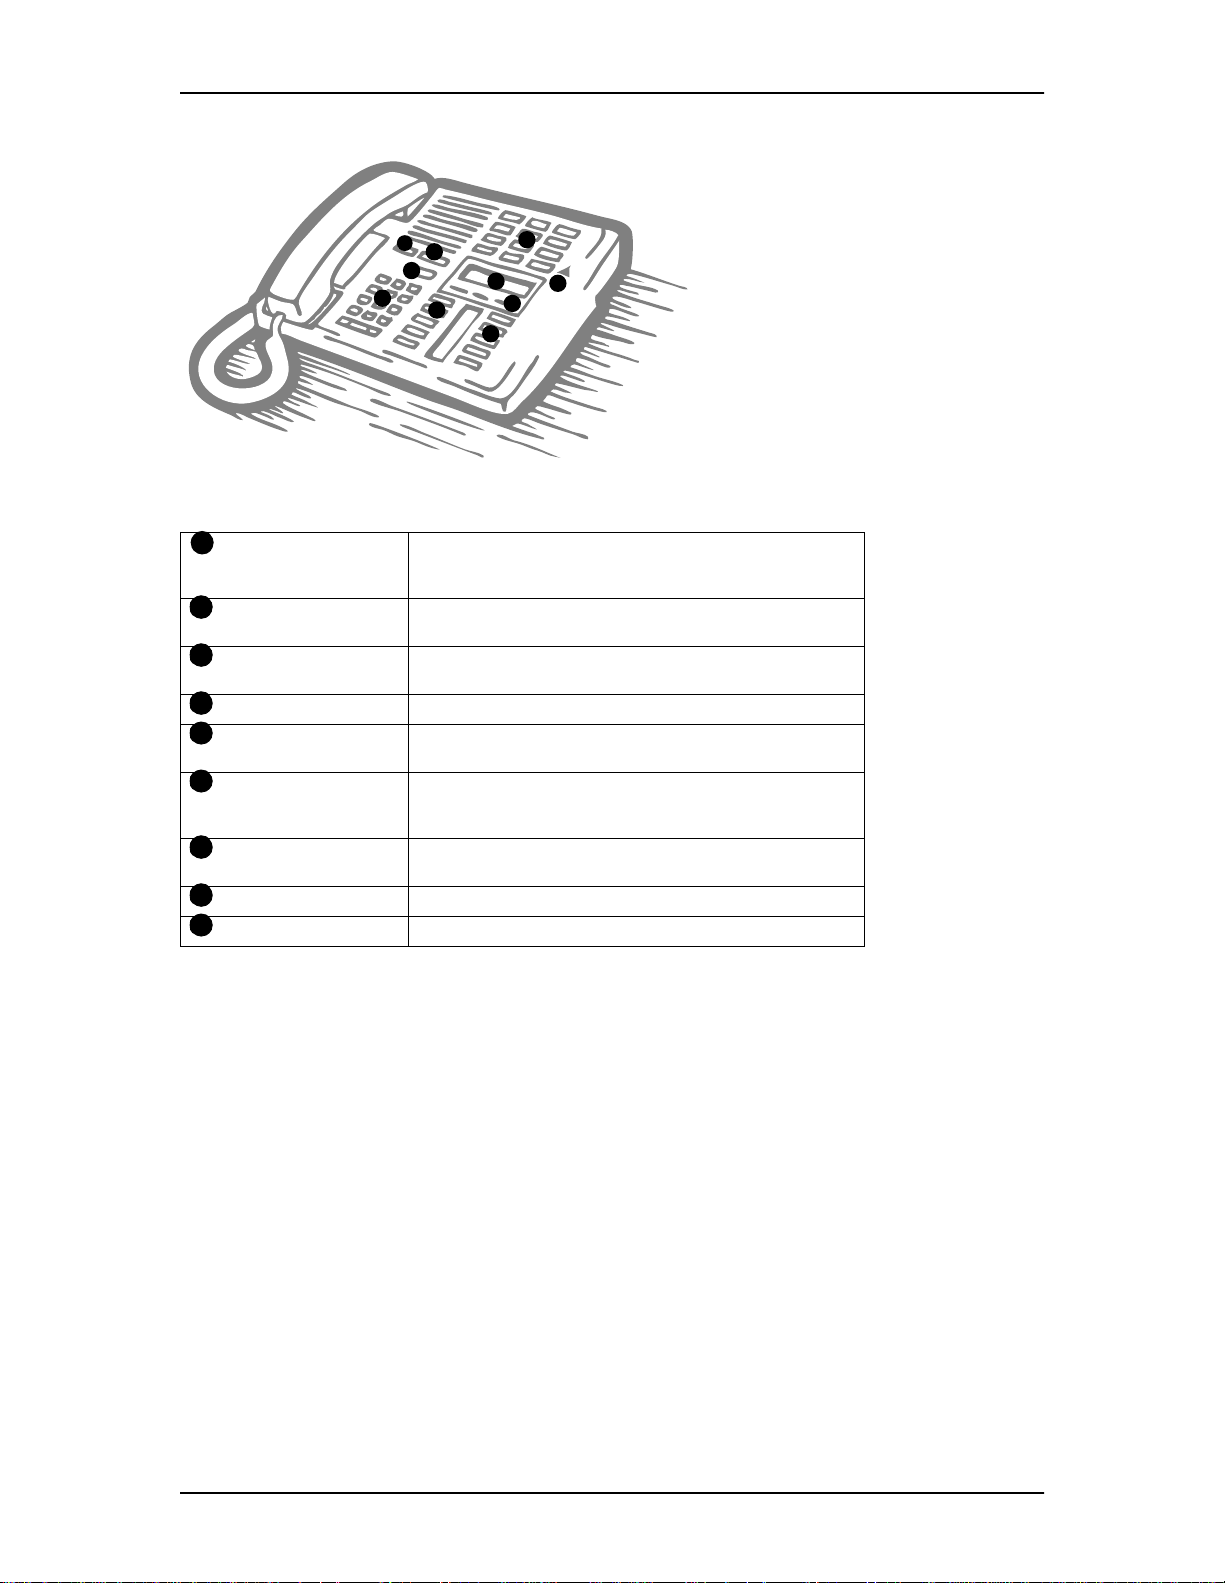
Dial pad Used for dialing numbers when you are making calls.
5
2
4
6
3
It’s also used for ente ri ng num bers and letters when
you’re programming.
2
Display Shows instructions for everyday calling as well as for
programming.
3
Display buttons Have a variety of uses. The current use is shown on the
display above each button.
4
Memory buttons Dial a number or feature code stored on the button.
5
Dual memory buttons Can store two numbers or feature codes (used with the
shift button).
6
Shift button Press the shift butto n before a dual memory button to
activate the seco nd number or feature code stored on
a dual memory button.
7
Feature button Allows you to enter a featur e code while using or
programming the tel ephone.
8
Hold button Puts an active call on hold.
9
Release button Hangs up an active call or ends programming.
P0908510 Issue 02 Enterprise Edge Feature Programming Telephone Guide
Page 14

14 Getting Started
The M7410 Cordless Telephone (CT)
The M7410 CT allows you to move freely around your workspace and still have full
access to all your Enterprise Edge system features.
The effective operating radio range in your facility will be dependent upon building
construction and the internal layout of the facility. Typically, a dense office
environment will yield an effective operating radio range of 125 to 150 feet.
Operating radio ranges will be enhanced in more open office environments.
Note:
Note: Up to 15 M7410 CT users can be accommodated on one Enterprise
Edge system.
The M7410 CT uses advanced digital technology to provide a quality audio path
over a 900 MHz radio link. Establishing calls over a radio link are comparable to
wire line communications but expect s mall delays when the handset is brought i nto
service from an on-hook position.
The M7410 CT mixes voice and data communications paths together, making it
very difficult for anyone to tune in and eavesdrop on conversations. The M7410 CT
is equipped with automatic channel scanning capabilities. The M7410 CT
automatically searches for a new channel when interference is detected.
Enterprise Edge Feature Programming Telephone Guide P0908510 Issue 02
Page 15

Answering calls
Answering incoming calls with Hunt Groups
Your Enterprise Edge system allows you to establish Hunt Groups in your system.
Hunt Groups are a group of Enterprise Edge set DNs that can be called by a single
directory number. The Hunt Groups feature ensures calls are easily routed to the
appropriate people. You can program
• the members for a Hunt Group
• member position within a Hunt Group
• how calls are distributed
• how long a call spends looking for available members
• what happens if all members are busy
2
For more information on Hunt Groups see the
Operations Guide
.
Answering an incoming call
There are three indications of an incoming call: ringing, a line butt on flashing, and
a message on the display. You do not necessarily receive all three indications for
any particular call. For example, you may have a line that has been set up not to ring
at your telephone. If so, you see only a flashing line button. There are many possible
combinations, depending on how your system is set up. See Choosing a line using
a line button on page 32 for more information on the use of lines.
If you receive a priority call and your telephone has no free internal line buttons,
you cannot transfer the priority call, you must accept or release it.
Line buttons
One line button for each line is assigned to your telephone. Press the line button to
select the line you want to answer or use to make a call. Having several line buttons
gives you immediate access to more than one line.
The M7100 telephone has two intercom paths which are used instead of line buttons
to answer and make calls. Each M7100 can be assigned two lines. You can press
˙ to switch between two calls, one active and one on hold.
Enterprise Edge Programming
P0908510 Issue 02 Enterprise Edge Feature Programming Telephone Guide
Page 16

16 Answering calls
What line indicators mean
Flashing on and off for
º
equal lengths of time
Flashing on and off
º
more quickly
Flashing on for longer
º
than off
On, not flashing You are connected to t he call on that
º
Off The line is free.
There is an incomin g call on the line.
You have placed a call on hold.
Someone else has put a call on hold
on that line.
line or the line i s in use elsewhere.
Rings you may hear
A double beep every ten
seconds
A long single ring There is an external call on the line for you.
A shorter double ring There is an int ernal call on t he line for you or
A brief single ri ng A cal l is being redirected on one of your
Three beeps
descendi ng in t one
A call has been camped to your telephone.
a call is being transferred to you.
redirect ed li nes. You cannot answer this
call.
You are receivi ng a pri ority call.
Answering calls at a prime telephone
Each line in an Enterprise Edge system can be assigned a prime telephone. Calls not
answered at their normal destinations are transferred to the prime telephone. The
prime telephone is usually the attendant’s telephone. The installer or customer
service representative programs a prime telephone for a line.
Displays
DND from 221
DND transfer
DRT Line001
Line061 callback
CALLBACK
Line061 to prime
The person at t elephone 221 has for ward ed
a call to you using Do Not Disturb.
The system has transferred a call to you
from a telephone with Do Not Distu rb turned
on.
Nobody answered thi s call so the system
transferr ed it to you.
Someone has camped, par ked or
transferr ed a call on line 061, but no one has
answered it. Press
button to connec t to t he call.
There is no tel ephone that can receive a call
on line 061 so the system has transfer red it
to you.
CALLBACK
or the line
Line002>Line052
For other displays, see Common feature displays on page 125.
The call comin g in on li ne 002 was i ntended
for target line 052. Line 052 is busy so the
call has come to you.
Enterprise Edge Feature Programming Telephone Guide P0908510 Issue 02
Page 17
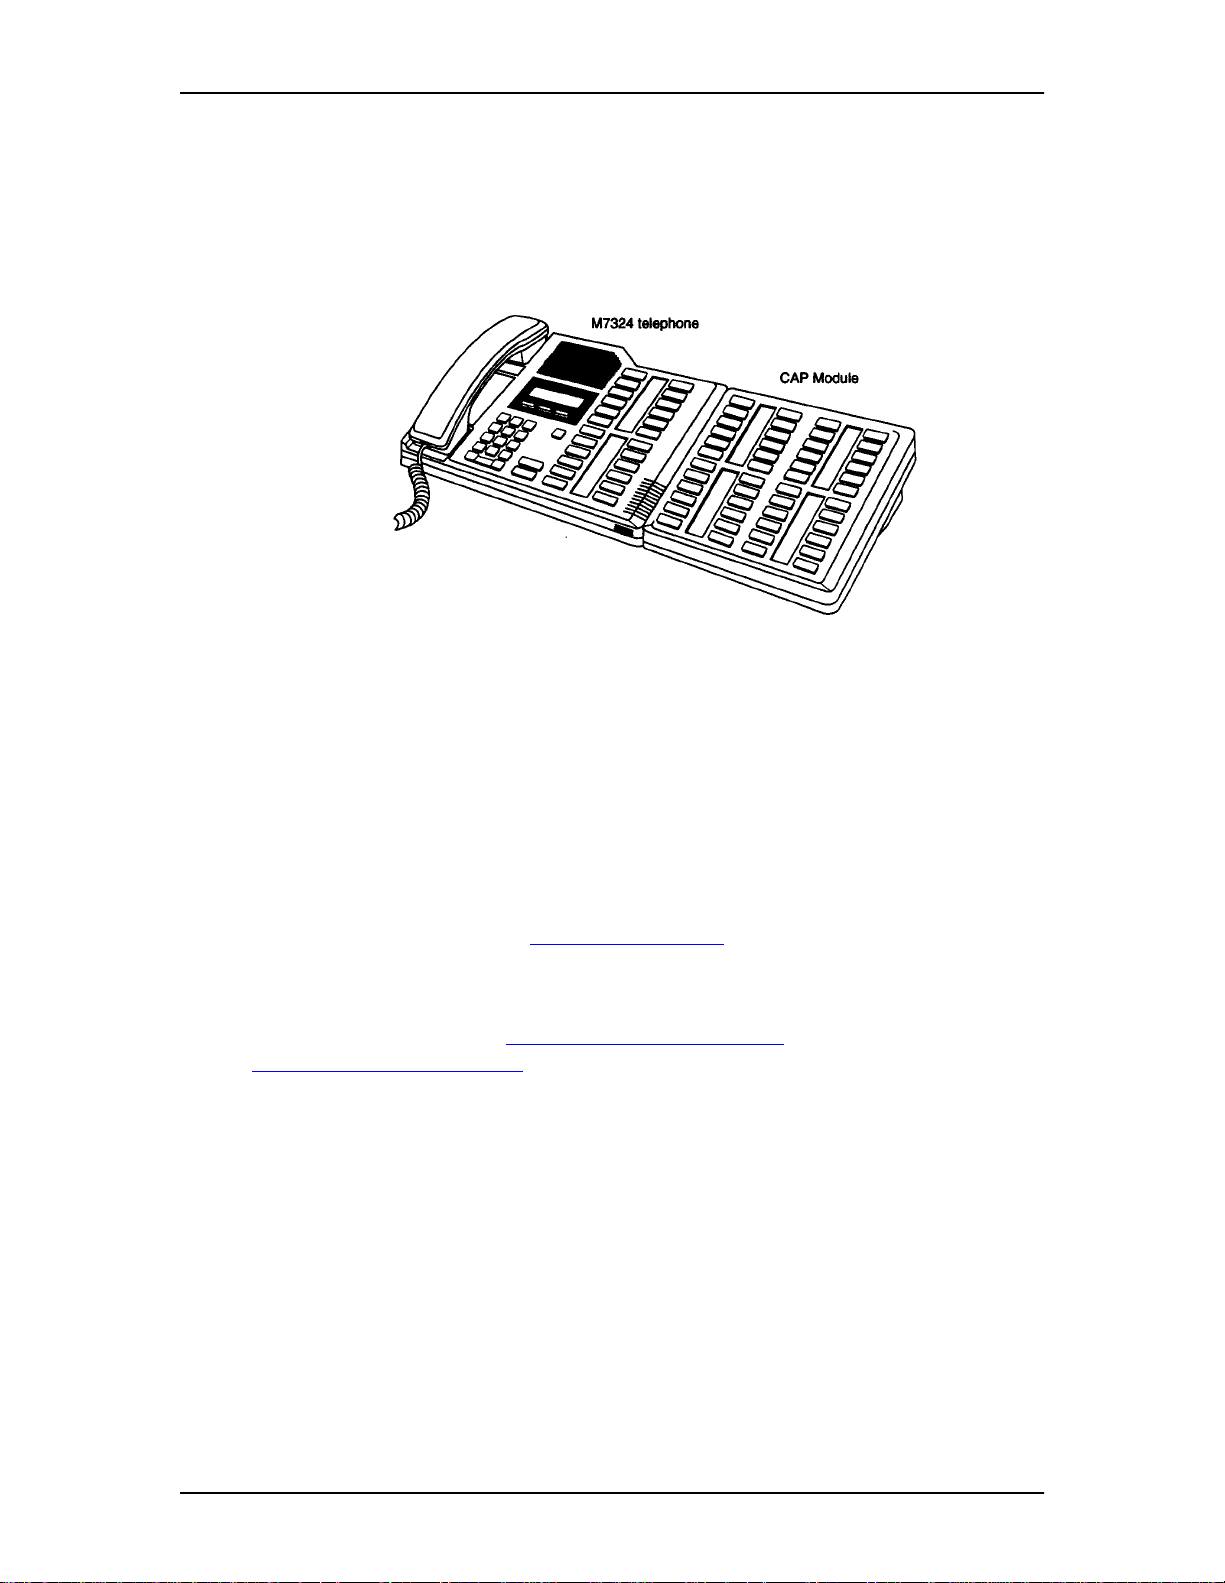
Using a central answering position (CAP) module
A central answering position (CAP) is an Enterprise Edge M7324 telephone and a
CAP module that your installer or customer service representative programmed as
a CAP. You can have five CAPs connected to an Enterprise Edge telephone. It is
best if the CAP is the prime telephone and direct-dial telephone for the lines and
telephones it serves.
A CAP module is an add-on device that provides 48 extra memory or l ine buttons.
You can connect one or two Enterprise Edge CAP modules to the telephone to
increase the number of lines it can handle.
Answering calls 17
When a CAP module is first plugged into your telephone, some of the module
buttons are already programmed to dial an internal number.
Customizing your CAP module
If your installer has programmed the CAP module to be the central answering
position for your system, you can move external lines onto the CAP module by
using ƒ•°⁄. See Moving line buttons on page 79.
Any of the buttons on your CAP module that do not select lines can be programmed
to dial internal or external numbers automatically. You can program features onto
CAP module buttons. See Time savers for making calls on page 37 and
Customizing your telephone on page 73 for information on programming memory
buttons.
Buttons on a CAP module cannot be assigned as answer buttons.
Monitoring te lep h o n e s with th e CA P mod ule
The indicators ˆ beside internal autodial buttons on your CAP module show the
status of Enterprise Edge telephones.
The indicator is on when the telephone has:
• an active call
• Do Not Disturb turned on
P0908510 Issue 02 Enterprise Edge Feature Programming Telephone Guide
Page 18

18 Answering calls
The indicator is off when a telephone has:
• no active call
• a call on hold and no other active call
Tip
You can send up to 30 messages from a CAP.
Release button
Pressing ® ends a call. You do not have to put the receiver down. ® also ends
feature programming.
While you are on a call, do not press ® to end a feature you are using. If you do,
you disconnect the call. Use ƒ instead.
Hearing aid compatibility
The receivers on all Enterprise Edge telephones are compatible with hearing aids as
defined in the FCC rules, Part 68, section 68. 316. Not all hearing aids are optimized
for use with a telephone.
Viewing information about a call on the display
If you subscribe to Call Display services from your local telephone company, one
line of information about an external caller is displayed after you answer.
Depending on the setting and the external information available, either the caller’s
name or telephone number is displayed.
When you transfer an external call to another E nterprise Edge user, this information
is displayed on the recipient’s telephone.
Call Display information becomes available between the first and second ring of an
incoming call. If you answer before the Call Display information is available on
your display, and you press ƒ°⁄⁄, you see only the line number or line
name.
To use logging features with Call Display, see Using Call Log on page 67.
Using Call Information for a particular call
ƒ°⁄⁄
Call Information allows you to see information about incoming calls. This
information is more detailed than the Call Display information you can receive
automatically. For external calls, you can display the caller’s name, telephone
number, and the line name. For an internal call, you can display the caller’s name
and their internal number. You can see information for ringing, answered, or held
calls.
Enterprise Edge Feature Programming Telephone Guide P0908510 Issue 02
Page 19

Answering calls 19
Call Information is available for calls even if they have been transferred, forwarded
or rerouted in some way.
Names and numbers for external calls are displayed only if you have s ubscribed to
Call Display services from your telephone company.
Tip
Call Log displays the same information as Call Information, along with the
date and time of the call, and the number of times the caller cal led.
Displaying Call Information before or after answering
To find out who is calling or to display information about your current call:
1. Press ƒ°⁄⁄.
2. Press £ or VIEW to display more information about an external call.
Call Display information becomes available between the first and second ring of an
incoming call. If you answer before the Call Display information is available on
your display, and you press ƒ°⁄⁄, you see only the line number or line
name.
Displaying Call Information for a call on hold
1. Press ƒ°⁄⁄. The display reads ˆSelect a call.
2. Select the line on hold. Information about the call is displayed.
3. Press £ or VIEW to display more information about an external call.
Tip
If your telephone automa tically displays Cal l Display information for a call ,
you still need to press
to display more information about the call.
ƒ°⁄⁄
before you can press £ or
Making Call Display information appear automatically at a telephone
Each telephone that rings for an external line can display Call Display information
for that line. After the call is answered, Call Display information is always shown
at the telephone that answered the call. Your installer or customer service
representative can program telephones to have automatic Call Display.
VIEW
P0908510 Issue 02 Enterprise Edge Feature Programming Telephone Guide
Page 20

20 Answering calls
Changin g w h ic h in f or m ation is shown fi rst about a call
Depending on the services you subscribe to, Call Display information may contain
up to three parts: the name of the caller, the number of the caller, and the name of
the line in your Enterprise Edge system that the call is on. For each telephone, you
can determine which information is displayed first.
You may see Unknown name
Unknown number
or
on the display if the information is not
available from your telephone company. You may see
Private number
on the display if the caller blocks that information.
You need to start a Unified Manager session to program this feature. For more
information about programming using the Unified Manager, see the
Edge Programming Operations Guide
.
Picking up a call ringing at another telephone
You can pick up a call ringing at another telephone by using Directed Pickup or
Group Pickup.
Answering any ringing telephone using Directed Pickup
ƒ‡fl
You can answer any telephone that is ringing in your Enterprise Edge system.
1. Press ƒ‡fl.
2. Enter the internal number of the ringing telephone.
Call Pickup cannot be used to answer private lines.
Private name or
Enterprise
To use Call Pickup (Directed Pickup), the telephone must be ringing. If, for
example, the auxiliary ringer is ringing, but the call is not ringing at a telephone, the
call cannot be answered using Directed Pickup. It must be answered normally at a
telephone that has a flashing indicator f or the call, or by using Trunk Answer. You
can answer a call that is ringing because someone has transferred the call to a
telephone and the call is ringing on an intercom button.
Tip
Directed pickup ca n retrieve calls that are ringing on an Answer DN. While
you may enter the internal number of t he telephone you hear ri nging, it may be
calls from another telephone you are answering.
Answering any ringing telephone using Group Pickup
ƒ‡fi
Your Enterprise Edge system can be divided into nine pickup groups. If you are a
member of a pickup group, you can pick up a call that is ringing at any telephone in
your pickup group.
Enterprise Edge Feature Programming Telephone Guide P0908510 Issue 02
Page 21

Answering calls 21
Press ƒ‡fi.
Group Pickup cannot be used to retrieve a camped call.
If there is more than one incoming call at a telephone in a pickup group, a call
ringing on an external line is answered first followed by calls on the prime line and,
finally, calls on internal lines.
Tip
A Hunt Group call ringing at an Enterprise Edge set DN that is also a member
of a call pickup group can be picked up by any Enterprise Edge set in that call
pickup group. For more information on Hunt Groups see Hunt Groups
83.
Changing a telephone’s pickup group
Telephones can be put into and taken out of pickup groups.
You need to start a Unified Manager session to program this feature. For more
information about programming using the Unified Manager, see the Enterprise
Edge Programming Operations Guide.
on page
Displays
Already joined
Pickup denied
Pickup:
You are already connected to the telephone that made the
call you ar e try ing to pick up . T his can happen if y ou are on
a call to a co-worker, your co-worker dials the number of a
telephone i n your pi cku p group, and yo u attempt to pi ck up
that call.
There is no call that you can pick up or the call that was
ringing has already been answered.
You have tried to pick up a call on someone else’s private
line.
Enter the internal number of the telephone that is ringing.
(You may use an internal autodial button to do this.)
If you decide not to answer a ringing call after you have
activated Directed Pickup, press
ƒ.
Trunk Answer
ƒ°‚‚
The Trunk Answer feature allows you to answer a ringing call anywhere in the
system from any telephone in the system. The line you are answering does not have
to appear or ring at the telephone you are using.
Trunk Answer works only with calls that are ringing on lines for which a Ringing
Service schedule is active and if Trunk Answer is enabled by your installer or
customer service representative.
P0908510 Issue 02 Enterprise Edge Feature Programming Telephone Guide
Page 22

22 Answering calls
Answering a call using Trunk Answer
Press ƒ°‚‚.
Tip
If there is more than one incomin g call on lines in a Ringing Service, the
Trunk Answer feature pic ks up the external call that has been ringing the
longest.
Displays
Line denied
Pickup denied
You have tried t o pick up a cal l on someone
else’s private line.
The call that is ringing is on a line that is not
in a Ringing Service.
Answer buttons
You can use an Answer button to monitor calls on another person’s telephone. All
calls to the monitored Enterprise Edge telephone appear on the Answer button.
Answer buttons are useful for attendants who monitor incoming calls for one or
several other people. For example, a secretary may have appearances for three
different bosses on her answer buttons. Once a call for boss A is answered by the
secretary, the appearance stops at that boss’ set. This allows for another
(simultaneous) call to come in on the same line. The same is true for boss B and
boss C. When incoming call traffic becomes high, the calls can then be routed to a
Hunt Group to optimize call handling. For more information on Hunt Groups see
Hunt Groups on page 83.
The Answer button setting in Feature settings programming allows you to
determine what types of calls alert at the telephone. Your choices are: Basic,
Enhanced and Extended.
See the Enterprise Edge Programming Operations Guide for more inform ation on
programming Answer buttons.
M7100 telephones cannot be assigned Answer buttons to monitor other sets, but
they can be monitored.
You cannot make calls using Answer buttons.
Enterprise Edge Feature Programming Telephone Guide P0908510 Issue 02
Page 23

If more than one call is ringing at someone’s telephone, the first call appears on the
attendant’s Answer button. Any subsequent calls appear on intercom buttons, if
they are available.
Tip
More than one attendant may have an Answer button for a single telephone.
This allows two or more attendants to handle calls for a busy person.
Each telephone can handle calls for up to eight other people using a separate
Answer button for each person.
Creating a Conference Call
ƒ‹
You can talk to two people at once.
1. Make sure you have two calls, one active and one on hold.
2. Press ƒ‹.
Answering calls 23
3. Press the appropriate button to retrieve the held call (this is automatic on the
M7100 telephone).
You can create a conference when you are on a call.
1. Make a second call.
2. Press ƒ‹.
3. Press the button where the first call is on hold to create a conference.
Only the person who established the conference can process the conference by
using the procedures described in this section.
Tip
You can create a confer ence by rel easing privacy on a call. See Turning
Privacy on or off for a call on page 29.
Disconnecting one party
You can disconnect one party from a conference and continue talking to the other.
On a M7208, M7310 or M7324 telephone:
1. Press the line button of the call that you want to disconnect. The call that you
want to keep is automatically put on hold.
P0908510 Issue 02 Enterprise Edge Feature Programming Telephone Guide
Page 24

24 Answering calls
2. Press ®. The call is disconnected.
3. Press the line button of the held call to speak to the remaining person.
On a M7100 telephone:
1. Press ƒ£‹, to place one caller on hold. Press ˙ again, to put
the caller you want to keep on hold.
2. Press ®. The call is disconnected.
3. Press ˙ to speak to the remaining party.
Independently holding two calls
For all Enterprise Edge telephones except the M7100 telephone, you can put the two
people in a conference call on hold independently so that they cannot talk to each
other.
1. Press the line button of one person. The other person is automatically put on
hold.
2. Press ˙. The second person is put on hold.
You can re-establish the conference.
3. Take one call off hold.
4. Press ƒ‹.
5. Take the other call off hold.
Putting a conference on hold
You can put a conference on hold, allowing the other two people to continue
speaking to each other by pressing ˙.
You can reconnect to the conference by pressing either of the held line buttons. For
the M7100 telephone, press ˙.
Splitting a conference
You can talk with one person while the other person is on hold.
On a M7208, M7310 or M7324 telephone
• Press the line button of the person to whom you want t o speak. The other person
is automatically put on hold.
Enterprise Edge Feature Programming Telephone Guide P0908510 Issue 02
Page 25

Answering calls 25
On a M7100 telephone:
1. Press ƒ£‹. The first party is on hold.
2. Press ˙, if necessary, to switch parties.
You can re-establish the conference.
3. Press ƒ‹.
4. Take the held call off hold. This is not necessary for the M7100 telephone.
Removing yourself from a conference
ƒ‡‚
You can remove yourself from a conference, and connect the other two callers
through your Enterprise Edge system.
Enter the Transfer feature code ƒ‡‚.
When you remove yourself from a conference using the Transfer feature, and both
callers are from outside your system, one of the callers must have called you on a
disconnect supervised line, or the call is be disconnected.
Displays
3 parties only
Conf. on hold
Conference busy
Line001 221
TRANSFER
Press held line
For other displays, see Common feature displays on page 125.
You are tryi ng to add a fourt h part y to y our confer ence
call, or to joi n two conferences together. Release one
call from the conference before adding another, or
keep the two confer ences separate.
You have put a conference call on hold.
You have tried to make a conf erence call, but your
system is already handling its maximu m numb er of
conference calls.
You are on a conference wi th the two lines or
telephones shown. You can drop out of the conference
and leave the other two parties connected
(Unsupervised Conference) by pressing
entering the Transfer feature code.
You have activated the Conference feature with one
call active and another on hold. Press the line of the
call on hold to bring that person into the conference.
TRANSFER
or
P0908510 Issue 02 Enterprise Edge Feature Programming Telephone Guide
Page 26

26 Answering calls
Listening to a call as a group
ƒ°‚¤
To allow people in your office to listen in on a call using Group Listening, press
ƒ°‚¤.
You hear the caller’s voice through your telephone’s speaker. Continue to speak to
the caller through the telephone receiver. Your telephone’s microphone is off, so
the caller does not hear people in your office.
Canceling Group Listening
ƒ£°‚¤
Group Listening is canceled automatically when you hang up or when you press
ƒ£°‚¤.
Tip
Keep the receiver away from the speaker, or you may hear feedback. The
higher the volume, the more the feedback. Press ® to prevent feedback
when hanging up.
Using Handsfree/Mute
The ability to use Handsfree must be turned on or off for each telephone. The type
of Handsfree can be changed. See Changing Handsfree for a telephone on page 28.
You must turn on Handsfree for a telephone to be able to use a headset.
Answering calls without lifting the receiver
1. Press the line button for the ringing call. (This step is not necessary if you
have a prime line assigned to your telephone.)
2. Press ©. The telephone’s internal microphone and speaker are
automatically turned on.
Handsfree is not available for a M7100 telephone.
Tip
Direct your voice toward the telephone. The closer you are to the telephone,
the easier it is for the microphone to transmit your voice cle arly to your
listener.
Enterprise Edge Feature Programming Telephone Guide P0908510 Issue 02
Page 27

Making calls without lifting the receiver
Answering calls 27
1. Press
©
. (If you don’t have a prime line assigned to your telephone,
press a line button.)
The telephone’s internal microphone and speaker are automatically turned on.
2. Dial your call.
3. Speak normally.
Muting Handsfree
1. Press
©
to switch off the telephone microphone so that you can speak
privately to someone in your office while you are on a handsfree call.
2. Press
©
to turn the microphone back on again and continue your
handsfree call.
Changing a regular call to handsfree
1. Press
©
.
2. Hang up the receiver.
Changing a handsfree to a regular call
Lift the receiver.
Using Handsfree
The indicator next to
©
is solid when you have Handsfree turned on. It
flashes when you mute the microphone.
Wait for your caller to finish speaking before you speak. The microphone and
speaker cannot both be on at once. Your caller’s voice may be cut off if you both
speak at the same time. Noises such as a tapping pencil could be loud enough to turn
on your microphone and cut off your caller’s speech.
To prevent a possible echo, keep the area around your telephone free of paper and
other objects that might screen your microphone. Turning down the microphone’s
volume (press the left end of
√
while speaking) prevents echoes. When
you change the volume level, both the microphone and speaker volume are adjusted
to prevent feedback problems.
P0908510 Issue 02 Enterprise Edge Feature Programming Telephone Guide
Page 28

28 Answering calls
Place the telephone so that any unavoidable local noise (such as an air conditioner)
is behind it. This limits the amount of disruptive background noise.
Tip
In open-concept environments, use the receive r when handsfree
communication is not necessary or when you need privacy during a call.
Another option is to use a headset.
Changing Handsfree for a telephone
You can program the type of Handsfree used with each telephone or activate
Handsfree Answerback.
You need to start a Unified Manager session to program this feature. For more
information about programming using the Unified Manager, see the
Edge Programming Operations Guide
There are three ways to set Handsfree for an individual telephone:
Enterprise
.
Handsfree:None
CHANGE
Handsfree:Auto
CHANGE
Handsfree:Std
CHANGE
For other displays, see Common feature displays on page 125.
Handsfree is not available to the telephone.
You can make or answer a call witho ut having to
pick up the receiver or press ©. The
telephone’ s interna l micropho ne and speaker turn
on automatical ly when you press a line or
intercom button to make or answer a call.
A standard ver sion of Handsfre e desc ribed Us ing
Handsfree/Mut e on page 26.
Both Auto and standard Handsfree allow you to use a headset with an Enterprise
Edge telephone.
A Handsfree/Mute button is automatically assigned to a telephone that is
programmed with Handsfree and is always located in the lower right-hand corner
of the telephone.
Handsfree Answerback
Handsfree Answerback allows you to answer a voice call without lifting the
receiver. It is always turned off for a M7100 telephone.
You can turn Handsfree Answerback on or off for a telephone that is programmed
to use Handsfree.
You need to start a Unified Manager session to program this feature. For more
information about programming using the Unified Manager, see the
Edge Programming Operations Guide
Enterprise Edge Feature Programming Telephone Guide P0908510 Issue 02
.
Enterprise
Page 29

Turning Privacy on or off for a call
ƒ°‹
Lines in your system can be configured to have automatic privacy. If a line is not
programmed with privacy, anyone with the line assigned to their telephone can join
your call by pressing the line button. If a line is programmed with privacy, only one
person at a time can use the line.
Privacy control cannot be used on internal or conference calls.
When another telephone joins a call, the participants on the call hear a tone, and a
message appears on the Enterprise Edge display. You cannot join a call without this
tone being heard.
Creating a conference by releasing privacy
If a line is programmed with privacy, you can turn privacy off to allow another
person with the same line to join in your conversation and form a conference. All
the rules applicable to a conference apply except there is only one line in use,
instead of the normal two. This means that you cannot split a conference set up
using Privacy.
Answering calls 29
1. Press ƒ°‹.
2. Tell the other person to press the line button and join your conversation.
Only two Enterprise Edge telephones in addition to the external caller can take part
in this kind of conference.
Making a call private
If a line is programmed not to have privacy, you can turn privacy on for a call,
preventing other people with the same line from joining your conversation.
Press ƒ°‹.
Checking call length using Call Duration Timer
ƒ‡‡
By pressing ƒ‡‡, you can see how long you spent on your last call, or
how long you have been on your present call.
Displays
221 02:47
The display shows t he last call you made, or the
current call, and the t otal elapsed time in minutes
and seconds.
Line061 01:45
P0908510 Issue 02 Enterprise Edge Feature Programming Telephone Guide
You parked your last call. The display shows the
length of time t he call was p arked. You cannot s ee
the length of time a c all was par ked unless t he call
is active at your telephone or has just been
released by your telephone.
Page 30

30 Answering calls
Disconnecting by accident
If you accidentally drop the receiver back into the telephone cradle while answering
a call, you can quickly retrieve the call.
Pick up the receiver again or press © within one second to be reconnected
to your call.
Time
Press ƒ°‚‹ to display the current date and time while you are on a call.
Enterprise Edge Feature Programming Telephone Guide P0908510 Issue 02
Page 31

Making calls
There are many ways to make a call, depending on the programming and the type
of call, as follows:
• Pick up the receiver and dial. The Enterprise Edge system supports three
methods of dialing. See Changing how you dial your calls on page 34.
• Pick up the receiver, press a line button, and dial (if the call is not on your prime
line).
•Press © and dial (to talk without using the receiver). See Using
Handsfree/Mute on page 26.
•Press ©, press a line button, and dial (to talk without the receiver and if
the call is not on your prime line).
• Press a line button and dial (to talk without the receiver and if Automatic
Handsfree is assigned to your telephone).
• Use one of the features that make dialing easier. See Time savers for making
calls on page 37.
3
Displays
221 busy
PRIORITY LATER
9__
QUIT BKSP
95551234
TRANSFER
Already joined
Calling 221
PRIORITY LATER
Can't ring again
Do not disturb
PRIORITY LATER
Expensive route
The telephone you have called has no internal lines
available. Press
Message features or press PRIORITY to make a
priority call.
You are dialing using Pre-dial. To erase an incorrect
digit, press the left end of √
the number is c omplete, sel ect a line or lift t he receiver.
This prompt remains on your display as long as you
are on a call you ha ve dialed. To transf er the call, press
TRANSFER.
Your telephone is alread y connected to the telephone
you are trying to cal l. Check your active line butto ns,
and return to that call.
Wait for the telephone to be answered. If no one
answers, pr ess
or Message (page 61) feature, or press
make a p ri o rity cal l .
You cannot use Ring Again on your current call. You
can only use Ring Again wh ile you have a busy signal
on an internal call or line pool request or while an
internal call is ringing.
The telephone you are calling has Do Not Disturb
turned on. Press
Messages features, or press
priority call.
You have dialed a number, but the least expensive
route that the system is programmed to use is busy.
Unless you rel ease the cal l, i t goes t hrough on a more
expensive route.
LATER to use the Ring Again or
BKSP. When
or
to use the Ring Again (page 36)
LATER
LATER
to use the Ring Again or
PRIORITY
PRIORITY
to make a
to
P0908510 Issue 02 Enterprise Edge Feature Programming Telephone Guide
Page 32

32 Making calls
Hidden number
Line denied
Line061
TRANSFER
No last number
No line selected
Not in service
On another call
LATER
Restricted call
The last number you dia led or the number you saved
for Saved Number Redial was a speed dial number
that displayed a nam e rather than the number. The
number is dialed correctly, but you cannot see it.
You have attempted to use someone else’s private
line.
Enter the digits of the number you want to dial.
You have not dialed an external telephone number
since the last power interruption or system reset.
Either you have no prim e li ne or your prime line is
busy. Select a li ne manually before dialing.
You have entered th e number of a telephone t hat is not
in service.
The telephone you have called is on another call.
Press
features.
The call you are trying to make has been restricted in
programming. A possible reason is time-of-day
restrict ions on certain calls.
to use the Ring Again or Message
LATER
Ring Again?
YES NO EXIT
Select a line
Send message?
Press
message. See Sending messa ges
Turning on Ring Again on page 36.
Either you have no prim e li ne, or the prime line is in
use, or the line progr am m ed for an autodial number,
speed dial number, or Hotline is in use. Select a line
and dial again.
Press
to use Ring Again. Press
YES
to send a message. See Messages.
YES
YES NO
For other displays, see Common feature displays on page 125.
Choosing a line using a line button
You have one line button for each line assigned to your telephone. Press the line
button to select the line you want to answer or use to make a call. Having several
line buttons allows you immediate access to more than one line.
The M7100 telephone has two intercom paths which are used instead of line buttons
to answer and make calls. Each M7100 can be assigned two lines. You can press
˙ to switch between two calls, one active and one on hold.
NO to send a
on page 61 and
Line pools
A line pool is a group of external lines that can be shared by many telephones. You
can use a line in a line pool to make an external call.
Enterprise Edge Feature Programming Telephone Guide P0908510 Issue 02
Page 33

Making calls 33
The Enterprise Edge system can have 15 line pools plus 6 PRI pools, and a
telephone can be programmed to access any number of them.
A line pool access code is a number you dial to get a l ine pool. The access code can
be up to four digits long. You can have several differ ent line pools for your system,
each one giving you access to a different set of external lines. It is one way of
sharing lines across telephones in a system.
Your installer programs the line pool access codes and gives each telephone access
to a line pool.
Everyone in the office should have a list of the line pool access codes for the line
pools their telephones can use.
Using a line pool to make a call
ƒfl›
1. Press ƒfl›.
2. Enter a line pool access code.
If you have a free internal line, you can make a call using a line pool without
entering the feature code first.
1. Select an internal line (intercom).
2. Dial the line pool access code.
Tip
If no lines are available in the line pool, you can use Ring Again at the busy
tone. You are notifi ed when a line in the line pool becomes availab le.
See Using Ring Again
on page 36.
Programming a memory button with a line pool feature code
When you program a button with the line pool feature code, you must enter a line
pool access code after the feature code. The programmed line pool button accesses
a specific line pool, not the line pool feature. See Programming feature buttons on
page 74 for more information.
If you program a button with an indi cator to access a line pool, when all t he lines in
a line pool are busy, the indicator for the line pool button turns on. The indicator
turns off when a line becomes available.
P0908510 Issue 02 Enterprise Edge Feature Programming Telephone Guide
Page 34

34 Making calls
Changing how you dial your calls
ƒ•°¤
1. Press ƒ•°¤.
2. Press £ or NEXT until the dialing mode you want appears.
3. Press ˙ or
OK
to select the displayed dialing mode.
The dialing modes feature code cannot be programmed onto a memory button.
Using Standard dial
Standard dial allows you to make a call by selecting a line and dialing the number.
If you have a prime line, it is selected automatically when you lift the receiver or
©.
press
You cannot use Standard dial on a M7100 telephone unless you pick up the receiver
first. If you have a M7100 telephone, use the Automatic dial or Pre-dial feature for
on-hook dialing.
Using Automatic dial
Automatic dial allows you to dial a number without selecting a line. Your prime line
is selected as soon as you start dialing a number.
Automatic dial does not work if your telephone has no prime line or if your prime
line is in use.
Telephones connected to an Enterprise Edge Analog Terminal Adaptor (ATA2) or
an Enterprise Edge Analog Station Module (ASM) cannot use Automatic dial.
Using Pre-dial
Pre-dial allows you to enter a telephone number, check it, then change it before
actually making the call. The call is not dialed until you select a l ine or line pool, or
pick up the receiver. You can pre-dial both external and internal numbers. You
must, however, select the correct type of line (external or internal) for the type of
number you have entered.
Tip
If your telephone starts ringing while you are pre-dialing a number, you can
stop the ringing by turning on Do Not Disturb (
not affect numbers you are ente ring.
You cannot pre-dial a telephone number if all the lines on your telephone are
busy.
Enterprise Edge Feature Programming Telephone Guide P0908510 Issue 02
ƒ°fi
). This does
Page 35

When the internal number you have called is busy
Priority Cal l
ƒfl·
If you get a busy signal or a Do Not Disturb message when you call someone in your
office, you can interrupt them. Use this feature for urgent calls only.
Tip
Priority calls cannot be made to Hunt Group DNs. For more informati on on
Hunt Groups see Hunt Groups
Making a priority call
1. Press ƒfl·.
2. Wait for a connection, then speak.
on page 83.
Making calls 35
A person who receives a priority call while on another call has eight seconds to
accept or block the call. For information on blocking calls see Stopping calls on
page 87. If the person does nothing, the priority call feature puts their active call,
including conference parties, on Exclusive Hold and connects your call.
Giving a telephone the ability to make priority calls
You need to start a Unified Manager session to program this feature. For more
information about programming using the Unified Manager, see the Enterprise
Edge Programming Operations Guide.
Displays
Call blocked
Please wait
Priority denied
You tried to place a priority call to another Enterprise
Edge telephone. The person you called has blocked
your call. Try to call later.
The party you are calling has eight seconds to decide
whether to accept or rej ect your priority call.
The telephone you are calling has already received a
priorit y call or is unable to receiv e priority calls.
P0908510 Issue 02 Enterprise Edge Feature Programming Telephone Guide
Page 36

36 Making calls
You can make a priority call only while your telephone displays:
221 busy
PRIORITY LATER
Calling 221
PRIORITY LATER
Do not disturb
PRIORITY LATER
On another call
PRIORITY LATER
Using Ring Again
ƒ¤
Use Ring Again when you call someone on your Enterprise Edge system and their
telephone is busy or there is no ans wer. Ring Again can tell you when they h ang up
or next use their telephone. You can use Ring Again to tell you when a busy line
pool becomes available.
Tip
The Ring Again feature cannot be used whe n cal ling a Hunt Group DN. For
more information on Hunt Groups see Hunt Groups
on page 83
Turning on Ring Again
ƒ¤
Press ƒ¤ before you hang up.
Using Ring Again cancels any previous Ring Again requests at your telephone.
Canceling Ring Again
ƒ£¤
Press ƒ£¤ to cancel a Ring Again request.
Displays
Can't ring again
Ring Again?
YES NO EXIT
You cannot use Ring Again on your current call. You
can only use Ring Again wh il e you have a busy signal
on an internal call or line pool request, or while an
internal call is ringing.
Press YES to use Ring Aga in. Pr ess NO if you prefer to
send a message.
Enterprise Edge Feature Programming Telephone Guide P0908510 Issue 02
Page 37

Time savers for making calls
Storing a number on a memory button for Autodial
You can program memory buttons for one-touch dialing of internal or external
telephone numbers.
Buttons used for lines, answer or Handsfree/Mute cannot be used as autodial
buttons. If the power to your Enterprise Edge system is off for more than three days,
autodial numbers (as well as some other system programming) may be lost f rom the
memory.
Adding an autodial button
ƒ•⁄ or ƒ•¤
1. Press ƒ•⁄ to program an external number or ƒ•¤ for an
internal number.
2. Choose a button and then enter the number as if you were dialing it.
4
When programming Autodial you can use:
• Last Number Redial
• Saved Number Redial
• destination codes (choose ∆ as th e line)
• host system signalling
Choosing a line for Autodial
To include a line selection for an external number, press the line or intercom button
before you enter the number. To select a line pool, press a programmed line pool
button, or press ∆ and enter a line pool access code.
If you select a line before pressing the autodial button, the call goes out on the line
you have selected instead of the line that is part of the autodialer programming.
For the M7100 telephone, an external autodialer can be programmed only by using
a line and not a line pool.
Tip
If you do not include a line selection in an autodial number, the call uses your
prime line (if you have one).
P0908510 Issue 02 Enterprise Edge Feature Programming Telephone Guide
Page 38

38 Time savers for making calls
Using inter c om a s th e lin e for Autodial
If you press ∆ as the line for an external autodial number, you must include
a valid line pool access code or a destination code. If line pool access codes or
destination codes are changed, remember to reprogram autodial numbers.
Displays
987___
QUIT BKSP OK
Autodial full
Button erased
Enter digits
QUIT OK
Intercom #: ___
QUIT
Invalid number
Press a button
QUIT
Program and HOLD
Continue to ente r di gits until the number is complete. Press
√ or
˙ or
The memory allott ed to autodial numbers in your Enterprise
Edge system is full.
While progr amming exter nal Aut odi al, y ou eras ed the butt on by
pressing ˙ or OK before entering any digits.
Enter the number you want to progr am (choosi ng t he line fir st if
necessary ) exactly as if you were making a call .
Enter the internal telephone number you want to prog ram.
You are programming an internal autodial button and have
entered a n umber th at is no t an int ernal nu mber on your syste m.
Enter a valid internal number . If the number you are entering is
a destination code, use external autodial .
Press the memory button you want to program.
Enter the number you want to program onto the button, then
press
˙.
BKSP
to erase an incorrect digit. Press
OK
when you are finished.
Program and OK
QUIT OK
Programmed
For other displays, see Common feature displays on page 125.
Enter the number you want to program onto the button, then
press
˙ or
selection in an autodial sequence by selecting the line before
entering any di gits.
The number is stored on the button.
OK
. You may include a line or line pool
Enterprise Edge Feature Programming Telephone Guide P0908510 Issue 02
Page 39

Time savers for making calls 39
Using Last Number Redial
ƒfi
Press ƒfi to redial the last external number you dialed.
Last Number Redial records a maximum of 24 digits.
Tip
If you have a programmed Last Number Redial button, you can use Button
Inquiry (
followed by (£) to check the last number befo re you dia l it.
ƒ•‚
), then press the Last Number Redial button
Preventing a telephone from using Last Number Redial
Last Number Redial can be restricted at individual telephones.
You need to start a Unified Manager session to program this feature. For more
information about programming using the Unified Manager, see the Enterprise
Edge Programming Operations Guide.
Displays
Hidden number
No last number
Using Speed Dial
Enterprise Edge provides two types of speed dialing: system and personal. System
Speed Dial programming allows you to assign two-digit speed dial codes to the
external numbers your co-workers call most frequently. Personal or User Speed
Dial programming allows individuals to program their own speed dial numbers.
Speed dial numbers are subject to the same restriction filters as regularly dialed
numbers. Your installer can program system speed dial numbers to bypass dialing
restrictions.
The last number you dia led was a speed dial number
that displayed a nam e rather than the number. The
number is dialed correctly, but you cannot see it.
You have not dialed an external telephone number
since the last power interruption or system reset.
Tip
You can copy a number onto an autodial button using Last Number Redia l.
Speed dial numbers may include host system signaling codes.
P0908510 Issue 02 Enterprise Edge Feature Programming Telephone Guide
Page 40

40 Time savers for making calls
Making a speed dial call
ƒ‚
1. Press ƒ‚ to quickly dial external telephone numbers that have been
programmed onto speed dial codes.
2. Enter the appropriate two-digit speed dial code.
Changing and adding System Speed Dials
System Speed Dial codes are numbered from 01 to 70. The installer assigns
numbers to System Speed Dial codes for the entire system .
Tip
There is no difference bet ween using User Speed Dial and using System
Speed Dial. They differ only in how you program them.
Adding or changing User Speed Dial
ƒ•›
To add or change a User Speed Dial number on your telephone:
1. Press ƒ•›.
2. Enter a two-digit code from 71 to 94 that you want to associate with a
telephone number.
3. To include a line selection for this number, press the line or intercom button.
To select a line pool, press a programmed line pool button, or press ∆
and enter a line pool access code. For the M7100 telephone, you can select
only a line pool.
4. Enter the number you want to program.
5. Press ˙
or
OK.
Enterprise Edge Feature Programming Telephone Guide P0908510 Issue 02
Page 41

Displays
01:9___
CANCL BKSP OK
Enter digits
QUIT OK
Time savers for making calls 41
Continue enter ing the number you want to program.
You can change the number by pressing
BKSP or
√. When you are finished , press
˙ or OK.
Enter the telephone number you want to program
exactly as if you were diali ng it n ormally. W hen you are
finished, press
˙ or OK.
Invalid code
No number stored
Program and HOLD
Program and OK
QUIT OK
Select a line
Unknown number
For other displays, see Common feature displays on page 125.
You have entered a code outside the code range
(01-70 for system, 71-94 for per sonal).
There is no number st ored on t he speed d ial co de you
have dialed.
If you want to program a line or line pool selection for
this speed dial num ber, select the line or line pool.
Otherwise, ent er the telephone number exactly as if
you were dialing it normally. When you are finished,
press
˙.
If you want to program a line or line pool selection for
this speed dial num ber, select the line or line pool.
Otherwise, ent er the telephone number you want to
program exactly as if you were dialing it normal ly.
When you are finished, press
There is no line asso ciate d with the speed dial number
you are tryin g to use. Select a free ext ern al line or l ine
pool and enter the speed dial feature code again.
The system can not dial the number stored. Reprogr am
the number.
OK.
Using Saved Number Redial
ƒfl‡
You can save the number of the external call you are on (provided you dialed the
call) so that you can call it again later. Each telephone can save one number at a time
with Saved Number Redial, not one number for each line.
Tip
You can copy a number onto an autodial button using Saved Number Redia l.
Saving a number
Press ƒfl‡ while you are on the call.
Saved Number Redial records a maximum of 24 digits.
P0908510 Issue 02 Enterprise Edge Feature Programming Telephone Guide
Page 42

42 Time savers for making calls
Dialing a saved number
Press ƒfl‡ when you are not on a call.
If you have a programmed Saved Number Redial button, you can use Button
Inquiry (ƒ•‚) to check the last number before you dial it.
Preventing a telephone from using Saved Number Redial
Saved Number Redial can be restricted at individual telephones.
You need to start a Unified Manager session to program this feature. For more
information about programming using the Unified Manager, see the Enterprise
Edge Programming Operations Guide.
Displays
Hidden number
No number saved
You have saved a speed dial number that displays a
name rather than th e numb er. The number is dialed
correctly, but you cannot see it.
You have tried to sav e the number of an incoming cal l.
You can only save numbe rs t hat you have dialed
yourself.
Enterprise Edge Feature Programming Telephone Guide P0908510 Issue 02
Page 43

Handling many calls at once
Using Hold
You can temporarily suspend a call by pressing ˙ .
When a call is on hold, its indicator flashes on all telephones that have access to the
line. The call can be retrieved from any of these telephones.
On the M7100 telephone, ˙ alternates between two lines; one active, one on
hold. The M7100 telephone cannot retrieve a call placed on hold by another
telephone.
Tip
Answered Hunt Group calls can be placed on hold at the answering Enterprise
Edge set. For more information on Hunt Groups see Hunt Groups
Retrieving a held call
You can connect to a call on hold by pressing the flashing line button of the held
call.
5
on page 83.
Holding automatically
If your line has been prog rammed with full autohold, you can switch fr om one call
to another and have your calls put on hold automatically.
Press the line button of the second caller. Your current caller is put on hold
automatically.
Listening on hold
If you have been put on hold, you can hang up the receiver while you wait for the
other person to return.
1. Press ˙.
2. Hang up the receiver.
3. Press the line button of the call. You may hear indications from the far end
that you are on hold (for example, tones or music).
P0908510 Issue 02 Enterprise Edge Feature Programming Telephone Guide
Page 44

44 Handling many calls at once
4. When the person returns, that is, you hear them through your telephone
speaker, simply lift the receiver to resume the conversation.
Tip
If Automatic Handsfree has been assigned to your telephone, you can use the
Handsfree/Mute feature instead of Listen on Hold.
Holding a call exclusively
ƒ‡·
You can put a call on Exclusive Hold so that it can be retrieved only at your
telephone.
Press ƒ‡· or ƒ˙. The line appears busy on all other
telephones, and the call cannot be picked up by anyone else in the office.
Displays
On hold: LINENAM
Using Call Queuing
ƒ°‚⁄
If you have more than one call ringing at your telephone, you can choose the call
that has the highest priority by pressing ƒ°‚⁄.
Call Queuing answers incoming external calls before callback, camped, and
transferred calls.
You have place d one or mo re cal ls on h old. Th e name
of the line that has been held the longest is displayed.
Enterprise Edge Feature Programming Telephone Guide P0908510 Issue 02
Page 45

Transferring calls
Using the transfer feature
ƒ‡‚
Transfer allows you to direct a call to a telephone in your Enterprise Edge system,
within the Enterprise Edge network, or external to Enterprise Edge.
Transferring a call
1. Press ƒ‡‚.
2. Call the person to whom you want to transfer the call.
3. If you want to talk to the person, wait for them to answer and speak to them
before proceeding.
4. When you are ready to complete the transfer, press ® or JOIN.
6
You cannot use Last Number Redial, Saved Number Redial, a speed dial code,
Priority Call or Ring Again to dial the number for a transfer.
Depending on how a private network call is routed, it may not always be possible
for the system to return a transferred call to you if the transferred call is not
answered. When transferring a call to a private network destination, stay on the line
until the person to whom you are transferring the call answers.
You cannot use the Line Pool feature code to access a line pool for a transfer. To
use a line pool, use a programmed line pool button, or press ∆ and enter a
line pool access code.
If you have an auxiliary ringer programmed to ring for calls on an external line, and
you transfer a call on that line without announcing the transfer, the auxiliary ringer
rings for the transferred call.
Transferring external calls
If an external call is transferred to a busy telephone, or not answered after a few
rings, the call automatically rings again at the telephone from which it was
transferred, and the display indicates that the telephone was busy or that no one
answered.
When transferring an external call to an external number, the external call you are
trying to transfer must be an incoming call on a disconnect supervised line.
P0908510 Issue 02 Enterprise Edge Feature Programming Telephone Guide
Page 46

46 Transferring calls
While on a conference call, you can remove yourself from the conference and
connect the other two callers using the Transfer feature. However, if both of the
other people are from outside the system, at least one of the outside callers must
have called you and both of the outside calls must be on disconnect supervision
lines.
Note: Transfer via Hold on DID lines is not supported. Once a call is answered the
line appearances on all other sets are free immediately to take other calls.
This allows a greater number of calls to be received. Use the Call Park
feature to transfer a call.
In certain situations, you may experience lower volume levels when transferring an
external call to an external person, or when transferring two external callers from a
conference call.
Canceling a transfer
You can reconnect to the person you are trying to transfer at any time before the
transfer is complete.
1. Press ƒ£‡‚ or CANCL.
2. If you are not reconnected to your original call, press ® and then press the
line key of the original call, which is now on hold.
Displays
221>222
CANCL RETRY JOIN
221 no reply
CALLBACK
Do not disturb
CANCL RETRY JOIN
Invalid number
CANCL RETRY
Line061 hung up
You are talking to the person you want to transfer the call
to. Pres s
someone else. Press
The person to whom you tried to transfer a call did not
answer. Press
reconnect to the call. On the M7100 telephone, lift the
receiver.
The person to whom you tried to transfer a cal l has Do Not
Disturb act ive on their tel ephone. Press JOIN to transf er the
call anyway. Press
else. Press
to the call (on the M7100 telephone, press
ƒ£‡‚).
You entered an invalid internal number. Press RETRY and
enter the number agai n.
The external cal ler you were transferring hung up before
the transfer was com plete.
if you decide to transf er the call to
RETRY
CANCL or the flashing line button to reconn ect
® or JOIN to transfer the call.
CALLBACK
or the flashing line button to
RETRY to transf er the call to someone
Line061>221
CANCL RETRY JOIN
Not in service
CANCL RETRY
Enterprise Edge Feature Programming Telephone Guide P0908510 Issue 02
Press
Press
you decide to tra nsfer the call to someone else.
The telephone to whi ch you are trying to transfer a call is
out of service.
to transfer the call on li ne 061 to telephone 221.
JOIN
if, after t alking to the per son at extens ion 221,
RETRY
Page 47

Transferring calls 47
Restricted call
CANCL RETRY
Still in trnsfer
CANCL RETRY
Transfer denied
CANCL RETRY
Transfer to:2___
CANCL RETRY
For other displays, see Common feature displays on page 125.
You cannot transf er the call because of teleph one or l ine
restrictions.
Complete the t ransfer i n progress be fore you acce ss a new
feature, ans wer another alerting call or select an outgoing
line.
Your transfer cannot be completed for one of these
reasons:
All the resources needed to perform a transfer ar e in use.
Try again later.
You have tried to transfer an external call to another
external par ty. Som e restrictions apply.
You cannot transfer your conference call.
Press
the person to whom you are tr ansferring the call is
unavailabl e.
if you entered the wron g inter nal num ber or if
RETRY
Using Camp-on
ƒ°¤
You can transfer an external call to another telephone, even if all of its lines are
busy.
1. Press ƒ°¤.
2. Dial the number of the telephone to which you want to camp the call.
Camped calls appear on a line button on the receiving telephone, if one is available.
If there is no line button available, you receive a message on the display and hear
Camp tones.
Each Enterprise Edge telephone can handle only one camped call at a time.
Displays
221 Camp max
CALLBACK
221 DND
CALLBACK
Camp denied
Camp to:
CANCL
You tried to camp a call to a te lephone that already has a
camped call. The cal l has come back to you. Press the
CALLBACK
On the M7100 telephone, just pick up the receiver.
The person to whom you redir ected a call has Do Not
Disturb act ive on t he tel epho ne. The cal l has c ome bac k to
you. Press the
reconnect t o the cal l. On t he M71 00 t elepho ne, just pick up
the receiver .
You have tri ed to c amp an in ternal ca ll. You c an o nly camp
external calls.
Dial the number of the int ernal telephone to which the call
is sent.
button or the lin e button to recon nect to the c all.
CALLBACK
button or the line but ton to
P0908510 Issue 02 Enterprise Edge Feature Programming Telephone Guide
Page 48

48 Transferring calls
Camped: 221
CALLBACK
Line061 hung up
Not in service
CALLBACK
Release a call
For other displays, see Common feature displays on page 125.
The telephone to whi ch you camped a call did not answer
the call. The c all has com e back to you. Press
the line button to reconnect to the call. On the M7100
telephone, just pick up the receiver.
A call you camped has come back to you, but the caller
hung up before you could reconnect.
The telephone to whi ch you have camped a call is out of
service or is being used for programming. The call has
come back to you. Press
reconnect t o the cal l. On t he M71 00 t elepho ne, just pick up
the receiver .
The line tha t the camped cal l is on i s in use or that line does
not appear at your telephone. Release the line or rel ease
an internal line.
Parking a call
ƒ‡›
You can suspend a call so that it can be retrieved from any telephone in your system.
1. Press ƒ‡›.
CALLBACK
CALLBACK
or the line button to
or
2. Use the Page feature (ƒfl‚) or press PAGE to announce the retrieval
code displayed by your telephone.
Retrieving a parked call
1. Select an internal line. (On the M7100 telephone, pick up the receiver.)
2. Dial the Call Park retrieval code.
Using Call Park
When you park a call, the system assigns one of 25 codes for the retrieval of the call.
These codes consist of the Call Park prefix, which may be any digit from 1 to 9, and
a two-digit call number between 01 and 25. For example, if the Call Park prefix is
1, the first parked call is assigned Call Park retrieval code 101.
The Enterprise Edge system assigns Call Park codes in sequence, from the lowest
to the highest, until all the codes are used. This round-robin approach means that a
greater variety of codes are used, which makes it easier for a call to reach the right
person when more than one incoming call is parked.
The highest call number (the Call Park prefix followed by 25) is used only by
analog telephones or devices connected to the system using an Enterprise Edge
ATA2 or an Enterprise Edge ASM. Analog telephones or devices cannot use the
other Call Park codes.
Enterprise Edge Feature Programming Telephone Guide P0908510 Issue 02
Page 49

Transferring calls 49
Your installer programs both the Call Park prefix and the delay before parked calls
are returned to the originating telephone. External calls parked for longer than the
programmed delay are returned to your telephone.
Tip
Answered Hunt Group calls are pa rked in the same manner as other calls. Fo r
more information on Hunt Groups see Hunt Groups
on page 83.
Call Park can be disabled by your installer.
Displays
Already parked
No call to park
Invalid number
No call on: 101
Park denied
Parked on: 402
PAGE EXIT
Parking full
For other displays, see Common feature displays on page 125.
The person you were tal king to has already parked your
call. You cannot park the same call.
You have a tt em pted to use Call Park with no acti ve call on
your telephone. If the call you want to park is on hold,
reconnect to it before you park it.
You have entered an invalid retrieval code.
There was no call on the retrieval code you entered.
You have tried to park a conference call. Split the
conference and park the cal ls separately. The person who
retrieves the calls can reconnect the conference.
Record the code shown. Use Page (ƒfl‚) or
press
PAGE to announce the call and its retrieval code.
All available retrieval codes are in use. Transfer the call or
take a message in stead.
P0908510 Issue 02 Enterprise Edge Feature Programming Telephone Guide
Page 50

50 Transferring calls
Using Callback
When you direct a call you have answered to another telephone, the system
monitors the call t o make s ure it is answered . If no one answe rs the call within a s et
length of time, the system directs it back to you.
Callback generates a variety of displays. Most occur after a set delay and are listed
in the index. Some occur immediately if the telephone to which you are directing a
call is out of service or othe rwise unavailable. These are listed with the descriptions
of the specific features such as Transfer or Camp-on.
Enterprise Edge Feature Programming Telephone Guide P0908510 Issue 02
Page 51

Forwarding your calls
Forwarding your calls to another telephone
ƒ›
ƒ›
Press
calls forwarded. You can forward your calls to an internal or external telephone. To
forward your calls to an external destination you must enter the route plus the
dialing digits of the external telephone. For example, if your system requires you to
dial 9 for external calls then you must enter 9 plus the dialing digits to forward your
calls to an external number.
You can also use Line Redirection to forward calls outside the system. Line
redirection takes precedence over Call Forward.
Canceling Call Forward
ƒ£›
Press
Using Call Forward at your telephone
and enter the number of the telephone to which you want your
.
7
When you use
ƒ›
, all calls go to the destination you select, regardless of
how Forward on busy and Forward no answer are programmed.
To allow external destination programming you need to start a Unified Manager
session. Allow redirect must be set to Yes for each set. For mor e information about
programming using the Unified Manager, see the
Operations Guide
.
Tip
If your Enterprise Edge set is a member of a Hunt Group, the Call Forward all
calls sett ing is overridden by the Hunt Group routing for Hunt Group calls. For
more information on Hunt Groups see Hunt Groups
Enterprise Edge Programming
on page 83.
If the telephone to which you forwarded your calls does not have the same external
lines as your telephone, the forwarded calls appear on intercom buttons.
If a call is forwarded, it does not ring but the line indicator flashes on your
telephone. You can answer the call by pressing the button next to the flashing
indicator.
Tip
If you are one of a group of people who regularly forwa r d their calls to one
another, be aware that it is possible to set up forward loops where a call is
forwarded from one telephone to another in a circle, and is never answered
anywhere.
P0908510 Issue 02 Enterprise Edge Feature Programming Telephone Guide
Page 52

52 Forwarding your calls
Overriding Call Forward
If you call someone who has their calls forwarded to you, your call rings at that
person’s telephone even though they are forwarding their calls to you.
Changing the automatic Call Forward settings for a telephone
Call forwarding can be programmed to forward a call when it is not answered or the
line is busy. You can also define the number of times the telephone rings before
forwarding takes place. These features must be programmed by starting a Unified
Manager session.
Changing Forward no answer
Forward no answer redirects unanswered calls to another telephone on your
Enterprise Edge system.
Tip
If the Enterprise Edge set is a mem b er of a Hunt Group, the Call Fo r w ard no
answer feature is overridden and the Hunt Group call continues to ring until
the hunt time has expired. For more information on Hunt Groups see Hunt
Groups on page 83.
Line Redirection takes precedence over Forward no answer.
For more information about changing Forward no answer using the Unified
Manager, see the Enterprise Edge Programming Operations Guide.
Changing the delay before a call is forwarded
You can assign the number of times that the incoming call rings at your telephone
before the call is forwarded. To estimate the delay time in seconds, multiply the
number of rings by six.
For more information see the Enterprise Edge Programming Operations Guide.
Forward on busy
Forward on busy redirects your calls to another telephone on your Enterprise Edge
system when you are busy on a call, or when you have Do Not Disturb activated at
your telephone. For more information about changing Forward on busy using the
Unified Manager, see the Enterprise Edge Programming Operations Guide.
Line Redirection takes precedence over Forward on busy. Calls that are redirected
by Line Redirection are not affected by any Call Forward features or Call Forward
programming.
Enterprise Edge Feature Programming Telephone Guide P0908510 Issue 02
Page 53

Forwarding your calls 53
Telephones that have Forward on busy active can receive priority calls. If you are
busy on a target line call, another call to that target line is redirected to the prime
telephone for that target line.
Tip
If the Enterprise Edge set is a mem b er of a Hunt Group, the Call Fo r w ard on
busy feature is overridden and the Hunt Group call continues to ring unti l the
hunt time has expired. For more information on Hunt Groups see Hunt Groups
on page 83.
DND on Busy
When you are busy on a call and a second call comes in, your telephone rings softly
to alert you to the second call. If you find this second ring distracting, you can have
the system prevent a second call from disturbing you by assigning Do Not Disturb
(DND) on Busy to your extension.
When DND on Busy is turned on for the set, internal and private network callers
hear a busy tone instead of ringing when you are on the telephone. External callers
are transferred to the prime set used in your system. For more information about
changing Do Not Disturb on Busy using the Unified Manager, see the Enterprise
Edge Programming Operations Guide.
If you use DND on Busy, the line indicator for an external incoming call flashes,
but your telephone does not ring.
Forward on busy takes priority over DND on Busy.
If an external call uses a target line, the call is processed according to the
programming of the target line. If the target line is busy, the caller may hear a busy
tone or be routed to the prime set for the target line regardless of the DND on Busy
programming for the telephone.
Tip
If an Enterprise Edge set is a member of a Hunt Group and the set activates
this feature, the set does not receive notification of incoming Hunt Group calls
while on a call. The DND on busy feature overrides the Hunt Group. For more
information on Hunt Groups see Hunt Groups
on page 83.
Call Forward and voice mail
If you want a voice mail system to pick up unanswered calls automatically
• use the internal number of your voice mail as the destination when you program
Forward no Answer and Forward on busy
or
• make the ring delay greater than the delay used by your voice mail system, if
your voice messaging system or service automatically retrieves calls
P0908510 Issue 02 Enterprise Edge Feature Programming Telephone Guide
Page 54

54 Forwarding your calls
Displays
Forward denied
Forward>221
CANCL
Not in service
For other displays, see Common feature displays on page 125.
There are several reasons why you may get this
message. Fo r i nstance, you cannot forward your calls
to a telephone tha t has been forwarded to your
telephone.
Your calls are being forwarded to telephone 221.
Two or more telephones are linked in a forwarding
chain, and one of them is out of service or is being
used for programming.
Line Redirection
Line Redirection allows you to send your external calls to a telephone outside the
office. You may choose to redirect all your external lines or only some of them.
Line Redirection takes precedence over the Call Forward feature. If both features
are active on a set, incoming external calls on redirected lines are routed to the
specified Selective Line Redir ection (SLR) external destination. Incoming internal
calls are forwarded to the specified Call Forward destinat ion.
You cannot use the Line Redirection feature on either a M7100 telephone or a
telephone connected to an Enterprise Edge ATA2 or an Enterprise Edge ASM.
Turning on Line Redirection
ƒ°›
1. Press ƒ°›.
2. Select the outgoing line to be used for redirected calls.
3. Enter the number to which calls are redirected (the ways you can do this are
listed below).
4. Select the lines to be redirected.
Enter the telephone number to which you want to redirect calls, using one of the
following methods:
• Press an external autodial button.
• Enter an external telephone number (using no more than 24 digits) then press
˙ or OK.
•Press ˙ or OK
if the line you have chosen as the outgoing line is a private
network line that does not require you to dial digits.
Enterprise Edge Feature Programming Telephone Guide P0908510 Issue 02
Page 55

Forwarding your calls 55
If you use ALL to redirect all your lines, it is impor tant that you wait until all the lines
on your telephone light up before pressing ˙ or OK. If you press ˙ or
OK before all the lines light up, those lines not lit are not redirected.
Tip
The line chosen for redirecti ng ca lls on other lines can be used normally when
it is not busy on a redirected call. To avoid redirection failing because the
chosen line is in use, choose a line pool with several lines in it.
The system does not check that the number you give for line redirection is a
valid one. If you redirect to an inv alid number, redirection fails . Using an
autodial butto n to enter the redirection number helps avoid this possibility. An
autodial button use d for line redirection must be programmed to use a specific
line.
Canceling Line Redirection
ƒ£°›
1. Press ƒ£°›.
2. Select the lines you no longer want to be redirected.
Allowing a telephone to redirect calls
You can turn a telephone’s ability to redirect calls on and off.
You need to start a Unified Manager session to program this feature. For more
information about programming using the Unified Manager, see the Enterprise
Edge Programming Operations Guide.
Turning the redi rec t ring for a telephone on or off
You can program a telephone to ring briefly (200 milliseconds) when a call is
redirected on one of its lines.
You need to start a Unified Manager session to program this feature. For more
information about programming using the Unified Manager, see the Enterprise
Edge Programming Operations Guide.
Tip
If a telephone has redirect ring enabled, it rings briefly for redirected calls on
one of its lines even if another telephone set up the lin e redirection.
P0908510 Issue 02 Enterprise Edge Feature Programming Telephone Guide
Page 56

56 Forwarding your calls
Displays while redirecting lines
Intercom
Line Redirection
QUIT ADD REMOVE
No line to use
Outgoing line
Pool code: ___
QUIT
Redir by 221
OVERRIDE
Redirect denied
Select line out
QUIT
You selected the intercom button as the facility on
which to place the call . Enter a line pool code or a
destination code.
Press • or ADD to begin redirection. Press £ or
REMOVE to cancel a previous redirecti on.
You have one extern al li ne on you r tel epho ne, but you
need a second line t o perform line redir ection. Redirect
your external line using a line poo l as the outgoing line.
You are attempti ng to redirect a line and the line you
have chosen is t he outgoi ng li ne you ha ve s electe d as
a destinat ion. Yo u cannot redirect a lin e to it self. Select
another lin e.
Enter a valid line pool access code.
You have attempted to redirect a line, but someone
else has already redirected that line. Press • or
OVERRIDE to override the previous redirection and
redirect the line as you want.
You can redirect calls only on individual lines.
Select the line that is used to redirect calls out of the
system.
Select line(s)
QUIT ALL
Select line(s)
ALL OK
Unequipped line
Press the lines to be redirected. To undo a line
selection , press it again. Press
lines.
Continue to pres s the l ines to be redirected. Press
˙
The line you are attempting to redirect cannot be
redirect ed because the hardware does not support
redirection.
or
OK when you are finished.
ALL to redirect all your
Displays while canceling redirection
Select line(s)
QUIT ALL
Select line(s)
ALL OK
For other displays, see Common feature displays on page 125.
Press the lines t hat are no longer to be redir ected. The
lines light up as you press them. Once you cancel
redirect ion for a line you cannot restore it by pressing
the line again. Press
your line s. When you ar e fini shed, press ˙
ALL to cancel redirection for all
OK.
Continue to pres s the l ines that are no longer to be
redirected. Press
finished.
˙
OK when you are
or
or
Enterprise Edge Feature Programming Telephone Guide P0908510 Issue 02
Page 57

Forwarding your calls 57
How Line Redirection is different from Call Forward
Call Forward forwards all calls that arrive at a particular telephone to an inter nal or
external telephone. Line Redirection redirects only the lines you specify, no matter
which telephones they appear on, to a telephone outside the Enterprise Edge
system. Line Redirection takes precedence over Call Forward.
Using Line Redirection
You redirect lines at a telephone, but once redirected, the lines are redirected for the
entire system.
You can redirect only lines that appear at line buttons on your telephone.
You can answer the telephone if it rings while you are in the middle of
programming Line Redirection, but none of the Enterprise Edge call handling
features are available until the feature times out. If you need to use an Enterprise
Edge feature to process the call, quit Line Redirection programming by pressing
ƒ
. Do not press
®
or you disconnect the call you are trying to process.
While you are programming Line Redirection you do not receive any indication of
calls that do not actually ring at your telephone.
Be careful to avoid redirection loops. If for example, you redirect your lines to your
branch office and your branch office redirects its lines to you, you can create a
redirection loop. If these calls are long distance, you end up paying charges.
In certain situations, callers may experience lower volume levels when you redirect
calls to an external location.
P0908510 Issue 02 Enterprise Edge Feature Programming Telephone Guide
Page 58

58 Forwarding your calls
Enterprise Edge Feature Programming Telephone Guide P0908510 Issue 02
Page 59

Communicating in the office
Paging
ƒfl‚
Paging allows you to make announcements over the Enterprise Edge system using
the telephone speakers, or your loudspeaker system, if one is available.
Making a page announcement
1. Press ƒfl‚.
2. Choose a page type. Page types are:
⁄ through the telephone speakers (internal page)
¤ through an external speaker (external page)
‹ both internal and external (combined page)
8
3. If necessary, choose a zone.
4. Make your announcement.
5. Press ®.
Tip
Instead of entering the Page feature code followed by the page type, you can
enter the following shortc ut codes.
Page zone 0 is all zones.
Internal ƒfl⁄ and zone (0 to 6)
External ƒfl¤ (code 2 has no zones)
Combined ƒfl‹ and zone (0 to 6)
Activatin g and deac tivat in g th e abil ity to pa g e
You need to start a Unified Manager session to program this feature. For more
information about programming using the Unified Manager, see the Enterprise
Edge Programming Operations Guide.
P0908510 Issue 02 Enterprise Edge Feature Programming Telephone Guide
Page 60

60 Communicating in the office
Creating page zones
Each telephone can be assigned to one of six zones for receiving pages.
Tip
Hunt Group DNs cannot be included in a page zone. For more information on
Hunt Groups see Hunt Groups
You need to start a Unified Manager session to program this feature. For more
information about programming using the Unified Manager, see the Enterprise
Edge Programming Operations Guide.
You can make a telephone part of a page zone only if the telephone has paging set
to Y (Yes).
A zone is any set of Enterprise Edge telephones that you want to group together for
paging, regardless of their location. The maximum number of sets in a page zone is
50.
Your installer programs whether a tone sounds before a page begins, and the
maximum number of seconds a page can last before it is automatically turned off.
on page 83.
Tip
Make sure that everyone who needs to make page announcements has a list
showing which telephones are in which page zones.
Displays
Enter zone:___
ALL
Invalid zone
Page choice:
SETS SPKR BOTH
Page timeout
Paging ALL
Enter the desired page zone number (0- 6) or press ALL.
You have entered a page zone code that is not between 0 and 6.
Select the type of page you want. See the list in Making a page
announcement on page 59.
The time allotted for paging has expired.
You are making a page. The displ ay shows t he pa ge zone you have
chosen. Press ƒ or ® when you are finished.
Paging busy
For other displays, see Common feature displays on page 125.
Enterprise Edge Feature Programming Telephone Guide P0908510 Issue 02
A page is alrea dy being made in the pag e zone y ou have request ed.
Page 61

Tip
You can make an announcement to one pers on by placing a voice call to thei r
telephone.
Using Page with external paging equipment
When you make a page that uses external paging equipment (external page or
combined page), the Long Tones feature is automatically activated for the external
paging system only. This allows you to control optional equipment with the Long
Tones feature.
Sending messages
The Messages feature allows you to leave a message on the display of another
Enterprise Edge telephone or to analog telephones connected to an Enterprise Edge
Analog Station Module (ASM). The Messages feature indicates if you have any
messages waiting.
Communicating in the office 61
The Messages feature uses a message waiting list to keep a record of your internal
messages and your (external) voice mail messages (if you subscribe to Enterprise
Edge Voice Messaging service with visual message waiting indication).
Sending a message
ƒ⁄
You can leave a message on the display of another telephone in your Enterprise
Edge system.
You can send up to four messages to different telephones, including your message
center. If your telephone is a direct-dial telephone or an Enterprise Edge CAP, you
can send up to 30 messages.
Only the designated direct-dial telephone for an analog telephone connected to an
Enterprise Edge ASM can send messages to analog telephones by pressing
ƒ⁄. Depending on the programming setup, the analog telephone provides
either a Stuttered Dial Tone or a Message Waiting Lamp to inform the user of
messages pending.
If your reply to a message is forwarded or is answered at another telephone using
the Call Pickup feature, the message remains on your telephone until you cancel it
or successfully contact the telephone that sent the message.
For analog telephones connected to an Enterprise Edge ASM, the message waiting
indicator remains on until the user invokes ˚£flfi. If the analog
telephone has the Message Reply Enhancement feature set to Yes, the message
waiting indicator is turned off automatically after the reply call is answered no
matter from where the call is answered.
P0908510 Issue 02 Enterprise Edge Feature Programming Telephone Guide
Page 62

62 Communicating in the office
For more information on the Message Reply Enhancement feature, see the
Enterprise Edge Programming Operations Guide.
1. Press ƒ⁄.
2. On a telephone with a two-line display, press
on a telephone with a one-line display.)
3. Enter the internal number of the person to whom you want to send the
message. The person’s display reads Message for you.
4. On analog telephones connected to an ASM, the message waiting indicator is
activated.
Canceling a message you have sent
1. Press ƒ£⁄. The display reads
2. Enter the internal number of the person to whom you sent the message.
Viewing your messages
ƒflfi
You can receive up to four messages from different telephones, including your
message center. A single message from your message center may pertain to several
messages.
ADD. (This step is not necessary
Cancel for:
.
On a telephone with a one-line display
1. Press ƒflfi. The display shows the first message.
2. Press • or £ to move through your messages.
On a telephone with a two-line display
1. Press
2. Press
MSG
. The display shows the first message you received.
NEXT
to move through your messages.
Replying to a message
You can call the person (or your message center) who sent a message while you are
viewing the message.
On a telephone with a one-line display
•Press ‚.
On a telephone with a two-line display
Enterprise Edge Feature Programming Telephone Guide P0908510 Issue 02
Page 63

Communicating in the office 63
•Press
CALL
.
If you want to call your message center using a line other than the programmed line,
exit your message list and dial the message center telephone number using normal
dialing methods.
Replying to a message using an analog telephone connected to an ASM
On an analog telephone connected to an ASM
•Press ˚•flfi. The system automatically retrieves and connects the
user to the oldest message sender. (The message can originate from either the
designated direct-dial telephone or the internal voice mail system.)
If the analog telephone has the Message Reply Enhancement feature set to Yes, and
the sender is the designated direct-dial telephone, the message waiting indicator is
turned off automatically after the reply call is answered, no matter from where the
call is answered.
For analog telephones connected to an ASM, using the Message Waiting Reply
feature (˚•flfi), retrieves only internal messages sent to the user.
Analog telephones connected to an ASM cannot retrieve external messages by
using the Message Waiting Reply feature (˚•flfi). For external
messages, users must call back the external voice mail center to retrieve their
messages. When doing so, the message waiting indicator on the analog telephone is
turned off automatically.
Tip
If Enterprise Edge Voice Messaging is not installed, only the designated
direct-dial tele phone can send messages to an analog telephone connected to
an ASM using ƒ⁄. The analog telephone can in turn invoke a
single digit access code to reach the designated direct-dial telephone and
retrieve messa ges.
If the designated direct-dial telephone of an analog telephone connected to an
ASM is changed, messages sent by the previous designated direct-dial
telephone are kept in the incoming message list of the analog telephone until
they are retrieved.
Removing items from your message list
You can erase a message while you are viewing it in your message list. If the
message is from your message center, this only erases the message notification at
your telephone. You need to erase the message at your message center. Refer to
your message center documentation.
On a telephone with a one-line display
•Press ˙.
On a telephone with a two-line display
•Press
P0908510 Issue 02 Enterprise Edge Feature Programming Telephone Guide
ERASE
.
Page 64

64 Communicating in the office
Removing items from your message list using an analog telephone connected to an ASM
To remove both internal and external messages on an analog telephone connected
to an ASM
•Press
˚£flfi
to invoke the Cancel Message Waiting feature.
On analog telephones connected to an ASM, the Cancel Message Waiting feature
cancels the oldest message received. The system no longer provides either a
Stuttered Dial Tone or a Message Waiting Lamp if there are no messages pending.
Viewing messages you have sent
ƒ⁄
On a telephone with a two-line display, you can view the messages you have sent.
1. Press
2. Press
3. Press
ƒ⁄
SHOW
to display your first sent message.
NEXT
to move through your sent messages.
.
Displays
Cancel denied
Cleared>LINENAM
NEXT
You have entered an invalid number when attempting to cancel a
message.
You have cleared an external message from your me ssage waiting
list. The message itself exists in your message cent er until you erase
it there.
In use: 221
L061:LINENAMVMsg
NEXT CALL CLEAR
Message denied
Message list
SHOW ADD EXIT
Message to:
Messages & Calls
MSG CALLS
You are trying to call from your message waiting list. The line that
you are tryi ng to use is being used by the ident ified Ent er prise Edg e
user.
You are viewing your message list. The display shows the num ber
and name of the line tha t was used for your message.
You have tried to sen d a message to an invalid int ernal number or to
a telephone that is out of service.
SHOW
appears only if you have outstanding messages. Pres s
to review messages you have sent. Press
message.
Enter the internal number of the tel ephone to whi ch you want to s end
a message.
You have one or more messages and one or more new Call Logs.
Press ƒ°‚fl to change the first line of the di splay to
the current time and date.
ADD
to send a new
SHOW
Enterprise Edge Feature Programming Telephone Guide P0908510 Issue 02
Page 65

Communicating in the office 65
No button free
No number stored
Start of list
NEXT
Their list full
Your list full
For other displays, see Common feature displays on page 125.
You have no line butt on fr ee with which to reply to a message.
There has been no number programmed for the message center .
Contact your voice messaging service provider.
You are at the beginning of your list of messages. Press NEXT to
move through you r m essages.
You are tryi ng to send a message to a user whose mess age wait ing
list is full.
You have tried to sen d a mess age but your telephone’s list of sent
messages is full. Cancel one of the messages you have sent, if
possible, or wait until you have received a reply to one of those
messages.
Using Voice Call
ƒflfl
You can make an announcement or begin a conversation through the speaker of
another telephone in the system.
Tip
Hunt Groups cannot accept voice calls. Answer button s ha ve no ap pearances
for voice calls, and the set does not ring for voice calls. For more information
on Hunt Groups see Hunt Groups
Answer buttons see Answer buttons
on page 83. For more information on
on page 22.
Making a Voice Call
Press ƒflfl.
Muting Voice Call tones
When a voice call begins at your telephone, you hear a beep every 15 seconds as a
reminder that the microphone is on. To stop it from beeping, pick up the receiver or
press © .
Answering a Voice Call witho ut to uc hing y ou r telep hone
If Handsfree Answerback is assigned to your telephone, you can respond to a voice
call without touching the telephone. Handsfree Answerback is not available to the
M7100 telephone.
When someone makes a voice call to you, simply start talking. Your telephone’s
microphone picks up your voice. Once you have answered a voice call, you can pu t
it on hold, transfer it, or otherwise treat it as a normal call.
P0908510 Issue 02 Enterprise Edge Feature Programming Telephone Guide
Page 66

66 Communicating in the office
Preventing Voice Calls to your telephone using Voice Call Deny
ƒ°°
Press
. Voice calls ring like regular internal calls. Your other calls
proceed normally.
Canceling Voice Call Deny
ƒ£°°
Press
.
Displays.
Dial voice call
Microphone muted
No voice call
Voice call
Dial the internal number or press the internal autodial button of the
person to whom you want to speak.
Your handsfree microphone is muted. Press © or pickup your
receiver to respond to the voice call.
The telephone receiving the call cannot accept voi ce calls for one of the
following reasons: it is active or ringing with another call; Cal l Forward is
turned on; Do Not Dist urb is t urned on; Voice Cal l Deny is tur ned on; it is
not an Enter prise Edge t elepho ne. Your cal l pro ceeds aut omat icall y as a
regular ringing call.
The line is open for you to speak.
Enterprise Edge Feature Programming Telephone Guide P0908510 Issue 02
Page 67

Tracking your incoming calls
Using Call Log
Telephones can automatically log Call Display information for calls on an external
line. The line must appear on that telephone but it does not have to be a ringing line.
If your system is equipped with the appropriate equipment and you have subscribed
to the call information feature supplied by your service provider, you are able to
capture information about incoming callers in your call log. The same feature is
supplied by an ISDN service package that comes with calling line identification
(CLID).
Call Log creates a record of incoming external calls. For each call the log can
contain:
• sequence number in the Call Log
• name and number of the caller
• indication if the call was long distance
• indication if the call was answered (and identity of who answered it)
9
• time and date of the call
• number of repeated calls from the same source
• name of the line on which the call came
Call Log can help you to
• keep track of abandoned or unanswered calls
• track patterns for your callers (for example volume of calls and geographical
location of calls)
• record caller information quickly and accurately
• build a personal telephone directory from log items
The long distance indicator and the caller’s name and number, may not be shown in
the log, depending on the Call Display services provided by your local telephone
company and the caller’s local telephone company.
To use the features on the following pages, your telephone must have spaces
available in its Call log. Your installer programs each telephone with an appropriate
number of spaces.
P0908510 Issue 02 Enterprise Edge Feature Programming Telephone Guide
Page 68

68 Tracking your incoming calls
Call Log options
ƒ•°›
You can select the type of calls to be stored in your Call Log. Choose from four
Autolog options: No one answered, Unanswerd by me, Log all calls, No autologging.
1. Press ƒ•°›. The display shows the current option.
2. Press £
3. Press ˙ or
NEXT to change the option.
or
OK to select the display option.
Logging a call manually
ƒ°⁄‹
If your calls are not automatically logged, you can manually log call information
when you are connected to an external call. Storing information for your current call
can be helpful in many situations. For example, you may want to
• record a caller’s information without using paper and pencil
• record only selected calls that you choose, as opposed to using Call Log
automatically
• quickly record caller information before a caller hangs up
Press ƒ°⁄‹ to log an external call manually.
Deleting old log items
ƒ°⁄fi
Your log has a set number of items that it can hold. When it becomes full, new calls
cannot be logged. When your log is full, Autobumping automatically deletes the
oldest Call Log item when a new call is logged.
Press ƒ°⁄fi to enable autobumping.
Press ƒ£°⁄fi to disable autobumping.
Viewing your Call Log
ƒ°⁄¤
To view your log:
1. Press ƒ°⁄¤. The display shows the number or previously read
items (old) and the number of new, unread items (new) in the log.
2. Press •
3. Press ‚ or
OLD to view old items; press £
or
RESUME to display the last item you viewed, the last time you
NEW to view new items.
or
viewed your Call Log.
Enterprise Edge Feature Programming Telephone Guide P0908510 Issue 02
Page 69

Tracking your incoming calls 69
Names and numbers for external callers are displayed only if you have subscribed
to Call Display services from your local telephone company.
Viewing a Call Log item
Press √ or MORE to view the information for a call log item.
Erasing log items
You should routinely erase log items that you’ve read, to make space for new items
in your log.
1. Display the item you want to erase.
2. Press ˙
or
ERASE.
3. Press ® to exit.
If you accidentally erase an item, you can retrieve it.
1. Press ˙
UNDO immediately after accidentally erasing an item.
or
2. Press ® to exit.
Making a call using Call Log
You may find it helpful to place calls from within your Call Log. The number stored
for each call may vary depending on the type of call. For example, if the call was
placed from a Centrex or PBX system, the first few numbers may need to be
trimmed before you can make the call. If the number you want to call is long
distance, or if you want to use a line pool, you may need to add numbers.
To place a call:
1. Display the log item for the call you want to place.
2. Display the associated telephone number.
3. Press √
TRIM, once for every digit that you want to remove.
or
4. Dial any extra digits required.
5. Press an external line or line pool button.
6. Lift the receiver. (This is not necessary if Handsfree is programmed at your
telephone.) The displayed number is dialed.
P0908510 Issue 02 Enterprise Edge Feature Programming Telephone Guide
Page 70

70 Tracking your incoming calls
Creating a password to your Call Log
ƒ•°fi
To access your Call Log through a password:
1. Press ƒ•°fi. The displays reads New passwrd:.
2. Enter your four-digit password. The display reads Repeat New:.
3. Re-enter your four-digit password. The display reads
Password changed, which
confirms that your password has been assigned.
To enter Call Log using your password:
1. Press ƒ°⁄¤ to enter Call Log. If you have programmed a
password, the display reads
Password:.
2. Enter your four-digit password.
If you forget your Call Log password, it can be deleted in programming from the
Unified Manager. For more information about programming using the Unified
Manager, see the Enterprise Edge Programming Operations Guide.
Changing your Call Log password
ƒ•°fi
1. Press ƒ•°fi. The display reads Old passwrd:.
2. Enter your old password. The display reads New passwrd:.
3. Enter your new four-digit password. The display reads
Repeat New:.
4. Re-enter your password. The display reads Password changed, which confirms
that your password has been changed.
Deleting an assigned pass word
ƒ•°fi
1. Press ƒ•°fi. The display reads
Old passwrd:.
2. Enter your old password. The display reads New passwrd:.
3. Press ˙
OK. The display reads No pswd assigned, which confirms that
or
your password has been deleted.
Enterprise Edge Feature Programming Telephone Guide P0908510 Issue 02
Page 71

Tracking your incoming calls 71
Programming a telephone to log calls automatically
Your installer can program each telephone to automatically log calls coming in on
a line.
Displays
1:Unknown name
1:Unknown number
12:KATE SMITH
NEXT ERASE MORE
12¯KATE SMITH
NEXT ERASE MORE
12§KATE SMITH
NEXT ERASE MORE
49/1234567890123
NEXT ERASE MORE
Call(s) bumped
Hold or release
The caller's name is unavailable.
The caller’s number is unavailable.
_ indicates a new item.
¯ indi cates that the call was answere d.
§ indi cates a long distance call.
/ indicates th at the s tored num ber has b een shor tened
to its final 11 di git s. Press
display addi ti onal information about t he call.
One or more log entries have been deleted by the
Autobumping feature while you are looking at the Call
Log.
Hold or release your active call before entering Call
Log.
√ or MORE to
In use: SETNAME
Jan 4 9:00a 3X
NEXT ERASE MORE
Line061 ¯227
NEXT ERASE MORE
Line061 ¯Logit
NEXT ERASE MORE
Line061
NEXT ERASE MORE
Messages & Calls
MSG CALLS
The external l ine is in use.
The repeat call counter, shown along with time and
date, indi cates the number of call s you have received
from the same caller.
This call was answered at another telephone (227).
This call was logged m anually.
This call was not answered.
There are one or more items in your message waiting
list, and there are one or more new items in your Call
Log. Press
line of the displ ay to the current time and date.
ƒ°‚fl to change the first
P0908510 Issue 02 Enterprise Edge Feature Programming Telephone Guide
Page 72

72 Tracking your incoming calls
New calls begin
No info to log
No log assigned
No resume item
For other displays, see Common feature displays on page 125.
You have viewed your las t old log item and now view
your new log items.
No informati on is av ailable for the call.
No log space has been assigned to the telephone.
The resume item has been removed because of
Autobumping, repeat call update, or log real location
while you are looking at the Call Log.
Using voice mail
If you subscribe to Enterprise Edge Voice Messaging, you can access that service
through your Enterprise Edge system. Note that a software keycode is required for
Enterprise Edge Voice Messaging. Your installer programs your Enterprise Edge
telephone to indicate when you have a voice message waiting on a particular line.
Enterprise Edge Feature Programming Telephone Guide P0908510 Issue 02
Page 73

Customizing your telephone
Finding out what a button does using Button Inquiry
ƒ•‚
You can check the function of any line, intercom, or programmed button on your
Enterprise Edge telephone by pressing ƒ•‚. On the M7100 telephone
Button Inquiry shows your internal number followed by the function assigned to
your single memory button.
Displays
10
061 <LINENAME>
SHOW OK
123456789012345...
VIEW‚ OK
221 <SETNAME>
NEXT VIEW‚
<Feature name>
SHOW OK
Press a button
EXIT
For other displays, see Common feature displays on page 125.
The display shows the number and name of the line.
Press SHOW to view the redirec tion status of the line.
Press
that is too long to fit on the display. Press ˙
or
OK
The display shows the directory number of the
telephone, and the assigned name. Press
the first lin e assigned to ring at the intercom button.
The name of the feature assigned to a button is
displayed when you press the button. Press
SHOW
Press the but ton yo u want to ch eck. Press ƒ
or EXIT
or press
£
when you are done.
for additional information.
when you are finished .
VIEW‚
or
·VIEW
o view a number
t
NEXT to see
£ or
Making the display darker or lighter using Contrast adjustment
ƒ•‡
1. Press ƒ•‡.
2. Press a number on the dial pad to choose the contrast level you prefer.
3. Press ˙ to save your setting.
On a two-line telephone, you can use the UP and DOWN display buttons to adjust the
contrast. The number of contrast levels available varies from one telephone model
to another.
P0908510 Issue 02 Enterprise Edge Feature Programming Telephone Guide
Page 74

74 Customizing your telephone
Changing the language on the display
You can select the language used on the display of each Enterprise Edge telephone.
Enterprise Edge software supports three languages: English, French and Spanish.
Button caps are available for each language. When your system is first installed, all
telephones use English.
If you program ƒ•fi‚⁄ on to a memory button, you can press that
button until the language you want appears on the display. You cannot program
ƒ•fi‚¤ or ƒ•fi‚‹ onto a memory button.
English
Press ƒ•fi‚⁄.
French
Press ƒ•fi‚¤.
Spanish
Press ƒ•fi‚‹.
Programming a feature code onto a memory button
You can program a feature code onto a memory button. In some cases, pressing the
button a second time cancels the feature.
Programming feature buttons
ƒ•‹
Any memory button not programmed as an external or internal line, target line,
Answer button, or Handsfree/Mute button, is available for features.
1. Press ƒ•‹.
2. Press the memory button you want to program with a feature.
3. Enter the appropriate feature code you want to assign onto the button.
The following feature codes cannot be programmed onto a memory button: Long
Tones and any code beginning with • except ƒ•fi‚⁄ (Language
Choice) and ƒ•‡ (Contrast Adjustment).
Tip
When you program a button with the line pool feature code, you must enter a
line pool access code after the feature code. The programmed line pool button
accesses a speci f ic line pool, not the line pool feature.
Enterprise Edge Feature Programming Telephone Guide P0908510 Issue 02
Page 75

Erasing a featur e bu tton
1. Press ƒ•⁄.
2. Press the feature button.
3. Press ˙ or OK to erase the button.
Displays
Customizing your telephone 75
<Feature name>
SHOW OK
Enter code:
F__
QUIT CLEAR
Feature code:
QUIT
Feature moved
Press a button
EXIT
Program and HOLD
Program and OK
QUIT OK
The name of the feature assigned to a button is
displayed when you press the button.
when there i s more i nformat ion availabl e. Press
SHOW
for additional i nformation.
If you are checking a speed dial button, enter the
two-digit speed dial code that you want to check.
Enter the feature code, or press ® or
programming or
entered. The syst em accepts the entry as soon as you
enter a valid feature code.
Press ƒ and enter the f eature code yo u want
to assign to t he button. You cannot enter inva lid codes.
You have programmed a button with a feature that was
already pr ogrammed onto an oth er butt on. The fe ature
has moved to the button you just programmed. Its
original button is now blank.
Press the but ton yo u want to ch eck. Press ƒ
EXIT
or
Enter the number you want to program and press
when you are finished.
CLEAR
to clear t he number s you have
SHOW
appears
QUIT
£ or
to quit
˙. To erase the button, just press
˙.
Enter the number you want to program and press OK.
To erase the button, just press
˙
OK
.
or
For other displays, see Common feature displays on page 125.
P0908510 Issue 02 Enterprise Edge Feature Programming Telephone Guide
Page 76

76 Customizing your telephone
Applying button cap labels
Before you apply button labels, activate the Button Inquiry feature (ƒ•‚)
to verify the button functions, and to avoid activating features as you put the labels
onto the buttons. For more information r efer to Finding out what a button does using
Button Inquiry on page 73.
Tip
Keep the extra labels and button caps with each Enterprise Edge telephone.
Types of but t on caps
• Unlabeled, clea r butt o n caps
with appropriate green or grey paper for typing in line numbers, telephone
numbers, and features
• Pre-printed, colore d button caps
in green or grey
Some examples of pre-printed button caps
Green caps Grey caps
¬ µ
© ß
Tip
To make identification of line types easier, us e preprinted green button cap s
for lines that support incoming and outgoing calls. Use cle ar button caps for
target lines that are incoming only.
Identifying the telephones
1. Write the individual telephone numbers on the labels and attach them to the
appropriate Enterprise Edge telephones.
2. Write the telephone number and the internal number on the appropriate
receiver card for each type and color of telephone that is to be installed.
3. Cover the receiver card underneath the receiver of each telephone with the
plastic lens.
Enterprise Edge Feature Programming Telephone Guide P0908510 Issue 02
Page 77

Enterprise Edge default button assignments
During Startup, the Enterprise Edge installer chooses one of the available templates.
Default features are assigned automatically to the programmable buttons on
Enterprise Edge telephones, and vary with the template and the telephone. The
default features are listed in the following tables in this chapter.
Tips
Enterprise Edge telephones are shipped from the fac tory with the button caps
in place for the PBX template.
Please consult your customer service representative to determine the type of
template programmed into your system before applying button assignments.
Rules of default button assignment
Line and Intercom buttons are assigned by default templates and can be changed in
programming. Handsfree/Mute and answer buttons are not assigned by default. If
these features are defined, however, they are automatical ly assigned to specific
buttons, as described on this and the following page. None of these buttons can be
assigned to M7100 telephones.
Customizing your telephone 77
The Handsfree/Mute feature appears on the bottom right-hand button, moving the
Intercom button(s) up one position.
Each telephone can have up to eight Intercom buttons. They appear above the
Handsfree/Mute button at the bottom right-hand position on your telephone.
Each telephone can have up to four answer buttons. They appear above Intercom
buttons in the right column and continue up from the bottom in the left column,
replacing the features on those buttons.
External line buttons appear in ascending line order, starting at the top button in the
left column (the top button on the M7208 telephone). If more than five external
lines are assigned to a M7310 telephone, or more than 12 to a M7324 telephone,
assignment continues down the buttons on the right column, erasing the features on
those buttons. Line buttons have priority over feature access buttons but not
Handsfree/Mute, Intercom, or answer buttons.
P0908510 Issue 02 Enterprise Edge Feature Programming Telephone Guide
Page 78

78 Customizing your telephone
M7310 and M7208 telephone button de faults
The default button assignments for the M7310 and M7208 telephones depend on
the template applied. The exception is the default numbering for the dual memory
buttons. Refer to Understanding the telephone buttons
Dual memory buttons example
∫
Set 233
∫
Set 221
∫
Set 234
∫
Set 222
∫
Set 235
∫
Set 223
∫
Set 236
∫
Set 224
…
∫
Set 227
…
∫
Set 228
…
∫
Set 229
…
∫
Set 230
This example shows defaults for a system with three-digit internal numbers. The
defaults do not actually exist on any telephone, as no telephone has an autodial
button for itself. The position that would be taken by the autodial button for itself,
is blank.
on page 12.
M7310 template button assignments
PBX DID
∂ ¬
† †
∞ ∞
œ œ
π π
ç ç
µ µ
≈ ≈
∆ ∆
∆ ∆
M7208 template button assignments
PBX DID
œ ¬
† †
µ µ
π π
ç ç
ß ß
∆ ∆
∆ ∆
Enterprise Edge Feature Programming Telephone Guide P0908510 Issue 02
Page 79

Customizing your telephone 79
M7324 telephone button defaults
The default button assignments for the M7324 telephone depend on the template
applied. Refer to Understanding the telephone buttons
PBX DID
∫ ∞ ç ∫ ∞ ç
∫ ß † ∫ ß †
∫ µ ∂ ∫ µ ∂
∫
∫ ∫ ≈ ∫ † ≈
∫ ∫ π ∫ ¬ π
∫ ∫ ∆ ∫ ∫ ∆
∫ ∫ ∆ ∫ ∫ ∆
∫Saved No.
œ ∫
∫Saved No.
on page 12.
œ
M7100 telephone button defaults
For all templates, the one programmable button on the M7100 telephone is
µ
.
Moving line buttons
ƒ•°⁄
You can move external lines to different buttons on your telephone to arrange your
lines in the way that makes the most sense to you.
You cannot move intercom, answer or Handsfree/Mute buttons onto a CAP module.
1. Press
2. Press the line button you want to move.
3. Press the button to which you want to move the line.
4. Press
ƒ•°⁄
®
.
Tip
The default Page button activates the External Page option
(ƒfl¤).
.
P0908510 Issue 02 Enterprise Edge Feature Programming Telephone Guide
Page 80

80 Customizing your telephone
Displays
Exchanged
Invalid location
Move line from:
QUIT
Move line to:
QUIT
Press a line
The two buttons you sel ected have exchanged
position.
You have tried to move a line to a button that cannot
be used as a line button, such as an intercom button,
Handsfree/Mute button, or an answer butto n.
Press the butto n of the line you want to move. Press
ƒ
lines.
Press the button you want to move the line to. Neither
of the buttons is erased. The lines, or the line and
feature, sim ply switch places.
The button you are trying to move is not a line button.
If you are trying to switch a line and a feature, move the
line to the feature button and not t he feature button to
the line.
Changing the type of ring
ĥfl
You can choose one of four distinctive rings for your telephone. This makes it easier
to identify your telephone in an open office.
QUIT when you have finished moving
or
1. Press
ĥfl
2. Press ⁄, ¤, ‹, ›, or
3. Repeat until you hear the ring you prefer, then press
Adjusting the Ring volume
ƒ•°‚
1. Press ƒ•°‚. The telephone rings.
2. Press √ to adjust the volume; left end for lower and right end for
higher.
.
NEXT. You hear the selected ring for two seconds.
˙ or OK.
Enterprise Edge Feature Programming Telephone Guide P0908510 Issue 02
Page 81

Hiding the message or calls indication
ƒ°‚fl
The display that shows you have messages or calls can be replaced with the current
time and date. You can retrieve your message and call information by using the
display buttons that appear on the second line of the display.
If you are using a telephone with a single-line display, the message or call indication
is hidden.
1. Press ƒ°‚fl. The current time and date appears on the top line of
the display.
2. Press MSG or ƒflfi to see your messages, or press CALLS or
ƒ°⁄¤ to see your calls.
Restoring the messages and calls indication
Press ƒ£°‚fl.
Customizing your telephone 81
P0908510 Issue 02 Enterprise Edge Feature Programming Telephone Guide
Page 82

82 Customizing your telephone
Enterprise Edge Feature Programming Telephone Guide P0908510 Issue 02
Page 83

Hunt Groups
The Hunt Groups feature allows a group of Enterprise Edge sets to be called by a
single directory number ensuring that calls are easily routed to the appropriate
group.
Hunt Groups are used in situations where a group of people performing the same
task are required to answer a number of related phone queries. Some typical uses of
Hunt Groups are:
• a sales department answering questions on product prices or availability
• a support department answering questions concerning the operation of a product
• an emergency department answering calls for help.
Hunt Groups can be used to route calls to a support service such as a Help Line for
a software company. Specialists dealing with Product A can be in one group, and
specialists dealing with Product B can be in another group. Incoming calls hunt for
the next available set in the group. If no set is available, the call can be placed in a
queue or routed to an overflow set.
11
You need to start a Unified Manager session to program this feature. For more
information about programming using the Unified Manager, see the Enterprise
Edge Programming Operations Guide.
Programming changes can be made to the following Hunt Group settings:
• members of a group and member position in a group
• what lines are assigned to a group
• how incoming calls are distributed
• how long the system looks for available members
• where a call goes if all members are busy
Features affected by Hunt Groups include:
• Call Forward All Calls
• Call Forward No Answer
• Call Forward on Busy
• Group Pickup
• Transfer via Hold
• Priority Call
• Line Redirection
• Page Zones
• Voice Call
P0908510 Issue 02 Enterprise Edge Feature Programming Telephone Guide
Page 84

84 Hunt Groups
Members of the group
Members of the group can be any Enterprise Edge set, or portable. An Enterprise
Edge set can be in more than one Hunt Group but is considered a member in each
Hunt Group, increasing the total number of members in the system.
There can be only one appearance of the same Hunt Group on a set. Hunt Group
DNs cannot be members of other Hunt Groups. A DN can be associated with a
member of a Hunt Group and is called a member DN.
Distribution mode
There are three modes of call distribution:
• Broadcast—rings each set in the group simultaneously. Calls are handled one at
a time; other calls are queued. As soon as a call is picked up, the call next in the
queue is presented to the Hunt Group without having to wait for queue time-out.
• In Broadcast mode, a single incoming call rings simultaneously at all the sets in
a group. This way, all receptionists in the group can share the load of answering
large volumes of calls. All sets automatically display the calling line
identification (CLID), if available. A familiar example is a fund-raising
campaign where a group of operators are waiting to take each call as it comes in.
• Linear—starts the call at the first set in the Hunt Group and distribution is
complete when the first free set has been found. Simultaneous calls can be
presented. Distribution is order based.
• In Linear mode, you can program your top salesperson to be the first member
of the group to receive incoming calls.
• Rotary—the call starts at the set after the one which answered the last call.
Distribution is complete when the next free set has been found. Simultaneous
calls can be presented. Distribution is order based.
• In Rotary mode, you can ensure that all your helpline people are receiving calls
on an equal basis, rather than one person receiving the majority of calls. The call
rings at one set at a time in a round robin fashion.
If a Hunt Group has available members but nobody answers the call, the call is
routed through the Hunt Group list until either someone answers the call or the
queue time-out occurs. In the latter case, the ca ll is routed to the overflow position.
Once a call goes to the overflow position it is no longer a Hunt Group call.
For information about Hunt Groups and software packaging, see the Enterprise
Edge Programming Operations Guide.
Enterprise Edge Feature Programming Telephone Guide P0908510 Issue 02
Page 85

Telephone features
Installing Enterprise Edge telephones
If you are connecting an Enterprise Edge telephone for the first time, refer to the
following illustrations as a guide.
Installing an Enterprise Edge telephone
12
Connect to
jack wired from
distribution block
Connect to
receiver
P0908510 Issue 02 Enterprise Edge Feature Programming Telephone Guide
Page 86

86 Tele phone features
Mounting an Enterprise Edge telephone on the wall
12
34
56
Naming a telephone or a line
You can assign names to identify external lines, target lines, and your co-workers’
telephones. During a call, the name (if programmed) is shown on the telephone
display instead of the external line number or internal telephone number of the
caller. You need to start a Unified Manager session to program this feature. For
more information about programming using the Unified Manager, see the
Enterprise Edge Programming Operations Guide.
Enterprise Edge Feature Programming Telephone Guide P0908510 Issue 02
Page 87

Telephone names and line names can contain both letters and numbers, but cannot
be longer than seven characters. You cannot use the # and * symbols.
Moving telephones
If automatic telephone relocation i s enabled in programming by your installer, you
can move your telephone from one Enterprise Edge jack to another without losing
any of its custom programming.
Telephone features 87
Tip
You can give the same name to two or more telep hones, or to a telephone and
a line in your system. To avoid confusion, avoid such duplication. Use
initials, abbreviations, or even nicknames to give each telephone a unique
name.
If automatic telephone relocation is turned on, the name and internal number
of a telephone are sav ed if the telephone is moved within your system.
You may be required by law to report any telephone moves to your local
telecommunicati ons carrier or 911 service provider. For further details ,
consult your local ca rrier, your local 911 service provider, and/or your local
telecommunicati ons service provider.
Stopping calls from ringing at your telephone using Do Not Disturb (DND)
ƒ°fi
Stopping calls
Press ƒ°fi to stop calls from ringing at your telephone.
Only priority calls ring at your telephone. A line button flashes when you receive a
call, but the call does not ring.
Refusing to answer a call
While you are on a call, you can refuse to answer a second call (including a priority
call).
Press ƒ°fi while your telephone is ringing.
Canceling Do Not Disturb
ƒ£°fi
Press ƒ£°fi.
P0908510 Issue 02 Enterprise Edge Feature Programming Telephone Guide
Page 88

88 Tele phone features
Displays
Allow calls
Your telephone r eceives calls normally.
Using Do Not Disturb
Once you turn Do Not Disturb on, calls are forwarded to the prime telephone only
if there is no other telephone on which the line appears. If there is another telephone
that shares the same line, the call may be answered by that person. (The Delayed
Ring Transfer feature transfers all unanswered calls to the prime telephone after a
specified time.)
Do Not Disturb prevents voice calls from alerting at your telephone. Voice calls are
presented as normal intercom calls.
Tip
Enterprise Edge sets that are members of a Hunt Group can temporarily leave
a Hunt Group by activating this feature. Hunt Group calls arriving while a set
is in Do Not Disturb mode are routed to the next member in the Hunt Group.
For more information on Hunt Groups see Hunt Groups
Using Background Music
on page 83.
ƒ°fl
Listen to music through your telephone speaker by pressing ƒ°fl.
Your installer makes this feature available to all telephones in programming. You
need to supply a music source, such as a radio, and have it attached to your
Enterprise Edge system.
In accordance with U.S. copyright law, a licen se may be required from the
American Society of Composers, Authors and Publishers or a similar
organization if radio or TV broadcasts are tran smitted through the
Background Musi c fea ture of this telecommunication system.
Northern Telecom Inc. hereby disclaims any liability arising out of the
failure to obtain such a lice nse.
Turning Background Music off
The music stops automatically if you make or answer a call or if you press
ƒ£°fl.
Enterprise Edge Feature Programming Telephone Guide P0908510 Issue 02
Page 89

ISDN PRI
Integrated Services Digital Network (ISDN) technology provides a fast, accurate
and reliable means of sending and receiving data, image text and voice information
through the telephone system.
Using ISDN Primary Rate Interface (PRI) allows for faster transmission speeds and
the addition of a variety of powerful business applications, including remote LAN
access, videoconferencing, file transfer, and Internet access.
Your installer configures your ISDN services and terminal equipment.
Benefits
PRI is economical because separate analog trunks and data circuits are not needed
for Direct Inward Dialing (DID), Direct Outward Dialing (DOD) and data transfer.
With PRI there is greater flexibility because B channels can be dynamically
reconfigured to accommodate changes in traffic with the Call by Call feature. For
more information see Call by Call service selection for PRI on page 91.
13
PRI offers fast information access because channel usage is optimized to allow you
the full benefit of available bandwidth and real-time connectivity.
PRI lines are configured as DID lines. Incoming calls on a PRI line can appear on
a DID button or on an intercom button depending on how your Enterprise Edge set
has been configured. Outgoing calls are made from the intercom buttons.
PRI lines can be accessed from all devices such as Enterprise Edge sets and wireless
sets.
ISDN PRI features
Selected ISDN network features can be used from an Enterprise Edge telephone.
Your central office switch (ISDN network) determines which features are available
to you.
Network Name Display for PRI
Your Enterprise Edge system displays the name of an incoming call when it is
available from the service provider. Name information can be displayed on an
Enterprise Edge set. If the Calling Party Name has the status of “private” it may be
displayed as “Private name”. If the Calling Party Name is unavailable it may be
displayed as “Unknown name”.
Your Enterprise Edge system displays the name of the called party on an outgoing
call, when it is provided by your service provider.
P0908510 Issue 02 Enterprise Edge Feature Programming Telephone Guide
Page 90

90 ISDN PRI
Your Enterprise Edge system sends the Business Name concatenat ed wit h the set
name on an outgoing call but only after the Business Name has been programmed.
The available features include:
• Receiving Connected Name
• Receiving Calling Name
• Receiving Redirected Name
• Sending Connected Name
• Sending Calling Party Name
Consult your customer service representative to determine which of these features
is compatible with your service provider.
Name and number blocking for PRI
When activated, ƒ°⁄· allows you to block the outgoing name
and/or number on a per-call basis. Name and number blocking can be used with an
Enterprise Edge set.
Consult your customer service representative to determine whether or not this
feature is compatible with your provider.
Emergency 911 Dialing
Enterprise Edge with the ISDN PRI feature is capable of transmitting the telephone
number and internal extension number of a calling station dialing 911 to the Public
Switched Telephone Network. State and local requirements for support of
Emergency 911 Dialing service by Customer Premises Equipment vary. Consult
your local telecommunications service provider regarding compliance with
applicable laws and regulations.
If transmission of internal extension numbers is not required or desired, then it is
recommended that you maintain a site map or location directory that allows
emergency personnel to rapidly locate an Enterprise Edge set given its DID number.
This list should be kept up to date and readily available, and can be included in the
Programming Record.
2-way DID
With PRI the same lines can be used f or receiving direct inward dialing (DI D) and
for making direct outward dialing (DOD) calls.
The dialing plan configured by your customer service representative determines
how calls are routed.
Consult your customer service representative to determine whether or not this
feature is compatible with your service provider.
Enterprise Edge Feature Programming Telephone Guide P0908510 Issue 02
Page 91

ISDN PRI 91
Call by Call service selection for PRI
PRI lines can be dynamically allocated to different service types with the Call by
Call feature. PRI lines do not have to be pre-allocated to a given service type.
Call types that may be available, depending on your service provider are:
Public
Public calls connect your Enterprise Edge set with a Central Office (CO). DID and
DOD calls are supported.
Private
Private calls connect your Enterprise Edge set with a Virtual Pr ivate Network. DID
and DOD calls are supported. A private dialing plan may be used.
Tie
Tie lines are private incoming and outgoing lines that connect Private Branch
Exchanges (PBX) such as Enterpri se Edge .
FX (Foreign Exchange)
FX calls connect your Enterprise Edge set to a remote CO. It provides the
equivalent of local service at the distant exchange.
Outwats
Outwats is for outgoing calls. This allows you to originate calls to telephones in a
specific geographical area called a zone or band. Typically a flat monthly fee is
charged for this service.
Inwats
Inwats is a type of long distance service which allows you to receive calls
originating within specified areas without a charge to the caller. A toll-fr ee number
is assigned to allow for reversed billing.
Consult your customer service representative to determine whether or not this
feature is compatible with your provider.
Dialing Plan and PRI
The Dialing Plan supports PRI connectivity to public and private networks. The
dialing plan is a collection of features responsible for processing and routing
incoming and outgoing calls. All PRI calls must go through a dialing plan.
The Dialing Plan
• allows incoming calls to be routed to sets based on service type and digits
received
• allows Enbloc dialing by buffering user-dialed digits until a complete DN has
been dialed
• provides the ability to map user-dialed digits to a service type on a Call by Call
basis
P0908510 Issue 02 Enterprise Edge Feature Programming Telephone Guide
Page 92

92 ISDN PRI
• allows long distance carrier selection via user-dialed Carrier Access Codes
Consult your customer service representative to determine how your dialing plan is
configured.
Service provi d er features
Consult your customer service representative to determine if the new ISDN features
are supported with your service provider.
Call Forward
Call Forward allows you to forward your calls to an external telephone number.
1. Select an ISDN line by selecting a line button, a line pool, or the Handsfree
button, or by lifting the handset (if an ISDN line is your prime line).
2. Consult your service provider for the appropriate feature code to enter on your
dial pad. Listen for three tones followed by dial tone.
3. Enter the internal number of the telephone to which you want your calls
forwarded. If the call is answered, stay on the line for at least five seconds to
activate the Call Forward feature.
Canceling Call Forward
1. Select an ISDN line by selecting a line button, a line pool, or the Handsfree
button, or by lifting the handset (if an ISDN line is your prime line).
2. Consult your service provider for the appropriate feature code to enter on your
dial pad. Listen for a series of tones.
3. Press ®.
Calling the number your calls are forwarded to
1. Select an ISDN line by selecting a line button, a line pool, or the Handsfree
button, or by lifting the handset (if an ISDN line is your prime line).
2. Consult your service provider for the appropriate feature code to enter on your
dial pad.
Automatic Call Back
If you call a number and it is busy, enter the appropriate feature code designated by
your service provider to receive a distinctive ring at your set when the line becomes
available for calls.
Enterprise Edge Feature Programming Telephone Guide P0908510 Issue 02
Page 93

Automatic Recall
Automatic Recall allows you to automatically dial the number of the last call you
received. You may not see the number on the display if the information is not
available from your service provider, or you do not have Caller ID as part of your
ISDN service.
Consult your service provider for the appropriate feature code to enter on your dial
pad.
ISDN applications for PRI
ISDN terminal equipment delivers a wide range of powerful business applications:
Videoconferencing and video telephony
Video conferencing offers instant visual and audio contact between distant parties
using studio-based terminals.
Desktop conferencing
ISDN PRI 93
ISDN allows computer users in distant locations to share and edit any image, data
or text file on their own computer screens while they discuss the information.
File transfer
The ISDN network allows you to transfer files containing data, text, images, data,
or audio clips, faster and cheaper than with a conventional modem.
Telecommuting
Convenient retrieval, processing and storage of files is possible for the employee
working at home by using ISDN lines to give high-speed access to information
resources at the office.
Group 4 fax
ISDN fax applications save money by increasing both transmission speed and the
quality of resolution.
Remote LAN access
ISDN provides an affordable and fast means for employees at remote sites (at home
or branch offices) to access local area networks (LANs).
Leased line backup
Essential backup for leased lines can be provided using ISDN as required, rather
than duplicating costly permanent leased lines.
P0908510 Issue 02 Enterprise Edge Feature Programming Telephone Guide
Page 94

94 ISDN PRI
LAN to LAN bridging
Local area network (LAN) bridge/routers allow flexible interconnection between
LANs using ISDN, with charges incurred only when information is actually
transmitted.
Internet and database access
The fast call set up and high bandwidth of ISDN are ideal for accessing information
services such as the Internet and databases.
Enterprise Edge Feature Programming Telephone Guide P0908510 Issue 02
Page 95

Using System features
Using alternate or scheduled services
There are three types of Services to make your Enterprise Edge system handle calls
differently on different days and at different times of the day: Ringing service,
Restriction service and Routing service.
Each of the three services, and the six schedules available to each service, are
customized for you by your installer who programs one telephone which is used to
turn Services on and off, and display what Services are in use. This is called the
control telephone.
Preventing certain calls from being made
Restriction service prevents a user from making certain kinds of calls from a
telephone or from lines that are available at the telephone. The restrictions are
programmed by your installer.
Making additional telephones ring
14
Ringing service makes additional telephones ring for incoming calls on external
lines. For instance, all incoming external calls can ring at a security guard’s
telephone during the night, or calls to one attendant can ring at another attendant’s
telephone during lunch. It does not suppress your normal ringing assignment.
Changing the lines used by outgoing calls
Routing service allows you to assign alternate routes to calls. In this way you can
take advantage of lower costs available on particular routes on certain days and at
certain times. Both the regular and alternate routes are programmed by your
installer.
Turning Services on and off
Three programming settings: Manual, Automatic and Off, control how different
services and their schedules are used by your system.
• Manual allows you to turn the service on and off at any time from a control
telephone using a feature code.
• Automatic allows you to use the preassigned stop and start time for a service.
You are able to start and stop the service by entering the appropriate feature
code at a control telephone. If you select this setting, you use the start and stop
times programmed by your installer.
• Off prevents the service from being activated.
For more information about programming using the Unified Manager, see the
Enterprise Edge Programming Operations Guide.
P0908510 Issue 02 Enterprise Edge Feature Programming Telephone Guide
Page 96

96 Using System features
Each schedule can have its own configuration of a Service which works
independently of automatic start and stop times. For example, there may be a
version of Restriction service called Night Schedule that prevents anyone from
making long distance calls. But calling it Night Schedule does not mean it can only
be used with a schedule. You can turn the Night Schedule for Restriction Service
on or off as needed any time of the day or night. If you decide to run a service on a
schedule, the system uses the start and stop times used for that schedule.
Turning Services on and off using feature codes
The master control for services is accessed from the Unified Manager. Day-to-day
use of Services is controlled using the following feature codes.
ƒ°‡⁄
ƒ£°‡⁄
ƒ°‡¤
ƒ£°‡¤
ƒ°‡‹
ƒ£°‡‹
Turns on Ringing service. When used at the
direct-dial telephone, i t activates the alt ernate
direct-dial telephone (extra-dial telephone).
Turns off Ringing service.
Turns on Restriction service.
Turns off Rest riction service.
Turns on Routing serv ice.
Turns off Routing service.
To turn a Service on:
1. Enter the appropriate feature code from a control telephone.
2. Press NEXT to move through the schedules until the display shows the version
of the service you want to be turned on.
3. Press OK to select the setting, or press QUIT to exit the feature without making
any changes.
To turn a Service off:
1. Enter the appropriate feature code from a control telephone.
Do not confuse activating Normal service with canceling a Service.
Setting a Service to Normal is not the same as canceling a Service using a
feature code. If you set th e Service to Normal, the normal version of a
Service overrides any automatic schedule and remains in effect until you
manually canc el it. If you cancel the Service, you return to the automatic
schedule.
Viewing the active Services from a two-line display telephone
When a Service is active, the control telephone display reads Services ON.
1. Press LIST. The display shows the first active Service and the schedule that is
in use.
Enterprise Edge Feature Programming Telephone Guide P0908510 Issue 02
Page 97

Using System features 97
2. If there are several active Services, press
3. Press
EXIT
to exit the feature.
NEXT
to see them all.
Viewing the active Services from a one-line display telephone
1. Press
ƒ°‡‚
. The display shows the first active Service.
2. Press £ to move through the active schedule.
3. Press
®
to exit.
Displays
<Sched> Restr'n
EXIT NEXT
<Sched> Restr'n
QUIT OK NEXT
<Sched> Ringing
EXIT NEXT
You are viewing the active Services. Press £ or NEXT
see the other active Services. Press
The name of the current Restriction service schedule is
displayed. Press
service schedules. Press
desired schedule.
You are viewing the active Services. Press £ or NEXT
see the other active Services. Press
£ or NEXT
˙ or OK
® or EXIT to quit.
to see the other Ringing
to select the
® or EXIT to quit.
to
to
<Sched> Ringing
QUIT OK NEXT
<Sched> Routing
EXIT NEXT
<Sched> Routing
QUIT OK NEXT
<Sched> until *
QUIT OK NEXT
No services ON
Services ON
LIST
For other displays, see Common feature displays on page 125.
The name of the current Ringing service schedule is
displayed. Press
service schedules. Press
desired schedule.
You are viewing the active Services. Press £ or NEXT
see the other active Services. Press
The name of the current Routing service schedule is
displayed. Press
service schedules. Press
desired schedule.
Press ˙ or OK to se lect this s chedule , £ or NEXT
to see the next avail able sc hedul e, or ® or QUIT to exit.
If you select this schedule, it is in effect until the next
automati c schedule takes effect .
You have entered the Show Serv ices feature code and
there is no active Service.
There is a Ser vice activ e in your syst em. Press • or LIST
to view the active Services.
£ or NEXT
£ or NEXT
to see the other Ringing
˙ or OK
® or EXIT to quit.
to see the other Routing
˙ or OK
to select the
to select the
to
Services that have been turned on automatically are indicated by an asterisk (*)
before the name on the display. You can neither manually activate nor cancel
scheduled services, although you can override them by manually turning on another
schedule.
P0908510 Issue 02 Enterprise Edge Feature Programming Telephone Guide
Page 98

98 Using System features
The control telephone can override Services that are turned on and off according to
a schedule at any time by entering a Ser vices feature c ode, and selecting a different
schedule. This override remains in effect until it is canceled. If you select a schedule
with an asterisk (*), the next automatic service schedule comes into effect at the
programmed time.
Direct-dial calls to a direct-dial telephone ring at the extra-dial telephone (the extradial telephone is designated by your installer) only when you enter the Ringing
service feature code (
the extra-dial telephone is activated, not the actual Ringing service (unless that
direct-dial telephone is a control telephone).
User passwords
ƒ°‡⁄
Tip
Enterprise Edge provides six service schedules named Night, Lunch, Evening,
Sched 4, Sched 5, and Sched 6. Your installer can change these names to s uit
your business.
) at that direct-dial telephone. Note that only
User passwords prevent unauthorized or unintentional changes to your Enterprise
Edge system. There are two types of user password: Registration and Call Log.
Registration password
The Registration password is used to control the registration of Companion
portables to the Enterprise Edge system. For more information see the
Edge Programming Operations Guide
Clearing a Call Log password
If an individual has forgotten their Call Log password, you can clear it in
programming. The individual can then enter a new password from his or her
telephone.
You need to start a Unified Manager session to program this feature. For more
information about programming using the Unified Manager, see the
Edge Programming Operations Guide
Using special telephones
Enterprise
.
Enterprise
.
Direct-dial
You can reach the direct-dial telephone by dialing a single digit. The direct-dial
telephone is usually in a central location, such as a attendant’s desk. You can have
up to five direct-dial telephones for your Enterprise Edge system. It is usually the
prime telephone or the central answering position (CAP).
The direct-dial telephone can send up to 30 messages and can invoke Services to
activate the extra-dial telephone.
Enterprise Edge Feature Programming Telephone Guide P0908510 Issue 02
Page 99

Using System features 99
You cannot forward calls to a direct-dial telephone that is outside your Enterprise
Edge system.
Changing the direct-dial telephone assignments
Your installer sets up the direct-dial telephone.
You can change which direct-dial telephone a telephone is assigned to, or assign it
no direct-dial telephone. You need to start a Unified Manager session to program
this feature. For more information about programming using the Unified Manager,
see the
Enterprise Edge Programming Operations Guide
.
Any number of telephones can be assigned to call the direct-dial telephone.
Tip
The digit you dial in ord er to get the direct-dial te lephone to ring can be
programmed by your installer.
The Enterprise Edge system cannot verify that the number you assign as an
external direct-dial telephone is valid. Check the number before assigning it
as a direct-dial telephone, and call the direct-dial telephone after you’ve
assi g ne d it in orde r to test it.
Hotline
A hotline telephone calls a preset internal or external telephone number when you
pick up the receiver (or press
Tip
Label the telephone to inform anyone using it th at Hotline is active.
©
).
Bypassing a Hotline
Press a line button, or use the Pre-Dial or Automatic Dial feature before you pick
up the receiver or press
Feature Card
or see Changing how you dial your calls
©
on a hotline telephone. See the
on page 34.
Telephone
Making a telephone a hotline telephone
You can set up a telephone as a hotline.
Tip
A Hunt Group set DN can be specified as a Hotline telephone. For more
information on Hunt Groups see Hunt Groups
on page 83.
P0908510 Issue 02 Enterprise Edge Feature Programming Telephone Guide
Page 100

100 Using System featu res
You need to start a Unified Manager session to program this feature. For more
information about programming using the Unified Manager, see the
Edge Programming Operations Guide
Internal assigns an internal number. External assigns an external number. If you
select an external number, you can select the line on which the call is made: the
prime line, an external line, a line in a line pool, or a line selected by the routing
table. If you select a line pool, you must specify the line pool access code. If you
select the routing table, the number dialed is treated as a destination code and is
routed according to the routing tables.
A telephone’s prime line, line pool access codes, and access to a line pool can be
programmed by your installer.
Control telephone
The control telephone allows you to place the telephones and external lines for
which it has responsibility into and out of service schedules. See Using alternate or
scheduled services on page 95.
Enterprise
.
Using Set lock
Set lock limits the ways in which you can customize your telephone. There are three
levels of Set Lock: Full, Partial, and None. None allows you to access all features
on your telephone.
Partial prevents:
• programming autodial buttons
• programming user speed dial
• programming feature buttons
• moving line buttons
• changing the display language
Full, in addition to the restrictions outlined for Partial lock, prevents:
• changing Background Music
• changing Privacy
• changing Do Not Disturb
• using Ring Again
numbers
• changing dialing modes
(Automatic Dial, Pre-Dial, and
Standard Dial)
• using Voice Call Deny
• saving a number with Saved
Number Redial
• using Call Forward all calls
• using Send Message
• using Trunk Answer
• activating Services
Changing Set Lock programming for a telephone
You need to start a Unified Manager session to program this feature. For more
information about programming using the Unified Manager, see the
Edge Programming Operations Guide
Enterprise Edge Feature Programming Telephone Guide P0908510 Issue 02
.
Enterprise
 Loading...