

Page 1

BCM50 Telset Administration Guide
BCM50 3.0
Business Communications Manager
Document Status: Standard
Document Number: NN40020-604
Document Version: 02.0
Da
te: October 2008
2
Page 2

Copyright © 2007–2008 Nortel Networks
All rights reserved.
The information in this document is subject to change without notice. The statements, configurations, technical data, and
recommendations in this document are believed to be accurate and reliable, but are presented without express or implied
warranty. Users must take full responsibility for their applications of any products specified in this document. The
information in this document is proprietary to Nortel Networks.
Trademarks
Nortel, the Nortel logo, and the Globemark are trademarks of Nortel Networks.
Microsoft, MS, MS-DOS, Windows, and Windows NT are trademarks of Microsoft Corporation.
All other trademarks and registered trademarks are the property of their respective owners.
Page 3

Contents
Getting started with BCM . . . . . . . . . . . . . . . . . . . . . . . . . . . . . . . . . . . . . . . . 5
About this guide . . . . . . . . . . . . . . . . . . . . . . . . . . . . . . . . . . . . . . . . . . . . . . . . . . . . . . . 5
Purpose . . . . . . . . . . . . . . . . . . . . . . . . . . . . . . . . . . . . . . . . . . . . . . . . . . . . . . . . . . 5
Audience . . . . . . . . . . . . . . . . . . . . . . . . . . . . . . . . . . . . . . . . . . . . . . . . . . . . . . . . . . . . 5
Acronyms . . . . . . . . . . . . . . . . . . . . . . . . . . . . . . . . . . . . . . . . . . . . . . . . . . . . . . . . . . . . 6
Symbols and conventions used in this guide . . . . . . . . . . . . . . . . . . . . . . . . . . . . . . . . . 6
Related publications . . . . . . . . . . . . . . . . . . . . . . . . . . . . . . . . . . . . . . . . . . . . . . . . . . . 8
How to get Help . . . . . . . . . . . . . . . . . . . . . . . . . . . . . . . . . . . . . . . . . . . . . . . . . . . . . . . 8
Administration telset interfaces . . . . . . . . . . . . . . . . . . . . . . . . . . . . . . . . . . 11
Initial setup telset menus . . . . . . . . . . . . . . . . . . . . . . . . . . . . . . . . . . . . . . . . . . . . . . . 11
Using FEATURE 9*8 for initial configuration . . . . . . . . . . . . . . . . . . . . . . . . . . . . . . . . 12
Logging in to the F9*8 interface . . . . . . . . . . . . . . . . . . . . . . . . . . . . . . . . . . . . . . 12
Entering keycodes and feature settings . . . . . . . . . . . . . . . . . . . . . . . . . . . . . . . . 14
Activating user accounts and changing passwords . . . . . . . . . . . . . . . . . . . . . . . 16
Viewing or entering IP network information . . . . . . . . . . . . . . . . . . . . . . . . . . . . . . 16
System restart . . . . . . . . . . . . . . . . . . . . . . . . . . . . . . . . . . . . . . . . . . . . . . . . . . . . 19
Using the telset configuration interface . . . . . . . . . . . . . . . . . . . . . . . . . . . 21
Contents 3
Programming with the telset telephony interface . . . . . . . . . . . . . . . . . . . . . . . . . . . . . 21
User access to the FEATURE**CONFIG interface . . . . . . . . . . . . . . . . . . . . . . . . . . . 22
Programming telephones . . . . . . . . . . . . . . . . . . . . . . . . . . . . . . . . . . . . . . . . . . . . . . 23
Navigating the telset menus . . . . . . . . . . . . . . . . . . . . . . . . . . . . . . . . . . . . . . . . . 23
Top-level menu of the telset telephony configuration tree . . . . . . . . . . . . . . . . . . . . . . 27
About the FEATURE **CONFIG menu system . . . . . . . . . . . . . . . . . . . . . . . . . . . . . . 27
Terminals and Sets . . . . . . . . . . . . . . . . . . . . . . . . . . . . . . . . . . . . . . . . . . . . . . . . 28
Lines . . . . . . . . . . . . . . . . . . . . . . . . . . . . . . . . . . . . . . . . . . . . . . . . . . . . . . . . . . . 34
Services . . . . . . . . . . . . . . . . . . . . . . . . . . . . . . . . . . . . . . . . . . . . . . . . . . . . . . . . 36
System speed dials . . . . . . . . . . . . . . . . . . . . . . . . . . . . . . . . . . . . . . . . . . . . . . . . 39
Passwords . . . . . . . . . . . . . . . . . . . . . . . . . . . . . . . . . . . . . . . . . . . . . . . . . . . . . . . 40
Time and Date . . . . . . . . . . . . . . . . . . . . . . . . . . . . . . . . . . . . . . . . . . . . . . . . . . . . 41
System programming . . . . . . . . . . . . . . . . . . . . . . . . . . . . . . . . . . . . . . . . . . . . . . 43
Telco features . . . . . . . . . . . . . . . . . . . . . . . . . . . . . . . . . . . . . . . . . . . . . . . . . . . . 50
Hardware . . . . . . . . . . . . . . . . . . . . . . . . . . . . . . . . . . . . . . . . . . . . . . . . . . . . . . . . 51
Maintenance . . . . . . . . . . . . . . . . . . . . . . . . . . . . . . . . . . . . . . . . . . . . . . . . . . . . . 53
Usage metrics . . . . . . . . . . . . . . . . . . . . . . . . . . . . . . . . . . . . . . . . . . . . . . . . . . . . 55
Index . . . . . . . . . . . . . . . . . . . . . . . . . . . . . . . . . . . . . . . . . . . . . . . . . . . . . . . . 57
BCM50 Telset Administration Guide
Page 4

4 Contents
NN40020-604NN40020-604
Page 5

Getting started with BCM
This section contains information on the following topics:
• “About this guide” on page 5
• “Audience” on page 5
• “Acronyms” on page 6
• “Symbols and conventions used in this guide” on page 6
• “Related publications” on page 8
• “How to get Help” on page 8
About this guide
The BCM50 Telset Administration Guide describes how to use the Telset interface to administer
your BCM system. The telset configuration is a tool that is used for system configuration if there is
no network connection to your BCM50.
5
Purpose
The tasks described in the guide relate to the inital setup of the BCM system, and the configuration
of telephone sets.
In brief, the information in this guide explains:
• start-up programming
• keycodes and feature settings
• activating user accounts and changing passwords
• viewing and entering IP network information
• programming telephones
Audience
The BCM50 Telset Administration Guide is directed to network administrators responsible for
maintaining BCM50 networks. This guide is also useful for network operations center (NOC)
personnel supporting a BCM50 managed services solution. To use this guide, you must:
• be an authorized BCM50 administrator within your organization
• know basic Nortel BCM50 terminology
• be knowledgeable about telephony and IP networking technology
BCM50 Telset Administration Guide
Page 6
6 Getting started with BCM
Acronyms
The following is a list of acronyms used in this guide.
Table 1 List of acronyms
Acronym Description
BCM Business Communications Manager
BRI Basic Rate Interface
DHCP Dynamic Host Configuration Protocol
DN Directory Number
IP Internet Protocol
ISDN Integrated Switched Digital Network
NOC Network Operations Center
ONN Outgoing Name and Number
PRI Primary Rate Interface
SM Silent Monitor
Symbols and conventions used in this guide
These symbols are used to highlight critical information for the BCM50 system:
Caution: Alerts you to conditions where you can damage the equipment.
Danger: Alerts you to conditions where you can get an electrical shock.
Warning: Alerts you to conditions where you can cause the system to fail or work
improperly.
Note: A Note alerts you to important information.
NN40020-604NN40020-604
Tip: Alerts you to additional information that can help you perform a task.
Page 7
Getting started with BCM 7
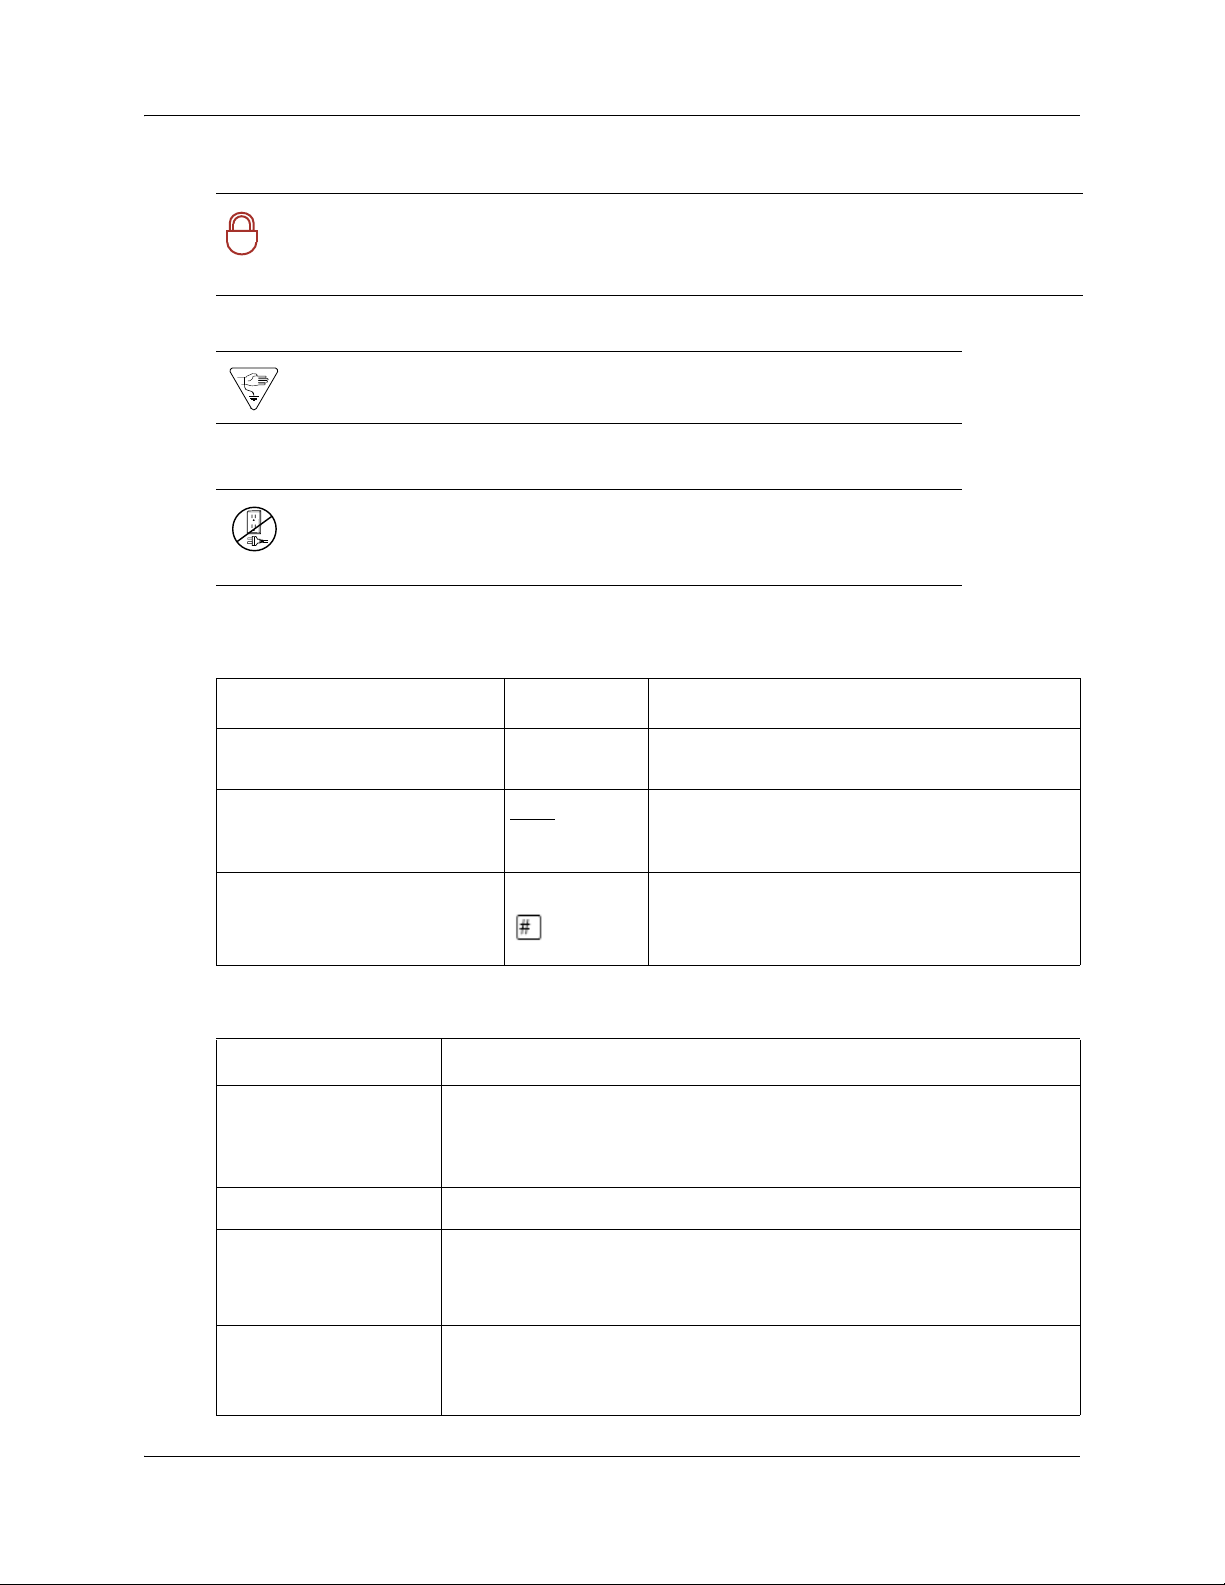
Security note: Indicates a point of system security where a default should be changed,
or where the administrator needs to make a decision about the level of security required
!
for the system.
Warning: Alerts you to ground yourself with an antistatic grounding
strap before performing the maintenance procedure.
Warning: Alerts you to remove the BCM50 main unit and expansion
unit power cords from the ac outlet before performing any maintenance
procedure.
These conventions and symbols are used to represent the Business Series Terminal display and
dialpad.
Convention Example Used for
Word in a special font (shown in
the top line of the display)
Underlined word in capital letters
(shown in the bottom line of a two
line display telephone)
Dialpad buttons Buttons you press on the dialpad to select a
Pswd:
PLAY
Command line prompts on display telephones.
Display option. Available on two line display
telephones
option on the display to proceed.
particular option.
. Press the button directly below the
These text conventions are used in this guide to indicate the information described:
Convention Description
bold Courier
text
Indicates command names and options and text that you need to enter.
Example: Use the
Example: Enter
info command.
show ip {alerts|routes}.
italic text Indicates book titles
plain Courier
text
Indicates command syntax and system output (for example, prompts
and system messages).
Example:
Set Trap Monitor Filters
FEATURE
HOLD
RELEASE
Indicates that you press the button with the coordinating icon on
whichever set you are using.
BCM50 Telset Administration Guide
Page 8

8 Getting started with BCM
Related publications
Related publications are listed below. To locate specific information, you can refer to the
Master Index of BCM50 Library (NN40020-100).
Keycode Installation Guide (NN40010-301)
CallPilot Telephone Administration Guide (NN40090-500)
BCM50 Administration Guide (NN40020-600)
How to get Help
This section explains how to get help for Nortel products and services.
Getting Help from the Nortel Web site
The best way to get technical support for Nortel products is from the Nortel Technical Support
Web site:
http://www.nortel.com/support
This site provides quick access to software, documentation, bulletins, and tools to address issues
with Nortel products. More specifically, the site enables you to:
• download software, documentation, and product bulletins
• search the Technical Support Web site and the Nortel Knowledge Base for answers to
technical issues
• sign up for automatic notification of new software and documentation for Nortel equipment
• open and manage technical support cases
Getting Help over the phone from a Nortel Solutions Center
If you don’t find the information you require on the Nortel Technical Support Web site, and have a
Nortel support contract, you can also get help over the phone from a Nortel Solutions Center.
In North America, call 1-800-4NORTEL (1-800-466-7835).
Outside North America, go to the following Web site to obtain the phone number for your region:
http://www.nortel.com/callus
Getting Help from a specialist by using an Express Routing Code
To access some Nortel Technical Solutions Centers, you can use an Express Routing Code (ERC)
to quickly route your call to a specialist in your Nortel product or service. To locate the ERC for
your product or service, go to:
NN40020-604NN40020-604
Page 9

Getting started with BCM 9
http://www.nortel.com/erc
Getting Help through a Nortel distributor or reseller
If you purchased a service contract for your Nortel product from a distributor or authorized
reseller, contact the technical support staff for that distributor or reseller.
BCM50 Telset Administration Guide
Page 10

10 Getting started with BCM
NN40020-604NN40020-604
Page 11
Administration telset interfaces
You can use Business Element Manager or you can use the Telset interface to administer your
BCM50 system. The telset configuration is a tool that is used for system configuration if there is
no network connection to your BCM50, or for quick configuration changes, such as changing
features in a DN record or updating one of the speed dial lists. Administration telset interfaces are
accessible only by a user with an Installer level of telset user privileges. These menus are used at
initial startup or to make changes to security-sensitive system settings.
• “Initial setup telset menus” on page 11
• “Using FEATURE 9*8 for initial configuration” on page 12
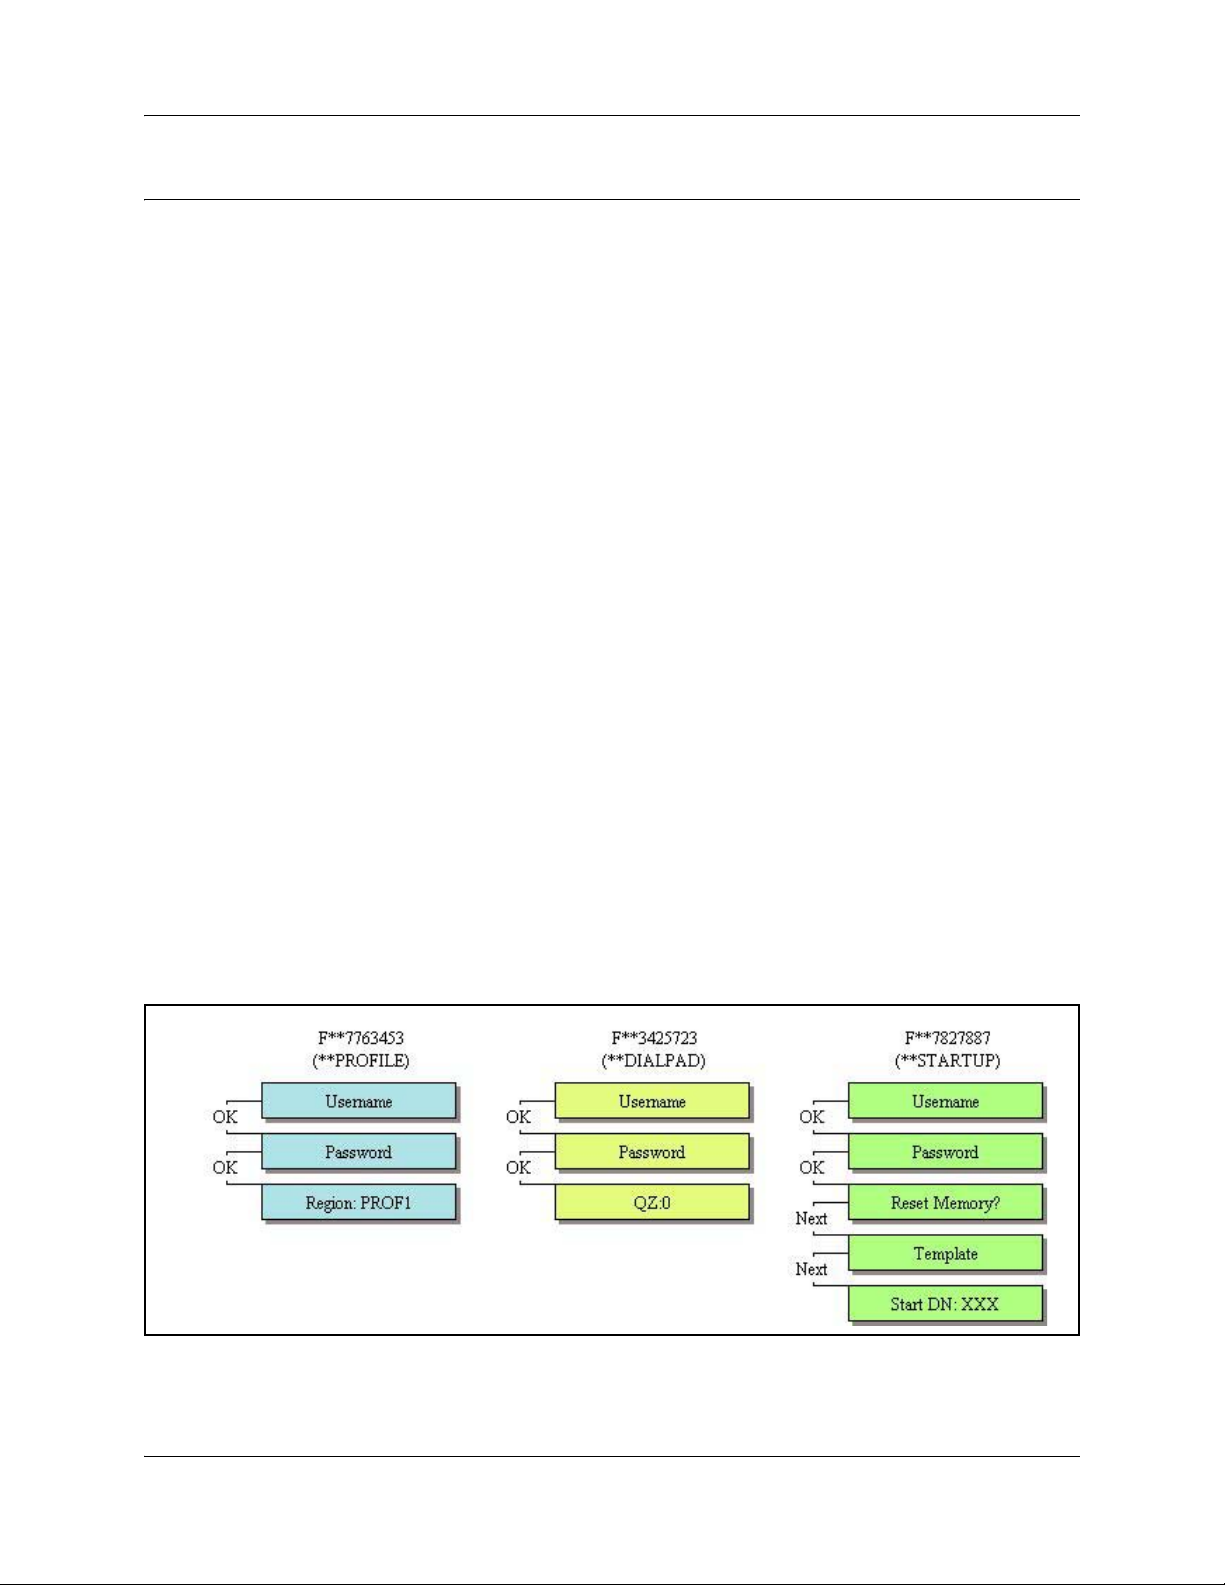
Initial setup telset menus
The initial telset menus are used during the initial configuration of your system. The user requires
Installer (Administrator) level of password to use these menus.
11
FEATURE
**7763453
FEATURE
**3425723
FEATURE
**7827887
Figure 1 Menus for profiles and dialpad function for startup programming
(**PROFILE) should only be run at the initial set up if the Startup profile did
not properly set the country profile on your system and the
Element Manager is not accessible to perform this task.
(**DIALPAD) allows you to change how the system receives Q and Z in
the telset interface.
(**STARTUP) should only be run at the initial set up if the Startup profile did
not set the telephony profile to the correct setting and the
Element Manager is not accessible to perform this task. Note
that using this interface returns your system to the default
state
BCM50 Telset Administration Guide
Page 12

12 Administration telset interfaces
Using FEATURE 9*8 for initial configuration
When you log in to the FEATURE 9*8 interface, it provides access to the following menus:
• Feature Codes: add a keycode for applications such as mail boxes, Fax suite, and private
networking. See “Entering keycodes and feature settings” on page 14
• User Accounts: change user accounts and passwords. See “Activating user accounts and
changing passwords” on page 16
• IP Address: view or set the IP network addressing. See Viewing or entering IP network
information on page 16
• Modem: enable or disable the soft modem. See “System restart” on page 19
• System Restart: restart your system. See “System restart” on page 19
Logging in to the F9*8 interface
An administration-level telset username and password are required to access this interface. Use the
following user ID and password to access the FEATURE 9*8 feature:
User ID SETNNA (738662)
Password CONFIG (266344)
For more information about accessing the telset interfaces, and about which telephones can be
used to access the interface, refer to “Using the telset configuration interface” on page 21. Note
that this interface does not use the keypad directional arrows that are used for the telephony
interface, but rather follows the conventions of the CallPilot F983 interface, which uses display
prompts to navigate through the menus.
NN40020-604NN40020-604
Page 13
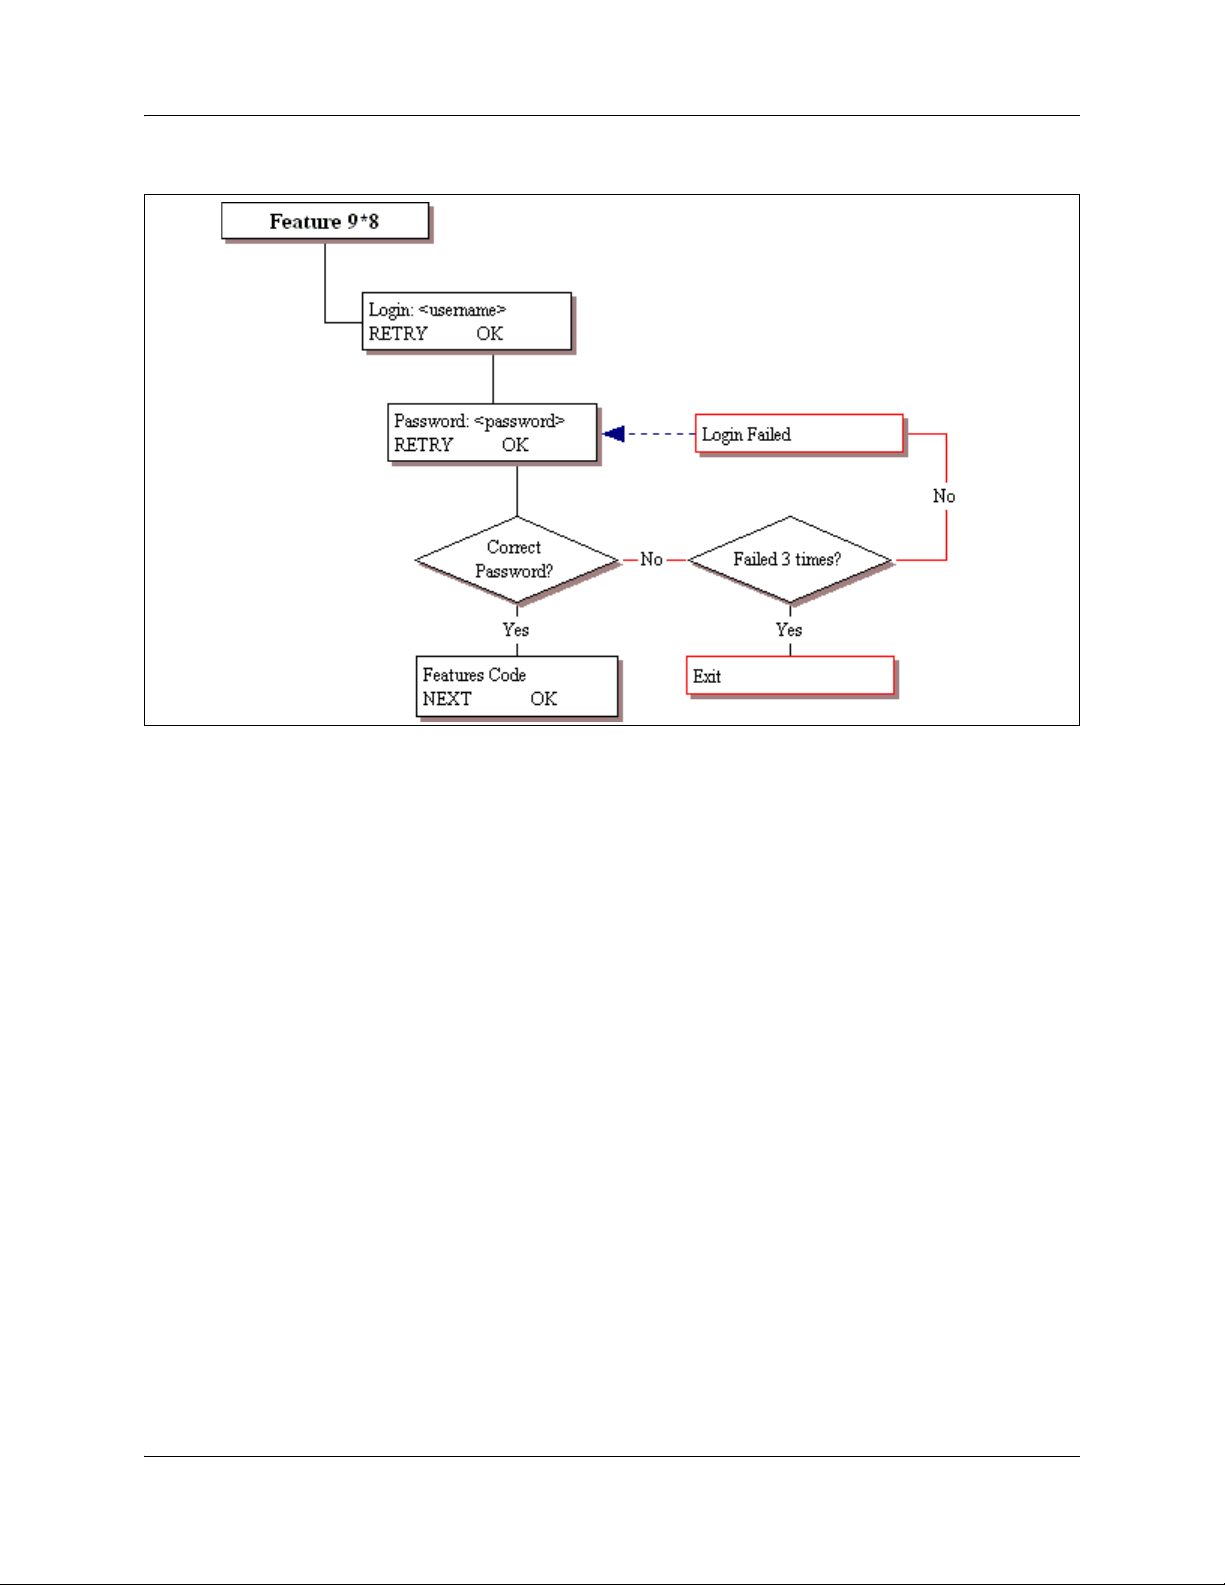
Figure 2 Log in menu
Administration telset interfaces 13
When a user enters an incorrect password, the system provides a display indicating that there is an
entry error. If the user tries repeatedly to enter an invalid username or password, the system locks
the user account. The user can wait until the lockout timer releases the account, or the account can
be released through this telset menu by a user with administration privileges or through the
Element Manager by a user with administration privileges. The lockout timer and the lockout
release can be configured in the Element Manager.
BCM50 Telset Administration Guide
Page 14

14 Administration telset interfaces
Entering keycodes and feature settings
Features List provides a list of applications that have applied keycodes in the system. When you
add applications or increase a feature capacity, you can make those adjustments through this menu.
For details about keycodes, refer to the Keycode Installation Guide (NN40010-301).
Figure 3 shows the layout for Features List.
NN40020-604NN40020-604
Page 15
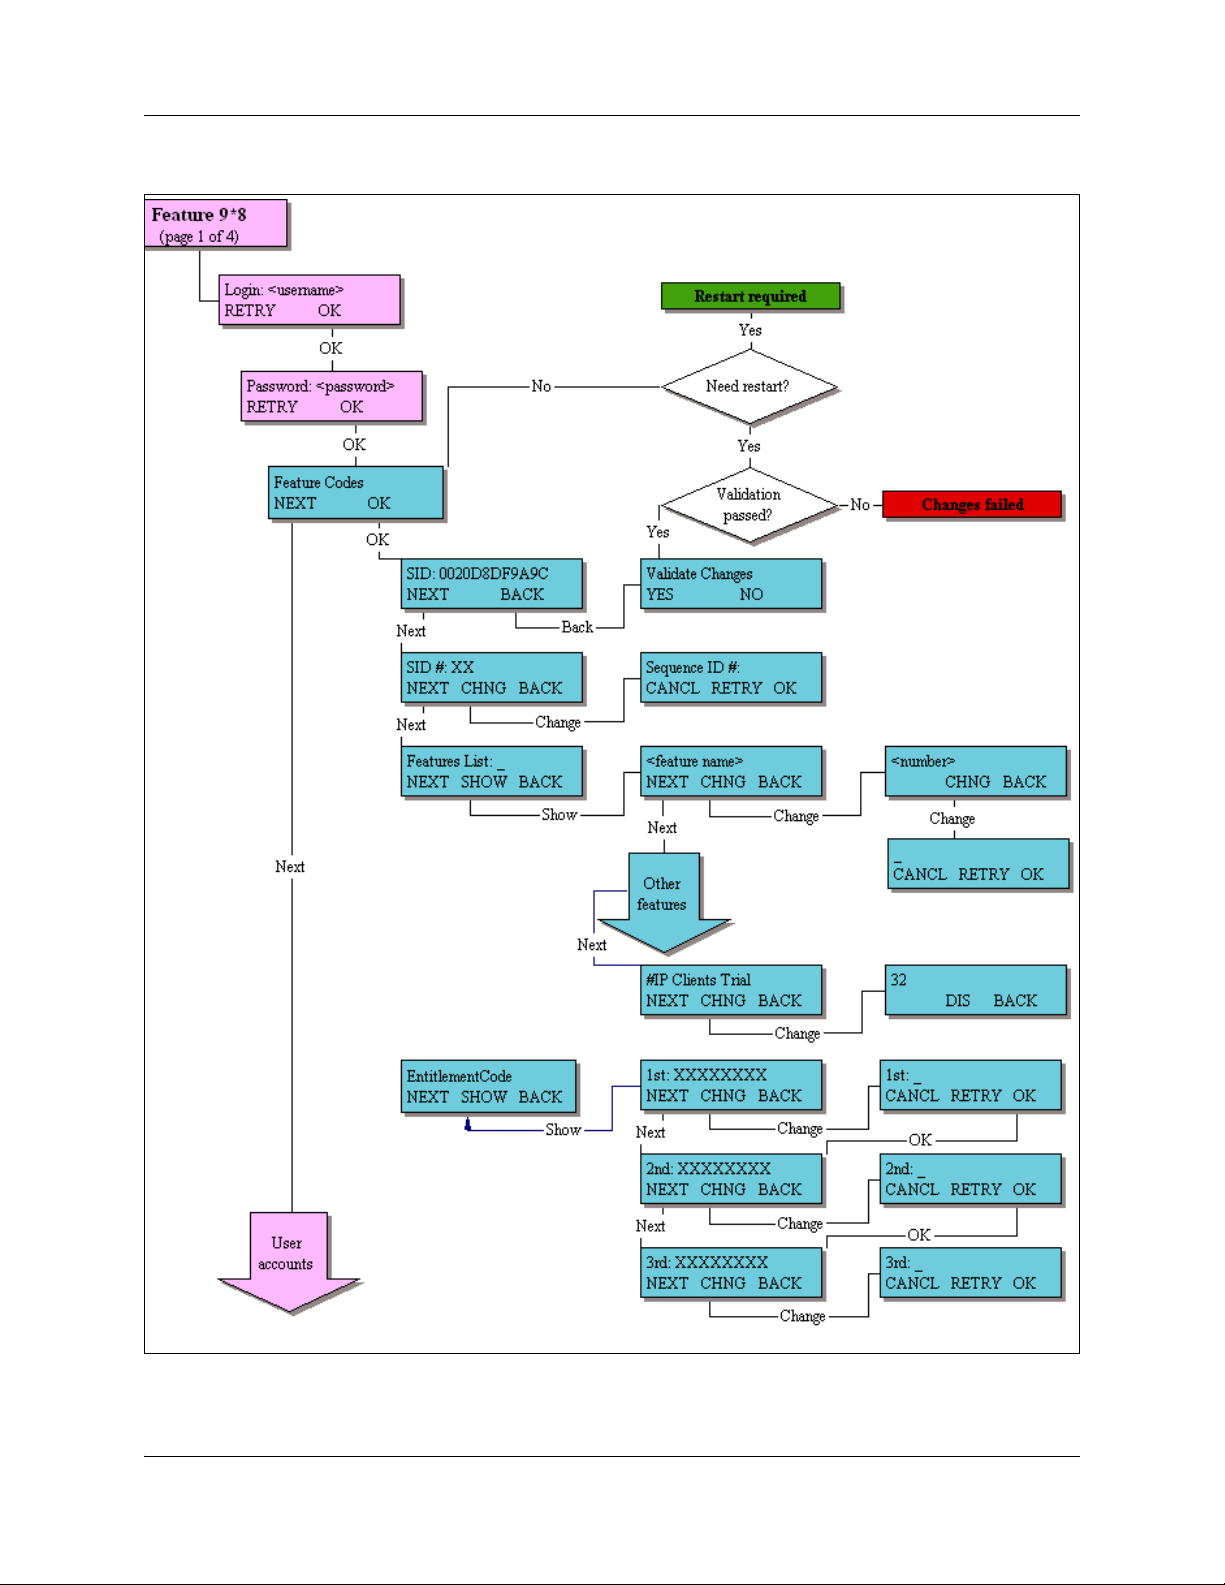
Figure 3 Accessing the Features List
Administration telset interfaces 15
BCM50 Telset Administration Guide
Page 16
16 Administration telset interfaces
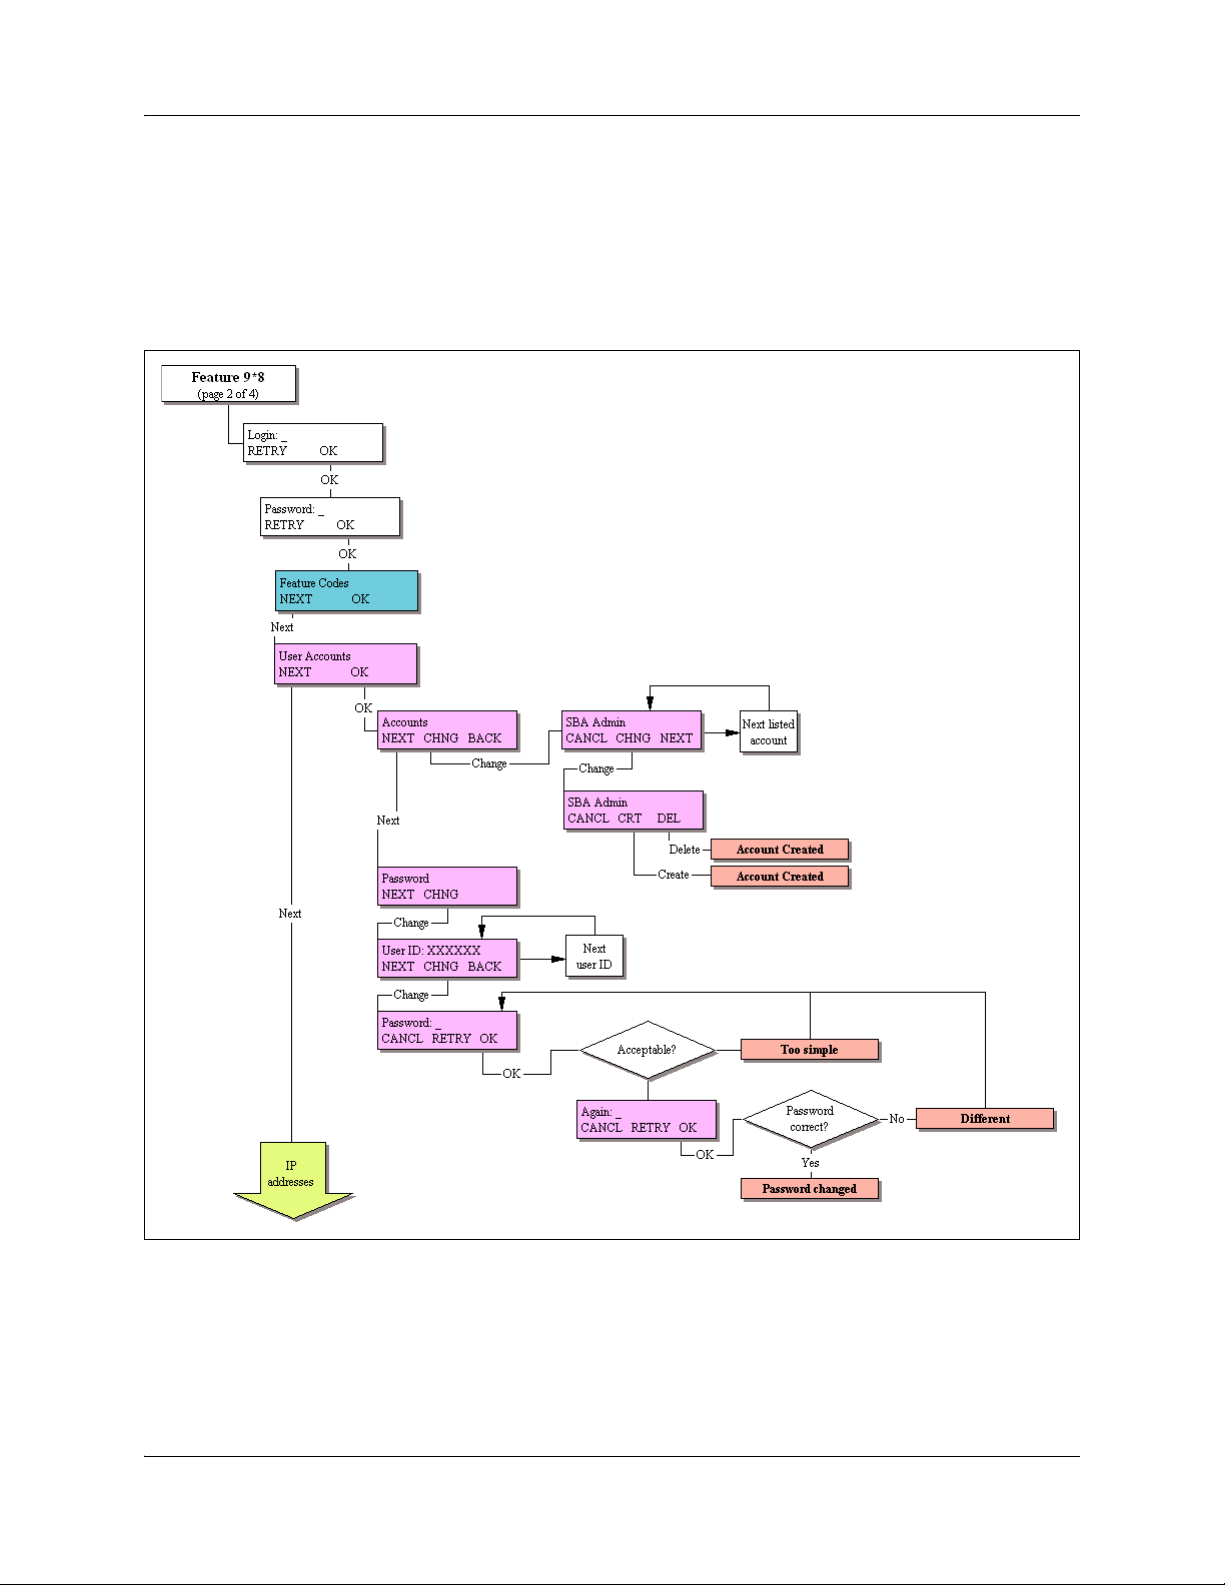
Activating user accounts and changing passwords
User Accounts provides two menus, one to create or delete user accounts and the other to enter
new passwords for user accounts. The username and password can each be 16 digits in length.
Figure 4 shows the layout for User Accounts.
Figure 4 Accessing user accounts and passwords
Viewing or entering IP network information
IP Address allows you to view IP network information on systems where DHCP is enabled. On
systems where DHCP is disabled, you can enable DHCP or enter static IP network information.
Figure 5 shows the layout for IP Address.
NN40020-604NN40020-604
Page 17

Figure 5 Viewing or setting the IP network information
Administration telset interfaces 17
BCM50 Telset Administration Guide
Page 18

18 Administration telset interfaces
NN40020-604NN40020-604
Page 19

System restart
The System Restart heading allows you to reboot the BCM50 main unit. Use this when changes
you have made indicate that a reboot is required.
Warning: Restarting the system interrupts system service.
Figure 6 shows the layout for System Restart.
Figure 6 Restarting the system
Administration telset interfaces 19
BCM50 Telset Administration Guide
Page 20

20 Administration telset interfaces
NN40020-604NN40020-604
Page 21

Using the telset configuration interface
This section provides maps of the telset configuration menus. The telset configuration is a tool that
is used for system configuration if there is no network connection to your BCM50, or for quick
configuration changes, such as changing features in a DN record or updating one of the speed dial
lists.
Although these menus have most of the features found in the Element Manager user interface, they
are not necessarily in the same location. The goal of this section is to help you quickly locate
feature programming within the telset configuration menus.
Note: For telset admininstration for CallPilot Vmail via F983, see the
Call Pilot Telephone Administration Guide (NN40090-500).
Programming with the telset telephony interface
When your system is installed, your installer, or customer service representative, programs it to
work with your telephone lines, with your private network if you have one, and with optional
equipment. In some cases, they also can provide customization for your specific office
requirements. If your system is connected to an IP network, the Element Manager interface
provides the most complete access for system programming and any post-installation adjustments
you may want to make.
21
However, if your system is not connected to an IP network, or if your system administrators do not
have access to a computer with the Element Manager installed, you can use the telset configuration
interface to program or customize your system setttings.
Some settings will need to be updated regularly, because of staff requirements or new business
contacts, and it is sometimes easier to make quick changes through this menu rather than through
the Element Manager.
There are four ways to use the teleset configuration interface to customize and maintain your
BCM50 system:
• Initial programming is performed for you by your installer or customer service representative.
This establishes how the system interacts with lines, telephones, and other equipment. The
user who performs the initial programming also has access to the FEATURE 9*8 telset
configuration menu, which allows access to system administration features.
• Post-installation programming, for example to change how features work for the system, is
performed by a user assigned as a system coordinator.
• Post-installation programming for basic configuration changes can be provided to the telset
user without exposing the more sensitive programming area s. For example:
— set user information (FEATURE **user (FEATURE **8737))
— set the Q and Z on the dialpad (FEATURE **dialpad (FEATURE **3425723))
BCM50 Telset Administration Guide
Page 22

22 Using the telset configuration interface
• Personal programming, to change functions related to how the telephone works, is available to
anyone through the Feature button on the telephone.
Note: You cannot use Telset to configure IP trunk remote gateways, or
to configure Meet-me Conferencing..
User access to the FEATURE**CONFIG interface
User identification and user passwords are required to access the telset configuration menus
(FEATURE **CONFIG). Although there are a set of default user IDs and passwords, for security
purposes it is recommended strongly that these be changed as part of the initial startup activities.
Also, it is recommended that each user has a unique user ID and password. This allows for more
accurate usage tracking.
User identification and passwords for the telset interface are defined either in the Element
Manager or by using the FEATURE 9*8 telset administration menu, see “Using FEATURE 9*8
for initial configuration” on page 12, which is only accessible to users with administrator
(Installer) privileges.
There are four levels of user access for the telset telephony configuration menus. These are
described in the Table 1. Refer to the system administration information for the Element Manager
for information about assigning these access privilege levels to users. Refer to “Activating user
accounts and changing passwords” on page 16 through that interface.
A user with Installer or System coordinator+ privileges can also use the Password heading in this
menu to change passwords for each privilege level.
Table 1 User access privileges
Access privilege levels Description of access
Installer Has full access to all telset menus, including FEATURE 9*8.
System coordinator+ Has full access to all telset telephony menus relating to telephony
system or device set up.
System coordinator Has more limited access to telset telephony menus relati ng to
telephony system and de vice set up . For example, this lev el of user
cannot define trunks.
Basic Has access limited to changing DN record information.
Debug
In addition, there are two default telset access passwords for the voicemail and call center telset
menus. Refer to the BCM50 Administration Guide (NN40020-600) for details.
NN40020-604NN40020-604
Page 23

Programming telephones
To access and use the telset configuration menus, you require a digital or IP telephone with a
two-line display.
Both the 7316E digital phone and the 2004 IP phone, shown in Figure 7, can be used for this
purpose.
Figure 7 Digital phone and IP phone
Using the telset configuration interface 23
7316E digital
phone
2004
IP phone
Navigating the telset menus
Digital and IP phones use slightly different methods of navigating through the telset menus. This
section contains the following information:
• “Using a digital phone to navigate” on page 23
• “Using an IP phone to navigate the menus” on page 24
• “What the navigation headings and directions mean” on page 25
• “Activating menu prompts” on page 25
Using a digital phone to navigate
When you use a 7316 or 7316E digital phone for telset programming, a group of buttons on the
telephone are used to move through programming headings and settings. The programming
overlay is used to relabel the four buttons used during programming. The overlay is supplied with
each telephone.
BCM50 Telset Administration Guide
Page 24

24 Using the telset configuration interface
Figure 8 7316E digital phone with programming overlay
7316E programming
Heading
Back
indicators
Place overlay over keys with
indicators
Show
Next
Navigation headings
HEADING SHOW
BACK NEXT
Using an IP phone to navigate the menus
IP telephones use the telephone directional buttons to move through the menu. The active
navigation buttons are shown as a small icon on the far left beside the message prompt.
See Figure 9.
Figure 9 Display and buttons, IP phone
DN: <DN #>
<Company name>
<telset menu prompt>
Navigation
icons
Featurecmd1cmd2cmd3
Heading
Back
Show
Next
Business
Series
Terminals
Programming
Record
7316 programming
indicators
NN40020-604NN40020-604
Navigation buttons
BACK
HEADING SHOW
NEXT
Page 25

What the navigation headings and directions mean
Figure 10 shows how the headings on the overlay and the navigational buttons on the IP phone are
used to navigate the programming menus.
Figure 10 How the navigation buttons work
Using the telset configuration interface 25
Programming buttons are active or inactive at different stages of programming. On the digital
phone, a button is active (meaning you can use that option), when the indicator next to it is lit.
On the IP phone, the navigation icons display the directional arrows that are active.
Activating menu prompts
Both telephones display the same menu prompts and action prompts that require the user to press
the display buttons to perform actions related to the current menu choice. Refer to Figure 11 and
Figure 12 for examples of each type of display.
BCM50 Telset Administration Guide
Page 26

26 Using the telset configuration interface
Figure 11 Display and buttons, digital phone
Show line:
COPY
Figure 12 Display and but tons, IP phone
<line>
Conference
Last num redial
DN: <DN #>
<Company name>
<telset menu prompt>
Navigation
icons
Feature
button and
static
display
prompt
Feature cmd1 cmd2 cmd3
Display text
Display button command
Display button
<Answer DN>
Intercom
Intercom
Display text
Display button command
Display buttons
NN40020-604NN40020-604
Navigation buttons
BACK
HEADING SHOW
NEXT
Page 27

Using the telset configuration interface 27
Top-level menu of the telset telephony configuration tree
Figure 13 describes the contents of each top-level menu on the FEATURE **266344
(**CONFIG) telephony configuration tree. Use the navigation buttons to move through the levels
of the tree.
In this section, main headings and their menus are color-coded.
Figure 13 Top-level menus of **CONFIG telset interface
About the FEATURE **CONFIG menu system
The following pages provide a number of flow charts that show the various levels of the telset
configuration tree. Note that the arrows indicate which navigation button is required to move to the
next level.
• “Terminals and Sets” on page 28
• “Lines” on page 34
• “Services” on page 36
BCM50 Telset Administration Guide
Page 28

28 Using the telset configuration interface
• “System speed dials” on page 39
• “Time and Date” on page 41
• “System programming” on page 43
• “Telco features” on page 50
• “Hardware” on page 51
• “Maintenance” on page 53
• “Usage metrics” on page 55
Terminals and Sets
Figure 14 through Figure 17 show the headings under the Terminals and Sets menu. These
records are used to set up System DN's for Telephones, and system devices.
NN40020-604NN40020-604
Page 29

Figure 14 Terminals and Sets (Sheet 1 of 4)
Using the telset configuration interface 29
BCM50 Telset Administration Guide
Page 30

30 Using the telset configuration interface
Figure 15 Terminals and Sets (Sheet 2 of 4)
NN40020-604NN40020-604
Page 31

Using the telset configuration interface 31
BCM50 Telset Administration Guide
Page 32

32 Using the telset configuration interface
Figure 16 Terminals and Sets (Sheet 3 of 4)
NN40020-604NN40020-604
Page 33

Figure 17 Terminals and Sets (Sheet 4of 4)
Using the telset configuration interface 33
BCM50 Telset Administration Guide
Page 34

34 Using the telset configuration interface
Lines
Figure 18 and Figure 19 show the headings under the telset interface Lines heading. These records
are used to set up individual lines that connect to the system from an external source.
Figure 18 Lines (Sheet 1 of 2)
NN40020-604NN40020-604
Page 35

Figure 19 Lines (Sheet 2 of 2)
Using the telset configuration interface 35
BCM50 Telset Administration Guide
Page 36

36 Using the telset configuration interface
Services
Figure 20, Figure 21 and Figure 22 show the headings und er the telset interface Services heading.
These records are used to set up scheduling for ring groups, restrictions, and routing. The ring
groups also are set up under this heading.
Figure 20 Services (Sheet 1 of 3)
NN40020-604NN40020-604
Page 37

Figure 21 Services (Sheet 2 of 3)
Using the telset configuration interface 37
BCM50 Telset Administration Guide
Page 38

38 Using the telset configuration interface
Figure 22 Services (Sheet3 of 3)
NN40020-604NN40020-604
Page 39

System speed dials
Figure 23 shows the headings under the telset interface System speed dials heading. These
records are used to set up lists of numbers that are accessed through a two- or three-digit code.
Figure 23 System speed dials
Using the telset configuration interface 39
BCM50 Telset Administration Guide
Page 40

40 Using the telset configuration interface
Passwords
Figure 24 shows the headings under the telset interface Passwords heading. These records are
used to adjust the passwords for the following system features:
• COS passwords
• Call log passwords
• Hospitality passwords
•SM password
NN40020-604NN40020-604
Page 41

Figure 24 Feature passwords
Using the telset configuration interface 41
Time and Date
Figure 25 shows the headings under the telset interface Time and Date head ing. These records are
used to adjust the time and date for the system. This is the time and date that appears on each
telephone.
BCM50 Telset Administration Guide
Page 42

42 Using the telset configuration interface
Figure 25 Time and Date
NN40020-604NN40020-604
Page 43

System programming
Figure 26 through Figure 32 shows the headings under the telset interface System prgrming
heading. These records are used to program global telephony settings. This includes the special
features for Hunt groups and Hospitality services.
Figure 26 System prgming (Sheet 1 of 7)
Using the telset configuration interface 43
BCM50 Telset Administration Guide
Page 44

44 Using the telset configuration interface
Figure 27 System prgming (Sheet 2 of 7)
NN40020-604NN40020-604
Page 45

Figure 28 System prgming (page 3 of 7)
Using the telset configuration interface 45
BCM50 Telset Administration Guide
Page 46

46 Using the telset configuration interface
Figure 29 System prgming (Sheet 4 of 7)
NN40020-604NN40020-604
Page 47

Figure 30 System prgming (page 5 of 7)
Using the telset configuration interface 47
BCM50 Telset Administration Guide
Page 48

48 Using the telset configuration interface
Figure 31 System prgming (Sheet 6 of 7)
NN40020-604NN40020-604
Page 49

Figure 32 System prgming (Sheet 7 of 7)
Using the telset configuration interface 49
BCM50 Telset Administration Guide
Page 50

50 Using the telset configuration interface
Telco features
Figure 33 shows the headings under the telset interface Telco features heading. These records are
used to program external voicemail numbers, and to program the outgoing name and number
(ONN) blocking for analog and BRI trunks.
Figure 33 Telco features
NN40020-604NN40020-604
Page 51

Hardware
Figure 34 and Figure 35 show the headings under the telset interface Hardware heading. These
records are used to program the ports on the main unit and any modules connected to the system
through the expansion units.
Figure 34 Hardware (Sheet 1 of 2)
Using the telset configuration interface 51
BCM50 Telset Administration Guide
Page 52

52 Using the telset configuration interface
Figure 35 Hardware (page 2 of 2)
NN40020-604NN40020-604
Page 53

Maintenance
Figure 36 shows the headings under the telset interface Maintenance heading. These records are
used to test or view statistics about the telephony system.
Figure 36 Maintenance (Sheet 1 of 2)
Using the telset configuration interface 53
BCM50 Telset Administration Guide
Page 54

54 Using the telset configuration interface
Figure 37 Maintenance (Sheet 2 of 2)
NN40020-604NN40020-604
Page 55

Usage metrics
Figure 38 shows the headings under the telset interface Usage Metrics heading. These records are
used to display performance records.
Figure 38 Usage Metrics
Using the telset configuration interface 55
BCM50 Telset Administration Guide
Page 56

56 Using the telset configuration interface
NN40020-604NN40020-604
Page 57

Index
Numerics
7316E
overlay 24
C
Conventions, guide 6
button options 6
buttons 6
command line 6
copyright 2
D
Display 6
I
installer programming 21
57
O
overlay 23
P
personal programming 22
programming
customizing your system 21
installer programming 21
personal programming 22
programming overlay 23
R
regulatory information 2
related publications 8
S
Symbols 6
T
trademarks 2
U
user programming 22
BCM50 Telset Administration Guide
Page 58

58 Index
NN40020-604NN40020-604
 Loading...