

Page 1

Multimedia Contact Center Setup and
Operation Guide
BCM 5.0
Contact Center
Document Status: Standard
Document Number: NN40170-602
Document Version: 01.01
Date: August 2009
Page 2

Copyright © 2009 Nortel Networks, All Rights Reserved
The information in this document is subject to change without notice. The statements, configurations, technical data, and
recommendations in this document are believed to be accurate and reliable, but are presented without express or implied
warranty. Users must take full responsibility for their applications of any products specified in this document. The
information in this document is proprietary to Nortel Networks.
Trademarks
Nortel, the Nortel logo, and the Globemark are trademarks of Nortel Networks.
Microsoft, MS, MS-DOS, Windows, and Windows NT are trademarks of Microsoft Corporation.
All other trademarks and registered trademarks are the property of their respective owners.
Sourced in Canada
Page 3

Task List
To set the Multimedia Contact Center public host name ...............................................24
To route calls using the CLID/DNIS table......................................................................28
To assign a callback route for a skillset or the system administrator mailbox ...............31
To configure outdialing using PRI lines .........................................................................33
To assign an outgoing line to a line pool .......................................................................38
To create a restriction on the BCM system ...................................................................42
To add a restriction to the BCM system ........................................................................43
To set the maximum number of outcalling channels .....................................................45
To configure the Dialing Translation Table ....................................................................46
To enable Multimedia Contact Center agents ...............................................................49
To add a Multimedia Contact Center agent ...................................................................49
To add more than one agent .........................................................................................51
To install Multimedia Contact Center software on an agent’s computer .......................53
To configure an agent’s server settings.........................................................................54
To configure an agent’s name .......................................................................................55
To download web pages or view lists of pages .............................................................63
To customize web pages ...............................................................................................65
An overview of customizing an MSG.html file for the ABC Computer Company...........65
To add the MMCC interface ..........................................................................................66
To upload or delete customized files .............................................................................67
To upload a media file ...................................................................................................70
To create a list of web pages.........................................................................................71
To view a log file ............................................................................................................73
3
Multimedia Contact Center Setup and Operation Guide
Page 4

4 Task list
NN40170-602
Page 5

Contents
How to get help . . . . . . . . . . . . . . . . . . . . . . . . . . . . . . . . . . . . . . . . . . . . . . . . 7
Chapter 1
Getting started . . . . . . . . . . . . . . . . . . . . . . . . . . . . . . . . . . . . . . . . . . . . . . . . . 9
Audience . . . . . . . . . . . . . . . . . . . . . . . . . . . . . . . . . . . . . . . . . . . . . . . . . . . . . . . . . . . . 9
Acronyms . . . . . . . . . . . . . . . . . . . . . . . . . . . . . . . . . . . . . . . . . . . . . . . . . . . . . . . . . . . . 9
Symbols and text conventions . . . . . . . . . . . . . . . . . . . . . . . . . . . . . . . . . . . . . . . . . . . 10
Related publications . . . . . . . . . . . . . . . . . . . . . . . . . . . . . . . . . . . . . . . . . . . . . . . . . . 11
Chapter 2
Multimedia Contact Center overview . . . . . . . . . . . . . . . . . . . . . . . . . . . . . . 13
How Multimedia Contact Center works for callers . . . . . . . . . . . . . . . . . . . . . . . . . . . . 14
Multimedia Contact Center caller interface . . . . . . . . . . . . . . . . . . . . . . . . . . . . . . 16
How Multimedia Contact Center works for agents . . . . . . . . . . . . . . . . . . . . . . . . . . . . 16
Multimedia Contact Center agent interface . . . . . . . . . . . . . . . . . . . . . . . . . . . . . . 17
Multimedia Contact Center call types . . . . . . . . . . . . . . . . . . . . . . . . . . . . . . . . . . . . . 18
Phone and browser calls . . . . . . . . . . . . . . . . . . . . . . . . . . . . . . . . . . . . . . . . . . . . 18
Browser-only calls . . . . . . . . . . . . . . . . . . . . . . . . . . . . . . . . . . . . . . . . . . . . . . . . . 20
Requirements for using CallPilot Manager to set up Multimedia Contact Center . . . . 21
System requirements . . . . . . . . . . . . . . . . . . . . . . . . . . . . . . . . . . . . . . . . . . . . . . 21
Browser requirements . . . . . . . . . . . . . . . . . . . . . . . . . . . . . . . . . . . . . . . . . . . . . . 21
5
Chapter 3
Setting up Multimedia Contact Center . . . . . . . . . . . . . . . . . . . . . . . . . . . . . 23
Creating a user account for Multimedia Contact Center . . . . . . . . . . . . . . . . . . . . . . . 23
Enabling Multimedia Contact Center . . . . . . . . . . . . . . . . . . . . . . . . . . . . . . . . . . . . . . 24
Setting Multimedia Contact Center parameters . . . . . . . . . . . . . . . . . . . . . . . . . . . . . . 24
Assigning routing to Multimedia Contact Center calls . . . . . . . . . . . . . . . . . . . . . . . . . 27
Routing tables . . . . . . . . . . . . . . . . . . . . . . . . . . . . . . . . . . . . . . . . . . . . . . . . . . . . 27
Routing Multimedia Contact Center calls using the CLID/DNIS Routing table . . . . . . 28
Assigning a callback route for Multimedia Contact Center . . . . . . . . . . . . . . . . . . . . . 31
Configuring outdialing using PRI lines . . . . . . . . . . . . . . . . . . . . . . . . . . . . . . . . . . . . . 33
Assigning an outgoing line to a line pool . . . . . . . . . . . . . . . . . . . . . . . . . . . . . . . . . . . 38
Creating a Multimedia Contact Center dial plan . . . . . . . . . . . . . . . . . . . . . . . . . . . . . 42
Example of a dial plan that restricts calls based on their country . . . . . . . . . . . . . 42
Setting the maximum number of outcalling channels . . . . . . . . . . . . . . . . . . . . . . . . . 44
Configuring the Dialing Translation Table . . . . . . . . . . . . . . . . . . . . . . . . . . . . . . . . . . 46
Chapter 4
Multimedia Contact Center agents . . . . . . . . . . . . . . . . . . . . . . . . . . . . . . . . 49
Enabling Multimedia Contact Center agents . . . . . . . . . . . . . . . . . . . . . . . . . . . . . . . . 49
Adding Multimedia Contact Center agents to Contact Center . . . . . . . . . . . . . . . . . . . 49
Adding more than one agent . . . . . . . . . . . . . . . . . . . . . . . . . . . . . . . . . . . . . . . . . . . . 51
Multimedia Contact Center Setup and Operation Guide
Page 6

6 Contents
Installing Multimedia Contact Center software on an agent’s computer . . . . . . . . . . . 52
Configuring an agent’s server settings . . . . . . . . . . . . . . . . . . . . . . . . . . . . . . . . . . . . 54
Configuring an agent’s name . . . . . . . . . . . . . . . . . . . . . . . . . . . . . . . . . . . . . . . . . . . . 55
Using Follow-me browsing . . . . . . . . . . . . . . . . . . . . . . . . . . . . . . . . . . . . . . . . . . . . . . 56
Chapter 5
Multimedia Contact Center messages . . . . . . . . . . . . . . . . . . . . . . . . . . . . . 57
Status and error messages . . . . . . . . . . . . . . . . . . . . . . . . . . . . . . . . . . . . . . . . . . . . . 58
Recording Multimedia Contact Center announcements . . . . . . . . . . . . . . . . . . . . . . . 62
Downloading web pages and viewing web page lists . . . . . . . . . . . . . . . . . . . . . . . . . 63
Customizing web pages . . . . . . . . . . . . . . . . . . . . . . . . . . . . . . . . . . . . . . . . . . . . . . . 65
Uploading or deleting web pages . . . . . . . . . . . . . . . . . . . . . . . . . . . . . . . . . . . . . . . . 67
Creating and distributing web page lists . . . . . . . . . . . . . . . . . . . . . . . . . . . . . . . . . . . 71
Requirements for agents using Multimedia Contact Center . . . . . . . . . . . . . . . . . 52
Multimedia Contact Center unavailable message . . . . . . . . . . . . . . . . . . . . . . . . . 58
No agents logged on message . . . . . . . . . . . . . . . . . . . . . . . . . . . . . . . . . . . . . . . 58
Bad calling preferences message . . . . . . . . . . . . . . . . . . . . . . . . . . . . . . . . . . . . . 59
Choose how to connect message . . . . . . . . . . . . . . . . . . . . . . . . . . . . . . . . . . . . . 59
Session completed message . . . . . . . . . . . . . . . . . . . . . . . . . . . . . . . . . . . . . . . . 60
User busy message . . . . . . . . . . . . . . . . . . . . . . . . . . . . . . . . . . . . . . . . . . . . . . . 60
Lines busy message . . . . . . . . . . . . . . . . . . . . . . . . . . . . . . . . . . . . . . . . . . . . . . . 60
Make call failed message . . . . . . . . . . . . . . . . . . . . . . . . . . . . . . . . . . . . . . . . . . . 61
No answer message . . . . . . . . . . . . . . . . . . . . . . . . . . . . . . . . . . . . . . . . . . . . . . . 61
Connected message . . . . . . . . . . . . . . . . . . . . . . . . . . . . . . . . . . . . . . . . . . . . . . . 61
Call transferred message . . . . . . . . . . . . . . . . . . . . . . . . . . . . . . . . . . . . . . . . . . . 62
Web refresh message . . . . . . . . . . . . . . . . . . . . . . . . . . . . . . . . . . . . . . . . . . . . . . 62
Downloading, customizing, and uploading pages . . . . . . . . . . . . . . . . . . . . . . . . . 65
Overviews of downloading, customizing and uploading pages . . . . . . . . . . . . . . . 65
Adding MMCC interfaces . . . . . . . . . . . . . . . . . . . . . . . . . . . . . . . . . . . . . . . . . . . 66
Chapter 6
Logs. . . . . . . . . . . . . . . . . . . . . . . . . . . . . . . . . . . . . . . . . . . . . . . . . . . . . . . . . 73
Viewing log files . . . . . . . . . . . . . . . . . . . . . . . . . . . . . . . . . . . . . . . . . . . . . . . . . . . . . . 73
NN40170-602
Page 7

How to get help
This section explains how to get help for Nortel products and services.
Getting Help from the Nortel Web site
The best way to get technical support for Nortel products is from the Nortel Technical Support
Web site:
http://www.nortel.com/support
This site provides quick access to software, documentation, bulletins, and tools to address issues
with Nortel products. More specifically, the site enables you to:
• download software, documentation, and product bulletins
• search the Technical Support Web site and the Nortel Knowledge Base for answers to
technical issues
• sign up for automatic notification of new software and documentation for Nortel equipment
• open and manage technical support cases
7
Getting Help over the phone from a Nortel Solutions Center
If you don’t find the information you require on the Nortel Technical Support Web site, and have a
Nortel support contract, you can also get help over the phone from a Nortel Solutions Center.
In North America, call 1-800-4NORTEL (1-800-466-7835).
Outside North America, go to the following Web site to obtain the phone number for your region:
http://www.nortel.com/callus
Getting Help from a specialist by using an Express Routing Code
To access some Nortel Technical Solutions Centers, you can use an Express Routing Code (ERC)
to quickly route your call to a specialist in your Nortel product or service. To locate the ERC for
your product or service, go to:
http://www.nortel.com/erc
Getting Help through a Nortel distributor or reseller
If you purchased a service contract for your Nortel product from a distributor or authorized
reseller, contact the technical support staff for that distributor or reseller.
Multimedia Contact Center Setup and Operation Guide
Page 8

8 How to get help
NN40170-602
Page 9

Chapter 1
Getting started
This guide assists a Contact Center administrator with installing and configuring Multimedia
Contact Center for Nortel Business Communications Manager (BCM) 50 and 450 platforms
running BCM 5.0.
Audience
This guide is intended for people who install and configure the Multimedia Contact Center
application. This guide assumes that you are familiar with using Business Element Manager and
CallPilot Manager. For more information, see the Nortel Business Communications Manager
Administration and Security Guide and the CallPilot Manager Set Up and Operation Guide.
Acronyms
The following is a list of acronyms used in this guide.
9
Table 1
Acronym Description
BCM Business Communications Manager
CLID Calling line identifier
DNIS Dialed number identification service
ERC Express routing code
PSTN Public switched telephone network
Multimedia Contact Center Setup and Operation Guide
Page 10
10 Chapter 1 Getting started
Symbols and text conventions
These symbols are used to highlight critical information for the BCM system:
Caution: Alerts you to conditions where you can damage the equipment.
Danger: Alerts you to conditions where you can get an electrical shock.
Warning: Alerts you to conditions where you can cause the system to fail or work
improperly.
Note: Alerts you to important information.
Tip: Alerts you to additional information that can help you perform a task.
These conventions and symbols are used to represent the Business Series Terminal display and
dialpad dialpad These text conventions are used in this guide to indicate the information described.
Convention Example Used for
Word in a special font (shown in
the top line of the display)
Underlined word in capital letters
(shown in the bottom line of a two
line display telephone)
Dialpad buttons
Convention Description
bold Courier
text
Pswd:
PLAY
£
Indicates command names and options and text that you need to enter.
Example: Use the
Example: Enter
Command line prompts on display telephones.
Display option. Available on two line display
telephones
option on the display to proceed.
Buttons you press on the dialpad to select a
particular option.
info command.
show ip {alerts|routes}.
. Press the button directly below the
NN40170-602
Page 11

Convention Description
italic text Indicates book titles
Chapter 1 Getting started 11
plain Courier
text
FEATURE
HOLD
RELEASE
Related publications
This document refers to other related publications, which appear in the following list. To locate
specific information, you can see the Master Index of BCM Library.
CallPilot Manager Set Up and Operation Guide (NN40170-300)
Intelligent Contact Center Set Up and Operation Guide (NN40170-301)
Keycode Installation Guide (NN40010-301)
Multimedia Contact Center Web Developer Guide (NN40040-100)
Nortel Business Communications Manager 5.0 Administration and Security Guide
(NN40170-603)
Indicates command syntax and system output (for example, prompts
and system messages).
Example:
Set Trap Monitor Filters
Indicates that you press the button with the coordinating icon on
whichever set you are using.
Multimedia Contact Center Setup and Operation Guide
Page 12

12 Chapter 1 Getting started
NN40170-602
Page 13

Chapter 2
Multimedia Contact Center overview
With Multimedia Contact Center, agents and callers can participate in multimedia calls that
include:
• speaking over a public switched telephone network (PSTN) voice connection
• text chatting
• exchanging and viewing web pages
• viewing screen captures sent by an agent
In this document, the server that Multimedia Contact Center is installed on is referred to as
<bcmip>
where:
<bcmip> is the ip address of the BCM system
To see an example of Multimedia Contact Center go to:
https://<bcmip>/ivb-html/demo/Mainpage.html
13
Multimedia Contact Center Setup and Operation Guide
Page 14
14 Chapter 2 Multimedia Contact Center overview
How Multimedia Contact Center works for callers
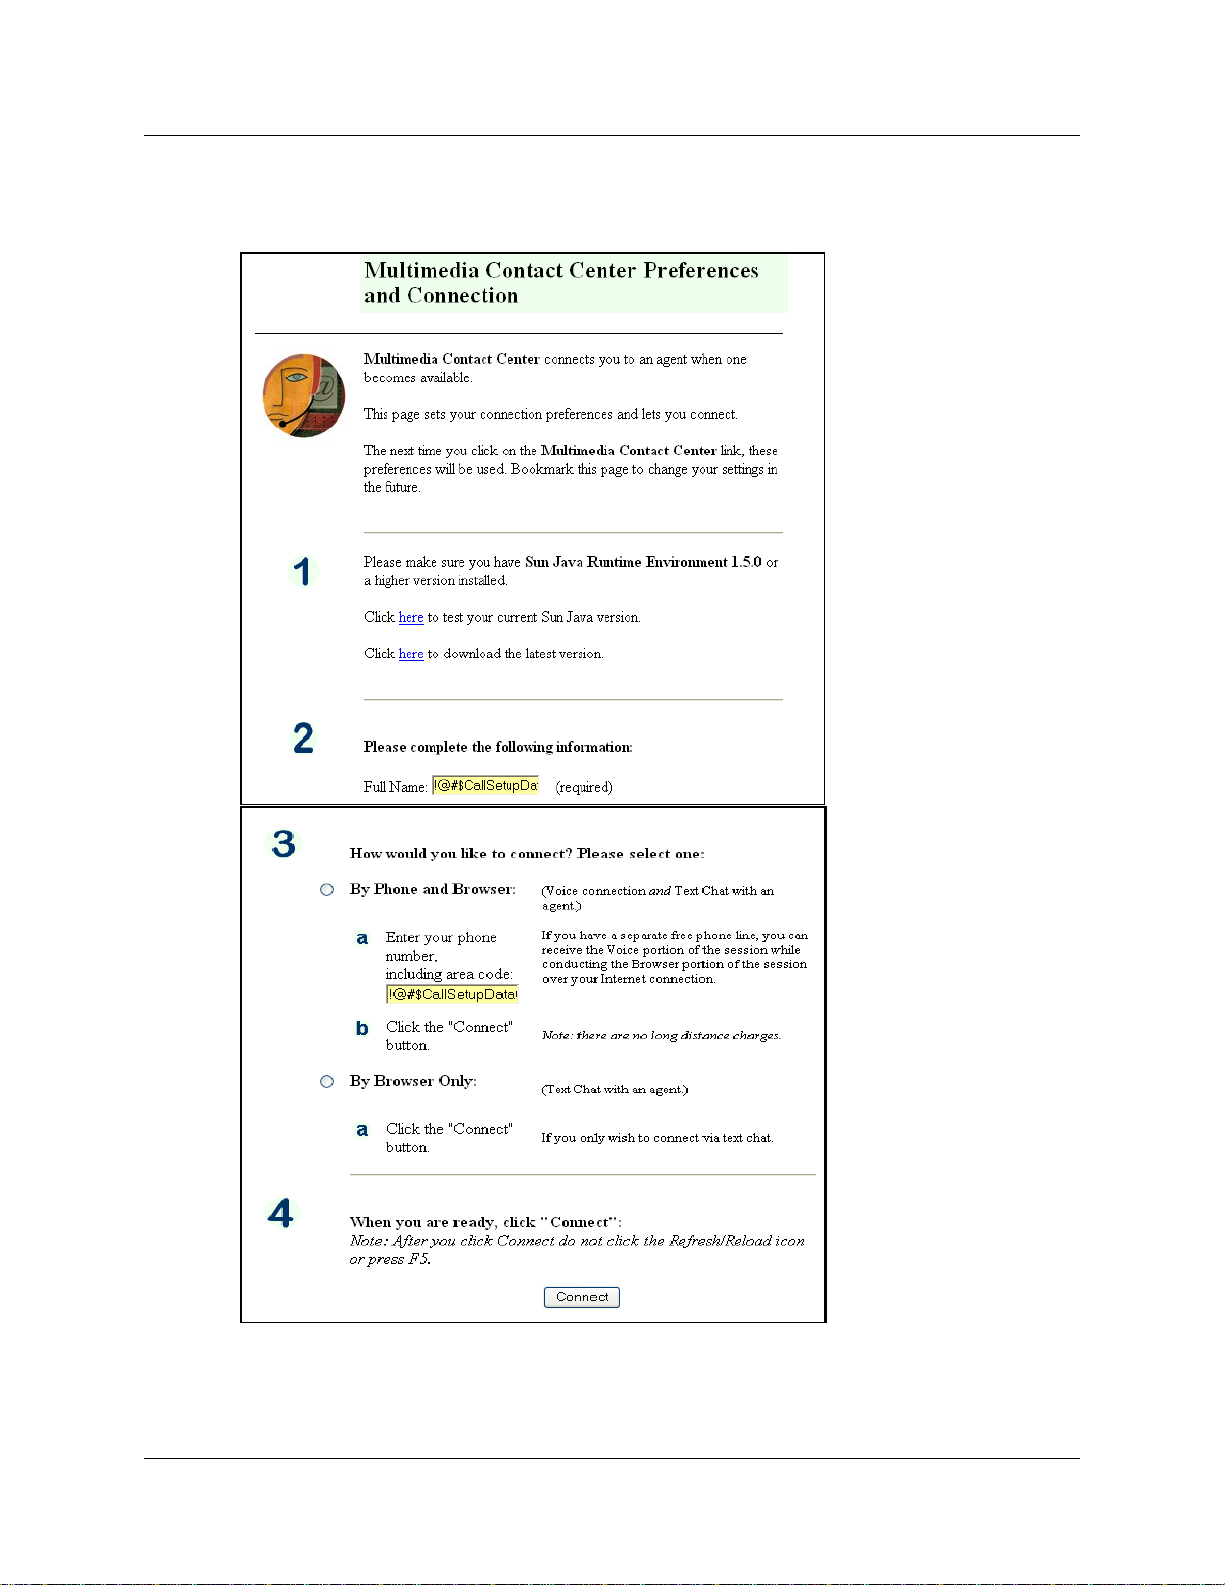
When callers on a web site click a multimedia HTML link, the Call setup page appears.
NN40170-602
Page 15
Chapter 2 Multimedia Contact Center overview 15
In the call setup page, callers specify their calling preferences. Callers can access the media types
based on their needs and resources. Callers with separate data and PSTN voice lines can have a
PSTN voice call while they view, receive, or even send web pages to agents. For information on
Multimedia Contact Center call types, see “Multimedia Contact Center call types” on page 18.
After a caller specifies their preferences, by clicking the Connect button, the following
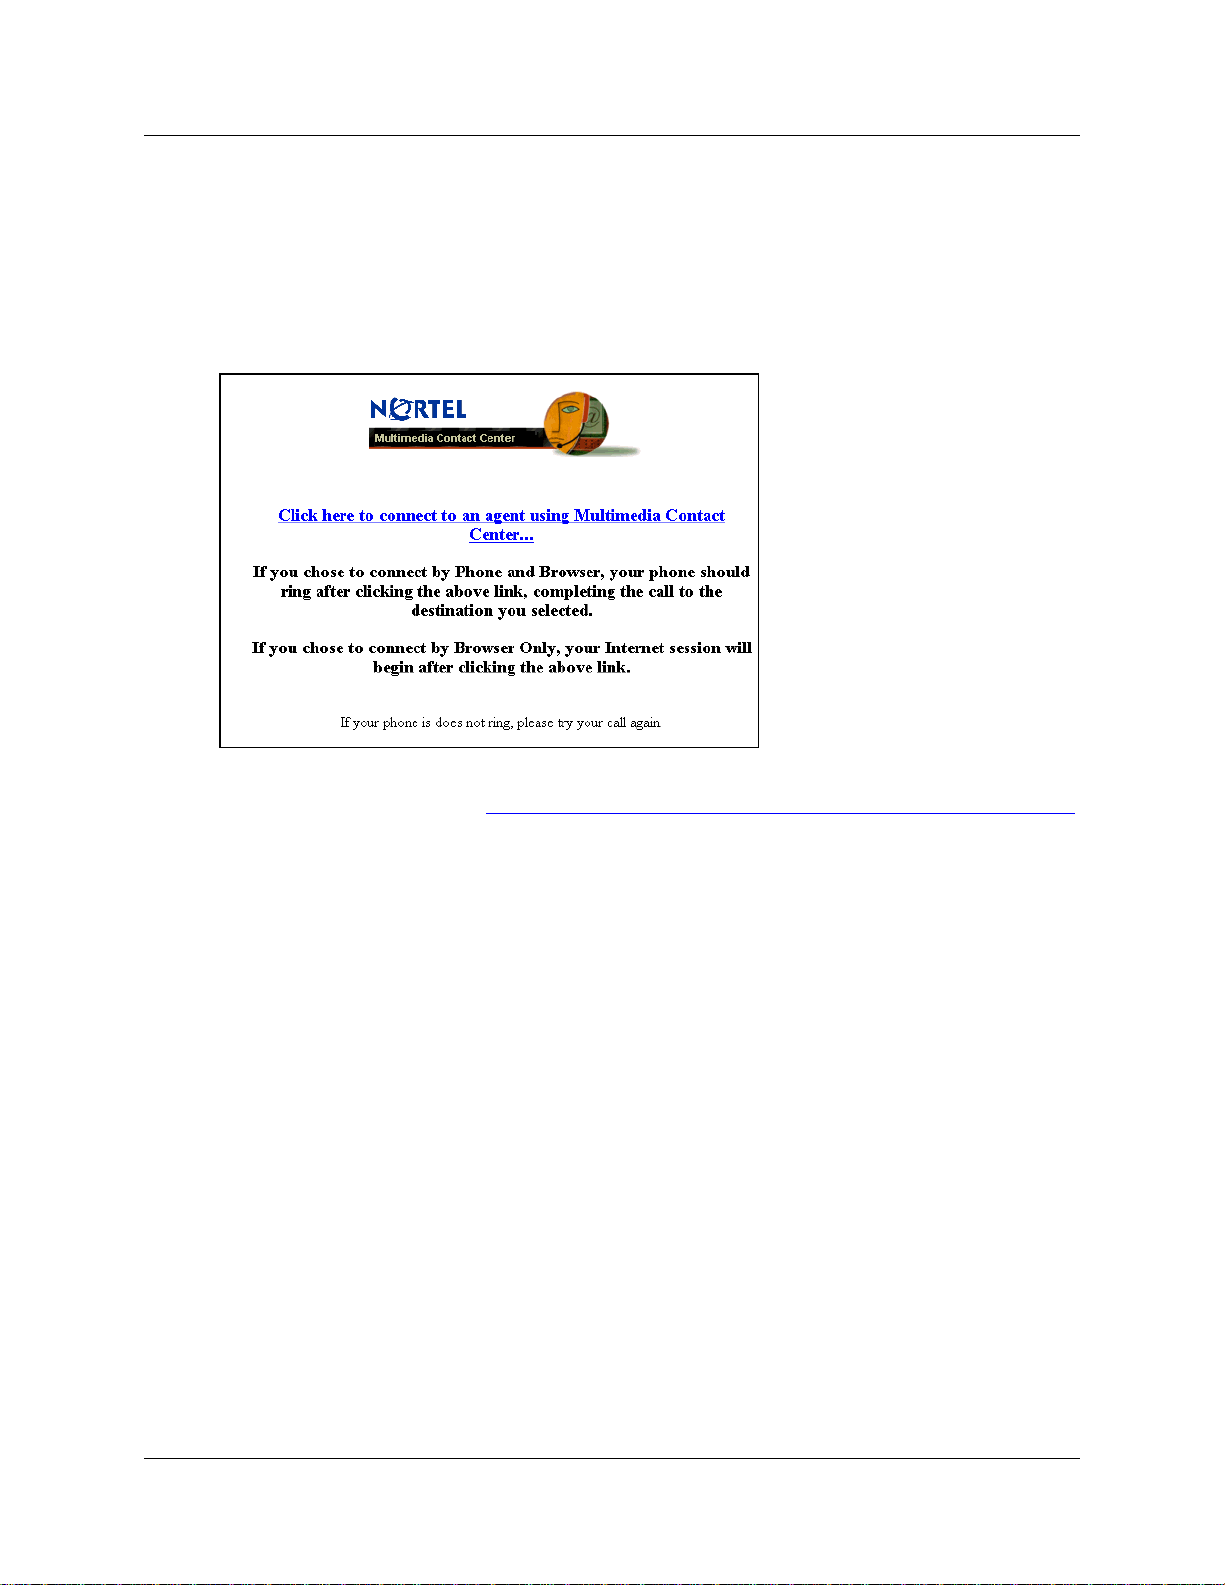
confirmation page displays.
After the caller clicks the link, Click here to connect to an agent using Multimedia Contact Center,
the multimedia call enters the Contact Center. Based on the rules created by the Contact Center
administrator, the request for an agent is sent to the appropriate skillset. If an agent is not
immediately available, the caller can receive periodic HTML messages (web refresh). The Contact
Center administrator programs these messages. The messages can thank callers for their interest,
inform them that there are no agents currently available, and tell them that they will be connected
to the first available agent.
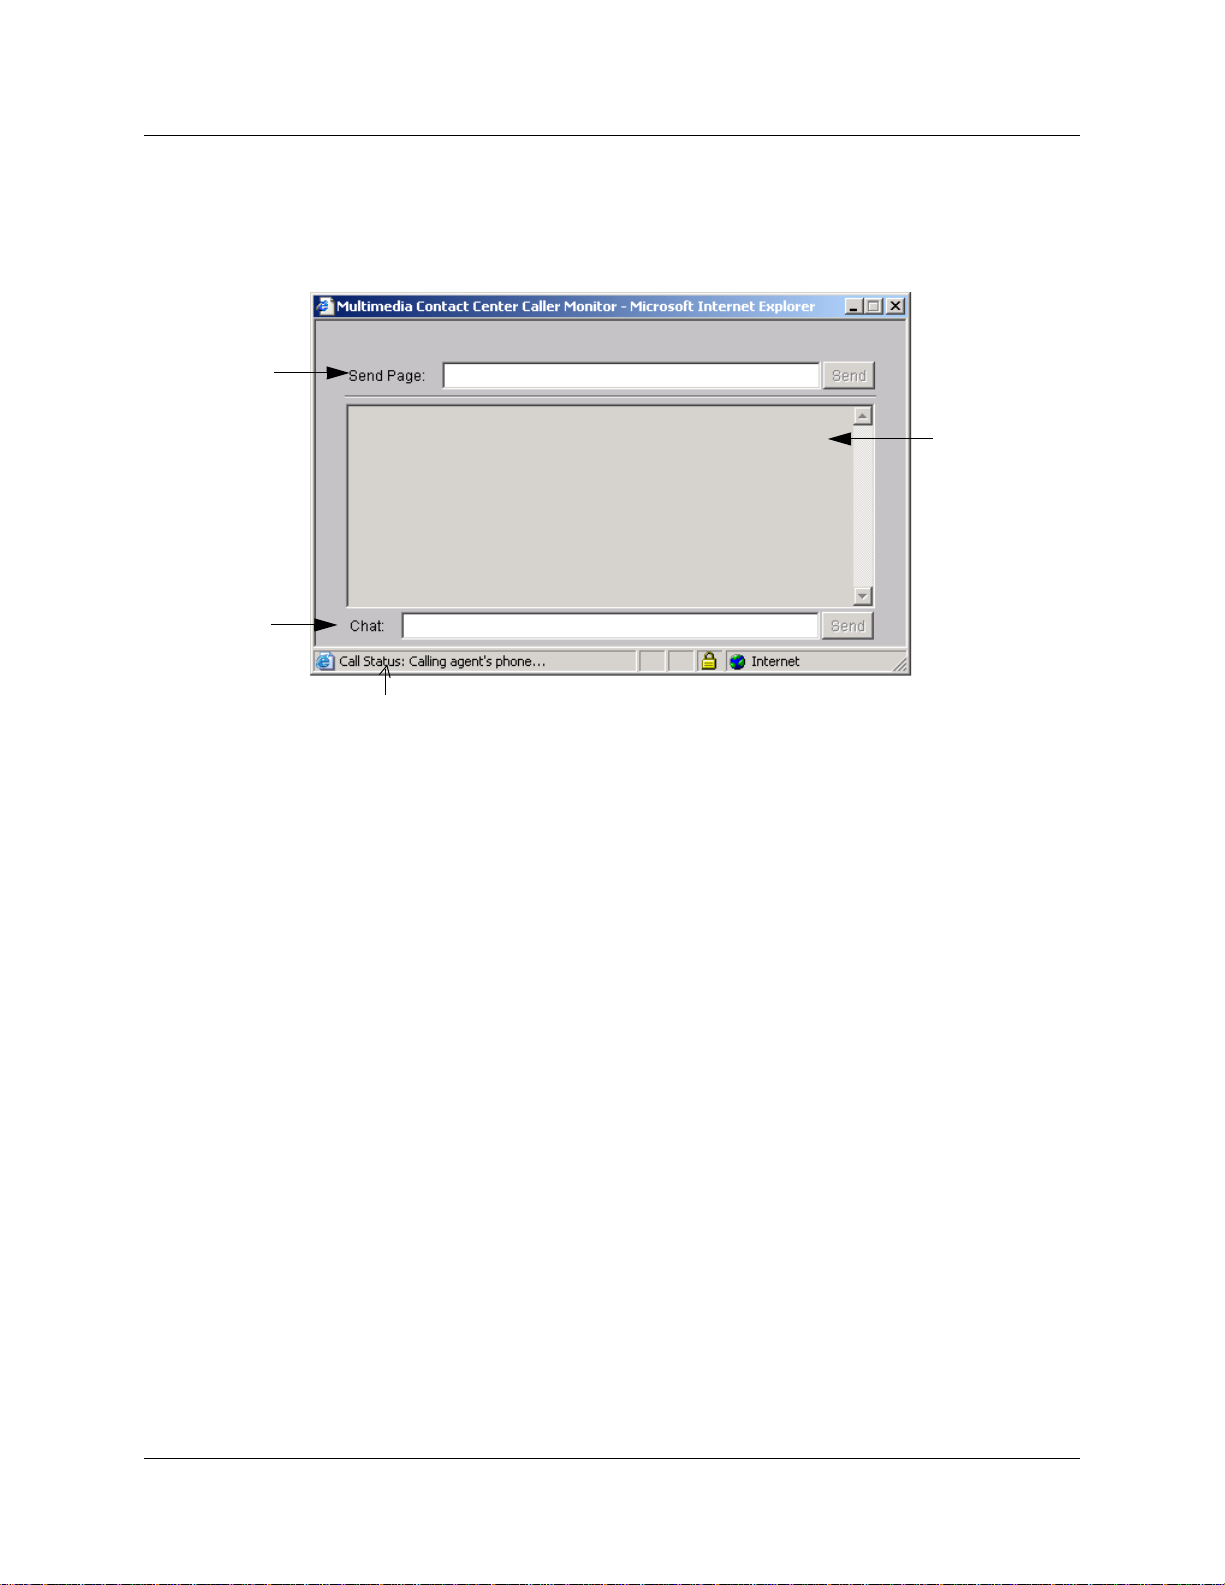
When the call is answered by an agent, the Multimedia Contact Center caller interface appears in
the caller’s web browser (see “Multimedia Contact Center caller interface” on page 16).
Multimedia Contact Center Setup and Operation Guide
Page 16
16 Chapter 2 Multimedia Contact Center overview
Multimedia Contact Center caller interface
The caller interface has one window that lets the caller control the progress of the call and to send
web pages to the agent.
Click Send to
send a web
page to the agent.
Type a message
and click send to
chat with the
agent.
View the status of your call.
Text messages
sent between
the caller and
the agent
appear here.
How Multimedia Contact Center works for agents
Depending on the call preferences the caller has requested in the call setup page, the agent can
have a browser-only or a phone- and-browser call with the caller. The agent can use follow-me
browsing to show the caller a sequence of web pages. The agent can also send pages or screen
captures, or have a text chat with the caller.
For a phone-and-browser call, the agent must answer the phone, and then the agent interface and
browser window appear on the agent’s computer. For a browser-only call, the agent interface and
browser window appear immediately, so the agent cannot decline this type of call. The agent’s
browser window shows the web page that the caller originally clicked to start the Multimedia
Contact Center call.
NN40170-602
Page 17
Chapter 2 Multimedia Contact Center overview 17
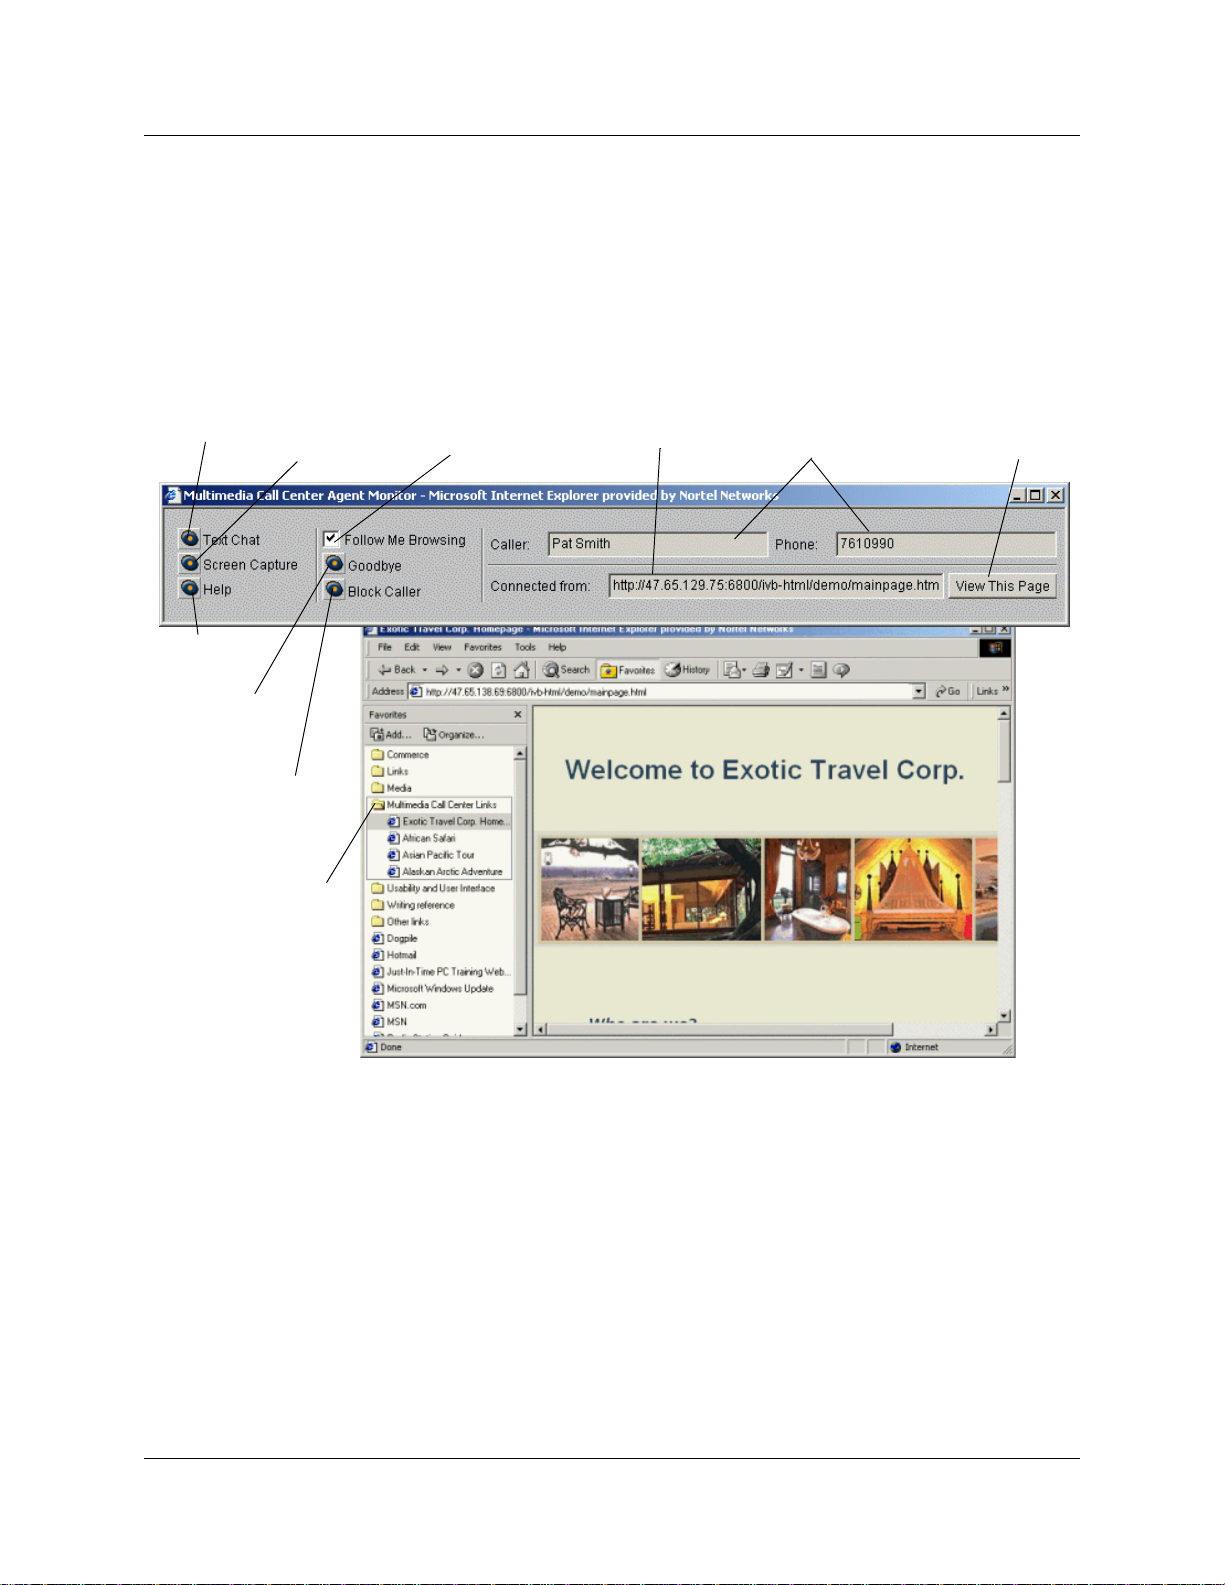
Multimedia Contact Center agent interface
The Multimedia Contact Center agent interface has two windows. The first window lets an agent
control the progress of the call. The second window displays the Multimedia Contact Center web
pages that the agent sends to a caller, or that a caller sends to them.
Initiates a
text chat
with the
caller
Opens
Help
Ends the
browser
session
Blocks calls
from
unwanted
callers
Takes a screen
capture of a
web page,
window, or
desktop.
Contains a
preset list of
web pages
Controls whether
web pages
clicked by the
agent are sent to
the caller
Shows the URL
of the web page
on which the
caller clicked the
MMCC icon.
Shows the name
and phone
number the caller
specified in the
call setup page
Displays in the
second window
the web page the
caller clicked the
MMCC icon on.
Multimedia Contact Center Setup and Operation Guide
Page 18
18 Chapter 2 Multimedia Contact Center overview
Multimedia Contact Center call types
Callers with a PSTN voice connection and a data connection, and callers with only a data
connection can have a multimedia session with a Multimedia Contact Center agent.
Phone and browser calls
Phone and browser calls (PSTN voice and data) are routed by Contact Center to agents.
After a caller clicks the Multimedia Contact Center icon, the Contact Center
Agent-centric call
How phone and browser calls are routed to agents
For this type of call, the caller has a separate PSTN voice and Internet connection, and is not using
the telephone.
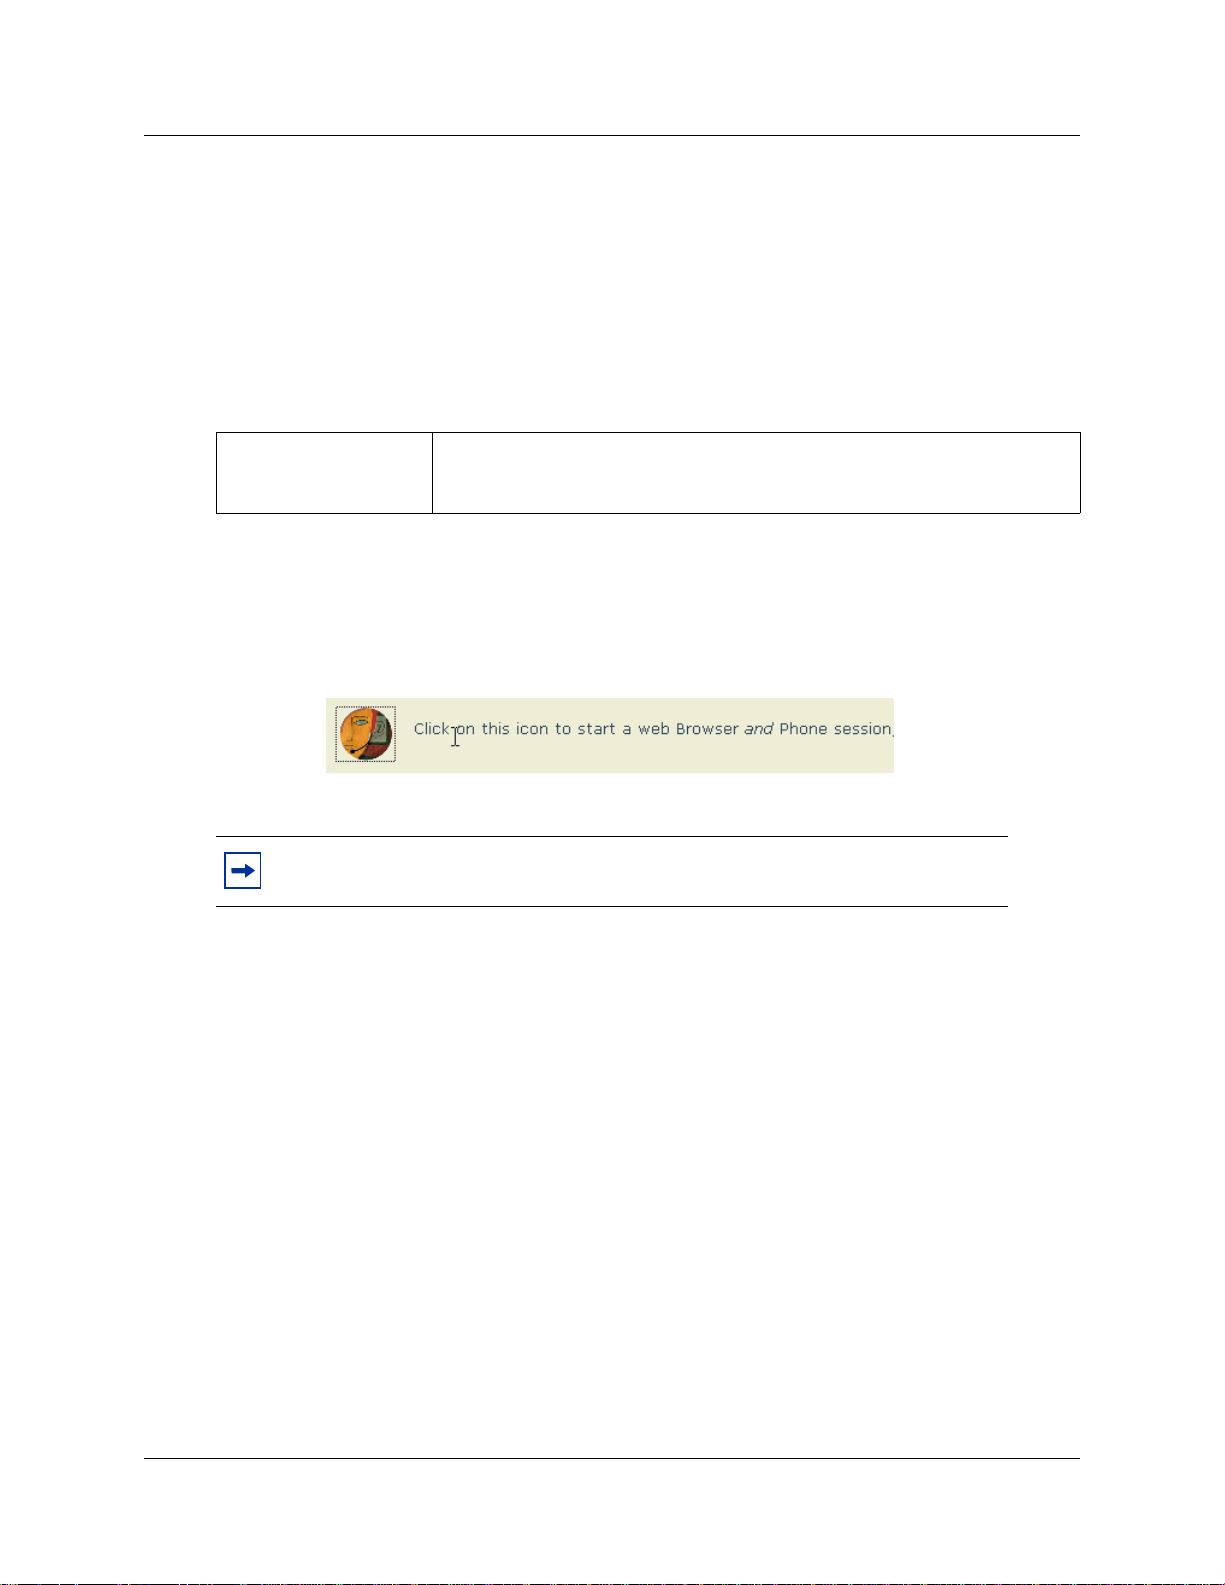
1 The caller clicks the Multimedia Contact Center icon on a web page.
phones the caller when an agent is available. The Contact Center then connects
the call to the agent.
The Multimedia Contact Center Preferences and Connection page appears.
Note: If cookies are enabled, preferences from the caller’s previous call (if any)
appear in the page.
2 The caller completes the set up procedure. The caller:
a verifies that their version of Sun Java Runtime Environment is the most recent version
(1.5.0 or higher), and downloads the most recent version if theirs is not.
b enters their full name.
c selects the By Phone and Browser radio button (a PSTN voice call with co-browsing and
text chat with an agent).
d enters their phone number, with area code, in the phone number field.
NN40170-602
Page 19
Chapter 2 Multimedia Contact Center overview 19
e clicks Connect.
The Caller Setup confirmation page appears.
f clicks the link Click here to connect to an agent using Multimedia Contact Center.
A request for an agent is sent over the IP network to the Contact Center.
The Multimedia Contact Center caller interface is launched in a new browser window on the
caller’s PC.
Note: While the caller is waiting, web-refreshed HTML pages appear in their
browser. These pages correspond to the announcements callers hear on a PSTN
voice call. A new web page can be pushed for every Contact Center
announcement.
Note: Because the Multimedia Contact Center application is real-time response
product, agents must remove or disable any power-saving settings that can affect
the response time of the agent to the caller.
3 When a Multimedia Contact Center agent becomes available, the caller's phone rings.
4 The caller answers the call.
5 The Contact Center routes the phone (PSTN voice) portion of the call to the Multimedia
Contact Center agent.
The agent’s set rings and displays “www:ss” (where ss = skillset number) to signify that the
call is a multimedia call.
6 The agent answers the call on their set and the agent’s and the caller's audio path are
connected, and the agent and caller's web pages are synchronized.
The Multimedia Contact Center agent interface is launched in a new browser window on the
agent’s PC.
7 The agent sends appropriate web pages to the caller. The agent can have a text chat session
with the caller.
Note: All agents must close unused browser windows at the end of a browser
session for either a phone and browser call or a browser-only call to ensure that
the next call opens in a new and full-sized browser window.
Multimedia Contact Center Setup and Operation Guide
Page 20
20 Chapter 2 Multimedia Contact Center overview
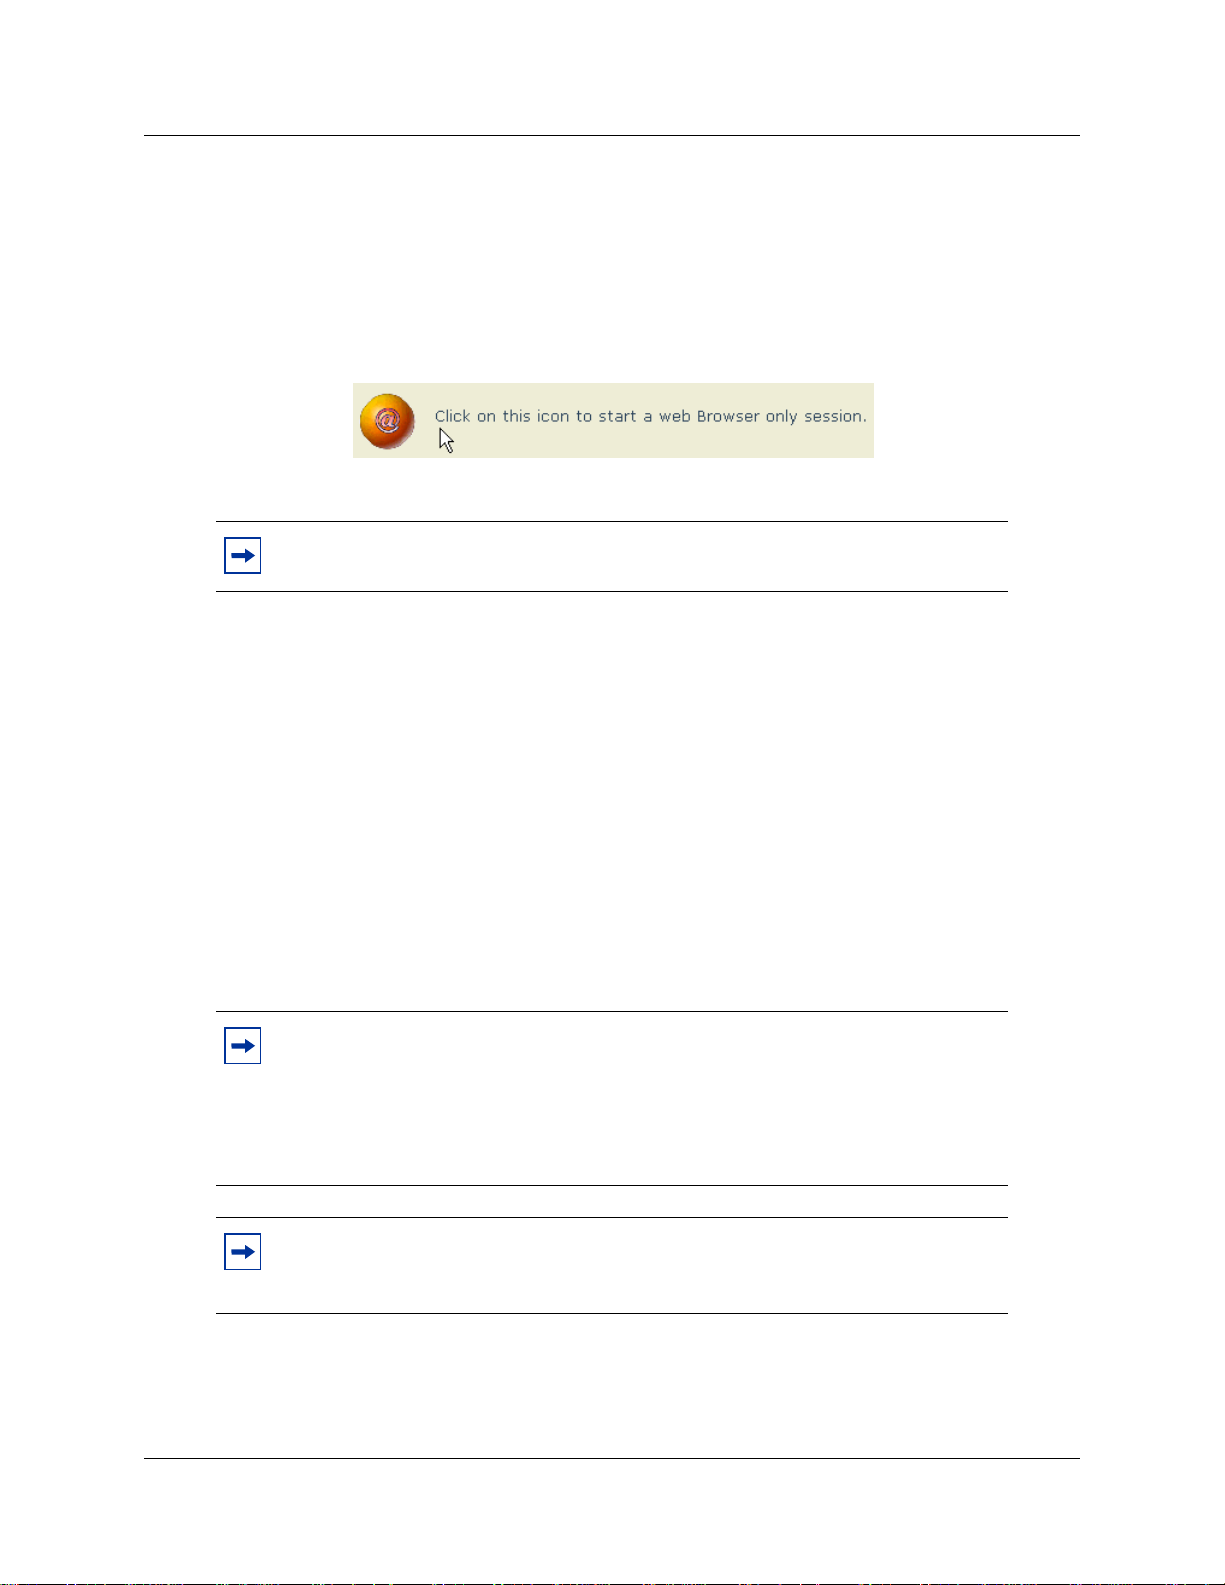
Browser-only calls
For this type of call, the caller needs an Internet connection. A browser-only call (data only call)
can include text chat and web pages that the agent sends to the caller.
How a browser-only call works
1 The caller clicks the Multimedia Contact Center icon on a web page.
The call setup page appears.
Note: If cookies are enabled, preferences from the caller’s previous call (if any)
appear in the page.
2 The caller completes the set up procedure. The caller
a verifies that their version of Sun Java Runtime Environment is the most recent version
(1.5.0 or higher), and downloads the most recent version if theirs is not.
b enters their full name.
c selects the By Browser Only radio button (co-browsing and text chat with an agent).
d clicks Connect.
The Caller Setup confirmation page appears.
e Clicks the link Click here to connect to an agent using Multimedia Contact Center.
A request for an agent is sent over the IP network to the Contact Center.
The Multimedia Contact Center caller interface is launched in a new browser window on the
caller’s PC.
Note: While the caller is waiting, web-refreshed HTML pages appear in their
browser. These pages correspond to the announcement callers hear on a PSTN
voice call. A new web page can be sent by an agent for every Contact Center
announcement, along with information such as the number of agents in the skillset
and the number of calls in the skillset. For a full list of CGI parameters, see the
Multimedia Contact Center Web Developer Guide.
Note: Because the Multimedia Contact Center application is real-time response
product, agents must remove or disable any power-saving settings that can affect
the response time of the agent to the caller.
NN40170-602
Page 21
Chapter 2 Multimedia Contact Center overview 21
3 When a Multimedia Contact Center agent is available, the Multimedia Contact Center agent
interface is launched in a new browser window on the agent’s PC (see “Multimedia Contact
Center agent interface” on page 17).
The agent and caller web pages are synchronized.
4 The agent pushes appropriate web pages to the caller. The agent can have a text chat session
with the caller.
Note: If you add a restriction to the Voicemail DN, you also restrict all outcalling calls,
including external transfers from CCR Trees, Off-premise Message Notification, and
Outbound Transfers.
Requirements for using CallPilot Manager to set up Multimedia Contact Center
You set up Multimedia Contact Center using CallPilot Manager, the web-based administration
tool. You access CallPilot Manager with a web browser from a computer on your network.
System requirements
Before you use CallPilot Manager to set up Multimedia Contact Center, you must have your
Business Communications Manager (BCM) system configured and the BCM software installed.
To enable a keycode, see “Enabling Multimedia Contact Center” on page 24.
Computer requirements
The computer you use to run CallPilot Manager must have:
• Windows XP Professional SP3, Windows Vista SP2, Windows Vista Business, Windows
Vista Ultimate, or Windows Vista Enterprise (32-bit and 64-bit).
• 64 MB RAM and 10 MB disk space
• minimum screen resolution of 1024 by 768 pixels
• all power-saving settings on the PC removed or disabled
Browser requirements
To use CallPilot Manager you must have:
• Microsoft Internet Explorer 6.0, 7.0, 8.0
• Java Runtime Environment version 1.5.0 or higher (you can download the latest version of
JRE from the Java web site)
If you use Microsoft Internet Explorer, set the following parameters:
• Check for newer versions: every visit to the page
• Java JIT compiler enabled: on
Multimedia Contact Center Setup and Operation Guide
Page 22

22 Chapter 2 Multimedia Contact Center overview
If you use Microsoft Internet Explorer 7.0, set these additional parameters:
• Add the BCM IP address to the trusted site list.
• Allow phishing for the BCM IP address.
For more information about using CallPilot Manager or Nortel Contact Center, see the CallPilot
Manager Set Up and Operation Guide and the Intelligent Contact Center Set Up and Operation
Guide.
NN40170-602
Page 23

Chapter 3
Setting up Multimedia Contact Center
Setting up Multimedia Contact Center involves:
• Creating a user account for Multimedia Contact Center
• Enabling Multimedia Contact Center
• Setting Multimedia Contact Center parameters
• Assigning routing to Multimedia Contact Center calls
— Routing tables
• Routing Multimedia Contact Center calls using the CLID/DNIS Routing table
• Assigning a callback route for Multimedia Contact Center
• Configuring outdialing using PRI lines
• Assigning an outgoing line to a line pool
• Creating a Multimedia Contact Center dial plan
— Example of a dial plan that restricts calls based on their country
• Setting the maximum number of outcalling channels
• Configuring the Dialing Translation Table
23
Creating a user account for Multimedia Contact Center
In Business Element Manager you can create user accounts that allow several people to have
access to Multimedia Contact Center settings. A user account allows users to access their own
information, but not anyone else’s.
For example, if you have a web developer who creates custom web pages for your business, you
can create a user account for them. This gives them their own user ID and password that gives
them access to certain tasks; for example, downloading and uploading web pages, and viewing
web page lists. Another example: ABC Computers has weekly specials and wants to update their
information weekly. You can create a user account for ABC Computers that lets anyone who has
the user ID update their web pages.
Multimedia Contact Center Setup and Operation Guide
Page 24
24 Chapter 3 Setting up Multimedia Contact Center
Enabling Multimedia Contact Center
You require a keycode to enable software features on the Business Communications Manager
(BCM) system. The keycode is a 24-digit code that authenticates the feature or bundle of features
you purchased for your BCM. To enable Multimedia Contact Center, the keycode must include
this feature.
To obtain a keycode you require the following:
• feature authorization code for the BCM
•system ID
The authorization code is a six-digit code you receive for each of the features you purchase.
The authorization code is on the label affixed to the keycode information sheet. You enable
Multimedia Contact Center by enabling the Multimedia Contact Center authorization code on the
BCM Business Element Manager.
For more information on the keycode and authorization codes, as well as steps for installing a
keycode and authorization codes, see the Keycode Installation Guide.
Setting Multimedia Contact Center parameters
You must define the public host name parameter. Multimedia Contact Center parameters are set
using CallPilot Manager.
Note: If your BCM is behind a firewall or proxy server, you must set the firewall
or proxy server TCP ports 443 and 4200 to forward inbound traffic to the BCM.
For more information on how to set inbound filters, see the documentation for
your firewall or proxy server. If you have a BCM firewall, see the Nortel BCM
Administration and Security Guide.
To set the Multimedia Contact Center public host name
1 Launch and log on to Business Element Manager.
The Business Element Manager opens with the Configuration tab selected in the Task
Navigation Panel.
2 Expand the Applications folder.
NN40170-602
Page 25

Chapter 3 Setting up Multimedia Contact Center 25
3 Click Voice Messaging/Contact Center.
The Voice Messaging/Contact Center panel appears.
4 Click Launch CallPilot Manager.
The CallPilot Manager: Main Menu page opens.
5 Click Contact Center.
The Contact Center page opens.
Multimedia Contact Center Setup and Operation Guide
Page 26

26 Chapter 3 Setting up Multimedia Contact Center
6 Click General Properties.
The Contact Center Properties page opens.
7 In the MMCC Public Hostname field, type the host name of your system.
8 Click Submit.
9 Do not log off BCM. Go to “Assigning routing to Multimedia Contact Center calls” on page
27.
NN40170-602
Page 27

Chapter 3 Setting up Multimedia Contact Center 27
Assigning routing to Multimedia Contact Center calls
You must assign how Multimedia Contact Center calls are routed. The standard method of
assigning call routing is to specify the initial skillset in the web link that is used to initiate the call.
See the Multimedia Contact Center Web Developer Guide for details. You specify the skillsets to
be used to the web developer, who includes this information on the customized web pages for your
company.
You can also use the callback number information for a Multimedia Contact Center Call, to move
the call to another skillset or change the call’s priority within the skillset. The callback number is
processed by the CLID (Calling Line Identification) column in the CLID/DNIS Routing table in
CallPilot Manager.
Note: The skillset defined in the HTML tag is used unless there is an overriding rule in
the CLID/DNIS (Calling line identifier/dialed number identification service) table.
Routing tables
When you set up your Contact Center, you create day and night routing tables for each skillset. To
route Multimedia Contact Center calls effectively, you must understand how routing steps affect
Multimedia Contact Center calls. For example, you can set up the Night Routing Table so that
when your Contact Center is closed, Multimedia Contact Center calls are transferred to a mailbox
or another number.
Before a Multimedia Contact Center call is connected to an agent, the following Intelligent
Overflow actions disconnect the call in the caller’s browser and display a message to the caller:
• transfer to Skillset mailbox
• transfer to external or internal DN
• transfer to Automated Attendant
• transfer to Operator
Before a Multimedia Contact Center call is connected to an agent, the following actions route the
call as expected:
• overflow to other skillsets
• move to another skillset
• change priority of call
For information about setting up Day and Night Routing Tables, see the Intelligent Contact Center
Set Up and Operation Guide.
Multimedia Contact Center Setup and Operation Guide
Page 28

28 Chapter 3 Setting up Multimedia Contact Center
Routing Multimedia Contact Center calls using the CLID/DNIS Routing table
If you do not want to use a CLID/DNIS table, continue with “Assigning a callback route for
Multimedia Contact Center” on page 31.
To route calls using the CLID/DNIS table
1 Launch and log on to Business Element Manager.
The Business Element Manager opens with the Configuration tab selected in the Task
Navigation Panel.
2 Expand the Applications folder.
3 Click Voice Messaging/Contact Center.
The Voice Messaging/Contact Center panel appears.
4 Click Launch CallPilot Manager.
The CallPilot Manager: Main Menu page opens.
5 Click Contact Center.
The Contact Center page opens.
6 Click CLID/DNIS Routing Table.
NN40170-602
Page 29

Chapter 3 Setting up Multimedia Contact Center 29
The Intelligent CLID/DNIS Routing page appears.
Multimedia Contact Center Setup and Operation Guide
Page 30

30 Chapter 3 Setting up Multimedia Contact Center
7 Click Insert to assign how Multimedia Contact Center calls are routed.
The CLID/DNIS Setup page appears.
8 Select how you want Multimedia Contact Center calls to be routed:
a If you want Intelligent CLID/DNIS routing to apply to Multimedia Contact Center calls,
select the Multimedia Calls check box and do not enter information in the Line or DNIS
boxes. You must enter a CLID/ANI entry.
Note: If you select the Multimedia Calls check box, you must have a CLID/ANI
entry, either a phone number or an asterisk (*). An asterisk (*) in the CLID/ANI
field represents all Multimedia Contact Center calls, including browser only calls
and phone and browser calls. If you select Multimedia Calls and enter an asterisk
(*) in the CLID/ANI field, then all Multimedia Calls are routed to the specific
skillset. If you want to route the phone and browser calls to another skillset, then
program a CLID/ANI entry with a telephone number. So it is a separate entry
from the browser only calls.
b To route calls to a specific skillset, select the Move to Skillset radio button and select a
skillset.
c To change the call priority, select the Change Call Priority Only radio button.
d Use the New Call Priority: drop-down list to select the priority of CLID/DNIS calls.
e Click Submit.
The Intelligent CLID/DNIS Routing page appears.
The routing rule you created appears in this table.
The CLID/DNIS Routing table shows four examples of Multimedia Contact Center rules.
• In the first Multimedia Contact Center rule, Multimedia Contact Center calls with a CLID
or ANI of 4033 are given a priority of 18.
• In the second Multimedia Contact Center rule, Multimedia Contact Center calls with a
CLID or ANI of 4053 change to a priority 4.
• In the third Multimedia Contact Center rule, Multimedia Contact Center calls with a CLID
or ANI beginning with 405 change to a priority of 5.
You can use the wildcard character (*) for Multimedia Contact Center rules. For example,
if you want to program all Multimedia Contact Center calls from a specific area code such
as 403 to have a high priority and go to skillset 1, select Multimedia Calls, enter 403* and
select priority 1 and skillset 1.
• In the fourth Multimedia Contact Center rule, any Multimedia call (browser only calls and
phone and browser calls) that do not match the three previous rules are routed to Skillset 2.
9 Do not log off CallPilot Manager.
Go to “Assigning a callback route for Multimedia Contact Center” on page 31 and assign a
callback route.
NN40170-602
Page 31

Chapter 3 Setting up Multimedia Contact Center 31
Assigning a callback route for Multimedia Contact Center
A callback route must be set up for Contact Center to connect to the caller’s phone. You can
program the callback route for each skillset by programming the skillset mailbox, or across the
entire system by using the system administration mailbox. The callback route is determined as
follows:
• If you program a skillset to have a callback route associated with it, Multimedia Contact
Center uses the callback route that you have programmed.
• If you do not program a skillset to have a callback route, but you program the system
administration mailbox to have a callback route associated with it, Multimedia Contact Center
uses the callback route that you have programmed.
• If you do not program a skillset or the system administrator mailbox to have a callback route,
Multimedia Contact Center uses Pool A.
To assign a callback route for a skillset or the system administrator mailbox
1 On CallPilot Manager, click the Mailbox Administration heading.
The Mailbox List page appears.
2 Click the Change link for the mailbox to which you want to assign a callback route, either the
system administrator mailbox or the skillset mailbox.
Multimedia Contact Center Setup and Operation Guide
Page 32

32 Chapter 3 Setting up Multimedia Contact Center
The window opens, showing the properties of the mailbox you selected.
3 Select an Outdial Type from the drop-down list.
If you are not sure of which outdial type to select, ask your system administrator.
• If you select Pool, enter a number between 1 (for Pool A) and 15 (for Pool O). Make sure
NN40170-602
that this pool has lines assigned to it. Refer to “Assigning an outgoing line to a line pool”
on page 38.
Page 33

Chapter 3 Setting up Multimedia Contact Center 33
• If your system uses Primary Rate Interface (PRI) lines for outdialing, select Route as the
outdial type. Ask your system administrator what the PRI routing code is.
If you use PRI lines, you must also:
a make sure the routing table is set up correctly
Refer to “Configuring outdialing using PRI lines”.
b create whatever calling restrictions you need, including the routing code
Refer to “Creating a Multimedia Contact Center dial plan” on page 42.
c configure the Dialing Translation Table
Refer to “Configuring the Dialing Translation Table” on page 46.
4 Click Submit.
5 Do not log off.
If you use PRI lines, go to “Configuring outdialing using PRI lines” on page 33.
If you use a line pool, go to “Assigning an outgoing line to a line pool” on page 38.
Configuring outdialing using PRI lines
If you use Primary Rate Interface (PRI) lines, you must configure the outdialing for your Contact
Center. If you don’t, go to “Assigning an outgoing line to a line pool” on page 38.
To configure outdialing using PRI lines
1 Launch and log on to Business Element Manager.
The Business Element Manager opens.
2 Expand the Resources folder.
3 Click Telephony Resources.
The T elephony Resources panel opens.
4 In the Modules table, select the module number of your PRI.
The Details for Module: panel opens below the Modules table.
5 In the Modules table, go to the Low column and record the line number assignment (for
example, 65).
You need this number for step 7.
Note: Make sure the protocol shown in the Details for Line: panel is set to be
compatible with your PRI service provider.
6 From the Configuration tab, expand the Telephony folder.
7 Open the Lines folder.
Multimedia Contact Center Setup and Operation Guide
Page 34

34 Chapter 3 Setting up Multimedia Contact Center
8 Click All Lines.
The All Lines panel opens.
9 In the All Lines table, scroll down to the line number you recorded in step 5 that has the PRI
trunk type.
10 In the Line Type: field, verify the line type.
11 From the Configuration tab, expand the Telephony folder.
12 Expand the Dialing Plan folder.
13 Click Routing.
The Dialing Plan – Routing panel opens with the Routes tab displayed.
14 Select a route from the Routes table.
or
If you want to add a new route, click Add. Enter the number of the new route and click OK.
Select the new route from the Routes table.Configure the route.
a Click the Use Pool column for the route you have selected.
b Select a pool from the drop-down list of possible pools.
c Click the DN type column.
d Select a DN type from the drop-down list of possible DN types.
15 Click the Destination Codes tab.
The Destination Codes panel opens showing the Destination Codes table.
NN40170-602
Page 35

16 Click Add.
The Add Destination Code dialog box appears.
Chapter 3 Setting up Multimedia Contact Center 35
Multimedia Contact Center Setup and Operation Guide
Page 36

36 Chapter 3 Setting up Multimedia Contact Center
17 In the Destination code field, type the destination code you want to use.
In this example, 8A is shown. (A represents any.) This means that any dialed number that
starts with 8 uses PRI-A, that is, routing code 8 uses Pool PRI-A.
18 In the Destination Codes table, select the destination code you created.
The Alternate Routes for Destination Code: panel appears below the Destination Codes panel.
19 In the Alternate Routes: table, select a schedule type.
20 In the First Route, Second Route, and Third Route columns, type the route numbers you
want to use the for selected schedule.
21 In the Absorbed Length column, click on the field in this column for the schedule you are
configuring.
A drop-down list opens.
NN40170-602
Page 37

Chapter 3 Setting up Multimedia Contact Center 37
22 From the Absorbed Length drop-down list, select an absorbed length.
Set the absorbed length so that the routing code is not actually dialed (Absorb All).
In this example, 8A is the destination code, which has an absorbed length of 1. This means that
the 8 is absorbed and only the first digit after it is dialed out on the PRI line.
23 View the public DN length.
This is the number of digits after the prefix that the agents can dial.
a In the Telephony folder, expand the Dialing Plan folder.
b Click Public Network.
The Dialing Plan – Public Network panel opens.
c In the Public Network DN Lengths table, select a DN prefix.
d In the DN Length column, view the DN length.
If you must change a DN length, see the BCM Networking Configuration Guide.
24 Log off Business Element Manager.
Go to “Creating a Multimedia Contact Center dial plan” on page 42.
Multimedia Contact Center Setup and Operation Guide
Page 38

38 Chapter 3 Setting up Multimedia Contact Center
Assigning an outgoing line to a line pool
You must assign an outgoing line to a line pool so that Multimedia Contact Center accepts
callback calls. In this example, a line is assigned to Pool A.
Note: You do not need to do this procedure if you use PRI lines.
To assign an outgoing line to a line pool
1 On a telset, enter Feature 985 to display the Voicemail DN.
The DN number appears on the telset screen.
2 In Business Element Manager, from the Configuration tab in the Task Navigation Panel,
expand the Telephony folder.
3 Expand the Sets folder.
4 Click All DNs.
The All DNs panel appears.
5 In the Line Access tab, select the DN that appears on the screen of your telset.
The details for that DN appear in the Details for DN: panel in the lower half of the All DNs
panel.
6 In the Details for DN: panel, select the Line Pool Access tab.
7 From the Line Pools list, select a line pool (for example, Pool A).
8 Open the Dialing Plan folder.
NN40170-602
Page 39

Chapter 3 Setting up Multimedia Contact Center 39
9 Click Line Pools.
The Dialing Plan – Line Pool panel opens.
10 In the Line Pools table, select the line pool you selected in step 7.
The Details for Pool: panel appears below the Dialing Pool – Line Pool panel.
11 In the Access Code column of the Line Pools table, type an access code (for example, 9) for
the line pool you selected.
12 In the DNs with Access to Line Pool list, verify that your DN is included.
13 Expand the Telephony folder.
14 Expand the Lines folder.
15 Click All Lines.
The All Lines panel opens.
Multimedia Contact Center Setup and Operation Guide
Page 40

40 Chapter 3 Setting up Multimedia Contact Center
16 In the All Lines table, select the number of the access code you assigned to your line pool in
step 11.
NN40170-602
Page 41

Chapter 3 Setting up Multimedia Contact Center 41
17 On the Line Type tab, click the Line Type.
A drop-down list opens.
18 From the Line Type drop-down list, select the pool you chose for your DN.
19 Do not log off.
Go to “Creating a Multimedia Contact Center dial plan” on page 42.
Multimedia Contact Center Setup and Operation Guide
Page 42

42 Chapter 3 Setting up Multimedia Contact Center
Creating a Multimedia Contact Center dial plan
You can create a callback dial plan that restricts Multimedia Contact Center from calling certain
numbers. When you create a dial plan you add restrictions to the DNs that BCM uses for callback.
These restrictions limit the calls that Multimedia Contact Center accepts; for example, you can
create a restriction that limits calls to local calls from your service area.
You can add restrictions to skillset and the Voicemail DNs. You can display DNs by entering
Feature 985 on a set.
Note: If you add a restriction to the Voicemail DN, you also restrict all outcalling calls,
including external transfers from CCR Trees, Off-premise Message Notification, and
Outbound Transfers.
Example of a dial plan that restricts calls based on their country
Bridgestone Computers sells computers in the United States and Canada, and has different
information for prices and shipping for each country.
The Contact Center administrator sets up restrictions for each of the U.S. and Canada skillsets.
When a caller in the U.S. clicks the HTML link and enters their phone number, the restriction rules
for the US skillset identify the caller as being in a U.S. area code. That skillset calls back telephone
numbers within the US.
To create a restriction on the BCM system
1 In Business Element Manager, from the Configuration tab in the Task Navigation Panel,
expand the Telephony folder.
2 Click Scheduled Services.
The Scheduled Services panel opens.
3 From the Schedules table, select the schedule you want to create.
The Details for Schedule panel appears to the right of the Schedules table.
4 In the Schedule Times table, set the daily start and stop time for the schedule you selected.
NN40170-602
Page 43

Chapter 3 Setting up Multimedia Contact Center 43
To add a restriction to the BCM system
1 In Business Element Manager, from the Configuration tab in the Task Navigation Panel,
expand the Telephony folder.
2 Expand the Sets folder.
3 Click All DNs.
The All DNs panel appears.
4 Click the Restrictions tab.
5 Select the DN for which you want to set a restriction.
The Details for DN panel appears below the All DNs panel.
6 Select the Set Restrictions tab.
7 In the Restrictions table, select the schedule you want to restrict and enter the appropriate
filter code in the Use Filter column.
The default restriction filter is 00.
For more information on programming dialing plans and filters, see the BCM
Configuration–Telephony.
8 Do not log off. Go to “Setting the maximum number of outcalling channels” on page 44.
Multimedia Contact Center Setup and Operation Guide
Page 44

44 Chapter 3 Setting up Multimedia Contact Center
Setting the maximum number of outcalling channels
When you install Multimedia Contact Center on your system, set the Maximum Outcalling
Channels to a value higher than 1. The default number of voice channels assigned for outcalling is
1. Also, to ensure that the Outcalling Channels do not consume all the available voice channels, set
the Outcalling Channels to a number lower than the minimum number of voice ports. For
information on how to change the minimum number of voice ports, see the BCM Networking
Configuration Guide.
If you do not set the Maximum Outcalling Channels to higher than one, callers see the Lines busy
message.
NN40170-602
Page 45

Chapter 3 Setting up Multimedia Contact Center 45
To set the maximum number of outcalling channels
1 From CallPilot Manager Main Menu page, click Configuration.
To launch CallPilot Manager, see “Setting Multimedia Contact Center parameters” on page
24.
2 Click System Properties.
The System Properties page appears.
3 In the Max Outcalling Channels field, type a value higher than 1.
4 Click Submit.
Do not log off CallPilot Manager.
Go to “Configuring the Dialing Translation Table” on page 46.
Multimedia Contact Center Setup and Operation Guide
Page 46

46 Chapter 3 Setting up Multimedia Contact Center
Configuring the Dialing Translation Table
If your outdialing type is Route, configure the Dialing Translation Table to add your routing prefix
to the callback numbers.
To configure the Dialing Translation Table
1 From the CallPilot Manager Main Menu page, click Configuration.
The Configuration page opens.
NN40170-602
Page 47

2 Click Dialing Translation Table.
The Dialing Translation Table page opens.
Chapter 3 Setting up Multimedia Contact Center 47
3 Click Add.
The Dialing Translation Setup page appears.
4 In the Input Value field, enter the number you want to translate.
Multimedia Contact Center Setup and Operation Guide
Page 48

48 Chapter 3 Setting up Multimedia Contact Center
5 In the Output Value field, enter the value to which you want to translate the number.
In this example, the number 4 is translated to 84. This means that when a Multimedia Contact
Center callers enters a number that starts with 4, Contact Center automatically adds the prefix
8.
6 Click Submit.
NN40170-602
Page 49

Chapter 4
Multimedia Contact Center agents
Setting up Multimedia Contact Center agents involves:
• Enabling Multimedia Contact Center agents
• Adding Multimedia Contact Center agents to Contact Center
• Adding more than one agent
• Installing Multimedia Contact Center software on an agent’s computer
• Configuring an agent’s server settings
• Configuring an agent’s name
Enabling Multimedia Contact Center agents
With the Nortel Multimedia Contact Center keycode, you can enable your Contact Center agents
as Multimedia Contact Center agents. The maximum number of active MMCC agents is 100.
Active agents are agents who are logged on to one skillset or a combination of skillsets.
49
To enable Multimedia Contact Center agents
1 Complete the steps in “Enabling Multimedia Contact Center” on page 24 to apply the Contact
Center Agent keycode for the number of agents you want to enable.
2 Do not log off Business Communications Manager.
Follow the steps in “Adding Multimedia Contact Center agents to Contact Center” to add
Multimedia Contact Center agents to Contact Center.
Adding Multimedia Contact Center agents to Contact Center
To add a Multimedia Contact Center agent
1 Launch and log on to Business Element Manager.
The Business Element Manager opens with the Configuration tab selected in the Task
Navigation Panel.
2 Expand the Applications folder.
3 Click Voice Messaging/Contact Center.
The Voice Messaging/Contact Center panel appears.
Multimedia Contact Center Setup and Operation Guide
Page 50

50 Chapter 4 Multimedia Contact Center agents
4 Click Launch CallPilot Manager.
The CallPilot Manager Main Menu page opens.
5 Click Contact Center.
The Contact Center page opens.
NN40170-602
Page 51

6 Click Agent List.
The Agent List appears.
7 Click Add.
The Add Agent window opens.
8 Complete the Agent ID and Name fields.
9 Select the Supervisor check box if you want the agents to have Supervisor status.
10 Select the Automatic Answer check box if you want calls to be force-delivered to the agents.
11 From the Missed Call Option drop-down list, select Make Not Ready (Return to Skillset) or
Automatic Logout.
12 Click Submit.
Adding more than one agent
You can save time by adding more than one agent at a time. When you add multiple agents, the
agents have the default agent name and parameters.
Chapter 4 Multimedia Contact Center agents 51
To add more than one agent
1 Launch CallPilot Manager from Business Element Manager.
2 Click Contact Center.
The Contact Center page opens.
3 Click Agent List.
The Agent List appears.
4 Click Add Many Agents.
The Add Many Agents page appears.
5 In the From field, type the lowest Agent ID number of the agents you want to create.
6 In the To field, type the highest Agent ID number of the agents you want to create.
7 Select the Supervisor check box if you want the agents to have Supervisor status.
8 Select the Automatic Answer check box if you want calls to be force-delivered to the agents.
9 From the Missed Call Option list box, select Make Not Ready (Return to Skillset) or
Automatic Logout.
10 Click Submit.
Note: Any previously configured agents with an Agent ID number that falls within the
range you enter in the From and To boxes are not changed. These agents are not
included in the number of agents added.
Multimedia Contact Center Setup and Operation Guide
Page 52

52 Chapter 4 Multimedia Contact Center agents
Installing Multimedia Contact Center software on an agent’s computer
You must install and configure the Multimedia Contact Center software on the computer of each
Multimedia Contact Center agent.To install the software, you must log on as an administrator. If
you see the following error message, you are logged on as a non-privileged user and will not be
able to install the software.
Requirements for agents using Multimedia Contact Center
To use Multimedia Contact Center, agents must have:
• Internet Explorer 5.5 with SP 2, or a later version of Internet Explorer
• any of these operating systems: Windows 2000 or Windows XP
• a Pentium II processor at 233 MHz, minimum (Pentium III at 500 MHz or higher
recommended)
• 64 MB of RAM, minimum (128 MB or higher recommended)
• 30 MB of free hard drive space
• Java runtime version 1.5.0 or higher (available from the Java web site)
• a network card and an Internet connection
NN40170-602
Page 53

Chapter 4 Multimedia Contact Center agents 53
To install Multimedia Contact Center software on an agent’s computer
Note: You must install Java Runtime Environment (JRE) 1.5 or higher before you
download Multimedia Contact Center to the agent’s computer.
You can download the
latest version of JRE from the Java web site.
1 On the agent’s computer, point the web browser to the URL
https://<bcmip>
where <bcmip> is the IP address of your Business Communications Manager system.
2 The Welcome to BCM page appears.Click Business Applications.
The Business Applications page opens.
3 In the left frame, under Contact Center Applications, click Multimedia Contact Center.
The Multimedia Contact Center application download page appears.
4 Click the Download Multimedia Contact Center link and download the application to the
agent’s PC.
The File Download dialog box appears.
5 Click Save.
The Save As dialog box appears.
6 Navigate to the location to which you want to download the file and click Save.
7 Locate the downloaded file and double-click it to unzip it.
Multimedia Contact Center Setup and Operation Guide
Page 54

54 Chapter 4 Multimedia Contact Center agents
8 Install the Agent Notification software on the agent’s PC.
Note: Nortel recommends that you install the software in C:\Program
Files\Nortel\Multimedia Contact Center Agent Notification.
Note: For non-administrative agents using Agent Notification software on a
Windows XP SP2 platform, the Contact Center administrator must include
javaw.exe and java.exe as exceptions in the firewall settings so these agents can
accept Multimedia Contact Center calls.
Configuring an agent’s server settings
To configure an agent’s server settings
1 To start the Multimedia Contact Center software on the agent’s computer, select the Start
menu.
2 Select Programs > Nortel > Multimedia Contact Center > Agent Notification.
This is the default installation path.
The Agent Login/Logout dialog box appears.
NN40170-602
Page 55

Chapter 4 Multimedia Contact Center agents 55
3 From the Options menu, select Server Setup.
The Server Setup dialog box appears.
4 In the Server IP field, enter the IP address or fully qualified domain name (FQDN) of the
BCM.
5 Click OK.
Configuring an agent’s name
Either you or the agent can enter the agent name that is displayed to callers.
To configure an agent’s name
1 Select Programs > Nortel > Multimedia Contact Center > Agent Notification.
This is the default installation path.
The Agent Login/Logout dialog box appears.
2 From the Options menu, click Agent Name.
Multimedia Contact Center Setup and Operation Guide
Page 56

56 Chapter 4 Multimedia Contact Center agents
The Agent Preferences dialog box appears.
3 In the Agent Name field enter, the agent name that will appear to callers.
4 Click OK.
Using Follow-me browsing
Follow-me browsing does not work with embedded Flash animations. If an agents clicks a Flash
button, the image that is sent to the agent is not displayed to the caller.
Tell agents that if the page they are sending to the caller contains Flash animations, the agents
must tell the caller to display the page by clicking on the appropriate button in their browser
display the next page (for example, the Next button).
NN40170-602
Page 57

Chapter 5
Multimedia Contact Center messages
Multimedia Contact Center messages are messages that are sent from a business web site to callers
(customers, contacts, or surfers) who have contacted the business.
These messages assist customers in making contact with the business, give customers choices in
the type of media they use to contact the business, and provide updates about the progress of their
call.
You or your web developer can:
• customize the default Multimedia Contact Center message templates
• create lists of web pages that Multimedia Contact Center agents push to callers
• create interfaces, which are sets of web pages specific to topics, such as sales and service
department, or language s, s uch as French, Spanish, and German
For information about:
57
• default Multimedia Contact Center messages, see“Status and error messages” on page 58
• downloading message templates, see “Downloading web pages and viewing web page lists”
on page 63
• customizing messages, see “Customizing web pages” on page 65
• uploading web pages, see “Uploading or deleting web pages” on page 67
• creating and distributing lists of web pages, see “Creating and distributing web page lists” on
page 71
• creating custom interfaces, see “Adding MMCC interfaces” on page 66
Multimedia Contact Center Setup and Operation Guide
Page 58

58 Chapter 5 Multimedia Contact Center messages
Status and error messages
During a call, a caller can see one or more of the following status and error messages. Multimedia
Contact Center displays these messages by creating an instance of the HTML template file called
MSG.html.
Multimedia Contact Center unavailable message
Callers see this message if they click the Multimedia Contact Center icon while Business
Communications Manager is not operational.
No agents logged on message
Callers see this message if there are no Multimedia Contact Center agents logged on.
NN40170-602
Page 59

Chapter 5 Multimedia Contact Center messages 59
Bad calling preferences message
Callers see this message if the phone number they enter in the call setup page is improperly
formatted, or if Multimedia Contact Center does not provide service to their calling area.
Choose how to connect message
Callers see this message if they do not specify their connection preferences in the call setup page.
Multimedia Contact Center Setup and Operation Guide
Page 60

60 Chapter 5 Multimedia Contact Center messages
Session completed message
Callers see this message after they click the Hangup button on the caller interface.
User busy message
Callers see this message if their call cannot be completed because their phone line is busy.
Lines busy message
Callers see this message if their call cannot be completed because Business Communications
Manager has no available phone lines. Set the Maxi mum Ou tcalling Channels to more than one so
that phone lines are available. For more information, see “Routing tables” on page 27.
NN40170-602
Page 61

Chapter 5 Multimedia Contact Center messages 61
Make call failed message
Callers see this message if their call cannot be connected because there is a problem with the
Multimedia Contact Center server.
No answer message
Callers see this message if they do not answer their phone.
Connected message
Callers see this message when they connect to an agent.
Multimedia Contact Center Setup and Operation Guide
Page 62

62 Chapter 5 Multimedia Contact Center messages
Call transferred message
Callers see this message when Multimedia Contact Center or an agent transfers the voice call.
Web refresh message
Callers see this message while they are waiting for a Multimedia Contact Center agent to become
available. You or your web developer can create variations of this message to assure callers that
their call is important, and all agents are still busy.
Recording Multimedia Contact Center announcements
You can record announcements for Multimedia Contact Center that callers hear while they are
waiting for agents. Record Contact Center messages using CallPilot Manager. For information on
recording Contact Center announcements, see the Intelligent Contact Center Set Up and
Operation Guide.
NN40170-602
Page 63

Chapter 5 Multimedia Contact Center messages 63
Downloading web pages and viewing web page lists
To customize a Multimedia Contact Center page, download it to your computer, customize it, and
then upload it to Business Communications Manager. You can also view the lists of Multimedia
Contact Center files that are on your system.
To download web pages or view lists of pages
1 Launch and log on to Business Element Manager.
The Business Element Manager opens with the Configuration tab selected in the Task
Navigation Panel.
2 Expand the Applications folder.
3 Click Voice Messaging/Contact Center.
The Voice Messaging/Contact Center panel appears.
4 Click Launch CallPilot Manager.
The CallPilot Manager: Main Menu page opens.
5 Click Contact Center.
The Contact Center page opens.
6 Click Customize MMCC Files.
The Customize MMCC window opens.
In this example, the user created two customized interfaces, Spanish and ABC Computer.
7 Click View for the default interface to see the list of default files.
The default subfolder only contains the set of default web page templates and text
substitutions.
Multimedia Contact Center Setup and Operation Guide
Page 64

64 Chapter 5 Multimedia Contact Center messages
The default files list appears in a new browser page.To download a file, right-click the
download link, click Save As, and save the file to your PC.
Note: If you click the View/Change for a customized interface, you see a list of
the customized files you uploaded to the BCM. If you have not uploaded any files,
the folder is empty.
NN40170-602
Page 65

Customizing web pages
You or your web developer can customize web pages and upload them to Business
Communications Manager. You can customize the default Multimedia Contact Center web pages
or create your own.
Note: Do not directly edit web pages.
Note: Do not change the location of the Multimedia Contact Center default files
on BCM.
To customize web pages
1 Download the web page or web page list you want to customize to your computer. Refer to
“Downloading web pages and viewing web page lists” on page 63.
2 Customize the file or list of files.
3 Upload the customized files to Business Communications Manager using the procedure in
“Uploading or deleting web pages” on page 67.
Chapter 5 Multimedia Contact Center messages 65
Downloading, customizing, and uploading pages
Overview of customizing an MSG.html file for the ABC Computer Company
1 Download the MSG.html template from Business Communications Manager to your desktop.
Refer to “Downloading web pages and viewing web page lists” on page 63.
2 Customize the MSG.html file.
3 Save the new customized file in your local directory. Save the new file with a new name, such
as abc_msg.html.
4 Log on to Business Communications Manager using the ABC Computer Company User ID
and password. For more information about user accounts, see “Creating a user account for
Multimedia Contact Center” on page 23.
5 Upload the file (see “Uploading or deleting web pages” on page 67).
Overviews of downloading, customizing and uploading pages
An overview of customizing an MSG.html file for the ABC Computer
Company
1 Download the MSG.html template from Business Communications Manager to your desktop.
Refer to “Downloading web pages and viewing web page lists” on page 63.
2 Customize the MSG.html file.
Multimedia Contact Center Setup and Operation Guide
Page 66

66 Chapter 5 Multimedia Contact Center messages
3 Save the new customized file in your local directory. Save the new file with a new name, such
as abc_Msg.html.
4 Log on to Business Communications Manager using the ABC Computer Company name and
password.
5 Upload the file. Refer to “Uploading or deleting web pages” on page 67.
Overview of uploading Spanish-language status and error messages
1 Download the Msg.html and Msg.txt template files from Business Communications Manager
to your desktop and customize them. Refer to “Downloading web pages and viewing web page
lists” on page 63.
2 Upload the files using the procedure in “Uploading or deleting web pages” on page 67:
a Click the Spanish link.
b Click Add.
c From the list of customizable file names, select the Msg.html file.
d Click Add File.
Adding MMCC interfaces
You can create a new interface to help manage your customized files. To create the interface, enter
a new interface name. The new interface name must contain only alpha-numeric characters and
has a maximum length of 16 characters.
After you add the new interface name, you can add customized files to your new interface. You
can also delete files from the customized interface. The entire interface, including all the
customized files, can be deleted by clicking the Delete link.
To add the MMCC interface
1 Launch and log on to Business Element Manager.
The Business Element Manager opens with the Configuration tab selected in the Task
Navigation Panel.
2 Expand the Applications folder.
3 Click Voice Messaging/Contact Center.
The Voice Messaging/Contact Center panel appears.
4 Click Launch CallPilot Manager.
The CallPilot Manager: Main Menu page opens.
5 Click Contact Center.
The Contact Center page opens.
6 Click Customize MMCC Files.
NN40170-602
Page 67

The Customize MMCC window opens.
7 Click Add.
The Add MMCC Interface page appears.
Chapter 5 Multimedia Contact Center messages 67
8 Enter the New Interface Name.
It must be alpha-numeric characters and a maximum of 16 characters.
9 Click Submit.
Uploading or deleting web pages
After you customize Multimedia Contact Center web pages, use this procedure to upload them to
Business Communications Manager. You can also use this procedure to view or delete any
customized files that are outdated, misnamed, or misfiled.
To upload or delete customized files
1 Launch and log on to Business Element Manager.
The Business Element Manager opens with the Configuration tab selected in the Task
Navigation Panel.
2 Expand the Applications folder.
3 Click Voice Messaging/Contact Center.
Multimedia Contact Center Setup and Operation Guide
Page 68

68 Chapter 5 Multimedia Contact Center messages
The Voice Messaging/Contact Center panel appears.
4 Click Launch CallPilot Manager.
The CallPilot Manager: Main Menu page opens.
5 Click Contact Center.
The Contact Center page opens.
6 Click Customize MMCC Files.
The Customize MMCC window opens.
7 Click View/Change in the command column of the interface to which you want to upload or
view files.
In this example, View/Change was clicked for the customized interface named Spanish.
Note: If you click the View/Change for a customized interface, you see a list of
the customized files you uploaded to the BCM. If you have not uploaded any files,
the folder is empty.
The MMCC Interface files page opens.
NN40170-602
Page 69

8 Click Add.
The Add Customized File window opens.
Chapter 5 Multimedia Contact Center messages 69
Note: Before you upload any file, ensure the file extensions in the File Name
drop-down list and the From Local File field match exactly.
9 To upload files:
a From the File Name: drop-down list, select the file you want to customize.
b In the From Local File: field, enter the path of the file, or click Browse to browse your
PC for the file.
The path of the file you selected appears in the field.
Note: If you upload a media file, use the relative path “/ivb-media” to see
uploaded media files. For example, if you upload the file “logo.jpg” to the media
interface, in a custom HTML file, reference the file by including a tag such as
<IMG SRC="/ivb-media/logo.jpg" ...>.
c Click Submit.
To delete files:
a From the MMCC Customize Files page, find the file you want to remove, and click
Remove in the commands column.
The file is deleted from the list.
Multimedia Contact Center Setup and Operation Guide
Page 70

70 Chapter 5 Multimedia Contact Center messages
To upload a media file
To upload a customized file for the media interface, complete this procedure.
1 From the CallPilot Manager Main Menu Web page, click the Contact Center heading.
The Contact Center page opens.
2 Click Customize MMCC Files.
The Customize MMCC window opens.
3 Click View/Change in the command column of the media interface.
The MMCC Interface Files window opens.
4 Click Add.
The Add Media File window opens.
NN40170-602
Page 71

Chapter 5 Multimedia Contact Center messages 71
5 In the Media File Name field, enter the name of the file you want to upload.
Note: Before you upload any file, ensure the file extensions in the Media File
Name field and the From Local File field match exactly.
6 In the From Local File field, enter the path of the file, or click Browse to browse your PC for
the file. The path of the file you selected appears in the field.
7 Click Submit.
The file uploads to the media interface directory.
Creating and distributing web page lists
You or your web developer can create bookmarked lists of web pages that agents can push to
callers.
After you create a web page list, export it in a shared directory on your network and notify the
Multimedia Contact Center agents to import the list.
Note: You must use Internet Explorer for the web page lists you create and distribute.
Other web browsers are not supported.
To create a list of web pages
1 In your browser, create a folder for the new list of web pages.
Create a folder name that is easy to identify.
2 Browse to the pages you want to bookmark.
3 Bookmark each page, and save each bookmark in the folder you created.
4 Start the Import/Export Wizard by selecting File > Import and Export.
5 Save the folder you created to a network drive.
6 Send an e-mail to the agents telling them to import the new folder into their Favorites folder.
In your e-mail, tell the Multimedia Contact Center agents where the web page list is located on
the network. Be sure to include the location of the folder in your message. You can set up an
address list of agents so you can notify all the agents with one e-mail.
Whenever you create or update a web page list, notify the agents to copy the list to their
computer.
Multimedia Contact Center Setup and Operation Guide
Page 72

72 Chapter 5 Multimedia Contact Center messages
NN40170-602
Page 73

Chapter 6
Logs
Viewing log files
Log files are automatically generated daily by Multimedia Contact Center. You can use log files to
diagnose system problems. The log files include all activity that occurs with its CGI interface and
its telephony server.
Multimedia Contact Center Log files are generated on the BCM. The logs are named:
• mmcc-cgi.out
• mmcc.out
You manage log files by transferring selected BCM log files from the BCM to a specified location,
such as your personal computer. You can then view individual log files using the BCM Business
Element Manager Log Browser or your usual text editor. On BCM models with an integrated
router, you can also retrieve router logs using the WebGUI router.
73
To view a log file
1 Launch the web page for your BCM at https://<ipaddress>
where
<ipaddress> is the IP address of your BCM.
Multimedia Contact Center Setup and Operation Guide
Page 74

74 Chapter 6 Logs
2 The Welcome to BCM page opens.Click Administrator Applications.
The Administrator Applications page opens.
3 Under Administration Management Tools, click BCM Logs.
NN40170-602
Page 75

Chapter 6 Logs 75
The Retrieve Log Files: tool appears in the right-hand panel.
4 Use the Retrieve Log Files: tool to retrieve log files.
You can transfer files to your PC, a USB memory card, or to an external resource, such as an
FTP server.
For more information on managing, viewing, downloading, and transferring log files, see the
section on managing log files in the BCM Administration and Security Guide.
Multimedia Contact Center Setup and Operation Guide
Page 76

76 Chapter 6 Logs
NN40170-602
Page 77

Index
Index 77
A
Adding multiple agents to Contact Center 51
Agent
adding multiple agents to Contact Center 51
server settings 54
software, installing 52
Agents
adding to Contact Center 49
enabling 49
Announcements
Contact Center 62
recording 62
B
Bookmarks
creating and distributing 71
exporting 71
Busy phone line message 60
C
Call failed message 61
Call preferences incorrectly formatted message 59
Call types
agent-centric 11, 18, 27
caller-centric 11, 18
voice and data 11, 18
Caller preferences, Call setup page 14
CallPilot Manager
browser requirements 21
computer requirements 21
system requirements 21
Choose how to connect message 59
Connected message 61
copyright 2
D
Dial plan
about 42
example 42
F
Favorites
creating and distributing 71
exporting 71
Flash animations 56
Follow-me browsing 56
H
how to get help, support 7
I
IP address 54
K
keycode 24
installing 49
L
Lines busy message 60
Log files
about 73
viewing 73
M
Messages
announcements 62
busy phone line 60
call failed 61
call preferences incorrectly formatted 59
call transferred 62
choose how to connect 59
connected 61
customizing 65
deleting 71
downloading 63
lines busy 60
Multimedia Contact Center unavailable 58
no agents logged on 58
no answer 61
no phone lines available 60
refresh 62
server down 58, 61
session completed 60
uploading 67
user busy 60
viewing 63
web refresh 62
Multimedia Contact Center
agent 49, 54
agent interface 17
agent software 52
Multimedia Contact Center Setup and Operation Guide
Page 78

78 Index
Call setup page 14
call types 11, 18
caller interface 16
installing 24
IP address 54
keycode 24
overview 13
port address 54
setting up 23
Multimedia Contact Center calls
assigning outgoing line 38
CLID/DNIS routing 27
enabling call-back 38
Intelligent Overflow rules 27
routing 27
Multimedia Contact Center unavailable message 58
N
No agents logged on message 58
No answer message 61
No phone lines available message 60
Nortel distributor 7
O
T
trademarks 2
U
User busy message 60
W
Web page lists
about 71
creating and distributing 71
deleting 71
downloading 63
exporting 71
naming 71
uploading 67
viewing 63
Web pages
customization example 65
customizing 65
Web refresh message 62
Outdialing using PRI lines 33
P
Phone line busy message 60
Port address 54
PRI lines 33
R
Refresh message 62
regulatory information 2
related publications 11
S
Server down message 58, 61
Session completed message 60
Software code 24
Supervisor
status, assigning 51
support 7
express routing code 7
how to get help 7
Nortel reseller 7
Nortel Solutions Center 7
Nortel Web site 7
NN40170-602NN40170-602
 Loading...