

Page 1

B5800 Branch Gateway FP1
Avaya Branch Gateway Manager 10.0
15-601011 Issue 29r – (Friday, November 02, 2012)
Page 2

© 2012 AVAYA All Rights Reserved.
Notices
While reasonable efforts have been made to ensure that the information in
this document is complete and accurate at the time of printing, Avaya assumes
no liability for any errors. Avaya reserves the right to make changes and
corrections to the information in this document without the obligation to notify
any person or organization of such changes.
Documentation disclaimer
Avaya shall not be responsible for any modifications, additions, or deletions to
the original published version of this documentation unless such modifications,
additions, or deletions were performed by Avaya.
End User agree to indemnify and hold harmless Avaya, Avaya's agents,
servants and employees against all claims, lawsuits, demands and judgments
arising out of, or in connection with, subsequent modifications, additions or
deletions to this documentation, to the extent made by End User.
Link disclaimer
Avaya is not responsible for the contents or reliability of any linked Web sites
referenced within this site or documentation(s) provided by Avaya. Avaya is
not responsible for the accuracy of any information, statement or content
provided on these sites and does not necessarily endorse the products,
services, or information described or offered within them. Avaya does not
guarantee that these links will work all the time and has no control over the
availability of the linked pages.
Warranty
Avaya provides a limited warranty on this product. Refer to your sales
agreement to establish the terms of the limited warranty. In addition, Avaya’s
standard warranty language, as well as information regarding support for this
product, while under warranty, is available to Avaya customers and other
parties through the Avaya Support Web site: http://www.avaya.com/support.
Please note that if you acquired the product from an authorized Avaya reseller
outside of the United States and Canada, the warranty is provided to you by
said Avaya reseller and not by Avaya.
Licenses
THE SOFTWARE LICENSE TERMS AVAILABLE ON THE AVAYA WEBSITE,
HTTP://SUPPORT.AVAYA.COM/LICENSEINFO/ ARE APPLICABLE TO ANYONE
WHO DOWNLOADS, USES AND/OR INSTALLS AVAYA SOFTWARE, PURCHASED
FROM AVAYA INC., ANY AVAYA AFFILIATE, OR AN AUTHORIZED AVAYA
RESELLER (AS APPLICABLE) UNDER A COMMERCIAL AGREEMENT WITH
AVAYA OR AN AUTHORIZED AVAYA RESELLER. UNLESS OTHERWISE AGREED
TO BY AVAYA IN WRITING, AVAYA DOES NOT EXTEND THIS LICENSE IF THE
SOFTWARE WAS OBTAINED FROM ANYONE OTHER THAN AVAYA, AN AVAYA
AFFILIATE OR AN AVAYA AUTHORIZED RESELLER, AND AVAYA RESERVES
THE RIGHT TO TAKE LEGAL ACTION AGAINST YOU AND ANYONE ELSE USING
OR SELLING THE SOFTWARE WITHOUT A LICENSE. BY INSTALLING,
DOWNLOADING OR USING THE SOFTWARE, OR AUTHORIZING OTHERS TO
DO SO, YOU, ON BEHALF OF YOURSELF AND THE ENTITY FOR WHOM YOU
ARE INSTALLING, DOWNLOADING OR USING THE SOFTWARE (HEREINAFTER
REFERRED TO INTERCHANGEABLY AS “YOU” AND “END USER”), AGREE TO
THESE TERMS AND CONDITIONS AND CREATE A BINDING CONTRACT
BETWEEN YOU AND AVAYA INC. OR THE APPLICABLE AVAYA AFFILIATE
(“AVAYA”).
Avaya grants End User a license within the scope of the license types described
below. The applicable number of licenses and units of capacity for which the
license is granted will be one (1), unless a different number of licenses or units
of capacity is specified in the Documentation or other materials available to
End User. "Designated Processor" means a single stand-alone computing
device. "Server" means a Designated Processor that hosts a software
application to be accessed by multiple users. "Software" means the computer
programs in object code, originally licensed by Avaya and ultimately utilized by
End User, whether as stand-alone products or pre-installed on Hardware.
"Hardware" means the standard hardware originally sold by Avaya and
ultimately utilized by End User.
License types
Designated System(s) License (DS). End User may install and use each copy of
the Software on only one Designated Processor, unless a different number of
Designated Processors is indicated in the Documentation or other materials
available to End User. Avaya may require the Designated Processor(s) to be
identified by type, serial number, feature key, location or other specific
designation, or to be provided by End User to Avaya through electronic means
established by Avaya specifically for this purpose.
Copyright
Except where expressly stated otherwise, no use should be made of materials
on this site, the Documentation(s) and Product(s) provided by Avaya. All
content on this site, the documentation(s) and the product(s) provided by
Avaya including the selection, arrangement and design of the content is owned
either by Avaya or its licensors and is protected by copyright and other
intellectual property laws including the sui generis rights relating to the
protection of databases. You may not modify, copy, reproduce, republish,
upload, post, transmit or distribute in any way any content, in whole or in part,
including any code and software. Unauthorized reproduction, transmission,
dissemination, storage, and or use without the express written consent of
Avaya can be a criminal, as well as a civil, offense under the applicable law.
Third Party Components
Certain software programs or portions thereof included in the Product may
contain software distributed under third party agreements ("Third Party
Components"), which may contain terms that expand or limit rights to use
certain portions of the Product ("Third Party Terms"). Information regarding
distributed Linux OS source code (for those Products that have distributed the
Linux OS source code), and identifying the copyright holders of the Third Party
Components and the Third Party Terms that apply to them is available on the
Avaya Support Web site: http://support.avaya.com/Copyright.
Preventing toll fraud
"Toll fraud" is the unauthorized use of your telecommunications system by an
unauthorized party (for example, a person who is not a corporate employee,
agent, subcontractor, or is not working on your company's behalf). Be aware
that there can be a risk of toll fraud associated with your system and that, if
toll fraud occurs, it can result in substantial additional charges for your
telecommunications services.
Avaya fraud intervention
If you suspect that you are being victimized by toll fraud and you need
technical assistance or support, call Technical Service Center Toll Fraud
Intervention Hotline at +1-800-643-2353 for the United States and Canada.
For additional support telephone numbers, see the Avaya Support Web site:
http://support.avaya.com
Suspected security vulnerabilities with Avaya products should be reported to
Avaya by sending mail to: securityalerts@avaya.com.
Trademarks
Avaya and Aura are trademarks of Avaya, Inc.
The trademarks, logos and service marks (“Marks”) displayed in this site, the
documentation(s) and product(s) provided by Avaya are the registered or
unregistered Marks of Avaya, its affiliates, or other third parties. Users are not
permitted to use such Marks without prior written consent from Avaya or such
third party which may own the Mark. Nothing contained in this site, the
documentation(s) and product(s) should be construed as granting, by
implication, estoppel, or otherwise, any license or right in and to the Marks
without the express written permission of Avaya or the applicable third party.
Avaya is a registered trademark of Avaya Inc. All non-Avaya trademarks are
the property of their respective owners.
Downloading documents
For the most current versions of documentation, see the Avaya Support Web
site: http://www.avaya.com/support
Contact Avaya Support
Avaya provides a telephone number for you to use to report problems or to
ask questions about your product. The support telephone number is
1-800-242-2121 in the United States. For additional support telephone
numbers, see the Avaya Web site: http://www.avaya.com/support
Avaya Branch Gateway Manager 10.0 Page 2
15-601011 Issue 29r (Friday, November 02, 2012)B5800 Branch Gateway
Page 3

Contents
Branch Gateway Manager1.
..................................................................... 121.1 Installing Branch Gateway Manager
..................................................................... 141.2 Starting Branch Gateway Manager
..................................................................... 161.3 Opening a Configuration
..................................................................... 181.4 Changing the Branch Gateway Manager Language
..................................................................... 181.5 Web Control
Configuration Mode2.
..................................................................... 222.1 The Configuration Mode Interface
..................................................................... 232.2 Security Settings
..................................................................... 242.3 Title Bar
..................................................................... 252.4 The Menu Bar
..................................................................... 262.5 Toolbars
............................................................................ 262.5.1 The Main Toolbar
............................................................................ 282.5.2 The Navigation Toolbar
............................................................................ 282.5.3 The Details Toolbar
..................................................................... 292.6 Using the Navigation Pane
..................................................................... 302.7 Using the Group Pane
..................................................................... 322.8 Using the Details Pane
..................................................................... 342.9 Using the Error Pane
..................................................................... 362.10 Altering the Interface
..................................................................... 382.11 The Status Bar
..................................................................... 392.12 Editing Configuration Settings
............................................................................ 412.12.1 Mergeable Settings
............................................................................ 422.12.2 Configuration Size
............................................................................ 432.12.3 Setting the Discovery Addresses
............................................................................ 452.12.4 Opening a Configuration from a System
............................................................................ 462.12.5 Opening a Configuration Stored on PC
............................................................................ 472.12.6 Known System Discovery
............................................................................ 482.12.7 Creating New Records
............................................................................ 492.12.8 Validation of Records
............................................................................ 512.12.9 Creating an Offline Configuration
............................................................................ 522.12.10 Importing and Exporting Settings
............................................................................ 542.12.11 Copying and Pasting
............................................................................ 542.12.12 Saving a Configuration Offline
............................................................................ 552.12.13 Sending a Configuration
............................................................................ 562.12.14 Erasing the Configuration
............................................................................ 572.12.15 Default Settings
Security Mode3.
..................................................................... 603.1 Security Settings
..................................................................... 613.2 Default Security Users
..................................................................... 643.3 The Security Mode Interface
..................................................................... 653.4 Security Administration
..................................................................... 743.5 Editing Security Settings
............................................................................ 763.5.1 General Settings
............................................................................ 783.5.2 System
............................................................................ 843.5.3 Services Settings
............................................................................ 863.5.4 Rights Groups
............................................................................ 933.5.5 Service Users
Menu Bar Commands4.
..................................................................... 984.1 Configuration Mode: File Menu
............................................................................ 984.1.1 Open Configuration
............................................................................ 984.1.2 Close Configuration
Contents
............................................................................ 984.1.3 Save Configuration
............................................................................ 984.1.4 Save Configuration As
............................................................................ 984.1.5 Change Working Directory
............................................................................ 1004.1.6 Preferences
............................................................................ 1064.1.7 Offline
............................................................................ 1074.1.8 Advanced
............................................................................ 1214.1.9 Backup/Restore
............................................................................ 1224.1.10 Import/Export
............................................................................ 1234.1.11 Exit
..................................................................... 1244.2 Configuration Mode: View Menu
............................................................................ 1244.2.1 Toolbars
............................................................................ 1244.2.2 Tooltip
............................................................................ 1244.2.3 Navigation Pane
............................................................................ 1244.2.4 Group Pane
............................................................................ 1244.2.5 Details Pane
............................................................................ 1244.2.6 Error Pane
............................................................................ 1244.2.7 Advance View
............................................................................ 1244.2.8 Hide Admin Tasks
............................................................................ 1244.2.9 Simplified View
............................................................................ 1254.2.10 TFTP Log
..................................................................... 1264.3 Configuration Mode: Tools Menu
............................................................................ 1264.3.1 Export | User
............................................................................ 1264.3.2 Extension Renumber
............................................................................ 1264.3.3 Line Renumber
............................................................................ 1264.3.4 Busy on Held Validation
............................................................................ 1274.3.5 MSN/DID Configuration
............................................................................ 1284.3.6 Print Button Labels
............................................................................ 1294.3.7 Import Templates
..................................................................... 1304.4 Security Mode
............................................................................ 1304.4.1 Open Security Settings
............................................................................ 1304.4.2 Close Security Settings
............................................................................ 1304.4.3 Save Security Settings
............................................................................ 1304.4.4 Reset Security Settings
............................................................................ 1304.4.5 Preferences
............................................................................ 1304.4.6 Exit
............................................................................ 1304.4.7 Configuration
..................................................................... 1314.5 Embedded File Management
............................................................................ 1324.5.1 Open File Settings
............................................................................ 1324.5.2 Close File Settings
............................................................................ 1324.5.3 Refresh File Settings
............................................................................ 1324.5.4 Upload File
............................................................................ 1324.5.5 Upload System Files
............................................................................ 1324.5.6 Backup System Files
............................................................................ 1324.5.7 Restore System Files
............................................................................ 1324.5.8 Upgrade Binaries
............................................................................ 1324.5.9 Upgrade Configuration
............................................................................ 1324.5.10 Upload Voicemail Files
............................................................................ 1334.5.11 Upload Phone Files
............................................................................ 1334.5.12 Copy System Card
............................................................................ 1334.5.13 Configuration
Configuration Settings5.
..................................................................... 1375.1 BOOTP
..................................................................... 1385.2 Operator
..................................................................... 1395.3 System
............................................................................ 1405.3.1 System
............................................................................ 1455.3.2 LAN1
Avaya Branch Gateway Manager 10.0 Page 3
15-601011 Issue 29r (Friday, November 02, 2012)B5800 Branch Gateway
Page 4

............................................................................ 1535.3.3 LAN2
............................................................................ 1545.3.4 DNS
............................................................................ 1555.3.5 Voicemail
............................................................................ 1595.3.6 Telephony
............................................................................ 1665.3.7 Directory Services
............................................................................ 1755.3.8 System Events
............................................................................ 1805.3.9 SMTP
............................................................................ 1815.3.10 SMDR
............................................................................ 1825.3.11 Twinning
............................................................................ 1835.3.12 VCM
............................................................................ 1865.3.13 CCR
............................................................................ 1875.3.14 Codecs
..................................................................... 1885.4 Line
............................................................................ 1905.4.1 Trunk Templates
............................................................................ 1965.4.2 Analog Line
............................................................................ 2015.4.3 BRI Line
............................................................................ 2055.4.4 E1 Line
............................................................................ 2115.4.5 E1R2 Line
............................................................................ 2145.4.6 T1 Line
............................................................................ 2195.4.7 T1 PRI Line
............................................................................ 2255.4.8 S0 Line
............................................................................ 2285.4.9 H323 Line
............................................................................ 2335.4.10 IP DECT Line
............................................................................ 2365.4.11 SIP Line
............................................................................ 2515.4.12 SM Line
..................................................................... 2565.5 Control Unit
..................................................................... 2575.6 Extension
............................................................................ 2585.6.1 Extn
............................................................................ 2605.6.2 Analog
............................................................................ 2625.6.3 VoIP
............................................................................ 2665.6.4 T38 Fax
............................................................................ 2675.6.5 IP DECT
..................................................................... 2685.7 User
............................................................................ 2715.7.1 User
............................................................................ 2745.7.2 Voicemail
............................................................................ 2775.7.3 DND
............................................................................ 2785.7.4 Short Codes
............................................................................ 2795.7.5 Source Numbers
............................................................................ 2815.7.6 Telephony
............................................................................ 2885.7.7 Forwarding
............................................................................ 2905.7.8 Dial In
............................................................................ 2915.7.9 Voice Recording
............................................................................ 2925.7.10 Button Programming
............................................................................ 2935.7.11 Menu Programming
............................................................................ 2955.7.12 Mobility (Twinning)
............................................................................ 3035.7.13 Phone Manager Options
............................................................................ 3035.7.14 Hunt Group Memberships
............................................................................ 3045.7.15 Announcements
............................................................................ 3065.7.16 SIP
............................................................................ 3075.7.17 Personal Directory
..................................................................... 3095.8 Hunt Group
............................................................................ 3105.8.1 Hunt Group
............................................................................ 3125.8.2 User List/Select Members
............................................................................ 3135.8.3 Queuing
............................................................................ 3165.8.4 Overflow
............................................................................ 3195.8.5 Fallback
............................................................................ 3225.8.6 Voicemail
............................................................................ 3255.8.7 Voice Recording
............................................................................ 3265.8.8 Announcements
............................................................................ 3285.8.9 SIP
............................................................................ 3295.8.10 Hunt Group Operation
..................................................................... 3355.9 Short Code
..................................................................... 3365.10 Service
............................................................................ 3375.10.1 Normal, WAN or Intranet Services
............................................................................ 3455.10.2 SSL VPN Service
..................................................................... 3465.11 RAS
............................................................................ 3475.11.1 PPP
..................................................................... 3485.12 Incoming Call Route
............................................................................ 3505.12.1 Standard
............................................................................ 3535.12.2 Voice Recording
............................................................................ 3545.12.3 Destinations
..................................................................... 3555.13 WAN Port
............................................................................ 3565.13.1 WAN Port
............................................................................ 3575.13.2 Frame Relay
............................................................................ 3585.13.3 DLCIs
............................................................................ 3605.13.4 Advanced
............................................................................ 3615.13.5 PPP
..................................................................... 3635.14 Directory
............................................................................ 3665.14.1 Directory
..................................................................... 3675.15 Time Profile
............................................................................ 3695.15.1 Time Profile
..................................................................... 3705.16 Firewall Profile
............................................................................ 3715.16.1 Standard
............................................................................ 3725.16.2 Custom
............................................................................ 3745.16.3 Static NAT
..................................................................... 3755.17 IP Route
............................................................................ 3765.17.1 IP Route
............................................................................ 3775.17.2 RIP
..................................................................... 3785.18 Account Code
............................................................................ 3805.18.1 Account Code
............................................................................ 3815.18.2 Voice Recording
..................................................................... 3825.19 Tunnel
............................................................................ 3835.19.1 L2TP Tunnel
............................................................................ 3865.19.2 IP Security Tunnel
..................................................................... 3895.20 User Rights
............................................................................ 3915.20.1 User
............................................................................ 3925.20.2 Short Codes
............................................................................ 3935.20.3 Button Programming
............................................................................ 3945.20.4 Telephony
............................................................................ 3975.20.5 Phone Manager
............................................................................ 3985.20.6 User Rights Membership
............................................................................ 3995.20.7 Voicemail
..................................................................... 4015.21 Auto Attendant
............................................................................ 4025.21.1 Auto Attendant
............................................................................ 4035.21.2 Actions
..................................................................... 4055.22 ARS
............................................................................ 4075.22.1 ARS
............................................................................ 4095.22.2 Cause Codes and ARS
............................................................................ 4105.22.3 ARS Operation
..................................................................... 4195.23 PLDS License
..................................................................... 4215.24 E911 System
............................................................................ 4225.24.1 E911 Adjunct
............................................................................ 4235.24.2 Zones
Avaya Branch Gateway Manager 10.0 Page 4
15-601011 Issue 29r (Friday, November 02, 2012)B5800 Branch Gateway
Page 5

Short Codes6.
..................................................................... 4266.1 Short Code Fields and Characters
..................................................................... 4296.2 User Dialing
..................................................................... 4306.3 Application Dialing
..................................................................... 4316.4 Secondary Dial Tone
..................................................................... 4326.5 ? Short Codes
..................................................................... 4336.6 Short Code Matching Examples
..................................................................... 4366.7 Default System Short Code List
..................................................................... 4386.8 Short Code Features
............................................................................ 4396.8.1 Acquire Call
............................................................................ 4396.8.2 AOC Previous Call
............................................................................ 4396.8.3 AOC Reset Total
............................................................................ 4396.8.4 AOC Total
............................................................................ 4396.8.5 Auto Attendant
............................................................................ 4406.8.6 Break Out
............................................................................ 4406.8.7 Barred
............................................................................ 4406.8.8 Busy On Held
............................................................................ 4416.8.9 Call Intrude
............................................................................ 4426.8.10 Call Listen
............................................................................ 4436.8.11 Call Park
............................................................................ 4436.8.12 Call Pickup Any
............................................................................ 4436.8.13 Call Pickup Extn
............................................................................ 4456.8.14 Call Pickup Group
............................................................................ 4456.8.15 Call Pickup Line
............................................................................ 4466.8.16 Call Pickup Members
............................................................................ 4466.8.17 Call Pickup User
............................................................................ 4476.8.18 Call Queue
............................................................................ 4476.8.19 Call Steal
............................................................................ 4486.8.20 Call Waiting On
............................................................................ 4486.8.21 Call Waiting Off
............................................................................ 4486.8.22 Call Waiting Suspend
............................................................................ 4496.8.23 Cancel All Forwarding
............................................................................ 4496.8.24 Cancel Ring Back When Free
............................................................................ 4496.8.25 Channel Monitor
............................................................................ 4506.8.26 Change Login Code
............................................................................ 4516.8.27 Clear After Call Work
............................................................................ 4516.8.28 Clear Call
............................................................................ 4516.8.29 Clear CW
............................................................................ 4526.8.30 Clear Hunt Group Night Service
............................................................................ 4526.8.31 Clear Hunt Group Out Of Service
............................................................................ 4536.8.32 Clear Quota
............................................................................ 4536.8.33 Coaching Intrusion
............................................................................ 4536.8.34 Conference Add
............................................................................ 4546.8.35 Conference Meet Me
............................................................................ 4556.8.36 CW
............................................................................ 4566.8.37 Dial
............................................................................ 4576.8.38 Dial 3K1
............................................................................ 4576.8.39 Dial 56K
............................................................................ 4576.8.40 Dial 64K
............................................................................ 4576.8.41 Dial CW
............................................................................ 4586.8.42 Dial Direct
............................................................................ 4586.8.43 Dial Direct Hot Line
............................................................................ 4596.8.44 Dial Emergency
............................................................................ 4596.8.45 Dial Extn
............................................................................ 4606.8.46 Dial Fax
............................................................................ 4606.8.47 Dial Inclusion
Contents
............................................................................ 4606.8.48 Dial Paging
............................................................................ 4626.8.49 Dial Physical Extension By Number
............................................................................ 4626.8.50 Dial Physical Extension By Id
............................................................................ 4636.8.51 Dial Speech
............................................................................ 4636.8.52 Dial V110
............................................................................ 4636.8.53 Dial V120
............................................................................ 4636.8.54 Dial Video
............................................................................ 4646.8.55 Disable ARS Form
............................................................................ 4646.8.56 Disable Internal Forwards
............................................................................ 4646.8.57 Disable Internal Forward Unconditional
............................................................................ 4656.8.58 Disable Internal Forward Busy or No Answer
............................................................................ 4656.8.59 Display Msg
............................................................................ 4666.8.60 Do Not Disturb Exception Add
............................................................................ 4666.8.61 Do Not Disturb Exception Delete
............................................................................ 4676.8.62 Do Not Disturb On
............................................................................ 4676.8.63 Do Not Disturb Off
............................................................................ 4676.8.64 Enable ARS Form
............................................................................ 4686.8.65 Enable Internal Forwards
............................................................................ 4686.8.66 Enable Internal Forward Unconditional
............................................................................ 4686.8.67 Enable Internal Forward Busy or No Answer
............................................................................ 4696.8.68 Extn Login
............................................................................ 4696.8.69 Extn Logout
............................................................................ 4716.8.70 Flash Hook
............................................................................ 4716.8.71 FNE Service
............................................................................ 4726.8.72 Follow Me Here
............................................................................ 4736.8.73 Follow Me Here Cancel
............................................................................ 4736.8.74 Follow Me To
............................................................................ 4746.8.75 Forward Hunt Group Calls On
............................................................................ 4746.8.76 Forward Hunt Group Calls Off
............................................................................ 4756.8.77 Forward Number
............................................................................ 4756.8.78 Forward On Busy Number
............................................................................ 4766.8.79 Forward On Busy On
............................................................................ 4766.8.80 Forward On Busy Off
............................................................................ 4776.8.81 Forward On No Answer On
............................................................................ 4776.8.82 Forward On No Answer Off
............................................................................ 4786.8.83 Forward Unconditional On
............................................................................ 4786.8.84 Forward Unconditional Off
............................................................................ 4796.8.85 Group Listen Off
............................................................................ 4796.8.86 Group Listen On
............................................................................ 4806.8.87 Headset Toggle
............................................................................ 4806.8.88 Hold Call
............................................................................ 4816.8.89 Hold CW
............................................................................ 4816.8.90 Hold Music
............................................................................ 4826.8.91 Hunt Group Disable
............................................................................ 4826.8.92 Hunt Group Enable
............................................................................ 4836.8.93 Last Number Redial
............................................................................ 4836.8.94 MCID Activate
............................................................................ 4836.8.95 Mobile Twinned Call Pickup
............................................................................ 4846.8.96 Off Hook Station
............................................................................ 4856.8.97 Outgoing Call Bar Off
............................................................................ 4856.8.98 Outgoing Call Bar On
............................................................................ 4866.8.99 Private Call
............................................................................ 4876.8.100 Private Call Off
............................................................................ 4876.8.101 Private Call On
............................................................................ 4886.8.102 Priority Call
............................................................................ 4886.8.103 Record Message
............................................................................ 4886.8.104 Relay On
Avaya Branch Gateway Manager 10.0 Page 5
15-601011 Issue 29r (Friday, November 02, 2012)B5800 Branch Gateway
Page 6

............................................................................ 4896.8.105 Relay Off
............................................................................ 4906.8.106 Relay Pulse
............................................................................ 4906.8.107 Resume Call
............................................................................ 4916.8.108 Retrieve Call
............................................................................ 4916.8.109 Ring Back When Free
............................................................................ 4916.8.110 Secondary Dial Tone
............................................................................ 4926.8.111 Set Absent Text
............................................................................ 4936.8.112 Set Account Code
............................................................................ 4936.8.113 Set Authorization Code
............................................................................ 4946.8.114 Set Hunt Group Night Service
............................................................................ 4956.8.115 Set Hunt Group Out Of Service
............................................................................ 4966.8.116 Set Inside Call Seq
............................................................................ 4976.8.117 Set Mobile Twinning Number
............................................................................ 4976.8.118 Set Mobile Twinning On
............................................................................ 4976.8.119 Set Mobile Twinning Off
............................................................................ 4986.8.120 Set No Answer Time
............................................................................ 4986.8.121 Set Outside Call Seq
............................................................................ 4996.8.122 Set Ringback Seq
............................................................................ 4996.8.123 Set Wrap Up Time
............................................................................ 5006.8.124 Shutdown Embedded Voicemail
............................................................................ 5006.8.125 Stamp Log
............................................................................ 5006.8.126 Startup Embedded Voicemail
............................................................................ 5006.8.127 Suspend Call
............................................................................ 5006.8.128 Suspend CW
............................................................................ 5026.8.129 Start After Call Work
............................................................................ 5026.8.130 Toggle Calls
............................................................................ 5026.8.131 Unpark Call
............................................................................ 5036.8.132 Voicemail Collect
............................................................................ 5046.8.133 Voicemail Node
............................................................................ 5046.8.134 Voicemail On
............................................................................ 5046.8.135 Voicemail Off
............................................................................ 5056.8.136 Voicemail Ringback On
............................................................................ 5056.8.137 Voicemail Ringback Off
............................................................................ 5056.8.138 Whisper Page
Button Programming7.
..................................................................... 5087.1 Programming Buttons
............................................................................ 5087.1.1 Programming Buttons with Manager
............................................................................ 5097.1.2 Interactive Button Menus
..................................................................... 5107.2 Phone Details
............................................................................ 5117.2.1 1100 Series
............................................................................ 5127.2.2 1200 Series
............................................................................ 5137.2.3 1400 Series
............................................................................ 5157.2.4 1600 Series
............................................................................ 5177.2.5 2400 Series
............................................................................ 5217.2.6 3600 Series
............................................................................ 5237.2.7 3700 Series
............................................................................ 5237.2.8 4600 Series (New Style)
............................................................................ 5267.2.9 5400 Series
............................................................................ 5307.2.10 5600 Series
............................................................................ 5347.2.11 9500 Series
............................................................................ 5357.2.12 9600 Series
............................................................................ 5437.2.13 B100 Series
............................................................................ 5447.2.14 D100
............................................................................ 5457.2.15 T-Series
..................................................................... 5507.3 Actions
............................................................................ 5557.3.1 Abbreviated Dial
............................................................................ 5557.3.2 Abbreviated Dial Pause
............................................................................ 5567.3.3 Abbreviated Dial Program
............................................................................ 5567.3.4 Abbreviated Dial Stop
............................................................................ 5567.3.5 Account Code Entry
............................................................................ 5587.3.6 ACD Agent Statistics
............................................................................ 5587.3.7 ACD Stroke Count
............................................................................ 5587.3.8 Acquire Call
............................................................................ 5587.3.9 AD Special Functions
............................................................................ 5597.3.10 AD Special Function Mark
............................................................................ 5597.3.11 AD Special Function Wait
............................................................................ 5607.3.12 AD Suppress
............................................................................ 5617.3.13 After Call Work
............................................................................ 5627.3.14 Appearance
............................................................................ 5637.3.15 Automatic Callback
............................................................................ 5647.3.16 Automatic Intercom
............................................................................ 5657.3.17 Break Out
............................................................................ 5667.3.18 Bridged Appearance
............................................................................ 5677.3.19 Busy
............................................................................ 5677.3.20 Busy On Held
............................................................................ 5677.3.21 Call Forwarding All
............................................................................ 5687.3.22 Call Intrude
............................................................................ 5687.3.23 Call List
............................................................................ 5697.3.24 Call Listen
............................................................................ 5707.3.25 Call Log
............................................................................ 5717.3.26 Call Park
............................................................................ 5727.3.27 Call Park To Other Extension
............................................................................ 5727.3.28 Call Pickup
............................................................................ 5737.3.29 Call Pickup Any
............................................................................ 5747.3.30 Call Pickup Group
............................................................................ 5747.3.31 Call Pickup Members
............................................................................ 5757.3.32 Call Queue
............................................................................ 5757.3.33 Call Steal
............................................................................ 5767.3.34 Call Waiting Off
............................................................................ 5767.3.35 Call Waiting On
............................................................................ 5767.3.36 Call Waiting Suspend
............................................................................ 5777.3.37 Cancel All Forwarding
............................................................................ 5777.3.38 Cancel Leave Word Calling
............................................................................ 5777.3.39 Cancel Ring Back When Free
............................................................................ 5797.3.40 Channel Monitor
............................................................................ 5797.3.41 Clear Call
............................................................................ 5797.3.42 Clear CW
............................................................................ 5817.3.43 Clear Hunt Group Night Service
............................................................................ 5827.3.44 Clear Hunt Group Out Of Service
............................................................................ 5827.3.45 Clear Quota
............................................................................ 5827.3.46 Coaching Intrusion
............................................................................ 5847.3.47 Conference
............................................................................ 5847.3.48 Conference Add
............................................................................ 5857.3.49 Conference Meet Me
............................................................................ 5877.3.50 Consult
............................................................................ 5877.3.51 Coverage Appearance
............................................................................ 5887.3.52 Dial
............................................................................ 5887.3.53 Dial 3K1
............................................................................ 5887.3.54 Dial 56K
............................................................................ 5897.3.55 Dial 64K
............................................................................ 5897.3.56 Dial CW
............................................................................ 5897.3.57 Dial Direct
............................................................................ 5907.3.58 Dial Emergency
Avaya Branch Gateway Manager 10.0 Page 6
15-601011 Issue 29r (Friday, November 02, 2012)B5800 Branch Gateway
Page 7

............................................................................ 5907.3.59 Dial Inclusion
............................................................................ 5917.3.60 Dial Intercom
............................................................................ 5917.3.61 Dial Paging
............................................................................ 5927.3.62 Dial Physical Extn by Number
............................................................................ 5927.3.63 Dial Physical Extn by Id
............................................................................ 5927.3.64 Dial Speech
............................................................................ 5937.3.65 Dial V110
............................................................................ 5937.3.66 Dial V120
............................................................................ 5947.3.67 Display Msg
............................................................................ 5947.3.68 Dial Video
............................................................................ 5947.3.69 Directed Call Pickup
............................................................................ 5967.3.70 Directory
............................................................................ 5977.3.71 Do Not Disturb Exception Add
............................................................................ 5977.3.72 Do Not Disturb Exception Delete
............................................................................ 5987.3.73 Do Not Disturb Off
............................................................................ 5987.3.74 Do Not Disturb On
............................................................................ 5997.3.75 Drop
............................................................................ 6007.3.76 Extn Login
............................................................................ 6017.3.77 Extn Logout
............................................................................ 6017.3.78 Flash Hook
............................................................................ 6027.3.79 Follow Me Here
............................................................................ 6027.3.80 Follow Me Here Cancel
............................................................................ 6037.3.81 Follow Me To
............................................................................ 6037.3.82 Forward Hunt Group Calls Off
............................................................................ 6037.3.83 Forward Hunt Group Calls On
............................................................................ 6047.3.84 Forward Number
............................................................................ 6057.3.85 Forward On Busy Number
............................................................................ 6057.3.86 Forward On Busy Off
............................................................................ 6067.3.87 Forward On Busy On
............................................................................ 6067.3.88 Forward On No Answer Off
............................................................................ 6077.3.89 Forward On No Answer On
............................................................................ 6077.3.90 Forward Unconditional Off
............................................................................ 6087.3.91 Forward Unconditional On
............................................................................ 6097.3.92 Group
............................................................................ 6107.3.93 Group Listen On
............................................................................ 6117.3.94 Group Paging
............................................................................ 6127.3.95 Headset Toggle
............................................................................ 6127.3.96 Hold Call
............................................................................ 6137.3.97 Hold CW
............................................................................ 6137.3.98 Hold Music
............................................................................ 6147.3.99 Hunt Group Enable
............................................................................ 6157.3.100 Hunt Group Disable
............................................................................ 6167.3.101 Inspect
............................................................................ 6167.3.102 Internal Auto-Answer
............................................................................ 6177.3.103 Last Number Redial
............................................................................ 6177.3.104 Leave Word Calling
............................................................................ 6177.3.105 Line Appearance
............................................................................ 6187.3.106 Manual Exclude
............................................................................ 6187.3.107 MCID Activate
............................................................................ 6197.3.108 Off Hook Station
............................................................................ 6207.3.109 Priority Call
............................................................................ 6207.3.110 Priority Calling
............................................................................ 6207.3.111 Private Call
............................................................................ 6227.3.112 Relay Off
............................................................................ 6227.3.113 Relay On
............................................................................ 6237.3.114 Relay Pulse
............................................................................ 6247.3.115 Resume Call
Contents
............................................................................ 6247.3.116 Retrieve Call
............................................................................ 6257.3.117 Ring Back When Free
............................................................................ 6267.3.118 Ringer Off
............................................................................ 6277.3.119 Self-Administer
............................................................................ 6287.3.120 Send All Calls
............................................................................ 6297.3.121 Set Absent Text
............................................................................ 6307.3.122 Set Account Code
............................................................................ 6317.3.123 Set Hunt Group Night Service
............................................................................ 6327.3.124 Set Hunt Group Out Of Service
............................................................................ 6337.3.125 Set Inside Call Seq
............................................................................ 6337.3.126 Set Night Service Group
............................................................................ 6347.3.127 Set No Answer Time
............................................................................ 6347.3.128 Set Out of Service Group
............................................................................ 6357.3.129 Set Outside Call Seq
............................................................................ 6357.3.130 Set Ringback Seq
............................................................................ 6367.3.131 Set Wrap Up Time
............................................................................ 6367.3.132 Speed Dial
............................................................................ 6377.3.133 Stamp Log
............................................................................ 6377.3.134 Stored Number View
............................................................................ 6387.3.135 Suspend Call
............................................................................ 6387.3.136 Suspend CW
............................................................................ 6397.3.137 Time of Day
............................................................................ 6407.3.138 Timer
............................................................................ 6417.3.139 Transfer
............................................................................ 6417.3.140 Toggle Calls
............................................................................ 6427.3.141 Twinning
............................................................................ 6427.3.142 Unpark Call
............................................................................ 6447.3.143 User
............................................................................ 6467.3.144 Visual Voice
............................................................................ 6487.3.145 Voicemail Collect
............................................................................ 6497.3.146 Voicemail Off
............................................................................ 6497.3.147 Voicemail On
............................................................................ 6507.3.148 Voicemail Ringback Off
............................................................................ 6517.3.149 Voicemail Ringback On
............................................................................ 6517.3.150 Whisper Page
Apperance Button Operation8.
..................................................................... 6538.1 Appearance Button Features
..................................................................... 6548.2 Call Appearance Buttons
............................................................................ 6558.2.1 Example 1
............................................................................ 6568.2.2 Example 2
............................................................................ 6578.2.3 How are Call Appearance Buttons Treated?
............................................................................ 6588.2.4 Button Indication
..................................................................... 6598.3 Bridged Appearance Buttons
............................................................................ 6608.3.1 Example 1
............................................................................ 6618.3.2 Example 2
............................................................................ 6628.3.3 Example 3
............................................................................ 6638.3.4 How are Bridged Appearances Treated?
............................................................................ 6648.3.5 Button Indication
..................................................................... 6658.4 Call Coverage Buttons
............................................................................ 6668.4.1 Example 1
............................................................................ 6668.4.2 Example 2
............................................................................ 6678.4.3 How is Call Coverage Treated?
............................................................................ 6688.4.4 Button Indication
..................................................................... 6698.5 Line Appearance Buttons
............................................................................ 6708.5.1 Example 1
............................................................................ 6718.5.2 Example 2
Avaya Branch Gateway Manager 10.0 Page 7
15-601011 Issue 29r (Friday, November 02, 2012)B5800 Branch Gateway
Page 8

............................................................................ 6728.5.3 How are Line Appearances Treated?
............................................................................ 6738.5.4 Button Indication
..................................................................... 6748.6 Other Appearance Controls
............................................................................ 6748.6.1 Selected Button Indication
............................................................................ 6758.6.2 Idle Line Preference
............................................................................ 6788.6.3 Ringing Line Preference
............................................................................ 6818.6.4 Answer Pre-Select
............................................................................ 6828.6.5 Auto Hold
............................................................................ 6838.6.6 Ring Delay
............................................................................ 6858.6.7 Delayed Ring Preference
............................................................................ 6878.6.8 Collapsing Appearances
............................................................................ 6888.6.9 Joining Other Calls (Bridging)
............................................................................ 6908.6.10 Multiple Alerting Buttons
............................................................................ 6918.6.11 Twinning
............................................................................ 6918.6.12 Busy on Held
............................................................................ 6918.6.13 Reserving a Call Appearance Button
............................................................................ 6928.6.14 Logging Off and Hot Desking
............................................................................ 6928.6.15 Applications
..................................................................... 6938.7 Programming Appearance Buttons
............................................................................ 6958.7.1 System Settings
............................................................................ 6968.7.2 User Settings
............................................................................ 6978.7.3 Line Appearance ID Numbers
............................................................................ 6988.7.4 Outgoing Line Programming
Telephone Features9.
..................................................................... 7029.1 Date and Time
..................................................................... 7049.2 User Directory Access
..................................................................... 7059.3 Mobile Call Control
............................................................................ 7079.3.1 Mobile Direct Access (MDA)
............................................................................ 7089.3.2 Mobile Callback
............................................................................ 7099.3.3 one-X Mobile Client
..................................................................... 7159.4 Advice of Charge
..................................................................... 7179.5 Centralized System Directory
..................................................................... 7229.6 Centralized Personal Directory
..................................................................... 7239.7 Centralized Call Log
..................................................................... 7269.8 Coverage Groups
..................................................................... 7279.9 Fax Relay
..................................................................... 7289.10 Malicious Call Tracing (MCID)
..................................................................... 7299.11 Call Barring
..................................................................... 7309.12 Caller Display
..................................................................... 7319.13 Call Intrusion
..................................................................... 7339.14 Call Tagging
..................................................................... 7349.15 Private Calls
..................................................................... 7349.16 Call Pickup
..................................................................... 7359.17 Call Waiting
..................................................................... 7369.18 Parking Calls
..................................................................... 7379.19 Ring Back When Free
..................................................................... 7389.20 Message Waiting Indication
..................................................................... 7399.21 Ring Tones
..................................................................... 7409.22 Music On Hold (MOH)
..................................................................... 7429.23 System Phone Features
..................................................................... 7439.24 The 'No User' User
..................................................................... 7439.25 Automatic Intercom Calls
..................................................................... 7439.26 Forwarding Calls
............................................................................ 7459.26.1 Do Not Disturb
............................................................................ 7479.26.2 Follow Me
............................................................................ 7499.26.3 Forward Unconditional
............................................................................ 7519.26.4 Forward on Busy
............................................................................ 7539.26.5 Forward on No Answer
............................................................................ 7559.26.6 Determining a User's Busy Status
............................................................................ 7569.26.7 Chaining and Loops
..................................................................... 7579.27 Transferring Calls
............................................................................ 7589.27.1 Off-Switch Transfer Restrictions
............................................................................ 7599.27.2 Context Sensitive Transfer
............................................................................ 7609.27.3 Dial Tone Transfer
............................................................................ 7629.27.4 Handsfree Announced Transfers
............................................................................ 7649.27.5 One Touch Transferring
............................................................................ 7659.27.6 Centrex Transfer
..................................................................... 7669.28 Conferencing
............................................................................ 7679.28.1 Conference Phones
............................................................................ 7689.28.2 Ad-Hoc Conferencing
............................................................................ 7699.28.3 Meet Me Conferencing
............................................................................ 7719.28.4 Routing External Callers
............................................................................ 7729.28.5 Context Sensitive Conferencing
..................................................................... 7739.29 Hot Desking
............................................................................ 7749.29.1 Call Center Agents
............................................................................ 7759.29.2 Hot Desking Examples
............................................................................ 7769.29.3 Automatic Log Off
..................................................................... 7779.30 Paging
............................................................................ 7799.30.1 Paging Via Standalone Voice Mail
..................................................................... 7819.31 Voice over IP Features
............................................................................ 7819.31.1 Wide Band Audio Support
............................................................................ 7829.31.2 Secure VoIP (SRTP)
Data Routing10.
..................................................................... 78610.1 Network Address Translation (NAT)
..................................................................... 78610.2 DHCP
..................................................................... 78710.3 Examples
............................................................................ 78710.3.1 Simple ISDN Internet Connection
............................................................................ 78810.3.2 Using a Dedicated T1/PRI ISP Link
............................................................................ 79010.3.3 Remote Access
............................................................................ 79310.3.4 WAN PPP
............................................................................ 79410.3.5 WAN Frame Relay
Appendix: Locale Settings11.
..................................................................... 79811.1 Locale Defaults
..................................................................... 80011.2 Phone Display Language Sets and Fallback
..................................................................... 80111.3 Argentina
..................................................................... 80211.4 Australia
..................................................................... 80311.5 Bahrain
..................................................................... 80411.6 Belgium - Flemish
..................................................................... 80511.7 Belgium - French
..................................................................... 80611.8 Brazil
..................................................................... 80711.9 Canada
..................................................................... 80811.10 Chile
..................................................................... 80911.11 China
..................................................................... 81011.12 Colombia
..................................................................... 81111.13 Customize
..................................................................... 81211.14 Denmark
..................................................................... 81311.15 Egypt
..................................................................... 81411.16 Finland
..................................................................... 81511.17 France
..................................................................... 81611.18 Greece
..................................................................... 81711.19 Germany
..................................................................... 81811.20 Hong Kong
Avaya Branch Gateway Manager 10.0 Page 8
15-601011 Issue 29r (Friday, November 02, 2012)B5800 Branch Gateway
Page 9

..................................................................... 81911.21 Hungary
..................................................................... 82011.22 Iceland
..................................................................... 82111.23 India
..................................................................... 82211.24 Italy
..................................................................... 82311.25 Korea
..................................................................... 82411.26 Kuwait
..................................................................... 82511.27 Mexico
..................................................................... 82611.28 Morocco
..................................................................... 82711.29 Netherlands
..................................................................... 82811.30 New Zealand
..................................................................... 82911.31 Norway
..................................................................... 83011.32 Oman
..................................................................... 83111.33 Pakistan
..................................................................... 83211.34 Peru
..................................................................... 83311.35 Poland
..................................................................... 83411.36 Portugal
..................................................................... 83511.37 Qatar
..................................................................... 83611.38 Russia
..................................................................... 83711.39 Saudi Arabia
..................................................................... 83811.40 Singapore
..................................................................... 83911.41 South Africa
..................................................................... 84011.42 Spain
..................................................................... 84111.43 Sweden
..................................................................... 84211.44 Switzerland
..................................................................... 84311.45 Taiwan
..................................................................... 84411.46 Turkey
..................................................................... 84511.47 United Arab Emirates
..................................................................... 84611.48 United Kingdom
..................................................................... 84711.49 United States
..................................................................... 84811.50 Venezuela
Contents
Appendix: SMDR12.
..................................................................... 85112.1 SMDR Fields
..................................................................... 85412.2 SMDR Examples
...............................................................................860Index
Avaya Branch Gateway Manager 10.0 Page 9
15-601011 Issue 29r (Friday, November 02, 2012)B5800 Branch Gateway
Page 10

Chapter 1.
Branch Gateway Manager
Avaya Branch Gateway Manager 10.0 Page 10
15-601011 Issue 29r (Friday, November 02, 2012)B5800 Branch Gateway
Page 11
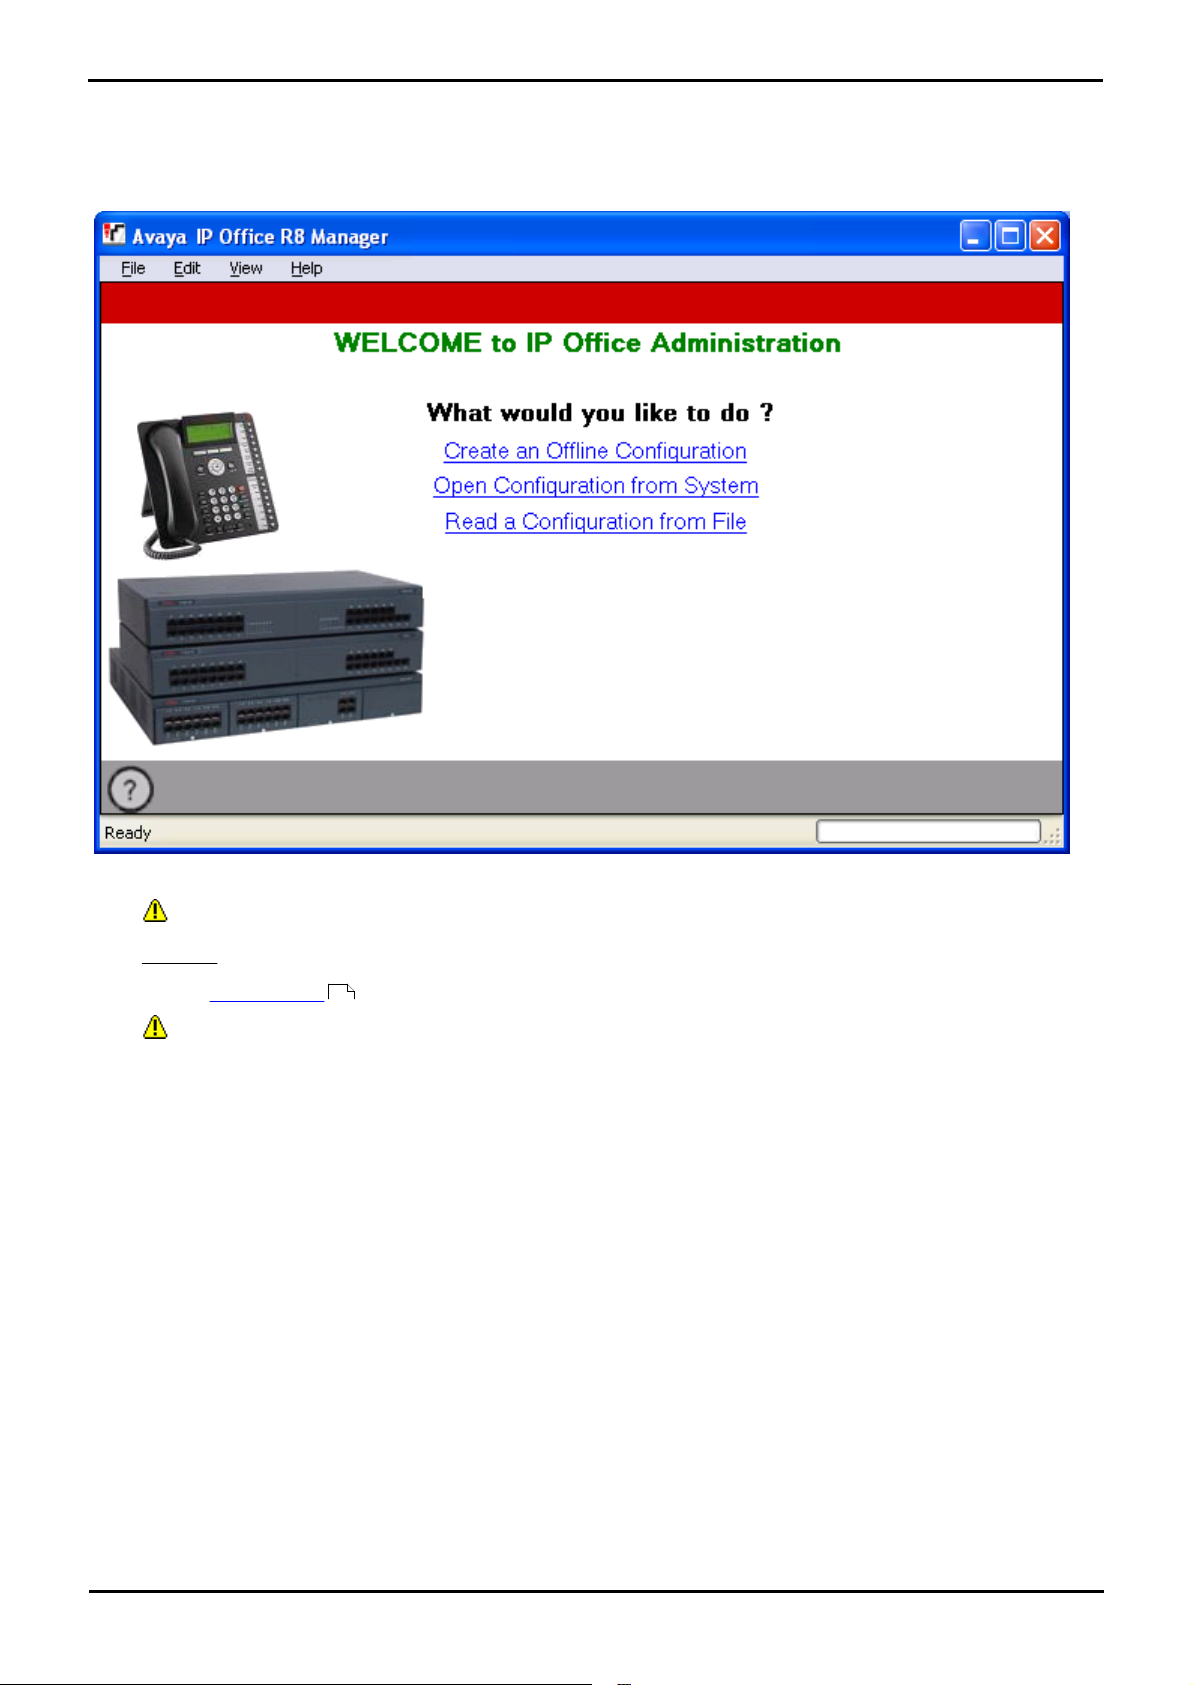
Branch Gateway Manager:
1. Branch Gateway Manager
Branch Gateway Manager is an application for viewing and editing an Avaya Branch Gateway system's configuration. It is
a tool for system installers and maintainers.
Branch Gateway Manager runs on a Windows PC and connects to the system via Ethernet LAN or WAN connections.
· WARNING - Password Changes Required
New systems use default security settings. These settings must be changed to make the system secure. As a
minimum, you must change the default passwords of the Security Administrator, the default Service Users
and the Unsecured Interfaces System Password. Failure to do so will render the system potentially unsecure.
See the Security Mode section for details.
· IMPORTANT - Branch Gateway Manager is an Off-Line Editor
Branch Gateway Manager is an off-line editor. It receives a copy of the system's current configuration settings.
Changes are made to that copy and it is then sent back to the system for those changes to become active. This
means that changes to the active configuration in the system that occur between Branch Gateway Manager
receiving and sending back the copy may be overwritten. For example, this may affect changes made by a user
through their phone or voicemail mailbox after the copy of the configuration is received by Branch Gateway
Manager.
59
Avaya Branch Gateway Manager 10.0 Page 11
15-601011 Issue 29r (Friday, November 02, 2012)B5800 Branch Gateway
Page 12
1.1 Installing Branch Gateway Manager
Minimum PC Requirements
RAM
256MB
Hard Disk Free Space
1GB*
Processor:
- Pentium
PIII 800MHz
- Celeron
Celeron 3 800Mhz
- AMD
Athlon Opteron, Athlon64/XP
Additional Apps:
- .NET2
Installed with Branch Gateway
Manager if not already present.
Operating System Support
Server OS:
2003 Server
2008 Server
Client OS:
XP Professional
Vista Business/Enterprise
Vista Ultimate
Windows 7
Component
Location - %ProgramFiles%\Avaya\IP
Office\Manager
Ports
Branch Gateway
Manager
manager.exe
TCP Port 50802.
TCP Port 50804.
TCP Port 50805.
Configuration access
TCP Port 50812.
TCP Port 50813.
Security configuration
access
Upgrade Wizard
upgradewiz.exe
UDP Port 50798.
System upgrade access.
In addition to Branch Gateway Manager, the Admin suite includes options to install the following applications:
· System Monitor
This is a tool for system installers and maintainers. Interpreting the information output by System Monitor requires
detailed data and telecoms knowledge.
· System Status Application
This is a Java application that can be used to monitor the status of the system such as extension, trunks and other
resources. It displays current alarms and most recent historical alarms.
Branch Gateway Manager PC Requirements
· *Includes disk space required for .NET2 component.
· Language Support
The Branch Gateway Manager application can run in Brazilian Portuguese, Simplified Chinese, Dutch, French,
German, Italian, Mexican Spanish, Russian, UK English and US English. By default the language used is determined
by the best match to the PC's regional setting. To change the language used see Changing the Branch Gateway
Manager Language .
18
Ports
The Branch Gateway Manager application uses the following ports for access to the telephone system. These ports may
need to be allowed within the configuration of any firewall software being run on the PC hosting the Branch Gateway
Manager application. Note that the ports used by a particular system can be adjusted through its security settings .
78
Avaya Branch Gateway Manager 10.0 Page 12
15-601011 Issue 29r (Friday, November 02, 2012)B5800 Branch Gateway
Page 13

Branch Gateway Manager: Installing Branch Gateway Manager
Installing Branch Gateway Manager
Note: This installation process will install Windows .NET2 if not already present. The installation of .NET2 may require
some systems to restart and the installation process to then be restarted.
1.If installing from the Admin DVD, insert the DVD and when the page is displayed click on the link for the Admin
suite. This will open a file windows showing the installation files for the suite. Locate and double-click on the
setup.exe file.
2.Select the language you want to use for the installation process. This does not affect the language used by Branch
Gateway Manager when it is run. Click Next >.
3.If an upgrade menu appears, it indicates that a previous installation has been detected. Select Yes to upgrade the
existing installed applications.
4.If required select the destination to which the applications should be installed. We recommend that you accept the
default destination. Click Next >.
5.The next screen is used to select which applications in the suite should be installed. Clicking on each will display a
description of the application. Click on the next to each application to change the installation selection. When
you have selected the installations required, click Next >.
6.The applications selected are now ready to be installed. Click Next >.
7.Following installation, you will be prompted whether you want to run Branch Gateway Manager. Selecting Yes runs
Branch Gateway Manager.
8.On some versions of Windows, you may be required to restart the PC. Allow this to happen if required.
Avaya Branch Gateway Manager 10.0 Page 13
15-601011 Issue 29r (Friday, November 02, 2012)B5800 Branch Gateway
Page 14
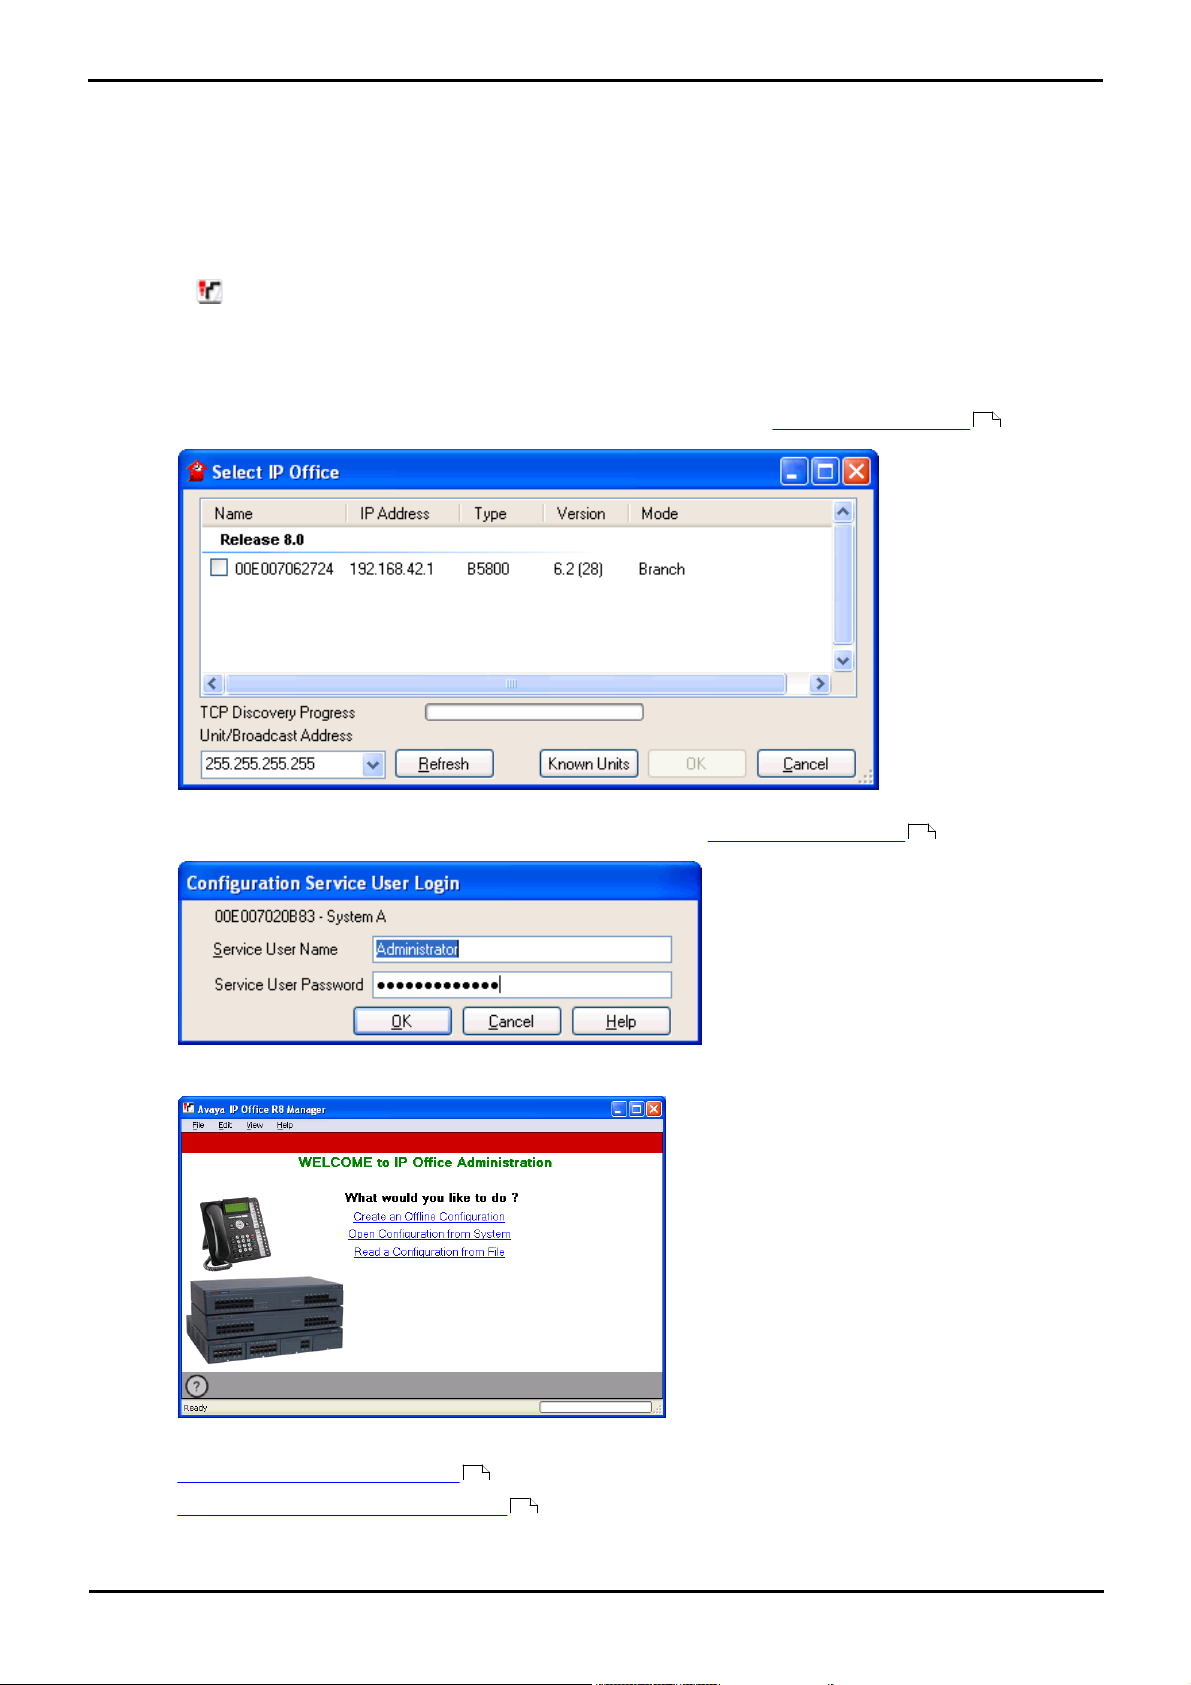
1.2 Starting Branch Gateway Manager
No name or password is required to start Branch Gateway Manager. A name and password is only required when
connecting with a system.
When started, by default Branch Gateway Manager will attempt to discover any systems on the network. If it finds any it
will display a list from which you can select the system required.
1.Select Start and then Programs or All Programs depending on the version of Windows. Select the IP Office
program group.
2.Select Manager. If a Windows Security Alert appears select Unblock to allow Branch Gateway Manager to
run.
3.By default Branch Gateway Manager will scan the network for any systems. What appears next depends on
whether it finds any systems.
· If it finds multiple systems, it will display a list of those systems from which you can select the one whose
configuration you want to edit. If you want to open a configuration go to Opening a Configuration . If you
don't want to load a configuration click on Cancel.
16
· If it finds a single system, it will attempt to open the configuration of that system by displaying the user name
and password request. If you want to open a configuration go to Opening a Configuration . If you don't
want to load a configuration click on Cancel.
· If no systems are found or you cancel the steps above, the Branch Gateway Manager simplified view is
displayed.
16
4.Use the view to select the action you want to do.
· Create an Offline Configuration
· Open a Configuration from a System
51
16
Avaya Branch Gateway Manager 10.0 Page 14
15-601011 Issue 29r (Friday, November 02, 2012)B5800 Branch Gateway
Page 15

· Read a Configuration from a File
Branch Gateway Manager: Starting Branch Gateway Manager
46
Avaya Branch Gateway Manager 10.0 Page 15
15-601011 Issue 29r (Friday, November 02, 2012)B5800 Branch Gateway
Page 16
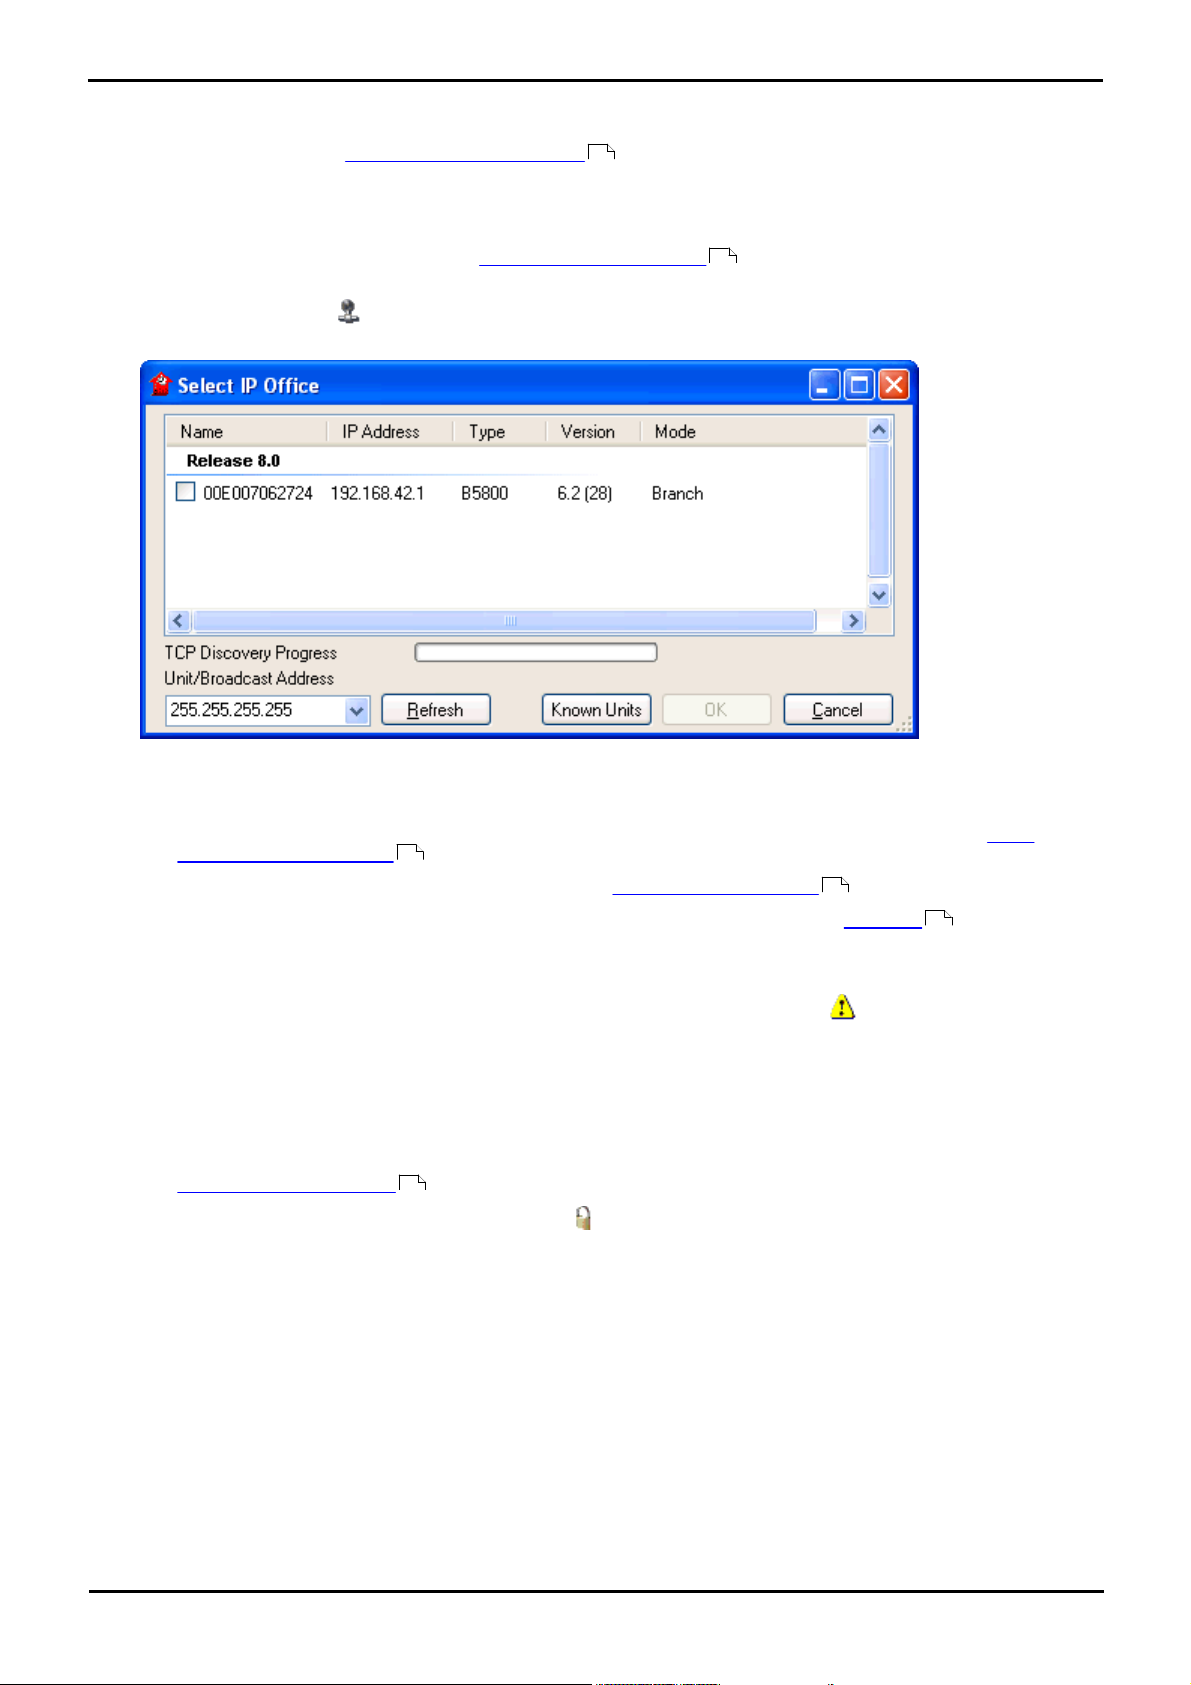
1.3 Opening a Configuration
The initial IP address ranges in which Branch Gateway Manager searches for systems are set through the Branch
Gateway Manager preferences (File | Preferences | Discovery ). By default it scans the local network of the Branch
Gateway Manager PC.
1.Start Branch Gateway Manager. If Branch Gateway Manager is already started and a configuration is open in it,
that configuration must be closed first.
· If Branch Gateway Manager is set to Auto Connect on start up , it will scan for systems automatically
and either display the list of systems discovered or automatically start login to the only system discovered.
· Otherwise, click on or select File | Open Configuration.
2.The Select B5800 window appears, listing those systems that responded.
102
100
· If the system required was not found, the Unit/Broadcast Address used for the search can be changed.
Either enter an address or use the drop-down to select a previously used address. Then click Refresh to
perform a new search.
· The address ranges used by Branch Gateway Manager for searching can be configured through the File |
Preferences | Discovery tab.
· A list of known systems can be stored and used. See Known System Discovery
· Branch Gateway Manager can be configured to search using DNS names. See the Use DNS option.
102
47
102
· Systems found but not supported by the version of Branch Gateway Manager being used will be listed as Not
Supported.
· If the system detected is running software other than from its primary folder, a warning icon will be
shown next to it. The configuration can still be opened but only as a read-only file.
3.When you have located the system required, check the box next to the system and click OK.
4.The system name and password request is displayed. Enter the required details and click OK.
5.Additional messages will inform you about the success or failure of opening the configuration from the system.
· The method of connection, secure or insecure, attempted by Branch Gateway Manager is set the applications
Secure Communications preferences setting.
104
· When Secure Communications is set to On, a padlock icon is displayed at all times in the lower right
Branch Gateway Manager status field.
· New installations of Branch Gateway Manager default to having Secure Communications enabled. This
means Branch Gateway Manager by default attempts to use secure communications when opening a
configuration.
· If no response to the use of secure communication is received after 5 seconds, Branch Gateway Manager will
offer to fallback to using unsecured communications.
6.Following a successful log in, the configuration is opened in Branch Gateway Manager. The menus and options
displayed will depend on the type of system configuration loaded.
Avaya Branch Gateway Manager 10.0 Page 16
15-601011 Issue 29r (Friday, November 02, 2012)B5800 Branch Gateway
Page 17

Branch Gateway Manager: Opening a Configuration
Login Messages
While attempting to login to a system, various additional messages may be displayed.
Configuration Not Loaded Messages
· Access Denied
This is displayed as the cause if the service user name/password were incorrect, or the service user has
insufficient rights to read the configuration. The Retry option can be used to log in again but multiple rejections in
a 10 minute period may trigger events, such as locking the user account, set by the Password Reject Limit and
Password Reject Action options in the systems security settings.
· Failed to communicate with system
This is displayed as the cause if the network link fails, or the secure communication mode is incorrect (for example
Branch Gateway Manager is set to unsecured, but the system is set to secure only).
· Account Locked
The account of the service user name and password being used is locked. This can be caused by a number of
actions, for example too many incorrect password attempts, passing a fixed expiry date, etc. The account lock
may be temporary (10 minutes) or permanent until manually unlocked. An account can be enabled again through
the system's security settings.
Additional Messages
· Your service user account will expire in X days
This message indicates that an Account Expiry date has been set on the system service user account and that date
is approaching. Someone with access to the system's security settings will be required unlock the account and set
a new expiry date.
· Your password will expire in X days. Do you wish to change it now?
This message indicates that password ageing has been configured in the system's security settings. If your
password expires, someone with access to the system's security settings will be required to unlock the account.
· Change password
Through the system's security settings, a service user account can be required to change their password when
logging in. The menu provides fields for entering the old password and new password.
· Contact Information Check - This configuration is under special control
This message will appear if a Branch Gateway Manager user with administrator rights has entered their contact
information into the configuration. For example to indicate that they do not want the configuration altered while a
possible problem is being diagnosed. The options available are:
· Cancel
Select this option to close the configuration without making any changes.
· Set configuration alteration flag
Select this option if the configuration is being opened because some urgent maintenance action. When the
configuration is next opened, the fact that it has been altered will be indicated on the System | System tab.
· Delete Contact Information
Select this option to take the system out of special control.
· Leave contact information and flags unchanged (Administrators only)
This option is only available to service users logging in with administrator rights.
140
Avaya Branch Gateway Manager 10.0 Page 17
15-601011 Issue 29r (Friday, November 02, 2012)B5800 Branch Gateway
Page 18

1.4 Changing the Branch Gateway Manager Language
Branch Gateway Manager
Language
Shortcut Locale Setting
Brazilian Portuguese
-locale:pt-Br
Chinese (Simplified)
-locale:zh-Hans
Dutch
-locale:nl-NL
French
-locale:fr-FR
German
-locale:de-DE
Italian
-locale:it-IT
Mexican Spanish
-locale:es-MX
Russian
-locale:ru-RU
US English
-locale:en-US
The Branch Gateway Manager application can run in US English, UK English, Chinese (Simplified), French, German,
Brazilian Portuguese, Dutch, Italian, Russian and Mexican Spanish. By default it tries to use the best match to the
PC's regional location settings, otherwise it will use UK English.
The process below can be used to run Branch Gateway Manager in one of its supported languages. However it does not
change the language used for help file content.
1.Create a Windows shortcut to the Branch Gateway Manager application .exe file. By default this file is located in C:
\Program Files\Avaya\IP Office\Manager\Manager.exe.
2.Right-click on the shortcut and select Properties.
3.The Target field can be used to specify the locale setting that Branch Gateway Manager should use.
· For example, for Italian the Target should have -locale:it-IT added to the end. For example: "C:\Program
Files\Avaya\IP Office\Manager\Manager.exe" -locale:it-IT.
4.The available locales for Branch Gateway Manager are:
5.Click OK.
6.Branch Gateway Manager should now run in the selected language when launched using the updated shortcut.
1.5 Web Control
Branch Gateway Manager is used to maintain and configure the telephony service running on the Avaya Branch Gateway
system. Other aspects of the systems operation are managed and configured through a series of web pages. Those
settings include the time and IP address settings used by the system including the telephony services.
The web control pages also include controls for starting, stopping and upgrading services including the telephony service.
The web control pages are also used to backup and restore the telephony service.
When a Avaya Branch Gateway system configuration is loaded in Branch Gateway Manager, the web control pages can be
accessed using File | Advanced | IP Office for Linux Web Management.
Avaya Branch Gateway Manager 10.0 Page 18
15-601011 Issue 29r (Friday, November 02, 2012)B5800 Branch Gateway
Page 19

Branch Gateway Manager: Web Control
Avaya Branch Gateway Manager 10.0 Page 19
15-601011 Issue 29r (Friday, November 02, 2012)B5800 Branch Gateway
Page 20

Chapter 2.
Configuration Mode
Avaya Branch Gateway Manager 10.0 Page 20
15-601011 Issue 29r (Friday, November 02, 2012)B5800 Branch Gateway
Page 21

Configuration Mode:
The Configuration Mode Interface
This part details the screen elements of
Branch Gateway Manager's configuration
mode interface.
· The Menu Bar
· Toolbars
· Using the Navigation Pane
· Using the Group Pane
· Using the Details Pane
· Using the Error Pane
· Altering the Interface
Editing Configuration Settings
This part details how Branch Gateway
Manager's configuration mode can be used
for the following tasks.
· How the Configuration is Used
· Loading a Configuration
· Creating a New Configuration
· Importing and Exporting Settings
· Sending a Configuration
· Saving a Configuration Offline
· Erasing the Configuration
2. Configuration Mode
This section of the documentation covers the operation of Branch Gateway Manager when being used to edit the
configuration of a system running in IP Office Essential Edition, IP Office Preferred Edition or IP Office Advanced Edition
modes.
This section is divided as follows.
26
Avaya Branch Gateway Manager 10.0 Page 21
22
25
29
30
32
34
36
39
39
45
51
52
55
54
56
15-601011 Issue 29r (Friday, November 02, 2012)B5800 Branch Gateway
Page 22
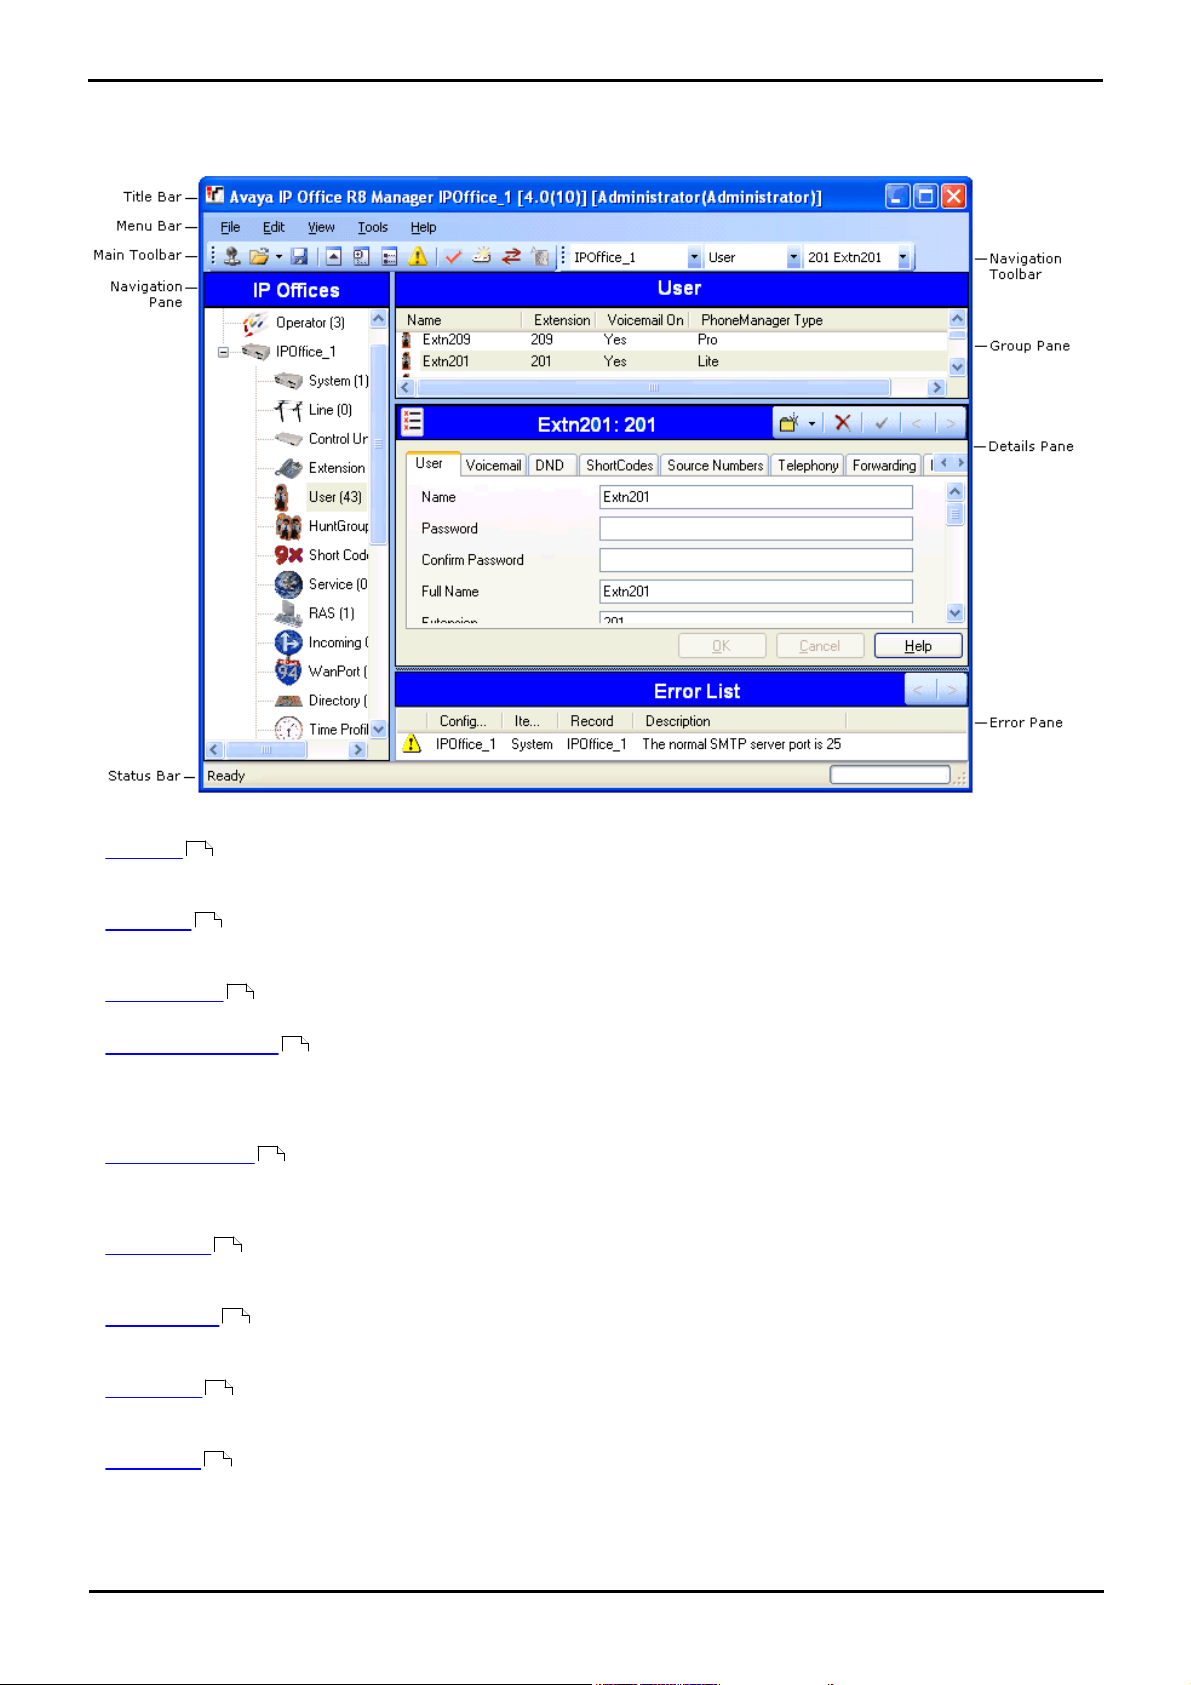
2.1 The Configuration Mode Interface
When Branch Gateway Manager is in configuration mode, the screen elements shown are available. Some of these
elements can be customized, moved and hidden.
Branch Gateway Manager Configuration Mode Screen Elements
· Title Bar
24
In addition to the application name, when configuration settings are loaded from a system, the title bar displays the
user name used to load the settings and the operator view applied.
· Menu Bar
25
The options available with the drop down menus provided here change according to whether Branch Gateway Manager
has a set of configuration or security settings loaded or not.
· Main Toolbar
26
This toolbar provides icon shortcuts to the most frequently required configuration setting actions.
· Navigation Toolbar
26
This toolbar provides a set of drop downs which can be used to navigate to particular records in the configuration
settings. The selected options in the navigation pane, the group pane and the details pane are synchronized with the
navigation toolbar and vice versa. This toolbar is particularly useful if you want to work with the group pane and or
navigation pane hidden in order to maximize the display space for the details pane.
· Navigation Pane
29
This pane shows icons for the different types of record that the configuration can contain. Each type is followed by the
number of records of that type already in the configuration. Selecting an icon displays the matching records in the
group pane and navigation toolbar.
· Group Pane
30
This pane lists all the records that match the type selected in the navigation pane or navigation toolbar. The list can be
sorted by clicking on column heading. Selecting a record in this pane displays its details in the details pane.
· Details Pane
32
This pane shows the configuration settings for a particular record within the configuration. The record is selected using
the navigation toolbar or using the navigation pane and group pane.
· Error Pane
34
This pane shows errors and warnings about the configuration settings. Selecting an item here loads the corresponding
record into the details pane.
· Status Bar
38
This bar display messages about communications between Branch Gateway Manager and systems. It also displays the
security level of the communications by the use of a padlock icon.
Avaya Branch Gateway Manager 10.0 Page 22
15-601011 Issue 29r (Friday, November 02, 2012)B5800 Branch Gateway
Page 23
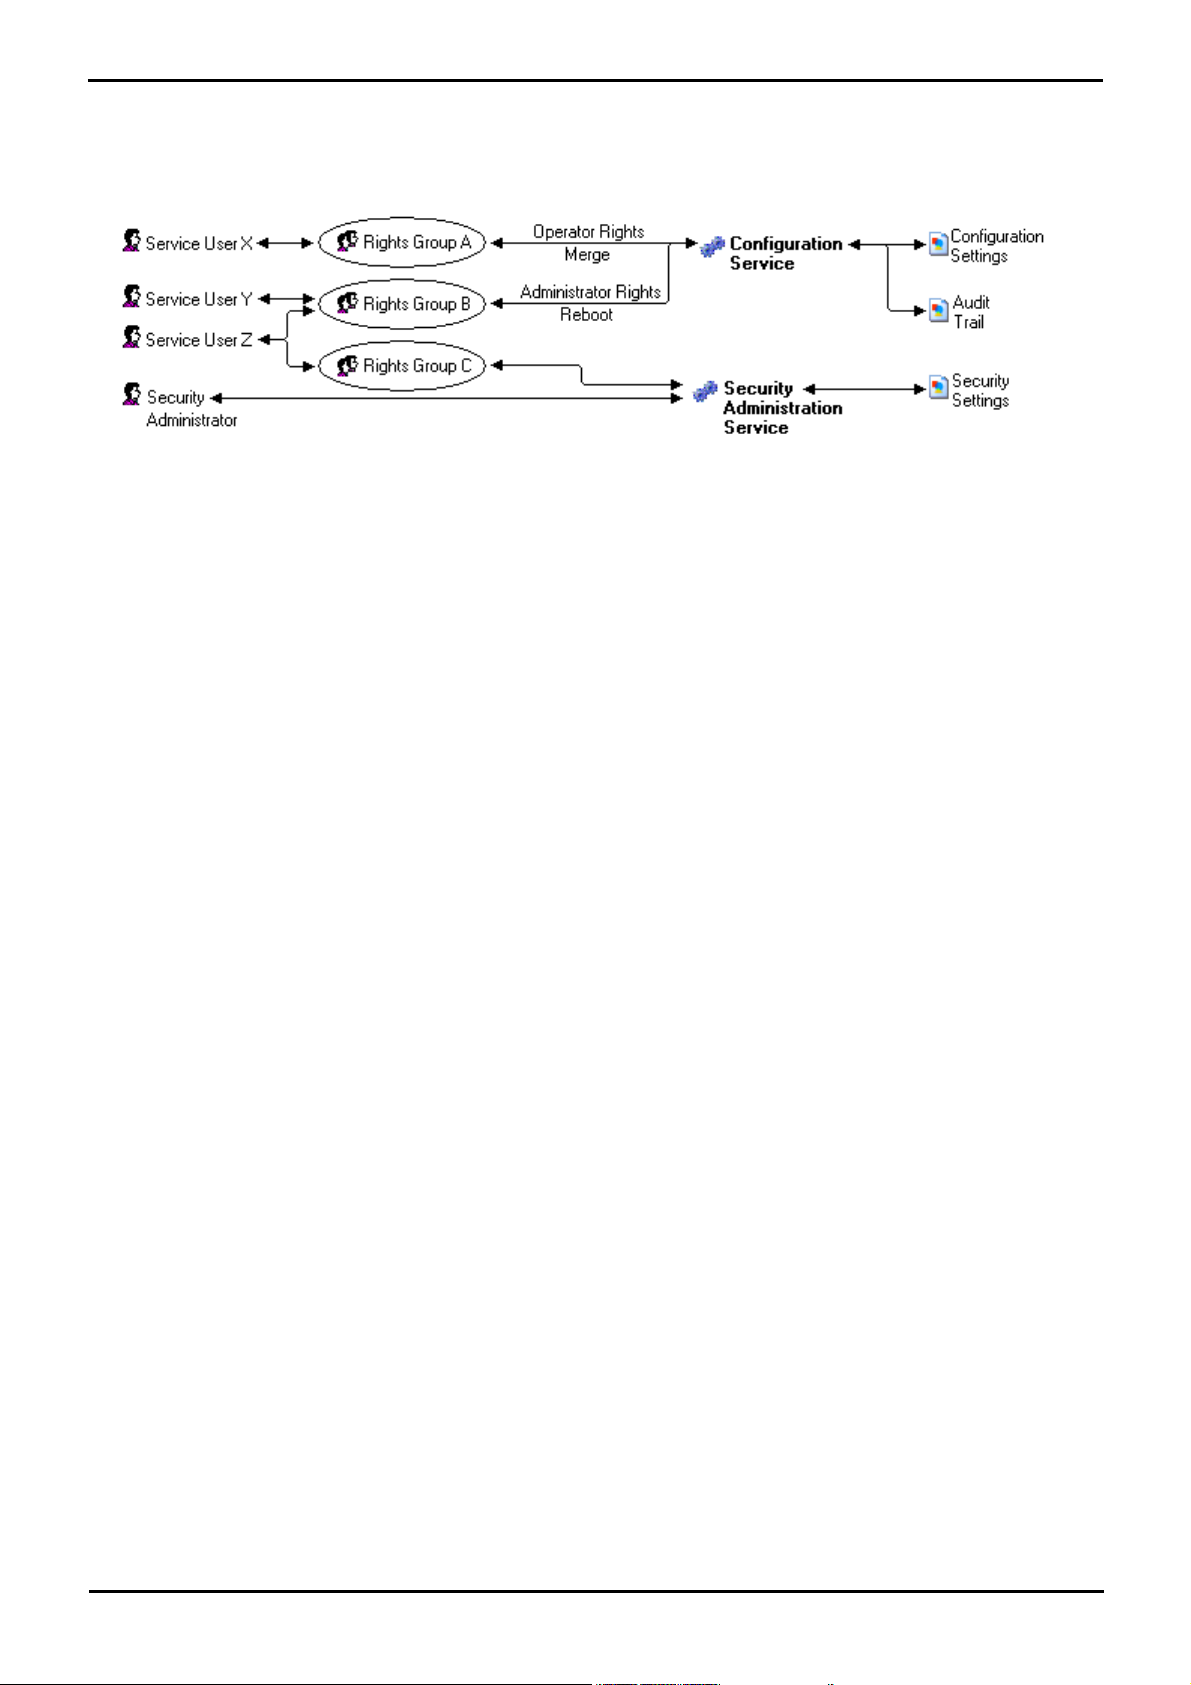
Configuration Mode: The Configuration Mode Interface
2.2 Security Settings
Access to system settings is controlled by Service Users and Rights Groups. stored in the control unit's security
settings. These are stored separately from the system's configuration settings. All actions involving communications
between Branch Gateway Manager and the system require a service user name and password. That service user must be
a member of a Rights Group with permissions to perform the required action.
In the example illustrated above:
· Service user X can read and write the configuration. However they can only edit Operator settings and can only
make changes that can be merged.
· Service user Y can read and write the configuration, edit all settings and make changes that require reboots.
· Service user Z can read and write the configuration, edit all settings and make changes that require reboots. They
can also access the security settings.
· The Security Administrator can only access the security settings.
Security Administrators
By default the security administrator is the only user who can access the system's security settings using Branch
Gateway Manager's security mode.
Service Users
Each service user has a name, a password and is a member of one or more Rights Groups.
Rights Groups
The Rights Groups to which a service user belongs determine what actions they can perform. Where a service user has
been configured as a member of more than one Rights Group, they combine the functions available to the separate
Rights Groups.
Avaya Branch Gateway Manager 10.0 Page 23
15-601011 Issue 29r (Friday, November 02, 2012)B5800 Branch Gateway
Page 24

2.3 Title Bar
The Branch Gateway Manager title bar shows several bits of information.
· The Branch Gateway Manager application version.
· The system name of the system from which the currently loaded configuration was received.
· The software level of the system's control unit.
Avaya Branch Gateway Manager 10.0 Page 24
15-601011 Issue 29r (Friday, November 02, 2012)B5800 Branch Gateway
Page 25
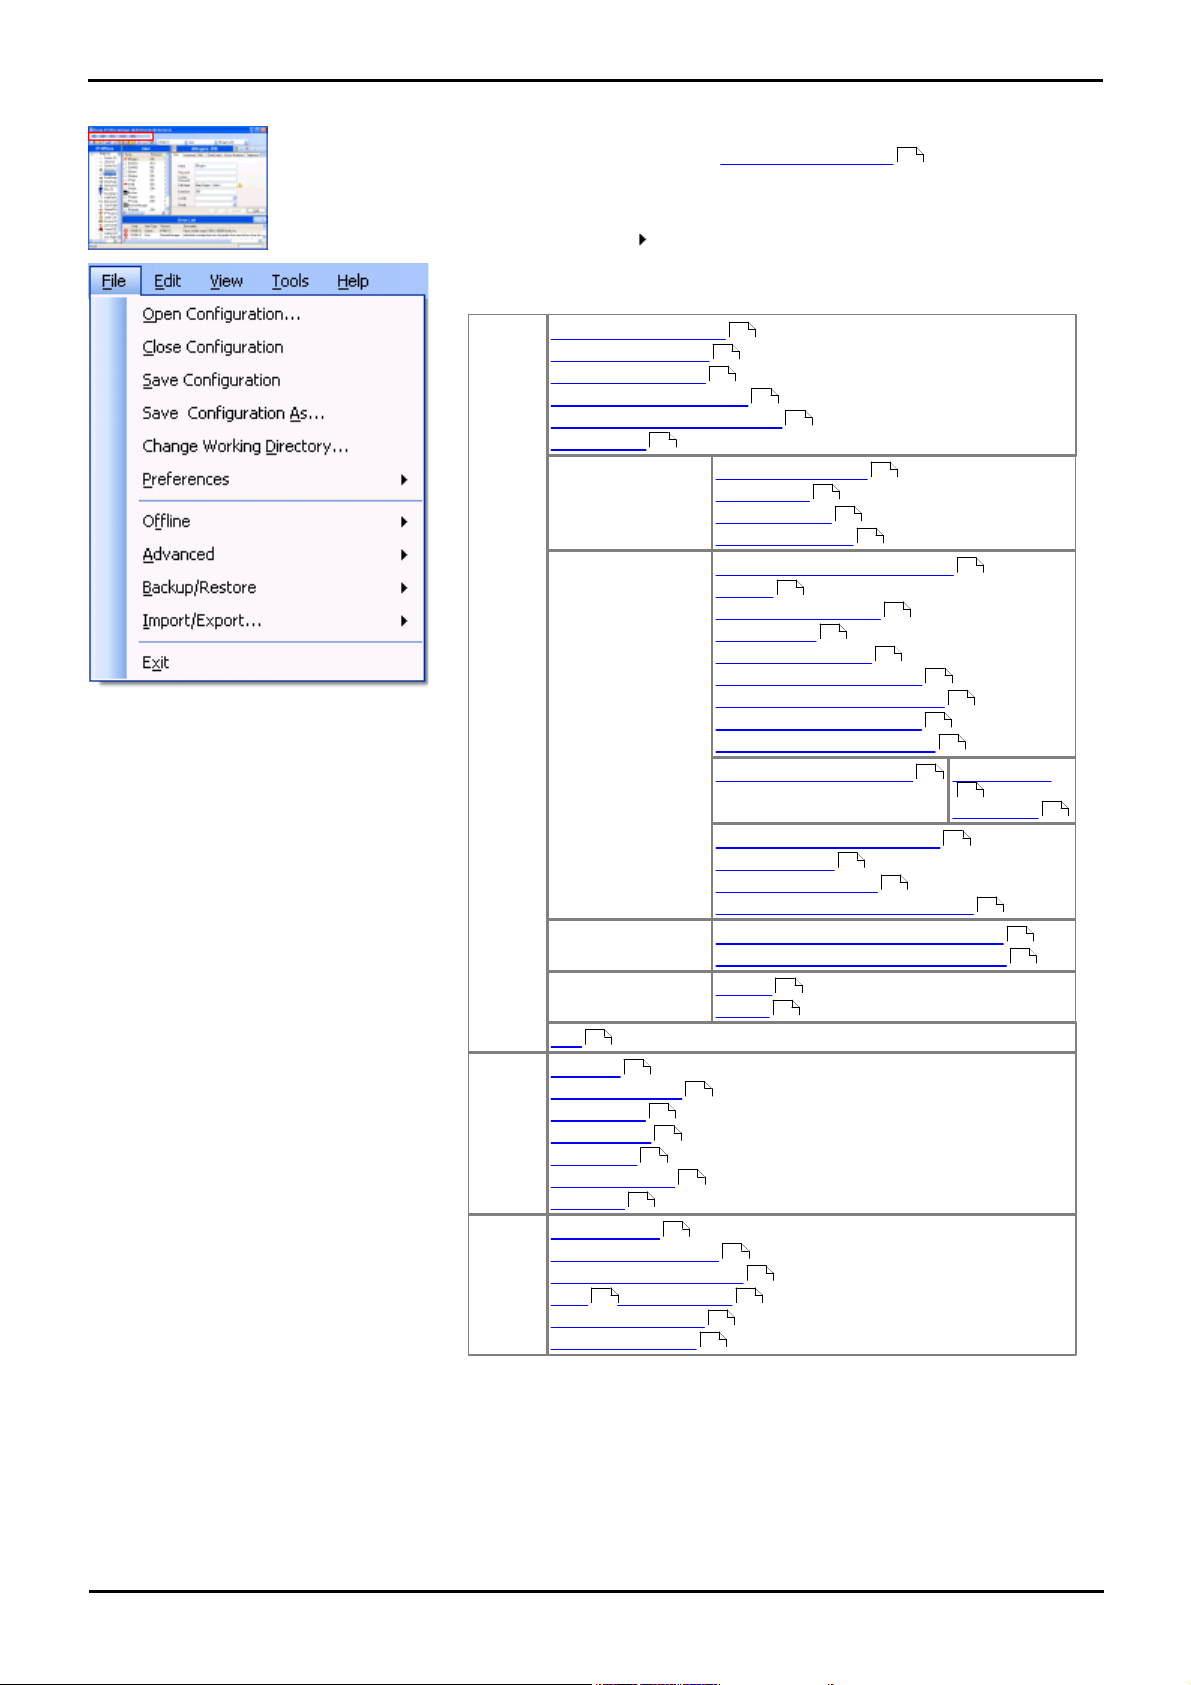
2.4 The Menu Bar
Details of all the options that may be available within the Menu Bar drop
downs are contained in the section Menu Bar Commands .
The commands are context sensitive. Commands are grayed out when not
usable.
For some commands, an symbol indicates that there are sub-commands
from which a selection can be made.
The following menu options are available:
File
Open Configuration...
Close Configuration
Save Configuration
Save Configuration As...
Change Working Directory...
Preferences
Offline
Create New Config
Open File...
Send Config...
Receive Config...
Advanced
Erase Configuration (Default)
Reboot
System Shutdown...
Audit Trail...
Security Settings...
Erase Security Settings...
Embedded File Management
Format IP Office SD Card
Recreate IP Office SD Card
Memory Card Command
Shutdown...
Start Up...
Launch Voicemail Pro Client
System Status
LVM Greeting Utility
Launch Initial Installation Utility
Backup/Restore
Backup Binaries and Configurations
Restore Binaries and Configurations
Import/Export
Import
Export
Exit
View
Toolbars
Navigation Pane
Group Pane
Details Pane
Error Pane
Simplified View
TFTP Log
Tools
Export | User
Extension Renumber
Busy on Held Validation
MSN Configuration
Print Button Labels
Import Templates
123
Configuration Mode: Title Bar
96
98
98
98
98
98
100
106
106
106
106
107
107
107
112
114
114
114
115
116
121
121
121
118
118
119
119
121
121
123
122
124
124
124
124
124
124
125
126
126
126
127 127
128
129
Avaya Branch Gateway Manager 10.0 Page 25
15-601011 Issue 29r (Friday, November 02, 2012)B5800 Branch Gateway
Page 26

2.5 Toolbars
A number of toolbars can be displayed by Branch Gateway Manager. These are:
· Main Toolbar
· Navigation Toolbar
· Details Toolbar
26
28
28
Showing or Hiding Toolbars
The different toolbars can be hidden if not required.
1.Select View and then Toolbars. Those toolbars currently shown are indicated by a tick mark.
2.To show or hide a toolbar, click on its name.
Moving Toolbars
The position of the Branch Gateway Manager toolbars can be moved. Note that when moving a toolbar, the other toolbars
and panes may adjust their size or position to ensure that all the toolbar icons remain visible.
1.Place the cursor over the end of the toolbar.
2.When the cursor changes to a four-way arrow, click and hold the cursor.
3.Move the toolbar to the required position and release the cursor.
2.5.1 The Main Toolbar
This toolbar is displayed at the top of the Branch Gateway Manager window, just below the menu bar. This toolbar is also
available when Branch Gateway Manager is in security mode. However many of the controls will not function in security
mode.
· Open Configuration from a System
Advertises to the address currently shown in the Branch Gateway Manager's title bar for any available systems. A
list of responding systems is then displayed. When a system is selected from this list, a valid user name and
password must be entered. Equivalent to File | Open Configuration.
· Open Configuration File
45
Open a configuration file stored on a PC. The button can be clicked to display a browse window. Alternatively the
adjacent arrow can be used to drop-down a list of the last 4 previously opened configuration files. Equivalent to
File | Offline | Open File.
· Save Configuration File
55
The action of this icon depends on whether the currently loaded configuration settings were received from a
system or opened from a file stored on PC. If the former applies, the menu sending the configuration back to the
system is displayed. In the latter case, the file changes are saved to the original file. Equivalent to File | Save
Configuration.
· Collapse All Groups
29
Causes all symbols in the navigation pane to be collapsed to symbols.
· Show/Hide the Navigation Pane
· Show/Hide the Group Pane
30
45
29
· Show/Hide the Error Pane
· Validate Configuration
34
34
Runs a validation on all the currently loaded configuration settings. The results appear in the error pane. By
default the configuration is automatically validated when loaded and changes are validated when made, however
the validation preferences can be changed through File | Preferences | Validation .
· Create New Configuration
51
Runs a series of dialogs that create a new configuration from scratch.
· Connect To
Not supported by B5800 Branch Gateway.
Avaya Branch Gateway Manager 10.0 Page 26
106
15-601011 Issue 29r (Friday, November 02, 2012)B5800 Branch Gateway
Page 27

Configuration Mode: Toolbars
· Standalone Voice Mail Client
Launch the Standalone Voice Mail client if also installed on the Branch Gateway Manager PC.
118
Avaya Branch Gateway Manager 10.0 Page 27
15-601011 Issue 29r (Friday, November 02, 2012)B5800 Branch Gateway
Page 28

2.5.2 The Navigation Toolbar
This toolbar provides drop down lists which can be used to navigate to particular records in the configuration settings.
The selected options in the navigation pane, group pane and the details pane are synchronized with the navigation
toolbar and vice versa. This toolbar is particularly useful if you want to work with the group pane and or navigation
29
pane hidden in order to maximize the display space for the details pane.
30
This toolbar is not available when Branch Gateway Manager is in security mode .
59
2.5.3 The Details Toolbar
This toolbar is shown in the top-right of the details pane. The options within the toolbar may vary or be greyed out
depending on the actions allowed for a particular configuration record.
· Create a New Record
The arrow is used to select the record type to be created. For example; when adding an extension clicking
may allow selection of a VoIP Extension or IP DECT Extension.
· Delete Current Record
Delete the currently displayed record.
· Validate Current Record
By default records are validated when opened and when edited. This is set through the Branch Gateway Manager
application's validation settings .
· < > Previous Record/Next Record
Click < or > at the top-right to move to the previous or next record.
106
Avaya Branch Gateway Manager 10.0 Page 28
15-601011 Issue 29r (Friday, November 02, 2012)B5800 Branch Gateway
Page 29

2.6 Using the Navigation Pane
This pane shows icons for the different types of record that the
configuration can contain. Each type is followed by the number of records
of that type already in the configuration. When Branch Gateway Manager is
used in security mode, this pane is also used by Branch Gateway Manager
in security mode to display records for security settings.
Selecting an icon displays the matching records in the group pane,
navigation toolbar and details pane. Note that Branch Gateway Manager is
used to configure different types of system. Therefore the icons shown may
vary depending on the type of system you are configuring. For descriptions
of the different icons refer to Configuration Settings .
The information in the pane also depends on whether the group pane is
visible or not. If the group pane is visible, the navigation pane just shows
icons for accessing which types of records should be shown in the group
pane. The group pane can then be used to select which of those records is
currently shown in the details pane. If the group pane is not visible, the
navigation pane shows icons for each type of records and under those icons
for each individual record. The navigation pane can then be used to select
which of those records is currently shown in the details pane.
Expanding/Collapsing the Navigation Tree
· Where or icons appear in the pane, they allow the structure to
be expanded or collapsed. When the group pane is hidden, and
icons are shown for each record type and allow the record type to be
expanded to display all the existing records of that type.
· The icon in the main toolbar can also be used to collapse all the
expanded record types shown in the navigation pane.
Moving the Border Between the Panes
The border between the visible panes can be adjusted. Note that this is a
proportional rather than exact position. If the whole window size is altered,
the border position may also move.
1.Place the cursor over the border between two panes.
2.When the cursor changes to a double headed arrow with a bar
through it, click and hold the cursor.
3.Drag the border to the required position and release the cursor.
Showing or Hiding the Navigation Pane
The navigation pane can be shown or hidden. To do this use either of the
following methods.
1.From the main toolbar, use the icon or select View. Those panes
currently shown are indicated by a tick mark.
2.To show or hide the navigation pane, click on its name.
Changing the Size of Configuration Icons
The size of the icons used on the navigation pane and details pane can be
adjusted.
1.Select File and then Preferences.
2.Select the Visual Preferences tab.
3.Select the required icon size from Small, Medium or Large.
4.Click OK.
Configuration Mode: Toolbars
135
59
135
30
Avaya Branch Gateway Manager 10.0 Page 29
15-601011 Issue 29r (Friday, November 02, 2012)B5800 Branch Gateway
Page 30
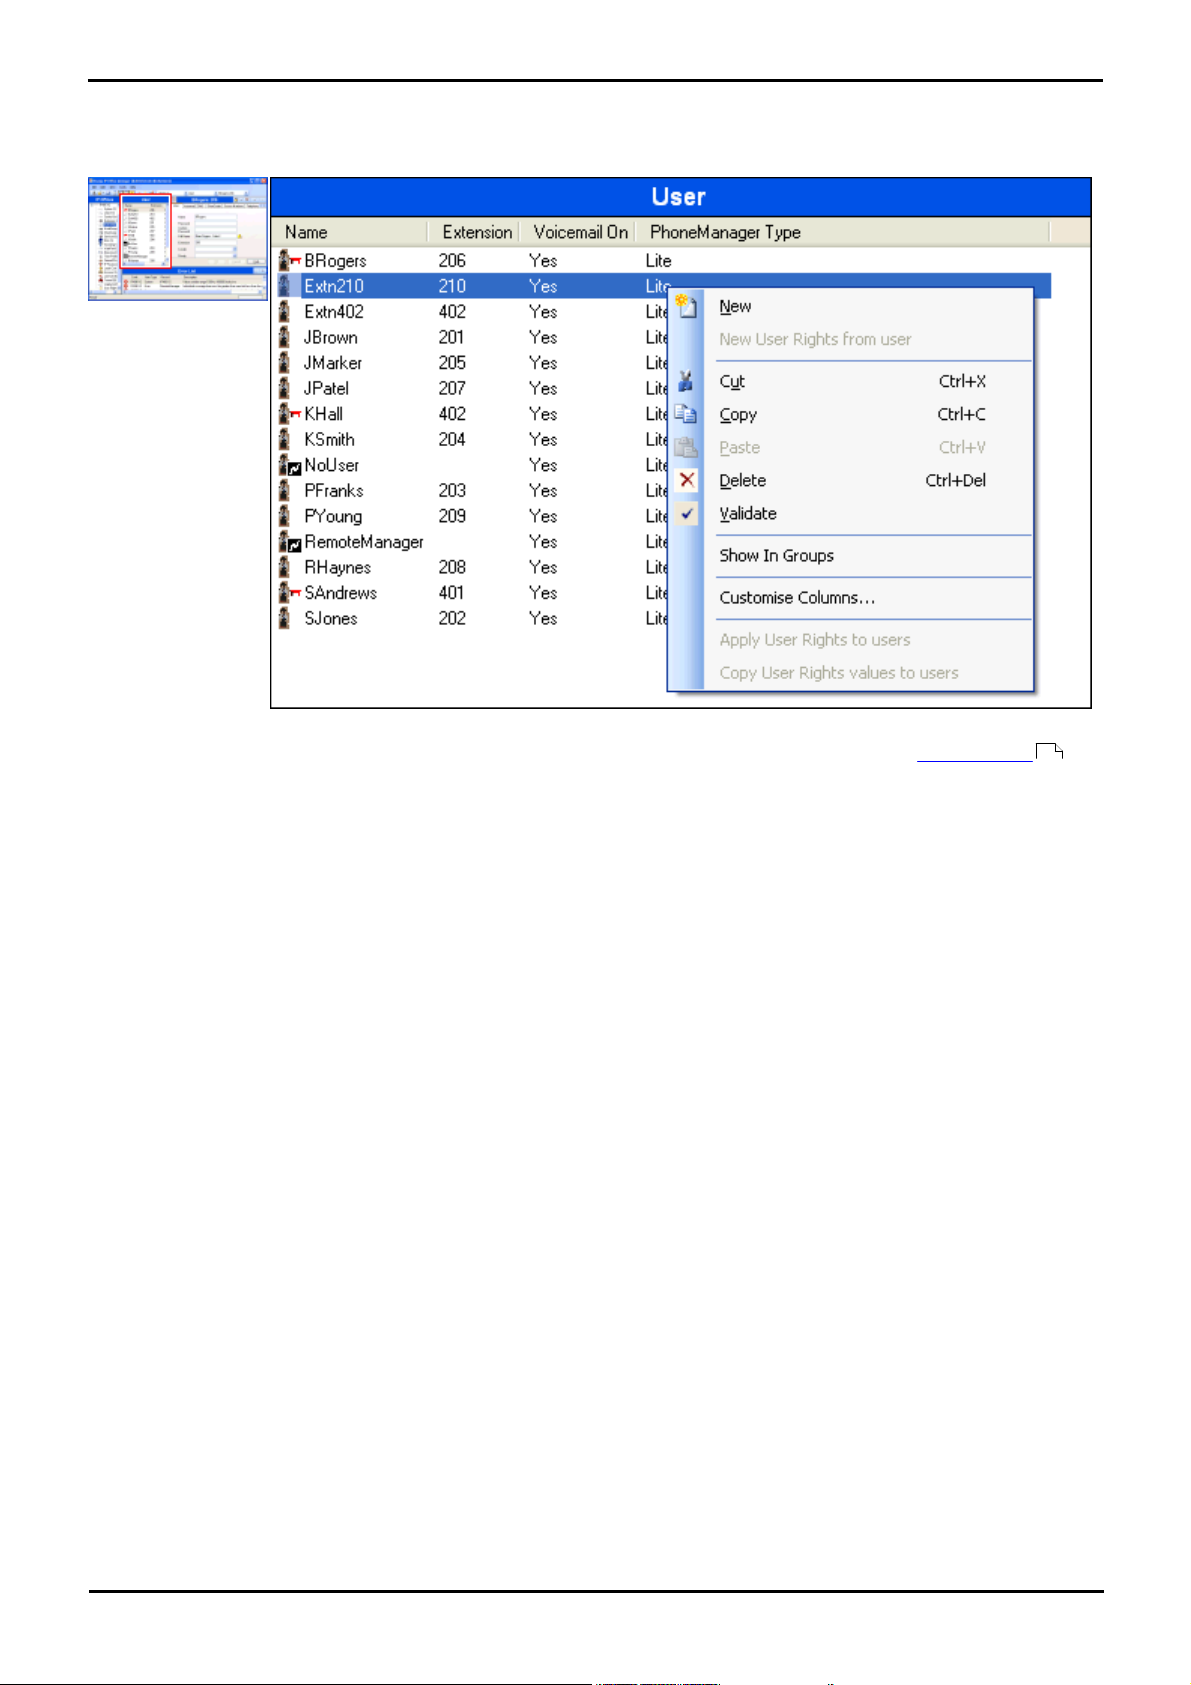
2.7 Using the Group Pane
This pane lists all the records that match the type selected in the navigation pane or navigation toolbar. The list can be
sorted by clicking on a column heading. Selecting a record in this pane displays its details in the details pane.
The icons used in the pane may vary according to the state of the record. For example, some of the users shown in this
example have been configured for hot desking. This pane is also used by Branch Gateway Manager in security mode
to display records for security settings.
59
Sorting the List
The records shown in the group pane can be sorted using any of the columns displayed.
1.To sort the list using the details in a particular column, click on the column header.
2.Clicking on the same column header again reverses the sort order.
Customizing the Columns Displayed
For each record type, which details are shown in the group pane can be customized. Also the order of the column can be
adjusted.
1.Right-click on the pane and select Customize Columns.
2.To add a column, selects its name in the left-hand Available Columns list and click >> to move it to the righthand Selected Columns list.
3.To remove a column, select its name in the right-hand Selected Columns list and click << to move it to the lefthand Available Columns list.
4.To change the order of the Selected Columns, click on a column name and use the ^ and V controls.
5.Click OK.
Changing the Column Widths
1.In the column headers, place the cursor over the border between two columns.
2.When the cursor changes to a double headed arrow with a bar through it, click and hold the cursor.
3.Drag the border to the required position and release the cursor.
Avaya Branch Gateway Manager 10.0 Page 30
15-601011 Issue 29r (Friday, November 02, 2012)B5800 Branch Gateway
Page 31

Configuration Mode: Using the Group Pane
Adding a New Record
The group pane can be used to add a new record of the type currently displayed.
1.Right-click on the pane and select New.
· A arrow symbol next to New indicates that you can select a particular type of new record to create. Click
the arrow and select an option from the list.
2.Use the details pane to configure the new record.
3.Click OK in the details pane.
Deleting an Record
1.Select the record to be deleted by clicking on it.
2.Right-click on the pane and select Delete.
Validating an Record
1.Select the record to be validated by clicking on it.
2.Right-click on the pane and select Validate.
Show in Groups
This command groups the items shown in the group pane. The grouping method will vary depending on the record type
being listed. For example, short codes are grouped based on short code feature type such as all forwarding short codes
together.
1.Right-click on the pane and select Show In Groups.
Moving the Border Between the Panes
The border between the visible panes can be adjusted. Note that this is a proportional rather than exact position. If the
whole window size is altered, the border position may also move.
1.Place the cursor over the border between two panes.
2.When the cursor changes to a double headed arrow with a bar through it, click and hold the cursor.
3.Drag the border to the required position and release the cursor.
Showing or Hiding Panes
The group pane can be shown or hidden. To do this use either of the following methods.
1.From the main toolbar, use the icon.
or
1.Select View. Those panes currently shown are indicated by a tick mark.
2.To show or hide the group pane, click on its name.
Changing the Size of Configuration Icons
The size of the icons used on the navigation pane and details pane can be adjusted.
1.Select File and then Preferences.
2.Select the Visual Preferences tab.
3.Select the required icon size from Small, Medium or Large.
4.Click OK.
Avaya Branch Gateway Manager 10.0 Page 31
15-601011 Issue 29r (Friday, November 02, 2012)B5800 Branch Gateway
Page 32

2.8 Using the Details Pane
Locked
Indicates that you can view the settings but cannot change them.
Editable
Indicates that you can change the settings if required.
Changed
Indicates that the settings have been changed since the tab was opened. Click OK to save the changes or Cancel to
undo.
Locked Setting
The setting cannot be changed through this tab. This icon appears on user settings where the user is associated
with User Rights that controls the setting.
Information
Indicates a value which does not have to be set but may be useful if set.
Warning
A warning indicates a configuration setting value that is not typical and may indicate misconfiguration.
Error
An error indicates a configuration setting value that is not supported by the system. Such settings may cause the
system to not operate as expected.
Whenever a selection is made through the group pane or the navigation toolbar, the settings for the matching record are
shown in the details pane. This pane is also used by Branch Gateway Manager in security mode to display records for
security settings.
The details are grouped into tabs. The tabs available may vary depending on what particular type of record is being
viewed. For example, for extension records the Analog tab is only shown for analog extensions.
Individual settings may also be grayed out. This indicates that they are either for information only or that they cannot be
used until another setting is enabled.
59
The top-left icon indicates the following:
Various icons may appear adjacent to settings:
15-601011 Issue 29r (Friday, November 02, 2012)B5800 Branch Gateway
Avaya Branch Gateway Manager 10.0 Page 32
Page 33

Configuration Mode: Using the Details Pane
Editing an Record
1.The method of entering a record varies as different fields may use different methods. For example text record
boxes or drop down lists.
2.By default when changes are made, they are validated once another field is selected. See File | Preferences |
Validation .
3.Clicking on OK at the base of the details pane to accept the changes or click on Cancel to undo the changes.
106
Adding a New Record
1.Click at the top-right of the details pane.
2.Select the type of record required. For example, with extensions you can select from H.323 Extension or SIP
Extension.
Deleting an Record
1.Click at the top-right of the details pane.
Validating an Record
1.Click at the top-right of the details pane.
Moving to the Previous or Next Record
1.Click < or > at the top-right to move to the previous or next record.
Selecting a Tab
1.To view the detail stored on a particular tab, click on the name of that tab.
2.If the tab required is not shown, use the controls if shown on the right to scroll through the available tabs.
The tabs available may vary depending on what particular type of record is being viewed.
Changing the Position of the Details Pane
When the group pane is visible, the details pane is shown either below it or to its right. This position can be adjusted.
1.Select View and then Details Pane.
2.The current position setting is indicated by a tick mark.
3.To select a position, click on it.
Changing How the Tabs Display
For records with more than two tabs, you can select whether Branch Gateway Manager should use controls or
arrange the tabs as multiple rows when necessary.
1.Select Files | Preferences | Visual Preferences.
2.Select Multiline Tabs.
3.Click OK.
Avaya Branch Gateway Manager 10.0 Page 33
15-601011 Issue 29r (Friday, November 02, 2012)B5800 Branch Gateway
Page 34

2.9 Using the Error Pane
Validation is a process where Branch Gateway Manager checks configuration records for errors or for values for which it
regards as requiring a warning. The results of this checking are shown by icons next to the field that caused the error or
warning, All errors and warnings are also listed in the Error Pane.
By default validation is performed automatically whenever a configuration file is opened and when any field is edited.
However, if required, the use of automatic validation can be controlled through the settings on the File | Preference |
Validation tab.
Icons
The icons used for errors and warnings are as follows. These are shown in the error pane and also next to the related
field in the details pane. In the details pane, the error or warning description is shown when the cursor is hovered over
the icon.
106
· Error
An error indicates a configuration setting value that is not supported by the system. Such settings are likely to
cause the system to not operate as expected.
· Warning
A warning indicates a configuration setting value that is not typical and may indicate misconfiguration.
· Information
Typically indicates a setting which may be useful to set.
Altering the Automatic Validation Settings
The settings for automatic validation by Branch Gateway Manager are adjustable.
1.Select File | Preferences.
2.Select the Validation tab. Select the options required.
· Validate configuration on open
Automatically validate configuration files when they are opened in Branch Gateway Manager.
· Validate configuration on edit
Validate the whole configuration when OK is clicked after editing a record. For large configurations, disabling
this option removes the delay caused by validating the configuration after every edit.
· Prompt for configuration validation on save or send
If selected, when saving or sending a configuration, a prompt is displayed asking whether the configuration
should be validated. If validation is selected and error are found, the send or save process is canceled. This
option is disabled if Validate configuration on edit is selected.
3.Click OK.
Revalidating Configuration Settings
If necessary, you can force a validation check of the whole configuration or of the current record shown in the details
pane.
1.To validate the whole configuration, click in the main toolbar.
2.For a particular record, click in the details pane.
Jumping to an Error or Warning
1.Clicking on an error or warning in the error pane will load the matching record tab into the details pane.
2.The < and > can be used to move to the next error or warning in the error pane.
Avaya Branch Gateway Manager 10.0 Page 34
15-601011 Issue 29r (Friday, November 02, 2012)B5800 Branch Gateway
Page 35

Configuration Mode: Using the Error Pane
Showing or Hiding the Error Pane
The error pane is automatically displayed if a configuration containing errors or warnings is loaded into Branch Gateway
Manager. However it can be manually shown or hidden using either of the following methods.
1.From the main toolbar, use the icon.
or
1.Select View. Those panes currently shown are indicated by a tick mark.
2.To show or hide the error pane, click on its name.
Avaya Branch Gateway Manager 10.0 Page 35
15-601011 Issue 29r (Friday, November 02, 2012)B5800 Branch Gateway
Page 36

2.10 Altering the Interface
The Branch Gateway Manager configuration settings interface can be customized in a number of ways. These changes are
remembered the next time Branch Gateway Manager is started.
Resizing the Branch Gateway Manager Window
When the Branch Gateway Manager window is not maximized or minimized, it size can be adjusted.
1.Place the cursor over the edge of the current window.
2.When the cursor changes to a double-headed arrow, click and hold the cursor.
3.Drag the edge to the required position and then release the cursor.
Moving the Border Between the Panes
The border between the visible panes can be adjusted. Note that this is a proportional rather than exact position. If the
whole window size is altered, the border position may also move.
1.Place the cursor over the border between two panes.
2.When the cursor changes to a double headed arrow with a bar through it, click and hold the cursor.
3.Drag the border to the required position and release the cursor.
Showing or Hiding Toolbars
The different toolbars can be hidden if not required.
1.Select View and then Toolbars. Those toolbars currently shown are indicated by a tick mark.
2.To show or hide a toolbar, click on its name.
Moving Toolbars
The position of the Branch Gateway Manager toolbars can be moved. Note that when moving a toolbar, the other toolbars
and panes may adjust their size or position to ensure that all the toolbar icons remain visible.
1.Place the cursor over the end of the toolbar.
2.When the cursor changes to a four-way arrow, click and hold the cursor.
3.Move the toolbar to the required position and release the cursor.
Showing or Hiding Panes
The details pane cannot be hidden. The navigation pane, group pane and error pane can be shown or hidden. To do this
use either of the following methods.
1.From the main toolbar, use the following icons:
· Hide/Show Navigation Pane.
· Hide/Show Group Pane.
· Hide/Show Error Pane.
or
1.Select View. Those panes currently shown are indicated by a tick mark.
2.To show or hide a pane, click on its name.
Avaya Branch Gateway Manager 10.0 Page 36
15-601011 Issue 29r (Friday, November 02, 2012)B5800 Branch Gateway
Page 37

Configuration Mode: Altering the Interface
Changing the Position of the Details Pane
When the group pane is visible, the details pane is shown either below it or to its right. This position can be adjusted.
1.Select View and then Details Pane.
2.The current position setting is indicated by a tick mark.
3.To select a position, click on it.
Changing the Size of Configuration Icons
The size of the icons used on the navigation pane and details pane can be adjusted.
1.Select File and then Preferences.
2.Select the Visual Preferences tab.
3.Select the required icon size from Small, Medium or Large.
4.Click OK.
Changing How the Tabs Display
For records with more than two tabs, you can select whether Branch Gateway Manager should use controls or
arrange the tabs as multiple rows when necessary.
1.Select Files | Preferences | Visual Preferences.
2.Select Multiline Tabs.
3.Click OK.
Avaya Branch Gateway Manager 10.0 Page 37
15-601011 Issue 29r (Friday, November 02, 2012)B5800 Branch Gateway
Page 38

2.11 The Status Bar
The status bar at the base of the Branch Gateway Manager screen is used to display icons and messages about
communications between Branch Gateway Manager and systems. If the Branch Gateway Manager is also acting as a
BOOTP and TFTP server it will also show BOOTP and TFTP messages.
A padlock icon is displayed whenever the Branch Gateway Manager communications settings are set to secure. This
indicates all attempted configuration and security settings exchanged will be attempted over a secure TLS link:
Status bar messages display information about communications the Branch Gateway Manager application receives. Some
typical status bar messages are listed below.
· Ready
This message is normally seen when Branch Gateway Manager has just started and no configuration has been
received.
· Received BOOTP request for 001125465ab2, unable to process
Branch Gateway Manager is acting as a BOOTP server. It has received a BOOTP request that does not match a
system listed in its BOOTP records. The cause may be a device or application, other than an Avaya Branch
Gateway, that also uses BOOTP.
· TFTP: Received TFTP Error "NotFound" from 192.168.42.1
An attempt to receive settings from or send settings to the system failed. The most probable cause is a name or
password error.
· TFTP: Received 17408 bytes for Marks_Test
Branch Gateway Manager has received configuration settings from the named system using TFTP.
·
Branch Gateway Manager has sent the indicated file in response to a BOOTP request.
Avaya Branch Gateway Manager 10.0 Page 38
15-601011 Issue 29r (Friday, November 02, 2012)B5800 Branch Gateway
Page 39

Configuration Mode: The Status Bar
2.12 Editing Configuration Settings
Before editing the system's configuration settings, it is important to understand how those settings are stored and used
by the system.
· The control unit holds copies of its configuration in both its internal non-volatile and RAM memory. A copy is also
held on the System SD card.
· The copies in non-volatile memory and System SD card, are retained even if power to the control unit is removed.
· During power up, the system loads the configuration file stored on the System SD card into its RAM memory. The
copy in RAM memory is then used to control the system's operation.
· If the system encounters a problem using the configuration file in its System SD card's /primary folder, it
attempt to use the copy in its non-volatile memory. For fully details of the IP500 V2 boot process and SD card
usage refer to the Avaya Branch Gateway Installation Manual.
· Users actions such as changing their forward destinations or mailbox passcode are written to the configuration in
RAM memory.
· Changes made using Branch Gateway Manager are written to the configuration in non-volatile memory and then
copied into the RAM memory and System SD.
· Between 00:00 and 00:30, a daily backup occurs which copies the configuration in the system's operation RAM
memory back into its non-volatile memory and, on IP500 V2 system's, the System SD card.
· When the system is shutdown using the correct shutdown method , the configuration in RAM memory is copied
to the non-volatile memory and System SD card.
107
Using Branch Gateway Manager
When using Branch Gateway Manager to edit the configuration settings, the following need to be remembered:
· Branch Gateway Manager receives the current configuration settings from RAM memory. Therefore the
configuration it receives includes any changes made by users up to that time. However it will not contain any
subsequent changes made by users.
· When sending the configuration settings back to the system, Branch Gateway Manager allows two choices, reboot
or merge.
· Reboot sends the configuration to the system's non-volatile memory along with an instruction to reboot.
Following the reboot, the new configuration in non-volatile memory is copied to the RAM memory and used.
· Merge sends the configuration to the system's non-volatile memory without rebooting. The system then copies
those changes that are mergeable into the RAM memory. A key point here is that not all configuration settings
are mergeable, see the Mergeable Settings list.
As a result of the above, it is important to bear the follow scenarios in mind:
· Changes made by users after a configuration is received by Branch Gateway Manager may be lost when the
configuration is sent back from Branch Gateway Manager. Therefore it is preferable to always edit a recently
received copy of the configuration rather than one that has been open for a period of time.
· If a merge is attempted with non-mergeable changes, those items will be written to the non-volatile memory but
will not be copied to RAM memory. If a daily backup occurs, they will then be overwritten by the RAM. If a power
loss reboot occurs, they will be written to RAM memory.
Avaya Branch Gateway Manager 10.0 Page 39
41
15-601011 Issue 29r (Friday, November 02, 2012)B5800 Branch Gateway
Page 40

Avaya Branch Gateway Manager 10.0 Page 40
15-601011 Issue 29r (Friday, November 02, 2012)B5800 Branch Gateway
Page 41

Configuration Mode: Editing Configuration Settings
Mergeable
System
- System
*1
- LAN1/LAN2
- DNS
- Voicemail
*2
- Telephony
*3
- VoIP
- LDAP
- System Events
- CDR/SMDR
- Twinning
Line
Control Unit
Extension
User
Hunt Group
Short Code
Mergeable
Service
RAS
Incoming Call
Route
WAN Port
Directory
Time Profile
Firewall Profile
IP Route
Account Code
Tunnel
User Rights
Auto Attendant
ARS
2.12.1 Mergeable Settings
The table below shows the configuration records for which changes can be merged and those that require a system
reboot. The Send Configuration menu shown when sending a configuration to the system automatically indicates when
the configuration is mergeable.
188
268
154
147
171
139
140
257
182
155
309
335
159
256
145
181
175
336
346
348
355
366
369
370
375
378
382
389
401
405
· *1 - System | System
Changes to Locale, License Server IP Address and Favor RIP Routes over Static settings require a reboot.
· *2 - System | Voicemail
Changes to Voicemail Type require a reboot.
· *3 - System | Telephony
Changes to Companding LAW and Busy Tone Detection require a reboot.
· *4 - Extension
Changes to Base Extension and Disable Speakerphone are mergeable.
Avaya Branch Gateway Manager 10.0 Page 41
15-601011 Issue 29r (Friday, November 02, 2012)B5800 Branch Gateway
Page 42

2.12.2 Configuration Size
Physical Extension: 70.
IP Extension: 70.
User: 170.
User Short Code: 40.
DSS Button: 20.
Hunt Group: 100.
Hunt Group member: 10.
System Short Code: 10.
Normal Service: 220.
Intranet Service: 240.
WAN Service: 400.
RAS Service: 110.
Incoming Call Route: 30.
WAN Port (PPP): 70.
WAN Port (FR): 120.
Directory Record: 70.
Time Profile: 40.
Time Profile Record: 20.
Firewall Profile: 40.
Custom Firewall Record:
80.
IP Route (Static): 30.
Account Code: 40.
Logical LAN: 60.
Tunnel (L2TP): 200.
Tunnel (IPSec): 110.
The maximum size configuration file that can be loaded into a control unit is 2.0MB.
· When you attempt to save a configuration that is too large, you will be prompted and the save is canceled.
· During normal operation, additional configuration records can be added to the configuration without using Branch
Gateway Manager (for example call log records and directory records made from phones). If, during the overnight
backup to flash memory , the configuration if found to be too large, records will be removed until the
configuration is sufficiently small to be backed up. The recordsremoved are call log records, system directory
records and then personal directory in that order. Note that those records will still exist in the configuration
running the system in its RAM memory, however if the system is restarted they will disappear as the configuration
is reloaded from the Flash memory.
Figures for all individual records in the configuration cannot be given as they vary. The list below gives typical values, in
bytes, for common records:
39
Avaya Branch Gateway Manager 10.0 Page 42
15-601011 Issue 29r (Friday, November 02, 2012)B5800 Branch Gateway
Page 43

Configuration Mode: Editing Configuration Settings
2.12.3 Setting the Discovery Addresses
By default, when or File | Open configuration is selected, Branch Gateway Manager's Select B5800 menu
appears. It performs a UDP broadcast to the address 255.255.255.255. This broadcast will only locate systems that are
on the same network subnet as the PC running Branch Gateway Manager.
The process above is called discovery. A UDP broadcast will not be routed to other networks and subnets. Therefore to
find systems not located on the same subnet as the Branch Gateway Manager PC, the following other options are
supported.
· Specific Addressing
The Unit/Broadcast Address shown on the Select B5800 menu can be changed to the specific IP address of
the required system. A single address is routable and so can be used to discover a system on another subnet.
· TCP Discovery Address Ranges
A set of TCP addresses and address ranges can be specified for use by the Select B5800 discovery process.
· Known System Discovery
Branch Gateway Manager can write the details of systems it discovers to a file. The list of systems in that file can
then be used for access to those systems. See Known System Discovery .
· DNS Lookup
Branch Gateway Manager can be configured to locate systems using DNS name lookup. This requires the systems
on a customer network to be added as names on the customer's DNS server and the Branch Gateway Manager PC
to be configured to use that server for DNS name resolution. The use of DNS is configured through File |
Preferences | Discovery .
47
47
102
Avaya Branch Gateway Manager 10.0 Page 43
15-601011 Issue 29r (Friday, November 02, 2012)B5800 Branch Gateway
Page 44

Changing the Initial Discovery Settings
The Discovery tab of the Preferences menu can be used to set the UDP and TCP addresses used by the discovery
process run by the Select B5800 menu.
1.Select File | Preferences menu.
2.Select the Discovery tab.
· TCP Discovery: Default = On.
This setting controls whether Branch Gateway Manager uses TCP to discover systems. The addresses used for TCP
discovery are set through the IP Search Criteria field below.
· NIC IP/NIC Subnet
This area is for information only. It shows the IP address settings of the LAN network interface cards (NIC) in
the PC running Branch Gateway Manager. Double-click on a particular NIC to add the address range it is part
of to the IP Search Criteria. Note that if the address of any of the Branch Gateway Manager PC's NIC cards is
changed, the Branch Gateway Manager application should be closed and restarted.
· IP Search Criteria
This section is used to enter TCP addresses to be used for the TCP discovery process. Individual addresses
can be entered separated by semi-colons, for example 135.164.180.170; 135.164.180.175. Address ranges
can be specified using dashes, for example 135.64.180.170 - 135.64.180.175.
· UDP Discovery: Default = On
This settings controls whether Branch Gateway Manager uses UDP to discover systems.
· Enter Broadcast IP Address: Default = 255.255.255.255
The broadcast IP address range that Branch Gateway Manager should used during UDP discovery. Since UDP
broadcast is not routable, it will not locate systems that are on different subnets from the Branch Gateway
Manager PC unless a specific address is entered.
· Use DNS:
Selecting this option allows Branch Gateway Manager to use DNS name (or IP address) lookup to locate a system.
Note that this overrides the use of the TCP Discovery and UDP Discovery options above. This option requires the
system IP address to be assigned as a name on the users DNS server. When selected, the Unit/Discovery
Address field on the Select B5800 dialogue is replaced by a Enter Unit DNS Name or IP Address field.
45
Avaya Branch Gateway Manager 10.0 Page 44
15-601011 Issue 29r (Friday, November 02, 2012)B5800 Branch Gateway
Page 45

Configuration Mode: Editing Configuration Settings
2.12.4 Opening a Configuration from a System
The initial IP address ranges in which Branch Gateway Manager searches for systems are set through the Branch
Gateway Manager preferences (File | Preferences | Discovery ). By default it scans the local network of the Branch
Gateway Manager PC.
1.Start Branch Gateway Manager. If Branch Gateway Manager is already started and a configuration is open in it,
that configuration must be closed first.
· If Branch Gateway Manager is set to Auto Connect on start up , it will scan for systems automatically
and either display the list of systems discovered or automatically start login to the only system discovered.
· Otherwise, click on or select File | Open Configuration.
2.The Select B5800 window appears, listing those systems that responded.
102
100
· If the system required was not found, the Unit/Broadcast Address used for the search can be changed.
Either enter an address or use the drop-down to select a previously used address. Then click Refresh to
perform a new search.
· The address ranges used by Branch Gateway Manager for searching can be configured through the File |
Preferences | Discovery tab.
· A list of known systems can be stored and used. See Known System Discovery
· Branch Gateway Manager can be configured to search using DNS names. See the Use DNS option.
102
47
102
· Systems found but not supported by the version of Branch Gateway Manager being used will be listed as Not
Supported.
· If the system detected is running software other than from its primary folder, a warning icon will be
shown next to it. The configuration can still be opened but only as a read-only file.
3.When you have located the system required, check the box next to the system and click OK.
4.The system name and password request is displayed. Enter the required details and click OK.
5.Additional messages will inform you about the success or failure of opening the configuration from the system.
· The method of connection, secure or insecure, attempted by Branch Gateway Manager is set the applications
Secure Communications preferences setting.
104
· When Secure Communications is set to On, a padlock icon is displayed at all times in the lower right
Branch Gateway Manager status field.
· New installations of Branch Gateway Manager default to having Secure Communications enabled. This
means Branch Gateway Manager by default attempts to use secure communications when opening a
configuration.
· If no response to the use of secure communication is received after 5 seconds, Branch Gateway Manager will
offer to fallback to using unsecured communications.
6.Following a successful log in, the configuration is opened in Branch Gateway Manager. The menus and options
displayed will depend on the type of system configuration loaded.
Avaya Branch Gateway Manager 10.0 Page 45
15-601011 Issue 29r (Friday, November 02, 2012)B5800 Branch Gateway
Page 46

Login Messages
While attempting to login to a system, various additional messages may be displayed.
Configuration Not Loaded Messages
· Access Denied
This is displayed as the cause if the service user name/password were incorrect, or the service user has
insufficient rights to read the configuration. The Retry option can be used to log in again but multiple rejections in
a 10 minute period may trigger events, such as locking the user account, set by the Password Reject Limit and
Password Reject Action options in the systems security settings.
· Failed to communicate with system
This is displayed as the cause if the network link fails, or the secure communication mode is incorrect (for example
Branch Gateway Manager is set to unsecured, but the system is set to secure only).
· Account Locked
The account of the service user name and password being used is locked. This can be caused by a number of
actions, for example too many incorrect password attempts, passing a fixed expiry date, etc. The account lock
may be temporary (10 minutes) or permanent until manually unlocked. An account can be enabled again through
the system's security settings.
Additional Messages
· Your service user account will expire in X days
This message indicates that an Account Expiry date has been set on the system service user account and that date
is approaching. Someone with access to the system's security settings will be required unlock the account and set
a new expiry date.
· Your password will expire in X days. Do you wish to change it now?
This message indicates that password ageing has been configured in the system's security settings. If your
password expires, someone with access to the system's security settings will be required to unlock the account.
· Change password
Through the system's security settings, a service user account can be required to change their password when
logging in. The menu provides fields for entering the old password and new password.
· Contact Information Check - This configuration is under special control
This message will appear if a Branch Gateway Manager user with administrator rights has entered their contact
information into the configuration. For example to indicate that they do not want the configuration altered while a
possible problem is being diagnosed. The options available are:
· Cancel
Select this option to close the configuration without making any changes.
· Set configuration alteration flag
Select this option if the configuration is being opened because some urgent maintenance action. When the
configuration is next opened, the fact that it has been altered will be indicated on the System | System tab.
· Delete Contact Information
Select this option to take the system out of special control.
· Leave contact information and flags unchanged (Administrators only)
This option is only available to service users logging in with administrator rights.
140
2.12.5 Opening a Configuration Stored on PC
A configuration file previously saved on the PC can be reopened in Branch Gateway Manager. This method of access does
not require entry of a service user name and password. All parts of the configuration are visible.
Use either of the following processes to load a saved configuration file:
1.Click the main toolbar or select File | Offline | Open File from the menu bar. If the files is one that has
previously been opened offline, click the symbol next to in the main toolbar
2.An Open configuration file window appears. Use this to browse to the required configuration file.
3.Select the file and click Open.
Avaya Branch Gateway Manager 10.0 Page 46
15-601011 Issue 29r (Friday, November 02, 2012)B5800 Branch Gateway
Page 47

Configuration Mode: Editing Configuration Settings
2.12.6 Known System Discovery
The Select B5800 menu normally displays systems discovered by Branch Gateway Manager using either UDP broadcast
and or TCP requests (see Setting the Discovery Addresses ). Branch Gateway Manager can be configured to also
record details of discovered units and then display a list of those previously discovered ('known') systems.
Configuring Branch Gateway Manager for Known System Discovery
Use of known systems discovery is not enabled by default. The Branch Gateway Manager must be configured for the
feature with a file location to which it can store and retrieve known system details.
1.Select File | Change Working Directory.
2.In the Known Units File field, enter the directory path and file name for a CSV file into which Branch Gateway
Manager can write details of the systems it discovers. If the file specified does not exist it will be created by
Branch Gateway Manager.
3.Click OK.
43
Using Known System Discovery
1.When the Select B5800 screen is displayed click on Known Units.
2.The screen displays the list of systems previously discovered and stored in the CSV file.
· To select an control unit, highlight the row containing unit data and click OK. The selected unit will appear in
the Select B5800 window.
· To filter displayed units, type the first few characters of the unit name in the Filter field. Any unit whose
name does not match the filter will be temporarily hidden.
· Each discovery appends data to the known unit list. It is possible that details of some records in the list may
be out of date. Right clicking on the leftmost (grey) column of any row will bring up a floating menu offering
the options of Refresh and Delete.
· A new record may be manually added without having to access the system first through normal discovery.
Enter the IP address of the new system in the IP Address column of the blank row shown with a * and select
Refresh from the floating menu. This will update the Known Units file with data relating to the unit with the
specified address.
· Select Cancel to return to the Select B5800 menu.
Note:
· The key used by the Known Systems CSV file is the IP address. The file cannot contain records for separate systems
that use the same IP address for access.
· The file can be made read only. In that case any attempts using Branch Gateway Manager to update the file will be
ignored.
Avaya Branch Gateway Manager 10.0 Page 47
15-601011 Issue 29r (Friday, November 02, 2012)B5800 Branch Gateway
Page 48

2.12.7 Creating New Records
There are a number of ways in which you can add new records to the configuration currently loaded in Branch Gateway
Manager.
Adding a New Record Using the Details Pane
1.Use the navigation pane, groups pane or navigation toolbar, select an existing record of the type required.
2.Click at the top-right of the details pane.
3.Select the type of record required. For example, with extensions you can select from H.323 Extension or SIP
Extension.
4.Complete the settings for the new record and click OK.
Adding a New Record Using the Group Pane
1.Using the navigation pane or navigation toolbar, select the type of record required.
2.Right-click on the group pane and select New.
3.If a list is displayed, select the specific type of record required.
4.Complete the settings for the new record and click OK.
Adding a New Record Using the Navigation Pane
1.In the navigation pane, right-click on the type of record required and select New.
2.If a list is displayed, select the specific type of record required.
3.Complete the settings for the new record and click OK.
Importing Records
New records can be created for users, hunt groups, short codes and directory entries by importing files. See Importing
and Exporting Settings .
52
Automatic Creation of Records
There are scenarios where new records are automatically added to the configuration:
· Certain default records are added to the configuration when a new system is started or when a system
configuration is erased .
· New records for extensions and lines are automatically added to match the hardware present when a system is
started or rebooted.
· For telephones connected via IP links (H.323, SIP and DECT), the system can be configured to automatically
create extension and or user records to match the telephone.
57
107
Using Templates to Create Records
Branch Gateway Manager supports a number of methods by which new records can be created from templates.
· Trunk Templates
SIP trunks can be created from templates. For analog trunks, records are automatically created by the presence of
the trunk hardware, however a template can then be applied to an analog trunk.
190
Avaya Branch Gateway Manager 10.0 Page 48
15-601011 Issue 29r (Friday, November 02, 2012)B5800 Branch Gateway
Page 49

Configuration Mode: Editing Configuration Settings
2.12.8 Validation of Records
Validation is a process where Branch Gateway Manager checks configuration records for errors or for values for which it
regards as requiring a warning. The results of this checking are shown by icons next to the field that caused the error or
warning, All errors and warnings are also listed in the Error Pane.
By default validation is performed automatically whenever a configuration file is opened and when any field is edited.
However, if required, the use of automatic validation can be controlled through the settings on the File | Preference |
Validation tab.
Icons
The icons used for errors and warnings are as follows. These are shown in the error pane and also next to the related
field in the details pane. In the details pane, the error or warning description is shown when the cursor is hovered over
the icon.
106
· Error
An error indicates a configuration setting value that is not supported by the system. Such settings are likely to
cause the system to not operate as expected.
· Warning
A warning indicates a configuration setting value that is not typical and may indicate misconfiguration.
· Information
Typically indicates a setting which may be useful to set.
Altering the Automatic Validation Settings
The settings for automatic validation by Branch Gateway Manager are adjustable.
1.Select File | Preferences.
2.Select the Validation tab. Select the options required.
· Validate configuration on open
Automatically validate configuration files when they are opened in Branch Gateway Manager.
· Validate configuration on edit
Validate the whole configuration when OK is clicked after editing a record. For large configurations, disabling
this option removes the delay caused by validating the configuration after every edit.
· Prompt for configuration validation on save or send
If selected, when saving or sending a configuration, a prompt is displayed asking whether the configuration
should be validated. If validation is selected and error are found, the send or save process is canceled. This
option is disabled if Validate configuration on edit is selected.
3.Click OK.
Revalidating Configuration Settings
If necessary, you can force a validation check of the whole configuration or of the current record shown in the details
pane.
1.To validate the whole configuration, click in the main toolbar.
2.For a particular record, click in the details pane.
Jumping to an Error or Warning
1.Clicking on an error or warning in the error pane will load the matching record tab into the details pane.
2.The < and > can be used to move to the next error or warning in the error pane.
Avaya Branch Gateway Manager 10.0 Page 49
15-601011 Issue 29r (Friday, November 02, 2012)B5800 Branch Gateway
Page 50

Showing or Hiding the Error Pane
The error pane is automatically displayed if a configuration containing errors or warnings is loaded into Branch Gateway
Manager. However it can be manually shown or hidden using either of the following methods.
1.From the main toolbar, use the icon.
or
1.Select View. Those panes currently shown are indicated by a tick mark.
2.To show or hide the error pane, click on its name.
Avaya Branch Gateway Manager 10.0 Page 50
15-601011 Issue 29r (Friday, November 02, 2012)B5800 Branch Gateway
Page 51

Configuration Mode: Editing Configuration Settings
2.12.9 Creating an Offline Configuration
Branch Gateway Manager can be used to create a new configuration without connecting to a system. This allows the
creation of a configuration prior to installation of the real system and so can be used to speed up the installation
process.
· The configuration created must match the physical equipment in the system into which the configuration will be
loaded. Doing otherwise may cause the system to reset and experience other problems.
· The Create Configuration tool includes all control units, external expansion modules and trunk cards supported.
It is your responsibility to confirm what equipment is supported in your locale.
Creating a New Configuration
1.With no configuration loaded, if necessary switch Branch Gateway Manager to its simplified view by selecting View
| Simplified view.
2.Click on Create an Offline Configuration.
3.In the Configuration drop down select Avaya Branch Gateway.
4.Select a Locale. The hardware selections available are affected by the locale and are reset if you later change the
locale.
5.In the Extension Number Length drop down, select the appropriate extension length.
6.In the System Units drop down, select the appropriate unit.
7.From the System Units drop down, select the extension/VCM cards and expansion modules that match your
system.
8.Click OK.
Avaya Branch Gateway Manager 10.0 Page 51
15-601011 Issue 29r (Friday, November 02, 2012)B5800 Branch Gateway
Page 52

2.12.10 Importing and Exporting Settings
File Name
Fields in Order
Directory
Name, Number.
Hunt Group
Name, Extension, Group, Hunt, Rotary, Longest Waiting, Queuing On, Voicemail On, Broadcast,
Voicemail Email.
Short Code
Code, Telephone Number, Feature.
User
Name, Extension, User Restriction/Rights, Voicemail Email address, Full Name.
Configuration
Proprietary format. Note that this does not contain all configuration fields.
Branch Gateway Manager can import configuration settings created elsewhere. This can be useful when setting up a new
system or sharing common settings such as a directory between systems.
· The system supports LDAP (System | Directory Services | LDAP ) for automatic importation of directory
records (LDAP Version 2).
· The system also supports HTTP (System | Directory Services HTTP ) for automatic importation of directory
records.
Settings are imported and exported in the following formats:
· Binary Files (.exp)
These are non-editable files. During import and export it is possible to select what types of records should be
included in the file. During import the whole file is imported.
· Comma Separated Variable Text Files (.csv)
These are plain text files. In addition to being exported from a system these files can be created and edited using
programs such as WordPad or Excel.
· When opening a .csv file in Excel it will alter the way some data is displayed, automatically changing the
display format of dates and long numbers such as phone numbers.
· UTF-8 Character Encoding
Branch Gateway Manager imports and exports CSV files using UTF-8 character encoding which uses a multiple
bytes to support characters with diacritic marks such as ä. Other applications, such as Excel, may, depending
on the user PC settings, use different encoding which will cause such characters to be removed or corrupted.
Care should be taken to ensure that any tool used to create or edit the CSV supports all the characters
expected and uses UTF-8 format.
· Importing into Branch Gateway Manager from Excel
From Excel save the file as a .csv. This file will use ANSI character encoding. Open the file in Notepad and
use the Save As option to rename the file and select UTF-8 encoding. Import the UTF-8 version of the file
into Branch Gateway Manager.
· Exporting from Branch Gateway Manager into Excel
Do not double-click on the file exported from Branch Gateway Manager. Start Excel and use File | Open
to select the file. Excel will recognize that the file uses UTF-8 encoding and will start its text file
importation wizard. Follow the wizard instructions and select comma as the field delimiter.
171 171
174 174
CSV File Formats
The format is CSV using commas as field separator, no text delimiters and no header row. The simplest way to check the
required format for a CSV file prior to import, is to export and a file from an existing system configuration.
Notes:
· Hunt Group: Apart from Name, Extension and Voicemail Email, the fields use a 1 or 0 value for on or off.
· The format of the system CSV is too complex to be described. It is a full export of all the system's configuration
settings. This file format should only be used for export and import between systems and not for any offline editing.
Avaya Branch Gateway Manager 10.0 Page 52
15-601011 Issue 29r (Friday, November 02, 2012)B5800 Branch Gateway
Page 53

Exporting Settings
1.Select File | Import/Export... from the menu bar.
2.Select Export.
Configuration Mode: Editing Configuration Settings
3.Select the type of file. The list of exportable record types will change to match the file type.
4.Select the types of items that should be exported.
5.Use the Save In path to select the location for the exported files. The default location used is sub-directory of the
Branch Gateway Manager application directory based on system name of the currently loaded system.
6.Click OK.
Importing Settings
Importing settings will overwrite any existing records that match a record being imported.
1.Select File | Import/Export... from the menu bar.
2.Select Import.
3.Select the type of file. The list of items will change to match the type of file selected and whether a matching file
or files is found in the current file path.
4.Use Look In to adjust the file path. The default location used is sub-directory of the Branch Gateway Manager
application directory based on system name of the currently loaded system.
5.Select the types of items that should be imported.
6.Click OK.
Avaya Branch Gateway Manager 10.0 Page 53
15-601011 Issue 29r (Friday, November 02, 2012)B5800 Branch Gateway
Page 54

2.12.11 Copying and Pasting
Branch Gateway Manager supports the normal Windows methods of cutting, copying, pasting and deleting records and
settings. These can be accessed through the Edit menu in the menu bar or using the standard Windows keyboard
shortcuts for those actions. They can also be accessed by selecting a record or text field and then right-clicking.
Copy and paste can be used with the navigation and group panes to create a new record with the same settings as the
original. The copy will be renamed as Copy of ... to avoid conflicting with the original.
When using copy and paste between individual settings fields, whether on the same record or a different record, care
should be taken to ensure that the fields use the same type of data. Similarly copying a record in the navigation or group
pane and then pasting it into the details pane will prompt Branch Gateway Manager to paste the copied records data into
the first field of the current record in the details pane. As a general rule, cut and paste actions should be used with the
same pane and within similar record types.
For users and user rights, a number of controls have been provided to copy settings between a user and a user right or
vice versa. See User Rights Overview in the Configuration Settings section.
389
2.12.12 Saving a Configuration Offline
The system configuration settings shown within Branch Gateway Manager can be saved as a .cfg file on the Branch
Gateway Manager PC. These files can be used as backups or sent to other persons to aid problem diagnostics. Note
however that an offline configuration file does not include the Audit Trail records for the system.
Automatically Saving Sent Configurations
By default, Branch Gateway Manager creates a file copy of the configuration before it is sent to the system. This copy is
stored in Branch Gateway Manager's Working Directory using the system name and .cfg. This behavior is controlled by
the Backup File on Send (File | Preferences | Security) option.
The number of backups of each systems configuration can be limited to a set number of the most recent copies.
104
Saving a Configuration Received from a System
1.Select File | Save Configuration as from the menu bar.
Saving a Configuration opened on the PC
1.Click in the main toolbar or select File | Save Configuration from the menu bar.
Avaya Branch Gateway Manager 10.0 Page 54
15-601011 Issue 29r (Friday, November 02, 2012)B5800 Branch Gateway
Page 55

Configuration Mode: Editing Configuration Settings
2.12.13 Sending a Configuration
The current configuration settings open within Branch Gateway Manager can be sent to the system.
Sending an Individual System Configuration
1.The first steps of this process depend on whether you are sending a configuration received from the system or
sending one opened offline/created new.
· A Configuration Opened from a System
Click in the main toolbar or select File | Save Configuration from the menu bar.
· A Configuration Created Offline or Opened from a PC File
Select File | Offline | Send Config from the menu bar.
2.The Send Configuration menu is displayed.
· Configuration Reboot Mode
If Branch Gateway Manager thinks the changes made to the configuration settings are mergeable, it will
select Merge by default, otherwise it will select Immediate.
· Merge
Send the configuration settings without rebooting the system. This mode should only be used with
settings that are mergeable. Refer to Mergeable Settings .
· Immediate
Send the configuration and then reboot the system.
· When Free
Send the configuration and reboot the system when there are no calls in progress. This mode can be
combined with the Call Barring options.
· Timed
The same as When Free but waits for a specific time after which it then wait for there to be no calls in
progress. The time is specified by the Reboot Time. This mode can be combined with the Call Barring
options.
· Reboot Time
This setting is used when the reboot mode Timed is selected. It sets the time for the system reboot. If the
time is after midnight, the system's normal daily backup is canceled.
· Call Barring
These settings can be used when the reboot mode When Free or Timed is selected. They bar the sending or
receiving of any new calls.
3.Click OK. A service user name and password may be requested.
· If the service user name or password used do not valid, "Access Denied" is displayed.
· If the service user name used does not have rights to send a configuration or to request a reboot or merge,
"Insufficient service user rights" is displayed.
· If the service user name used does not have operator rights to make the changes that have been made to the
configuration, "Insufficient operator rights. Operator cannot modify xxxx records" is displayed.
41
· The warning will appear if the configuration being sent contain any errors indicated by a icon in the error
pane. The configuration can still be sent by selected Yes.
· The message Failed to save the configuration data. (Internal error) may indicate that the IP500 V2
system has booted using software other than that in its System SD card's primary folder.
Avaya Branch Gateway Manager 10.0 Page 55
15-601011 Issue 29r (Friday, November 02, 2012)B5800 Branch Gateway
Page 56

2.12.14 Erasing the Configuration
The system configuration settings can be erased. During this process, the system is rebooted and starts with a set of
default settings . This process does not erase the security settings of the system.
Erasing the Configuration
1.Select File | Advanced | Erase Configuration (Default).
2.Enter a valid user name and password.
3.The system will be rebooted.
57
Avaya Branch Gateway Manager 10.0 Page 56
15-601011 Issue 29r (Friday, November 02, 2012)B5800 Branch Gateway
Page 57

Configuration Mode: Editing Configuration Settings
2.12.15 Default Settings
The following applies to new systems and those defaulted using the Erase Configuration command. They also apply to
IP500 and IP500 V2 control units defaulted using the reset button on the rear of the unit (refer to the Installation manual
for details of using the reset button).
For B5800 Branch Gateway only the Avaya Branch Gateway SD card should be used.
· A-Law or U-Law
PCM (Pulse Code Modulation) is a method for encoding voice as data. In telephony, two methods of PCM encoding
are widely used, A-Law and U-Law (also called Mu-Law or µ-Law). Typically U-Law is used in North America and a
few other locations while A-Law is used elsewhere. As well as setting the correct PCM encoding for the region, the
A-Law or U-Law setting of a system when it is first started affects a wide range of regional defaults relating to line
settings and other values.
Default Data Settings
When a new or defaulted control unit is switched on, it requests IP address information from a DHCP Server on the
network. This operation will occur whether the LAN cable is plugged in or not.
· If a DHCP server responds within approximately 10 seconds, the control unit defaults to being a DHCP client and
uses the IP address information supplied by the DHCP server.
· If no DHCP Server responds, the control unit still defaults to being the DHCP client but assumes the following
default LAN addresses:
· For its LAN1 it allocates the IP address 192.168.42.1 and IP Mask 255.255.255.0.
· For its LAN2 if supported, it allocates the IP address 192.168.43.1 and IP Mask 255.255.255.0.
56
· ! Once a control unit has obtained IP address and DHCP mode settings, it will retain those settings even if rebooted
without a configuration file present on the System SD card. To fully remove the existing IP address and DHCP mode
setting, the system must be defaulted using Branch Gateway Manager.
Default Security Settings
Security settings are held separately from the configuration settings and so are not defaulted by actions that default the
configuration. To return the security settings to their default values the separate Erase Security Settings command
should be used.
114
Default IP Office Essential Edition Telephony Configuration Settings
· A hunt group Main is created with extension number 200. The first 16 extensions on the systems are added to the
group.
· All physical extensions ports are numbered from extension number 201 upwards. A matching user record for each
extension is also created.
· A default incoming call route for all voice calls is created, with the default hunt group Main as its destination.
· A default incoming call route for data calls is created with the default RAS record DialIn as its destination.
· All lines are defaulted to Incoming Group ID and Outgoing Group ID of 0.
· Default short codes are created based on whether the system's locale is A-Law or U-Law. See Default Short Codes
436
.
Avaya Branch Gateway Manager 10.0 Page 57
15-601011 Issue 29r (Friday, November 02, 2012)B5800 Branch Gateway
Page 58

Chapter 3.
Security Mode
Avaya Branch Gateway Manager 10.0 Page 58
15-601011 Issue 29r (Friday, November 02, 2012)B5800 Branch Gateway
Page 59

Security Mode:
3. Security Mode
These menus are used to edit the security settings of a system.
The security settings are stored on the system and are separate from the system's configuration settings. To change a
system's security settings, Branch Gateway Manager must first be switched to security mode by selecting File |
Advanced | Security Settings from the menu bar.
Avaya Branch Gateway Manager 10.0 Page 59
15-601011 Issue 29r (Friday, November 02, 2012)B5800 Branch Gateway
Page 60

3.1 Security Settings
Access to system settings is controlled by Service Users and Rights Groups. stored in the control unit's security
settings. These are stored separately from the system's configuration settings. All actions involving communications
between Branch Gateway Manager and the system require a service user name and password. That service user must be
a member of a Rights Group with permissions to perform the required action.
In the example illustrated above:
· Service user X can read and write the configuration. However they can only edit Operator settings and can only
make changes that can be merged.
· Service user Y can read and write the configuration, edit all settings and make changes that require reboots.
· Service user Z can read and write the configuration, edit all settings and make changes that require reboots. They
can also access the security settings.
· The Security Administrator can only access the security settings.
Security Administrators
By default the security administrator is the only user who can access the system's security settings using Branch
Gateway Manager's security mode.
Service Users
Each service user has a name, a password and is a member of one or more Rights Groups.
Rights Groups
The Rights Groups to which a service user belongs determine what actions they can perform. Where a service user has
been configured as a member of more than one Rights Group, they combine the functions available to the separate
Rights Groups.
Avaya Branch Gateway Manager 10.0 Page 60
15-601011 Issue 29r (Friday, November 02, 2012)B5800 Branch Gateway
Page 61

Security Mode: Security Settings
Unique Security Control Unit
Enabled
Name
security
Password
securitypwd
Name
Password
Role
Rights Group Memberships
Administrat
or
Administrator
These are the default accounts used for system
configuration using the Branch Gateway Manager
application.
Administrator, Customer
Admin, System Status Group.
Manager
Manager
Customer Admin, Manager,
System Status.
Operator
Operator
Customer Admin, Operator,
System Status.
EnhTcpaSer
vice
EnhTcpaPwd1
This service user is not used for Avaya Branch Gateway.
TCPA Group.
SCN_Admin
This service user is not used for Avaya Branch Gateway.
Administrator Group, System
Status Group.
IPDECTServ
ice
–
This account is used for DECT R4 system provisioning via
an IP DECT trunk .
IPDECT Group.
SMGRB580
0Admin
SMGRB5800A
dmin
This account is used for web based configuration services.
SGMR Admin
secureuser
secureuser
Security Admin
BusinessPa
rtner
BusinessPartn
er
Business Partner
service
service
Maintainer
3.2 Default Security Users
This section lists the default Rights Groups and Service Users.
· WARNING: Change Passwords
These settings must be changed to make the system secure. At minimum you must change the default passwords of
the Security Administrator and the default service users. Failure to do so will render the system unsecure.
Default Service Users
233
Avaya Branch Gateway Manager 10.0 Page 61
15-601011 Issue 29r (Friday, November 02, 2012)B5800 Branch Gateway
Page 62

Default Rights Groups
Rights
Administrator
Group
Manager
Group
Operator
Group
Description
These groups are intended for users using the
Branch Gateway Manager application to configure
the system.
Service Rights
Read Configuration
Write Configuration
Default Configuration
Merge
Reboot Immediately
Reboot When Free
Reboot at Time of Day
Operator Rights
Operator View
Administrator
Manager
Operator
Web Service
Security Read All
–––
Security Write All
–––
Security Write Own Password
–––
Config Read All
Config Write All
–––
Backup
Restore
Upgrade
Business Partner Role
–––
Service Provider Role
–––
Administrator Role
–––
End User Role
Rights
System Status
Group
TCPA Group
IPDECT Group
Description
This group is
intended for
users using the
System Status
application.
This group is
not used by
Avaya Branch
Gateway.
This group is
used for IP
DECT R4
provisioning
services.
System Status
System Status Access
–
–
Read all configuration
–
–
System Control
–
–
Enhanced TSPI
Enhanced TSPI Access
–
–
HTTP
DECT R4 Provisioning
–
–
Web Service
Security Read All
–––
Security Write All
–––
Security Write Own Password
–––
Config Read All
Config Write All
–––
Backup
Restore
Upgrade
Business Partner Role
–––
Service Provider Role
–––
Administrator Role
–––
End User Role
Rights
SMGR
Admin
Security
Admin
Backup
Admin
Upgrade
Admin
System
Admin
Main
Admin
Business
Partner
Custome
r Admin
Maintain
er
Description
These groups are used by SMGR users for web service access to the system.
Avaya Branch Gateway Manager 10.0 Page 62
15-601011 Issue 29r (Friday, November 02, 2012)B5800 Branch Gateway
Page 63

Security Mode: Default Security Users
Web
Services
Security
Read All
–––––
–
Security
Write All
–––––
–
Security
Write
Own
Passwor
d
–––––––––
Config
Read All
–––
–
Config
Write All
–––––
Backup––
–
Restore––
–
Upgrade––
–
Avaya Branch Gateway Manager 10.0 Page 63
15-601011 Issue 29r (Friday, November 02, 2012)B5800 Branch Gateway
Page 64

3.3 The Security Mode Interface
Branch Gateway Manager can be switched to security mode. This mode it is used to load and edit the security settings of
a system. How the controls operate is similar to Branch Gateway Manager in configuration mode.
Switching Branch Gateway Manager to Security Mode
1.Select File | Advanced | Security Settings.
Switching Branch Gateway Manager Back to Configuration Mode
1.Select File | Configuration.
Branch Gateway Manager Security Mode Screen Elements
· Menu Bar
Provides commands for loading and saving security settings. See the Menu Bar Commands section.
· Main Toolbar
The toolbar icons perform the following actions:
· Get the Security Settings.
· Save the Security Settings.
· Not Used in security mode.
· Show/Hide the Navigation Pane.
96
· Show/Hide the Group Pane.
· Not used in security mode.
· Not used in security mode.
· Security Settings Pane
This pane is used to select the type of security records that should be displayed in the group pane or details pane.
· General
Defines general security controls for the system. When selected, the settings are displayed in the details pane.
· System
Defines security settings for the system such as application access. When selected, the settings are displayed in the
details pane.
· Services
Secure services supported by the system. Currently these are access to security settings and access to configuration
settings.
· Rights Groups
Create groups with different access rights. When selected, the existing Rights Groups are displayed in the group
pane.
· Service Users
Sets the name and password for an administrator. Also allows selection of the Rights Groups to which the user
belongs. When selected, the existing service users are displayed in the group pane.
· Group Pane
This pane is used to display the existing Right Groups or Service Users when those options are selected in the security
settings pane.
· Details Pane
This pane shows the settings selected in the security settings pane or the group pane.
· Status Bar
This bar display messages about communications between Branch Gateway Manager and systems. It also displays the
security level of the communications by the use of a padlock icon.
Avaya Branch Gateway Manager 10.0 Page 64
15-601011 Issue 29r (Friday, November 02, 2012)B5800 Branch Gateway
Page 65

Security Mode: The Security Mode Interface
3.4 Security Administration
This section also covers a basic introduction to security principles and the security mechanisms.
· NOTE: If administration security is of no concern, the default settings allow modification of all system features
without restriction. It is recommended as a minimum that default passwords are changed.
1. Introduction
Administration security is achieved using a number of optional cryptographic elements:
· Access control to prevent unauthorized use.
· Encryption to guarantee data remains private.
· Message Authentication ensures data has not been tampered with.
· Identity assures the source of the data.
2. Access Control
Access to configuration, security settings and SSA is controlled by the use of service users, passwords and Rights Groups.
All actions involving communications between the Branch Gateway Manager user and the system require a service user
name and password. That service user must be a member of a Rights Group configured to perform the required action.
In the example illustrated above:
· Service user X can read and write the configuration. However they can only edit Operator settings and can only
make changes that can be merged.
· Service user Y can read and write the configuration, edit all settings and make changes that require reboots.
· Service user Z can read and write the configuration, edit all settings and make changes that require reboots. They
can also access the security settings.
· The Security Administrator can only access the security settings.
Security Administrator
By default the security administrator is the only user who can access the system's security settings using Branch
Gateway Manager's security mode.
Service Users
Each service user has a name, a password and is a member of one or more Rights Groups.
Rights Groups
The Rights Groups to which a service user belongs determine what actions they can perform. Actions available to Rights
Groups include configuration actions, security actions and system status actions.
Where a service user has been configured as a member of more than one Rights Group, they combine the functions
available to the separate Rights Groups.
Avaya Branch Gateway Manager 10.0 Page 65
15-601011 Issue 29r (Friday, November 02, 2012)B5800 Branch Gateway
Page 66

3. Encryption
Algorithm
Effective key size (bits)
Use
DES-40
40
Not recommended.
DES-56
56
‘Minimal’ security.
3DES
112
‘Strong’ security.
RC4-128
128
‘Strong’ security.
AES-128
128
‘Very strong’ security.
AES-256
256
‘Very strong’ security.
Encryption ensures that all data sent by either the system or Branch Gateway Manager cannot be ‘read’ by anyone else,
even another copy of Branch Gateway Manager. Encryption is the application of a complex mathematical process at the
originating end, and a reverse process at the receiving end. The process at each end uses the same ‘key’ to encrypt and
decrypt the data:
Any data sent may be optionally encrypted using a number of well known and cryptographically secure algorithms:
In general the larger the key size, the more secure the encryption. However smaller key sizes usually incur less
processing. The system supports encryption using the Transport Layer Security (TLS) v1.0 protocol. In addition, many
cryptographic components of the TLS module have been FIPS 140-2 certified, indicating the accuracy of implementation.
Avaya Branch Gateway Manager 10.0 Page 66
15-601011 Issue 29r (Friday, November 02, 2012)B5800 Branch Gateway
Page 67

Security Mode: Security Administration
Algorithm
Effective hash size (bits)
Use
MD5
128
‘Minimal’ security.
SHA-1
160
‘Strong’ security.
4. Message Authentication
Message authentication ensures that all data sent by either the system or Branch Gateway Manager cannot be tempered
with (or substituted) by anyone else without detection. This involves the originator of the data producing a signature
(termed a hash) of the data sent, and sending that as well. The receiver gets the data and the signature and check both
match.
Any data sent may be optionally authenticated using a number of well known and cryptographically secure algorithms:
In general the larger the hash size, the more secure the signature. However smaller hash sizes usually incur less
processing.
Avaya Branch Gateway supports message authentication using the Transport Layer Security (TLS) v1.0 protocol. In
addition, many cryptographic components of the TLS module have been FIPS 140-2 certified, indicating the accuracy of
implementation.
Avaya Branch Gateway Manager 10.0 Page 67
15-601011 Issue 29r (Friday, November 02, 2012)B5800 Branch Gateway
Page 68

5. Identity
The identity of the equipment or person at each end of the link is achieved by the used of digital certificates – more
specifically X.509 v3 certificates. Digital certificates are the preferred mechanism for the majority of internet-based
applications including e-commerce and email, and can be thought of as a credential, just like a passport or drivers’
license.
A digital certificate contains at least three things:
· A public key.
· Certificate information (Identity information about the user, such as name, user ID, and so on.)
· One or more digital signatures
The purpose of the digital signature on a certificate is to state that the certificate information has been verified to by
some other person or entity. The digital signature does not verify authenticity of the certificate as a whole; it vouches
only that the signed identity information goes along with, or is bound to, the public key: A certificate essentially is a
public key with one or two forms of ID attached, plus a stamp of approval from some other ‘trusted individual’.
Trusted individuals (also termed Certificate Authorities) themselves have publicly available certificates, which can contain
signatures from their trusted authorities. These can be verified all the way up to a ‘self-signed’ root certificate from a root
certificate authority.
Examples of root certificate authorities’ certificates can be found in every web browsers’ certificate store.
Avaya Branch Gateway Manager 10.0 Page 68
15-601011 Issue 29r (Friday, November 02, 2012)B5800 Branch Gateway
Page 69

Security Mode: Security Administration
6. Windows Certificate Store Usability
The certificate store that is used by the Branch Gateway Manager to save X509 certificates to and retrieve certificates
from is the default one provided by the Windows operating system. This may be accessed for maintenance purposes by a
user with sufficient permission via the use of a ‘snap-in’.
· WARNING
Avaya accept no responsibility for changes made by users to the Windows operating system. Users are responsible
for ensure that they have read all relevant documentation and are sufficiently trained for the task being
performed.
If not installed already, the Microsoft Management Console (MMC) Certificates snap-in can be installed by following the
relevant instructions. Both ‘user account’ and ‘computer’ options should be installed.
· For Windows XP Professional:
http://www.microsoft.com/resources/documentation/windows/xp/all/proddocs/en-us/sag_cm_addsnap.mspx
· For Windows Server 2003:
http://technet2.microsoft.com/windowsserver/en/library/4fa4568e-16de-4a64-b65e-12ee14b31dc21033.mspx?
mfr=true
· For Windows Vista:
http://technet2.microsoft.com/WindowsVista/f/?en/library/a8b21b9b-d102-4045-9f36-e4b3430d2f381033.mspx
7. Windows Certificate Store Organization
By default, certificates are stored in the following structure:
Each of the sub folders has differing usage. The Certificates - Current User area changes with the currently logged-in
windows user. The Certificate(Local Computer) area does not change with the currently logged-in windows user.
Avaya Branch Gateway Manager 10.0 Page 69
15-601011 Issue 29r (Friday, November 02, 2012)B5800 Branch Gateway
Page 70

Branch Gateway Manager only accesses some of the certificate sub folder:
Certificates (Local
Computer) Folder
Branch Gateway Manager Use
Personal | Certificates
· Folder searched by Branch Gateway Manager 1st for matching certificate to send to the
system when requested. Certificate matched by the subject name contained in File |
Preferences | Security | Certificate offered to the system.
· Folder accessed whenever ‘Local Machine certificate store’ used for Security
Settings.
· Folder searched by Branch Gateway Manager for matching certificate when certificate
received from the system, and File | Preferences | Security | Manager Certificate
Checks = Medium or High.
Trusted Root Certification
Authorities | Certificates
· Folder searched by Branch Gateway Manager for matching parent certificates when
non-self signed certificate received from the system, and File | Preferences |
Security | Manager Certificate Checks = Medium or High.
Certificates – Current User
Folder
Branch Gateway Manager Use
Personal | Certificates
· Folder searched by Branch Gateway Manager 2nd for matching certificate (subject
name) to send to the system when requested. Certificate matched by the subject name
contained in File | Preferences | Security | Certificate offered to the system.
· Folder accessed whenever ‘Current User certificate store’ used for Security Settings.
· Folder searched by Branch Gateway Manager for matching certificate when certificate
received from Avaya Branch Gateway, and File | Preferences | Security | Manager
Certificate Checks = Medium or High.
Trusted Root Certification
Authorities | Certificates
· Folder searched by Branch Gateway Manager for matching parent certificates when
non-self signed certificate received from the system, and File | Preferences |
Security | Manager Certificate Checks = Medium or High.
Other People | Certificates
· Folder searched by Branch Gateway Manager for matching parent certificates when
non-self signed certificate received from the system, and File | Preferences |
Security | Manager Certificate Checks = Medium or High.
Avaya Branch Gateway Manager 10.0 Page 70
15-601011 Issue 29r (Friday, November 02, 2012)B5800 Branch Gateway
Page 71

Security Mode: Security Administration
8. Windows Certificate Store Import
In order to use certificates – either for security settings or Branch Gateway Manager operation – they must be present in
the windows certificate store. Certificates may be placed in the store by the Certificate Import Wizard or the Certificate
MMC snap-in
The Certificate Import Wizard can be used whenever a certificate is viewed. In order for Branch Gateway Manager to
subsequently access this certificate the Place all certificate in the following store option must be selected:
· If the certificate is to subsequently identify the system, the Other People folder should be used.
· If the certificate is to subsequently identify the Branch Gateway Manager, the Personal folder should be used, and
the associated private key saved as well.
If the saved certificate is to be used by other windows users, the MMC certificate snap-in must be used to move it to the
Certificates (Local Computer) folder.
9. Certificate Store Export
Any certificate required outside of the Branch Gateway Manager PC required to be first saved in the Certificate store,
then exported using the MMC snap-in.
If the certificate is to be used for identity checking (i.e. to check the far entity of a link) the certificate alone is sufficient,
and should be saved in PEM or DER format.
If the certificate is to be used for identification (i.e. to identify the near end of a link) the certificate and private key is
required, and should be saved in PKCS#12 format, along with a password to access the resultant .pfx file.
10. Implementing Administration Security
This section suggests system security settings that could implement possible security requirements. This section does not
cover the general aspects of security policy analysis or definition, or how the system administration security interacts
with other security mechanism.
10.1. Negligible Security
If all Branch Gateway Manager and system security settings are left at default, no security mechanisms are active, other
than the use of default service user names and passwords. In addition, all legacy interfaces are active, and all
configuration and security data is sent unencrypted.
It is recommended that at the very least, the default service user passwords are changed.
Avaya Branch Gateway Manager 10.0 Page 71
15-601011 Issue 29r (Friday, November 02, 2012)B5800 Branch Gateway
Page 72

10.2. Minimum Security
A minimum security scenario could be where configuration data is open, but the security settings are constrained: Any
individual with the correct service user name and password can access the configuration from any PC installation of
Branch Gateway Manager, no logging of access: Passwords can be simple, and will never age.
· Change all default passwords of all service users and Security Administrator
· Set the system Security Administration service security level to Secure, Low.
· Set the system service user Password Reject Action to None.
· Set the system Client Certificate Checks level to None (default).
· Set the system Minimum Password Complexity to Low (default).
· Set the system Previous Password Limit to zero (default).
· Set the system Password Change Period to zero (default).
· Set the system Account Idle Time to zero (default).
· Set certificate check level to low in Branch Gateway Manager Security Preferences (default).
In addition, any PC installation of Branch Gateway Manager can manage any Avaya Branch Gateway.
10.3. Medium Security
A medium security scenario could be where both configuration and security settings are constrained and a level of
logging is required: Any individual with the correct service user name and password can access the configuration from
any PC installation of Branch Gateway Manager: Passwords cannot be simple, and will age.
· Change all default passwords of all service users and Security Administrator
· Set the system Security Administration service security level to Secure, Medium.
· Set the system Configuration service security level to Secure, Medium.
· Set the system service user Password Reject Action to Log to Audit Trail (default).
· Set the system Client Certificate Checks level to None (default).
· Set the system Minimum Password Complexity to Medium.
· Set the system Previous Password Limit to non zero.
· Set the system Password Change Period to non zero.
· Set the system Account Idle Time to zero (default).
· Disable all the system Unsecured Interfaces.
· Set certificate check level to low in Branch Gateway Manager Security Preferences (default).
Avaya Branch Gateway Manager 10.0 Page 72
15-601011 Issue 29r (Friday, November 02, 2012)B5800 Branch Gateway
Page 73

Security Mode: Security Administration
10.4. Maximum Security
A maximum security scenario could be where both configuration and security settings are constrained and a full level of
logging is required: Certified individuals with the correct service user name and password can access the configuration
from specific PC installations of Branch Gateway Manager: Passwords cannot be simple, and will age: Branch Gateway
Manager can managed specific systems.
· Change all default passwords of all service users and Security Administrator
· Set the system Security Administration service security level to Secure, High.
· Set the system Configuration service security level to Secure, High.
· Set the system service user Password Reject Action to Log and Disable Account.
· Set the system Client Certificate Checks level to High.
· Set the system Minimum Password Complexity to High.
· Set the system Minimum Password Length to >8.
· Set the system Previous Password Limit to non zero (>5).
· Set the system Password Change Period to non zero.
· Set the system Account Idle Time to non zero.
· Set the system Session ID Cache to zero.
· Install valid, 1024 bits+, non self signed certificates (+private key) in all Avaya Branch Gateway server
certificates, derived from a trusted certificate authority.
· Install the corresponding trusted CA certificate in each of the Branch Gateway Manager’s windows certificate
stores.
· Install valid, 1024 bits+, non self signed certificate (+ private key) in all Branch Gateway Manager Certificate
Stores.
· Install the corresponding certificates in all the system Certificate Stores of all permissible Branch Gateway
Manager entities, and the trusted CA certificate.
· Disable all the system Unsecured Interfaces.
· Set Branch Gateway Manager Certificate Checks level to high in Branch Gateway Manager Security Preferences.
· Set Certificate offered to the system in Branch Gateway Manager Security Preferences.
The above essentially locks the systems and corresponding Branch Gateway Managers together. Only recognized (by
strong certificate) entities may communicate successfully on the service interfaces. All services use strong encryption and
message authentication.
The use of intermediate CA certificates can be used to overcome the limit of 6 maximum certificates in each system
Certificate Store.
Avaya Branch Gateway Manager 10.0 Page 73
15-601011 Issue 29r (Friday, November 02, 2012)B5800 Branch Gateway
Page 74

3.5 Editing Security Settings
Security settings can only be loaded directly from a system. These settings cannot be saved as a file on the local PC, nor
do they appear as a temporary file at any time.
By default Branch Gateway Manager and the system will always attempt to use the original, unsecured link.
When secure communications mode is selected a padlock icon is present on the Branch Gateway Manager status bar.
Loading Security Settings
The address ranges in which Branch Gateway Manager searches for systems are set through the Branch Gateway
Manager preferences (File | Preferences | Discovery ). The security mechanism used for security settings transfer
between Branch Gateway Manager and a system are set through the Secure Communications attribute of Branch
Gateway Manager preferences (File | Preferences | Security).
1.If not already done, switch Branch Gateway Manager to security mode by selecting File | Advanced | Security
Settings.
· Note: If the system's configuration settings have already been loaded using a service user name and
Password that also has security access, then the security settings are automatically loaded when Branch
Gateway Manager is switched to security mode.
2.If already in security mode, click in the main toolbar or select File | Open Security Settings from the menu
bar.
3.The Select B5800 window appears, listing those systems that responded. The list can be sorted by clicking on the
column names.
4.If the system required was not found, the address used for the search can be changed. Enter or select the
required address in the Unit/Broadcast Address field and then click Refresh to perform a new search.
5.When the system required is located, check the box next to the system and click OK.
6.The user name and password request for the system is then displayed. Enter the required details and click OK. By
default this is a different user name and password from those that can be used for configuration access.
100
7.If the security settings are received successfully, they appear within Branch Gateway Manager.
· If the service user name/password is incorrect, or the service user has insufficient rights to read the security
settings, "Access Denied" is displayed.
· If the network link fails, or the secure communication mode is incorrect (for example Branch Gateway
Manager is set to unsecured, but the system is set to secure only), "Failed to communicate with IP
Office" is displayed.
Avaya Branch Gateway Manager 10.0 Page 74
15-601011 Issue 29r (Friday, November 02, 2012)B5800 Branch Gateway
Page 75

Security Mode: Editing Security Settings
Editing Security Settings
Editing security settings differ from editing configuration settings in a number of ways:
1.Editing of security settings may only be done online to a system. No offline saving or editing is allowed for security
purposes.
2.No errors in the security settings are allowed to persist. This prevents the system becoming inaccessible through
operator error.
3.Sets of changes to security objects may be made without the need for the OK button to be selected every time.
This allows a coordinated set of changes to be accepted or canceled by the operator.
Saving Security Settings
1.Click in the Main Toolbar or select File | Save Security Settings from the menu bar. These options are only
available when some change has been made.
2.The user name and password request for the system is then displayed. Enter the required details and click OK. By
default this is a different user name and password from those that can be used for configuration access.
Resetting a System's Security Settings
1.Select File | Reset Security Settings (if in security mode), or File | Advanced | Erase Security Settings (if in
configuration mode).
2.The Select B5800 window appears, listing those systems that responded. The list can be sorted by clicking on the
column names.
3.When the system required is located, check the box next to the system and click OK.
4.The user name and password request for the system is then displayed. Enter the required details and click OK. By
default this is a different user name and password from those that can be used for configuration access.
5.Branch Gateway Manager will indicate if the security settings are reset successfully.
Avaya Branch Gateway Manager 10.0 Page 75
15-601011 Issue 29r (Friday, November 02, 2012)B5800 Branch Gateway
Page 76

3.5.1 General Settings
These settings are displayed when General is selected in the navigation pane.
· Security Administrator
The security administrator is a special service user who does not belong to any Rights Groups. The security
administrator is able to access the system's security settings but cannot access its configuration settings. By default
they are the only service user able to access to the security settings.
· Unique Security Administrator: Default = Off
When selected, only the Security Administrator is able to access the system's security settings. When this is
selected, the security options for Rights Groups are disabled. When not selected, the ability to access security
settings can also be assigned to Rights Groups.
· Name: Default = 'security'. Range = 6 to 31 characters.
The name for the Security Administrator.
· Password: Default = 'securitypwd'. Range = 6 to 31 characters.
The password for the Security Administrator. In order to change the Security Administrator password, the current
password must be known.
· Minimum Password Complexity: Default = Low.
The password complexity requirements for the Security Administrator. This setting is active for attempted password
changes on both Security Manager and the system.
· Low
Any password characters may be used without constraint.
· Medium
The password characters used must include characters from at least 2 of the 'code point sets' listed below. For
example a mix of lower case and upper case. In addition, there should not be any adjacent repeated characters of
any type.
1.Lower case alphabetic characters.
2.Upper case alphabetical character.
3.Numeric characters.
4.Non-alphanumeric characters, for example # or *.
Avaya Branch Gateway Manager 10.0 Page 76
15-601011 Issue 29r (Friday, November 02, 2012)B5800 Branch Gateway
Page 77

Security Mode: Editing Security Settings
· High
The password characters used must include characters from at least 3 of the 'code point sets' listed above. For
example a mix of lower case, upper case and numbers. In addition, there should not be any adjacent repeated
characters of any type.
· Previous Password Limit (Entries): Default = 0. Range = 0 (Off) to 10 records.
The number of previous password to check for duplicates against when changing the password. When set to 0, no
checking of previous passwords takes place. This setting is active for attempted password changes on both Security
Manager and the system.
· Service User Details
These settings control service user names and password/account policies.
· Minimum Name Length: Default = 6, Range 1 to 31 characters.
This field sets the minimum name length for service user names.
· Minimum Password Length: Default = 6, Range 1 to 31 characters.
This field sets the minimum password length for service user passwords.
· Password Reject Limit: Default = 3, Range 0 to 255 failures.
Sets how many times an invalid name or password is allowed within a 10 minute period before the Password Reject
Action is performed. Selecting 0 indicates never perform the Password Reject Action.
· Password Reject Action: Default = Log to Audit Trail
The action performed when a user reaches the Password Reject Limit. Current options are:
· No Action
· Log to Audit Trail
Log to Audit Trail creates a record indicating the service user account name and time of last failure.
· Log and Disable Account:.
Log and Disable Account creates an audit trail record and additionally permanently disables the service user
account. This account may only be enabled using the Security Manager Service User settings.
· Log and Temporary Disable:
Log and Temporary Disable creates an audit trail record and additionally temporarily disables the service user
account for 10 minutes. This account may additionally be enabled using the Security Manager Service User
settings.
· Minimum Password Complexity: Default = Low.
The password complexity requirements for all service users. This setting is active for attempted password changes
on both Security Manager and the system.
· Low
Any password characters may be used without constraint.
· Medium
The password characters used must cover two 'code point sets'. For example lower case and upper case. In
addition, Medium and High do not allow more than 2 repeated characters of any type.
· High
The password characters used must cover three 'code point sets'. For example lower case plus upper case and
numbers.
· Password Change Period: Default = 0 (Off), Range 0 to 999 days.
Sets how many days a newly changed password is valid. Selecting 0 indicates any password is valid forever. This
setting is active for password changes through this form or prompted by Branch Gateway Manager. Note that the
user must be a member of a Rights Group that has the Security Administration option Write own service
user password enabled. If this timer expires, the service user account is locked. The account may only be reenabled using the Service User Settings . To prompt the user a number of days before the account is locked set a
93
Expiry Reminder Time (see below).
· Whenever this setting is changed and the OK button is clicked, the Security Manager recalculates all existing
service user password timers.
· Account Idle Time: Default = 0 (Off), Range 0 to 999 days.
Sets how many days a service user account may be inactive before it becomes disabled. Selecting 0 indicates an
account may be idle forever. If this timer expires, the service user account is permanently disabled. The account
may only be re-enabled using the Service User Settings . The idle timer is reset whenever a service user
93
successfully logs in.
· Whenever this setting is changed and the OK button is clicked, the Security Manager recalculates all existing
service user idle timers.
· Expiry Reminder Time: Default = 28, Range 0 (Off) to 999 days.
Sets the period before password or account expiry during which a reminder indication if the service user logs in.
Selecting 0 prevents any reminders. Reminders are sent, for password expiry due to the Password Change Period
(above) or due to the Account Expiry date (see Service User setting) – whichever is the sooner. Currently Branch
93
Gateway Manager displays reminders but System Status does not.
90
Avaya Branch Gateway Manager 10.0 Page 77
15-601011 Issue 29r (Friday, November 02, 2012)B5800 Branch Gateway
Page 78

Service
Method
Port Used
Default
Port
Service
Security
Level
Configuration
This service is used for access to control
unit configuration settings by the Branch
Gateway Manager application. If set to a
mode other than secure, the Branch
Gateway Manager's Security preferences
also need to changed to match.
Unsecure
Base TCP
Port
50804
Secure
Medium.
Secure
" plus 1.
50805
System Status
Interface
This service is used by connections to the
System Status Application application. The
default setting is Disabled. When disabled,
the service is not available on any port.
Unsecure
" plus 4.
50808
Disabled.
Security
Administration
This service is used for access to control
unit security settings by the Branch
Gateway Manager applications.
Unsecure
" plus 8.
50812
Secure
Medium.
Secure
" plus 9.
50813
Enhanced TSPI
The default setting is Disabled. When
disabled, the service is not available on any
port.
Unsecure
" plus 10.
50814
Disabled.
Web Services
This service is used for access to control
unit configuration settings by web
applications. The default setting is Secure,
Medium. You cannot select Unsecure +
secure for this service. If set to Disabled
, the service is not available on any port.
Unsecure
" plus 14.
50818
Secure
Medium.
Secure
" plus 15.
50819
HTTP
The HTTP service affects all HTTP
connections provided by the system.
Unsecure
Base HTTP
Port
80
Secure Low.
3.5.2 System
3.5.2.1 System Details
This tab is accessible when System is selected in the navigation pane.
· Base Configuration
· Services Base TCP Port: Default = 50804. Range = 49152 to 65526.
This is the base TCP port for services provided by the system. It sets the ports on which the system listens for
requests to access those services, using its LAN1 IP address. Each service uses a port offset from the base port
value. If this value is changed from its default, the Branch Gateway Manager application must be set to the same
Base TCP Port through its Services Base TCP Port setting (File | Preferences ).
104
84
100
Avaya Branch Gateway Manager 10.0 Page 78
15-601011 Issue 29r (Friday, November 02, 2012)B5800 Branch Gateway
Page 79

Security Mode: Editing Security Settings
Service
Method
Port Used
Default
Port
Service
Security
Level
Changing its setting will affect applications
other than just the DECT R4. The default
Service Security Level is Secure +
Unsecure, meaning both http and https
can be used.
· Unsecure = HTTP port 80 available.
This is used for phone files, embedded
file manager, system file upgrade, one-X
Portal directory services, DECT R4
provisioning, IPO softphone
provisioning.
· Secure = HTTPS port 443 available.
This can be used for DECT R4
provisioning, IPO softphone
provisioning.
Secure–443
· When changing the base port, exercise caution that the selected port and those offset from it do not conflict with
any ports already in use by other applications.
· Maximum Service Users: Default = 64.
This is a fixed value for indication purposes only. This value is the maximum number of service users that can be
stored in a system's security settings.
· Maximum Rights Groups: Default = 32.
This is a fixed value for indication purposes only. This value is the maximum number of Rights Groups that can be
stored in a system's security settings.
· System Discovery
System discovery is the processes used by applications to locate and list available systems. The Avaya Branch Gateway
can be disabled from responding to this process if required. If this is done, access to the Avaya Branch Gateway
requires its specific IP address to be used.
· TCP Discovery Active: Default = On.
Selecting TCP Discovery Active allows the system to respond to those requests.
· UDP Discovery Active: Default = On.
Selecting UDP Discovery Active allows the system to respond to those requests.
· Security:
These settings cover the per-system security aspects, primarily TLS settings.
· Session ID Cache: Default = 10 hours, Range 0 to 100 hours.
This sets how long a TLS session ID is retained by the system. If retained, the session ID may be used to quickly
restart TLS communications between the system and a re-connecting application. When set to 0, no caching takes
place and each TLS connection must be renegotiated.
· HTTP Challenge Timeout (Seconds): Default = 10.
For HTTP/HTTPS connection attempts, this field sets the timeout for connection validation responses.
· RFC2617 Session Cache (Minutes): Default = 10.
For HTTP/HTTPS sessions, this field sets the allowed duration for successful logins as per RFC2617.
· HTTP Ports: Release 6.2+.
· HTTP Port: Default = 80.
· HTTPS Port: Default = 443.
· Web Services Port: Default =8443.
Avaya Branch Gateway Manager 10.0 Page 79
15-601011 Issue 29r (Friday, November 02, 2012)B5800 Branch Gateway
Page 80

3.5.2.2 Unsecured Interfaces
This tab is accessible when System is selected in the navigation pane. These features relate to applications that
access the system configuration settings using older security methods.
· System Password: Default = 'password'. Range = 0 to 31 characters.
This password is required by some legacy applications such as Monitor and Call Status. It is also used for control unit
software upgrades.
· VM Pro Password: Default = Blank. Range = 0 to 31 characters.
This password is required if a matching password is also set through the Standalone Voice Mail client application.
Typically no password is set.
· Monitor Password: Default = Blank. Range = 0 to 31 characters.
This password, if set, is used by the System Monitor application. If this password is not set, those applications use the
system password. If changing this password with no previous password set, enter the system password as the old
password.
· Applications Controls: Default = All selected except TFTP Configuration Write.
These check boxes control which actions the system will support for legacy applications. Different combinations are
used by the different applications. A summary of the applications affected by changes is listed in the Application
Support list.
· TFTP Configuration Read: Default = Off.
· TFTP Configuration Write: Default = Off.
· Voicemail: Default = On.
· EConf: Default = On.
· Program Code: Default = Off.
· Real Time Interface: Default = On.
· TAPI: Default = On.
· HTTP Directory Read: Default = Off..
Allow the system's current directory records to be accessed using HTTP.
· HTTP Directory Write: Default = Off.
Allow HTTP import to be used to place temporary directory records into the directory.
· Application Support
This panel is shown for information only. It indicates the effect on various applications of the Application Controls
selections.
174
Avaya Branch Gateway Manager 10.0 Page 80
15-601011 Issue 29r (Friday, November 02, 2012)B5800 Branch Gateway
Page 81

Security Mode: Editing Security Settings
3.5.2.3 Certificates
Services between the system and applications may, depending on the settings of the service being used for the
connection, require the exchange of security certificates. The system can either generate its own certificate or certificates
provided from a trusted source can be loaded.
84
· ! WARNING
The process of 'on-boarding' (refer to the Avaya Branch Gateway Installation manual and the IP Office SSL
VPN Solutions Guide) automatically adds a certificate for the SSL VPN to the system's security settings when
the on-boarding file is uploaded to the system. Care should be taken not to delete such certificates except
when advised to by Avaya.
· Identity Certificate: Default = None.
The Identity Certificate is an X.509v3 certificate that identifies the system to a connecting client device (usually a PC
running a application). This certificate is offered in the TLS exchange when the system is acting as a TLS server, which
occurs when accessing a secured service. By default the system's own self-generated certificate is used (see notes
below), but Set can be used to replace this with another certificate.
· The certificate may be generated by the system itself, and can take up to 5 minutes to generate. This occurs
when any of the Service Security Level is set to a value other than Unsecure Only. During this time, normal
system operation is suspended.
· Set
Set the current certificate and associated private key. The certificate and key must be a matching pair. The
source may be:
· Current User Certificate Store.
· Local Machine Certificate Store.
· File in PKCS#12 (.pfx), DER (.cer), or password protected DER (.cer) format.
84
Avaya Branch Gateway Manager 10.0 Page 81
15-601011 Issue 29r (Friday, November 02, 2012)B5800 Branch Gateway
Page 82

· Pasted from clipboard in PEM format, including header and footer text.
· View
View the current certificate. The certificate (not the private key) may also be installed into the local PC
certificate store for export or later use when running the manager in secured mode.
· Delete
Delete the current certificate. When sent to the system, the system will generate a new certificate when next
required. This can take up to 5 minutes to generate. During this time, normal system operation is suspended.
· Offer Certificate: Default = On.
This is a fixed value for indication purposes only. This sets whether the system will offer a certificate in the TLS
exchange when the Avaya Branch Gateway is acting as a TLS server, which occurs when accessing a secured
service.
· Private Key: Default = None.
This is a fixed value for indication purposes only. This indicate whether the system has a private key associated with
the certificate.
· Device Certificate Name: Default = None. Release 6.2+.
· Received Certificate Checks (Management Interface): Default = None.
This setting is used configuration administration connections to the system by applications such as Branch Gateway
Manager. When the Service Security Level of the service being used is set to High, a certificate is requested by
84
the system. The received certificate is tested as follows:
· None: No extra checks are made (The certificate must be in date).
· Low: Certificate minimum key size 512 bits, in date.
· Medium: Certificate minimum key size 1024 bits, in date, match to store, no reflected.
· High: Certificate minimum key size 1024 bits, in date, match to store, no self signed, no reflected.
· Received Certificate Checks (Telephony Endpoints): Default = None.
This setting is used with IP telephony endpoints connecting to the system.
· None: No extra checks are made (The certificate must be in date).
· Low: Certificate minimum key size 512 bits, in date.
· Medium: Certificate minimum key size 1024 bits, in date, match to store, no reflected.
· High: Certificate minimum key size 1024 bits, in date, match to store, no self signed, no reflected.
· Trusted Certificate Store: Default = Empty.
The certificate store contains a set of trusted certificates used to evaluate received client certificates. Up to 25 X.509v3
certificates may be installed. The source may be:
· Current User Certificate Store.
· Local Machine Certificate Store.
· File in PKCS#12 (.pfx), DER (.cer), or password protected DER (.cer) format.
· Pasted from clipboard in PEM format, including header and footer text.
· Add
Sets the current Server Certificate and associated private key. The certificate and key must be a matching
pair. The source may be:
· Current User Certificate Store.
· Local Machine Certificate Store.
· File in PKCS#12 (.pfx), DER (.cer), or password protected DER (.cer) format.
· Pasted from clipboard in PEM format, including header and footer text.
· View
View the current selected certificate. The certificate (not the private key) may also be installed into the local
PC certificate store for export or later use when running the manager in secured mode.
· Delete
Delete the current selected certificate. Any services currently using the certificate are disconnected and
disabled until the appropriate certificate is added back into the security configuration. That includes SSL VPN
connections being used to perform system maintenance.
· SCEP Settings: Release 6.2+.
The Simple Certificate Enrollment Protocol is a protocol intended to ease the issuing of certificates in a network where
numerous devices are using certificates. Rather than having to individually administer the certificate being used by
each device, the devices can be configured to request a certificate using SCEP. These settings are used for B5800
Branch Gateway systems.
Avaya Branch Gateway Manager 10.0 Page 82
15-601011 Issue 29r (Friday, November 02, 2012)B5800 Branch Gateway
Page 83

· Activity: Default = Off.
· Request Interval: Default = 120 seconds. Range = 5 to 3600 seconds.
· SCEP Server IP/Name: Default = Blank.
· SCEP Server Port: Default = 80 for HTTP and 443 for HTTPS.
· SCEP URI: Default = /ejbca/publicweb/apply/scep/pkiclient.exe
· SCEP Domain Cert Name: Default = Blank.
· SCEP Password: Default = Blank.
Security Mode: Editing Security Settings
Avaya Branch Gateway Manager 10.0 Page 83
15-601011 Issue 29r (Friday, November 02, 2012)B5800 Branch Gateway
Page 84

3.5.3 Services Settings
Service
Method
Port Used
Default
Port
Service
Security
Level
Configuration
This service is used for access to control
unit configuration settings by the Branch
Gateway Manager application. If set to a
mode other than secure, the Branch
Gateway Manager's Security preferences
also need to changed to match.
Unsecure
Base TCP
Port
50804
Secure
Medium.
Secure
" plus 1.
50805
System Status
Interface
This service is used by connections to the
System Status Application application. The
default setting is Disabled. When disabled,
the service is not available on any port.
Unsecure
" plus 4.
50808
Disabled.
Security
Administration
This service is used for access to control
unit security settings by the Branch
Gateway Manager applications.
Unsecure
" plus 8.
50812
Secure
Medium.
Secure
" plus 9.
50813
Enhanced TSPI
The default setting is Disabled. When
disabled, the service is not available on any
port.
Unsecure
" plus 10.
50814
Disabled.
Web Services
This service is used for access to control
unit configuration settings by web
applications. The default setting is Secure,
Medium. You cannot select Unsecure +
secure for this service. If set to Disabled
, the service is not available on any port.
Unsecure
" plus 14.
50818
Secure
Medium.
Secure
" plus 15.
50819
HTTP
The HTTP service affects all HTTP
connections provided by the system.
Changing its setting will affect applications
other than just the DECT R4. The default
Service Security Level is Secure +
Unsecure, meaning both http and https
can be used.
· Unsecure = HTTP port 80 available.
This is used for phone files, embedded
file manager, system file upgrade, one-X
Portal directory services, DECT R4
provisioning, IPO softphone
provisioning.
Unsecure
Base HTTP
Port
80
Secure Low.
Secure–443
This tab is accessible when Service is selected in the navigation pane. It shows details of the services that the
system runs to which service users can communicate.
· Name
The name of the service. This is a fixed value for indication purposes only.
· Host System
This field shows the system's name. This is a fixed value for indication purposes only.
· Service Port
This is the port on which the system listens for attempts to access the service. The routing of traffic to this port may
need to be enabled on firewalls and network devices between the service users and the system. The base port (TCP or
HTTP) for each service is offset by a fixed amount from the ports set in System Settings.
104
Avaya Branch Gateway Manager 10.0 Page 84
15-601011 Issue 29r (Friday, November 02, 2012)B5800 Branch Gateway
Page 85

Security Mode: Editing Security Settings
Service
Method
Port Used
Default
Port
Service
Security
Level
· Secure = HTTPS port 443 available.
This can be used for DECT R4
provisioning, IPO softphone
provisioning.
· Service Security Level:
Sets the minimum security level the service will support. See File | Preferences | Security for the corresponding
104
Branch Gateway Manager application setting, which must be changed to match the appropriate service access security
settings.
· WARNING
Selecting a setting other than Unsecure Only will cause the system to stop responding for a period (less than
a minute) while the system initializes the secure port.
· Unsecure Only
This option allows only unsecured access to the service. The service's secure TCP port, if any, is disabled. This or
disabled are the only options supported for the System Status Interface and Enhanced TSPI services.
· Unsecure + Secure
This option allows both unsecured and secure (Low) access. In addition, TLS connections are accepted without
encryption, just authentication.
· Secure, Low
This option allows secure access to that service using TLS, and demands weak (for example DES_40 + MD5)
encryption and authentication or higher. The service's unsecured TCP port is disabled.
· Secure, Medium
This option allows secure access to that service using TLS, and demands moderate (for example DES_56 + SHA-1)
encryption and authentication or higher. The service's unsecured TCP port is disabled.
· Secure, High
This option allows secure access to that service using TLS and demands strong (for example 3DES + SHA-1)
encryption and authentication, or higher. In addition, a certificate is required from the client (usually Branch
Gateway Manager). See System Details | Client Certificate Checks for tests made on the received certificate. The
78
service's unsecured TCP port is disabled.
· Disabled
This option is available for the System Status Interface and Enhanced TSPI services. If selected, access to the
service is disabled.
· Service Access Source
This option is only shown for the Configuration service. This setting is not used for Avaya Branch Gateway.
Avaya Branch Gateway Manager 10.0 Page 85
15-601011 Issue 29r (Friday, November 02, 2012)B5800 Branch Gateway
Page 86

3.5.4 Rights Groups
Rights
Administrator
Group
Manager
Group
Operator
Group
Description
These groups are intended for users using the
Branch Gateway Manager application to configure
the system.
Service Rights
Read Configuration
Write Configuration
Default Configuration
Merge
Reboot Immediately
Reboot When Free
Reboot at Time of Day
Operator Rights
Operator View
Administrator
Manager
Operator
Web Service
Security Read All
–––
Security Write All
–––
Security Write Own Password
–––
Config Read All
Config Write All
–––
Backup
Restore
Upgrade
Business Partner Role
–––
Service Provider Role
–––
Administrator Role
–––
End User Role
Rights
System Status
Group
TCPA Group
IPDECT Group
Description
This group is
intended for
users using the
System Status
application.
This group is
not used by
Avaya Branch
Gateway.
This group is
used for IP
DECT R4
provisioning
services.
System Status
System Status Access
–
–
Read all configuration
–
–
System Control
–
–
Enhanced TSPI
Enhanced TSPI Access
–
–
HTTP
DECT R4 Provisioning
–
–
Web Service
Security Read All
–––
Security Write All
–––
Security Write Own Password
–––
Config Read All
Config Write All
–––
Backup
Restore
Upgrade
Business Partner Role
–––
Service Provider Role
–––
Administrator Role
–––
End User Role
Rights
SMGR
Admin
Security
Admin
Backup
Admin
Upgrade
Admin
System
Admin
Main
Admin
Business
Partner
Custome
r Admin
Maintain
er
The Rights Groups to which a service user belongs define what the service user is able to do after that login to the
system. The maximum number of rights groups that can be created is 32.
93
Avaya Branch Gateway Manager 10.0 Page 86
15-601011 Issue 29r (Friday, November 02, 2012)B5800 Branch Gateway
Page 87

Security Mode: Editing Security Settings
Description
These groups are used by SMGR users for web service access to the system.
Web
Services
Security
Read All
–––––
–
Security
Write All
–––––
–
Security
Write
Own
Passwor
d
–––––––––
Config
Read All
–––
–
Config
Write All
–––––
Backup––
–
Restore––
–
Upgrade––
–
· Administrator Group/Manager Group/ Operator Group:
These default groups are used for configuration access. They differ only in the level of rights to view and amend
configuration settings.
Some of the groups above have been added in different software releases. For new systems and systems with default
security settings, the new rights groups are created automatically when the system is upgraded to the new release. For
systems which have customized (non default) security settings, these rights groups may have to be created manually.
89
Avaya Branch Gateway Manager 10.0 Page 87
15-601011 Issue 29r (Friday, November 02, 2012)B5800 Branch Gateway
Page 88

3.5.4.1 Group Details
These settings are displayed when Rights Groups is selected in the navigation pane. This tab sets the name of the
Rights Group.
Avaya Branch Gateway R6.2 creates the SMGRAdmin rights group with full access to all Web Services. The maximum
number of rights groups is 32.
· Name: Range = Up to 31 characters
The name for the Rights Group should be unique.
Avaya Branch Gateway Manager 10.0 Page 88
15-601011 Issue 29r (Friday, November 02, 2012)B5800 Branch Gateway
Page 89

Security Mode: Editing Security Settings
Operator
View/Edit/
New/Delete
Configuration Record Types
Administrator
All
View, edit create and delete all configuration records.
Manager
View
View all except WAN Port.
Edit
Extension, User, Hunt Group, Short Code, Service, RAS, Incoming
Call Route, Directory, Time Profile, Firewall Profile, IP Route, Account
Code, ARS, E911 System.
New
Delete
As edit except Short Code.
Operator
View
View all except WAN Port.
Edit
Extension, User, Hunt Group, Short Code, Service, RAS, Incoming
Call Route, Time Profile, Firewall Profile, IP Route, Account Code,
License, ARS, E911 System.
New
None.
Delete
Delete Incoming Call Route and Directory.
User & Group Edit
View
User and Hunt Group records only.
Edit
New
None
Delete
User & Group Admin
All
User and Hunt Group records only.
Dir & Account Admin
All
Directory and Account Code records only.
Time & Attendant Admin
All
Time Profile and Auto Attendant records only.
ICR & User Rights Admin
All
Incoming Call Route and User Rights records only.
Read Only
View
View all configuration records.
Edit
None.
New
Delete
3.5.4.2 Configuration
These settings are displayed when Rights Groups is selected in the navigation pane. This tab sets the configuration
settings access for service user's who are members of this Rights Group.
· IP Office Service Rights
This setting controls what action on the system can be performed by members of the Rights Group.
· Manager Operator Rights
This setting controls what types of configuration records Branch Gateway Manager will allow members of the
Rights Group to viewed and what actions they can perform with those types of records.
Avaya Branch Gateway Manager 10.0 Page 89
15-601011 Issue 29r (Friday, November 02, 2012)B5800 Branch Gateway
Page 90

3.5.4.3 Security Administration
These settings are displayed when Rights Groups is selected in the navigation pane. This tab sets the security
settings access for Service user's who are members of this Rights Group. These settings are ignored and greyed out if a
Unique Security Administrator has been enabled in General Settings .
· Read all security settings
Members of the Rights Group can view the system's security settings.
· Write all security settings
Members of the Rights Group can edit and return changes to the system's security settings.
· Reset all security settings:
If selected, members of the Rights Group can reset the security settings to default values.
· Write own service user password:
If selected, members of the Rights Group can change their own password when requested to do so by the system.
That request may be the result of a Password Change Period , Force new password or Account
Expiry . The new password change is requested automatically at login time.
93
76
76 93
3.5.4.4 System Status
These settings are displayed when Rights Groups is selected in the navigation pane. This tab sets whether
members of the group can access the system using the System Status Application (SSA).
· System Status Access
If selected, members of the Rights Group can view the system's current status and resources using the System
Status Application (SSA).
· Read all configuration
The System Status application includes tools to take a snapshot of the system for use by Avaya for diagnostics.
That snapshot can include a full copy of the system's configuration settings. This setting must be enabled for the
SSA user to include a copy of the configuration in the snapshot.
· System Control:
If enabled, the SSA user is able to use SSA to initiate system shutdowns and memory card shutdown/restarts.
Avaya Branch Gateway Manager 10.0 Page 90
15-601011 Issue 29r (Friday, November 02, 2012)B5800 Branch Gateway
Page 91

Security Mode: Editing Security Settings
3.5.4.5 Enhanced TSPI
These settings are displayed when Rights Groups is selected in the navigation pane. This tab sets whether
members of the group can access the system using the Enhanced TSPI application interface.
· Enhanced TSPI Access
If selected, applications in this rights group are able to use the system's Enhanced TSPI interface. This interface is
not currently used by Avaya Branch Gateway.
3.5.4.6 HTTP
These settings are displayed when Rights Groups is selected in the navigation pane. This tab sets the HTTP
services supported for members of the group.
· DECT R4 Provisioing
This service is used to allow the system to configure the DECT R4 master base station and to respond to handsets
subscribing to the DECT R4 system. It requires both the system and DECT R4 master base station to be configured
to enable provisioning. For full details refer to the DECT R4 Installation Manual.
3.5.4.7 Web Services
These settings are displayed when Rights Groups is selected in the navigation pane. These groups are used by
SMGR users for web service access to the system.
IP Office Service Rights
· Security Read All
If selected, the rights group members can view system security settings.
Avaya Branch Gateway Manager 10.0 Page 91
15-601011 Issue 29r (Friday, November 02, 2012)B5800 Branch Gateway
Page 92

· Security Write All
If selected, the rights group members can change system security settings.
· Security Write Own Password
If selected, members of the Rights Group can change their own password when requested to do so by the system.
That request may be the result of a Password Change Period , Force new password or Account
Expiry . The new password change is requested automatically at login time.
· Config Read All
If selected, the rights group members can view system configuration settings.
· Config Write All
If selected, the rights group members can change system configuration settings.
· Backup
If selected, the rights group members can initiate the system backup process.
· Restore
If selected, the rights group members can initiate the system restore process.
· Upgrade
If selected, the rights group members can initiate the system upgrade process.
93
76 93
Web Manager Rights
These rights are used with web service access to a system such as the IP Office web manager used with IP Office Basic
Edition systems.
Avaya Branch Gateway Manager 10.0 Page 92
15-601011 Issue 29r (Friday, November 02, 2012)B5800 Branch Gateway
Page 93

Security Mode: Editing Security Settings
3.5.5 Service Users
These settings are displayed when Service Users is selected in the navigation pane and a particular service user is selected in the group pane.
In Avaya Branch Gateway R6.2, a service user SMGRAdmin with the default password SMGRAdmin01 is created during
a Avaya Branch Gateway R6.2 installation. This service user is assigned the SMGRAdmin rights group. For R6.1 to R6.2
upgrades, this service user and rights group is also added, but the security user settings must be set to the default
values for the SMGRAdmin service user to be assigned the SMGRAdmin rights group.
Users can be created and deleted using the and icons at the top-right of the details pane. The maximum number of
service users is 64.
· Name: Range = Up to 31 characters.
Sets the service user's name. The minimum name length is controlled through General settings .
76
· Note: If changing the user name and/or password of the current service user used to load the security settings,
after saving the changes Branch Gateway Manager should be closed. Not closing Branch Gateway Manager will
cause error warnings when attempting to send any further changes.
· Password: Range = Up to 31 characters.
Sets the service user's password.
· To change the current password click Change. Enter and confirm the new password. Note that an error will be
indicated if the password being entered does not meet the password rules set through General settings .
· To clear the cache of previous password details used by the password rules setting, click Clear Cache. For
example, if the rule restricting the reuse of old passwords has been enabled, clearing the cache allows a previous
password to be used again.
· Account Status: Default = 'Enabled'.
Displays the current service user account status (correct at the time of reading from the system).
· Enabled
This status is the normal non-error state of a service user account. This setting can be selected manually to reenable an account that has been disabled or locked. Note that re-enabling a locked account will reset all timers
relating to the account such as Account Idle Time.
· Force New Password
This status can be selected manually. The service user is then required to change the account password when they
next log in. Until a password change is successful, no service access is allowed. Note that the user must be a
member of a Rights Group that has the Security Administration option Write own service user password
90
enabled.
· Disabled
This status prevents all service access. This setting can be selected manually. The account can be enabled manually
by setting the Account Status back to Enabled.
· Locked – Password Error
This status indicates the account has been locked by the Password Reject Action option Log and Disable
Account on the security General Settings tab. The account can be enabled manually by setting the Account
76
Status back to Enabled.
· Locked - Temporary
This status indicates the account is currently locked temporarily by the Password Reject Action option Log and
Temporary Disable on the security General Settings tab. The account can be enabled manually by setting
76
the Account Status back to Enabled, otherwise the service user must wait for the 10 minute period to expire.
76
Avaya Branch Gateway Manager 10.0 Page 93
15-601011 Issue 29r (Friday, November 02, 2012)B5800 Branch Gateway
Page 94

· Locked - Idle
This status indicates the account has been locked by passing the number of days set for the Account Idle Time on
the security General Settings tab without being used. The account can be enabled manually by setting the
76
Account Status back to Enabled.
· Locked - Expired
This status indicates the account has been locked after passing the Account Expiry date set below. The account can
be enabled manually by setting Account Status back to Enabled, and resetting the Account Expiry date to a
future date or to No Account Expiry.
· Locked – Password Expired
This status indicates the account has been locked after having not been changed within the number of days set by
the Password Change Period option on the security General Settings tab. The account can be enabled manually
76
by setting the Account Status back to Enabled.
· Account Expiry: Default = <None> (No Expiry).
This option can be used to set a calendar date after which the account will become locked. The actual expiry time is
23:59:59 on the selected day. To prompt the user a number of days before the expiry date, set an Expiry Reminder
Time on the security General Settings tab.
76
· Rights Group Membership
The check boxes are used to set the Rights Groups to which the user belongs. The user's rights will be a combination
of the rights assigned to the groups to which they belong.
Avaya Branch Gateway Manager 10.0 Page 94
15-601011 Issue 29r (Friday, November 02, 2012)B5800 Branch Gateway
Page 95

Chapter 4.
Menu Bar Commands
Avaya Branch Gateway Manager 10.0 Page 95
15-601011 Issue 29r (Friday, November 02, 2012)B5800 Branch Gateway
Page 96

File
Open Configuration...
Close Configuration
Save Configuration
Save Configuration As...
Change Working Directory...
Preferences
Offline
Create New Config
Open File...
Send Config...
Receive Config...
Advanced
Erase Configuration (Default)
Reboot
System Shutdown...
Audit Trail...
Security Settings...
Erase Security Settings...
Embedded File Management
Format IP Office SD Card
Recreate IP Office SD Card
Memory Card Command
Shutdown...
Start Up...
Launch Voicemail Pro Client
System Status
LVM Greeting Utility
Launch Initial Installation Utility
Backup/Restore
Backup Binaries and Configurations
Restore Binaries and Configurations
Import/Export
Import
Export
Exit
View
Toolbars
Navigation Pane
Group Pane
Details Pane
Error Pane
Simplified View
TFTP Log
Tools
Export | User
Extension Renumber
Busy on Held Validation
MSN Configuration
Print Button Labels
Import Templates
4. Menu Bar Commands
The commands available through the Branch Gateway Manager's menu bar change according to the mode in which
Branch Gateway Manager is running. Commands may also be grayed out if not currently applicable. The following
sections outline the functions of each command. The Edit and Help menus are not included.
Advanced View Configuration Mode
The following menu options are available:
98
98
98
98
98
100
106
106
106
106
107
107
107
112
114
114
114
115
116
121
121
121
118
118
119
119
121
121
123
122
123
124
124
124
124
124
124
125
126
126
126
127 127
128
129
Avaya Branch Gateway Manager 10.0 Page 96
15-601011 Issue 29r (Friday, November 02, 2012)B5800 Branch Gateway
Page 97

Security Mode
File
Open Security Settings
Close Security Settings
Save Security Settings
Reset Security Settings
Preferences
Configuration
Exit
View
Toolbars
Navigation Pane
Group Pane
Details Pane
File
Open File Settings
Close File Settings
Refresh File Settings
Upload File
Upload System Files
Backup System Files
Restore System Files
Upgrade Binaries
Upgrade Configuration
Upload Voicemail Files
Upload Phone Files
Copy System Card
Preferences
Configuration
Exit
View
Toolbars
Tiles
Icons
List
Details
TFTP Log
130
130
130
124
124
124
124
Embedded File Management
114
114
132
114
132
132
132
132
133
133
100
98
123
124
114
114
114
114
125
Menu Bar Commands:
130
130
130
130
132
132
Avaya Branch Gateway Manager 10.0 Page 97
15-601011 Issue 29r (Friday, November 02, 2012)B5800 Branch Gateway
Page 98

4.1 Configuration Mode: File Menu
4.1.1 Open Configuration
This command displays the Select B5800 menu used to receive a systems configuration settings. See Loading a
Configuration .
The same action is performed by the icon in the Main Toolbar.
The Select B5800 menu is also used for other actions such as reboot and sending a configuration. If the unit required is
not found, the Unit/Broadcast Address can be changed and then Refresh clicked. To change the TCP addresses scanned,
select File | Preferences | Discovery and enter the required addresses in the IP Search Criteria.
Known Units is not available unless configured, see Known System Discovery .
45
100
47
4.1.2 Close Configuration
This command closes the currently loaded configuration without saving it.
4.1.3 Save Configuration
The File | Save command saves the amended configuration.
If the configuration has been received from a system, the Send Config menu is displayed. See Sending a Configuration
55
.
If the configuration file has been opened offline or created from new, the file is saved to disk only.
4.1.4 Save Configuration As
The File | Save As command allows you to save a configuration a file on the Branch Gateway Manager computer. Note
that dynamic configuration data, for example hunt groups advertised from other systems in a network, are not included
in a configuration file saved onto PC and then reopened.
The command displays the Save File As dialog box. You can enter the new file name, including the drive and directory.
Configurations saved onto the PC in this way can be reopened using the icon or the File | Offline | Open File
command.
106
4.1.5 Change Working Directory
This command allows you to change the default locations where Branch Gateway Manager looks for and saves files.
These fields set the default location where Branch Gateway Manager will look for and save files. This tab is also accessed
by the File | Change Working Directory command.
Avaya Branch Gateway Manager 10.0 Page 98
15-601011 Issue 29r (Friday, November 02, 2012)B5800 Branch Gateway
Page 99

Menu Bar Commands: Configuration Mode: File Menu
· Working Directory (.cfg files)
Sets the directory into which Branch Gateway Manager saves .cfg files. By default this is the Branch Gateway
Manager application's program directory.
· This folder location is also used for the Recreate IP Office SD Card command. It uses sub-folders of
the \Memory Cards folder at the specified locations. If the Working Directory is changed to a location
without an appropriate set of \Memory Cards sub-folders, the required set of files will not be copied onto the
SD card.
· Binary Directory (.bin files)
Sets the directory in which the Branch Gateway Manager upgrade wizard, HTTP, TFTP and BOOTP functions look
for firmware files requested by phones and other hardware components. That includes .bin file, .scr files and .txt
files. By default this is the Branch Gateway Manager application's program directory.
· Note that in the Upgrade Wizard , right-clicking and selecting Change Directory also changes this setting.
109
· Known Units File
Sets the file and directory into which Branch Gateway Manager can record details of the systems it has discovered.
Once a file location has been specified, a Known Units button becomes available on the discovery menu used
47
for loading system configuration. Pressing that button displays the known units file as a list from which the
required system can be selected. It also allows sorting of the list and records to be removed.
116
Avaya Branch Gateway Manager 10.0 Page 99
15-601011 Issue 29r (Friday, November 02, 2012)B5800 Branch Gateway
Page 100

4.1.6 Preferences
This command displays a menu for configuring various aspects of Branch Gateway Manager's operation. The menu is
divided into a number of tabs.
· Preferences
· Directories
· Visual Preferences
· Discovery
· Validation
· Security
4.1.6.1 Preferences
This tab is accessed through File | Preferences and then selecting the Preferences sub-tab.
100
101
103
102
106
104
· Edit Communication Port: Default = On.
This field shows or hides the base communication port settings.
· Service Base TCP Port: Default = 50804.
Access to the configuration and security settings on a system requires Branch Gateway Manager to send its
requests to specific ports. This setting allows the TCP Base Port used by Branch Gateway Manager to be set to
match the TCP Base Port setting of the system. The system's TCP Base Port is set through its security
settings.
· Service Base HTTP Port: Default = 80.
Access to the HTTP server on a system requires Branch Gateway Manager to send its requests to specific
ports. This setting allows the HTTP Base Port used by Branch Gateway Manager to be set to match the HTTP
Base Port setting of the system. The system’s HTTP Base Port is set through its security settings.
· Enable Time Server: Default = On.
This setting allows Branch Gateway Manager to respond to RFC868 Time requests from systems. It will provide the
system with both the UTC time value and the local time value of the PC on which it is running. See Date and Time
702
.
· Enable BootP and TFTP Servers: Default = Off.
This setting allows Branch Gateway Manager to respond to BOOTP request from systems for which it also has a
matching BOOTP record. It also allows Branch Gateway Manager to respond to TFTP requests for files.
· Enable Port for Serial Communication
Not used. This is a legacy feature for some older control units that were managed via the serial port rather than
the LAN.
· Enter Port Number to be used for Serial Communication
Used with the setting above to indicate which serial port Branch Gateway Manager should use.
· Auto Connect on start up: Default = On
If on, when Branch Gateway Manager is started it will automatically launch the Select B5800 menu and display
any discovered systems. If only one system is discovered, Branch Gateway Manager will automatically display the
login request for that system or load its configuration if the security settings are default.
Avaya Branch Gateway Manager 10.0 Page 100
15-601011 Issue 29r (Friday, November 02, 2012)B5800 Branch Gateway
 Loading...