

Page 1

Using Avaya Conference Phone B199
Release 1.0.4
Issue 1
February 2021
Page 2

©
2018-2021, Avaya, Inc.
All Rights Reserved.
Note
Using a cell, mobile, or GSM phone, or a two-way radio in close
proximity to an Avaya IP telephone might cause interference.
Documentation disclaimer
“Documentation” means information published in varying mediums
which may include product information, operating instructions and
performance specifications that are generally made available to users
of products. Documentation does not include marketing materials.
Avaya shall not be responsible for any modifications, additions, or
deletions to the original published version of Documentation unless
such modifications, additions, or deletions were performed by or on
the express behalf of Avaya. End User agrees to indemnify and hold
harmless Avaya, Avaya's agents, servants and employees against all
claims, lawsuits, demands and judgments arising out of, or in
connection with, subsequent modifications, additions or deletions to
this documentation, to the extent made by End User.
Link disclaimer
Avaya is not responsible for the contents or reliability of any linked
websites referenced within this site or Documentation provided by
Avaya. Avaya is not responsible for the accuracy of any information,
statement or content provided on these sites and does not
necessarily endorse the products, services, or information described
or offered within them. Avaya does not guarantee that these links will
work all the time and has no control over the availability of the linked
pages.
Warranty
Avaya provides a limited warranty on Avaya hardware and software.
Refer to your sales agreement to establish the terms of the limited
warranty. In addition, Avaya’s standard warranty language, as well as
information regarding support for this product while under warranty is
available to Avaya customers and other parties through the Avaya
Support website:
https://support.avaya.com/helpcenter/
getGenericDetails?detailId=C20091120112456651010 under the link
“Warranty & Product Lifecycle” or such successor site as designated
by Avaya. Please note that if You acquired the product(s) from an
authorized Avaya Channel Partner outside of the United States and
Canada, the warranty is provided to You by said Avaya Channel
Partner and not by Avaya.
“Hosted Service” means an Avaya hosted service subscription that
You acquire from either Avaya or an authorized Avaya Channel
Partner (as applicable) and which is described further in Hosted SAS
or other service description documentation regarding the applicable
hosted service. If You purchase a Hosted Service subscription, the
foregoing limited warranty may not apply but You may be entitled to
support services in connection with the Hosted Service as described
further in your service description documents for the applicable
Hosted Service. Contact Avaya or Avaya Channel Partner (as
applicable) for more information.
Hosted Service
THE FOLLOWING APPLIES ONLY IF YOU PURCHASE AN AVAYA
HOSTED SERVICE SUBSCRIPTION FROM AVAYA OR AN AVAYA
CHANNEL PARTNER (AS APPLICABLE), THE TERMS OF USE
FOR HOSTED SERVICES ARE AVAILABLE ON THE AVAYA
WEBSITE,
HTTPS://SUPPORT.AVAYA.COM/LICENSEINFO UNDER
THE LINK “Avaya Terms of Use for Hosted Services” OR SUCH
SUCCESSOR SITE AS DESIGNATED BY AVAYA, AND ARE
APPLICABLE TO ANYONE WHO ACCESSES OR USES THE
HOSTED SERVICE. BY ACCESSING OR USING THE HOSTED
SERVICE, OR AUTHORIZING OTHERS TO DO SO, YOU, ON
BEHALF OF YOURSELF AND THE ENTITY FOR WHOM YOU ARE
DOING SO (HEREINAFTER REFERRED TO INTERCHANGEABLY
AS “YOU” AND “END USER”), AGREE TO THE TERMS OF USE. IF
YOU ARE ACCEPTING THE TERMS OF USE ON BEHALF A
COMPANY OR OTHER LEGAL ENTITY, YOU REPRESENT THAT
YOU HAVE THE AUTHORITY TO BIND SUCH ENTITY TO THESE
TERMS OF USE. IF YOU DO NOT HAVE SUCH AUTHORITY, OR IF
YOU DO NOT WISH TO ACCEPT THESE TERMS OF USE, YOU
MUST NOT ACCESS OR USE THE HOSTED SERVICE OR
AUTHORIZE ANYONE TO ACCESS OR USE THE HOSTED
SERVICE.
Licenses
THE SOFTWARE LICENSE TERMS AVAILABLE ON THE AVAYA
WEBSITE, HTTPS://SUPPORT.AVAYA.COM/LICENSEINFO,
UNDER THE LINK “AVAYA SOFTWARE LICENSE TERMS (Avaya
Products)” OR SUCH SUCCESSOR SITE AS DESIGNATED BY
AVAYA, ARE APPLICABLE TO ANYONE WHO DOWNLOADS,
USES AND/OR INSTALLS AVAYA SOFTWARE, PURCHASED
FROM AVAYA INC., ANY AVAYA AFFILIATE, OR AN AVAYA
CHANNEL PARTNER (AS APPLICABLE) UNDER A COMMERCIAL
AGREEMENT WITH AVAYA OR AN AVAYA CHANNEL PARTNER.
UNLESS OTHERWISE AGREED TO BY AVAYA IN WRITING,
AVAYA DOES NOT EXTEND THIS LICENSE IF THE SOFTWARE
WAS OBTAINED FROM ANYONE OTHER THAN AVAYA, AN AVAYA
AFFILIATE OR AN AVAYA CHANNEL PARTNER; AVAYA
RESERVES THE RIGHT TO TAKE LEGAL ACTION AGAINST YOU
AND ANYONE ELSE USING OR SELLING THE SOFTWARE
WITHOUT A LICENSE. BY INSTALLING, DOWNLOADING OR
USING THE SOFTWARE, OR AUTHORIZING OTHERS TO DO SO,
YOU, ON BEHALF OF YOURSELF AND THE ENTITY FOR WHOM
YOU ARE INSTALLING, DOWNLOADING OR USING THE
SOFTWARE (HEREINAFTER REFERRED TO
INTERCHANGEABLY AS “YOU” AND “END USER”), AGREE TO
THESE TERMS AND CONDITIONS AND CREATE A BINDING
CONTRACT BETWEEN YOU AND AVAYA INC. OR THE
APPLICABLE AVAYA AFFILIATE (“AVAYA”).
Avaya grants You a license within the scope of the license types
described below, with the exception of Heritage Nortel Software, for
which the scope of the license is detailed below. Where the order
documentation does not expressly identify a license type, the
applicable license will be a Designated System License as set forth
below in the Designated System(s) License (DS) section as
applicable. The applicable number of licenses and units of capacity
for which the license is granted will be one (1), unless a different
number of licenses or units of capacity is specified in the
documentation or other materials available to You. “Software” means
computer programs in object code, provided by Avaya or an Avaya
Channel Partner, whether as stand-alone products, pre-installed on
hardware products, and any upgrades, updates, patches, bug fixes,
or modified versions thereto. “Designated Processor” means a single
stand-alone computing device. “Server” means a set of Designated
Processors that hosts (physically or virtually) a software application
to be accessed by multiple users. “Instance” means a single copy of
the Software executing at a particular time: (i) on one physical
machine; or (ii) on one deployed software virtual machine (“VM”) or
similar deployment.
License types
Designated System(s) License (DS). End User may install and use
each copy or an Instance of the Software only: 1) on a number of
Designated Processors up to the number indicated in the order; or 2)
up to the number of Instances of the Software as indicated in the
order, Documentation, or as authorized by Avaya in writing. Avaya
may require the Designated Processor(s) to be identified in the order
by type, serial number, feature key, Instance, location or other
specific designation, or to be provided by End User to Avaya through
electronic means established by Avaya specifically for this purpose.
Shrinkwrap License (SR). End User may install and use the Software
in accordance with the terms and conditions of the applicable license
agreements, such as “shrinkwrap” or “clickthrough” license
accompanying or applicable to the Software (“Shrinkwrap License”)
as indicated in the order, Documentation, or as authorized by Avaya
in writing.
Heritage Nortel Software
“Heritage Nortel Software” means the software that was acquired by
Avaya as part of its purchase of the Nortel Enterprise Solutions
Business in December 2009. The Heritage Nortel Software is the
software contained within the list of Heritage Nortel Products located
https://support.avaya.com/LicenseInfo under the link “Heritage
at
Nortel Products” or such successor site as designated by Avaya. For
Heritage Nortel Software, Avaya grants Customer a license to use
Heritage Nortel Software provided hereunder solely to the extent of
the authorized activation or authorized usage level, solely for the
purpose specified in the Documentation, and solely as embedded in,
for execution on, or for communication with Avaya equipment.
Charges for Heritage Nortel Software may be based on extent of
activation or use authorized as specified in an order or invoice.
Page 3

Copyright
Except where expressly stated otherwise, no use should be made of
materials on this site, the Documentation, Software, Hosted Service,
or hardware provided by Avaya. All content on this site, the
documentation, Hosted Service, and the product provided by Avaya
including the selection, arrangement and design of the content is
owned either by Avaya or its licensors and is protected by copyright
and other intellectual property laws including the sui generis rights
relating to the protection of databases. You may not modify, copy,
reproduce, republish, upload, post, transmit or distribute in any way
any content, in whole or in part, including any code and software
unless expressly authorized by Avaya. Unauthorized reproduction,
transmission, dissemination, storage, and or use without the express
written consent of Avaya can be a criminal, as well as a civil offense
under the applicable law.
Virtualization
The following applies if the product is deployed on a virtual machine.
Each product has its own ordering code and license types. Unless
otherwise stated, each Instance of a product must be separately
licensed and ordered. For example, if the end user customer or
Avaya Channel Partner would like to install two Instances of the
same type of products, then two products of that type must be
ordered.
Third Party Components
“Third Party Components” mean certain software programs or
portions thereof included in the Software or Hosted Service may
contain software (including open source software) distributed under
third party agreements (“Third Party Components”), which contain
terms regarding the rights to use certain portions of the Software
(“Third Party Terms”). As required, information regarding distributed
Linux OS source code (for those products that have distributed Linux
OS source code) and identifying the copyright holders of the Third
Party Components and the Third Party Terms that apply is available
in the products, Documentation or on Avaya’s website at:
support.avaya.com/Copyright or such successor site as designated
by Avaya. The open source software license terms provided as Third
Party Terms are consistent with the license rights granted in these
Software License Terms, and may contain additional rights benefiting
You, such as modification and distribution of the open source
software. The Third Party Terms shall take precedence over these
Software License Terms, solely with respect to the applicable Third
Party Components to the extent that these Software License Terms
impose greater restrictions on You than the applicable Third Party
Terms.
The following applies only if the H.264 (AVC) codec is distributed with
the product. THIS PRODUCT IS LICENSED UNDER THE AVC
PATENT PORTFOLIO LICENSE FOR THE PERSONAL USE OF A
CONSUMER OR OTHER USES IN WHICH IT DOES NOT RECEIVE
REMUNERATION TO (i) ENCODE VIDEO IN COMPLIANCE WITH
THE AVC STANDARD (“AVC VIDEO”) AND/OR (ii) DECODE AVC
VIDEO THAT WAS ENCODED BY A CONSUMER ENGAGED IN A
PERSONAL ACTIVITY AND/OR WAS OBTAINED FROM A VIDEO
PROVIDER LICENSED TO PROVIDE AVC VIDEO. NO LICENSE IS
GRANTED OR SHALL BE IMPLIED FOR ANY OTHER USE.
ADDITIONAL INFORMATION MAY BE OBTAINED FROM MPEG LA,
L.L.C. SEE
Service Provider
THE FOLLOWING APPLIES TO AVAYA CHANNEL PARTNER’S
HOSTING OF AVAYA PRODUCTS OR SERVICES. THE PRODUCT
OR HOSTED SERVICE MAY USE THIRD PARTY COMPONENTS
SUBJECT TO THIRD PARTY TERMS AND REQUIRE A SERVICE
PROVIDER TO BE INDEPENDENTLY LICENSED DIRECTLY FROM
THE THIRD PARTY SUPPLIER. AN AVAYA CHANNEL PARTNER’S
HOSTING OF AVAYA PRODUCTS MUST BE AUTHORIZED IN
WRITING BY AVAYA AND IF THOSE HOSTED PRODUCTS USE
OR EMBED CERTAIN THIRD PARTY SOFTWARE, INCLUDING
BUT NOT LIMITED TO MICROSOFT SOFTWARE OR CODECS,
THE AVAYA CHANNEL PARTNER IS REQUIRED TO
INDEPENDENTLY OBTAIN ANY APPLICABLE LICENSE
AGREEMENTS, AT THE AVAYA CHANNEL PARTNER’S EXPENSE,
DIRECTLY FROM THE APPLICABLE THIRD PARTY SUPPLIER.
WITH RESPECT TO CODECS, IF THE AVAYA CHANNEL
PARTNER IS HOSTING ANY PRODUCTS THAT USE OR EMBED
THE H.264 CODEC OR H.265 CODEC, THE AVAYA CHANNEL
HTTP://WWW.MPEGLA.COM.
https://
PARTNER ACKNOWLEDGES AND AGREES THE AVAYA
CHANNEL PARTNER IS RESPONSIBLE FOR ANY AND ALL
RELATED FEES AND/OR ROYALTIES. THE H.264 (AVC) CODEC
IS LICENSED UNDER THE AVC PATENT PORTFOLIO LICENSE
FOR THE PERSONAL USE OF A CONSUMER OR OTHER USES
IN WHICH IT DOES NOT RECEIVE REMUNERATION TO: (I)
ENCODE VIDEO IN COMPLIANCE WITH THE AVC STANDARD
(“AVC VIDEO”) AND/OR (II) DECODE AVC VIDEO THAT WAS
ENCODED BY A CONSUMER ENGAGED IN A PERSONAL
ACTIVITY AND/OR WAS OBTAINED FROM A VIDEO PROVIDER
LICENSED TO PROVIDE AVC VIDEO. NO LICENSE IS GRANTED
OR SHALL BE IMPLIED FOR ANY OTHER USE. ADDITIONAL
INFORMATION FOR H.264 (AVC) AND H.265 (HEVC) CODECS
MAY BE OBTAINED FROM MPEG LA, L.L.C. SEE
WWW.MPEGLA.COM.
Compliance with Laws
You acknowledge and agree that it is Your responsibility for
complying with any applicable laws and regulations, including, but not
limited to laws and regulations related to call recording, data privacy,
intellectual property, trade secret, fraud, and music performance
rights, in the country or territory where the Avaya product is used.
Preventing Toll Fraud
“Toll Fraud” is the unauthorized use of your telecommunications
system by an unauthorized party (for example, a person who is not a
corporate employee, agent, subcontractor, or is not working on your
company's behalf). Be aware that there can be a risk of Toll Fraud
associated with your system and that, if Toll Fraud occurs, it can
result in substantial additional charges for your telecommunications
services.
Avaya Toll Fraud intervention
If You suspect that You are being victimized by Toll Fraud and You
need technical assistance or support, call Technical Service Center
Toll Fraud Intervention Hotline at +1-800-643-2353 for the United
States and Canada. For additional support telephone numbers, see
the Avaya Support website:
successor site as designated by Avaya.
Security Vulnerabilities
Information about Avaya’s security support policies can be found in
the Security Policies and Support section of
support.avaya.com/security.
Suspected Avaya product security vulnerabilities are handled per the
Avaya Product Security Support Flow (https://
support.avaya.com/css/P8/documents/100161515).
Downloading Documentation
For the most current versions of Documentation, see the Avaya
Support website:
as designated by Avaya.
Contact Avaya Support
See the Avaya Support website:
product or Hosted Service notices and articles, or to report a problem
with your Avaya product or Hosted Service. For a list of support
telephone numbers and contact addresses, go to the Avaya Support
website:
designated by Avaya), scroll to the bottom of the page, and select
Contact Avaya Support.
Regulatory Statements
Industry Canada (IC) Statements
RSS Standards Statement
This device complies with Industry Canada licence-exempt RSS
standard(s). Operation is subject to the following two conditions:
https://support.avaya.com (or such successor site as
1. This device may not cause interference, and
2. This device must accept any interference, including
https://support.avaya.com, or such successor site
interference that may cause undesired operation of the
device.
https://support.avaya.com or such
https://support.avaya.com for
HTTP://
https://
Page 4
Le présent appareil est conforme aux CNR d'Industrie Canada
applicables aux appareils radio exempts de licence. L'exploitation est
autorisée aux deux conditions suivantes:
1. L'appareil ne doit pas produire de brouillage, et
2. L'utilisateur de l'appareil doit accepter tout brouillage
radioélectrique subi, même si le brouillage est susceptible
d'en compromettre le fonctionnement.
Radio Transmitter Statement
Under Industry Canada regulations, this radio transmitter may only
operate using an antenna of a type and maximum (or lesser) gain
approved for the transmitter by Industry Canada. To reduce potential
radio interference to other users, the antenna type and its gain
should be so chosen that the equivalent isotropically radiated power
(EIRP) is not more than that necessary for successful
communication.
Conformément à la réglementation d'Industrie Canada, le présent
émetteur radio peut fonctionner avec une antenne d'un type et d'un
gain maximal (ou inférieur) approuvé pour l'émetteur par Industrie
Canada. Dans le but de réduire les risques de brouillage
radioélectrique à l'intention des autres utilisateurs, il faut choisir le
type d'antenne et son gain de sorte que la puissance isotrope
rayonnée équivalente ne dépasse pas l'intensité nécessaire à
l'établissement d'une communication satisfaisante.
This Class B digital apparatus complies with Canadian ICES-003.
Cet appareil numérique de la classe B est conforme à la norme
NMB-003 du Canada.
Radiation Exposure Statement
This equipment complies with FCC & IC RSS102 radiation exposure
limits set forth for an uncontrolled environment. This equipment
should be installed and operated with minimum distance 20cm
between the radiator & your body. This transmitter must not be colocated or operating in conjunction with any other antenna or
transmitter.
Cet équipement est conforme aux limites d'exposition aux
rayonnements ISEDétablies pour un environnement non contrôlé.
Cet équipement doit être installé et utilisé avec un minimum de 20
cm de distance entre la source de rayonnement et votre corps.
This product meets the applicable Innovation, Science and Economic
Development Canada technical specifications.
Industry Canada (IC) Statements
This Class B digital apparatus complies with Canadian ICES-003.
Cet appareil numérique de la classe B est conformeà la norme
NMB-003 du Canada.
This product meets the applicable Innovation, Science and Economic
Development Canada technical specifications.
Japan Statements
Class B Statement
This is a Class B product based on the standard of the VCCI Council.
If this is used near a radio or television receiver in a domestic
environment, it may cause radio interference. Install and use the
equipment according to the instruction manual.
Denan Power Cord Statement
Danger:
Please be careful of the following while installing the
equipment:
• Please only use the connecting cables, power cord, and
AC adapters shipped with the equipment or specified by
Avaya to be used with the equipment. If you use any
other equipment, it may cause failures, malfunctioning,
or fire.
• Power cords shipped with this equipment must not be
used with any other equipment. In case the above
guidelines are not followed, it may lead to death or
severe injury.
本製品を安全にご使用頂くため、以下のことにご注意ください。
• 接続ケーブル、電源コード、AC アダプタなどの部品は、必ず
製品に同梱されております添付品または指定品をご使用くだ
さい。添付品指定品以外の部品をご使用になると故障や動作
不良、火災の原因となることがあります。
• 同梱されております付属の電源コードを他の機器には使用し
ないでください。上記注意事項を守らないと、死亡や大怪我
など人身事故の原因となることがあります。
México Statement
The operation of this equipment is subject to the following two
conditions:
1. It is possible that this equipment or device may not cause
harmful interference, and
2. This equipment or device must accept any interference,
including interference that may cause undesired operation.
La operación de este equipo está sujeta a las siguientes dos
condiciones:
1. Es posible que este equipo o dispositivo no cause
interferencia perjudicial y
2. Este equipo o dispositivo debe aceptar cualquier
interferencia, incluyendo la que pueda causar su operación
no deseada.
Brazil Statement
Este equipamento não tem direito à proteção contra interferência
prejudicial e não pode causar interferência em sistemas devidamente
autorizados
Power over Ethernet (PoE) Statement
This equipment must be connected to PoE networks without routing
to the outside plant.
Taiwan Low Power Radio Waves Radiated Devices Statement
802.11b/802.11g/BT:
Article 12 — Without permission granted by the NCC, any company,
enterprise, or user is not allowed to change frequency, enhance
transmitting power or alter original characteristic as well as
performance to an approved low power radio-frequency devices.
Article 14 — The low power radio-frequency devices shall not
influence aircraft security and interfere legal communications; If
found, the user shall cease operating immediately until no
interference is achieved. The said legal communications means radio
communications is operated in compliance with the
Telecommunications Act. The low power radio-frequency devices
must be susceptible with the interference from legal communications
or ISM radio wave radiated devices.
低功率電波輻射性電機管理辦法
第十二條 經型式認證合格之低功率射頻電機,非經許可,公司、商號
或使用者均不得擅自變更頻率、加大功率或變更原設計之特性及功
能。
第十四條 低功率射頻電機之使用不得影響飛航安全及干擾合法通信;
經發現有干擾現象時,應立即停用,並改善至無干擾時方得繼續使
用。前項合法通信,指依電信法規定作業之無線電通信。低功率射頻
電機須忍受合法通信或工業、科學及醫療用電波輻射性電機設備之干
擾。
U.S. Federal Communications Commission (FCC) Statements
Compliance Statement
Page 5

The changes or modifications not expressly approved by the party
responsible for compliance could void the user’s authority to operate
the equipment.
To comply with the FCC RF exposure compliance requirements, this
device and its antenna must not be co-located or operating to
conjunction with any other antenna or transmitter.
This device complies with part 15 of the FCC Rules. Operation is
subject to the following two conditions:
1. This device may not cause harmful interference, and
2. This device must accept any interference received,
including interferences that may cause undesired
operation.
Class B Part 15 Statement
This equipment has been tested and found to comply with the limits
for a Class B digital device, pursuant to Part 15 of the FCC Rules.
These limits are designated to provide reasonable protection against
harmful interferences in a residential installation. This equipment
generates, uses and can radiate radio frequency energy and, if not
installed and used in accordance with the instructions, may cause
harmful interference to radio communications. However, there is no
guarantee that interference will not occur in a particular installation. If
this equipment does cause harmful interferences to radio or
television reception, which can be determined by turning the
equipment off and on, the user is encouraged to try to correct the
interference by one or more of the following measures:
• Reorient or relocate the receiving antenna.
• Increase the separation between the equipment and receiver.
• Connect the equipment into an outlet on a circuit different from
that to which the receiver is connected.
• Consult the dealer or an experienced radio/TV technician for
help.
Radiation Exposure Statement
This equipment complies with FCC radiation exposure limits set forth
for an uncontrolled environment . This equipment should be installed
and operated with minimum distance of 8 in or 20 cm between the
radiator and your body. This transmitter must not be co-located or
operating in conjunction with any other antenna or transmitter.
• Keep the device away from benzene, diluents, and other
chemicals.
Trademarks
The trademarks, logos and service marks (“Marks”) displayed in this
site, the Documentation, Hosted Service(s), and product(s) provided
by Avaya are the registered or unregistered Marks of Avaya, its
affiliates, its licensors, its suppliers, or other third parties. Users are
not permitted to use such Marks without prior written consent from
Avaya or such third party which may own the Mark. Nothing
contained in this site, the Documentation, Hosted Service(s) and
product(s) should be construed as granting, by implication, estoppel,
or otherwise, any license or right in and to the Marks without the
express written permission of Avaya or the applicable third party.
Avaya is a registered trademark of Avaya Inc.
All non-Avaya trademarks are the property of their respective owners.
Linux® is the registered trademark of Linus Torvalds in the U.S. and
other countries.
Device Usage Consent
By using the Avaya device you agree that Avaya, from time to time,
may collect network and device data from your device and may use
such data in order to validate your eligibility to use the device.
EU Countries
This device when installed complies with the essential requirements
and other relevant provisions of EMC DirectiveButt 2014/30/EU and
LVD Directive 2014/35/EU. A copy of the Declaration may be
obtained from
Meridian Parkway Suite 200. Durham, NC 27713 USA.
WiFi transmitter
Frequencies for 2412-2472 MHz, transmit power: 10 dBm
General Safety Warning
• Use only the Avaya approved Limited Power Source power
• Ensure that you:
• Do not push objects into holes and ventilation slots of the
• Do not place a naked flame source, such as lighted candles,
• Do not intentionally hit the device or place heavy or sharp
• Do not attempt to repair the device yourself. Always use a
https://support.avaya.com or Avaya Inc., 2605
supplies specified for this product.
- Do not operate the device near water.
- Do not use the device during a lightning storm.
- Do not report a gas leak while in the vicinity of the leak.
- For Accessory Power Supply – Use Only Limited Power
Supply and products that conform to Radio Equipment
Directive, EU directive 2014/53/EU.
device.
on or near the device.
objects on the device.
qualified service agent to perform adjustments and repairs.
Page 6

Contents
Chapter 1: Introduction............................................................................................................ 9
Purpose.................................................................................................................................. 9
Change history........................................................................................................................ 9
Chapter 2: Overview............................................................................................................... 11
Phone overview..................................................................................................................... 11
Safety guidelines................................................................................................................... 11
Physical layout...................................................................................................................... 13
Connection layout.................................................................................................................. 14
Dimensions........................................................................................................................... 14
Icons.................................................................................................................................... 15
LED status indicators............................................................................................................. 18
Specifications........................................................................................................................ 18
Sleep mode.......................................................................................................................... 19
Chapter 3: Telephony operations.......................................................................................... 21
Regular phone calls............................................................................................................... 21
Making a call................................................................................................................... 21
Answering a call.............................................................................................................. 22
Answering a call while on another call............................................................................... 22
Muting and unmuting the microphone during a call............................................................. 22
Placing a call on hold....................................................................................................... 23
Redialing a number......................................................................................................... 23
Conference calls................................................................................................................... 24
Setting up a conference call............................................................................................. 24
Adding a participant to a conference call........................................................................... 25
Placing a participant of a conference call on hold............................................................... 25
Talking to a participant of a conference call privately.......................................................... 26
Dropping a participant from a conference call.................................................................... 26
Splitting a conference call................................................................................................ 26
Bluetooth calls...................................................................................................................... 27
Handling incoming Bluetooth calls.................................................................................... 28
Handling outgoing Bluetooth calls..................................................................................... 28
Phone book.......................................................................................................................... 29
Searching for a contact.................................................................................................... 29
Making a call to a contact................................................................................................. 30
Viewing a contact card..................................................................................................... 30
Call transfer.......................................................................................................................... 31
Making an attended transfer............................................................................................. 31
Making an unattended call............................................................................................... 32
Caller information presentation............................................................................................... 33
February 2021 Using Avaya Conference Phone B199 6
Comments on this document? infodev@avaya.com
Page 7

Contents
Chapter 4: Settings configuration and management.......................................................... 34
Configuration of Avaya Conference Phone B199...................................................................... 34
Viewing the IP address.................................................................................................... 34
Setting the password for Avaya Conference Phone B199................................................... 35
Changing the password................................................................................................... 35
Logging in to the web interface of Avaya Conference Phone B199...................................... 36
Logging out from Avaya Conference Phone B199.............................................................. 36
Configuration of the basic settings.......................................................................................... 37
Configuring the phone settings on the phone..................................................................... 37
Configuring the settings through the web interface............................................................. 38
Phone settings description............................................................................................... 38
Daylight Saving Time....................................................................................................... 45
Configuring Daylight Saving Time through the web interface............................................... 45
Configuring the minute offset through the web interface...................................................... 46
Time format.................................................................................................................... 46
Chapter 5: Connectivity.......................................................................................................... 47
Connection to other devices................................................................................................... 47
USB cable connection........................................................................................................... 47
Connection to a personal computer or a deskphone........................................................... 47
Connecting to a personal computer or a deskphone........................................................... 47
Managing VoIP calls through a PC.................................................................................... 48
Bluetooth connection............................................................................................................. 48
Pairing and connecting Bluetooth devices......................................................................... 49
Connection between paired Bluetooth devices................................................................... 50
Disconnecting Bluetooth devices...................................................................................... 51
Removing Bluetooth pairing............................................................................................. 51
Bridge connection.................................................................................................................. 52
Chapter 6: Phone management application......................................................................... 53
Avaya® Conference Assistant................................................................................................. 53
Pairing and connecting devices........................................................................................ 53
Disconnecting devices..................................................................................................... 54
Deleting pairing............................................................................................................... 55
Checking the calendar and scheduled events.................................................................... 56
Participating in a conference call from the calendar............................................................ 56
Starting an unscheduled call............................................................................................ 57
Managing contacts.......................................................................................................... 57
Configuring the Avaya® Conference Assistant settings....................................................... 58
Avaya® Conference Assistant settings............................................................................... 58
Chapter 7: Features and accessories................................................................................... 60
Expansion of the phone coverage........................................................................................... 60
Arranging a daisy chain................................................................................................... 61
Defining the mode of the phone........................................................................................ 61
Disabling the daisy chain mode........................................................................................ 62
February 2021 Using Avaya Conference Phone B199 7
Comments on this document? infodev@avaya.com
Page 8

Contents
Expansion microphone firmware upgrade................................................................................ 63
Upgrading expansion microphone firmware....................................................................... 63
Upgrading two expansion microphones............................................................................. 64
Terminating expansion microphone upgrade...................................................................... 65
Upgrading Smart Expansion Microphone manually............................................................ 66
Chapter 8: Maintenance......................................................................................................... 67
Device status........................................................................................................................ 67
Viewing the phone status................................................................................................. 68
Licenses............................................................................................................................... 69
Viewing licenses.............................................................................................................. 70
Chapter 9: Related resources................................................................................................ 71
Documentation...................................................................................................................... 71
Finding documents on the Avaya Support website............................................................. 72
Support................................................................................................................................ 72
Using the Avaya InSite Knowledge Base........................................................................... 72
Viewing Avaya Mentor videos........................................................................................... 73
February 2021 Using Avaya Conference Phone B199 8
Comments on this document? infodev@avaya.com
Page 9
Chapter 1: Introduction
Purpose
This document describes the procedures for using Avaya Conference Phone B199 and is intended
for the end users.
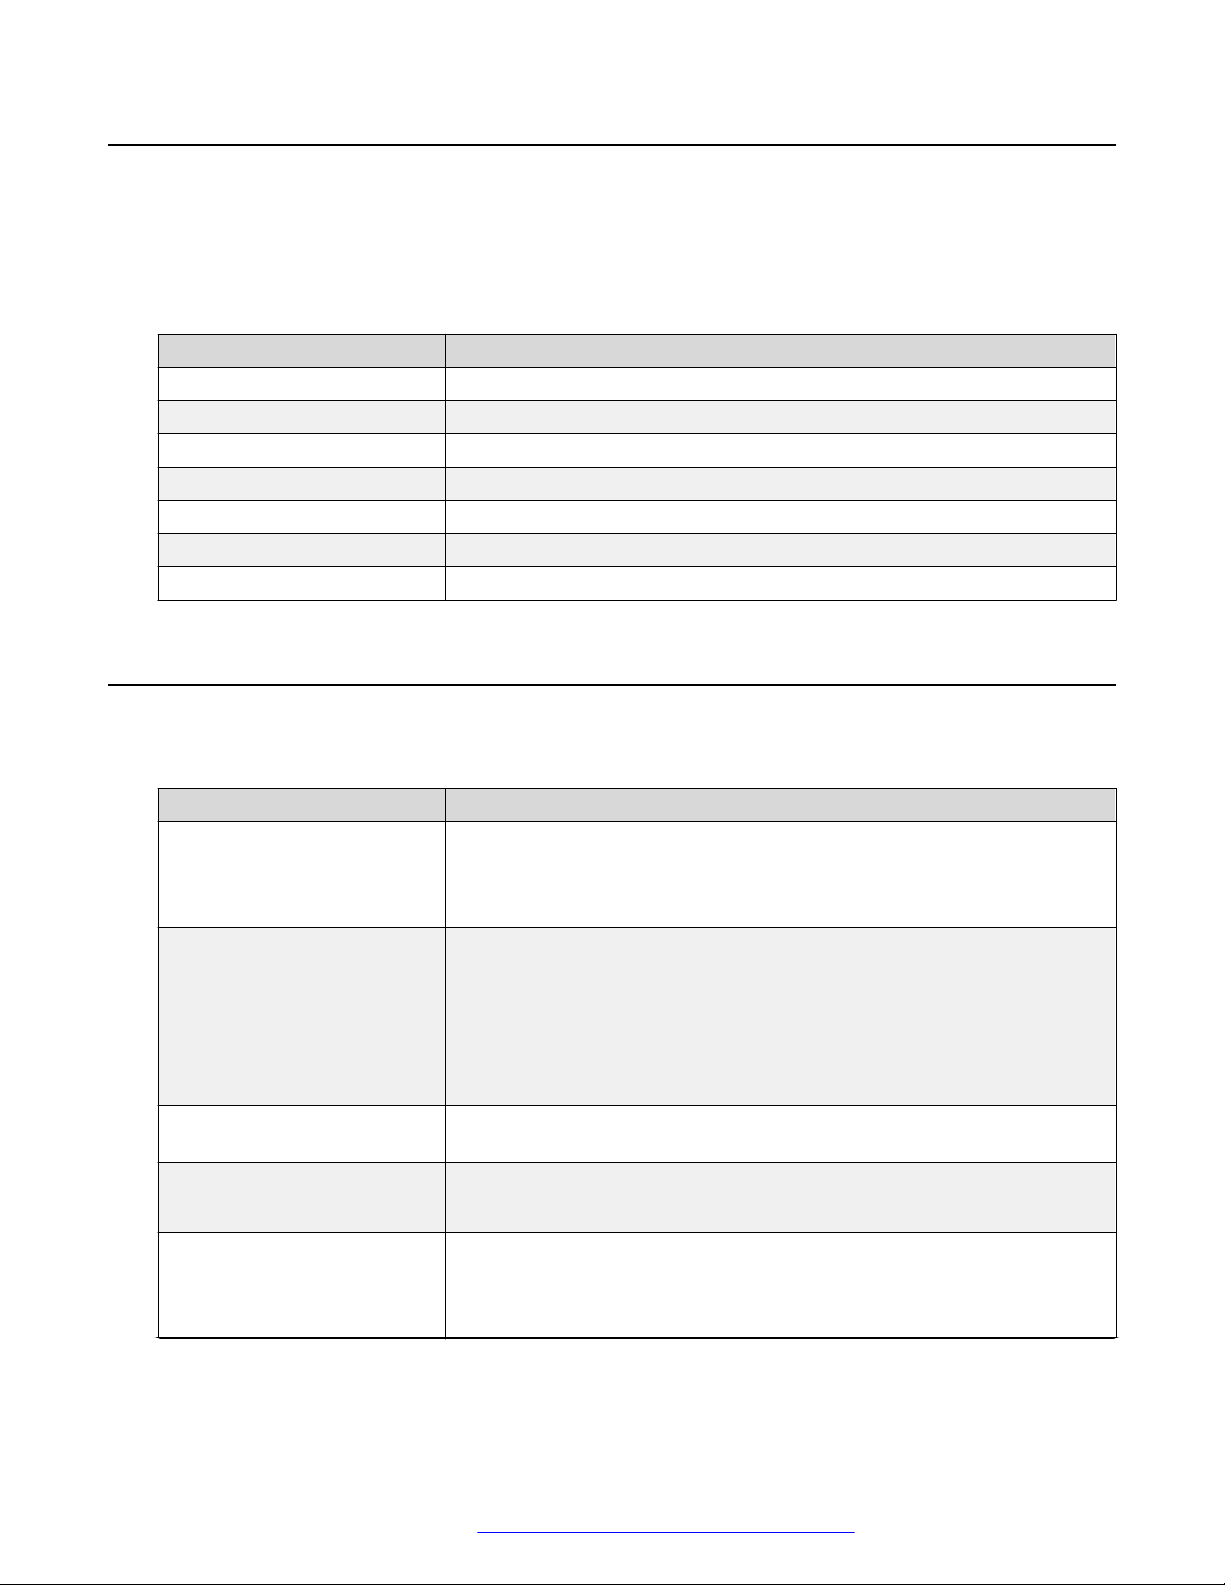
Change history
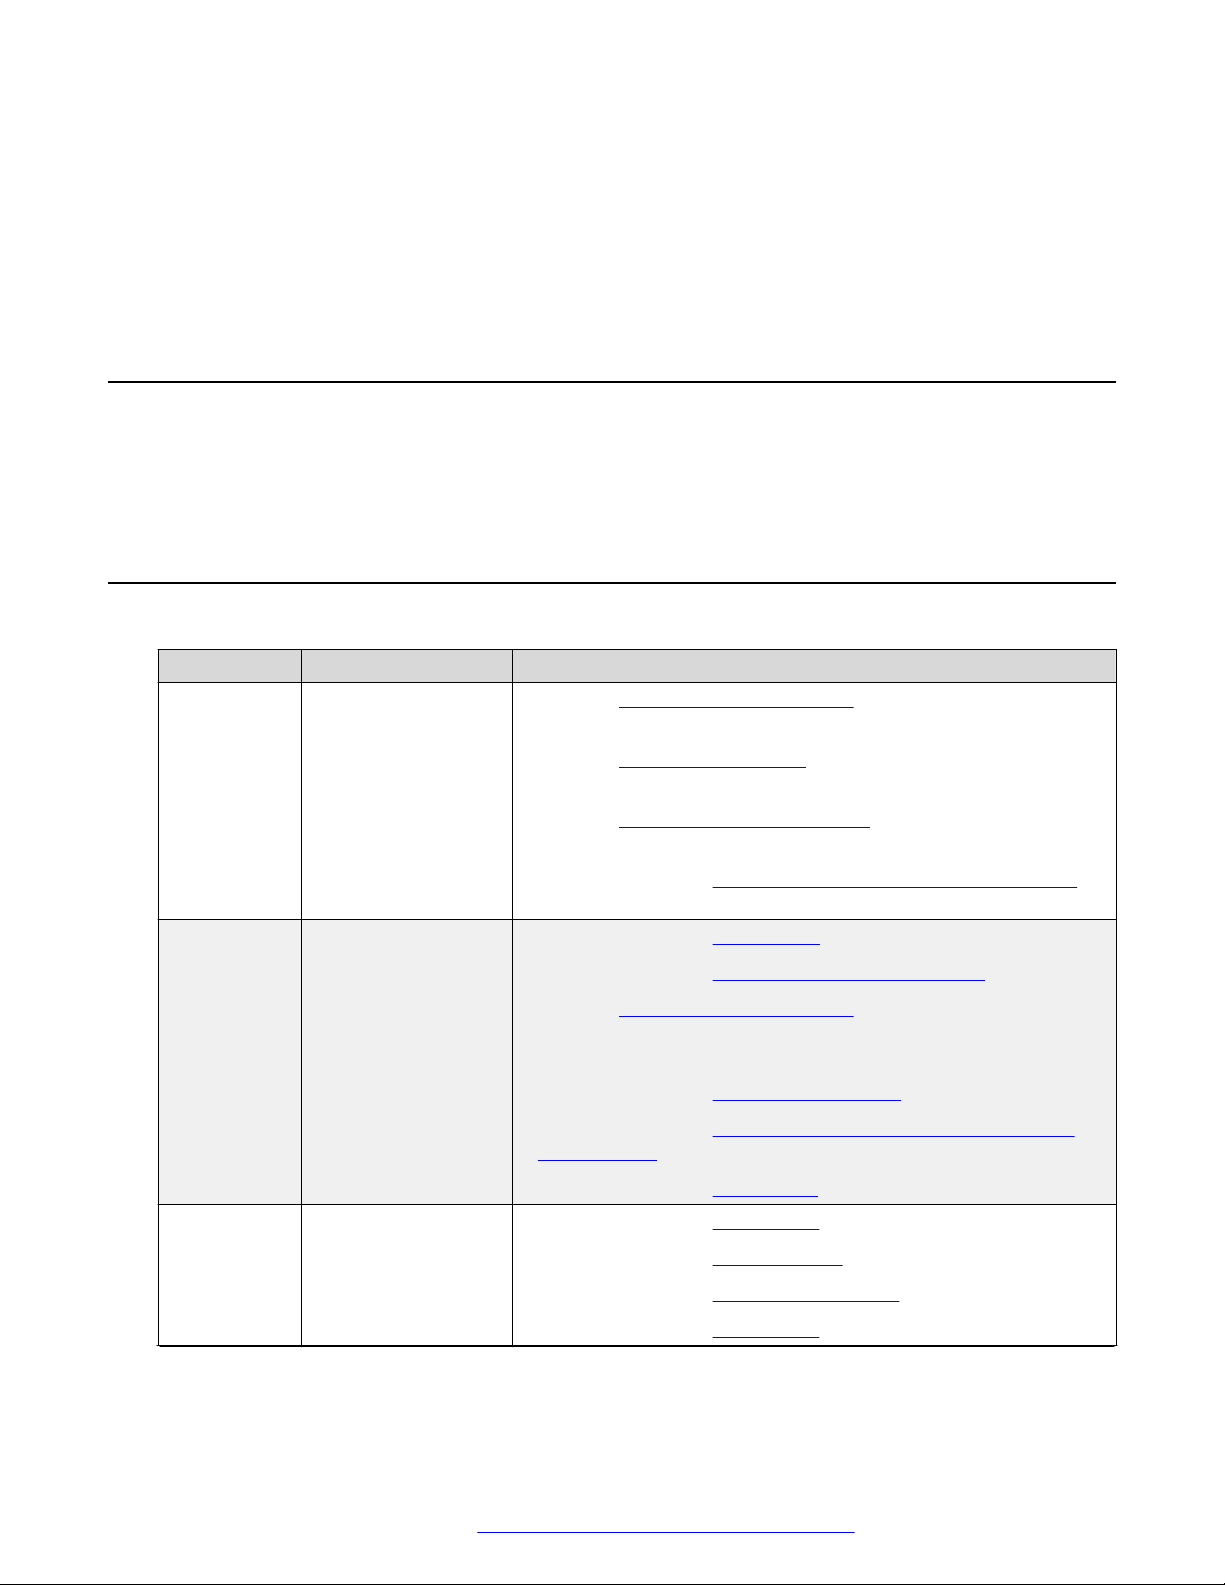
Issue Date Summary of changes
Release 1.0.4 February 2021 • Updated Phone settings description on page 38 with the Allow
Legacy Encryption settings.
• Updated Bluetooth connection on page 48 with information on
switching between the Bluetooth modes.
• Updated Avaya Conference Assistant on page 53 in line with
the change in MD5 usage.
• Added new section Expansion microphone firmware upgrade on
page 63.
Release 1.0.3 October 2020 • Added new section Call transfer on page 31.
• Added new section Caller information presentation on page 33.
• Updated Phone settings description on page 38 with the date,
date format, time, time format, Daylight Saving Time (DST)
mode, timezone and Custom DST settings.
• Added new section Daylight Saving Time on page 45.
• Added new section Configuring the minute offset through the
web interface on page 46.
• Added new section Time format on page 46.
Release 1.0.2 August 2020 • Added new section Sleep mode on page 19.
• Added new section Bluetooth calls on page 27.
• Added new section Bluetooth connection on page 48.
• Added new section Phone book on page 29.
Table continues…
February 2021 Using Avaya Conference Phone B199 9
Comments on this document? infodev@avaya.com
Page 10
Introduction
Issue Date Summary of changes
Release 1.0.1 March 2020 • Updated Logging in to the web interface of Avaya Conference
Phone B199 on page 36 with the supported browser and
communication protocol.
• Updated Phone settings description on page 38 with key tone
functionality.
• Added Disabling the daisy chain mode on page 62.
• Added Upgrading Smart Expansion Microphone manually on
page 66.
February 2021 Using Avaya Conference Phone B199 10
Comments on this document? infodev@avaya.com
Page 11

Chapter 2: Overview
Phone overview
Avaya Conference Phone B199 is a SIP conference phone that you can use to make calls and
hold conferences with a great audio quality. It provides an improved user experience and ensures
an easier connection to audio conference bridges. The phone is based on a multi-connectivity
platform to leverage the “Bring your own device” approach.
The features of the conference phone include a simple-to-use 4.3 inch graphical LCD with a
backlight and volume control and mute buttons. Two more mute key buttons are located along the
perimeter of the device. You can attach additional expansion microphones or cascade three B199
devices in a daisy chain to expand the audio distribution and pickup in the room.
B199 Conference Phone is supported in the Avaya network through the Avaya Aura
communication solutions and IP Office.
®
Safety guidelines
Ensure that you are familiar with the following safety guidelines before using, installing,
configuring, and administering Avaya Conference Phone B199.
Note:
This conference phone is not designed for making emergency telephone calls when the power
fails. Make alternative arrangements for access to emergency services.
• Read, understand, and follow all the instructions.
• Do not place this phone on an unstable cart, stand, or table. If the phone falls, serious
damages can be caused to the device.
• Do not drop, knock, or shake the phone. Rough handling can break internal circuit boards.
• Ensure that the power cord or plug is not damaged.
• Do not overload wall outlets and extension cords as this can result in the risk of fire or electric
shock.
• Avoid wetting the device to prevent fire or electrical shock hazard.
February 2021 Using Avaya Conference Phone B199 11
Comments on this document? infodev@avaya.com
Page 12

Overview
• Unplug the device from the wall outlet before cleaning. Do not use liquid or aerosol cleaners,
harsh chemicals, cleaning solvents, or strong detergents to clean the device. Use a damp
cloth for cleaning.
• Avoid exposing the phone to high temperatures above 40°C (104°F), low temperatures below
0°C (32°F), or high humidity.
• Do not block or cover slots and openings of the phone. These openings are provided for
ventilation, to protect the phone from overheating.
• Never push objects of any kind into this phone through cabinet slots as they might touch
dangerous voltage points or short out parts that could result in a risk of fire or electric shock.
• Do not disassemble this product to reduce the risk of electric shock. Opening or removing
covers may expose you to dangerous voltages or other risks. Incorrect reassembly can
cause electric shock during subsequent use.
• Do not use the phone to report a gas leak in the vicinity of the leak.
• Do not use the phone near intensive care medical equipment or close to persons with
pacemakers.
• Do not place the phone too close to electrical equipment such as answering machines, TV
sets, radios, computers, and microwave ovens to avoid interference.
Important:
In case B199 Conference Phone and the corresponding accessories are damaged, the device
does not operate normally or exhibits a distinct change in performance, refer for servicing to
the qualified service personnel.
February 2021 Using Avaya Conference Phone B199 12
Comments on this document? infodev@avaya.com
Page 13
Physical layout
1
2
4
3
6
5
6
6
1
1
Physical layout
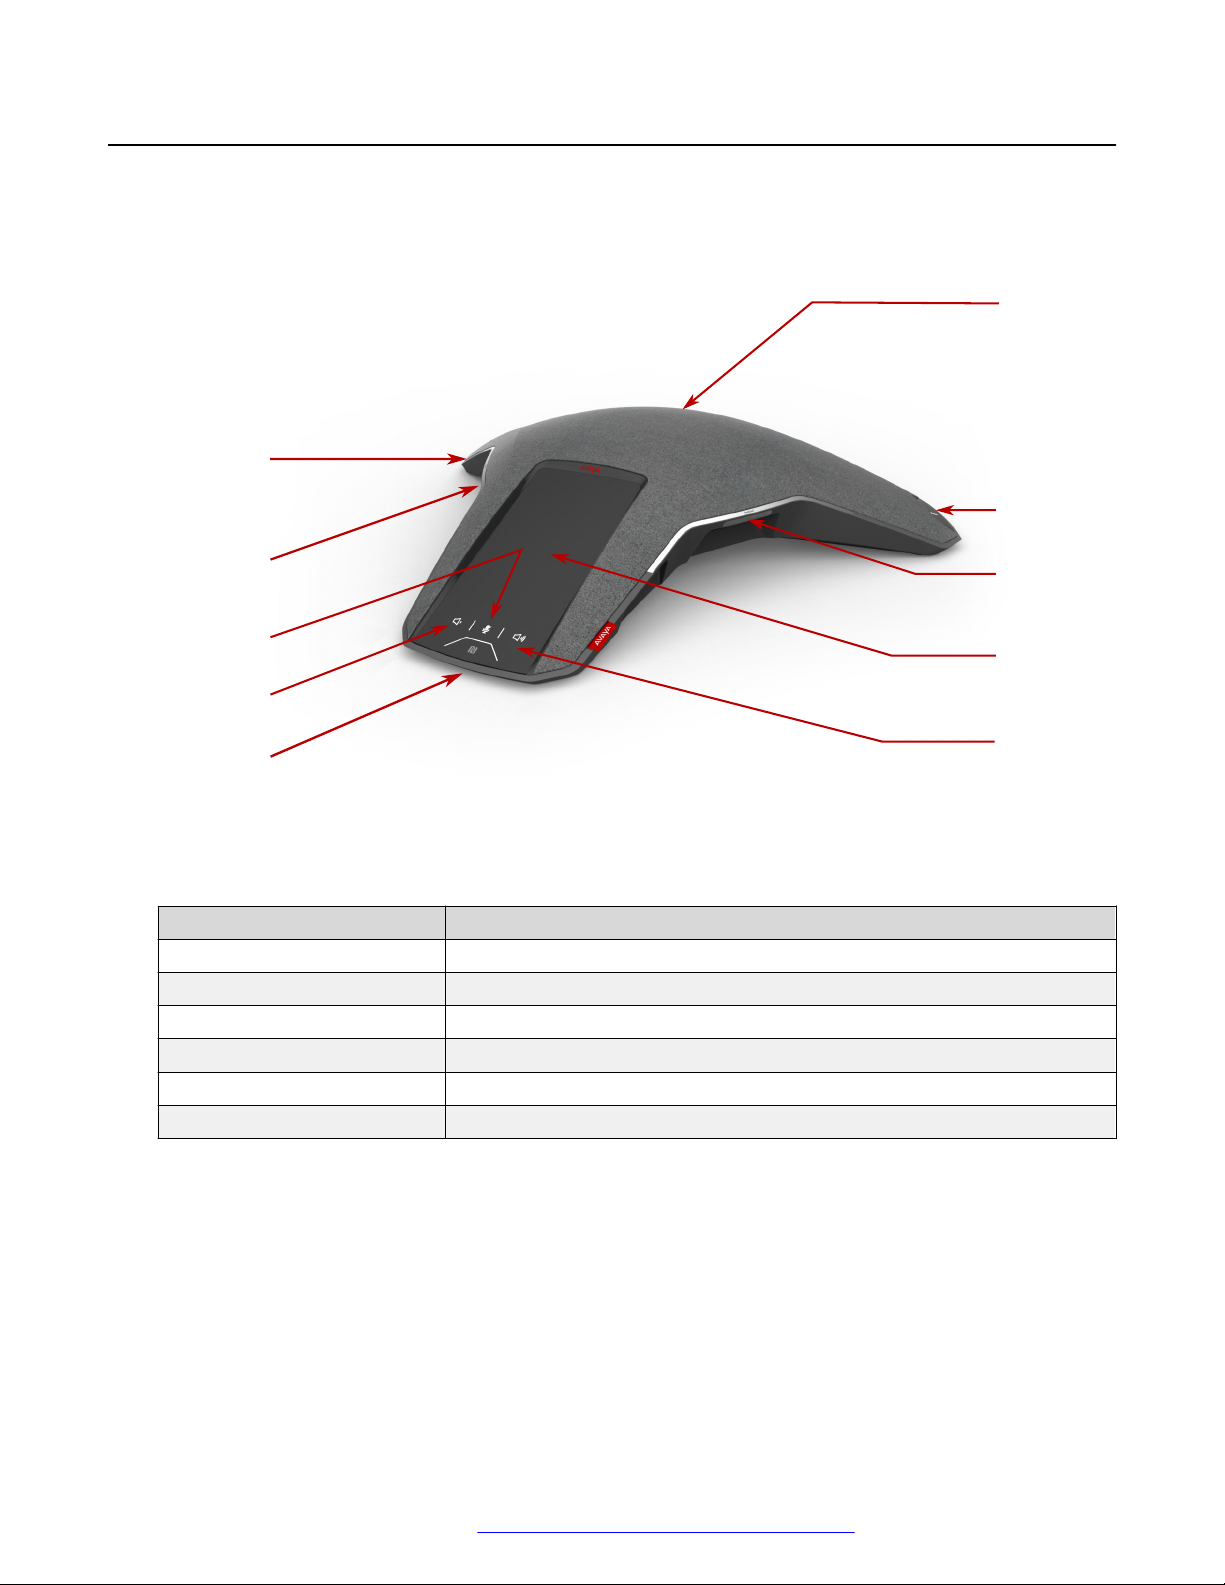
Figure 1: Front view of Avaya Conference Phone B199
The following table lists the buttons and the other elements of Avaya Conference Phone B199.
Callout number
1 Mute buttons
2 Volume down button
3 Volume up button
4 NFC tag
5 Touch screen
6 LED status indicators
Description
February 2021 Using Avaya Conference Phone B199 13
Comments on this document? infodev@avaya.com
Page 14
Overview
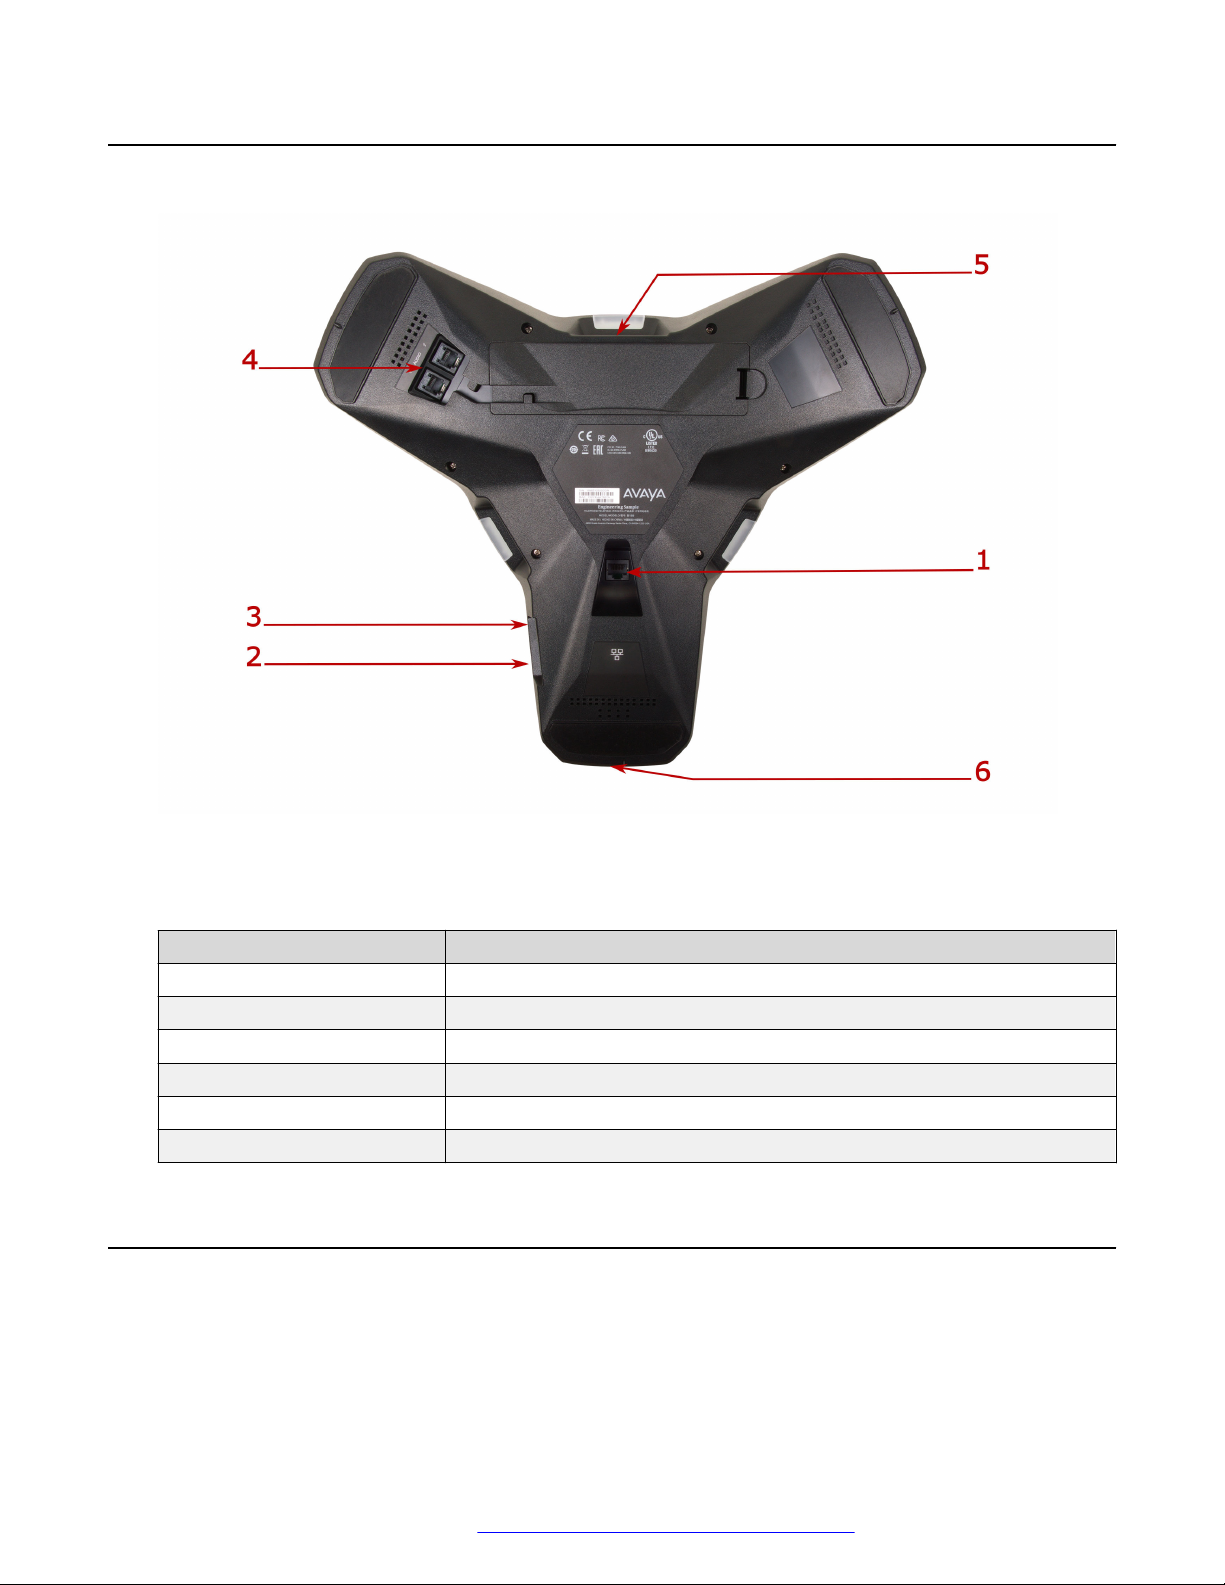
Connection layout
Figure 2: Connection layout of Avaya Conference Phone B199
The following table lists the sockets and ports available on Avaya Conference Phone B199 for
connection.
Callout number
1 PoE/Ethernet connection socket
2 USB Type A
3 Micro-USB Type B
4 Audio expansion ports
5 Kensington® security lock port
6 NFC tag for Bluetooth
Description
Dimensions
The following table shows the dimensions of Avaya Conference Phone B199.
February 2021 Using Avaya Conference Phone B199 14
Comments on this document? infodev@avaya.com
Page 15
Parameter Dimension
Width 326.41 mm
Length 369.87 mm
Height 74.7 mm
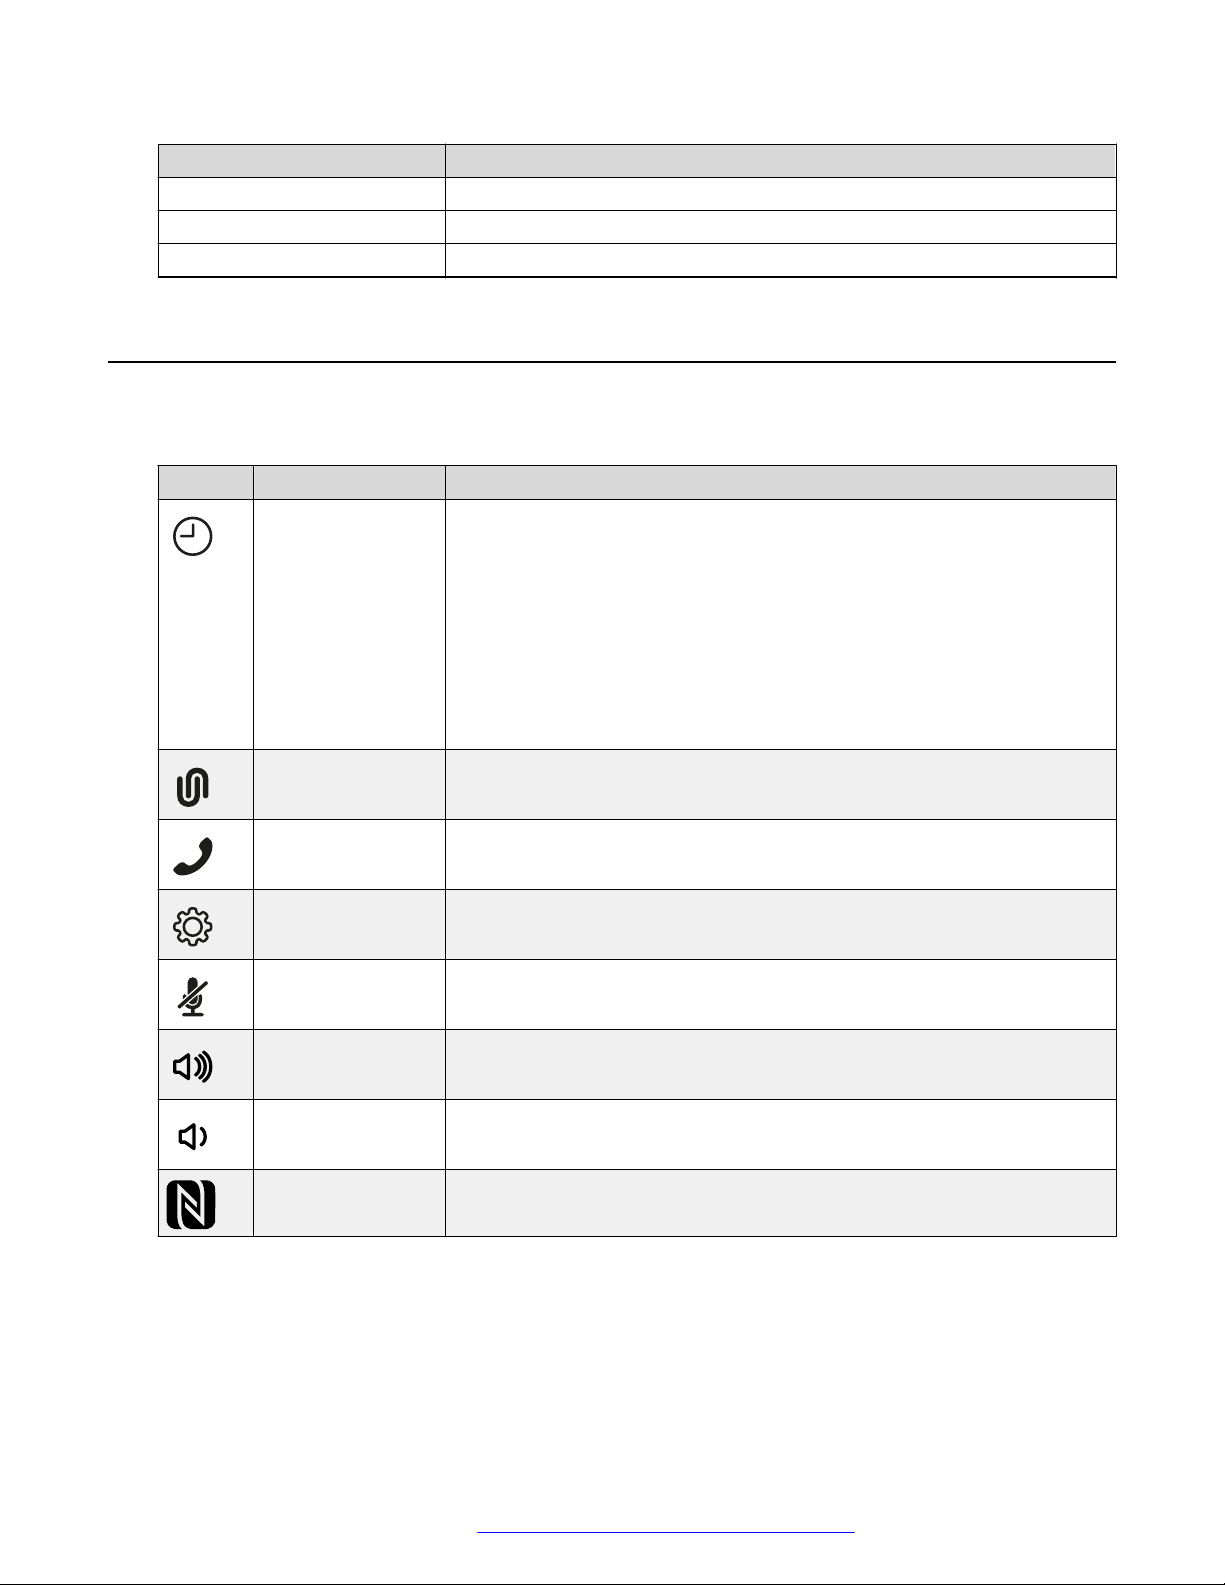
Icons
Icons on the home screen of Avaya Conference Phone B199
Icon Name Description
Recent To check the call list. The phone provides the following information about
the calls:
• Number. View the phone number of the contact.
• Date. View the information when the phone received the call. This
applies only to the calls preceding the current day.
Icons
• Time. For the current day, the phone shows the time of the call in the
convenient time format.
• Direction. View the incoming, outgoing and missed calls.
Conference
Assistant
Call To dial phone numbers and codes for telephone operations or Avaya
Settings To check and configure the settings from the phone. View the phone
Microphone Muted To mute and unmute the phone.
Volume Up To increase the phone volume level.
Volume Down To decrease the phone volume level.
NFC To indicate the built-in NFC tag.
To access the Avaya® Conference Assistant settings.
Conference Assistant connection.
status and reach the menu.
®
February 2021 Using Avaya Conference Phone B199 15
Comments on this document? infodev@avaya.com
Page 16
Overview
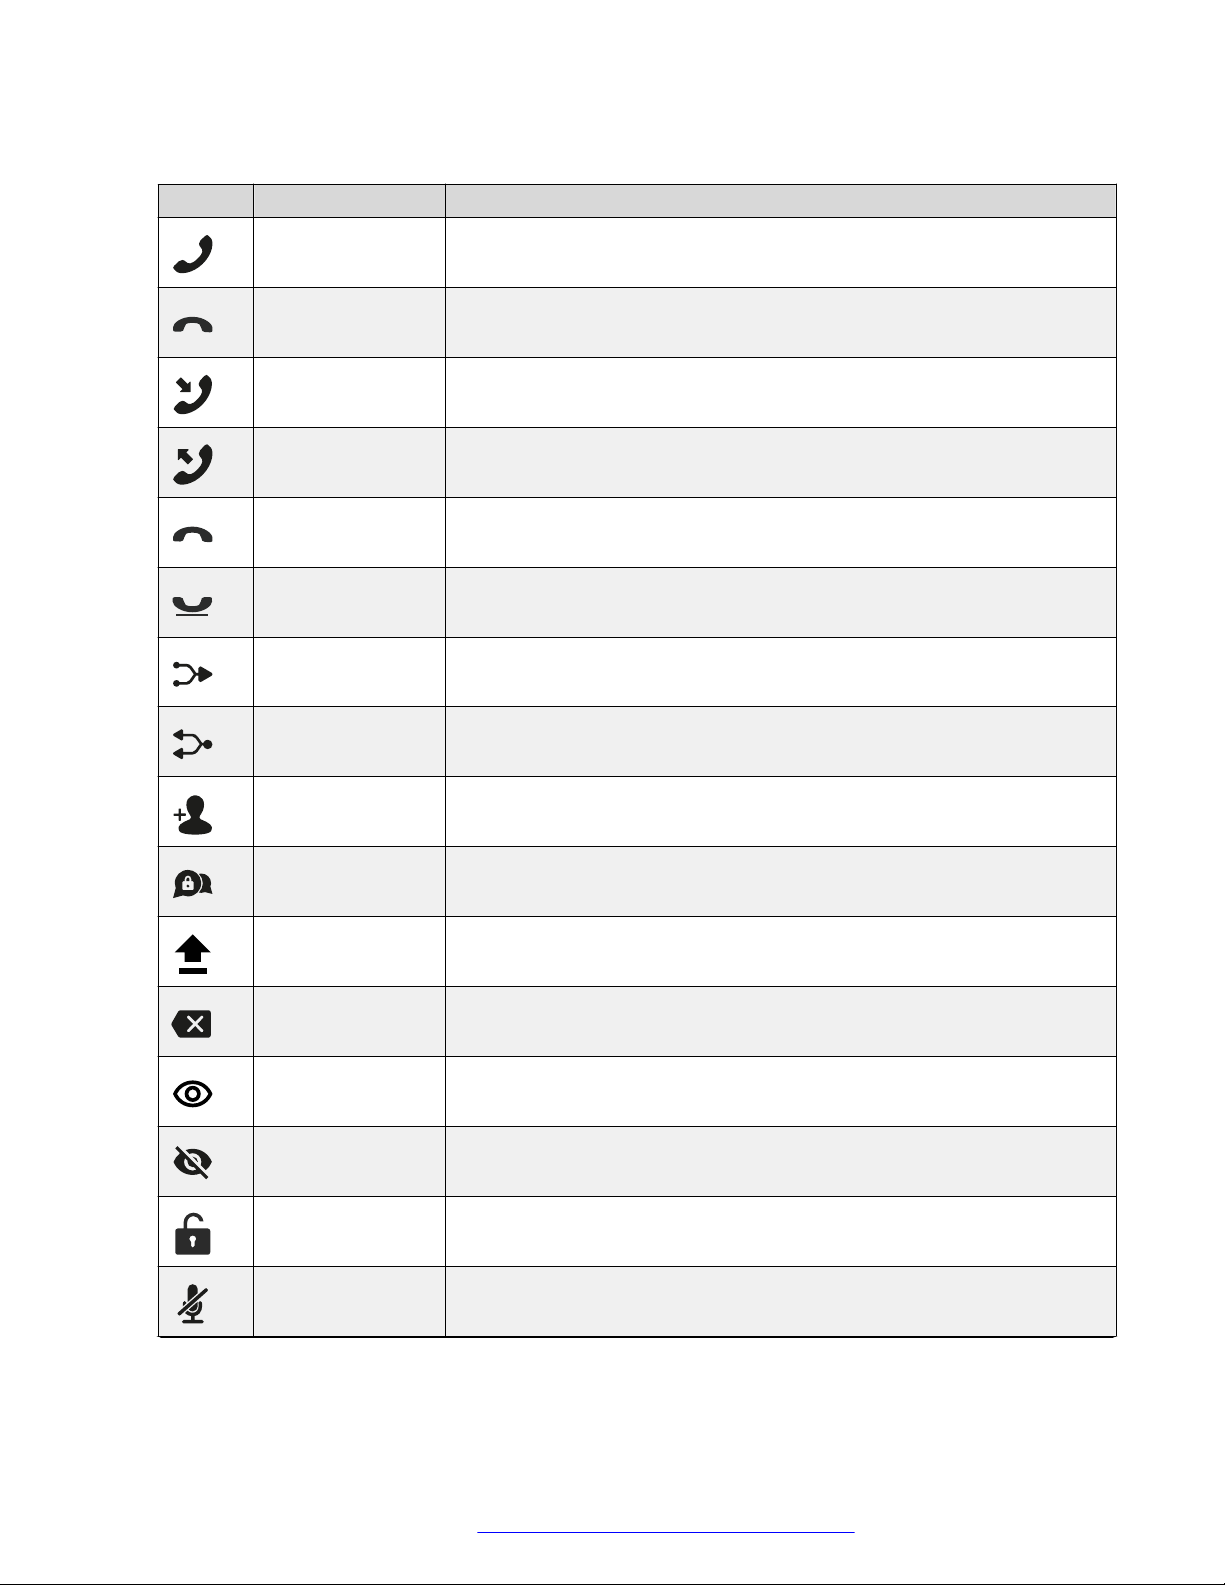
Other icons of B199 Conference Phone
Icon Name Description
Make Call or
Answer
Hang Up To indicate the phone on-hook status and end a call.
Incoming To show an incoming call.
Outgoing To show an outgoing call.
Missed To indicate a missed call.
Hold or On Hold To put a call on hold or to indicate that a call is on hold.
Conference To arrange a conference call.
To indicate the phone off-hook status and answer an incoming call.
Split To split a conference call into several separate calls.
Add Participant To add a participant to a conference call.
Talk Private To arrange a private discussion with a participant of a conference call.
Caps To type in capital letters.
Delete To delete an unneeded number or letter.
Visibility To mark whether the characters must stay visible to the user, for example,
when logging in with the password.
Invisibility To mark whether the characters must stay invisible to the user, for
example, when logging in with the password.
Logged In To indicate that the user logged in as the administrator.
Microphone Muted To indicate that the phone is in muted state.
Table continues…
February 2021 Using Avaya Conference Phone B199 16
Comments on this document? infodev@avaya.com
Page 17

Icon Name Description
Enter To confirm the input of information.
Confirm To confirm the information.
Reject To discard the information.
Arrow Down To move to the sections below.
Arrow Up To move to the sections above.
Arrow Left To return to the previous page.
Arrow Right To move to subsections of a section.
Icons
USB Connected To indicate an active USB connection.
Avaya® Conference
To show the connection of the phone to Avaya® Conference Assistant.
Assistant
connected
Daisy Chain Mode To indicate that the phone is in a daisy chain mode.
Loading To show that the phone is loading the new version of the firmware or new
setting from DES server.
DES warning icon To notify the user of issues which occurred during the automatic
provisioning process performed using Device Enrollment Services.
Contacts To show that the LDAP external phone book is available.
Bluetooth
To indicate an active Bluetooth Classic connection.
connection
Call Transfer To show that it is possible to transfer an ongoing call to another contact
person.
February 2021 Using Avaya Conference Phone B199 17
Comments on this document? infodev@avaya.com
Page 18
Overview
LED status indicators
The LEDs on the phone indicate the status of a call, such as an incoming call, a call on hold, or a
call on mute, or the status of the phone. The LEDs emit bright red, green, and blue colors that are
visible over a distance to draw your attention to the phone status as required.
You can also press the status indicator LEDs to mute and unmute the phone.
LED color Description
Steady red Microphones are on mute.
Flashing red A call is on hold. Microphones and the speaker are turned off.
Steady green A call is in progress.
Flashing green An incoming call is ringing.
Steady blue Active Bluetooth connection.
Flashing blue The phone is in Bluetooth pairing mode.
LEDs off The phone is inactive.
Specifications
The following table lists the specifications that Avaya Conference Phone B199 supports:
Name
Power • PoE 802.3af
Connectivity • Ethernet RJ45 10/100/1000 Mbps, PoE 802.3af, and PoE 802.3at
Screen Graphical touch screen with a resolution of approximately 480 x 800 and
Acoustics • 3 symmetrically placed MEMS microphones
Music • PoE 802.3at: 91 dB and bass boost
Description
• PoE 802.3at
• PoE injector available as an accessory
• USB 3.0 device
• Built-in Bluetooth LE and NFC
• Bluetooth Classic
• Daisy Chain (audio) ports (6-pin RJ-type)
size of 4.3”
• Full range speaker in the sealed enclosure
• PoE 802.3af: 87 dB
• Daisy Chain: 91 dB
Table continues…
February 2021 Using Avaya Conference Phone B199 18
Comments on this document? infodev@avaya.com
Page 19
Sleep mode
Name Description
Speech • PoE 802.3at: 91 dB
• PoE 802.3af: 87 dB
• Daisy Chain: 91 dB
USB Micro USB 3.0 device Type B
Bluetooth • Bluetooth LE
• Bluetooth Classic
Accessories You can additionally purchase the following accessories:
• Avaya PoE kit
• Avaya Smart Microphones
• Avaya Daisy Chain kit
User interface • Simplified user interface
• Functional keypad and dial pad
• LED indicators for call and connectivity status
Mobile app Avaya® Conference Assistant. With the app, you can access your mobile
phone contact book and calendar. The app is available for free at
AppStore and Google Play
Operation environment • Avaya Aura
®
• IP Office
Interoperability with PBX and
platforms
• Broadsoft
• Zang Office
• Ring Central
Sleep mode
B199 Conference Phone supports the sleep mode feature, which saves power by turning the
screen off after a specified period of inactivity. By default, the sleep mode is in disabled state. The
phone administrator can enable the sleep mode and configure the time-out value.
The phone wakes up from the sleep mode when you do any of the following:
• Touch the screen
• Connect or disconnect the USB cable
• Connect or disconnect a daisy chain Slave device
• Connect or disconnect the Bluetooth Classic
The phone also wakes up from the sleep mode in case of screen activity, such as an incoming
call, Avaya® Conference Assistant connection, or error prompts.
February 2021 Using Avaya Conference Phone B199 19
Comments on this document? infodev@avaya.com
Page 20

Overview
The phone cannot enter the sleep mode during an active call or when it is in the music streaming
mode.
February 2021 Using Avaya Conference Phone B199 20
Comments on this document? infodev@avaya.com
Page 21

Chapter 3: Telephony operations
Regular phone calls
You can make and manage regular phone calls with Avaya Conference Phone B199. Regular call
is a traditional telephony option when two persons are speaking over the phone.
B199 Conference Phone supports the following regular phone call operations:
• Making a call
• Answering a call
• Answering a call while on another call
• Muting the phone during a call
• Placing the call on hold
• Redialing a number
You can use the volume control buttons on the phone to adjust the volume during a call.
Making a call
About this task
Use this procedure to make a call with Avaya Conference Phone B199.
Procedure
1. On the phone screen, tap the Call icon.
The Dialpad view opens.
2. Use the dial pad to dial the number you want to call.
3. (Optional) To edit a dialed number, tap the Delete icon.
4. Tap the Make Call icon.
The phone starts dialing the number. The LEDs show a steady green light. When the other
person answers, you can see the duration of the call on the screen.
If the other person discards your call, the phone shows you the following message: User
busy.
February 2021 Using Avaya Conference Phone B199 21
Comments on this document? infodev@avaya.com
Page 22

Telephony operations
Answering a call
About this task
Use this procedure to answer an incoming call. When there is an incoming call, the phone plays a
ringtone, the green LED starts flashing, and the phone displays the number of the calling person
on the screen.
Procedure
1. On the phone screen, tap the Answer icon.
When you answer the call, the phone displays the timer to control the duration of the call,
the phone number or the name of the caller or both. If the caller information is unavailable,
the phone displays Unknown.
2. To end an ongoing call, tap the Hang Up icon.
Answering a call while on another call
About this task
Use this procedure to answer an incoming call when you are on a call without dropping the first
call. When there is a second incoming call, the phone shows the caller’s number and the green
LED starts flashing.
Procedure
1. On the phone screen, tap one of the following:
a. Answer: To answer the second call, and put the first call on hold.
b. Hang Up: To ignore the second call, and continue the first call.
2. Go on with the call.
B199 Conference Phone stops ringing.
Muting and unmuting the microphone during a call
About this task
Use this procedure to mute the microphone during a call.
Before you begin
Start a call.
Procedure
1. On the phone, tap the Microphone Muted icon.
February 2021 Using Avaya Conference Phone B199 22
Comments on this document? infodev@avaya.com
Page 23

The LED color changes from green to red. The other participant cannot hear what you are
saying.
2. To unmute the microphone, tap the Microphone Muted icon again.
Placing a call on hold
About this task
Use this procedure to place an active call on hold and then resume the call.
Before you begin
Start a call.
Procedure
1. On the phone screen, tap the On Hold icon.
The LED starts flashing red indicating that the call is placed on hold.
2. Tap the On Hold icon again.
Regular phone calls
The LEDs turn green indicating that the call is active again.
3. To end an ongoing call, tap the Hang Up icon.
Redialing a number
About this task
Use this procedure to redial the number from your call list.
Procedure
1. On the phone screen, tap the Recent icon.
The phone displays the list of the last incoming, outgoing and missed calls.
2. Scroll through the list and select the number you want to call.
The phone displays the following information about the call:
• Number
• Date or time
• Direction
3. Tap the Make Call icon to redial the number.
The phone dials the selected number.
February 2021 Using Avaya Conference Phone B199 23
Comments on this document? infodev@avaya.com
Page 24

Telephony operations
Conference calls
You can make and manage conference calls with Avaya Conference Phone B199. Conference call
is a telephony option when at least three persons are speaking over the phone.
Note:
These conference calls are conference calls generated by B199 Conference Phone (the builtin audio conference bridge).
B199 Conference Phone supports the following conference call operations:
• Setting up a conference call
• Adding participants to a conference call
• Putting a participant of a conference call on hold
• Talking to a participant of a conference call privately
• Splitting a conference call
• Dropping a participant from a conference call.
Note:
B199 Conference Phone supports a conference of maximum 5 participants, out of whom 4 are
external. The number depends on the used codecs.
Setting up a conference call
About this task
Use this procedure to set up a conference call on your phone.
Procedure
1. On the phone screen, tap the Call icon.
The Dialpad view opens.
2. Dial the number of the first person that you want to include in the conference call.
3. When the person answers, tap Add Participant.
The phone displays the Add Participant screen.
4. Dial the number of the second person that you want to include in the conference call. You
can do it as follows:
• Choose the number in the Recent tab from the recent calls list.
• Dial the number using the Dialpad.
• Choose the number in the Contacts tab from the LDAP phone book.
5. Tap Conference when the called party answers.
February 2021 Using Avaya Conference Phone B199 24
Comments on this document? infodev@avaya.com
Page 25

The phone displays the conference call window and starts the conference call. The
conference call window displays the names or numbers of the participants on the call and
a call timer.
Adding a participant to a conference call
About this task
Use this procedure to add participants to an ongoing conference call.
Before you begin
Start a conference call.
Procedure
1. On the phone screen, tap Add Participant.
The phone displays the Add Participant screen.
2. To add a participant, do one of the following:
• On the Recent tab, choose the number of the person that you want to include in the
conference from the recent calls list.
Conference calls
• Dial the number using the Dialpad.
• On the Contacts tab, choose the number of the person that you want to include in the
conference from the LDAP phone book.
3. When the called person answers the call, tap Conference.
The phone includes the called person into the conference call.
Placing a participant of a conference call on hold
About this task
Use this procedure to put a participant of a conference call on hold. This action does not put other
participants of the conference call on hold.
Before you begin
Start a conference call.
Procedure
1. On the phone screen, tap the participant’s number or the
The phone shows the participant and the list of actions, which you can do during an
ongoing conference call.
icon.
2. Tap the On Hold icon to put the participant on hold.
The phone activates the On Hold icon to demonstrate the procedure is complete.
February 2021 Using Avaya Conference Phone B199 25
Comments on this document? infodev@avaya.com
Page 26

Telephony operations
3. Tap the On Hold icon again for the participant to rejoin the conference call.
Talking to a participant of a conference call privately
About this task
Use this procedure to talk privately with a participant of a conference call. When you do it, other
participants of the conference call are not able to listen to the discussion between you and the
selected participant.
Before you begin
Start a conference call.
Procedure
1. On the phone screen, tap the participant’s number or the
The phone shows the participant and the list of actions, which you can do during an
ongoing conference call.
2. Tap the Talk Private icon to talk privately with the participant.
The phone puts all other participants on hold.
3. Tap the Conference icon to reconnect to the conference call.
Dropping a participant from a conference call
About this task
Use this procedure to drop a participant from an ongoing conference call.
Before you begin
Start a conference call.
Procedure
1. On the phone screen, tap the participant’s number or the
The phone shows the participant and the list of actions, which you can do during an
ongoing conference call.
icon.
icon.
2. Tap the Hang Up icon.
The phone drops the participant from the conference call.
Splitting a conference call
About this task
Use this procedure to split an ongoing conference call into several calls.
February 2021 Using Avaya Conference Phone B199 26
Comments on this document? infodev@avaya.com
Page 27

Bluetooth calls
Before you begin
Start a conference call.
Procedure
On the phone screen, tap the Split icon.
The phone places all participants to separate calls and puts the calls on hold.
Next steps
• To resume the call with any one of the participants, tap the participant’s entry and then the
On Hold icon.
• To connect all the separate calls to the conference call, tap the Conference icon.
Bluetooth calls
You can use Avaya Conference Phone B199 to handle the phone calls coming to your mobile
device. This functionality is available when you pair the phone with your mobile device and the two
devices are in a connected state.
B199 Conference Phone supports the following Bluetooth call operations:
• Answering a call
• Rejecting a call
• Ending a call
Note:
You can handle Bluetooth calls only when B199 Conference Phone is in on-hook mode. The
phone does not support Bluetooth calls in off-hook mode during a SIP or USB call.
Handling Bluetooth calls from B199 Conference Phone affects incoming SIP and USB calls.
When the phone is on a Bluetooth call, it sends a busy signal to other incoming calls. Also,
accepting a Bluetooth call blocks any ongoing USB audio stream.
Volume control
During a call, you can adjust the volume level. B199 Conference Phone synchronizes the volume
level with the volume level of the connected mobile device. Rather than adjusting the volume of
each device independently, you can turn the volume up or down on any one of the devices.
You can also mute the Bluetooth call on any one of the devices. Note that the devices do not
synchronize the mute state.
Note:
B199 Conference Phone does not synchronize the volume level with the Bluetooth device
when streaming audio.
February 2021 Using Avaya Conference Phone B199 27
Comments on this document? infodev@avaya.com
Page 28

Telephony operations
Ringtone
The ring signal you hear on B199 Conference Phone in case of an incoming Bluetooth call
depends on specifications of the mobile Bluetooth device. The options are as follows:
• If your mobile device supports in-band ringtone, B199 Conference Phone plays the signal it
receives from the connected Bluetooth device.
• If your mobile device does not support in-band ringtone, B199 Conference Phone plays its
local ringtone or remains silent depending on its Ring Level setting.
Related links
Pairing and connecting Bluetooth devices on page 49
Handling incoming Bluetooth calls
About this task
You can use Avaya Conference Phone B199 to handle calls coming to your mobile device if the
two devices are in a paired and connected state. When you receive an incoming call on your
mobile device, the LEDs on B199 Conference Phone start flashing green, the phone rings and
displays the caller ID and the following message: Incoming Call. You can use B199
Conference Phone to answer or reject the call.
Before you begin
Ensure that B199 Conference Phone and your mobile device are in paired and connected state.
• When the phone rings, do one of the following:
- To reject the call, tap the Hang Up icon.
- To answer the call, tap the Answer icon.
When you answer the call, the LEDs on B199 Conference Phone show a steady green light,
the phone displays the caller ID and the following message: Bluetooth call.
• To end an ongoing call, tap the Hang Up icon.
Related links
Pairing and connecting Bluetooth devices on page 49
Handling outgoing Bluetooth calls
About this task
You can use Avaya Conference Phone B199 to handle calls coming from your mobile device if the
two devices are in a paired and connected state. When you make a call from your mobile device,
the LEDs on B199 Conference Phone are steady green. The phone plays ringback tone generated
by your mobile device and displays the following message: Calling. When the other person
answers the call, the phone displays the following message: Bluetooth call. You can cancel
or end the call using B199 Conference Phone.
February 2021 Using Avaya Conference Phone B199 28
Comments on this document? infodev@avaya.com
Page 29

Before you begin
Ensure that B199 Conference Phone and your mobile device are in paired and connected state.
• To cancel the call before the other person answers, tap the Hang Up icon.
• To end an ongoing call, tap the Hang Up icon.
Related links
Pairing and connecting Bluetooth devices on page 49
Phone book
You can make and manage phone calls using a phone book. Avaya Conference Phone B199
supports connection to an external phone book using the Lightweight Directory Access Protocol
(LDAP). With the phone book feature enabled, you can search and use the contact information
stored in a remote company directory.
The phone book is available in the Dialpad view of the phone interface and in the Add Participant
viewer. It can contain thousands of contacts.
Phone book
The administrator must activate and configure the LDAP feature for Avaya Conference Phone
B199 to make your phone book available.
Searching for a contact
About this task
Use this procedure to search for a contact from your phone book with Avaya Conference Phone
B199.
Procedure
1. On the phone screen, tap the Call icon.
The Dialpad view opens.
2. Tap the Contacts icon.
3. In the search field, start typing the name of the contact.
The phone immediately sends the search request when you stop typing letters, press
Enter or minimize the keyboard.
The phone displays the maximum hits found for your search request.
4. Choose the contact from the list and open the contact card.
5. (Optional) Do one of the following:
• View the contact card
February 2021 Using Avaya Conference Phone B199 29
Comments on this document? infodev@avaya.com
Page 30

Telephony operations
• Make a call to the contact
Next steps
If the search is unsuccessful, Avaya Conference Phone B199 shows the following message: No
Match Found. You can try to find the contact again by typing the name differently.
Making a call to a contact
About this task
Use this procedure to make a call to a contact from your phone book with Avaya Conference
Phone B199.
Before you begin
The administrator must activate and configure the LDAP feature for your Avaya Conference
Phone B199.
Procedure
1. On the phone screen, tap the Call icon.
The Dialpad view opens.
2. Tap the Contacts icon.
3. Choose the contact from the phone book.
4. Select the number for your phone to dial if there are more than one number available in the
contact card.
5. Tap the selected phone number.
The phone starts dialing the contact number.
Viewing a contact card
About this task
Use this procedure to view a contact card from your phone book with Avaya Conference Phone
B199.
Before you begin
Conduct the contact search procedure and get the hits for your search request.
Procedure
1. Click a contact from the list on the screen.
The phone displays the contact card with the contact details available. The information fully
depends on the configuration of the Number attributes by the administrator.
February 2021 Using Avaya Conference Phone B199 30
Comments on this document? infodev@avaya.com
Page 31

The contact card may contain the following contact details:
• Work phone
• Home phone
• Mobile phone (or several mobile phone numbers)
• Fax
• Other details that the administrator configured for the LDAP database.
2. (Optional) Select the phone number you need and proceed with a call.
3. (Optional) Repeat the contact search procedure to find a contact card.
Call transfer
B199 Conference Phone supports the Call Transfer feature for you to direct an ongoing phone
call to another person. The transfer can be attended or unattended.
The Attended Transfer is when you notify the transfer target person of the transfer. If the person
accepts the call, then the phone transfers it over to the transfer target.
Call transfer
The Unattended Transfer is when you do not notify the transfer target person of the transfer. The
phone automatically transfers the call when you dial the required phone number.
Note:
The Call Transfer feature is available only for the regular phone calls and not for the
conference calls.
Making an attended transfer
About this task
Use this procedure to transfer a call to another extension after consultation with the transfer target
person.
Before you begin
Make sure you are on an active call.
Procedure
1. Tap the
The phone displays the side menu. This menu shows the contact number for the transfer,
the Attended Transfer and Unattended Transfer buttons.
icon.
The other person is on hold during the transfer procedure.
2. Tap the Attended Transfer button.
The phone opens the Transfer Call view.
February 2021 Using Avaya Conference Phone B199 31
Comments on this document? infodev@avaya.com
Page 32

Telephony operations
3. Do one of the following:
• Dial the number of the transfer target manually.
• In the Contacts or Recent tab, select the number of the transfer target.
• To return to the initial call, tap Back to Call on the top of the screen. In this case, start
the procedure from the beginning to transfer the call.
4. Tap the Transfer button.
The call transfer target phone starts ringing.
5. Wait for the transfer target to answer, explain the reason for calling, and do one of the
following:
• To transfer the call, tap Transfer.
• To drop the call with the transfer target and return to the initial call, tap Cancel.
6. To end the call, tap Hang up.
Making an unattended call
About this task
Use this procedure to transfer an active call without consultation with the transfer target.
Before you begin
Make sure you are on an active call.
Procedure
1. Tap the
The phone displays the side menu. This menu shows the contact number for the transfer,
the Attended Transfer and Unattended Transfer buttons.
2. Tap Unattended Transfer.
The phone opens the Transfer Call view.
3. Do one of the following:
• Dial the number of the transfer target manually.
• In the Contacts or Recent tab, select the number of the transfer target.
• To return to the initial call, tap Back to Call on the top of the screen. In this case, start
the procedure from the beginning to transfer the call.
4. Tap the Transfer button.
icon.
The phone transfers the call to the transfer target.
February 2021 Using Avaya Conference Phone B199 32
Comments on this document? infodev@avaya.com
Page 33

Caller information presentation
Caller information presentation
B199 Conference Phone displays the calling person information. For example, you can see the
contact name or phone number. This information is available on the Incoming Call, Active Call,
and Recent Call List screens.
The phone can show the following data:
• Caller name: Usually specifies the contact name.
• Caller ID: Usually specifies the caller phone number.
If the server does not provide the caller ID, the phone displays Unknown.
February 2021 Using Avaya Conference Phone B199 33
Comments on this document? infodev@avaya.com
Page 34

Chapter 4: Settings configuration and
management
Configuration of Avaya Conference Phone B199
You can configure the settings directly on Avaya Conference Phone B199 and through the web
interface. The basic settings, such as the phone name, language, key tone, startup sound, and
ring level, can be modified by any user. To configure other settings you need to login as the
administrator.
Important:
The web interface is accessible with the administrator password only. For security reasons,
you can set the administrator password only on the phone.
Viewing the IP address
About this task
View the IP address of your Avaya Conference Phone B199. Use this address to log into the web
interface of the conference phone and manage the settings in the device through the web browser.
Procedure
1. On the phone screen, tap Settings.
2. Tap Status or the icon.
The phone displays the following hardware details:
• DES Status
• IP Address
• MAC Address
• Bluetooth MAC Address
• Hardware Revision
• Software Version
• Smart Mic 1 Version
• Smart Mic 2 Version
February 2021 Using Avaya Conference Phone B199 34
Comments on this document? infodev@avaya.com
Page 35

Configuration of Avaya Conference Phone B199
3. Tap the icon twice to return to the home screen.
Setting the password for Avaya Conference Phone B199
About this task
Use this procedure to set the password for your B199 Conference Phone when you first activate
the phone or after a reset to the factory settings.
Before you begin
Connect the PoE cable to ensure the phone power supply.
Procedure
1. Wait for the following message to appear on the phone screen:
For full functionality, please set administration password.
2. Tap Yes to set the password.
3. (Optional) Tap Skip to avoid setting the password.
In this case, B199 Conference Phone will be functioning in the administration mode, and
you will be able to configure settings on the phone. However, you will not be able to access
the web interface.
4. Using the keyboard on the phone screen, type your password. It can contain letters,
numbers, and special characters.
The password must contain at least 4 characters. As you enter the password, the phone
informs if the password has acceptable length.
5. Type the password again to confirm it.
6. Tap the
The phone reboots.
icon three times to return to the home screen.
Changing the password
About this task
As an administrator, you can change the administrator password using the phone.
Procedure
1. On the phone screen, tap Settings > Admin Login.
2. Enter your administrator password.
The Settings menu in the full functionality mode opens.
3. In the Settings menu, tap Phone > Admin Password.
February 2021 Using Avaya Conference Phone B199 35
Comments on this document? infodev@avaya.com
Page 36

Settings configuration and management
The Change Password menu opens.
4. In the Enter new password field, enter the new password.
The password must contain at least 4 characters. As you enter the password, the phone
informs if the password has acceptable length.
5. In the Confirm new password field, enter the new password again to confirm.
The phone informs if the password matches the one you entered in the Enter new
password field.
6. Tap the
The phone changes the password and reboots.
icon three times to return to the home screen
Logging in to the web interface of Avaya Conference Phone B199
About this task
Use this procedure to log in to the web interface of your B199 Conference Phone. You can access
the web interface only if you set the administrator password for your phone.
Note:
B199 Conference Phone officially supports only the Google Chrome browser.
The phone supports only HTTPS communication protocol.
Before you begin
Obtain the IP address and the administrator password for the phone.
Procedure
1. On the web browser, type the IP address of your phone in the following format:
https://111.222.33.44/.
2. Enter password in the Password field.
The password is the administrator password for your phone.
3. Click Login to log in to the web server of your B199 Conference Phone.
Related links
Viewing the IP address on page 34
Setting the password for Avaya Conference Phone B199 on page 35
Logging out from Avaya Conference Phone B199
About this task
Use this procedure to log out from the web server of your B199 Conference Phone from your web
browser.
February 2021 Using Avaya Conference Phone B199 36
Comments on this document? infodev@avaya.com
Page 37

Configuration of the basic settings
Before you begin
You must be logged in to the web interface of your conference phone.
Procedure
On the web browser, click Logout.
You are forwarded to the Login page and see the prompt that you are not logged in.
Configuration of the basic settings
You can configure the basic settings directly on Avaya Conference Phone B199 or through the
web interface.
Any user can configure the following basic settings of B199 Conference Phone:
• Phone Name
• Language
• Ring Level
• Key Tone
• Startup Sound
To configure other basic and advanced settings you must log in as the administrator.
Related links
Phone settings description on page 38
Configuring the phone settings on the phone
About this task
Use this procedure to configure the phone settings on the phone.
Procedure
1. On the phone screen, tap Settings > Phone.
2. Choose the parameter that you want to configure and proceed to the options available.
You must log in as the administrator to change the password, set time settings, choose the
Daisy Chain mode or reset the phone to factory settings.
3. After you made the choices, return to the home screen.
Depending on what parameters you change, the phone restarts the application or reboots.
February 2021 Using Avaya Conference Phone B199 37
Comments on this document? infodev@avaya.com
Page 38

Settings configuration and management
Configuring the settings through the web interface
About this task
Use this procedure to configure the settings through the web interface of your Avaya Conference
Phone B199. Note that only administrator can configure all the settings.
Procedure
1. Log in to the web interface.
2. Click Phone.
3. Choose the parameter that you want to configure and proceed to the options available.
4. Click Save.
Phone settings description
The following table lists the basic settings of Avaya Conference Phone B199 available through the
web interface in the Phone tab or on the phone in Settings > Phone and Settings > Admin
Login > Phone.
Name
Phone
Phone Name To specify the name of the phone, which is visible on the home screen when
Description
the phone is in a stand-by or on-hook mode. The default name is Conference
Phone.
Table continues…
February 2021 Using Avaya Conference Phone B199 38
Comments on this document? infodev@avaya.com
Page 39
Name Description
Phone Language To select the language. The options are:
• English. This is the default setting.
• Swedish
• Danish
• Norwegian
• Finnish
• Italian
• German
• French
• Spanish
• Portuguese
• Dutch
• Simplified Chinese
Configuration of the basic settings
The characters on the B199 keyboard match the selected language for all
languages except Simplified Chinese. For Simplified Chinese, B199 uses
English keyboard layout.
Security
Allow Legacy
Encryption
To enable or disable legacy encryption for backward compatibility. By default,
the legacy encryption mode is disabled.
Note:
You can configure this parameter if you logged in with the administrator
password.
Admin Password To change the administrator password.
Note:
You can configure this parameter if you logged in with the administrator
password.
Important:
For security reasons, you can change the administrator password only on
the phone.
Ringtone Level To choose from six volume levels and a Silent mode. The default setting is
Level 4.
If you select the Silent mode, only the green LEDs on the phone flash when a
call is received.
Key Tone To enable or disable the key click sound as you tap the phone screen buttons.
By default, the key tone is on.
Table continues…
February 2021 Using Avaya Conference Phone B199 39
Comments on this document? infodev@avaya.com
Page 40

Settings configuration and management
Name Description
Reboot Device To reboot the phone when needed.
Note:
You can use this function only through the web interface.
Webapp Debug To enable or disable the debugging function for the web application. It activates
the web application logging available in the System Logs tab. By default,
Webapp Debug is off.
Note:
You can use this function only through the web interface.
Daisy Chain To choose a mode, in which your B199 Conference Phone operates in case of
a daisy chain arrangement. The options are:
• Master. This is the default setting.
• Slave
Note:
You can configure this parameter on the phone if you log in with the
administrator password. The administrator can also configure this
parameter using the .xml configuration file.
Factory Reset To reset the phone to its factory settings. By resetting the phone to its factory
settings, you remove all the configurations set, imported and installed in course
of the phone use.
Note:
You can do the factory reset only if you log in with the administrator
password and only on the phone.
Startup Sound To enable or disable the phone's branded startup sound. By default, the startup
sound is on.
Note:
The change of this setting does not require a restart or reboot of the
phone.
Time and Region
NTP Enable To enable or disable the Network Time Protocol (NTP). By default, NTP is
enabled.
Note:
You can configure this parameter if you logged in with the administrator
password.
Table continues…
February 2021 Using Avaya Conference Phone B199 40
Comments on this document? infodev@avaya.com
Page 41

Configuration of the basic settings
Name Description
NTP Server To specify the NTP server when NTP is enabled. By default the phone uses the
following NTP server: 0.pool.ntp.org.
Note:
You can configure this parameter if you logged in with the administrator
password.
Date To set the current date.
Note:
You can set the current date manually only if NTP is in disabled state.
Specify the date by doing the following:
• Manually enter the date in the field by clicking the day, month, and year to
change the value.
• Select a date from the date picker.
Note:
You can use this function only through the web interface.
Table continues…
February 2021 Using Avaya Conference Phone B199 41
Comments on this document? infodev@avaya.com
Page 42

Settings configuration and management
Name Description
Date Format To set the date format.
The following date formats are available:
• dd M, D - Date, short name for the month and day of the week. For
example, 10 Jan, Mon.
• dd MM, DD - Date, full name for the month and day of the week. For
example, 10 January, Monday.
• M dd, D - Short name for the month, date, and short name for the day of the
week. For example, Jan 10, Mon.
• MM dd, DD - Full name for the month, date, and full name for the day of the
week. For example, January 10, Monday.
• D, dd M - Short name for the day of the week, date, and short name for the
month. For example, Mon, 10 Jan.
• DD, MM dd - Full name for the day of the week, full name for the month, and
date. For example, Monday, January 10.
• dd/mm/yy - Date/month/short numerical designation of the year. For
example, 10/01/20.
• dd/mm/yyyy - Date/month/full numerical designation of the year. For
example, 01/10/2020.
• mm/dd/yy - Month/date/short numerical designation of the year. For
example, 01/10/2020.
• mm/dd/yyyy - Month/date/full numerical designation of the year. For
example, 01/10/2020.
• yy/mm/dd - Short numerical designation of the year/month/date. For
example, 20/01/10.
• yyyy/mm/dd - Full numerical designation of the year/month/date. For
example, 2020/01/10.
You can also leave the Default format of the date. In this case your B199
Conference Phone applies the date format that is standard for the selected
language. For example, if your selected language is Finnish, the date format is
dd.mm.yyyy.
Note:
You can configure this parameter only through the web interface. The
administrator can also configure this parameter using the .xml
configuration file.
Table continues…
February 2021 Using Avaya Conference Phone B199 42
Comments on this document? infodev@avaya.com
Page 43
Name Description
Time To set the current time.
Note:
You can set the time manually only if NTP is in disabled state.
See the time on the home screen of the phone.
Set the time by doing the following:
• Manually enter the time value in the field by clicking the hours, minutes, and
seconds to change the value.
• Select the time from the time picker.
Note:
You can use this function only through the web interface.
Time Format To set the time format.
When you select the language, the time format automatically changes to the
standard time format for the chosen language. You can manually change the
convenient time format.
Configuration of the basic settings
Geo Timezone (auto
DST)
The following time formats are available:
• Default
• 12 hours
• 24 hours
Note:
You can configure this parameter through the web interface. The
administrator can also update settings with the .xml configuration file.
To enable or disable the Daylight Saving Time (DST) mode based on the
selected geographical timezone.
By default, DST is disabled.
Note:
You can use this function only through the web interface.
Table continues…
February 2021 Using Avaya Conference Phone B199 43
Comments on this document? infodev@avaya.com
Page 44

Settings configuration and management
Name Description
Timezone To specify a timezone and minute offset. The available timezone is based on
Geo Timezone (auto DST) being enabled or disabled. With Geo Timezone
(auto DST) disabled, the phone sets the time as a difference with the
Coordinated Universal Time (UTC). You can specify the minute offset for the
selected UTC time zone. The possible minute offset values are 0, 15, 30, and
45.
With Geo Timezone (auto DST) enabled, the phone specifies the timezone
based on the country and the city observing the DST.
The default setting is UTC.
Note:
You can configure this parameter through the web interface. The
administrator can also update settings with the .xml configuration file.
Custom DST To enable or disable the custom DST mode.
If Geo Timezone (auto DST) is enabled, Custom DST is automatically
disabled.
You can use the custom DST functions only with the enabled Custom DST.
Note:
You can configure this parameter through the web interface. The
administrator can also update settings with the .xml configuration file.
Custom DST Settings
Offset Hours To specify the time in hours between the standard time and the DST. The
values are 1 and 2. The default setting is 1.
Start Month To select the month when to apply Offset Hours.
Start Day Mode To select the day mode when to apply Offset Hours.
Start Day To select the day when to apply Offset Hours.
Start Hour To select the hour when to apply Offset Hours.
Stop Month To select the month when to stop applying Offset Hours.
Stop Day Mode To select the day mode when to stop applying Offset Hours.
Stop Day To select the day when to stop applying Offset Hours.
Stop Hour To select the hour when to stop applying Offset Hours.
After you click Save in the web interface, the phone saves the changes and restarts the
application or reboots, depending on what parameters you changed. To save changes on the
phone, you must return to the home screen, and the phone restarts the application or reboots to
apply them.
February 2021 Using Avaya Conference Phone B199 44
Comments on this document? infodev@avaya.com
Page 45

Configuration of the basic settings
Daylight Saving Time
Together with the UTC timezones, B199 Conference Phone supports the Daylight Saving Time
(DST) feature, which advances the clock during the specified period of time. Activate this feature
manually through the web interface by enabling Custom DST. The Custom DST settings card
provides for defining a required transition date.
Configuring Daylight Saving Time through the web interface
About this task
Use this procedure to configure DST offset through the web interface.
Important:
When you use the DST start parameters, enable the comparable DST stop parameters.
Procedure
1. Log in to the web interface.
2. Click Phone.
3. Enable Custom DST.
4. In the Offset Hours field, specify the time in hours between the standard time and the
period when the DST parameter is active.
The values are 1 and 2. The default setting is 1.
5. In the Start Month field, select the month to apply the DST offset.
6. In the Start Day Mode field, select the day mode to apply the DST offset.
7. In the Start Day field, specify the day to apply the DST offset.
The value range depends on the selected Start Day Mode. For example, if you select Day
of month as the day mode, the value range is from 1 to 31. The value range for the
weekday is from 0 to 7. Note that in this case, 0 and 7 mean Sunday.
When Start Day Mode is 0, the start day is a day of the month. In case of other values, the
day is a day of the week: 1 is Monday, 5 is Friday. If Start Day Mode is 2 and Start Day is
5, you define the second Friday in the month.
The values -1 to -5 show a weekday in the month from the month end. If Start Day Mode
is -1 and Start Day is 5, this is the last Friday in the month.
8. In the Start Hour field, specify the hour to apply the DST offset.
9. In the Stop Month field, select the month to stop applying the DST offset.
10. In the Stop Day Mode field, select the day mode to stop applying the DST offset.
11. In the Stop Day field, specify the day to stop applying the DST offset.
February 2021 Using Avaya Conference Phone B199 45
Comments on this document? infodev@avaya.com
Page 46

Settings configuration and management
The value range depends on the selected Stop Day Mode. For example, if you select Day
of month as the day mode, the value range is from 1 to 31.
12. In the Stop Hour field, specify the hour to stop applying the DST offset.
13. Click Save.
Configuring the minute offset through the web interface
About this task
Use this procedure to configure the minute offset through the web interface.
B199 Conference Phone supports the minute offset of the specified UTC time zone. You can set
the UTC time zone offset to 0, 15, 30, or 45 minutes.
Procedure
1. Log in to the web interface.
2. Click Phone.
3. In the Time and Region section, disable Geo Timezone (auto DST).
4. In the Timezone field, configure the following:
a. In the first drop-down list, select the UTC time zone.
b. In the second drop-down list, select the minute offset for the specified UTC time zone.
5. Click Save.
Time format
B199 Conference Phone supports various time formats so that the user get the convenient time
presentation.
The following values are available for the time format parameter:
• hh:mm - B199 Conference Phone shows time using the 24-hour clock approach.
• hh:mm AP - B199 Conference Phone shows time using the 12-hour clock approach.
• Empty value - B199 Conference Phone shows the standard time format for the selected
language.
February 2021 Using Avaya Conference Phone B199 46
Comments on this document? infodev@avaya.com
Page 47

Chapter 5: Connectivity
Connection to other devices
Avaya Conference Phone B199 is based on a multi-connectivity platform and can be connected to
a personal computer, a deskphone, and mobile devices.
You can connect B199 Conference Phone to other Bluetooth devices by establishing Bluetooth LE
or Bluetooth Classic connection between the phone and any such device. The NFC tag ensures
easy pairing and quick reconnection between B199 Conference Phone and a mobile device with
Avaya® Conference Assistant application installed.
You can connect up to two expansion microphones to your B199 Conference Phone by using the
available audio expansion ports. You can also connect up to three conference phones in a daisy
chain to expand the phone coverage.
USB cable connection
You can connect Avaya Conference Phone B199 to a personal computer, a deskphone, or other
devices using a Micro-USB Type B cable. When connected through the micro-USB port, B199
Conference Phone serves as a full duplex, echo cancellation and noise reduction device.
Connection to a personal computer or a deskphone
You can connect your Avaya Conference Phone B199 to a personal computer or a deskphone by
using a USB cable.
The connected device normally uses the phone as a speaker and a conference unit. When the
computer starts communication software or audio recording software, the microphone on the
phone is also activated. At the same time, the green LEDs on the phone light up.
Connecting to a personal computer or a deskphone
About this task
Use this procedure to connect your Avaya Conference Phone B199 to a personal computer or a
deskphone with a cable. When connected, the phone becomes an echo-cancelling device. This
February 2021 Using Avaya Conference Phone B199 47
Comments on this document? infodev@avaya.com
Page 48

Connectivity
connection ensures better sound quality that can be manually adjusted in the appropriate
applications on the PC.
Before you begin
Prepare USB micro Type B receptacle for connection purposes.
Procedure
1. Use the USB cable to connect the phone and the computer.
The B199 Conference Phone screen shows that the USB is connected.
2. (Optional) Access the computer settings and select the phone as the audio device. The
computer operating system automatically selects the phone as a speaker and microphone.
3. (Optional) Restart the software to switch to the new audio device if the computer has
active software that is using built-in speakers of the computer.
Managing VoIP calls through a PC
About this task
Use this procedure to manage VoIP calls through a personal computer or a laptop. The phone
functions as a speaker and microphone for the PC.
If you receive an incoming VoIP call during an active USB call, the phone indicates the incoming
call with a ring tone and LEDs flashing.
Before you begin
• Turn on the PC.
• Connect B199 Conference Phone with the USB receptacle to the PC.
• Select B199 Conference Phone as the audio device in the computer settings.
• Run the VoIP software.
Procedure
1. In the VoIP software, select the contact to call.
2. Dial the number and talk to your contact.
3. End the call in the computer VoIP software.
The phone functions as a speaker for the computer.
Bluetooth connection
Avaya Conference Phone B199 can establish wireless communication over Bluetooth with devices
equipped with Bluetooth connectivity, such as mobile phones, tablets, or computers. With
Bluetooth, you can use the phone as a speakerphone for call handling, or as an audio receiver for
audio streaming.
February 2021 Using Avaya Conference Phone B199 48
Comments on this document? infodev@avaya.com
Page 49

Bluetooth connection
The following table lists the Bluetooth technologies that B199 Conference Phone supports:
Bluetooth technology B199 icon Functionality
Bluetooth LE To connect to a mobile device with Avaya® Conference
Assistant application installed on it. For more information,
see Avaya Conference Assistant on page 53.
This is the default mode.
Bluetooth Classic To connect to Bluetooth devices, such as mobile phones,
tablets, and personal computers, for call handling or audio
streaming.
Note:
To use the Bluetooth Classic functionality on B199
Conference Phone, your Bluetooth device must support
Hands-Free Profile (HFP) and Advanced Audio
Distribution Profile (A2DP).
B199 Conference Phone has a modified Pulse-code modulation (PCM) bus installed. This
provides for a better audio transmission compared to the previous releases of the phone.
Note:
You cannot use Bluetooth LE and Bluetooth Classic connection simultaneously.
If you connect B199 Conference Phone to a Bluetooth device, you cannot connect it to a
mobile device with the Avaya® Conference Assistant application until you end the connection
to the Bluetooth device.
If you connect B199 Conference Phone to a mobile device using the Avaya® Conference
Assistant application, you cannot connect it to another Bluetooth device until you end the
connection to Avaya® Conference Assistant.
Switching between the Bluetooth modes
The default mode is Bluetooth LE. To switch to Bluetooth Classic, you must pair and connect B199
Conference Phone to a Bluetooth device. When you select the Bluetooth Classic mode, the phone
turns off Bluetooth LE. If there is no Bluetooth Classic connection, the phone switches back to
Bluetooth LE after a timeout.
In case of a successful Bluetooth Classic connection, B199 Conference Phone restores the
Bluetooth LE mode when you end the Bluetooth Classic connection.
Pairing and connecting Bluetooth devices
About this task
To enable Bluetooth communication between B199 Conference Phone and another Bluetooth
device, you must pair the two devices and ensure that they are in a connected state. The devices
stay in a paired state until you remove the pairing.
February 2021 Using Avaya Conference Phone B199 49
Comments on this document? infodev@avaya.com
Page 50

Connectivity
Note:
You can connect only one device supporting Bluetooth at a time.
Procedure
1. On the B199 Conference Phone screen, tap Settings > Bluetooth > Pair with device.
2. On your Bluetooth device, find B199 Conference Phone in the list of devices available for
The LEDs start flashing blue, and the phone displays the following message: This phone
is now discoverable as “<Phone Name>”.
The time-out value for discoverable mode is 120 seconds.
Tip:
Tap Cancel to cancel pairing, for example, if you do not want to make the phone
discoverable. In this case, you return to the Bluetooth menu.
Bluetooth connection and tap the phone name.
B199 Conference Phone establishes the connection with the Bluetooth device and displays
the Bluetooth icon and one of the following messages:
• If B199 Conference Phone retrieves the device name from your Bluetooth device, it
displays Connected to <your Bluetooth device name>. For example,
Connected to My Smartphone.
• If B199 Conference Phone does not retrieve the device name from your Bluetooth
device, it displays Connected to <your device Bluetooth address>. For
example, Connected to 00:11:22:33:FF:EE.
Note:
B199 Conference Phone is not visible in the Avaya® Conference Assistant application
while the conference phone and the Bluetooth device are in the connected state.
Related links
Phone settings description on page 38
Connection between paired Bluetooth devices
Connection
After you pair B199 Conference Phone and your Bluetooth device, the two devices establish the
connection.
Disconnection
The connection ends if you manually disconnect B199 Conference Phone from the Bluetooth
device or if the distance between the devices does not allow to maintain the communication.
When the Bluetooth device ends the connection, B199 Conference Phone displays the following
message: Disconnected and then stops displaying the Bluetooth icon.
February 2021 Using Avaya Conference Phone B199 50
Comments on this document? infodev@avaya.com
Page 51

Bluetooth connection
Reconnection
You can reconnect your Bluetooth device to B199 Conference Phone if the two devices are in a
paired state. You can reconnect B199 Conference Phone to the paired Bluetooth device only from
the paired Bluetooth device.
Disconnecting Bluetooth devices
About this task
You can disconnect Avaya Conference Phone B199 from your Bluetooth device.
When you end the connection between Avaya Conference Phone B199 and your Bluetooth
device, the two devices remain in the paired state.
Note:
Disconnecting the devices using this procedure does not affect the connection to Avaya
Conference Assistant.
Before you begin
Ensure that B199 Conference Phone and the Bluetooth device are in the connected state.
®
Procedure
1. Tap Settings > Bluetooth > Disconnect Device.
The phone displays the following question: Disconnect device <Bluetooth Device
Name>?
If B199 Conference Phone and the Bluetooth device are not paired and connected, the
phone displays the following message: Not connected.
2. Tap Ok to confirm disconnection.
B199 Conference Phone displays Disconnected and then stops displaying the Bluetooth
icon.
Tip:
To cancel the disconnection, tap Cancel.
Removing Bluetooth pairing
About this task
Use this procedure to remove the pairing between Avaya Conference Phone B199 and your other
Bluetooth device to delete unwanted pairings.
B199 Conference Phone also deletes the Bluetooth pairing information when the phone
administrator resets the phone to factory settings or performs the system recovery.
February 2021 Using Avaya Conference Phone B199 51
Comments on this document? infodev@avaya.com
Page 52

Connectivity
Note:
Removing Bluetooth pairing as described below does not affect Avaya® Conference Assistant
pairing information.
Before you begin
Ensure that B199 Conference Phone and the Bluetooth device are in the paired state.
Procedure
1. Tap Settings > Bluetooth > Remove pairing.
The phone displays the following question: Do you want to remove all Bluetooth
pairing information from the phone?
2. To confirm that you want to delete the Bluetooth pairing information, tap Ok.
The phone restarts the application to apply the changes.
Bridge connection
Avaya Conference Phone B199 supports bridging all connected devices within the external dial-in
conference calls. You can connect B199 Conference Phone to SIP server using Ethernet and also
connect B199 Conference Phone to a laptop, a deskphone or a PC using USB. B199 Conference
Phone can bridge all these connections together into a combined call.
When bridging your computer and the phone, you must activate both sources of sound. B199
Conference Phone can handle full duplex, echo cancellation, and noise reduction for all bridged
sound sources simultaneously. The sound from the bridged computer and SIP call can have
different levels. To hear all participants of the conference call clearly, adjust each sound source
individually.
Note:
B199 Conference Phone does not support bridging of Bluetooth calls with SIP and USB calls.
February 2021 Using Avaya Conference Phone B199 52
Comments on this document? infodev@avaya.com
Page 53

Chapter 6: Phone management application
Avaya® Conference Assistant
You can manage your Avaya Conference Phone B199 from a mobile phone or a tablet if you have
Avaya® Conference Assistant installed on the device. Download and install Avaya® Conference
Assistant free from App Store and Google Play like any other application. Use the NFC tag to
easily start downloading the application. For that, you must bring the mobile device with the NFC
enabled to the NFC tag on the conference phone, and the web browser on the mobile device
opens the web page with the application in App Store or Google Play.
With Avaya® Conference Assistant, you can call contacts from your local address book, create
conference groups, and control a call. For example, answer and hang up the call, mute and
unmute the microphone, dial a number, adjust the volume level, and hold and resume the call.
The mobile device with Avaya® Conference Assistant is connected to the phone over the built-in
Bluetooth LE. B199 Conference Phone is always discoverable for this connection.
Starting from R 1.0.4, Avaya Conference Phone B199 uses SHA256 method for challengeresponse authentication to connect to Avaya® Conference Assistant.
Note:
If your conference phone fails to connect to Avaya® Conference Assistant, you must download
a newer version of the application from App Store or Google Play. It works both with R 1.0.4
and earlier released firmware.
Configure Avaya® Conference Assistant parameters on the phone and from the mobile device with
the application installed.
Pairing and connecting devices
About this task
Use this procedure to pair your Avaya Conference Phone B199 with Avaya® Conference Assistant
on your mobile device the first time when you use them together. After that, they connect with one
touch when you run the application near the conference phone.
The connection range is up to 20 meters. The connection breaks if this range is exceeded. You
see a request to reconnect when Avaya® Conference Assistant is within the range of B199
Conference Phone. Reconnection requires only one touch.
February 2021 Using Avaya Conference Phone B199 53
Comments on this document? infodev@avaya.com
Page 54

Phone management application
Important:
You can pair up to 100 mobile phones or tablets with your B199 Conference Phone. But only
one user connection is active at a time.
Before you begin
Install Avaya® Conference Assistant on your mobile device.
Procedure
1. On your mobile device, open Avaya® Conference Assistant.
The mobile phone displays the closest B199 Conference Phone.
2. To select the phone you want to connect, perform one of the following actions:
• If your mobile device displays B199 Conference Phone you want to connect, tap
Connect on the mobile device screen.
• If your mobile device does not display B199 Conference Phone you want to connect, tap
Skip and then tap the connection symbol in the upper left corner of your mobile device
screen.
The mobile device displays the list of available conference phones.
The mobile phone displays a pairing code for about 30 seconds.
3. Enter the code with the keypad on the conference phone.
4. Tap Enter on the conference phone to start pairing.
When the devices are paired, both Avaya® Conference Assistant and B199 Conference
Phone display the connection symbol.
The conference phone and Avaya® Conference Assistant remain paired while they are
close to one another.
Note:
You cannot connect B199 Conference Phone to a Bluetooth device for call handling or
audio streaming while the Avaya® Conference Assistant connection is active.
Disconnecting devices
About this task
Use this procedure to disconnect your Avaya Conference Phone B199 from the mobile device with
Avaya® Conference Assistant installed.
February 2021 Using Avaya Conference Phone B199 54
Comments on this document? infodev@avaya.com
Page 55

Avaya® Conference Assistant
Before you begin
Ensure that B199 Conference Phone is connected to a mobile device with Avaya® Conference
Assistant installed.
• To disconnect from the mobile device, do the following:
1. In Avaya® Conference Assistant, tap the connection symbol in the upper left corner of
the screen.
2. (Optional) Under Change device, select another conference phone to connect to.
You can do it if there are other conference phones available nearby.
The application starts connecting to the selected conference phone.
3. Tap the Disconnect button near the highlighted connected device name.
The connection symbol in the upper left corner of the screen becomes inactive.
• To disconnect from B199 Conference Phone, do one of the following:
- Tap Conference Assistant > Disconnect Device.
- Tap Settings > Conference Assistant > Disconnect Device.
The phone displays the following question: Disconnect device <Device Name>?
To confirm, tap Ok.
The phone shows the Avaya® Conference Assistant icon and informs that the application is
disconnected.
Deleting pairing
About this task
Use this procedure to delete the pairing between the conference phone and the mobile device.
You can delete the paring only from the conference phone.
Before you begin
Pair Avaya Conference Phone B199 with a mobile device with Avaya® Conference Assistant.
Procedure
1. To delete the pairing from the conference phone, on the home screen, do one of the
following:
• Tap Conference Assistant.
• Tap Settings > Conference Assistant.
2. Tap Remove Bonding Information.
3. Tap Ok to confirm removal of all bonding information from the device.
This function both disconnects the current connection and deletes the pairing. You must
start a new pairing process the next time you want to connect to the phone.
February 2021 Using Avaya Conference Phone B199 55
Comments on this document? infodev@avaya.com
Page 56

Phone management application
Checking the calendar and scheduled events
About this task
Use this procedure to check your calendar on your mobile device with Avaya® Conference
Assistant installed. Then you can arrange calls with the paired Avaya Conference Phone B199
and Avaya® Conference Assistant.
Before you begin
You must allow your mobile device with Avaya® Conference Assistant to connect to your calendar
and agenda.
Procedure
1. On your mobile device, open Avaya® Conference Assistant.
2. Tap the Calendar icon.
The mobile phone shows all calendar events on the screen. Some of these events are
meeting invitations with the meeting information included. In the Overview tab, you see the
time, duration, and title of the meeting. In the Participants tab, the application shows the list
of persons invited to the meeting.
3. Select a conference call from the list.
The mobile phone displays an overview and a list of other participants of the conference
call. Avaya® Conference Assistant finds the phone numbers, PIN codes, and meeting links
in the calendar.
Participating in a conference call from the calendar
About this task
Use this procedure to participate in a conference call from the calendar accessible with Avaya
Conference Assistant.
Before you begin
Your calendar must contain an invitation to a conference call. The contact information in the
conference invitation must comply with the E164 international phone number standard. This
guarantees that Avaya® Conference Assistant interprets the information correctly.
Procedure
1. After you receive a notification about the upcoming conference call on your mobile device,
open Avaya® Conference Assistant.
The application finds the closest Avaya Conference Phone B199.
®
2. In the conference room, pair Avaya® Conference Assistant and Avaya Conference Phone
B199.
3. Connect to the meeting from the mobile device by tapping the conference in the calendar.
February 2021 Using Avaya Conference Phone B199 56
Comments on this document? infodev@avaya.com
Page 57

Avaya® Conference Assistant dials the phone number and enters the PIN code from the
conference call invitation.
Starting an unscheduled call
About this task
Avaya® Conference Assistant
Use this procedure to start a call that is not scheduled in the calendar. You will have complete
control over Avaya Conference Phone B199 during the call from your mobile device with Avaya
Conference Assistant installed.
Before you begin
Ensure that Avaya Conference Phone B199 is paired with Avaya® Conference Assistant.
Procedure
1. Do one of the following to choose a number to call:
• Select a number from your Contacts list.
• Select a number from your Favorites list.
• Select a number from the your recent calls list.
• Dial a number using the keypad.
The phone dials the number, and the call starts. The screen displays the name and the
number of the person called.
2. (Optional) Do one or more of the following:
a. Adjust the volume on the screen of you mobile device by moving the Volume up
slider.
b. Add additional participants by tapping the Add Participant icon.
®
c. Split the conference call to separate calls by tapping Split.
d. Mute the microphone by tapping Microphone Muted. To unmute, tap Microphone
Muted again.
e. Enter Dual Tone Multi Frequency (DTMF) digits by tapping Keypad.
f. Put the call for any participant on hold by tapping Arrow down > Hold.
g. Talk to any participant in private by tapping Arrow down > Talk Private.
h. Disconnect any participant from the call by tapping Arrow down > Hang Up.
3. To end the call, tap the Hang Up icon.
Managing contacts
About this task
Use this procedure to manage contacts with Avaya® Conference Assistant.
February 2021 Using Avaya Conference Phone B199 57
Comments on this document? infodev@avaya.com
Page 58

Phone management application
Procedure
1. On your mobile device, open Avaya® Conference Assistant.
2. Tap the Contacts icon.
3. To add a contact to your favorite contacts list, tap the Contacts tab and press the star
symbol near the selected contact.
4. To open a list of your favorite contacts, tap Favorites.
5. To create a new conference group in the phone book, tap Groups > Plus on the screen.
Configuring the Avaya® Conference Assistant settings
About this task
Use this procedure to configure the Avaya® Conference Assistant settings from the application
installed on a mobile device.
Procedure
1. Run Avaya® Conference Assistant on your mobile device.
2. (Optional) Connect to Avaya Conference Phone B199.
The phone displays a connection symbol on the screen.
3. Tap Settings and proceed with configuration.
Avaya® Conference Assistant settings
The following table lists the parameters for Avaya Conference Phone B199, which you can set
from the Avaya® Conference Assistant interface:
Name
Connection To enable or disable the connection to Avaya Conference Phone B199. The
Description
options are:
• On: The default option.
• Off: To use Avaya® Conference Assistant without connection to any Avaya
Conference Phone B199. You can use the conferencing application from your
mobile device within your mobile phone subscription.
Table continues…
February 2021 Using Avaya Conference Phone B199 58
Comments on this document? infodev@avaya.com
Page 59
Avaya® Conference Assistant
Name Description
Moderator code To join the scheduled conference calls as a moderator. You must enter
respective codes in the following fields:
• Use moderator code: To host conference calls over a bridge service. For
every call you join, Avaya® Conference Assistant uses your moderator code
instead of your guest code.
• Instead of guest code: To specify the guest code instead of which Avaya
®
Conference Assistant uses your moderator code.
Dial prefix To enter the prefix digits in the Use prefix field.
My bridge To enter the phone number and optional PIN code of the most frequently used
conference service. You can use the My bridge button to join the conference
call.
The My bridge button appears in the calendar view.
Meeting notification To set a reminder about a call. The options are:
• 5 minutes before
• 10 minutes before
• 15 minutes before
• Never
Calendars to show To select the calendars in the mobile phone from which you want Avaya
®
Conference Assistant to take the information.
Tell a colleague To share information about Avaya® Conference Assistant with a person that
you want. You can do it by using an email application.
After you confirm that Avaya® Conference Assistant can access your email
application, you see a message created. Along with the description of the
application, it contains links to Avaya® Conference Assistant in App Store and
Google Play so that the person can easily start the download.
Read more about
Conference Assistant
To get additional information about Avaya® Conference Assistant. The
application forwards you to the web site with the corresponding information.
Diagnostics To select a log of the events for Avaya® Conference Assistant.
You can send the created log by tapping Send through an email application.
The log can be used in troubleshooting.
You can also delete the logs from the application by tapping Clear.
Show tutorial To read information about Avaya® Conference Assistant features.
About Conference
To check the version of the application installed on your mobile device.
Assistant
February 2021 Using Avaya Conference Phone B199 59
Comments on this document? infodev@avaya.com
Page 60

Chapter 7: Features and accessories
Expansion of the phone coverage
Use your Avaya Conference Phone B199 on larger conference tables or when the number of a
meeting participants is greater than 10. In this case you can ensure high-level quality of audio
signal by expanding the phone coverage in the room without a PA system. Do it by connecting
Smart Mic expansion microphones to the phone or by cascading several B199 devices in a daisy
chain.
Expansion of the phone coverage helps to improve the audio quality in large rooms. The
conference phone and two Smart Mics increase the capture range from 30 square meters to up to
70 square meters. Three phones in a daisy chain increase the range from 30 square meters to up
to 90 square meters.
Expansion coverage arrangement
Arrange a daisy chain with your conference phone and another B199 Conference Phone or
connect Smart Mic expansion microphones. The maximum number of devices connected in a
daisy chain is 3. One B199 phone acts as a central device (a “master”) and one or two other units
act as expansion devices (“slaves”).
The typical arrangements when the phone’s coverage is expanded are the following:
• Master phone — Slave phone
• Slave phone — Master phone — Slave phone
• Master phone — Expansion microphone
• Expansion microphone — Master phone — Expansion microphone
• Expansion microphone — Master phone — Slave phone
Functions of the Master and Slave devices
When B199 Conference Phone acts as a master, it performs all its configured functions.
When B199 Conference Phone is in a subordinate position (a “slave”), it performs the following
functions:
• Play audio received from the master device. The master phone defines the audio
characteristics.
• Send its microphone audio to the master device.
• Receive and indicate mute state changes made on the master device.
• Send information to the master device, when you tap Microphone Muted.
February 2021 Using Avaya Conference Phone B199 60
Comments on this document? infodev@avaya.com
Page 61

Expansion of the phone coverage
• Send information to the master device when you adjust the volume on it.
Note:
You cannot make calls between the Master and the Slave devices.
In a daisy chain, the Slave device follows the signal from the Master device to enter the sleep
mode or the active mode.
In a daisy chain, each phone is powered by its own PoE injector. The phone powers the Smart
Mics when these are connected. The power available from each port is around 5 W.
Arranging a daisy chain
About this task
Use this procedure to arrange a daisy chain of one master B199 phone and one or two slave
conference phones or expansion microphones.
Before you begin
If you arrange the daisy chain made of several conference phones, prepare the connection cables.
The cables in the Avaya Daisy Chain kit are 5 and 10 meters long. You can purchase the Avaya
Daisy Chain kit as an accessory.
The cable of the Avaya Smart Mic is 3 m long.
Procedure
1. Connect the cable to the audio expansion port on the phone.
There are 2 audio expansion ports on B199 Conference Phone.
2. Connect the other end of the cable to the audio expansion port of the other phone.
In case of expansion microphones, the other end of the cable is fixed in the device.
Defining the mode of the phone
About this task
Use this procedure to define the mode of your Avaya Conference Phone B199 in a daisy chain.
• To define the mode of your B199 on the phone, do the following:
1. Log in as the administrator.
2. In the Settings menu, tap Phone > Daisy Chain.
3. Select the required mode.
The options are:
- Master
- Slave
February 2021 Using Avaya Conference Phone B199 61
Comments on this document? infodev@avaya.com
Page 62

Features and accessories
4. Tap three times to return to the home screen.
The phone restarts the application to apply the changes.
• To define the mode of your B199 Conference Phone through the web interface, do the
following:
1. On the web interface, click Phone.
2. In Daisy Chain Mode, select the required mode from the drop-down list.
The options are:
- Master. This is the default mode.
- Slave
3. Click Save.
The slave unit displays the Daisy Chain Mode icon and the following message: Daisy
Chain. This message remains for the period when the phone is in the slave mode within the
daisy chain arrangement.
Disabling the daisy chain mode
About this task
Use this procedure to disable the Daisy Chain mode through the web interface or from the phone.
Before you begin
Ensure that the phone displays the Daisy Chain icon.
• To disable the Daisy Chain mode from the web interface, do the following:
1. On the web interface, click Phone.
2. In Daisy Chain Mode, select Master.
3. Click Save.
• To disable the Daisy Chain mode from the phone, do the following:
1. Touch the phone screen and enter the administrator password.
2. Tap Phone > Daisy Chain.
3. Select the Master mode.
4. Tap the
Application restarts and restores the Master status.
icon three times to return to the home screen.
February 2021 Using Avaya Conference Phone B199 62
Comments on this document? infodev@avaya.com
Page 63

Expansion microphone firmware upgrade
Expansion microphone firmware upgrade
You can upgrade the expansion microphone firmware to the Avaya Conference Phone B199
firmware version when your Smart Mic has an older firmware installed. Regularly updating the
expansion microphone firmware to match the phone firmware ensures the best possible audio
performance.
The phone suggests an automatic upgrade of the expansion microphone firmware when you
connect your Smart Mic to B199. You can connect one or two Smart Mics simultaneously.
You can also initiate the expansion microphone firmware upgrade manually.
If you connect the expansion microphone to Avaya Conference Phone B199 during an active call,
the upgrade does not start until the call ends.
During the upgrade, the phone rejects all incoming and outgoing calls and does not activate the
Call Transfer feature. At that B199 indicates that it is Busy.
Upgrading expansion microphone firmware
About this task
Use this procedure to upgrade the expansion microphone firmware when the Smart Mic and your
device have different firmware installed.
Before you begin
Make sure B199 is in the Idle Mode.
Procedure
1. Connect the expansion microphone to your conference phone using the available audio
expansion port.
The expansion microphone LEDs flash red once.
A pop-up dialog window shows the following message: A connected microphone
needs firmware upgrade. Upgrade now?
2. On the pop-up dialog window, tap Yes to start the upgrade.
The LEDs on the phone turn red to indicate that it is busy with the microphone upgrade.
The expansion microphone LEDs start flashing green.
The phone displays the Upgrade in progress message and shows the upgrade
progress in percentage (0%-100%).
When you connect one Smart Mic to B199, the phone shows the upgrade status for Smart
Mic 2 as N/A.
Smart Mic 1: 10%
Smart Mic 2: N/A
3. (Optional) To cancel the upgrade, tap No.
February 2021 Using Avaya Conference Phone B199 63
Comments on this document? infodev@avaya.com
Page 64

Features and accessories
In this case, you postpone the upgrade until the phone reboots.
Result
If the upgrade is complete, the microphone LEDs turn off, and Avaya Conference Phone B199
displays the following message:
Upgrade in progress
Smart Mic 1: Done
Smart Mic 2: N/A
In 10 seconds, the pop-up dialog window hides, and the phone enters the Idle mode.
If the Smart Mic firmware upgrade fails, the microphone LEDs turn off, and the phone displays the
Smart Mic 1: Failed message.
Upgrading two expansion microphones
About this task
Use this procedure to upgrade two expansion microphones connected to your device
simultaneously.
Before you begin
Connect Smart Mic 1 to the first audio expansion port of your conference phone.
Procedure
1. Connect Smart Mic 2 to your conference phone using the second audio expansion port.
The LEDs on the phone turn red to indicate that it is busy with the microphone upgrade.
The Smart Mic 2 LEDs start flashing green.
A pop-up dialog window provides the expansion microphones upgrade status in the
following format:
Smart Mic 1: 20%
Smart Mic 2: 10%
2. (Optional) Terminate Smart Mic 2 upgrade by detaching the expansion microphone from
the phone.
In this case, you postpone the upgrade until you connect Smart Mic 2 again.
Result
When the upgrade is complete for Smart Mic 1 and Smart Mic 2 is still upgrading, the LED turns
off on Smart Mic 1, and Avaya Conference Phone B199 displays the following message:
Upgrade in progress
Smart Mic 1: Done
Smart Mic 2: 86%
When the upgrade is complete for both microphones, their LEDs turn off, and Avaya Conference
Phone B199 displays the following message:
February 2021 Using Avaya Conference Phone B199 64
Comments on this document? infodev@avaya.com
Page 65

Expansion microphone firmware upgrade
Upgrade in progress
Smart Mic 1: Done
Smart Mic 2: Done
In 10 seconds, the pop-up dialog window hides, and the phone enters the Idle mode.
If the firmware upgrade for any of the expansion microphones fails, the microphone LEDs turn off,
and the phone displays the message stating the Failed status of the corresponding Smart Mic.
Terminating expansion microphone upgrade
About this task
Use this procedure to terminate the expansion microphone upgrade.
You can do it in the following cases:
• The phone has one Smart Mic 1 connected; or
• The phone has both Smart Mic 1 and Smart Mic 2 connected simultaneously.
Before you begin
Connect Smart Mic 1 and Smart Mic 2 to the phone and start the upgrade process for both
expansion microphones.
Procedure
1. Detach Smart Mic 2 from the phone.
Smart Mic 1 continues upgrading with the value for the upgrade progress being updated.
Smart Mic 2 upgrade dialog indicates an error and aborts the mic upgrade. Avaya
Conference Phone B199 displays the following message:
Upgrade in progress
Smart Mic 1: 50%
Smart Mic 2: Failed
When Smart Mic 1 upgrade is complete, its LED turns off, and Avaya Conference Phone
B199 displays the following message:
Upgrade in progress
Smart Mic 1: Done
Smart Mic 2: Failed
This message disappears in 10 seconds.
2. (Optional) To upgrade Smart Mic 2, connect it to the conference phone and proceed with
the upgrade.
February 2021 Using Avaya Conference Phone B199 65
Comments on this document? infodev@avaya.com
Page 66

Features and accessories
Upgrading Smart Expansion Microphone manually
About this task
Upgrade your expansion microphone manually when it is convenient to you.
Procedure
1. Hold the Microphone Muted button on the Smart Mic while you connect the microphone
cable, and keep holding the button for 5 seconds after you inserted the cable.
When you release the button, it flashes red one time and then starts flashing green to
indicate that the upgrade process has started. The LEDs on the phone turn red to indicate
that it is busy with the microphone upgrade. The upgrade process takes about 7 minutes.
When the upgrade is completed, the microphone LEDs turn off.
2. Check the microphone version by doing one of the following:
• On the phone screen, tap Settings > Status.
• On the web interface, go to the Status tab.
February 2021 Using Avaya Conference Phone B199 66
Comments on this document? infodev@avaya.com
Page 67

Chapter 8: Maintenance
Device status
You can find the information about Avaya Conference Phone B199 status, including its current
settings, through the web interface. This information can be useful for troubleshooting.
The following table describes the type of the information available in each of the Status tab
sections.
Section name Description
General To show the status information of B199 Conference Phone, including the
following:
• Phone Name
• Product Name
• Build Version
• HW Revision
• Serial Number
• Smart Microphone 1 Version
• Smart Microphone 2 Version
Network To show the information about the network settings of the phone. You can
see the following information:
• IP Address
• MAC Address
• Bluetooth MAC Address
• Hostname
• Network Mask
• Domain
• Gateway
• Primary DNS
• Secondary DNS
Table continues…
February 2021 Using Avaya Conference Phone B199 67
Comments on this document? infodev@avaya.com
Page 68

Maintenance
Section name Description
SIP To show the information about the SIP settings of the phone. You can see
the following information:
• Primary Account Status
• Secondary Account Status
• Fallback Account Status
Time and Region To show the information about the time and region settings of the phone.
You can see the following information:
• NTP Status
• Time
• Date
• Timezone
• Daylight Saving Time
DES To show the DES status. The options are:
• Enabled. Cannot be changed
• Enable
• Disabled. Cannot be changed
• Disable
Note:
You can not change settings in the Status tab.
Viewing the phone status
About this task
Use this procedure to view the status and settings of Avaya Conference Phone B199 through the
web interface.
Procedure
1. Log in to the web interface.
2. Select the Status tab.
February 2021 Using Avaya Conference Phone B199 68
Comments on this document? infodev@avaya.com
Page 69

Licenses
Some parts of the phone software are subject to open source license agreements. You can get the
information about the use and redistribution conditions for the following:
• BSD. This is the Berkeley Software Distribution system for distribution of the source code to
the operating system.
• GPL v2.0. This is the General Public License, version 2.0, which guarantees the end
users the freedom to run, study, share and modify the software.
• LGPL v2.1. This is the Lesser General Public License, version 2.1, which is applicable to
specially designated software packages of the Free Software Foundation and some other
authors.
• GFDL v1.2. This is the GNU Free Documentation License, version 1.2, providing the freedom
to copy and redistribute specific documentation.
• GFDL v1.3. This is the GNU Free Documentation License, version 1.3.
• ISC. This is the Internet Systems Consortium permissive free software license.
• MIT. This is the Massachusetts Institute of Technology permissive free software license.
• OpenSSL. This is the license to use OpenSSL being a software library for applications that
secure network communications and help to identify the party at the other end.
Licenses
• PHP v3.0. This is the license under which the PHP scripting language is released.
• Bzip2. This is the license to a free and open-source file compression software that
compresses single files.
• Socat. This is the license to a relay for bidirectional data transfer between two independent
data channels.
• Libpng. This is the license which defines the terms under which the libpng software library
can be distributed.
• Qt-Company-Commercial. This is the license for development of proprietary software when
the source code is not to be shared with third parties or there are other inconsistencies with
the terms of the LGPL license.
• TI-TSPA. This is the Texas Instruments Incorporated license to publicly available technology
and software.
• Zlib. This is the license which defines the terms under which the zlib software library can be
distributed.
• MPL v2.0. This is the simple copyleft Mozilla Public License (MPL) version 2.0.
Note:
You can get the license information only through the web interface.
February 2021 Using Avaya Conference Phone B199 69
Comments on this document? infodev@avaya.com
Page 70

Maintenance
Viewing licenses
About this task
Use this procedure to view the status and settings of Avaya Conference Phone B199 through the
web interface.
Procedure
1. Log in to the web interface.
2. Select the Licenses tab.
3. Select the license that you want to view from the list of licenses available.
February 2021 Using Avaya Conference Phone B199 70
Comments on this document? infodev@avaya.com
Page 71

Chapter 9: Related resources
Documentation
The following table lists related documents, which you can see at http://support.avaya.com:
Title Use this document to: Audience
Deploying
Administering Avaya Aura® System
Manager
Administering Avaya Aura
Communication Manager
Administering Avaya Aura® Session
Manager
Avaya IP Office™ Platform SIP
Telephone Installation Notes
Deploying Avaya IP Office
Platform IP500/IP500 V2
Installing and Administering Avaya
Conference Phone B199
Using
Using Avaya Conference Phone
B199
Quick Reference
Avaya Conference Phone B199
Quick Reference Guide
®
™
Get an understanding of Avaya Aura
System Manager.
Get an understanding of Avaya Aura
Communication Manager.
Get an understanding of Avaya Aura
Session Manager.
Get an understanding of IP Office system
installation.
Get an understanding of Avaya IP Office
500.
Install, configure, and maintain Avaya
Conference Phone B199.
Set up and use Avaya Conference Phone
B199.
Reference Avaya Conference Phone B199
features quickly.
®
®
®
Implementation
personnel and
administrators
Implementation
personnel and
administrators
Implementation
personnel and
administrators
Implementation
personnel and
administrators
Implementation
personnel and
administrators
Implementation
personnel and
administrators
End users
End users
February 2021 Using Avaya Conference Phone B199 71
Comments on this document? infodev@avaya.com
Page 72

Related resources
Finding documents on the Avaya Support website
Procedure
1. Go to https://support.avaya.com.
2. At the top of the screen, type your username and password and click Login.
3. Click Support by Product > Documents.
4. In Enter your Product Here, type the product name and then select the product from the
list.
5. In Choose Release, select the appropriate release number.
The Choose Release field is not available if there is only one release for the product.
6. In the Content Type filter, click a document type, or click Select All to see a list of all
available documents.
For example, for user guides, click User Guides in the Content Type filter. The list only
displays the documents for the selected category.
7. Click Enter.
Support
Go to the Avaya Support website at https://support.avaya.com for the most up-to-date
documentation, product notices, and knowledge articles. You can also search for release notes,
downloads, and resolutions to issues. Use the online service request system to create a service
request. Chat with live agents to get answers to questions, or request an agent to connect you to a
support team if an issue requires additional expertise.
Using the Avaya InSite Knowledge Base
The Avaya InSite Knowledge Base is a web-based search engine that provides:
• Up-to-date troubleshooting procedures and technical tips
• Information about service packs
• Access to customer and technical documentation
• Information about training and certification programs
• Links to other pertinent information
If you are an authorized Avaya Partner or a current Avaya customer with a support contract, you
can access the Knowledge Base without extra cost. You must have a login account and a valid
Sold-To number.
February 2021 Using Avaya Conference Phone B199 72
Comments on this document? infodev@avaya.com
Page 73

Use the Avaya InSite Knowledge Base for any potential solutions to problems.
1. Go to http://www.avaya.com/support.
2. Log on to the Avaya website with a valid Avaya user ID and password.
The system displays the Avaya Support page.
3. Click Support by Product > Product-specific Support.
4. In Enter Product Name, enter the product, and press Enter.
5. Select the product from the list, and select a release.
6. Click the Technical Solutions tab to see articles.
7. Select relevant articles.
Viewing Avaya Mentor videos
Avaya Mentor videos provide technical content on how to install, configure, and troubleshoot
Avaya products.
About this task
Support
Videos are available on the Avaya Support website, listed under the video document type, and on
the Avaya-run channel on YouTube.
• To find videos on the Avaya Support website, go to
the following:
- In Search, type Avaya Mentor Videos, click Clear All and select Video in the Content
Type.
- In Search, type the product name. On the Search Results page, click Clear All and select
Video in the Content Type.
The Video content type is displayed only when videos are available for that product.
In the right pane, the page displays a list of available videos.
• To find the Avaya Mentor videos on YouTube, go to www.youtube.com/AvayaMentor and do
one of the following:
- Enter a key word or key words in the Search Channel to search for a specific product or
topic.
- Scroll down Playlists, and click a topic name to see the list of videos available for the topic.
For example, Contact Centers.
Note:
Videos are not available for all products.
https://support.avaya.com/ and do one of
February 2021 Using Avaya Conference Phone B199 73
Comments on this document? infodev@avaya.com
Page 74

Index
A
application to manage the phone .........................................53
Avaya support website .........................................................
72
B
basic settings ....................................................................... 38
Bluetooth
audio streaming ............................................................ 48
calls .............................................................................. 27
deleting pairing ............................................................. 51
disconnecting devices .................................................. 51
handling incoming calls ................................................
handling outgoing calls ................................................. 28
paired devices connection ............................................ 50
paired devices reconnection .........................................50
pairing ...........................................................................49
reconnection .................................................................
Bluetooth Classic ................................................................. 48
Bluetooth LE ........................................................................ 48
bridge connection ................................................................
buttons ................................................................................. 13
28
50
52
C
Caller ID ...............................................................................33
caller information ................................................................. 33
Caller name ......................................................................... 33
call on hold ...........................................................................18
call transfer
attended ........................................................................31
unattended ..............................................................31, 32
changing password ..............................................................38
conference call
adding a participant ...................................................... 25
dropping a participant ................................................... 26
putting a participant on hold ......................................... 25
setting up ...................................................................... 24
splitting .........................................................................
talking privately .............................................................26
conference calls ...................................................................24
conference phone ................................................................ 11
configuration ........................................................................ 34
basic settings ................................................................37
connecting
to a deskphone ............................................................. 47
to a personal computer .................................................47
connection
deskphone .................................................................... 47
laptop ............................................................................47
other devices ................................................................ 47
personal computer ........................................................47
26
connection (continued)
using Bluetooth .............................................................48
connection layout .................................................................14
D
daisy chain
arranging ...................................................................... 61
cascading ..................................................................... 60
defining mode ............................................................... 61
disabling mode ............................................................. 62
expansion microphones ................................................
master phone ................................................................60
slave phone .................................................................. 60
daisy chain mode .................................................................38
Daylight Saving Time ...........................................................45
configuring through web interface ................................ 45
dimensions .....................................................................13, 14
document changes ................................................................ 9
60
E
expansion microphone
firmware upgrade
automatic ...............................................................63
manual .............................................................63, 66
termination .............................................................65
expansion microphones .......................................................60
external phone book ............................................................ 29
I
icons .............................................................................. 13, 15
incoming call ........................................................................ 18
InSite Knowledge Base ........................................................72
intended audience ................................................................. 9
L
language .............................................................................. 38
LDAP ................................................................................... 29
LED status ...........................................................................
licenses ................................................................................69
viewing ..........................................................................70
logging in ............................................................................. 36
18
M
minute offset
configuring
through the web interface ......................................46
muted call ............................................................................ 18
February 2021 Using Avaya Conference Phone B199 74
Comments on this document? infodev@avaya.com
Page 75

Index
O
open source license agreements .........................................69
overview ...............................................................................
11
P
password ............................................................................. 34
changing ....................................................................... 35
setting ........................................................................... 35
phone book .......................................................................... 29
making a call .................................................................30
searching for a contact ................................................. 29
viewing a contact card .................................................. 30
phone management application
calendar and scheduled events ....................................56
conference call from the calendar ................................ 56
configuring settings from the mobile device ................. 58
deleting pairing ............................................................. 55
disconnecting devices ..................................................
managing contacts ....................................................... 57
pairing and connecting devices .................................... 53
settings ......................................................................... 58
starting an unscheduled call ......................................... 57
phone name .........................................................................38
phone settings configuration
on the phone .................................................................37
physical layout ..................................................................... 13
power-saving mode ............................................................. 19
purpose ..................................................................................9
54
R
reboot device ....................................................................... 38
regular phone call
answering ..................................................................... 22
answering while on another call ................................... 22
making .......................................................................... 21
muting a microphone .................................................... 22
placing on hold .............................................................
redialing ........................................................................ 23
unmuting a microphone ................................................ 22
regular phone calls .............................................................. 21
related documentation ......................................................... 71
ringtone level ....................................................................... 38
23
upgrade (continued)
upgrade (continued)
termination .............................................................65
specifications ....................................................................... 18
start up sound ......................................................................
status ................................................................................... 67
viewing ..........................................................................68
support .................................................................................72
38
T
time and region settings .......................................................38
time format ...........................................................................
46
U
USB cable connection .........................................................
47
V
videos .................................................................................. 73
viewing
firmware version ........................................................... 34
IP address .................................................................... 34
MAC address ................................................................34
VoIP calls .............................................................................48
W
webapp debug ..................................................................... 38
web interface ................................................................. 34, 36
logging out .................................................................... 36
S
safety guidelines .................................................................. 11
safety instructions ................................................................ 11
settings configuration through the web interface ................. 38
sleep mode .......................................................................... 19
Smart Mic .............................................................................
upgrade
automatic ...............................................................63
manual .............................................................63, 66
February 2021 Using Avaya Conference Phone B199 75
Comments on this document? infodev@avaya.com
60
 Loading...