

Avaya Aura Installation Manual

Installing and Updating Avaya Aura
®
Media Server Application on customersupplied hardware and OS
Release 8.0.x
Issue 3
April 2020

©
2015-2020, Avaya Inc.
All Rights Reserved.
Notice
While reasonable efforts have been made to ensure that the
information in this document is complete and accurate at the time of
printing, Avaya assumes no liability for any errors. Avaya reserves
the right to make changes and corrections to the information in this
document without the obligation to notify any person or organization
of such changes.
Documentation disclaimer
“Documentation” means information published in varying mediums
which may include product information, operating instructions and
performance specifications that are generally made available to users
of products. Documentation does not include marketing materials.
Avaya shall not be responsible for any modifications, additions, or
deletions to the original published version of Documentation unless
such modifications, additions, or deletions were performed by or on
the express behalf of Avaya. End User agrees to indemnify and hold
harmless Avaya, Avaya's agents, servants and employees against all
claims, lawsuits, demands and judgments arising out of, or in
connection with, subsequent modifications, additions or deletions to
this documentation, to the extent made by End User.
Link disclaimer
Avaya is not responsible for the contents or reliability of any linked
websites referenced within this site or Documentation provided by
Avaya. Avaya is not responsible for the accuracy of any information,
statement or content provided on these sites and does not
necessarily endorse the products, services, or information described
or offered within them. Avaya does not guarantee that these links will
work all the time and has no control over the availability of the linked
pages.
Warranty
Avaya provides a limited warranty on Avaya hardware and software.
Refer to your sales agreement to establish the terms of the limited
warranty. In addition, Avaya’s standard warranty language, as well as
information regarding support for this product while under warranty is
available to Avaya customers and other parties through the Avaya
Support website:
https://support.avaya.com/helpcenter/
getGenericDetails?detailId=C20091120112456651010 under the link
“Warranty & Product Lifecycle” or such successor site as designated
by Avaya. Please note that if You acquired the product(s) from an
authorized Avaya Channel Partner outside of the United States and
Canada, the warranty is provided to You by said Avaya Channel
Partner and not by Avaya.
“Hosted Service” means an Avaya hosted service subscription that
You acquire from either Avaya or an authorized Avaya Channel
Partner (as applicable) and which is described further in Hosted SAS
or other service description documentation regarding the applicable
hosted service. If You purchase a Hosted Service subscription, the
foregoing limited warranty may not apply but You may be entitled to
support services in connection with the Hosted Service as described
further in your service description documents for the applicable
Hosted Service. Contact Avaya or Avaya Channel Partner (as
applicable) for more information.
Hosted Service
THE FOLLOWING APPLIES ONLY IF YOU PURCHASE AN AVAYA
HOSTED SERVICE SUBSCRIPTION FROM AVAYA OR AN AVAYA
CHANNEL PARTNER (AS APPLICABLE), THE TERMS OF USE
FOR HOSTED SERVICES ARE AVAILABLE ON THE AVAYA
WEBSITE,
HTTPS://SUPPORT.AVAYA.COM/LICENSEINFO UNDER
THE LINK “Avaya Terms of Use for Hosted Services” OR SUCH
SUCCESSOR SITE AS DESIGNATED BY AVAYA, AND ARE
APPLICABLE TO ANYONE WHO ACCESSES OR USES THE
HOSTED SERVICE. BY ACCESSING OR USING THE HOSTED
SERVICE, OR AUTHORIZING OTHERS TO DO SO, YOU, ON
BEHALF OF YOURSELF AND THE ENTITY FOR WHOM YOU ARE
DOING SO (HEREINAFTER REFERRED TO INTERCHANGEABLY
AS “YOU” AND “END USER”), AGREE TO THE TERMS OF USE. IF
YOU ARE ACCEPTING THE TERMS OF USE ON BEHALF A
COMPANY OR OTHER LEGAL ENTITY, YOU REPRESENT THAT
YOU HAVE THE AUTHORITY TO BIND SUCH ENTITY TO THESE
TERMS OF USE. IF YOU DO NOT HAVE SUCH AUTHORITY, OR IF
YOU DO NOT WISH TO ACCEPT THESE TERMS OF USE, YOU
MUST NOT ACCESS OR USE THE HOSTED SERVICE OR
AUTHORIZE ANYONE TO ACCESS OR USE THE HOSTED
SERVICE.
Licenses
THE SOFTWARE LICENSE TERMS AVAILABLE ON THE AVAYA
WEBSITE,
HTTPS://SUPPORT.AVAYA.COM/LICENSEINFO,
UNDER THE LINK “AVAYA SOFTWARE LICENSE TERMS (Avaya
Products)” OR SUCH SUCCESSOR SITE AS DESIGNATED BY
AVAYA, ARE APPLICABLE TO ANYONE WHO DOWNLOADS,
USES AND/OR INSTALLS AVAYA SOFTWARE, PURCHASED
FROM AVAYA INC., ANY AVAYA AFFILIATE, OR AN AVAYA
CHANNEL PARTNER (AS APPLICABLE) UNDER A COMMERCIAL
AGREEMENT WITH AVAYA OR AN AVAYA CHANNEL PARTNER.
UNLESS OTHERWISE AGREED TO BY AVAYA IN WRITING,
AVAYA DOES NOT EXTEND THIS LICENSE IF THE SOFTWARE
WAS OBTAINED FROM ANYONE OTHER THAN AVAYA, AN AVAYA
AFFILIATE OR AN AVAYA CHANNEL PARTNER; AVAYA
RESERVES THE RIGHT TO TAKE LEGAL ACTION AGAINST YOU
AND ANYONE ELSE USING OR SELLING THE SOFTWARE
WITHOUT A LICENSE. BY INSTALLING, DOWNLOADING OR
USING THE SOFTWARE, OR AUTHORIZING OTHERS TO DO SO,
YOU, ON BEHALF OF YOURSELF AND THE ENTITY FOR WHOM
YOU ARE INSTALLING, DOWNLOADING OR USING THE
SOFTWARE (HEREINAFTER REFERRED TO
INTERCHANGEABLY AS “YOU” AND “END USER”), AGREE TO
THESE TERMS AND CONDITIONS AND CREATE A BINDING
CONTRACT BETWEEN YOU AND AVAYA INC. OR THE
APPLICABLE AVAYA AFFILIATE (“AVAYA”).
Avaya grants You a license within the scope of the license types
described below, with the exception of Heritage Nortel Software, for
which the scope of the license is detailed below. Where the order
documentation does not expressly identify a license type, the
applicable license will be a Designated System License as set forth
below in the Designated System(s) License (DS) section as
applicable. The applicable number of licenses and units of capacity
for which the license is granted will be one (1), unless a different
number of licenses or units of capacity is specified in the
documentation or other materials available to You. “Software” means
computer programs in object code, provided by Avaya or an Avaya
Channel Partner, whether as stand-alone products, pre-installed on
hardware products, and any upgrades, updates, patches, bug fixes,
or modified versions thereto. “Designated Processor” means a single
stand-alone computing device. “Server” means a set of Designated
Processors that hosts (physically or virtually) a software application
to be accessed by multiple users. “Instance” means a single copy of
the Software executing at a particular time: (i) on one physical
machine; or (ii) on one deployed software virtual machine (“VM”) or
similar deployment.
License types
Designated System(s) License (DS). End User may install and use
each copy or an Instance of the Software only: 1) on a number of
Designated Processors up to the number indicated in the order; or 2)
up to the number of Instances of the Software as indicated in the
order, Documentation, or as authorized by Avaya in writing. Avaya
may require the Designated Processor(s) to be identified in the order
by type, serial number, feature key, Instance, location or other
specific designation, or to be provided by End User to Avaya through
electronic means established by Avaya specifically for this purpose.
Concurrent User License (CU). End User may install and use the
Software on multiple Designated Processors or one or more Servers,
so long as only the licensed number of Units are accessing and using
the Software at any given time. A “Unit” means the unit on which
Avaya, at its sole discretion, bases the pricing of its licenses and can
be, without limitation, an agent, port or user, an e-mail or voice mail
account in the name of a person or corporate function (e.g.,
webmaster or helpdesk), or a directory entry in the administrative
database utilized by the Software that permits one user to interface
with the Software. Units may be linked to a specific, identified Server
or an Instance of the Software.
Heritage Nortel Software
“Heritage Nortel Software” means the software that was acquired by
Avaya as part of its purchase of the Nortel Enterprise Solutions
Business in December 2009. The Heritage Nortel Software is the

software contained within the list of Heritage Nortel Products located
at https://support.avaya.com/LicenseInfo under the link “Heritage
Nortel Products” or such successor site as designated by Avaya. For
Heritage Nortel Software, Avaya grants Customer a license to use
Heritage Nortel Software provided hereunder solely to the extent of
the authorized activation or authorized usage level, solely for the
purpose specified in the Documentation, and solely as embedded in,
for execution on, or for communication with Avaya equipment.
Charges for Heritage Nortel Software may be based on extent of
activation or use authorized as specified in an order or invoice.
Copyright
Except where expressly stated otherwise, no use should be made of
materials on this site, the Documentation, Software, Hosted Service,
or hardware provided by Avaya. All content on this site, the
documentation, Hosted Service, and the product provided by Avaya
including the selection, arrangement and design of the content is
owned either by Avaya or its licensors and is protected by copyright
and other intellectual property laws including the sui generis rights
relating to the protection of databases. You may not modify, copy,
reproduce, republish, upload, post, transmit or distribute in any way
any content, in whole or in part, including any code and software
unless expressly authorized by Avaya. Unauthorized reproduction,
transmission, dissemination, storage, and or use without the express
written consent of Avaya can be a criminal, as well as a civil offense
under the applicable law.
Virtualization
The following applies if the product is deployed on a virtual machine.
Each product has its own ordering code and license types. Unless
otherwise stated, each Instance of a product must be separately
licensed and ordered. For example, if the end user customer or
Avaya Channel Partner would like to install two Instances of the
same type of products, then two products of that type must be
ordered.
Third Party Components
“Third Party Components” mean certain software programs or
portions thereof included in the Software or Hosted Service may
contain software (including open source software) distributed under
third party agreements (“Third Party Components”), which contain
terms regarding the rights to use certain portions of the Software
(“Third Party Terms”). As required, information regarding distributed
Linux OS source code (for those products that have distributed Linux
OS source code) and identifying the copyright holders of the Third
Party Components and the Third Party Terms that apply is available
in the products, Documentation or on Avaya’s website at:
support.avaya.com/Copyright or such successor site as designated
by Avaya. The open source software license terms provided as Third
Party Terms are consistent with the license rights granted in these
Software License Terms, and may contain additional rights benefiting
You, such as modification and distribution of the open source
software. The Third Party Terms shall take precedence over these
Software License Terms, solely with respect to the applicable Third
Party Components to the extent that these Software License Terms
impose greater restrictions on You than the applicable Third Party
Terms.
The following applies only if the H.264 (AVC) codec is distributed with
the product. THIS PRODUCT IS LICENSED UNDER THE AVC
PATENT PORTFOLIO LICENSE FOR THE PERSONAL USE OF A
CONSUMER OR OTHER USES IN WHICH IT DOES NOT RECEIVE
REMUNERATION TO (i) ENCODE VIDEO IN COMPLIANCE WITH
THE AVC STANDARD (“AVC VIDEO”) AND/OR (ii) DECODE AVC
VIDEO THAT WAS ENCODED BY A CONSUMER ENGAGED IN A
PERSONAL ACTIVITY AND/OR WAS OBTAINED FROM A VIDEO
PROVIDER LICENSED TO PROVIDE AVC VIDEO. NO LICENSE IS
GRANTED OR SHALL BE IMPLIED FOR ANY OTHER USE.
ADDITIONAL INFORMATION MAY BE OBTAINED FROM MPEG LA,
L.L.C. SEE
Service Provider
THE FOLLOWING APPLIES TO AVAYA CHANNEL PARTNER’S
HOSTING OF AVAYA PRODUCTS OR SERVICES. THE PRODUCT
OR HOSTED SERVICE MAY USE THIRD PARTY COMPONENTS
SUBJECT TO THIRD PARTY TERMS AND REQUIRE A SERVICE
PROVIDER TO BE INDEPENDENTLY LICENSED DIRECTLY FROM
THE THIRD PARTY SUPPLIER. AN AVAYA CHANNEL PARTNER’S
HOSTING OF AVAYA PRODUCTS MUST BE AUTHORIZED IN
HTTP://WWW.MPEGLA.COM.
https://
WRITING BY AVAYA AND IF THOSE HOSTED PRODUCTS USE
OR EMBED CERTAIN THIRD PARTY SOFTWARE, INCLUDING
BUT NOT LIMITED TO MICROSOFT SOFTWARE OR CODECS,
THE AVAYA CHANNEL PARTNER IS REQUIRED TO
INDEPENDENTLY OBTAIN ANY APPLICABLE LICENSE
AGREEMENTS, AT THE AVAYA CHANNEL PARTNER’S EXPENSE,
DIRECTLY FROM THE APPLICABLE THIRD PARTY SUPPLIER.
WITH RESPECT TO CODECS, IF THE AVAYA CHANNEL
PARTNER IS HOSTING ANY PRODUCTS THAT USE OR EMBED
THE H.264 CODEC OR H.265 CODEC, THE AVAYA CHANNEL
PARTNER ACKNOWLEDGES AND AGREES THE AVAYA
CHANNEL PARTNER IS RESPONSIBLE FOR ANY AND ALL
RELATED FEES AND/OR ROYALTIES. THE H.264 (AVC) CODEC
IS LICENSED UNDER THE AVC PATENT PORTFOLIO LICENSE
FOR THE PERSONAL USE OF A CONSUMER OR OTHER USES
IN WHICH IT DOES NOT RECEIVE REMUNERATION TO: (I)
ENCODE VIDEO IN COMPLIANCE WITH THE AVC STANDARD
(“AVC VIDEO”) AND/OR (II) DECODE AVC VIDEO THAT WAS
ENCODED BY A CONSUMER ENGAGED IN A PERSONAL
ACTIVITY AND/OR WAS OBTAINED FROM A VIDEO PROVIDER
LICENSED TO PROVIDE AVC VIDEO. NO LICENSE IS GRANTED
OR SHALL BE IMPLIED FOR ANY OTHER USE. ADDITIONAL
INFORMATION FOR H.264 (AVC) AND H.265 (HEVC) CODECS
MAY BE OBTAINED FROM MPEG LA, L.L.C. SEE HTTP://
WWW.MPEGLA.COM.
Compliance with Laws
You acknowledge and agree that it is Your responsibility for
complying with any applicable laws and regulations, including, but not
limited to laws and regulations related to call recording, data privacy,
intellectual property, trade secret, fraud, and music performance
rights, in the country or territory where the Avaya product is used.
Preventing Toll Fraud
“Toll Fraud” is the unauthorized use of your telecommunications
system by an unauthorized party (for example, a person who is not a
corporate employee, agent, subcontractor, or is not working on your
company's behalf). Be aware that there can be a risk of Toll Fraud
associated with your system and that, if Toll Fraud occurs, it can
result in substantial additional charges for your telecommunications
services.
Avaya Toll Fraud intervention
If You suspect that You are being victimized by Toll Fraud and You
need technical assistance or support, call Technical Service Center
Toll Fraud Intervention Hotline at +1-800-643-2353 for the United
States and Canada. For additional support telephone numbers, see
the Avaya Support website:
successor site as designated by Avaya.
Security Vulnerabilities
Information about Avaya’s security support policies can be found in
the Security Policies and Support section of
support.avaya.com/security.
Suspected Avaya product security vulnerabilities are handled per the
Avaya Product Security Support Flow (
support.avaya.com/css/P8/documents/100161515).
Downloading Documentation
For the most current versions of Documentation, see the Avaya
Support website:
as designated by Avaya.
Contact Avaya Support
See the Avaya Support website:
product or Hosted Service notices and articles, or to report a problem
with your Avaya product or Hosted Service. For a list of support
telephone numbers and contact addresses, go to the Avaya Support
website: https://support.avaya.com (or such successor site as
designated by Avaya), scroll to the bottom of the page, and select
Contact Avaya Support.
Trademarks
The trademarks, logos and service marks (“Marks”) displayed in this
site, the Documentation, Hosted Service(s), and product(s) provided
by Avaya are the registered or unregistered Marks of Avaya, its
affiliates, its licensors, its suppliers, or other third parties. Users are
https://support.avaya.com, or such successor site
https://support.avaya.com or such
https://
https://
https://support.avaya.com for

not permitted to use such Marks without prior written consent from
Avaya or such third party which may own the Mark. Nothing
contained in this site, the Documentation, Hosted Service(s) and
product(s) should be construed as granting, by implication, estoppel,
or otherwise, any license or right in and to the Marks without the
express written permission of Avaya or the applicable third party.
Avaya is a registered trademark of Avaya Inc.
All non-Avaya trademarks are the property of their respective owners.
Linux® is the registered trademark of Linus Torvalds in the U.S. and
other countries.

Contents
Chapter 1: Introduction............................................................................................................ 8
Purpose.................................................................................................................................. 8
Chapter 2: Overview................................................................................................................. 9
About the Avaya Aura® MS application...................................................................................... 9
New in this release.................................................................................................................. 9
Chapter 3: System requirements and preparation.............................................................. 10
System requirements............................................................................................................. 10
Hardware requirements and setup.......................................................................................... 10
Hardware requirements................................................................................................... 10
1+1 High Availability cluster requirements.......................................................................... 11
Installing the server.......................................................................................................... 11
Configuring server BIOS for maximum performance........................................................... 12
Connecting Avaya Aura® MS to the network...................................................................... 12
Software requirements........................................................................................................... 12
Supported operating systems........................................................................................... 12
Linux kernel requirements................................................................................................ 12
MySQL server................................................................................................................. 13
Net-SNMP...................................................................................................................... 13
Required network ports.................................................................................................... 13
Third-party software......................................................................................................... 13
Obtaining Avaya Aura® MS Software...................................................................................... 14
Linux® software............................................................................................................... 14
Red Hat Enterprise Linux installation....................................................................................... 14
Installing RHEL............................................................................................................... 14
Configuring the hostname................................................................................................ 15
Configuring the Linux® firewall.......................................................................................... 15
Configure core file generation for 1+1 High Availability systems.......................................... 16
Logical Volume Management support............................................................................... 17
Network and security configuration......................................................................................... 17
Securing Avaya Aura® MS installations............................................................................. 17
Virtual Teaming Adapter configuration............................................................................... 18
NIC and switch configuration............................................................................................ 18
PVI Check............................................................................................................................ 18
Obtaining the PVI Check software.................................................................................... 19
Verifying specifications using PVI Check........................................................................... 19
Viewing PVI Check reports............................................................................................... 20
Verifying specifications using PVI Check................................................................................. 20
Using PVI Check in the command-line mode..................................................................... 21
PVI Check in the installer mode........................................................................................ 21
April 2020 Installing and Updating Avaya Aura® Media Server Application on customer-supplied
hardware and OS 5
Comments on this document? infodev@avaya.com

Contents
Viewing PVI Check reports..................................................................................................... 21
Chapter 4: Element Manager................................................................................................. 23
Element Manager overview.................................................................................................... 23
EM installation ...................................................................................................................... 23
Accessing Avaya Aura® MS EM.............................................................................................. 23
Chapter 5: Installation............................................................................................................ 25
Linux® installation.................................................................................................................. 25
Installing Avaya Aura® MS on Linux® using the interactive command-line mode.................... 25
Installing Avaya Aura® MS on Linux® using the silent mode................................................. 27
Linux® uninstallation.............................................................................................................. 28
Uninstalling Avaya Aura® MS from Linux® using the interactive command-line mode............. 29
Uninstalling Avaya Aura® MS from Linux® using the silent mode ......................................... 30
Changing the default software ports........................................................................................ 30
Chapter 6: Patches................................................................................................................. 32
Quick Fix Engineering overview.............................................................................................. 32
Obtaining QFE...................................................................................................................... 32
Description of the patch tool................................................................................................... 32
Installing a QFE patch........................................................................................................... 33
Removing a QFE patch.......................................................................................................... 35
Managing QFEs for 1+1 High Availability clusters.................................................................... 37
Managing QFEs for N+1 load sharing clusters......................................................................... 38
Chapter 7: Service packs....................................................................................................... 40
Installing a service pack......................................................................................................... 40
Removing a service pack....................................................................................................... 42
Managing service packs for 1+1 High Availability clusters......................................................... 44
Managing service packs for N+1 load sharing clusters.............................................................. 45
Chapter 8: Upgrade from a previous release....................................................................... 47
Upgrade overview................................................................................................................. 47
Simplex media server upgrade overview........................................................................... 47
1+1 High Availability cluster upgrade overview................................................................... 48
N+1 load sharing cluster upgrade overview....................................................................... 48
Prerequisites for upgrade....................................................................................................... 49
Performing a backup.............................................................................................................. 49
Choose an upgrade procedure............................................................................................... 50
Upgrading automatically......................................................................................................... 51
Upgrading manually............................................................................................................... 53
Upgrading 1+1 High Availability clusters.................................................................................. 56
Upgrading N+1 load sharing clusters...................................................................................... 57
Rolling back to a previous release.......................................................................................... 58
Chapter 9: Server replacement.............................................................................................. 60
Replacing Avaya Aura® MS hardware..................................................................................... 60
Moving Avaya Aura® MS data to a new server......................................................................... 61
April 2020 Installing and Updating Avaya Aura® Media Server Application on customer-supplied
hardware and OS 6
Comments on this document? infodev@avaya.com

Contents
Chapter 10: Related resources.............................................................................................. 63
Media Server documentation.................................................................................................. 63
Training................................................................................................................................ 64
Viewing Avaya Mentor videos................................................................................................. 64
Support................................................................................................................................ 65
Using the Avaya InSite Knowledge Base........................................................................... 65
April 2020 Installing and Updating Avaya Aura® Media Server Application on customer-supplied
hardware and OS 7
Comments on this document? infodev@avaya.com

Chapter 1: Introduction
Purpose
Use this document when you are working with the Avaya Aura® Media Server (MS) application
that is installed on servers you provide.
Important:
Avaya also provides appliance versions of Avaya Aura® MS. Do not use this document when
you are working with Avaya Aura® MS as a physical or virtual appliance. For appliance
installation, see Deploying and Updating Avaya Aura® Media Server Appliance.
This document is intended for people who install, upgrade, and maintain the non-appliance
software-only Avaya Aura® Media Server application.
Administrators of appliance versions of Avaya Aura® MS must not use this document.
April 2020 Installing and Updating Avaya Aura® Media Server Application on customer-supplied
hardware and OS 8
Comments on this document? infodev@avaya.com

Chapter 2: Overview
About the Avaya Aura® MS application
The Avaya Aura® MS application is a software-only version of Avaya Aura® Media Server which is
installed on servers that you provide.
An Avaya Aura® MS application is installed as follows:
• You must provide a physical server with the Red Hat Enterprise Linux® operating system.
• You must run an Avaya provided installer to install Avaya Aura® MS on your server.
• You must maintain software updates for the operating system.
Important:
Avaya also provides appliance versions of Avaya Aura® Media Server. Do not use this
document when you are working with the Avaya Aura® Media Server as an appliance in the
VMware® virtualized environment or as an appliance on Avaya Common Server. For
appliance installations, see Deploying and Updating Avaya Aura® Media Server Appliance.
New in this release
• Removed support for Red Hat Enterprise Linux® Server 6.x
• Video Compositor (VCMP) is a new optional component that provides video transcoding and
compositing capabilities. The Video Compositing Resource server profile provides a
scaleable video compositing feature by creating multiple video processing media servers.
• Web Collaboration (WCS) is a new optional component that provides advanced content
sharing functionality.
• FIPS 140-2
• EM emergency login based on EM authentication instead of OS.
April 2020 Installing and Updating Avaya Aura® Media Server Application on customer-supplied
hardware and OS 9
Comments on this document? infodev@avaya.com
Chapter 3: System requirements and
preparation
System requirements
You can install Avaya Aura® Media Server (MS) on the commercially available off-the-shelf
(COTS) hardware by using standard server operating systems. The hardware and operating
system configuration must meet the minimum system requirements to support the functionality of
Avaya Aura® MS. Avaya provides Platform Vendor Independent (PVI) Check software to verify the
server you have installed meets the system requirements.
Review the system requirements in this chapter and perform the procedures to configure your
system. You must run the PVI Check to verify that the system meets the minimum requirements
after configuration.
Hardware requirements and setup
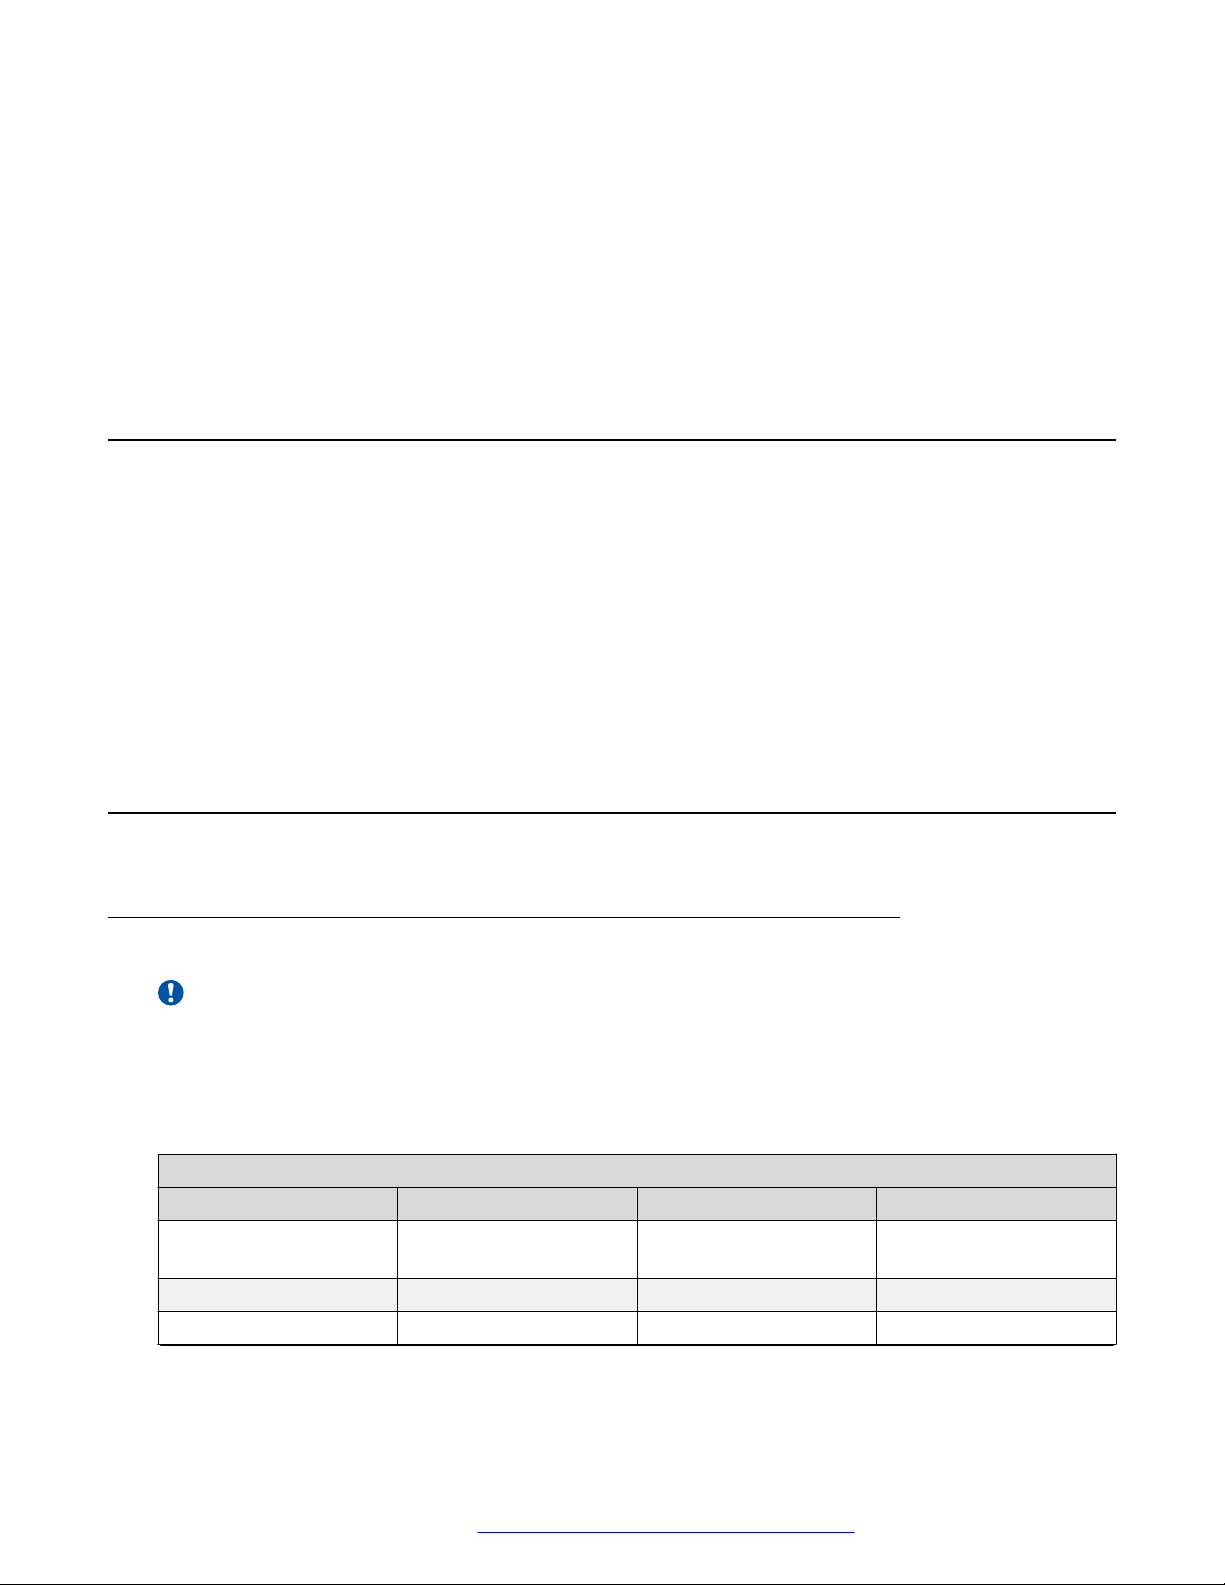
Hardware requirements
Important:
• Intel® processors are strongly recommended, or performance cannot be guaranteed.
• Intel® and AMD processors require minimum SSE 4.1 support.
The server must meet the following hardware requirements to support Avaya Aura® MS
functionality:
Hardware requirements
Hardware Component Minimum Typical High Capacity
Number of Processor
cores
Processor Speed 1.2 GHz 2.2 GHz or greater 2.5 GHz or greater
Memory 2 GB 4 GB 8 GB or greater
2 4 8 or greater
Table continues…
April 2020 Installing and Updating Avaya Aura® Media Server Application on customer-supplied
hardware and OS 10
Comments on this document? infodev@avaya.com
Hardware requirements and setup
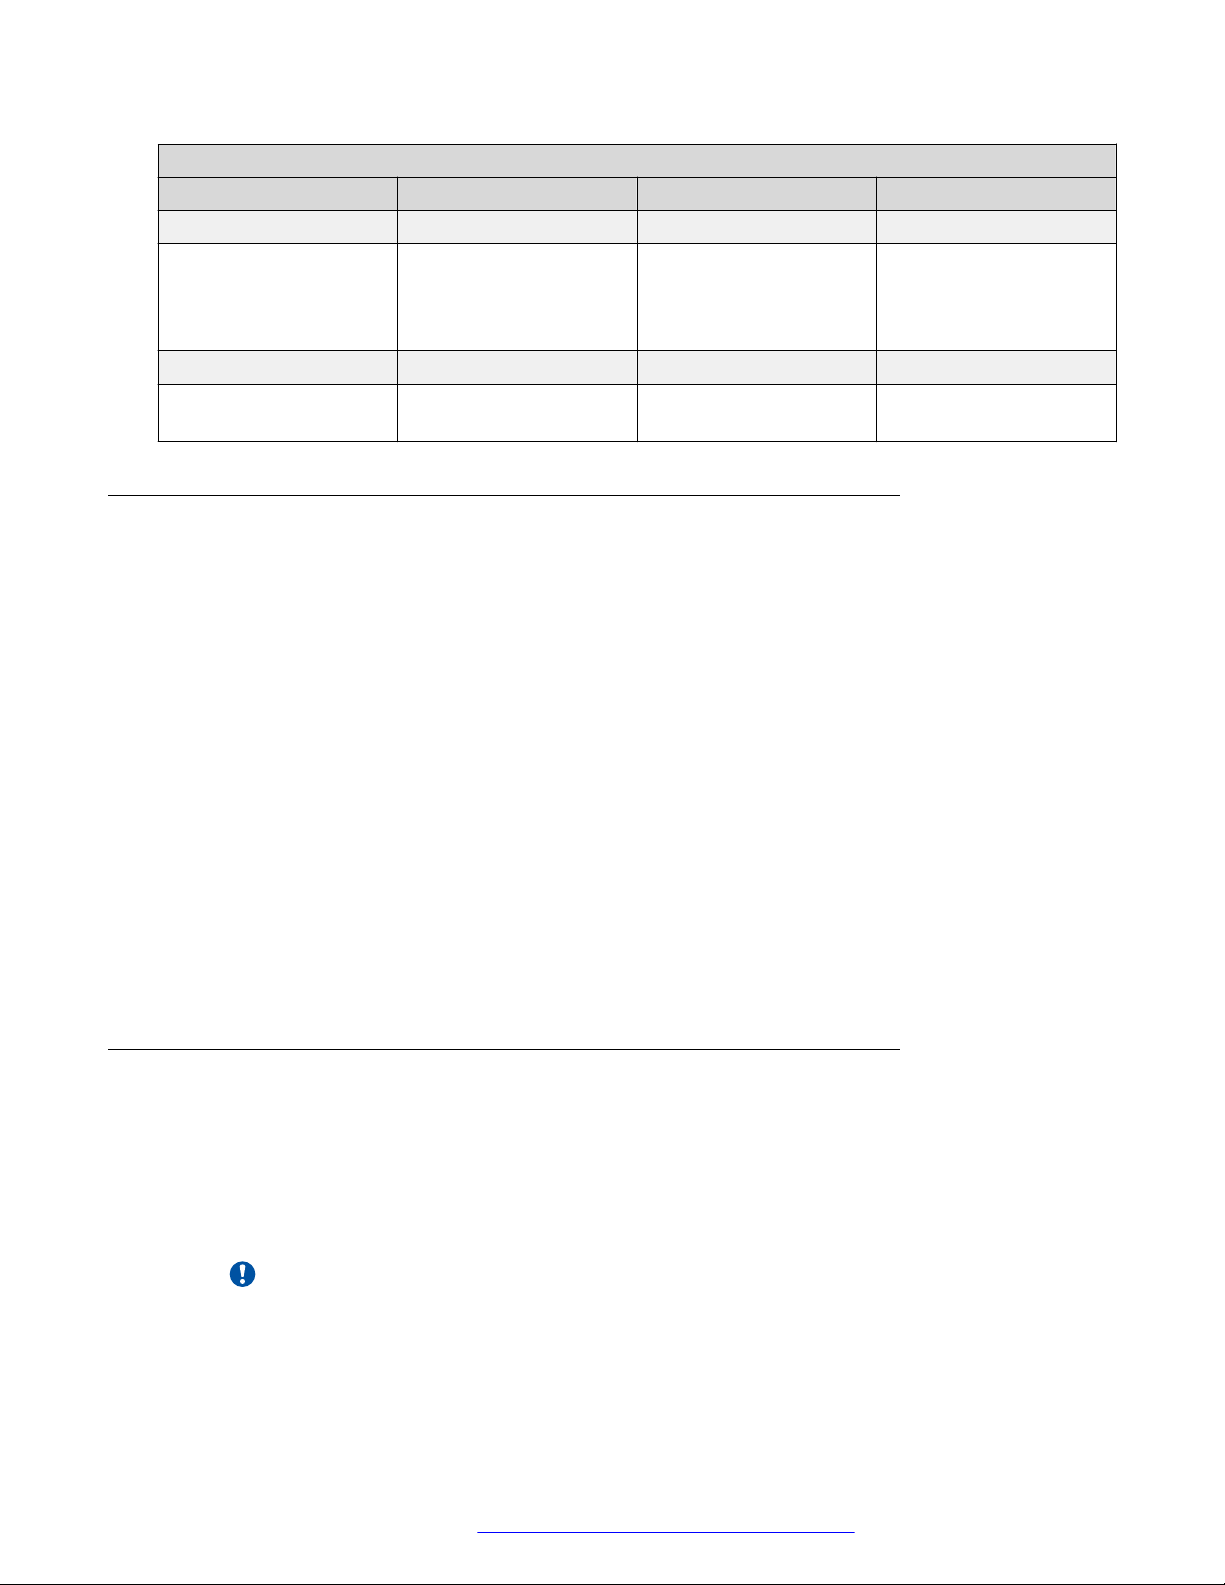
Hardware requirements
Hardware Component Minimum Typical High Capacity
Network Interfaces 1 at 100 Mbps or greater 2 at 1000 Mbps teamed 2 at 1000 Mbps teamed
Recommended partition
size for Avaya Aura® MS
software (default
partition is /opt).
Disk Drive Speed 5,000 RPM 10,000 RPM 10,000 RPM
Input/Output Operations
per Second (IOPS)
At least 10 GB (3 GB
free minimum to install)
100 100 100
50 GB or greater 250 GB or greater
1+1 High Availability cluster requirements
The 1+1 High Availability cluster configuration ensures uninterrupted availability of media
processing in cases where a media server fails. Use the High Availability configuration option
when you require the capacity of only a single Avaya Aura® MS.
The High Availability configuration deploys as a Primary server and a Backup server. Only one
server is active at a time. The other server is waiting in synchronized hot standby to take over
instantly.
Both servers must have identical configuration so that either server can take over the full media
processing load if the other server fails. Ensure that the deployed servers meet the following
requirements:
• Each media server in a 1+1 High Availability cluster deployed must be deployed on similar
hardware with the same processor model. The servers can be from a different manufacturer,
but the two systems must have the same clock rate, number of cores, bus speed, and other
performance-critical specifications.
• There is no inter-cluster communication between different 1+1 High Availability clusters.
Different 1+1 High Availability clusters can use different hardware or profiles, but the
specifications within a cluster must match.
Installing the server
Procedure
1. Install the hardware by following the instructions of the manufacturer.
2. Connect applicable peripheral devices. For example, a monitor, a keyboard, and a mouse.
3. Connect the power cables to the server and to a properly grounded power source.
Important:
If your server has redundant power supplies, connect the power cables to both power
supplies.
April 2020 Installing and Updating Avaya Aura® Media Server Application on customer-supplied
hardware and OS 11
Comments on this document? infodev@avaya.com

System requirements and preparation
4. Turn the server on.
Configuring server BIOS for maximum performance
For maximum system performance, ensure that the energy savings features are disabled or that
the maximum performance settings are enabled in BIOS.
For more information about the configuration settings and the procedure to enter and alter the
BIOS settings, see the documentation for your server.
Connecting Avaya Aura® MS to the network
Procedure
1. Connect the network cables between the network ports on the back of the server and the
required Ethernet switch.
Important:
When using multiple network connections, install and connect each network cable to
the correct Ethernet switch for network redundancy.
2. At each end of the Ethernet connection, ensure that the Ethernet activity lights are ON.
Software requirements
Supported operating systems
Install Avaya Aura® MS only on the following operating system:
• Red Hat Enterprise Linux® Server 7.x 64–bit
Important:
Avaya Aura® MS does not support operating systems other than those listed.
Linux kernel requirements
Avaya Aura® MSrequires Symmetric Multiprocessing (SMP). All i686 and x86_64 kernel variants
of RHEL 7 include SMP.
April 2020 Installing and Updating Avaya Aura® Media Server Application on customer-supplied
hardware and OS 12
Comments on this document? infodev@avaya.com
Software requirements
You require Physical Address Extension (PAE) to install an i686 32-bit variant of RHEL. PAE
enables 32-bit architectures to address more than 4 GB of memory. PAE is enabled by default for
RHEL 5 Advanced Platform and RHEL 5 or RHEL 6 Server 32-bit variants.
MySQL server
Avaya Aura® MS installations include a MySQL server. Only one MySQL server instance must run
on the system even if the other MySQL server instance opens different server ports.
Net-SNMP
Net-SNMP is a suite of management and monitoring applications that you can optionally install. If
you require Net-SNMP on your system, install it before you install Avaya Aura® MS.
Required network ports
Avaya Aura® MS requires network ports for communicating with clients and other servers in the
network and for media transmission. Use the document Avaya Port Matrix: Avaya Aura® Media
Server 8.0.x to properly configure firewall policies on the local server.
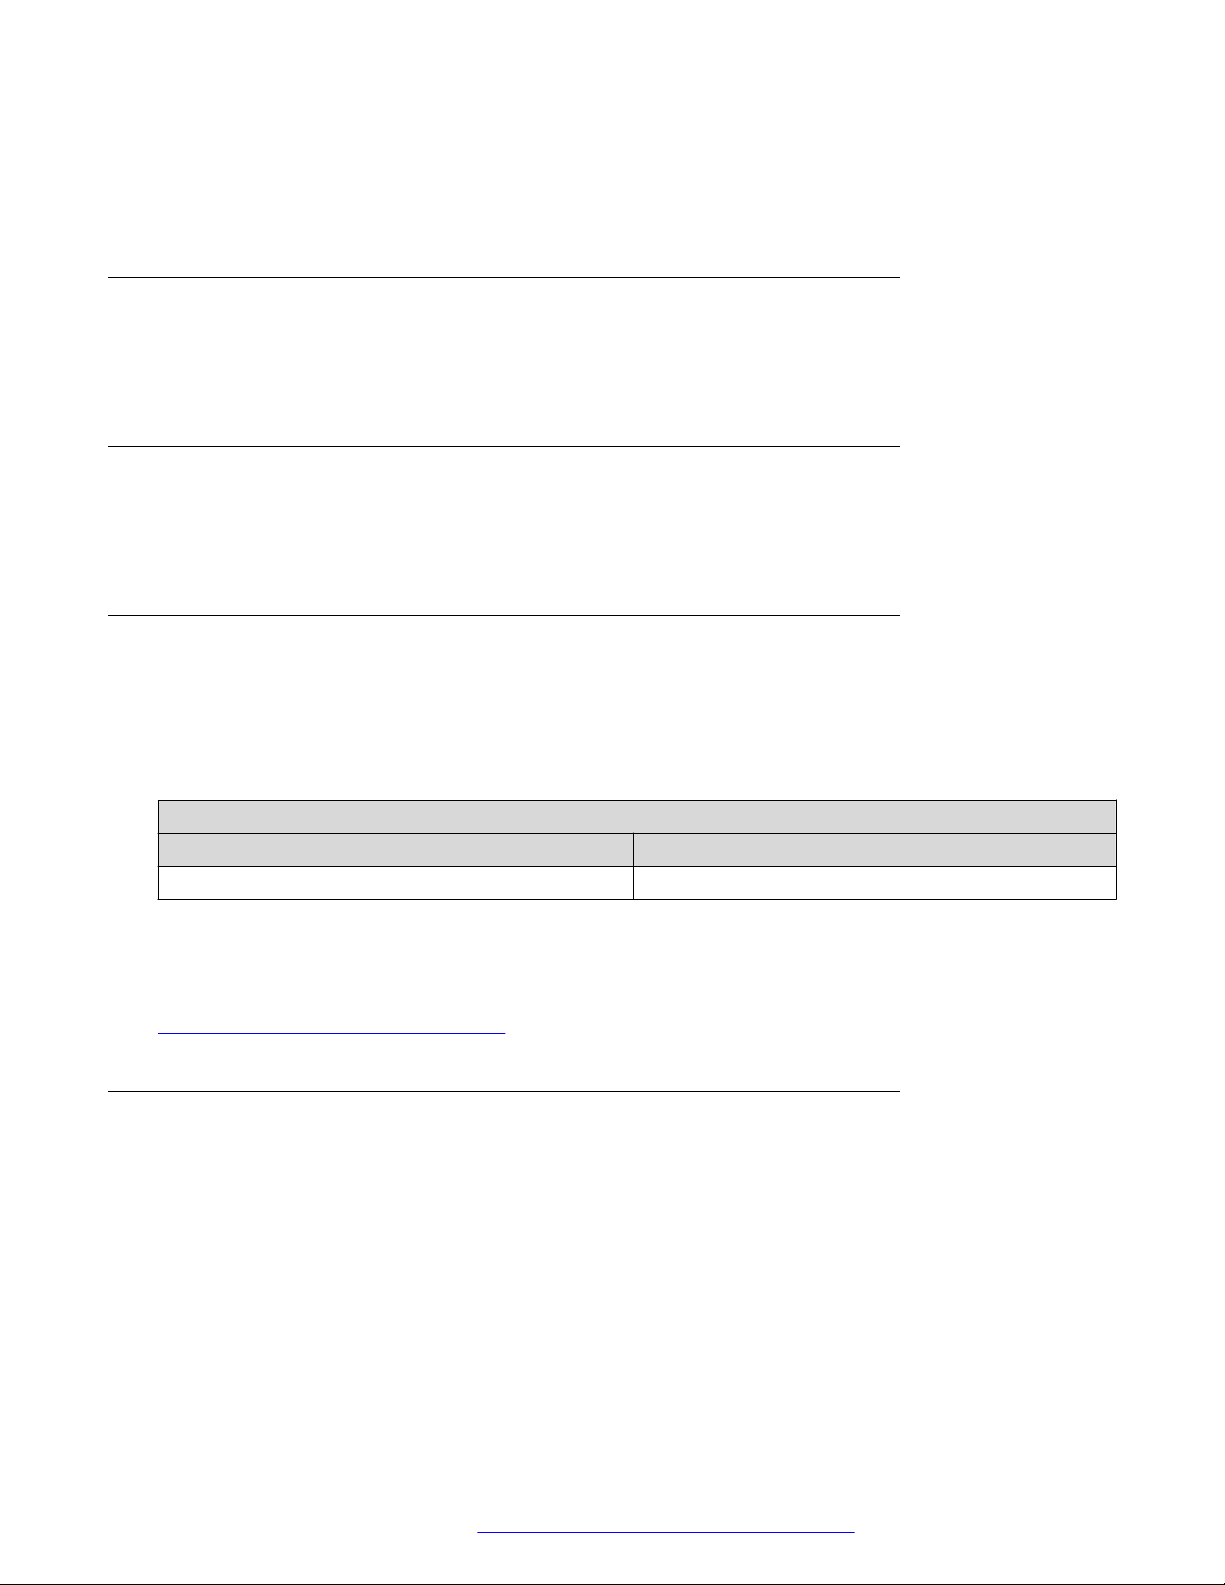
The following table lists default media port ranges. The port ranges are configurable.
External UDP port ranges required for media to clients
Linux® port range Direction required
6000-32599 Inbound and Outbound
After Avaya Aura® MS is installed, you can use Avaya Aura® MS Element Manager to reassign
many of the ports Avaya Aura® MS uses.
Related links
Changing the default software ports on page 30
Third-party software
You can install additional third-party software on the same system, when Avaya Aura® MS is
installed on servers that you provide.
Avaya may request that you remove third-party software during troubleshooting support, if the
third-party software is suspected of contributing to a problem.
Third-party antivirus scans must be configured to exclude directories that include Avaya Aura® MS
software.
April 2020 Installing and Updating Avaya Aura® Media Server Application on customer-supplied
hardware and OS 13
Comments on this document? infodev@avaya.com

System requirements and preparation
Third-party software that scans the system in real-time or that performs full system scans can
reduce capacity or impact the functionality of the media server. Scanning should be limited to once
a day during periods of low system use.
Obtaining Avaya Aura® MS Software
Linux® software
About this task
You can download Avaya Aura® MS application software from the Avaya Product Licensing and
Delivery System (Avaya PLDS) at
https://plds.avaya.com.
Red Hat Enterprise Linux installation
Installing RHEL
About this task
Perform the following procedure to install the RHEL operating system and configure the operating
system to meet Avaya Aura® MS system requirements:
Procedure
1. Install the RHEL operating system by using the Red Hat installation procedures.
You do not need to customize the software installation or include optional packages during
the initial installation. Use the default server installation options.
2. Install the latest, critical security updates.
For update procedures, see Red Hat documentation. You can install security updates by
using the YUM package manager.
3. Add the required user and administrator accounts by using defined procedures for your
site.
4. Restart the server.
April 2020 Installing and Updating Avaya Aura® Media Server Application on customer-supplied
hardware and OS 14
Comments on this document? infodev@avaya.com
Red Hat Enterprise Linux installation
Configuring the hostname
About this task
Perform the following procedure to associate the IP address of the server with the hostname and
domain name when DNS is unavailable:
Procedure
Edit the file /etc/hosts and ensure that the IP address mapping to the hostname is configured
as shown in the first line of the following example:
135.45.72.153 Server4885.lab.avaya.com Server4885
127.0.0.1 localhost.localdomain localhost
::1 localhost6.localdomain6 localhost6
Important:
The hostname must not appear in the other lines which associate localhost.
Configuring the Linux® firewall
About this task
For proper firewall configuration, you must follow the adopting product documentation and
installation procedures. If adopting product firewall procedures are unavailable, perform the
following procedure to modify RHEL default firewall rules so that the external ports that are listed
in the tables of section
you do not use the default RHEL firewall, see the firewall documentation.
Tip:
Do not use this procedure if you need to enable all ports. Instead, use a Linux® shell on Avaya
Aura® MS and turn off the firewall as follows:
service iptables stop
chkconfig iptables off
If IPv6 networking is used, turn of the IPv6 firewall as follows:
service ip6tables stop
chkconfig ip6tables off
Procedure
1. For IPv4, do the following:
Required network ports on page 13 are permitted through the firewall. If
a. To allow the required ports through the firewall, edit the file /etc/sysconfig/
iptables.
To open each required port in the firewall, add rules to iptables.
For example, to open the 8080 port, type:
April 2020 Installing and Updating Avaya Aura® Media Server Application on customer-supplied
hardware and OS 15
Comments on this document? infodev@avaya.com

System requirements and preparation
-A INPUT -m state --state NEW -m tcp -p tcp --dport 8080 –j
ACCEPT
b. Save and close the iptables file.
c. To restart the firewall, type service iptables restart.
d. Verify that the firewall is set to accept connections on the ports you added to the
iptables file. Look for an ACCEPT row relating to the required ports in the output of
this command:
iptables -L –n
2. For IPv6, do the following:
a. To allow the required ports through the firewall, edit the file /etc/sysconfig/
ip6tables.
To open each required port in the firewall, add rules to ip6tables.
For example, to open the 8080 port, type:
-A INPUT -m state --state NEW -m tcp -p tcp --dport 8080 –j
ACCEPT
b. Save and close the ip6tables file.
c. To restart the firewall, type service ip6tables restart.
d. Verify that the firewall is set to accept connections on the ports you added to the
ip6tables file. Look for an ACCEPT row relating to the required ports in the output of
this command:
ip6tables -L –n
Related links
Hardware requirements on page 10
Required network ports on page 13
Configure core file generation for 1+1 High Availability systems
The system creates a core file when a software process unexpectedly exits. Support engineers
use the information in the core file to diagnose problems. The system copies the memory and
other system information that is related to the process to a file on a disk. A busy system has large
processes. The time taken by the system to create the core file depends on the size of the
process in system memory. The larger the process, the longer the duration of the core file
creation. Avaya Aura® MS cannot resume service until the core file creation is complete.
Therefore, core file generation must be disabled at the system level so that the media server can
immediately recover. If core file creation is not disabled, end-users experience temporary voice
loss or loss of service when processes unexpectedly quit.
April 2020 Installing and Updating Avaya Aura® Media Server Application on customer-supplied
hardware and OS 16
Comments on this document? infodev@avaya.com

Network and security configuration
Core file generation must be disabled on the servers that are being configured to use the High
Availability feature. Core file generation can be enabled temporarily on High Availability systems
when you are working with the Avaya technical support engineers.
Enabling core file generation
About this task
Perform the following procedure to restore typical system defaults for core file generation or when
instructed by Avaya support to enable core file generation:
Procedure
In a Linux® shell, enable core file generation using the following command:
echo |/usr/libexec/abrt-hook-ccpp %s %c %p %u %g %t e >/proc/sys/kernel/
core_pattern
Disabling the core file generation
About this task
Perform the following procedure for the servers that are being configured to use the 1+1 High
Availability feature to alter the system configuration for core file generation.
Procedure
In a Linux® shell, disable core file generation using the following command:
echo /nowhere/null > /proc/sys/kernel/core_pattern
Logical Volume Management support
Avaya Aura® MS is compatible with Logical Volume Management (LVM) on RHEL. You can resize
logical volumes on the system provided that the Avaya Aura® MS is not in service and the
directory structure is not changed.
Network and security configuration
Securing Avaya Aura® MS installations
About this task
Perform the following procedure to apply the following optional security measures to the operating
system you installed:
April 2020 Installing and Updating Avaya Aura® Media Server Application on customer-supplied
hardware and OS 17
Comments on this document? infodev@avaya.com

System requirements and preparation
Procedure
1. (Optional) Configure the operating system by using the defined site security procedures.
2. (Optional) Install antivirus software and ensure that you exclude the following directories
and their subdirectories from the scans:
• Linux®:
installpath/ma/MAS/common/log
installpath/ma/MAS/platdata
Important:
Scanning software can degrade the performance and decrease the reliability of the
system. Install virus scanning software only if you connect the system to a network
exposed to the Internet.
To maintain the performance of the server, you must schedule virus scans only during
maintenance periods or low usage hours.
Virtual Teaming Adapter configuration
Teaming, also called bonding, of the network interfaces on your server into a single logical network
interface provides increased throughput and redundancy in case one of the network interfaces
fails. Teaming configuration is hardware specific. Follow the procedures provided by your server
hardware manufacturer.
Avaya recommends using the active-backup bonding mode to provide fault tolerance for the
system.
NIC and switch configuration
Auto-negotiation of transmission speed and duplex mode is mandatory for 1000 BASE-T gigabit
Ethernet over copper. To avoid duplex mode mismatches and other interoperability problems,
ensure that auto-negotiation is configured on the Network Interface Cards (NICs) and the switch.
Configure the NICs and the switch with matching modes. If you disable auto-negotiation and
configure the NICs to full-duplex mode or half-duplex mode then the switch must also have autonegotiation disabled and be set to the matching full-duplex mode or half-duplex mode. For more
information, see the configuration procedures your server and switch manufacturer provides.
PVI Check
PVI Check is a software that you run to verify that a server and the configured operating system
meet the Avaya Aura® MS hardware and software requirements. PVI Check is available as a
April 2020 Installing and Updating Avaya Aura® Media Server Application on customer-supplied
hardware and OS 18
Comments on this document? infodev@avaya.com

standalone software that you can run on a server prior to installation and is automatically run by
the Avaya Aura® MS installer. The installer blocks the installation if it detects any noncompliance.
Obtaining the PVI Check software
About this task
Follow the recommendations in the documentation of the adopting product on how to obtain and
run the PVI Check utility. You can download PVI Check to the server or you can obtain the
software from the product installation DVD.
The software for PVI Check is as follows:
• Linux®: amspvicheck
Verifying specifications using PVI Check
PVI Check provides two different user interface modes:
PVI Check
• The Command-line mode.
• The Integrated installer mode, whenever the media server installer is run.
Related links
Using PVI Check in the command-line mode on page 19
PVI Check in the installer mode on page 20
Using PVI Check in the command-line mode
About this task
You can run PVI Check software in command-line mode on Linux®. The command-line mode of
the tool displays the results to the console or generates a results text file.
Procedure
1. Open a Linux® shell.
2. From the command-line, go to the directory where you saved the amspvicheck file.
3. Run the system check by using one of the following commands:
amspvicheck -m console
amspvicheck -m log -f results.txt
4. Review the results in the console window or in the results.txt file.
Related links
Verifying specifications using PVI Check on page 19
April 2020 Installing and Updating Avaya Aura® Media Server Application on customer-supplied
hardware and OS 19
Comments on this document? infodev@avaya.com

System requirements and preparation
PVI Check in the installer mode
When you run the Avaya Aura® MS installer, the installer automatically runs PVI Check. PVI Check
runs silently during all installations. PVI Check does not display any output unless PVI Check
detects a warning, or a failure. In case of a warning or failure system message, follow the onscreen instructions and see the GUI mode or the command-line mode PVI Check instructions
discussed earlier in this section.
Related links
Verifying specifications using PVI Check on page 19
Viewing PVI Check reports
About this task
After the installation is completed, you can review the results of the PVI Check inspection in the
following ways:
Procedure
1. In the home directory of the user, check the amspviresult.xml file located in /root.
2. Use the log capture utility. Go to EM > Tools > Logcapture, and click download.
The generated log archive contains the results in the PVI Check Results.htm file.
3. View the results directly in EM. Go to EM > Tools > PVI Results.
The results of the PVI Check inspection run during the installation are shown on this EM
page.
Note:
You can only use Avaya Aura® MS EM after the installation of your system is complete.
Avaya Aura® MS EM is an optional component which may not be installed on your
system.
Verifying specifications using PVI Check
PVI Check provides two different user interface modes:
• The Command-line mode.
• The Integrated installer mode, whenever the media server installer is run.
Related links
Using PVI Check in the command-line mode on page 19
PVI Check in the installer mode on page 20
April 2020 Installing and Updating Avaya Aura® Media Server Application on customer-supplied
hardware and OS 20
Comments on this document? infodev@avaya.com

Viewing PVI Check reports
Using PVI Check in the command-line mode
About this task
You can run PVI Check software in command-line mode on Linux®. The command-line mode of
the tool displays the results to the console or generates a results text file.
Procedure
1. Open a Linux® shell.
2. From the command-line, go to the directory where you saved the amspvicheck file.
3. Run the system check by using one of the following commands:
amspvicheck -m console
amspvicheck -m log -f results.txt
4. Review the results in the console window or in the results.txt file.
Related links
Verifying specifications using PVI Check on page 19
PVI Check in the installer mode
When you run the Avaya Aura® MS installer, the installer automatically runs PVI Check. PVI Check
runs silently during all installations. PVI Check does not display any output unless PVI Check
detects a warning, or a failure. In case of a warning or failure system message, follow the onscreen instructions and see the GUI mode or the command-line mode PVI Check instructions
discussed earlier in this section.
Related links
Verifying specifications using PVI Check on page 19
Viewing PVI Check reports
About this task
After the installation is completed, you can review the results of the PVI Check inspection in the
following ways:
Procedure
1. In the home directory of the user, check the amspviresult.xml file located in /root.
2. Use the log capture utility. Go to EM > Tools > Logcapture, and click download.
The generated log archive contains the results in the PVI Check Results.htm file.
April 2020 Installing and Updating Avaya Aura® Media Server Application on customer-supplied
hardware and OS 21
Comments on this document? infodev@avaya.com
 Loading...