

Page 1

Part No. P0936572 02
Business Communications
Manager
Attendant Console User Guide
Page 2

2
Copyright © 2002 Nortel Networks
All rights reserved.
The information in this document is subject to change without notice. The statements, configurations, technical data, and
recommendations in this document are believed to be accurate and reliable, but are presented without express or implied
warranty. Users must take full responsibility for their applications of any products specified in this document. The
information in this document is proprietary to Nortel Networks NA Inc.
Trademarks
NORTEL NETWORKS is a trademark of Nortel Networks.
Microsoft, MS, MS-DOS, Windows, and Windows NT are registered trademarks of Microsoft Corporation.
All other trademarks and registered trademarks are the pro pert y of their respective owners.
P0936572 02
Page 3

Contents
Chapter 1
Introduction to Attendant Console. . . . . . . . . . . . . . . . . . . . . . . . . . . . . . . . . 7
About Attendant Console . . . . . . . . . . . . . . . . . . . . . . . . . . . . . . . . . . . . . . . . . . . . . . . . 7
Attendant Console components . . . . . . . . . . . . . . . . . . . . . . . . . . . . . . . . . . . . . . . . . . 8
The Server component . . . . . . . . . . . . . . . . . . . . . . . . . . . . . . . . . . . . . . . . . . . . . . 8
The Client component . . . . . . . . . . . . . . . . . . . . . . . . . . . . . . . . . . . . . . . . . . . . . . . 8
The Reports component . . . . . . . . . . . . . . . . . . . . . . . . . . . . . . . . . . . . . . . . . . . . . 8
Attendant Console features . . . . . . . . . . . . . . . . . . . . . . . . . . . . . . . . . . . . . . . . . . . . . . 9
Chapter 2
Getting started . . . . . . . . . . . . . . . . . . . . . . . . . . . . . . . . . . . . . . . . . . . . . . . . 11
Configuring Attendant Console . . . . . . . . . . . . . . . . . . . . . . . . . . . . . . . . . . . . . . . . . . 11
Starting Attendant Console . . . . . . . . . . . . . . . . . . . . . . . . . . . . . . . . . . . . . . . . . . . . . 11
Types of attendant setups . . . . . . . . . . . . . . . . . . . . . . . . . . . . . . . . . . . . . . . . . . . . . . 12
Full-time main attendant . . . . . . . . . . . . . . . . . . . . . . . . . . . . . . . . . . . . . . . . . . . . 12
Part-time main attendant . . . . . . . . . . . . . . . . . . . . . . . . . . . . . . . . . . . . . . . . . . . . 13
Backup attendant . . . . . . . . . . . . . . . . . . . . . . . . . . . . . . . . . . . . . . . . . . . . . . . . . 14
Overflow attendant . . . . . . . . . . . . . . . . . . . . . . . . . . . . . . . . . . . . . . . . . . . . . . . . 16
Assistant attendant . . . . . . . . . . . . . . . . . . . . . . . . . . . . . . . . . . . . . . . . . . . . . . . . 17
Adding or removing an assistant attendant’s assigned extensions . . . . . . . . . . . . 18
Setting up other attendant features . . . . . . . . . . . . . . . . . . . . . . . . . . . . . . . . . . . . . . . 19
Call notification . . . . . . . . . . . . . . . . . . . . . . . . . . . . . . . . . . . . . . . . . . . . . . . . . . . 19
Restoring the Attendant Console window . . . . . . . . . . . . . . . . . . . . . . . . . . . . . . . 20
Setting the Attendant Selected option . . . . . . . . . . . . . . . . . . . . . . . . . . . . . . . . . . 21
Disabling Transfer options . . . . . . . . . . . . . . . . . . . . . . . . . . . . . . . . . . . . . . . . . . 22
3
Chapter 3
Using the Attendant Console window . . . . . . . . . . . . . . . . . . . . . . . . . . . . . 23
Components of the Attendant Console window . . . . . . . . . . . . . . . . . . . . . . . . . . . . . . 23
Status bar . . . . . . . . . . . . . . . . . . . . . . . . . . . . . . . . . . . . . . . . . . . . . . . . . . . . . . . . . . 24
Attendant Console menus . . . . . . . . . . . . . . . . . . . . . . . . . . . . . . . . . . . . . . . . . . . . . . 24
Using keystroke commands . . . . . . . . . . . . . . . . . . . . . . . . . . . . . . . . . . . . . . . . . . . . 30
Access keys . . . . . . . . . . . . . . . . . . . . . . . . . . . . . . . . . . . . . . . . . . . . . . . . . . . . . 30
Menu keystroke commands . . . . . . . . . . . . . . . . . . . . . . . . . . . . . . . . . . . . . . . . . 30
Keystroke commands with the Alt key . . . . . . . . . . . . . . . . . . . . . . . . . . . . . . . . . 31
Using right-click capability . . . . . . . . . . . . . . . . . . . . . . . . . . . . . . . . . . . . . . . . . . . . . . 31
Using the toolbar . . . . . . . . . . . . . . . . . . . . . . . . . . . . . . . . . . . . . . . . . . . . . . . . . . . . . 32
About Loop buttons . . . . . . . . . . . . . . . . . . . . . . . . . . . . . . . . . . . . . . . . . . . . . . . . . . . 33
Using Caller Information options . . . . . . . . . . . . . . . . . . . . . . . . . . . . . . . . . . . . . . . . . 34
The Edit Caller Information dialog box . . . . . . . . . . . . . . . . . . . . . . . . . . . . . . . . . 35
Attendant Console User Guide
Page 4

4 Contents
Chapter 4
Handling calls. . . . . . . . . . . . . . . . . . . . . . . . . . . . . . . . . . . . . . . . . . . . . . . . . 45
Answering calls as an attendant . . . . . . . . . . . . . . . . . . . . . . . . . . . . . . . . . . . . . . . . . 46
Using the Target list box . . . . . . . . . . . . . . . . . . . . . . . . . . . . . . . . . . . . . . . . . . . . . . . 48
Transferring a call . . . . . . . . . . . . . . . . . . . . . . . . . . . . . . . . . . . . . . . . . . . . . . . . . . . . 52
Parking, holding and screening calls . . . . . . . . . . . . . . . . . . . . . . . . . . . . . . . . . . . . . . 54
Screening calls . . . . . . . . . . . . . . . . . . . . . . . . . . . . . . . . . . . . . . . . . . . . . . . . . . . . . . 58
Contacting employees using Voice Call . . . . . . . . . . . . . . . . . . . . . . . . . . . . . . . . . . . 59
Linking and Joining calls . . . . . . . . . . . . . . . . . . . . . . . . . . . . . . . . . . . . . . . . . . . . . . . 60
Creating a conference call . . . . . . . . . . . . . . . . . . . . . . . . . . . . . . . . . . . . . . . . . . . . . . 61
Handling a callback call . . . . . . . . . . . . . . . . . . . . . . . . . . . . . . . . . . . . . . . . . . . . . . . . 62
Making a call from your extension . . . . . . . . . . . . . . . . . . . . . . . . . . . . . . . . . . . . . . . . 64
Handling calls at an employee’s telephone . . . . . . . . . . . . . . . . . . . . . . . . . . . . . . . . . 65
Using the call processing area . . . . . . . . . . . . . . . . . . . . . . . . . . . . . . . . . . . . . . . 37
The Edit Employee Information dialog box . . . . . . . . . . . . . . . . . . . . . . . . . . . . . . 39
Using the Directory options . . . . . . . . . . . . . . . . . . . . . . . . . . . . . . . . . . . . . . . . . . 41
Sorting information in the Directory list . . . . . . . . . . . . . . . . . . . . . . . . . . . . . . . . . 44
Using the Contacts boxes . . . . . . . . . . . . . . . . . . . . . . . . . . . . . . . . . . . . . . . . . . . 48
Using the Directory tabs . . . . . . . . . . . . . . . . . . . . . . . . . . . . . . . . . . . . . . . . . . . . 49
Using the Directory Find box . . . . . . . . . . . . . . . . . . . . . . . . . . . . . . . . . . . . . . . . . 50
Using the Department list box . . . . . . . . . . . . . . . . . . . . . . . . . . . . . . . . . . . . . . . . 51
Parking calls and paging employees . . . . . . . . . . . . . . . . . . . . . . . . . . . . . . . . . . . 54
Placing and retrieving calls on hold . . . . . . . . . . . . . . . . . . . . . . . . . . . . . . . . . . . . 57
Joining a call on hold . . . . . . . . . . . . . . . . . . . . . . . . . . . . . . . . . . . . . . . . . . . . . . . 60
Responding to a callback that an extension did not answer . . . . . . . . . . . . . . . . . 62
Responding to a Callback that an employee returns . . . . . . . . . . . . . . . . . . . . . . 62
Chapter 5
Maintaining caller and employee information. . . . . . . . . . . . . . . . . . . . . . . 67
Maintaining caller information . . . . . . . . . . . . . . . . . . . . . . . . . . . . . . . . . . . . . . . . . . . 67
Finding and editing caller information . . . . . . . . . . . . . . . . . . . . . . . . . . . . . . . . . . . . . 70
Maintaining employee information . . . . . . . . . . . . . . . . . . . . . . . . . . . . . . . . . . . . . . . . 71
Finding an employee record . . . . . . . . . . . . . . . . . . . . . . . . . . . . . . . . . . . . . . . . . . . . 72
Editing employee information . . . . . . . . . . . . . . . . . . . . . . . . . . . . . . . . . . . . . . . . . . . 74
Adding notes to employee records . . . . . . . . . . . . . . . . . . . . . . . . . . . . . . . . . . . . . . . 76
P0936572 02
Creating a new caller record . . . . . . . . . . . . . . . . . . . . . . . . . . . . . . . . . . . . . . . . . 67
Using the Directory list . . . . . . . . . . . . . . . . . . . . . . . . . . . . . . . . . . . . . . . . . . . . . 71
Resetting the Full tab view . . . . . . . . . . . . . . . . . . . . . . . . . . . . . . . . . . . . . . . . . . 73
Using the Make Caller button . . . . . . . . . . . . . . . . . . . . . . . . . . . . . . . . . . . . . . . . 75
Page 5

Contents 5
Chapter 6
Generating reports. . . . . . . . . . . . . . . . . . . . . . . . . . . . . . . . . . . . . . . . . . . . . 79
About Attendant Console reports . . . . . . . . . . . . . . . . . . . . . . . . . . . . . . . . . . . . . . . . 79
Report types . . . . . . . . . . . . . . . . . . . . . . . . . . . . . . . . . . . . . . . . . . . . . . . . . . . . . 79
About the Reports window . . . . . . . . . . . . . . . . . . . . . . . . . . . . . . . . . . . . . . . . . . . . . . 80
Components of the Reports window . . . . . . . . . . . . . . . . . . . . . . . . . . . . . . . . . . . . . . 81
Creating and viewing reports . . . . . . . . . . . . . . . . . . . . . . . . . . . . . . . . . . . . . . . . . . . . 85
Loading the database . . . . . . . . . . . . . . . . . . . . . . . . . . . . . . . . . . . . . . . . . . . . . . . . . 85
Selecting a report type . . . . . . . . . . . . . . . . . . . . . . . . . . . . . . . . . . . . . . . . . . . . . . . . . 85
Setting the report period . . . . . . . . . . . . . . . . . . . . . . . . . . . . . . . . . . . . . . . . . . . . . . . 86
Selecting employees and customers for the report . . . . . . . . . . . . . . . . . . . . . . . . . . . 88
Creating the report . . . . . . . . . . . . . . . . . . . . . . . . . . . . . . . . . . . . . . . . . . . . . . . . . . . . 89
Viewing the report . . . . . . . . . . . . . . . . . . . . . . . . . . . . . . . . . . . . . . . . . . . . . . . . . . . . 89
Printing a report . . . . . . . . . . . . . . . . . . . . . . . . . . . . . . . . . . . . . . . . . . . . . . . . . . . . . . 90
Glossary . . . . . . . . . . . . . . . . . . . . . . . . . . . . . . . . . . . . . . . . . . . . . . . . . . . . . 91
Index . . . . . . . . . . . . . . . . . . . . . . . . . . . . . . . . . . . . . . . . . . . . . . . . . . . . . . . . 93
Attendant Console User Guide
Page 6

6 Contents
P0936572 02
Page 7

Chapter 1
Introduction to Attendant Console
About Attendant Console
Attendant Console is a call-management application that gives your business centralised call
management and call activity reporting capability. Attendant Console runs on one or more
Pentium
This guide tells an attendant how to set up and use Attendant Console, and how to use Attendant
Console setups that meet your business’ call handling needs.
You can customise Attendant Console to suit your company’s call management needs. Your
telephone attendant uses Attendant Console’s graphical user interface to:
• originate calls
• answer and manage multiple calls
• view a company’s name before answering a call
• record, add and change caller information for future use
• quickly access information about a caller
• transfer calls to employees or their voice message mailbox
• send the caller’s name to the employee’s telephone display
• park calls and page employees
• view information in a Directory about your company’s employees such as their extension
• create and print reports showing how incoming calls are handled
• view the status of extensions in the company’s Attendant Console system
®
class personal computers.
number, person status and telephone status
7
Attendant Console User Guide
Page 8

8 Chapter 1 Introduction to Attendant Console
Attendant Console components
Attendant Console is a software application that has three interrelated components:
• Server component
• Client component
• Reports component
The Server component
The Server component:
• communicates with your Business Communications Manager 2.5 system to initiate telephone
functions such as transferring calls, placing calls on hold and parking calls.
• collects and manages call-processing information in a database that can be used for reporting
purposes.
• communicates with one or more Client components. A Client component is on a computer
connected by a Local Area Network (LAN).
The Server component receives:
• notification of incoming calls
• information about telephones attached to the Business Communications Manager base unit
The Client component
The Client component has an easy-to-use graphical user interface (GUI). The Attendant Console
window displays information about incoming callers and includes a Company Directory with
employee names, telephone status (such as on-hook, off-hook, Do Not Disturb and Call Forward)
and person status (s uch as None, Not at desk and Out of offi ce). You can search t he Direct ory from
the Attendant window.
You can configure Attendant computers to be main, assistant, overflow or backup attendants. For
more information, refer to “Types of attendant setups” on page 12. Incoming calls can be
transferred to an extension, a voice message mailbox or an external number.
You can set up more t han one attendant for your company. You can also se t up At tendant Console
to provide call covera ge for assigned gro ups of employees. In thi s setup, you are notified of call s to
assigned employees and can answer calls when the employees cannot.
The Reports component
The Reports component pr ovi des inf or ma ti on a bout in coming calls. Reports can he lp you identify
trends and find answers to ques ti ons befo re they be come problems. You can request a report fro m
any computer with a Client comp onent and view the rep ort in th e Reports window or print it on an
attached printer.
P0936572 02
Page 9

Attendant Console features
There are many features and benefits associated with Attendant Console.
Computer compatibility
Attendant Console combines telecommunications with personal computing to make your job
easier, faster and more efficient.
Chapter 1 Introduction to Attendant Console 9
Use of existing hardware
Multi-tasking
You do not need to purchase additional dedicated hardware to use the
power of Attendant Console. If you have the minimum computer
requirements, all you need is the software that lets your computer
communicate with the Business Communications Manager 2.5 system.
Attendant Console works in a multi-tasking environment. You can use
your computer for other tasks such as word processing in addition to
attending to calls. You can quickly switch from computer tasks to the
Attendant window if there is an incoming call.
Graphical User Interface (GUI)
Attendant Console has a GUI that has sophisticated features but is less complicated than other
attendant consoles. You can easily select the buttons to process incoming calls. Very few key
strokes are needed for most activities. For example, answering an incoming call and transferring it
to an extension usually requires two steps: clicking a Loop button to answer the call and
double-clicking the icon beside the called party’s name to transfer the call.
The GUI provides at-a-glance information about the progress and status of calls. Before you
answer a call, you know the caller’s telephone number and how long the caller is waiting. If a call
transfers back to you, the Attendant Console window immediately displays the status of the call.
The readily available online Help ensures that Attendant Console is easy to learn and use.
Because performing normal attendant functions is faster with a GUI, you can do other tasks while
you use Attendant Console.
Advanced software capabilities
Some of Attendant Console’s advanced software capabilities are:
Visual call announcing and
control
Backup attendant
Overflow attendant
When a telephone is busy with a call, an attendant can send caller
information to the telep hone’s tw o line di splay area. The person call ed
can use display buttons to control the call. This prevents important
calls from being lost.
Incoming calls can be quickly and easil y transferred to a backup
attendant at a different location than the main attendant. This means
that a backup attendant does not have to leave their desk to cover for
the main attendant.
Overflow calls are trans ferred t o an ov erflow attend ant. Cons equen tly,
calls are not lost during busy periods.
Attendant Console User Guide
Page 10

10 Chapter 1 Introduction to Attendant Console
Reports
Ability to handle growth
You can generate repo rts that conta in info rmat ion s uch as the nu mber
of incoming calls and who answers the calls. This information shows
the calling trends in the business and the performance of the
telephone system.
A one-time purchase of Attendan t Console is ofte n all tha t is needed . If
you want to add more attendant positions as the company grows,
Attendant Console is easily expandable.
Choice of Attendant types
You can set up each computer to handle c alls e ither as a main a ttenda nt, or an overflow, ba ckup or
assistant attendant. Each attendant type gives you flexibility in responding to calls. This ensures
that calls can be handled in a professional and prompt manner. For detailed information about
attendant setups, refer to “Types of attendant setups” on page 12.
P0936572 02
Page 11

Chapter 2
Getting started
Configuring Attendant Console
You must set up each computer that has Attendant Console installed to handle calls either as a
full-time main attendant, part-time main attendant, or a backup, overflow or assistant attendant.
Every Client component must have the Server ID and Attendant extension options set for the
Client component to function. The Server ID tells the Client component where the Server
component is located. The Attendant extension tells the Client component which telephone
belongs to the attendant.
To configure Attendant Console
1 On the taskbar, click Start, point to Programs, point to Attendant Console and click
Attendant.
The Client component starts. The first time the Client component starts after installation, the
Enter Attendant Options dialog box appears.
11
2 In the Attendant Extension box type the extension number of the attendant.
3 If your network has more than one Attendant Console Server running, you must enter the
Server ID for the Business Communications Manager 2.5 system you want to use in the
Server ID box. The Server ID refers to the Windows TCP/IP host name of the Server
computer. If you do not know the Server ID, ask your System Administrator.
4 Click the OK button.
The Tip of the Day dialog box appears over the Attendant Console window.
5 Click the Close button to see the Attendant Console window.
Refer to “Components of the Attendant Console window” on page 23.
When the setup is complete, the Directory list displays the extensions connected to the
Business Communications Manager 2.5 system.
Starting Attendant Console
1 On the Attendant computer, click Start and point to Programs, point to Nortel Networks,
point to Attendant Console and then click Attendant.
The Attendant Console taskbar button app ears on the taskbar . The Attenda nt Consol e window
appears with the Tip of the Day window over it.
2 On the Tip of the Day window click the Close button.
Attendant Console User Guide
Page 12
12 Chapter 2 Getting started
Types of attendant setups
You must set up each computer that has Attendant Console installed to handle calls either as a
full-time main attendant, part-time main attendant, or a backup, overflow or assistant attendant.
The following section explains the different types of attendant setups.
Full-time main attendant
The full-time main a tt end ant is a telephone operator th at has t h e Att enda nt wi ndo w alwa ys vi si ble
on their computer. There can be more than one full-time attendant.
The Client component di splays t he incoming calls to the at tendant’ s telephon e as a yell ow Ringing
Loop button on the Attendant window. If the attendant’s telephone is programmed to receive all
the incoming calls for the company, (t hat is, as a main attendant), Attendant C onsole disp lays the
calls.
Before you can receive and make call s, you must se t the att endant ’s exte nsion numbe r throug h the
Client component. The extension must be a valid extension on the Business Communications
Manager 2.5 system and must be the telephone at the attendant’s desk.
To set or change the attendant’s extension number
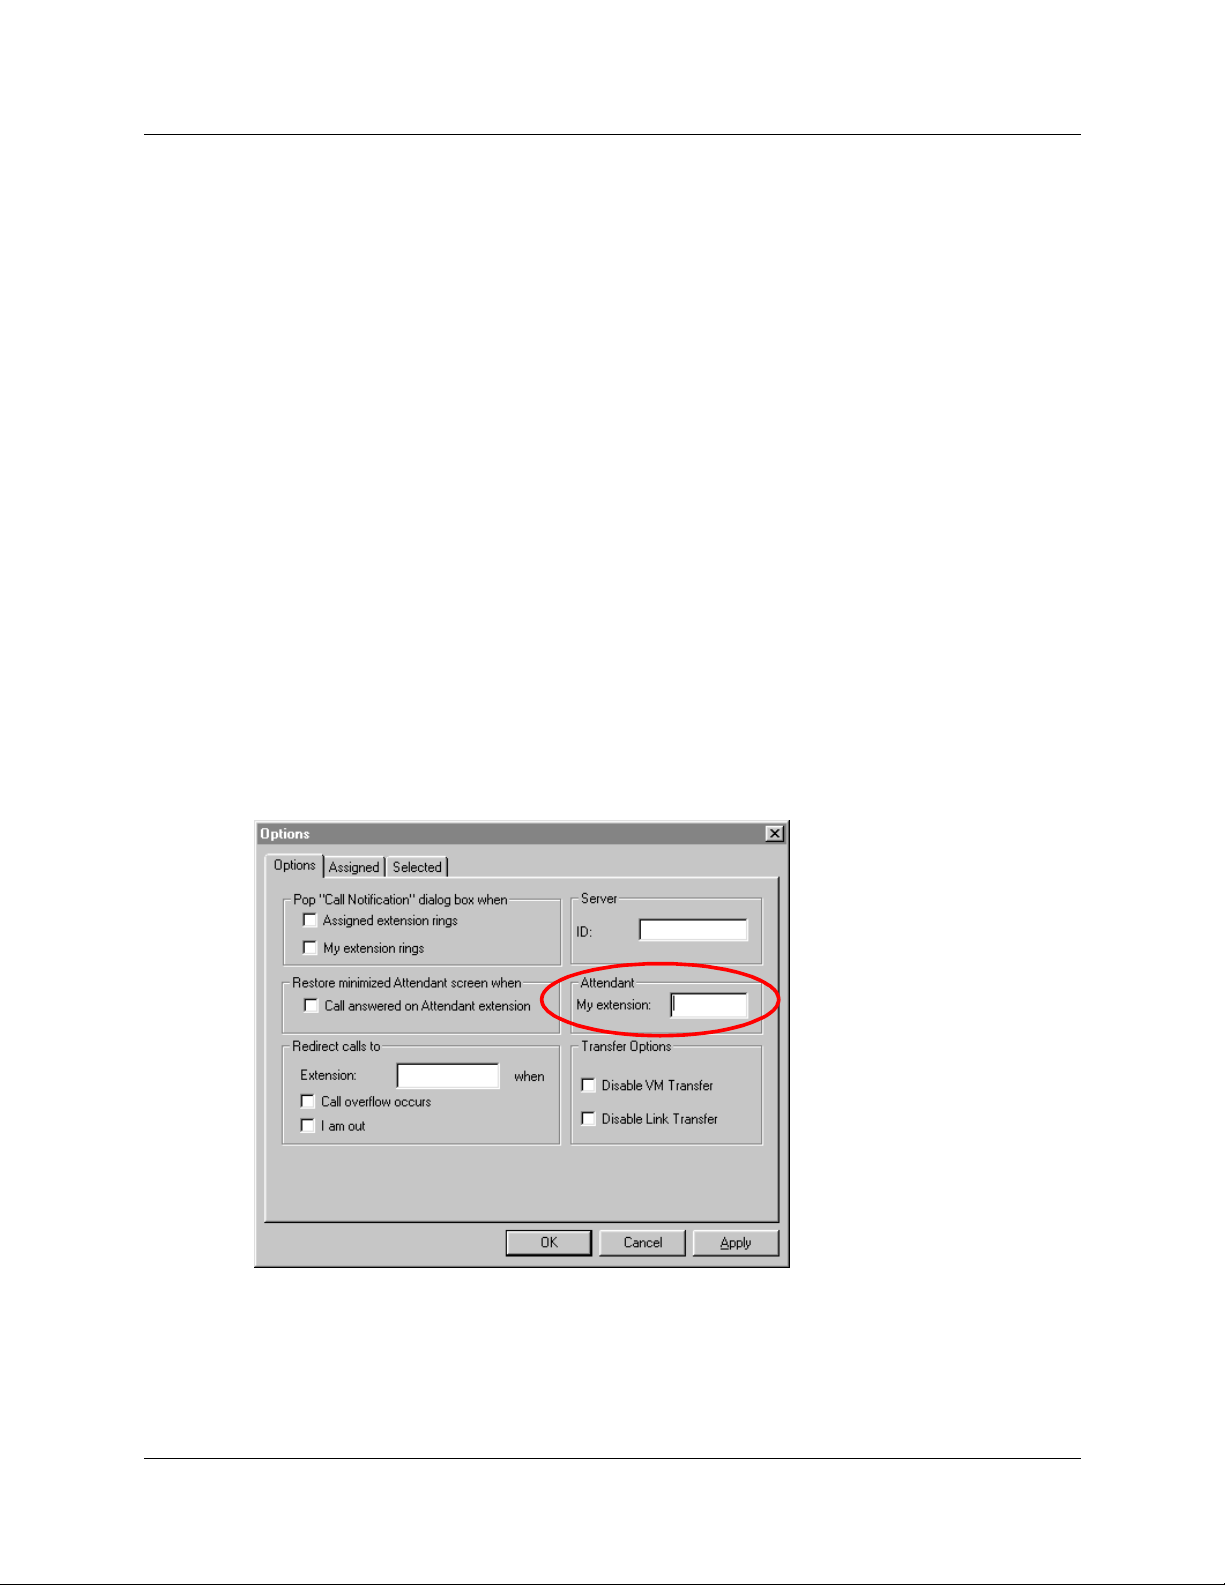
1 On the Tools menu click Options.
The Options dialog box appears with the Options t ab dis p la yed .
2 In the Attendant option, in the My Extension box, type the extension number of the
attendant’s telephone .
3 Click the OK button.
P0936572 02
Page 13

Chapter 2 Getting started 13
Part-time main attendant
The part-time main attendant can answer incoming calls and performs tasks on the computer such
as word processing.
The difference between the full-time main attendant setup and the part-time main attendant setup
is that the part-time setup has additional attendant options selected that notify the attendant of
incoming calls when th e Attendant component is minimised. Refer to “Full-time main attenda nt”
on page 12 and “Setting up other attendant features” on page 19.
Attendant Console User Guide
Page 14
14 Chapter 2 Getting started
Backup attendant
A backup attendant is an attendant position that receives calls that are redirected from another
attendant position. The ba ckup attendant can at the same time operat e as a main attendant , assistant
attendant, or any combination of the attendant types.
You must set up each Attendant computer that is set up to receive incoming calls to redirect the
calls to the backup Attendant computer.
Note: The system can redirect calls to another Attendant Console attendant or any
extension number in the company.
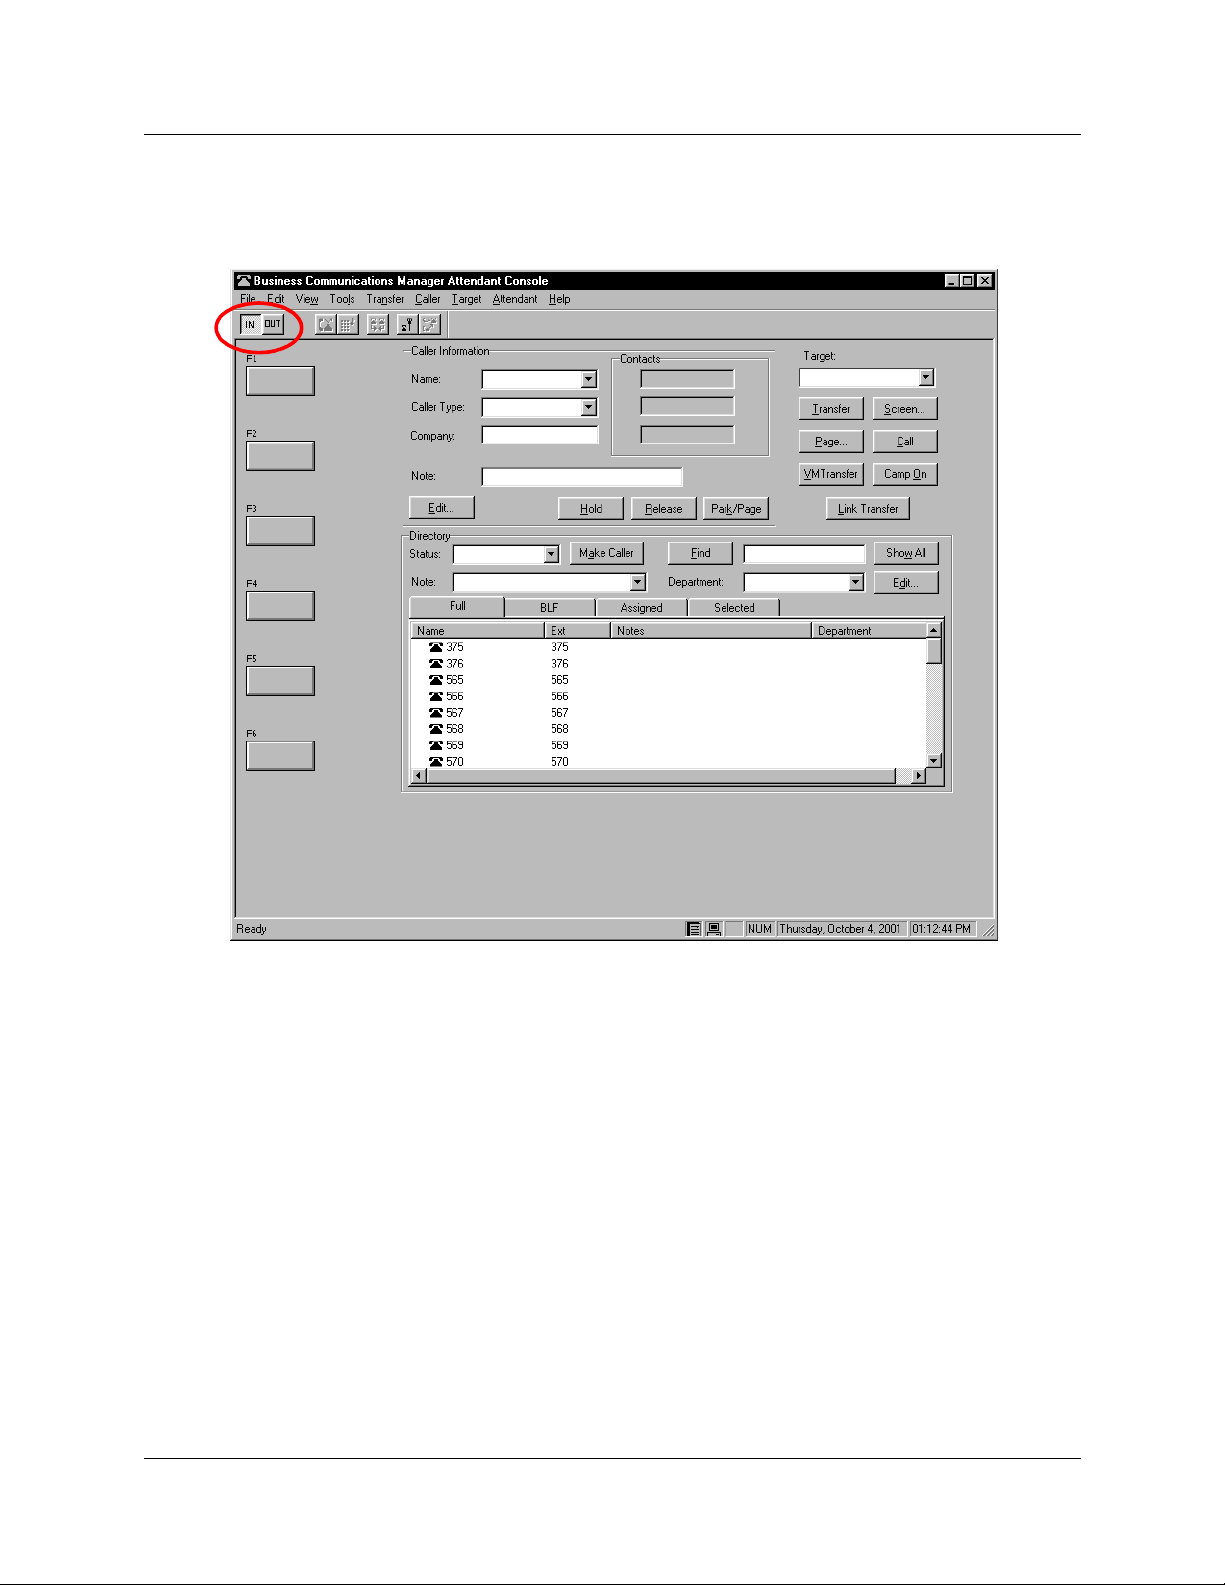
If the attendant needs to leave their position, they can route calls to the backup attendant by
clicking the Out button on the Attendant window. After the attendant clicks the Out button, they
attendant can complete calls that are currently in progress on the Attendant window. New calls
appear on the absent main attendant’s computer and the backup attendant’s computer. Although
the main attendant is out, the Client component can still process calls, if required.
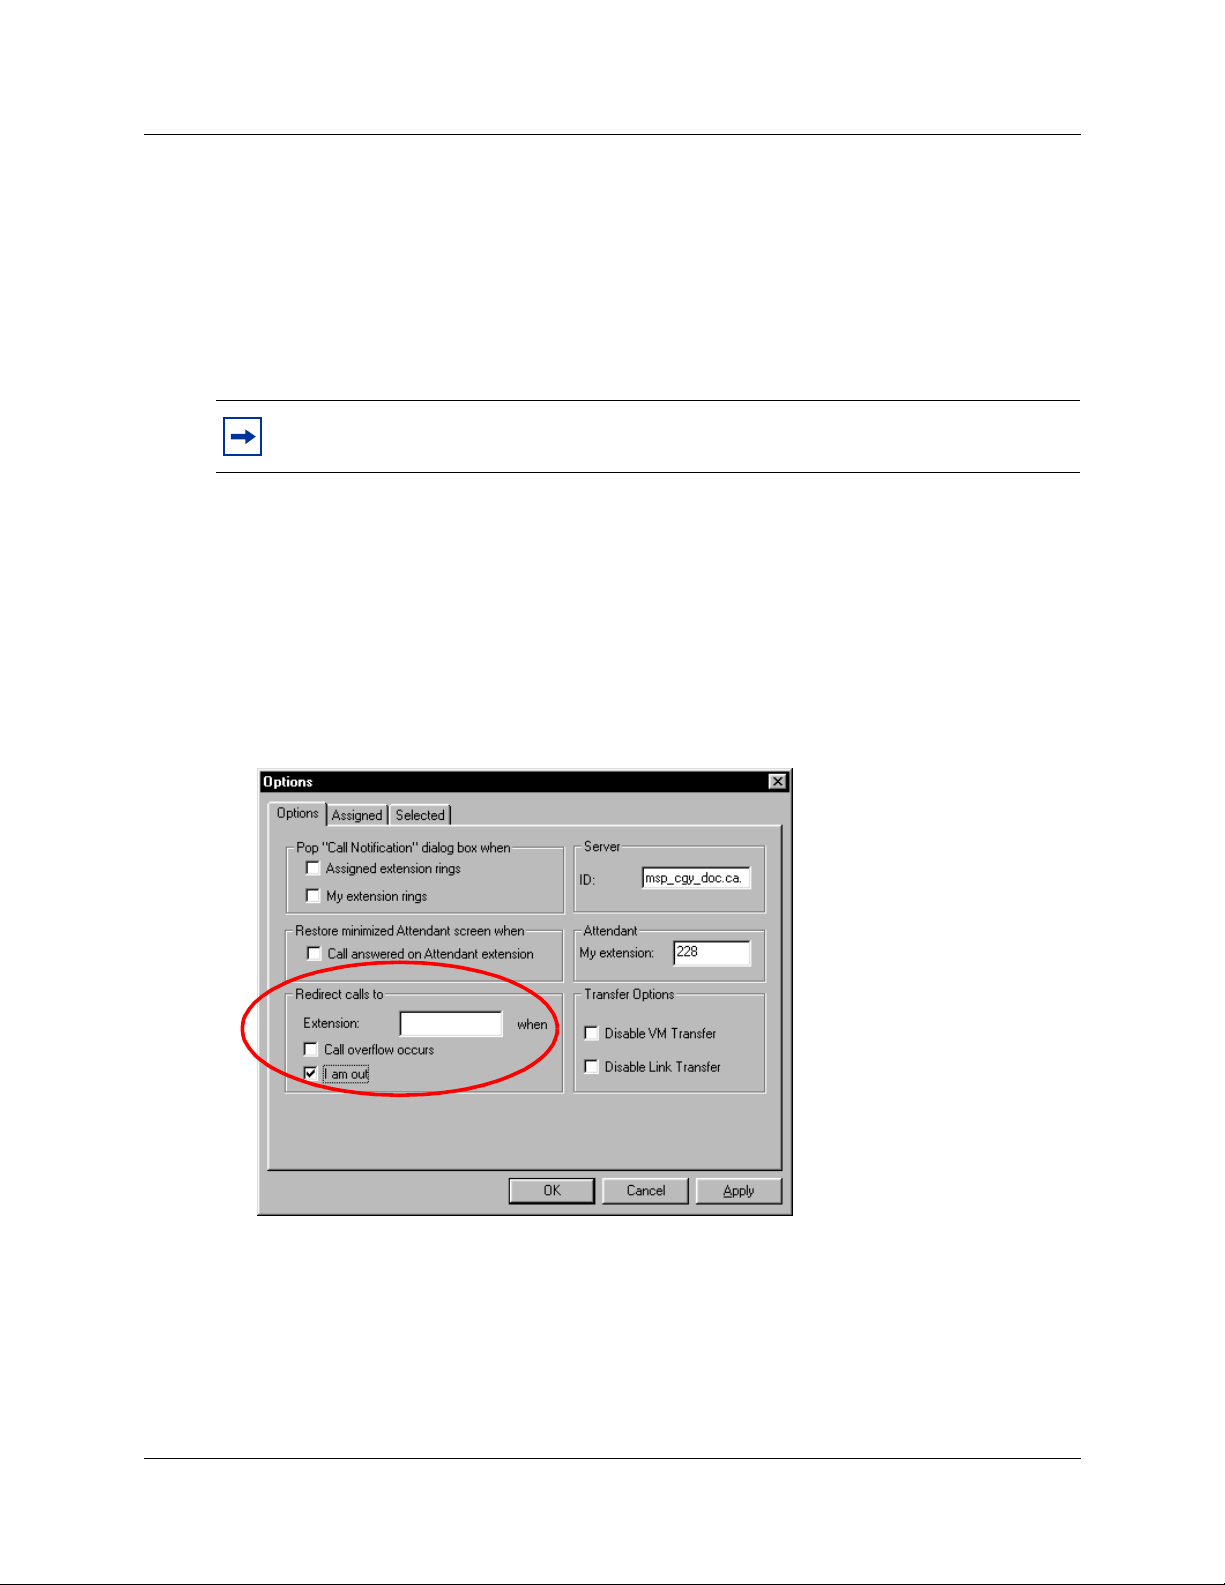
To set up the backup attendant
1 On the Tools menu click Options.
The Options dialog box appears with the Options tab displayed.
2 In the Redirect calls to option in the Extension box, type the backup attendant’s extension
number.
3 Select the I am out check box.
4 Click the OK button.
P0936572 02
Page 15
Chapter 2 Getting started 15
The main attendant can redirect their calls to the backup attendant by clicking the Out button on
the Attendant Console window. The main attendant can click the In button to resume receiving
calls at their computer.
Attendant Console User Guide
Page 16
16 Chapter 2 Getting started
Overflow attendant
An overflow attendant receives calls that are redirected from another attendant position whose
Loop buttons are occupied with calls. For example, if a main attendant is handling six incoming
calls, the next c all is r edirect ed to the o verflow at tendant u ntil one of the main atten dant’s si x Loop
buttons is available. If all the Loop buttons are in use, the Loop overflow icon appears in the
Attendant Status Bar and the overflow call goes to the overflow attendant. For more information
on the Loop overflow icon, see “Status bar” on page 24.
The overflow attendant can also operate as a main attendant, an assistant attendant or any
combination of the attendant types.
After you set up an Attendant comput er as the overflow, each Attendant comput er that is se t up to
receive incoming calls must be set up to redirect calls to the overflow Attendant computer
whenever overflow occurs. You must activate the overflow feature at each Attendant computer.
Note: The system can redirect calls to another Attendant Console attendant or any
extension number.
To set the overflow extension
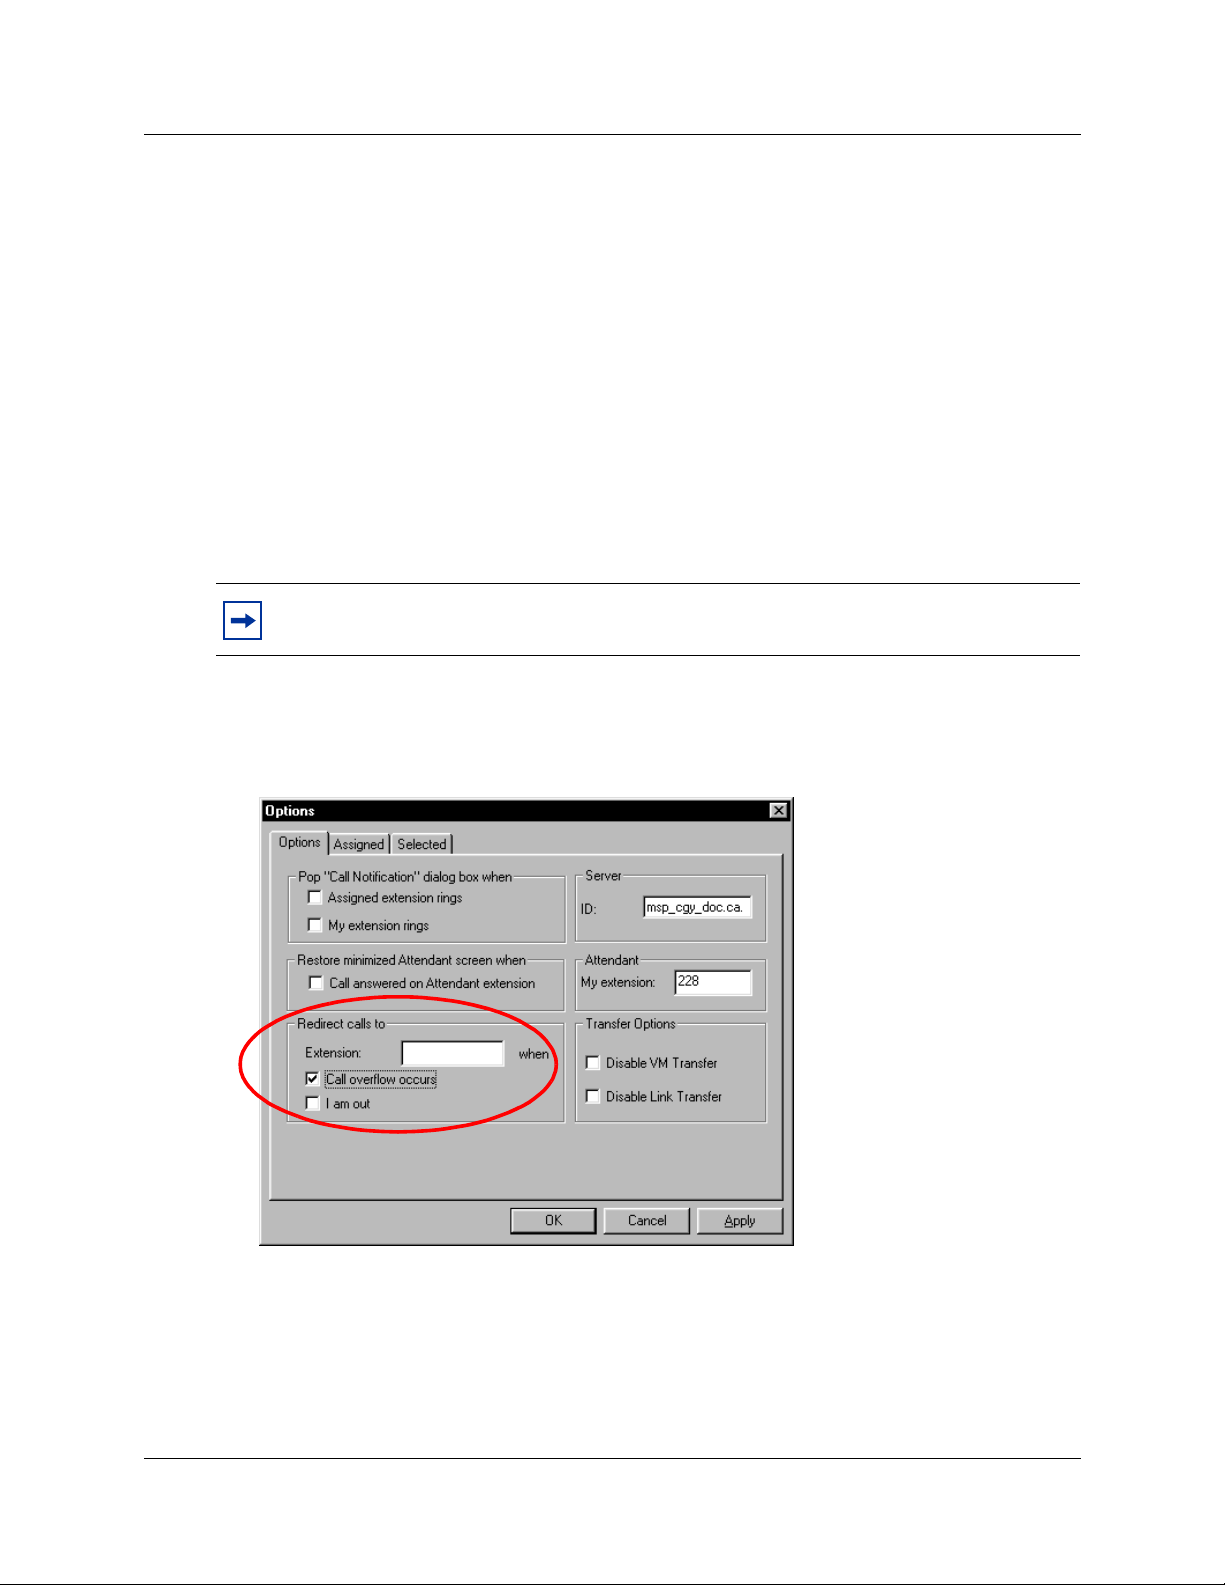
1 On the Tools menu, click Options.
The Options dialog box appears with the Options tab displayed.
2 In the Redirect calls to option, in the Extension box, type the overflow attendant’s extension
number.
3 Select Call overflow occurs to redirect calls when all of the main attendant’s Loop buttons are
busy with calls.
4 Click the OK button.
P0936572 02
Page 17

Chapter 2 Getting started 17
Assistant attendant
An assistant attendan t provides call covera ge for one or more extensions in the s ystem. You can
set up an ass istant attendant to monitor incomin g calls to specific extensions. Set up an assistant
attendant if an employee wants an assistant attendant, such as an administrative assistant, to
answer their calls.
Setting up an assistant attendant
1 On the Tools menu, click Options.
The Options dialog box appears with the Options tab displayed.
2 In the My extension box, type the assistant attendant’s extension.
3 Click the OK button.
Attendant Console User Guide
Page 18
18 Chapter 2 Getting started
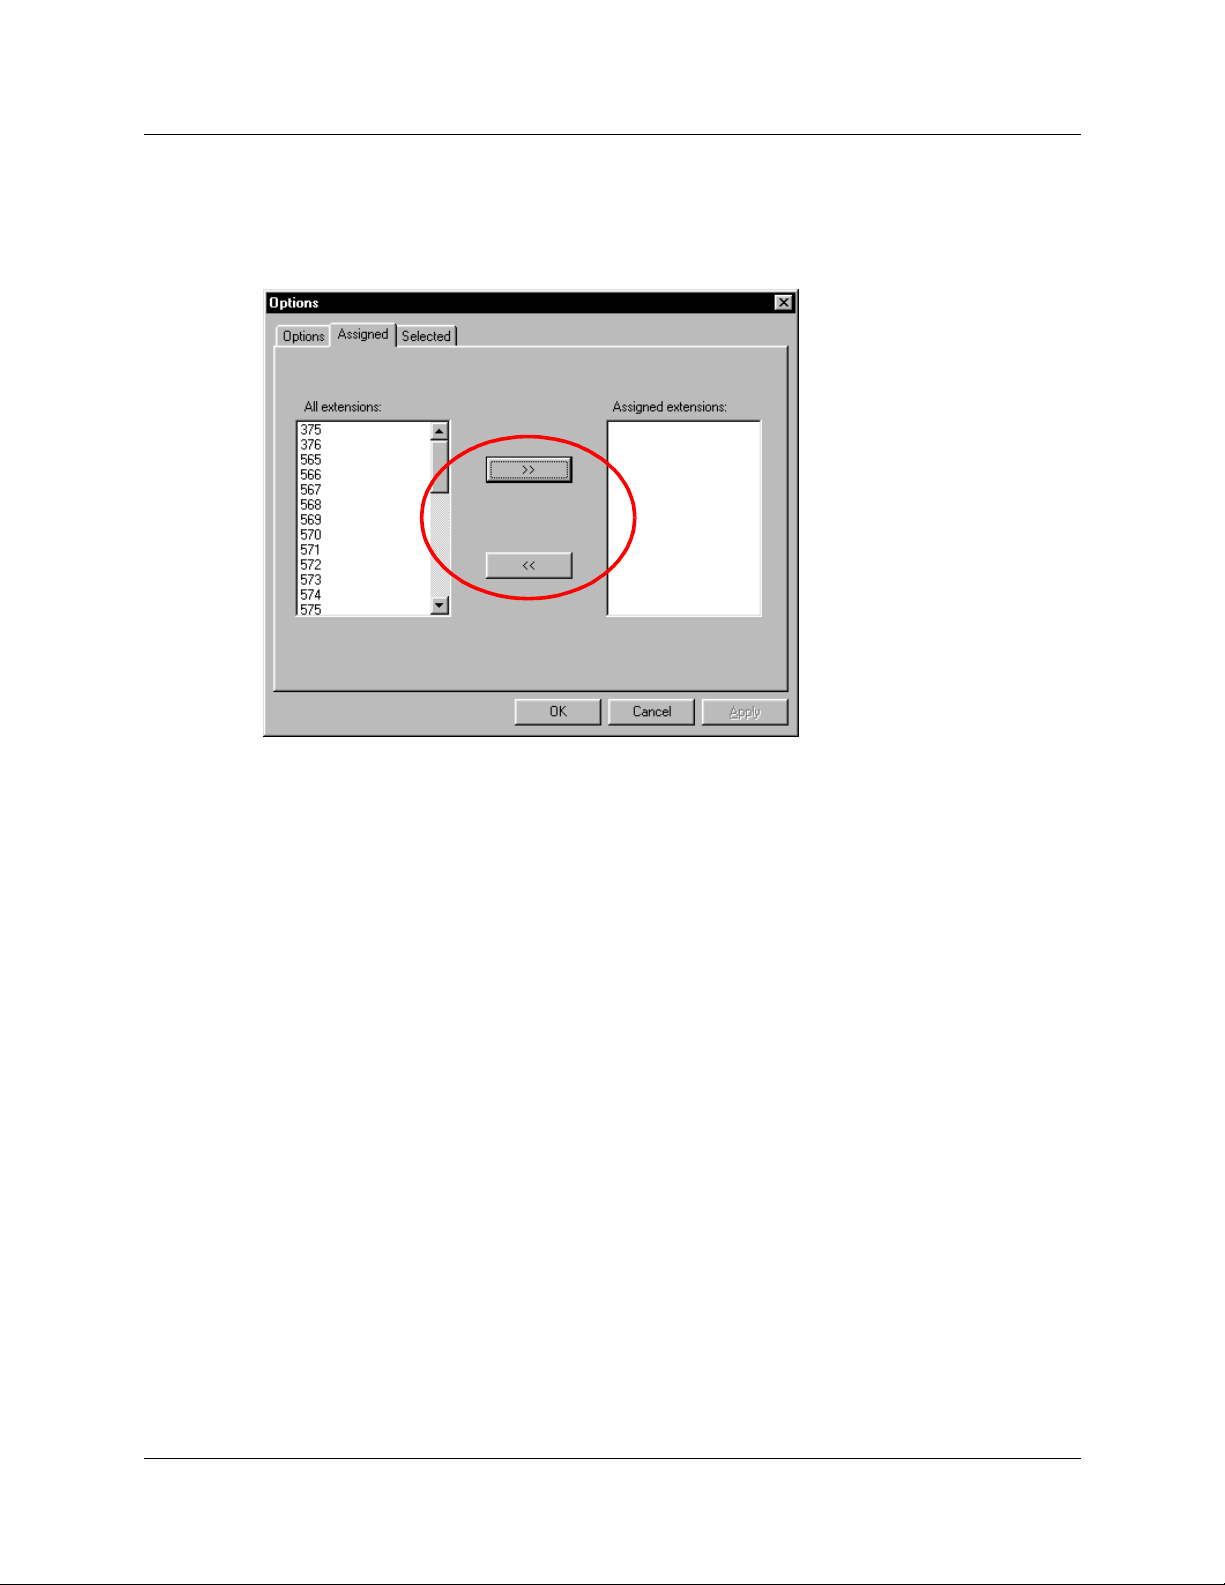
Adding or removing an assistant attendant’s assigned extensions
1 On the Tools menu, click Options.
The Options dialog box appears with the Options tab displayed.
2 Click the Assigned tab.
To add an extension, click the extension you want in the All extensions box and click
copy it to the Assigned extensions list.
To remove an extension from the Assigned extensions list, click the extension number in the
Assigned extensions list and click
<<
.
To view an assistant attendant’s assigned extensions
1 On the Tools menu, click Options.
The Options dialog box appears with the Options tab displayed.
2 Click the Assigned tab.
3 After you view the extensions, click the OK button.
>>
to
P0936572 02
Page 19
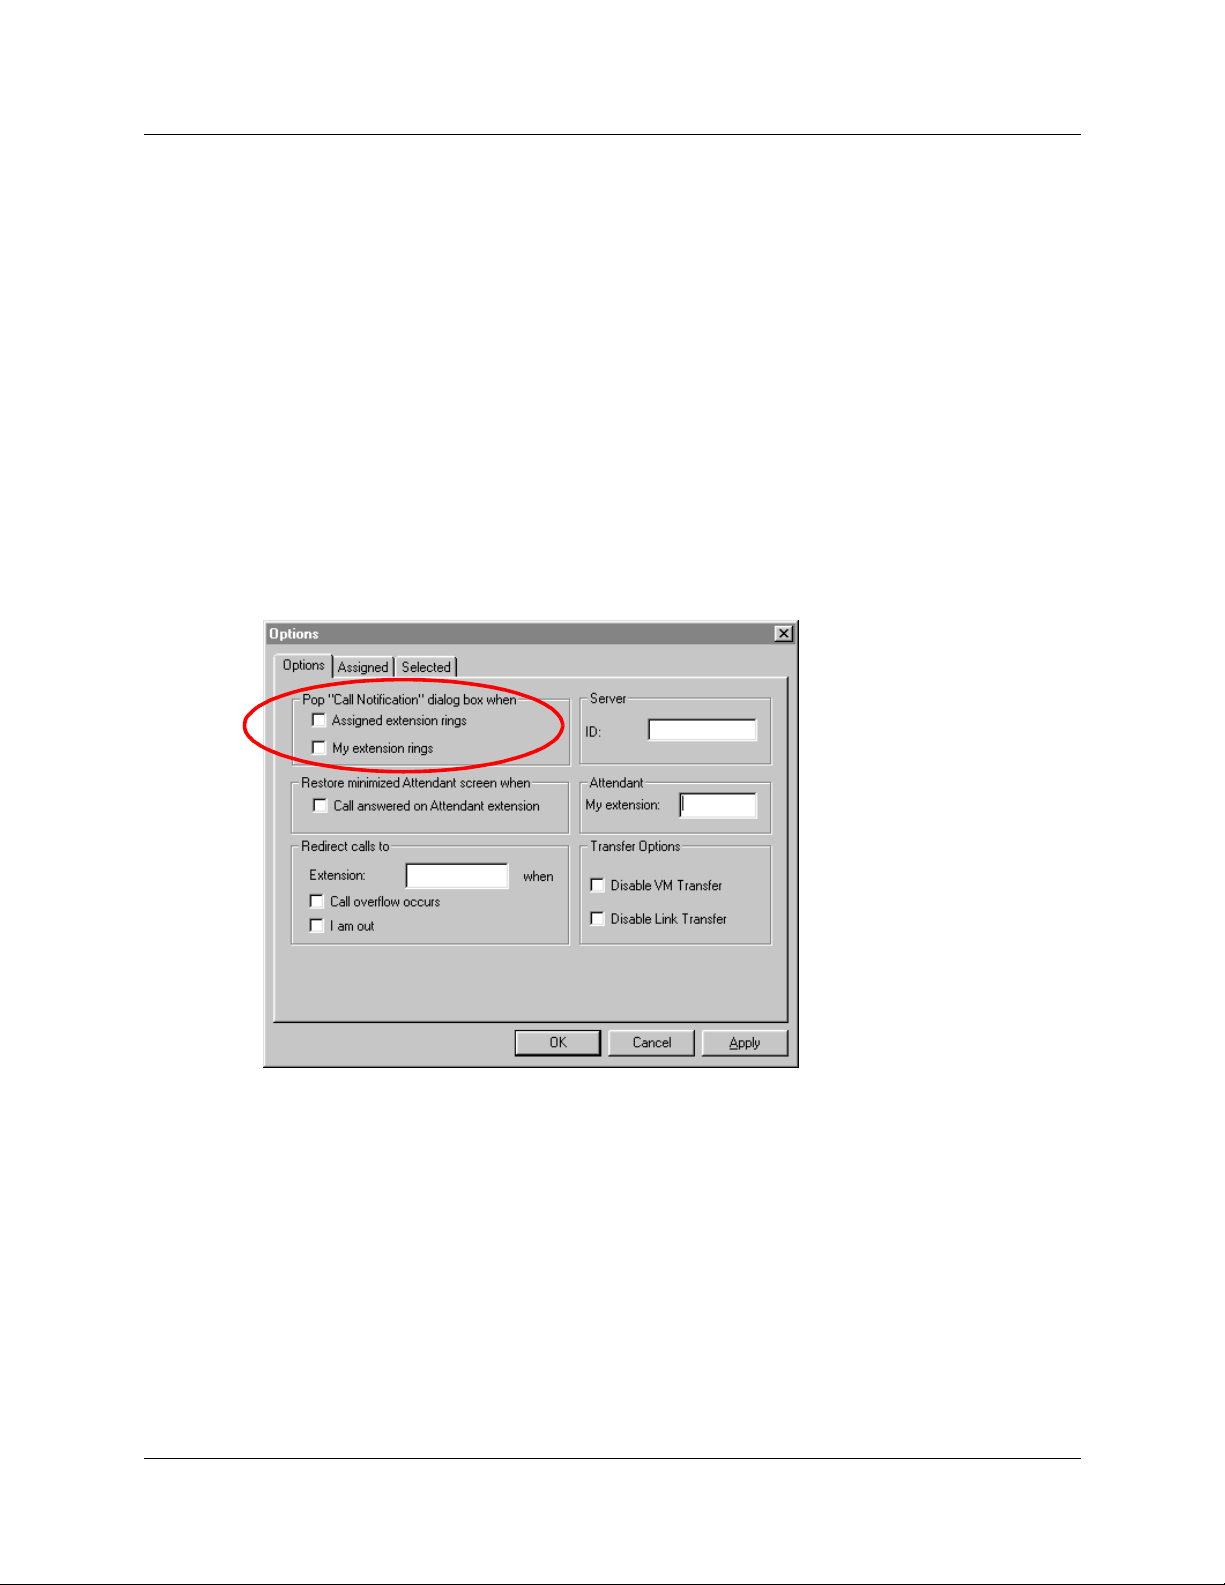
Setting up other attendant features
Call notification
There are two ways Attendant Console can notify an attendant of incoming calls:
• If an attendant keeps the Atte ndant Console window minimised and works on other tas ks, they
are notified of incoming calls with a Call Notification dialog box. The attendant can answer
the call by clic king the Ta ke butt on or they can ignore the ca ll and le t another attendan t answer
it.
• If the Attendant Console window is not minimised, the attendant is notified of an incoming
call by a Ringing Loop button.
To activate call notification
1 On the Tools menu click Options.
The Options dialog box appears.
Chapter 2 Getting started 19
2 In the Pop “Call Notification” dialog box when list, select either check box:
Assigned extension rings - The attendant is notified of calls to the assigned extensions.
or
My extension rings -The attendant is notified if their extension has an incoming call.
If both check boxes are clear, the attendant is not notified of calls when the window is
minimised.
3 Click the OK button.
When an outside call arri ve s for an assigned extension, a Call Noti f ica ti on di al og box appears
to inform the assistant attendant of the call. Internal calls from an extension to an assigned
extension are not displayed on the assistant attendant’s window.
Attendant Console User Guide
Page 20

20 Chapter 2 Getting started
Restoring the Attendant Console window
Part-time attendan ts can ha ve the Att endant Cons ole window mi nimised or under an other wind ow.
The attendant can restore the Attendant Console window from the taskbar by clicking the
Attendant Console taskbar button. A quicker method is to set the Attendant Console window to
restore automatically.
The Client component can automatically restore the window when the attendant’s extension goes
off-hook (“active”).
To set the Attendant Console window to restore automatically
1 On the Tools menu click Options.
The Options dialog box appears with the Options tab displayed.
2 In the Restore minimized Attendant screen when option, click the Call Answered on
Attendant extension check box.
3 Click the OK button.
When an outside call arrives for an assigned extension, a Call Notification dialog box appears to
inform the assistan t attendant of the call. Internal calls from an extens ion to an assigned extension
are not displayed on the assistant attendant’s window.
P0936572 02
Page 21
Chapter 2 Getting started 21
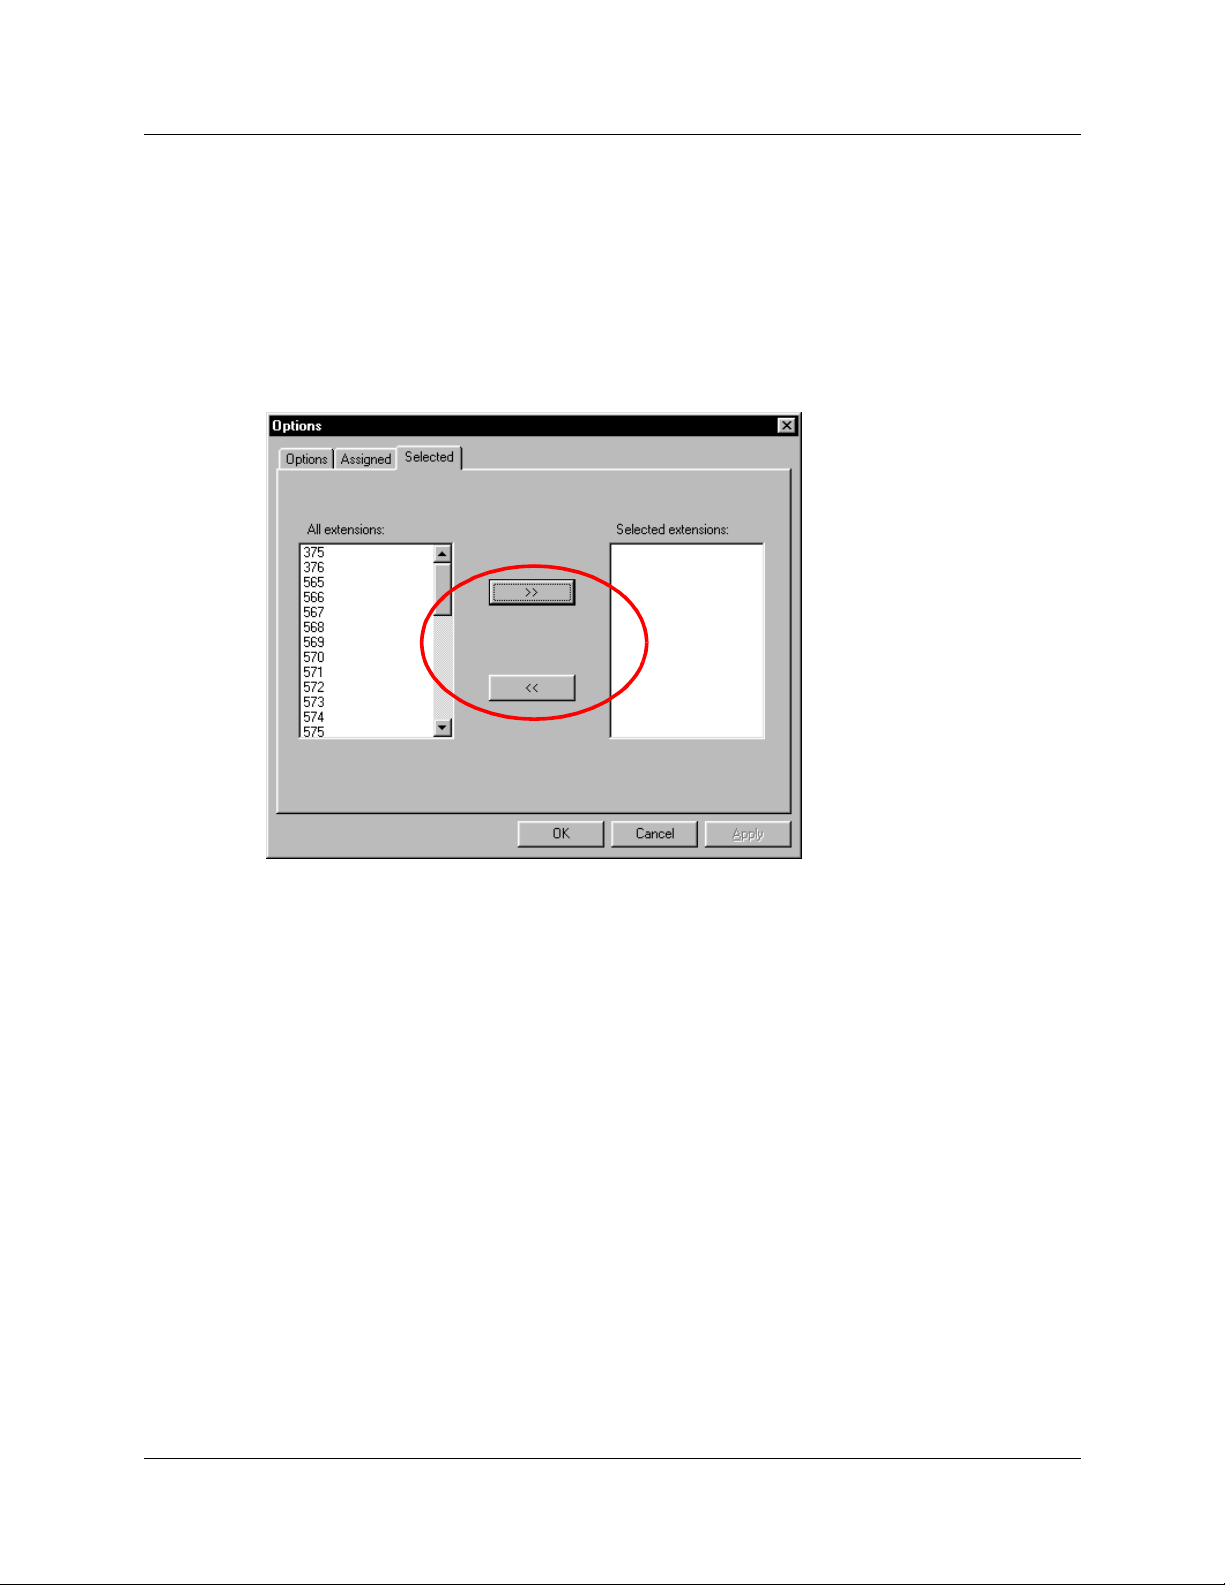
Setting the Attendant Selected option
The Selected tab lets the attendant view a selected subset of the full directory. This is useful if the
attendant’s incoming calls are directed to a limited number of extensions.
To display extensions
1 On the Tools menu click Options.
The Options dialog box appears with the Options tab displayed.
2 Click the Selected tab.
3 To add an extension, click the extension you want in the All extensions list and click
copy it to the Selected extensions list.
To remove an extension from the Selected extensions list, click the extension number in the
Selected extensions list and click
4 Click the OK button.
<<
.
Attendant Console User Guide
>>
to
Page 22
22 Chapter 2 Getting started
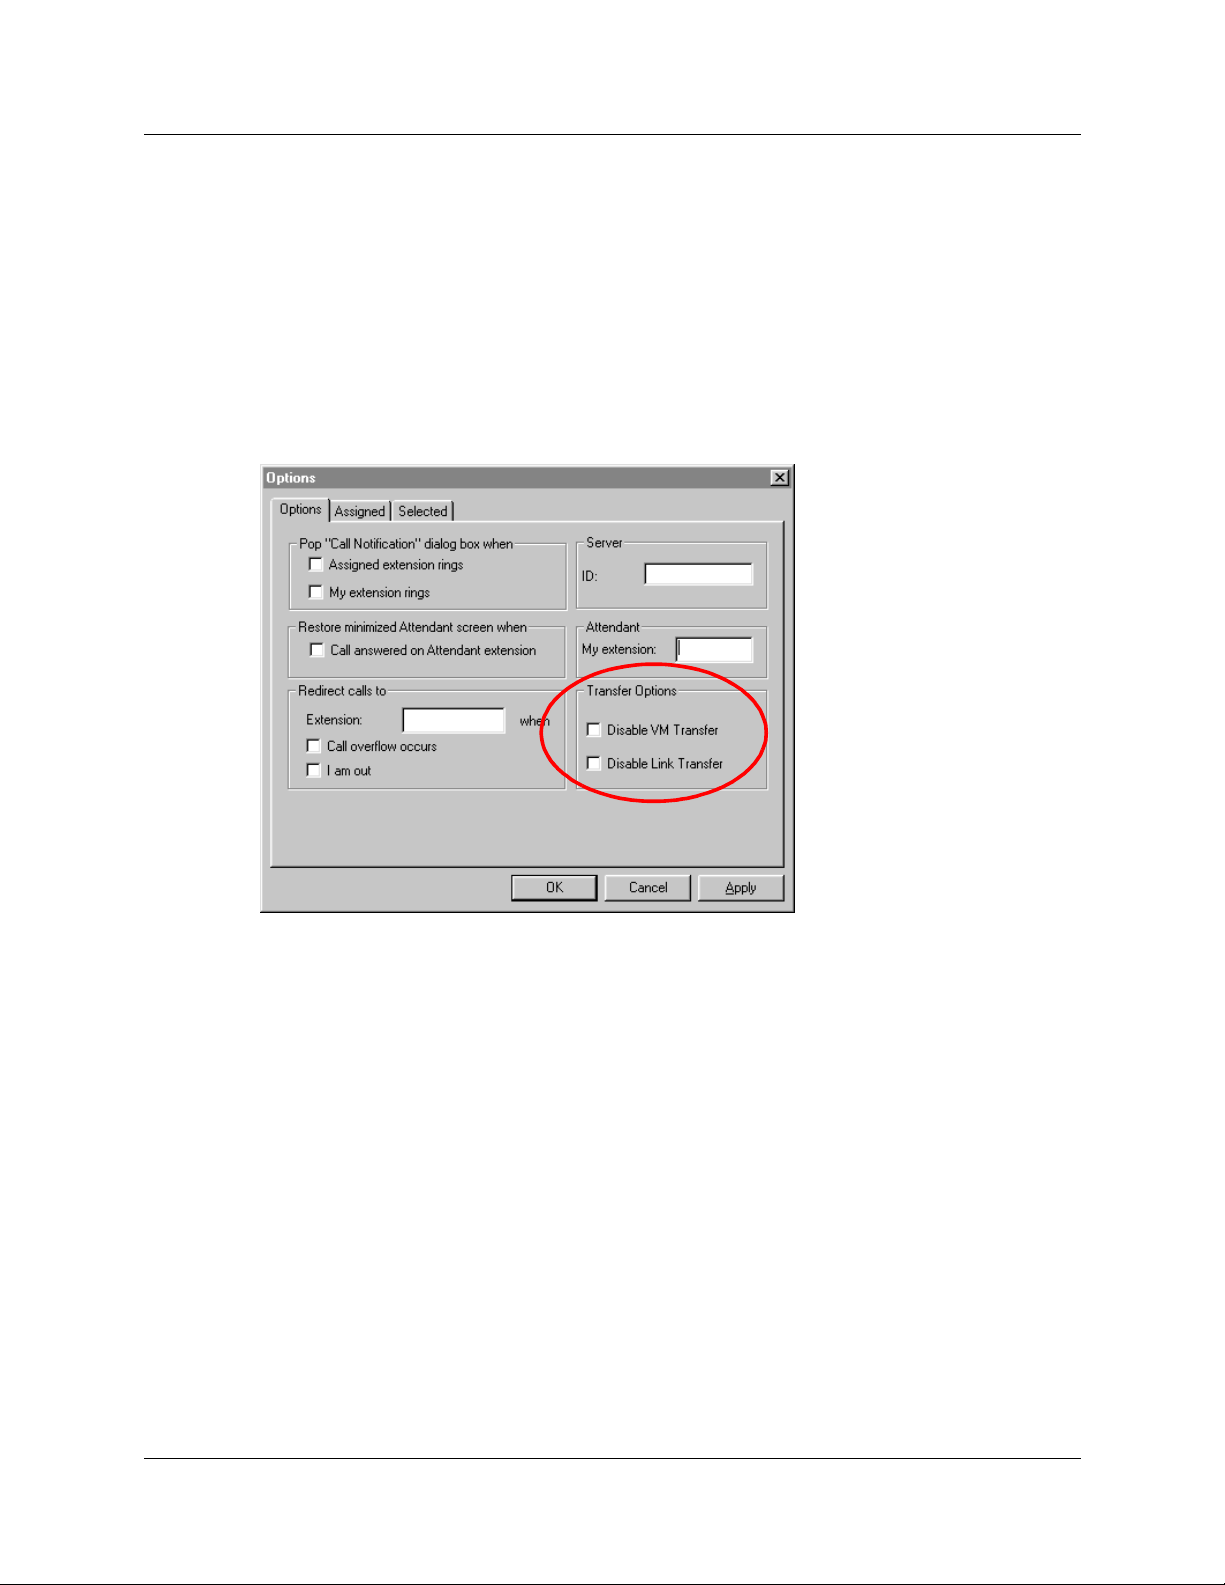
Disabling Transfer options
If your Business Communications Manager 2.5 system is not connected to a Centrex switch or is
not connected to CallPilot, you can disable the Link Transfer or VM Transfer buttons on the
Attendant Console window.
To disable the Transfer Options
1 On the Tools menu click Options.
The Options dialog box appears with the Options tab displayed.
The Transfer Options are in the bottom right of the dialog box.
2 Select the Disable VM Transfer check box to disable the VM Transfer button
or
select the Disable Link Transfer check box to disable the Link Transfer button.
If they are disabled the buttons appear dimmed on the Attendant Console window. You can
re-enable the buttons by clearing the check mark from the appropriate check box.
P0936572 02
Page 23
Chapter 3
Using the Attendant Console window
This chapter explains how to use the Attendant Console window.
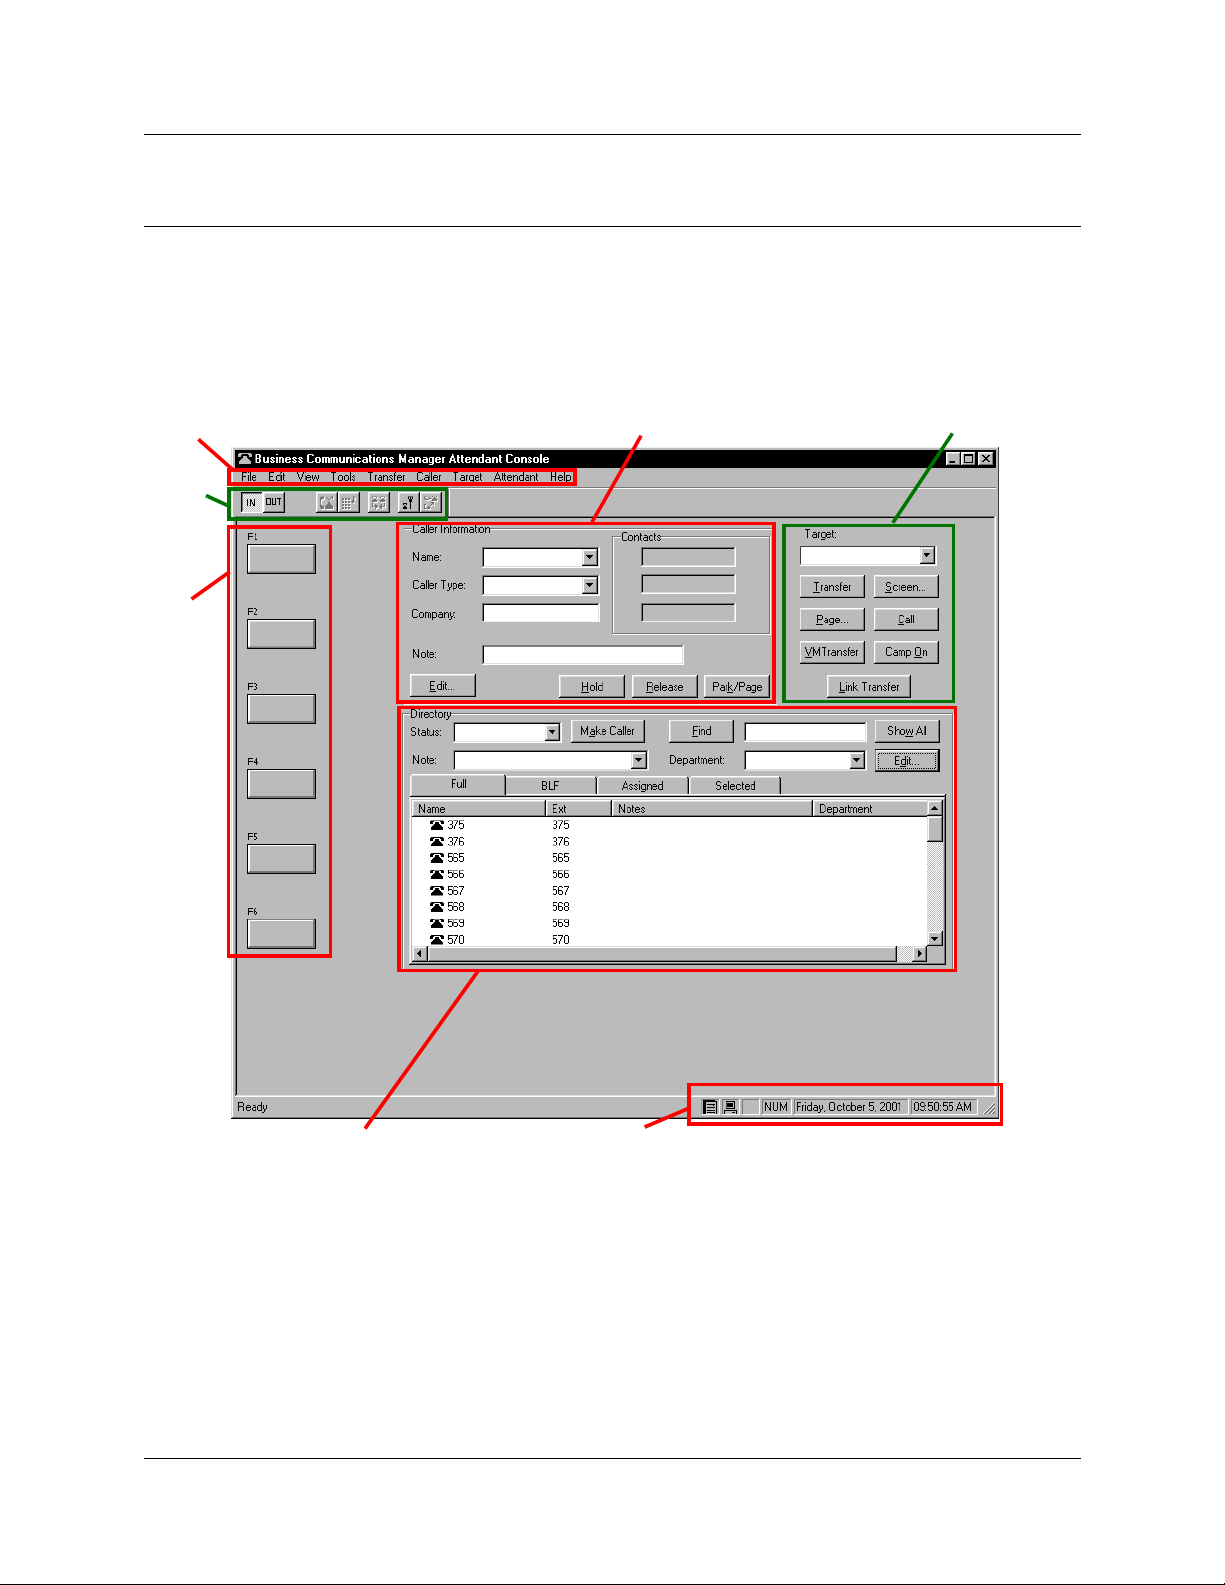
Components of the Attendant Console window
23
menu bar
toolbar
Loop
buttons
Caller Information options
Call processing area
Directory options
Status bar
Attendant Console User Guide
Page 24
24 Chapter 3 Using the Attendant Console window
Status bar
To display the Status bar:
1 On the View menu click Status bar.
Displays the functions of the toolbar button when you point to it.
The Loop Overflow icon appea rs if th ere are m ore c alls wa iting t o
be answered than available Loop buttons.
Appears if the Num Lock key is on.
Shows the date and time.
Attendant Console menus
If you hover your mouse p oint er ove r the menu commands the Hel p tip s appea r in t he Stat us bar at
the bottom of the Attendant Console window.
File menu
Exit
Closes the Client component
P0936572 02
Page 25
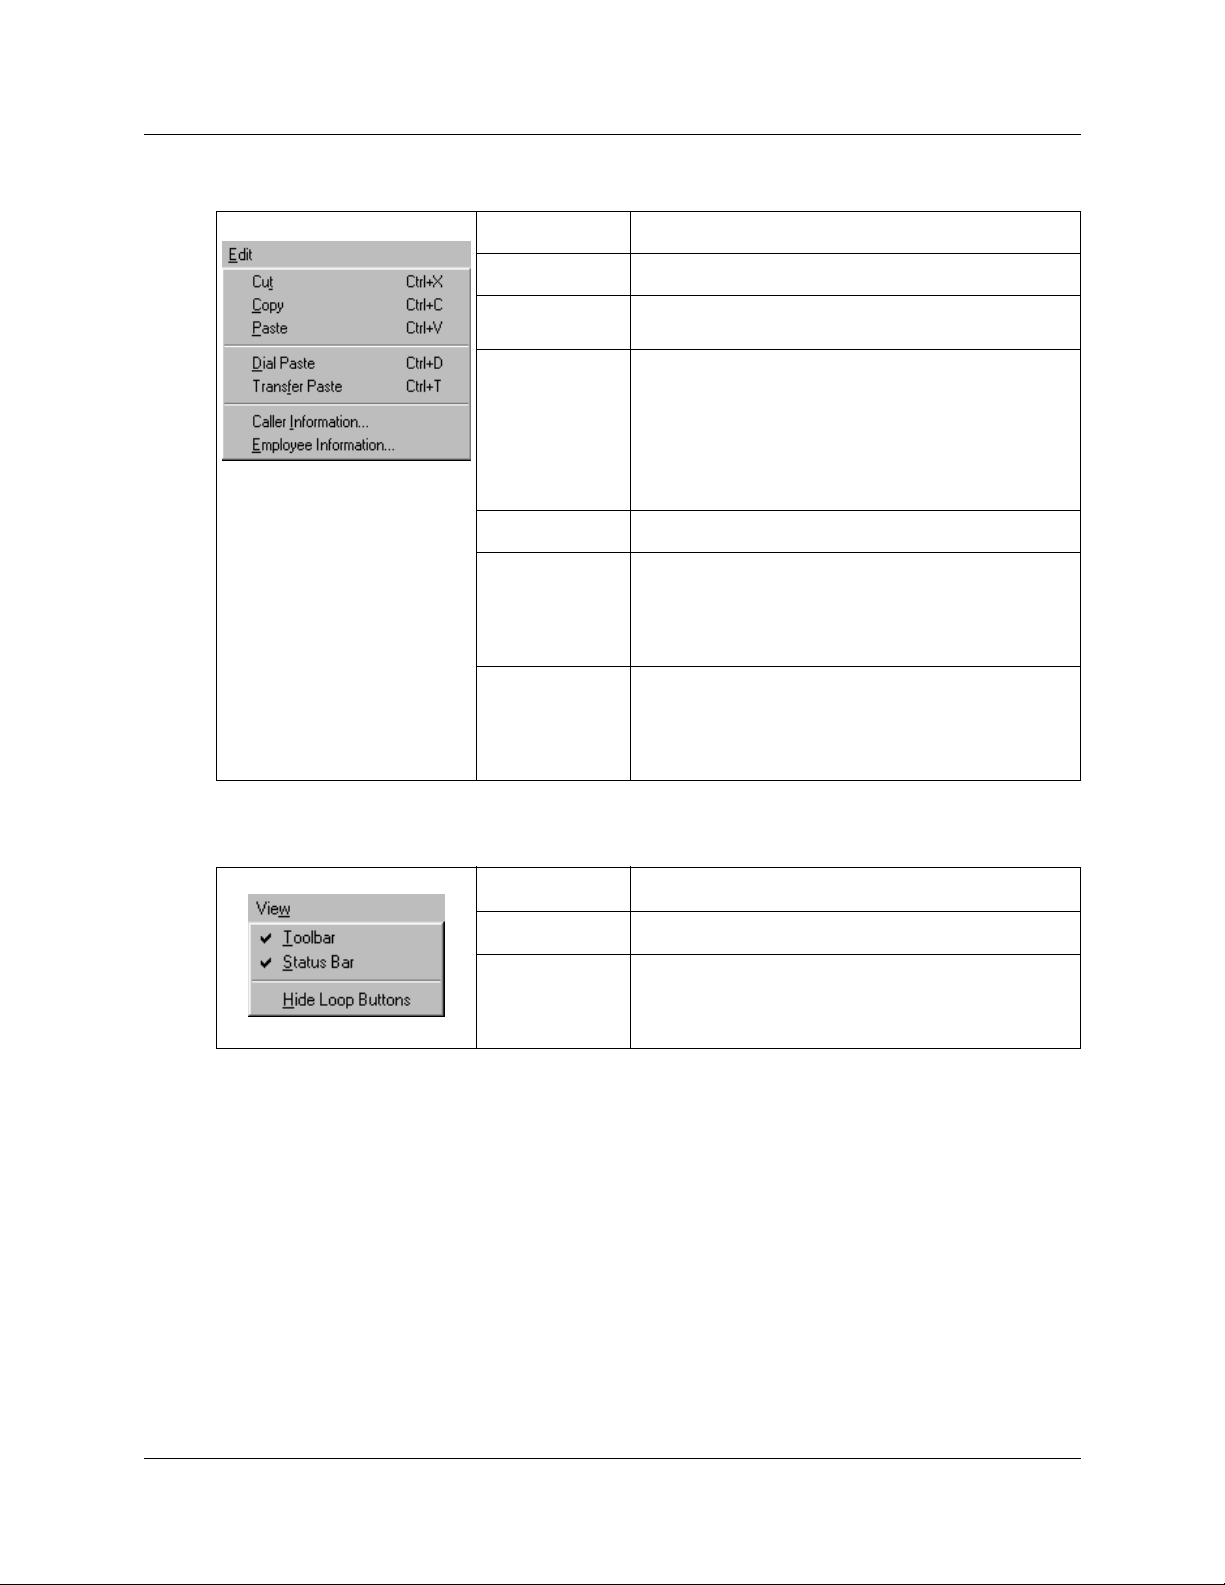
Edit menu
Chapter 3 Using the Attendant Console window 25
Cut
Copy
Paste
Dial Paste
Transfer Paste
Caller
Information
Employee
Information
Cuts the selected text and moves it to the clipboard.
Copies the selected text to the clipboard.
Pastes the contents of the clipboard at the insertion
point.
Dials the number in the Clipboard. The number can
include special characters such as hyphen,
parenthesis, space or period.
Note: The Clipboard contents are added to any
characters already in the Target list box. This lets you
type a routing code in the Targ et list box and then click
the Dial Paste button.
Transfers a call to the number in the Clipboard.
Opens the Edit Caller Information dialog box. The Edit
button in the Caller Information list performs the same
function. Refer to “The Edit Caller Information dialog
box” on page 35 and “Maintaining caller information” on
page 67.
Opens the Edit Employee Information dialog box. The
Edit button in the Directory list performs the same
function. Refer to “The Edit Employee Information
dialog box” on page 39 and “Maintaining caller
information” on page 67.
View menu
Toolbar
Status bar
Hide Loop
Buttons
Shows or hides the toolbar.
Shows or hides the Status bar.
Shows or hides the inactive Loop buttons. When
selected, only the active Loop buttons appear on the
Attendant window.
Attendant Console User Guide
Page 26
26 Chapter 3 Using the Attendant Console window
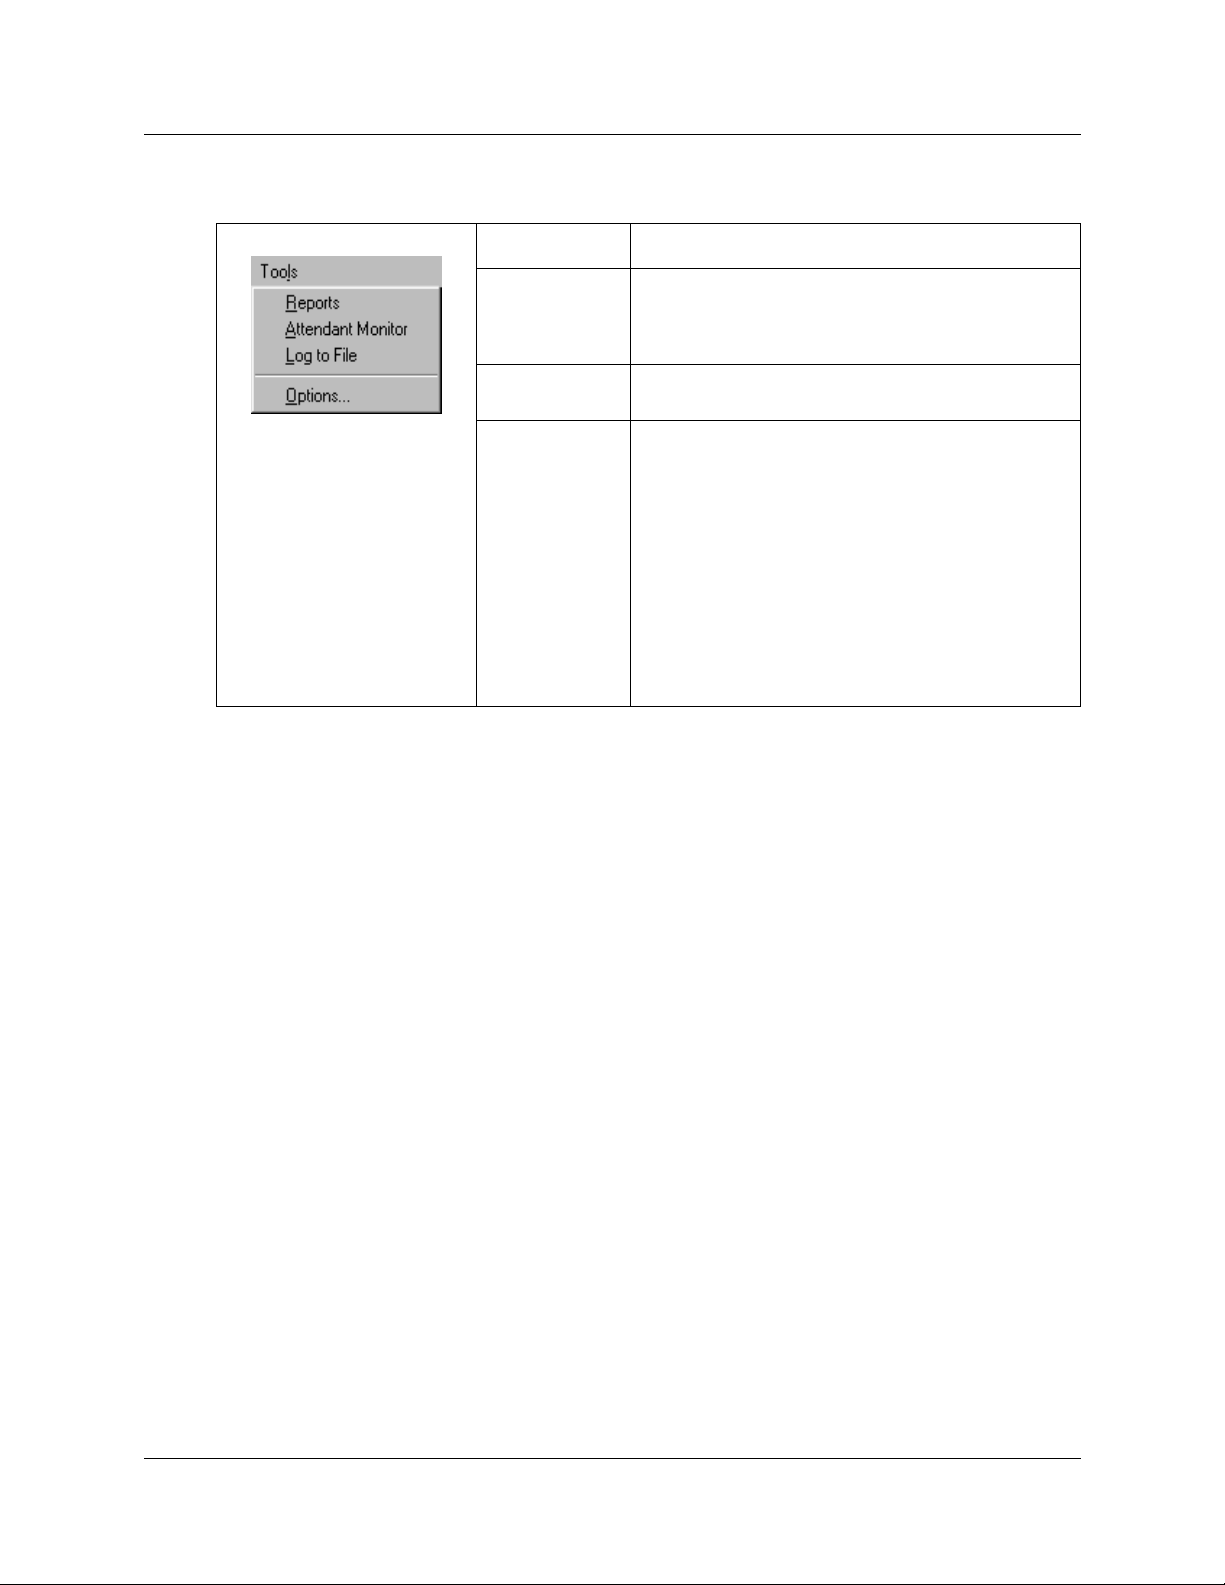
Tools menu
Reports
Attendant
Monitor
Log to File
Options
Starts the Reports component.
Opens the Attendant Monitor dialog box that displa ys
diagnostic information sent by the Client component
and received back from the Server component. The
Attendant Monitor helps in troubleshooting.
Writes Client comp onent activity and S erver messaging
to a log file. This is used for troubleshooting.
Opens the Opt ions dialog box:
• The Options tab lets you specify the Server ID,
enter the Attendant e xten sion, set the condition s f or
making the Attendant Console Attendant window
appear, and set call redirection.
• The Assigned tab lets you choose extensions to
appear in the Directory List’s Assigned tab.
• The Selected tab lets you select which extensions
appear in the Directory List’s Selected tab.
For more information, refer to “Using the Directory
options” on page 41.
P0936572 02
Page 27
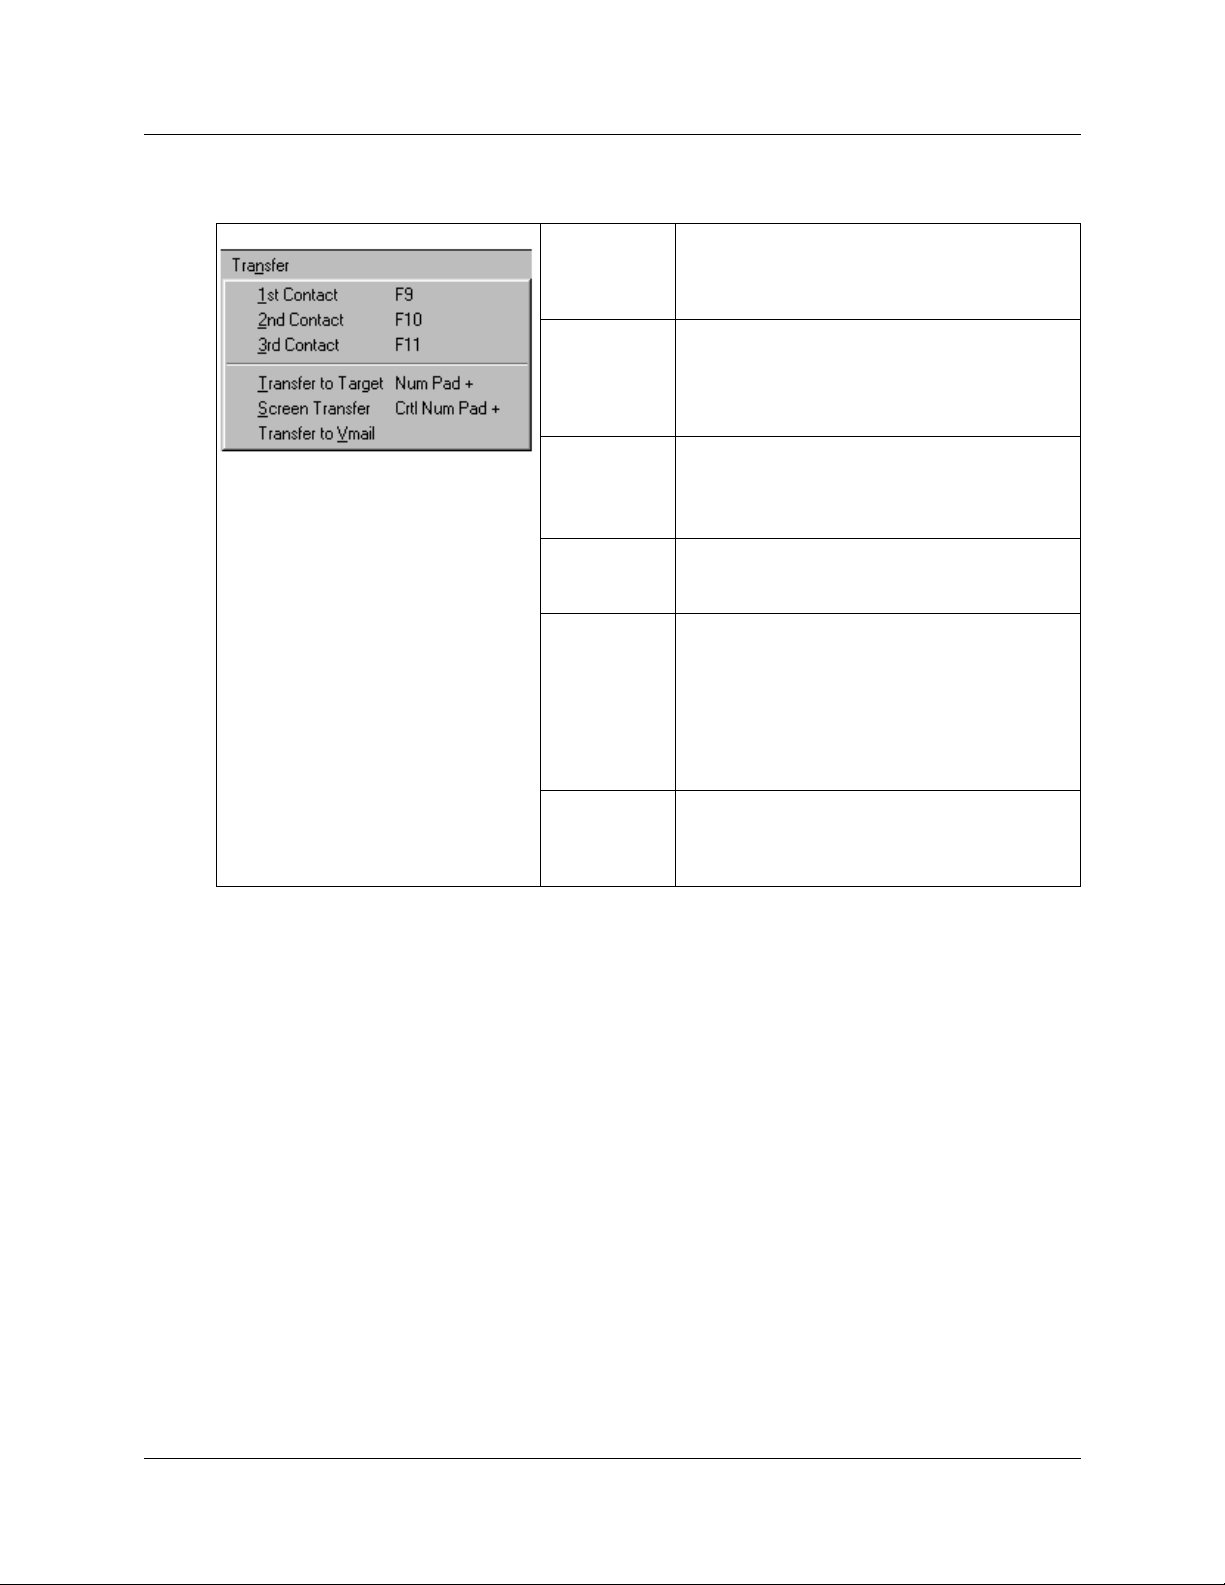
Transfer menu
Chapter 3 Using the Attendant Console window 27
1st Contact
2nd Contact
3rd Contact
Transfer to
Target
Screen
Transfer
Transfer to
VMail
Transfers the active call to the caller’s first
contact.
1st Contact is enabled if there is an active call
and a contact in the first box of the Contacts list.
Transfers the active call to the caller’s second
contact.
2nd Contact is enabled if there is an active call
and a contact in the second box of the Contacts
list.
Transfers the active call to the caller’s third
contact.
3rd Contact is enabled if there is an active call
and a contact in the third box of the Contacts list.
Transfers the active call to the extension in the
Target list box. The Transfer button performs the
same function.
Screens a call transfer of an active call to the
extension number in the Target list box. The
caller is put on hold when you click Screen
Transfer. The caller is connected when you click
Transfer Now in the Screen Transfer dialog box.
The Screen button performs the same function.
Refer to “Parking, holding a nd screen ing call s” on
page 54.
Transfers the active call to the voice message
mailbox of the extension in the Target list box.
The VMTransfer button performs the same
function.
Attendant Console User Guide
Page 28
28 Chapter 3 Using the Attendant Console window
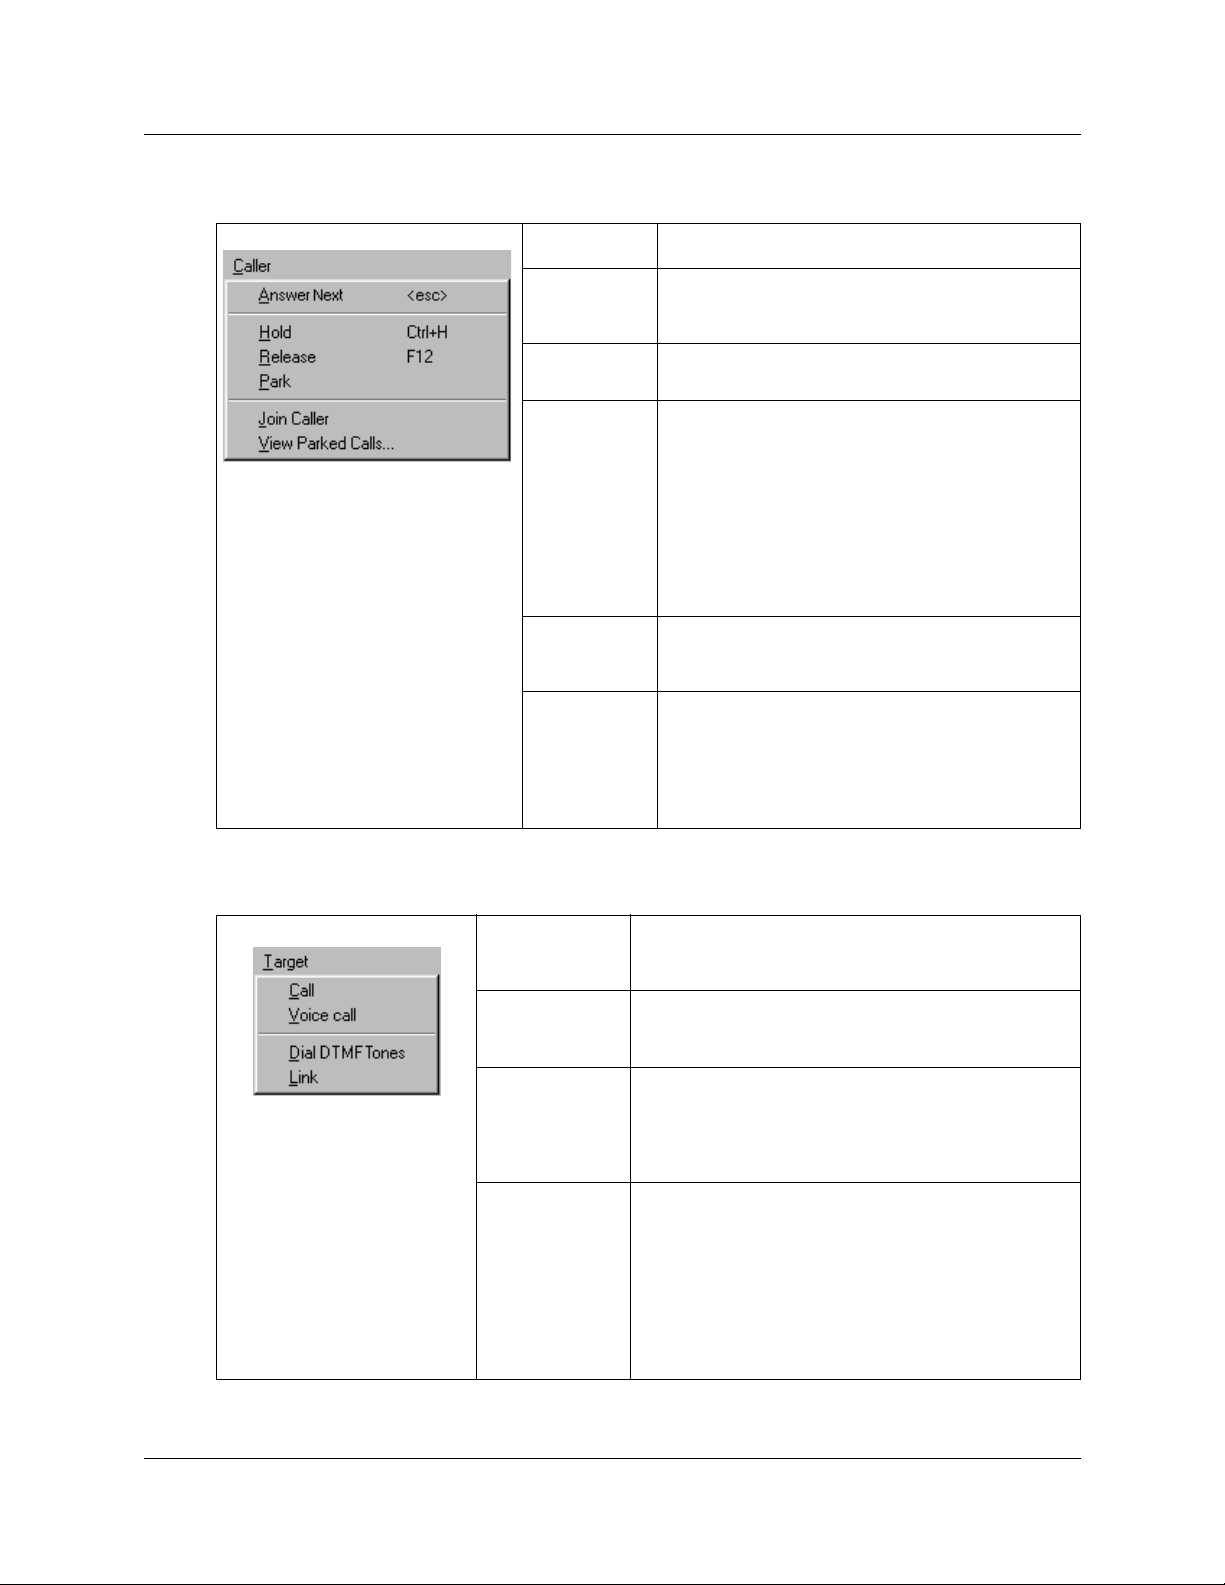
Caller menu
Answer Next
Hold
Release
Park
Join Caller
View Parked
Calls
Answers the next call in the queue.
Places an active call on hold. The Hold button
performs the same function. Refer to “Parking,
holding and screening calls” on page 54.
Disconnects the active call. The Release button
performs the same function.
Parks the active call so you can page the person
whose extension is in the Ta rget lis t box. A lis t of all
parked calls appears in the Parked Calls dialog box
when you click View Parked Calls on the Caller
menu. You can retrieve the call from the View
Parked Calls dialog box by pressing the Retrieve
button. For more information on viewing parked
calls, refer to “Parking, ho ldi ng a nd s c reen ing ca lls”
on page 54. The Park/Page button performs the
same function.
Connects two callers by joining the active call with
the call on hold. Refer to “Linking and Joining calls”
on page 60.
Opens the Parked Calls dialog box, which displays
calls parked by all attendants. A call can be
retrieved by any atten dant or from any tel ephone on
the Business Communications Manager 2.5
system. For more information, refer to “Linking and
Joining calls” on page 60.
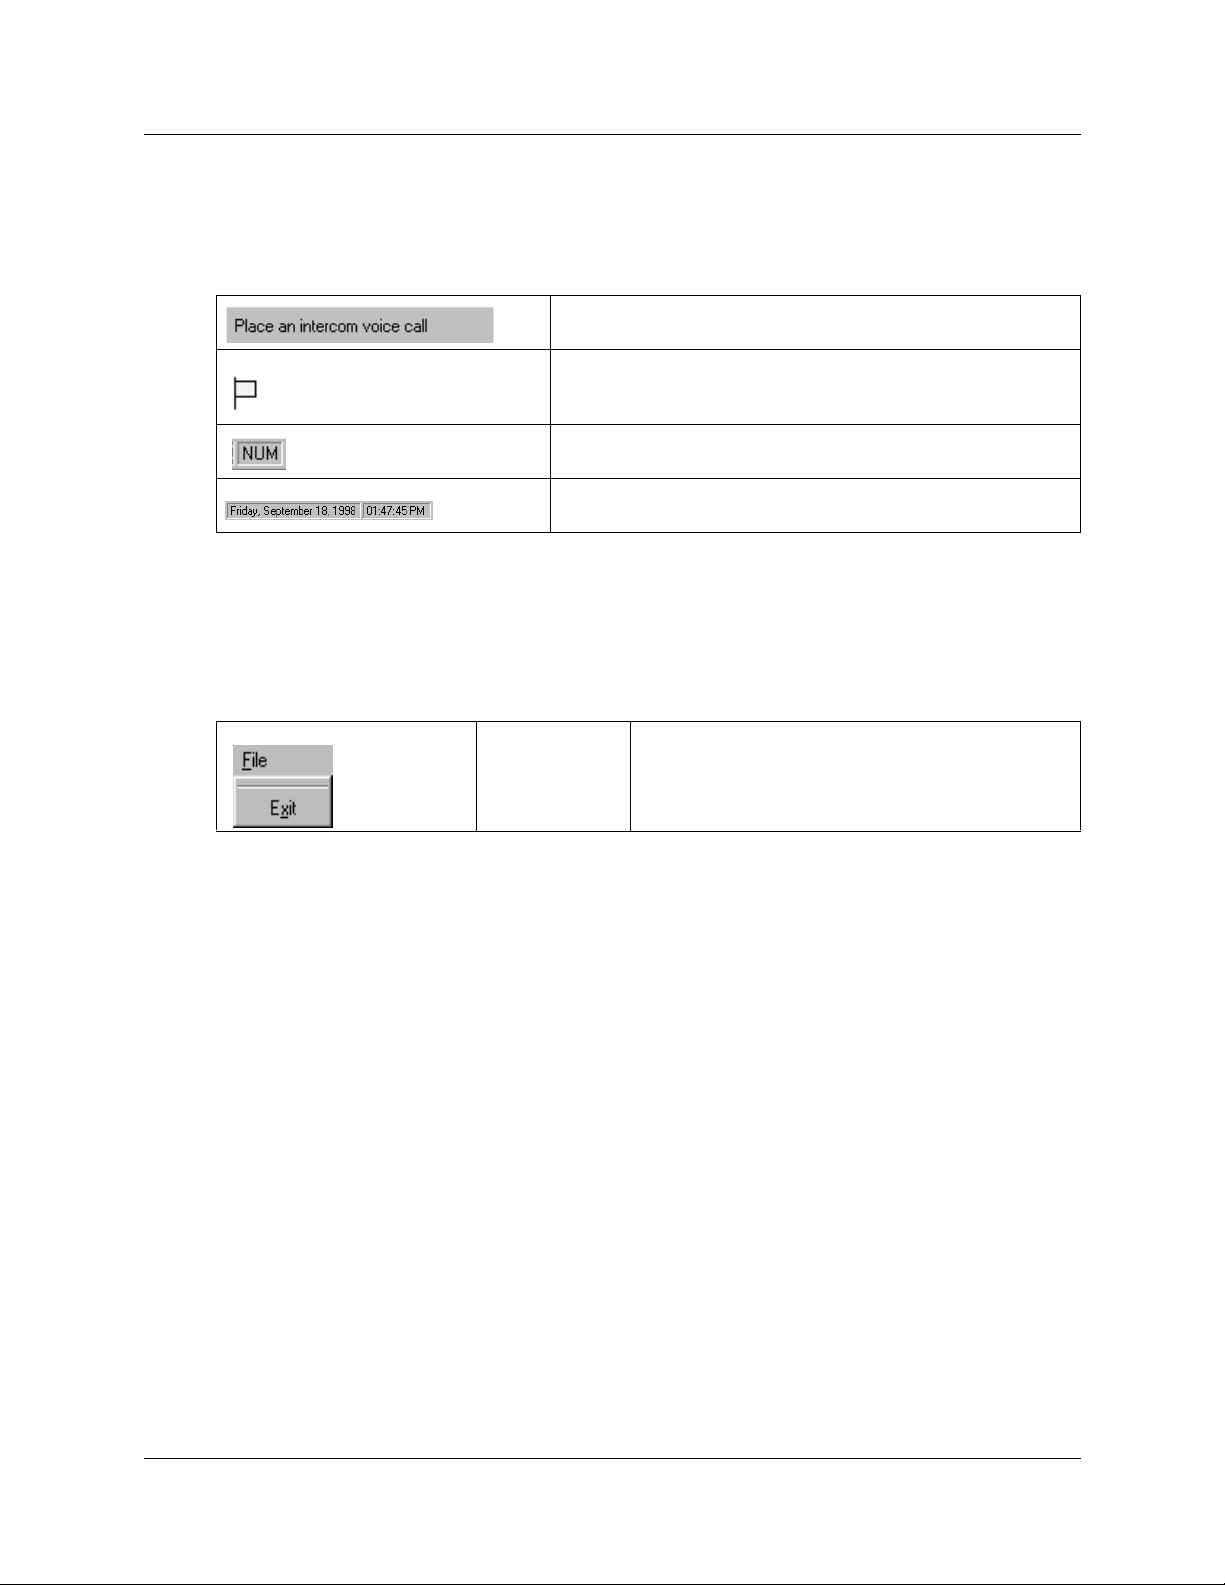
Target menu
Call
Voice Call
Dial DTMF
Tones
Link
Initiates a call from y ou r e xte nsion to the number i n the
Target list box. The Call button performs the same
function.
Places a voice call from the Attendant to the extension
in the Target list box. For more information, refer to
“Contacting employees using Voice Call” on page 59.
Dials DTMF-tone digits to the external number in the
Target list box. This must be used in conjunction with
the Link button and with outdialing on an active line to
access other systems or carriers (for example,
Centrex).
Accesses (hookflash) Centrex or CO line features
(such as off-premise transfer or conference) or other
systems or carriers w hi le on a n i nc om ing ca ll . C li ck the
Link button while on an incom ing c all t o plac e the calle r
on hold and generate a Li nk sig nal (als o c all ed fl as h or
recall) on the activ e line . The DTMF button is us ed with
the Link button to outdial the digits in the Target list
box. For more informa tion, refer to “ Linki ng and Joining
calls” on page 60.
P0936572 02
Page 29
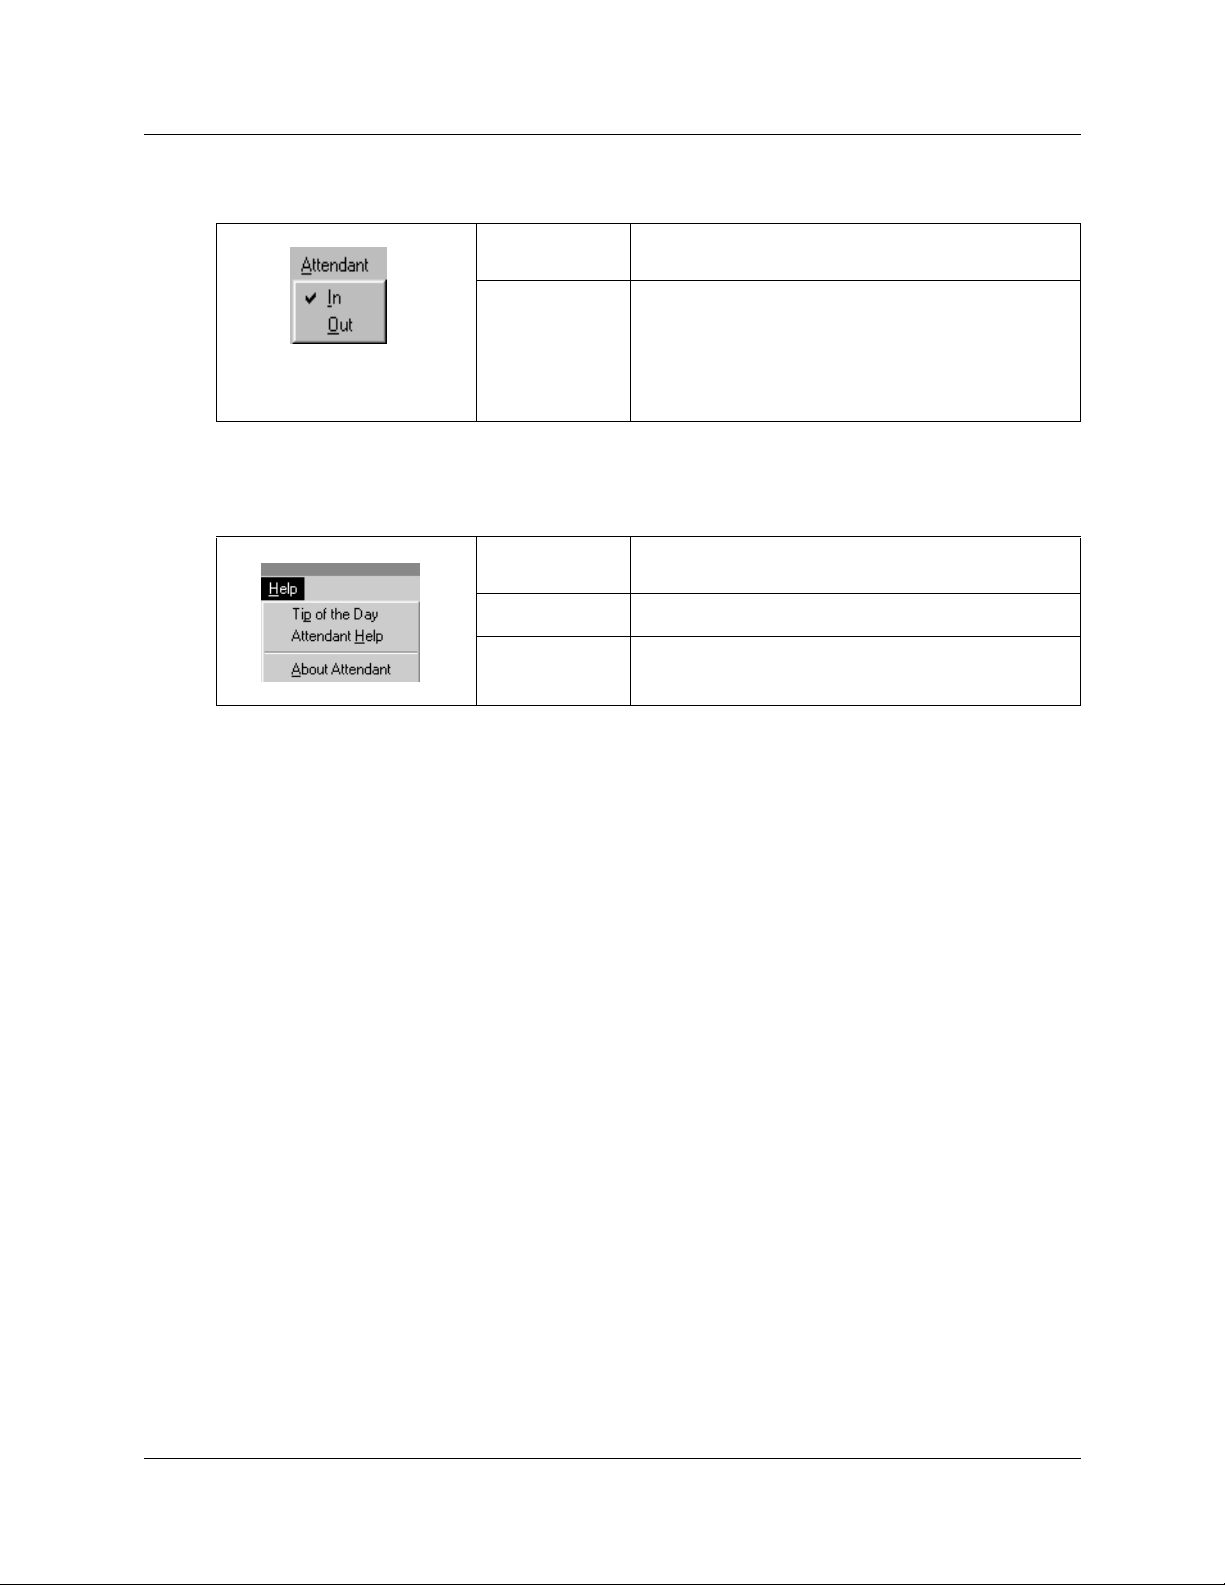
Attendant menu
Chapter 3 Using the Attendant Console window 29
Help menu
In
Out
Tip of the Day
Attendant Help
About Attendant
Toggles with the Out command. When set to In, you
are taking calls.
Toggles with the In command. When set to Out, you
are not taking calls. Calls that ring at your telephone
are forwarded to the backup attendant position.
Note: To redirect calls to a backup extension, on the
Tools menu click Options. Set redirect options in the
Options dialog box.
Shows or hides the Ti p o f the Day dialo g box when you
start the Attendant component.
Displays Help files.
Displays program information, revision number,
copyright information, and system information.
Attendant Console User Guide
Page 30

30 Chapter 3 Using the Attendant Console window
Using keystroke commands
You can use keystroke commands to do many tasks quickly in Attendant Console.
Access keys
In Attendant Console, each menu and command has an underlined letter called an access key.
1 Press the Alt key.
This gives you access to the menu names in the menu bar.
2 Press the access key for the menu name. For example, to open the Edit menu, press Alt and
then E.
3 Press the access key fo r t he de si re d command. For example, to select Cal ler Information from
the Edit menu, press I and the Edit Caller Information dialog box appears.
Menu keystroke commands
Keystroke commands are shown beside some menu commands. To use these you press Ctrl key
while you press another key. The keystroke commands are shown in the following tables.
Edit Menu keystroke commands
Cut
Copy
Paste
Dial Paste
Transfer Paste
Ctrl+X
Ctrl+C
Ctrl+V
Ctrl+D
Ctrl+T
Transfer Menu keystroke commands
1st Contact
2nd Contact
3rd Contact
Transfer to Target
Screen Transfer
F9
F10
F11
Num Pad+
Ctrl Num Pad+
Caller Menu keystroke commands
Answer Next
Hold
Release
P0936572 02
Esc
Ctrl+H
F12
Page 31

Keystroke commands with the Alt key
You can access Call handling functions directly from the Attendant window by pressing the Alt
key and the underlined keys in the commands. You must press the Alt key while you press other
key. For example, to place an active call on Hold, press the Alt key and press H.
Using right-click capability
Right-click capability lets you process calls faster by minimising mouse movement. You can use
right-click capability to:
• originate a call
• transfer a call
• screened transfer
• transfer a call to voice message mailbox
• link transfer
• park a call and page an employee
• camp a call on an extension
Chapter 3 Using the Attendant Console window 31
To use right-click capability
1 Right-click a name or extension in the Directory list.
A list of call processing commands appears.
2 Click a call processing command.
Attendant Console User Guide
Page 32

32 Chapter 3 Using the Attendant Console window
Using the toolbar
The toolbar contains several buttons that provide quick and easy access to some of the Attendant
Console functions.
To display the toolbar
1 On the View menu click Toolbar.
The toolbar is displayed across the top of the Attendant window below the menu bar.
Toolbar buttons
Use the In and Out buttons to indicate whether or not you can take calls.
Use the Link button to access Centrex or CO line features (such as
off-premise transfer or conference) or other systems or carriers while on an
outside call. For more information, refer to “Linking and Joining calls” on
page 60.
Use the DTMF button to dial DT MF-tone dig its to the e xterna l numb er in th e
Target list box. This must be used with the Link button and with outdialing
on an active line to access other systems or carriers such as Centrex. This
button also sends special characters (such as * and #) from the Target list
box to other services such as Interactive Voice Response (IVR) and
Business Communications Manager 2.5 messaging services.
Use the Join button to connect two callers by joining the active call with the
call that is on hold at the Attendant Console. Refer to “Linking and Joining
calls” on page 60.
Use the View Parked button to display the Parked dialog box, which lists
parked calls. Calls can be parked and retrieved from any telephone
connected to your Busin ess Communi cations Mana ger 2.5 sys tem. Refer to
“Parking calls and paging employees” on page 54.
Use the Voice Call to initiate a call from your telephone to the speaker of
another telephone without causing the telephone to ring. Refer to “Parking
calls and paging employees” on page 54.
Six Loop buttons, labeled F1 to F6, are used to answer calls. Each Loop
button represents call. The color of the Loop button and the word that
appears shows the type of call activity occurring.
You can display or hide Loop buttons. On the View menu click Hide Loop
Buttons. When a check mark appears, only active Loop buttons appear.
When Hide Loop Buttons is not selected, all the Loop buttons appear.
P0936572 02
Page 33

About Loop buttons
The Loop buttons on the left of the Attendant Console window are labeled F1 to F6. You use the
Loop buttons to answer calls. Each Loop button can handle a single call. The Loop buttons have
colors and words that represent call activities. For example, a yellow Loop button with the word
"Ringing" represents an incoming call at your extension. For information on how to hide or
display the Loop buttons, exce pt for those tha t indicat e call activit y, refer to “View menu” on page
25.
A yellow Loop button with the word Ringing appears when an incoming call rings
at your extension.
A green Loop button with the word Active appears when a call is answered by
you. Only one Loop button is active at one time.
A blue Loop button with the words On Hold a ppe ars w he n a ca ll is on ho ld at your
extension.
Chapter 3 Using the Attendant Console window 33
An orange Loop butto n wi th the word Callback a pp ears whe n a call returns to yo u
from the Target extension.
A red Loop button with the word Ringing appears when a call ring s at an Assigned
extension.
Grey Loop buttons appear when the Loop button is inactive and when Hide Loop
Buttons is not selected.
Attendant Console User Guide
Page 34

34 Chapter 3 Using the Attendant Console window
Using Caller Information options
The Caller Information options display information about the caller that is stored in the Business
Communications Manager 2.5 system database.
Name Displays the name of the caller.
Caller Type Unclassified, Personal, Employee, Vendor or Customer.
Company The company the call is originating from.
Note Any note you want to add to the caller information.
P0936572 02
Opens the Ed it Caller Information dialog box. Ref er to “Maintaining caller
information” on page 67.
Places the active call on Hold.
Disconnects the active call.
Places the active call in park and opens the Page dialog box so that you
can page the person whose extension is in the Target list box.
Refer to “Parking calls and paging employees” on page 54.
Page 35

Chapter 3 Using the Attendant Console window 35
The Edit Caller Information dialog box
Use the Edit Caller Information dialog box to change or add information about callers.
To access the Edit Caller Information dialog box
1 Below the Caller Information options, click the Edit button.
The Edit Caller Information dialog box appears.
Name
Caller Type
Company
Phone
City, State/Province, and
ZIP/Postal Code
Contains the caller’s name. A first time caller name is the Caller ID name
provided by the telephone company. You can change this Caller ID name to
the caller’s name.
Contains the classification of the caller. There are five types: Unclassified,
Personal, Employee, Vendor and Customer.
Contains the name of the company associated with the caller. The Caller ID
name automatically appears in this box. You can edit the name here or in the
Caller Information options.
Contains the telephone number of the caller.
Contains the caller’s address.
Attendant Console User Guide
Page 36

36 Chapter 3 Using the Attendant Console window
Caller ID Name and
Caller ID Number
Record Number
Contacts
Contains information provided through subscription by the public switched
telephone network.
Contains a unique caller record identifier number. You cannot change the
information in this box.
Lists the caller’s three most frequently called persons in your company.
Saves the caller record displayed in the boxes of the Edit Caller Information
dialog box to the database.
Closes the Edit Caller Info rmat ion di alog b ox witho ut sav ing the chang es to th e
record.
Opens the Find dialog box in the Edit Caller Information dialog box.
Creates a blank caller record that you can add information to.
Creates a new name caller record using an existing caller record. All boxes
except the Name box contain the existing caller information. You must enter a
new name.
Deletes caller record displayed in the Edit Caller Information dialog box from
the database.
P0936572 02
Page 37

Chapter 3 Using the Attendant Console window 37
Using the call processing area
Use the Target list box and the Call Processing buttons to make and transfer calls.
The call processing area contains:
Use the Target list box to enter th e extens ion or tel ephone number to call.
Transfers the active call to the extension number in the Target list box.
Screens a call transfer of an active call to the extension number in the
Target list box. Click the Screen button and the caller is put on hold. The
caller is connected to the Target extension when you click Transfer Now
in the Screen Transfer dialog box.
Opens the Page dialog box.
Attendant Console User Guide
Page 38

38 Chapter 3 Using the Attendant Console window
Makes a call from your extension to the number in the Target list box.
Transfers the activ e cal l to th e voi ce me ssag e mai lbox o f the e xtens ion in
the Target list box so the caller can leave a message.
Places a call on hold at the target extension.
Accesses Centrex or CO line features (such as off-premise transfer or
conference) or other s ystems o r carriers w hile on a n outside c all. It is a lso
used to tone dial the digits in the Target list box.
P0936572 02
Page 39

Chapter 3 Using the Attendant Console window 39
The Edit Employee Information dialog box
This dialog box appears when you click the Edit button in the Directory option. Use the Edit
Employee dialog box to change or add information about employees. For more information, refer
to “Maintaining employee information” on page 71.
Name
Type
Department
Phone
City
State/Province
ZIP/Postal Code
Assistant Extension
Contains the employee’s name or the extension number if a name is not
entered.
Contains the classification of the employee record. “Employee” is the default.
Contains the employee’s department name.
Contains the employee’s telephone number. You cannot edit this box.
Contains the employee’s city.
Displays the state or province of the employee.
Displays the ZIP code or Postal Code of the employee.
Displays the extension of the person who handles c al ls fo r the e xte ns ion wh en
the employee cannot.
Attendant Console User Guide
Page 40

40 Chapter 3 Using the Attendant Console window
Record Number
Voice Mail
Contacts
Displays a unique record identifier number. You cannot edit this box.
Displays the voice message mailbox extension of the employee. You cannot
edit this box.
Lists the employee’s three most frequently called persons or extensions in the
Company.
Saves the employee information displayed to the database.
Closes the window without saving the record.
Opens the Find dialog box in the Edit Employee I nformat ion dialog box. Refer to
“Maintaining employee information” on page 71.
Creates a new name for the extension and does not change the other boxes.
P0936572 02
Page 41

Chapter 3 Using the Attendant Console window 41
Using the Directory options
The Directory options are at the bottom of the Attendant Console window.
The Directory options are tabbed directories that show views of the extensions on the Business
Communications Manager 2.5 telephone system. You can use the Directory opti ons to sea rch and
edit extension and employee information.
Shows the status of the employee. When you select a
category from the list box, a corresponding icon appears
in the first column of the Directory list. The available
category are: None, Not at Desk and Out of Office.
Used to enter information about individual employees.
Changes the caller or Caller ID record to an employee
record if an employee c alls in from ou tside. Thi s prevents
an employee name from appearing in the caller record
related to the Caller ID name or number.
Attendant Console User Guide
Page 42

42 Chapter 3 Using the Attendant Console window
Finds names of individual employees or groups of
employees by department. The Find box finds employee
by name. The Department box finds employees by
department. Type the first few letters of the name in the
Find box and click the Find button. Names that start with
the letters appear in the Directory list. To search by
department, select a departme nt from the Department l ist
box and then click the Find button. Employees in the
selected department appear in the Directory list.
Resets the Full tab Directory view to display all names
and extensions.
Opens the Edit Employee Information dialog box. If you
select a name or extension in the Directory list,
information about to that name or extension appears in
the dialog box. If you do not select a name or extension,
the Edit Employee Information dialog box is empty. You
can also access the Edit Employee Information window
by clicking the Edit menu and clicking Employee
Information. Refer to “The Edit Employee Information
dialog box” on page 39 and “Maintaining employee
information” on page 71.
Directory tabs
Full
BLF
Assigned
Selected Displays a subset of the Full tab extensions. The Selected tab view displays the
displays extensions connected to the Business Communications Manager 2.5 system,
including wireless Companion telephones, CallPilot extensions and Hunt group
extensions. This view displays the maximum amount of extension and employee
information allowed in the Directory list.
Displays extensions connected to the Business Comm unications Manager 2.5 system,
including wireless Companion telephones, CallPilot extensions and Hunt group
extensions. This view displays only the person status icon, telephone status icon and
employee name. This allows more extensions to be displayed at once.
Displays specific extensions for which an assistant attendant is responsible. Like the Full
tab view, the Assigned tab view displays the maximum amount of extension and
employee information allowed in the Directory list. Extensions are assigned or removed
from the Assigned tab view in the Options dialog box. Refer to “Assistant attendant” on
page 17.
maximum amount of extension and employee information allowed in the Directory list.
Selected extensions are useful if you direct incoming calls to a limited number of
extensions and wan ts to displ ay only tho se extensio ns. Exte nsions are add ed or remov ed
from the Selected tab in the Options dialog box.
P0936572 02
Page 43

Chapter 3 Using the Attendant Console window 43
Directory list employee and extension information
Each Directory list tab view shows the following employee and extension information..
Note: The first two columns are not labeled and contain only icons, not text.
person status
icon
telephone status
icon
Available for
calls
On-hook
Off-hook
Note: A Hunt Group is a group of telephones that can be called by a single number.
Hunt Groups are configured in your Business Communications Manager 2.5 system.
The telephone status icon for a Hunt Group extension is blue and always indicates
on-hook.
This is the leftmost column in the Directory list views and does not have a column
heading. It can co ntain an i con or be blank. T he person sta tus icon shows th e locatio n of
the employee. Refer to “Using the Directory options” on page 41.
This is the second column from the left in the Directory list views and does not have a
column heading. The telephone icons show the current status of the telephones
connected to the Business Communications Manager 2.5 system. They also show
additional informa tion suc h as whe ther the e xtension is read y to r eceive cal ls or is on Do
Not Disturb (DND). The telephone icons are:
Do Not
Disturb
Call
Forwarded
Directory list columns
Name
Ext
Notes
Department
The first labeled column on the left, containing the names of employees.
Contains telephone extensions.
Displays additional info rma tion about the employee that y ou en ter. Notes can be edited
only from the Notes list box at the top of the Directory dialog box.
Displays the name of the department to which the employee belongs. Enter the
department by clicking the Edit button, clicking Empl oyee Informati on and using the Edit
Employee Information dialog box. Refer to “Maintaining caller information” on page 67.
Attendant Console User Guide
Page 44

44 Chapter 3 Using the Attendant Console window
Sorting information in the Directory list
You can sort the employee information in the Directory list tabs by extension, name, notes or
department. In the Full, Assigned and Selected views, the information a ppears in columns with
headings.
To sort information
1 In the Directory list, click the Name, Ext, Notes or Department column heading.
The information sorts b y the column you select.
P0936572 02
Page 45

Chapter 4
Handling calls
With Attendant Console you c an manage calls using a mouse o r a keyboar d. When a call c omes in,
you can respond to the cal ler us ing eit he r a tele phone or a headset . If you use a hea dset you r han ds
are free to use your computer.
Basic call processing with Attendant Console
• Answering a call.
Refer to “Answering calls as an attendant” on page 46.
• Putting an employee’s extension in the Target list box.
Refer to “Using the Target list box” on page 48.
• Transferring a call.
Refer to “Transferring a call” on page 52.
45
Other call processing functions
• Parking an incoming call and page the employee.
Refer to “Parking, holding and screening calls” on page 54.
• Linking and joining calls.
Refer to “Linking and Joining calls” on page 60.
• Handling a callback call.
Refer to “Handling a callback call” on page 62.
• Making a call from your extension.
Refer to “Making a call from your extension” on page 64.
• Managing calls at the employee’s telephone.
Refer to “Handling calls at an employee’s telephone” on page 65.
This chapter explains how you handle calls using the Attendant window. For more information
about the Attendant wind ow, re fer t o “Component s of th e Atten dant Cons ole wind ow” on p age 23.
Attendant Console User Guide
Page 46

46 Chapter 4 Handling calls
Answering calls as an attendant
The Attendant Console window has six Loop buttons for call answering. Refer to “About Loop
buttons” on page 33. Each Loo p but ton can handle a single call in pr ogr es s. The color of the Loop
button changes depending on the activity.
What the Loop buttons display
If the Loop buttons are hidden, they appe ar when a call occurs. If the Loop Overflo w ic on a ppears
on the Status Bar there are more than six calls.
A new incoming call appea rs as a ye llow Loop button that di splay s the word Ringing . Inf ormati on
about the call appears beside the Loop button to assist you with personalised call processing:
• the function key name above the Loop button, (F1 in the example) shows the key on the
computer keyboard that relates to the ringing Loop button.
• the timer above the Loop button shows in minutes and seconds how long the call is active.
• the company name to the right of the Loop button shows the company that is calling. The
company name is either from the caller database or from Caller ID. If you do not have Caller
ID, this line of display is blank. You can enter or edit a company name using the Caller
Information list box.
• The Caller ID name on the second line of the information to the right of the Loop button,
shows the Caller ID number prov ided by the t elephone co mpany. If you do not have Caller ID,
this line of display is blank.
• The bottom line of in formati on to t he rig ht o f the Loo p butto n shows t he name of the Busines s
Communications Manager base unit server line that carries the call.
To show or hide inactive Loop buttons
1 On the View menu click Hide Loop Buttons.
To answer an incoming call
1 A Loop button turns yellow displays the word Ringing. You can respond to a call in one of
four ways:
• Click the yellow Ringing Loop button.
• Press the function key that is shown above the Loop button, for example, F1.
• Press the Esc key.
• Press the associated intercom or line key on your telephone.
The Loop button becomes green and displays the word Active.
P0936572 02
Page 47

Chapter 4 Handling calls 47
2 Answer the call with your company greeting. If you are answering a call from this number or
company for the first time, you can enter caller information. For further information, refer to
“The Edit Caller Information dialog box” on page 35. If this is not the first time you have
answered a call from this number or company, refer to “Using the Target list box” on page 48.
To release a call
1 Click the Release button.
The call disconnects and the Loop button becomes idle.
Note: Server line names are programmed in your Business Communications Manager
base unit by your telephone administrator.
Note: If your Business Communications Manager base unit is shared by two or more
companies, the telephone administrator can associate the names of each company with
their hardware lines. This means tha t you can tell which compa ny is being ca lled before
answering the call.
Attendant Console User Guide
Page 48

48 Chapter 4 Handling calls
Using the Target list box
After you answer a call, click the called extension to put it in the Target list box.
There are four ways to find the correct extension when you are ready to process a call:
• “Using the Contac ts boxes” on page 48
• “Using the Direct ory tabs” on page 49
• “Using the Directory Find box” on page 50
• “Using the Depar tment list b ox” on page 51
Using the Contacts boxes
The Contacts boxes contain the extension numbers and names of the three most frequently called
numbers that the caller requests. These caller contacts are listed from most frequently to least
frequently called.
To the left of eac h Cont ac t box is the current pe rs on status icon for tha t c ont act , and to the right of
each Contact box is the person’s telephone status icon.
To transfer a caller to a frequently called number
1 Double-click the telephone status icon.
The call is forwarded to that extension.
P0936572 02
Page 49

Using the Directory tabs
The tabs in the Directory dialog box show information about extensions.
Chapter 4 Handling calls 49
To search by extension or name
1 Click the Full, BLF, Assigned or Selected tab.
2 Click the extension, the name or the department of the employee being called in the list. The
name or extension number appears in the Target list box.
3 Click the Transfer button.
Attendant Console User Guide
Page 50

50 Chapter 4 Handling calls
Using the Directory Find box
Use the Directory Find box to search by name.
To search by Name and put an extension in the Target list box
1 In the Find box, type the first letter or lett ers of the person’s last name or first name,
depending on how the employee names are entered. For example, if they are entered “Jane
Doe”, type “j”. If they are entered “Doe, Jane”, type “d”.
2 Click the Find button.
Any matching names are displayed in a list under the Full tab.
3 In the Directory list, click the name of the employee being called.
The name appears in the Target list box.
4 To restore all names in the Full tab view, click the Show All button.
After the search result is shown in the Full tab view, the BLF, Selected and Assigned tab views
remain unchanged.
P0936572 02
Page 51

Chapter 4 Handling calls 51
Using the Departme nt list box
You can search for a name by department from the Full tab using the Department list box.
To search by department
1 Click the arrow of the Department list box.
The list appears displaying the departments associated with extensions.
2 Click a department name from the list.
The department name appears in the Department list box.
3 Click the Find button.
The extensions that match the department appear in a list under the Full Directory tab view.
4 In the Directory list box, click the name of the employee being called.
The name appears in the Target list box. The search result is shown in the Full tab. The BLF,
Selected and Assigned tab views remain unchanged.
5 To restore all names in the Full tab view, click the Show All button.
Note: Department names for each extension are created in the Edit Employee
Information dialog box.
Attendant Console User Guide
Page 52

52 Chapter 4 Handling calls
Transferring a call
You can transfer an active call to an extension using the Contacts box, the Target list box or the
Directory dialog box. You can also transfer a call to a voice message mailbox.
To transfer using the Contacts box
1 Double-click the telephone status icon to the right of the Contacts box.
The call transfers to the displayed extension.
To transfer using the Target list box
1 Make sure the extension in the Target list box is correct. Double-click the telephone statu s
icon beside the Targ et li st box or click the Transfer button. You can also c li ck the Target list
box and press the Enter key on the keyboard.
The call transfers to the displayed extension.
To transfer using the Directory list
1 Double-click the teleph one st atus i con or the name of the person to whom you ar e trans ferr ing
the call. The call trans fers.
To transfer a call to the mailbox of an extensi on in the Target list
box
1 Type the extension number of the employee in the Target list box.
2 Click the VMTransfer button.
The call transfers and the Loop bu tton becomes idle.
P0936572 02
Note: You can make the VMTransfer button inactive when a non-CallPilot system is
attached to the Business Communications Manager base unit.
Page 53

Chapter 4 Handling calls 53
To transfer a call to an outside number
1 With an active incoming call on Attendant Console, in the Target list box type an outside
telephone number.
2 Click the Link Transfer button.
The Loop button label shows Active, and the number in the Target list box is tone dialed.
3 Click the Release button and the incoming call transfers to the outside telephone number.
The Attendant disconnects from the call and the Loop button becomes idle.
Attendant Console User Guide
Page 54

54 Chapter 4 Handling calls
Parking, holding and screening calls
With Attendant Console you can screen calls for a employee, put the calls on hold and park calls
so that you can page the employee. You can also talk to the employee in intercom mode using
Voice Call.
Parking calls and paging employees
With the Park/Page feature you can place a call on hold and page the employee. You can also use
this method to page an employee when there is no active call.
To park a call and page an employee
1 In the Target list box type the extension of the employee.
If there is no active call and you want to page an employee, type or select the extension of the
person being paged in the Target list box.
2 Click the Park/Page button.
The Page dialog box appears. The Page dia log box shows all parke d calls and all page zon es so
that you can page the employee.
.
3 Click a call in the Parked calls list and then click the appropriate zone in the Page zones list.
4 Click the Page button.
The Console Message box appears and the speakers on the telephones in the selected zone
emit a low-level tone.
5 Speak into the headset or handset, depending on your setup. When you are finished, click the
OK button.
P0936572 02
Page 55

To retrieve a parked call
1 On the Caller menu, click View Parked Calls.
The Parked Calls dialog box appears.
Chapter 4 Handling calls 55
2 Select the parked call.
3 Click the Retrieve button.
or
1 On the toolbar, click .
The Parked Calls dialog box appears.
2 Select the parked call.
3 Click the Retrieve button.
Attendant Console User Guide
Page 56

56 Chapter 4 Handling calls
To view parked calls
1 On the Caller menu, click View Parked Calls.
The Parked Calls dialog box appears, displaying:
• the park number of the call
• the caller’s name (from the Name box of the Caller Information list box)
• the name or extension of the called employee
2 Click the Close button.
The Parked Calls dialog box closes.
P0936572 02
Page 57

Chapter 4 Handling calls 57
Placing and retrieving calls on hold
Calls can be placed on Hold and retrieved quickly.
To put an incoming call on hold
1 Click the Ringing Loop button.
2 Click the Hold button or click another Ringing Loop button.
The previous call is put on hold.
When the active call is placed on hold, the Loop button displays the words On Hold and the
Loop button color changes to blue.
To place a call on Hold at an active extension
1 With an active call on the Loop button and the employee’s extension in the Target list box,
click the Camp On button.
When the active call is camped on the Target list box extension (placed on hold at the Target
extension), the Loop button becomes idle.
2 The camped call sends a message with tones to the employee either on or off the telephone,
indicating a call is camped on their extension.
To retrieve a call on Hold
1 Click the blue On Ho l d Loop button.
The Caller Information boxes show all of the information related to this call.
2 Respond to the call accordingly.
Attendant Console User Guide
Page 58

58 Chapter 4 Handling calls
Screening calls
You can screen calls by asking an employee whether they want to talk to the caller.
To screen and transfer a call
1 Click the Screen button.
The active call goes on hold. The Loop button changes color to blue. The extension rings and
the Screen Transfer dialog box appears.
2 Ask the person being called if they can take the call. If the answer is yes click the Transfer
Now button and the call transfers. If the answer is no follow steps 3 to 5.
3 Click the Cancel button.
4 Click the Loop button on which the call is being held to reconnect with the caller.
5 Process the call accordingly.
P0936572 02
Page 59

Contacting employees using Voice Call
You can use this feature as an intercom to talk directly through the speaker of the employee’s
telephone.
1 In the Target list box type or enter the extension of the employee.
2 On the toolbar, click .
3 Speak to the employee through the speaker in their telephone.
Chapter 4 Handling calls 59
Attendant Console User Guide
Page 60

60 Chapter 4 Handling calls
Linking and Joining calls
Using Attendant Console, you can create conference calls linking or joining calls. Use the DTMF
button to transfer or link calls on Centrex lines.
To use the DTMF button with an incoming call on a Loop button
1 On the toolbar click .
The active incoming call is placed on hold.
2 In the Target list box type an outside telephone number.
3 On the toolbar click .
The number in the Target list box is dialed out with DTMF tones on the same CO line on
which the active incoming call arrived.
4 Click the Release button and the incoming call transfers to the outside telephone number
(using the telephone company’s Centrex capability). The Attendant disconnects from the call
and the Loop button becomes idle.
Joining a call on hold
To join a call on a hold on a Loop button with an active call on a
Loop button
1 On the toolbar click .
2 Drag the “Join” cursor to the Loop button on which the call is held.
3 Click the Loop button holding the call.
The two callers connect, the Attendant releases from the active call and both Loop buttons
become idle.
P0936572 02
Page 61

Creating a conference call
To create a conference call to an outside number
1 With an active incoming call on Attendant Console, in the Target list box type an outside
telephone number.
2 Click the Link Transfer button.
The Loop button label shows Active, and the number in the Target list box is tone dialed.
3 Click the Link button to set up a conference call between the incoming call, the outgoing call
and the Attendant.
4 When the conference call is finished, click the Release button to disconnect from the call.
Note: To disable the Link Transfer button:
•On the Tools menu click Options.
The Options dialog box appears.
Chapter 4 Handling calls 61
• Select Disable Link Transfer Option.
Attendant Console User Guide
Page 62

62 Chapter 4 Handling calls
Handling a callback call
There are two types of calls that return to Attendant Console:
• an unanswered transfer call
• a call that the employee returns to you for attendant handling
Responding to a callback that an extension did not answer
A callback can be a call that is sent to an extension, or a call that is not answered and returns to
you. The callback is shown by:
The Callback button d isplays t he name and ext ension fr om which the ca ll is re turned and o ther c all
related information. This lets you personalise how you handle the call.
To respond to a Callback call
1 Click the Callback button.
The Caller Information list box shows the information originally displayed so that you can
process the call accordingly, such as transfer to CallPilot, park the call, page the employee,
and so on.
Responding to a Callback that an employee returns
A call that the employee decide s not take ca n be hand led by you acc ording to instr uction s that you
or your company establ ish. This type of c all is s imilar to a Callback to the a ttendant . The employee
can press a telephone display button to give one of the following pre-set prompts:
• Hold. You ask the caller to hold for a moment.
• Assist. You send the call to the employee’s assistant.
• IntAct. You tell the caller that the person they called is on the line and ask if they wish to
interrupt the call.
Hold, Assistant or IntAct is displayed below the Callback button.
To respond to a Callback that a employee returns
1 Click the Callback button.
The Caller Information list box shows the information originally displayed.
2 Advise the caller according to the message that appears.
P0936572 02
Page 63

Chapter 4 Handling calls 63
To process a Hold call
1 Tell the caller that the employee requests that they hold.
2 In the Target list box enter the employee’s extension.
3 Click the Camp On button.
The call is camped to the employee’s extension.
To process an Assist call
1 Tell the caller that the employee is temporarily unable to take calls and requests that calls are
routed to the Assistant extension.
2 Click the Edit menu and then click Employee Information.
The Employee Information dialog box appears and the assistant’s number appears in the
Assistant Extension box.
3 Click the Close button to return to the Attendant window.
4 In the Target list box enter the assistant’s extension number.
5 Transfer th e call to the assistant’s extension nu mber.
To process an IntAct call
1 Tell the caller that the employee is on another call but can be interrupted.
2 If the caller agrees, enter the employee’s extension in the Target list box.
3 Transfer the call back t o the extension.
Attendant Console User Guide
Page 64

64 Chapter 4 Handling calls
Making a call from your extension
As the attendant, you can call any extension in the company and any outside number. The
telephone number you type in the Target list box ignores special characters such as hyphens,
parentheses, blank spaces and commas. However, to reach special services such as Interactive
Voice Response systems (IVR) you can type special characters (*, #, P, and W) in the Target list
box and these characters can be dialed using on the toolbar.
To place a call to an extension or outside number
1 When there is no active call, type or select an extension or outside number in the Target list
box.
2 Press Enter on the keyboard.
A call is made to the extension or outside number.
To transfer a call to an extension
1 Place or type an extension in the Target list box when there is an active call.
2 Press Enter on the keyboard.
The call transfers to the extension.
If you select an entry in t he Direc tory or in the Cont acts box , the exte nsion nu mber a lso appe ars in
the Target list box. If t he Target is an ext ension , the pers on status icon for the pe rson appea rs to th e
left of the Target list box. To the right of the Target the person’s telephone status icon appears.
To make a call to an inside extension
1 Make sure that the number you want to call appears in the Target list box. You can type the
extension in directly or select it from the Directo ry list.
For further information, refer to “Using the Directory Find box” on page 50.
2 Click the Call button or press the Enter key to make the call.
To make a call to an outside number
1 In the Target list box type the same digits you would dial if you were using your telephone.
2 Click the Call button or press the Enter key.
P0936572 02
Page 65

Handling calls at an employee’s telephone
With Attendant Console employees can handle calls at their telephones.
After a call routes to an exten sion, a low-level tone al erts the employe e they have an incoming call,
even if they are on the ir t elepho ne. The n ame of t he cal ler appear s in t he di splay of the empl oyee’s
telephone for a few seconds.
If the employee is us ing a Business Communicatio ns Man age r 2.5 two line display t el eph one they
can use the display buttons to:
• talk to a caller
• send a call to the attendant who then asks the caller to hold
• send a call to CallPilot
• join a call with the current call
• send a call back to the attendant to ask the caller if they wish to interrupt the current call
• send a call back to the attendant who then routes it to an assistant attendant
Chapter 4 Handling calls 65
display button to see the
Note: If there are mor e than two options, pre ss the
additional options.
Next
To speak to a caller
display button to automatically connect with the call, or pick up the handset.
1 Press the
If the telephon e is in u se, pr ess the
the new caller.
Talk
display button to put t he first c all on hol d and conn ect
Talk
To send a call to the attendant who then asks the caller to hold
display button.
1 Press the
This delivers a pre-set m essage to the attendant. The attendan t asks the caller to hold fo r the
employee and camps the call to the employee’s extension.
2 The employee sees the call camped on their telephone and handles the call.
Hold
To send a call to CallPilot
1 Press the VM (Voice Messaging) display button on the telephone.
The call transfers to the employee’s voice message mailbox.
Attendant Console User Guide
Page 66

66 Chapter 4 Handling calls
To join a call with the current call
display button to conference the caller in with your current call.
1 Press the
The employee can see the caller’s name or Caller ID name in the display of the telephone and
decide whether to include the caller in the current call.
Join
To send a call to the attendant who then asks the caller if they
want to interrupt
1 Press the
This delivers a pre-set message to the attendant who asks the caller if they want to interrupt the
employee.
2 If yes, the a ttendant transfers the call back to the employee.
3 The calling part y’s name ap pears in the displ ay of the employee’s telepho ne for app roximatel y
20 seconds. To answer the call that the attendant transfers back, press the Talk display button.
IntAct
display button.
To send a call back to the attendant who then routes it to an
assistant attendant
1 Press the
This delivers a pre-set m essage to the attendant. The attendan t tells the caller that the
employee is temporarily unable to take calls and requests that they are transferred to an
Assistant extension.
2 The attendant refers to the Assistant extension box in the Edit Employee Information dialog
box and enters the Assistant extension number in the Target list box.
3 The attendant transfers the call to the Assistant ex tension.
Assist
display button.
P0936572 02
Page 67
Chapter 5
Maintaining caller and employee information
With Attendant Console you can manage caller and employee information.
Maintaining caller information
When a caller contacts your company, information about the caller from the Attendant Console
database appears in the Caller Information list box of the Attendant window. Either the caller is
already in the database, or other employees of the callers company are in the database. Or the
caller and the company can be new.
Creating a new caller record
New caller records are created in the following ways:
• automatically, during an active call, the first ti me Caller ID information is received by the
Client component. You can customise the new caller record during the active call or later.
• when you create a new caller record from an existing one
• when you create a new blank caller record
67
Note: The caller record is not saved if you click the Release button without processing
the call.
When a call comes i n, At te ndan t Co nso le checks the Caller ID fr om the telephone company to see
if the numbe r has previously called. If there is a record that the number has called before,
information from the caller database appears in the Caller Information list box on the Attendant
Console window. The Name list box displays the names of callers on record that are associated
with the incoming Call er ID. There can be several callers from the same t el ephone number calling
if they are employees at t he same company. For mo re information, refer to “The Edit Caller
Information dialog box” on page 35.
If you select the name of the caller from the list, the Caller In for m ati on li st box displa ys
information about the caller.
To create a new caller record from an active call
1 Click the Ringing Loop button to answer the incoming call.
Information in the database about the caller appears in the Caller Information list box on the
Attendant Console window.
Attendant Console User Guide
Page 68

68 Chapter 5 Maintaining caller and employee information
2 In the Caller Information list box click Edit.
The Edit Caller Information dialog box appears.
3 Click the New Caller button.
This clears all the boxes in the Edit Caller Information dialog box and lets you create a new
caller record.
4 In the Name list box, type the caller’s name in the format of last name first, space, then first
name.
5 From the Caller Type list box, select a Caller Type, either Unclassified, Personal, Employee,
Vendor or Customer.
6 In the Company box, type the caller’s company’s name.
7 Click the Save button to save the information.
If you click the Close button without saving, the message, “Do you want to save the current
record?” appears. Clic k the Yes button to save the record.
8 After you enter caller information, process the call:
• Transfer the call to the called party.
Refer to “Transferring a call” on page 52.
• Put the call on hold.
Refer to “Parking, holding and screening calls” on page 54.
• Transfer the call to CallPilot.
Refer to “Transferring a call” on page 52.
• Park the call and page the called party.
Refer to “Parking calls and paging employees” on page 54.
P0936572 02
Page 69

Chapter 5 Maintaining caller and employee information 69
To create a new name caller record from an existing caller record
1 On the Attendant Console window, in the Caller Information options, click the Edit button.
The Edit Caller Information dialog box appears.
2 Click the New Caller button.
This clears only the Name box in the Edit Caller Information dialog box. The other boxes do
not change.
3 In the Name list box type the new caller’s name.
4 Click the Save button when you are done to save the record.
To create a new caller record when there are no active calls
1 On the Attendant Console window, in the Caller Information options, click the Edit button.
The Edit Caller Information dialog box appears.
2 Click the New Caller button.
A new blank caller record is created with a new Record Number assigned.
3 Type the desired information in the boxes.
4 Press the Save button to save the new caller record.
To create a new caller record from a Caller ID
1 On the Attendant Console window, in the Caller Information options, click the Edit button.
The Edit Caller Information dialog box appears.
2 Click the Find button.
The Find dialog box appears.
3 In the Name box type the name of another caller from the same company and click the OK
button.
4 Click the New Name button.
The Name box clears. The other boxes do not change.
5 Type the new caller’s name.
6 Click the Save button.
The record is saved in the database.
7 Click the Close button.
If you click the Close button without clicking the Save button, the Edit Caller Information
dialog box closes without saving the changes.
Attendant Console User Guide
Page 70

70 Chapter 5 Maintaining caller and employee information
Finding and editing caller information
You can edit caller information at any time and save the changes.
To find caller information
1 In the Attendant Console window, in the Caller Information options, click the Edit button.
The Edit Caller Information dialog box appears.
2 Click the Find button.
The Find dialog box appears. Use the Find dialog box to find a caller’s name in the database.
3 In the Name box, type the first letter or letters of the caller’s last name.
If the caller’s first name is used instead of their l ast name, ty pe the first letter or letters of the
caller’s first name.
4 Click the OK button or press the Enter key.
The Find dialog box closes.
5 Any matching names appear in the Name list box of the Edit Caller Information dialog box.
If there is more than one name, a list appears below the Name box.
6 Click the caller name you want to edit.
The information about the caller appears in the Edit Caller Information dialog box.
To edit a caller’s record
1 Make sure the caller name y ou want to edit a ppears in the Edit Caller Information dialog
box. Click the box you want to edit and make the change. Repeat if needed.
2 Click the Save button to save the changes to the database.
3 Click the Close button to close the Edit Caller Information dialog box.
Note: If you ans wer a cal l and the n open the Edi t Call er Info rmation dialog box without
first selecting a name from the Name box list, you must click the Edit button twice.
To delete a caller record
1 In the Attendant Console window, in the Caller Information options, click the Edit button.
The Edit Caller Information dialog box appears.
2 Make sure the caller name you want to delete appears.
3 Click the Delete Caller button.
The record that appears in the Edit Caller Information dialog box is deleted from the database.
P0936572 02
Page 71

Chapter 5 Maintaining caller and employee information 71
Maintaining employee information
When Attendant Console is installed, employee information is provided by the Business
Communications Manager base unit. This information appears in the Directory list box in the
bottom center of the Attendant Console window.
The Directory list box has four tabs that display lists of employees. They are the Full, BLF (Busy
Lamp Field), Assigned and Selected tabs. For further information, refer to “The Directory options
are tabbed directories that show views of the extensions on the Business Communications
Manager 2.5 telepho ne syst em. You c an use the Di rect ory opt ions to searc h and e dit e xtens ion and
employee information.” on page 41.
Using the Directory list
Information in the Directory list appears in ascending order (1 to 9 or A to Z). Sorting is based on
the contents of one column at a time. If there are different forms of information in the same
columns, priority is given in the following order: no information entered (blank), numeric, then
alphabetic. For example, if you sort a Name column that contains both names and extension
numbers, the extension numbers appear before the names.
You can sort Directory information by column by clicking any column heading. For example, to
sort the directory by extension, click the Ext column heading. The listing appears with the
extensions in numerical order.
To sort a column of information in the Directory
1 Click the tab you want to sort, either Full, Selected or Assigned.
Informati on in the BLF tab view appears in the sam e order you s elect for Full view.
2 Click the column heading you want to sort, either Name, Ext, Notes or Department.
Attendant Console User Guide
Page 72

72 Chapter 5 Maintaining caller and employee information
Finding an employee record
You can search for an employee by name, by department or by an individual within a department.
You can search by an employee’s name two ways:
• On the Edit Employee Information dialog box click the Edit button and then click the Find
button
• On the Attendant Console window, in the Directory list box, click the Find button.
To search by name
1 In the Attendant Console window, in the Directory options, click the Edit button.
The Edit Employee Information dialog box appears. For more information, refer to “The Edit
Employee Information dialog box” on page 39.
2 Click the Find button.
The Find dialog box appears.
3 In the Name box, type the first letter or letters of the employee’s last name.
If the employee’s first name is used instead of their last name, type the first letter or letters of
the employee’s first name.
4 Click the OK button or press the Enter key.
The Find dialog box closes. Any matching names appear in the Name box of the Edit
Employee Information dialog box.
To search by name on any Directory list box on the Attendant
window
1 In the Find box on the Attendant Console window type the first letters of the person’s last or
first name, according to how names are listed in the Directory list’s Name column.
2 Click the Find button.
Any names that match the letters you enter appear in a list in the Full tab Directory view.
To search by department
1 In the Directory options, click Department list box arrow.
A list of the departments associated with extensions appear in the list. The name of the
department for each extension appears in the Edit Employee Information dialog box.
2 Select the department name from the list and the department name appears in the Department
box.
3 Click the Find button.
Any extensions that match the department appear in a list in the Full tab Directory view.
P0936572 02
Note: A department search takes priority over a name se arch.
Page 73

Chapter 5 Maintaining caller and employee information 73
To search for a person in a department
1 In the Department box select a department.
2 In the Find box type the person’s name.
3 Click the Find button.
Any extensions that match th e name in t he d epart ment appe ar in a list in the F ull tab Dir ector y
view.
Resetting the Full tab view
You can reset the Full tab view to the default display.
To reset the Full tab view
1 In the Directory options, click the Show All button.
The Full tab view shows the extensions, names, notes and department information.
2 Click the Show All button to return to the Direc tory view after you perform a search.
Attendant Console User Guide
Page 74

74 Chapter 5 Maintaining caller and employee information
Editing employee information
You can edit employee information by adding or changing an extension, changing the person
status of an extension or by creating a new name for an extension.
To add or change an extension
1 In any Directory tab view (Full, BLF, Selected or Assigned), click the extension in the
Directory list for which you wish to change or add information.
2 In the Directory options, click the Edit button.
The Edit Employee Information dialog box appears. Use this dialog box to create or edit
information in the employee database.
3 Enter the new informatio n in any of the boxes that ca n be edited.
4 Click the Save button.
The changes are made to the database and to the employee’s extension in the Directory.
5 Click the Close button to close the Edit Employee Information dialog box.
To change the person status of an extension
1 In any of the Directory views (Full, BLF, Assigned or Selected), click the extension.
2 From the Status list box select None, Not at desk or Out of office.
The status you choose appears beside the name.
There is no icon for None. Instead, a blank space appears next to the person’s telephone status if
you select it. If you select Out of office the Out of office icon appears . If you select Not at
desk the Not at desk icon appears .
Do not type in the Status box.
Creating a new name for an extension
You can change the name of an employee assigned to an extension.
To create a new name for an extension
1 In the Directory options, click the Edit button.
The Edit Employee Information dialog box appears.
2 Click the New Name button.
3 Type the new employee’s name.
4 Click the Save button when you are done.
P0936572 02
Page 75

Chapter 5 Maintaining caller and employee information 75
Using the Make Caller button
Use this function if an employee calls from a customer’s office.
To assign the name of an employee to a caller record
1 In the Directory list, select the employee's exte nsion or type the employ ee’s extensio n number
in the Target list box.
2 Click the Make Caller button.
The name of the employee is assigned to the caller record and is not saved as a customer
record.
Attendant Console User Guide
Page 76

76 Chapter 5 Maintaining caller and employee information
Adding notes to employee records
You can add a note to an employee recor d by selec ting a note fr om a list or typing a per sonal not e.
The note appears in the Notes column under Directory in the Attendant window.
To select from the list of notes
1 Click an extension number in the Full, Assigned or Selected Directory views.
2 From the Note list box, click the applicable note.
The note appears in the Directory list’s Notes column.
To type a note
1 Click an extension number in the Full, Assigned or Selected Directory views.
2 In the Note list box type a note.
3 Press the Enter key.
The note appears in the Directory list’s Notes column.
P0936572 02
Note: To delete a Note:
• Delete the information in the Note list box.
• Press the Enter key.
Page 77

Chapter 5 Maintaining caller and employee information 77
To save employee edit changes
1 On the Edit Employee Information dialog box click the Save button.
The changes made to t he boxe s in t he Edit Employee Infor mation di alog bo x for the empl oyee
highlighted in the Direc to ry l is t ar e sa ved t o the database. After you click th e Save button, the
Edit Employee Information dialog box remains open.
Note: If you cl ick t he Clos e bu tton wi thout clic king t he Save button , t he Edit Employee
Information dialog box closes without saving the changes.
Attendant Console User Guide
Page 78

78 Chapter 5 Maintaining caller and employee information
P0936572 02
Page 79

Chapter 6
Generating reports
About Attendant Console reports
Attendant Console collects information about incoming calls and tracks how calls are processed.
Use the information from the Reports component to help spot trends and prevent problems.
You can use the caller-related information in Reports to:
• increase sales opportunities
• improve productivity
• reduce expenses
• streamline operations
For example, the Calls by Cus tomer r eport shows ho w call ers fr om your company’s top cu st omers
are handled. It shows if calls are handled by employees or are routed to CallPilot.
79
Report types
There are three report types:
• Calls by Customers
• Calls to Employees
• Extension Directory
Calls by Customers report
The Calls by Customers report shows how your employees handle calls from your customers.
Each employee report can identify as many customers as necessary. The Calls by Customers report
shows:
• the number of calls taken by the employee
• the number of calls routed to CallPilot
• the number of calls handled by others
• the total calls from eac h customer
Calls to Employees report
The Calls to Employees report shows the type of calls employees receive over a defined time
period. This report can spot caller abuse such as too many personal calls, and misdirected calls
such as calls from cus tomers rou ted to the wrong pers on or depar tment. This report l ists the type of
call across the top and names of employees down the left side. Each Caller Type has a column for
the number of calls and percent. The total of all calls and percent are shown separately.
Extension Directory report
The Extension Directory report lists the employees in the Attendant Console database and the
information in their call record.
Attendant Console User Guide
Page 80

80 Chapter 6 Generating reports
About the Reports window
To open the Reports window
1 On the Attendant window click Tools and then click Reports.
The Reports window opens.
P0936572 02
Page 81

Components of the Reports window
The Reports window contains the Database, Information, Period, Employees and Customers list
boxes and a report viewing area. The Reports window menus are File, Edit, View and Help.
Use the Create Report, Page <, Page > and Print buttons to define the type of report you create.
You can change the preview image after you create a report.
Chapter 6 Generating reports 81
Database box
The Database box contains information on selecting a database.
Click the Select button to open the Open dialog box. Select a
Microsoft Access database. For more information about databases
and how to locate the database (.mdb) file, refer to “Loading the
database” on page 85.
Type the path name of an Attendant Console database in the Current
Database box.
Attendant Console User Guide
Page 82

82 Chapter 6 Generating reports
Information list box
The Information list box contains the report type information.
The Report Type is available if you type a valid Microsoft
Access database in the Current Database box.
If you select a report type, a description of the report type
appears in the Description area.
P0936572 02
Page 83

Chapter 6 Generating reports 83
Period list box
The Period list box is available if:
• you select a valid database
and
• you select a report type that requires you to define a report period.
opens the One Week dialog box. You can specify a report period with
a duration of one week (Sunday through Saturday).
Opens the One Month dialog box. You can select a one-month report
period.
Shows the date of the beginning of the report period. The boxes
change to reflect the dates in the Month, Week , and Calendar but tons.
The From date must be earlier than the To date.
Opens the Calendar dialo g boxes that you us e to set the Fro m and To
report period dates. The Calenda r dial og bo x res em ble s the Calend ar
dialog boxes in other Windows-based programs. The Calendar
buttons are available if you select a valid database and you sel ect a
report type that requires you to define a report period.
Attendant Console User Guide
Page 84

84 Chapter 6 Generating reports
Employees and Customers options
Use these options to define the customers or employees who will be the subject of the report.
Generates a report that inclu des d ata fo r membe rs of the select ed categ ory
(employees or customers).
Generates a report th at inc lu des d ata fo r th e members in the list box. If you
click the Select option, the button under the selection list box , eithe r
Customer or Employee, is available so you can make your selection.
list box
Customer and Employee
options
Displays informatio n if you sel ect a subs et of the cust omers and employee s
in your database. If you select All, the list box is blank. If the list is long
enough, you can scroll to view its contents. You cannot edit the list box by
typing in it. Use the but tons u nder the list box to ch ang e th e c on tents of the
list.
Accesses directories. The Employee and Customer options are active if
you choose the Select option. Click these options to display either the
Employee or Customer Record Selection dialog box, f rom which you can
make your selection.
Note: These options are available only if you select a valid database, a report period,
and a report type that uses the category Employees or Customers.
Customer and Employee Selection dialog box
From the Customer and Employee Selection dialog boxes, you can choose the employees or
customers to include in a report.
The program records the items you selected here the last time you created a report. When the
dialog box opens, the items you selected the last time are highlighted.
P0936572 02
Page 85

Creating and viewing reports
Use the Reports component to genera te re ports for analy sing teleph one use in your company. Th is
section describes the st eps req uired to generate reports:
• select a database
• select a report type
• select a report period
• select employees and customers
• create and preview the report
• print the report
Loading the database
Attendant Console stores information in a database about your company’s telephone use. This
database is used to generate the different types of reports. In most cases you use the database
installed on the Business Communications Manager base unit system. However, if you make
backups of the database for archiving purposes, Reports can also use these backups. If you are
generating reports from a computer that does not have the database stored, locate the database on
the Business Communicat ions Manager b ase unit t hrough Networ k Neighborhoo d. Check with t he
System Administrator to ensure that the database is a shared file.
Chapter 6 Generating reports 85
To load the database
1 On the Reports window, at the Database option, click the Select button.
The Open dialog box appears.
2 In the File name box, type:
\\"name of server"\consoleservicedb
where "name of server" is the name of your Business Communications Manager base unit. If
you do not know the name of the server, ask your System Administrator.
3 Click the Open button.
4 Click ConsoleService.mdb
5 Click the Open button.
The database loads to your computer and the database path appears in the Current Database
box.
6 Click the Close button to return to the Attendant window.
After you load a database, select the report type.
Selecting a report type
1 From the Report Type list box select your report.
Attendant Console User Guide
Page 86

86 Chapter 6 Generating reports
Setting the report period
Some reports require a report period. The report period defines the time span for which data is
considered. If you choose a report type that does not require a report period, the Period li st box is
unavailable. The report period begins on the From date and ends on and includes the To date.
To set the report period
1 In the From box type the date.
The following are acceptable date formats:
• June 5, 1997
• 6/5/1997
2 Press the Enter key.
3 In the To box type the date.
4 Press the Enter key.
Note: An error message appears if you type a date in an unrecognised format or if you
type a date that does not exist.
To select a report of one week
1 Click the One Week button.
The One Week dialog box appears.
2 In the month list box, choose the month that the desired week starts or ends.
3 In the year list box, select the year the week occurs in.
You can type the year box or use the arrows.
4 In the list of weeks select a week and click the OK button, or double-click the desired week.
After you select a week, the start and end dates of the week appear in the From and To boxes.
To select a report of one month
1 Click the One Month button.
The One Month dialog box appears.
2 In the month list box, choose the desired month.
3 In the year select the desired year either by typing it or selecting it with the arrows.
4 Click the OK button to accept the month, or click the Cancel button to cancel your Report
Period selection.
If you select a month, the start and end dates of the month app ear in t he Fro m and To boxes. Dat es
for February automatically account for leap-years, centuries, and millennia.
To cancel a selection, press the Esc key or click the Cancel button.
The Period list box information does not change.
P0936572 02
Page 87

Chapter 6 Generating reports 87
To clear a date
You can clear a date by deleting the contents of the box. A cleared box does not count as a date,
and does no t restrict th e range of th e other date.
Note: The To and From boxes are active if you select a valid database and you select a
report type that requires you to define a Report Period.
Attendant Console User Guide
Page 88

88 Chapter 6 Generating reports
Selecting employees and customers for the report
Some types of reports, especially those that concern call data, let you select sets of employees,
customers, or both. The information for the set you select is summarised in the report. Reports
have categories that are appropriate to the type of report that you chose. If your report type does
not need or allow these selections, the Employees and Customers options are unavailable.
To select employees or customers
1 Click either the Employees or Customers option.
The Employee or Customer Record Selection dialog box appears.
Note: Th e first t ime you clic k one of these options af ter you conn ect to a dat abase, ther e
is a pause while Reports builds the directory. After Reports builds the directory, if you
click an option, there is a pause while Reports opens the dialog box. If a directory is
large, the pause can be several seconds long. After the pause, the Selection dialog box
appears.
2 The Selection dialog box contai ns a lis t of E mploye es o r Cust omers. The l ist of Cu stomers has
a single column that lists the Customer’s Company Name. The list of Employees has several
columns that list the employee’s last, first and middle names, and telephone extension. You
can resize the columns by dragging the column header edges in the bar at the top of the list.
3 You can choose either a si ngle item or multi ple i tems. Items th at you sel ect appe ar highligh ted
in blue. Choose a single it em by clicki ng it. Choose multi ple items b y pressing t he Control key
while you click the items you want. You can select up to 100 items f rom the list. If you re quire
more than 100 items, create several reports with different selection lists, or click the All
button.
4 Click the OK button.
The Customer or Employee Record Selection dialog box closes and the Selection list box
displays the items you selected from the dialog box.
P0936572 02
Page 89

Creating the report
When you have enter ed al l the data needed to cre ate a report, the Cre at e Re por t button is availa bl e.
To create a report
1 Click the Create Report button.
This starts the report g eneration process. The Reporting animated icon appears to show that
the report is running. The icon stops when the report is complete.
Note: You cannot close the application while it is running. If you need to quit the
application while a report is running, you can do it from the Close Programs dialog box
in the Windows Task Mana ger . Re fer to Windows Help for i nfor mat ion on how to force
programs to quit.
2 After the report is complete, it appears in the Report Viewing area. The Create Report button
is unavailable again , to show that the report is created. The Report controls are unava ilable and
the keyboard func tions only i n the Rep ort Viewin g area. You can re- access t he Report controls
by pressing the Tab key.
Chapter 6 Generating reports 89
Viewing the report
After you create a report, the Page > and Page < buttons are available. The Page > button shows
the next available page of the report, if there is one, in the report view. The Page < button shows
the previou s page of the report, if there is one.
The page number of the current page appears in the bottom right corner of each page of the report.
You can also change the displayed page from the keyboard.
To change the displayed page from the keyboard
1 Ensure the keyboard is active in the Report Display area, in the lower half of the Attendant
Console Report s window. This i s set automatic ally aft er creating a report, but can also be do ne
by pressing the Tab key to move through the Report settings.
2 Press Ctrl + Page Up to view the previous page, or Ctrl + Page Down to view the next page.
Attendant Console User Guide
Page 90

90 Chapter 6 Generating reports
Printing a report
When a report is in the Report Viewing area, the Print button is available.
To print a report
1 Click the Print button.
The report prints to the d efault printer. You can change default printer the from the Printers
folder. Acc ess the Printers folder from the Windows Start menu or Control Panel. Refer to
Attendant Console Help for further information.
2 Choose the pages and number of copies of the report to print.
3 Click the OK button and the report prints
or
click the Cancel button to cancel printing the report.
Note: If you change a report parameter in one of the report controls, the Create Report
button is available and the Print button is unavailable. Do not change any report
parameters before you print the report. If you change a report parameter, you must
regenerate the report before you can print it.
P0936572 02
Page 91

Glossary
Assistant attendant
Backup attendant
BLF (Busy Lamp Field)
CF
Caller ID
91
The assistant attendant is the telephone attendant who provides call coverage for specific
employees.
The backup attendant receives calls when the main attendant is not available. The main
attendant uses the Out button on the Attendant main window to direct calls to the backup
attendant.
Busy Lamp Field is one of the Directory list tab views. It displays the phone status and
extensions of employees.
Call Forwar d.
Caller ID, known as CLID or Calling Line Identification, is provided by your telephone
company. If your company subscribes to Caller ID, the caller name and number are
displayed on incoming calls.
CO
Central Office.
Destination extension
The destination extension is the person’s exten sion to which a caller (or attendant)
attempts to connect.
DND
Do not disturb.
DTMF - Dual Tone Multi Frequency
DTMF is the sound emitted when telephone buttons are pressed.
Attendant Console
Attendant Console is a Windows-based software product that provides call management
and call activity reporting capability to a business.
Business Communications Manager base unit
The telephone system that Attendant Console works with.
External call
An external call is a call that originates from outside your company’s telephone system.
Hookflash
The signal that occurs when a telephone goes on-hook followed by off-hook.
Attendant Console User Guide
Page 92

92 Glossary
Hunt Grou p
A Hunt Group is a group of t elephones tha t can be c alled by a single numbe r. Hunt Group s
are configured in your Business Communications Manager base unit.
ID
Identification.
Internal call
An internal call is a cal l, s uch a s a call from another employ ee’ s ex tension, that originat es
from your company’s Business Communications Manager base unit.
LAN
Local area network.
Main attendant
A main attendant is the telephone attendant who is primarily responsible for managing a
company’s incoming calls. The main attendant can have other attendants.
Networked model
In a networked model the Attendant Console main attendant’s computer is connected to
one or more additional attendant computers through a network.
Overflow attendant
The overflow attendant receives incoming calls when there are more than six active calls
at the main attendant’s computer.
Server component
The Attendant Console server program supports the Client component that resides in the
attendant’s computer.
Shared syst em
In an Attendant Console shared system the Business Communications Manager base unit
is shared by two or more companies.
Stand-alone model
A stand-alone model is a Attendant Console system in which one attendant manages a
business’s incoming calls. There are no assistant attendants, backup attendants or
overflow attendants in a stand-alone model.
Target extension
A target extension is the extension number to which you are directing a call.
VM
Voice mail or voice message mailbox.
P0936572 02
Page 93

Index
93
Numerics
1st Contact, 27
2nd Contact, 27
3rd Contact, 27
A
About Attendant Console 29
Active Call 33
Adding notes to employee records 76
All extensions 18
All extensions box 21
Answer next 28
Answering calls as an attendant 46
Assigned extension rings 19
Assigned tab
Directory list 18
Assigned tab view 42
Assistant attendant 17, 91
Assistant Extension box 39
Attendant
assistant 17
backup 9, 14
features 19
In and Out buttons 29
overflow 9, 16
Attendant Console
Attendant button 20
Introduction 7
Attendant Console Help 29
Attendant Console window 11, 23
Attendant Extension 11
Attendant Monitor 26
Attendant setups, types 12
Attendant, main full-time 12
Attendant, part-time main 13
B
Backup attendant 9, 14
BLF tab view 71
Blue Loop button 33
C
Calendar button 83
Call 28
joining calls 60
making a call 64
screening 58
transferring 52
Call Forwarded 43
Call Notification dialog box 19
Call overflow occurs 16
Call processing area
Call button 38
Camp On button 38
Link Transfer button 38
Page button 37
Screen button 37
Transfer button 37
using 38
VMTransfer button 38
Callback 33
Caller information
finding and editing 70
Caller Information options
Edit button 34
Hold button 34
Park/Page button 34
Release button 34
Caller menu 28
Caller record
creating new 67
deleting 70
Caller Type 35
Calls by customers report 79
Calls to employees report 79
City box 39
Client component
restoring Attendant Console window 20
starting 11
Transfer options 22
Close button 40
Company box 35
ConsoleServiceDB 85
Contacting employees using Voice Call 59
Contacts boxes 36, 48
using 48
Creating a new caller record 67
Attendant Console User Guide
Page 94

94 Index
D
Department box 39, 51
using 51
Dial DTMF Tones 28
Directory Find box 50
using 50
Directory list 11
Department column 43
employee information 43
Ext column 43
extension information 43
Name column 43
Notes column 43
sorting information 44
using 71
Directory list tab views 42, 49
BLF tab view 42
Full 42
Selected 42
Directory tab views
using 49
Disable Link Transfer 22
Disable VM Transfer 22
Do Not Disturb 43
DTMF button 32
F
File menu 24
Find button 40
Finding an employee record 72
Finding and editing caller information 70
Finding the correct extension 48
Full tab view 42
resetting 73
Full-time main attendant 12
G
Green Loop button 33
H
Handling a Callback call
Callback call 62
Help file 29
Help menu 29
Hold 28, 57
placing an d retrieving calls 57
Hold button 34
Hunt Group 43
E
Edit Caller Information dialog box 35
Caller ID Name 36
Caller ID Number 36
Caller Type 35
Company box 35
Contacts 36
Delete Caller button 36
Find button 36
New Caller button 36
New Name button 36
Record number 36
Save button 36
Edit Employee Information dialog box
Assistant Extension box 39
Contacts box 40
Department box 39
Voice Message box 40
Edit menu 25
Extension
creating an new name for 74
finding 48
Extension box 14
Extension Directory report 79
Extension, Attendant 11
I
In and Out buttons 32
Introduction to Attendant Consol e 7
J
Join button 32
L
LAN 92
Link 28
Link button 32
Link Transfer button 22
Linking and Joining calls 60
Log to File 26
Loop button 12, 16, 19, 32, 46
Loop Overflow icon 16, 24, 46
P0936572 02
Page 95

Index 95
M
Main attendant, full-time 12
Maintaining caller information 67
Maintaining employee information 71
Making a call from the attendant’s extension 64
Managing calls using telephone display buttons 65
Menu bar
using 24
My Extension 12
My extension rings 19
N
Name box 35, 39, 70
Networked model 92
New Caller button 69
New Name button 40
O
Off-hook 43
One Month button 83
One Week button 83
On-hook 43
Options 26
Options dialog box 11, 12
Selected tab 21
Orange Loop button 33
Out button 14
Overflow attendant 9, 16
P
Page button 37
Park 28
Park/Page button 34
Parked calls box 54
Parking calls and paging employees 54
Parking, holding and screening calls 54
Part-time main attendant 13
Period list box 83
Person status icon 43
Phone box 39
Placing and retrieving calls on Hold 57
Postal Code of an employee 39
R
Record Number box 40
Red Loop button 33
Redirect calls to 14, 16
Release 28
Release button 34
Reports 26
All button 84
calls by customers 79
calls to employees 79
Customer/Employee button 84
Database box 81
extension directory 79
Information list box 82
Select button 84
Reports window 80
using 80
Resetting the Full tab view 73
Restore minimised Attendant Console screen when 20
Restoring Attendant Console window 20
Right-click capability 31
using 31
Ringing 33
Ringing Assi gned Extens i on 33
S
Save button 40
Screen Transfer 27
Screening calls 58
Search by department 72
Search for an individual 73
Selected extensions box 21
Selected tab
Directory list 21
Options dialog box 21
Selected tab view 42
Shared system 92
Standalone model 92
Starting the Client component 11
State/Province box 39
Status Bar 24
Attendant Console User Guide
Page 96

96 Index
T
Take button 19
Target box 37
finding an extension and moving it to 48
Target extension 92
Target menu 28
Telephone display buttons
Assist 66
Hold 65
IntAct 66
Join 66
Next 65
Talk 65
VM 65
telephone status icon
call forward 43
do not disturb 43
off-hook 43
on-hook 43
Tip of the Day dialog box 11, 29
Toolbar
using 32
Tools 21
Tools menu 26
Transfer menu 27
Transfer Options 22
Transfer to Target 27
Transfer to VMail 27
Type box 39
Types of attendant setups 12
U
Using the menu bar 24
V
View menu 25
View Parked button 32
View Parked Calls 55
Visual call announcing 9
VM Transfer button 22
Voice Call 28, 32
Voice Mail Box 40
W
Window 23
Z
ZIP/Postal Code box 39
P0936572 02
 Loading...