

Page 1
Avaya Solution and Interoperability Test Lab
Red Hat Linux 9 DHCP Server Configuration for Avaya
4600 Series IP Telephones - Issue 1.0
Abstract
These Application Notes describe how to configure a Red Hat Linux 9 DHCP Server for
Avaya 4600 Series IP Telephones. Dynamic Host Configuration Protocol (DHCP) provides a
means by which configuration parameters can be automatically assigned to 4600 Series IP
Telephones on a TCP/IP network, thus removing the need to individually assign and maintain
IP addresses and other parameters for each IP telephone on the network. These Application
Notes were written at the request of the Avaya Hosted Solutions team.
AM; Reviewed:
WCH 3/18/2004
Solution & Interoperability Test Lab Application Notes
© 2004 Avaya Inc. All Rights Reserved.
1 of 10
Linux-DHCP.doc
Page 2
1. Introduction
These Application Notes describe how to configure a Red Hat Linux 9 DHCP Server for Avaya
4600 Series IP Telephones. DHCP is a network protocol that provides a means by which
configuration parameters can be automatically assigned to 4600 Series IP Telephones on a
TCP/IP network, thus removing the need to individually assign and maintain IP addresses and
other parameters for each IP Telephone on the network.
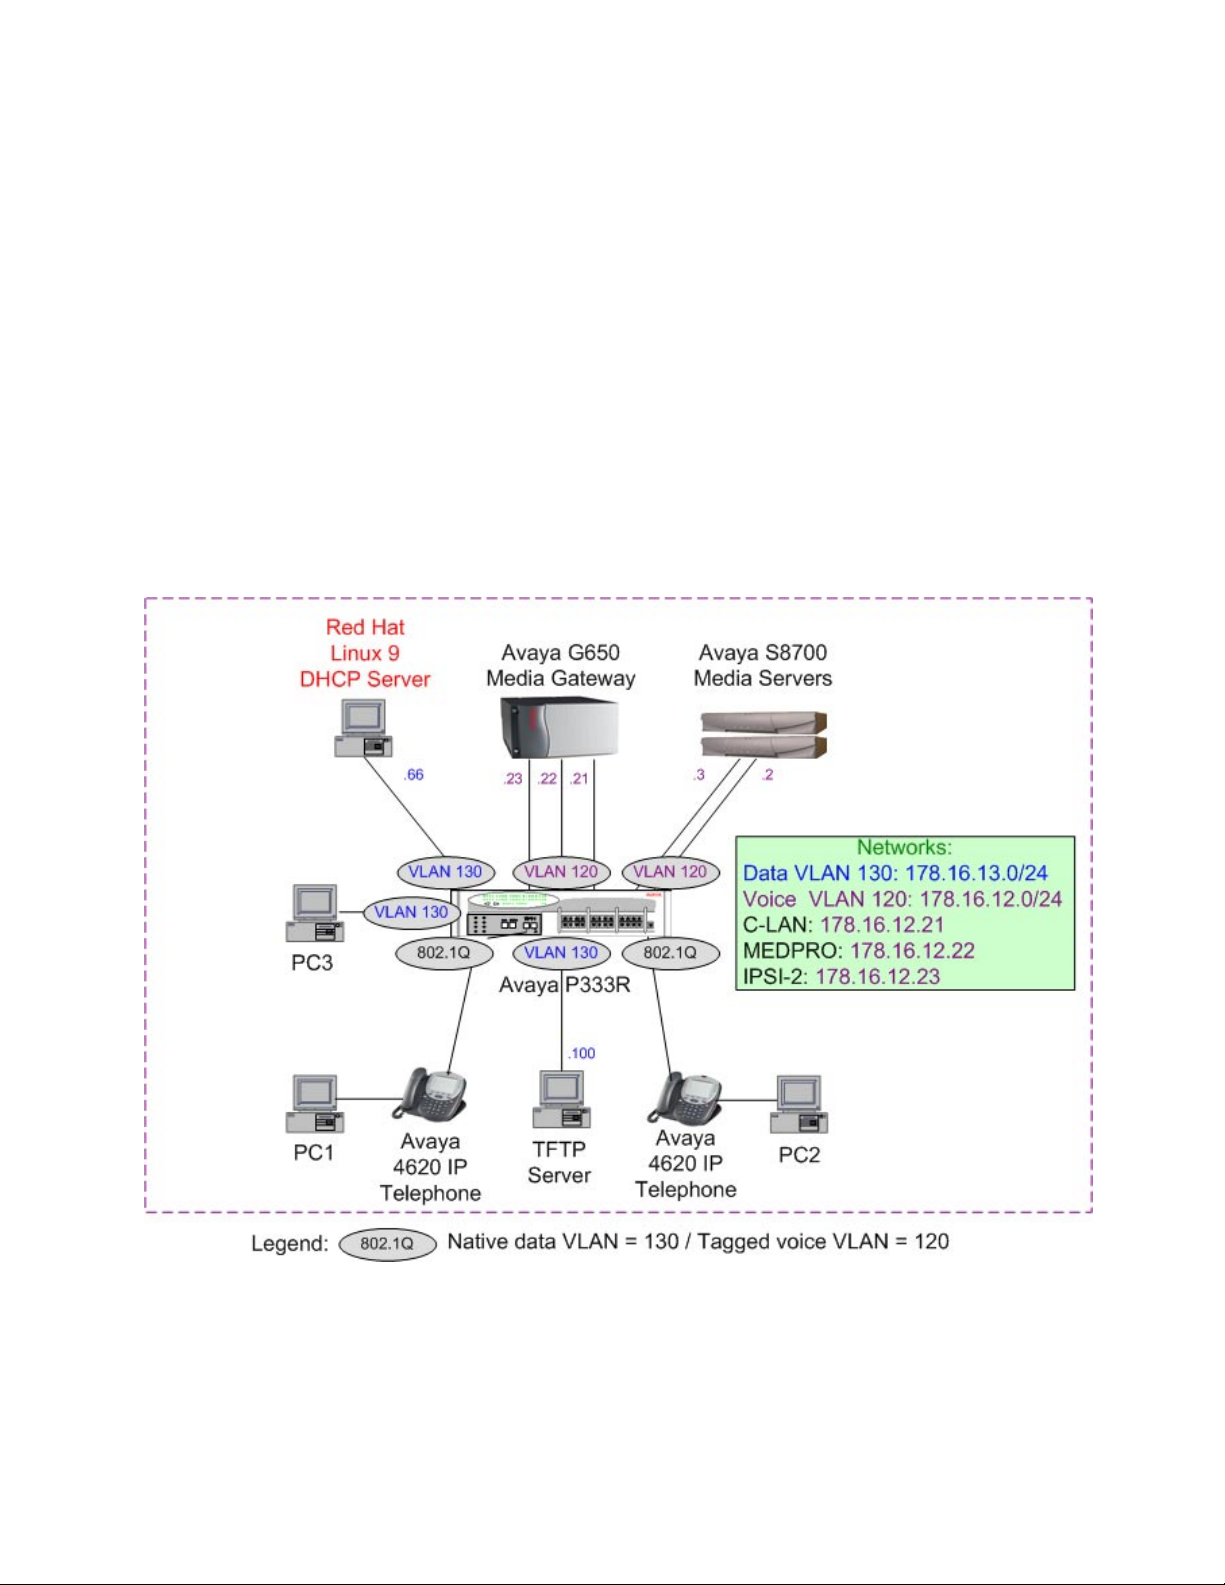
The sample configuration depicted in Figure 1 uses separate Virtual Local Area Networks
(VLANs) for voice and data traffic. As a result, the DHCP configuration presented in these
Application Notes supports scenarios where the switch ports may connect to a computer, an IP
telephone, or an IP telephone with an attached computer. IEEE 802.1Q tagged VLAN ID 120
was used for the IP telephones, and untagged VLAN ID 130 was used for computers, whether
standalone, or attached to an IP Telephone.
Figure 1: Red Hat Linux DHCP Server – Avaya IP Telephone Configuration
AM; Reviewed:
WCH 3/18/2004
Solution & Interoperability Test Lab Application Notes
© 2004 Avaya Inc. All Rights Reserved.
2 of 10
Linux-DHCP.doc
Page 3

The following DHCP server parameters were configured for the endpoints on the native data
VLAN:
• Data endpoints IP address Range (178.16.13.100 – 178.16.13.250)
• Router IP address (178.16.13.1)
• Subnet broadcast IP address (178.16.13.255)
• Subnet Mask (255.255.255.0)
• L2Q=1 - IEEE 802.1Q trunking
• L2QVLAN=120 - Voice VLAN
The following DHCP server parameters were configured for the Avaya 4600 Series IP
Telephones on the voice VLAN:
• Telephone IP address Range (178.16.12.100 – 178.16.12.250)
• Router IP address (178.16.12.1)
• Subnet broadcast IP address (178.16.12.255)
• Subnet Mask (255.255.255.0)
• IP address of C-LAN board – MCIPADD (178.16.12.21)
• Gatekeeper port - MCPORT (Default: 1719)
• TFTP server IP address – TFTPSRVR (178.16.12.100)
The following occurs when an IP telephone is installed (or reset). The IP telephone will initially
send an untagged DHCP request. The Avaya P333R switch port is configured with both an
untagged VLAN and tagged VLAN for the port. The untagged DHCP request will be associated
with the untagged VLAN on the port. The Avaya P333R router interface on that VLAN has IP
address 178.16.13.1. When the router interface relays the DHCP request to the configured
DHCP server (178.16.13.66), it will use 178.16.13.1 as the source address. The DHCP server
associates this request with the 178.16.13.0 scope and returns a reply with Option 176 string set,
instructing the requestor to enable 802.1Q tagging with voice VLAN ID 120. The IP telephone
receiving this reply will release the supplied IP address and issue a new DHCP request with
VLAN ID 120. This request will be associated with the tagged VLAN on the port. The Avaya
P333R interface of this VLAN has IP address 178.16.12.1 and will relay the DHCP request to
the DHCP server with this address as the source. The DHCP server associates this address with
scope 178.16.12.0 and replies with an IP address from that scope as well as several parameters in
the Option 176 string.
Computers attached to the Avaya IP telephones issue untagged DHCP requests. These requests
will be serviced the same as the initial request from the phone. However, the computer will
ignore the Option 176 values specifying a new VLAN. Therefore, no new DHCP request is
issued.
Note: The Avaya P333R switch and TFTP server configurations are out of the scope of this
document. Please consult the appropriate user guides for more information on how to configure
these devices.
AM; Reviewed:
WCH 3/18/2004
Solution & Interoperability Test Lab Application Notes
© 2004 Avaya Inc. All Rights Reserved.
3 of 10
Linux-DHCP.doc
Page 4

2. Equipment and Software Validated
The following hardware and software versions were used for this configuration:
Equipment Version
Avaya S8700 Media Servers 2.0
Avaya G650 Media Gateway
• Avaya TN2312BP IPSI Circuit Packs
• Avaya TN799DP C-LAN Circuit Pack
• Avaya TN2302AP MEDPRO Circuit Pack
HW03 FW006
HW01 FW009
HW03 FW055
Avaya 4620 IP Telephones 1.8
Avaya P333R Switch 4.0.9
Internet Software Consortium DHCP Server: Red Hat Linux 9 3.0pl1
TFTP Server: Microsoft Windows 2000 Server 5.00.2195 (SP3)
PCs: Microsoft Windows 2000 Professional 5.00.2195 (SP3)
AM; Reviewed:
WCH 3/18/2004
Solution & Interoperability Test Lab Application Notes
© 2004 Avaya Inc. All Rights Reserved.
4 of 10
Linux-DHCP.doc
Page 5

3. Red Hat Linux 9 DHCP Server Configuration
The following Red Hat Linux DHCP server configuration was done through the command line
interface (CLI):
Note: This configuration assumes that a DHCP server has been previously installed in the Red
Hat Linux 9 server.
Step Description
1.
2.
3.
4.
Log in to the Red Hat Linux 9 server using the username and password with administrative
credentials.
Check if there is a “dhcpd.conf” file in the “/etc” directory. If the file doesn’t exist, copy it
from the “/etc/log.d/conf/services” directory to the “/etc” directory using the command “cp
/etc/log.d/conf/services/dhcpd.conf /etc”.
Edit the “dhcpd.conf” file and comment out the bolded lines as shown below:
# $Id: dhcpd.conf,v 1.2 2002/10/12 02:08:09 kirk Exp $
########################################################################
# You can put comments anywhere you want to. They are effective for the
# rest of the line.
# this is in the format of <name> = <value>. Whitespace at the beginning
# and end of the lines is removed. Whitespace before and after the = sign
# is removed. Everything is case *insensitive*.
# Yes = True = On = 1
# No = False = Off = 0
# Title = "dhcpd"
# Which logfile group...
# LogFile = messages
# Only give lines pertaining to the dhcpd service...
# *OnlyService = dhcpd
# *RemoveHeaders
########################################################
# This was written and is maintained by:
# Kirk Bauer <kirk@kaybee.org>
#
# Please send all comments, suggestions, bug reports,
# etc, to kirk@kaybee.org.
########################################################
Configure the DHCP server to use the ad-hoc dynamic DNS update scheme by adding the
command “ddns-update-style ad-hoc;” to the “dhcpd.conf” file.
AM; Reviewed:
WCH 3/18/2004
Solution & Interoperability Test Lab Application Notes
© 2004 Avaya Inc. All Rights Reserved.
5 of 10
Linux-DHCP.doc
Page 6

Step Description
5.
Add the scope information for the voice and data networks to the “dhcpd.conf” file. The scope
information should follow the ad-hoc DNS update scheme command configured in Step 4:
ddns-update-style ad-hoc;
option option-176 code 176 = string;
shared-network data {
subnet 178.16.13.0 netmask 255.255.255.0 {
option routers 178.16.13.1;
option broadcast-address 178.16.13.255;
option option-176 "L2Q=1,L2QVLAN=120";
range 178.16.13.100 178.16.13.250;
}
}
shared-network voice {
subnet 178.16.12.0 netmask 255.255.255.0 {
option routers 178.16.12.1;
option broadcast-address 178.16.12.255;
option option-176 "MCIPADD=178.16.12.21,MCPORT=1719,TFTPSRVR=178.16.13.100";
range 178.16.12.100 178.16.12.250;
}
}
Save the “dhcpd.conf” file.
6.
Check if there is a “dhcpd.leases” file in the “/var/lib/dhcp” directory. If the file doesn’t
exist, use the “touch /var/lib/dhcp/dhcpd.leases” command to create it. The DHCP server
uses the “dhcpd.leases” file to store information about current leases.
7.
If the Red Hat Linux server has more than one network interface attached to the system, the
DHCP server can be configured to only start on one of the interfaces by adding the name of the
interface to the list of “DHCPDARGS” in the “/etc/sysconfig/dhcpd” file.
# Command line options here
DHCPDARGS=eth0
Save the “/etc/sysconfig/dhcpd” file.
8.
Use the “chkconfig --level 5 dhcpd on” command to configure the “dhcpd” service to run
automatically at boot-up time.
9.
Start the DHCP server by running the “service dhcpd start” command.
#[root@cvlan1 root]# service dhcpd start
Starting dhcpd: OK ]
[root@cvlan1 root]#
Note: The DHCP server can be started in debug mode using the “dhcpd –d -f” command.
AM; Reviewed:
WCH 3/18/2004
Solution & Interoperability Test Lab Application Notes
© 2004 Avaya Inc. All Rights Reserved.
6 of 10
Linux-DHCP.doc
Page 7

4. Verification Steps
In the field, the following tests can be performed to verify the Linux DHCP server configuration
is operating correctly.
Step Description
From the Red Hat Linux server, issue the command “service dhcpd status” to find out if the
1.
Linux DHCP server is running.
E[root@cvlan1 root]# service dhcpd status
dhcpd (pid 3613) is running...
[root@cvlan1 root]#
Reset the Avaya 4600 Series IP Telephones by pressing “MUTE (RESET) 73738 #” while
2.
the phones are on-hook and idle. Press “#” when prompted to “Reset Values?”.
Verify the Avaya IP Telephones are able to obtain an IP address and scope options from the
3.
Red Hat Linux DHCP server.
The IP telephones should display the following prompt after contacting the C-LAN card
specified in the DHCP server scope.
Extension=
#=OK New=
Enter an extension, ending with the “#” button. The following password prompt is displayed.
Password=
#=OK
Enter the extension’s password, ending with the “#” button. Verify successful registration to
Avaya Communication Manager.
While the telephones are on-hook and idle, use “MUTE (ADDR) 2337 #” to verify the
Avaya IP Telephone DHCP parameters.
Connect PCs to the Avaya IP Telephones and the Avaya P333R switch. Use the “ipconfig”
4.
command to verify the PCs are able to obtain an IP address and scope options from the Red
Hat Linux DHCP server.
AM; Reviewed:
WCH 3/18/2004
Solution & Interoperability Test Lab Application Notes
© 2004 Avaya Inc. All Rights Reserved.
7 of 10
Linux-DHCP.doc
Page 8

From the Red Hat Linux server, issue the command “more /var/lib/dhcp/dhcpd.leases” to
5.
determine which IP addresses have been leased to the Avaya IP Telephones and PCs. The
following screen shot shows the output of the “dhcpd.leases” file after the Avaya IP
Telephones and PCs depicted in Figure 1 successfully obtained IP addresses.
[root@cvlan1 root]# more /var/lib/dhcp/dhcpd.leases
# All times in this file are in UTC (GMT), not your local timezone. This is
# not a bug, so please don't ask about it. There is no portable way to
# store leases in the local timezone, so please don't request this as a
# feature. If this is inconvenient or confusing to you, we sincerely
# apologize. Seriously, though - don't ask.
# The format of this file is documented in the dhcpd.leases(5) manual page.
# This lease file was written by isc-dhcp-V3.0pl1
lease 178.16.12.250 {
starts 2 2004/02/03 15:25:40;
ends 3 2004/02/04 03:25:40;
tstp 3 2004/02/04 03:25:40;
binding state active;
next binding state free;
hardware ethernet 00:04:0d:00:34:c1;
}
lease 178.16.12.249 {
starts 2 2004/02/03 15:30:40;
ends 3 2004/02/04 03:30:40;
tstp 3 2004/02/04 03:30:40;
binding state active;
next binding state free;
hardware ethernet 00:04:0d:00:33:d2;
}
lease 178.16.13.250 {
starts 2 2004/02/03 22:52:07;
ends 3 2004/02/04 10:52:07;
binding state active;
next binding state free;
hardware ethernet 00:06:5b:31:e5:36;
uid "\001\000\006[1\3456";
client-hostname "PC1";
}
lease 178.16.13.249 {
starts 2 2004/02/03 22:54:00;
ends 3 2004/02/04 10:54:00;
binding state active;
next binding state free;
hardware ethernet 00:06:5b:31:d5:9c;
uid "\001\000\006[1\325\234";
client-hostname "PC2";
}
lease 178.16.13.248 {
starts 2 2004/02/03 22:56:00;
ends 3 2004/02/04 10:56:00;
binding state active;
next binding state free;
hardware ethernet 00:06:5b:31:f8:e6;
uid "\001\000\006[1\324\223";
client-hostname "PC3";
}
AM; Reviewed:
WCH 3/18/2004
Solution & Interoperability Test Lab Application Notes
© 2004 Avaya Inc. All Rights Reserved.
8 of 10
Linux-DHCP.doc
Page 9

5. Conclusion
These Application Notes provide administrators with the basic steps necessary to configure a
Red Hat Linux 9 DHCP Server for Avaya 4600 Series IP Telephones. The steps provided should
be helpful for implementing most deployments, but they do not address all possible configuration
scenarios.
AM; Reviewed:
WCH 3/18/2004
Solution & Interoperability Test Lab Application Notes
© 2004 Avaya Inc. All Rights Reserved.
9 of 10
Linux-DHCP.doc
Page 10

©
2004 Avaya Inc. All Rights Reserved.
Avaya and the Avaya Logo are trademarks of Avaya Inc. All trademarks identified by ® and ™
are registered trademarks or trademarks, respectively, of Avaya Inc. All other trademarks are the
property of their respective owners. The information provided in these Application Notes is
subject to change without notice. The configurations, technical data, and recommendations
provided in these Application Notes are believed to be accurate and dependable, but are
presented without express or implied warranty. Users are responsible for their application of any
products specified in these Application Notes.
Please e-mail any questions or comments pertaining to these Application Notes along with the
full title and filename, located in the lower right corner, directly to the Avaya Solution &
Interoperability Test Lab at interoplabnotes@list.avaya.com
AM; Reviewed:
WCH 3/18/2004
Solution & Interoperability Test Lab Application Notes
© 2004 Avaya Inc. All Rights Reserved.
10 of 10
Linux-DHCP.doc
 Loading...