

Page 1

Avaya Gemini CLI Analog Telephone 9335-AV
Page 2

General Note: When power is switched on or batteries are inserted the display
will be blank until the Handset is lifted or the Handsfree button is pressed.
Page 3

Figure One
17
16
15
14
13
1
3
2
4
5
6
P
7
8
RESET
26
9
10
11
12
Page 4
19
23
17
18
24
DC 9V
22 21 20 25
Page 5

Contents
INTRODUCTION ............................................................................................................... 7
INTENDED USE ................................................................................................................ 8
SAFETY............................................................................................................................. 9
TELEPHONE FEATURES............................................................................................... 11
DISPLAY.......................................................................................................................... 14
SETTING THE CLOCK.................................................................................................... 15
MEMORY FUNCTION ..................................................................................................... 16
DIRECTORY...........................................................................................................................16
Programming Directory memory .........................................................................................16
Dialling a Directory memory................................................................................................17
To delete a Directory memory.............................................................................................17
DIRECT ACCESS MEMORY ......................................................................................................17
Programming Direct Access memory buttons ....................................................................18
Dialling Direct Access memory buttons ..............................................................................19
CALLS MEMORY.....................................................................................................................19
DISPLAYING CALLS RECEIVED.................................................................................................19
To store a Call memory to Directory Memory .....................................................................20
To store a Call Memory to Direct Access memory .............................................................20
Deleting the Calls memory..................................................................................................21
REDIAL MEMORY ...................................................................................................................21
Viewing the Redial memories .............................................................................................22
Page 6

SERVICE......................................................................................................................... 23
HEARING AID COMPATIBLE.......................................................................................... 23
WARRANTY .................................................................................................................... 23
Page 7

GB
Introduction
This AVAYA 9335-AV caller display telephone is specially designed to work
behind the AVAYA IP OFFICE system.
The telephone is able to show caller display information provided that this option
has been switched on by your installer.
When a call is received at the telephone, it will display the number of the person
calling you (there are some exceptions to this like withheld numbers). This
information is stored together with information about the time/date of the call and
whether you answered the call or not. Information on the last 80 calls is retained
in the telephone memory and it is possible to scan through these calls and dial
someone back by simply pressing one button.
There is an independent directory for you to store the telephone numbers and
names of 100 entries. If one of your directory “Names” calls you, then the display
will show not only the number calling you but the name, as stored in your
directory or the IP OFFICE system memory.
As well as a directory of numbers it is possible to store up to 20 names and
numbers in ten one- and two-touch buttons.
It is also possible to use this telephone in combination with a headset. There is a
universal interface in the telephone which will allow connection of most headsets,
providing that they have an RJ11 plug for connection to the headset socket
situated at the back of the telephone.
7
Page 8

GB
Intended Use
This apparatus is intended for use on the 2 wire analogue ports of the AVAYA IP
OFFICE circuits in all countries except the USA. Because the product is
connected behind a PABX it must not be relied upon to contact the emergency
services during a power failure.
Declaration of Conformity
Avaya declares under its sole responsibility that this product
Model : Avaya Gemini CLI Phone 9335-AV
Is in conformity with the following relevant harmonized standards
Health & Safety EN60950
Electromagnetic Compatibility EN55022 : 1998 & EN55024 : 1998
Telecom EN301437 : 1999 & TBR38 : 1998
Following the provisions of Council Directive on radio equipment and
telecommunications terminal equipment.
May 2004
8
Page 9

GB
Safety
When using your telephone equipment, the following safety precautions should
always be followed to reduce the risk of fire, electric shock and injury to persons.
Read and understand all instructions. Follow all warnings and instructions
marked on the telephone. This telephone can be hazardous if immersed in water.
If you suspect a natural gas leak, report it immediately, but use a telephone away
from the area in question.
Never push objects of any kind into the equipment through housing slots. To
reduce the risk of electric shock, do not disassemble this telephone. There are no
user serviceable parts.
Avoid using the telephone during thunderstorms in your immediate area.
9
Page 10

GB
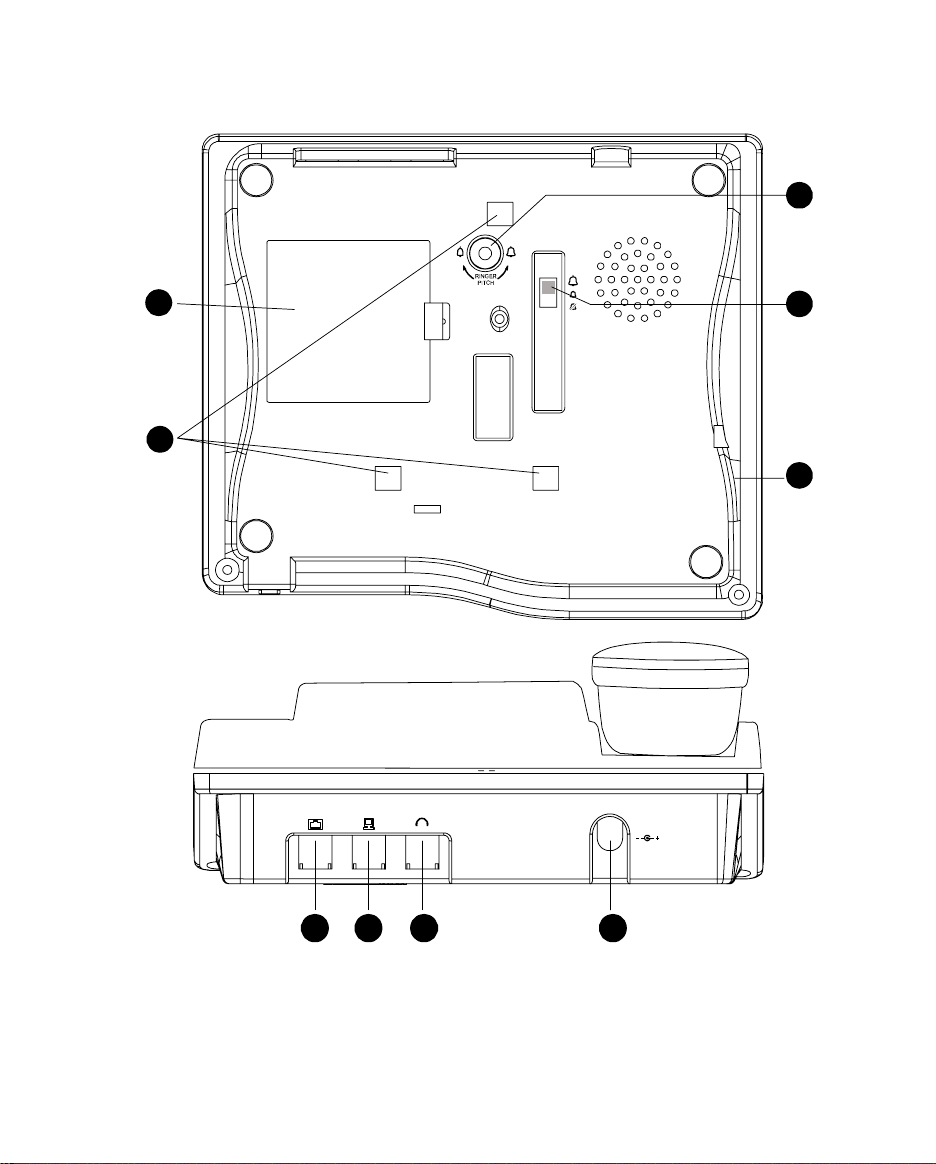
Installation
Please refer to Figure One at the front of this user guide
25
DC 9V
This telephone requires a power supply in order to operate
correctly. A suitable power supply is included with the telephone
and it should be connected to the socket at the rear of the
telephone.
23
22
24
20
21
18
19
17
Alternatively, the telephone will operate utilizing 3 AA batteries
(not provided). To insert the batteries, first ensure that the
telephone is disconnected from the telephone line.
I
This jack is used to connect a line cord to your telephone.
The handset cord plugs in here.
A headset plugs in here.
The jack labelled is used to connect a device such as a modem to
your Telephone.
A 3-position switch is used to control the volume of the ring tone.
Select from loud ring, quiet ring or ringer off.
Turn the pitch control to adjust the pitch of the ringer.
Wall mounting - An additional wall bracket is required - Using the
template supplied with the bracket, position where you want to fix
your telephone. Drill two holes and fix roundhead screws. Attach
the telephone to the bracket. Slide the bracket into place on the
screws. Remove the handset retainer by pushing up out of the
slot. Turn the retainer through 180° and place back in its slot.
Wall brackets can be obtained from your distributor or contact
Avaya Analog support on +44 870 220 0402
www.analogphonesavaya.com
10
Page 11

GB
Telephone Features
Please refer to Figure One at the front of this user guide
1
2
3
The telephone is supplied with a protective cover over the
display. Carefully peel this off before using the telephone.
The large LCD panel normally shows the time of day and the
number of new calls that you have not yet viewed. With
incoming calls or when viewing the directory or viewing the
calls list it will show the date, the number and the name of the
caller (if programmed into the directory or the IP OFFICE).
There are several prompts that also tell you what state the
telephone is in at a particular moment in time (see detailed
instructions on page 14).
Use this button to delete a Directory memory.
Access the Directory memory to be deleted and press this
button TWICE in quick succession.
“ERASE” will appear on the display and the memory will be
deleted.
To adjust the volume of the Handset, Headset and Handsfree,
Press the ▲ and ▼ volume buttons.
Note: The ▲ and ▼ can also be used as Scroll Up or Down
buttons to review the Redial, Directory and the Caller memory
list. The Scroll buttons also serve as Edit buttons during
memory storage.
4
5
Use this button to program the 100 telephone numbers and
names in your Directory and the 10 Direct Access memory
buttons 11.
The red message waiting light flashes when you have a
message. It also flashes when your telephone rings.
11
Page 12

GB
6
7
8
9
10
11
This light is to let you know that new calls have been received
which have not been reviewed.
Pressing this button will bring the calls information on the
display and, at the same time, cause the LED to stop flashing
and reset the NEW CALLS counter to 0.
You can store up to 100 telephone numbers and names in your
personal directory.
Use this button to access a memory; a call can be made by
pressing the
If an incoming call is received from someone whose name is
stored in the Directory, then that name will appear on your
display together with the incoming callers telephone number.
Use this button to dial a number on the display. This can be a
call from your Directory
Call memory or one of the calls in the Last Number Redial
memory.
Press this button to insert a pause.
These 10 Direct Access memory buttons are able to save 20
memories, each with a maximum of 32 digits and 16 alpha
characters. The memories are accessed by either one touch or
two touches of the memory button.
button.
or an incoming call stored in the
12
13
Press this button during a call to return dial tone. This will
enable you to transfer the call to another party or instigate a
feature such as conference.
Press this button to redial the last number you dialled from the
keypad. Using the ▲ and ▼ buttons, you can scroll through the
last five numbers you dialled. To call any of the numbers press
the
screen.
button when the correct number is displayed on the
12
Page 13

GB
T
14
15
16
26
This button mutes the microphone so the other person on the
call cannot hear you. A red lamp indicates the mute is on.
Pressing it a second time releases the mute and returns you to
normal conversation. It works in Handset, Handsfree and
Headset mode.
This button will activate the two-way Handsfree speech circuit.
Lifting the Handset will revert to Handset working. Pressing the
button when in Handset mode will switch to Handsfree,
allowing you to replace the Handset in the cradle without
disconnecting the call in progress. When a Headset is plugged
in to the Headset socket 20 the Handsfree function is disabled
to allow the button to operate the Headset.
A standard telephone keypad with the number “5” having a
raised dot for visually impaired users.
RESE
If the telephone appears not to function correctly pressing this
button will reset the telephone.
13
Page 14

Display
GB
NEW
REPEAT
CALL#
Numeric Field
Alpha-Numeric
Field
TIMER
DATE TIME
AM / PM
Please refer to the drawing above
This is the received calls indicator.
NEW denotes calls not previously reviewed.
REPEAT - indicates multiple calls from the same caller; only the
Date and Time from the most recent attempt will be displayed.
CALL # - indicates received Caller List entry number.
This is the Date field showing date in MONTH/DAY format; it
shows the current date or date of received call.
This field indicates Time mode status.
TIMER - indicates Call Timer or Stop Watch mode is active.
AM/PM - for clock display (only displays in 12 hour mode).
ENVELOPE
ANSWERED
UNANSWERED
BATTERY
ADAPTOR
Displays the current time or the time of the received call in
HOUR : MINUTE format. It also displays the call timer and stop
watch in MINUTE : SECOND format.
These symbols are used in conjunction with Caller list.
indicates the call was answered;
indicates call was not answered.
If this symbol is displayed, you are recommended to change the
batteries.
14
Page 15

GB
This symbol will be displayed when the unit is functioning with
batteries.
16 digit field for displaying the telephone number.
16 character alpha numeric display to show caller name or
number of new calls and total calls received.
Setting the clock
Lift Handset, insert the 9V DC Adaptor (supplied) to the power socket or insert 3
AA Alkaline batteries.
1. Key in the year, #
month and day
2. Press "1" for 12HR or
Press "2" for 24HR
3. If 12HR selected,
Press "1" for AM or
Press "2" for PM
4. Enter time hour & minute
5. The display will show
"CLOCK STORED"
NOTE: You do not need to perform this operation if you wait for your first call to
be received, clock will be set automatically to the correct time by the caller display
signal. If you want to reset date / clock, press STORE and
15
.
Page 16

GB
Memory function
There are four different memory stores on this telephone. All of the memory
locations will accept 32 digits and 16 alpha characters.
Directory
You can store up to 100 telephone numbers and names in your personal
directory. By accessing a memory, a call can be made by pressing the
If an incoming call is received from someone whose name is stored in the
directory or in the IP OFFICE directory, then that name will appear on your
display together with the incoming callers telephone number.
button.
Programming Directory memory
To store a Directory memory; Press then press follow the screen
prompts
- at “ENTER NUMBER” prompt key in the number to be stored.
Press
- at “ENTER NAME” prompt key in the name to be stored using the numeric
keypad press the appropriate button a number of times to display the letter you
require.
Press the ► to move the cursor to the next space, use the ◄►buttons to edit the
name or ▲▼ buttons to edit the number. The names will be stored in
alphabetical order.
Press
16
Page 17

GB
Dialling a Directory memory
To dial a Directory memory; Press
You can then scroll through the complete directory by using the▲ and ▼ buttons.
Each memory will appear in alphabetical order.
Alternatively, you can search for a particular letter by pressing
the alpha key for which you want to search - press 6 once for “M” or twice for “N”
for example. All entries that begin with that letter will then be scanned using the▲
and ▼ buttons.
When you find the memory you require press the
button to dial.
, followed by
To delete a Directory memory
Access the Directory memory to be deleted, as described above. Press the
button TWICE in quick succession. “ERASE” will appear on the display and the
memory will be deleted.
Direct Access memory
There are 10 buttons providing 20 Direct Access memory locations, each with a
maximum of 32 digits and 16 alpha characters. The memories are accessed by
one touch or two touches of the Direct Access memory button 11.
17
Page 18

GB
Programming Direct Access memory buttons
To store a Direct Access memory; Press the button. “STORE” will appear on
the display.
Press one of the Direct Access memory buttons 11, where you wish the memory
to be stored.
NOTE: if the button is pressed once the memory will be stored under the button
as a one-touch button. If the memory button is pressed twice in quick succession,
the memory will be stored under the button as a two-touch button.
At the prompt dial the number to be stored. It is possible to store the Handsfree
function
pressed, the telephone will automatically seize the line and make the call, in
Handsfree mode.
Press the
- at ”ENTER NAME” prompt key in the name to be stored using the numeric
keypad press the appropriate button a number of times to display the letter you
require. Press the ► to move the cursor to the next space use the ◄►buttons
to edit the name or ▲▼ buttons to edit the number.
Press the
“STORE COMPLETED” will appear on the display.
If you make a mistake in entering the data, simply overwrite the memory data by
doing the entry again.
as the first character. In this case when a memory button is
button
button
18
Page 19

GB
Dialling Direct Access memory buttons
Pressing any of the Direct Access buttons 11 once or twice will automatically
display the number stored. If the Handsfree
memory then pressing the memory button will automatically dial the number. If
the number is displayed because the Handsfree function has not been stored,
pressing the
button will dial the number.
has been programmed into the
Calls memory
Each call received, up to a maximum of 80 calls, can be stored in this memory.
The information stored includes telephone number and name (if this information
is stored in your personal or IP OFFICE directory) date and time of call, whether
the call was answered or not.
Displaying calls received
If the
viewed before. Press
screen. Using the ▲ and ▼ button you can move up and down through the
memories to see who has called. If you wish to make a call to a particular caller,
make sure that the entry is on the screen and then press the
is flashing then there are new calls in the Directory that you have not
button to display the last call to be received on the
button. The
telephone will automatically call the number in Handsfree mode.
19
Page 20

GB
To store a Call memory to Directory Memory
Press the
Press the ▲ and▼ button to select desired number from the Caller list.
Press
Follow the screen prompts
- at “ENTER NUMBER” prompt key in the number to be stored.
Press
- at “ENTER NAME” prompt key in the name to be stored
Press
button
and then press .
To store a Call Memory to Direct Access memory
Press the
Press the ▲ and▼ button to select desired number from the Caller list
button
Press
11
Follow the screen prompts
- at “ENTER NUMBER” prompt key in the number to be stored.
and then press a memory button (one- or two-touch memory button)
20
Page 21

GB
Press
- at “ENTER NAME” prompt key in the name to be stored
Press
Deleting the Calls memory
Press the
Press the ▲ and▼ button to select desired number from the Caller list that is to
be erased.
Press
There may be situations where you wish to delete the entire Calls memory.
Press the
Press
press until the screen has displayed “HOLD TO CLR CALL”.
The screen displays “CALL MEM CLEAR” after all call memories have been
erased.
button
button twice; the call is erased.
button
button twice in quick succession holding it down after the second
Redial memory
The redial buffer stores the phone number of the last five numbers that were
called from the telephone, either from the keypad or from a Direct Access
memory
21
Page 22

GB
Viewing the Redial memories
Press the button. The last number called on the telephone will be displayed
with the telephone number and the message REDIAL 1. Using the ▲ and ▼
buttons you can review the last five numbers called. To call any of the numbers,
make sure that the entry required is on the screen and press the
telephone will automatically call the number in Handsfree mode.
button. The
22
Page 23

GB
Service
Before cleaning, unplug the telephone from the modular wall jack. Do not use
liquid cleaners or aerosol cleaners. Use a damp cloth for cleaning.
Hearing Aid Compatible
This telephone is Hearing Aid Compatible (HAC).
Warranty
This product is guaranteed for 18 months from the date of manufacture. To get
warranty service on your telephone call the authorised service agent on +44 870
220 0402. Alternatively you may call the distributor from whom the product was
purchased.
If you are directed to ship your telephone to the authorised service location, you
must do this at your cost. We suggest that you retain the original packing
material in the event you need to ship the unit. When sending your telephone
include your name, address, and phone number, and description of the fault.
After repairing or replacing your telephone, it will be shipped back at our expense.
Further information can be obtained from www.analogphonesavaya.com
23
Page 24

3C9335001-AV
 Loading...