

Page 1
PARTNER
®
Messaging System
Logging
In
User's Guide
518-100-701
Issue 2
May 2003
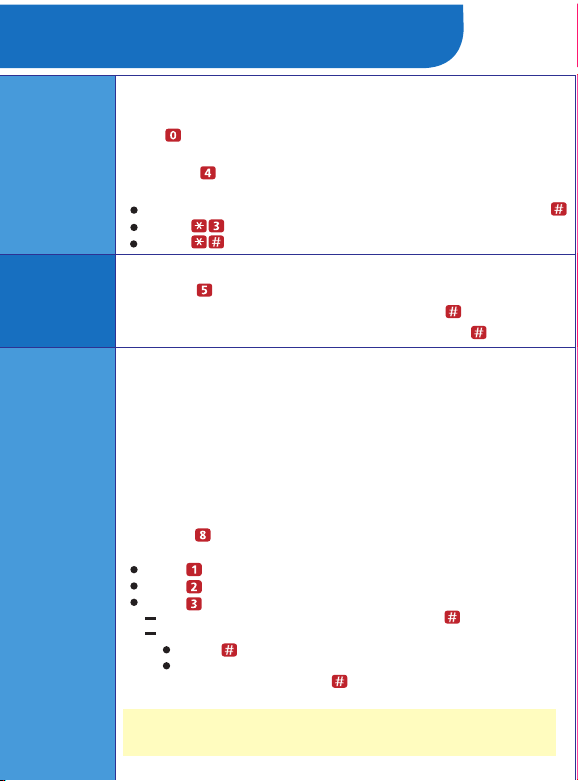
1: Choose an option:
If you are at an internal extension, go to Step 2.
If you are at an external telephone, call in on a line
answered by PARTNER Messaging Automated Attendant or
Call Answer Service, and press when you hear the
menu or greeting. Skip to Step 3.
2: Dial the PARTNER Messaging extension, , to
access the Voice Messaging system.
3: Choose an option:
If you are at your own extension, press .
If you are at another telephone, enter your extension
number, then press .
4: Enter your Password, then press .
The first time you log in, your Password is not set. Press #
for Step 4, then follow the system prompts to enter your new
Password and record your name.
The system announces the number of new and old
messages in your mailbox.
Page 2
Getting Started
Options
Hints
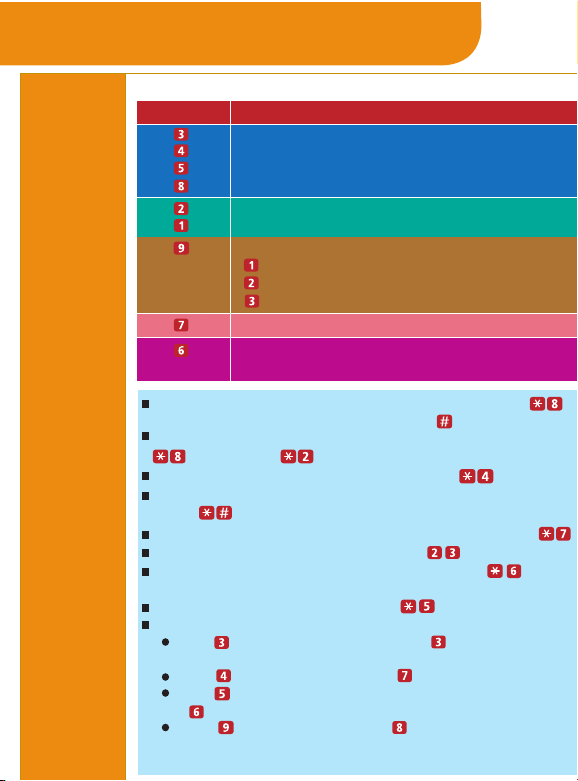
After you log in, choose an option.
Press... To...
Change your name or Personal Greeting.
Change your Personal Operator.
Change your Password.
Change Call Answer Mode.
Listen to messages.
Record and send messages.
Access more mailbox options:
Message retrieval order
New message preview
Last heard message
Program Personal Group Lists.
Program Outcalling (if Outcalling
permission is activated for your mailbox).
To transfer to another extension at any time, press ,
then the extension number followed by .
To transfer to another extension using the Directory, press
, then press .
To replay a Voice Messaging menu, press .
To go back to the previous Voice Messaging menu,
press .
To return to the Voice Messaging Activity Menu, press .
To replay message header only, press .
To change message status back to new, press .
(Release 6.0 or later)
To return to previous message, press .
While a message is playing you can:
Press to pause the playback and again to resume
playback.
Press to raise the volume or to lower it.
Press to rewind the message four seconds and play,
or to skip forward four seconds and play.
Press to increase speed or to decrease.
(Release 6.0 or later.)
(Release 6.0 or later.)
(Release 6.0 or later)
Page 3

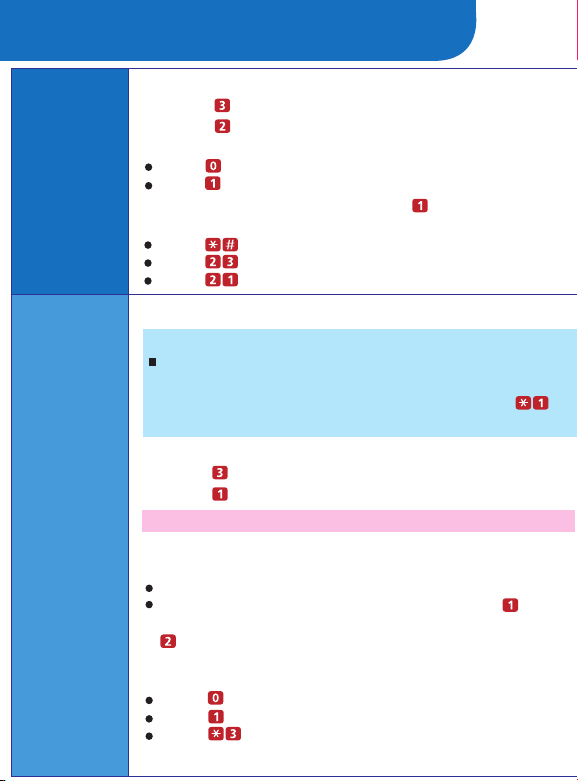
Getting Started
Using
Dial Code/
Button
Features
To...
Call Voice Mail Service or programmed
Press...
Intercom
Voice Mail Auto Dial button.
Turn voice mail
coverage on and off
Programmed VMS Cover button.
VMS Coverage is on when the
light is on.
Send calls to your
mailbox without ringing
your extension first
Programmed DND button to turn
it on (and VMS Cover button if
present). If no VMS Cover button
is programmed, Automatic VMS
must be on.
Transfer outside callers
to another user's
mailbox
Feature
or programmed
Voice Mailbox Transfer (VMBox)
button, then dial the extension
number.
Lock your telephone
Feature
or programmed
Station Lock button, then dial
the four-digit code. Reenter the
code.
Record an active call
Programmed Record-a-Call
(RAC) button.
Listen to a caller
leaving a message in
your voice mailbox
Programmed Call Screening
button before the call is
answered by the PARTNER
Messaging System.
NOTE:
In some countries, the Voice Mailbox Transfer code is
Feature
. Also, some systems allow you to use Voice
Mailbox Transfer form a standard phone by pressing
then the extension number. Check with your
System Manager.
Page 4
Personalizing Your Mailbox
Recording
Your
Name
Recording
or Deleting
a Personal
Greeting
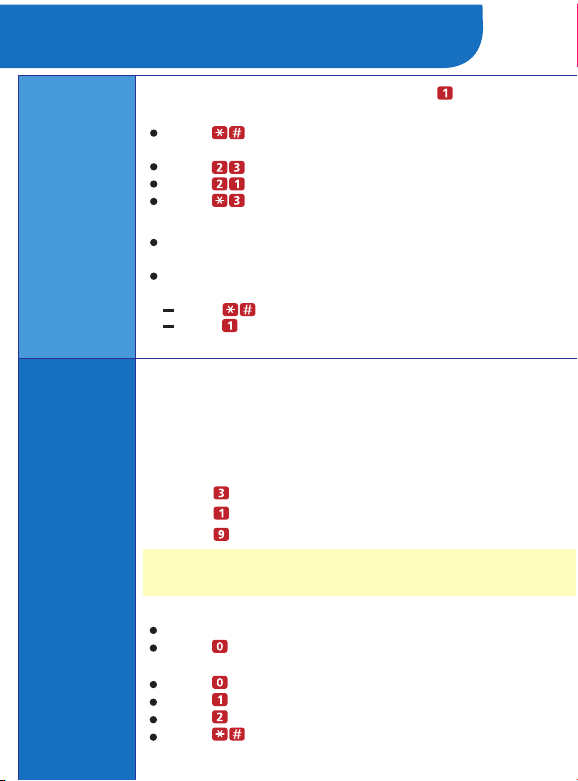
1: Log in to Voice Messaging.
2: Press to change your name recording or greeting.
3: Press to change your name recording.
4: Choose an option:
Press to listen to the current name.
Press to record your name.
5: Record your name, then press .
6: Choose an option:
Press to approve your name.
Press to play back your name.
Press to re-record your name.
You can have up to 6 different Personal Greetings.
HINT:
If the system is set for Bilingual Mode, you can record
your Personal Greeting(s) in both languages. Your
greeting(s) should tell the callers they can press
to hear the Personal Greeting in an alternate language.
1: Log in to Voice Messaging.
2: Press to change your name recording or greeting.
3: Press to change your greeting.
The system announces the current setting(s).
4: Enter the greeting number [1–6].
5: Choose an option:
If the system is set for Monolingual Mode, go to Step 6.
If the system is set for Bilingual Mode, press to
record your greeting in the Primary Language, or press
to record your greeting in the Secondary Language.
Then go to Step 6.
6: Choose an option:
Press to listen to your greeting.
Press to record your greeting.
Press to delete your greeting.
continued...
Page 5
Personalizing Your Mailbox
Recording
or Deleting
a Personal
Greeting
(continued)
Activating
a Personal
Greeting
7: Record your greeting, then press
8: Choose an option:
Press to approve your greeting.
Go to Step 6 of Activating a Personal Greeting.
Press to play back your greeting.
Press to re-record your greeting.
Press to delete the greeting just recorded.
9: Do one of the following:
If greeting is not already active, go to Step 6 of
Activating a Personal Greeting.
If greeting is currently active, choose one of the
following:
Press to keep current activation setting.
Press to change, then go to Step 6 of
Activating a Personal Greeting.
You can record up to 6 Personal Greetings. Activate the Personal
Greeting you want a caller to hear. You can activate up to 2
Personal Greetings. You can have 1 greeting for internal calls and
1 greeting for external calls, or you can use the same greeting for
both internal and external calls.
1: Log in to Voice Messaging.
2: Press to change your name or greeting.
3: Press to change your greeting.
4: Press to activate a greeting.
.
If a Personal Greeting is not active, the system greeting is
used.
5: Choose an option:
Enter the number of the greeting you want to activate.
Press to activate the system default greeting.
6: Choose an option:
Press to use this greeting for all calls.
Press to use this greeting for internal calls only.
Press to use this greeting for external calls only.
Press if finished.
Page 6
Personalizing Your Mailbox
Changing
Your
Personal
Operator
Changing
Your
Password
Choosing
Call
Answer
Mode
Your Personal Operator is the person you want to handle
your calls when the caller needs immediate assistance and you are
not available. In your greeting, be sure to mention that callers can
press to reach your Personal Operator or the System Operator.
1: Log in to Voice Messaging.
2: Press to change your Personal Operator.
3: Choose an option:
Enter your Personal Operator's extension, then press .
Press to delete your Personal Operator.
Press
1: Log in to Voice Messaging.
2: Press to change your Password.
3: Enter the new Password, then press .
4: Re-enter the new Password, then press .
Call Answer Mode determines whether or not the system allows
callers to leave a message after listening to your Personal Greeting.
When your mailbox is in Record Mode, callers can leave a message;
when it is in Answer-Only Mode, they cannot. Auto-Copy Mode
(Release 6.0 or later) allows you to designate that a copy of all
messages left in your mailbox also be left in another mailbox. The
caller leaving the message is not aware of this unless you explain
it in your Personal Greeting. Private messages are not copied to
the other mailbox.
1: Log in to Voice Messaging.
2: Press to change Call Answer Mode.
3: Choose an option:
Press for Record Mode.
Press for Answer-Only Mode.
Press for Auto-Copy Mode. Then do one of the following:
Enter destination extension, then press .
If mailbox is already in Auto-Copy Mode, do one of the following:
Press to keep current destination.
To change current destination, enter new destination
extension, then press .
if finished.
The Call Answer Mode of the destination mailbox must be set to
Record Mode in order for Auto-Copy to work.
Page 7

Your Messages
About
Message
Categories
Listening
to
Messages
You can assign Priority, Private, and/or Return Receipt categories to
messages you send. New Priority messages are heard first when
listening to new messages. Private messages cannot be forwarded.
Return Receipt messages notify you when the message is listened
to by the recipient. You can assign one, two, or all three categories
to a message. In Release 6.0 or later, you can receive an Auto-Copy
message, which is sent to you by an originating mailbox that has
designated your mailbox as an Auto-Copy destination. The message
header indicates the mailbox where the message originated and that
the message is an Auto-Copy.
1:
Log in to Voice Messaging.
2: Press to get messages.
The system plays the message header.
3: Choose an option:
Press to listen to the message body.
Press to skip the message. (The message will
remain as "new" until you listen to the body.)
Press to delete the message.
HINTS:
While the message plays, you can choose additional options:
Press to pause and again to resume.
Press to rewind four seconds and play.
Press to skip forward four seconds and play.
Press to increase volume or to decrease volume.
Press to increase speed or to decrease. Change in speed lasts
for current Voice Messaging connection. (Release 6.0 or later.)
4: After the message plays, choose an option:
Press to save (skip) the message.
Press to replay the message.
Press to replay the header only.
Press to change the message status back to new,
then press to go to the next message.
log in for messages, you will hear this as a new message.
(Release 6.0 or later.)
Press to return to the previous message. Repeatedly
press to
Press to respond to the message (see next section).
backup to the desired message. (Release 6.0 or later.)
The next time you
Page 8

Your Messages
Responding
to a Message
1: After the recorded message plays, press to
respond to the recorded message.
2: Choose an option:
Press to reply to the sender. (In order to reply, the
sender must have a mailbox in the system.)
Press to forward the recorded message.
Press to return the call to an internal sender.
3: Record your message, then press again.
4: Choose an option:
Press to approve. (if replaying, skip to step 7.)
Press to play back your comments.
Press to re-record your comments.
Press to cancel replying or forwarding.
5: If forwarding, do one of the following:
Enter the extension of an individual, then press .
Press and a Group List number, then . Use
Personal Group Lists 1–10 or System Group Lists 50–59.
Press to use the Directory. (See Using the Directory.)
Press to delete the last entry.
Repeat Step 5 to address the message to others.
6: Press when finished addressing.
7: Choose an option:
Press to make this a Private message.
Press to make this a Priority message.
Press to request a Return Receipt.
Press to cancel the category.
Press to send the recorded message.
After you assign a category to a message, the system
gives you the options to assign the other two categories.
8: Return to Step 4 of Listening to Messages.
Sending
a Message
1: Log in to Voice Messaging.
2: Press to record a message.
3: Record your message.
4: Press when finished recording.
continued...
Page 9

Your Messages
Sending
a Message
(continued)
Using the
Directory
5: Choose an option:
Press to approve the recorded message. (Go to Step 6.)
Press to play back the recorded message.
Press to re-record the message. (Go to Step 3.)
Press to delete the recorded message and return
to the Voice Messaging Activity Menu.
6: Choose an option:
Enter the extension of an individual, then press .
Press and a Group List number, then . Use
Personal Group Lists 1–10 or System Group Lists 50–59.
Press to use the Directory. (See Using the
Directory.)
Press to delete the last entry.
Repeat Step 6 to address the recorded message to others.
7: Press when finished addressing.
8: Choose an option:
Press to make this a Private message.
Press to make this a Priority message.
Press to request a Return Receipt.
Press to cancel the category.
Press to send the recorded message.
After you assign a category to a message, the system
gives you the options to assign the other two categories.
To use the Directory to transfer to an extension:
1:
Press then to transfer to a user’s extension.
2:
Enter up to the first ten letters
of the name,then .
users are listed by first or last name.)
To use the Directory to address a message, or to add
entries to a Group List:
1:
Press to access the Directory.
2:
Enter up to the first ten letters
(Ask your System Manager if
of the name,then .
Use for the letter Q.
Use for the letter Z.
Page 10

More Mailbox Options
Options
Changing
Message
Retrieval
Order
Listening
to New
Messages
in Preview
Mode
In Release 6.0 or later, additional mailbox options are
available.
Change the Message Retrieval Order _ you can
listen to your messages in First-In First-Out order
or Last-In First-Out order.
Use Message Preview Mode _ you can listen to the
message body of all new messages and keep the
message status marked as new. This feature is
particularly helpful when accessing your new
messages remotely from a cell phone. Minimal
button presses are required to listen to all your new
messages.
Listen to Last Heard Message _ you can listen to
the last message you heard during your previous
message retrieval session.
1:
Log in to Voice Messaging.
2: Press for more mailbox options.
3: Press to change the message retrieval order.
4: Choose an option:
Press to listen to messages in First-In First-Out order.
Press to listen to messages in Last-In First-Out order.
Press when finished.
1:
Log in to Voice Messaging.
2: Press for more mailbox options.
3: Press to preview new messages.
4: Choose an option:
Press to immediately begin listening to the first
new message.
Press for options to use while a message is
playing.
Press to exit Preview Mode.
HINT:
To quickly listen to new messages when you log in to
your mailbox, set your message retrieval order to Last-In
First-Out and listen to your messages in Preview Mode.
See
Listening to Messages.
continued...
Page 11

More Mailbox Options
1:
Listening
to Last
Heard
Message
Log in to Voice Messaging.
2: Press for more mailbox options.
3: Press to listen to the last message you heard.
The system plays the message header.
4: Press to listen to the message body.
See Listening to Messages for options to use while and after
the message plays. You cannot press to skip forward to the
next message or to return to the previous message. Both
of these options return you to the Voice Messaging Activity
Menu.
If you deleted the last message you heard and exited your
mailbox, there is no last message to hear.
Page 12

Using Personal Group Lists
Creating
Personal
Group
Lists
Reviewing
or
Modifying
Personal
Group
Lists
You can use Group Lists to address messages to sets of
mailboxes without entering each extension individually. You
can create up to 10 Personal Group Lists, each with up to
50 mailboxes in it.
1: Log in to Voice Messaging.
2: Press to select Group Lists.
3: Press to create a list.
4: Enter the Group List number [1–10], then press .
5: Choose an option:
Enter the extension of the mailbox, then press .
Press to use the Directory. (See Using the
Directory.)
Press to delete the last entry.
Repeat Step 5 for each mailbox that you want to add.
6: Press when finished.
1: Log in to Voice Messaging.
2: Press to select Group Lists.
3: Press to review or modify Group Lists.
The system announces the number of entries in the first
Group List.
4: Choose an option:
Press to review or modify the list. (Go to Step 5).
Press to delete the list.
Press to skip to the next list. (Repeat Step 4).
5: Choose an option:
Press to skip the extension.
Press to delete the extension.
Press to add an extension, then choose an option:
Enter the extension of the mailbox, then press .
Press to use the Directory. (See Using the Directory.)
6: Press when finished.
Page 13

Using Outcalling
About
Outcalling
Turning
Outcalling
On or Off
Setting
Your
Outcalling
Numbers
If you turn on Outcalling, PARTNER Messaging calls the
numbers which you have programmed to signal that a new
message has arrived in your mailbox.
for all messages or just Priority messages.
HINT:
If you choose Outcalling for Priority messages only,
give your callers instructions on how to leave a Priority message.
Check with your System Manager to see if your mailbox has
been assigned Outcalling
Outcalling continues until one of the following happens:
During the Outcalling message call, you press to
cancel Outcalling until a new message arrives for you.
You log in to your mailbox and listen to the message.
The interval specified in your Outcalling Schedule expires.
PARTNER Messaging has called all numbers in your Outcalling
List the number of times specified by the Cycles option
1:
Log in to Voice Messaging.
privileges.
You can have Outcalling
.
2: Press to select Outcalling.
3: Press then choose an option:
Press to turn Outcalling On for all messages.
Press
Press to turn Outcalling Off.
Press to return to the Outcalling menu.
1:
Log in to Voice Messaging.
to turn Outcalling On for Priority messages only.
2: Press to select Outcalling.
3: Press to change your list of Outcalling Numbers.
4: Choose the entry number [1
If an Outcalling Number is programmed, you hear the Outcalling
entry information. If an Outcalling Number is not programmed, you
hear, "Entry number x is not used."
–
5].
continued...
Page 14

Using Outcalling
5:
Setting
Your
Outcalling
Numbers
(continued)
Choose an option:
Press to change or add an Outcalling Number.
(Go to Step 6.)
Press to delete the Outcalling Number.
Press to keep the Outcalling Number and return to
the Outcalling menu.
6:
Choose an option:
Press to enter a telephone Outcalling Number.
Press to enter a pager Outcalling Number.
Press to return to the Outcalling menu without
making a change.
7:
Enter the Outcalling Number and wait 5 seconds for
the system confirmation.
See Guidelines for Setting Outcalling Numbers for further details
and examples of how to set your Outcalling Numbers.
8:
Choose an option:
When prompted, press if you are finished entering
the number. Listen to the Outcalling entry information and
go to Step 9
Press to enter more digits, then repeat Step 7.
9:
Choose an option:
Press to confirm your entry.
Press to cancel your entry.
Return to Step 4 to program more Outcalling Numbers.
.
Guidelines
for Setting
Outcalling
Numbers
You may enter any combination of up to 60 digits
including – , (for a 1.5-second pause), and in an
Outcalling Number. The Outcalling Number can consist of:
to access an outside line (this is required to reach
an external number).
The telephone number and/or paging system numbers
(including area codes, if necessary).
Your paging system Personal Identification Number (PIN),
if any.
A Callback Number, if Outcalling to a pager.
continued...
Page 15

Using Outcalling
Guidelines
for Setting
Outcalling
Numbers
(continued)
Reviewing
Your
Outcalling
Numbers
Setting
Your
Outcalling
Cycles
EXAMPLE:
Your Outcalling Number is a paging system. To place
the call, the Voice Messaging system must access an outside
line, dial the number, wait several seconds for the paging
system to answer, enter your PIN followed by , and a
Callback Number followed by .
The Outcalling Number you would enter is:
To enter this Outcalling Number, you must dial:
(where represents a pause) to allow the Voice
Messaging system time to access an outside line.
to reach your paging system.
to allow several seconds for the paging
system to answer.
followed by as your PIN.
followed by as your Callback Number.
1:
Log in to Voice Messaging.
2: Press to select Outcalling.
3: Press to review your Outcalling Numbers.
The system announces your list of Outcalling Numbers.
Your Outcalling Cycles setting determines the number of times
the system will call your list of Outcalling Numbers. The default
setting is 3 times. It is suggested that you use at least 2 cycles.
1:
Log in to Voice Messaging.
2: Press to select Outcalling.
3: Press to change the number of your Outcalling
Cycles.
4: Choose an option:
Enter the number of times [1
should be called, then press .
Press to keep the current setting and return to the
Outcalling menu.
–
9] your Outcalling List
Page 16

Using Outcalling
Setting
Your
Outcalling
Interval
Setting
Your
Outcalling
Schedule
Your Outcalling Interval is the minimum amount of time
(in minutes) the system will wait before calling the next
number in your Outcalling List. The system default is 15 minutes.
1:
Log in to Voice Messaging.
2: Press to select Outcalling.
3: Press to change the Outcalling Interval.
4: Choose an option:
Enter the number of minutes [5
Interval, then press .
Press to keep the current setting and return to
the Outcalling menu.
You can set the time period during which the system will
perform Outcalling for your mailbox. The default schedule is
set to perform Outcalling 24 hours a day.
1:
Log in to Voice Messaging.
2: Press to select Outcalling.
3: Press to change the Outcalling Schedule.
4: Choose an option:
Press to change starting time and/or ending time.
Press to keep the current schedule and return to
the Outcalling menu.
5: Enter the starting time in 24-hour format in the
form hhmm (hh=hour, mm=minute), or to keep
the current starting time, press .
6: Enter the ending time in 24-hour format in the
form hhmm, or to keep the current ending time,
press .
7: Choose an option:
Press to approve your new schedule and return to
the Outcalling menu.
Press to re-enter. (Return to Step 5).
–
99] for the Outcalling
Page 17

Recording/Screening Calls
Using the
Recorda-Call
Feature
This feature allows you to record a conversation while
you are active on a call at your extension.
NOTE:
The Record-a-Call feature is not available to all users on all
systems. See your System Manager for feature availability.
When on a call you want to record, do the following to
begin recording:
1: Press the preprogrammed Record-a-Call
(RAC) button.
When the system answers, if there is space in
your mailbox, the system will confirm that it will
begin recording.
2: You and your party should begin speaking.
NOTE:
If the system detects silence for a period of 15 seconds
after you have begun recording a conversation, the
system automatically turns off the Record-a-Call feature.
If this happens you can begin recording again by pressing
the Record-a-Call button. When you resume recording, the
system saves the new recording as a separate message.
3: To stop recording the conversation, do one of the
following:
Press the Record-a-Call button again. (You will still
be connected to the other party.)
Hang up. (Recording stops and you are
disconnected from your party.)
continued...
Page 18

Recording/Screening Calls
Using the
Call
Screening
Feature
This feature allows you to listen to a caller leaving a
message in your voice mailbox.
NOTE:
The Call Screening feature is not available on all systems.
See your System Manager for feature availability. For more
information about using this feature, see the instructions
that came with your communications system.
You must have a Call Screening button programmed
on your telephone in order to use this feature. This
feature must be programmed by the System Manager.
You must activate this feature before or while the
incoming call is ringing at your telephone.
(It cannot be activated after the call has been sent to
the Voice Messaging system.)
You cannot be active on another call while using this
feature.
To use Call Screening:
Press the preprogrammed Call Screening button to
have your telephone begin screening incoming calls
automatically.
If you want to speak to the calling party, pick up your
phone's handset and begin speaking. The Voice
Messaging system will say goodbye.
Press the preprogrammed Call Screening button to
turn off this feature when you no longer want to
screen calls.
 Loading...