

Page 1
MegaRAID®Intelligent Transportable Battery Backup Unit (iTBBU)
Quick Installation Guide
®
This document describes how to install the intelligent
Transportable Battery Backup Unit (iTBBU). The battery is
attached to the back of the memory module that goes in the
memory socket on the MegaRAID 320-2E controller. The
iTBBU protects the cached data on the MegaRAID storage
adapter by providing backup power if the main power source
fails.
The iTBBU is compliant with the Smart Battery Data
Specification, which removes all communication and
charging responsibility from the host system.
The BIOS Configuration Utility and WebBIOS Configuration
Utility display the battery information and eventsand support
battery discharging and reconditioning.
INSTALLING THE iTBBU IN THE HOST ADAPTER
Follow the steps in this document to install the iTBBU on a
MegaRAID 320-2E controller. The battery pack is already
mounted on the memory module, as shown in the bottom
view of the iTBBU (see figure below).
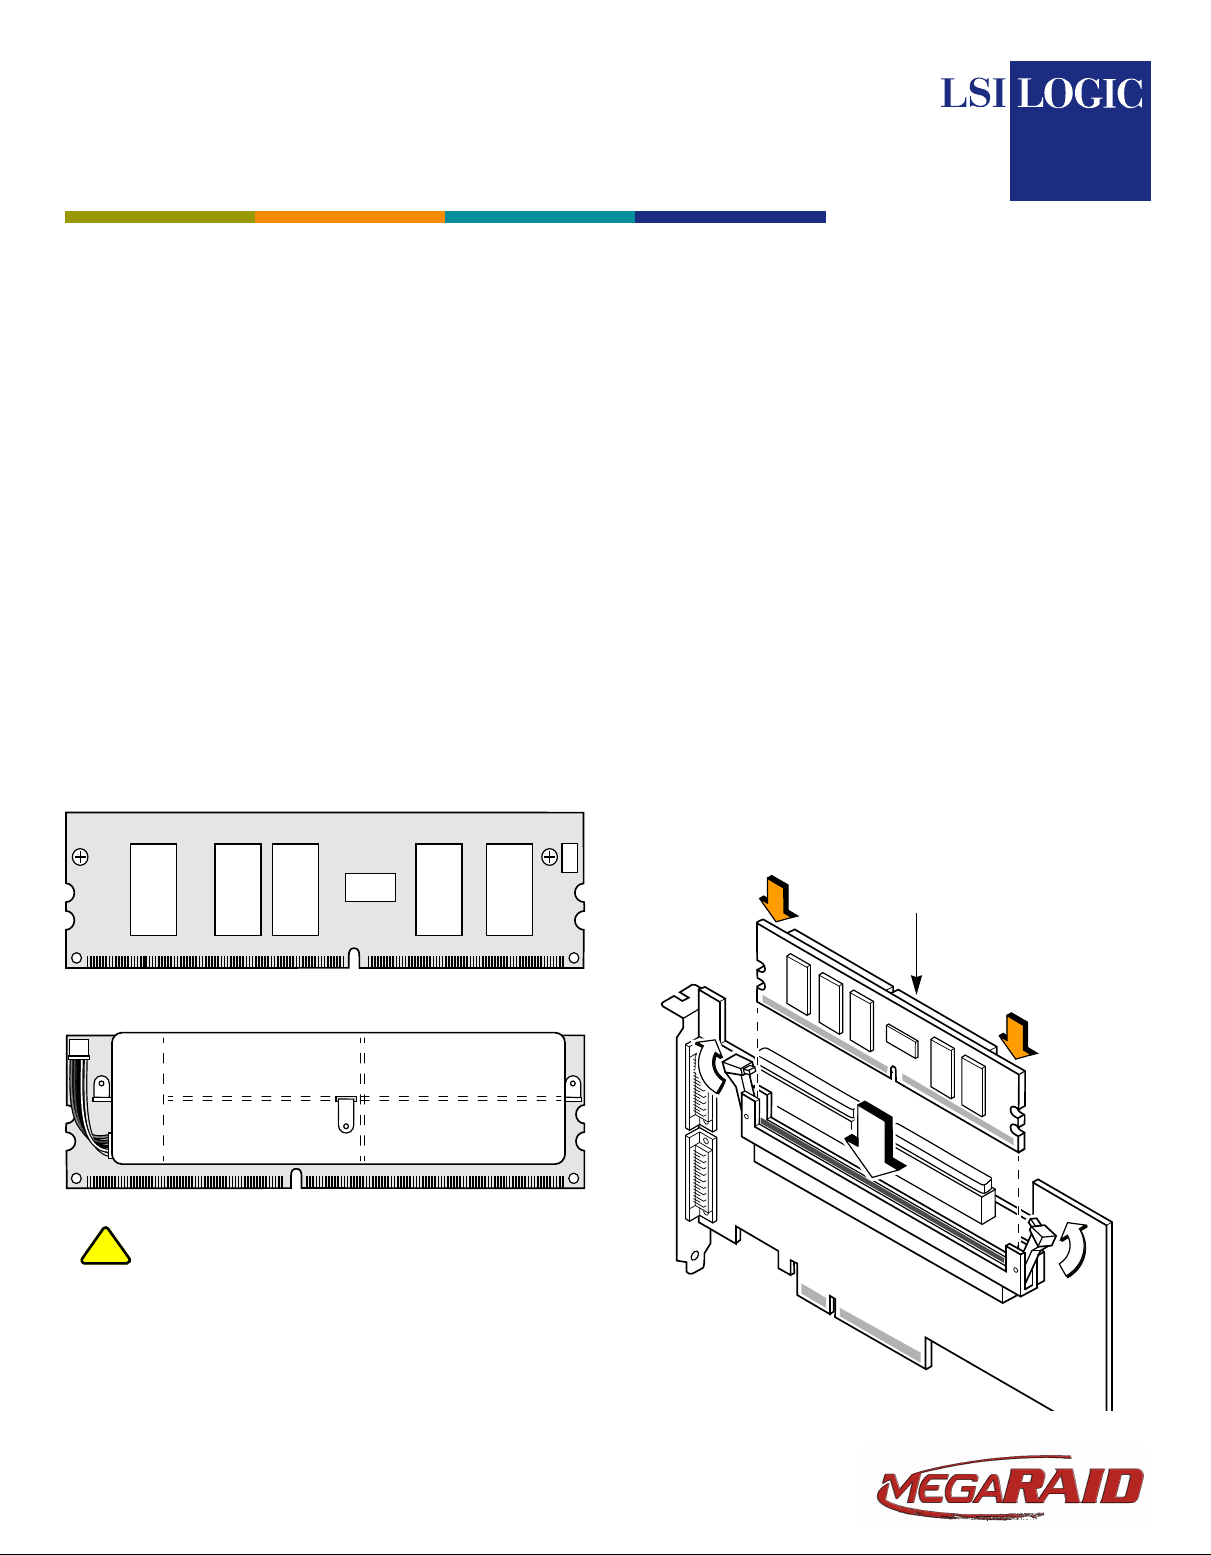
Memory Module (Top View)
Step 1 Ground yourself before removing the iTBBU from
the package.
Step 2 Insert the battery pack harness connector (at the
end of the colored wires) into the J1 5-pin mating
connector on the memory module.
Step 3a If the MegaRAID 320-2E controller is already
installed in a computer, shut down the system,
turn off the computer power, unplug the power
cord(s), and remove the cov er from your computer.
Perform these actions according to the
instructions in the user’s manual for your system.
Make sure you observe all antistatic procedures.
Step 3b If the MegaRAID 320-2E controller is not
installed in a computer, place it on a flat, clean,
static-free surface.
Step 4 Mount the iTBBU memory module in the
controller memory socket like a standard DIMM,
as shown in the following figure.
The memory socket is mounted flush with the
MegaRAID card, so the iTBBUmemory module is
parallel to the MegaRAID card when properly
installed.
Press
Here
Memory Module
Battery Pack
J1
!
CAUTION
Memory Module (Bottom View)
All work must be performed at an ESD-safe
workstation meeting the requirements of EIA-625
– “Requirements For Handling Electrostatic
Discharge Sensitive Devices.” All actions must be
performed following the IPC-A-610 latest revision
ESD-recommended practices.
Press
Here
Page 2

Step 5 Press the iTBBU memory module firmly into the
memory socket.
As you press the memory module into the socket,
the iTBBU clicks into place, indicating proper
seating in the socket, and the arms on the socket
fit into the notches to hold the memory module
securely.
Step 6 If necessary, install the MegaRAID 320-2E
controller in the PCI-Express slot in the computer
as shown in the following figure. Replace the
computer cover and reattach the power cord(s).
Press
Here
Press
Here
HARDWARE SPECIFICATIONS
The iTBBU and memory module hardware specifications are
listed in the table below.
Item Description
Socket Type DIMM for ECC SDRAM
Module Support DDR 1
Cache Memory Size Supported 128 Mbytes
Memory Bus Speed 333 MHz
Memory Bus Width 64-bit or larger
Retention Time 72 hours for 128 Mbyte
standard memory
Error Correcting Capability (ECC) Supported
Battery Type NiMH
Press down gently, but firmly, to ensure that the
card is properly seated in the slot. The bottom
edge of the controller card must be flush with the
slot. Attach the board to the computer chassis
with the bracket screw.
If your board has a memory module, never apply
!
CAUTION
pressure to the module when inserting the
adapter. Applying pressure could break the
module.
®
DB11-000056-00, Version 1.0, October 2004
Find a list of LSI Logic Corporation’s U.S. distributors, international distributors,
sales offices, and design resource centers on the LSI Logic web site at:
http://www.lsilogic.com/contacts/index.html
LSI Logic, the LSILogic logo design, and MegaRAID are trademarks or registered
trademarks of LSI Logic Corporation. All other brand and product names may be
trademarks of their respective companies.
Copyright © 2004 by LSI Logic Corporation. All rights reserved.
LSI Logic Corporation reserves the right to make changes to any products and ser-
vices herein at any time without notice. LSI Logic does not assume any responsibility or liability arising out of the application or use of any product or service
described herein, except as expressly agreed to in writing by LSI Logic; nor does
the purchase, lease, or use of a product or service from LSI Logic conveya license
under any patent rights, copyrights, trademark rights, or any other of the intellectual property rights of LSI Logic or of third parties.
 Loading...