

Page 1
TWO-WAY LED AUTOMATIC TRANSMISSION
REMOTE STARTER
AS-2310TW-FM
User Guide
WARNING
FCC/IC Notice:
This device complies with Part 15 of the FCC Rules, and RSS-210 of the IC rules. Operati on is
subject to the following two conditions: (1) this device may not c ause har mful int erference, an d
(2) this device must accept any inte rference received, including interference that may cause
undesired operation.
DOC: 1.00 (i) – January 4, 2007 DL Lp Manufactured in Canada by Autostart
It is the responsibility of the vehicle operator to ensure
their vehicle is parked in a safe and responsible
manner.
1. When leaving the vehicle, it is the user’s
responsibility to ensure that the gearshift lever is in
“Park” in order to avoid accidents upon remote
starting.
2. It is the user's responsibility to ensure that the
remote starter is disabled or put into valet mode before
servicing.
Page 2

The manufacturer is not responsible for any rad io or TV interference caused by unauthoriz ed
modifications to this equipment. Such modif ications could void the user's authority to operate
the equipment.
User Guide P. 2
Page 3

Table of Contents
Introduction........................................... 3
Using the Remote Control...................4
Vehicle Presets.....................................4
Heater & Heated Seat................................4
Windshield Wipers & Radio & Headlights..4
Arming the Starter Kill.......................... 5
Remote-Starting Your Vehicle............. 5
Remote-starting..........................................5
Driving Off..................................................5
Remote Starter Features...................... 5
Idle Mode....................................................5
Valet Modes...............................................6
Ignition Valet...................................6
Remote Valet Mode........................6
Panic Mode................................................6
Quick LockoutTM.........................................7
Cold Weather Mode...................................7
Extended Run Time ...................................7
Feature Confirmation Chart................. 8
Advanced Features: Installation-
programmable Options........................ 8
Remote Door Locks ...................................8
Priority Door Access...................................8
Ignition-Controlled Door Locks...................8
Ignition Re-lock...........................................8
Secure Lock................................................9
Remote Trunk Release ..............................9
The Starter Kill and the Anti-grind Feature.9
Safe Start....................................................9
Valet Modes................................................9
Valet Mode Using the Valet Switch (if
installed) .........................................9
“Home ValetTM” Mode.................................9
Turbo Mode..............................................10
Engine Run Time......................................10
Flashing LED............................................10
Multi-car Operation...................................10
Multi-Level Features (default state)..... 11
Vehicle Status Request...................... 12
Status Request When the Engine IS NOT
Running....................................................12
Status Request When the Engine is
Running....................................................13
Troubleshooting Transmitting Range13
Diagnostics – Parking Light Flash
Table.................................................... 15
Introduction
This is a state-of-the-art remote starter system. The system is packed with advanced features such
as priority access to the driver’s door (commodity features) and the safe start children safety
feature. With many an advanced function, t his product will satisfy any one your expect ations from
high-end commodity and security systems, without neglecting any standard feature commonly
offered by entry-level starters.
P. 3 User Guide AS-1525 SH
Page 4
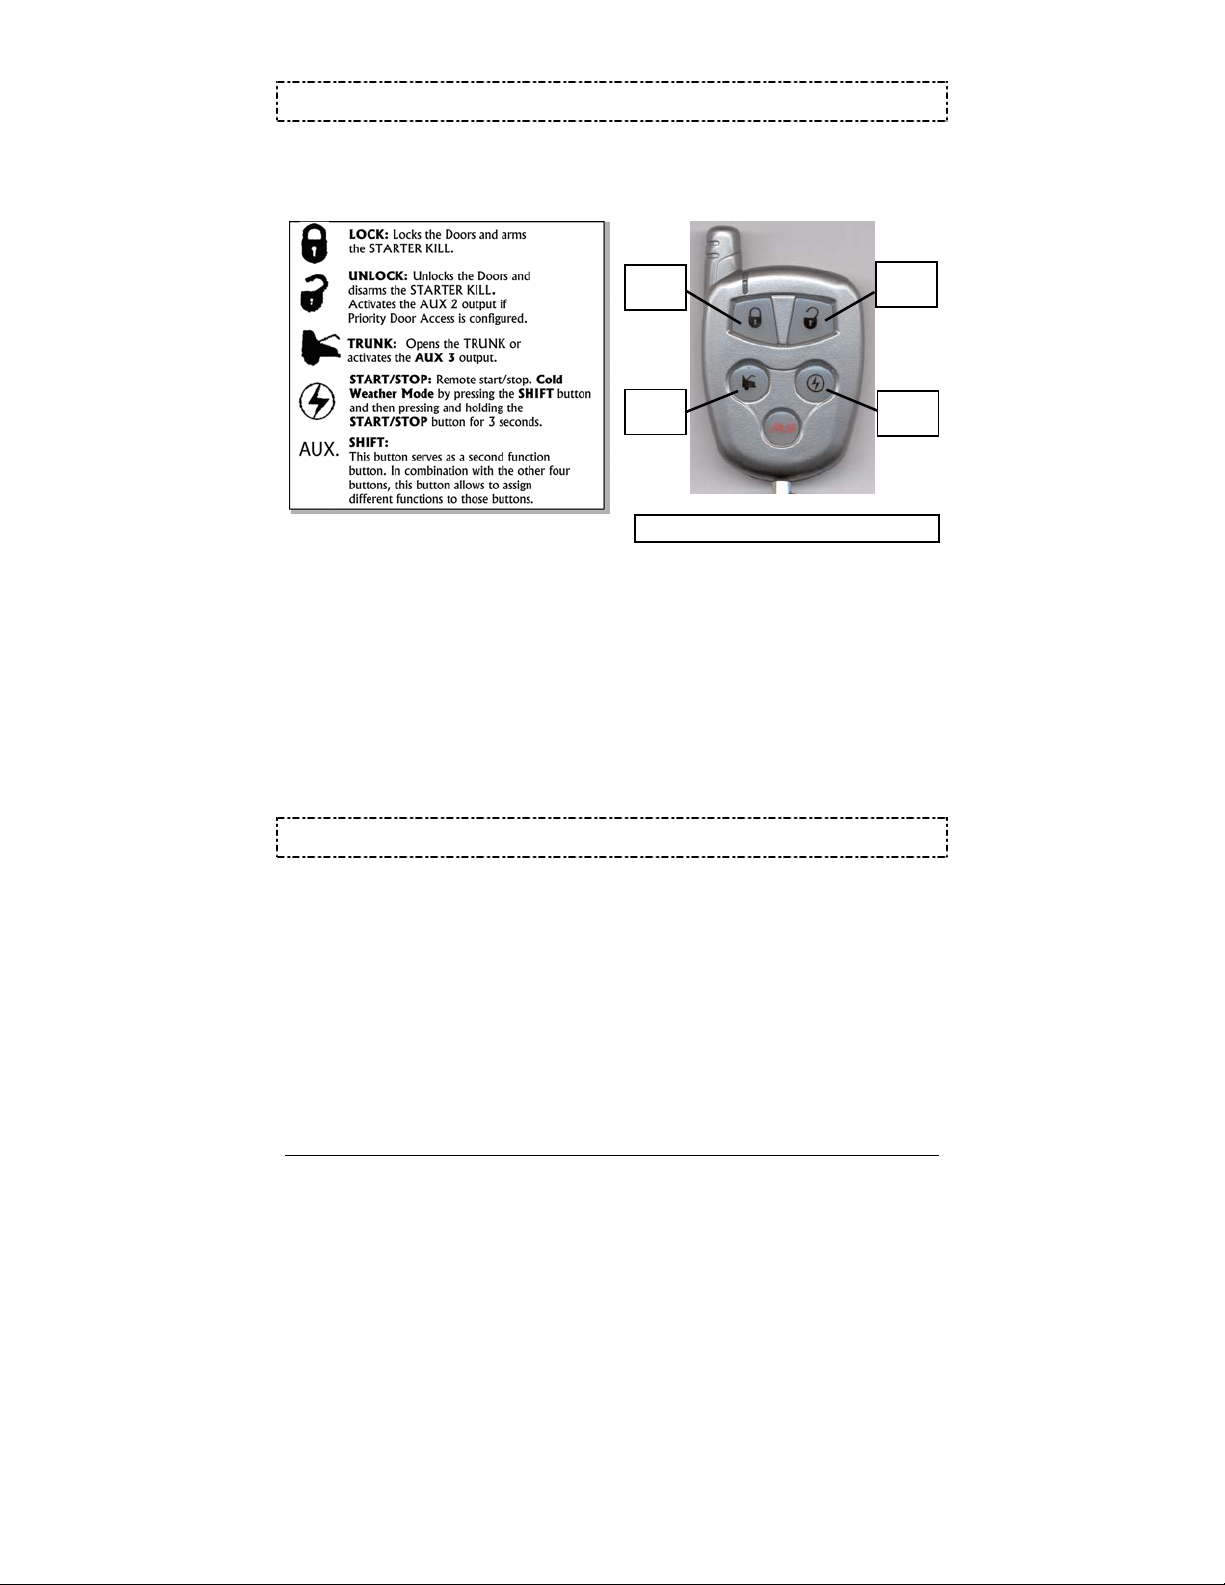
Using the Remote Control
Your remote starter is equipped with a 5-button multi-channe l remote control. It can operate two
independent vehicles equipped with a remote starter (see Multi-car operation section on page
10). The functions of the transmitter are as follows:
LED #1
LED #3
LED #2
LED #4
Picture serves as example only.
Transmitter Part Number: ASRF3501
For certain vehicles:
• Pressing and holdi ng the LOCK button for more than 3 seconds will lock all doors and will s end a
constant pulse as long as the
LOCK button is held down (maximum of 15 seconds). This
constant pulse can be configured to activate certain functionalities such as rolling up the
windows – Please refer to your installer to see if your vehicle is compatible with this
option.
• Pressing and holding th e
send a constant pulse as long as the
UNLOCK button for more than 3 seconds will unlock all doors and will
UNLOCK button is held down (maximum of 15 seconds).
This constant pulse can be configured to activate c ertain func tionali ties su ch as rolli ng down the
windows – Please refer to your installer to see if your vehicle is compatible with this
option.
Vehicle Presets
Heater & Heated Seat
When leaving the vehicle it is recommended to preset the ac cessory c ontrols in preparatio n for the
next remote start. Settings for the blower motor (fan), front and rear, as well as heated s eats (if
equipped) should not be left on
HIGH. It is recommended to leave the settings on LOW or MEDIUM
instead.
Windshield Wipers & Radio & Headlights
Certain vehicles require the radio and / or windshield wiper and / or headlight circuits to become
energized while running under remote s tart. When leaving the vehicle you must ensure that the
windshield wiper and headlight switches are
of vehicles could cause them to remain
OFF. Leaving the headlight switch ON on c ertain types
ON even after remote starter shut down, resulting in a dead
battery.
P. 4 User Guide
Page 5
Arming the Starter Kill
The starter kill (if installed) can be configured by the i nstaller so as to arm automatically (passiv e
mode) or not to arm automatically (active mode).
• To disarm the starter kill, press the UNLOCK button on the transmitter.
The parking lights will flash twice.
If remote door locks are installed, this will also unlock the doors.
• To arm the Starter Kill, press the LOCK button on the transmitter.
The parking lights will flash once.
If remote door locks are installed, this will also lock the doors.
• In passive mode, the starter kill will automatically arm if the ignition key is not inserted
Into the ignition switch within 1 or 3 minutes after unlocking (the key sense feature
must be installed).
Remote-Starting Your Vehicle
Remote-starting
Press the
that the remote starter has received your sign al. Approximately 5 seconds later, the engine will
start. The parking lights will remain ON during the pre-programmed run time of the engine.
If the vehicle does not start at th e first attempt , the system will shut down, wait a few secon ds and
try to start the engine again. There will be 3 start attempts before the system gives up.
Driving Off
With the vehicle running under remote co ntrol, press the UNLOCK button to disarm and unlock the
doors. Enter the vehicle and do the following:
Turn the ignition key to the IGNITION ON (RUN) position. (Do not turn the key to the CRANK position
while the engine is running. This would cause the starter motor to re-engage.)
Press the brake pedal to disengage the remote starter unit.
You are now ready to drive off.
START/STOP button for approx. 1 second. The parking lights will come ON to inform you
Remote Starter Features
Idle Mode
Convenience feature: Idle mode allows you to keep the engine running and the doors
locked while you stop, for example, at a convenience store or for a short delivery.
This feature allows you to let the remote starter take over c ontrol of the vehicle (i.e. no key in the
ignition switch) while the engine is running. For examp le, if you stop for a delivery or at a convenience store, lock your vehicle and lea ve it running for the length of a run cycle while you are away.
To leave the vehicle in idle mode:
1. With the engine running, press the LOCK or UNLOCK button (to unlock the doors) or the
START/STOP button on the remote control until the parking lights come on.
2. Remove the key and exit the vehicle. The engine will go on running.
3. Lock the doors if needed.
The engine will go on running until the user re-enters the vehicle or until the expiration of the
engine run time.
Caution!!! Do not leave children or pets unattended in a vehicle standing in Idle Mode.
User Guide P. 5
Page 6

Valet Modes
When your vehicle is in valet mode, the remote starter functiona lities are disabled. If the vehicle
needs to be serviced, or if you park it indoors, the valet mode will prev ent the engine from being
remote-started accidentally.
Ignition Valet
This feature will allow you to remotely put your system into valet mode by using the ignition key
instead of the valet button as above. Ignition valet can be used without a valet button installed.
To put the system i n t o valet mode:
Insert the ignition key into the ignition switch. Within 10 sec., turn the key 5 times successively into
the IGNITION ON / RUN and OFF positions.
The parking lights will flash three times to indicate that the v ehicl e is now in v alet mode . The L.E.D.
will come ON solid.
To take the system o u t o f valet mode:
Insert the ignition key into the ignition switch. Within 10 sec., turn the key 5 times successively into
the IGNITION ON / RUN and OFF positions.
The parking lights will flash twice to indicate t hat the vehicle is now out of v alet mode. The L.E.D.
will go out.
Note: With the ignition valet activated, the remote sta rter fun ction s will be di sabled .
Remote Valet Mode
This feature will allow you to remotely put your system into valet mode by using the transmitter
instead of the valet button as above.
Getting into valet mode
• Hold the UNLOCK and START/STOP buttons simultaneously for 3 second.
• The parking lights will flash 3 times.
The LED will remain on solid.
Getting out of valet mode
• Hold the UNLOCK and START/STOP buttons simultaneously for 3 second.
• The parking lights will flash 2 times.
The LED will turn off.
Note: With the remote valet activated, the remo te sta rter fun ction s will be disabled.
Panic Mode
Note: Panic mode can only be activated if the horn has been adequ ately configured by your
installer.
In an emergency situation, you c an activate panic mode by pressing and holding th e SHIFT button
for 3 seconds. If the vehicle is unde r a remote start, you can shutdown the engine, stop the horn
and lock your doors by pressing the
If the car is not running, you can stop the horn by pressing the
LOCK button:
LOCK or UNLOCK buttons but it will not
lock or unlock the doors.
Furthermore, the panic mode can be stop by activating one of the following three (3) features:
a) Remote valet (pressing
UNLOCK and START/STOP for 3 seconds)
b) Ignition valet (turning the key inside the ignition switch from OFF to ON 5 times in a row)
c) By pressing the valet switch (if included).
Panic Mode will automatically shut down after 25 sec.
P. 6 User Guide
Page 7

Quick LockoutTM
(Also called secure panic.) For fast protection in emergency situations, the system will
LOCK all
doors when you press the brake pedal while you hear the sound sig nal. (Quick loc kout is only
available when panic mode has been set off.)
Cold Weather Mode
When cold weather mode is active, the engine starts every 2 hours and runs for 3 min utes (or for 8
or 20 minutes with diesel engines). Cold weather mode automatically ends after 24 hours.
To enter Cold Weather Mode:
• Press the SHIFT button and then the START/STOP for 3 seconds.
• There will be two (2) beeps and the parking lights will flash three (3) times.
To exit Cold Weather Mode, do any one of the following actions:
• Open the hood.
• Start the engine by remote.
• Turn the ignition key to the IGNITION ON (RUN) position.
• Press the SHIFT button and then the START/STOP button for three seconds.
There will be one (1) beep and the parking lights will flash once.
To verify whether the system is in cold weather mode:
Press and release the brake pedal:
If the vehicle is in cold weather mode, the parking lights will stay on while the pedal is pressed.
Extended Run Time
While the vehicle is running under a remote start, pressing and holding the START/STOP button
for more than 3 seconds will reset the run time counter to zero and restart the run time cycle from
the beginning. There will be one beep ⎯a pause⎯ t hree more beeps; the parking lights will flash
three times and the horn (if configured) will ho nk once. The extended run time procedure can
only be carried out once per remote start.
To stop the vehicle, at any moment, simply press the
START/STOP button.
Example: If your remote car starter is programmed for a run time of 3 minutes and y our vehicle
has been running for 3 minutes already, pressing the START/STOP button will reset th e
counter to zero and allow the engine to run for another cycle (in this case, 3 minutes).
User Guide P. 7
Page 8
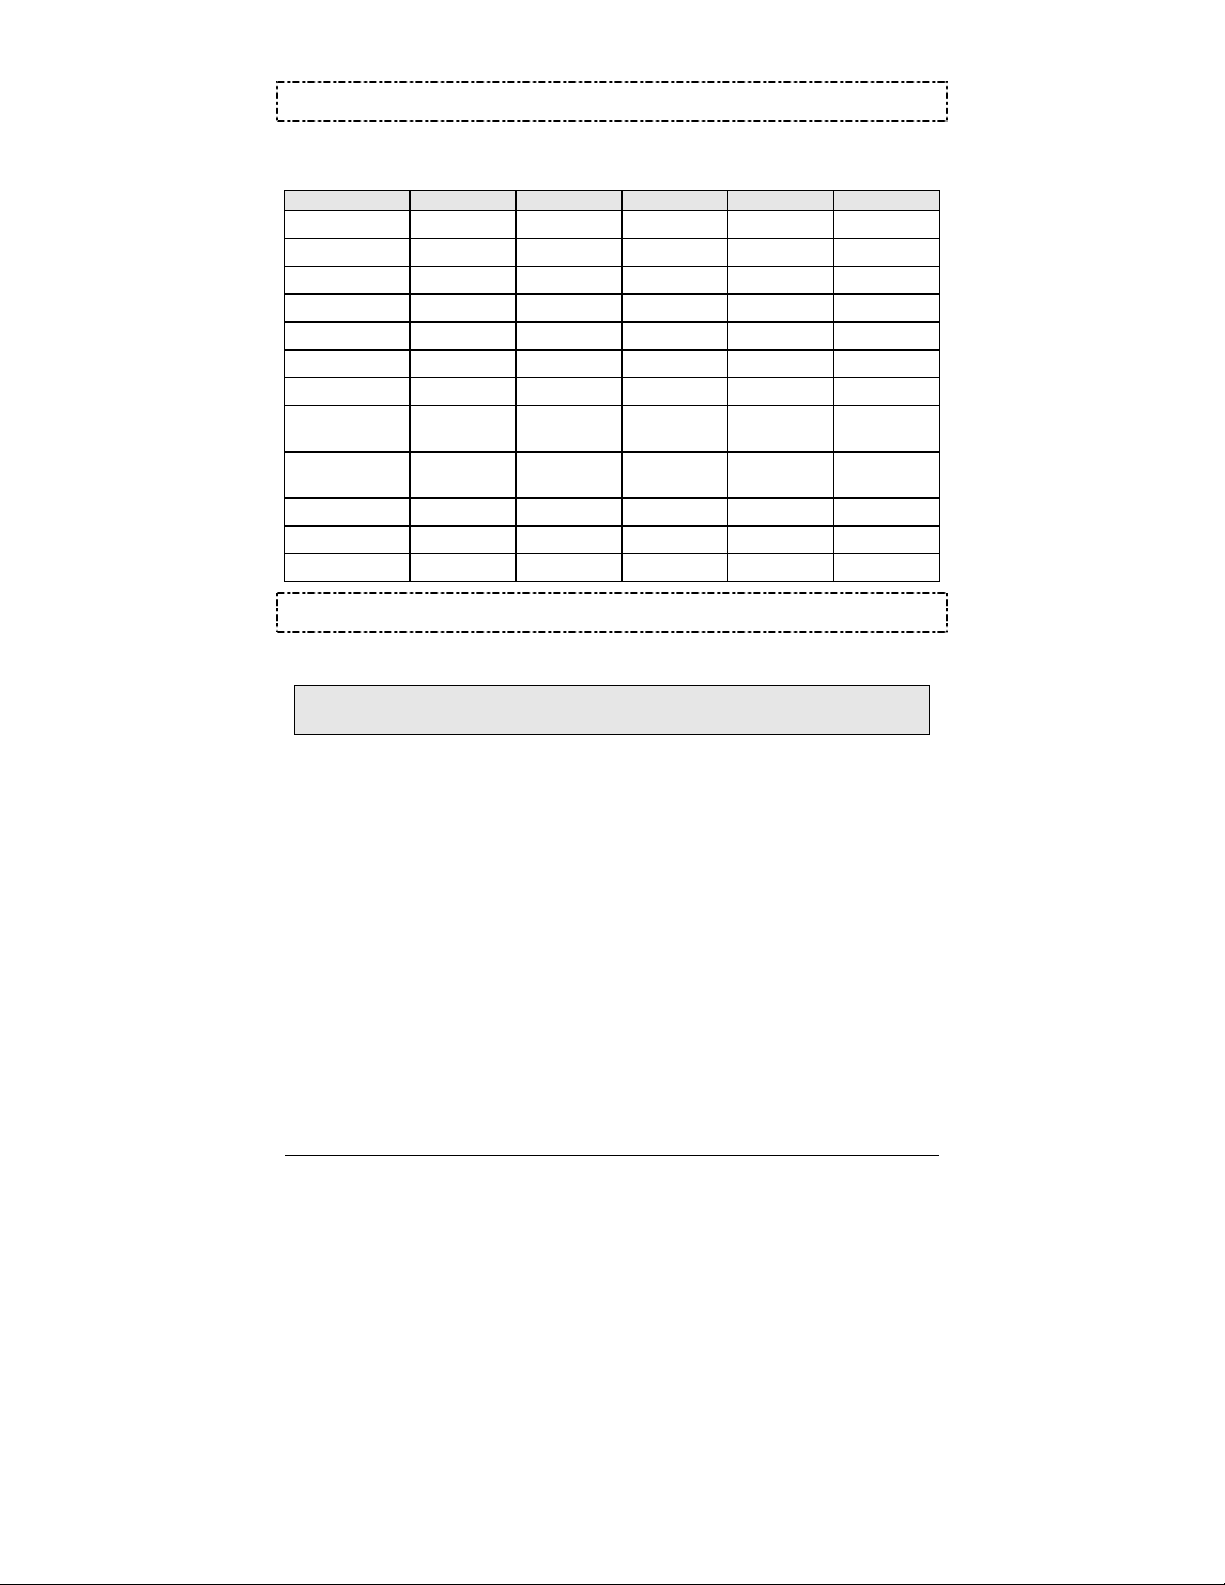
Feature Confirmation Chart
A visual and audible confirmation i s emitted each time a command is sent. The following chart
indicates the confirmation sequences:
Feature LED #1 LED #2 LED #3 LED #4 Beep(s)
Lock 3 flashes X X X 1
Unlock X 3 flashes X X 2
Trunk X X 3 flashes X 1
LED ON/OFF 3 flashes 3 flashes X X 1
Start X X X 3 flashes 1
Running X X X 3 flashes 3
Stop X X X 3 flashes 2
Entering Cold
Weather Mode
Exiting Cold
Weather Mode
Home Valet 3 flashes X X 3 flashes 2
Valet Mode 3 flashes X X 3 flashes 1
Exit ValetMode X 3 flashes X 3 flashes 1
X X X 3 flashes 2
X X X 3 flashes 1
Advanced Features: Installation-programmable Options
The remote starter was designed with flexib ility and OEM integration in mind. With its programmable options, this unit can single-handedly control nearly any electrical system in yo ur vehicle.
Caution: The programming of your system should be left to a professional. Changing any
one of the settings may affect the operation of your remote starter.
Remote Door Locks
If your remote starter was installed with the remote door locks option, you will have the
convenience of remote keyless entry . See section Arming the Starter Kill, on page 5, for further
instructions on remote door locking and unlocking.
Priority Door Access
If the remote door locks option is installed on your vehicle, this safety feature allows you unlock
solely the driver’s door with a single press of the
press of the
UNLOCK button, all the other doors will unlock.
UNLOCK button on the transmitter; upon a second
Ignition-Controlled Door Locks
This is an added security feature. If your remote starter was installed with the ignition-controlled
door locks option, the doors will automatically be locked as soon as the ignition key is turned to the
IGNITION ON (RUN) position while the brakes are pressed. When the key is turned t o the OFF position,
the doors will automatically be unlocked.
Ignition Re-lock
On remote starters of this series, when igniti on-controlled door locks are enabled and the ignition
key is in the
IGNITION ON (RUN) position, should any door be unlock ed and opened, al l doors will be
relocked next time the brake pedal is pressed.
P. 8 User Guide
Page 9

Secure Lock
Before it can remote-start your vehicle, the remote starter must first disarm the factory security
system. The secure lock feature may be required on certain vehicle models with factory security
systems that automatically unlock the doors when the secu rity system is disarmed.
To keep your vehicle protected when the factory security sys tem is disarmed for a remote start,
secure lock will relock your doors as soon as the vehicle has started. Once the engine run cycle
ends, secure lock will rearm your factory security system.
Remote Trunk Release
If your system was installed with the remote trunk release option, you can open your trunk by
pressing the
TRUNK button. There will be one beep and LED #3 will flash 3 times.
The Starter Kill and the Anti-grind Feature
With this added security feature, the system will prevent your vehicle from starting with the ignition
key when the starter kill is armed. If your rem ote starter was installed with the starter kill opti on,
one will not be able to start your vehicle with the key unless the system has been unlocked and
disarmed first, or put into valet mode.
Note: If the starter kill is installed, your vehicle will benefi t from a protection against starter
motor damage that could occur after remote-starting the eng ine should the user, by force of
habit, turn the ignition key to the CRANK position.
Safe Start
If this feature is enabled, the user must press the
START/STOP button 2 times within 3 seconds to
remote-start the vehicle. This will eliminate accidental remot e starts, e.g . when ch ildren are playing
with the transmitter.
If swa p start mode is selected, to remote-s tart your vehicle, press the
LOCK button. The AUX 2 output can be activated by pressing the START/STOP button.
SHIFT button and then the
Valet Modes
Valet Mode Using the Valet Switch (if installed)
To put the system i n t o valet mode:
1. Turn the ignition key to the IGNITION ON (RUN) position.
2. Within 3 sec., press the valet button.
The parking lights will flash three times to indicate that the vehicle is now in valet mode.
3. Turn the ignition key to the OFF position.
The L.E.D. will come ON solid.
To take the system o u t o f valet mode:
1. Turn the ignition key to the IGNITION ON (RUN) position.
2. Within 3 sec., press and release the valet button.
The parking lights will flash twice to indicate that the vehicle is now out of valet mode.
3. Turn the ignition key to the OFF position.
The L.E.D. will go out.
Note: Once valet mode is activated, the remote starter functions will be disabled.
“Home ValetTM” Mode
If configured at installation, this feature will rem otely set the vehicle to a no-remote-start mode: if
the vehicle is parked indoors there is no danger of it starting accidentally by remote control.
Note: Once the home valet mode is activated, the vehicle will not start by remote.
User Guide P. 9
Page 10

To take the system i n t o home valet mode:
• Press the LOCK or UNLOCK button.
• Within 3 seconds, press the LOCK and START/STOP buttons simultaneously until the
parking lights go out
To take the system o u t o f home valet mode:
• Turn the ignition key to the IGNITION ON (RUN) position.
The system will warn you if someone attempts to start your vehicle while it stands in home valet
mode. The parking lights will:
1- Turn ON then OFF; then
2- Flash twice, pause; then
3- Flash twice again.
Turbo Mode
If turbo mode is configured at installati on, it will allow a turbocharger to idle down aft er the user
leaves the vehicle: the unit will take over the vehicle a nd keep it running for 60 seconds (or until it
is shut down by remote control), then shut down the engine.
Proceed as follows to set the system to Turbo Mode:
1. With the eng ine already running, press the LOCK button on the trans mitter unti l the parki ng lights
come ON.
2. Remove the ignition key from the ignition switch. The engine will go on running.
3. Exit the vehicle and close the door.
4. Press the TRUNK b utton to lock the doors; the engine will s hut down after 60 seconds of Turbo
Mode.
Engine Run Time
If you have a gas engine, your remote starter can be programmed to run the en gine for 3, 15, or
25 minutes (15 minutes by default). If you have a diesel engine, the remote starter can be
programmed to run the engine for 8, 20, or 30 minutes (20 minutes default).
Flashing LED
The user may decide to turn on or off LED fl ashi ng at any momen t. To do s o, sim ultane ousl y press
and hold the
LOCK and UNLOCK buttons on the transmitter. There will be an init ial beep. Keep
holding the buttons pressed until you he ar another beep. At that point release the bu ttons. The
LED will toggle to its next state –i.e.: ON/OFF:
There are three programmable options regarding the flashing LED:
i. The LED flashes once the starter kill is activated (p assive or active arming) and will
turn itself off once the user turns the key to the
IGNITION ON position.
ii. The LED is totally disabled and will not flash –it will turn on solid, howev er, when in
valet mode.
iii. The LED will flash once the starter kill is activated but requir es pressing the
button to turn itself off. Failure to press the
even if the key is in the
IGNITION ON position.
UNLOCK button will make the LED flash
UNLOCK
Multi-car Operation
This option allows the owner of two vehicles, both equi pped with t he s ame remote s tarter m odel, to
control both systems with a single rem ote control. To control the second vehi cle:
P. 10 User Guide
Page 11

Press TRUNK + LOCK buttons simultaneously:......................... LOCK
Press TRUNK + UNLOCK simultaneously:..................................UNLOCK
Press TRUNK + START/STOP simultaneously:....................................START
Press TRUNK + START/STOP simultaneously:............................STOP
Press SHIFT ¾ SHIFT ¾ TRUNK:................................................TRUNK
or
Press SHIFT ¾ SHIFT ¾ LOCK:.................................................. LOCK
Press SHIFT ¾ SHIFT ¾ UNLOCK:............................................. UNLOCK
Press SHIFT ¾ SHIFT ¾ START/STOP:..................................................START
Press SHIFT ¾ SHIFT ¾ START/STOP:.......................................STOP
Press SHIFT ¾ SHIFT ¾ TRUNK:...............................................TRUNK
Note: If the multi-level features have been modified from their def ault state by your inst aller,
the SHIFT button may have to be pre ssed once, twice or three times, according to the option
you chose.
Multi-Level Features (default state)
The multi-level features allow you to ac cess different fe atures of your vehi cle or of a second car by
pressing the shift button once, twice or three times. By default, the multi-level features are
programmed as follows:
Basic Features (press the SHIFT button 1X)
SHIFT ¾ LOCK:.......................................................................aux 2
SHIFT ¾ TRUNK:.....................................................................status request
SHIFT ¾ START/STOP............................................................cold weather
Multi-Car Operation (press the SHIFT button 2X)
SHIFT ¾ SHIFT ¾ LOCK:.........................2
SHIFT ¾ SHIFT ¾ UNLOCK:.....................2
SHIFT ¾ SHIFT ¾ START/STOP:...............2
SHIFT ¾ SHIFT ¾ TRUNK:.......................2
Customized Features (press the SHIFT button 3X)
(May not be applicable for certain vehicles)
Your installer can add customized features such as turning on the radio, opening sliding doors, etc.
SHIFT ¾ SHIFT ¾ SHIFT ¾ ......................LOCK: customized feature 1
SHIFT ¾ SHIFT ¾ SHIFT ¾ ......................UNLOCK: customized feature 2
SHIFT ¾ SHIFT ¾ SHIFT ¾ ......................TRUNK: customized feature 3
SHIFT ¾ SHIFT ¾ SHIFT ¾ ......................START/STOP: customized feature 4
Your installer can customize the system as to personalize these multi-level features in an order that
best suits you. Your options are:
Option 1:
(requires pressing the SHIFT button 1X) Æ Multi car operation
Level 1
(requires pressing the SHIFT button 2X) Æ Basic features
Level 2
Level 3 (requires pressing the SHIFT button 3X) Æ Customized features
Option 2:
Level 1
(requires pressing the SHIFT button 1X) Æ Basic features
Level 2 (requires pressing the SHIFT button 2X) Æ Multi car operation
Level 3 (requires pressing the SHIFT button 3X) Æ Customized features
nd
car lock
nd
car unlock
nd
car start/stop
nd
car trunk
User Guide P. 11
Page 12

Option 3:
(requires pressing the SHIFT button 1X) Æ Customized features
Level 1
(requires pressing the SHIFT button 2X) Æ Multi car operation
Level 2
Level 3 (requires pressing the SHIFT button 3X) Æ Basic features
Option 4:
(requires pressing the SHIFT button 1X) Æ Basic features
Level 1
(requires pressing the SHIFT button 2X) Æ Customized features
Level 2
Level 3 (requires pressing the SHIFT button 3X) Æ Multi car operation
Example: If the multi-leve l features have been modified from their default state to option 3, the
setup would be as follows:
For “Basic features”:
To access the aux.2 feature, the user needs to press on the SHIFT button three (3) times
followed by the LOCK button.
To access the status request feature, the user needs to press on the SHIFT button three (3)
times followed by the TRUNK button.
To access cold weather mode, the user needs to press on the SHIFT button three (3) times
followed by the START/STOP button.
Vehicle Status Request
The status request feature allows the user to see the status of the vehicle ⎯i.e.: if the doors are
locked or unlocked or if the vehicle is in cold we ather mode, home valet mode, in valet mode or
how much time is left in the run time cycle. The following charts (Tables 1 and 2) indicate the
confirmation sequences.
To retrieve the vehicle status:
Press and release the SHIFT button then press and release the TRUNK button (there will be a beep).
The transmitter will then flash the corres ponding sequence of LEDs depending on the vehicle’s
status.
If the engine is NOT running, refer to Table 1.
If the engine IS running under a remote start, refer to Table 2 (if the doors are locked)
or refer to Table 3 (if the doors are unlocked).
The status request feature is a two-step procedure:
• The first sequence of flashes denotes if the vehicle’s doors are locked or unlocked.
• The second sequenc e of flashes (if applicable) denotes if the vehicle is Cold weat her mode,
Home valet mode, or, Valet mode.
• If there is no second sequence transmission, that the vehicle is not in any of the three (3)
mentioned features (Cold weather mode, Home valet mode or Valet mode).
Status Request When the Engine IS NOT Running
STATUS SEQUENCE LED #1 LED #2 LED #3 LED #4 Beep(s)
Lock
Unlock
Cold
Weather
1st sequence if
locked
1st sequence if
unlocked
nd
sequence X X X 1 second X
2
3 flashes X X X 1
X 3 flashes X X 2
3 flashes X X X 2
X 3 flashes X X 2
P. 12 User Guide
Page 13

STATUS SEQUENCE LED #1 LED #2 LED #3 LED #4 Beep(s)
Home
Valet
Valet
Mode
1st sequence if
locked
1st sequence if
unlocked
nd
2
sequence 1 second X X 1 second X
1st sequence if
locked
1st sequence if
unlocked
nd
2
sequence 1 second X X 1 second X
3 flashes X X X 2
X 3 flashes X X 2
3 flashes X X X 1
X 3 flashes X X 1
Table 1
Status Request When the Engine is Running
When the vehicle doors are locked:
The LED # 1 will flash 3 times to denote that the vehicle’s doors are locked.
When the vehicle doors are unlocked:
The LED # 2 will flash 3 times to denote that the vehicle’s doors are unlocked.
RUN TIME Beep(s) LED #1 LED #2 LED #3 LED #4
If there is more than 3/4 of run
time cycle
If there is more than half of
run time cycle
If there is more than 1/4 of run
time cycle
If there is less than 1/4 of run
time cycle
3 ON for 1-sec ON for 1-sec ON for 1-sec ON for 1-sec
3 ON for 1-sec ON for 1-sec ON for 1-sec X
3 ON for 1-sec ON for 1-sec X X
3 ON for 1-sec X X X
Table 2
Troubleshooting Transmitting Range
Many factors may affect the operating range of the transmitter. Some of these are:
• The condition of the battery in the transmitter.
• The operating environment (for example: downtown radio-frequency noise, airports, cellular
phone towers…)
• Metal: any type of metal will affect operating range. This includes the metal in the car.
• The shape of the vehicle can affect range as well; vans in general have an especia lly poor
range.
• The shape of the roof a nd A-pillars brings about cons iderable radio-freq uency deflection (i n this
case the signal from the remote control). As a result, the direction in whic h the vehicle is facing
in relation to the remote control can affect the range. Straight on – standing in front of the
vehicle – generally gives you the greatest ran ge; the second b est perfo rmance is from the bac k.
Using the remote control from either side of the vehicle will usually give the lowest range.
• The range will be significantly lower in a crowded parking lot than in open space.
User Guide P. 13
Page 14

• Always hold the transmitter high, approximately at shoulder height. Holding the transmitter
against your chin will also increase your range: your head acts as an antenna.
• The operating ran ge will be somew hat low er on ve hicl es equ ipped wi th an af term arket or f actory
alarm.
P. 14 User Guide
Page 15

Diagnostics – Parking Light Flash Table
Flashes Description
• Doors locked, starter kill armed
• End of run time
•
1
2
3
4
5
6
8
10
1 – pause – 2
ON solid
2 – pause – 2
ON 2 sec.
ON 3 sec.
ON 4 sec.
ON 25 sec.
Irregular
Constant
flashes
up to 25 sec.
User Guide P. 15
TRUNK button pressed
• Start signal received by the module
• Cold weather mode cancelled
• Doors unlocked, starter kill disarmed
• Run time cancelled
• Remote start attempt cancelled by remote
• Exiting remote valet
• Exiting ignition valet
• Entering cold weather mode.
• Entering extended run time.
• Entering remote valet
• Entering ignition valet
• +12 V where detected on the brake line and cranking was cancelled.
• Entering tach-programming mode
• New transmitter programmed.
• Tach programmed.
• A remote start was attempted while a tach or a vacuum signal was detected
before cranking.
• Unit reset: occurs when the unit is reset to the factory defaults.
• The hood switch line went to ground during cranking or run time.
• There was an attempt to start the vehicle while the module was in valet
mode.
• Cold weather mode: the brake pedal is being held down.
• There was an attempt to start the vehicle while the module was in home valet
mode.
• The hood is up and the hood switch line went to ground. This is step one of
the programming centre procedure.
• First press of the
START button under safe start.
• Locking or unlocking a door (with door pulses configured to 4 sec.)
• The hood pin-switch has been pressed twice: the unit went into step 1 of the
programming centre procedure, and no transmitter activity was detected for
20 seconds.
• Or the unit went into step 1 of the transmitter programming procedure and no
activity was detected for a few seconds. The unit has exited the transmitter
programming procedure.
• If the unit gives irregular signals (1 to 10 flashes followed by a pause,
followed by further flashes), the system is playing back start failure codes.
This occurs when the hood pin-switch is pressed three times
• Panic mode is triggered.
 Loading...