

Page 1

15A Fuse
5. Red Wir e: +12V To Consta nt Battery Source
4. Brown W ire: Positive output To
3. Black W ire: Ground to Ve hicle FRAME
2. White W ire: Parking Ligh t Relay Output
1. Red / W hite Wire: Parkin g Light Relay input
Siren
Transmitter Programming
Note: This mode will only retain the last 4 remote transmitters programmed. If the transmitter
memory is exceeded, the security system will start deleting transmitters from memory in
chronological order.
1. Turn the Ignition 'switch ‘OFF/ON’ 3 TIMES and stay in ON position.
“Within 15 seconds”.
2. Push the Valet switch 2 times and hold it on the 2ndpush until a long chirp is heard then
release the valet switch. You are now in theT ransmitterprogramming mode.
3. Press and hold any button of t he transmitter until the siren responds with a confirming chirp,
indicating the signal has been stored intom emory.
4. If you have additional transmitters (up to 4) that need to be programmed, repeat step 3 for
each transmitter.
Exit: Turn Ignition to 'OFF' position, or leave it for 15 seconds. 3 long chirps & 3 parking light
flashes will confirm exit.
355A
5 PIN WIRE HARNESS
This manual was writtenSeptember 1,2015
©2015 Varad International, Inc.All rightsreserved.
GI-S346
* Starter Kill relay optional
ALARM FEATURE “I” PROGRAMMING:
1 Turn the Ignition 'switch ‘ON/OFF’ 3 TIMES ands tayin OFF position.
2 Push the Valet switch 3 times and hold in on the 3rd push. When a long chirp is heard, release the
valet switch. You are now in the Alarm feature ‘I’ programmingmode.
3 Press the transmitter button correspondingt othe feature you want to program.
a. The factory defaultsettings is always [1] LED flash, [1] chirp.
4 Depress the transmitter button again to change the f eature. Simply keep pressing the transmitter
button again until the module advances toyour desired setting.
Press
Transmitter
Button
One Chirp /
LED one pulse
Factory Default
Setting
Two Chirps /
LED two pulses
Three Chirps
/
LED three
pulses
Four Chirps /
LED four
pulses
1
Active arming
Passive arming
without passive
door locking
Passive
arming with
passive door
locking.
2
Automatic Rearm off
Automatic Rearm
on
3
Instant Door Ajar
error chirp
45 seconds delay
Door Ajar error
chirp.
4
Siren Confirmation
chirp on only
All Confirmation
chirps On
Horn
Confirmation
chirp on only
All
Confirmation
chirps off
5 +
White wire=
Dome Light Output
White wire=
4thChannel
Momentary
White =
4thchannel
Latched
6
+
Lock/Arm &
Unlock/Disarm
Confirmation Chirps
Lock/Arm
Confirmation
Chirp Only
7. +
ALARM with
Keyless Entry
Keyless Entry
ONLY
8.
+
Car Jacking
feature Off
Car Jacking
feature On
ALARM FEATURE “B” PROGRAMMING:
1 Turn the Ignition 'switch ‘ON/OFF’ 3 TIMES ands tayin OFF position.
2 Push the Valet switch 5 times and hold in on the 5thpush. When a long chirp is heard, release the
valet switch. You are now in the Alarm feature‘B’ programming mode.
3 Press the transmitter button correspondingt othe feature you want to program.
Press
Transmitter
Button
One Chirp / LED
one pulse
Factory Default
Setting
Two Chirps / LED
two pulses
Three Chirps / LED
three pulses
Four Chirps /
LED four
pulses
1
Pathway
illumination feature
“off”
Parking light turns
“on” for 30- second
upon an unlock
signal
Parking light turns
“on” for 30- second
upon an unlock signal
& 10-second upon a
lock signal.
2
Ignition controlled
door locks &
unlocks
Ignition controlled
door locks only
Ignition controlled
door unlocks only
Without ignition
controlled door
locks & unlocks
3
0.8-second Door
lock pulses.
3.5-second Door
lock pulse.
Double pulse unlock Comfort feature
4
3rdChannel Pulsed 3rdChannel
Momentary
5 +
Button =
Silent Arm/Disarm
Button = 4
th
Channel Aux.
6 +
Gray Wire = Trunk
(Channel 3) Output
Gray Wire = Two
Step Door Unlock
Output
7. +
Horn chirp Duration
Standard
Horn chirp Duration
50 mS
Horn chirp Duration
30 mS
Horn chirp
duration
10 mS
Exit: Turn Ignition to 'ON' position, or leavei tf or15 seconds. 3 long chirps will confirm exit.
SHOCK SENSOR ADJUSTMENT
1. Turn the Ignition switch ‘ON/OFF’ 3 TIMES and stay in OFF position.
2. Push the Valet switch 7 times holding in on the 7th push. Three chirps with a long chirp wi ll be heard. Release the valet
switch. You are now in the Alarm feature ‘Shock Sensor’ programming mode.
3. Press and hold button for 2 seconds. One long siren chirp will indicate the unit is ready t o accept adjustments of the
shock sensor.
4. Press button on the transmitter once. This will decrease sensitivity level by one. Each time the button is pushed and a
decrease is made the siren/horn chirpwill respond with [1] chirp. Two chirps indicate the minimum sensitivity. Warn away &
full trigger will be deleted when minimum sensitivity is selected
5. Press button on the transmitter o nce. This will increase sensitivity level by one. Each time an increase is made the
siren/horn chirp will respond with [1] chirp. Two chirps indicate the maximum sensitivity.
6. Hit the bumper or strong metal part of the vehicle to test the threshold level of the sensor.
a). Activate the warn-away (first stage the shock sensor), the siren will emita sho rtchir p.
b). Activate the full alarm (second stage the shock sensor), the siren will emit a long chirp.
7. When you are satisfied witht he setting, press the button to lock in the adjustment. One long siren chirp will ind icate the
unit has locked in the adjustment.
Note: If 30 seconds of inactivity expires or you turn ON the ignition during of above steps, the unit will exit the program mode
and return to the disarmed mode. Three long chirps will confirm exit.
8 PIN CONNECTOR WIRE HARNESS:
355A
INSTALLATION MANUAL
Varad International, Inc.
5349 Zambrano Street,
Commerce,CA 90040
www.varad.com
Page 2
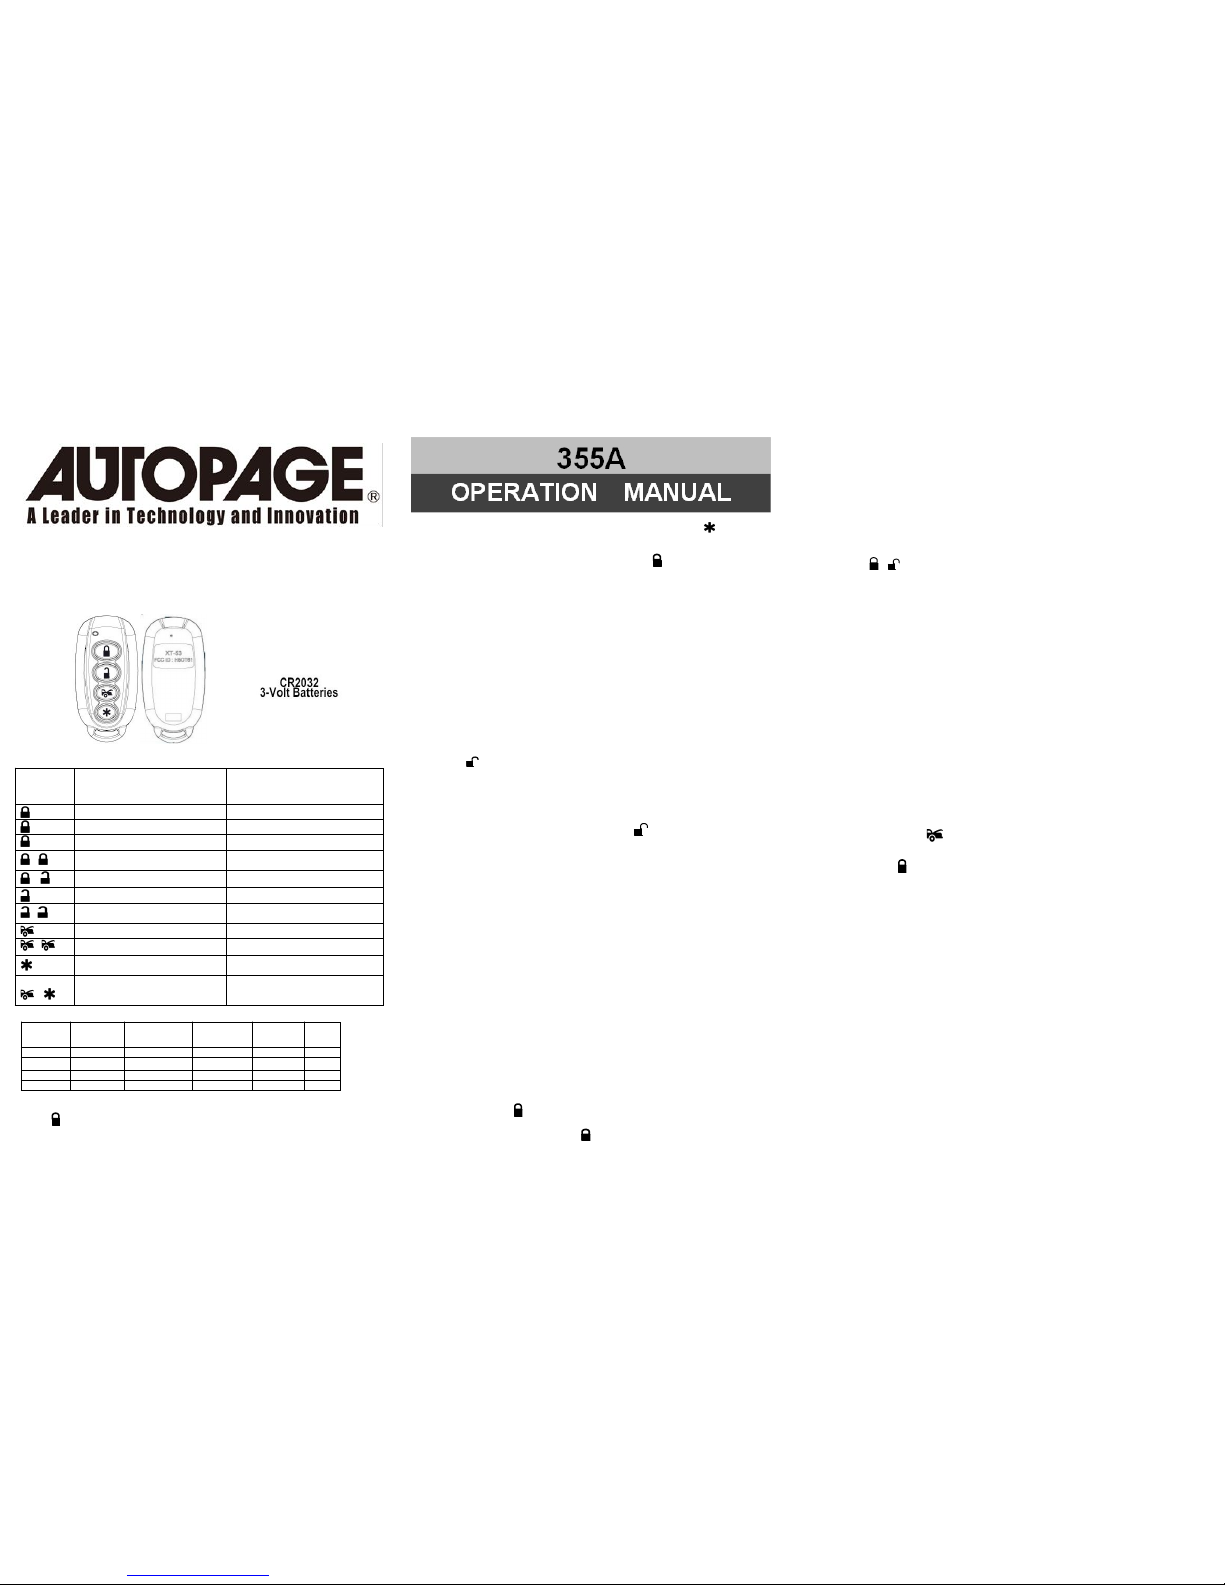
CHANGING THE BATTERY IN YOUR TRANSMITTERS
XT-53: The XT-53 transmitter uses a 3-volt lithium ion batteries (#CR2032) To replace the battery,
you will need t o use a small flat blade screwdriver. Locate the small notch on the lower right side of the
transmitter case next to the key ring. Using the flat blade screwdriver, carefully pry the top c ase from the
bottom case. It should snap apart after breaking the seal. Before removing the batteries note t he
direction of the positive (+) terminal. Place the new batteries in exactly the same manner, being careful
not to bend or damage the contact terminal. Snap the cases back together and then t est the transmitter
to insure it arms and disarms the alarm.
TRANSMITTER OPERATION
Transmitter
Button
System Function Remark
Lock Doors & Arm System
Panic function Press and Hold for 3 seconds
Car Locator Under armed mode
-
Arm and Delete The 2 Stage Shock
Sensor
Press twice within 3 seconds
+
Silent Arming / Disarming Ignition in "off" position.
Unlock Doors & Disarm System
-
Two Steps Door Unlock & Disarm
System
Press twice within 3 seconds.
Trunk Release (Channel 3) Press and Hold for 2 seconds
-
Passive Arming By-pass While the system Disarmed.
Silent Arming / Disarming or 4thch
+
Switching code For 2nd Car Operation.
SILENT LOCKING AND UNLOCKING: ARMING / DISARMING: Press the button on the
transmitter to LOCK or UNLOCK your security system, No chirp sound will be heard; arm / disarm
confirmation will be through the vehicles parkinglights only.
SHOCK SENSOR / OPTIONAL SENSOR BY-PASS: Pressing the button on the transmitter twice
within 3 seconds will arm the security system and by-pass the shock sensor. The system will c hirp
one additional time to confirm t he sensor bypass mode was activated. The sensor bypass feature is
programmed to activate for one arming cycle only. The security s ystem will return to normal operation
during the next arming cycle
PASSIVE LOCKING OR ARMING : Programmable
Active arming / disarming is controlling yours ecuritysystem via the remote transmitter. This
security system is equipped with an optionalP assiveArming feature, which allows the security
system to arm 30 seconds after the last door isclosed. Operation is as follows.
1. Turnthe ignition to the “OFF” position and exit the vehicle.
2. After all entrances are closed, the security system LED will flash fast for 30 seconds. If you
reopen any door / hood / trunk, the security system LED will stop flashing. It will begin flashing
again once all vehicle entrances are closed.
3. After 30-second timer has elapsed, the security system will automatically “ARM”. The siren or
horn will chirp [1] time and the parking lightswill flash [1] time.
PASSIVE DOOR LOCKING: Programmable
The vehicle doors will automatically lock afterpassive arming cycle has been completed.
ACTIVE UN-LOCKING – UNLOCK & DISARM:
1. Press the button on the transmitter.
2. The siren or horn will chirp twice and parking lights will flash twice to indicate that the security
system is now disarmed. The vehicle doors willunlock when interfaced with the security system.
TAMPER DISARMING: (OPTIONAL). If the alarm is t riggered; Upon disarming the system the
siren or horn will chirp 4 times and parking lights will flash 3 times. This will indicate that the alarm
has been triggered while armed.
TWO STEP DOOR UNLOCK: (OPTIONAL) This feature will independently unlock the driver’s
door only when disarming the security system. Pushing the button on the transmitter a second
time within 3 seconds will unlock the entirevehicle. (Optional, Additional installation required).
AUTOMATIC RE-LOCKING or RE-ARM: If this feature is selected, the security system will
automatically re-arm itself 60 seconds after disarming with remote transmitter. Automatic rearm will
cancel if any door is opened before the 60 secondstimer has elapsed.
DISARMING WITHOUT A TRANSMITTER
The Override function may be used if theremote transmitter is lost or inoperative.
1. Enter the vehicle and turn the ignition switch to 'ON’ position. (Alarm will sound.)
2. Within 10 seconds push and release the valet switch
The alarm will stop sounding and enter the disarm mode. You can now start and operate the
vehicle normally.
VALET MODE:
The valet switch allows you to temporarily bypass all alarm functions eliminating the need to hand
your transmitter to parking attendants or garage mechanics. When the s ystem is in valet mode,
all alarm functions are bypassed, however, the remote panic feature and remote door locks will
remain operational.
Enter Valet Mode:
1. Turn the ignition to “ON” position.
2. Push and hold valet switch for 2 seconds or until the LED turns on. The LED will remain on as
long as the system is in 'valet mode'.
Exit Valet Mode:
1. Return to normal operation, turn ignition 'ON'.
2. Push and hold valet switch for 2 seconds; the LED will turn off indicating the system is exiting
the valet mode.
PANIC FUNCTION:
The transmitter can be used as a remote panic switch to manually trigger the alarm in case of
emergency.
1. Press and hold the button on the transmitter for 3 seconds. The alarm will immediately
sound.
2. To stop the alarm, press and hold the button for 3 seconds on the transmitter, the panic
mode will be turned off immediately.
3. If the button is not pressed, the alarm will automatically stop after 30 seconds.
TRIGGER THE SYSTEM: (OPTIONAL) If alarmoption is installed.
When armed, your vehicle is protected as follows:
1. Light impacts will trigger the warn-away signal. A long chirp from siren /horn.
2. Heavy impacts / Doors open / Hood open / Trunk open / Turning on the ignition switch- All will trigger the
programmed sequence.
The starter disable relay (if installed) preventst hevehicle’s starter from cranking. The siren or horn and parking
lights will turn on to alert of an intrusion for 30seconds. Then the siren or horn will stop and automatically reset
and re-arm. If any the sensors or detectors ares tillactive, the alarm system will sound a maximum of three-30
second cycles.
ANTI CAR-JACKING: (OPTIONAL) If alarm optionis installed.
Warning: If you don't need the carjacking functionin this alarm system, be sure to set carjacking feature “OFF”.
This system is default setting Car-jacking “OFF”.
1. TRANSMITTER ACTIVATES THE CAR JACKING:
Press and hold + button on the transmitter for 1 second while the vehicle’s ignition is ON. The parking
light will turns on for 1.5” seconds to indicatec arjacking activated.
2. DOOR SWITCH ACTIVATE CAR JACKING:
1. Turn the ignition switch to “ON” position, thesystem is armed.
2. Once the system is armed, if you are forcedf romthe vehicle, the system will active the carjacking trigger
when the door is opened and closed while theignition is “ON”.
TRIGGER THE CAR JACK MODE:
3-timer circuits will function as follows:
First timer:
a. 50 seconds after the system has been triggered. The siren or horn willstart chirping for 15 seconds.
b. During this 15 s econds period of chirping, you will be alerting to push the valet switch once to turn off the
car-jacking feature.
c. If not, it will enter second timer car jacking.
Second timer:
65 seconds after the system has beer triggered. The siren or horn starts alarming and the parking light starts
flashing.
Third timer:
90 seconds after the system has been triggered
a. The siren or horn will still be alarming and the parking light flashing.
b. The starter disable will activate to prevent the vehicle from starting.
c. It will remain active until the vehicle's battery power exhausted.
OVERRIDE THE SYSTEM TO TURN OFF CARJACKING:
Turn the ignition switch from OFF to ON, and within 10 seconds push valet switch. The siren or horn will
stop and the system will be disarmed
IGNITION CONTROL DOOR LOCKS.
If the vehicle’s door locks have been interfacedto the security system, the system will automatically lock the
vehicle's doors when the ignition is turned “ON”and /or unlock the vehicle’s doors when the ignition is turned
“OFF”.
TRUNK RELEASE: Press and hold button on transmitter for three seconds to remotecontrol the trunk
release or other electric devices.
CAR LOCATOR : Press the button on the transmitter when the vehicle is inthe armed / locked mode to active
car locator function. The siren or horn will chirp6 times. The parking light will flash 12 times, allowing you to easily
locate your car.
ALARM OPERATING CONDITION: (OPTIONAL)
Function Siren or horn
Parking Lights
LED Doors
Starter
Disable
1. Arm 1 Chirp 1 Flash Slow flash Locking On
2. Disarm 2or4 Chirps 2 or 3 Flashes Off or Fast flash Unlocking Off
3. Trigger Alarming Flashing Slow flash On
4. Panic Alarming Flashing Slow flash Locking On
ACTIVE LOCKING – LOCK & ARMING:
1. Press button on transmitter.
2. The siren or horn will chirp once and the parking lights will flash once indicating that the system is
now armed. The vehicle doors will lock upon arming when interfaced with the security system.
Note: Defective sensor reminder: If t he siren or horn sounds 3 chirps, then you have left a door, trunk,
or hood lid ajar. (OPTIONAL)
LIMITED LIFETIME WARRANTYPROVISIONS
( U.S. ,Contine ntal U.S. and CanadaOnly)
VARAD International offers an industry-leading lifetime system warranty on the Autopage brand of remote start and security
products which protects users of its products from defects in ma terial and workmanship under normal use and circumstances. This
warranty only covers materials both sold and installed by an "Aut horized Dealer" of Autopage product
"Authorized Dealer" is defined by VARAD International as a company who qualifies to purchase Autopage products directly from
VARAD International, or one of its approved distributors. Thus, products not sold nor installed by an "Authorized Dealer" are not
covered by this warranty. This includes, but is not limited to, Autopage products sold on Amazon.com that are not supplied directly
by Amazon or eBay.com. If you would like more information on "Authorized Dealer" locations, please e-mail
Customerservice@Varad.com or visit www.Autopageusa.com.
Autopage Lifetime System Warranty does NOT cover remote transmitters, or RF kits, as these materials are covered by a separate
warranty. Autopage remote transmitters are covered by a 1-year warranty, which protects users from defects in material and
workmanship.
VARAD International warrants to the original purchaser that this product shall be free of defects in material and workmanship under
normal circumstances for the period of time that the original owne r of this product owns the vehicle in which it is first installed;
except that the remote controller unit, or "brain", for the perio d of five years from the date of installation to the original owner of this
product. When purchased or prepaid postal to VARAD Internation al, 5349 Zambrano Street, Commerce,CA, USA within the
warranty period, and if the product is defective, VARAD Internat ional i.e. Autopage will at its own option, repair or replace as such.
To the maximum extent allowed by law, any and all warranties are excluded by the manufacturer and each entity participating in the
stream of commerce there with. This exclusion includes but is not limited to, the exclusion of any and all warranty of merchantability
and/or any and all warranty of fitness for a particular purpose a nd/or any and all warranty of non-infringement or patents, in the
United States of America and/or abroad. Neither the manufacture r of any entities connected therewith shall be responsible or liability
for any damages whatsoever, including but not limited to, any con sequential damages, incidental damages, damages for loss of time,
loss of earnings, commercial loss, loss of economic opportunity a nd the like, notwithstanding the above, manufacturer does offer a
limited warranty to replace or repair the control module, or "brain", as described above.
Some states do not allow limitations on how long an implied wa rranty will last or the exclusion or limitation on how long an implied
warranty will last or the exclusion or limitation of incidental or consequential damages. This warranty gives you the specific legal
rights, and you may also have other rights, which vary state to state.
VARAD International i.e. Autopage, is not responsible or liable for any damages whatsoever, including but not limited to, any
consequential damages, incidental damages, damages for loss of time, loss of earnings, commercial loss, loss of economic
opportunity, and the like that may or may not result from the ope ration of Autopage products. Not with standing the above, VARAD
International i.e. Autopage does offer a limited warranty to repla ce or repair the control module, or "brain", as described above.
Page 3

FCC statement
This device complies with Part 15 of the FCC Rules. Operation is subject to the following two conditions:
(1) This device may not cause harmful interference, and
(2) This device must accept any interference received, including interference that may cause undesired operation.
 Loading...