

Page 1
User Instructions for PRLCD Remote
Technical Sales / Customer Service: +1-818-338-7788 • Email: [email protected]
31328 Via Colinas Suite 102 • Westlake Village, CA 91362 USA • www.autec.com
1 / 11
Remote Control for Solar Charger Driver Model # LSDCMPPT
Dear valued customer:
Thank you for choosing another Autec Power Systems product and please read the
instructions carefully before use.
Page 2

User Instructions for PRLCD Remote
Technical Sales / Customer Service: +1-818-338-7788 • Email: [email protected]
31328 Via Colinas Suite 102 • Westlake Village, CA 91362 USA • www.autec.com
2 / 11
Table of Contents
1. Product Overview………………………………………………………………………………………………………………………………………………3
2. Button Instruction…………………………………………………………………………………………………………………………………………3
3. Operation steps.............................................................. ...........................................................................4
3.1: Confirm controller's model and version........................................................4
3.2: Choose right version ................................................................................................5
3.3: Setting parameters................................................... .....................................................5
3.4: Input parameters............................................................................................................ 6
3.5: Reading the Controller’s(Solar Charger/Driver) Settings............7
3.6: Checking status and warning.................................................................................8
4.Related information................................................................................................................8
5.Lock/Unlock remote................................................................................................................10
6.Indicator Light of Controller Conditions...................................................................11
7.Setting battery parameters(For Reference).................................................................11
Page 3
User Instructions for PRLCD Remote
Technical Sales / Customer Service: +1-818-338-7788 • Email: [email protected]
31328 Via Colinas Suite 102 • Westlake Village, CA 91362 USA • www.autec.com
3 / 11
1. Product Overview
PRLCD remote is used for reading and setting parameters for the Autec Power systems series LSDCMPPT. Please verify
the PRLCD model version before setting the parameters. Requires 2AA batteries, batteries not included.
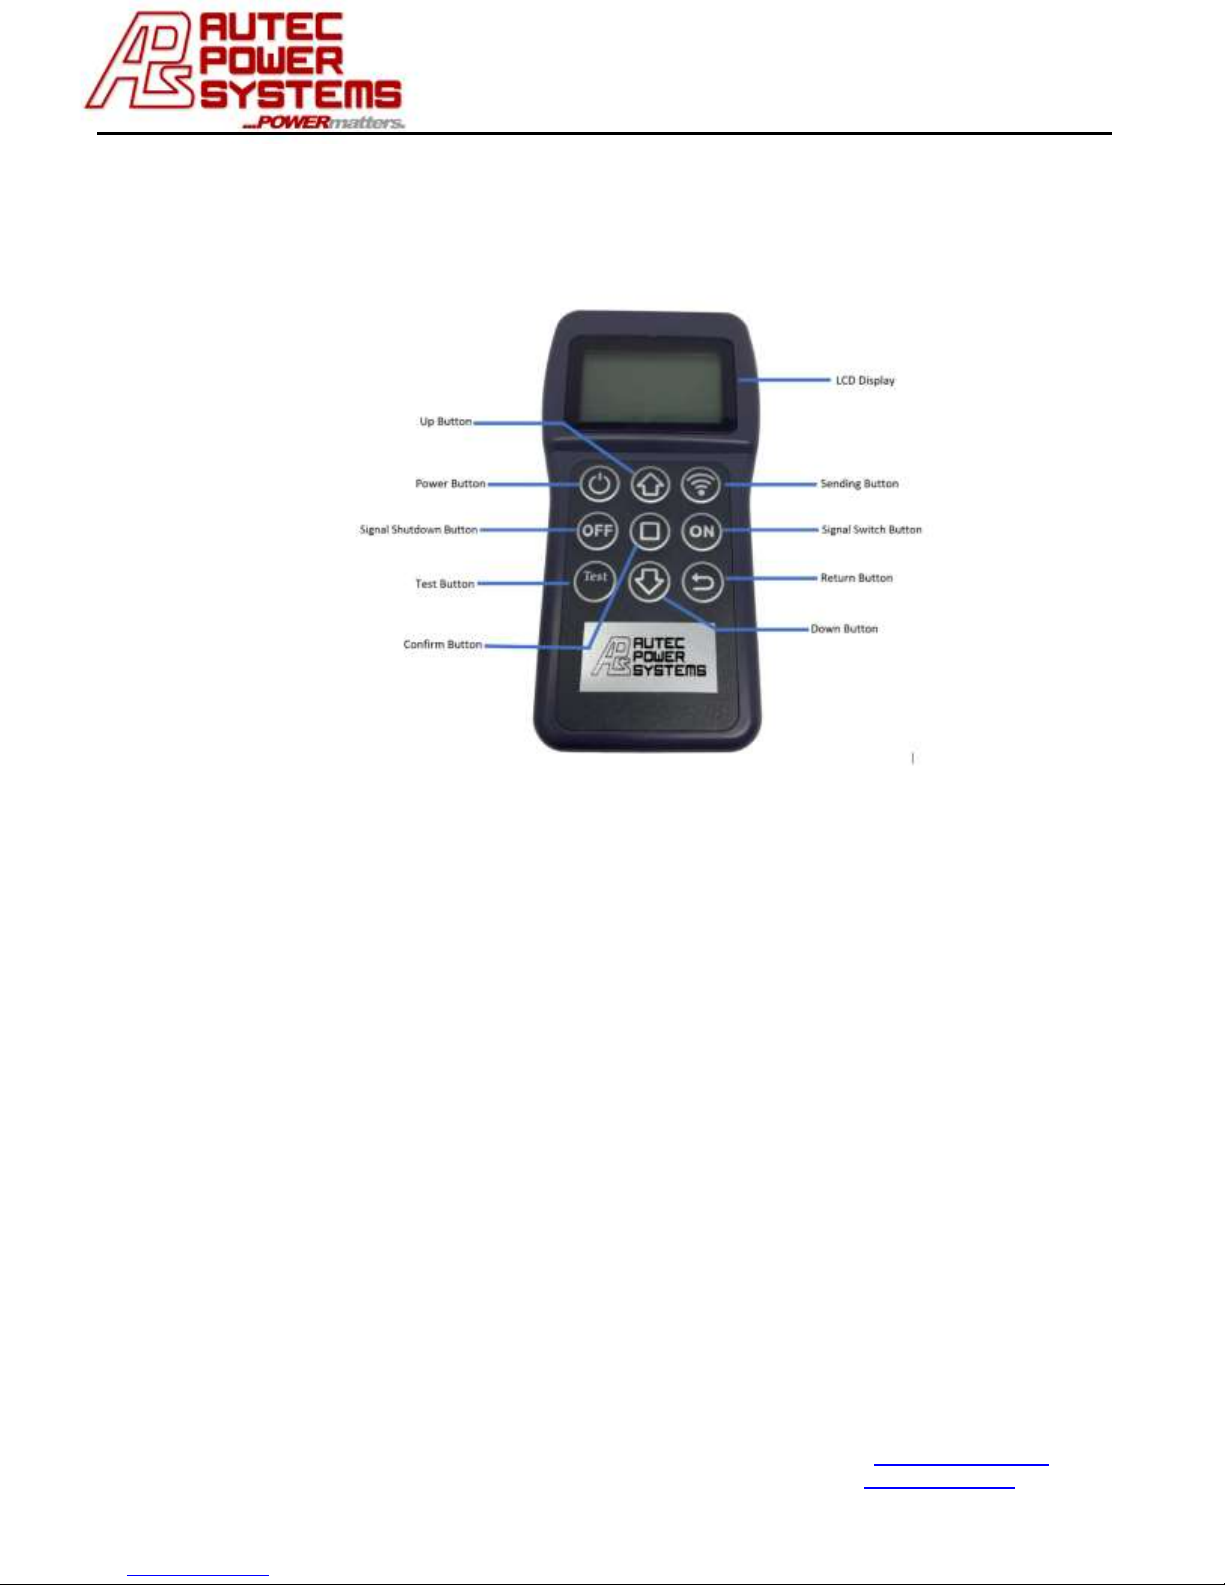
2. Button Instruction
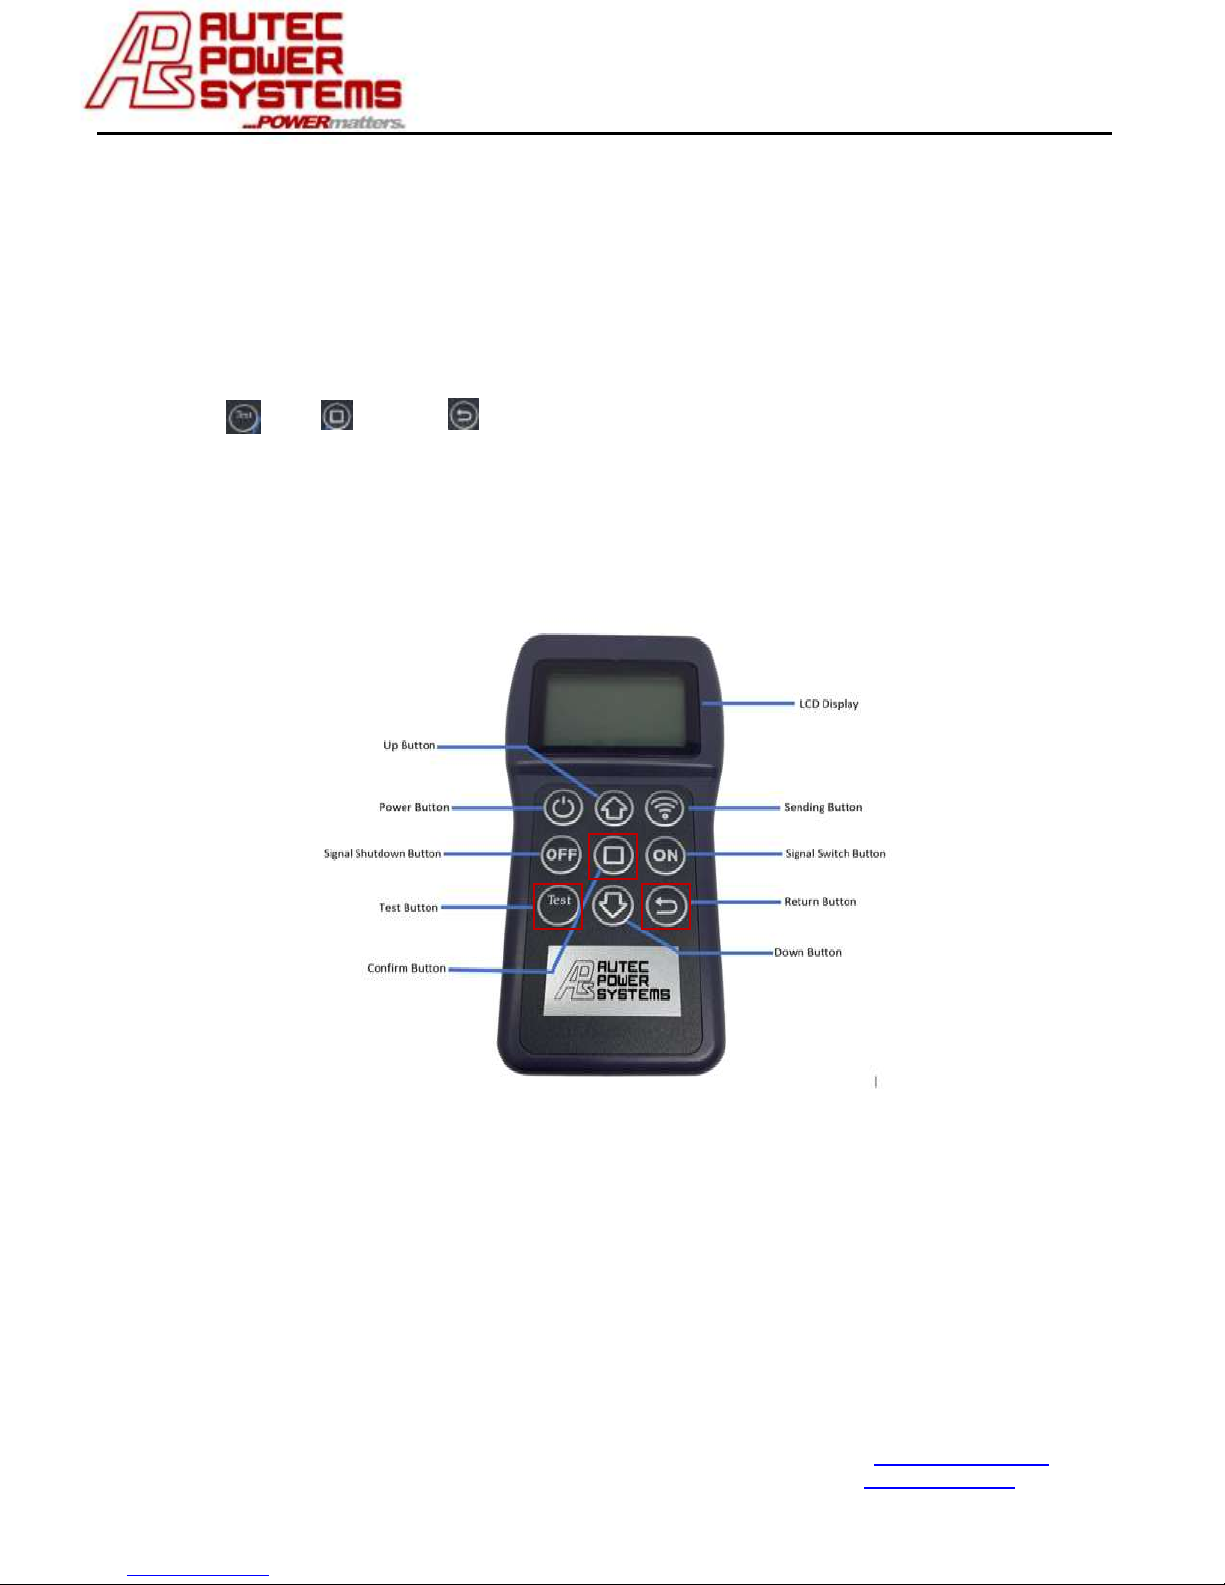
LCD Display: Displays all data
Power Button: Press once to power on LCD display. To power off hold down button for two seconds.
Up Button: Press once to move the cursor up, and increase the numbers; holding the button down longer will
increase the speed.
Sending Button: After setting parameters, press this button, new data will be sent to the system and
LCD display will show success when the highlight disappears.
Signal Shutdown Button: Press to set the controller into sleep mode.
Confirm Button: When setting parameters, press this button to select and edit the desired parameter.
To confirm press button again to exit edit mode.(Highlight will disappear)
Test Button: Use this button to text system function.(If all is working well the LED will illuminate)
Down Button: Press once to move the cursor down, and increase the numbers; holding the button down longer
will increase the speed.
Return Button: Press to return to home screen.
Page 4
User Instructions for PRLCD Remote
Technical Sales / Customer Service: +1-818-338-7788 • Email: [email protected]
31328 Via Colinas Suite 102 • Westlake Village, CA 91362 USA • www.autec.com
4 / 11
3. Operation Steps
3.1 : Confirm controller’s model and version
Method as follows:
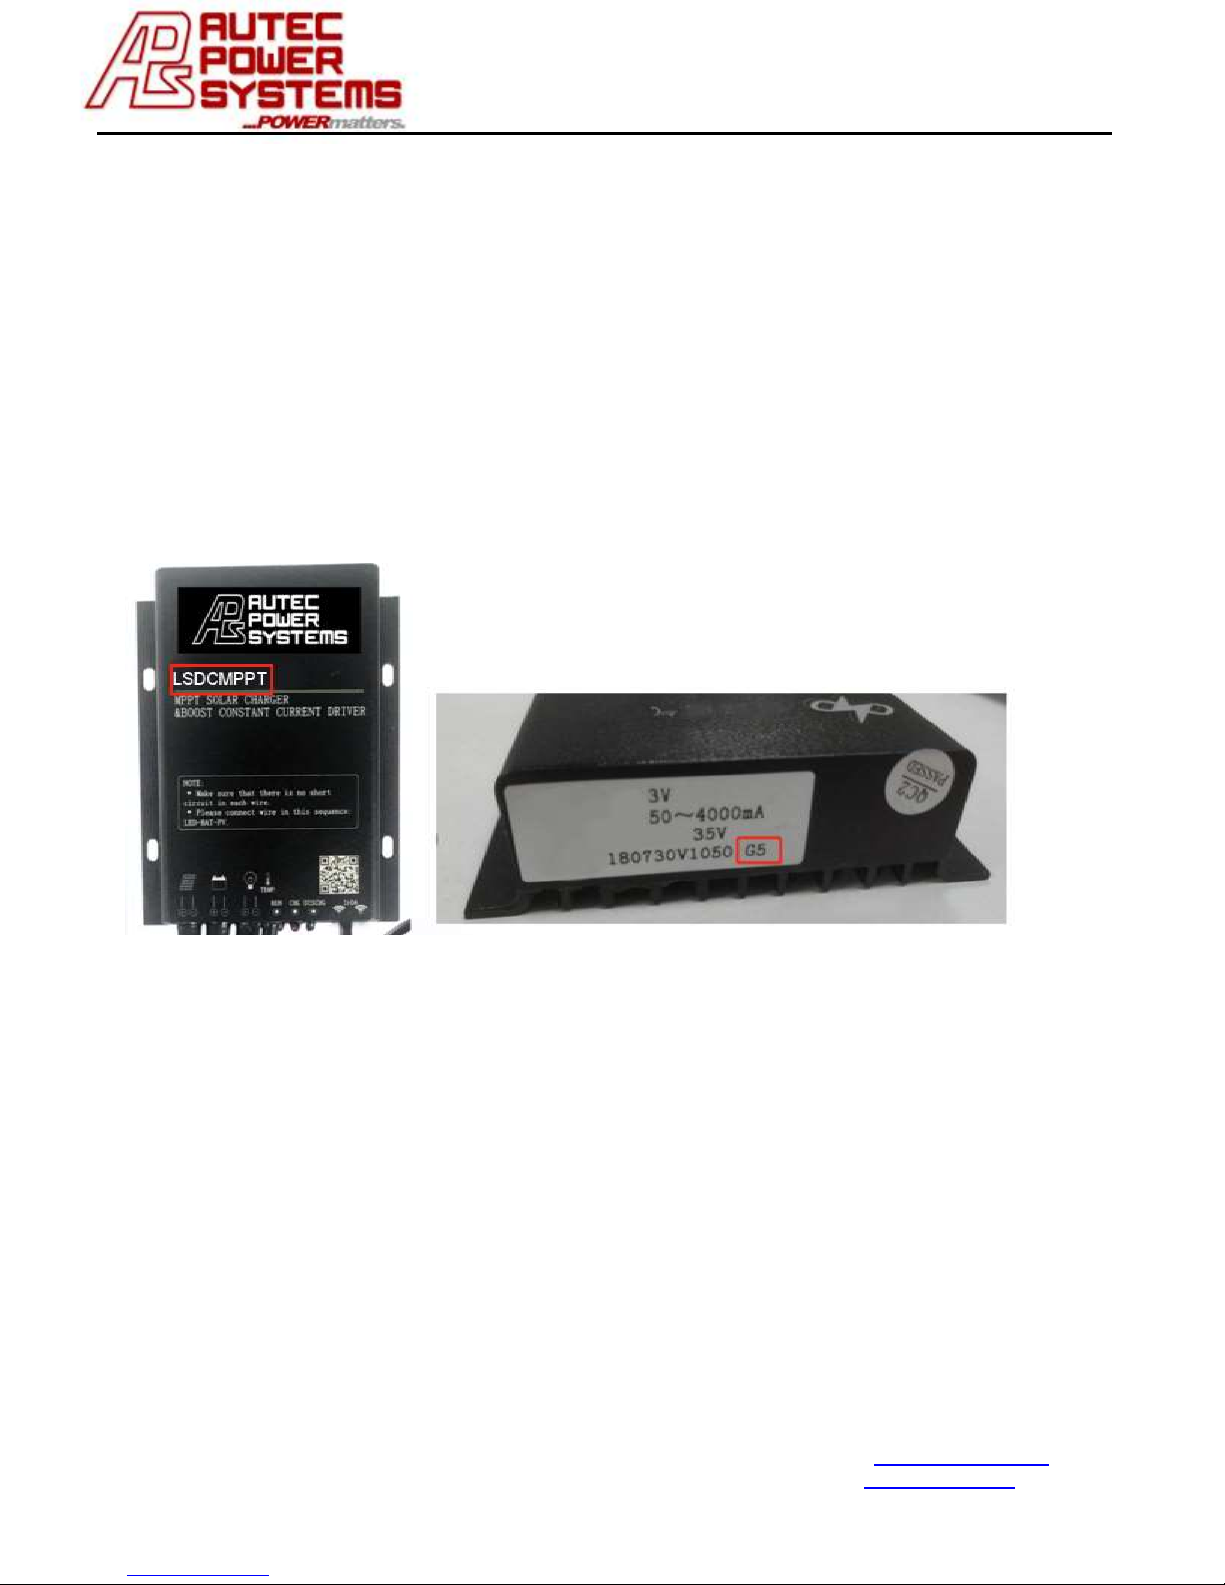
1. The model No. is on the part, see image 3-1,
LSDCMPPT is the model number.
2. See label on the side of controller for product
version, reference image 3-2.
Image: 3-1 Model No.
Image: 3-2 Version
Page 5
User Instructions for PRLCD Remote
Technical Sales / Customer Service: +1-818-338-7788 • Email: [email protected]
31328 Via Colinas Suite 102 • Westlake Village, CA 91362 USA • www.autec.com
5 / 11
3.2 : Choose right version in remote
Method as follows:
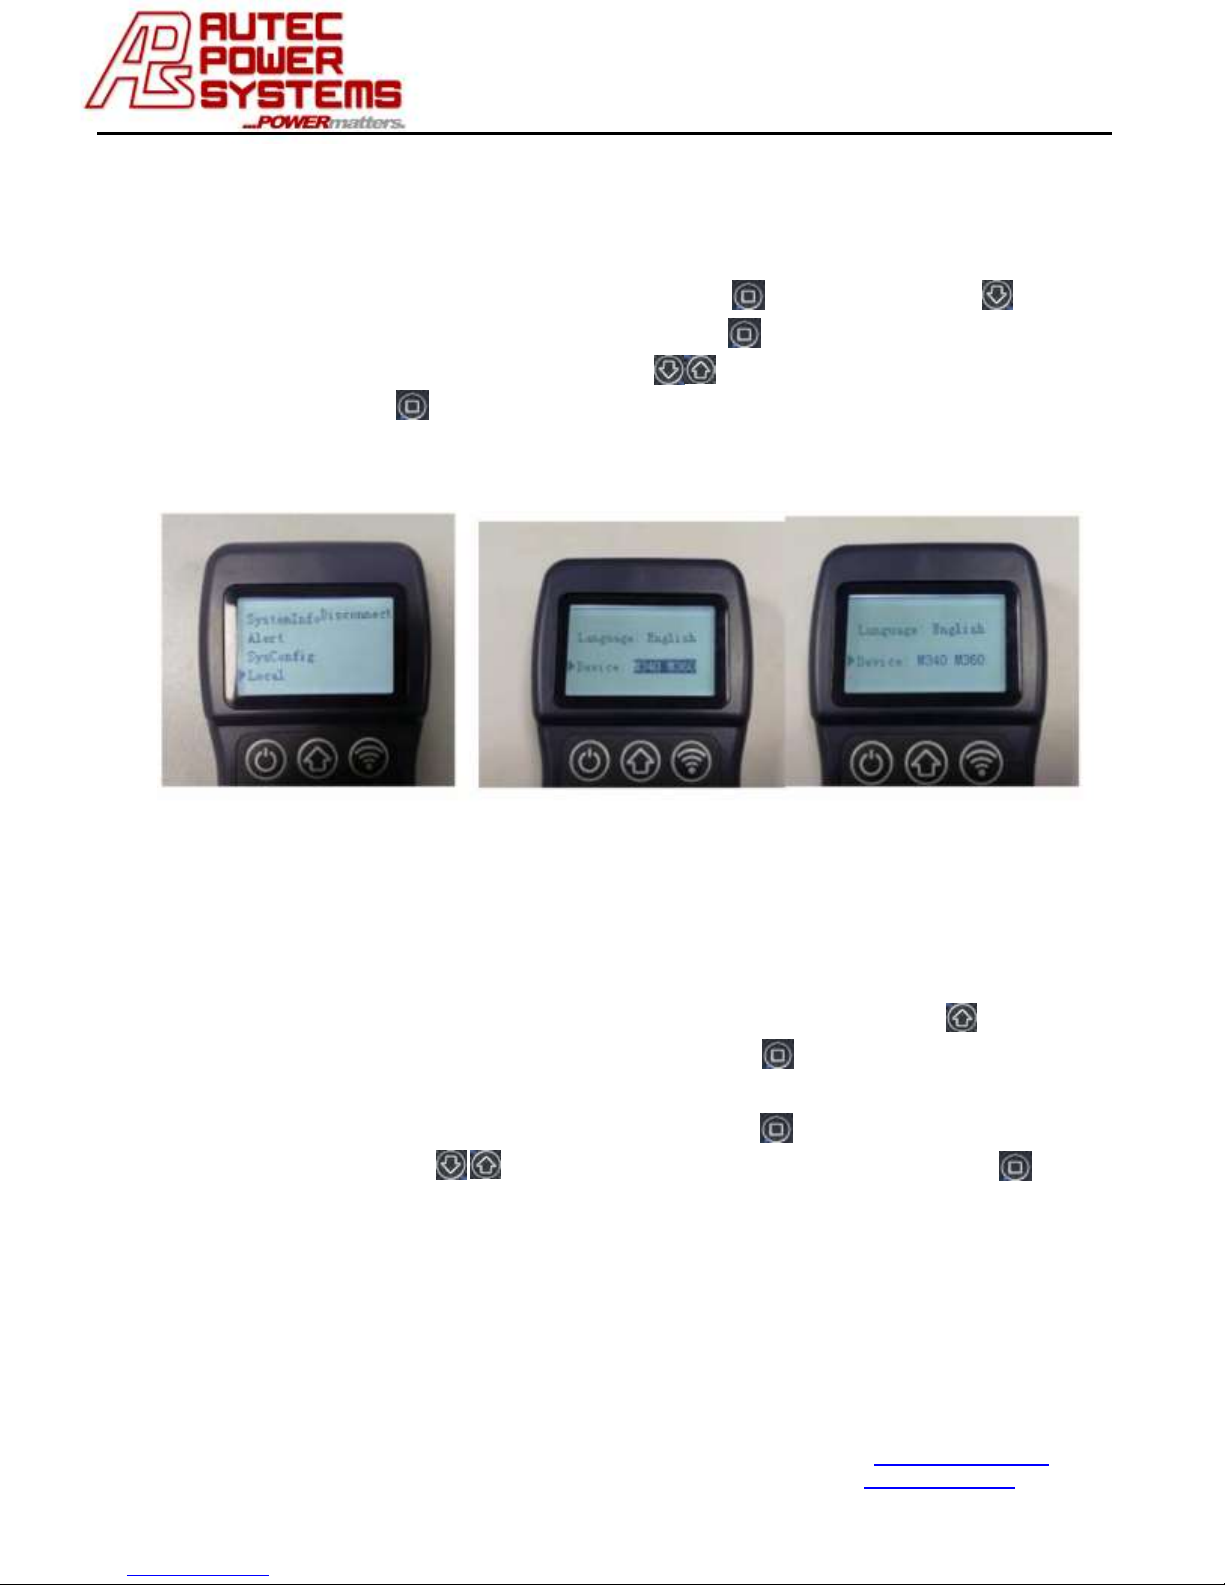
1. Power on the remote.
2. Move cursor to “local” parameter, press “ “, and then press “ “, to
“Device” as image 3-3 shows, then press “ “ again and a highlight will
appear see image 3-4. Later press “ “ to choose model and version.
Then press “ “ to confirm. When the highlight disappears setting is
successful. See image 3-5.
3.3 : Setting parameters
Method as follows:
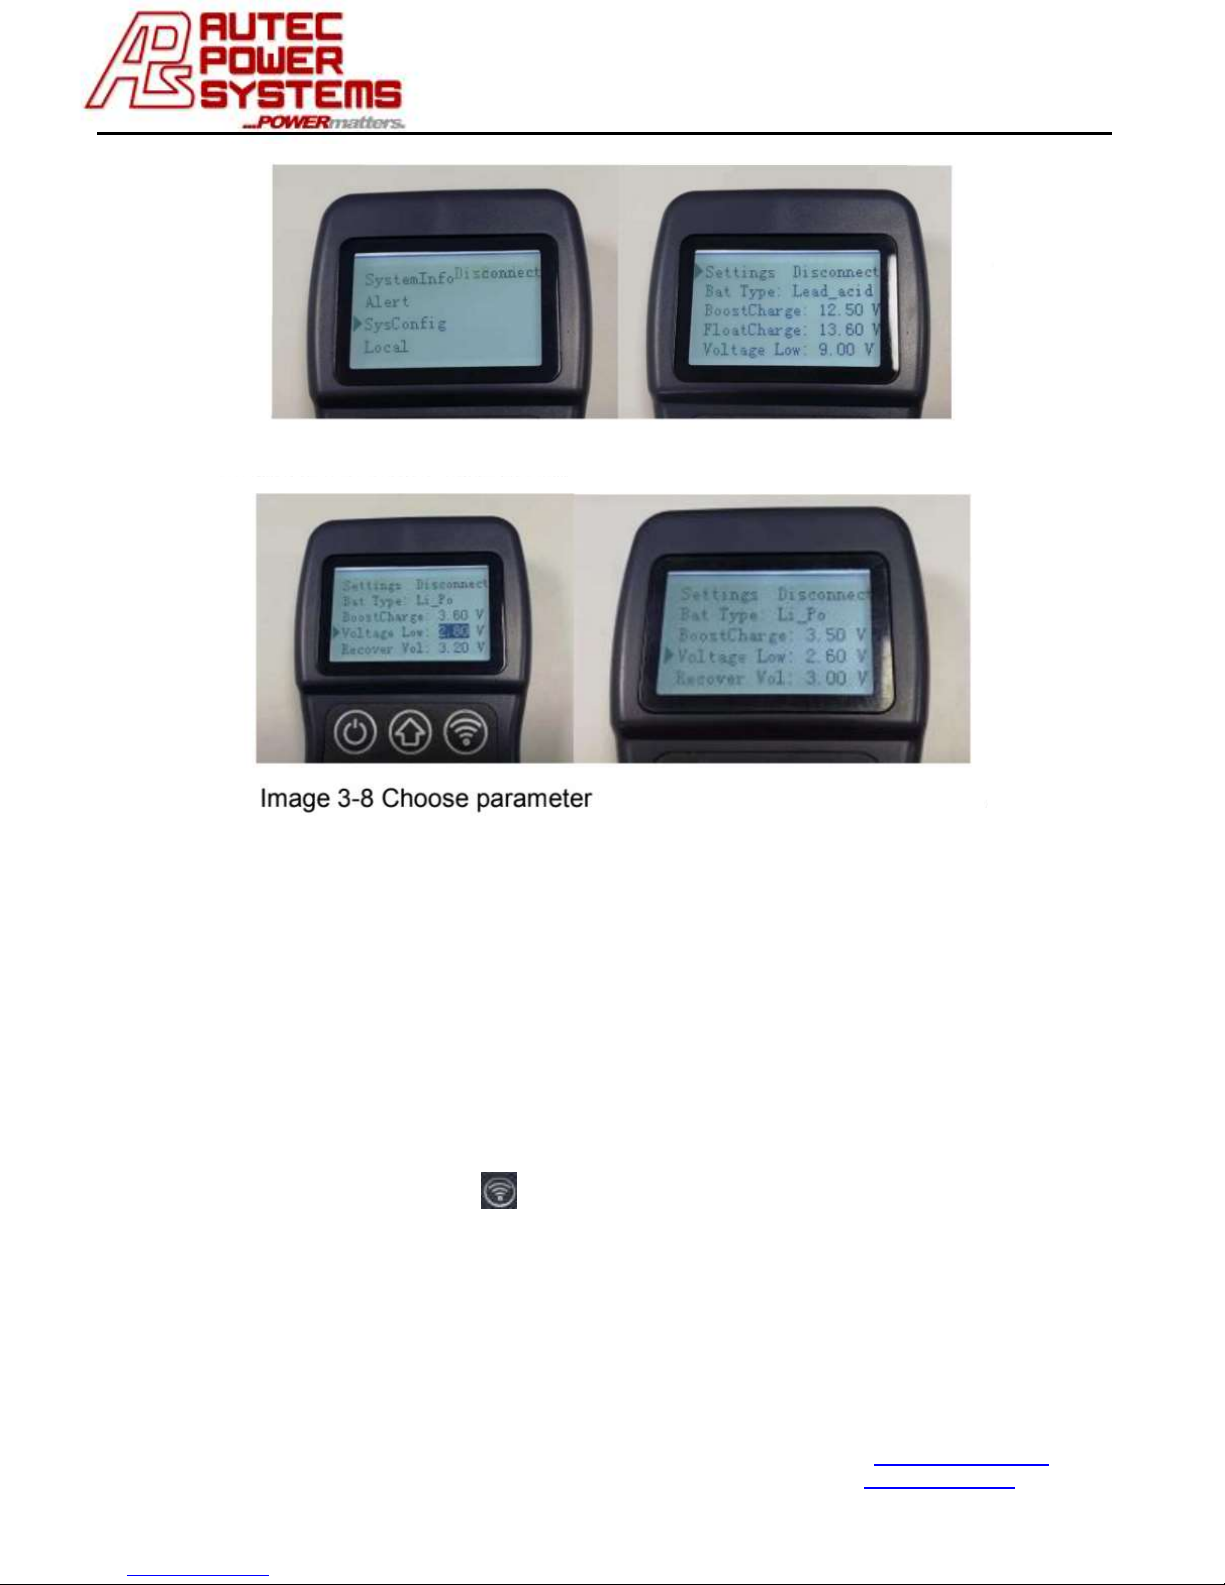
1. Press “return button” to exit the current screen, then press “ “ to
move cursor to “SysConfig”, and then press “ “ to view parameter
setting screen. See image 3-6 and 3-7.
2. Moving cursor on related place, then press “ “, when there are
shadows press “ “ to adjust parameters. After setting press “ “ to
confirm, see image 3-8 and 3-9.
Image: 3-5 Successful
Image: 3-4 Choose Model
Image: 3-3 Into “Local”
Page 6
User Instructions for PRLCD Remote
Technical Sales / Customer Service: +1-818-338-7788 • Email: [email protected]
31328 Via Colinas Suite 102 • Westlake Village, CA 91362 USA • www.autec.com
6 / 11
3.4 : Input parameters
Method as follows:
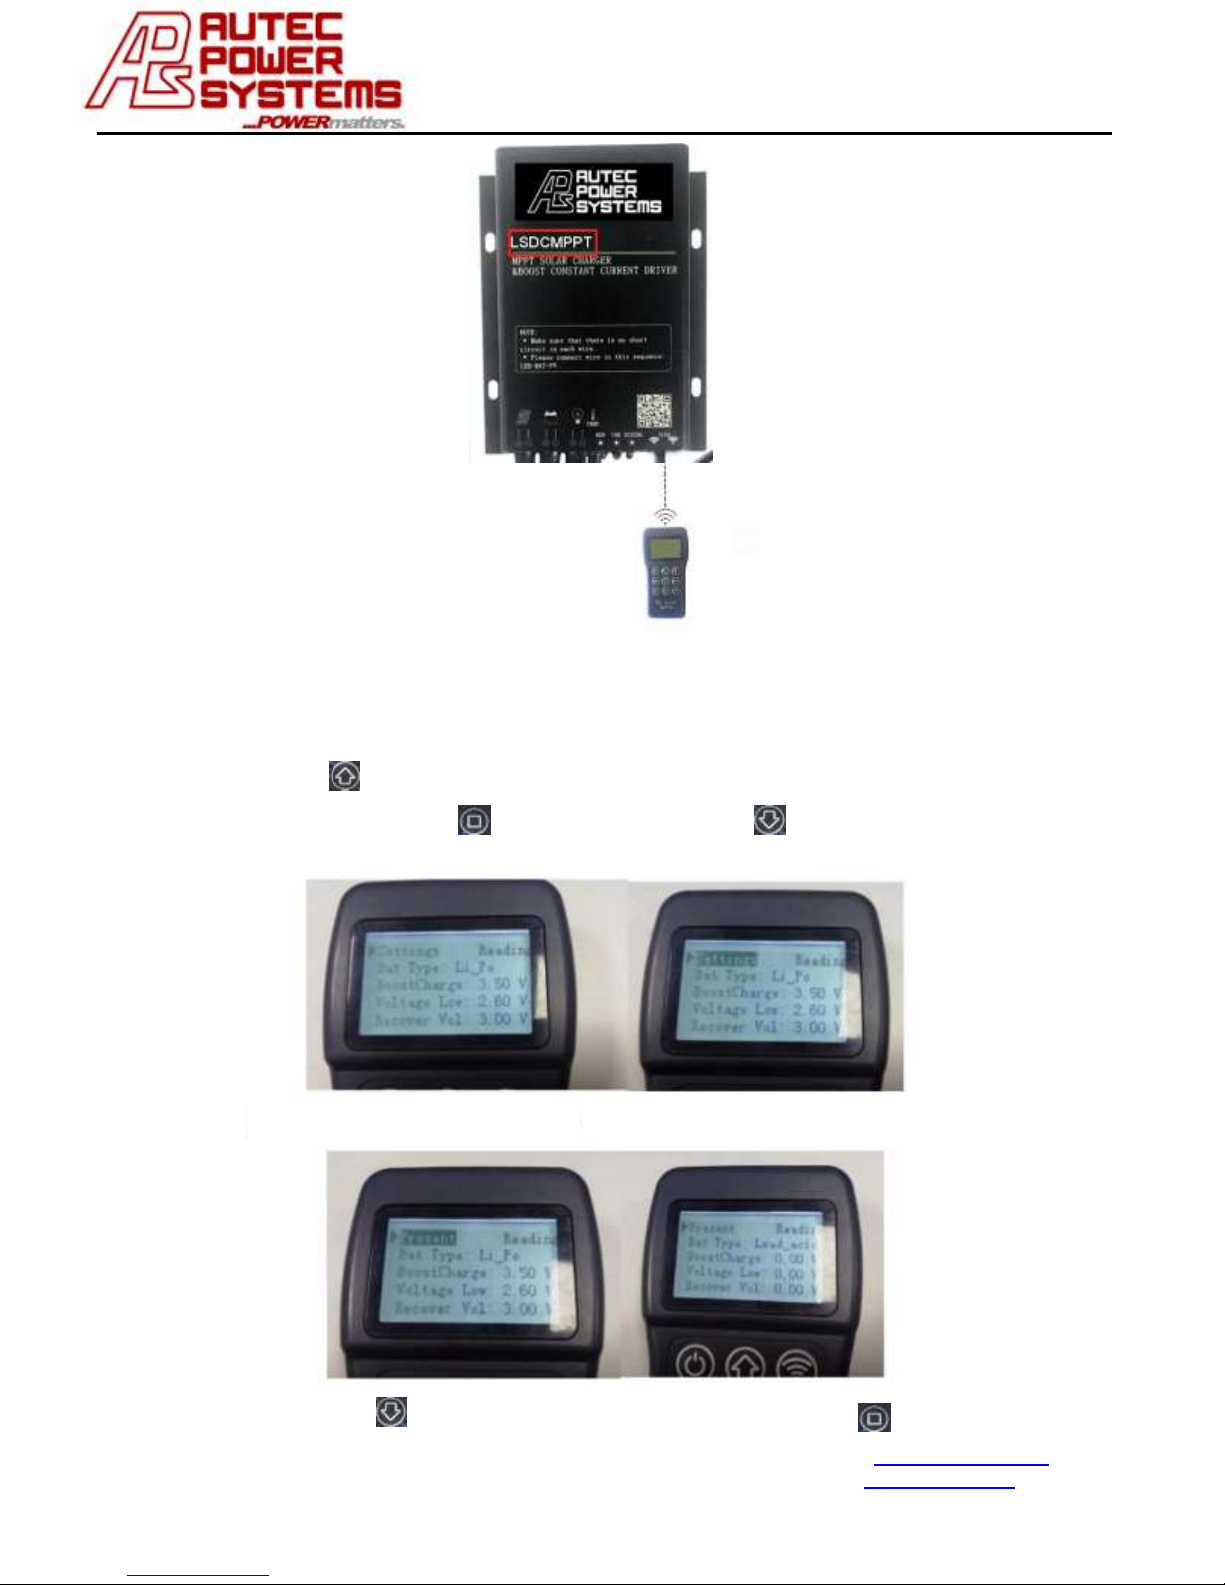
1. Before setting parameters please make sure already connected with
controller(Solar Charger/Driver). The remote should be in the range of
the sensor, otherwise it won’t set properly. See Image 3-10.
2. Important: Align top of remote with IR receiver sensor on the
controller(Solar Charger/Driver). After LCD shows successful set up of
parameters, press ” “, then you will hear a tone, which will indicate
the controller(Solar Charger/Driver) is successfully programmed with the
new settings.
Image: 3-7 Enter “Settings”
Image: 3-9 Setting Successful
Image: 3-6 Choose “SysConfig”
Page 7
User Instructions for PRLCD Remote
Technical Sales / Customer Service: +1-818-338-7788 • Email: [email protected]
31328 Via Colinas Suite 102 • Westlake Village, CA 91362 USA • www.autec.com
7 / 11
3.5 : Reading the Controller’s(Solar Charger/Driver) Settings
Method as follows:
1. Press “ “ to move cursor to “SystemInfo” then into submenu of
“Settings”, press “ “ to select, and press “ “ again, then you can
view all current set parameters. As image 3-11~3-14 shows.
Image: 3-13 Press “ “ to adjust parameter
Image: 3-14 Press “ “ to confirm
Image: 3-10 Remote IR Communication
Image: 3-11 Settings Menu
Image: 3-12 Edit Settings
Page 8

User Instructions for PRLCD Remote
Technical Sales / Customer Service: +1-818-338-7788 • Email: [email protected]
31328 Via Colinas Suite 102 • Westlake Village, CA 91362 USA • www.autec.com
8 / 11
3.6 : Checking status and warning information(Troubleshooting)
Users can check the status of the LED driver once the remote is successfully
connected by the IR communication.
4. Related information(Definitions)
Battery Under-voltage: When the battery voltage is under the low-voltage
protection setting, the output current will be stopped.
Recovery-voltage: The battery is allowed to output only when the correct voltage
is restored.
Lighting control: PV voltage is under the setting of lighting voltage, light’s on; PV
voltage is above the setting of lighting voltage, light’s off.
Timer control mode: The Timing Control can be set in five different intervals. Each
Interval can be set from 0-9hours. This can help save power/current.
Sensor mode: When infrared or microwave sensor detects movement, the light will
be brighter, otherwise lights will go out once no motion is detected. The lighting
can be adjusted as desired.
Delay sensor mode: During the lighting period, the primary method of lighting is
timer control mode, the secondary method of lighting is sensor mode.
Morning light mode: Lighting before sunrise
Power saving mode: when this mode is activated, the controller will adjust the
output based on battery voltage.
For example:
Assuming the battery setting as below
Average voltage: 12.5V
Under-voltage: 9V
Recovery: 11.1V
Power saving: on
Start saving power: 11V
Super saving power: 10V
Page 9

User Instructions for PRLCD Remote
Technical Sales / Customer Service: +1-818-338-7788 • Email: [email protected]
31328 Via Colinas Suite 102 • Westlake Village, CA 91362 USA • www.autec.com
9 / 11
Power saving model 2: split into 5 levels, each level reduce 10%
10.8-11V:90% on base of original setting
10.6-10.8V:80% on base of original setting
10.4-10.6V:70% on base of original setting
10.2-10.4V:60% on base of original setting
10-10.2V:50% on base of original setting
Power saving model 1: split into 5 levels, each level reduce 15%
10.8-11V:85% on base of original setting
10.6-10.8V:70% on base of original setting
10.4-10.6V:55% on base of original setting
10.2-10.4V:40% on base of original setting 40%
10-10.2V:25% on base of original setting 25%
Attention:
1. For both model 1 or model 2, when the electricity is below 50mA, the
battery will operate.
2. Start Saving Power and Super Saving Power must be above Under-voltage,
Start Saving Power voltage must be above Super Saving Power voltage
settings.
3. Only G3 has “model 1” & “model 2” options. G4 and G5 are “power saving
models”, same as “model 1”.
Page 10
User Instructions for PRLCD Remote
Technical Sales / Customer Service: +1-818-338-7788 • Email: [email protected]
31328 Via Colinas Suite 102 • Westlake Village, CA 91362 USA • www.autec.com
10 / 11
5. Lock/Unlock Remote
The remote can be used to program many controllers. Once the controllers are
programmed successfully, the remote can be locked to prevent accidental
reprogramming. The remote can be unlocked and be used again.
Lock/Unlock operation as below:
Press “ “, “ “ and “ “ at same time, when you hear tone it means it’s
locked. Press the three buttons again to unlock.
Note: Under lock condition you can’t revise parameters, but you can read
controller’s parameters.
Image 3-15 lock/unlock remote
Page 11
User Instructions for PRLCD Remote
Technical Sales / Customer Service: +1-818-338-7788 • Email: [email protected]
31328 Via Colinas Suite 102 • Westlake Village, CA 91362 USA • www.autec.com
11 / 11
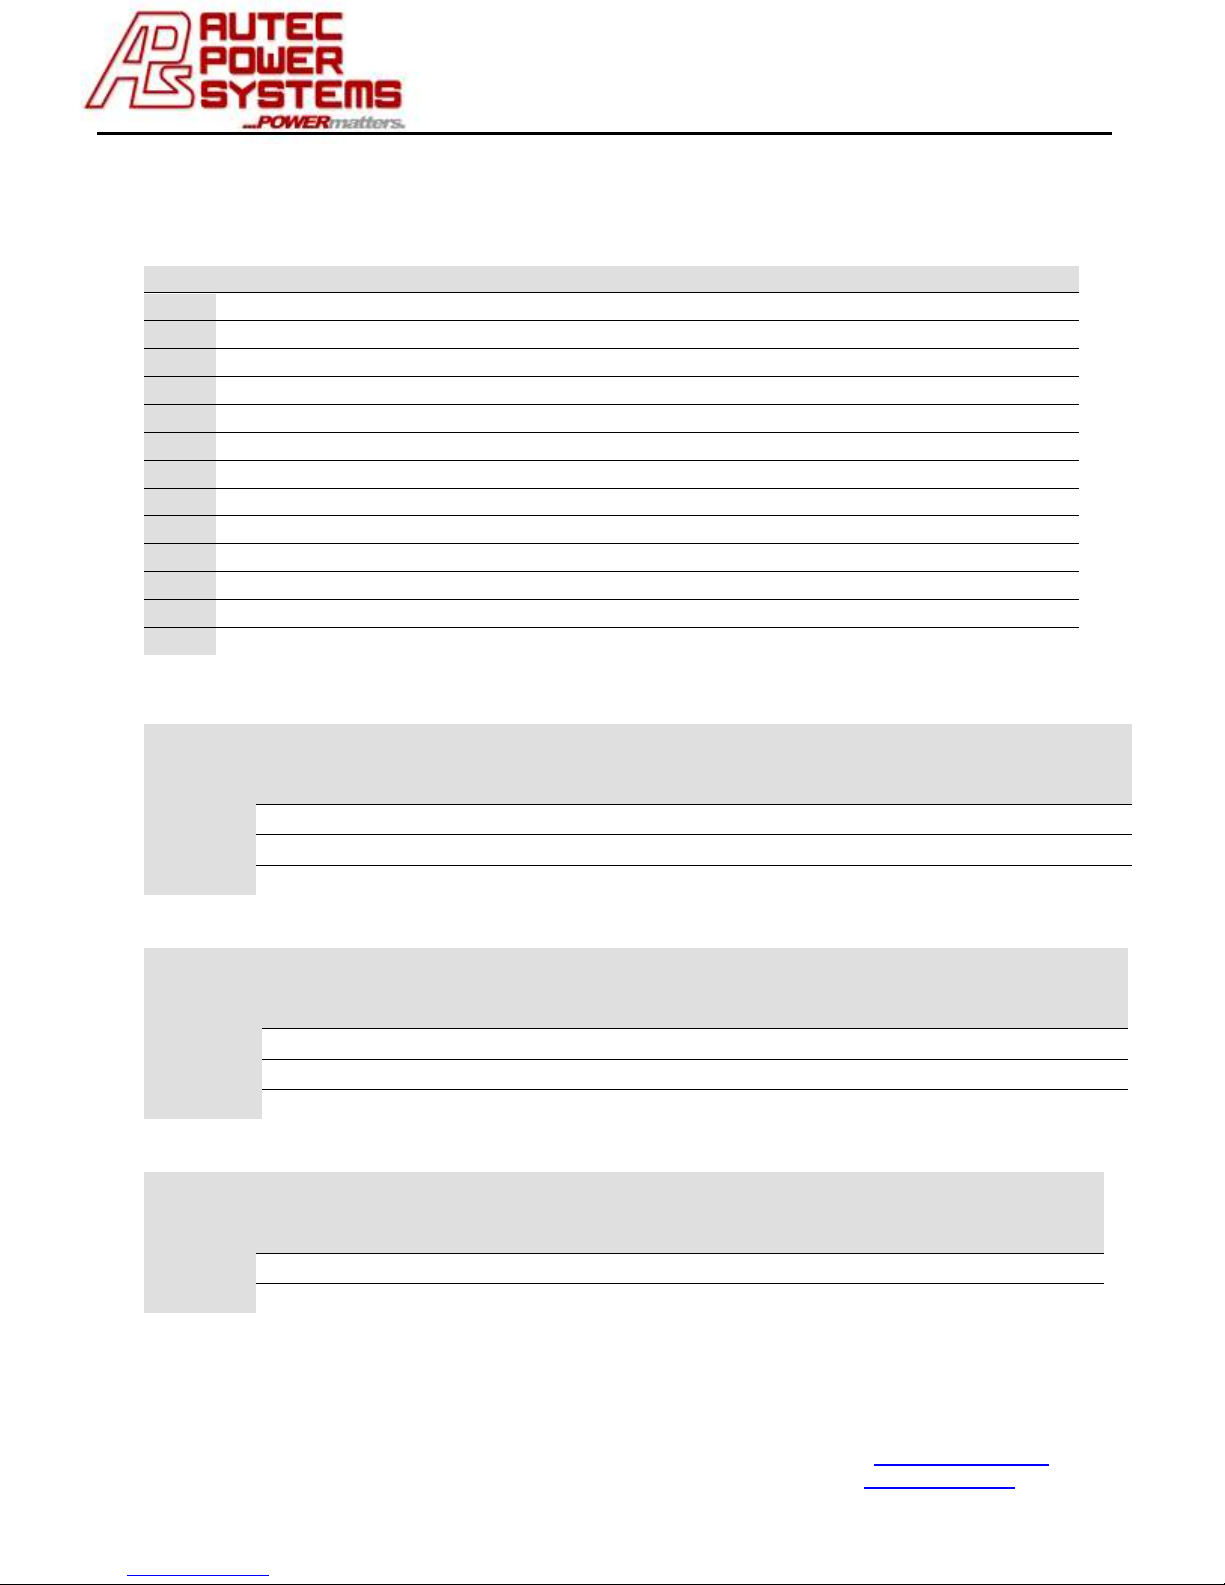
6. Indicator Light of Controller Conditions
Below are the Controller LED Alert Conditions:
No.
Condition
Run Status
Charge
Discharge
1.
Initialization
Flashing
Flashing
Flashing
2.
Standby
ON
OFF
OFF
3.
Discharge
ON
OFF
ON
4.
Charging
ON
ON
OFF
5.
Battery reversed
OFF
Fast Flashing
OFF
6.
Output Short
OFF
OFF
Fast Flashing
7.
Battery Voltage Low
OFF
Slow Flashing
OFF
8.
Driving Timeout
OFF
OFF
Slow Flashing
9.
Battery Voltage High
Slow Flashing
OFF
OFF
10.
PV Voltage High
Fast Flashing
OFF
OFF
11.
PV Reversed
Fast Flashing
Fast Flashing
OFF
12.
Parameter Set Fail
Slow Flashing
Slow Flashing
OFF
13.
Save Parameter Fail
Fast Flashing
Fast Flashing
Fast Flashing
7. About Battery Parameters
LiFePO4
String
No.
Standard
Voltage
Boost
Charge
Voltage
Low
Voltage
Recovery-
Voltage
Lighting
Control
Voltage
Start
Saving
Power
Super
Saving
Power
1
3.2
3.5
2.8
3.2 5 3
2.9 4 12.8
14
11.2
12.8
5
12
11.6 8 25.6
28
22.4
25.6
10
24
23.2
Li-ion
String
No.
Standard
Voltage
Boost
Charge
Voltage
Low
Voltage
Recovery-
Voltage
Lighting
Control
Voltage
Start
Saving
Power
Super
Saving
Power
1
3.7
4.15
3.2
3.5
5
3.4
3.3 3 11.1
12.5
9.6
10.5
5
10.2
10 6 22.2
25
19.2
21
10
20.4
20
Lead-acid
String
No.
Standard
Voltage
Boost
Charge
Voltage
Low
Voltage
Recove
ry-
Voltage
Lighting
Control
Voltage
Start
Saving
Power
Super
Saving
Power
String
No.
6
12
14.4
13.8
11
12 5 13
12
12
24
28.8
27.6
22
24
10
26
24
• Above parameters are for reference, users should set parameters according to their lighting
needs.
 Loading...