

Page 1

1
User manual
45x / 55x / 65x / 75x / 55x55x
Austroflamm Inserts
Page 2

2
Contents
1. foreword.............................................................................................. 3
2. insert types......................................................................................... 3
3. operating elements ............................................................................ 4
4. operating symbols/operation............................................................ 4
5. fuel....................................................................................................... 4
6. special advice..................................................................................... 5
7. air supply in the installation room ................................................... 5
8. initial startup ...................................................................................... 6
9. first firing ............................................................................................ 6
10. heating ................................................................................................ 6
11. putting more wood on the fire .......................................................... 7
12. heating in between-seasons ............................................................. 7
13. operation with open door (sliding version) ..................................... 7
14. heating with ceramic heat exchanger .............................................. 7
15. cleaning .............................................................................................. 7
16. behaviour in case of a chimney fire ................................................. 8
17. combustion chamber refractory lining ............................................ 8
18. sliding door – guiding rails ............................................................... 8
19. what to do if, …? ................................................................................ 8
20. information for the stove fitter in case of a warranty ..................... 9
21. warranty and guarantee .................................................................. 10
Page 3
3
1. foreword
You chose an Austroflamm high quality insert – we thank you for your confidence. The correct operation
and maintenance of your insert (according to this instruction) are imperative for a trouble-free heating
and a long lifespan. Please read the following instruction carefully.
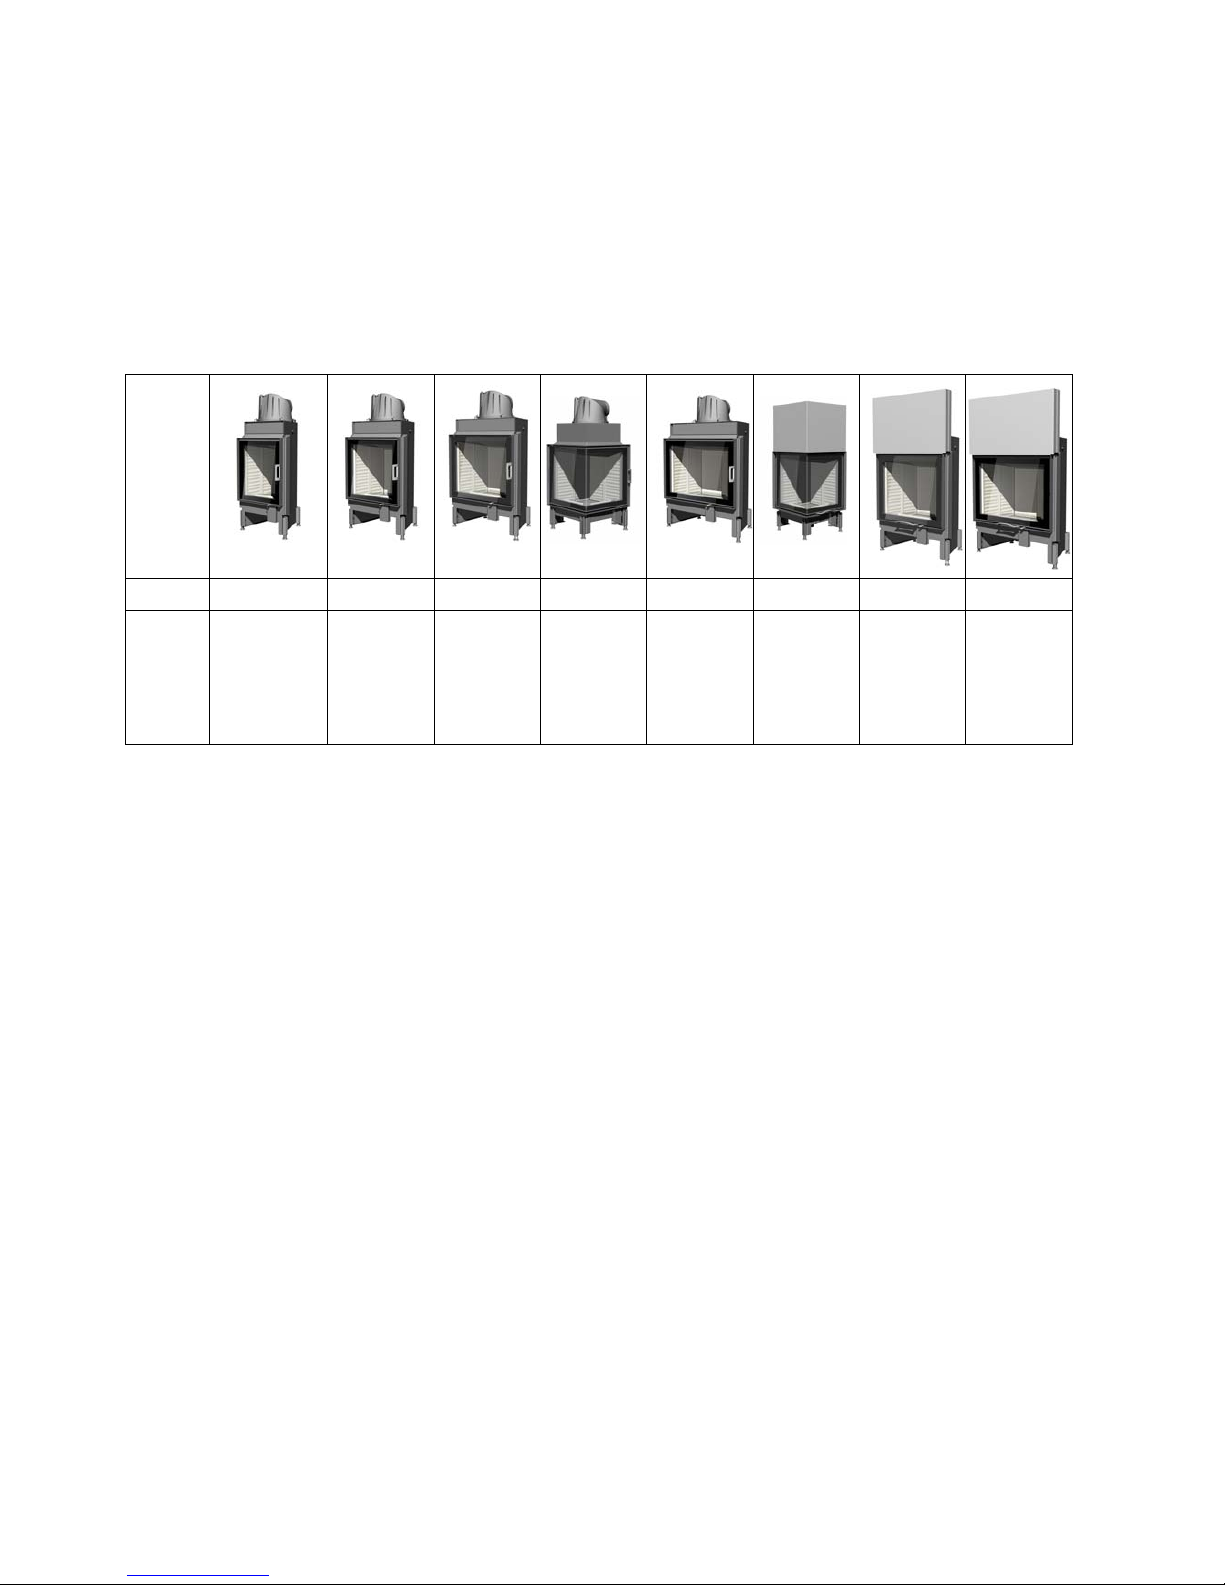
2. insert types
This manual describes the following inserts and their function:
hinged door version sliding door version
measures
in cm
45K
55K 65K
55x55K 75K 55x55S
65S
75S
width:
- 45 - 55 - 65 - 55 - 75 - 55 - 65 - 75
door
version
and
height:
- flat / 51
/ 57
/ 68
- round / 51
/ 57
- flat / 45
/ 51
/ 57
- round / 51
/ 57
- flat / 45
/ 51
/ 57
- round / 51
/ 57
- corner / 51
/ 57
/ 68
- flat / 39
/ 57
- corner / 51
/ 57
- flat / 51
/ 57
- flat / 39
/ 57
Page 4

4
3. operating elements
The insert series of 45x, 55x, 65x, 75x, 55x55x stands out because of the extremely simple operation.
convection air in-/outlet
possible deflection damper
(for deflecting flue gases into heat exchanger)
or throttle valve
door lock
operating lever for combustion air flap
combustion/convection air inlet
4. operating symbols/operation
operation lever for combustion air flap
+ = maximum air supply for fast burning
I = average heat output
– = small heat output
hinged door mechanism
o press handle outwards
o pull open
o door can be swung open
– „release“:
Release the door handle in an open position (angle > 20°), door closes and locks
automatically.
sliding door mechanism
– lift = door open
– pull down = door closed
deflection damper for heat exchanger
– turn to the right: flue gases will be conducted into the heat exchanger.
This may be executed only if the insert door is closed.
– turn to the left: flue gases will be conducted directly into the chimney. The insert door may be opened only in
this position.
throttle valve
– turn to the left: flap closes.
– turn to the right: flap opens. Flue gases exit through the chimney. The insert door
may be opened now.
5. fuel
allowed fuel
dry, well-seasoned and natural wood (preferably hard wood) or wood briquettes.
Clean combustion
The fuel wood must be dry (wood moisture < 15 %) and untreated. Moreover it is very important to use the
correct quantity of wood, in order to reach a clean and low-emission combustion. Apart from a low caloric value,
moist wood also makes your insert’s glass panes soot faster than necessary. A sooting after 2-3 times of use is
normal. If you use fuel for heating which is not allowed, all guarantee or warranty claims ends
immediately!
Page 5

5
6. special advice
• Please mind that all surfaces of the insert heat up extremely during operation. Please
use the heat-proof glove, which comes with the insert. Please also make your children
aware of this danger and keep them away from the fireplace during operation.
• In order to avoid a heat buildup, please DO NOT cover or close any air grids/in-
/outlets.
• Every insert is made for and therefore has its own maximum fuel quantity. Bigger
quantities than the ones listed below may lead to overheating and damages of the
fireplace!
Maximum fuel quantity:
45K / 45S = 2,5 kg/h
55K / 55S = 3,0 kg/h
65K / 65S = 3,5 kg/h
75K / 75S = 4,0 kg/h
55x55x = 2,4 kg/h
If the insert has been installed with a ceramic heat exchanger, we recommend the
following maximum fuel quantities:
45K / 45S 2 x 2,5 kg
55K / 55S 2 x 3,0 kg
65K / 65S 2 x 3,5 kg
75K / 75S 2 x 4,0 kg
55x55x 2 x 2,5 kg
The second fuel reload should be made after approx. 45 min after the first. Further fuel
reloads can be made, but please prolong the intervals and reduce the fuel quantity (by
0,5 – 1 kg).
• If the manufacturer’s dimensional instructions for combustion air cross sections and
flue dimensions cannot be kept or are changed afterwards, all warranty and guarantee
claims end.
• No flammable elements may be placed in the insert’s
radiation area closer than 80 cm measured from the bottom
edge of the comustion chamber. Next to the fireplace casing
a maximum distance of 5 cm must be kept for objects made
of flammable materials.
• construction type A1: Inserts are tested and certified
according to this type and are equipped with a self-closing door, which means that an
operation with open door is no longer possible. This also means that special closing
mechanisms have been installed on the insert, to avoid the door staying open during
operation. It is not allowed to carry out modifications on the insert, which may
afterwards allow the operation of the insert with an open door. For putting in more
wood or cleaning the door glass, the door must be held open against the clamping
force of the door spring or the sliding mechanism and it must not be blocked with any
jamming gadget.
• Only original spare parts or spare parts which have explicitly been approved or offered
by the manufacturer may be used. Please ask your stove fitter or a specialised
Austroflamm dealer.
• The insert/fireplace must not be modified!
7. air supply in the installation room
The fireplace can only operate correctly if there is a sufficient air supply in the installation room. Take
care of a sufficient air supply before your start firing up your fireplace. Open the combustion air flap on
the fireplace and keep it open during the whole time of operation. Equipment concerning the combustion
air supply must not be altered.
80cm 80cm
Page 6

6
8. initial startup
• Remove all enclosed documents and accessory parts from the combustion chamber.
• Carefully read this user manual.
• The first operation of your fireplace should take place at the earliest 4 weeks after the completion of
its surroundings, so that all parts can dry out well.
• The fire should be kept small during the first hour, please only increase the wood quantity slowly.
However the maximum amount of fuel per hour must not be exceeded at any time.
• The odours occurring during the first operation are normal and result from the vaporisation of greasy
metal surfaces and binding agents of the varnish. These vapours are non-toxic, but displeasing. We
therefore recommend airing your rooms well during the first operation.
9. first firing
For the correct and safe operation of the fireplace it is necessary to mind the necessary feed pressure. It
is especially important to check the feed pressure, before each initial firing (after the summer break) or in
between-seasons (e.g. strong wind, fog, etc.). Hold a match or lighter close to the open insert door. If the
flame is not being dragged into the open door, a kind of draught boost must be induced by a strong heat
generation (e.g. by lighting paper or small kindling). If this cannot be done successfully, please do not
heat your fireplace!
• Turn the air flap operation knob to the right – position “+“
• Open throttle valve completely, if installed.
• Place the larger logs (1), approx. 2-3 pieces (beech, oak or birch) at the bottom and put the
smaller cleaved softwood (2) on top. Put some lighting aid (3) inbetween the cleaved
softwood. Never use petrol, spiritus or the like for lighting the fire.
• After approx. 5-10 minutes (when the logs have burnt well) the combustion air flap may
be shut approx. 50 % (operation now in middle position).
Close throttle valve (if installed) after approx 5-10 min by 50 % (turn handle to the left).
10. heating
• open the combustion air flap by maximum 50 % (knob in middle position), otherwise the fuel quantity
will burn down too fast and thus too high temperarures may occur.
• open throttle valve by 50 %, otherwise the fuel quantity will burn down too fast.
• all existing convection air in- and outlets must be completely open.
• put more wood into the fireplace after approx. 45 to 60 minutes.
2
Page 7

7
11. putting more wood on the fire
• open door slowly, so no turbulences can occur which might cause escaping flue gases. The right
moment for putting more wood into the combustion chamber is when all fuel has burnt down to
embers.
• open throttle valve completely, if at all installed.
• refill fuel.
• close door.
• close throttle valve by two thirds.
12. heating in between-seasons
In between-seasons, i.e. when the outside temperatures are higher, the flue gases may not be able to
escape completely and this may lead to distrubances in the chimney draught, especially if the
temperatures are rising suddenly. The fireplace has to be filled with less fuel and operated with a more
open position of the air flap, so that the fuel can burn down faster (with visible flames) and thus the
chimney draught can stabilise. In order to avoid a drag in the firebed, please remove the ashes more
often.
13. operation with open door (sliding version)
Please do not operate the fireplace with an open door unattended. Small embers may fall out of the
combustion chamber during operation. FIRE HAZARD!
14. heating with ceramic heat exchanger
If your fireplace is installed with a ceramic or metallic heat exchanger, please mind the
following advice during heating:
• The deflection of the flue gases across the heat exchanger may follow soonest after
15 minutes after the first firing. Otherwise there is a danger of uncontrolled flue gas
escape above the door frame.
• During the operation across the heat exchanger, the insert door MUST NOT be
opened (flue gas escape).
• For putting more wood into the combustion chamber, please open the deflector first,
only then you can open the insert door.
15. cleaning
• Remove the ashes from the combustion chamber regularly and early enough, also empty the ash
box (accessory).
• If the ashes are not being taken out regularly there is a danger of the combustion air inlets getting
blocked and thus the insert gets damaged.
• The fireplace may be cleaned only in a cooled down state!
• The insert and the flue gas piping must be cleaned on demand or at least once a year. Thus an
economic and troublefree operation can be guaranteed. Ceramic or metallic flue gas ducts shall be
cleaned through their provided cleaning apertures. The necessary works shall be executed by the
stove builder or another professional company. We recommend to agree upon a maintenance
contract.
• Please also have your chimney cleaned regularly by your local chimney sweep. He will inform you
about the necessary cleaning intervals.
Page 8

8
• leaning the door glass:
1.)
Lock sliding mechanism.
2.)
Unlock swinging latch.
3.)
Swing open the door.
• 1.) + 2.) Loosen the left and right bolt on the top of the sliding door. If you have a hinged model, just open
the door. 3.)
• Protect the fireplace bench or floor before the cleaning.
• Spray glass with glass cleaning liquid and leave to react.
• Remove dissolved soot with an absorbent cloth or kitchen roll.
• Finally close door properly and lock the swinging latches again.
16. behaviour in case of a chimney fire
If prohibited or moist fuel is used, it may lead to chimney sooting and thus lead to a chimney fire.
Correct behaviour in case of a chimney fire:
• call the fire brigade and the local chimney sweep.
• close the combustion air inlets!
• enable free access to the cleaning apertures of the chimney (e.g. cellar or attic)!
• remove alle flammable materials near the chimney.
Before operating the firplace again after a chimney fire, please inform your local chimney sweep and
let him check the chimney system for possible damages!
17. combustion chamber refractory lining
The combustion chamber lining is made of Keramott. This is a top-quality material with special features
for a better combustion and a very appealing visual effect. The Keramott parts may show fine crackings
during or after operation, which have however no influence on the function – a replacement of such parts
is thus not necessary.
18. sliding door – guiding rails
Both guiding rails should be lubricated at least once a year. To do so please lift the door
up into the highest position and thinly apply the high temperature lubricant on the
marked area on the guiding rails (Fin Grease, -30 °C to 220 °C).
19. what to do if, …?
... if the fire smoulders or goes out by itself?
• Is the throttle valve open?
• Is the deflection damper of the heat exchanger in the right position?
• Is the combustion air flap open (+)?
Page 9

9
• Do you use dry enough wood?
• Is the outside temperture too high (>15C°)?
... the room does not get warm enough?
• Are all convection air in-/outlets open?
• Does the deflection damper deflect the flue gases through the heat exchanger?
• Is the chimney draught too high?
... the fire burn down too fast and uncontrolled?
• Has the combustion air supply been throttled after reaching the operating
temperature in the combustion chamber (+ / -)?
• Are all gaskets on the inside of the door frame in good condition?
• Has the insert door been closed properly?
• Is the chimney draught too high?
... the door glass soots too fast?
A gradual sooting of the door glass after 8-10 hours of operation is normal.
• Has dry, natural wood been used?
• Has the insert reached the operating temperature?
20. information for the stove fitter in case of a warranty
Please contact your stove fitter, if any defects should occur on your fireplace. The stove
fitter/Austroflamm dealer needs the following information about your insert:
– serial number and type (insert name)
– original sales invoice (sales date)
You will find this information on the name plate, which is fixed underneath the boot
Keramott brick/ash box.
Page 10

10
Händlerstempel / dealer’s stamp / Timbro concessionario /
tampon du concessionnaire
angeschlossen von / installed by / installato da / raccordée par
Kunde / customer / cliente / client
an / to / per / pour
21. warranty and guarantee
Precondition for a valid guarantee claim is that your AUSTROFLAMM insert was installed and handed over by a certified
professional stovefitter and is operated in accordance with the operator’s manual and the local regulations and laws.
We guarantee full functionality of the Austroflamm insert carcass for 6 years and all stove components made of steel or cast
iron for a full two years from the date of purchase. Steel and cast-iron components which show defect in materials or
workmanship during the guarantee period shall be replaced with new components.
We do not guarantee wearable components (such as Keramott, gaskets, floor grids), surface coatings, lacquer and glass
panes.
Our guarantee includes free shipping of new components. Work and travel times are not included. Unjustified claims will
be re-invoiced to the operator.
Im Garantiefall herausschneiden und Ihrem AUSTROFLAMM-Fachhändler vorlegen!
In case of a guarantee claim, separate here and present this proof of purchase to your certified AUSTROFLAMM dealer!
In caso di richiesta di garanzia, ritagliare la cartolina e presentarla al rivenditore AUSTROFLAMM!
Découpez selon les pointillés et présentez ce coupon à votre revendeur AUSTROFLAMM !
GARANTIE / GUARANTEE / GARANZIA / GARANTIE
Kaufdatum / date of purchase / Data d’acquisto / date d’achat
Modellname / name of model / tipo del modello / nom du produit
Serien No. / serial no. / No. di serie / no. de série
(siehe Typenschild / see type plate /vedi targhetta / voir plaque
signalétique)
03/2010 – 940140_AF_KE _Benutzerhandbuch_2010-04-27 engl
Manufacturer:
Austroflamm GmbH
Austroflamm-Platz 1
A-4631 Krenglbach
 Loading...