

Aukey DRA2 User Manual

User Manual
Mirror Dash Camera

Contents
English
Deutsch
Français
Español
Italiano
日本語
01 - 11
12 - 23
24 - 35
36 - 47
48 - 59
60 - 69
Thank you for purchasing the AUKEY DRA2 Mirror Dash Camera. Please
read this user manual carefully and keep it for future reference. If you
need any assistance, please contact our support team with your
product model number and Amazon order number.
Package Contents
Mirror Dash Camera
Rear Camera with 7m / 23ft Cable
Car Charger with 3.5m / 11.5ft USB Mini-B Cable
Four Mounting Straps (2 + 2 spare)
Two Screws
Two 3M Stickers
Six Cable Clips
Trim Removal Tool
User Manual
Warranty Card
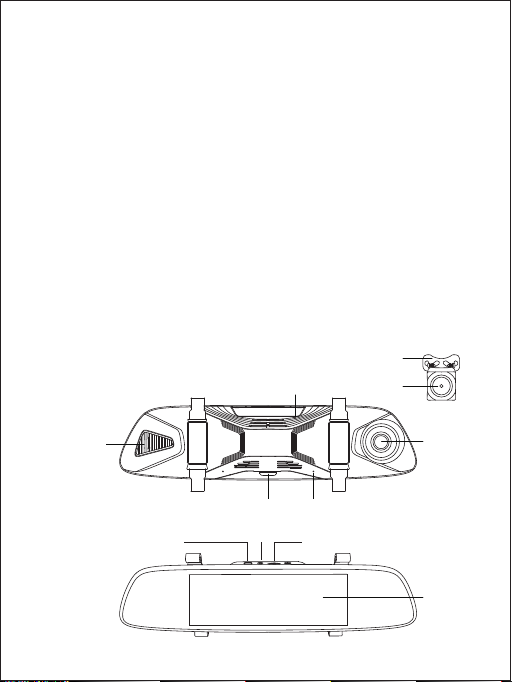
Product Diagram
Speaker
USB Mini-B Power Input
Mounting Bracket
Reset Button
Power Button Microphone
AV Input
- 01 -
MicroSD Card Slot
Lens
Lens
Screen

Specifications
Model
Image Sensor
CPU
Screen
Screen Resolution
Angle of View
Aperture
Recording Resolutions
Video Format
Video Recording Modes
Sound Recording
MicroSD Card
Input
Battery
Operating Temperature
Materials
Dimensions
DRA2
Front camera: SC2363 2-megapixel CMOS
Rear camera: H65 1.3-megapixel CMOS
MSC8336
6.8” LCD
1280 x 480p
Front camera: 170°
Rear camera: 160°
Front camera: f/2.2
Rear camera: f/2.3
Front camera: 1080p (30fps)
Rear camera: 720p (30fps)
MOV
Loop, Motion Detection, Parking,
Time-Lapse, and Emergency Recording
On / Off
Class 10 or higher, 256GB Max
DC 5V 2.5A via mini USB
500mAh
-20°C – 70°C (-4°F – 158°F)
ABS, PC, glass
Mirror Dash Camera:
319 x 80 x 42mm / 12.56” x 3.15” x 1.65”
Rear Camera:
31 x 23 x 23mm / 1.22” x 0.9” x 0.9”
- 02 -

Using a MicroSD Card
The dash camera doesn’t include internal storage and requires a
microSD card (Class 10+ recommended and 256GB Max supported) to
function. Use a high-quality, branded card for maximum reliability. Insert
a microSD card into the mirror dash camera microSD card slot. Later,
when the camera is powered on, format it (‘Format SD Card’ in dash
camera ‘General Settings’) to prepare the card for first use in the dash
camera. Formatting will permanently erase any data on the microSD
card. For best performance, format periodically (after backing up any
important files).
Testing the Dash Camera System
You may wish to connect and test the dash camera system before
proper, long-term installation in your car (or other vehicle). Connect the
two cables to the mirror dash camera and plug the car charger into
your car 12V/24V outlet (see ‘Installing the Dash Camera System’ steps 2
& 3 below); then switch on the car ignition to power the 12V/24V outlet.
The dash camera system will power on automatically. Check that both
cameras are operating correctly. See ‘Using the Touchscreen Buttons’
and other sections for information on operation.
- 03 -
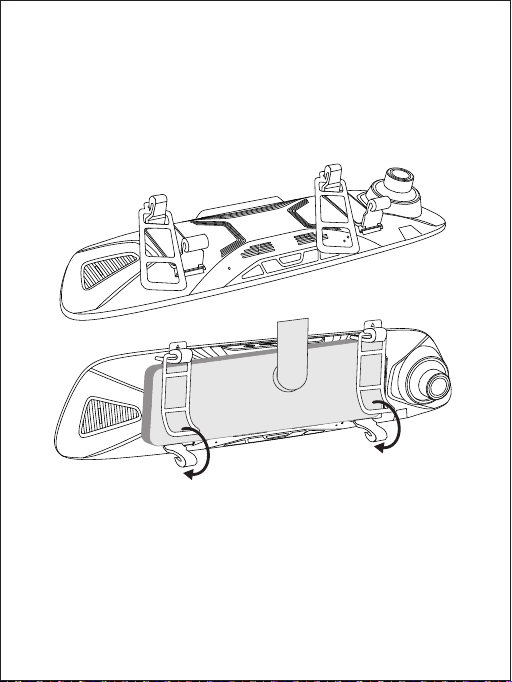
Installing the Dash Camera System
Use two of the included mounting straps to attach the mirror dash
1.
camera to your car rear-view mirror. It should be attached with the
widest part of the mirror dash camera at the bottom and the input
ports on the top edge
Plug the car charger into your car 12V/24V outlet and connect the
2.
other end to the USB mini-B power input of the mirror dash camera
Plug the 7m/23ft rear camera cable into the AV input of the mirror
3.
dash camera
- 04 -

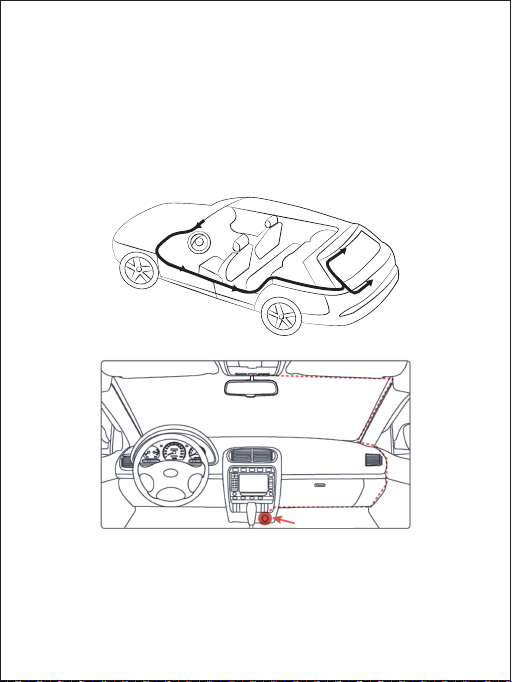
Cable routing should be as shown in the following two diagrams. Use
4.
the cable clips to help fix the two cables conveniently and safely. A
trim removal tool is included for concealment of cables behind trim
and carpeting for a tidier finish. Removed trim can be left off until the
cables are well-arranged in their final position and the dash camera
system is operational
A
B
Windshield
Plug in car charger
You can mount the rear camera internally or externally. External
5.
mounting generally offers a clearer image and better view point for
reversing. However, it requires three small holes to be drilled in your
car bodywork (two for camera mounting and one for cable routing).
- 05 -

External Camera Mounting:
(a)
Detach the rear camera from the rest of the cable at the connection
point on the cable 155mm/6.1” from the rear camera. Note that this
slim rear camera connector defines the size of the hole you’ll need to
drill later for the camera cable
(b)
Find a suitable camera mounting position above your license plate
(central and tucked under an edge is most effective and discreet)
(c)
Remove trim on the inside of the car behind that mounting position
to check there are no obstructions for drilling and also get access for
cable routing (leave the trim off for step 6)
(d)
Confirm your rear camera mounting position. Ensure the camera is
the right way up for correct picture orientation (note that the
bracket is fixed to the camera back top edge). Drill the two holes for
the camera bracket screws and one hole for the camera cable (use
a metal drill bit for drilling through metal)
(e)
Insert the rear camera connector & cable into the car through the
hole and fix the camera securely onto the car using the camera
bracket screws. Reconnect the two sections of the rear camera
cable inside the car
Internal Camera Mounting:
(a)
Install the camera inside your car next to the rear window using
the 3M sticker. Ensure the camera is the right way up for correct
picture orientation (note that the bracket is fixed to the camera
back top edge)
6.
You need to hardwire the red wire of the rear camera cable to
the positive wire of your reversing lights (ask a skilled person for
help if you aren’t confident about doing this). This enables the
screen to automatically switch to the rear camera full view when
you go into reverse. If you don’t complete this step, you’ll need to
switch views manually and the reversing guide lines won’t appear
on-screen.
- 06 -

(a)
Ensure your car is safely parked in a flat place
(b)
Remove trim to get access to the wiring system connections
inside the trunk
(c)
Identify the reversing light wiring. Use a voltmeter to find the wire
that’s only live (with about +12V) when your car is in reverse
(d)
Hardwire to this wire using a soldering or ‘military splice’ method
and seal with electrical tape
7.
Switch on the car ignition to power the 12V/24V outlet. The dash
camera system will power on and start recording automatically.
Check that both cameras are operating correctly and are
positioned well for the best view. The mirror dash camera has a
pivoting lens barrel and the rear camera tilts on its bracket
Caution
AUKEY is not responsible for any damage caused to or by the air bag
due to incorrect placement of the device or its cables
Powering On / Off
Press and hold the power button for 3 seconds to turn the dash camera
on/off. After the dash camera is turned on, short-press the power button
to turn the screen on/off (recording continues). ‘Auto Screen Off’ and
‘Auto Power-Off’ in ‘General Settings’ can be used to turn the screen or
the dash camera off automatically after 1 or 3 minutes.
Using the Touchscreen Buttons
09:00
2019/01/01
- 07 -

Audio Recording: Mute/unmute the microphone. When audio
recording is on, in-car audio will be recorded during video recording
Screen Brightness Adjustment: Choose from 5 screen brightness levels
Playback: Preview, lock/unlock, or delete recorded videos
Recording: Start/stop recording. There will be a short delay to begin
and end writing videos to storage
Screen View Switch: Switch between 3 screen view options– dual
view, front camera, and rear camera (in that order). Touch the icon
or swipe horizontally across the screen
Video Protection: Lock/unlock a video in video recording mode.
Protected videos won’t be overwritten by loop recording and
can only be deleted if you unlock them first
Settings: Change video and general settings. Touch the up & down
arrows to see more settings and settings options
Video Recording
Loop Recording: Recording will begin automatically after powering
●
on with a microSD card in the device. Each recorded file is up to 3
minutes long, with old footage being replaced when microSD card
storage is full. The videos will be saved in the ‘Normal’ folder (or
‘Emergency’ folder if Emergency Recording is activated)
Motion Detection Recording: Switch on motion detection in
●
‘General Settings.’ This function will start recording video when the
dash camera optically detects motion in front and stop recording
when motion is no longer detected. The videos will be saved in the
‘Motion Detection’ folder
Parking Mode: Switch on parking mode in ‘General Settings.’ The
●
dash camera will use its internal rechargeable battery to operate
even when the car ignition is turned off and power is disconnected. If
any motion or vibration is physically detected by the G-sensor when
parked, it will record automatically (screen off) for 10 seconds and
then turn off. The videos will be saved in the ‘Emergency’ folder
- 08 -

Time-Lapse Recording: Switch on time-lapse recording in ‘Video
●
Settings.’ This function will capture a picture per second to make a
video played at 30fps. The videos will be saved in the ‘Normal’
folder
Notes
Motion detection recording keeps the cameras active to detect
●
motion and start recording. It’s necessary to use a dash camera
hardwire kit with output current greater than 2A for this mode
Time-lapse recording has 12 or 24-hour recording durations. It’s
●
necessary to use a dash camera hardwire kit with output current
greater than 2A for this mode. This mode is for creating activity and
time progression entertainment videos while your car is parked. It
isn’t suitable for monitoring purposes while driving
Emergency Recording
Manual File Backup
Click the lock icon to protect the current video so that it won’t be
overwritten. The red recording indicator in the top left of the LCD
screen will turn yellow to indicate a protected emergency recording
is in progress. The videos will be saved in the ‘Emergency’ folder.
Auto File Backup
Once the G-sensor is activated by a sudden impact, the device will
automatically make a recording and protect it from being overwritten.
The red recording indicator in the top left of the LCD screen will turn
yellow to indicate a protected emergency recording is in progress.
Adjust G-sensor sensitivity in the ‘General Settings’ menu. The videos will
be saved in the ‘Emergency’ folder.
- 09 -

File Transfer
USB File Transfer
Connect the mirror dash camera (with card inside) to your computer
1.
using your own USB mini-B data cable. It should be recognized as a
removable device
Find the video recording files located in the Normal, Motion Detection,
2.
and Emergency folders
Copy the files to your computer
3.
MicroSD Card File Transfer
Shut down the device and eject the microSD card
1.
Insert the microSD card into a computer microSD card slot or reader
2.
and your computer will automatically detect the microSD card
Find the video recording files located in the Normal, Motion Detection,
3.
and Emergency folders
Copy the files to your computer
4.
Product Care & Use
Ensure mirror dash camera and rear camera are firmly attached
●
before use to avoid falls
Keep away from liquids, extreme heat, and strong magnetic fields
●
Avoid touching the lens surfaces. They may be cleaned with a
●
cotton swab or lens cleaning paper. If any dirt is difficult to
remove, a non-abrasive glasses lens cleaner may be used. Don’t
use corrosive solutions
Keep important videos backed up elsewhere to protect against
●
file corruption or loss caused by any SD card issues
If the dash camera stops working, press and hold the reset button
●
for 7 seconds to restart it (this won’t affect saved files)
- 10 -

Warranty & Customer Support
For questions, support, or warranty claims, please contact us at the
address below that corresponds with your region. Please include your
Amazon order number and product model number.
Amazon US orders: support.us@aukey.com
Amazon EU orders: support.eu@aukey.com
Amazon CA orders: support.ca@aukey.com
Amazon JP orders: support.jp@aukey.com
*Please note, AUKEY can only provide after sales service for products purchased directly
from AUKEY. If you have purchased from a different seller, please contact them directly for
service or warranty issues.
- 11 -

Vielen Dank für den Kauf des AUKEY DRA2 Spiegel-Dashcam. Bitte lesen
Sie diese Bedienungsanleitung sorgfältig durch und bewahren Sie sie
zum späteren Nachschlagen auf. Wenn Sie Hilfe benötigen, wenden Sie
sich bitte an unser Support-Team
Lieferumfang
Spiegel-Dashcam
Rückfahrkamera mit Kabel 7 m
Autoladegerät mit USB-Mini-B-Kabel 3,5 m
Vier Befestigungsbänder (2 + 2 als Ersatz)
Zwei Schrauben
Zwei 3M-Klebestreifen
Sechs Kabelhalter
Werkzeug zur (De-)Montage von Verkleidungen
Bedienungsanleitung
Garantiekarte
Produktbild
Lautsprecher
Netzeingang USB-Mini-B
Montagehalterung
Reset-Taste
Power-Taste Mikrofon
AV-Eingang
- 12 -
microSD-Kartensteckplatz
Objektiv
Objektiv
Display

Technische Daten
Modell
Bildsensor
CPU
Display
Displayauflösung
Bildwinkel
Blende
Aufnahmeauflösungen
Videoformat
Videoaufnahmemodi
Tonaufnahme
microSD-Karte
Eingang
Akku
Betriebstemperatur
Materialien
Abmessungen
DRA2
Frontkamera: CMOS SC2363 2 Megapixel
Rückfahrkamera: CMOS H65 1,3 Megapixel
MSC8336
LCD 6,8 Zoll
1280 x 480p
Frontkamera: 170°
Rückfahrkamera: 160°
Frontkamera: f/2,2
Rückfahrkamera: f/2,3
Frontkamera: 1080p (30 BpS)
Rückfahrkamera: 720p (30 BpS)
MOV
Endlosaufzeichnung, Bewegungserkennung,
Parken, Zeitraffer und Notfallaufnahme
an/aus
Klasse 10 oder höher, max. 256 GB
5 V, 2,5 A über Mini-USB (Gleichstrom)
500 mAh
-20 °C – 70 °C
ABS, PC, Glas
Spiegel-Dashcam: 319 x 80 x 42 mm
Rückfahrkamera: 31 x 23 x 23 mm
- 13 -

Verwendung einer microSD-Karte
Die Dashcam hat keinen internen Speicher. Aus diesem Grund ist eine
microSD-Karte erforderlich (Klasse 10+ empfohlen und max. 256 GB
unterstützt), damit sie ordnungsgemäß funktioniert. Wir empfehlen die
Verwendung einer hochwertigen Markenkarte für maximale Zuverlässigkeit. Setzen Sie eine microSD-Karte in den microSD-Kartensteckplatz
der Spiegel-Dashcam ein. Wenn die Kamera an ist, formatieren Sie die
Karte („Formatieren“ in den „Grundeinstellungen“ der Dashcam), damit
die Karte für den ersten Einsatz in der Dashcam bereit ist. Durch das
Formatieren werden alle Daten auf der microSD-Karte unwiederbringlich gelöscht. Für eine optimale Leistung empfehlen wir regelmäßiges
Formatieren (nach einem Back-up wichtiger Dateien).
Test des Dashcam-Systems
Möglicherweise wollen Sie das Dashcam-System vor der finalen
Montage in Ihrem Wagen (oder einem anderen Fahrzeug) verbinden
und testen. Dazu verbinden Sie die zwei Kabel mit der Spiegel-Dashcam
und stecken das Autoladegerät in den 12-V/24-V-Anschluss Ihres
Wagens (siehe unten „Installation des Dashcam-Systems“ > Schritte 2 &
3); dann schalten Sie die Zündung Ihres Wagens ein, um den
12-V/24-V-Anschluss zu aktivieren. Das Dashcam-System schaltet sich
automatisch ein. Überprüfen Sie, ob beide Kameras ordnungsgemäß
funktionieren. Siehe „Verwendung der Touchscreen-Tasten“ und
weitere Abschnitte bezüglich Informationen über den Betrieb.
- 14 -

Installation des Dashcam-Systems
Befestigen Sie die Spiegel-Dashcam mithilfe von zwei der
1.
mitgelieferten Bänder an Ihrem Innenspiegel. Die breiteste Seite
der Spiegel-Dashcam sollte unten befestigt werden und die
Eingänge sollten sich am oberen Rand befinden.
Stecken Sie das Autoladegerät in den 12-V/24-V-Anschluss Ihres
2.
Wagens und verbinden Sie das andere Ende mit dem
USB-Mini-B-Eingang der Spiegel-Dashcam.
Verbinden Sie das 7-m-Kabel der Rückfahrkamera mit dem
3.
AV-Eingang der Spiegel-Dashcam.
- 15 -
Die korrekte Kabelführung können Sie den beiden folgenden
4.
Grafiken entnehmen. Verwenden Sie die Kabelhalter zur
praktischen und sicheren Befestigung der beiden Kabel. Mit dem
mitgelieferten Werkzeug zur (De-)Montage von Verkleidungen
können Sie die Kabel hinter den Verkleidungen und Teppichen
verstecken, damit sie nicht stören. Wir empfehlen, zuerst die Kabel
entsprechend zu verlegen und das Dashcam-System einzurichten,
bevor die Verkleidungen wieder angebracht werden.
A
B
Windshield
Plug in car charger
Die Rückfahrkamera kann innerhalb oder außerhalb montiert
5.
werden. Die Außenmontage hat folgende Vorteile: ein klareres Bild
sowie einen besseren Blickwinkel beim Rückwärtsfahren. Dafür
müssen jedoch drei kleine Löcher in die Karosserie gebohrt werden
(zwei für die Kamerabefestigung und eines für das Kabel).
- 16 -

Außenmontage der Kamera:
(a)
Trennen Sie das Kabel der Rückfahrkamera, und zwar am
Verbindungspunkt 155 mm von der Rückfahrkamera ab gemessen.
Das Loch, das Sie später für das Kamerakabel bohren müssen,
muss groß genug sein, dass der dünne Steckverbinder der
Rückfahrkamera durchpasst.
(b)
Wählen Sie eine geeignete Position über Ihrem Nummernschild
zur Befestigung aus (mittig unter einer Kante ist am effektivsten
und diskretesten).
(c)
Entfernen Sie die Verkleidung an der Innenseite des Wagens
hinter der Befestigungsposition, um sicherzustellen, dass dort
ungehindert gebohrt werden kann und die Kabelführung
möglich ist (Verkleidung vor Schritt 6 nicht montieren).
(d)
Wählen Sie die passende Position für die Rückfahrkamera. Achten
Sie darauf, dass die Kamera korrekt ausgerichtet ist (die Halterung
wird hinten oben an der Kamera befestigt). Bohren Sie zwei
Löcher für die Schrauben der Kamerahalterung und ein Loch für
das Kamerakabel (Metallbohrer für das Bohren durch Metall
verwenden).
(e)
Führen Sie den Steckverbinder der Rückfahrkamera und das Kabel
durch das Loch nach innen und befestigen Sie die Kamera mit den
Schrauben für die Kamerahalterung. Verbinden Sie die zwei
getrennten Kabelabschnitte für die Rückfahrkamera nun wieder.
Innenmontage der Kamera:
(a)
Befestigen Sie die Kamera an der Heckscheibe mithilfe des
3M-Klebestreifens. Achten Sie darauf, dass die Kamera korrekt
ausgerichtet ist (die Halterung wird hinten oben an der Kamera
befestigt).
- 17 -

Der rote Draht des Rückfahrkamerakabels muss fest mit dem
6.
Pluskabel Ihres Rückfahrscheinwerfers verdrahtet werden (bitten Sie
jemanden um Hilfe, der sich damit auskennt, wenn Sie sich dies nicht
zutrauen). Dadurch wird auf dem Display automatisch das Bild der
Rückfahrkamera angezeigt, wenn Sie rückwärtsfahren. Falls Sie
diesen Schritt nicht durchführen, müssen Sie manuell umschalten
und die Hilfslinien beim Rückwärtsfahren werden nicht angezeigt.
(a)
Parken Sie Ihren Wagen sicher auf einer ebenen Fläche.
(b)
Entfernen Sie die Verkleidung, damit Sie im Kofferraum Zugang zur
Verkabelung haben.
(c)
Sie benötigen nun die Verkabelung für den Rückfahrscheinwerfer.
Mit einem Voltmeter können Sie herausfinden, welcher Draht unter
Strom (ungefähr 12 V) steht, wenn der Rückwärtsgang eingelegt ist.
(d)
Verdrahten Sie diesen Draht durch Löten oder Spleißen und
kleben Sie die Stelle mit Isolierband zu.
7.
Schalten Sie die Zündung des Wagens ein, um den 12-V/24-V-Anschluss
zu aktivieren. Das Dashcam-System schaltet sich automatisch ein und
beginnt mit der Aufnahme. Überprüfen Sie, ob beide Kameras
ordnungsgemäß funktionieren und der Blickwinkel Ihren Wünschen
entspricht. Die Spiegel-Dashcam verfügt über ein schwenkbares
Objektivgehäuse und die Rückfahrkamera kann über die Halterung
geneigt werden.
Achtung
AUKEY ist nicht haftbar für Schäden am oder durch den Airbag
infolge einer fehlerhaften Positionierung des Produkts oder der Kabel.
- 18 -

Ein-/Ausschalten
Halten Sie die Power-Taste 3 Sekunden gedrückt, um die Dashcam
ein-/auszuschalten. Sobald die Dashcam eingeschaltet ist, drücken Sie
die Power-Taste kurz, um das Display ein-/auszuschalten (die Aufnahme
wird fortgesetzt). Über „Bildschirmschoner “ und „Auto-Abschaltung“ in
„Grundeinstellungen“ können Sie einstellen, dass das Display oder die
Dashcam nach einer oder 3 Minuten automatisch ausgeschaltet wird.
Verwendung der Touchscreen-Tasten
09:00
2019/01/01
Audioaufnahme: Mikrofon aktivieren/deaktivieren. Bei aktivierter
Audioaufnahme werden die Geräusche im Wagen während der
Videoaufnahme aufgezeichnet.
Displayhelligkeitseinstellung: Sie können zwischen 5 verschiedenen Helligkeitsstufen wählen.
Wiedergabe: Vorschau, Sperren/Entsperren oder Löschen
aufgezeichneter Videos
Aufnahme: Starten/Beenden der Aufnahme. Beim Starten und
Beenden der Aufnahme kann es für den Speichervorgang zu
einer kurzen Verzögerung kommen.
Wechsel der Displayansicht: Sie können zwischen 3 Optionen
wechseln: Doppelanzeige, Frontkamera und Rückfahrkamera (in
dieser Reihenfolge). Tippen Sie auf das Symbol oder wischen Sie
horizontal über das Display.
- 19 -

Videoschutz: Sperren/Entsperren eines Videos im Videoaufnahmemodus. Geschützte Videos werden durch die Endlosaufzeichnung
nicht überschrieben und können nur nach vorherigem Entsperren
gelöscht werden.
Einstellungen: Änderung der Video- und allgemeinen Einstellungen.
Berühren Sie die Pfeile nach oben & unten, um weitere Einstellungen
und Einstellungsoptionen zu sehen.
Videoaufnahme
Endlosaufzeichnung: Die Aufnahme beginnt automatisch nach
●
dem Einschalten, sofern sich eine microSD-Karte im Gerät
befindet. Jede Datei ist bis zu 3 Minuten lang, wobei altes Filmmaterial überschrieben wird, sobald die microSD-Karte voll ist. Die
Videos werden im Ordner „Normal“ (oder im Ordner „Notfall“,
wenn die Notfallaufnahme aktiviert ist) gespeichert.
Bewegungserkennungsaufzeichnung: Schalten Sie in „Grundeinstel-
●
lungen“ die Bewegungserkennung ein. Bei dieser Funktion startet die
Videoaufnahme, wenn die Dashcam vor dem Fahrzeug optisch eine
Bewegung erkennt, und sie stoppt, wenn keine Bewegung mehr
erkannt wird. Die Videos werden im Ordner „Bewegungserkennung“
gespeichert.
Parkmodus: Schalten Sie in „Grundeinstellungen“ den Parkmodus ein. Die
●
Dashcam ist über den internen wiederaufladbaren Akku auch dann
aktiv, wenn die Zündung ausgeschaltet ist und keine Verbindung zum
Stromnetz besteht. Falls der Beschleunigungssensor beim Parken eine
physische Bewegung oder Erschütterung erkennt, nimmt die Kamera
(Display aus) automatisch 10 Sekunden lang auf und schaltet sich dann
ab. Die Videos werden im Ordner „Notfall“ gespeichert.
Zeitrafferaufzeichnung: Schalten Sie in „Videoeinstellungen“ die
Zeitrafferaufzeichnung ein. Bei dieser Funktion wird ein Bild pro
●
Sekunde aufgenommen und ein Video mit 30 BpS erstellt. Die
Videos werden im Ordner „Normal“ gespeichert.
- 20 -
 Loading...